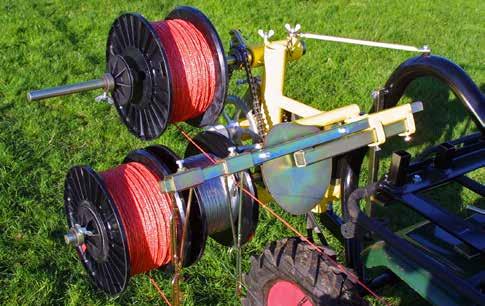
ATV WINDER WINDER WHEEL ARM AUTO WIND CLUTCHES SHEAR BOLT WIRE GUIDES REEL SHAFT TOP PULLEY GEAR BOX SPRINGS CONNECTION TUBE AND PIN DRIVE BELT
|
|
|
- Lydia McKinney
- 5 years ago
- Views:
Transcription


1 HANDBOOK ATV WINDER


2 ATV WINDER WINDER SHEAR BOLT CLUTCHES AUTO WIND WIRE GUIDES TOP PULLEY GEAR BOX SPRINGS REEL SHAFT WHEEL ARM CONNECTION TUBE AND PIN DRIVE BELT STAY BAR DRIVE WHEEL 17MM BOLT WHEEL ARM PULLEY


3 MOUNTING FRAME UNIQUE REELS ONLY USE RAPPA REELS ON YOUR WINDER, THEY ARE SPECIFICALLY DESIGNED FOR THIS MACHINE. SPARE PARTS FROM TIME TO TIME YOU MAY NEED TO REPLACE CONSUMABLES SUCH AS SHEAR BOLTS AND CLUTCHES. PLEASE CALL THE OFFICE TO ORDER


4 FITTING 1. Place the mounting frame to the rear of the rack with the wheel arm tubes adjacent to the seat. 3. Once the required position is reached, secure the mounting frame with the clamping plates and lightly tighten. Try to clamp the mounting frame onto the strongest part of the rack. 2. Attach the wheel arm to the mounting frame with the large pin. The wheel should sit on the offside rear tyre. Move the arm until the drive wheel is just outside of centre of the ATV tyre and the connection tube for the winder is close to vertical, tipping slightly towards the bike. 4. Attach the winder to the wheel arm using the connection pin ensuring the reel shaft is on top of the machine. Swing into working position. Rotate the winder fully to check that there is clearance on all moving parts between the winder and the ATV.


5 5. Tighten the clamp plate bolts. It may be necessary to trim the ATV mudguard and adjust the position of the rear lights if fitted. WARNING: WHEN FITTED THIS MACHINE CAN AFFECT THE STABILITY OF YOUR ATV EXTRA CARE SHOULD BE TAKEN WHEN CORNERING OR ON UNEVEN GROUND OPERATION REELING OUT 1. Attach the wheel arm and winder and swing to the left side of the ATV. Hold in position with stay bar. No drive belt is required when unwinding. in position. 3. Compress the springs lightly so they act as a brake to prevent the reels from over running. 4. Start with an anchor post and tie the wire to this post. 5. Drive forwards dropping the stakes off at every 10-12m intervals. 6. Walk back along fence line and connect stakes to wire. 2. Place reels on the reel shafts with springs between and hold 7. Finish by placing reels onto a reel post. Tension wire by hand and use the lynch pin to lock into position.


6 PICKING UP 1. Attach the wheel arm and winder to the ATV and swing to the left side of the ATV. some use it may be necessary to adjust the belt tension. To do this move the 17mm bolt on the wheel arm to tighten up or down to slacken. 2. Push the winder towards the bike and slip the drive belt over the Top Pulley and Wheel Arm Pulley twisting it to form a figure of eight. 5. Remove the reels from the reel post and place on the reel shafts guiding the wire through the Wire Guides and coming from the bottom of the reels. 6. Place the springs between the reels. Using the clutch compress between 5-10mm holding in position with clutches. 3. Pull the winder away from the bike and tension the belt by attaching the stay bar from the wheel arm to the winder and securing with the yellow knob. 4. All adjustments are pre-set before delivery. However, after 7. Over tensioning the springs between reels will slack wires and loops on the reels. 8. Drive smoothly parrell to the fence collecting the stakes as you go. Ensure the wire feeds evenly onto the reels. 9. Remember to oil the clutches and the wire feed mechanism


7 regularly. 10. If the white plastic shear bolt brakes, check why before replacing. The shear bolt is there to protect the gearbox, never use a steel bolt. OIL CLUTCHES BEFORE EVERY USE TRANSPORT Always transport the winder unit on the left hand side of the mounting frame and the wheel arm in the raised position. WARNING: TRANSPORTING INCORRECTLY MAY CAUSE DAMAGE TO THE ATV RACK AND CHASSIS

8 TROUBLESHOOTING REELS RUNNING TOO LOOSE Reduce spring pressure on clutches. Ensure clutches are oiled and that pads are not burnt smooth. Check reels are not burnt smooth by unoiled clutches. BELT SLIPPING Re-tension belt using the Belt Tensioner Bolt. If this still does-not work replace the belt. AUTO WIND NOT WORKING Check Shearbolt, if all OK check grub screw on collar of big black sprocket is tight and engaged on flat edge of gearbox shaft. WIRE NOT WINDING EVENLY Make sure the spring between the reels is not too compressed. Check that the wire guide has not moved or have been burnt. LOOSE WIRE WHEN PICKING UP Reduce forward speed, keep it smooth.
9
10
11
12 Rappa Fencing Ltd Steepleton Hill Stockbridge Hampshire SO20 6JE
COMPONENTS RTV WINDER WINDER WHEEL ARM AUTO WIND SHEAR BOLT WIRE GUIDES STAY BAR TOP PULLEY REEL SHAFT CLUTCHES SPRINGS GEAR BOX DRIVE WHEEL
 HANDBOOK RTV Winder COMPONENTS RTV WINDER WINDER WIRE GUIDES SHEAR BOLT AUTO WIND STAY BAR REEL SHAFT TOP PULLEY CLUTCHES SPRINGS GEAR BOX WHEEL ARM DRIVE WHEEL WHEEL ARM PULLEY BELT TENSIONER MOUNTING
Installation Instructions Table of Contents
 Installation Instructions Table of Contents Pre- Installation of Garage Storage Lift 2 Layout the Garage Storage Lift 3 Installing the strut Channels 3 Install the Drive Assembly 5 Install the Drive Shaft
R O A D S M I T H TRIKE CONVERSIONS BY THE TRIKE SHOP
 R O A D S M I T H TRIKE CONVERSIONS BY THE TRIKE SHOP Please thoroughly review the instructions before and during installation. Keep in mind that this product was designed to be installed by trained dealer
Not for Reproduction. BILLY GOAT AERATOR Owner's Manual AE401, AE401H, AE401H5T Replacement Parts. AE Owner s Manual TINE ROW KIT TINE KIT P/N
 BILLY GOAT AERATOR Owner's Manual AE401, AE401H, AE401H5T Replacement Parts TINE ROW KIT Complete tine row set for replacement of one complete row of tines. Includes mounting plates, spacer, and all hardware.
F SERIES STARTER. thrust washer. STARTER DISASSEMBLY. to the starter motor. Remove cup. Remove starter pulley and spring. USE
 STARTER DISASSEMBLY Remove retainer ring, pinion stop washer, pinion spring and pinion gear from helix. Remove starter pulley and spring. USE CAUTION WHEN REMOVING SPRING. Remove three screws holding the
OPERATING INSTRUCTIONS SET UP: CW10: The CW10 is shipped partially assembled. The following items should be received:
 Models CW10, CW20, CW30 Coilers OPERATING INSTRUCTIONS SET UP: CW10: The CW10 is shipped partially assembled. The following items should be received: 1 vertical bench stand 1 2-piece clutch assembly (1
SERIES B & C ROLLER DOORS INSTALLATION GUIDE
 SERIES B & C ROLLER DOORS INSTALLATION GUIDE THESE INSTRUCTIONS ARE PROVIDED FOR USE BY EXPERIENCED INSTALLERS OF GARAGE DOORS BY UNDERTAKING THE INSTALLATION OF THIS DOOR, THE INSTALLER UNDERSTANDS THE
ELECTRIC WINCHES. No. 712 and 713 INSTALLATION INSTRUCTIONS. Illustration 1 WRONG! WRONG! CORRECT
 INSTALLATION INSTRUCTIONS ELECTRIC WINCHES No. 712 and 713 1. WINCH/PULLEY LOCATION. Placements of the winch and hoist pulley are critical to ensure the proper and safe folding operation of the backstop.
Honda Super Cub Etc. Frame & Forks
 Honda Super Cub Etc. Frame & Forks Introduction This section is all about how to strip, servioce and rebuild the frame and forks of the Honda Super Cub and other bikes using the same frames, plus all the
TITLE: Princetown Play Area Maintenance Schedule
 TITLE: Princetown DOCUMENT MANAGEMENT This document constitutes Draft 1; adopted on tbd. This schedule is based on manufacturers maintenance recommendations where available. Items where manufacturer s
Rhino-Rack Hybrid Bike Carrier (RBC050)
") CONTROLLED Rhino-Rack Hybrid Bike Carrier (RBC050) Important: Please read these instructions carefully prior to installation. Please refer to your fi tting instruction to ensure that the roof racks are
CONTROLLED Rhino-Rack Hybrid Bike Carrier (RBC050) Important: Please read these instructions carefully prior to installation. Please refer to your fi tting instruction to ensure that the roof racks are
Tri-Spark Ignition System Installation Triple Cylinder TRI-0001
 Tri-Spark Ignition System Installation Triple Cylinder TRI-0001 There are potentially lethal high voltages produced at the ignition coils and spark plugs, therefore every precaution must be taken to prevent
Continuous Cord Loop Designer Series Roller Shades
 Shade Maintenance Leveling a Crooked Shade 1. Pull down shade until roller is exposed. Do not pull further to avoid pulling cloth off roller. 2. Stick a 5" strip of masking tape into the roller at opposite
Prusa i3 Printer Assembly Guide
 Prusa i3 Printer Assembly Guide Special thanks to Carlos Sanchez and Miguel Sanchez for the graphics. All graphics captured from their great animation: http://www.carlos-sanchez.com/ Prusa3/ For copyright
CALIFORNIA TRIMMER MOWER MAINTENANCE MANUAL
 CALIFORNIA TRIMMER MOWER MAINTENANCE MANUAL 2 Table of Contents Section 1: General Information Page Handle Assembly Instructions 4 Maintenance All Models 6 Oil Change Procedures All Models 9 Height Adjustment
A1062 & A1072 AUGER ASSEMBLY MANUAL. Read & understand all instructions pertaining to this auger prior to use!
 A1062 & A1072 AUGER ASSEMBLY MANUAL Read & understand all instructions pertaining to this auger prior to use! Safety Alert Watch for this ALERT Symbol. It identifies potential hazards to Personal SAFETY
MICROGUARD 500 EXTENSION REEL TRAINING MANUAL. Greer Company. Greer Company Crane Systems 1 OF18
 MICROGUARD 500 EXTENSION REEL TRAINING MANUAL 1 OF18 TABLE OF CONTENTS MICROGUARD 500 SERIES EXTENSION REEL TRAINING MANUAL EXTENSION REEL OVERVIEW...3 REEL-OFF CABLE LAYERING...3 CHECKING THE REEL-OFF
Rotary Pak-Tyers. Thanks, again. Felins USA, Inc. Phone: Fax: West Parkland Court Milwaukee, Wisconsin 53223
 Rotary Pak-Tyers Thank you very much for choosing this Felins Rotary Pak-Tyer tying machine. This tying machine is designed and manufactured to tie many articles with string, poly tape or elastic materials
WIND RATED ROLLER DOORS INSTALLATION GUIDE
 WIND RATED ROLLER DOORS INSTALLATION GUIDE THESE INSTRUCTIONS ARE PROVIDED FOR THE USE BY EXPERIENCED INSTALLERS OF GARAGE DOORS BY UNDERTAKING THE INSTALLATION OF THIS DOOR, THE INSTALLER UNDERSTANDS
Rhino-Rack Hybrid Bike Carrier (RBC050)
") Important: Please read these instructions carefully prior to installation. Please refer to your fi tting instruction to ensure that the roof racks are installed in the correct locations. Check the contents
Important: Please read these instructions carefully prior to installation. Please refer to your fi tting instruction to ensure that the roof racks are installed in the correct locations. Check the contents
Overview. There are three (3) New Era Units Available. Two (2) of these units are designed to wind up a product web.
 New Era Units Available. Two (2) of these units are designed to wind up a product web.") Overview There are three (3) Units Available. Two (2) of these units are designed to wind up a product web. The web widths these units are capable of handling are From 50 wide to 13 wide The Winders have
Overview There are three (3) Units Available. Two (2) of these units are designed to wind up a product web. The web widths these units are capable of handling are From 50 wide to 13 wide The Winders have
Important Information
 Important: Please read these instructions carefully prior to installation. Please refer to your fitting instruction to ensure that the roof racks are installed in the correct locations. Check the contents
SERVICE SHEET No. 515
 SERVICE SHEET No. 515 MODEL D7 DISMANTLING AND REASSEMBLY OF HUBS AND BRAKES Both wheels are fitted with ball journal bearings which do not require adjustment. The bearings are packed with grease during
IMPORTANT INFORMATION BEFORE USING YOUR 12V ELECTRIC WINCH
 IMPORTANT INFORMATION BEFORE USING YOUR 12V ELECTRIC WINCH The responsibility for safe operation of this winch ultimately rests with the operator. Please read all operating instructions carefully before
PowerWind Troubleshooting Guide
 PowerWind Troubleshooting Guide 1 PowerWind Troubleshooting Guide New PowerWind, does not work 1. Tape removed from battery cap? 2. Battery cap installed properly? 1. Remove yellow tape from battery cap.
Zip Tie Domes - 3V 3/8 Assembly Manual
 Zip Tie Domes - 3V 3/8 Assembly Manual Instructions for Assembling the 25 Foot 3V 3/8 Frequency Geodesic Dome Tools Needed: 8 foot Step Ladder, Wire Cutters SAFETY RULES: Do Not Climb On the Dome. It is
Rhino-Rack Rocky Mount Bike Carrier (RBC050)
") Important: Please read these instructions carefully prior to installation. Please refer to your fi tting instruction to ensure that the roof racks are installed in the correct locations. Check the contents
Important: Please read these instructions carefully prior to installation. Please refer to your fi tting instruction to ensure that the roof racks are installed in the correct locations. Check the contents
OWNERS GUIDE 12V / 24V DC ELECTRIC WINCH. 12,000lb (6124kg) TWO SPEED VERY IMPORTANT
 TWO SPEED VERY IMPORTANT") OWNERS GUIDE 12V / 24V DC ELECTRIC WINCH. 12,000lb (6124kg) TWO SPEED VERY IMPORTANT IT IS ESSENTIAL THAT YOU READ AND UNDERSTAND THIS GUIDE BEFORE INSTALLING AND OPERATING YOUR WINCH WINCHMAX UK WWW.WINCHMAX.CO.UK
OWNERS GUIDE 12V / 24V DC ELECTRIC WINCH. 12,000lb (6124kg) TWO SPEED VERY IMPORTANT IT IS ESSENTIAL THAT YOU READ AND UNDERSTAND THIS GUIDE BEFORE INSTALLING AND OPERATING YOUR WINCH WINCHMAX UK WWW.WINCHMAX.CO.UK
632 Western Avenue Henniker, New Hampshire Tel. (603) Fax (603) POSITION OF THE ROLLER PLATES
 Fax (603) POSITION OF THE ROLLER PLATES") POSITION OF THE ROLLER PLATES The roller plate must be positioned as shown. The measurement to both of the roller plates is taken from the face of the kingpin shaft to the inside edge of the roller wheel
POSITION OF THE ROLLER PLATES The roller plate must be positioned as shown. The measurement to both of the roller plates is taken from the face of the kingpin shaft to the inside edge of the roller wheel
HT-Shaver FB Harvester User Manual
 HT-Shaver FB Harvester User Manual REID LINE EAST, RD 5 FEILDING 4775, New Zealand Phone (06)323 2509 Fax (06)323 2709 Email info@harvesterconcepts.co.nz 9/2012 Jenquip 2010 Freighting Freighting on the
vertical cradle lifts installation instructions
 vertical cradle lifts installation instructions models 7,000 lb. thru 45,000 lb. important: read this manual before beginning installation of cradle lift. 5560 Ulmerton Road Clearwater, Florida 33760 1.800.878.5560
MITSUBISHI 'AMITSUBISHI. Industrial Sewing Machine. Automatic Undertrlmmer, Needle Feed, Single-Needle Lookstitch
 MITSUBISHI Industrial Sewing Machine TECHNICAL INFORMATION Automatic Undertrlmmer, Needle Feed, Single-Needle Lookstitch Model LSS-210 ET-oes 'AMITSUBISHI ELECTRIC CONTENTS 1. CONSTRUCTION.. 2~3 1.1 Entire
Series 1000 and Cutout
 17.15.Remove the belt from the tractor. NOTE: There were a small number of tractors made using a CVT drive and a 2-speed (L-H-N-R) GT transaxle. The belt must pass over the center mounted gear selector
R O A D S M I T H TRIKE CONVERSIONS BY THE TRIKE SHOP
 R O A D S M I T H TRIKE CONVERSIONS BY THE TRIKE SHOP Please thoroughly review the instructions before and during installation. Keep in mind that this product was designed to be installed by trained dealer
Rhino-Rack Nautic Kayak Loader (NKL)
") Important: Please read these instructions carefully prior to installation. Please refer to your fi tting instruction to ensure that the roof racks are installed in the correct locations. heck the contents
Important: Please read these instructions carefully prior to installation. Please refer to your fi tting instruction to ensure that the roof racks are installed in the correct locations. heck the contents
Specifications Page 3. User Guide Page 4. Riding Precautions Page 5. Assembling Your E-Bike Page 6. Maintenance Page 9
 Thank you for purchasing the Z1. Your new Zipper e-bike is made with a strong aluminium alloy frame, making it light yet durable, and comes with a lithium battery pre-installed, which has a range of up
Service Schedule Chevrolet Utility
 1. This Service Schedule will have preference over the Owner's Manual and Warranty & Service Guide 2. Refer to the Warranty and Service Guide for Severe Driving Conditions. 3. Consult the Owner/Customer
Electrically Assisted Pedal Cycles. Assembly Instructions
 Electrically Assisted Pedal Cycles Assembly Instructions Version 1 December 2005 Introduction Thank you for buying a PowaCycle Edinburgh electric bike. We hope it brings you many hours of enjoyment. For
EVO 2 FAIRING Rev6 18/05/ :40:00 1
 EVO 2 FAIRING Rev6 18/05/2014 20:40:00 1 NOTE : BEFORE COMMENCING WORK ON THE CONVERSION, TAKE TIME TO READ THE INSTRUCTIONS CAREFULLY. ALL WORK CAN BE CARRIED OUT BY A COMPETENT MECHANIC, BUT IF YOU ARE
Fitting new lock and replacing a door latch assembly
 Fitting new lock and replacing a door latch assembly It has long been a problem with older MGBs and Midgets that once the door lock becomes worn the whole barrel assembly twists with the key as you try
Hunter Automatics HA-8. Installation Manual
 Hunter Automatics HA-8 Installation Manual WARNING TO REDUCE RISK OF INJURY 1. READ AND FOLLOW ALL INSTALLATION INSTRUCTIONS CAREFULLY. FAILURE TO DO SO MAY RESULT IN PERSONAL INJURY OR PROPERTY DAMAGE
STANTON 120 DUTCH ROLL. If you are missing any of the following items, please contact Stanton Video immediately (602)
") STANTON 0 DUTCH ROLL If you are missing any of the following items, please contact Stanton Video immediately (60) 9-9505. Cradle. Trolley. Dovetail. Servo 5. Tilt Shaft 6. Safety Clips () 7. Ladder Chain
STANTON 0 DUTCH ROLL If you are missing any of the following items, please contact Stanton Video immediately (60) 9-9505. Cradle. Trolley. Dovetail. Servo 5. Tilt Shaft 6. Safety Clips () 7. Ladder Chain
REPAIR PARTS SNOW THROWER - - MODEL NO. PR827ES ( ) AUGER HOUSING / IMPELLER ASSEMBLY
 AUGER HOUSING / IMPELLER ASSEMBLY") REPAIR PARTS SNOW THROWER - - MODEL NO. PR8ES (00000) AUGER HOUSING / IMPELLER ASSEMBLY (x) (x) 0.0.00-A 0X8 AUGER HOUSING 0X SCRAPER BAR 00 CARRIAGE BOLT / 8 X. NUT / 8 0.0.0-B 08 AUGER BEARING BEARING
REPAIR PARTS SNOW THROWER - - MODEL NO. PR8ES (00000) AUGER HOUSING / IMPELLER ASSEMBLY (x) (x) 0.0.00-A 0X8 AUGER HOUSING 0X SCRAPER BAR 00 CARRIAGE BOLT / 8 X. NUT / 8 0.0.0-B 08 AUGER BEARING BEARING
AmTryke Adult Recumbent Model HP1000 #50-HC-1000
 AmTryke Adult Recumbent Model HP1000 #50-HC-1000 TOOLS Needed for Assembly 5 mm Allen Wrench 8 mm Socket or Wrench 10 mm Socket or Wrench 14 mm Socket or Wrench 15 mm Socket or Wrench 22 mm Socket or Adjustable
TL4076 Top 5 Tips Get to know your TL4076
 TL4076 Top 5 Tips Get to know your TL4076 Thermal Break with Teflon liner (behind fan) Hot End Assembly Fan Heat Block Extruder with toothed gear(brass) and idler (steel) Filament Guide Tube Nozzle Cable
CBEA/CJAA Timing belt procedure. Written by: greengeeker Photos by: DanG144, Kriesel, coalminer16. Required tools:
 CBEA/CJAA Timing belt procedure Written by: greengeeker Photos by: DanG144, Kriesel, coalminer16 Required tools: 1. Securing pin 3359 (you need two of them!) 2. Crankshaft stop T10050 3. Counter-hold tool
CBEA/CJAA Timing belt procedure. Written by: greengeeker Photos by: DanG144, Kriesel, coalminer16. Required tools:
 CBEA/CJAA Timing belt procedure Written by: greengeeker Photos by: DanG144, Kriesel, coalminer16 Required tools: Securing pin 3359 (need two of them!) Crankshaft stop T10050 Counter-hold tool T10172 Special
Your G3 buggy is fitted with three switches on the front part of the body:
 CONTENTS Buggy operation... 3 General Maintenance... 5 Technical Maintenance... 6 Front wheel bearing replacement... 6 Rear wheel bearing replacement... 7 Chain replacement... 8 Chain Adjustment... 9 Brake
INSTALLATION INSTRUCTIONS AMBASSADOR DRUM OVERHEAD SERIES 100 DUMBWAITER
 INSTALLATION INSTRUCTIONS AMBASSADOR DRUM OVERHEAD SERIES 100 DUMBWAITER The installation of Matot Drum Dumbwaiters should only be performed by qualified, experienced, and trained elevator installers.
Tech Note Truck 14 & 15.5 Twin Plate Cast Iron Type Installation Guidelines
 1. (14 & 15.5 ) Check condition of the flywheel. Grind to resurface or replace flywheel. Surface MUST BE machined or premature clutch failure can occur. Flywheel depth must be 2.938 (74.62mm) for 14 (350mm)
PFadvantage JD 3300/4400/6600/7700; 4420
 Ag Leader Technology Combine Installation JD 33//66/77; 2 Note: Indented items indicate parts included Quantity by Model in an assembly listed above Early Late Part Name/Description Part Number 3 3 6 6
8400 Series Fiber Distribution System
 8400 Series Fiber Distribution System Instructions January 1997 34-7041-4699-1-A 1 Contents: 1.0 General... 3 2.0 System Components... 4 3.0 System Engineering... 5 4.0 Hardware Installation... 7 5.0 Cable
ProLine. 44 Mower. for 120 Traction Unit. Model No & Up. Operator s Manual
 FORM NO. 9 ProLine Mower for 0 Traction Unit Model No. 05 99000 & Up Operator s Manual IMPORTANT: Read this manual carefully. It contains information about your safety and the safety of others. Also become
Pan Car Setup and Troubleshooting
 Pan Car Setup and Troubleshooting Problems can come up in the midst of competition. Either the car is not handling properly on the track or there are problems with equipment. Troubleshooting problems should
M661 Instruction Manual
 M661 Instruction Manual Please inspect your machine carefully upon receipt. Let us know immediately if you note any damage. -IMPORTANT NOTICE- THIS MACHINE IS NOT TO BE OPERATED BY ANYONE UNTIL HAVING
At Mark's suggestion I thought I'd write this up so future Coupe lovers can have as much fun* as I did with this job.
 At Mark's suggestion I thought I'd write this up so future Coupe lovers can have as much fun* as I did with this job. My enormous thanks to forum members, particularly glorfindel, for their advice when
Electric Winch Installation & Operation Manual Permanent Magnet 12 V DC EMD2000SS STAINLESS STEEL WINCH
 Endurance Marine Products Ltd 210 19138 26 Ave Surrey, BC V3S 3V7 T 604 535 0669 TOLL FREE 1 877 535 0669 Info@endurance-marine.com www.endurance-marine.com Electric Winch Installation & Operation Manual
Haul-Your-Might T3. Product Name: Product Code: Please read all instructions carefully before assembly, installation and/or use of this product.
 WARNING: DO NOT exceed 800 lbs. (363 Kgs) WARNING: DO NOT exceed vehicle manufacturer s weight rating. Tools Required: 17mm Socket 5mm Hex Key 1/8 Hex Key Tape Measure 17mm Wrench 13mm Socket Hack Saw
Rotax Sprag Replacement
 Rotax Sprag Replacement This is intended as a full walk through on a Sprag replacement on a Electric start Rotax engine These instructions were made from a sprag replacement on an MT 350 Tools List Non
Instruction and Installation Manual
 Instruction and Installation Manual ROSTA Tensioner Devices Tensioners Accessories -G -W -R Sprocket wheel N Chain rider P Oil resistant Up to + 120 C Reinforced Sprocket wheel set Chain rider set -I -F
OPERATOR S MANUAL R-Series Roust-a-Bout
 December 2017 OPERATOR S MANUAL R-Series Roust-a-Bout! Before operatingthis lift, readand understandthis Operator s Manual. Become familiar with the potentialhazards of thisunit. Call SUMNER if youhaveanyquestions.
Instruction Kit Gleaner K2, K3, F2, F Flow Sensor K2-F
 Parts List for Combine NOTE: Indented items indicate parts included In an assembly listed above. Quantity by Model Part Name/Description Part No. K2 F2 Instruction Kit 2005300-1 1 1 Flow Sensor K2-F2 2000292
Owners Manual. Wheelchair Accessible
 Owners Manual Wheelchair Accessible Contents 1. Contents of E920 Box. 2. E920 Assembly Instructions. 3. E920 Control Arm. 4. E920 Slider Arm Kit. 5. Tank Filling and Water Treatment. CAUTION 6. Long Term
POWER ASSISTED BICYCLES OWNERS MANUAL
 OWNERS MANUAL Simply explained this is how your e.life bike basically works. Firstly may we congratulate you on purchasing your new electric power assisted e.bike. Please take time to read your manual.
Next, chase the threads in the lower A-arm mounts with the 5/8-18 tap and blowout any remaining particles.
 Next, chase the threads in the lower A-arm mounts with the 5/8-18 tap and blowout any remaining particles. Now, apply some anti-seize to the threads of the pivot stud. Also put anti-seize inside the bore
Hexhead Torque Values
 Contents: 11: Engine 12: Engine Electrical 13: Fuel Preparation 16: Fuel Supply 17: Cooling 18: Exhaust 21: Clutch 23: Gearbox 31: Front Axle, Front Wheel Steering 32: Steering 33: Rear axle, rear-wheel
E L L I O T T 14M, 18M & 24M. Contents OPERATORS INSTRUCTION HANDBOOK FOR THE HIGH SPEED SHAPING MACHINES MODELS. Also COMPONENT PARTS LIST.
 OPERATORS INSTRUCTION HANDBOOK FOR THE E L L I O T T HIGH SPEED SHAPING MACHINES MODELS 14M, 18M & 24M Also COMPONENT PARTS LIST Contents Page Slinging 2 Examination 2 Cleaning 2 Installation 3 Foundation
AU DU PONT DE LUTTRE BRUSSELS BELGIUM PHONE: FAX: OPERATING MANUAL. Electric Fully Automatic Floor Saw FS 1218 EX
 AU DU PONT DE LUTTRE 74-1190 BRUSSELS BELGIUM PHONE: 322 34 83 162 FAX: 322 34 83 136 OPERATING MANUAL Electric Fully Automatic Floor Saw FS 1218 EX 2 Important information before you start! When the machine
CONVERTIBLE CAR SEAT ISOFIX COMPATIBLE Birth to 4 years (approx)
") CONVERTIBLE CAR SEAT ISOFIX COMPATIBLE Birth to 4 years (approx) REARWARD FACING Birth to 2-3 years (approx) Series No. BS7200A-i20133 FORWARD FACING 12 months to 4 years (approx) IMPORTANT: KEEP THIS
CONVERTIBLE CAR SEAT ISOFIX COMPATIBLE Birth to 4 years (approx) REARWARD FACING Birth to 2-3 years (approx) Series No. BS7200A-i20133 FORWARD FACING 12 months to 4 years (approx) IMPORTANT: KEEP THIS
NEW WAVE 3 INSTALLATION, OPERATION & MAINTENANCE INSTRUCTIONS. with Quad Spring Tensioners
 NEW WAVE 3 with Quad Spring Tensioners INSTALLATION, OPERATION & MAINTENANCE INSTRUCTIONS Check us out at www.asgco.com Customer Service 800-344-4000 800-394-2358 ASGCO Mfg., Inc. 301 Gordon Street Allentown,
WARNING WARNING WARNING. Warnings and Cautions MOVING PARTS ENTANGLEMENT HAZARD CHEMICAL AND FIRE HAZARD FALLING OR CRUSHING HAZARD
 Warnings and Cautions As you read these instructions, you will see S, S, NOTICES and NOTES. Each message has a specific purpose. S are safety messages that indicate a potentially hazardous situation, which,
SHERPA 4x4 WINCH OWNER'S MANUAL
 www.sherpa4x4.com.au info@sherpa4x4.com.au SHERPA 4x4 WINCH OWNER'S MANUAL Copyright (C) Sherpa 4x4 www.sherpa4x4.com.au info@sherpa4x4.com.au 1 PLEASE READ WARNING! Your winch has a duty cycle and cannot
Electrically Assisted Pedal Cycles. Assembly Instructions
 Electrically Assisted Pedal Cycles Assembly Instructions Version 4 23 Sept 2005 Introduction Thank you for buying a PowaCycle Freeway electric bike. We hope it brings you many hours of enjoyment. For safe
MITSUBISHI Industrial Sewing Machine
 MITSUBISHI Industrial Sewing Machine TECHNICAL INFORMATION Automatic Undertrimmer, Single-Needle Lookstitch Model LS2-1 1 80 ET-035 MITSUBISHI.. "ELECTRIC CONTENTS 1. SPECIFICATIONS... 2 2. THREAD TRIMMER
R O A D S M I T H TRIKE CONVERSIONS BY THE TRIKE SHOP
 R O A D S M I T H TRIKE CONVERSIONS BY THE TRIKE SHOP Please thoroughly review the instructions before and during installation. Keep in mind that this product was designed to be installed by trained dealer
DC Series Installation Manual (# )
") DC Series Installation Manual (# 101630) Page 1 of 33 In this booklet you will find: TOWER INSTALLATION... 3 U-Bolt Style mount... 4 Side Frame Style mount... 4 PIVOT INSTALLATION... 5 External Pivot Installation:
DC Series Installation Manual (# 101630) Page 1 of 33 In this booklet you will find: TOWER INSTALLATION... 3 U-Bolt Style mount... 4 Side Frame Style mount... 4 PIVOT INSTALLATION... 5 External Pivot Installation:
Owners Manual E820/E920
 Owners Manual E820/E920 Wheelchair Accessible Training with E820/E920 2 Contents 1. Contents of E820/920 Box. 2. E820/E920 assembly instructions. 3. E820/E920 Control arm. 4. E920 Adjustable crank arms.
ROTARY MOWER SERVICING MANUAL
 ROTARY MOWER SERVICING MANUAL 567441.A.4 WWW.MASPORT.COM Contents CONTROLS 3 Engine Controls 3 Throttle Control Adjustment 3 Throttle Control Replacement 3 OPC Control Adjustment 3 Propulsion Controls
Engine Dismantle and Assemble ( )
") Engine Dismantle and Assemble ( 34 8) Special Tools 5 053 Slide hammer 47 Vibration damper remover 47 5053 00 Splined head socket, cylinder head bolts 87 Mounting stand with geared drive 00 059C Installer
Engine Dismantle and Assemble ( 34 8) Special Tools 5 053 Slide hammer 47 Vibration damper remover 47 5053 00 Splined head socket, cylinder head bolts 87 Mounting stand with geared drive 00 059C Installer
Rhino-Rack Nautic Kayak Loader (NKL)
") Important: Please read these instructions carefully prior to installation. Please refer to your fitting instruction to ensure that the roof racks are installed in the correct locations. heck the contents
Important: Please read these instructions carefully prior to installation. Please refer to your fitting instruction to ensure that the roof racks are installed in the correct locations. heck the contents
Rotary Folding Hoists. Owner s Manual
 Rotary Folding Hoists Owner s Manual Introduction Congratulations Congratulations on the purchase of your new Hills Rotary Hoist, which will bring you many years of trouble free and efficient outdoor drying.
Roof Mount Carrier Fitting Instructions
 max 60 mm Roof Mount Carrier Fitting Instructions H W H W W : max 60 mm H : max 80 mm L : max 50 mm H : max 50 mm H W W max = 32 mm H max = 22 mm Suitable for round bike frames up to 60mm diameter Suitable
Sheet metal work. Mechanisms and accessories
 Sheet metal work GENERAL LOWER STRUCTURE UPPER SIDE STRUCTURE UPPER REAR STRUCTURE TOP OF BODY Mechanisms and accessories EXTERIOR PROTECTION JE0 AL - JE0 EL - JE0 HL 77 11 196 742 DECEMBER 1997 Edition
STAPLER FOLDER DBM-120 PARTS CATALOG
 STAPLER FOLDER DBM-0 PARTS CATALOG Parts are indicated separately as shown below according to destinations. q : AC 0 to 0 V 0/0 Hz Specification w : AC 0 V 0 Hz Specification DUPLO CORPORATION Table of
Check the wires going to the back of the computer, if the wires are secure and console will not start see step b.
 ELECTRONIC TROUBLESHOOTING 1. PROBLEM: Console LED's will not light, console will not power up The bike must be pedaled at greater than 50 RPM while Check the wires going to the back of the computer, if
BILLY GOAT AERATOR Owner's Manual AE401, AE401H, AE401H5T Replacement Parts
 BILLY GOAT AERATOR Owner's Manual AE401, AE401H, AE401H5T Replacement Parts TINE ROW KIT TINE KIT Complete tine row set for replacement of one complete row of tines. Includes mounting plates, spacer, and
Owner s Manual. Boat Trailer Winch: 5:1 ratio model (500kg~700kg) F10204, F10205, F10214, F10215, F10216
 F10204, F10205, F10214, F10215, F10216") Owner s Manual Boat Trailer Winch: 5:1 ratio model (500kg~700kg) F10204, F10205, F10214, F10215, F10216 Contents: Specifications and Features 1 Spare Parts Listing 2 Front and Side Elevation, Bolt Down
Owner s Manual Boat Trailer Winch: 5:1 ratio model (500kg~700kg) F10204, F10205, F10214, F10215, F10216 Contents: Specifications and Features 1 Spare Parts Listing 2 Front and Side Elevation, Bolt Down
Felco Industries, Ltd Grant Creek Road P O Box Missoula, Montana (406) Fax (406)
 Fax (406)") Standard Slider Bedding Conveyor Model Number: STD 10-20 Serial Number: Bedding Conveyor Patent Number: 4,462,747 Felco Industries, Ltd. 3660 Grant Creek Road P O Box 16750 Missoula, Montana 59808-6750
Standard Slider Bedding Conveyor Model Number: STD 10-20 Serial Number: Bedding Conveyor Patent Number: 4,462,747 Felco Industries, Ltd. 3660 Grant Creek Road P O Box 16750 Missoula, Montana 59808-6750
NOTE: Skids and all hardware for the skids are located in the plow blade box.
 Description Item Qty. Part# 0 0 ATV PUSH TUBE AND BLADE MOUNTING INSTRUCTIONS P/N: 0-0 CUSTOMER MUST RECEIVE A COPY OF THIS INSTRUCTION SHEET AT THE TIME OF SALE NOTE: Skids and all hardware for the skids
Marine Engineering Exam Resource Review of Couplings
 1. What are rigid couplings used for? Used to join drive shafts together. True alignment and rigidity are required. Example Drive shafts and production lines, bridge cranes, solid shaft that needs to be
OLYMPIAN MODEL 740 Operation and Service Manual
 OLYMPIAN MODEL 740 Operation and Service Manual P/N 133911-102 FCI MANUAL P/N 133865-001 Data herein has been verified and validated and believed adequate for the intended use. If the machine or procedures
SUZUKI MOTORCYCLES AUSTRALIA OZARK 250 VISIT SUZUKIMOTORCYCLES.COM.AU
 OZARK 250 1 OF 6 FLAME RED OZARK 250 The Ozark 250 is engineered to be practical, with nimble handling and a comfortable ride even when the going gets rough. With an engine that punches above it's weight,
Installation and Operator s Manual: UTV Winch System: PE5000 with Cable (PN: W) PE5000 with Rope (PN: W)
 PE5000 with Rope (PN: W)") Installation and Operator s Manual: UTV Winch System: PE5000 with Cable (PN: 77-50120W) PE5000 with Rope (PN: 77-53120W) Table of Contents: Safety Warnings & Precautions...3 Winching Tips & Techniques...6
Installation and Operator s Manual: UTV Winch System: PE5000 with Cable (PN: 77-50120W) PE5000 with Rope (PN: 77-53120W) Table of Contents: Safety Warnings & Precautions...3 Winching Tips & Techniques...6
Tusk Pannier Racks. Instructions and information KLR
 1 Tusk Pannier Racks Instructions and information KLR650 2008 + Congratulations on your purchase of the Tusk Pannier Racks. These racks are made to handle extreme adventure riding, but work great for the
UNISTEER Performance Products
 UNISTEER Performance Products 1965-Early 1967 Manual Mustang Install Manual 8001110-01 & 8001120-01 *ALTHOUGH THIS KIT IS FAIRLY SIMPLE TO INSTALL, SOME MODIFICATIONS MAYBE NECESSARY. *BEFORE STARTING
GROUNDSMASTER. 52 Recycler. for 120 Traction Unit. Model No & UP. Operator s Manual
 FORM NO. 8-980 Rev A GROUNDSMASTER 5 Recycler for 0 Traction Unit Model No. 077 79000 & UP Operator s Manual IMPORTANT: Read this manual carefully. It contains information about your safety and the safety
Thank you for purchasing a Nelson RainTrain2.
 Thank you for purchasing a Nelson RainTrain2. Read this manual carefully to learn how to operate and service your machine properly. Failure to do so can result in personal injury and/or property damage.
*Enclosed pictures and devices are for reference only. Individual vehicles and devices may vary.
 Dash Strap Mount Product Number AS5.S500.001 *Enclosed pictures and devices are for reference only. Individual vehicles and devices may vary. The Dash Strap Mount is held tight against the vehicle dash
USER MANUAL. CareCo (UK) Ltd, Hubert Road, Brentwood, Essex, CM14 4JE PAGE 1 PRODUCT CODE WC01060.BLU
 Ltd, Hubert Road, Brentwood, Essex, CM14 4JE PAGE 1 PRODUCT CODE WC01060.BLU") by USER MANUAL PRODUCT CODE WC01060.BLU PAGE 1 CareCo (UK) Ltd, Hubert Road, Brentwood, Essex, CM14 4JE INFORMATION Thank you for purchasing a wheelchair from I-GO. This I-GO wheelchair has been designed
by USER MANUAL PRODUCT CODE WC01060.BLU PAGE 1 CareCo (UK) Ltd, Hubert Road, Brentwood, Essex, CM14 4JE INFORMATION Thank you for purchasing a wheelchair from I-GO. This I-GO wheelchair has been designed
Repairing SpeedTreater-TX Spray Proximity Sensor
 Repairing SpeedTreater-TX Spray Proximity Sensor How to remove and replace the proximity sensor on the spray valve assembly. 2017 guides.equipmentzone.com Page 1 of 9 Step 1 Unscrew and Remove Top Cover