N) manual. Register your instrument! Eppendorf Research plus. Operating manual
|
|
|
- Clarence Norman
- 5 years ago
- Views:
Transcription


1 search ual plus N) manual Register your instrument! Operating manual
2 Copyright 2013 Eppendorf AG, Hamburg. No part of this publication may be reproduced without the prior permission of the copyright owner. Trademarks Eppendorf and the Eppendorf logo are registered trademarks of Eppendorf AG, Hamburg, Germany. Combitips, ept.i.p.s., Multipette, Repeater and Research are registered trademarks of Eppendorf AG, Hamburg, Germany. Registered trademarks are not marked in all cases with or in this manual /042013
3 Table of contents 3 Table of contents 1 Product description Features Delivery package Main illustration Research plus single-channel Research plus Multi-channel Materials Safety Intended use Warnings for intended use Operation Setting the volume (only Research plus variable) Using pipette tips Aspirating liquid Dispensing liquid Troubleshooting Error search Maintenance Cleaning Sterilizing or disinfecting the pipette Autoclaving Disinfection Replacing O-rings Removing the O-ring Mounting a new O-ring Research plus disassembly and assembly Single-channel up to µl ml and 10 ml single-channel Multi-channel Adjusting pipettes General notes on user and factory adjustment settings Changing the user adjustment Changing the factory adjustment Decontamination before shipment Technical data Research plus single-channel variable Research plus multi-channel variable Research plus fix Ambient conditions
4 4 Table of contents 7 Ordering Information Single-channel, adjustable volume Single-channel, fixed volume Multi-channel Patents
5 Product description 5 1 Product description 1.1 Features The Research plus pipettes are piston-stroke pipettes that operate according to the air-cushion principle. When the control button is pressed, the piston in the pipette moves in the same direction. If the control button and the piston are moved upwards, the liquid can be aspirated into the pipette tip. With the downward movement of the piston, the liquid is dispensed (measuring stroke). Blow-out occurs if the downward piston stroke exceeds the first stop. Depending on the Research plus pipette it is possible to dispense volumes from 0.1 µl to 10 ml. The Research plus family consists of single-channel and multi-channel pipettes (8 and 12-channels) with variable volume settings, as well as single-channel fixed-volume pipettes. You can find a list of all available models of the Research plus in the "Technical Data" section. All Research plus pipettes are fully autoclavable. You can adjust the Research plus pipettes. The side viewing window displays the change in the adjustment. When attaching a pipette tip, the spring-loading action of the tip cone is activated (exceptions 5 ml and 10 ml pipettes). 1.2 Delivery package The Research plus delivery package contains: Pcs. Description 1 Research plus operating manual 1 Certificate 1 Adjustment tool (Allen key with a blue handle) 1 Mini CD 1 Black locking ring for single-channel pipettes µl 5 Red adjustment seal 5 Protective filters for 5 ml and 10 ml pipettes 1 Pipette key for opening the lower part (5 ml and 10 ml) 1 O-ring tool for cutting the O-rings (only multi-channel 100 μl and 300 μl) 1 Safety plug tool 1 Pin for loosening the safety plug
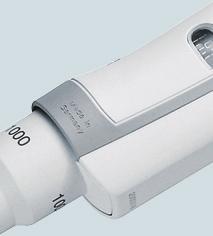
6 6 Product description 1.3 Main illustration Research plus single-channel Control button The control button and the trays of the matching ept.i.p.s. pipette tips have the same color. 2 Volume setting ring To set the volume for the variable pipettes. 3 Ejector The ejector moves the ejector sleeve and ejects the pipette tip. 4 Volume display (only variable pipettes) The set volume is read from top to bottom. 5 Adjustment opening The adjustment opening is fitted with the gray adjustment seal before delivery. 6 Adjustment display Set to "0" before delivery. 7 Labeling field Space for labels containing internal lab information. The serial number appears at the bottom. 8 Ejector sleeve Eject the pipette tips after use. 9 Spring-loaded tip cone The spring loading action optimizes the force required for attaching and ejecting tips (no spring-loaded action with 5 ml and 10 ml pipettes). The 5 ml and 10 ml pipettes have an easily replaceable protection filter in the tip cone. 10 Pipette tip The Research plus pipettes can only be used in combination with matching pipette tips. It is recommended to use ept.i.p.s. 9 10
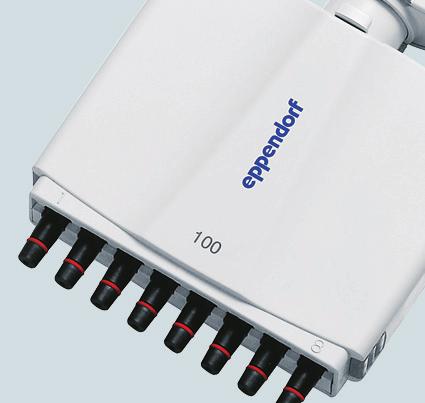
7 Product description Research plus Multi-channel For an explanation of the upper part of the pipette, refer to the main illustration of the single-channel pipette (see p. 6). 1 Lever To loosen the multi-channel lower part. 2 Multi-channel lower part The multi-channel lower part is freely rotatable. The lower part does not detach when it is rotated. The outer channels are labeled with the numbers 1 and 8 (or 12). The multi-channel version has a piston for each channel allowing it to be equipped with less than 8 or 12 tips. The lower part can be converted from an 8 to a 12-channel version with the same volume range. The multi-channel lower part can be opened, enabling you to replace or remove individual channels. 6 3 Latches on the right and left To release the cover plate with the interior ejector rail. 4 Spring-loaded tip cones The spring loading action optimizes the force required for attaching and ejecting tips Pipette tips It is recommended to use ept.i.p.s. 6 Cover plate Detachable cover plate with an interior ejector rail. The cover plate is opposite the side with the lever (1)
8 8 Product description 1.4 Materials NOTICE! Aggressive substances can damage the pipette, pipette tips and the accessories. Check for material compatibility before using organic solvents and aggressive chemicals. Observe the cleaning instructions (see Cleaning on p. 15). For information regarding chemical resistance (compatibility of materials) please refer to the Research plus CD. Components of the Research plus that can be accessed by the user are made of the following materials: Component External surfaces of the upper part Exterior and interior of lower parts Material Improved polypropylene (PP) Polycarbonate(PC) Polyetherimide(PEI) Foil Improved polypropylene (PP) Polyvinylidene fluoride (PVDF) Polyetherimide(PEI) Polyphenylene sulfide (PPS) Polyetheretherketone(PEEK) Polytetrafluoroethylene(PTFE) Ethylene propylene diene rubber (EPDM) Silicone Steel(stainless steel and spring steel) Pipette tip ept.i.p.s. epdualfilter T.I.P.S. filter Material Polypropylene (PP) Polyethylene (PE)
9 Safety 9 2 Safety 2.1 Intended use The intended use is described in a separate document enclosed in the package. 2.2 Warnings for intended use WARNING! Damage to health due to handling infectious liquids and pathogenic germs. Observe the national regulations for handling these substances, the biological security level of your laboratory, the safety data sheets and the manufacturer's application notes. Wear personal protective equipment (PPE). Follow the instructions regarding hygiene, cleaning and decontamination. For complete instructions regarding the handling of germs or biological material of risk group II or higher, please refer to the "Laboratory Biosafety Manual" (source: World Health Organization, current edition of the Laboratory Biosafety Manual). WARNING! Damage to health due to toxic, radioactive or aggressive chemicals. Observe the national regulations for handling these substances as well as the safety data sheets and manufacturer's application notes. Wear personal protective equipment (PPE). CAUTION! Danger to persons from careless use. Never point the opening of a Research plus fitted with pipette tip at yourself or anyone else. Only initiate dispensing if it is safe to do so. For all dispensing tasks, make sure that you are not endangering yourself or anyone else. CAUTION! Poor safety due to incorrect accessories and spare parts. The use of accessories and spare parts other than those recommended by Eppendorf may impair the safety, functioning and precision of the device. Eppendorf cannot be held liable or accept any liability for damage resulting from the use of incorrect or non-recommended accessories and spare parts or from the improper use of such equipment. Only use accessories and original spare parts recommended by Eppendorf. NOTICE! Damage to device from missing pipette tips. Only use the Research plus with fitted pipette tips. When using standard tips (without a filter): use the 1-10 ml and ml pipettes only with the protection filter inserted.
10 10 Safety NOTICE! Carry-over, contamination and incorrect dispensing results due to the incorrect use of pipette tips. The pipette tips are for single use only. Prolonged use can have a negative impact on dispensing tasks. Use the pipette tips only once. Do not use autoclaved ep Dualfilter T.I.P.S. for dispensing. NOTICE! Incorrect dispensing volume with special liquids and from temperature differences. Solutions which differ greatly from water in terms of their physical data, or temperature differences between the pipette, pipette tip and liquid, can result in incorrect dispensing volumes. Avoid temperature differences between pipette, pipette tip and liquid. Make sure that the temperature is constant, between 20 and 25 C and at ±0.5 C. Check the dispensing volume and make sure that you can affirm all the questions listed in the general information.
11 Operation 11 3 Operation 3.1 Setting the volume (only Research plus variable) Turn the volume adjustment ring as depicted to adjust the volume. The height of the control button changes as the volume is adjusted. The numbers on the volume display are to be read from the top to the bottom. The decimal places are below the hyphen. The volume is displayed up to µl in µl. For the 5 ml and 10 ml sizes, the volume is displayed in ml. We recommend to adjust the volume setting from a higher value to a lower value. If required, turn beyond the required value and then back again. 3.2 Using pipette tips The liquid to be dispensed is aspirated into pipette tips. It is recommended to use ept.i.p.s. The ept.i.p.s. pipette tips are available in different purities, as tips with and without a filter and as special tips. When using liquids whose surface tension is lower than that of water (e.g., due to the presence of a wetting agent in the liquid), the use of the special tips ept.i.p.s. LoRetention is recommended. The pipette is only functional if a pipette tip has been attached. You can either attach the pipette tip by hand or directly insert the end of the pipette into a tip held in the tip storage box. If attaching a pipette tip by hand, it must be handled in such a way to avoid contamination and heating of the pipette tip. The color of the control button of the Research plus matches the color of the ept.i.p.s. tray. If you are using pipette tips without a filter, insert the protection filter into the 5 ml and 10 ml pipettes. Remove the protection filter from the pipette if you are using the 5 ml or 10 ml ep Dualfilter T.I.P.S. This also applies to 5 ml / 10 ml filter tips of other manufacturers. The filters can interfere with each other. The backpressure of the two filters makes it difficult to exactly identify the first stop (see p. 12). Fit the suitable pipette tip(s) on the tip cone, applying light pressure. The pipette tip is securely fitted to the tip cone when it responds with spring-loaded action (exceptions: no spring-loading action with 5 ml and 10 ml single-channel pipettes.) You can deactivate the spring loading action of the tip cone in the case of single-channel pipettes (see p. 18).
12 12 Operation 3.3 Aspirating liquid 1. The liquid to be aspirated must be taken from a suitable vessel. For multi-channel pipettes, we recommend the reagent reservoir "Tip-Tub". 2. Press down the control button to the first stop (measuring stroke). 3. Immerse the pipette tip(s) vertically approx. 4 mm into the liquid. 4. To aspirate liquid, allow the control button to slide back slowly. Maintain the immersion depth, so that no air is aspirated accidentally. 5. In the case of large volumes: before removing the pipette tip from the liquid, wait for approx. 3 seconds. To ensure maximum precision and accuracy, we recommend to wet each new tip initially by aspirating and dispensing the liquid one to three times. Only then should pipetting commence. 6. Remove the tip(s) slowly from the liquid. 7. Wipe the tip(s) slowly against the tube wall to ensure that no outer wetting remains on the tip. 3.4 Dispensing liquid 1. Place the tip(s) on the tube wall at an angle. 2. Press the control button slowly until the first stop (measuring stroke) and wait until the flow of liquid stops. 3. To empty the tip(s) completely, press down the control button until the second stop (blow-out). 4. Hold down the control button and wipe the tip(s) against the tube inner wall. 5. Let the control button slide back slowly outside of the tube. 6. To eject the tips, press the ejector. Pipette tips are for single use only.
13 Troubleshooting 13 4 Troubleshooting 4.1 Error search Symptom Possible cause Solution Liquid is dripping from the tip and/or the dispensed volume is incorrect. The control button jams and does not move smoothly. The adjustment seal has been removed; the adjustment display has been changed. No spring-loading action of the tip cone when taking up pipette tips. The tip is loose or the pipette tip is poorly fitted. Liquid with high vapor pressure and/or different density. Pipetted too quickly. The tip is withdrawn from the liquid too quickly. Liquid aspirated with blow-out and dispensed with blow-out. The piston is soiled or damaged. The tip cone is damaged. The O-rings of the tip cones are damaged. The piston is soiled. The seal is soiled. The pipette is blocked. The pipette has been adjusted for another liquid. Spring-loading action is blocked by a locking ring. The use of a 5 ml or 10 ml pipette. Press the tip on firmly, use ept.i.p.s. If you use 5 ml or 10 ml ep Dualfilter T.I.P.S. remove the protection filter from the pipette. Wet the tip several times and adjust the pipette for the liquid used. Move the control button slowly. Slowly remove the tip with a time delay (approx. 3 seconds) from the liquid. Repeat dispensing correctly. Clean the piston, relubricate slightly and/or replace. Replace the lower part or channel. Replace the O-rings (only 100 μl, 300 μl multi-channel). Clean the lower part. 5 ml and 10 ml sizes: replace the protection filter. Adjust the pipette for the liquid used (see Adjusting pipettes on p. 23). Remove the locking ring again. No remedy. The tip cone does not respond with spring-loaded action in combination with these sizes. To avoid dispensing errors, check the precision and accuracy of the Research plus at regular intervals. The "PICASO" program (from Version 2.3) is available to determine the permitted measured systematic and random errors. If the pipette is used at an extremely high location, it must be adjusted to the ambient air pressure. A SOP (Standard Operation Procedure) for checking pipettes can be found on the Research plus CD and on our website
14 14 Troubleshooting
15 Maintenance 15 5 Maintenance NOTICE! Aggressive substances can damage the pipette, pipette tips and the accessories. Check for material compatibility before using organic solvents and aggressive chemicals. Observe the cleaning instructions (see Cleaning on p. 15). For information regarding chemical resistance (compatibility of materials) please refer to the Research plus CD. All single and multi-channel lower parts are wear parts. Clean them after contamination, use of aggressive chemicals and/or heavy stress. If the lower parts are worn or damaged, replace the respective parts. Faulty dispensing results are sometimes due to lack of maintenance. 5.1 Cleaning NOTICE! Damage to device from unsuitable cleaning fluids or sharp or pointed objects Unsuitable cleaning fluids can damage the surfaces and printing. Never use corrosive cleaning fluids, strong solvents or abrasive polishes. Note the information on chemical resistance (see the Research plus CD). Do not use acetone to clean the Research plus. Do not use sharp objects to clean the Research plus. Remove any contamination on the outside of the Research plus as follows: Wet a cloth with a mild cleaning fluid and water and remove the contamination. To remove heavy contamination resulting from liquid penetration, disassemble the lower part of the pipette (see Research plus disassembly and assembly on p. 18) and clean it with demineralized water. Relubricate the piston sealing rings after contamination, use of aggressive chemicals and/or heavy stress. Remove the old grease before relubricating. Only use the grease specified in the ordering information (see the enclosed CD).
16 16 Maintenance 5.2 Sterilizing or disinfecting the pipette NOTICE! Damage to device from incorrect handling. Do not use any additional disinfectants, decontamination agents or sodium hypochlorite during autoclaving or UV exposure. When autoclaving make sure that the temperature does not exceed 121 C. Before using disinfecting agents or decontaminating agents, test for material compatibility and check the manufacturer's instructions about chemical resistance. Consider also the material of the pipette Autoclaving All Research plus pipettes are completely steam autoclavable Before autoclaving 1. Remove any contamination from the exterior and in the lower part (see Research plus disassembly and assembly on p. 18). 2. If you remove existing grease, slightly relubricate the piston seal using only the grease specified in the ordering information (see the enclosed CD) Procedure Follow the operating manual of the autoclave manufacturer. 1. Autoclave at: 121 C; 20 minutes; 1 bar overpressure 2. When placing the Research plus into the autoclave, make sure that the temperature at the pipette does not exceed 121 C. 3. You can put the Research plus into the autoclave as a whole unit or with the lower part removed. Do not disassemble the lower part. 4. For 5 ml and 10 ml pipettes: remove the old protection filter. Add a new protection filter and install it after autoclaving. Autoclave the protection filter only once. 5. If lower parts have been removed, make sure that no lower parts are confused during reassembly. (Tip: Use one plastic beaker per pipette) After autoclaving Cool the pipette down to room temperature and leave to dry. For 5 ml / 10 ml pipettes: the protection filter swells during autoclaving. Slightly compress the protection filter when inserting it into the tip cone. The piston does not need to be relubricated after autoclaving. If autoclaving is carried out as described above, no gravimetric testing or adjustment is necessary.
17 Maintenance Disinfection Carefully wipe off the outer surfaces with disinfectant, DNA/RNA decontamination agents or 70% isopropanol. You can wipe the outside of the tip cone and the ejector sleeve with a sodium hypochlorite solution of 4%. After the exposure time of the sodium hypochlorite solution has elapsed, remove thoroughly with demineralized water. The Research plus pipettes may be temporarily subjected to the UV light of a sterile bench ( 254 nm). 5.3 Replacing O-rings The 100 µl and 300 µl multi-channel lower parts are equipped with O-rings. These are wear parts. Replace old, worn or damaged O-rings. Defective O-rings result in the incorrect positioning of the tips and in dispensing errors Removing the O-ring 1. Push the opening of the O-ring tool (included in the delivery package) against the tip cone from the side so that the sharp edge in the opening of the O-ring tool is positioned on top of the o-ring. Do not slide the O-ring tool onto the cone! 2. Supporting the O-ring tool with your thumb, push it firmly against the tip cone. This O-ring is cut in one place. 3. Remove the O-ring tool and the O-ring from the tip cone Mounting a new O-ring 1. Fit the mounting aid (shortened pipette tip, included in the delivery package of the O-rings) on the tip cone. 2. Push the new O-ring over the tip onto the tip cone. 3. Check that the pipette tips are correctly positioned. Ensure that the tips are tightly sealed and properly aligned.
18 18 Maintenance 5.4 Research plus disassembly and assembly Single-channel up to µl Removing the lower part PUSH UP TO RELEASE Keep the ejector pressed and remove the ejector sleeve and 3 : on the lower part, slide the ring marked "PUSH UP TO RELEASE" up by about 5 mm until the lower part comes off : take the lower part out of the upper part Deactivating the spring-loading action: installing the locking ring For the following dispensing tasks it can be helpful to deactivate the spring loading action of the tip cone. A pipette tip is to be used for a long period. The pipette tip is slightly bended during dispensing. Deactivating this action can also be helpful for pipette tips which are not designed for the Eppendorf pipette tip cone. The spring loading action of the tip cone can be deactivated by installing the locking ring. The locking ring is included in the delivery package. 1. Push the black locking ring onto the lower part from the top. Slightly squeeze the clamps on the lower part when doing so. 2. Insert the lower part into the upper part until it engages audibly. 3. Keep the ejector pressed. The ejector rod protrudes from the upper part. 4. Fit the ejector sleeve onto the ejector rod. It is fitted correctly if it engages slightly. Remove the locking ring to reactivate the spring-loading action.
19 Maintenance Opening and assembling the lower part ( µl) To avoid confusion of parts, only disassemble and assemble one pipette at a time Opening the lower part: 1. On the piston mount (1) push the stop pins together slightly. 2. Remove the piston mount. 3. Remove the piston (2) and the piston spring (3). The piston is under spring tension. Pistons and piston springs will look different for the individual volume versions. Assembling the lower part: 1. Carefully guide the piston and the piston spring into the cylinder. Make sure that the piston is guided correctly in the piston spring and in the cylinder. There must not be any perceptible resistance. Stop pushing as soon as any resistance is felt This may indicate that the piston is not positioned correctly in the cylinder. There is a risk of bending the piston if too much force is applied. Carefully pull out the piston and repeat the process correctly. In the case of piston springs with double windings (4), these windings must point downwards. 2. Keep the piston and the piston spring pressed. 3. Keep the stop pins on the piston mount pressed with the other hand. 4. Mount the piston mount in such a way that the two locking mechanisms engage in their retainers. 5. Gently press a pipette tip against the inserted piston. The piston must move down in the cylinder without any noticeable resistance. Installing the lower part and ejector sleeve: 1. Insert the lower part into the upper part until it engages audibly. 2. Set the maximum volume and operate the control button several times. It must run smoothly and resistance-free. 3. Keep the ejector pressed. The ejector rod protrudes from the upper part. 4. Fit the ejector sleeve onto the ejector rod. It is fitted correctly if it engages slightly. 5. Carry out a gravimetric test of the systematic and random error (see Technical data on p. 29). This test ensures that no parts were confused during assembly and that the pipette has been assembled correctly.
20 20 Maintenance ml and 10 ml single-channel Replace the protection filter in the tip cone after each contact with liquid or if it is frayed. 4 ADJ ADJ ADJ ADJ ADJ ADJ 1. 1 : unscrew the ejector sleeve : Keep the ejector pressed and turn the lower part to the left or right by approximately 30. The lower part is automatically released from the upper part : open the lower part: fit the pipette key 4 (included in the delivery package) onto the lower part. Hold the cylinder and unscrew it from the lower part. See the next figure. 4. Hold the piston (4) which is now partly visible in the lower part. 5. Push the piston mount (1) slightly downwards (3 mm) and turn it by 45. The piston spring pushes the piston mount upwards. The lower part opens. The lower part consists of the following: ml / 10 ml piston mount 2 Piston spring 3 Upper part of the lower part 4 Piston (with seal) 5 Cylinder and tip cone 6 Protection filter in the tip cone
21 Maintenance 21 Before assembling the pipette, first install the piston mount, the piston spring, and the piston in the upper part of the lower part. Further assembly is as shown in the figures. Carry out the procedure in reverse order. After the assembly: The assembly is performed in reverse order. After the assembly: Carry out a gravimetric test of the systematic and random error (see Technical data on p. 29). This test ensures that no parts were confused during assembly and that the pipette has been assembled correctly. For the replacement of an ejector sleeve, the sizes 5 ml and 10 ml are delivered with an ejector sleeve and ejector carrier. The lower part has to be removed for the installation of a new ejector carrier Multi-channel Loosen and open the 10 µl, 100 µl and 300 µl multi-channel lower part and 2 : Slide the lever on the lower part to the left or right. This separates the lower part from the upper part so that it can be removed. 2. Put down the lower part with the lever facing downwards : slide the two latches (right and left at the side) down. Use a coin to do this. The lower part is still lying on the table with the lever facing downwards. 4. Remove the cover panel facing upwards with the integrated ejector rail. Do not remove the ejector rail from the cover panel. The spring for the ejector rail could accidentally come off and get lost in this step.
22 22 Maintenance Removing and installing channels Channels must only be removed and installed if the multi-channel lower part is separated from the upper part! The channels in the lower parts consist of piston, cylinder and spring. The channels for 100 μl and 300 μl are equipped with an O-ring at the tip cone (see Replacing O-rings on p. 17) and 2 : Position a pipette tip under the piston and carefully take the piston off the upper rail. 2. Carefully pull the piston out in an upward direction. Do not bend the piston. 3. Hold the tip cone at the lower end and push it slightly upwards 3. This compresses the spring : Lift the tip cone slightly and release it from the lower rail : Relax the spring by letting the tip cone slide back again above the lower rail : Take the tip cone with the cylinder and the spring out of the upper rail. Before installation, slide the piston into the cylinder. Install the channels in reverse order Assembling the µl multi-channel pipette 1. Fit the cover plate with integrated ejector. 2. Push the latches upwards. 3. To mount, push the lower part into the upper part until it engages audibly. 4. Carry out a gravimetric test of the systematic and random error (see p. 29). This test ensures that no parts were confused during assembly and that the pipette has been assembled correctly.
23 Maintenance Adjusting pipettes NOTICE! Incorrect dispensing volume with special liquids and from temperature differences. Solutions which differ greatly from water in terms of their physical data, or temperature differences between the pipette, pipette tip and liquid, can result in incorrect dispensing volumes. Avoid temperature differences between pipette, pipette tip and liquid. Make sure that the temperature is constant, between 20 and 25 C and at ±0.5 C. Check the dispensing volume and make sure that you can affirm all the questions listed in the general information. The random and systematic errors recorded upon delivery can be drawn from the Eppendorf Certificate. This certificate is included in the delivery. Changes to the factory adjustment will render the certificate void General notes on user and factory adjustment settings The Research plus was adjusted, tested and fitted with a gray adjustment seal with the abbreviation "ADJ" before delivery. The adjustment display on the side reads "0". Changing the adjustment of the Research plus is sometimes recommended for solutions which are very different from water with regard to their density, viscosity, surface tension and/or vapor pressure etc. If the density of an aqueous solution changes by approximately ±10%, for example because of the salt concentration, the volume changes by approximately ±0.2%. This statement does not apply if other relevant properties of the liquid also change. If the pipette is used at extremely high altitudes, it must be calibrated to the ambient air pressure. At m above sea level, the volume error of a 100 µl pipette is about 0.3%. When using special tips, that is, tips that significantly differ from standard tips in their geometry, changing the adjustment can improve the dispensing accuracy (systematic error). Please follow the recommendations regarding the adjustment of ept.i.p.s. long contained in the User Adjustment document on theresearch plus CD. Adjustment changes can be reset by simple steps. In addition to changing the user adjustment, a Research plus with variable volume setting can be permanently changed by altering the factory adjustment (see Changing the factory adjustment on p. 26). Changes made to the user or factory adjustment do not affect dispensing precision (random error). Precision can be improved by exchanging worn parts. Precision is also considerably affected by handling.
24 24 Maintenance Before changing the adjustment or factory calibration, you must check the existing dispensing volume. The actual volume can be checked by weighing: The density of distilled water is approx mg/µl at 20 C and mg/µl at 27 C. If the set volume corresponds to the actual volume, no correction is necessary. If there is a difference between the actual volume and the set volume of distilled water, please check the following: Is there any liquid dripping from the tip? Is the pipette tip fitted leak-proof? Is the tip cone undamaged? Are the piston and the cylinder leak-proof? Adequate leak tightness is ensured when no drop is formed at the pipette tip after aspiration of the nominal volume with distilled water and a waiting time of approx. 15 s. Hold the pipette vertically, making sure not to touch the pipette tip. Prewet the tip several times in the case of nominal volumes 20 µl. Does the temperature of the pipetted liquid correspond to: the temperature of the device? the ambient air temperature? Is the weighing location free from drafts? Does the work method and pipetting speed permit complete aspiration and dispensing of the liquid? Has the correct numerical value for "Density liquids at weighing temperature" been used for the calculation of the actual volume? Is the set volume correct? For very small volumes (<10 µl): is the fine balance sufficiently sensitive (balance resolution: mg)? Were original ept.i.p.s pipette tips used for testing? For the pipette tip used for testing please refer to the Technical Data (see p. 29). No adjustment changes are allowed unless you can answer all the questions with "yes". In all other cases, the problems associated with the questions answered with "no" must be eliminated. If the problem is remedied by exchanging a complete lower part or other parts that have an effect on the volume, proper assembly must be verified by carrying out a gravimetric test. Information on the systematic and random errors to be met can be found in the "Technical Data" chapter.
25 Maintenance Changing the user adjustment If the adjustment is changed, the volume changes by a certain value. Strictly speaking, the change only applies to the testing volume. Example You readjust a µl pipette with a volume setting of 100 µl by 1 µl (1 µl 1%). If the volume setting is 10 µl, the pipette is also adjusted by 1 µl ( 10%). Auxiliary equipment Supplied adjustment tool (order no ) Supplied red adjustment seal (ADJ) 1. Remove the gray adjustment seal. 2. Keep the ejector pressed. 3. Insert the adjustment tool (from the delivery package). 4. Turn the adjustment tool until the adjustment display shows the desired value. 5. Place the Research plus on a horizontal surface (table). When completing the adjustment, look absolutely vertically at the window and read the set value via the backsight in the viewing window. 6. Carry out weighings to verify accuracy and precision. 7. After the tests, close the opening with the red adjustment seal (from the delivery package). If the adjustment is meant for a specific liquid, mark the pipette accordingly. Use the labeling area on the pipette for this purpose and write down the liquid and the volume. Carry out a gravimetric test for each adjustment change. Follow the test procedures of EN ISO and A SOP (Standard Operation Procedure) and further information on user and factory adjustment settings can be found on the Research plus CD and on our website
26 26 Maintenance Changing the factory adjustment Auxiliary equipment Supplied safety plug tool Supplied pin to loosen the safety plug It is possible to change the factory adjustment with the corresponding accessories for a Research plus with variable volume setting. If the factory adjustment of the Research plus has been changed by a user, this can be recognized by a red safety plug behind the ejector. If the Research plus has been adjusted and calibrated by Eppendorf AG, this is indicated by a gray safety plug. The random and systematic errors recorded upon delivery can be drawn from the Eppendorf Certificate. This certificate is included in the delivery. Changes to the factory adjustment will render the certificate void. If the dispensing accuracy is only be to changed temporarily, the correct method is to change the user adjustment. Before changing the user or factory adjustment, observe the general notes (see General notes on user and factory adjustment settings on p. 23) and the associated gravimetric tests. In the case of Research plus fixed-volume pipettes, modifications are only possible by changing the user adjustment (see Changing the user adjustment on p. 25). The procedure for changing the factory adjustment is described on the Research plus CD. The parts necessary for completing the change are included in the delivery package and are listed in the ordering information on the Research plus CD.
27 Maintenance Decontamination before shipment If you wish to return the pipette to Eppendorf AG or an Eppendorf AG service partner to be checked or repaired, please note the following: CAUTION! Use of a contaminated device may result in personal injuries and damage to the device. Clean and decontaminate the Research plus before shipping or storage according to the cleaning instructions. Hazardous substances are: solutions presenting a hazard to health potentially infectious agents organic solvents and reagents radioactive substances proteins presenting a hazard to health DNA 1. Please note the information in the document "Decontamination certificate for product returns". It is available in PDF format on our homepage or on the enclosed CD. 2. Enter the serial number of the Research plus in the decontamination certificate. This can be found at the lower end of the entry field. 3. Enclose the fully-completed decontamination certificate for returned goods with the Research plus.
28 28 Maintenance
29 Technical data 29 6 Technical data 6.1 Research plus single-channel variable Research plus single-channel variable Model Test tip ept.i.p.s. Color code Volume range Length Testing volume Error limits Eppendorf AG Error systematic random ± % ± µl ± % ± µl µl Increment: µl µl Increment: 0.01 µl 2-20 µl Increment: 0.02 µl 2-20 µl Increment: 0.02 µl µl Increment: 0.1 µl µl Increment: 0.2 µl µl Increment: 0.2 µl µl Increment: 1 µl dark gray µl 34 mm medium gray µl 40 mm light gray μl L 46 mm yellow µl 53 mm yellow µl 53 mm yellow µl 53 mm orange µl 55 mm blue µl 71 mm 0.1 µl ± 48 ± ± 12 ± µl ± 12 ± 0.03 ± 6 ± µl ± 2.5 ± ± 1.5 ± µl ± 1.4 ± ± 0.7 ± µl ± 8 ± 0.04 ± 5 ± µl ± 2.5 ± ± 1.8 ± µl ± 1.5 ± ± 0.8 ± µl ± 1.0 ± 0.1 ± 0.4 ± µl ± 5 ± 0.1 ± 1.5 ± µl ± 1.2 ± 0.12 ± 0.6 ± µl ± 1.0 ± 0.2 ± 0.3 ± µl ± 5 ± 0.1 ± 1.5 ± µl ± 1.2 ± 0.12 ± 0.6 ± µl ± 1.0 ± 0.2 ± 0.3 ± µl ± 3 ± 0.3 ± 1 ± µl ± 1 ± 0.5 ± 0.3 ± µl ± 0.8 ± 0.8 ± 0.2 ± µl ± 2.5 ± 0.5 ± 0.7 ± µl ± 1 ± 1 ± 0.3 ± µl ± 0.6 ± 1.2 ± 0.2 ± µl ± 2.5 ± 0.75 ± 0.7 ± µl ± 1 ± 1.5 ± 0.3 ± µl ± 0.6 ± 1.8 ± 0.2 ± µl ± 3 ± 3 ± 0.6 ± µl ± 1 ± 5 ± 0.2 ± µl ± 0.6 ± 6 ± 0.2 ± 2
30 30 Technical data Research plus single-channel variable Model Test tip ept.i.p.s. Color code Volume range Length Testing volume Error limits Eppendorf AG Error systematic random ± % ± µl ± % ± µl ml Increment: ml 1 10 ml Increment: 0.01 ml purple ml 120 mm turquoise 1 10 ml 165 mm 0.5 ml ± 2.4 ± 12 ± 0.6 ± ml ± 1.2 ± 30 ± 0.25 ± ml ± 0.6 ± 30 ± 0.15 ± ml ± 3 ± 30 ± 0.6 ± ml ± 0.8 ± 40 ± 0.2 ± ml ± 0.6 ± 60 ± 0.15 ± Research plus multi-channel variable Research plus multi-channel variable Model Test tip ept.i.p.s. Color code Volume range Length Testing volume Error limits Eppendorf AG Error systematic random ± % ± µl ± % ± µl µl Increment: 0.01 µl µl Increment: 0.1 µl µl Increment: 0.2 µl medium gray µl 40 mm yellow µl 53 mm orange µl 55 mm 0.5 µl ± 12 ± 0.06 ± 8.0 ± µl ± 8.0 ± 0.08 ± 5.0 ± µl ± 4.0 ± 0.2 ± 2.0 ± µl ± 2.0 ± 0.2 ± 1.0 ± µl ± 3.0 ± 0.3 ± 2.0 ± µl ± 1.0 ± 0.5 ± 0.8 ± µl ± 0.8 ± 0.8 ± 0.3 ± µl ± 3.0 ± 0.9 ± 1.0 ± µl ± 1.0 ± 1.5 ± 0.5 ± µl ± 0.6 ± 1.8 ± 0.3 ± 0.9
31 Technical data Research plus fix Research plus fixed volume Model Test tip ept.i.p.s. Color code Volume range Length Error limits Eppendorf AG Error systematic random ± % ± µl ± % ± µl 10 µl medium gray µl 40 mm 20 µl light gray μl L 46 mm ± 1.2 ± 0.12 ± 0.6 ± 0.06 ± 0.8 ± 0.16 ± 0.3 ± µl yellow ± 1.2 ± 0.12 ± 0.6 ± µl µl 53 mm ± 1.0 ± 0.2 ± 0.3 ± µl ± 1.0 ± 0.25 ± 0.3 ± µl ± 0.7 ± 0.35 ± 0.3 ± µl ± 0.6 ± 0.6 ± 0.2 ± µl ± 0.6 ± 1.2 ± 0.2 ± µl blue ± 0.6 ± 1.2 ± 0.2 ± µl µl 71 mm ± 0.6 ± 1.5 ± 0.2 ± µl ± 0.6 ± 3 ± 0.2 ± µl ± 0.6 ± 6 ± 0.2 ± 2 Test conditions according to ISO , and for piston-stroke pipettes with air cushion by means of a fine balance with evaporation protection, tested by the German gauging office. Number of determinations: 10; water according to ISO 3696; 20 C to 25 C ±0.5 C constant; with pre-wetted pipette tip; dispensing against the tube wall. 6.4 Ambient conditions Temperature range Relative humidity Storage without transport packaging 5 to 45 C 10 to 95% Operating conditions 5 to 40 C 10 to 95% Technical specifications subject to change.
32 32 Technical data
33 Ordering Information 33 7 Ordering Information 7.1 Single-channel, adjustable volume Order no. (International) Order no. (North America) Description Eppendorf Research plus, variable single-channel dark gray, µl medium gray, µl light gray, 2-20 µl yellow, 2-20 µl yellow, µl yellow, µl orange, µl blue, µl violet, ml turquoise, 1-10 ml 7.2 Single-channel, fixed volume Order no. (International) Order no. (North America) Description Eppendorf Research plus, fixed single-channel medium gray, 10 µl yellow, 10 µl light gray, 20 µl yellow, 20 µl yellow, 25 µl yellow, 50 µl yellow, 100 µl yellow, 200 µl blue, 200 µl blue, 250 µl blue, 500 µl blue, µl
34 34 Ordering Information 7.3 Multi-channel Order no. (International) Order no. (North America) Description Eppendorf Research plus, variable 8-channel medium gray, µl yellow, µl orange, µl Eppendorf Research plus, variable 12-channel medium gray, µl yellow, µl orange, µl The ordering information can be found on the Research plus CD.
35 Patents 35 8 Patents U.S. Patent No. 7,434,484 Is used by Research plus pipettes with variable volume setting (single-channel and multi-channel) and fixed volume with following nominal volumes: U.S. Patent No. 7,674,432 Is used by Research plus pipettes with variable volume setting (single-channel and multi-channel) and fixed volume with following nominal volumes: U.S. Patent No. 7,673,532 Is used by Research plus pipettes with variable volume setting (multi-channel) with following nominal volumes: U.S. Patent No. 8,133,453 is used by Research plus pipettes with variable volume setting (single-channel and multi-channel) and fixed volume with following nominal volumes: U.S. Patent No. 8,297,134 is used by Research plus pipettes with variable volume setting (single-channel and multi-channel) and fixed volume with following nominal volumes: 2.5 µl, 10 µl, 20 µl, 25 µl, 50 µl, 100 µl, 200 µl, 250 µl, 300 µl, 500 µl and 1000 µl 2.5 µl, 10 µl, 20 µl, 25 µl, 50 µl, 100 µl, 200 µl, 250 µl, 300 µl, 500 µl, 1000 µl, 5 ml and 10 ml 10 µl, 100 µl, 300 µl 2.5 µl, 10 µl, 20 µl, 25 µl, 50 µl, 100 µl, 200 µl, 250 µl, 300 µl, 500 µl, 1000 µl, 5 ml and 10 ml 2.5 µl, 10 µl, 20 µl, 25 µl, 50 µl, 100 µl, 200 µl, 250 µl, 300 µl, 500 µl, 1000 µl, 5 ml and 10 ml
36 36 Patents
37
38 Evaluate your manual Give us your feedback. Your local distributor: Eppendorf AG Hamburg Germany
N) manual. Register your instrument! Eppendorf Research plus. Operating manual
 manual. Register your instrument! Eppendorf Research plus. Operating manual") earch ual plus N) manual Register your instrument! www.eppendorf.com/myeppendorf Operating manual Copyright 2017 Eppendorf AG, Germany. All rights reserved, including graphics and images. No part of this
earch ual plus N) manual Register your instrument! www.eppendorf.com/myeppendorf Operating manual Copyright 2017 Eppendorf AG, Germany. All rights reserved, including graphics and images. No part of this
N) manual. Register your instrument! Eppendorf Reference 2. Operating manual
 manual. Register your instrument! Eppendorf Reference 2. Operating manual") erence ual 2 N) manual Register your instrument! www.eppendorf.com/myeppendorf Operating manual Copyright 2016 Eppendorf AG, Germany. All rights reserved, including graphics and images. No part of this
erence ual 2 N) manual Register your instrument! www.eppendorf.com/myeppendorf Operating manual Copyright 2016 Eppendorf AG, Germany. All rights reserved, including graphics and images. No part of this
Register your instrument! Eppendorf Reference 2. Operating manual
 Register your instrument! www.eppendorf.com/myeppendorf Operating manual Operating Eppendorf see on Fig. Tab. p. p. manual Reference 2 Copyright 2016 Eppendorf AG, Germany. All rights reserved, including
N) manual. Register your instrument! Eppendorf Research plus. Operating manual
 manual. Register your instrument! Eppendorf Research plus. Operating manual") earch ual plus N) manual Register your instrument! www.eppendorf.com/myeppendorf Operating manual Copyright 2018 Eppendorf AG, Germany. All rights reserved, including graphics and images. No part of this
earch ual plus N) manual Register your instrument! www.eppendorf.com/myeppendorf Operating manual Copyright 2018 Eppendorf AG, Germany. All rights reserved, including graphics and images. No part of this
4 ual Repeater M4. N) manual. Register your instrument! Multipette M4 Repeater M4. Operating manual
 manual. Register your instrument! Multipette M4 Repeater M4. Operating manual") 4 ual Repeater M4 N) manual Register your instrument! www.eppendorf.com/myeppendorf Operating manual Copyright 2018 Eppendorf AG, Germany. All rights reserved, including graphics and images. No part of
4 ual Repeater M4 N) manual Register your instrument! www.eppendorf.com/myeppendorf Operating manual Copyright 2018 Eppendorf AG, Germany. All rights reserved, including graphics and images. No part of
Register your instrument! Easypet 3. Operating manual
 N) manual Register your instrument! www.eppendorf.com/myeppendorf Operating manual Copyright 2014 Eppendorf AG, Hamburg. All rights reserved, including graphics and images. No part of this publication
Register your instrument! Easypet 3. Operating manual
 Register your instrument! www.eppendorf.com/myeppendorf Operating manual Copyright 2016 Eppendorf AG, Germany. All rights reserved, including graphics and images. No part of this publication may be reproduced
Register your instrument! Easypet 3. Operating manual
 N) manual Register your instrument! www.eppendorf.com/myeppendorf Operating manual Copyright 2017 Eppendorf AG, Germany. All rights reserved, including graphics and images. No part of this publication
Register your instrument! HeatSealer S100. Operating manual
 00N) manual Register your instrument! www.eppendorf.com/myeppendorf Operating manual Copyright 2015 Eppendorf AG, Germany. All rights reserved, including graphics and images. No part of this publication
3/E3x ual Repeater E3/E3x
 3/E3x ual Repeater E3/E3x N) manual Register your instrument! www.eppendorf.com/myeppendorf Multipette E3/E3x Repeater E3/E3x Operating manual Copyright 2016 Eppendorf AG, Germany. All rights reserved,
3/E3x ual Repeater E3/E3x
 3/E3x ual Repeater E3/E3x N) manual Register your instrument! www.eppendorf.com/myeppendorf Multipette E3/E3x Repeater E3/E3x Operating manual Copyright 2017 Eppendorf AG, Germany. All rights reserved,
Multipette /Repeater (X)stream. Operating manual
stream. Operating manual") Multipette /Repeater (X)stream 4986 900.115 Copyright 2008 Eppendorf AG, Hamburg. No part of this publication may be reproduced without the prior permission of the copyright owner. Registered trademarks
Multipette /Repeater (X)stream 4986 900.115 Copyright 2008 Eppendorf AG, Hamburg. No part of this publication may be reproduced without the prior permission of the copyright owner. Registered trademarks
Easypet 3. Operating manual
 Easypet see on Fig. Tab. p. p. 3manual Operating manual Easypet 3 Operating manual 4430 900.019 Copyright 2012 Eppendorf AG, Hamburg. No part of this publication may be reproduced without the prior permission
Eppendorf Repeater Pro Instruction Manual Manual de Instrucciones
 Eppendorf Repeater Pro Instruction Manual Manual de Instrucciones Technical Data / Datos técnicos Technical Data / Datos técnicos See chapter 4 / ver apartado 4 Systematic error/ Error sostemàtico (Inaccuracy/Incorreción)
CLASSIC. User s Guide. Do not lubricate this pipette. The use of lubricant cancels the warranty of this pipette. NOTICE
 CLASSIC User s Guide EN NOTICE Do not lubricate this pipette. The use of lubricant cancels the warranty of this pipette. TABLE OF CONTENTS INTRODUCTION 3 Parts Checklist 3 GLP Features 3 Description 4
LIQUID HANDLING TECHNOLOGY. User Manual Bedienungsanleitung
 LIQUID HANDLING TECHNOLOGY User Manual Bedienungsanleitung EC Declaration of Conformity USA Scientific certifies that 7166-0010 ErgoOne FAST has been manufactured and inspected in accordance with the following
Operation Manual BOTTLE TOP DISPENSER
 Operation Manual BOTTLE TOP DISPENSER TABLE OF CONTENTS Page No. Intended Use Of The Instrument 1 Safety Instructions 1 Functions and Limitations of Use 2 Operating Exclusions 3 Storage Conditions 3 Chemical
TABLE OF CONTENTS INTRODUCTION. Chapter 1. Parts Check List INTRODUCTION TABLE OF CONTENTS NOTICE INTRODUCTION 3
 User s Guide EN G TABLE OF CONTENTS TABLE OF CONTENTS INTRODUCTION 3 Parts CheckList 3 GLP Features 4 Description Specifications 6 SETTING THE VOLUME 8 PIPETTING 9 Fit the Tips 9 Pre-rinse the Tips 0 Aspirate
CappController Pipette Controller. Operation Manual Version: 1.2.
 CappController Pipette Controller Operation Manual Version: 1.2 www.capp.dk Table of Content 1. Safety Precautions... 1 2. General Description... 2 3. Getting Started... 3 3.1. Recharging the Battery...
Thermo Scientific Matrix Manual Pipette User Manual
 Thermo Scientific Matrix Manual Pipette User Manual Thermo Scientific Matrix Manual Pipette User Manual Trademarks and Copyright 2007 Thermo Fisher Scientific Inc. All rights reserved. All trademarks are
Premium Design - Premium Performance - Premium Quality
 WITOPET premium NEW Premium Design - Premium Performance - Premium Quality Looking for the latest pipetting innovation at an attractive price? WITOPET premium is just the right pipette for you. The ergonomic
Operation Manual. Pipette Aid. Concorde Liquid Handling Equipment. *This instrument is intended for laboratory use only.
 Concorde Liquid Handling Equipment Pipette Aid Operation Manual Cat. no. R14-PANAID *This instrument is intended for laboratory use only http://www.recenttec.com E-mail : support@recenttec.com Version
User Manual dpette+ Electronic Pipette 2016-ver.1
 User Manual dpette+ Electronic Pipette 2016-ver.1 CONTENTS 1. Product Overview...- 1-2. Parts Description...- 3-3. Display... - 5-4. Operation...- 6-5. dpette+ setup... - 14-6. Storage... - 18-7. Care
Liquid Handling Easy Handling! Transferpette. electronic. Gebrauchsanleitung Operating Manual Mode d'emploi Instrucciones de manejo
 Liquid Handling Easy Handling! Transferpette electronic F I R S T C L A S S B R A N D 3 33 63 93 Gebrauchsanleitung Operating Manual Mode d'emploi Instrucciones de manejo Table of Contents Safety Instructions
Register your instrument! MiniSpin /MiniSpin plus. Operating manual
 Register your instrument! www.eppendorf.com/myeppendorf Operating manual Operating MiniSpin /MiniSpin see on Fig. Tab. p. p. manual plus Copyright 2015 Eppendorf AG, Germany. All rights reserved, including
JADE Bottle Top Dispenser
 Accrediting Certifying Bodies S C B A (E) ASCB(E) UK ISO 13485 JADE Bottle Top Dispenser Re-Circulation Valve Operation Manual TABLE OF CONTENTS Page No. Intended Use Of The Instrument 1 Safety Instruction
BlueSwan Pipette Controller
 BlueSwan Pipette Controller BSST-0100 Operation Manual Ver. 1.0 Copyright 2016 Blue-Ray Biotech Corp. All Rights Reserved. Table of Contents 1. Safety Precautions... 1 2. General Description... 2 2.1
Operating Manual for. Dispenser. Read this manual thoroughly before operating the Labmax Bottle Top Dispenser!
 Operating Manual for Dispenser Read this manual thoroughly before operating the Labmax Bottle Top Dispenser! General Safety Precautions When using the Labmax please observe the following safety precautions
Prospenser. User Manual Mode d emploi Bedienungsanleitung Manual Usuario. For capacities of 2.5 ml 5 ml 10 ml 30 ml and 50 ml
 Prospenser User Manual Mode d emploi Bedienungsanleitung Manual Usuario For capacities of 2.5 ml 5 ml 10 ml 30 ml and 50 ml Prospenser User Manual...1 Mode d emploi... 11 Bedienungsanleitung... 21 Manual
SofTouch Electronic Precision Pipette Instruction Manual
 SofTouch Electronic Precision Pipette Instruction Manual CONTENTS 1.HAMILTON SOFTOUCH ELECTRONIC PIPETTE... 2 1.1. SofTouch Single Channel Electronic Pipettes... 2 1.2. SofTouch Multi-Channel Electronic
Dispensette. Testing Instructions (SOP) 1. Introduction. May 2009
 1. Introduction. May 2009") Dispensette Testing Instructions (SOP) May 2009 1. Introduction The standard ISO DIS 8655 describes both the design and the testing of the bottle-top dispenser. The following Testing Instructions describe
Dispensette Testing Instructions (SOP) May 2009 1. Introduction The standard ISO DIS 8655 describes both the design and the testing of the bottle-top dispenser. The following Testing Instructions describe
Operator s Guide for Mechanical Volume-Set Pipettes (Ovation M)
") Operator s Guide for Mechanical Volume-Set Pipettes (Ovation M) L070-0001-001 Rev. B TABLE OF CONTENTS Introduction Product Description & Specifications 1-1 Pipette Components 1-2 BioNatural Pipetting
Operator s Guide for Mechanical Volume-Set Pipettes (Ovation M) L070-0001-001 Rev. B TABLE OF CONTENTS Introduction Product Description & Specifications 1-1 Pipette Components 1-2 BioNatural Pipetting
Single and 8-channel Electronic Pipettes. Operation Manual Version: 2.9
 Single and 8-channel Electronic Pipettes Operation Manual Version: 2.9 Table of Contents 1. Safety Precautions...1 1.1. Operation Safety Precautions...1 1.2. Battery Safety...1 2. General Description...3
Eppendorf Research pro. Instruction Manual Mode d emploi Manual de Instrucciones
 Eppendorf Research pro Instruction Manual Mode d emploi Manual de Instrucciones Inhalt / Contents / Sommaire / Indice / Indice Teil A / Part A / Section A / Parte A / Parte A Contents / Sommaire / Indice
Ultra. Pipetman. continuously adjustable digital microliter pipettes. 8 pipettes for volume ranges from 0.1 µl to 10 ml
 Pipetman continuously adjustable digital microliter pipettes Ultra 8 pipettes for volume ranges from 0.1 µl to 10 ml U-2 U-10 U-20 U-100 U-200 U-1000 U-5000 U-10ML Pipetman Ultra U-200 shown Contents Description...1
User s Manual. Pipette Controller for liquid handling. Thank you very much for purchasing Pipette Mate NEO.
 Pipette Controller for liquid handling User s Manual Thank you very much for purchasing Pipette Mate NEO. Please read this manual carefully before using. Always Pursuing Originality Since 1944 Features
Repeater Plus Pipette. Instruction Manual Mode d emploi Manual de Instrucciones
 4 Repeater Plus Pipette Instruction Manual Mode d emploi Manual de Instrucciones Repeater Plus Pipette Instruction Manual.......................1 Mode d'emploi.........................13 Manual de Instrucciones.................25
PIPETMAN ultra. EN ENGLISH User's Guide
 PIPETMAN ultra EN ENGLISH User's Guide PIPETMAN ultra Contents Page 1 - INTRODUCTION 2 2 - PARTS CHECK LIST 3 3 - DESCRIPTION 4 4 - SWITCHING ON 5 5 - VOLUME INDICATOR - LCD WINDOW 6 6 - SETTING THE VOLUME
Multichannel ENGLISH
 PIPETMAN Ultra Multichannel ENGLISH PIPETMAN Ultra Multichannel CONTENTS page 1 - INTRODUCTION 2 2 - PARTS CHECK LIST 3 3 - DESCRIPTION 4 4 - SWITCHING ON 5 5 - VOLUME INDICATOR - LCD WINDOW 6 6 - SETTING
DURAN GROUP DISPENSER & DURAN GROUP DISPENSER PRO. A safe and precise dispensing system
 DURAN GROUP DISPENSER & DURAN GROUP DISPENSER PRO A safe and precise dispensing system REMOVAL OF LIQUID MEDIA MADE EASY DURAN laboratory glassware ensures outstanding safety and precision when working
Perfection in Liquid Handling PRECISE AND CONVENIENT PIPETTING
 Perfection in Liquid Handling PRECISE AND CONVENIENT PIPETTING 21 VITLAB micropipette The VITLAB piston-operated pipettes are the ideal manual pipettes for demanding laboratory applications, and have all
Digital Burette. Assembly and operating instructions. For capacities of 30ml & 50ml
 Digital Burette Assembly and operating instructions For capacities of 30ml & 50ml General Safety Instructions Careful safety precautions must apply when dispensing corrosive, radioactive or hazardous chemicals.
Instructions for Fitting, Operating and Maintenance Canopy Door RE / (St.: )
") EN Instructions for Fitting, Operating and Maintenance Canopy Door 1 818 012 RE / (St.: 12.2010) 12.2010 ENGLISH Contents 1 Safety Instructions... 3 1.1 Qualified persons... 3 1.2 Symbols and signal words
EN Instructions for Fitting, Operating and Maintenance Canopy Door 1 818 012 RE / (St.: 12.2010) 12.2010 ENGLISH Contents 1 Safety Instructions... 3 1.1 Qualified persons... 3 1.2 Symbols and signal words
Liquid Handling Easy Handling! Transferpette -8/-12. electronic. Gebrauchsanleitung Operating Manual Mode d'emploi Instrucciones de manejo
 Liquid Handling Easy Handling! Transferpette -8/-12 electronic F I R S T C L A S S B R A N D 3 35 67 99 Gebrauchsanleitung Operating Manual Mode d'emploi Instrucciones de manejo Table of Contents Page
Operator s Guide for Fixed Volume Pipettes (Ovation F1 and Ovation F2)
") Operator s Guide for Fixed Volume Pipettes (Ovation F1 and Ovation F2) L057-0189-001 Rev. C TABLE OF CONTENTS Introduction Product Description & Specifications 1-1 Pipette Components 1-2 BioNatural Pipetting
Operator s Guide for Fixed Volume Pipettes (Ovation F1 and Ovation F2) L057-0189-001 Rev. C TABLE OF CONTENTS Introduction Product Description & Specifications 1-1 Pipette Components 1-2 BioNatural Pipetting
Nichipet EX Plus II. User s Manual. Autoclavable & UV resistant. Digital micro pipette for liquid handling
 Autoclavable & UV resistant Nichipet EX Plus II Digital micro pipette for liquid handling User s Manual In Vitro Medical Diagnostic Devices (98/79/EC) Annex III self-declared ISO 8655 STANDARD CERTIFIED
Never charge the batteries with a charger other than that supplied by the manufacturer.
 INTRODUCTION The Diamond SeroLogic portable pipette controller is a rechargeable electronic pipetting aid designed for use with glass or plastic serological pipettes in the 0.1 to 100mL volume range. The
SERVICE MANUAL ACROSS Pro Pipette
 SRVIC MNUL SRVIC MNUL CROSS Pro Pipette Ohaus Corporation, 7 Campus Drive, Suite 310, Parsippany, NJ 07054 (973) 377-9000 SRVIC MNUL CROSS Pro Pipette The information contained in this manual is believed
Pipette Controllers OPERATOR INSTRUCTIONS
 Pipette Controllers OPERATOR INSTRUCTIONS Introduction GlassMaster has been carefully designed and manufactured as a lightweight, cordless pipetting aid for use with all plastic or glass pipettes from
XCM12 Mini-Centrifuge
 Multi-speed Digital User Manual v. 1.0 C&A Scientific Disclaimer C & A Scientific owns the copyright of this user manual. No person shall reprint or distribute the contents of this user manual, including
VITLAB Dispenser. Standard Operating Procedure (SOP)
") VITLAB Dispenser Standard Operating Procedure (SOP) VITLAB GmbH Linus-Pauling-Str. 63762 Grossostheim Germany tel: +49 6026 97799-0 fax: +49 6026 97799-30 info@vitlab.com www.vitlab.com Table of contents.
VITLAB Dispenser Standard Operating Procedure (SOP) VITLAB GmbH Linus-Pauling-Str. 63762 Grossostheim Germany tel: +49 6026 97799-0 fax: +49 6026 97799-30 info@vitlab.com www.vitlab.com Table of contents.
Maintenance Adjustments
 4 Maintenance and Adjustments Chapter Contents Cleaning the Printer and Paper Handling Accessories..... 158 Cleaning the HP Digital Copier....................... 161 Cleaning ADF and Glass............................
Eppendorf Easypet. Operating manual
 Eppendorf Easypet Operating manual 4421 900.090 Copyright 2010 Eppendorf AG, Hamburg. No part of this publication may be reproduced without the prior permission of the copyright owner. eppendorf and Eppendorf
Lumitester PD-30. Instruction Manual. Table of Contents
 Table of Contents Lumitester PD-30 Instruction Manual Thank you very much for purchasing the Lumitester PD-30. All of this Instruction Manual must be read before operation of this product for safe and
Instructions for Fitting, Operating and Maintenance
 EN Instructions for Fitting, Operating and Maintenance Retractable Door 1 818 024 RE / 10.2011 ENGLISH Contents 1 Safety Instructions... 3 1.1 Qualified persons... 3 1.2 Symbols and signal words used...
VHM-P (Non-Locking) Variable Height Arm with VESA Mounting Plate for 75 x 75mm or 100 x 100mm applications
 Variable Height Arm with VESA Mounting Plate for 75 x 75mm or 100 x 100mm applications") 3875 Cypress Drive Petaluma, CA 94954 800.228.2555 +1.707.773.1100 Fax 707.773.1180 www.gcx.com VHM-P (Non-Locking) Variable Height Arm with VESA Mounting Plate for 75 x 75mm or 100 x 100mm applications
3875 Cypress Drive Petaluma, CA 94954 800.228.2555 +1.707.773.1100 Fax 707.773.1180 www.gcx.com VHM-P (Non-Locking) Variable Height Arm with VESA Mounting Plate for 75 x 75mm or 100 x 100mm applications
TopPette Mechanical Pipettes
 TopPette Mechanical Pipettes Features for TopPette - Lightweight, ergonomic, low force design - Digital display clearly reads volume setting - The pipettes cover volume range of 0.1μl to 10ml - Easy to
Instruction Manual for the Revolutionary Science RS-200 RevSpin Microcentrifuge
 Instruction Manual for the Revolutionary Science RS-200 RevSpin Microcentrifuge REVOLUTIO NARY SCIENCE Manufacturer of Precision Laboratory Equipment Table of Contents Introduction 2 Recommended Safeguards
The Efficient Solution for Pipetting up to 100 ml at once! USER'S GUIDE
 The Efficient Solution for Pipetting up to 100 ml at once! This equipment generates, uses and can radiate radio frequency energy and, if not installed and used in accordance with the User s Guide, may
Instruction Manual Bedienungsanleitung Mode d emploi Manual de Instrucciones Instruzioni d impiego BIOH T
 TM eline Instruction Manual Bedienungsanleitung Mode d emploi Manual de Instrucciones Instruzioni d impiego BIOH T BIOH T TM eline Instruction Manual...1 Bedienungsanleitung...37 Mode d emploi...73 Manual
3875 Cypress Drive Petaluma, CA Fax
 3875 Cypress Drive Petaluma, CA 94954 800.228.2555 +1.707.773.1100 Fax 707.773.1180 www.gcx.com VHM-P (Non-Locking) Variable Height Arm with Fixed Angle Front End for Flat Panel / Keyboard Bracket (L Brackets
Userts Manual. Digital micro pipette for liquid handling. In Vitro Medical Diagnostic Devices (98/79/EC) Annex III self-declared ISO 8655 STANDARD
 Annex III self-declared ISO 8655 STANDARD") Autoclavable & UV Resistant Digital micro pipette for liquid handling Userts Manual In Vitro Medical Diagnostic Devices (98/79/EC) Annex III self-declared ISO 8655 STANDARD CERTIFIED ISO9001 Thank you
Autoclavable & UV Resistant Digital micro pipette for liquid handling Userts Manual In Vitro Medical Diagnostic Devices (98/79/EC) Annex III self-declared ISO 8655 STANDARD CERTIFIED ISO9001 Thank you
Efficiency in variable pipetting
 Efficiency in variable pipetting Microliter pipettes with variable volumes VITLAB micropipette VITLAB specialises in accurate dispensing, titration and pipetting, and offers a variety of highly developed
VHM-P (Non-Locking) and VHM-PL (Locking) Variable Height Arm with Slide-In Mounting Plate
 and VHM-PL (Locking) Variable Height Arm with Slide-In Mounting Plate") 3875 Cypress Drive Petaluma, CA 94954 800.228.2555 +1.707.773.1100 Fax 707.773.1180 www.gcx.com VHM-P (Non-Locking) and VHM-PL (Locking) Variable Height Arm with Slide-In Mounting Plate (Refer to qualified
3875 Cypress Drive Petaluma, CA 94954 800.228.2555 +1.707.773.1100 Fax 707.773.1180 www.gcx.com VHM-P (Non-Locking) and VHM-PL (Locking) Variable Height Arm with Slide-In Mounting Plate (Refer to qualified
OPERATIONS MANUAL LEVER CHAIN HOIST
 OPERATIONS MANUAL LEVER CHAIN HOIST IMPORTANT SAFETY INFORMATION Please read, understand and follow all safety information contained in these instructions prior to the use of this hoist. Retain these instructions
Operating instructions ErgoPack 600 E
 Operating instructions ErgoPack 600 E Operation of the device is only permitted if the operating instructions have been carefully read and understood before use! Declaration of conformity EU declaration
Sofa Slideout Assembly OWNER'S MANUAL. Rev: Page 1 Sofa Slideout Owners Manual
 Sofa Slideout Assembly OWNER'S MANUAL Rev: 06.14.2016 Page 1 Sofa Slideout Owners Manual TABLE OF CONTENTS Warning, Safety, and System Requirement Information 3 Product Information 3 Prior to Operation
8.0 pipet4u pipets General Information
 8.0 pipet4u pipets General Information An incredible combination of accuracy, precision and value High Comfort, Comfortable and Low Effort Pipetting The new design with soft grip allows you to use less
Operating Instructions & Parts Manual
 Swift Lift Hydraulic Service Jack Operating Instructions & Parts Manual Model Number ATD7341 Capacity 3-1/2 Ton U.S. Patent No's. 5,946,912 6,199,379! This is the safety alert symbol. It is used to alert
Transferpette. Testing Instructions (SOP) 1. Introduction. May 2009
 1. Introduction. May 2009") Transferpette Testing Instructions (SOP) May 2009 1. Introduction The standards DIN EN ISO 8655 describe both the design and the testing of the piston operated pipette Transferpette. The following Testing
Transferpette Testing Instructions (SOP) May 2009 1. Introduction The standards DIN EN ISO 8655 describe both the design and the testing of the piston operated pipette Transferpette. The following Testing
Instruction Manual for the Revolutionary Science RS-102 RevSpin Microcentrifuge
 Instruction Manual for the Revolutionary Science RS-102 RevSpin Microcentrifuge REVOLUTIO NARY SCIENCE Manufacturer of Precision Laboratory Equipment Table of Contents Introduction 2 Recommended Safeguards
Hydraulic Long Jacks
 Operating Instructions & Parts Manual Hydraulic Long Jacks Model 44915 44930 44940 44980 44981C (Air option) Capacity 1-1/2 Ton 3 Ton 4 Ton 8 Ton 8 Ton Models 44915, 44930, 44940 & 44980 Model 44981C U.S.
Installation, Operating and Maintenance Instructions Retractable Door / Art.-Nr.:
 Installation, Operating and Maintenance Instructions Retractable Door 06.2008 / Art.-Nr.: 1 818 024 ENGLISH CONTENTS PAGE 1 SAFETY REQUIREMENTS 3 1.1 Symbols and key words used 3 1.2 Designated use 3 1.3
4 - SETTING UP THE MACROMAN CHARGING POSITION 4 Wall mounted 4 Workbench set-up 4
 User's Guide Contents Page 1 - SAFETY SYMBOLS USED 3 2 - PROPER USE 3 3 - SAFETY PRECAUTIONS 3 Possible dangers if the safety precautions are not observed 3 Safety at work 3 Safety aspects for the user
VistaLab Technologies, Inc. 27 Radio Circle Drive Mt. Kisco, NY USA
 ! Use of the Ovation pipette not specified in this manual may impair protection provided by the equipment. For the most current information about Ovation pipettes, tips and accessories, see www.vistalab.com.
ALWAYS DISCONNECT DISPENSER FROM WATER SOURCE WHEN DISPENSER IS NOT IN USE.
 1060GAPRF With dilution selector 1060GAP OVERVIEW DEMA S MPD is a multiple product and dilution dispenser designed for use with SafeLink closed loop inserts. With its innovative patent pending QuickDock
(Refer to qualified personnel)
") 3875 Cypress Drive Petaluma, CA 94954 800.228.2555 +1.707.773.1100 Fax 707.773.1180 www.gcx.com Installation Guide VHM-P (Non-Locking) and VHM-PL (Locking) Variable Height Arm (Slide-Above-Arm Configuration)
3875 Cypress Drive Petaluma, CA 94954 800.228.2555 +1.707.773.1100 Fax 707.773.1180 www.gcx.com Installation Guide VHM-P (Non-Locking) and VHM-PL (Locking) Variable Height Arm (Slide-Above-Arm Configuration)
Low Profile Service Jack Jack Stand Combo
 Low Profile Service Jack Jack Stand Combo Jack Stands Low Profile Service Jack U.S. Patent No. 6,199,379! This is the safety alert symbol. It is used to alert you to potential personal injury hazards.
MagicLift Hydraulic Service Jack Model (w/one piece handle) (w/one piece handle)
 (w/one piece handle)") Operating Instructions & Parts Manual MagicLift Hydraulic Service Jack Model 27025 27026 (w/one piece handle) 27035 27036 (w/one piece handle) Capacity 2-1/2 Ton 2-1/2 Ton 3-1/2 Ton 3-1/2 Ton Model 27025
Operating Instructions & Parts Manual MagicLift Hydraulic Service Jack Model 27025 27026 (w/one piece handle) 27035 27036 (w/one piece handle) Capacity 2-1/2 Ton 2-1/2 Ton 3-1/2 Ton 3-1/2 Ton Model 27025
PICO Cleaning Instructions
 PICO Cleaning Instructions How to clean PICO piezoelectric metering valves IMPORTANT! Save this Sheet. Forward to Maintenance or Tool Crib Supervisors Electronic pdf files of EFD manuals are also available
TITREX. One instrument for all your titration and dosing applications
 TITREX One instrument for all your titration and dosing applications The digital burette TITREX is ideal for a fast and sensitive titration drop by drop. One instrument simulates all volumes up to 99.99
EP1306N 5 Gallon Can Extruder System Rev. A June EP1306N Operation Manual
 EP1306N Operation Manual 1 THIS PAGE HAS BEEN INTENTIONALLY LEFT BLANK 2 TABLE OF CONTENTS SECTION 1: SAFETY... 4 1. GENERAL SAFETY... 5 2. PUMP SAFETY... 5 3. FLUID PRESSURE AND COMPATIBILITY... 6 4.
The Proven Industry Leader in Ergonomics and Accuracy. The VWR UHP Pipettor was superior in all of the test categories.
 The Proven Industry Leader in Ergonomics and Accuracy In 2010, in order to determine the ergonomic benefits of the VWR Ultra High-Performance Pipettor, United States Ergonomics was hired to conduct an
Rectangular Door L-VAT with pneumatic actuator double acting
 Rectangular Door L-VAT with pneumatic actuator double acting This manual is valid for the products: 0 7 5 1 0 U A 2 4 0 0 0 1 4 character option code Size 10... 46 x 236 12... 50 x 336 Actuator 24... without
Titrette. class A precision. The next generation Digital Burette!
 The next generation Digital Burette! Titrette class A precision F I R S T C L A S S B R A N D With the Titrette bottle-top burette, you can titrate quickly and reliably with highest precision, even in
Finnpipette Novus. Single Channel & Multichannel. User Manual. Instructions for Use
 User Manual Finnpipette Novus Single Channel & Multichannel Instructions for Use Thermo Fisher Scientific Thermo Scientific Novus SCP/MCP User Manual 1 CONTENT PRODUCT DESCRIPTION...............................
Long Chassis Hydraulic Service Jacks
 Model BH6011 Long Chassis Hydraulic Service Jacks Operating Instructions and Parts Manual Capacity 10 Ton Model BH6011 U.S. Patent No's. 5,946,912 5,341,723! This is the safety alert symbol. It is used
01 / Pralinenfix PFM 2000
 01 / 2011 New Now available Especially for the filling of liquor we can now offer an new special nozzle ör For more information talk to your Costumer consultant Artikel Nr.: 29. 10. 08 Annex 1 PFM 2000
Operating Manual for Disc Brake Type: SB 8.11
 for Disc Brake Type: PINTSCH BUBENZER GmbH Postfach 123 57540 Kirchen-Wehbach Tel.: +49-2741 - 9488-0 Fax: +49-2741 - 9488-44 G E R M A N Y www.pintschbubenzer.de e-mail: info@pintschbubenzer.de PB84-0508-01/1
Low Profile Service Jack
 Low Profile Service Jack Model GMG29031 Capacity 3 Ton U.S. Patent No. 6,199,379! This is the safety alert symbol. It is used to alert you to potential personal injury hazards. Obey all safety messages
nual k Voltage Stabilizer N) manual New Brunswick Voltage Stabilizer Operating manual
 manual New Brunswick Voltage Stabilizer Operating manual") nual k Voltage Stabilizer N) manual New Brunswick Voltage Stabilizer Operating manual Copyright Copyright 2014 Eppendorf AG, Germany. No part of this publication may be reproduced without the prior permission
nual k Voltage Stabilizer N) manual New Brunswick Voltage Stabilizer Operating manual Copyright Copyright 2014 Eppendorf AG, Germany. No part of this publication may be reproduced without the prior permission
Installation, Operation, and Maintenance Manual. Welker Automatic Insertion Corrosion Coupon Device Model AID-1CC
 Installation, Operation, and Maintenance Manual Welker Automatic Insertion Corrosion Coupon Device Model The information in this manual has been carefully checked for accuracy and is intended to be used
9. WARRANTY INFORMATION
 1. YOUR NEW PIPETTE FILLER... 2 2. UNPACKING AND PREPARING THE PIPETTE FILLER FOR USE 2 2.1 Charging the Pipette Filler... 2 2.2. Electrical specifications 3 3. Pipette Filler OVERVIEW... 3 4. Pipette
Starting up hydraulic systems
 General / Installation A hydraulic system that operates economically, safely, and trouble-free requires careful planning, as well as proper installation and start-up. Conscientious maintenance has a considerable
anual N) - English MixMate 5353 from serial number 10,000 Service manual - English
 - English MixMate 5353 from serial number 10,000 Service manual - English") al - English ixmate anual N) - English 5353 from serial number 10,000 MixMate 5353 from serial number 10,000 Service manual - English Copyright 2014 Eppendorf AG, Hamburg. All rights reserved, including
al - English ixmate anual N) - English 5353 from serial number 10,000 MixMate 5353 from serial number 10,000 Service manual - English Copyright 2014 Eppendorf AG, Hamburg. All rights reserved, including
Exchange of rollers from the XTS-Mover
 Service documentation for AT901-0050-0550 and AT9011-00x0-0550 Version: Date: 1.0 0.10.017 Table of contents Table of contents 1 Foreword... 5 1.1 Notes on the documentation... 5 1. Documentation issue
250L Cartridge Dual Seal
 INSTALLATION, OPERATION AND MAINTENANCE INSTRUCTIONS 250L Cartridge Dual Seal Installation, Operation and Maintenance Instructions TABLE OF CONTENTS 1.0 Cautions...2 2.0 Transport and Storage...2 3.0 Description...2
Assembly and Maintenance Manual Type ASNU
 Assembly and Maintenance Manual Type ASNU Hatschekstr.36 69126 Heidelberg Germany Tel +49(0)6221 30470 Fax +49(0)6221 304731 info@stieber.de www.stieber.de Date of issue: 30.05.2018 GB Revision: 0 U:\EngUsers\!ProduktDoku\1AAA_Einbauerklaerung_Wartungsanleitung_Konformitaetserklaerung\1AAA_Wartungsanleitungen\Orginal_Worddatei\_ASNU.docx
Transferpette. Testing Instructions (SOP) 1. Introduction. October 2013
 1. Introduction. October 2013") Transferpette Testing Instructions (SOP) October 2013 1. Introduction The standards DIN EN ISO 8655 describe both the design and the testing of the piston operated pipette Transferpette. The following
Transferpette Testing Instructions (SOP) October 2013 1. Introduction The standards DIN EN ISO 8655 describe both the design and the testing of the piston operated pipette Transferpette. The following
Operating Instructions Flexdip CYA112
 BA00432C/07/EN/13.13 71207066 Products Solutions Services Operating Instructions Wastewater assembly About this document Safety messages The structure, signal words and safety colors of the signs comply