PAPI with Portable Mounting
|
|
|
- Zoe Barker
- 5 years ago
- Views:
Transcription
1 PAPI with Portable Mounting Technical Support: Toll Free: (US & Canada) Worldwide: Fax: Web: carmanah.com 2016 Carmanah Technologies Corporation
2 Contents 1.0 Safety & Usage Viewing Precautions Battery Precautions Wireless Precautions Regulatory Warranty Disclaimer Recycling Handling Abbreviations Equipment Characteristics Theory of Operation Light Housing Assembly (LHA) Power Control Unit (PCU) Battery Box Assembly (BBA) Solar Panel System Set Up and Installation Site Requirements Installation of the Light Housing Assemblies Installation of the Power Control Unit Installation of the Battery Box Assembly Installation of Solar Panels Electrical Connections Tilt Switch (optional) Power Control Unit Operating Procedures Power Control Unit Switches Power Power Control Unit Manual Operation Remote Control and Photocell Operating Procedures Preparation for Movement Operation in Unusual Conditions Unusual Environment and Weather Emergency Procedures Maintenance System Checks Before and After Installation Maintenance Carmanah Technologies Corporation 2
3 9.3 Periodic Preventative Maintenance Cleaning the Lenses of a Light Housing Assembly Parts Replacement Removal of LHA Weather Cover Replacement of White LED / Steady IR Panel Replacement of Red LED / Flashing IR Panel Replacement of LHA Power Circuit Board Replacement of Batteries in the Battery Box Assembly Replacement of a Solar Panel Troubleshooting Power Train LHA Power Control Board White LED / Steady IR Panels Red LED / Flashing IR Panels Tilt Switch Solar Panel Inclinometer Instructions Battery Charger in the Battery Box Assembly Instructions Charge Controller Instructions Warranty Carmanah Technologies Corporation 3

4 1.0 Safety & Usage The following symbols indicate important safety warnings and precautions throughout this manual: WARNING indicates that serious bodily harm or death may result from failure to adhere to the precautions. CAUTION indicates that damage to equipment may result if the instructions are not followed. NOTE suggests optimal conditions and provides additional information. WIRELESS features and functions that require a Handheld Controller. 1.1 Viewing Precautions Do not view an actively emitting infrared or visible light from the side or top of the light (close to or on beam) from a range of less than 4 ft. (1.2 m). A safe limit for near-infrared viewing, established by the American Conference of Governmental and Industrial Hygienists (ACGIH), is 65 mw/in 2 (10 mw/cm 2 ) as the maximum exposure limit for viewing for up to 16 minutes. This power density can be produced at the lens surface when actively emitting infrared light. 1.2 Battery Precautions Use extreme caution when handling the light. This product is capable of generating enormous shortcircuit currents. Remove all jewelry (bracelets, metal-strap watches, rings) before attempting to handle or remove the batteries. Charge your battery periodically. Permanent damage and reduced capacity will result if the battery is not correctly maintained. The rate of battery self-discharge is very dependent upon temperature. The warmer the temperature, the faster the batteries will discharge. Lights that have been stored will usually require a top-up charge before they are put into service. The most accurate battery health status reading is obtained when the unit has been in a dark location and in off mode for at least 24 hours Carmanah Technologies Corporation 4
5 1.3 Wireless Precautions Keep the Handheld Controller at a distance of at least 3 ft. (1 m) from the antennas of lights or other Handheld Controllers. It transmits a powerful radio signal that could damage sensitive receiver circuitry if operated at close range. 1.4 Regulatory This device complies with Part 15 of the FCC Rules. Operation is subject to the following two conditions: 1. This device may not cause harmful interference, and 2. This device must accept any interference received, including interference that may cause undesired operation. This equipment has been tested and found to comply with the limits for a Class B digital device, pursuant to Part 15 of the FCC Rules. These limits are designed to provide reasonable protection against harmful interference in a residential installation. This equipment generates, uses, and can radiate radio frequency energy and, if not installed and used in accordance with the instruction manual, may cause harmful interference to radio communications; however, there is no guarantee that interference will not occur in a particular installation. If this equipment does cause harmful interference to radio or television reception, which can be determined by turning the equipment off or on, the user is encouraged to try to correct the interference by one or more of the following measures: Reorient or relocate the receiving antenna; Increase the separation between the equipment and receiver; Connect the equipment into an outlet on a circuit different from that to which the receiver is connected; Consult the dealer or an experienced radio/tv technician for help. This Class [B] digital apparatus complies with Canadian ICES-003. Cet appareil numérique de la classe [B] est conforme à la norme NMB-003 du Canada. 1.5 Warranty Disclaimer This manual will familiarize you with the features and operating standards of the product. Failure to comply with the use, storage, maintenance, or installation instructions detailed in this manual could void the user warranty. Changes or modifications not expressly approved by the party responsible for compliance could void the user s authority to operate the equipment. Installation work must be done by a qualified person(s) in accordance with all application local codes and standards. 1.6 Recycling This product required the extraction and use of natural resources. It may contain substances that could be harmful to the environment or human health if improperly handled at the product s end of life. In order to avoid release of such substances into the environment and to reduce the use of natural resources, we encourage you to recycle the product in an appropriate way that will ensure most of the materials are reused or recycled appropriately. Check your local municipality for electronics recyclers Carmanah Technologies Corporation 5
 contain glass components.")
 in any position other than the top side up.")
6 The symbol indicates that this product complies with the European Union s requirements according to Directive 2002/96/EC on waste electrical and electronic equipment (WEEE). The battery is a rechargeable lead-acid battery. Consult your local laws for information on recycling. 1.7 Handling The Light Housing Assemblies (LHA) contain glass components. Care should be taken to avoid unnecessary shock. Do not drop. The Light Housing Assembly (LHA) is designed to be transported in the horizontal position. DO NOT store, carry, or use the Battery Box Assemblies (BBA) in any position other than the top side up. DO NOT STEP on the top of the Light Housing assemblies (LHA), Battery Box Assemblies (BBA), or Power Control Unit (PCU). Improper cleaning methods and use of unauthorized cleaning agents can injure personnel and damage equipment DO NOT place battery in backwards. Refer to Appendix B, Inclinometer Instructions. The digital inclinometer must be calibrated before use to ensure accurate readings. To calibrate, perform the Superset instructions in Appendix B. DO NOT expose the inclinometer to temperature extremes. DO NOT connect the Power Control Unit (PCU) directly to the DC output of a generator or any unregulated power source. Refer to Section 5 for instructions. DO NOT connect power to the Power Control Unit (PCU) with the control panel power switch set to the "ON" position. Doing so may result in damage to the power sources or the PCU. Refer to Section 5 for instructions. 1.8 Abbreviations The following is a list of abbreviations used in the description of Airfield Lighting Systems. Some terms listed below may not be used in this document. A ampere AC AGM AH alternating current absorbed glass mat ampere-hour APAPI Abbreviated Precision Approach Path Indicator BBA cm DC FAA ft. Hz ICAO Battery Box Assembly centimeter Direct Current United States Federal Aviation Administration foot Hertz International Civil Aviation Organization 2016 Carmanah Technologies Corporation 6
7 ILS in IR kg lb. LED LHA mm Instrument Landing System inch Infrared kilogram pound (US) Light Emitting Diode Light Housing Assembly millimeter MTBF Mean Time Between Failure NATO North Atlantic Treaty Organization NSN NVE NVG PAPI PCB PCL PCU RCT s SE National Stock Number Night Vision Equipment Night Vision Goggle Precision Approach Path Indicator Printed Circuit Board Pilot Controlled Lighting Power Control Unit Remote Control Transmitter Second Solar Engine STANAG (NATO) Standardization Agreement TDZ Touchdown Zone V VAC VDC volt volts, alternating current volts, direct current Location terms Throughout this manual, the terms front, rear, top, bottom, starboard side, and port side are used to describe the views of the light housing assemblies (LHA). Glass lenses are located on the front panel. The power connector and manufacturer s labels are located on the rear panel. The port side is the side to the right when looking at the front of the LHA, and the starboard side is the side to the left when looking at the front of the LHA Limitations of scope This manual provides an overview of Carmanah Precision Approach Path Indicator Systems This manual is not specific to either solar or AC-powered systems, nor is it specific to system configurations within those categorizations. Supplemental information specific to each Precision Approach Path Indicator configuration is supplied with the purchased equipment under separate cover. This manual is for visible light (non-infrared) systems only 2016 Carmanah Technologies Corporation 7
8 2.0 Equipment Characteristics The Carmanah PAPI is an approach path indicator that utilizes highly-efficiency light emitting diode (LED) light sources to provide glideslope guidance to aircraft on final approach to landing. General Description The Carmanah PAPI provides glideslope guidance to pilots on approach to landing that indicate an aircraft s vertical position with respect to the proper glideslope. Light emitting diodes (LEDs) provide corridors of red and white lights emanating from a location that is typically off to the left side of the landing zone. The PAPI is composed of a power control unit, a battery box assembly, solar panels and two or four light housing assemblies. Each light housing assembly (LHA) projects beams of steady white and steady red light. The indication for proper glideslope is two LHA showing a red light and the other two showing a white light to the pilot on approach to landing. When the aircraft is well above the proper glideslope, then the pilot sees white lights from all four LHA. When the aircraft is above the proper glideslope, then the pilot sees white lights from three LHAs and a red light from one LHA. When below the proper glideslope, then the pilot sees red lights emanating from three LHAs and a white light from one LHA. When well below the proper glideslope, then the pilot sees red lights emanating from all four LHAs. Infrared light emitting diodes provide corridors of steady and modulated infrared (IR) light that is night vision goggle (NVG) compatible. The corridor of steady IR light corresponds and overlaps the white light corridor, and the corridor of modulated IR light corresponds to and overlaps the red light corridor. The flash rate is 2 per second, and the modulation pattern is 50% on, 50% off. The indication for proper glideslope as seen with NVG is two LHA showing a flashing light and the other two showing a steady light to the pilot on approach to landing. When the aircraft is well above the proper glideslope, then the pilot with NVG sees steady lights from all four LHA. When the aircraft is above the proper glideslope, then the pilot with NVG sees steady lights from three LHA and a flashing light from one LHA. When the below the proper glideslope, then the pilot with NVG sees flashing lights emanating from three LHA and a steady light from one LHA. When well below the proper glideslope, then the pilot with NVG sees flashing lights emanating from all four LHA. The portable solar panel system utilizes an assembly of silicon solar cells that convert light into electricity using the photovoltaic effect to generate electricity to operate a Carmanah PAPI and to charge its batteries. The portable solar panels by Carmanah are fully modularized, rapid deployment solar power systems composed of mantransportable components and packaging. While designed to provide solar power for Carmanah portable PAPI and APAPI systems, this modular system can be used in all applications requiring mobile and rapidly deployable electrical power. Due to its modular nature, virtually any size power requirement can be accommodated. General Performance Specifications Carmanah provides a variety of options and alternatives for its LED-based Precision Approach Path Indicators (PAPI) and Abbreviated Precision Approach Path Indicators (APAPI). All models have the following characteristics: 2 or 4 Light Housing Assemblies for the 4-box configuration signals are compliant with L880 for four LHA systems and L-881 (2 LHA) 5 levels of intensity radio remote control (optional) configured for fixed installations battery operation, 24 VDC batteries charged by 95 to 250 VAC, 50 or 60Hz batteries charged by solar panels (optional) tilt switch (optional) 2016 Carmanah Technologies Corporation 8
9 photocell for autonomous operation (optional) inclinometer frangible couplings for solar panels, power control unit and LHAs All Carmanah PAPI Light Housing Assemblies (LHAs) are constant voltage fixtures. Light output is PWM controlled via integrated LED drive circuitry within each LHA. A solar system with a high efficiency panel(s) that connects directly to Battery Box Assembly (BBA) that provides of energy storage at 24 VDC Cabling that allows the solar panel to be placed remotely from the BBA Configured for rapid deployment so that it can be set up in 5 minutes Fully modularized so that as many as desired can be connected together to achieve any desired power level Major Components The PAPI system is comprised of the following major components: Two or four light housing assemblies (LHA) Power control unit (PCU) integrated with battery box assembly (BBA) Solar panels Also included are: Inclinometer One BBA to PCU cable Four LHA cables Solar Panel to battery box connection cables (solar only) Tie-down straps and stakes General arrangement of a 4-LHA portable, solar PAPI 2016 Carmanah Technologies Corporation 9
 are 14.2 inches (360 mm) wide, 30.")
.")
10 General arrangement of a 4-LHA portable, solar PAPI Light Housing Assembly The light housing assemblies (LHA) are 14.2 inches (360 mm) wide, 30.7 inches (780 mm) long, and 6.6 inches (194 mm) high. The weight of an LHA with the rapid deployment legs is 37 lb (17 kg). Light Housing Assembly (LHA) 2016 Carmanah Technologies Corporation 10
 dimensions (in inches)")

11 Light Housing Assembly (LHA) dimensions Light Housing Assembly (LHA) dimensions (in inches) with the rapid deployment legs extended. Power Control Unit 2016 Carmanah Technologies Corporation 11
 setting and 50 W in IR (NVG-compatible)")
 view 2 The PCU control panel has switches for system on-off control, radio remote or local operation, visible or IR operation, and five")

12 The LHA are powered and controlled from the power control unit (PCU). The PCU box is 14 by 12 by 6 inches (36 x 31 x 15 cm). The PCU requires 24 VDC and uses 330 W of power when the four LHA are on at the highest intensity (daytime) setting and 50 W in IR (NVG-compatible) mode. Power Control Unit (PCU) attached to the Battery Box Assembly (BBA) view 1 Power Control Unit (PCU) attached to the Battery Box Assembly (BBA) view 2 The PCU control panel has switches for system on-off control, radio remote or local operation, visible or IR operation, and five choices for the intensity levels. Intensity step 5 is high (100%), intensity step 4 is 20%, intensity step 3 is 4%, intensity step 2 is 0.8% and the lowest intensity step 1 is 0.16%. The PCU control panel also has toggle switches for tilt switch bypass and to enable photocell operation Carmanah Technologies Corporation 12


13 Power Control Unit (PCU) control panel. The PCU has an input connector for power from the Battery Box Assembly on its starboard side panel. Also on this side panel are connections for radio remote control. See the Tactical Lighting Systems manual for information on these connections. Power Control Unit (PCU) starboard side panel connections. On the top is the receptacle for radio remote control power; in the middle is the receptacle for the radio connection; and on the bottom is the receptacle for 24 VDC input power. On the other side panel is a connector for the LHA connection cable. The LHA cable is 36-ft long and had 19 pins. All four LHA cables are identical Carmanah Technologies Corporation 13
 box is 12.6 inches wide by 26.1 inches long by 11.4 inches high (32 x 66 x 29 cm). The BBA weights 150 lbs (68 kg).")

14 Power Control Unit (PCU) port side panel receptacle for the cable to the LHA. The cable from the PCU to the LHA is identical to the other three LHA-to-LHA cables. Battery Box Assembly The Battery Box Assembly (BBA) box is 12.6 inches wide by 26.1 inches long by 11.4 inches high (32 x 66 x 29 cm). The BBA weights 150 lbs (68 kg). The BBA contain AGM-type batteries that supply 24 VDC to the PCU for 14-hour duration at the night setting (intensity step 4, 20%). The BBA plugs into the PCU. The batteries of each BBA are recharged by 200 to 400 VAC, 50/60 Hz, which is input on the side of the BBA. The charge time for a Battery Box Assembly with AC power is 4.5 hours under normal conditions. Battery Box Assembly (BBA). There is a power inlet receptacle towards the rear of the starboard side of the BBA for the AC input voltage. There is also a receptacle for a solar panel input power and a receptacle for pass-through 400 VAC power. Towards the front of the starboard side of the BBA is a 24 VDC output receptacle which connects with the BBA-to-PCU cable to the PCU. The BBA-to-PCU cable is 2-ft long and has 3-pin connectors Carmanah Technologies Corporation 14


15 Dimensions of the Battery Box Assembly (in inches) Battery Box Assembly receptacles: the solar panel input is in the middle and the 400 VAC input is on the right. The receptacle on the left is a pass-through of the 400 VAC input. Battery Box Assembly 24 VDC output receptacle. DO NOT store, carry, or use the Battery Box Assemblies (BBA) in any position other than the top side up Carmanah Technologies Corporation 15
 wide, 68.8 inches (1.75 m) long, and 3.0 inches (0.38 m) high. When deployed, the solar panel is 67.")
16 Inclinometer A digital inclinometer is included to set the side-to-side level and tilt angles of the LHA. Instructions for its use are contained in the Appendix. Digital inclinometer Solar Panels When folded, the solar panels are 33.5 inches (0.85 m) wide, 68.8 inches (1.75 m) long, and 3.0 inches (0.38 m) high. When deployed, the solar panel is 67.7 inches (1.72 m) wide, 66.2 inches (76 mm) long. When set at the maximum inclination angle of 61 degrees, the height is 30.7 inches (0.78 m). The weight of a solar panel and frame is 100lb (45 kg). Solar panel dimensions when folded flat 2016 Carmanah Technologies Corporation 16
17 The solar panel may be permanently mounted. In this case, use four frangible mounts per panel. A standard frangible mount terminates in ½-inch threaded rod. These mounts should be placed so the rods come up through each of the clearance holes in the base frames; these are the same holes as used to stake the panel down in earth. The connecting cable from the solar panels to the Battery Box Assembly (BBA) has 3 pairs of red and white twist connectors that attach to the solar panels, is 50-ft long, and has a 3-pin connector that plugs into the receptacle on the BBA. Solar panel dimensions when at the maximum inclination angle of 61 Dimensions of the mounting holes in the solar panel frame 2016 Carmanah Technologies Corporation 17

18 3.0 Theory of Operation 3.1 Light Housing Assembly (LHA) Light-emitting diodes (LED) have significant advantages over conventional lighting. Estimates of LED lifetimes range from 100,000 hours up to 10,000,000 hours, which can be compared to the 1,000 to 2,000 hours for conventional incandescent bulbs. The LED is a solid-state device with no fragile glass bulbs or filaments that are susceptible to shock and vibration. And the LED is significantly more efficient at conversion of electrical power into illumination than conventional lighting. Besides being more efficient, there are no losses through filters, so that depending on the color, the efficiency of LED is a factor of 5 to 20 times greater than incandescent bulbs. Thus LED-based lighting has much low power consumption and requires small diameter cables for continuous operation. In addition, the light beam from the LED can be formed to be directional, so that light does not need to be wasted in directions where it is not desired or useful. There is also increased safety in handling because the LED does not get significantly hotter than its environment. In addition an LED light has multiple sources which permits continued operation if it experiences a failure or damage. The light housing assembly (LHA) utilizes a row of high power LEDs to generate light of the required color: red for the bottom corridor and white for the top corridor. The signal format seen by the pilot is illustrated in the figure below. Signal format as seen by pilot on approach to landing for the 4-box configuration. Light emitting diodes (LEDs) provide corridors of red and white lights emanating from a location that is typically off to the left side of the landing zone. Each of the light housing assemblies (LHAs) projects beams of steady white and steady red light. The indication for proper glideslope is two LHAs showing a red light and the other two showing a white light to the pilot on approach to landing. When the aircraft is well above the proper glideslope, then the pilot sees white lights from all four LHAs. When the aircraft is above the proper glideslope, then the pilot sees white lights from three LHAs and a red light from one LHA. When below the proper glideslope, then the pilot sees red lights emanating from three LHAs and a white light from one LHA. When dangerously well below the proper glideslope, then the pilot sees red lights emanating from all four LHA. Infrared light emitting diodes provide corridors of steady and modulated infrared (IR) light that is night vision goggle (NVG) compatible. The corridor of steady IR light corresponds and overlaps the white light corridor, and the corridor of modulated IR light corresponds to and overlaps the red light corridor. The flash rate is 2 per second, and the modulation pattern is 50% on-50% off. The indication for proper glideslope as seen with NVG is two LHA showing a flashing light and the other two showing a steady light to the pilot on approach to landing. When the aircraft is well above the proper glideslope, then the pilot with NVG sees steady lights from all four LHA. When the aircraft is above the proper glideslope, then the pilot with NVG sees steady lights from three LHA and a flashing light from one LHA. When the below the proper glideslope, then the pilot with NVG sees flashing lights emanating from three LHA and a steady light from one LHA. When well below the proper glideslope, then the pilot with NVG sees flashing lights emanating from all four LHA Carmanah Technologies Corporation 18
19 3.2 Power Control Unit (PCU) The Power Control Unit (PCU) receives 24 VDC power from the Battery Box Assembly (BBA) and control signals from a radio remote control receiver (optional). The PCU sends power and control signals to each of the Light Housing Assemblies (LHAs). The PCU has switches on its control panel to select the operating mode of the PAPI and provide local system operation. Power Control Unit (PCU) control panel. The toggle switches on the top row of the PCU control panel are used to: turn the system on and off; select radio remote control or local manual control; and one of 5 intensity steps. The toggle switches on the bottom of the PCU control panel are used to enable and disable autonomous photocell control of day or night intensity settings; and enable or disable the tilt switches on each LHA. Note: Remote radio control via Carmanah s Handheld Controller provides three intensity steps: 100%, 20% and 4% 3.3 Battery Box Assembly (BBA) The BBA contains two 12 VDC, 75 AH AGM-type batteries that supply 24 VDC to the PCU. The BBA plugs into the PCU. The batteries of the BBA are recharged by VAC, 50/60Hz, which is input on the side of the BBA. There is a circuit breaker with an on-off switch inside the BBA. The solar panels will also charge the BBA. The solar charge controller is located in the BBA. When AC Charging is being used it will charge the batteries, and the system will revert to solar automatically when the AC is disconnected or turned off. DO NOT store, carry, or use the Battery Box Assemblies (BBA) in any position other than the top side up. DO NOT STEP on the top of the Battery Box Assemblies (BBA) Carmanah Technologies Corporation 19
20 3.4 Solar Panel System The solar panel is composed of an assembly of silicon solar cells that convert light into electricity using the photovoltaic effect. The electricity is gathered together and transmitted to a charge controller, located in the Battery Box Assembly (BBA) of the PAPI, that switches on to charge the batteries in the BBA whenever there is sufficient voltage generated by the solar panel. A single solar panel can produce a maximum of 275 W of power with a maximum voltage of 42.7 V and maximum current of 5.2 A at an irradiance of 1kW/m2. At high noon on a cloudless day at the equator, the power of the sun is about 1 kw/m² to a plane that is perpendicular to the sun's rays. The current produced by the solar panel is proportional to the irradiance that it receives. Typically for best production, the solar panels should face towards the equator (that is towards the south in the northern latitudes) and have a tilt angle from the horizontal that is equal to the latitude of the location. For temporary installations, improved performance can be obtained with a tilt angle that takes into account the current tilt angle of the earth's axis with respect to the solar plane, which varies throughout the year. 4.0 Set Up and Installation 4.1 Site Requirements The PAPI should be placed near the runway in accordance with the specifications from the applicable regulatory agency, for example FAA or ICAO. The PAPI is placed to the left of the runway as seen by the approaching aircraft across from the touchdown zone. The location is determined based on the type of aircraft, the grade of the runway, the nominal glideslope angle, and the height of the LHA above the ground. As an example, Figure illustrates some of the specifications from FAA AC 150/ d. Note that the site requirements are more complex than illustrated in this figure as they must take into consideration the aircraft type, the grade of the runway, and whether or not there is an ILS. In addition, there are different rules for a general aviation runway used by non-jet aircraft. The light housing assembly nearest the runway ( LHA-1 ) should be placed with the front (the side with the lenses) facing towards the approach end of the runway (the approach end is the end from which aircraft will be coming) and with the sides of the LHA parallel to the runway at a distance from the runway as specified by the appropriate regulatory agency. The location of LHA-1 and tolerances on the placement of the LHA-1 must be in accordance with the appropriate regulatory agency. For example, the tolerance on azimuthal aiming in UFC and AC 150/ D is ±0.5 deg. Adjust the incline angle of LHA-1 with the procedure in Section 4, except that for a standard FAA installation, the LHA nearest the runway is set at an incline that is 30 arcminutes (0.5 ) above the glide path within ±3 arcmin (0.05 deg). The second light housing assembly ( LHA-2 ) is placed further from the runway edge than the first LHA, with its front facing towards the approach end of the runway and with its sides parallel to the runway at a distance from LHA-1 as specified by the appropriate regulatory agency. The location of LHA-2 and tolerances on its placement must be in accordance with the appropriate regulatory agency regulations. For example, the tolerance on azimuthal aiming in UFC and AC 150/ D is ±0.5 deg and the beam centers of all of the LHA must be within ±1 inch of a horizontal plane. Adjust the incline angle of LHA-2 with the procedure in Section 4, except that for a standard FAA installation, LHA-2 is set at an incline that is 10 arcminutes (0.17 ) above the glide path within ±3 arcmin (0.05 deg). The third and fourth light housing assemblies are placed further from the runway adjacent to LHA-2 and spaced with the same distance as between LHA-1 and LHA-2. The locations of LHA-3 and LHA-4 and tolerances on their placement must be in accordance with the appropriate regulatory agency regulations. For example, the tolerance 2016 Carmanah Technologies Corporation 20
21 on azimuthal aiming in UFC and AC 150/ D is ±0.5 deg and the beam centers of all of the LHA must be within ±1 inch of a horizontal plane. Adjust the incline angle of LHA-3 with the procedure in Section 4, except that for a standard FAA installation, LHA-3 is set at an incline that is 10 arcminutes (0.17 ) below the glide path within ±3 arcmin (0.05 deg). Adjust the incline angle of LHA-4 with the procedure in Section 4, except that for a standard FAA installation, LHA-4 is set at an incline that is 30 arcminutes (0.5 ) below the glide path within ±3 arcmin (0.05 deg). There must not be any obstructions in front of (towards the approaching aircraft) the four LHA in order for the pilot to see both LHA on the approach to landing. The obstruction clearance must be in accordance with the appropriate regulatory agency. The ICAO standards have an obstacle protection surface 0.9 below the aim angle of the outer (lower) LHA Carmanah Technologies Corporation 21
22 Diagram of the layout on the runway for PAPI Light Housing Assemblies (LHA) from FAA AC 150/ d. This is an example only. The installer is responsible for placing the LHA in accordance with the specifications from the applicable regulatory agency, for example FAA or ICAO. 4.2 Installation of the Light Housing Assemblies Unpacking from Deployable Container (optional) Each PAPI Light Housing Assembly (LHA) will be shipped in an optional deployable container or reusable crate. The associated LHA to PCU cable, 3 tie-down stapes, and 6 stakes are also located in the container. The dimensions of the container are 40 inches by 24 inches by 16 inches (102 x 61 x 41 cm) Carmanah Technologies Corporation 22


23 Deployable container (optional) Reusable crate Place the shipping container with the labeled side up. Unclip the hold-downs from all around the perimeter of the shipping container. Pull off the top cover of the shipping container. Pull the LHA up from the container. Take the cable out of the container. Remove the tie-down straps and the stakes. Replace the top of the shipping container and secure the latches. When the optional rapid deployment legs are implemented, the following procedure is used to install the LHA. Remove the locking pin from one of the front legs by pushing on the center knob then pulling the pin outwards. Let down the leg, and then pull the foot away from the LHA until it reaches its stop. Secure the leg into its extended position with its locking pin. Remove the locking pin from the other front leg, let down the leg, and then secure it into its extended position with its expanding pin. Remove the locking pin from the rear leg, let down the rear leg, and secure it into its extended position with its locking pin Carmanah Technologies Corporation 23
 is facing the approach end of the runway.")


 the LHA can be used, but if an equal distance is used, then it can be marked with any linear lengt")
24 (a) Remove locking pin from one of the front legs (b) Let down the leg (c) Pull the foot until it reaches its stop (d) Secure the leg with its locking pin Sequence for extending one of the legs. Orient the LHA so that its front (the side with the glass lenses) is facing the approach end of the runway. Rotate the LHA until the side of the weather cover is parallel to the runway centerline. Check procedure Alignment in the azimuthal direction can be checked by measuring the perpendicular distance from the runway centerline to a side of the weather cover, then setting a mark the same distance forward of the LHA and perpendicular to the runway centerline. The LHA is then rotated until the mark is visually sighted along the same edge of the weather cover from which the distance to the runway centerline was measured. Note that either side of the weather cover can be used, so long as the same side is used for the distance measurement and sighting. Also note that any distance forward of (or backward from) the LHA can be used, but if an equal distance is used, then it can be marked with any linear length (e.g. a string) and does not require a tape measure. Pull all three legs outward to their maximum extension so that the LHA is stable with no rocking. Shield 2016 Carmanah Technologies Corporation 24


25 Remove the shield from in front of the lenses by twisting four 1/4-turn fasteners counterclockwise to release. Place the shield on top of the LHA weather cover so that the angled piece sticks up at the front edge of the weather cover. Lock the shield in place by pushing the 1/4-turn fasteners into their respective holes and turning clockwise until they lock. Setting the LHA level and at the proper tilt angle To set the LHA level and at the proper tilt angle, first set the central turnbuckle on all three legs so that they are near the middle of their adjustment range, by rotating the turnbuckle using the pegs that stick out the sides. The brass locking mechanisms may have to be backed away from the central locking turnbuckle. Note that if the LHA have been set up previously, then starting from the middle position may not be necessary. Start the leg adjustment by setting the turnbuckles on each leg to the middle of their adjustment range. To set the LHA level side-to-side, place the inclinometer in the middle of the front of the base plate, as shown in Figure If the LHA is dirty, then first clean the base plate in the spot where the inclinometer will be placed. Rotate the inclinometer so that it is aligned with the front edge of the base plate, perpendicular to the runway direction. To set the side-to-side angle of the LHA to level, place the inclinometer in the middle of the front of the base plate so that it is aligned with the front edge of the base plate Carmanah Technologies Corporation 25

26 Adjust the front leg lengths until the inclinometer shows level. Adjust one front leg shorter and the other front leg longer until the inclinometer indicates level within ±0.05 deg (3 arcmin). Clean the top of the inclinometer bracket. Place the inclinometer on the top of the inclinometer bracket and tighten the thumb screws. A picture that shows the proper position on the inclinometer bracket is shown below. To adjust the legs in order to set the proper incline angle of the LHA, place the inclinometer on the inclinometer bracket. Adjust the rear leg of the LHA until the incline angle is proper according to the appropriate regulatory agency. For example for a standard installation of a 4-box configuration and glideslope is 3 degrees, then set LHA-1 (nearest to the runway) to 3 deg 30 min, LHA-2 (next adjacent) to 3 deg 10 min, LHA-3 to 2 deg 50 min, and LHA-4 (outermost) to 2 deg 30 min. Adjust until the inclinometer indicates the proper angle within ±0.05 deg (3 arcmin) Move the inclinometer back to the position for measurement of the side-to-side level. Repeat the level adjustment by moving one leg down and the other up and equal amount. Move the inclinometer back to the inclinometer bracket. If the incline angle has changed, repeat adjustment of the incline angle until it is set properly as before. Continue these two adjustments until both the incline angle and the side-to-side level are within the tolerance. Secure the leg length adjustment by tightening the two lock nuts on each leg by turning the pegs on the lock nuts until the lock nuts are snug against the turnbuckle, as shown in the figure below Carmanah Technologies Corporation 26
 Thread the end of a strap through the hole on the rear leg.")

27 Tighten the lock nuts against the turnbuckle Secure the three feet with pegs or stakes through the feet and straps from the handles to stakes. A staked leg of a Light Housing Assembly (LHA) Thread the end of a strap through the hole on the rear leg. Secure the strap in a loop using the he buckle end of the strap Hammer in a ground stake directly behind the LHA at a distance so that the strap will reach. Loop the strap onto the ground stake and tighten Carmanah Technologies Corporation 27


28 Strap looped through the hole on a rapid deployment leg Thread the end of a strap through the hole on one of the side legs. Secure the strap in a loop using the he buckle end of the strap. Hammer in a ground stake at an angle in the horizontal of about 120 degrees from the strap in the rear. Loop the strap onto the ground stake and tighten. Repeat for the other side leg. A deployed Light Housing Assembly (LHA) 2016 Carmanah Technologies Corporation 28
 to the BBA. The PCU is mounted on a BBA.")
29 Note stakes are not fully in place for illustration purposes only Re-check for the proper incline and side-to-side level. Adjust as required. Remove the inclinometer from the LHA. 4.3 Installation of the Power Control Unit Carry the Power Control Unit (PCU) to the BBA. The PCU is mounted on a BBA. Remove the pins that are stored in position in the U-channel near the top of an end of one of the BBA. The base flange of the PCU fits into the U- shaped trough near the bottom end of the BBA, and the extension on the flange at the top of the PCU fits into the U-channel on the top of the BBA. Reinstall the pins to hold the PCU in place with the two pins Carmanah Technologies Corporation 29
 between the PCU and each LHA connect the output of each LHA to the next LHA in line. Attach a radio power and control cables to the PCU.")
 cable between the PCU and the BBA. 4.")
30 Power Control Unit (PCU) mounted on a Battery Box Assembly (BBA) 2 views Connect a power/control cable (19 pin 36 ft. cable) between the PCU and each LHA connect the output of each LHA to the next LHA in line. Attach a radio power and control cables to the PCU. Rotate the photocell shield so that the opening is pointing towards true north (in the northern hemisphere). If in the southern hemisphere point the opening towards the south. Place the two-position on-off toggle switch on the PCU control panel to the "OFF" position. Connect the battery power (3 pin 2 ft ) cable between the PCU and the BBA. 4.4 Installation of the Battery Box Assembly Before operation of the BBA, first charge the batteries. Attach an external power cable to the BBA. Supply VAC, 50/60 Hz to the external power cable. When connected, a battery charger located in the BBA Box will charge the BBA. Allow 4.5 hours for the BBA to fully charge. Carry the Battery Box Assembly (BBA) to a location near the LHA. If the BBA is to be charged in place, connect a power cable to the AC input receptacle on the side of the BBA, and connect the other end to a source of AC power Carmanah Technologies Corporation 30


31 The solar panel will also charge the BBA. The solar charge controller is located in the BBA. When AC charging is being used it will charge the batteries, and the system will revert to solar automatically when the AC is disconnected or turned off. 4.5 Installation of Solar Panels Solar panel system may be shipped in optional deployable containers or reusable crates. Deployable containers Reusable crates 2016 Carmanah Technologies Corporation 31


32 Cabling and loose parts The solar panels are stacked together, one on top of the other. The solar panels are stacked together To lift the solar panels, fold out the handles on all four corners Carmanah Technologies Corporation 32


33 Lift handles folded against the frame (left) and unfolded (right) Deployment Transport the solar panels to the erection site. Three solar panels are used for each PAPI system. Place the solar panels on the ground with the side with the sets of hinges pointed south (in north latitudes) so that the solar panels will face south when erected. Preparing to erect the solar panels Loosen the locking knobs on both sides of each of the solar panels Carmanah Technologies Corporation 33


34 Loosen the locking knob on the side of the solar panel Raise a solar panel and secure by tightening the two knobs on the sides of the frame into one of the capture stops. Repeat for the other two solar panels. Tightening the knobs into the upper stop position on the frame at the higher position 2016 Carmanah Technologies Corporation 34
 and have a tilt angle from the horizontal that is equal to the")

35 Close-up of the pin in the highest position Adjust the incline angle of the solar panels by moving the pins on the side brace of the solar panel to a hole that provides the appropriate incline angle. Typically for best production, the solar panels should face towards the equator (that is towards the south in the northern latitudes) and have a tilt angle from the horizontal that is equal to the latitude of the location. For temporary installations, improved performance can be obtained with a tilt angle that takes into account the current tilt angle of the earth's axis with respect to the solar plane, which varies throughout the year. Solar panels set at the lower angle Use stakes provided to secure the panel frame on earth. There are stake holes in each corner of each lower frame. To access the inside stake holes near the solar panels you will have to raise the panels to the near vertical position. Note: stake the rear first so the panel cannot move around then have one person elevate the panel it there is not enough access. Insert stakes in the hole at each corner of the frame. Drive the stakes into the ground Carmanah Technologies Corporation 35


36 Driving a stake to secure the base frame Use the cargo straps provided to further secure the panel for high winds. Hook straps to the support arms just below the stabilizer bar. Drive in stakes in two positions on each side of the panel at 45 degrees to the extended axis. Tighten cargo straps. Repeat on the other side. Adding additional support with tie-down straps The ground stakes are 12-inch Type II steel tent pin, NSN , that is heat treated to a hardness of Rockwell C. The hardened steel allows the tent pin to be driven into frozen ground and pavement. 4.6 Electrical Connections Use the solar panel to Battery Box Assembly (BBA) cable to connect two solar style connectors, marked with red and white tape, to each of the solar panels. Connect the mil-style connector at the other end of this cable to the BBA. This cord will only fit on the proper bulkhead connector Carmanah Technologies Corporation 36


37 Connections to solar panels Connections between PCU + BBA1 and the remote BBA2 For LHA-1, connect an LHA cable to the female receptacle on the LHA. The receptacle is located on the bottom of the LHA near the rear. The LHA cable is 36-ft long and has 19-pin connectors. For LHA-2 and LHA-3, then connect the cable from the inner LHA to the male receptacle and another LHA cable to its female receptacle. If this is LHA-4, then connect the LHA cable from LHA-3 to its male receptacle, connect an LHA cable to it female receptacle, and then connect the other end to the PCU. Note that all four of the LHA cables are identical Carmanah Technologies Corporation 37

38 Layout of the connecting cables 4.7 Tilt Switch (optional) Place the "Tilt Switch Bypass" toggle on the PCU control panel in the disable (up) position. Clean the bottom of the tilt switch assembly. Place the inclinometer against the bottom of the tilt switch assembly. Loosen the screw on the front side of the tilt switch bracket. Adjust the tilt switch with the inclinometer firmly against the bottom of the tilt switch until the inclinometer reads level within ±0.05 deg (3 arcmin). Tighten the screw that holds the tilt switch in position. If this LHA is the last LHA in the chain of cable connections (typically the LHA that is closest to the runway) place the tilt switch toggle on the bottom of the LHA into the position pointed towards the rear of the LHA by first pulling the toggle out past its stop, switching the toggle, then letting the toggle spring back. DO NOT FORCE the toggle switch, just pull it out before moving to change positions. This action completes the tilt switch series electrical circuit. Tilt switch assembly. Note the screw on the front side (on the right in this picture). Note: Image above is of a portable configuration LHA. Fixed LHA configuration may differ. If this LHA is not the last LHA in the chain of cable connections, place the tilt switch toggle on the bottom of the LHA into the position pointed towards the front of the LHA by first pulling the toggle out past its stop, switching the toggle, then letting the toggle spring back. DO NOT FORCE the toggle switch (pull it out to change positions) Carmanah Technologies Corporation 38

39 Tilt switch toggle on the bottom of the LHA. Note: Image above is of a portable configuration LHA. Fixed LHA configuration may differ. To enable the tilt switches after all LHA are set at the proper incline and horizontal angles, place the "Tilt Switch Bypass" toggle on the PCU control panel to the down position. Note that the purpose of the tilt switch is to automatically remove power from the PAPI if any LHA is off of its proper setting by more than ½ degree, for example if an LHA is displaced by a vehicle. The use of the tilt switches is optional. 5.0 Power Control Unit Operating Procedures 5.1 Power Control Unit Switches The Power Control Unit (PCU) has ten toggle switches on its control panel. The two switches on the left of the top row are for control. The third switch, from left-to-right, is for selection of the operating mode of the LHA, either visible signals or IR signals. The next five toggle switches are used to select the intensity step. The toggle switch on the left side, below the top row enables or disables autonomous photocell operation. The toggle switch on the bottom is to enable or disable the tilt switch Carmanah Technologies Corporation 39
40 Power Control Unit (PCU) control panel layout. The toggle switches on the top row are: The switch on the left-hand side marked with "PWR" turns the system on and off. When this switch is in the off position, no power is supplied to the LHAs and radio remote controller signals will not be received by the PCU The local-radio switch determines if the PCU options are chosen by the remaining switches on the PCU control panel or by the radio remote controller. If this switch is in the "RADIO" (radio) position, then the PCU operation options are activated by the radio remote controller (optional). If this switch is in the "LCL" (local) position, then the PCU options are selected by the positions of the switches to the right and below of this switch The switch marked with VIS/IR determines if the visible (white/red) or infrared sources of the LHA s are turned on when the local-radio switch is in the local control position ("LCL"). If the local-radio switch is in the radio ("RADIO") position, then the position of this switch is ignored. The intensity switch marked with 5 determines if the corridors of the LHAs are turned on the high setting (100% intensity) when in local control mode. If the local-radio switch is in the "RADIO" position, then the position of this switch is ignored The intensity switch marked with 4 determines if the corridors of the LHAs are turned on the 20% intensity level when in local control mode. If the local-radio switch is in the "RADIO" position, then the position of this switch is ignored The intensity switch marked with 3 determines if the corridors of the LHAs are turned on the 4% intensity level when in local control mode. If the local-radio switch is in the "RADIO" position, then the position of this switch is ignored The intensity switch marked with 2 determines if the corridors of the LHAs are turned on the 0.8% intensity level when in local control mode. If the local-radio switch is in the "RADIO" position, then the position of this switch is ignored The intensity switch marked with 1 determines if the corridors of the LHAs are turned on the lowest setting (0.16% intensity) when in local control mode. If the local-radio switch is in the "RADIO" position, then the position of this switch is ignored. The controls on the bottom of the PCU control panel are: 2016 Carmanah Technologies Corporation 40
41 The switch marked with PHOTOCELL ENABLE determines if the photocell is used to switch the intensity high intensity, for daylight flight operations, or step 4 for night flight operations. If the photocell switch is in the "ON" position, then the intensity of the LHA are set by the ambient light intensity (i.e. the photocell is the dominant control), 100% intensity level for day and 20% intensity level for night. When the photocell switch in the PCU is in the "ON" position, the mode switches in the PCU are ignored. The toggle switch marked "Tilt Switch Bypass" is used to defeat the tilt switch cut-off for testing or other special operations. When the "Tilt Switch Bypass" toggle is in the down position, the tilt switch is enabled. When the tilt switch is enabled, the PCU will turn off all power to all LHAs if any LHA becomes misaligned in incline angle of nominal ±0.5 degree. If issues arise with the operation of the tilt switches, use the tilt switch bypass to continue to operate the PAPI system by placing the "Tilt Switch Bypass" toggle on the PCU control panel in the up (tilt sensing disabled) position. 5.2 Power The PAPI operates on nominal 24VDC and uses 220 W at the step 5 (100%) intensity level. The LHA receive 24 VDC power from the PCU. WARNING DO NOT connect the Power Control Unit (PCU) directly to the DC output of a generator or any unregulated power source. Connecting to an unregulated source may result in damage to the PCU and LHA. WARNING Make sure that the power toggle switch is in the "OFF" position when power is applied to the PCU. DO NOT connect power to the Power Control Unit (PCU) control panel power switch to the "PWR" position. Failure to do so may result in damage the power sources or the PCU. The Battery Box Assemblies (BBA) supply 24 VDC to the PCU. The batteries in the BBA can be charged with 95 to 250 VAC, 50 or 60 Hz. The current draw during LHA operation is dependent upon the AC voltage. At 110 VAC the peak current draw is 15 A and at 220 VAC the peak current draw is 8 A. The current draws during charging are smaller. The batteries in the BBA can also be charged from solar panels. AC Power Option There is an option to power the PAPI off of AC power from standard electrical power grids, or generators without solar power. Solar Power can then be added later as on option. For non-solar powered systems the AC to DC power supply is located inside the PCU. The PCU, on the left side bottom, has an AC power input cable coming out through the Flex Conduit fitting. This is a three conductor line with ground, neutral, and line wires using the conventional (ground = green, neutral = white, and line = black) color coding. For systems designed to be wired to either the power grid or solar, there are two additional Red and Black wires coming from the same fitting. Under no circumstance should these two single conductor wires (Red and Black) be wired to AC power. These are for DCpower operation only. Connect AC to the three wires and connect the optional solar (DC) to the red (positive) and black (negative) wires. To select AC operation, there are 2 switches on the lower right hand portion of the control panel. One switch turns on the AC power to the power supply, the other connects the output of the power supply to the PAPI system. To run on AC power both switches are placed in the up position as shown in the photo below: 2016 Carmanah Technologies Corporation 41
 control panel, the radio-local toggle switch must be in the local (\"LCL\") position.")
42 For solar operation both switches are turned off. 5.3 Power Control Unit Manual Operation For manual operation from the Power Control Unit (PCU) control panel, the radio-local toggle switch must be in the local ("LCL") position. Note that if all of the intensity level switches are in the off position, then no signal emanates from the LHA. Also note that if the radio-local toggle switch on the PCU is in the radio ("RADIO") position, then the operating intensity is selected from the optional radio remote control receiver. To operate the PCU 1. Before operating the PCU, make sure that the power switch is in the "OFF" position. 2. Set the local-radio toggle switch to the local ("LCL") position. 3. Set all of the intensity step toggle switches on the PCU control panel to the "OFF" position. 4. Set the Visible-IR toggle switch on the PCU control panel to the VIS or IR position. 5. Move the power toggle switch on the PCU to the "PWR" position. 6. Set one of the intensity step toggle switches to its ON position. Step 1 is the lowest intensity and step 5 is the highest intensity. If more than one of the intensity step toggle switches is in the ON position, then the LHA will operate at the highest step that is switched to the on position. 6.0 Remote Control and Photocell Operating Procedures In order for a Power Control Unit (PCU) to receive and process the signals for radio remote control, the power switch of the PCU must be in the PWR position and the radio-local toggle switch on the PCU control panel must be in the radio ("RADIO") position Carmanah Technologies Corporation 42


43 *Radio remote control is optional - See separate the radio remote control manual for set up and operational procedures. Control of PAPI using Photocell The PAPI system may be operated off the installed photocell for systems with this option. For normal photocell operation place the PCU control switch in LCL for local control. Then place the photocell switch in Photocell enable, this is the up position. The PAPI will now operate automatically with no further commands required - changing from day to night mode when the sun goes down. Note that the photocell enable mode will override any other commands that are issued by the controller so, be sure to turn it off for direct local, or radio control. A photo of the control panel in photocell mode is shown below: Two Level Photocell Operation There is an option for the nighttime intensity level to be selected between two different levels for photocell operation. Standard photocell operation is at intensity Level 3. For systems with this option it is possible for the night setting to be switched to Level 4 for a brighter operating point during night operations. This is done by selecting the Photocell Enable mode, and also selecting Intensity Level 4 as shown below. In this case night operations using the photocell mode will be at Level 4. This mode would be used for areas with a large amount of ambient light such as airports located inside of cities, etc. A photo of this mode is shown below: 7.0 Preparation for Movement The following procedure is used to prepare the PAPI for movement Carmanah Technologies Corporation 43
44 Solar Panels 1. Unplug the cable from the solar panel system to the BBA. 2. Remove the tie-down straps. 3. Remove ground stakes that hold the frame in place. 4. Loosen the knobs that hold the frame in position. 5. Gently lower the solar panel to the ground. 6. Clean off the surface of the solar panels. 7. Unfold the carry handles on each corner of the frame. 8. Stack the panels. 9. Fold the carry handles. 10. Stow on the system trailer. Power Control Unit (PCU) 1. Place the on-off toggle switch on the PCU control panel to the Off position 2. Remove the cables from the PCU to the four LHA Battery Box Assembly (BBA) 1. Turn off the power from the power source 2. Unplug the cables from the power sources 3. Remove the cable from the BBA to the PCU 4. Remove the PCU from the BBA (see section 4) Light Housing assemblies (LHA) 1. Remove the tilt switch assembly. Secure the mounting screws back in the tilt switch bracket 2. Remove the shield from the top of the weather cover by twisting four 1/4-turn fasteners counterclockwise to release. Place the shield in front of the lenses. Lock the shield in place by pushing the 1/4-turn fasteners into their respective holes and turning clockwise until they lock 3. Remove the ground stakes and tie-down straps that hold the Light Housing Assemblies (LHA) in place 4. Loosen each of the lock nuts from the turnbuckles on each of the LHA legs 5. Turn the turnbuckles on each of the six legs to minimize the length of thread that is exposed 6. Fold up each of the legs of the LHA by removing the lock pin, folding the foot under the LHA, and replacing the lock pin 2016 Carmanah Technologies Corporation 44

45 Legs folded under a Light Housing Assembly (LHA) The LHA are designed to be transported in the horizontal position with the legs folded up and locked underneath. In this position the weight of the LHA is supported by the three extensions that protrude downward from the leg mounts. Store the inclinometer in its protective plastic case. If the system is to be transported, replace the LHA components in the shipping containers. Place the cover on the shipping container and secure the latches. 8.0 Operation in Unusual Conditions 8.1 Unusual Environment and Weather Below Freezing Temperatures If required, clear frost from the exit aperture lenses and solar panels by wiping them with a clean, soft cloth. Recalibrate the digital inclinometer. Soft Ground and with optional rapid deployment legs (portable systems only) Check the level, angle, and aim of the LHA daily. Snow Clear snow away from the front of the LHA, PCU, and solar panels. If required, wipe the exit aperture lenses with a clean, soft cloth to remove any snow. Heavy Rain If required, clear residual water drops from the exit aperture lenses by wiping them with a clean, soft cloth Carmanah Technologies Corporation 45
46 Dust storm Clear dust from the exit aperture lenses and solar panels by wiping them with a clean, soft cloth. 8.2 Emergency Procedures 1. Place the on-off toggle switch on the Power Control Unit (PCU) control panel to the "OFF" position. 2. Turn off the power from the power source. 3. Unplug the cable from the BBA to the PCU. 4. Unplug the cable from the Battery Box Assembly (BBA) to the solar panel system. 5. Unplug the cables within the solar panel system between solar panels. 9.0 Maintenance 9.1 System Checks Before and After Installation Light Housing Assemblies Move the Light Housing Assemblies (LHA) to a work area. If the LHA are dirty, rinse the LHA by spraying with clean water and wiping off any debris with a cloth. Set up the LHA and the Power Control Unit (PCU) as explained in Section 4, except that they do not need to be set up next to the runway, do not need to be aligned in any particular direction, and do not need to be set level in the side-to-side direction or at any particular tilt angle. Clean the exposed surfaces of the lenses according to the instructions in Section 9. Connect power to the PCU according to Section 5. If a charge controller does not show a green status light, then remove the cable from the solar panels to the BBA. With the solar panels pointed toward the sun (or a suitable bright light source), check the voltage at the end of the cable from the solar panels. The voltage should be greater than 24 VDC and as high as 47 VDC. Reconnect the cable to the BBA. Check the voltages at the output receptacle of the BBA. It should be nominal 24 VDC. Manual Operation Turn the radio-local toggle switch on the PCU to the local ("LCL") position, see Section 5. Place the "Tilt Switch Bypass" toggle on the PCU to the disabled (up) position. Operate the LHA in full intensity visible mode (step 5) according to Section 5. Stand in front of an LHA and place a diffuse reflective surface in front of the weather cover so that you can see the reflection of the beams. CAUTION: DO NOT STARE INTO THE BEAMS. The surface can be a 2016 Carmanah Technologies Corporation 46
47 piece of paper, cardboard, or even your clothing. Check that white light is emitted from the top row and red light is emitted from the bottom row Note the intensity of the light on the reflective surface. Move the intensity step 5 toggle switch on the PCU control panel to the "OFF" position, then move the intensity step 4 toggle switch to the ON ( 4 ) position. The intensity of the white and red beams should now be 20% of the step 5 intensity Move the intensity step 4 toggle switch on the PCU control panel to the "OFF" position, then move the intensity step 3 toggle switch to the ON ( 3 ) position. The intensity of the white and red beams should now be 4% of the intensity before the positions of the toggle switches were changed Move the intensity step 3 toggle switch on the PCU control panel to the "OFF" position, then move the intensity step 2 toggle switch to the ON ( 2 ) position. The intensity of the white and red beams should now be 0.8% of the step 5 intensity Move the intensity step 2 toggle switch on the PCU control panel to the "OFF" position, then move the intensity step 1 toggle switch to the ON ( 1 ) position. The intensity of the white and red beams should now be 0.16% of the step 5 intensity. In order to check the operation of the IR LED sources, the work area must be dark and NVG must be used to view the beams. Operate the LHA in full intensity (step 5) IR mode Stand in front of an LHA and place a diffuse reflective surface in front of the weather cover so that you can see the reflection of the beams. CAUTION: DO NOT STARE INTO THE BEAMS. Look at the reflective surface with NVG to verify that the steady signal is emitted from the top row and that a flashing signal is emitted from the bottom row Move the intensity step 5 toggle switch on the PCU control panel to the "OFF" position, then move the intensity step 4 toggle switch to the ON ( 4 ) position. The intensity of the steady and flashing IR beams should now be 20% of the step 5 intensity Move the intensity step 4 toggle switch on the PCU control panel to the "OFF" position, then move the intensity step 3 toggle switch to the ON ( 3 ) position. The intensity of the steady and flashing IR beams should now be 4% of the intensity before the positions of the toggle switches were changed Move the intensity step 3 toggle switch on the PCU control panel to the "OFF" position, then move the intensity step 2 toggle switch to the ON ( 2 ) position. The intensity of the steady and flashing IR beams should now be 0.8% of the step 5 intensity Move the intensity step 2 toggle switch on the PCU control panel to the "OFF" position, then move the intensity step 1 toggle switch to the ON ( 1 ) position. The intensity of the steady and flashing IR beams should now be 016% of the step 5 intensity. Check the operation of the other LHA in the same manner as for the first LHA in the preceding two paragraphs. Solar Panels Move the solar panels to a work area. If the solar panels are dirty, rinse the panels by spraying with clean water and wiping off any debris with a soft cloth. Set up the solar panel and BBA. They do not need to be set up next to the runway and do not need to be secured. Inside the BBA are charge controllers. The charge controllers have a status light that will be green when running properly, i.e. charging the batteries. When there is an error, then the status light will be red or flashing red. If the status LED is off, but there is a brief flicker every 5 seconds, then there is not enough light illuminating the solar panels and the charge controller has switched to night mode. Radio Remote Control Operation 2016 Carmanah Technologies Corporation 47
48 Turn the radio-manual toggle switch on the PCU to the radio ("RAD") position. Place the "Tilt Switch Bypass" toggle on the PCU to the disabled (up) position. Follow the instructions in the radio remote control manual for testing. 9.2 Maintenance Light Housing Assemblies After installation, the only required maintenance under normal operating conditions is a weekly cleaning of the outer surfaces of the lenses of each of the Light Housing assemblies (LHA). The cleaning procedure is described in Section 9. The lenses should also be cleaned after a storm. Solar Panels After installation, the only required maintenance under normal operating conditions is a weekly cleaning of the solar panels by spraying with clean water and wiping off any debris with a soft cloth. The solar panels should also be cleaned after a storm. 9.3 Periodic Preventative Maintenance No periodic preventive maintenance is required. To maintain readiness, it is recommended that the procedures in Section 9 should be performed every three months. 9.4 Cleaning the Lenses of a Light Housing Assembly The front surfaces of the lenses of a Light Housing Assembly (LHA) are reached through the front, under the weather cover. Use a clean, soft lint-free cloth or lens tissue to clean the outer surfaces of the lenses. Reach in to clean the lenses. It is best to wipe with a downward motion, and lifting the cloth from the lens surface before repeating the wiping motion. In this way, the dirt and debris is accumulated at the bottom of the lens where it has no effect on the beam. Be careful to apply only light pressure as often the grit on the lens is hard and sharp and will scratch the surface of the lenses. Clean water may be sprayed on the outer surfaces of the lenses. Then use a clean, soft lint-free cloth or lens tissue to clean the outer surfaces of the lenses and wipe the residue water off of the lenses. If the front surfaces of the lenses are very dirty, lens cleaner fluid may be used. Spray or pour a small amount of the lens cleaning fluid on some clean lens tissue of piece of soft cloth, then wipe the lenses in a downward motion, as explained previously. Take another piece of clean, dry lens tissue or soft cloth and wipe the residual lens cleaner fluid off of the lenses with the same downward motion as discussed previously. Note that if lens cleaning fluid is not available, then clean water may be used. NOTE: It is important not to scratch the outer surface of the lenses or leave residue that attracts dust or dirt. CAUTION Be careful to apply only light pressure as often the grit on the lens is hard and sharp and will scratch the surface of the lenses. CAUTION 2016 Carmanah Technologies Corporation 48
49 Do not use standard commercial glass window cleaners on the exit windows. While the lens itself is hard, the outer surface is coated and the cleaner may remove or scratch the coating. If necessary, use a standard lens cleaning fluid. Supplies Needed: clean, soft lint-free cloth clean water lens cleaning fluid 10.0 Parts Replacement It is best if replacement of any part is performed in a clean, dry environment. However if necessary, part replacement can be performed while the PAPI-266F is deployed. For greatest safety all power to the PCU should be disconnected, and the LHA cable should be disconnect at the PCU. However, parts replacement in a Light Housing Assembly (LHA) can be performed with the power toggle switch on the Power Control Unit (PCU) control panel to the "OFF" position. In this case, it is recommended that the power toggle switch on the Power Control Unit (PCU) control panel be taped to the "OFF" position so that power cannot be inadvertently applied to the Light Housing Assemblies (LHA) and a tag be placed on the outside of the PCU to indicate that work is underway Carmanah Technologies Corporation 49
50 Exploded view of the PAPI with the parts numbered: 1 - weather cover, LG6514; 2 - electronic enclosure top, LG6570; 3 - electronic enclosure bottom, LG6526; 4 - optics enclosure, LG6521; 5 - base plate, LG6513; 7 - front bezel, LG6461; 8 - primary lens assembly, LG6454; 9 - LED panel red, LG6399; 10 - LED panel white, LG6596; 11 - deflector/lens cover, LG Removal of LHA Weather Cover Remove four machine screws along the bottom of the rear panel of the LHA weather cover, and five machine screws along the bottom of both sides of the weather cover. Save these screws in a clean, safe place. Slide the weather cover back slightly, then lift the weather cover straight up until it clears the optical assembly. Set the weather cover away from the remainder of the LHA Carmanah Technologies Corporation 50

51 PAPI with the weather cover removed. The front of the PAPI is on the right. The power circuit board is located in the aluminum enclosure at the rear of the PAPI. Note: Portable LHA assembly shown in above photo Tools Needed: Phillips screwdriver 10.2 Replacement of White LED / Steady IR Panel Place the power toggle switch on the Power Control Unit (PCU) control panel to the "OFF" position. Disconnect the LHA cable at the PCU. For greatest safety power to the PCU should be disconnected. Remove the LHA weather cover The white LED panels are located on the top row of the optical head assembly. Disconnect the cables to the panel that is to be replaced Carmanah Technologies Corporation 51


.")
52 The white LED panels are located on the top row of the optical head assembly. Red panels are located on the bottom row of the optical head assembly. Remove the aluminum tape that is a seal around the white LED panel that is being replaced. Mark the position, relative to the optical head, of the LED panel, so that the replacement panel can be placed in the same position. Use a 3/32-inch hex wrench to loosen the six machine screws that hold the white LED panel to the optical head. Remove all of these screws. Hold on to the LED panel while removing the screws. Store the screws in a clean, dry place. Separate the LED panel from the optical head assembly by lifting it upwards. Remove the gasket (if there is a replacement gasket available). Gasket on the optical head. Obtain a replacement white LED panel and gasket. White LED panel from LED side Carmanah Technologies Corporation 52

53 Replace the gasket. Place the white LED panel against the optical head assembly so that all six slots are aligned with their corresponding screw holes. Replace the six socket head cap screws that hold the LED panel to the optical head assembly. Do not tighten yet. Move the LED panel up and down until it is in the same location as the LED panel that was removed. Note that the location of the original LED panel was marked before the screws were loosened. Tighten these screws with a 3/32-inch hex wrench. Use aluminum tape to seal around the white LED panel. Aluminum tape seal on the white LED panel. Connect the cables. Note that the connector is keyed so that it cannot be inserted in an incorrect orientation. Perform the checks in Section 8 to ensure that the panel is functioning properly. Replace the weather cover by reversing the steps. Tools Needed: Philips screwdriver 3/32-inch hex wrench Spare Part Needed: white LED panel gasket for LED panel aluminum tape 10.3 Replacement of Red LED / Flashing IR Panel Place the power toggle switch on the Power Control Unit (PCU) control panel to the "OFF" position. Disconnect the LHA cable at the PCU. For greatest safety power to the PCU should be disconnected. Remove the LHA weather cover. The red LED panels are located on the bottom row of the optical head assembly. Disconnect the cables to the panel that is to be replaced Carmanah Technologies Corporation 53
54 Remove the aluminum tape that is a seal around the red LED panel that is being replaced. Mark the position, relative to the optical head, of the red LED panel, so that the replacement panel can be placed in the same position. Use a 3/32-inch hex wrench to loosen the six screws that hold the white LED panel to the optical head. Remove all of these screws. Hold on to the LED panel while removing the screws. Store the screws in a clean, dry place. Separate the LED panel from the optical head assembly. Remove the gasket if there is a new gasket available. Obtain a replacement red LED panel. Replace the gasket. Place the red LED panel against the optical head assembly so that all six slots are aligned with their corresponding screw holes. Replace the six socket head cap screws that hold the LED panel to the optical head assembly. Do not tighten yet. Move the LED panel up and down until it is in the same location as the LED panel that was removed. Note that the location of the original LED panel was marked before the screws were loosened. Tighten these screws with a 3/32-inch hex wrench. Use aluminum tape to seal around the red LED panel. Connect the cables. Note that the connector is keyed so that it cannot be inserted in an incorrect orientation. Perform the checks in Section 9 to ensure that the panel is functioning properly. Replace the weather cover by reversing the steps. Tools Needed: Philips screwdriver 3/32-inch hex wrench Spare Part Needed: red LED panel, LG6399 gasket for LED panel, LG6520 aluminum tape 10.4 Replacement of LHA Power Circuit Board Place the power toggle switch on the Power Control Unit (PCU) control panel to the OFF position. Disconnect the LHA cable at the PCU. Remove the LHA weather cover. Remove the six countersunk-head screws from the top of the aluminum enclosure that is mounted in the rear starboard side of the LHA base plate. Remove the top cover of the box. Store the screws and the cover in a clean, dry place. Remove the six nuts that hold the power circuit board to the stand-offs. Store the nuts in a clean, dry place. Mark the Molex connectors to indicate the location and orientation relative to the power control board. Carefully lift the circuit board and remove the Molex connectors from the power control board Carmanah Technologies Corporation 54

55 Obtain a replacement LHA power control board. LHA Power Control Board Insert the Molex connectors in the same location and orientation on the power control board. Make sure that the Molex connectors are fully engaged to the power control board. Carefully replace the power control board into the box and secure the power control board to the standoffs with the nuts. Replace the cover of the box and secure with its screws. Replace the weather cover by reversing the steps. Tools Needed: #1 Phillips screwdriver 1/4-inch wrench or 1/4-inch nut driver Spare Parts Needed: LHA power control board 10.5 Replacement of Batteries in the Battery Box Assembly Place the power toggle switch on the Power Control Unit (PCU) control panel to the OFF position. Disconnect the input AC power cord to the Battery Box Assembly (BBA), if it is connected. Disconnect the solar panels to BBA. Disconnect the input AC power cord to the Battery Box Assembly (BBA), if it is connected. Disconnect the solar panels to BBA cable at the BBA. Disconnect the 24 VDC cable from the BBA to the PCU Carmanah Technologies Corporation 55

56 Open the lid of the BBA by unlatching the 4 latches around the perimeter of the BBA lid. Looking inside the Battery Box Assembly from the top. The circuit breaker is in the upper left corner of the picture. The battery charger is on the left. The two batteries are in the middle. A 2:1 step-down AC transformer is in the upper right of the picture. The charge controller for the solar panels is in the lower right. Carefully remove the black cover from the ground side terminal of the batteries. Using both a 1/2-inch and 9/16- inch wrench, loosen the bolt that holds the cable to the battery terminal. Be very careful not to touch the wrenches to any other conductive surface. When the cable is free, cover it with an insulating material and pull it away from the battery terminal. Remove the bolt and store it in a clean, dry place. Cover the battery terminal with an insulating material, so that no cables or tools are able to touch the battery terminal. Carefully remove the black cover from the other battery. Using both a 1/2-inch and 9/16-inch wrench, loosen the bolt that holds the cable to the battery terminal. Be careful not to touch the wrenches to any other conductive surface. When the cable is free, cover it with an insulating material and pull it away from the battery terminal. Remove the bolt and store it in a clean, dry place. Cover the battery terminal with an insulating material, so that no cables or tools are able to touch the battery terminal. Carefully remove the red cover from the positive terminal of the batteries. Using both a 1/2-inch and 9/16-inch wrench, loosen the bolt that holds the cable to the battery terminal. Be careful not to touch the wrenches to any other conductive surface. When the cable is free, cover it with an insulating material and pull it away from the battery terminal. Remove the bolt and store it in a clean, dry place. Cover the battery terminal with an insulating material, so that no cables or tools are able to touch the battery terminal Carmanah Technologies Corporation 56
57 Carefully remove the red cover from the positive terminal of the other battery. Using both a 1/2-inch and 9/16-inch wrench, loosen the bolt that holds the cable to the battery terminal. Be careful not to touch the wrenches to any other conductive surface. When the cable is free, cover it with an insulating material and pull it away from the battery terminal. Remove the bolt and store it in a clean, dry place. Cover the battery terminal with an insulating material, so that no cables or tools are able to touch the battery terminal. Loosen the battery hold down clamps with a 7/16-inch wrench. Remove the nuts and store in a clean, dry place. Remove the battery hold down frame. Remove the battery hold down clamps, which have a hooked end. Note the orientation of the batteries in the BBA. Lift the batteries out of the BBA. Obtain replacement batteries. Note that both batteries should be replaced at the same time. Place the batteries in the BBA in the same orientation as the original batteries. Replace the battery hold-down clamps, battery hold down frame, and the battery hold down clamp nuts. Tighten the nuts so that the battery do not move, but do not over tighten. Connect the cable between the two batteries using the bolts and nuts that held the cable to the battery terminals. Be sure that the cable is oriented so that the red cover is on the positive terminal of one battery and the black cover is on the negative terminal of the other battery. Slide the battery terminal covers over the terminals. Connect the negative-side cable with the black terminal cover to the negative side of the batteries. Slide the black cover over the terminal. Very carefully attach the positive side cable with the red terminal cover to the positive terminal of the battery. Be very careful not to let the cable or the wrenches touch any conductive surface. Slide the red cover over the battery terminal. Replace the BBA lid and secure the latches. Tools Needed: 7/16-inch wrench 1/2-inch wrench 9/16-inch wrench Spare Parts Needed: 12V AGM batteries (quantity and capacity dependent on system configuration) 10.6 Replacement of a Solar Panel Remove the connector at the rear of the solar panel. Remove four 1/4-20 button-head cap screws that hold the solar panel in the frame. Store the bolts in a clean, dry location Carmanah Technologies Corporation 57
58 Note the orientation of the solar panel in the panel frame. Remove the solar panel from the frame. Place the new solar panel into the frame in the same orientation as the old panel. Replace the four 1/4-20 bolts to hold the panel in the frame. Reconnect the connector at the rear of the solar panel. Parts Needed: Solar panel Tools needed: 5/32-inch hex wrench 11.0 Troubleshooting In the event that the PAPI system is not functioning properly, first ensure that power is being supplied, that the switches of the Power Control Unit (PCU) are set properly, and all of the cables are attached properly Power Train If there is no light emitted from all Light Housing assemblies (LHA), first check to see if the local-radio toggle switch on the PCU control panel is in the local ("LCL") position and that all of the intensity switches are in the off position. If this is the case, then no light should emanate from the LHAs. Switch the step 5 toggle switch to the ON ("5") position and check for light from the LHAs. If the local-radio toggle switch is in the radio ("RADIO") position, then change the local-radio toggle switch to the local ("LCL") position and the step 5 toggle switch to the ON ("5") position. If there is no light emitted from all Light Housing assemblies (LHA), disable the tilt switches by placing the "Tilt Switch Bypass" toggle on the PCU control panel to the disabled (up) position. If light is now emitted from the LHA, realign the LHA according to Section 4. If there is still no light emitted from the LHA, then check for power along the power train. Determine if the battery bank is charged. Connect the battery charging cord to the Battery Box Assemblies (BBA) and connect to a known working source of appropriate AC power. If the PAPI operates, then the batteries were discharged. Allow sufficient time for the batteries to charge. Remove the BBA to PCU cables from the BBA. Check the voltage at the output connector of each BBA. It should be a nominal 24 VDC, which can be between 22 and 28.8 VDC, depending upon the state of charge. If the voltage is zero, then open the top of the battery box and check the circuit breaker. Reset the circuit breaker and make sure that its switch is in the on position. Connect the BBA to PCU cable to each BBA and remove the BBA to PCU cable from the PCU. Check the voltage at the end of the cable. The voltage should be nominal 24 VDC. If there is voltage at the BBA and not at the end of the cable, then the wrong cable end was connected to the BBA, the connector was not fastened properly, or the cable is defective and must be replaced Carmanah Technologies Corporation 58
59 Plug the BBA to PCU cables into the PCU. Operate the PCU in manual mode according to the instructions in Section 5. Check to be sure that the radio-local switch on the PCU control panel is in the local "LCL" position. If none of the LHAs are functioning in any mode, then disconnect the PCU to LHA cables and check the voltage across pins A and B of the connector. The voltage should be nominal 24 VDC. If there is no voltage out of the PCU, check that the BBA to PCU cables are connected properly. If still no voltage, return the PCU for repair. Connect the PCU to LHA cables to the PCU, and remove the PCU to LHA cables from the LHA. Check the voltage across pins A and B. The voltage should be nominal 24 VDC. If there is voltage at the PCU and not at the end of the cable, then the wrong cable end was connected to the PCU or the cable is defective and must be replaced. Reconnect the PCU to LHA cables LHA Power Control Board If three LHAs operate properly and one LHA does not emit any light and there is voltage at the PCU to LHA cable to the non-functioning LHA, then the most likely cause is failure of the LHA power control board. Place the power toggle switch on the Power Control Unit (PCU) control panel to the OFF position, see Section 5. Disconnect the LHA cable at the PCU. Remove the LHA weather cover by following the procedure in Section 9. Check all of the connections to the receptacles on the power control board enclosure Remove the six countersunk-head screws from the top of the aluminum enclosure that is mounted in the rear starboard side of the LHA base plate. Remove the top cover of the box. Store the screws and the cover in a clean, dry place. Check all of the connections to the LHA power control board. If all of the connections are good, then the most likely cause is failure of the LHA power control board. Replace the power control board in the non-functioning LHA White LED / Steady IR Panels If three LHA operate properly and the other LHA does not emit any white light from the white LED panel (meaning panel with both the white light LEDs and steady IR LEDs) and there is power to the non-functioning LHA, remove the weather cover according to the instructions in Section 10. Check that the connector to the non-functioning white LED panel is connected properly. If the white LED panel still does not function properly, then replace the LED panel. If that does not correct the problem, replace the LHA power control board. If one side of a white panel does not emit any white light, then check the connector to the non-functioning side to see that is it connected properly. If the white LED panel still does not function properly, then replace the LED panel. If that does not correct the problem, replace the LHA power control board Carmanah Technologies Corporation 59
60 Note that failure of up to 25% of the white LED sources on the white panel of an LHA is allowed before the LHA must be removed from service. The LED sources can be seen by looking into the LHA through the front lenses with the LHA set at the lowest intensity level, step 1. If the white LED panels do not change intensity levels, but still emit white light in one of the modes, then return the PCU for repair. If three LHA operate properly and the other LHA does not emit any steady IR light from one of the white LED panels and there is power to the non-functioning LHA, remove the weather cover according to the instructions in Section 10. Check that the connector to the non-functioning white LED panel is connected properly. If the white LED panel still does not function properly, then replace the LED panel. If that does not correct the problem, replace the LHA power control board. If one side of a white panel does not emit any steady IR light, then check the connector to the non-functioning side to see that is it connected properly. If the white LED panel still does not function properly, then replace the LED panel. If that does not correct the problem, replace the LHA power control board. If the white LED panels do not change IR intensity levels, but still emits IR light in one of the modes, then return the PCU for repair Red LED / Flashing IR Panels If one LHA operates properly and the other LHA does not emit any red light from one of the red LED panels (meaning panels with both the red light LEDs and the flashing IR LEDs), remove the weather cover according to the instructions in Section 10 and first check that the connector to that LED panel is connected properly. If the red LED panel still does not function properly, then replace the LED panel according to the instructions in Section 10. If that does not correct the problem, replace the LHA power control board according to the instructions in Section 10. If one side of a red panel does not emit any red light, then check the connector to the non-functioning side to see that is it connected properly. If the red LED panel still does not function properly, then replace the LED panel. If that does not correct the problem, replace the LHA power control board. Note that failure of up to 25% of the LED sources on the combination of the two red panels in an LHA is allowed before the LHA must be removed from service. The LED sources can be seen by looking into the LHA through the front lenses. If the red LED panels do not change from high (daytime ) to low (nighttime) modes, but still emit red light in one of the modes, then return the PCU for repair. If three LHA operate properly and the other LHA does not emit any flashing IR light from one of the red LED panels and there is power to the non-functioning LHA, remove the weather cover according to the instructions in Section 10. Check that the connector to the non-functioning white LED panel is connected properly. If the red LED panel still does not function properly, then replace the LED panel. If that does not correct the problem, replace the LHA power control board. If one side of a red panel does not emit any flashing IR light, then check the connector to the non-functioning side to see that is it connected properly. If the red LED panel still does not function properly, then replace the LED panel. If that does not correct the problem, replace the LHA power control board Carmanah Technologies Corporation 60
61 If the red LED panels do not change IR intensity levels, but still emits IR light in one of the modes, then return the PCU for repair Tilt Switch If there is no light emitted from all Light Housing assemblies (LHA) and there is power all along the power train, disable the tilt switches by placing the "Tilt Switch Bypass" toggle on the PCU control panel to the disabled (up) position. If light is now emitted from the LHA, check the incline of the LHAs according to Section 4. When the LHAs are all aligned within the specification, check that the tilt switches on each LHA are set to level. Check that the tilt switch toggles on the three LHAs closest to the PCU are pointing towards the front of the respective LHA and that the tilt switch toggle on the LHA that is at the end of the connection chain is in the position pointing towards the rear of that LHA. Place the "Tilt Switch Bypass" toggle on the PCU control panel to the enabled (down) position. If there is no light emitted from all Light Housing assemblies (LHA), disable the tilt switches by placing the "Tilt Switch Bypass" toggle on the PCU control panel to the disabled (up) position Solar Panel In the event that the Portable Solar Panel is not functioning properly, the first action is to ensure that all of the cables are attached properly. Disconnect the cable from the PAPI Battery Box Assembly (BBA) at the BBA. Check the voltages at the output receptacle of the BBA. It should be a nominal 24 VDC, which can be between 22 and 28.8 VDC, depending upon the state of charge. If the voltage is zero, then open the top of the BBA box and check the circuit breaker, which is located on the side of the battery box. Reset the circuit breaker and make sure that its switch is in the on position. If the voltage is below 24 VDC, charge the batteries. Repeat the output voltage measurement. If the voltage remains below 22 VDC, replace the batteries. With the solar panels pointed toward the sun (or a suitable bright light source), check the voltage at the end of the cable from the solar panels. The voltage should be greater than 24 VDC, and as high as 47 VDC Carmanah Technologies Corporation 61


62 12.0 Inclinometer Instructions 2016 Carmanah Technologies Corporation 62


63 2016 Carmanah Technologies Corporation 63


64 2016 Carmanah Technologies Corporation 64

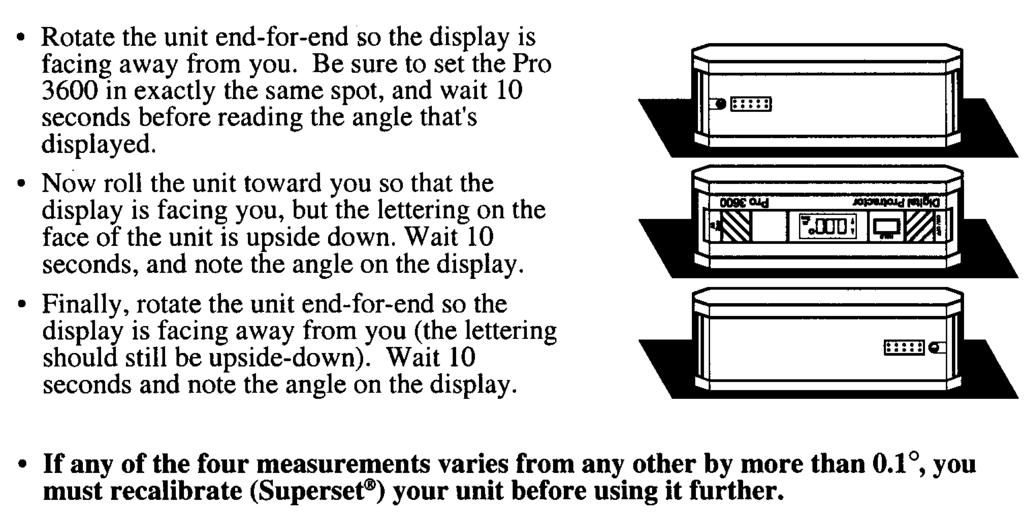
65 2016 Carmanah Technologies Corporation 65


66 2016 Carmanah Technologies Corporation 66
67 2016 Carmanah Technologies Corporation 67
68 2016 Carmanah Technologies Corporation 68

69 13.0 Battery Charger in the Battery Box Assembly Instructions The ProNautic P2420 battery charger is fully automatic with sequential multi-stage charging that provides electronically controlled charging, conditioning, and maintenance. This unit is designed for VAC operation at 60 Hz and 50 Hz. Note: there is a 2:1 step-down transformer in the Battery Box Assembly (BBA), so that the input voltage to the BBA is VAC. Front panel of the universal battery charger. LED Indicators and Digital Displays Feature Color Function AC power blue AC power applied volts amps displays charger voltage displays charger amperage auto temp control green fan active red flash high-temp caused unit shut-down active PFC green indicates that power factor correction is functioning charger output variable speed cooling amber displays actual vs available charge rate by percentage indicates speed of fan standby amber auto conservation mode when no change in charge in 72 hours battery health program amber maintenance after 21 days of standby 2016 Carmanah Technologies Corporation 69
70 charging green actively charging batteries conditioning green in absorption charge mode ready green in float charge mode self test blue performing a system check equalization red equalization charge initiated by user OK green indicates successful self-test fault red indicates fault reverse polarity red indicates reverse polarity situation DC volts low amber DC system less than 11.0 VDC DC volts high red high DC voltage from outside source charger high temp amber shutdown due to high temperature check fan red fan failure Selecting Battery Type To select the battery type/ charging profile, perform the following: 1. Press and hold "Setup/Enter" button for 5 seconds. 2. The current battery type and voltage/amperage displays will flash. 3. Use the up and down buttons to select AGM type. 4. The Volts/Amps readout will display the charge/conditioning and ready voltages for the profile highlighted. 5. Press the "Setup/Enter" button to confirm selection; the LED will remain solid. Self-Test Mode (1) Press and hold "Setup/Enter" button and the up and down buttons simultaneously for 5 seconds. (2) Only the "Self Test" LED will flash until the test is complete. (3) OK or fault LEDs will be displayed Carmanah Technologies Corporation 70
71 14.0 Charge Controller Instructions The Morningstar Corporation Morningstar model TS-MPPT-45 solar battery charger and load controller provides electronically controlled charging, conditioning, and maintenance of the batteries in the PAPI Battery Box Assembly (BBA). The charge controller is located in the BBA. Status LED There are three LEDs that are visible through the front cover of the charge controller with colors green (G), yellow (Y), and red (R). There are three groups of indications: general transitions; battery status; and faults & alarms. The sequencing patterns, which are used for faults, repeat until the fault is cleared. Pattern examples G =green is lit Y / R = yellow is lit, then red is lit G+Y = green and yellow are both lit at the same time G+Y / R = green and yellow are both lit, then red is lit alone Battery State-of-Charge 80% to 95% G 60% to 80% G+Y 35% to 60% Y 0% to 35% Y+R Battery discharging R General transitions controller start-up G / Y / R (one cycle) equalize start G+Y+R / G+Y+R / G / G equalize cancel G+Y+R / G+Y+R / R / R Battery Status absorption state G blinking, ½ s on / ½ s off equalization state G fast blink, 2 to 3 Hz float state G slow blink, 1 s on, 1 s off Battery Status LED Error Indications: Over-temperature High voltage disconnect Y / R sequencing G / R sequencing DIP switch fault R / Y / G sequencing Self-test faults R / Y / G sequencing 2016 Carmanah Technologies Corporation 71
72 Battery voltage sense G + Y / Y + R Common Problems Problem: No LED indications Solution: With a multi-meter, check the voltage at the battery terminals on the charge controller. Battery voltage must be at least 8VDC. Problem: The SS-MPPT is not charging the battery. Solution: Check the 3 LEDs. If they are flashing a sequence, then there is a fault. If the LED indications are normal, check the fuses, breakers, and wiring connections in the solar panel wiring. Measure the voltage across the solar input terminals of the charge controller. The input voltage must be greater than battery voltage before charging can begin. Check solar panels for shading Carmanah Technologies Corporation 72
73 15.0 Warranty This product is covered by the Carmanah warranty. Visit carmanah.com for additional information. Before contacting Carmanah s customer service department, please have the serial number of your light available, a brief description of the problem, as well as all details of the installation and recharging efforts. To contact Customer Service: Mail: Carmanah Technologies Corp. 250 Bay Street Victoria, BC Canada V9A 3K5 Phone: (worldwide) (toll-free, U.S. and Canada) Fax: Website: customerservice@carmanah.com carmanah.com 2016 Carmanah Technologies Corporation 73
 Worldwide: 1.250.380.0052 Fax: 1.250.380.0062 Web: carmanah.")
74 2016 Carmanah Technologies Corporation Technical Support: Toll Free: (US & Canada) Worldwide: Fax: Web: carmanah.com 2016 Carmanah Technologies Corporation PAPI with Portable Mounting User Manual revd
PAPI with Permanent Mounting
 PAPI with Permanent Mounting Technical Support: Email: customerservice@carmanah.com Toll Free: 1.877.722.8877 (US & Canada) Worldwide: 1.250.380.0052 Fax: 1.250.380.0062 Web: carmanah.com 2016 Carmanah
LED Precision Approach Path Indicator (AV-PAPI) Model AV-PAPI-24
 Model AV-PAPI-24") LED Precision Approach Path Indicator (AV-PAPI) Model AV-PAPI-24 User Manual www.avlite.com email: usa@avlite.com Phone: +1 (603) 737 1310 Distribution Statement A - Approved for public release; distribution
LED Precision Approach Path Indicator (AV-PAPI) Model AV-PAPI-24 User Manual www.avlite.com email: usa@avlite.com Phone: +1 (603) 737 1310 Distribution Statement A - Approved for public release; distribution
EG80/EG145 INSTALLATION GUIDE
 EG80/EG145 GUÍA DE INSTALACÍON GUIDE D'INSTALLATION Model Modelo Modèle EG80/EG145 Warnings and Precautions The following symbols indicate important safety warnings and precautions throughout this manual.
MONOPRICE. Power Cache 220 Solar Power Generator. User's Manual P/N 15278
 MONOPRICE Power Cache 220 Solar Power Generator P/N 15278 User's Manual SAFETY WARNINGS AND GUIDELINES Do not expose this device to water or moisture of any kind. Do not place drinks or other containers
OWNER S MANUAL. Solar LED Airfield Sign Light
 OWNER S MANUAL Solar LED Airfield Sign Light CONTENTS 1.0 Introduction...4 1.1 Precautions...4 1.2 Patents...4 2.0 Standards and Precautions for Solar Installations...5 3.0 Components...6 3.1 Luminaire...6
Bluetooth Smart Speed/Cadence Sensor Instruction Manual
 Bluetooth Smart Speed/Cadence Sensor Instruction Manual Contents Before using this product... 3 Warranty... 4 List of Parts... 4 Battery... 6 Installation... 7 Pairing... 11 Technical Specs... 11 2 WARNINGS:
pro user guide 940H Student Microphone 940C Microphone Charger
 pro user guide 90H Student Microphone 90C Microphone Charger Contents Introduction.............................................................. 1 Chapter 1 90H Microphone and 90C Charger..............................
Back-Up Sensor System
 Back-Up Sensor System Model No.: PKC0RE Owner s Manual and Warranty Information OFF ON 0.4m/1.3ft 0.6m/2.0ft 1.0m/3.3ft 1.2m/4.0ft 1.5m/5.0ft LEFT RIGHT Read these instructions completely before using
V-D2425 and V-D2440 Digital Clock
 Installation Manual V1.03 V-D2425 and V-D2440 Digital Clock Valcom, Inc. V-D2425 and V-D2440 Wired Clock Table of Contents Table Installation of Contents 2 Instructions Flush Mount Installation 3 3 Wall
Instruction Manual 03
 Instruction Manual 03 Nike HyperAdapt 1.0 Functionality When the wearer slips into the shoe, the Nike HyperAdapt 1.0's heel sensor will trigger the laces to auto-lace to a preset tightness. Two buttons
HERCULES ITEM NO UNBREAKABLE HELICOPTER AGES CHANNEL GYRO RC HELICOPTER FEATURES
 HERCULES UNBREAKABLE HELICOPTER 3.5 CHANNEL GYRO RC HELICOPTER FEATURES AGES 14+ ITEM NO. 35850 World s First Unbreakable Helicopter Super Strong Polymer Body 3.5 Channel Radio Control Built In Gyro LED
Installer Guide smart connect
 Installer Guide smart connect TM 7490 Wireless Remote Outdoor Sensor Please read all instructions before proceeding. The wireless remote outdoor sensor monitors temperature at a remote outdoor location
AirVolt - P User s Manual. 3CH Mini Indoor Helicopter w/ Gyro. Ages 14+ and up
 AirVolt - P16-41459 3CH Mini Indoor Helicopter w/ Gyro User s Manual Ages 14+ and up TABLE OF CONTENTS What s in the Box... 3 Helicopter Part LIst... 4 Installing the Batteries... 5 Charging the Helicopter...
RJH-4/6046. Wireless 3.5 Channel Mega Helicopter. (Instruction Manual)
") AGES 12+ RJH-4/6046 Wireless 3.5 Channel Mega Helicopter (Instruction Manual) Main rotor diameter: 14.5 Fuselage Length: 15.5 Fuselage Height: 8.5 Total Weight: 0.68lbs Note: Physical damage to the product
AGES 12+ RJH-4/6046 Wireless 3.5 Channel Mega Helicopter (Instruction Manual) Main rotor diameter: 14.5 Fuselage Length: 15.5 Fuselage Height: 8.5 Total Weight: 0.68lbs Note: Physical damage to the product
READ AND FOLLOW ALL SAFETY INSTRUCTIONS SAVE THESE INSTRUCTIONS
 7.5 Swift Lock Ready Shape Tree (Patent Pending) Instructions IMPORTANT SAFETY INSTRUCTIONS When using electrical products, basic precautions should always be followed including the following: READ AND
Step1: Battery and Speaker Assembly Step 2: Pump and Battery Installation Step 3: Setting Up Your Fountain 6 Troubleshooting and Maintenance
 Owner s Manual Contents Step1: Battery and Speaker Assembly 1 Step 2: Pump and Battery Installation 3 Step 3: Setting Up Your Fountain 6 Fill Your Fountain 7 Operating Your Fountain 7 Troubleshooting and
PerfectTilt RF Motorized Shutter User Manual
 PerfectTilt RF Motorized Shutter User Manual Pictured: PerfectTilt RF Solar with auxiliary solar panels and auxiliary battery pack INTRODUCTION The PerfectTilt RF motorization system features a remote
LED Recessed Troffer Retrofit Kit
 Model # TRK series LED Recessed Troffer Retrofit Kit Installation Instructions PACKAGE CONTENTS A B E Part Item Name Qty. A Retrofit assembly 1 B Bracket 2 C Sheet metal screw 4 D Wire nuts 5 E Gap channel
 www.fisher-price.com P6246 R2772 P6248 P6247 Each sold separately and subject to availability. Vehicles shown in illustrations may be different than the vehicle included with your toy. 1 Battery Installation
Asymmetrical Installation Instructions. Components: i2cove Asymmetrical LED Light Fixtures. 12 [305mm] [918mm] 48.
![Asymmetrical Installation Instructions. Components: i2cove Asymmetrical LED Light Fixtures. 12 [305mm] [918mm] 48.](/thumbs/77/74625192.jpg "Asymmetrical Installation Instructions. Components: i2cove Asymmetrical LED Light Fixtures. 12 [305mm] [918mm] 48.") support@i2systems.com www.i2systems.com Electrical Specifications PARAMETER Input Power VALUE 8 Watts* / Ft Input Voltage 120-277V AC, 50/60 Hz Max. Fixture Run Length LED Color (CCT) 8 Watts: 120VAC:
support@i2systems.com www.i2systems.com Electrical Specifications PARAMETER Input Power VALUE 8 Watts* / Ft Input Voltage 120-277V AC, 50/60 Hz Max. Fixture Run Length LED Color (CCT) 8 Watts: 120VAC:
R247-G, R829-G SOLAR FLASHING BEACONS USER MANUAL
 R247-G, R829-G SOLAR FLASHING BEACONS USER MANUAL Warnings and Precautions Warnings and Precautions Safety and Usage Precautions The following symbols indicate important safety warnings and precautions
Complete Solar Airfield Lighting Solutions
 AVIATION LIGHTING Complete Solar Airfield Lighting Solutions Avlite Systems is an international designer & manufacturer of complete aviation lighting systems; airfield, heli & obstruction. AVIATION LIGHTING
MQ4C-24/6485 WIRELESS INDOOR/OUTDOOR QUAD-COPTER
 AGES 14+ MQ4C-24/6485 WIRELESS INDOOR/OUTDOOR QUAD-COPTER INSTRUCTION MANUAL PLEASE READ ALL INSTRUCTIONS CAREFULLY & RETAIN FOR FUTURE USE Welcome! Thank you for purchasing Wireless Indoor/Outdoor Quad-copter.
XM Series. Quick Start Guide. Technology at Work XMCom9
 XM Series Quick Start Guide Technology at Work. 062411XMCom9 Copyright 2011 Janam Technologies LLC. All rights reserved. XM Series, Janam and the Janam logo are trademarks of Janam Technologies LLC. Other
READ AND FOLLOW ALL SAFETY INSTRUCTIONS SAVE THESE INSTRUCTIONS
 5 Swift Lock Ready Shape Tree (Patent Pending) Instructions IMPORTANT SAFETY INSTRUCTIONS When using electrical products, basic precautions should always be followed including the following: READ AND FOLLOW
8 Step Fully Automatic Intelligent BATTERY CHARGER 12V 5A USER S MANUAL. Charges & Maintains. Flooded (WET), MF, VRLA, AGM, GEL & Calcium batteries
, MF, VRLA, AGM, GEL & Calcium batteries") 8 Step Fully Automatic Intelligent BATTERY CHARGER 12V 5A Charges & Maintains Flooded (WET), MF, VRLA, AGM, GEL & Calcium batteries USER S MANUAL 5 User s Manual And Guide To Professional Battery Charging
8 Step Fully Automatic Intelligent BATTERY CHARGER 12V 5A Charges & Maintains Flooded (WET), MF, VRLA, AGM, GEL & Calcium batteries USER S MANUAL 5 User s Manual And Guide To Professional Battery Charging
7.5 FT PRE-LIT ENGLEWOOD PINE TREE
 ITEM #0243778 7.5 FT PRE-LIT ENGLEWOOD PINE TREE Holiday Living & Design is a registered trademark of LF, LLC. All Rights Reserved. MODEL #W14L030 Español p. 11 ATTACH YOUR RECEIPT HERE Serial Number Purchase
SOKAR FPV DRONE. Quick Start Manual SkyRC Technology Co., Ltd. All Rights Reserved. Version
 SOKAR FPV DRONE Quick Start Manual Manufactured by SKYRC TECHNOLOGY CO., LTD. www.skyrc.com 2015 SkyRC Technology Co., Ltd. All Rights Reserved. Version 1.0 7504-0694-01 RoHS TABLE OF CONTENTS INTRODUCTION
R920 SOLAR LED RRFB USER MANUAL
 R920 SOLAR LED RRFB USER MANUAL Warnings and Precautions Warnings and Precautions Safety and Usage Precautions The following symbols indicate important safety warnings and precautions throughout this manual.
Powerware Vdc Extended Battery Cabinet User s Guide.
 Powerware 9125 48 Vdc Extended Battery Cabinet User s Guide www.powerware.com FCC Part 15 Class A EMC Statements NOTE This equipment has been tested and found to comply with the limits for a Class A digital
CAUTION-ELECTRICALLY OPERATED PRODUCT:
 CAUTION-ELECTRICALLY OPERATED PRODUCT: NOT RECOMMENDED FOR CHILDREN UNDER 8 YEARS OF AGE, AS WITH ALL ELECTRIC PRODUCTS, PRECAUTIONS SHOULD BE OBSERVED DURING HANDLING AND USE TO PREVENT ELECTRIC SHOCK,INPUT:120V
Motion Activated Solar Powered LED Security Light MODEL: PSO1
 Motion Activated Solar Powered LED Security Light MODEL: PSO1 Please do not return this item to the store. For service or questions about your solar light, call our customer service at 800.284.8828 (8:30am
EG-SERIES USER MANUAL MANUAL DEL USUARIO MANUEL DE L'UTILISATEUR. Model Modelo Modèle EG40/EG80/EG145/EG320/ EG340/EG500
 EG-SERIES USER MANUAL MANUAL DEL USUARIO MANUEL DE L'UTILISATEUR Model Modelo Modèle EG40/EG80/EG145/EG320/ EG340/EG500 Warnings and Precautions Warnings and Precautions Safety and Usage Precautions The
Sylvania 9 Color Changing One Plug Tree Tree ID # T5, Item # V
 Sylvania 9 Color Changing One Plug Tree Tree ID # T5, Item # V66354-13 Thank you for purchasing this tree. This tree assembles in minutes and is decorated with 600 LED lights. This tree has 8 lighting
Touchstone TB130 DC Output UPS
 Touchstone TB130 DC Output UPS User Guide Release 2.5 STANDARD 1.0 August 2017 August 2017 Touchstone TB130 DC Output UPS User Guide Release 2.5 STANDARD 1.0 ARRIS Copyrights and Trademarks 2017 ARRIS
SKU# LC54225 Please retain these instructions for future reference. Adult assembly required.
 www.tomy.com Thank you for purchasing a Chuggington Brewster s Big City Adventure Playset! SKU# LC54225 Please retain these instructions for future reference. Adult assembly required. 1 CONTENTS TTS TRACK
LIGHT & SOUND BATH VANITY LIGHT
 LIGHT & SOUND ATH VANITY LIGHT CONTEMPORARY SLAT 3L SWITCH/NL/T LACK CHROME ITM. / ART. 962793 Model #: 1301-030303-01 ASSEMLY, INSTALLATION, AND CARE INSTRUCTIONS IMPORTANT, RETAIN FOR FUTURE REFERENCE
Use and Care Guide. Part # SC SV-OS-BZ SC SV-OS-W Model #
 Part # SC-20-840-SV-OS-BZ SC-20-840-SV-OS-W Model # 51402241 51402242 Use and Care Guide LED SECURITY LIGHT Dusk to Dawn Questions, problems, missing parts? Call ETiSSL Customer Service 8 a.m. - 5 p.m.,
TNA-AS-50 OMNI-DIRECTIONAL BATTERY POWERED PORTABLE AIRFIELD LIGHT (PAL) AND TACTICAL MARKER
 AND TACTICAL MARKER") ICAO, FAA & NATO COMPLIANT OMNI-DIRECTIONAL PORTABLE AIRFIELD LIGHT (PAL) AND TACTICAL MARKER NATO (NSN) SERIAL NUMBER 6230-66-082-6260 is a robust, completely self-contained LED airfield light designed
ICAO, FAA & NATO COMPLIANT OMNI-DIRECTIONAL PORTABLE AIRFIELD LIGHT (PAL) AND TACTICAL MARKER NATO (NSN) SERIAL NUMBER 6230-66-082-6260 is a robust, completely self-contained LED airfield light designed
P
 P7639 Please keep this instruction sheet for future reference, as it contains important information. Requires four AA batteries (included) for operation. Adult assembly is required. Tool required for assembly:
453X Series. Application. Features. Two-Position Damper Actuator General Instructions
 453X Series Two-Position Damper Actuator General Instructions Application The 453L, light duty damper actuators are designed for a variety of two-position, spring return, damper applications. The 453L
Deltran Battery Tender 6V/12V 4Amp 5 & 10 Bank Battery Management System TABLE 1. Length of Cord, Feet AWG Size of Cord
 Deltran Battery Tender 6V/12V 4Amp 5 & 10 Bank Battery Management System Designed for Six-cell and three-cell Flooded/AGM/GEL Lead-Acid Batteries and Four-Cell Lithium Iron Phosphate (LiFePO4) Batteries
Installation and Operations Manual
 Installation and Operations Manual 11343 REVA IMPORTANT SAFETY INSTRUCTIONS SAVE THESE INSTRUCTIONS 2071 Ringwood Ave, Unit C, San Jose, CA 95131 888-395-2248 This Manual contains important instructions
FOR AGES 8 AND UP. 2.4GHz 3.5CH REMOTE CONTROL HELICOPTER ITEM NO
 8+ FOR AGES 8 AND UP 2.4GHz 3.5CH REMOTE CONTROL HELICOPTER ITEM NO. 35922 INTRODUCTION Thank you for purchasing this World Tech Toys product. Please make sure you carefully read the entire manual before
IRRIGATION 810-3T-PLUS TRANSMITTER GUIDE
 IRRIGATION 810-3T-PLUS TRANSMITTER GUIDE Pg. 2 HOT SHOT OVERVIEW 3 STANDARD OPERATION MODE 4 HOW TO CONTROL AND SHARE MULTIPLE S 5 TRANSMITTER FUNCTION SWITCH SETTINGS 6 OPERATING THE TEST BEACON 7 OPERATING
Safety Precaution. Notation. Meaning of symbols WARNING CAUTION
 Safety Precaution Introduction The following precautions are provided for using the Mobile Terminal safely. The symbols used and their meanings are described below. Make sure you have understood the safety
SolarWrap. Quick Start Guide. Model # PP1040/PP1025
 SolarWrap Quick Start Guide Model # PP1040/PP1025 04-13 IMPORTANT SAFETY INFORMATION Please read this manual in its entirety before operating your Bushnell POWERSYNC product. It contains important information
User s Manual. Automatic Switch-Mode Battery Charger
 User s Manual Automatic Switch-Mode Battery Charger IMPORTANT Read, understand, and follow these safety rules and operating instructions before using this battery charger. Only authorized and trained service
FOR INDOOR/SEASONAL USE ONLY
 9' Warm White /Multi LED Color Changing One Plug Tree V66362-60 INSTRUCTION MANUAL Thank you for purchasing a SYLVANIA Pre-lighted Tree. This tree assembles in minutes and is decorated with energy saving
ELECTRICAL TECHNICAL PAPER 22 AIRFIELD/HELIPORT/HELIPAD PORTABLE LIGHTING REQUIREMENTS IN A THEATER OF OPERATIONS (TO) (FOR ARMY ONLY)
 (FOR ARMY ONLY)") ELECTRICAL TECHNICAL PAPER 22 AIRFIELD/HELIPORT/HELIPAD PORTABLE LIGHTING REQUIREMENTS IN A THEATER OF OPERATIONS (TO) (FOR ARMY ONLY) This Technical Paper provides U.S. Army policy for portable lighting
ELECTRICAL TECHNICAL PAPER 22 AIRFIELD/HELIPORT/HELIPAD PORTABLE LIGHTING REQUIREMENTS IN A THEATER OF OPERATIONS (TO) (FOR ARMY ONLY) This Technical Paper provides U.S. Army policy for portable lighting
SFA275 USER MANUAL PLEASE READ THIS USER MANUAL COMPLETELY BEFORE OPERATING THIS UNIT AND RETAIN THIS BOOKLET FOR FUTURE REFERENCE
 Parking Alert Sensor SFA275 USER MANUAL PLEASE READ THIS USER MANUAL COMPLETELY BEFORE OPERATING THIS UNIT AND RETAIN THIS BOOKLET FOR FUTURE REFERENCE COMPLIANCE WITH FCC REGULATIONS This device complies
1000-Watt Energy Center
 1000-Watt Energy Center OPERATING INSTRUCTIONS Patent Pending Sierra Wave 1000-Watt Energy Center #9675 The Sierra Wave 1000-Watt Energy Center is a heavy duty and efficient portable power center offering
- Wiring Brochure Zone Manager 336
 - Wiring Brochure W 336 12/08 1 Information Brochure Choose controls to match application Application Brochure Design your mechanical applications 2 3 Rough-in Wiring Rough-in 4 Wiring Brochure Wiring
P Volt Charger Each sold separately and subject to availability.
 P6828 6-Volt 4 Amp/Hr Battery P6829 6-Volt Charger Each sold separately and subject to availability. IMPORTANT SAFETY INSTRUCTIONS - SAVE THESE INSTRUCTIONS. For use with a Power Wheels toddler vehicle
031266_Umschlag_HV_301.qxd :36 Uhr Seite 1 HV301
 HV301 www.trimble.com www.trimble.com TABLE OF CONTENTS GB FOR YOUR SAFETY 12 Important Information 12 COMPONENTS 13 SETTING TO WORK 13 Rotation mode 13 Pointing mode 13 Line/scanning mode 14 Self-leveling
OWNER S MANUAL. EverGEN Solar Area Lighting System with RUUD/BETA Fixtures. SE-10, SE-20, SE-30, SE-50, and SE-80
 OWNER S MANUAL EverGEN Solar Area Lighting System with RUUD/BETA Fixtures SE-10, SE-20, SE-30, SE-50, and SE-80 Owner s Manual EverGEN Solar Area Lighting System RUUD/BETA CONTENTS 1.0 Introduction...2
Battery Charger. Series EASY Charger. User s manual
 Battery Charger Series EASY Charger User s manual 1 Warranty RIPEnergy is not manufacturer of these units. All technical information s, data s and dimensions rely on information s given by the manufacturer.
Hendrickson Fit Adapter Installation Instructions
 Hendrickson Fit Adapter Installation Instructions Hendrickson Fit Adapter (HFA) Installation Manual Table of Contents Pre-Installation Requirements... 3 Clocking Wheels...3 HFA Hubcap Installation... 4
PAPI System Hella Induperm type 801 USER MANUAL GB
 PAPI System Hella Induperm type 801 USER MANUAL GB LIST OF CONTENT 1. General information... 3 1.1 The layout of this manual... 3 1.2 The use of the manual... 3 1.3 Manufacturer information... 3 1.4 Document
MULTI-FUNCTION JUMP STARTER
 MULTI-FUNCTION JUMP STARTER FEATURES 1. Flashlight 2. Jump Start Port 3. LED Power indicator 4. USB Output 5. Power button 6. Charging port 7. Car battery clamp 8. Home charger&car charger 9. Portable
Auto-Lift Operating System
 Installation Instructions Parasol Cellular Shades Auto-Lift Operating System CONTENTS Getting Started: Product View... 1 Tools and Fasteners Needed... 2 Installation: Installation Overview... 3 STEP 1
CASE LIGHT 10,000 / 5,000 / 1,000 LUMEN PORTABLE LED LIGHT. Owner s Manual MODEL: CLU10K
 CASE LIGHT Owner s Manual 10,000 / 5,000 / 1,000 LUMEN PORTABLE LED LIGHT MODEL: CLU10K April 2016 TABLE OF CONTENTS Introduction 3 Cautions/Warnings 4 Case Light Item Numbers 5 Parts Identification 6
User Guide. Digital Shipping Scale S150
 User Guide Digital Shipping Scale S150 2012 Sanford, L.P. All rights reserved. Revised 3/12. No part of this document or the software may be reproduced or transmitted in any form or by any means or translated
Nanometrics Solar Power System
 Nanometrics Solar Power System Installation Guide Nanometrics Inc. Kanata, Ontario Canada 2003 Nanometrics Inc. All Rights Reserved. Installation Guide The information in this document has been carefully
- Wiring Brochure Zone Manager 335
 - Wiring Brochure W 335 12/08 1 Information Brochure Choose controls to match application 2 Application Brochure Design your mechanical applications Rough-in Wiring Rough-in wiring instructions 3 4 Wiring
2800 OPERATING INSTRUCTIONS
 StarLight 2800 OPERATING INSTRUCTIONS 3 4 2 5 1 1. Input port: 5V/1000mA 2. Output port: 5V/1000mA 3. Power Switch 4. Indicator display 5. Flashlight Included items: -HALO StarLight 2800 charger unit -1
Switching DC Power Supply
 99 Washington Street Melrose, MA 02176 Phone 781-665-1400 Toll Free 1-800-517-8431 Visit us at www.testequipmentdepot.com Model 1693, 1694 Switching DC Power Supply INSTRUCTION MANUAL 1 Safety Summary
Battery Charger Series EASY Charger
 Battery Charger Series EASY Charger User s manual 1 Warranty RIPEnergy is not manufacturer of these units. All technical information s, data s and dimensions rely on information s given by the manufacturer.
Valor 2000 Series Instruction Manual
 99 Washington Street Melrose, MA 02176 Phone 781-665-1400 Toll Free 1-800-517-8431 Visit us at www.testequipmentdepot.com TM Valor 2000 Series Instruction Manual Valor 2000 Series Scales EN-1 1. INTRODUCTION
ALSF APPROACH LIGHTING. High-Intensity Approach Lighting System WITH ELEVATED SEQUENCED FLASHERS. Operating Conditions. Compliance with Standards
 High-Intensity Approach Lighting System WITH ELEVATED SEQUENCED FLASHERS Compliance with Standards FAA: ICAO: Military: Uses Designed according to -1, -2, -2/SSALR FAA-E-2628; FAA-E-2325 (Sequenced Flashing
Parkit360 Transformer
 Parkit360 Transformer 1 Owner s Manual Introduction We know you re busy, and need to get that fifth wheel moved. Now. So with that in mind, we ve kept these instructions as brief as possible, but they
7.5' LED Silver Glitter with Pinecones One Plug Tree V INSTRUCTION MANUAL
 7.5' LED Silver Glitter with Pinecones One Plug Tree V70065-60 INSTRUCTION MANUAL Thank you for purchasing a SYLVANIA Pre-lighted Tree. This tree assembles in minutes and is decorated with energy saving
- Wiring Brochure Mixing Expansion Module 440
 - Wiring Brochure Mixing Expansion Module 440 W 440 12/08 1 Information Brochure Choose controls to match application Application Brochure Design your mechanical applications 2 3 Rough-in Wiring Rough-in
User s Manual VTech Printed In China US CA Manual new.indd /6/6 10:41:57
 User s Manual 2013 VTech Printed In China 91-002805-014 US CA 6700-201 Manual new.indd 1 2013/6/6 10:41:57 Dear Parent, Smart Wheels fun as well. Go! Go! Smart Wheels Go! Go! Go! Go! Smart Wheels features
Rated for use on 110/120VAC 60Hz and 220/240VAC 60Hz applications
 WPC1-XXXX-T Rated for use on 110/120VAC 60Hz and 220/240VAC 60Hz applications Installation Instructions: Read these instructions in their entirety before performing any installation work. FOR USE WITH
Learn & Discover Driver TM
 User s Manual Learn & Discover Driver TM 2012 VTech Printed in China 91-002724-000US TM INTRODUCTION Thank you for purchasing the VTech Learn & Discover Driver TM learning toy! Take a spin down the learning
Owner s Manual. S.P.O.T. Trainer. Signaling. Protecting. Obedience. Trainer. With Night Sight Technology TECHNOLOGIES USED: Let Your Dog Be a Dog!
 Owner s Manual S.P.O.T. Trainer Signaling. Protecting. Obedience. Trainer. With Night Sight Technology TECHNOLOGIES USED: Let Your Dog Be a Dog! IMPORTANT NOTE: Please read this owner s manual in its entirety
Cab Control Operators Manual
 Cab Control Operators Manual Cab Control 2400 Cab Control 3400 Cab Control 3600 Ft. Atkinson, Wisconsin USA Panningen, The Netherlands www.digi-star.com D3820-US Rev B June 21, 2013 Table Of Contents Cab
IMPORTANT SAFETY INFORMATION:
 Owner s Manual Model WRCPF-KIT IMPORTANT SAFETY INFORMATION: Always read this manual first before attempting to install or use this device. For your safety, always comply with all warnings and safety instructions
R
 R3858 Please keep this instruction sheet for future reference, as it contains important information. Adult assembly is required. Tools required for assembly: Phillips Screwdriver, Hammer and Scrap Block
Cruising Charger Series OWNER S MANUAL
 R Cruising Charger Series OWNER S MANUAL ON BOARD BATTERY CHARGERS Models DC Amperage No. Of Banks Volts 2614A 5,10 Amps 2 Bank 12/12 2614A-230 2621A 5,5,10 Amps 3 Banks 12/12/12 2621A-230 2622A 10,10
User s Manual ATTILA THE ANKYLOSAURUS TM VTech Printed in China US
 User s Manual ATTILA THE ANKYLOSAURUS TM TM 2012 VTech Printed in China 91-002772-000 US Hi Friend, You re about to embark on a dino-mite adventure with me, Attila the Ankylosaurus! Just so you know, I
BATTERY CHARGER INSTRUCTION MANUAL. model no. ACG112CL
 model no. ACG112CL BATTERY CHARGER IMPORTANT: Please read this manual carefully before running this battery charger and save it for reference INSTRUCTION MANUAL 3 TABLE OF CONTENTS Technical specifications
CAT-1 Series 3. Installation Guide. The Valley Group, Inc. 871 Ethan Allen Hwy. Suite 104 Ridgefield, CT 06877
 CAT-1 Series 3 Installation Guide The Valley Group, Inc. 871 Ethan Allen Hwy. Suite 104 Ridgefield, CT 06877 (203) 431-0262 (203) 431-0296 FAX tvg@cat-1.com Installation of Load Cells for CAT-1 Systems
WVC. Wireless Valve Controller. Multiple Station Battery Powered Irrigation Controller. Owner s Manual and Installation Instructions
 WVC Wireless Valve Controller Multiple Station Battery Powered Irrigation Controller Owner s Manual and Installation Instructions TABLE OF CONTENTS Introduction...1 WVC Components...2 Installing the Battery...3
MODEL C HOVERBOARD USER MANUAL
 MODEL C HOVERBOARD USER MANUAL Thank you for purchasing High Roller Hoverboard Model C. Before you begin, please make sure to read the User Manual and follow all safety precautions. The User Manual can
Installation Instructions: Read these instructions in its entirety before performing any installation work.
 WIR-TRAN Rated for use on 110/120VAC 60Hz applications Installation Instructions: Read these instructions in its entirety before performing any installation work. FOR USE WITH POOL AND SPA PRODUCTS ETL
DOOR LIMITS A) ENGAGE CHAIN/BELT CONNECTOR TO CARRIAGE CAUTION B) CLOSE TRAVEL LIMIT
 ENGAGE CHAIN/BELT CONNECTOR TO CARRIAGE CAUTION B) CLOSE TRAVEL LIMIT") 20 6 DOOR LIMITS Severe injury or death can result if the door closing force is set too high. Never increase the door closing force above the minimum required to move the door. Never adjust force to compensate
20 6 DOOR LIMITS Severe injury or death can result if the door closing force is set too high. Never increase the door closing force above the minimum required to move the door. Never adjust force to compensate
Sectional And Tilting Door Opener
 Sectional And Tilting Door Opener Installation Instructions and User Guide FS 600 FS 1000 FS 1200 600N 1000N 1200N FS 600-Speed FS 1000-Speed 600N 1000N S/N WARNING Please read the manual carefully before
Pan and Tilt Head CDD2416-T
 Pan and Tilt Head CDD2416-T Installation guide Before attempting to connect or operate this product, please read these instructions completely Williams Electronics Ltd www.w-e.co.uk Tel: +44 (0)2921 660
Press the buttons for fun sounds and music! fisher-price.com
 K7189 Press the buttons for fun sounds and music! fisher-price.com Please keep these instructions for future reference, as they contain important information. Requires three button cell (LR44) batteries
Tractor Interface Module Installation Instructions. Switch Input (TIM-SI)
") Tractor Interface Module Installation Instructions Switch Input (TIM-SI) 821-7002 Installation Instructions Tractor Interface Module Switch Input (TIM-SI) 821-7002 Getting Started... 1 Installing the TIM...
Tractor Interface Module Installation Instructions Switch Input (TIM-SI) 821-7002 Installation Instructions Tractor Interface Module Switch Input (TIM-SI) 821-7002 Getting Started... 1 Installing the TIM...
INSTRUCTIONS FOR CONTINUED AIRWORTHINESS
 INSTRUCTIONS FOR CONTINUED AIRWORTHINESS INSTALLED IN AIRCRAFT LISTED IN APPROVED MODEL LIST, Issue Date RECORD OF REVISIONS Upon receipt of revisions, insert the revised pages into this document and enter
MALSR APPROACH LIGHTING. Medium-Intensity Approach Lighting System WITH ELEVATED SEQUENCED FLASHERS AND STEADY BURNING LIGHTS
 Medium-Intensity Approach Lighting System WITH ELEVATED SEQUENCED FLASHERS AND STEADY BURNING LIGHTS Compliance with Standards FAA: Uses Designed according to FAA-E-2325 The approach lighting system with
DeSoto NEMA 4X EMERGENCY LIGHTING UNIT. U.S. Versions: 6V- DM90X618 / DM90X654 12V- DM90X1254 / DM90X12100 INSTALLATION INSTRUCTIONS
 DeSoto U.S. Versions: 6V- DM90X618 / DM90X654 12V- DM90X1254 / DM90X12100 NEMA 4X EMERGENCY LIGHTING UNIT INSTALLATION INSTRUCTIONS U.S. Patent No.s 6,135,624; 6,193,395; 6,502,044 B1; D505,222; IMPORTANT
Instruction Manual. Blink HQ Charger. Charge on. a CarCharging Company
 Instruction Manual Blink HQ Charger a CarCharging Company 2014 by Blink Network, LLC No part of the contents of this document may be reproduced or transmitted in any form or by any means without the express
W9740. fisher-price.com. 2 Ride. 1 Sit. 3 Walk
 W9740 2 Ride 1 Sit 3 Walk Please keep this instruction sheet for future reference, as it contains important information. For ages 9 36 months and up to 44 lbs (20 kg). Adult supervision is required. Never
Eaton Battery Charger Module Models ASY-0652 and ASY-0675 User s Guide
 Eaton 9170 + Battery Charger Module Models ASY-0652 and ASY-0675 User s Guide Class A EMC Statements FCC Part 15 NOTE This equipment has been tested and found to comply with the limits for a Class A digital
Automated Coupled Roller Shade Instruction Manual. link. Coupled Shade System 2.6 and 3.3 Bracket Standard Roll Inside or Outside Mount
 Automated Coupled Roller Shade Instruction Manual link Coupled Shade System 2.6 and 3.3 Bracket Standard Roll Inside or Outside Mount WARNING: Read and understand all instructions to avoid damage or injury.
Conserve Insight Energy Use Monitor. User Guide
 Conserve Insight Energy Use Monitor User Guide Find out how much energy your devices really use including watts, the cost of operation, and the amount of carbon dioxide (CO 2 ) produced in generating the