WIRING DIAGRAM FOR SPEED SENSOR ADAPTER CABLE FOR MODEL YEARS 2003 _ 2004 SPEED SENSOR ADAPTER CABLE I
|
|
|
- Emil Long
- 6 years ago
- Views:
Transcription

1 Progressive
2 Or'\, 1
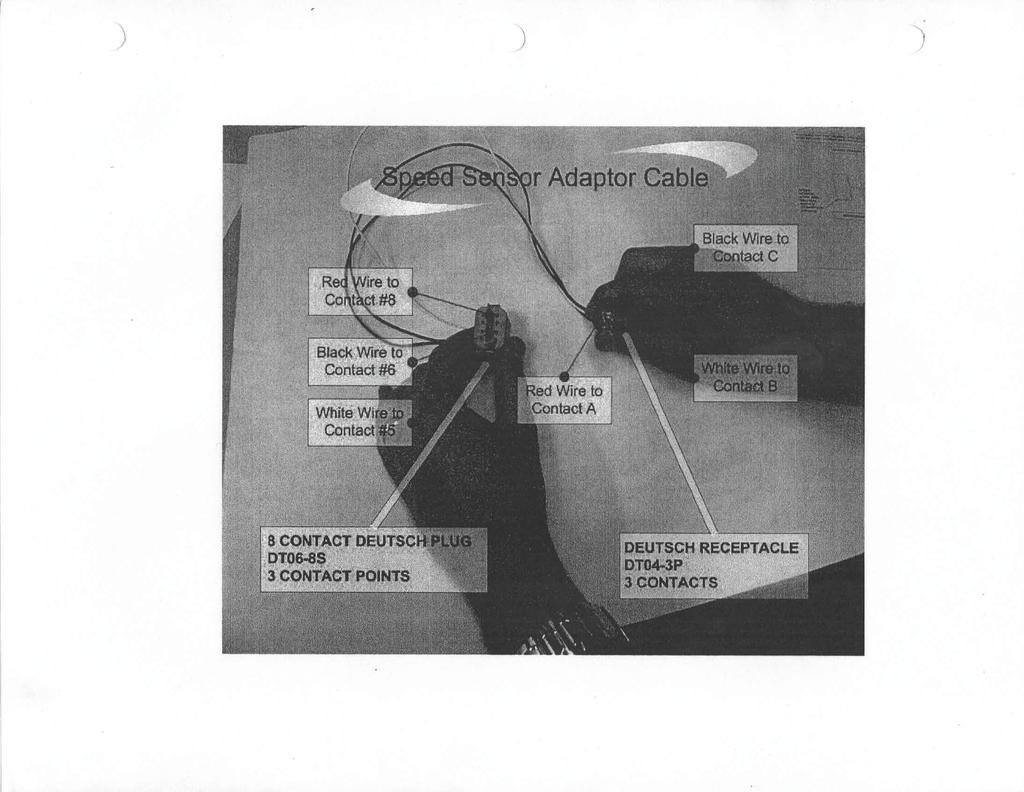
3 ) ) ) #20 AWG INSULATED HOOKUP WIRE, 3 PIECES, EACH CUT TO lb INCHES Jl CONNECTOR PART NUMBER DEUTSCH DT04-3P, QUANTITY = 1 CONTACT PART NUMBER , QUANTITY' 3..." "" Pl CONNECTOR PART NUMBER DEUTSCH DT06-BS, QUANTITY' 1 CONTACT PART NUMBER , QUANTITY = 3 WIRING DIAGRAM FOR SPEED SENSOR ADAPTER CABLE FOR MODEL YEARS 2003 _ lbinches ~ SPEED SENSOR ADAPTER CABLE I SPEED SENSOR, HORN AND NEUTRAL SWITCH CONNECTOR ON BIKE INTERCONNECT DIAGRAM FOR SPEED SENSOR ADAPTER CABLE FOR MODEL YEARS 2003 _2004 SPEED SENSOR TEST HARNESS, ITEMC, CONNECTOR
4 ) ) )

5 . ~ CLUTCH ADJUSTMENT (CABLE): CAUTION: Clutch adjustment should not be performed while motorcycle is hot, as clutch slippage may occur. 5. Loosen clutch adjuster screw locknut. Turn adjuster screw inward until it lightly seats. 6. Back out adjuster screw Y, turn. Torque adjuster screw locknut to 6 to 10 ft. lbs. (Fi Motorcycle will need to be in the upright position and level. 2. Pull clutch cable boot upward to expose clutch cable adjuster. 3. Loosen jam nut and turn adjuster all the way in so that no threads are showing, providing slack in the cable (Fig. I)., 7. Adjust clutch cable to obtain 1116to 1/8 inch of free play. 8. Tighten jam nut and slide boot back over adjuster. 9. Using blue Loctite@ 243 replace three (3) Y. -20 x 'I. inch SHCS bolts to attach derby cover to primary chaincase cover. 4. Remove three (3) Y. -20 x 'I. inch SHCS bolts to detach derby cover from rim chaincase cover Fig. 2. CLUTCH ADJUSTMENT (HYDRAULIC): CAUTION: Clutch adjustment should not be performed while motorcycle is hot, as clutch slippage may occur. 1. Motorcycle will need to be in the upright position and level. 2. Remove three (3) Y. -20 x 'I. inch SHCS bolts to detach derby cover from primary chaincase cover (Fig. I).
 Y.")
6 3. Loosen locknut on adj uster screw to allow adjuster screw to tum freely (Fig 2). /""'\ I 4. Tighten adjuster screw until tension is achieved Fig 3). 5. Back adjuster screw out 1/8 tum. 6. Tighten locknut. 7. Check fluid level. 8. Using blue Loctite@ 243 replace three (3) Y. -20 x % inch SHCS bolts to attach derby cover to primary chaincase cover.

7 Progressive Air Ride Suspension Description: The Air Ride Suspension system incorporates 1 coil-over shock absorber of a conventional Softtail@ design. It has an oil filled dampener system wrapped by a stiff spring under compression. The second "shock" is actually a pair of air chambers on opposite sides of a piston within a shock absorber body. These air chambers are pressurized by the use of an on-board air compressor. The system design incorporates manual air pressure bleed valves, as well as manual fill Schrader valves in the event of a compressor failure. In the event of a pressure hose failure or an air chamber failure, the motorcycle, will failsafe into a "neutral" ride height. This insures the motorcycle suspension will not bottom out against the frame stops, should such a pressure failure occur. Balancing the air pressure in each of the two air chambers, by activating the air pump, controls the system. With both chambers bled (by depressing the two bleed valves, fi ure 1),, you have the suspension in the "neutral" position. Start familiarizing your self with the system by depressing the bottom half of the toggle switch, located on the ignition switch module figure 2, Operation: NOTE: DO NOT ATTEMPT TO ADJUST THE AIR RIDE SUSPENSION WHILE MOVING. THIS COULD RESULT IN SERIOUS BODILY INJURY OR DEATH. NEVER OPERATE THIS SYSTEM WITH LESS THAN 40 PSI IN THE REAR PRESSURE CHAMBER, AND LESS THAN 10 PSI IN THE FRONT PRESSURE CHAMBER. to activate the air pump. Under normal operation, the rear pressure chamber is being pressurized, and the motorcycle will raise. Release the switch when the motorcycle stops raising. Now locate and depress the bleed valve that allows....

8 -{\ Stand the motorcycle upright. With no rider on the motorcycle, pressurize the rear chamber to the maximum 150 psi. This will cause the rear wheel to be at its highest point. Measure from the center of the axle block cover to the middle of the of the rear fender, figure 5. and lets the motorcycle lower back to the "neutral" position. Repeat the process by depressing the opposite side of the tog Ie switch figure 4, forcing air into the front air chamber causing the motorcycle to lower. Depressing the second bleed valve will again allow the motorcycle to return to the "neutral" position. Remember the minimum air pressure values are 40 psi for the rear chamber and 10 psi for the front chamber. Both air chambers can be pressurized to let the individual rider adjust for road conditions and motorcycle loading. As a rule of thumb, the higher the pressures in both chambers the harsher the ride. Only adjust the system while sitting on the motorcycle with both feet firmly 0ll the ground, and the motorcycle off, or idling in neutral. 1\.,. Setting up the Bottoming Control: Once you have completed this measurement place rider on the motorcycle and take the same measurement. The second measurement should be between 1.25 and 1.5 inches less that your first measurement. If your second measurement is not 1.25 to 1.5 inches less than the first, bleed off air from the rear chamber until you achieve the proper measurement. Setting up the Ride Height: NOTE: When setting up the ride height a minimum of two inches should be between the top of the tire and the rear fender. NOTE: Ride height will affect to the handling of the motorcycle. You have now successfully set the "Bottoming Control", now it is time to adjust the "Ride Height". To do this, depress the toggle switch that controls the amount of air in the front chamber or
9 \._- "Ride Height" chamber, until the motorcycle is lowered to the desired level. To raise the "Ride Height", release pressure in the "Ride Height" chamber by releasing air from the bleed valve.
E.C.C. and AirTail Compressor Kit For the Airtail Suspension System Setup Instructions
 E.C.C. and AirTail Compressor Kit For the Airtail Suspension System Setup Instructions Note: Please read and follow the Installation Instructions first, then read and follow these Setup Instructions completely
E4-WM5-Y556A00 MOUNTING INSTRUCTION
 IMPORTANT! READ THIS FIRST! Installation of shock absorbers requires special tools and expert knowledge. Accordingly, installation of all BILSTEIN products must be performed by a qualified suspension specialist.
Installation Guide. Sportster. 34 Sport Trike Kit 2004 & UP
 Installation Guide Sportster 34 Sport Trike Kit 2004 & UP INCLUDED IN YOUR TRIKE KIT: COMPONENTS Frankenstein Trikes Rear End 2 Sport Shocks Swing Arm 2 Sport Fenders 2 Fender Brackets 10 lug nuts 1 2
E4-WM5-Y530A00 MOUNTING INSTRUCTION
 IMPORTANT! READ THIS FIRST! Installation of shock absorbers requires special tools and expert knowledge. Accordingly, installation of all BILSTEIN products must be performed by a qualified suspension specialist.
IMPORTANT! READ THIS FIRST!
 IMPORTANT! READ THIS FIRST! Installation of shock absorbers requires special tools and expert knowledge. Accordingly, installation of all BILSTEIN products must be performed by a qualified suspension specialist.
Installation Guide. Sportster. 34 Sport Trike Kit & Down
 Installation Guide Sportster 34 Sport Trike Kit 2003 & Down INCLUDED IN YOUR TRIKE KIT: COMPONENTS Frankenstein Trikes Rear End 2 Sport Shocks Swing Arm 2 Sport Fenders 2 Fender Brackets 10 lug nuts 1
518A00 MOUNTING INSTRUCTION
 IMPORTANT! READ THIS FIRST! Installation of shock absorbers requires special tools and expert knowledge. Accordingly, installation of all BILSTEIN products must be performed by a qualified suspension specialist.
AmTryke Adult Recumbent Model HP1000 #50-HC-1000
 AmTryke Adult Recumbent Model HP1000 #50-HC-1000 TOOLS Needed for Assembly 5 mm Allen Wrench 8 mm Socket or Wrench 10 mm Socket or Wrench 14 mm Socket or Wrench 15 mm Socket or Wrench 22 mm Socket or Adjustable
Installation Guide. V-Rod. 38 Sport Trike Kit. All Years
 Installation Guide V-Rod 38 Sport Trike Kit All Years INCLUDED IN YOUR TRIKE KIT: COMPONENTS Frankenstein Trikes Rear End Swing Arm 2 Sport Fenders 2 Fender Brackets 10 lug nuts 2 American Eagle 15 X 8
See SPECIFICATIONS & PROCEDURES article in WHEEL ALIGNMENT. Lower Ball Joint 1-22 ( ) Upper Ball Joint 6-39 ( )
 Upper Ball Joint 6-39 ( )") Page 1 of 9 ARTICLE BEGINNING DESCRIPTION Front suspension uses coil springs with integral shock absorbers. Coil springs are mounted between the upper control arms and vehicle frame. A stabilizer bar controls
Page 1 of 9 ARTICLE BEGINNING DESCRIPTION Front suspension uses coil springs with integral shock absorbers. Coil springs are mounted between the upper control arms and vehicle frame. A stabilizer bar controls
AmTryke Adult Recumbent Model JT2000 #50-FC-2000
 AmTryke Adult Recumbent Model JT2000 #50-FC-2000 TOOLS Needed for Assembly 5 mm Allen Wrench 8 mm Socket or Wrench 10 mm Socket or Wrench 14 mm Socket or Wrench 15 mm Socket or Wrench 22 mm Socket or Adjustable
Installation Guide. Yamaha Bolt. 36 Light Sport 200 Trike Kit. All Years
 Installation Guide Yamaha Bolt 36 Light Sport 200 Trike Kit All Years INCLUDED IN YOUR TRIKE KIT: COMPONENTS Frankenstein Trikes Rear End Swing Arm 2 Fenders 2 Fender Brackets 10 lug nuts 1 2 Pacer 15
MINI BIKE-2016 MB 200 Set-up Instruction
 MINI BIKE-2016 MB 200 Set-up Instruction 2016-06-01 1. Install rear shocks: open the crate and install the rear shocks with bolt M10x1.25x40 and self-locking nut M10x1.25. The requested torque is 37-44N.m
INSTALLATION GUIDE DIRECT-REPLACEMENT
 DIRECT-REPLACEMENT INSTALLATION GUIDE FORD T6 RANGER (12+) 983-02-085-2.0 Performance Series Coil-Over IFP 883-02-093-2.5 Factory Series Coil-Over Reservoir 883-06-093-2.5 Factory Series Coil-Over Reservoir
B8 5112/5162 LEVELING KIT (FRONT) RAM x4 GAS
 RAM x4 GAS") B8 5112/5162 LEVELING KIT (FRONT) 2014+ RAM 2500 4x4 GAS IMPORTANT! READ THIS FIRST! Installation of shock absorbers requires special tools and expert knowledge. Accordingly, installation of all BILSTEIN
B8 5112/5162 LEVELING KIT (FRONT) 2014+ RAM 2500 4x4 GAS IMPORTANT! READ THIS FIRST! Installation of shock absorbers requires special tools and expert knowledge. Accordingly, installation of all BILSTEIN
ProPass-200 Top Dresser
 Setup Manual Form No. 3365-184 Rev A ProPass-200 Top Dresser Model No. 44700-Serial No. 310000001 and Up Model No. 44701-Serial No. 310000001 and Up Model No. 44704 Model No. 44705 Model No. 44706 Model
Trike Conversion Kit ROADLINER, STRATOLINER, & STRATOLINER DELUXE
 by Trike Conversion Kit ROADLINER, STRATOLINER, & STRATOLINER DELUXE Installation Instructions Revised 1-2015 California Sidecar Parts & Technical Support 434.263.8866 Table of Contents: 1. Warnings and
FRONT FORK 2.16 GENERAL REMOVAL HOME. 4. See Figure Loosen upper and lower fork clamp pinch fasteners (1, 4).
.") FRONT FORK.6 GENERAL The XRScg model utilizes a mm fork assembly while all other models have changed to the mm fork assembly. The front fork consists of two telescoping outer tube/inner slider assemblies.
FRONT FORK.6 GENERAL The XRScg model utilizes a mm fork assembly while all other models have changed to the mm fork assembly. The front fork consists of two telescoping outer tube/inner slider assemblies.
Installation Guide. Sportster 34 Sport Trike Kit
 Installation Guide Sportster 34 Sport Trike Kit INCLUDED IN YOUR TRIKE KIT: COMPONENTS HARDWARE PULLEY MOUNTING 5 pcs. - 7/16-14 x 1 ½ Grd. 8 (Gold) Bolt 5 pcs. - 7/16 Lock Washer 34 Light Sport Rear End
FRONT WHEEL AND BRAKE DISCS. Order Job/Part Q ty Remarks Removing the front wheel and brake discs NOTE:
 FRONT WHEEL AND BRAKE DISCS EAS00514 SIS FRONT WHEEL AND BRAKE DISCS 1 2 3 4 Order Job/Part Q ty Remarks Removing the front wheel and brake discs Remove the parts in the order listed. Place the motorcycle
SUSPENSION - FRONT Toyota Celica DESCRIPTION ADJUSTMENTS & INSPECTION WHEEL ALIGNMENT SPECIFICATIONS & PROCEDURES WHEEL BEARING
 SUSPENSION - FRONT 1988 Toyota Celica FRONT SUSPENSION Toyota DESCRIPTION Vehicles are equipped with front wheel drive and independent MacPherson strut front suspension. Suspension consists of vertically
SUSPENSION 2-1 SUSPENSION TABLE OF CONTENTS
 DN SUSPENSION 2-1 SUSPENSION TABLE OF CONTENTS page ALIGNMENT... 1 FRONT SUSPENSION - 4x2... 6 page FRONT SUSPENSION - 4x4... 14 REAR SUSPENSION... 23 ALIGNMENT TABLE OF CONTENTS page AND OPERATION WHEEL
2010+ Victory Cross Country / Cross Roads Installation Guide Nov 2014
 2010+ Victory Cross Country / Cross Roads Installation Guide Nov 2014 125 Industrial Drive Spearfish, SD 57783 Toll Free 888.3WHEELS w w w. l e h m a n t r i k e s. c o m UNDERSTANDING SAFETY LABELS &
1997 Mazda MX-5 Miata SUSPENSION Front - Miata
 1997-2000 SUSPENSION Front - Miata DESCRIPTION NOTE: Mazda did not produce 1998 Miata models. Front suspension is an independent, double wishbone design using upper and lower control arms. A spring over
Shock Absorber Rebuild Manual
 Shock Absorber Rebuild Manual Model PODIUM RC3 FOX RACING SHOX 130 Hangar Way, Watsonville, CA 95076 PHONE 800.369.7469 FAX 831.768.7026 Email: psservicemw@ridefox.com Website: www.ridefox.com Disclaimer
FRONT SHOCK ABSORBER
 FRONT SHOCK ABSORBER INSTALLATION AND USER S INSTRUCTIONS Thank you for purchasing a MAZDASPEED accessory. Before removal and installation, be sure to thoroughly read these instructions. Please read the
INSTALLATION INSTRUCTIONS
 INSTALLATION INSTRUCTIONS 2013-2014 Honda CBR500R/RA Tour Performance Handlebar Risers P/N: HR01087 IMPORTANT: PLEASE GIVE CUSTOMER ENCLOSED INFORMATION! Thank you for your purchase of our HeliBars. They
Sportster 34 Sport Trike Kit
 Sportster 34 Sport Trike Kit INCLUDED IN YOUR TRIKE KIT: COMPONENTS HARDWARE PULLEY MOUNTING 5 pcs. - 7/16-14 x 1 ½ Grd. 8 (Gold) Bolt 5 pcs. - 7/16 Lock Washer 34 Light Sport Rear End FENDER MOUNTING
MODEL XR200 2-BIKE CARRIER
 PRODUCT REGISTRATION: MAKE SURE TO REGISTER YOUR PURCHASE AT http://allensportsusa.com/about/product-registration TO QUALIFY FOR PRODUCT WARRANTY AND TO RECEIVE IMPORTANT PRODUCT NOTIFICATIONS MODEL XR200
IMPORTANT! READ THIS FIRST!
 MPORTANT! READ THS FRST! nstallation of shock absorbers requires special tools and expert knowledge. Accordingly, installation of all BLSTEN products must be performed by a qualified suspension specialist.
TOYOTA COROLLA LOWERING SPRINGS Preparation
 Preparation Part Number: PTR07-02140 Kit Contents Item # Quantity Reqd. Description 1 2 Front Spring 2 2 Rear Spring 3 1 Hardware 4 1 Instruction Form Hardware Bag Contents Item # Quantity Reqd. Description
CROSSRUNNER 250 REASSEMBLY MANUAL. ATV - All Terrain Vehicle. Age Category: Adult Only riders age 16 years or older may ride this bike
 CROSSRUNNER 250 ATV - All Terrain Vehicle Age Category: Adult Only riders age 16 years or older may ride this bike REASSEMBLY MANUAL Note: This ATV was fully assembled and tested at the CROSSRUNNER factory.
IMPORTANT! READ THIS FIRST!
 MPORTANT! READ THS FRST! nstallation of shock absorbers requires special tools and expert knowledge. Accordingly, installation of all BLSTEN products must be performed by a qualified suspension specialist.
Installation Guide. Yamaha. 40 Sport Trike Kit All Years
 Installation Guide Yamaha 40 Sport Trike Kit All Years INCLUDED IN YOUR TRIKE KIT: COMPONENTS Frankenstein Trikes Rear End Swing Arm Body Body Mounting Bracket 10 lug nuts 1 2 American Eagle 15 X 8 wheels
4. Front Strut 4-1 SERVICE PROCEDURE A: REMOVAL
 A: REMOVAL G4M0502 1 2 3 4 5 6 Dust seal Strut mount Spacer Upper spring seat Rubber seat Dust cover 7 8 9 10 11 Helper Coil spring Damper strut Adjusting bolt Self-locking nut N m (kg-m, ft-lb) T1: 20±6
REMOVAL & INSTALLATION
 REMOVAL & INSTALLATION CAUTION: This application is an interference engine. Do not rotate camshaft or crankshaft when timing belt is removed, or engine damage may occur. TIMING BELT & BALANCE SHAFT BELT
w w w. h d o n l i n e s h o p. d e CHROME FRONT BRAKE MASTER CYLINDER KIT GENERAL INSTALLATION -J03735 REV Kit Number Models
 -J05 REV. 005-06- GENERAL Kit Number 58-D, 58-D Models CHROME FRONT BRAKE MASTER CYLINDER KIT These Chrome Master Cylinder Kits are designed to replace the original equipment front brake master cylinder
SCION tc LOWERING SPRINGS Preparation
 Preparation Part Number: PTR11-21100 PTR11-21100-50 Kit Contents Item # Quantity Reqd. Description 1 2 Front Spring 2 2 Rear Spring 3 2 Locking Nut 4 2 Spring Bumper, Front 5 1 Instruction Form Hardware
w w w. h d o n l i n e s h o p. d e CRUISE CONTROL KIT GENERAL INSTALLATION -J04064 REV Kit Number Models Additional Parts Required
 -J006 REV. 006-08- CRUISE CONTROL KIT GENERAL Kit Number 7796-07 Models For the most up-to-date model fitment information, please see the product label or www.harley-davidson.com. Additional Parts Required.
Victory CrossRoads CrossCountry CrossCountry Tour HardBall
 by Trike Conversion Kit Victory CrossRoads CrossCountry CrossCountry Tour HardBall Installation Instructions Revised 3-2018 California Sidecar Parts & Technical Support 434.263.8866 Table of Contents:
FREIGHT TRAIN HEADLAMP NACELLE KITS
 -J09 0-08-8 FREIGHT TRAIN HEADLAMP NACELLE KITS GENERAL Kit Numbers 6000, 600 Models For model fitment information, see the P&A retail catalog or the Parts and Accessories section of wwwharley-davidsoncom
3. INSPECTION/ADJUSTMENT
 SERVICE INFORMATION...3-0 FINAL REDUCTION GEAR OIL...3-7 MAINTENANCE SCHEDULE...3-2 DRIVE BELT...3-7 FUEL FILTER...3-3 BRAKE SHOE...3-8 THROTTLE OPERATION...3-3 BRAKE ADJUSTING NUT...3-8 AIR CLEANER...3-4
Remove four nuts, then the cooling fan assembly.
 The DOHC and SOHC engines both use the same Service and Repair procedure from Isuzu. Make note that the DOHC and SOHC engines both use a single gear for the camshaft but use different alignment marks.
HAND THROTTLE KIT For Workman 3000 Series
 FORM NO. 7 6 MODEL NO. 0746 INSTALLATION INSTRUCTIONS HAND THROTTLE KIT For Workman 000 Series. Position vehicle on a clean, level surface, stop engine, engage parking brake and remove key from ignition
Final Assembly Instructions Portside Cruiser
 Final Assembly Instructions Portside Cruiser Thank you for buying your new bicycle from L.L.Bean. Read these instructions carefully before beginning the final assembly. Prior to shipping, our expert cycling
1993 ACCESSORIES & EQUIPMENT Volkswagen Cruise Control Systems. Volkswagen; Corrado SLC, EuroVan, Passat
 Article Text ARTICLE BEGINNING 1993 ACCESSORIES & EQUIPMENT Volkswagen Cruise Control Systems Volkswagen; Corrado SLC, EuroVan, Passat DESCRIPTION & OPERATION The cruise control system allows driver to
P/N Figure 1. Figure 2. 3 Valve Stem
 P/N 80523 BY MN-75 (12612) ECN1965 ECR 8167 3 Valve Stem 2 1 Figure 1 1 1. Jack up front end of vehicle and place safety stands under axle. Remove front wheels and lower shock absorber attaching bolts.
Installation Instructions
 By Trike Conversion Kit for INDIAN MOTORCYCLES CLASSIC - VINTAGE - DARKHORSE CHIEFTAN & ROADMASTER MODELS 2014 - CURRENT Installation Instructions Revised 4-2017 California Sidecar Parts & Technical Support
INSTALLATION GUIDE. Doc ID: A Doc Rev:
 REKLUSE MOTOR SPORTS EXP Kit for Harley-Davidson Big Twin Hydraulic-Actuated OVERVIEW INSTALLATION GUIDE Doc ID: 191-6200A Doc Rev: 061215 This kit replaces the OEM clutch pack (friction disks and drive
I. Preparing the Vehicle
 Multiple Applications See below for kit numbers and important notes by MN-126 (17507) ECN 5244 NOTE: If your vehicle is equipped with vibration dampers between the turns of the coil, it is necessary that
Chevy HD Recoil Traction Bar System. Part#: ,
 Part#: 121408, 123409 Chevy HD Recoil Traction Bar System Rev. 111816 491 W. Garfield Ave., Coldwater, MI 49036. Phone: 517-279-2135 Web/live chat: www.bds-suspension.com. E-mail: tech-bds@sporttruckusainc.com
Trike Conversion Installation Guide Kawasaki Vulcan 900 Classic, Classic LT, and Custom Models 2007 and Up Solid Axle Suspension
 Trike Conversion Installation Guide Kawasaki Vulcan 900 Classic, Classic LT, and Custom Models 2007 and Up Solid Axle Suspension CAUTION: -Failure to make the proper adjustments will potentially lead to
w w w. h d o n l i n e s h o p. d e FLHT FRONT END LOWERING KIT GENERAL -J02546 REV Kit Number Models Additional Parts Required
 -J0546 REV. 007--0 GENERAL Kit Number 5468-06 Models For model fitment information, please see the P&A Retail Catalog or the Parts and Accessories section of www.harleydavidson.com (English only). Additional
Installation Instructions
 Installation Instructions Eibach Springs, Inc. 264 Mariah Circle Corona, California 92879-1751 USA Tech Support 800-222-8811 Ext 114 Eibach Pro Street-S Coilovers - #2895.711 2009 Dodge Challenger, R/T,
Installation Instructions
 BY Trike Conversion Kit KAWASAKI Vulcan 900 CLASSIC- CLASSIC LT AND CUSTOM MODELS 2006-CURRENT Installation Instructions Revised 1-2015 California Sidecar Parts & Technical Support 434.263.8866 2 Table
1400LB Capacity Jumbo Wagon Owner s Manual ITEM# 59701
 1400LB Capacity Jumbo Wagon Owner s Manual ITEM# 59701 WARNING: Read carefully and understand all INSTRUCTIONS before operating. Failure to follow the safety rules and other basic safety precautions may
1400-Lb. Capacity Jumbo Wagon Owner s Manual
 1400-Lb. Capacity Jumbo Wagon Owner s Manual WARNING: Read carefully and understand all INSTRUCTIONS before operating. Failure to follow the safety rules and other basic safety precautions may result in
Owner s Instructions and Safety Manual. Double-Double series. Performance Bicycle Trailers
 Owner s Instructions and Safety Manual Double-Double series TM Performance Bicycle Trailers Contents 1. Trailer Components 2. Tow Bar and Hitch Components 3. Assembling Your Trailer 4. Attaching the Wheels
3. INSPECTION/ADJUSTMENT
 3 SERVICE INFORMATION...3-0 FINAL REDUCTION GEAR OIL...3-7 MAINTENANCE SCHEDULE...3-2 DRIVE BELT...3-7 FUEL FILTER...3-3 BRAKE SHOE...3-8 THROTTLE OPERATION...3-3 BRAKE ADJUSTING NUT...3-8 AIR CLEANER...3-4
A proportioning valve is used to regulate brake pressure between front and rear brakes. Rear brakes on all models are self-adjusting.
 Page 1 of 21 ARTICLE BEGINNING DESCRIPTION & OPERATION WARNING: For warnings and procedures regarding vehicles equipped with Anti- Lock Brake Systems (ABS), see ANTI-LOCK BRAKE SYSTEM article in the BRAKES
Installation Manual. Model T680A/B Engine Brakes. For Mack 6 Cylinder, 4 Valve Head E6 and E7 Series Engines. Engine Brakes
 Engine Brakes Installation Manual Model T680A/B Engine Brakes For Mack 6 Cylinder, 4 Valve Head E6 and E7 Series Engines TecBrake P.O. Box 27822 Houston, Texas 77227 INSTALLATION MANUAL TECBRAKE T680A
E.C.C. Airtail Compressor Kit for Airtail Suspension System Installation Instructions
 E.C.C. Airtail Compressor Kit for Airtail Suspension System Installation Instructions The following document will cover Installation Instructions for the following applications: 2000-2006 Harley Davidson
FORK FREE PISTON MODIFICATION 2011 HONDA CRF250R
 217 Lorain Place Los Gatos, California 95032 408.406.2089 www.smartperformanceinc.com www.spi-racing.com FORK FREE PISTON MODIFICATION 2011 HONDA CRF250R WHAT? All production versions of the 2011 HONDA
PRODUCT NOTES: These components are designed for suspension height adjustment lower than stock height.
 INSTALLATION INSTRUCTIONS Progress Technology Competition Series Coilover System 2001 2005 Acura RSX 2001-2005 Honda Civic, Civic Si Revision B (2/19/13) WHO SHOULD INSTALL THIS PRODUCT? Progress Technology
Four-Wheel Alignment ( )
") Published: Mar 7, 2005 Four-Wheel Alignment (57.65.04) CAUTION: Make sure the vehicle is on a flat level surface. CAUTION: Make sure the tire pressures are within specification. CAUTION: Make sure that
Published: Mar 7, 2005 Four-Wheel Alignment (57.65.04) CAUTION: Make sure the vehicle is on a flat level surface. CAUTION: Make sure the tire pressures are within specification. CAUTION: Make sure that
INSTALLATION INSTRUCTIONS 6298 Air Suspension Kit (pat. pending) Thank you for purchasing a quality Hellwig Product.
 Thank you for purchasing a quality Hellwig Product.") 559-734-7451 800-367-5480 TechSupport@HellwigProducts.com INSTALLATION INSTRUCTIONS 6298 Air Suspension Kit (pat. pending) Thank you for purchasing a quality Hellwig Product. PLEASE READ THIS INSTRUCTION
559-734-7451 800-367-5480 TechSupport@HellwigProducts.com INSTALLATION INSTRUCTIONS 6298 Air Suspension Kit (pat. pending) Thank you for purchasing a quality Hellwig Product. PLEASE READ THIS INSTRUCTION
INSPECTION/ADJUSTMENT
 3 3 INSPECTION/ADJUSTMENT SERVICE INFORMATION----------------------------------------------------------------------- 3-1 MAINTENANCE SCHEDULE-------------------------------------------------------------------
INSTALLATION INSTRUCTION 89400
 INSTALLATION INSTRUCTION 89400 FOR RANCHO SUSPENSION SYSTEM RS66400B: 2012 RAM 1500 4WD. READ ALL INSTRUCTIONS THOROUGHLY FROM START TO FINISH BEFORE BEGINNING INSTALLATION Rev B IMPORTANT NOTES! WARNING:
INSTALLATION INSTRUCTIONS FOR THE MOTOR TRIKE CROSS COUNTRY / CROSS ROADS / HARD BALL RAKE KIT
 INSTALLATION INSTRUCTIONS FOR THE MOTOR TRIKE CROSS COUNTRY / CROSS ROADS / HARD BALL RAKE KIT Thank you for choosing the Motor Trike Cross Country / Cross Roads / Hard Ball rake kit. We ask that you read
'99-03 CHEVROLET/GMC IFS 4WD 6" SUSPENSION SYSTEM P/N INSTALLATION INSTRUCTIONS
 1/16/04 '99-03 CHEVROLET/GMC IFS 4WD 6" SUSPENSION SYSTEM P/N. 10-41099 INSTALLATION INSTRUCTIONS NOTE: Each Lift Kit and options to Lift Kits are packaged separately. Therefore, installation procedures
This page was intentionally left blank.
 2004 OWNER'S MANUAL 82 This page was intentionally left blank. CONGRATULATIONS! Welcome to the American IronHorse Family The AMERICAN IRONHORSE Motorcycle you have just purchased utilizes the latest technology
4 & 6 4-Link Suspension Systems. Ford Super Duty 4WD Part#: ,
 Part#: 013013, 013014 4 & 6 4-Link Suspension Systems Ford Super Duty 4WD 2011-2016 Rev. 051817 491 W. Garfield Ave., Coldwater, MI 49036. Phone: 517-279-2135 E-mail: tech-bds@sporttruckusainc.com Read
KG09100BK / KG09101BK GM WD.
 KG09100BK / KG09101BK GM. 1988-2006 2 WD. KG09101BK KG09100BK Instruction Sheet: P10476-05 2013 Daystar Products International Inc. Tools Needed Quantity Description 1 Floor Jack 2 Jack Stands 2 Wheel
Progressive Suspension Airtail I.A.S.
 5572 Fresca Drive, La Palma, CA 90623 714.523.8700, FAX 714.523.3220 Progressive Suspension Airtail I.A.S. Installation Instructions for Harley Davidson E.C.C. with Compressor Kit FLH/FLT Models with and
INSTRUCTIONS. w w w. h d o n l i n e s h o p. d e ENGINE GUARD-MOUNTED FOG LAMP KIT 1WARNING -J02798 REV Installation.
 INSTRUCTIONS -J0798 REV. 9-4-00 Kit Number 689-98B General ENGINE GUARD-MOUNTED FOG LAMP KIT Installation This kit fits all models equipped with Harley-Davidson -/4 in. ( mm) diameter front engine guards,
Suspension System RS6582B
 Suspension System RS6582B Tahoe/Yukon READ ALL INSTRUCTIONS THOROUGHLY FROM START TO FINISH BEFORE BEGINNING INSTALLATION IMPORTANT NOTES! WARNING: This suspension system will enhance the off-road performance
A Division of Thiessen Products, Inc.
 The JIMS FORCEFLOW CYLINDER HEAD COOLER is designed for Twin Cam Models 1999 to present. Also fits all JIMS Twin Cam Race Engines. NOTE: These instructions show the installation of this product on a 2012
Engineered to Ride, Built to last
 Congratulations on your selection to purchase an Arnott Air Suspension System. We at Arnott Air Suspension Systems are proud to offer a high quality product at the industry s most competitive pricing.
***THE OWNER'S MANUAL MUST BE GIVEN TO THE END USE CUSTOMER AFTER COMPLETING THE INSTALLATION.***
 INSTALLATION INSTRUCTIONS FOR THE MOTOR TRIKE HARLEY MECHANICAL REVERSE 1999-2006 FIVE SPEED FLH LAST UPDATED: OCTOBER 2011 AS THE INSTALLER OF THIS MECHANICAL REVERSE, YOU MUST BECOME FAMILIAR WITH PROPER
JEEP WRANGLER JEEP WRANGLER UNLIMITED 2 & 4 DOOR 1 BODY LIFT KIT INSTALLATION INSTRUCTIONS KIT# 991
 3651 N Highway 89 Chino Valley, AZ 86323 (928) 636-7080 www.p-a-g.net JEEP WRANGLER JEEP WRANGLER UNLIMITED 2 & 4 DOOR 1 BODY LIFT KIT INSTALLATION INSTRUCTIONS 07-11 KIT# 991 Installation of a Performance
3 Suspension System. Dodge Ram Dodge Ram Part#:
 Part#: 012311 3 Suspension System Dodge Ram 3500 2013 Dodge Ram 2500 2014 Rev. 041917 491 W. Garfield Ave., Coldwater, MI 49036. Phone: 517-279-2135 E-mail: tech-bds@sporttruckusainc.com Read And Understand
Trike Conversion Kit. KAWASAKI 1700 Vulcan Voyager Vulcan Vaquero Vulcan Nomad. Installation Instructions
 BY Trike Conversion Kit KAWASAKI 1700 Vulcan Voyager Vulcan Vaquero Vulcan Nomad Installation Instructions REVISED 1-2015 California Sidecar Parts & Technical Support 434.263.8866 Table of Contents: 1.
PERIODIC MAINTENANCE
 PERIODIC MAINTENANCE CONTENTS PERIODIC MAINTENANCE SCHEDULE 2 1 MAINTENANCE PROCEDURES 2 3 2 BATTERY 2 3 CYLINDER HEAD NUTS AND EXHAUST PIPE NUTS 2 4 CYLINDER HEAD AND CYLINDER 2 4 SPARK PLUG 2 4 FUEL
Flt/Flh Road King 38 Sport Trike Kit. Installation Guide
 Flt/Flh Road King 38 Sport Trike Kit Installation Guide INCLUDED IN YOUR TRIKE KIT: COMPONENTS HARDWARE 38 Sport Std. Rear End Swing Arm PULLEY MOUNTING 5 pcs. - 7/16-14 x 2 Grd. 8 (Gold) Bolt (2000 &
Current. Installation Instructions
 by Trike Conversion Kit 2004 - Current Harley-Davidson Sportster Installation Instructions REVISED 4-2017 California Sidecar Parts & Technical Support 434.263.8866 Table of contents: 1. Warnings and Considerations
Read and understand all instructions and warnings prior to installation of system and operation of vehicle.
 491 W. Garfield Ave., Coldwater, MI 49036 Phone: 517-279-2135 Web/live chat: www.bds-suspension.com E-mail: tech@bds-suspension.com Part#: 121619 Product: Rear Traction Bar System Read and understand all
INSTALLATION GUIDE DIRECT-REPLACEMENT
 DIRECT-REPLACEMENT INSTALLATION GUIDE TITAN (04+) 883-06-120-2.5 Factory Series Coil-Over Reservoir - Adjustable 883-02-120-2.5 Factory Series Coil-Over Reservoir 983-02-053-2.0 Performance Series Coil-Over
Spring manual V3.1 ENGLISH
 Spring manual V3.1 ENGLISH HYPERPRO TOOLS, used in this manual: Tool Description Part no. A, B, C Cartridge fork spring removal tool kit HP-T01 D Big Piston Fork end cap socket 45mm HP-T102 E Big Piston
PLEASE BE SAFE WHEN RIDING ALWAYS WEAR A HELMET AND OBEY ALL LAWS!
 X-Treme TM Electric Scooters X-10 Electric Scooter Owner s Manual PLEASE BE SAFE WHEN RIDING ALWAYS WEAR A HELMET AND OBEY ALL LAWS! Page1 IMPORTANT BATTERY MAINTENANCE and CHARGING INSTRUCTIONS 1. You
TAHOE/YUKON SILVERADO/SIERRA 1500 SERIES 2 FRONT LEVELING KIT INSTALLATION INSTRUCTIONS KIT# CL220PA
 This kit should only be installed on a vehicle that is in good working condition. Before you install the kit, thoroughly inspect the vehicle for corrosion or deformation of the sheet metal. If the vehicle
MODELS 1324 & 1624 & 1824
 THE MODELS 1324 & 1624 & 1824 HYDRAULIC TRENCHERS CONGRATULATIONS! You are now the proud owner of a BARRETO trencher. Please take a moment of your time to look over the following information. Familiarize
w w w. h d o n l i n e s h o p. d e CHROME SWITCH HOUSING KIT GENERAL HANDLEBAR SWITCH REMOVAL/INSTALLATION FXDWGI AND FXDBI MODEL TURN SIGNAL REMOVAL
 -J00 REV. 00-07-9 GENERAL Kit Number 70-9B, 70-9B, 708-9C Models For the most up-to-date model fitment information, please see the product label or www.harley-davidson.com. See Table for items contained
MODEL XLT-X2 BIKE TRAILER. Owner s Manual should be kept for future reference
 1 MODEL XLT-X2 BIKE TRAILER Owner s Manual should be kept for future reference 1. Completely read and understand Owner s Manual before assembling or operating this product. 2. This product should be assembled
INSTALLATION INSTRUCTIONS FOR THE TOMAHAWK ELECTRIC REVERSE
 INSTALLATION INSTRUCTIONS FOR THE TOMAHAWK ELECTRIC REVERSE LAST UPDATED: April 2018 Thank you for choosing the Motor Trike Electric Reverse. We ask that you read the directions before you start and follow
DIAGNOSIS AND TESTING
 DIAGNOSIS AND TESTING SUSPENSION AND STEERING SYSTEM 2007 SUSPENSION Suspension - Nitro CONDITION POSSIBLE CAUSES CORRECTION FRONT END NOISE 1. Loose or worn wheel bearings. 1. Replace wheel bearings.
Depress each tab as you pull the bezel off. The bezels are tight. L.H. shown.
 2013-2014 Ford Mustang V6 & Boss 302 Lower Valance Fog Light Kit Parts List: Quantity: Tool List: Fog light & bulb with bracket 2 Flat head & Phillips screwdriver Black bezels 2 Ratchet & Socket set OR
INSTALLATION / OPERATING INSTRUCTIONS Reese Elite Series FIFTH WHEEL SLIDER HITCH
 INSTALLATION / OPERATING INSTRUCTIONS Reese Elite Series FIFTH WHEEL SLIDER HITCH DEALER/INSTALLER: (1) Provide this Manual to end user. (2) Physically demonstrate hitching and unhitching procedures in
ADJUSTMENTS Mazda MX-3. Fig. 1: Identifying Engine Code & Number Courtesy of MAZDA MOTORS CORP. VALVE CLEARANCE ADJUSTMENT
 Fig. 1: Identifying Engine Code & Number Courtesy of MAZDA MOTORS CORP. ADJUSTMENTS VALVE CLEARANCE ADJUSTMENT 1. No valve clearance adjustment is required, as hydraulic valve lash adjusters are used.
Tacoma/Tundra/4-Runner/Sequoia/Sway-A-Way Front Coilover Installation
 191 Granite St, Corona, CA 92879 Phone # 888-901-7693 afepower.com/swayaway Tacoma/Tundra/4-Runner/Sequoia/Sway-A-Way Front Coilover Installation Parts List -2 Sway-A-Way Coilover Shocks Tool List -5/32
HONDA VTX1300 and VTX1800 Air Ride Installation Instructions WILD BIKERS MOTORCYCLES
 Parts List: (Please inventory to ensure you have all the parts before beginning the installation). (1) Air Compressor (1) Pair of Air Shocks (1) Dump Valve (1) Heavy Duty 3-way Switch (1) Drop Speed Controller