MINI BIKE-2016 MB 200 Set-up Instruction
|
|
|
- Candice Flynn
- 6 years ago
- Views:
Transcription

1 MINI BIKE-2016 MB 200 Set-up Instruction
 2.")

2 1. Install rear shocks: open the crate and install the rear shocks with bolt M10x1.25x40 and self-locking nut M10x1.25. The requested torque is 37-44N.m (1N.m = 0.74 ft lb) 2. Install the front fender: Install the front fender between the fork using bolt M6x16 and nut M6 (The fender is to install in the middle of the fork, the space to left and right side of the fork should be the same.)

 SAE 10W-30(SG or above) can be used, the refill amount is 1 pint.")
3 3. Install the front wheel: determinate the rotate direction of the front wheel, install it with the front wheel axle M14*1.5*310 and the self-locking nut M14*1.5. The requested torque is 56-62N.m. 4. Refill the engine oil: (note: if your mini bike with an assembled engine on the frame, you still need to do change oil for first time operation!) SAE 10W-30(SG or above) can be used, the refill amount is 1 pint. (Caution: only engine oil for 4 stroke engine can be used!)

4 5. Install the clutch jackshaft plate L: (note: if your mini bike comes with pre-assembled engine, you may skip this step), attach the jackshaft L on the engine using M8x16 bolt, please do not tighten all the bolts at this step. 6. Install the engine: (note: if your mini bike comes with pre-assembled engine, you may skip this step), A) As shown put the engine on the frame engine mount place B) Put 2 M8x55 front mounting bolts upside down through the engine mount and engine front mounting holes, then put flat washer φ8 and spring washer φ8 on the bolt, put on the M8 nut with hand (not tighten the nuts at this step) C) Same as B) put on the other 2 rear mounting bolts through the rear mounting holes of the engine mount plate, screw into the jackshaft thread holes (do not tighten the bolts at this step)
 Push the engine assembly all the way back")
 G) Tighten two front mounting bolts (torque:")
5 D) Tighten the four bolts on the jackshaft to the engine E) Push the engine assembly all the way back F) Tighten two rear mounting bolts (torque: 22-29N.m) G) Tighten two front mounting bolts (torque: 22-29N.m)
 8.")
 open the master link, put the chain around the sprockets, lock the master link (Caution: the")
6 7. Install the flat key and 10 teeth sprocket (note: if your mini bike comes with pre-assembled engine, you may skip this step) 8. Install the drive chain: (note: if your mini bike comes with pre-assembled engine, you may skip this step) open the master link, put the chain around the sprockets, lock the master link (Caution: the direction of the master link opening is opposite to the chain forward movement direction)

 A) Slightly")
 Adjust the chain")


7 9. Chain adjustment: (note: if your mini bike comes with pre-assembled engine, you may skip this step) A) Slightly loose the bolt as shown in the picture B) Adjust the chain adjuster bolt to chain has up to 3/8 inch tension space in vertical direction. The adjustment on left and right side of the chain adjuster should be equal.


8 C) Tighten the adjuster bolt D) Tighten the rear axle nut with torque 56-62N.m E) Tighten the bolt which is loosen by step A)
 A) Install the rear driven pulley B) Put 12.5mm bushing, 1pc of 3.")

9 10. Install the CVT clutch: (note: if your mini bike comes with pre-assembled engine, you may skip this step) A) Install the rear driven pulley B) Put 12.5mm bushing, 1pc of 3.5mmwahser and 4pc of 1mm washer in turn onto the engine output shaft (remark: the reason to have the washers is to make the alignment of front clutch to the rear driven pulley, so you may need change the quantity of the washers you put in there)

 D)")

10 C) Put on the inside piece of the front clutch and check the alignment (adjust the washer to make it straight) D) Install the belt: (plain side is inside, and angled side is outside)

 Tighten the M16x1.")
11 E) Install the front clutch bushing, front clutch cover. Tighten the M8x55 bolt with torque 22-29Nm F) Tighten the M16x1.5self-locking nut on the driven pulley with torque 75-83Nm

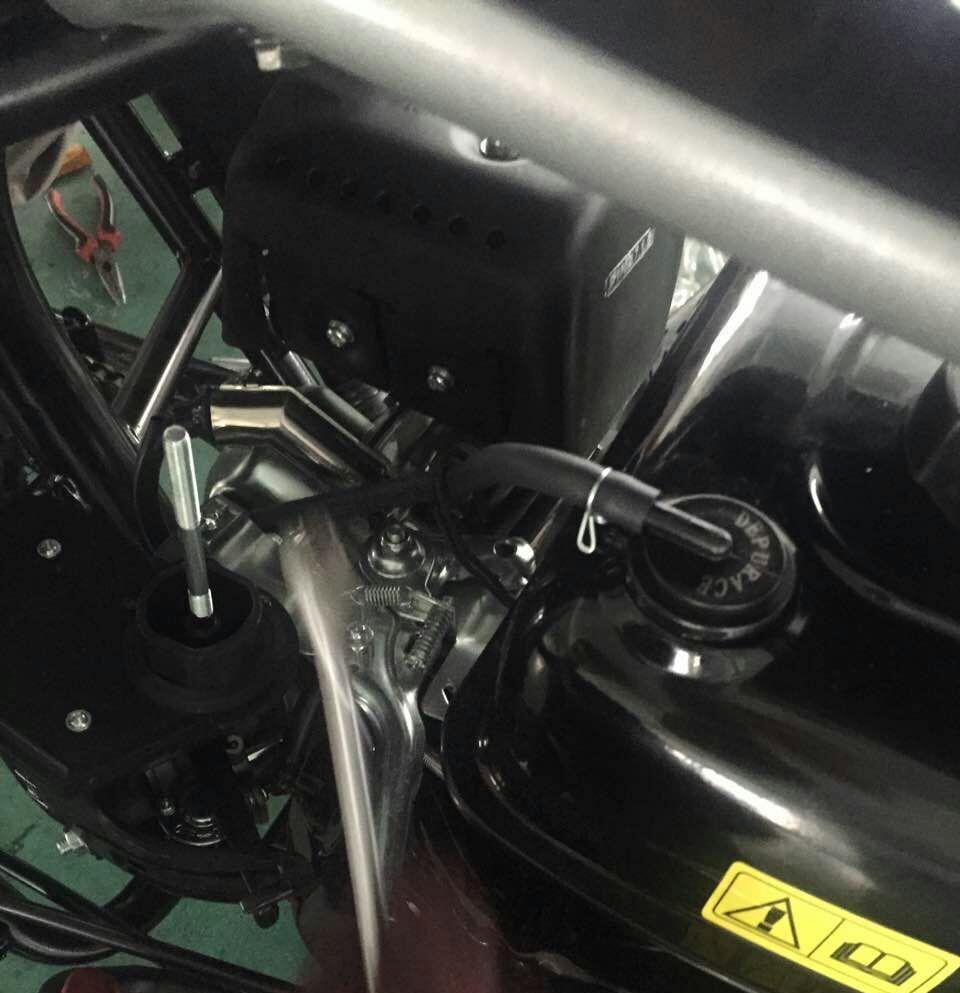
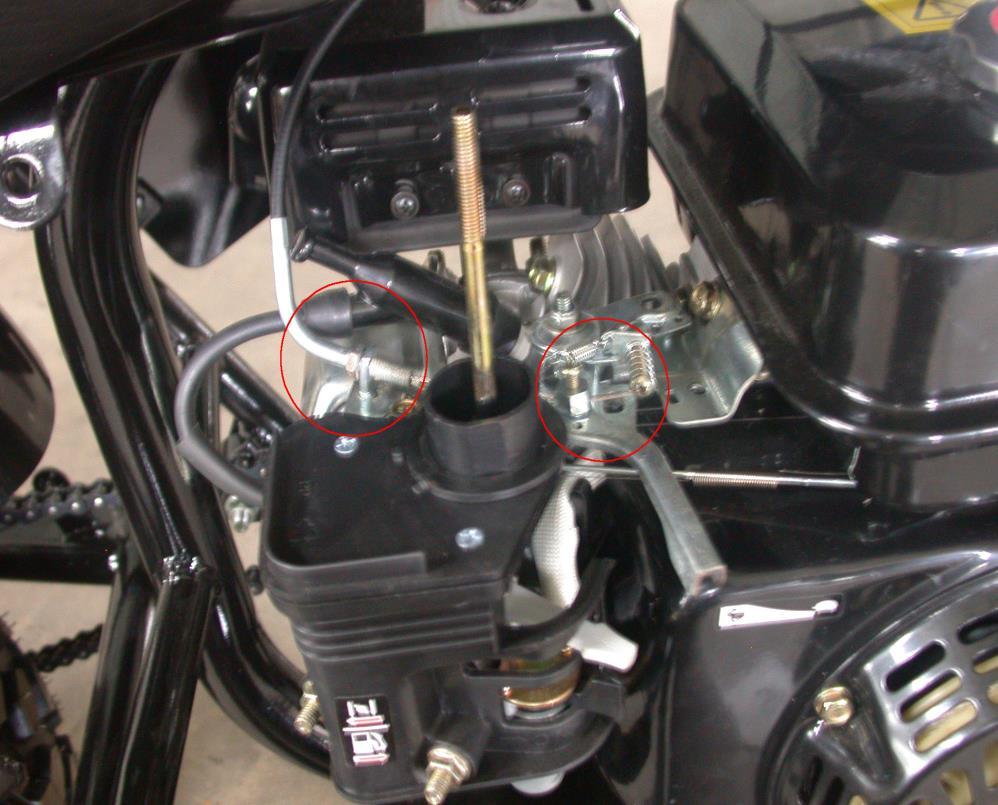
12 11. Install the clutch cover: (note: if your mini bike comes with pre-assembled engine, you may skip this step) 12. Install the throttle cable: (note: if your mini bike comes with pre-assembled engine, you may skip this installation, but always check the throttle function!) A) Insert the throttle cable between the front right shock and the frame. B) Let throttle cable go through under the dummy gas tank and attach it on the frame bar with clamp, leave a proper length so that the throttle cable core can move freely. C) Open the air filter upper cover, filter and filter bracket. D) Turn the M6 bolt on the end of the throttle cable all the way back. E) Open the engine throttle cable mounting bracket, put in the throttle cable, and mounts the throttle cable on the bracket.
13
 Turn the bolt of the throttle cable handle piece on the engine to the position that the cable handle can spring back freely.")

14 F) Install the other end of the throttle cable on the throttle handle; check when turn the throttle handle if the throttle cable moves freely back and forth. Re-adjust it when necessary, it s very important! G) Turn the bolt of the throttle cable handle piece on the engine to the position that the cable handle can spring back freely. H) Reinstall the filter bracket, filter and air filter upper cover back on the engine. I) Make final check of the throttle handle, make sure it moves freely without any resistance. 13. Adjust rear brake: (note: if your mini bike comes with pre-assembled engine, you may skip this installation, but always check the brake function!) adjust the nut on the brake cable, so that the brake core has 2-5mm free movement distance and the rear wheel moves freely. When press the brake handle to ¾ of the max., the brake should reach its max. brake efficiency.


15 14. Connect the wiring on the engine: (note: if your mini bike comes with pre-assembled engine, you may skip this step) 15. Zip-tie the brake cable, throttle cable, kill switch cable: (note: if your mini bike comes with pre-assembled engine, you may skip this installation 16. Install of steering handle bar: as shown in the picture, the requested torque to tighten the bolts is 22-29N.m Thanks for choosing TrailMaster Mini Bike, please check all the bolts, nuts and cables are installed and functioning properly before riding it. Always wear helmet while riding the mini bike, Thank you!
MINI BIKE Set up Instruction Off Road Only!!!
 MINI BIKE Set up Instruction Off Road Only!!! Part I. Check Parts in the Package. 1.1 Screw Package: Bolt M8x16 x6, Locking Nut M8 x1, Bolt M6x12 x2, Bolt M6x16 x3, Flange Nut M6 x3, Washer Φ8 x1. 1.2
TrailMaster MINI XRX
 TrailMaster MINI XRX Version: 2.0 2011/11/28 This set up instruction guides our customer to set up the go kart TrailMaster MINI XRX step by step to ensure a correct assembly for safe driving. 1. Check
Parts Lists - DB30 Qunshe Doodlebug 2.5hp Mini Bike (VIN PREFIX L4GS)
") Page 1 of 7 Product Information Baja Web > Product Information > Parts Lists > MINIBIKE > DB30 Qunshe Doodlebug 2.5hp Mini Bike (VIN PREFIX L4GS) DB30 Qunshe Doodlebug 2.5hp Mini Bike (VIN PREFIX L4GS)
Page 1 of 7 Product Information Baja Web > Product Information > Parts Lists > MINIBIKE > DB30 Qunshe Doodlebug 2.5hp Mini Bike (VIN PREFIX L4GS) DB30 Qunshe Doodlebug 2.5hp Mini Bike (VIN PREFIX L4GS)
8G Brake Assembly Alignment
 8G Brake Assembly Alignment 8G (9-5250) This document explains how to do the 8G (9-5250) brake assembly alignment in order to eliminate noise in the drive system coming from the mis-aligned brake plates.
ST 93 RIPPER INSTALL KIT
 ST 93 RIPPER INSTALL KIT P/N 2883777;2883778;2883779 APPLICATION The Timbersled Ripper ST93 Install Kit is designed to fit all Timbersled ST90 and ST93 Ripper models. This includes; Timbersled Model No.
Sherco Setup and Lubrication Guide
 Sherco Setup and This guide is designed to provide the Sherco owner with instructions on how to: Set up a new bike Clean and re-oil the air filter Change the transmission oil Change the fork oil Repack
Parts Lists - BE500 Qunsheng Baja 500watt Scooter (VIN PREFIX L4G)
") Page 1 of 9 Product Information Baja Web > Product Information > Parts Lists > SCOOTERS > BE500 Qunsheng Baja 500watt Scooter (VIN PREFIX L4G) BE500 Qunsheng Baja 500watt Scooter (VIN PREFIX L4G) BE500
Page 1 of 9 Product Information Baja Web > Product Information > Parts Lists > SCOOTERS > BE500 Qunsheng Baja 500watt Scooter (VIN PREFIX L4G) BE500 Qunsheng Baja 500watt Scooter (VIN PREFIX L4G) BE500
This is the Unpacking Guide for the Optibike Pioneer Allroad electric bicycle. The Guide provides information required to remove the Allroad from the
 This is the Unpacking Guide for the Optibike Pioneer Allroad electric bicycle. The Guide provides information required to remove the Allroad from the box and assemble it. If you have not assembled a bicycle
REMOVAL & INSTALLATION
 REMOVAL & INSTALLATION CAUTION: This application is an interference engine. Do not rotate camshaft or crankshaft when timing belt is removed, or engine damage may occur. TIMING BELT CAUTION: DO NOT turn
REMOVAL & INSTALLATION
 REMOVAL & INSTALLATION CAUTION: This application is an interference engine. Do not rotate camshaft or crankshaft when timing belt is removed, or engine damage may occur. TIMING BELT Removal 1. Disconnect
WARNING: the engine does not come with oil in it. Please fill the oil before starting. The 200cc hardknock requires 9/10 of a quart of oil.
 WARNING: the engine does not come with oil in it. Please fill the oil before starting. The 200cc hardknock requires 9/10 of a quart of oil. Things needed for assembly. -2 tubes of blue loc-tite. I don
Sherco Motorcycle Assembly Instructions
 Sherco Motorcycle Assembly This manual is intended to be used as an assembly guide for the Sherco 1.25 2.9 Trials Motorcycles. The motorcycle shown in the pictures is a new 2002, 2.9, the one that you
2005 Hyundai Tucson LX. On some models, engine is equipped with a timing belt and timing chain. Inspect timing chain when replacing timing belt.
 TIMING BELT NOTE: On some models, engine is equipped with a timing belt and timing chain. Inspect timing chain when replacing timing belt. Removal 1. Remove the engine cover. See Fig. 1. 2. Remove right
Base Kit Chain Drivetrain Build Guide
 222fg Base Kit Chain Drivetrain Build Guide August 11, 2017 Chain Drivetrain Build Guide Copyright 2017 REV Robotics, LLC 1 1.1 Description This document outlines the steps required to four wheel, chain
REMOVAL & INSTALLATION
 REMOVAL & INSTALLATION TIMING BELT Removal 1. Disconnect negative battery cable. On Millenia, raise and support vehicle. Remove right front wheel. Remove lower engine covers. 2. On all models, remove accessory
Go-ped ESR750 / ESR750EX Rear Brake Installation Instructions
 Go-ped ESR750 / ESR750EX Rear Brake Installation Instructions This kit provides all the parts you need to install a rear brake on your ESR750 or ESR750EX. It will not work on an ESR Sport, or other Go-ped
1/24/2008 HANDLE BAR ASSEMBLY MODEL MB165, HT65. Item No.
 165 Toll Free: 888-863-2252 (BAJA) PARTS AND PRICES ARE SUBJECT TO CHANGE 1 of 28 HANDLE BAR ASSEMBLY Part UPC Number Description Baja Description 1 165-001 883099010613 GRIP, RIGHT, THROTTLE CONTROL 1
IN-VEHICLE REPAIR. Timing Drive Components Camshaft Drive Cassette, LH. Special Tool(s) Holding Tool, Camshaft Sprocket (T97T-6256)
 Holding Tool, Camshaft Sprocket (T97T-6256)") 303-01A-1 IN-VEHICLE REPAIR Timing Drive Components Camshaft Drive Cassette, LH 303-01A-1 Special Tool(s) Holding Tool, Camshaft Sprocket 303-564 (T97T-6256) Adapter for 303-564 303-578 (T97T-6256-A) Holding
303-01A-1 IN-VEHICLE REPAIR Timing Drive Components Camshaft Drive Cassette, LH 303-01A-1 Special Tool(s) Holding Tool, Camshaft Sprocket 303-564 (T97T-6256) Adapter for 303-564 303-578 (T97T-6256-A) Holding
Superbike Kit
 Superbike Kit www.spieglerusa.com sales@spieglerusa.com Mounting Instructions & Safety Instructions for Honda CBR 1000 RR ABS model year 2017 - Attention Important Safety Instructions: Thank you for purchasing
Parts Lists - MB165 Wenling Mini Baja Mini Bike (ALL OTHER VIN PREFIXES)
") Page 1 of 12 Product Information Baja Web > Product Information > Parts Lists > MINIBIKE > MB165 Wenling Mini Baja Mini Bike (ALL OTHER VIN PREFIXES) MB165 Wenling Mini Baja Mini Bike (ALL OTHER VIN PREFIXES)
Page 1 of 12 Product Information Baja Web > Product Information > Parts Lists > MINIBIKE > MB165 Wenling Mini Baja Mini Bike (ALL OTHER VIN PREFIXES) MB165 Wenling Mini Baja Mini Bike (ALL OTHER VIN PREFIXES)
CALIFORNIA TRIMMER MOWER MAINTENANCE MANUAL
 CALIFORNIA TRIMMER MOWER MAINTENANCE MANUAL 2 Table of Contents Section 1: General Information Page Handle Assembly Instructions 4 Maintenance All Models 6 Oil Change Procedures All Models 9 Height Adjustment
Trike Conversion Installation Guide Kawasaki Vulcan 900 Classic, Classic LT, and Custom Models 2007 and Up Solid Axle Suspension
 Trike Conversion Installation Guide Kawasaki Vulcan 900 Classic, Classic LT, and Custom Models 2007 and Up Solid Axle Suspension CAUTION: -Failure to make the proper adjustments will potentially lead to
Set Up instructions DB30 Doodlebug Removal from crate
 Set Up instructions DB30 Doodlebug Removal from crate 1. Remove carton top 2. Remove set up instuctions, owners manual and parts. E - REV - B Hardware and Parts Front fork assembly Hardware 10mm Front
YOUTH MINI BIKE MM-B80(FSD80P) SPARE PARTS LIST
 SPARE PARTS LIST") YOUTH MINI BIKE MM-B80(FSD80P) SPARE PARTS LIST No. OLD MM# NEW MM# DESCRIPTION 12 1 10100 90-10000-00 AXLE BOLT M12 X 1.25 X 215 2 10101 90-10001-00 SPACER, AXLE M12.5ID X 18OD X 62L 3 10102 30-10016-00
YOUTH MINI BIKE MM-B80(FSD80P) SPARE PARTS LIST No. OLD MM# NEW MM# DESCRIPTION 12 1 10100 90-10000-00 AXLE BOLT M12 X 1.25 X 215 2 10101 90-10001-00 SPACER, AXLE M12.5ID X 18OD X 62L 3 10102 30-10016-00
AmTryke Adult Recumbent Model HP1000 #50-HC-1000
 AmTryke Adult Recumbent Model HP1000 #50-HC-1000 TOOLS Needed for Assembly 5 mm Allen Wrench 8 mm Socket or Wrench 10 mm Socket or Wrench 14 mm Socket or Wrench 15 mm Socket or Wrench 22 mm Socket or Adjustable
Bill of Materials for
 Bill of Materials for 77060012 1 2-P5153572 Inlet Pipe 1 21-202M 2.75" Filter 1 103-BLO-4820N Filter Hose Clamp 1 559999 Washer, Fender M6x25 1 1-3028 Washer, 1/4 SAE Flat 1 1-2072 Bolt, 1/4-20-UNC x 1
BB65 BAJA BLASTER 10/15/2008
 BB65 BAJA BLASTER Toll Free: 888-863-2252 PARTS AND PRICES ARE SUBJECT TO CHANGE 1 of 36 CYLINDER HEAD MODEL MB165, HT65 1 165-300 883099011627 CYLINDER HEAD ASSY HEAD COMP, CYLINDER 1 1 $66.00 $33.00
IMING BELT COMPONENTS REMOVAL
 1 of 11 11/21/2012 2:21 PM IMING BELT COMPONENTS REMOVAL 1. Remove the wheel of passenger side. 2. Remove the side cover. 3. Remove the engine cover. 4. Disconnect the power steering hose fixing on the
N S I D E T H I S G U I D E
 GTC Manufacturing General Information and Installation Instructions, Release 3 February 2010 TC2 Torque Converter Asymmetrical System Superior Performance GTC Industries The TC2 is an asymmetrical torque
CHAS FRONT FORK FRONT FORK LEGS 4-45 FRONT FORK. Order Job/Part Q ty Remarks
 EAS00647 FRONT FORK FRONT FORK LEGS 30 Nm (3.0 m kg, 22 ft lb) 6 Nm (0.6 m kg, 4.3 ft lb) 30 Nm (3.0 m kg, 22 ft lb) Order Job/Part Q ty Remarks 2 3 4 5 Removing the front fork legs Front wheel Front brake
1992 Mitsubishi 3000GT VR-4
 TIMING BELT Removal (Diamante SOHC) 1. Remove left front and left side splash shields. Using engine hoist, lift engine just enough to remove weight from engine mounts. Remove drive belts. Remove A/C tensioner
AmTryke Adult Recumbent Model JT2000 #50-FC-2000
 AmTryke Adult Recumbent Model JT2000 #50-FC-2000 TOOLS Needed for Assembly 5 mm Allen Wrench 8 mm Socket or Wrench 10 mm Socket or Wrench 14 mm Socket or Wrench 15 mm Socket or Wrench 22 mm Socket or Adjustable
6.0 Liter Timing Chain, Crankshaft Sprocket, Camshaft Position Actuator, and Solenoid Valve Replacement
 Special Tools EN 46330 Timing Belt Tensioner Retaining Pin J 8433 Two Jaw Puller J 41478 Crankshaft Front Oil Seal Installer J 41558 Crankshaft Sprocket Remover J 41665 Crankshaft Balancer and Sprocket
9/24/2017 Camshaft Timing Chain Removal and Installation Engine Mechanical 2002 Audi A6/S6/Quattro/Allroad MotoLogic
 2002 A6/S6/Quattro/Allroad The information in this article comes from a service manual containing information that applies to the following engine code: BAS. Section Info: Report a problem with this article
CHASSIS CONTENTS EXTERIOR PARTS 7-1 FRONT WHEEL 7-2 FRONT BRAKE 7-6 HANDLEBARS 7-13 FRONT FORK 7-15 STEERING 7-23 REAR WHEEL 7-26 REAR BRAKE 7-30
 CHASSIS CONTENTS EXTERIOR PARTS 7- FRONT WHEEL 7-2 FRONT BRAKE 7-6 HANDLEBARS 7-3 FRONT FORK 7-5 STEERING 7-23 REAR WHEEL 7-26 REAR BRAKE 7-30 REAR SHOCK ABSORBER 7-32 SWING ARM 7-33 7 7- CHASSIS EXTERIOR
Engine, disassembling and
 Page 1 of 38 13-1 Engine, disassembling and assembling Lock carrier, moving into service position Special tools and equipment 3369 support tool 1 - Bolts 2 - Bolts 3 - Bolts 4 - Bolts 5 - Bore 45 Nm (33
WIRING DIAGRAM FOR SPEED SENSOR ADAPTER CABLE FOR MODEL YEARS 2003 _ 2004 SPEED SENSOR ADAPTER CABLE I
 Progressive Or'\, 1 ) ) ) #20 AWG INSULATED HOOKUP WIRE, 3 PIECES, EACH CUT TO lb INCHES Jl CONNECTOR PART NUMBER DEUTSCH DT04-3P, QUANTITY = 1 CONTACT PART NUMBER 04-202-16141, QUANTITY' 3..." "" Pl CONNECTOR
Installation & Maintenance Manual
 Installation & Maintenance Manual SMX System & Parts Take a minute to familiarize yourself with the parts and system included: 1 Frozen MOTO SMX Snow Bike System 1 Frozen MOTO Bike Specific fit system
What Are Gears? What Do They Do?
 What Are Gears? What Do They Do? Pre-Lesson Quiz 1. What is a gear? 2. List as many examples as you can of gears or objects that use gears. 2 Pre-Lesson Quiz Answers 1. What is a gear? A gear is a wheel
2003 Hyundai Truck Santa Fe V6-3.5L
 Page 1 of 12 2003 Hyundai Truck Santa Fe V6-3.5L Vehicle» Engine, Cooling and Exhaust» Engine» Timing Belt» Service and Repair Page 2 of 12 REMOVAL 1. Remove the wheel of passenger side. 2. Remove the
10th letter in VIN: J
 08 0th letter in VIN: J Headlight G Br Speedometer Headlight Light Switch B Br Ignition Switch R B Y/R Brake Light Switch B G/Y Starter Relay Fuse A + G Starter Motor Rear Brake Light G/Y Br G Speed Sensor
Timing Drive Components Camshaft Timing
 SECTION 303-01B: Engine 4.0L SOHC 1998 Explorer/Mountaineer Workshop Manual IN-VEHICLE REPAIR Procedure revision date: 10/17/2002 Timing Drive Components Camshaft Timing Special Tool(s) Timing Chain Tensioner
Parts catalogue RABBIT MOWER RM86G (BRIGGS)
") OREC ISSUED NO. B-1 Parts catalogue RABBIT MOWER (EXPORT MODEL) (BRIGGS) MODEL CODE NO. 0240- CONTENTS Fig.1 FRAME & CONTROL------------------------------ 1 Fig.2 TRANSMISSION--------------------------------------
OREC ISSUED NO. B-1 Parts catalogue RABBIT MOWER (EXPORT MODEL) (BRIGGS) MODEL CODE NO. 0240- CONTENTS Fig.1 FRAME & CONTROL------------------------------ 1 Fig.2 TRANSMISSION--------------------------------------
18SP680Rev3 EPA04 MBE 4000 Car Hauler Low Pressure Fuel Lines
 8SP680Rev3 EPA04 MBE 4000 Car Hauler Low Pressure Fuel Lines KIT DESCRIPTION These service kits include all necessary parts to replace the low pressure fuel lines between the fuel filter housing and fuel
Parts catalogue. Transporter
 OREC ISSUED NO. -2 Parts catalogue Transporter (EXPORT MODEL) MODEL CODE NO. 80-1923-???-?? CONTENTS Fig.1 HANDLE -------------------------------------- 1 Fig.2 FRAME ----------------------------------------
INSTALLATION GUIDE. RMS500, RMS501, RMS502, RMS503, RMS506, RMS507, RMS508, RMS509, -OR Manual Revision:
 REKLUSE MOTOR SPORTS z-start Brake Kit INSTALLATION GUIDE RMS500, RMS501, RMS502, RMS503, RMS506, RMS507, RMS508, RMS509, -OR 196-200 Manual Revision: 051309 2009 Rekluse Motor Sports Rekluse Motor Sports,
JEEP WRANGLER (TJ), UNLIMITED (TJL), RUBICON MODELS BODY LIFT KIT INSTALLATION INSTRUCTIONS KIT# KIT# 973
, UNLIMITED (TJL), RUBICON MODELS BODY LIFT KIT INSTALLATION INSTRUCTIONS KIT# KIT# 973") JEEP WRANGLER (TJ), UNLIMITED (TJL), RUBICON MODELS BODY LIFT KIT INSTALLATION INSTRUCTIONS 1997-2006 2 KIT# 972 3 KIT# 973 WARNING Installation of a Performance Automotive Group body lift will change
JEEP WRANGLER (TJ), UNLIMITED (TJL), RUBICON MODELS BODY LIFT KIT INSTALLATION INSTRUCTIONS 1997-2006 2 KIT# 972 3 KIT# 973 WARNING Installation of a Performance Automotive Group body lift will change
MANUFACTURER'S SUGGESTED SCHEDULED MAINTENANCE
 HONDA 2.2L & 2.3L 4-Cylinder - DOHC & SOHC - 1990-97 MANUFACTURER'S SUGGESTED SCHEDULED MAINTENANCE For 1990-94 vehicles, the manufacturer recommends camshaft and balance shaft belts be replaced at 90,000
Preparation IMPORTANT! BMW K 1600 GTL EXCLUSIVE ONLY. Assembly:
 BMW K 1600 GT BMW / GTL K 1600 / EXCLUSIVE GTL EXCLUSIVE SEAT INSTALLATION ADDENDUM SHEET GUIDE BMW K 1600 GTL EXCLUSIVE PRE-INSTALLATION INSTRUCTIONS Preparation IMPORTANT! BMW K 1600 GTL EXCLUSIVE ONLY
MAINTENANCE MANUAL DP-265
 MAINTENANCE MANUAL DP-265 Drive Gears Sisu Axles, Inc. Autotehtaantie 1 P.O. Box 189 FIN-13101 Hämeenlinna Finland Phone int + 358 204 55 2999 Fax int + 358 204 55 2900 DP265DG.PDF (2/2003) k Table of
JEEP WRANGLER, RUBICON, UNLIMITED (TJ & TJL) 1 BODY LIFT KIT INSTALLATION INSTRUCTIONS KIT# 951
 1 BODY LIFT KIT INSTALLATION INSTRUCTIONS KIT# 951") 3651 N Highway 89 Chino Valley, AZ 86323 (928) 636-7080 www.p-a-g.net JEEP WRANGLER, RUBICON, UNLIMITED (TJ & TJL) 1 BODY LIFT KIT INSTALLATION INSTRUCTIONS 1997-2006 KIT# 951 Installation of a Performance
3651 N Highway 89 Chino Valley, AZ 86323 (928) 636-7080 www.p-a-g.net JEEP WRANGLER, RUBICON, UNLIMITED (TJ & TJL) 1 BODY LIFT KIT INSTALLATION INSTRUCTIONS 1997-2006 KIT# 951 Installation of a Performance
CHAINGUARD REGAL ST COLOR
 DESOTO/ REGAL HAULER PARTS LIST Item Part # Description QTY Item Part # Description QTY 1 11871 REFLECTOR KIT TRIKE 1 32 11764 FENDER BRACE 24" MWT 1 2 12199 SCREW #14 x 3/4 4 33 12176 NUT5/16-24 HEX 2
FENDER ELIMINATOR. Remove axle nut, slide out axle, and drop rear tire away from the fender. (Picture 1)
") TRIUMPH BOBBER Remove axle nut, slide out axle, and drop rear tire away from the fender. (Picture ) Remove () tail light bolts. (Picture ) Unplug stock connectors and remove from underneath the fender.
TRIUMPH BOBBER Remove axle nut, slide out axle, and drop rear tire away from the fender. (Picture ) Remove () tail light bolts. (Picture ) Unplug stock connectors and remove from underneath the fender.
X150 National Extreme 150cc Atv (VIN PREFIX RKKG)
") Page 1 of 25 Product Information Baja Web > Product Information > Parts Lists > ATV > X150 National Extreme 150cc Atv (VIN PREFIX RKKG) X150 National Extreme 150cc Atv (VIN PREFIX RKKG) Cylinder Head [Image]
Page 1 of 25 Product Information Baja Web > Product Information > Parts Lists > ATV > X150 National Extreme 150cc Atv (VIN PREFIX RKKG) X150 National Extreme 150cc Atv (VIN PREFIX RKKG) Cylinder Head [Image]
1992 Clutch. Eclipse, Expo/Expo LRV, Galant, Mirage, Precis, 3000GT
 Article Text ARTICLE BEGINNING 1992 Clutch Eclipse, Expo/Expo LRV, Galant, Mirage, Precis, 3000GT DESCRIPTION All clutches are single disc type. Pressure plate assembly uses a diaphragm spring to engage
Ersatzteilliste. Herkules SH 50
 Ersatzteilliste Herkules SH 50 Stand/Version: 05/2003 Fig.1 HANDLE Quantity Ref. Parts No. Parts Name SH50 SH50C GX160 GX160 Remarks 1 0206-10110 Handle 1 1 2 0203-10200 Driving Clutch Lever 1 1 3 0203-10300
CHAINGUARD REGAL ST COLOR
 DESOTO/ REGAL HAULER PARTS LIST Item Part # Description QTY Item Part # Description QTY 1 11871 REFLECTOR KIT TRIKE 1 32 11762 FENDER BRACE 20" MWT 1 2 12199 SCREW #14 x 3/4 4 11764 FENDER BRACE 24" MWT
CHASSIS CONTENTS EXTERIOR PARTS 6-1 FRAME COVER 6-2 REAR FRAME COVER 6-4 FRONT WHEEL 6-6 FRONT BRAKE 6-10 HANDLEBARS 6-17 FRONT FORK 6-19
 CHASSIS CONTENTS EXTERIOR PARTS 6- FRAME COVER 6- REAR FRAME COVER 6-4 FRONT WHEEL 6-6 FRONT BRAKE 6-0 HANDLEBARS 6-7 FRONT FORK 6-9 STEERING 6-6 REAR WHEEL 6-3 REAR BRAKE 6-39 6 REAR SHOCK ABSORBER 6-43
Generator, removing and
 Page 1 of 14 27-26 Generator, removing and installing CAUTION! Disconnect the battery Ground (GND) strap before working on the electrical system. Notes: Before disconnecting the battery, determine the
1999 Honda Accord DX
 Installation 1. Clean tensioner pulleys. Ensure cylinder No. 1 is at TDC by aligning dimple on timing belt drive pulley with pointer on oil pump housing. See Fig. 4. Ensure camshaft pulley TDC marks are
TIMING BELT REPLACEMENT. Tools Required. J A (KM-421-A) Timing Belt Adjuster J Angle Meter KM-470-B Angular Torque Gage
 Timing Belt Adjuster J Angle Meter KM-470-B Angular Torque Gage") Page 1 of 20 TIMING BELT REPLACEMENT Tools Required J 42492-A (KM-421-A) Timing Belt Adjuster J 45059 Angle Meter KM-470-B Angular Torque Gage Removal Procedure Fig. 37: View Of Throttle Cable CAUTION:
Page 1 of 20 TIMING BELT REPLACEMENT Tools Required J 42492-A (KM-421-A) Timing Belt Adjuster J 45059 Angle Meter KM-470-B Angular Torque Gage Removal Procedure Fig. 37: View Of Throttle Cable CAUTION:
ASSEMBLY. Engine. Special Tool(s) Installer, Crankshaft Vibration Damper (T74P-6316-B) Special Tool(s)
 Installer, Crankshaft Vibration Damper (T74P-6316-B) Special Tool(s)") 303-01A-1 ASSEMBLY Engine Special Tool(s) Tensioner, Timing Chain 303-571 (T97T-6K254-A) Special Tool(s) 303-01A-1 Installer, Crankshaft Vibration Damper 303-102 (T74P-6316-B) Holding Tool, Camshaft Sprocket
303-01A-1 ASSEMBLY Engine Special Tool(s) Tensioner, Timing Chain 303-571 (T97T-6K254-A) Special Tool(s) 303-01A-1 Installer, Crankshaft Vibration Damper 303-102 (T74P-6316-B) Holding Tool, Camshaft Sprocket
LOW, MID, HIGH RISE PRO-TAPER HANDLEBAR WITH HEATED GRIPS KIT
 LOW, MID, HIGH RISE PRO-TAPER HANDLEBAR WITH HEATED GRIPS KIT P/N 2881235; 2881236; 2881237 APPLICATION All AXYS and PRO RIDE chassis with stock Pro-Taper Bar BEFORE YOU BEGIN Read these instructions and
CRATE CONTENTS LIST / SET UP INSTRUCTION Art.Nr.: Verpackung 1 und 2
 CRATE CONTENTS LIST / SET UP INSTRUCTION Art.Nr.: 3.211.183 Verpackung 1 und 2 CRATE CONTENTS LIST: 1 Motorcycle in state as shipped 1 Front wheel 1 Folder of documents containing Owner's Handbook and
Technical Service Bulletin
 Page 1 of 41 MITSUBISHI MOTORS Technical Service Bulletin SUBJECT No: NOISE FROM CVT AT ALL ENGINE SPEEDS DATE: February, 2015 MODEL: See below CIRCULATE TO: I[ ]GENERAL MANAGER I [ X l PARTS MANAGER I
HO 729. Shock Absorber for Honda CRF250L-2017 Asia. Mounting Instructions. Note! Note!
 Before installing this product, check the contents of the kit. If anything is missing, please contact an Öhlins dealer. Kit Contents Description Part No Pcs Shock absorber HO 729 1 Reservoir bracket 05378-10
Trike Conversion Installation Guide for Harley-Davidson Sportster Motorcycles 2004 & Up Revision 7
 Trike Conversion Installation Guide for Harley-Davidson Sportster Motorcycles 2004 & Up Revision 7 CAUTION : Failure to follow these instructions can lead to serious personal injury and/or property damage
2017+ L5P Duramax 3 ½ Down Pipe & EGR Fix Kit
 2017+ L5P Duramax 3 ½ Down Pipe & EGR Fix Kit Covers installation of PN s: WCF100630, WCF100829 Note: This Kit is for off road competition use only! Off Road Competition Use Tuning & Exhaust System is
215 MINI BIKE OWNER GUIDE GOKARTS USA
 215 MINI BIKE OWNER GUIDE By GOKARTS USA CONTENTS SAFETY INFORMATION... 2 AMERICAN RACER MINI BIKE... 3 UNPACK AND SEPARATE PARTS... 4 Parts List:... 4 PAINT... 5 ASSEMBLY INSTRUCTIONS... 6 FORK... 6 WHEELS...
S i. wp U-i >-;t(iw> - r^r? *. - * CHAPTER 5. CHASSIS
 wp U-i >-;t(iw> - r^r? *. - * S i CHAPTER 5. CHASSIS 5-1. FRONT WHEEL 5-2 A. Removal 5-2 B. Front Axle Inspection 5-2 C. Front Wheel Inspection 5-2 D. Brake Shoe Wear Inspection 5-2 E. Brake Drum Inspection
REMOVAL & INSTALLATION
 REMOVAL & INSTALLATION CAUTION: This application is an interference engine. Do not rotate camshaft or crankshaft when timing belt is removed, or engine damage may occur. TIMING BELT Removal 1. Raise and
BV Powersports go kart parts price list* MID XRX
 BV Powersports go kart parts price list* MID XRX PART NO. DESCRIPTION FOR MSRP 10201-80 DRIVE COVER PLASTIC BRACKET MID XRX $6.40 10202-80 DRIVE COVER PLASTIC COLLAR MID XRX $6.40 2.000.054 FRAME COMP.(R.S.B)
Indicates a potential hazard that could result in death or injury. Indicates a potential hazard that could result in motorcycle damage.
 FOREWORD This motorcycle has been designed and produced utilizing Suzuki s most modern technology. The finest product, however, cannot perform properly unless it is correctly assembled and serviced. This
-Failure to make the proper adjustments will potentially lead to serious personal injury and/or property damage and may void the warranty.
 Trike Conversion Installation Guide Victory Cross Roads Classic and 8-Ball Victory Cross Country/Tour/8-Ball and Ness Cross Country Limited-Edition and Up Independent Suspension Rev. 1 CAUTION: -Failure
INSTALLATION INSTRUCTIONS FOR THE MOTOR TRIKE CROSS COUNTRY / CROSS ROADS / HARD BALL RAKE KIT
 INSTALLATION INSTRUCTIONS FOR THE MOTOR TRIKE CROSS COUNTRY / CROSS ROADS / HARD BALL RAKE KIT Thank you for choosing the Motor Trike Cross Country / Cross Roads / Hard Ball rake kit. We ask that you read
gas passes through baffle plates in cylinder oil separator inlet port. Separated oil returns The first separation will happen when blowby
 2 05 LAYOUT AND OVERVIEW Lubrication System PCV Oil Separator Cylinder head cover (oil + gas) Blow-by gas (air duct hose) Inlet port Oil (oil gauge pipe) The first separation will happen when blowby gas
w w w. h d o n l i n e s h o p. d e CRUISE CONTROL KIT GENERAL INSTALLATION -J04064 REV Kit Number Models Additional Parts Required
 -J006 REV. 006-08- CRUISE CONTROL KIT GENERAL Kit Number 7796-07 Models For the most up-to-date model fitment information, please see the product label or www.harley-davidson.com. Additional Parts Required.
Steering. Section 6 CONTENTS. Precautions Precautions Precautions for Steering
 Table of Contents 6- i Section 6 Steering CONTENTS Precautions...6-1 Precautions... 6-1 Precautions for Steering... 6-1 Steering General Diagnosis... 6A-1 Diagnostic Information and Procedures...6A-1 Steering
Timing Chain: Service and Repair
 2005 Nissan-Datsun Altima L4-2.5L (QR25DE) Copyright 2013, ALLDATA 10.52SS Page 1 Timing Chain: Service and Repair TIMING CHAIN Removal and Installation Apply new engine oil to parts marked in illustration
Removing/installing final drive
 1(16) Removing/installing final drive Special tools: 998 5972, 999 5561, 999 5652, 999 5659, 999 5660 Removing Note! Position the rear lifting arms on the arrows on the sills. This is so the support arm
1 of 12 11/20/2016 9:32 PM
 1 of 12 11/20/2016 9:32 PM Caution: After removing timing chain, do not turn crankshaft and camshaft separately, or valves will strike piston heads. Apply new engine oil to the sliding surfaces when Installing
For installation on pre-2018 Timbersled kits the following kit is also required (sold separately): PN Traverse Ski Upgrade Kit
: PN Traverse Ski Upgrade Kit") TIMBERSLED TRIO KIT P/N 2883324;2883325;2883326;2883327 APPLICATION The Timbersled TRIO Kit is designed to fit the below listed makes and models of bikes. The installation instructions given may vary slightly
TIMBERSLED TRIO KIT P/N 2883324;2883325;2883326;2883327 APPLICATION The Timbersled TRIO Kit is designed to fit the below listed makes and models of bikes. The installation instructions given may vary slightly
MANUFACTURER'S SUGGESTED SCHEDULED MAINTENANCE
 MAZDA 1.6L & 1.8L 4-Cylinder - 1986-95 MANUFACTURER'S SUGGESTED SCHEDULED MAINTENANCE For 1992 and earlier model years, the manufacturer recommends the belt be replaced every 60,000 miles. For 1993-95
MASTER CYLINDER INSPECTION
 7-16 CHASSIS A-PDF Split DEMO : Purchase from www.a-pdf.com to remove the watermark Remove the piston assembly. MASTER CYLINDER INSPECTION MASTER CYLINDER Inspect the master cylinder bore for any scratches
3/17/2010 DX110. Baja Motorsports Inc. P.O. Box Phoenix, AZ Toll Free: PARTS AND PRICES ARE SUBJECT TO CHANGE 1 of 37
 DX110 Toll Free: 888-863-2252 PARTS AND PRICES ARE SUBJECT TO CHANGE 1 of 37 HANDLEBAR Part UPC Number Description Baja Description Qty. 1 DX110-100 883099101441 HANDLE BAR 1 2 DX-101 883099101458 LEFT
TSS Fit Kit Installation Instructions Timbersled Snow Bike System
 TSS Fit Kit Installation Instructions Timbersled Snow Bike System Information needed before you start: Read the entire installation instructions before starting. The instruction sheet is universal for
1995 Mitsubishi Montero LS. Ensure timing marks are aligned. Mark timing belt direction of rotation.
 TIMING BELT NOTE: Ensure timing marks are aligned. Mark timing belt direction of rotation. Removal 1. Disconnect negative battery cable. Drain engine coolant. Remove engine coolant reservoir tank, fan
MOUNTAIN HORSE INSTALL KIT
 MOUNTAIN HORSE INSTALL KIT P/N 9928508 APPLICATION Installation Instructions are for all Mountain Horse TSS and TFS Installation Kits and Timbersled Mountain Horse chassis installations. The Timbersled
CHAPTER 111 MODELS 9500, 9501 ONLY SECTION 1 INTRODUCTION
 CHAPTER 111 MODELS 9500, 9501 ONLY SECTION 1 INTRODUCTION Models 9500 and 9501 Lawn-Boy compact riders are propelled by a conventional, geared transmission with two forward speeds and one reverse. The
BANANA PEEL OWNER'S GUIDE # /98 $1.00
 BANANA PEEL OWNER'S GUIDE #1880 /98 $1.00 ILLUSTRATED PARTS BREAKDOWN ITEM PARJff DESCRIPTION QTY. ITEM PART# DESCRIPTION 1. 19171 SCREW #10-3 X 3/8 RHMS. 1863 FENDER B/P 3 3. 18306 FENDER B/P BRACE.
Installation Guide. Sportster 34 Sport Trike Kit
 Installation Guide Sportster 34 Sport Trike Kit INCLUDED IN YOUR TRIKE KIT: COMPONENTS HARDWARE PULLEY MOUNTING 5 pcs. - 7/16-14 x 1 ½ Grd. 8 (Gold) Bolt 5 pcs. - 7/16 Lock Washer 34 Light Sport Rear End
INSTALLATION INSTRUCTIONS 97 FORD EXPEDITION
 INSTALLATION INSTRUCTIONS 97 FORD EXPEDITION 1. Read the instructions completely and carefully before you begin. Check the kit for proper contents (refer to the part s list and the picture diagrams). Before
REMOVAL AND REPLACEMENT
 2002 Mitsubishi Truck Montero LTD 4WD V6-3.5L SOHC Vehicle > Engine, Cooling and Exhaust > Engine > Timing Components > Timing Belt > Service and Repair REMOVAL AND REPLACEMENT https://my.alldata.com/repair/#/repair/article/36847/component/64/itype/401/nonstandard/
MODELS 1324 & 1624 & 1824
 THE MODELS 1324 & 1624 & 1824 HYDRAULIC TRENCHERS CONGRATULATIONS! You are now the proud owner of a BARRETO trencher. Please take a moment of your time to look over the following information. Familiarize
DONGDIANEBIKEKITS.COM
 THE BEST MOTOR MANUFACTORY IN CHINA,LEADING IN BICYCLE MOTOR,MOTORCYCLE MOTOR AND ELECTRIC CAR MOTOR DONGDIANEBIKEKITS.COM READY TO DIY YOUR FANCY EBIKE? LET S GO FOR FURTHER INFORMATION.PLEASE VISIT WWW.DONGDIANEBIKEKITS.COM
10th letter in VIN: H
 0 0th letter in VIN: H Headlight G Br Speedometer Headlight Light Switch B Br Ignition Switch R B Y/R Brake Light Switch B G/Y Starter Relay Fuse A + G Starter Motor Rear Brake Light G/Y Br G Speed Sensor
Parts List (Mini Bike)
") STEERING PRINCIPLES Ackerman Steering Principle The Ackerman Steering Principle defines the geometry that is applied to all vehicles (two or four wheel drive) to enable the correct turning angle of the
STEERING PRINCIPLES Ackerman Steering Principle The Ackerman Steering Principle defines the geometry that is applied to all vehicles (two or four wheel drive) to enable the correct turning angle of the
Instruction Sheet IS D Gearbox Drive Update Kit Installation To instruct dealers in installation. Model Numbers: IS-0129
 Instruction Sheet Date: Bulletin #: Subject: Purpose: Model Numbers: Serial Numbers: Recipients: 16 October 425D Gearbox Drive Update Kit Installation To instruct dealers in installation 425D All serial
90 Utility Model Number A2013KUB2BUSZ SHARE OUR PASSION.
 2013 90 Utility Model Number A2013KUB2BUSZ TM SHARE OUR PASSION. TABLE OF CONTENTS 2013 ATV 90 (Model No. A2013KUB2BUSZ) BODY PANEL AND HEADLIGHT ASSEMBLY... 1 FRONT AND REAR RACK ASSEMBLY... 2 FRAME AND
HO429. Shock Absorber for Honda CRF 250L. Mounting Instructions. Note! Note!
 Before installing this product, check the contents of the kit. If anything is missing, please contact an Öhlins dealer. Kit Contents Description Part No Pcs Shock absorber HO110007 1 Sticker Öhlins 0019-01