STEAM MYLOCOSOUND 17P MAY 1 ST 2018
|
|
|
- Corey Butler
- 5 years ago
- Views:
Transcription
1 1

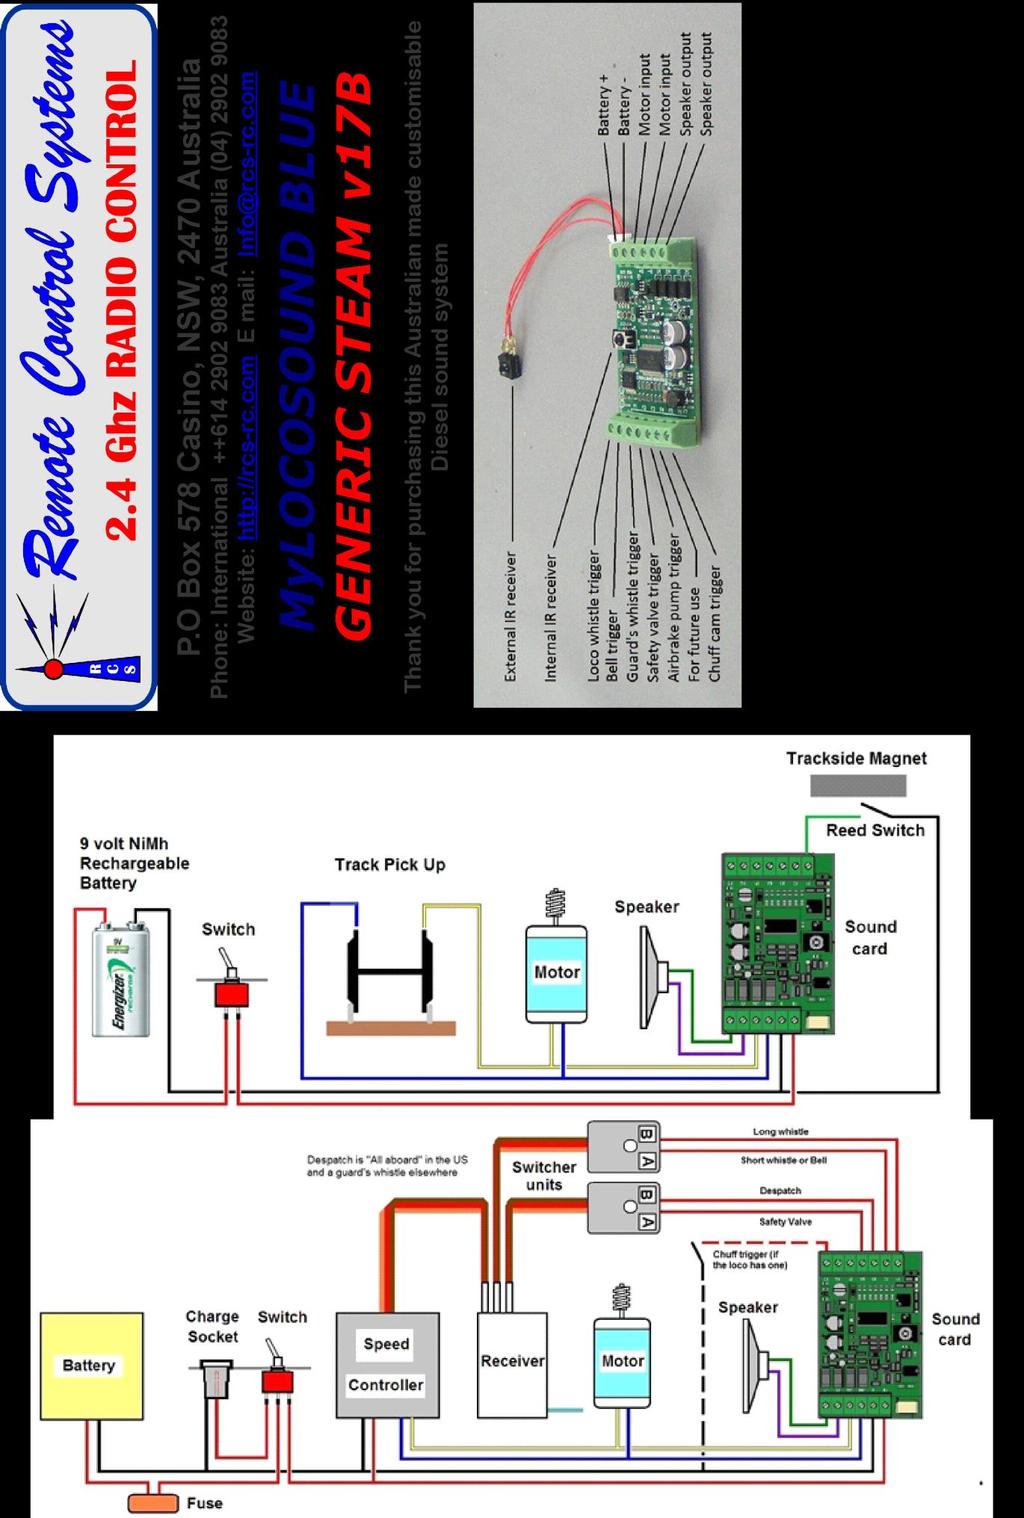
2 2 STEAM MYLOCOSOUND 17P MAY 1 ST 2018 UNIVERSAL SOUND FOR LARGE SCALE, DC, STEAM LOCOMOTIVES OVERVIEW. Easy installation using screw terminals with no soldering. Uses a TV remote control to adjust the volume and sounds to match the prototype loco. Provides a chuff sound, which matches the loco speed and load. Plain, chime, hooter and Thomas whistles with adjustable tone to suit the loco. Full remote control of the whistle, bell, safety valve, guard s whistle and optional brake pump. For track powered DC or battery powered radio controlled railways Measures 55mm x 33mm x 11mm. CONTENTS. The soundcard generates synthesised sound which is adjustable to reproduce the sounds of most diesel locos and railcars. The terminal connections on the right are necessary for the soundcard to generate diesel sounds which vary with the loco speed and load. The terminal connections on the left trigger the various sounds where the locomotive controller has the appropriate outputs available. Sounds can also be triggered by a Sony infra-red TV remote control which can be purchased locally. Low cost, universal, TV remote controls are available from most consumer electronics stores and need to be set to Sony coding to work with the soundcard. Although it can be used when running in the garden, the remote control is intended mainly for the adjustment and testing of sounds. The remote control communicates with the soundcard via two infra-red receivers. One is located on the soundcard and the other is on a flying lead which allows it to be fixed to any external surface of the loco. Adjustments to the sounds can then be made without taking the loco apart to access the soundcard.


3 3 SPEAKERS & SOUND QUALITY. The soundcard requires an 8 ohm loudspeaker which is not included. A 4 ohm speaker can also be used but you may cause the soundcard to overheat and temporarily shut down if the volume is very high and the soundcard is in a confined space. Your choice of speaker is highly important because it determines the quality of the sound produced. A power output of at least one watt is recommended. The lowest cost option is to fit speaker from your local consumer electronics store. Typically these come in 27mm or 57mm diameters. Use the largest, which you can fit in your loco. For a better quality sound and more volume, the speaker needs to be baffled. That means that it needs to be built into the front face of an airtight box so that sound is heard only from the front of the speaker and none from the back. The plastic top of a spray paint can is good for making a baffle as shown in the diagram. A good solution, which ensures high quality sound with lots of deep throbbing bass, is to purchase an 8 ohm impedance external speaker unit for ipod and MP3 music players and remove the two speaker modules, in their enclosures, for use in two locos. These are readily available at consumer electronics stores. Speakers can be connected to the terminals either way around. It is also possible to boost the volume by using a commercial stereo amplifier. Section 11 of these instructions shows how this can be done. Use of an external amplifier is recommended for ride on railways. THE REMOTE CONTROL The soundcard will operate with any Sony TV remote control using the buttons described in this section. It will also operate with any universal remote control when it is set to Sony coding. MyLocoSound can supply a suitable remote control, the one illustrated here, or they can be purchased from your local consumer electronics store, Kmart, Good Guys, etc. for less than $20. You will probably find a number of codes listed for Sony and will need to try each one until you get to the code which operates the soundcard volume, mute and function buttons correctly. The code for Audiosonic remote controls from Kmart is The MyLocoSound remote control comes with a CR2025 or CR2032 battery fitted but isolated. From the battery compartment, pull out and discard the plastic tab to activate the battery. It is a universal device which has been pre-programmed to Sony coding. Do not hold down the mute button for more than a second since this can cause the remote control to lose its coding. If your remote control stops working then please refer to the Trouble Shooting Guide at the end of these instructions, to re-establish the coding. Other, locally purchased, universal remote controls will usually have a battery compartment in the back and their own instructions for setting Sony coding. Note that the buttons on the remote control auto-repeat if held down. If you want a single event to occur, like turning on the safety valve, then press the safety valve and release it immediately. If you want to make a large change in volume or tone then you can hold the button down to avoid the need to press the button repeatedly.

4 4 THE INFRA-RED RECEIVERS The infrared receivers accept commands from the handheld I/R remote control to adjust or trigger sounds. Two receivers are provided. One is fixed in the middle of the soundcard. The other is on a flying lead which plugs into the small white socket as shown on page one. In some installations, the soundcard is visible when installed in the loco. This usually occurs when the soundcard is mounted on the floor of a cab, with or without windows. In this case, the remote control can be pointed directly at the soundcard and the on-board receiver is all that is needed. If the soundcard is within the loco and is not visible, then the flying lead needs to be used. Plug it into the white socket and glue the black receiver, round side outwards, to any external surface of the loco to which you can easily point the radio control. Do not paint the receiver. INSTALLING THE SOUNDCARD IN A TRACK POWERED LOCOMOTIVE OR RAILCAR. The soundcard is suitable for use on analogue DC track powered railways. It is not suitable for use with DCC. When the track voltage is below nine volts it is insufficient to power the soundcard. Therefore, a nine volt PP3 battery is used to drive the soundcard and produce sound when the loco is static or moving slowly. This battery will be automatically recharged whenever the track voltage is at least one volt higher than the battery voltage so there should never be a need to remove the battery for recharging. However, the battery must be a Nickel Metal Hydride type; Lithium and Nickel Cadmium batteries must not be used. On small shunting layouts, the loco speed is often not high enough for charging to take place. Some owners of shunting layouts put an isolation switch on the loco motor circuit so that they can turn up the power to recharge the battery without having the loco moving. Because most DC controllers do not have function buttons, an alternative way of triggering the horn, bell and other sounds needs to be found. The options are: 1. You can set the whistle to sound automatically three times a minute when the train is running. This is described in the Configuring The sound Card section on page # You can connect the soundcard whistle trigger to a reed switch which you mount on the bottom of the loco. Then install magnets in the track where you want the whistle to sound eg. at the approaches to a level crossing. The whistle will then sound briefly as the loco crosses each magnet. 3. Use the remote control, supplied with the soundcard, to trigger all the sounds. However, infrared remote controls are not designed for long distance use outside. On an overcast but bright day, the remote with coin batteries will only operate up to one metre away from the loco. A larger remote control, powered by AA or AAA batteries, will probably operate up to three metres away. Any combination, or all, of these methods can be used.


5 5 INSTALLING THE SOUNDCARD IN A BATTERY POWERED LOCOMOTIVE OR RAILCAR. The wiring diagram below shows a typical installation for common types of battery powered radio control systems such as a VIPER ESC. You can use any current RCS TX handpiece including the RCS # EVO-BATT. The Rx102-1 receiver, not shown here, has three function channels, two of which, Ch # 2 & Ch # 4, can operate two triggers ach via two R/C switcher units. The fifth soundcard trigger, the brake pump, can be operated by adding a third R/C switch to Ch # 5. Or, if required, switched on to automatic by the IR remote control. N.B. # EVO-BATT can only trigger 3 x sounds. The wiring diagram below shows a typical installation for an RCS Omega radio control systems with the current model TX-3 transmitter handpiece. This combination has two function channels, each of which can operate a sound trigger. In the above case, the whistle and bell triggers have been selected. The Omega should be programmed to make the whistle channel momentary and the bell toggle. You can choose to use different channels. There are options available to use more triggers. RCS can help you with this. The Tx7k has 4 x sound triggers & can be operated as shown on the left.


6 6 INSTALLING THE SOUNDCARD IN A CREST REVO BATTERY POWERED LOCOMOTIVE OR RAILCAR. The Crest Revolution can trigger all six sound functions. It is connected as shown in the diagram below. To connect the Crest Revolution, the adaptor plug for custom installations is used with the outer red, orange, grey and black wires being connected as shown. All auxiliary functions should be set to momentary by selecting MENU ASSIGN FUNCTIONS AUX FUNC SETUP. However, the bell, if in use, can be set to latch. The wiring diagram below shows the connections for the DC jumper board in a Bachmann locomotive. The above wiring diagrams can be seen in colour by visiting the web site at Also shown are specific wiring diagrams for RCS, Barker, Mac 5, RailBoss, Mtronics, Roundhouse, Electronise and LocoLinc.
7 7 CONFIGURING THE SOUNDCARD Configuring this new BLUE v16 pcb card is a lot different from all of the earlier versions including V15. It has two modes. Setting Mode in which you can select the sounds to which you wish to make adjustments. Run Mode in which the soundcard does its job on your railway. All changes to the settings must be made using the Sony Compatible IR hand piece. We will cover that first. 1. Turn the soundcard ON and place into Setting Mode by pointing the IR remote Controller or the remote receiver on the end of the flying lead, and press the MUTE button. The LED on the soundcard will blink slowly and all sounds swill cease. 2. Select the sound you wish to configure by pressing the relevant key on the remote control to change the sounds listed below. When you press a key, the LED on the soundcard will start blinking faster. At any time you can press the MUTE button to hear the sound you have selected. Then press the MUTE again to turn the sound off so further programming can proceed. The options are as follows. Remember, the MUTE button must be pressed first to start programming. Power Button Battery or Track Power. The soundcard can be used with battery powered, radio controlled locomotives or with locomotives which are powered from the track (but not DCC). Press this button to change from one to the other. 1 x Beep Battery powered radio control. 2 x Beeps Track Power. In this case, the soundcard will automatically turn itself off when the locomotive has not moved for 30 seconds. Turning the track power up a little will turn the soundcard back on. BUTTON # 0 Country. This is used to select the part of the World from which your locomotive is a prototype. Your choice at this step will determine the selection of whistles offered and how those whistles are sounded. When you press the 0 button, one or more beeps will be heard to indicate the country currently selected as follows. 1 x Beep Britain 2 x Beeps North America. 3 x Beeps Australasia. Press the 0 button repeatedly to select the region you want. The sole purpose of changing the country is to select default whistles and sounds which are appropriate. If you want to use a whistle from another country because it fits your particular locomotive then there is no problem with changing the country to access that whistle. BUTTON # 1 Whistles. This button is used to select the style of whistle that suits your locomotive. All of these whistles are adjustable for pitch and volume. Each time you press the # 1 button the number of beeps will increase to indicate that the whistle listed below has been selected. If you wish to hear what the whistle sounds like, press the MUTE button to start the whistle and then again, to stop the whistle. While the whistle is sounding, you can use the channel up/down buttons to vary the pitch and the volume control buttons to set the volume. The pre-selected whistles available are; BEEPS Britain North America Australasia 1 Classic Original (default) American 5 3 Chime Puffing Billy NA 2 Churchward Hancock 3 Chime NSW Chime 3 Stanier Hooter Reading 6 Chime Victorian Chime (default) 4 Bulleid Nathan 6 Chime South Australian Chime 5 Gresley Chime C & O Chime (default) New Zealand Chime 6 Thomas Thomas Thomas
8 Button 2 Bell. This button is used to select the type of bell from the list below. 1 beep Manual bell. Rings repeatedly when the button is pressed, until the button is pressed again. 2 beeps Timed bell. When F2 is triggered, rings repeatedly for a predetermined time. To set that time, press the Mute button to exit setting mode and then press Button 2 to ring the bell. When the bell has rung for as long as you want, press Button 2 again to stop the ringing. The time is then set and the bell will ring for that time when F2 is triggered while running. 3 beeps Automatic bell. Rings repeatedly when the motor voltage is less than 4 volts. (US Default) 4 beeps Automatic bell. Rings repeatedly when the motor voltage is less than 8 volts. 5 beeps Automatic bell. Rings repeatedly when the motor voltage is less than 12 volts. 6 beeps Manual bell. Rings once only each time the button is pressed. (Australasian Default) 7 beeps Bell not required. Button sounds a short whistle toot. (British Default) Button 3 Guard. This button is used to select the guard s sounds from the list below. 1 beep Sounds a guard s Acme Thunderer whistle. (British Default) 2 beeps Sounds All aboard. (US Default) 3 beeps Sounds All aboard and then the guard s whistle. (Australasian Default) Button 4 Safety Valve. This will operate in four ways: 1 beep Manual. Starts blowing when the button is pressed and stops when pressed again. 2 beeps Throttle controlled. When the loco is stationary, turn the throttle up a little and the safety valve will blow off until you turn the throttle off or forwards to move off. 3 beeps Automatic. Blows for ten seconds once a minute. 4 beeps Automatic. Blows for ten seconds once every three minutes. (Default) Button 5 Westinghouse Brake Pump. This will operate in two ways: 1 beep Not required. The locomotive does not use a Westinghouse brake. (British Default) 2 beeps Automatic. Sounds whenever the locomotive is stationary. (Other Default) Button 6 Injectors. This will operate in three ways: 1 beep Manual. Starts blowing when the button is pressed and stops when pressed again. 2 beeps Automatic. Operates for twenty seconds once every two minutes. (Default) 3 beeps Automatic. Operates for twenty seconds once every four minutes. Button 7 Steam Chuff. The locomotive chuff can be generated in three ways: 1 beep Automatic chuff based on the motor voltage for two or four cylinders. (Default) 2 beeps Automatic chuff based on the motor voltage for locomotives with three cylinders. 3 beeps Mechanically triggered chuff. For locomotives which have a built in chuff trigger on an axle. The output from that chuff trigger needs to be connected to the F7 terminal on the soundcard. Note that the chuff trigger will function only when there is a voltage on the M1/M2 terminals. Button 8 Brake Squeal. This will operate in either of two ways: 1 beep Not required. 2 beeps Automatic. Sounds whenever the locomotive comes to a halt. (Default) 8
9 Button 9 The Operating Mode. There are three operating modes available: 1 beep Indicates manual mode. In this mode all sounds are triggered according to the above settings. The whistle will sound for as long as its button is pressed. 2 beeps Indicates simple automatic mode. This is designed for controllers which have no function buttons, as is often the case with track power, or at exhibitions, etc, where you don t want to operate manually. The whistle will sound once automatically when the loco moves off and then once more three times a minute when the loco is on motion. A reed switch can be placed under the loco and be connected to the F1 terminal to make the whistle sound when the loco passes over a magnet. Another reed switch, connected to the F2 terminal, can be used to trigger the bell. If the bell is set to one beep then it will ring continuously until the loco passes over another magnet. If the bell is set to two beeps, then it will ring for the set time. 3 beeps Indicates American automatic mode. Again, this is designed for controllers which have no function buttons, as is often the case with track power, or at exhibitions, etc, where you don t want to operate manually. However, it follows American rules. The whistle will sound two long toots when the loco moves off forwards or three short when backing up. If these occur the wrong way around then reverse the leads at the M1/M2 terminals. When the loco stops, a single short toot will indicate brakes on. A reed switch can be placed under the loco and be connected to the F1 terminal to make the whistle sound the grade crossing sequence when the loco passes over a magnet. Another reed switch, connected to the F2 terminal, can be used to trigger the bell. If the bell is set to one beep, then it will ring continuously until the loco passes over another magnet. If the bell is set to two beeps then it will ring for the set time. Channel up/down buttons Load Sensitivity. The soundcard can be programmed to make the engine loud when accelerating and softer when coasting and slowing down. The channel up/down buttons change the level of sensitivity as indicated by the number of beeps when pressed. One beep indicates maximum sensitivity. Five beeps sets minimum sensitivity i.e. the engine will be loud all the time. The default sensitivity is two and change to one if you want more sensitivity or three or more if the chuff sounds erratic. Resetting the soundcard back to factory default settings. If you get in a bit of mess and want to start again then you can reset the soundcard by holding down the 0 (zero) button of the remote control for three seconds. You will then hear five beeps and all settings will revert to the defaults for the country you have selected. These include the default sounds, 2/4 cylinders and a voltage controlled chuff. It will not change the country. You can change all the above settings whenever you wish and the changes will be effective immediately. OPERATING THE SOUNDCARD When the loco is running, the engine sounds should operate automatically, getting louder when accelerating and softer when slowing down or idle. Where your controller has function buttons then you can use them as follows: Button 1. Sounds the long whistle for as long as the button is pressed. Button 2. The bell. Button 3. Sounds the guard s whistle or All aboard. Button 4. Sounds the safety valve blowing off. Button 5. Sounds the Air Pump. 9
10 10 TROUBLE SHOOTING GUIDE The Remote Control won t work Start the soundcard, press any button on the remote control and the LED should flash. If it does not flash then the battery probably needs replacing. If the LED flashes but the soundcard does not respond then the Sony coding may have been lost and can be reset as follows. If using a MyLocoSound remote control. Switch on the van or loco so that you get the steam hiss. Point the remote control at the receiver and do the following: Hold the mute button down. The remote control will go through its list of codes until it gets to the correct one at which time the sound will go off. When that happens, let go of the mute button immediately. The correct code should now be selected. Test the remote by pressing the mute button again to turn on the sound & then test the functions. It may not work & you may have to try several times. Releasing the button immediately when the sound stops is critical. If using a locally purchased remote control. Refer to its instructions for resetting the Sony coding. You will probably find a number of codes listed for Sony and will need to try each one until you get to the code which operates the soundcard volume, mute and function buttons correctly. The code for K Mart Home & CO IR remote controls is If the remote control still does nothing then the problem may be the infrared receiver on the loco which must not be painted or obstructed. I get no sound at low speeds when using trackpower. You may get no sound at low speeds until the track voltage gets up to about nine volts. This indicates that the support battery is flat. Charge the battery by running the loco at half speed for ten minutes. I get no sound at all. Press the Mute button on the remote control in case the sound has been accidentally turned off. Switch the loco off and then on again. When the soundcard starts, the LED should flash three times. If not, then use a multimeter to check that there is at least nine volts at the B+ and B- terminals. If not then check your wiring in case something has come adrift. Check that the speaker is connected correctly. The soundcard makes a clicking noise or shuts down. This most often occurs when the whistle is sounded. It is caused by the soundcard restarting because there is insufficient voltage in the track or the battery to sustain the volume setting. Recharge the battery. When installed in a loco, the loco and sound stop intermittently and I have to reset the controller to get it going again. The soundcard maximum output is 1.5 amps. If this is exceeded as a result of a large motor, a heavy load and/or high volume settings then the soundcard will shut down. Also, if the soundcard is installed in a very confined space and is run for a prolonged period at high power, then it can overheat and switch itself off while it cools down. The sound is erratic on track power only. Not radio control. When using track power, some controllers have an output which is so rough as to cause the soundcard to run erratically. This can be cured by fitting a 220µF bi-polar capacitor across the M1/M2 terminals to smooth the DC pulses. The capacitor rating needs to be at least 30 volts to ensure that it is more than the maximum voltage of the controller. A bi-polar capacitor can be connected either way around. My radio control has become erratic. If the soundcard is installed very close to the loco radio receiver ie, back to back, then it can interfere with the radio commands and operation can become erratic. To avoid this problem move the soundcard a little away from the receiver. You can also avoid the problem by wrapping the soundcard in silver paper but would have to be very careful to avoid shorts and component overheating.

11 11 USING AN EXTERNAL AMPLIFIER FOR RIDE ON RAILWAY LOCOMOTIVES When used in 5 inch and 7¼ inch ride on railways there is a lot of environmental background noise. The one watt output of the soundcard is not sufficient for these environments and an external amplifier needs to be used. The wiring diagram below shows how the soundcard can be interfaced to a commercial stereo amplifier in a loco powered by a 12 V battery. A 24v battery powered loco will require a 24v to 12v DC converter as shown alongside. Note that the soundcard can handle a maximum of 24 volts DC. A battery which is labelled as 24 volts will typically output 28 volts when fully charged and will therefore damage the soundcard if connected directly. In Australia, the 2x15 watt AA0487 amplifier from Jaycar is suitable. Other amplifiers may require the 100Ω resistor to be changed. If the output volume is too low then raise the value of the 100Ω resistor. A single speaker can be used on the right output or two speakers on the left and right outputs. Any of the five functions can be used by means of a pushbutton between the function terminal and ground. The sound functions available are whistle, bell, guard s whistle, safety valve and brake pump. The installation can be made more robust by using two blobs of silicon to attach the soundcard to a plastic box in which the capacitor and two resistors are placed as shown above. The whole can then be fixed to the top of the amplifier, again using silicon. Select a speaker which matches the impedance and power output of the amplifier. In the case of the Jaycar AA0487, a 15 watt speaker of four ohms impedance is needed. It is also important to make a soundbox which is an airtight fit to the back of the speaker. This will improve both volume and sound quality.


12 12 PLC009 RCS Blue pcb Steam Instructions.doc 08/02/18 For more information, please visit the web site at or Copyright Peter Lucas Consulting Pty. Ltd.
STEAM MYLOCOSOUND MAY 4 TH 2017
 1 STEAM MYLOCOSOUND MAY 4 TH 2017 UNIVERSAL SOUND FOR LARGE SCALE, DC, STEAM LOCOMOTIVES 1.OVERVIEW Easy installation using screw terminals with no soldering. Uses a TV remote control to adjust the volume
UNIVERSAL SOUND FOR LARGE SCALE, DC, STEAM LOCOMOTIVES
 1 MYLOCOSOUND UNIVERSAL SOUND FOR LARGE SCALE, DC, STEAM LOCOMOTIVES 1.OVERVIEW Easy installation using screw terminals with no soldering. Uses a TV remote control to adjust the volume and sounds to match
UNIVERSAL SOUND FOR LARGE SCALE, DC, STEAM LOCOMOTIVES
 1 MYLOCOSOUND UNIVERSAL SOUND FOR LARGE SCALE, DC, STEAM LOCOMOTIVES 1.OVERVIEW Easy installation using screw terminals with no soldering. Uses a TV remote control to adjust the volume and sounds to match
UNIVERSAL SOUND FOR LARGE SCALE, DC, STEAM LOCOMOTIVES
 1 MYLOCOSOUND UNIVERSAL SOUND FOR LARGE SCALE, DC, STEAM LOCOMOTIVES 1.OVERVIEW Easy installation using screw terminals with no soldering. Uses a TV remote control to adjust the volume and sounds to match
ELECTRIC MYLOCOSOUND 16E MAR 1 ST 2019
 1 2 ELECTRIC MYLOCOSOUND 16E MAR 1 ST 2019 UNIVERSAL SOUND FOR LARGESCALE, ELECTRIC OUTLINE LOCOMOTIVES. OVERVIEW Easy installation using screw terminals with no soldering. Uses a TV remote control to
UNIVERSAL SOUND FOR LARGE SCALE, DC, STEAM LOCOMOTIVES
 1 MYLOCOSOUND UNIVERSAL SOUND FOR LARGE SCALE, DC, STEAM LOCOMOTIVES 1.OVERVIEW Easy installation using screw terminals with no soldering. Uses a TV remote control to adjust the volume and sounds to match
UNIVERSAL SOUND FOR LARGE SCALE, DC, DIESEL LOCOS & RAILCARS
 1 MYLOCOSOUND UNIVERSAL SOUND FOR LARGE SCALE, DC, DIESEL LOCOS & RAILCARS 1.OVERVIEW Easy installation using screw terminals with no soldering. Uses a TV remote control to adjust the sounds to match the
UNIVERSAL SOUND FOR LARGE SCALE, DC, STEAM LOCOMOTIVES
 1 MYLOCOSOUND UNIVERSAL SOUND FOR LARGE SCALE, DC, STEAM LOCOMOTIVES 1.OVERVIEW Easy installation using screw terminals with no soldering. Uses a TV remote control to adjust the volume and sounds to match
LITE DIESEL MYLOCOSOUND 3C JAN 1 ST 2019.
 1 2 LITE DIESEL MYLOCOSOUND 3C JAN 1 ST 2019. FOR LARGESCALE, SMALL DIESEL LOCOS & RAILCARS. OVERVIEW Easy installation using screw terminals with no soldering. Uses a TV remote control to adjust the sounds
MYLOCOSOUND RECORDED SOUND FOR LARGE SCALE RUSTON & HORNSBY AND GENERIC INDUSTRIAL DIESEL LOCOS
 1 MYLOCOSOUND RECORDED SOUND FOR LARGE SCALE RUSTON & HORNSBY AND GENERIC INDUSTRIAL DIESEL LOCOS 1.OVERVIEW Easy installation using screw terminals with no soldering. Uses a TV remote control to adjust
UNIVERSAL SOUND FOR LARGE SCALE, DC, DIESEL LOCOS & RAILCARS
 1 MYLOCOSOUND UNIVERSAL SOUND FOR LARGE SCALE, DC, DIESEL LOCOS & RAILCARS 1.OVERVIEW Easy installation using screw terminals with no soldering. Uses a TV remote control to adjust the sounds to match the
The speaker soundbox improves the performance of the speaker in locos which have no purpose designed speaker cradle.
 1 1.OVERVIEW 8 pin DCC sound decoder with adjustable back-emf loco control. Fully adjustable sounds to match the chuff and whistle to the prototype loco. Provides a chuff which matches the loco speed and
MYLOCOSOUND LARGE SCALE DIESEL LOCOMOTIVE KIT
 1 MYLOCOSOUND LARGE SCALE DIESEL LOCOMOTIVE KIT 1.OVERVIEW 16mm to the foot scale model of an 0-4-0 Sugar Cane locomotive. Easy glued assembly. Heavy, high quality motor, gears and steel chassis for a
TX-1 Digital Proportional R/C
 P.O Box 578 Casino, NSW, 2470 Australia Phone: International ++614 2902 9083 Australia (04) 2902 9083 Website: http://rcs-rc.com E mail: info@rcs-rc.com TX-1 Digital Proportional R/C TABLE OF CONTENTS
CAUTION DO NOT ATTEMPT TO ALTER THE TUNING OF THE RADIO EQUIPMENT. DO NOT USE RADIO CONTROL EQUIPMENT IN THUNDERSTORMS.
 P.O Box 578 Casino, NSW, 2470 Australia Phone: International ++614 2902 9083 Australia (04) 2902 9083 Website: http://rcs-rc.com E mail: info@rcs-rc.com TX-3 Digital Proportional R/C TABLE OF CONTENTS
INSTALLING THE #OMEGA-3v9k ESC.
 - 2 - INSTALLING THE #OMEGA-3v9k ESC. We usually supply the # OMEGA-3v9k ESC with a Lemon brand Rx which is simply plugged in upside down on the ESC pcb in the 24 pin socket. The two parts are bench tested
HiLine Diesel sound installation instructions:
 HiLine Diesel sound installation instructions: OVERVIEW: This device is an electronic, self contained, sound system for installation in model diesel locomotives that are designed to operate with any type
USE ONLY OPERATING PROGRAM BV1. DO NOT CONNECT TO MAINS POWER ( V AC).
.") P.O Box 578 Casino, NSW, 2470 Australia Phone: International ++614 2902 9083 Australia (04) 2902 9083 Website: http://rcs-rc.com E mail: Info@rcs-rc.com # PnP-3s Electronic Speed Controller FULL INSTRUCTION
P.O Box 578 Casino, NSW, 2470 Australia Phone: International ++614 2902 9083 Australia (04) 2902 9083 Website: http://rcs-rc.com E mail: Info@rcs-rc.com # PnP-3s Electronic Speed Controller FULL INSTRUCTION
INSTRUCTIONS. DO NOT CONNECT TO MAINS POWER ( V AC).
.") P.O Box 578 Casino, NSW, 2470 Australia Phone: International ++614 2902 9083 Australia (04) 2902 9083 Website: http://rcs-rc.com E mail: Info@rcs-rc.com ALPHA-3v2 Electronic Speed Controller Supplied for
P.O Box 578 Casino, NSW, 2470 Australia Phone: International ++614 2902 9083 Australia (04) 2902 9083 Website: http://rcs-rc.com E mail: Info@rcs-rc.com ALPHA-3v2 Electronic Speed Controller Supplied for
HiLine Steam sound sytem installation instructions:
 HiLine Steam sound sytem installation instructions: OVERVIEW: This device is an electronic, self contained, sound system for installation in model diesel locomotives that are designed to operate with any
INSTALLING THE #OMEGA-3v9s ESC.
 - 2 - INSTALLING THE #OMEGA-3v9s ESC. We usually supply the # OMEGA-3v9s ESC with a Lemon brand Rx which is simply plugged in upside down on the ESC pcb in the 24 pin socket. The two parts are bench tested
CAUTION-ELECTRICALLY OPERATED PRODUCT
 CAUTION-ELECTRICALLY OPERATED PRODUCT NOT RECOMMENDED FOR CHILDREN UNDER 14 YEARS OF AGE. AS WITH ALL ELECTRIC PRODUCTS, PRECAUTIONS SHOULD BE OBSERVED DURING HANDLING AND USE TO PREVENT ELECTRIC SHOCK.
30A BLDC ESC. Figure 1: 30A BLDC ESC
 30A BLDC ESC Figure 1: 30A BLDC ESC Introduction This is fully programmable 30A BLDC ESC with 5V, 3A BEC. Can drive motors with continuous 30Amp load current. It has sturdy construction with 2 separate
BigSound 2K2 Handbook
 BigSound 2K2 Handbook Phoenix Sound Systems, Inc. 3514 West Liberty Road Ann Arbor MI 48103 www.phoenixsound.com phone: 800-651-2444 fax: 734-662-0809 e-mail: phoenixsound@phoenixsound.com 2002-2007 Phoenix
INSTRUCTIONS. DO NOT CONNECT TO MAINS POWER ( V AC).
.") P.O Box 578 Casino, NSW, 2470 Australia Phone: International ++614 2902 9083 Australia (04) 2902 9083 Website: http://rcs-rc.com E mail: Info@rcs-rc.com OMEGA-3v5k Electronic Speed Controller FULL INSTRUCTION
P.O Box 578 Casino, NSW, 2470 Australia Phone: International ++614 2902 9083 Australia (04) 2902 9083 Website: http://rcs-rc.com E mail: Info@rcs-rc.com OMEGA-3v5k Electronic Speed Controller FULL INSTRUCTION
OMEGA-3v8s Electronic Speed Controller
 P.O Box 578 Casino, NSW, 2470 Australia Phone: International ++614 2902 9083 Australia (04) 2902 9083 Website: http://rcs-rc.com E mail: Info@rcs-rc.com OMEGA-3v8s Electronic Speed Controller FULL INSTRUCTION
Conversion to Battery Power Del Tapparo
 Conversion to Battery Power Del Tapparo Converting a track powered locomotive to battery power eliminates all of the electrical continuity problems associated with track power. However, the process of
INSTRUCTIONS. DO NOT CONNECT TO MAINS POWER ( V AC).
.") P.O Box 578 Casino, NSW, 2470 Australia Phone: International ++614 2902 9083 Australia (04) 2902 9083 Website: http://rcs-rc.com E mail: Info@rcs-rc.com TABLE OF CONTENTS PROVIDED IN INSTRUCTIONS. Page
P.O Box 578 Casino, NSW, 2470 Australia Phone: International ++614 2902 9083 Australia (04) 2902 9083 Website: http://rcs-rc.com E mail: Info@rcs-rc.com TABLE OF CONTENTS PROVIDED IN INSTRUCTIONS. Page
OMEGA-3v7 Electronic Speed Controller
 P.O Box 578 Casino, NSW, 2470 Australia Phone: International ++614 2902 9083 Australia (04) 2902 9083 Website: http://rcs-rc.com E mail: Info@rcs-rc.com OMEGA-3v7 Electronic Speed Controller FULL INSTRUCTION
ZTC 335 Dual Track Detector Installation Manual
 ZTC 335 Dual Track Detector Installation Manual WARNING If you fail to read the installation instructions properly it is possible that you could accidentally damage your ZTC unit. Such damage is NOT covered
INSTALLING RCS-BELTROL ESC s.
 - 2 - INSTALLING RCS-BELTROL ESC s. E-SKY IS A GROUP B R/C & THIS ESC MUST USE THE BTLvB1 OPERATING PROGRAM. RCS-BELTROL ESC s can use E-SKY ET61 6 channel 2.4 GHz digital proportional R/C. These instructions
Application Note: Using two DCv3 type sound systems with one speaker.
 Application Note: Using two DCv3 type sound systems with one speaker. Various applications of the DCv3 sound card are shown on the following pages along with the Revolution receiver offered by AristoCraft
BigSound P5 Handbook
 BigSound P5 Handbook Phoenix Sound Systems, Inc. 3514 West Liberty Road Ann Arbor MI 48103 www.phoenixsound.com phone: 800-651-2444 fax: 734-662-0809 e-mail: phoenixsound@phoenixsound.com 2005-2008 Phoenix
INSTALLING RCS-BELTROL ESC s.
 - 2 - INSTALLING RCS-BELTROL ESC s. PLANET IS A GROUP A R/C & THIS ESC MUST USE THE BTLvA2 OPERATING PROGRAM. RCS-BELTROL R/C ESC s can use a PLANET T5 5 channel 2.4 GHz digital proportional R/C R6M RX
BigSound P8 Handbook
 BigSound P8 Handbook Phoenix Sound Systems, Inc. 3514 West Liberty Road Ann Arbor MI 48103 www.phoenixsound.com phone: 734-662-6405 fax: 734-662-0809 e-mail: phoenixsound@phoenixsound.com 2010-2014 Phoenix
RailPro DCC User Manual
 RailPro DCC User Manual User Manual (219) 322-0279 www.ringengineering.com Revision 1.01 Copyright 2017 All rights reserved Table of Contents Introduction...2 STEP 1 - Install a RailPro Module into a Locomotive...3
Norfolk & Western Y6b Mallet
 2002 Kohs & Company, Inc - Clarkston, Michigan 48348 Norfolk & Western Y6b Mallet OPERATION AND MAINTENANCE INSTRUCTIONS The Kohs & Company Norfolk & Western Y6b locomotive is an exact scale replica of
Norfolk & Western Y6a Mallet
 2003 Kohs & Company, Inc - Clarkston, Michigan 48348 Norfolk & Western Y6a Mallet OPERATION AND MAINTENANCE INSTRUCTIONS The Kohs & Company Norfolk & Western Y6a locomotive is an exact scale replica of
Digital Command & Control (DCC) has progressed a great deal over recent years and can now provide a myriad of actions which can be made to precisely r
 has progressed a great deal over recent years and can now provide a myriad of actions which can be made to precisely r") (Digital Command & Control) January 2016 All content & images copyright of Garden Railways Specialists Ltd Digital Command & Control (DCC) has progressed a great deal over recent years and can now provide
(Digital Command & Control) January 2016 All content & images copyright of Garden Railways Specialists Ltd Digital Command & Control (DCC) has progressed a great deal over recent years and can now provide
Cross Hare Installation Guide
 Cross Hare Installation Guide Introduction: The Cross Hare is designed to provide all of the functions you need to control a one or two track grade crossing in a prototypical manner. The Cross Hare uses
Multi-Rotor Series User Guide
 1 INTRODUCTION Multi-Rotor Series User Guide This manual provides instructions on incorporating your Castle Creations Multi-Rotor ESCs into your aircraft, from wiring and mounting your ESCs to configuring
Operator s Manual. DC Users See Page 2. DCC Users See Page 8. Paragon 2. Diesel Locomotives RELEASE 1. Paragon 2 12/22/08
 Operator s Manual Diesel Locomotives RELEASE 1 DC Users See Page 2 DCC Users See Page 8 12/22/08 1 Table of Contents: DC Operation...2 DCC Operation...8 DCC Programming Quick Reference & Tips... 22 Throughout
DMR Series User Guide
 1 INTRODUCTION DMR Series User Guide This manual provides instructions on incorporating your Castle Creations DMR (Dedicated Multi-Rotor) ESCs into your aircraft, from wiring and mounting your ESCs to
Auscision 48/830 Class DCC Operating Information
 Auscision 48/830 Class DCC Operating Information Your Auscision 48/830 class models main printed circuit board and associated lighting has been designed to function as a DC / DCC Ready and DCC Sound Decoder
Phoenix Sound Systems, Inc West Liberty Road Ann Arbor MI
 BigSound PBv6 Handbook Phoenix Sound Systems, Inc. 354 West Liberty Road Ann Arbor MI 4803 www.phoenixsound.com phone: 800-65-2444 fax: 734-662-0809 e-mail: phoenixsound@phoenixsound.com 203-204 Phoenix
AUSTRALIA (04) PHONE: INTERNATIONAL # MRW-SSLS
 PHONE: INTERNATIONAL # MRW-SSLS") R/C SWITCHES PO BOX 8 BAYSWATER, VIC 353, AUSTRALIA PHONE: INTERNATIONAL ++64 2902 9083 AUSTRALIA (04) 2902 9083 Web: http://www.rcs-rc.com Email: rcs@rcs-rc.com # MRW-SSLS # MRW-SSLS by Model Radio Workshop
R/C SWITCHES PO BOX 8 BAYSWATER, VIC 353, AUSTRALIA PHONE: INTERNATIONAL ++64 2902 9083 AUSTRALIA (04) 2902 9083 Web: http://www.rcs-rc.com Email: rcs@rcs-rc.com # MRW-SSLS # MRW-SSLS by Model Radio Workshop
ITCEMS950 Idle Timer Controller - Engine Monitor Shutdown Isuzu NPR 6.0L Gasoline Engine
 Introduction An ISO 9001:2008 Registered Company ITCEMS950 Idle Timer Controller - Engine Monitor Shutdown 2014-2016 Isuzu NPR 6.0L Gasoline Engine Contact InterMotive for additional vehicle applications
MrRCSound Sound Generator. Version 4.1 for RC Aircraft/Cars/Trucks
 MrRCSound Sound Generator Version 4.1 for RC Aircraft/Cars/Trucks Thank You! Thank you for purchasing the MrRCSound electric aircraft sound module, or other product. I know there are options out there,
DC Analog Reference Manual for QSI Quantum HO Equipped Locomotives
 DC Analog Reference Manual for QSI Quantum HO Equipped Locomotives Version 4.0 For Firmware Version 7 25 August 2006 Table of Contents Introduction to Quantum Q1a Analog Operation... 6 New Features...6
NCE DCC TWIN. In addition to the NCE DCC TWIN, you will need:
 NCE DCC TWIN Welcome to the world of DCC! This manual will familiarize you with the set up and operation of two locomotives on your railroad using the NCE DCC TWIN. In addition to the NCE DCC TWIN, you
Sound Commander 2. Generic Installation & Operation Manual
 Sound Commander 2 Generic Installation & Operation Manual Revised: October, 2008 Sound Commander 2 tm Locomotive Sound Upgrade Board Overview The Sound Commander 2 is a low cost way to add sound to your
INSTALLING RCS-BELTROL ESC s.
 - 2 - INSTALLING RCS-BELTROL ESC s. HOBBY KING IS A GROUP B R/C & THIS ESC MUST USE THE BTLvB1 OPERATING PROGRAM. RCS-BELTROL ESC s can use a HK TR6a 6 channel 2.4 GHz digital proportional R/C TX & RX
Operator s Manual. Important Notice: This product is not recommended for children under 14 years of age.
 Operator s Manual Paragon 3 with Rolling Thunder Steam Locomotives Important Notice: This product is not recommended for children under 14 years of age. 07/13/17 Broadway Limited locomotives manufactured
Steam Locomotive. v.2
 Steam Locomotive O p e r a t o r s M a n u a l N E OPERATE IN SILENCE NO MORE. 1 MO v.2 Before running your engine: Prior to operation, be sure to perform a reset procedure on your engine as outlined in
MODEL No s: PP3, PP3K
 instructions for: Power PROBE 3 12-24v MODEL No s: PP3, PP3K Thank you for purchasing a Sealey product. Manufactured to a high standard this product will, if used according to these instructions and properly
Triumph Street Triple VSM Grip Heater Install
 Triumph Street Triple VSM Grip Heater Install Introduction: With winter fast approaching and with painful memories of last winter riding with the club it was time to do something about getting some grip
Building a Battery Car and other technical concerns
 Building a Battery Car and other technical concerns Presented by The Tucson Garden Railway Society, The Tucson Botanical Garden Nick C. Buchholz presenting 1 Where to start. Decisions- What Locomotive?
PROTOSOUND 3.0 HO GAUGE DIESEL & ELECTRIC TROUBLESHOOTING
 PROTOSOUND 3.0 HO GAUGE DIESEL & ELECTRIC TROUBLESHOOTING Start Up When I apply power to my DCS track my engine doesn't do anything. No lights, no sound, no nothing. When I apply power to my DCC track
Owner and Operating Manual for
 Owner and Operating Manual for 120VAC Manual Control 12VDC Solar Battery Manual Control 120VAC Remote Control 12VDC Solar Battery Remote Control GEN2 Remote Versions Only Boat Lifts Please read this manual
PHOENIX ENIX Features of the Phoenix-60 : 2.3 Connecting the Motor. 2.4 Reversing Rotation. 2.5 Connecting the Receiver
 PHOENIX ENIX-60 Warning! High power motor systems can be very dangerous! High currents can heat wires and batteries, causing fires and burning skin. Follow the wiring directions carefully! Model aircraft
General Purpose Flasher Circuit
 General Purpose Flasher Circuit By David King Background Flashing lights can be found in many locations in our neighbourhoods, from the flashing red light over a stop sign, a yellow warning light located
Features: Enhanced throttle response, excellent acceleration, linearity and driveability
 120A/150A ESC X-Car 120A/150A Series Sensored/Sensorless Brushless ESC for 1:8 scale Car or Truck Thank you for purchasing the X-Car Brushless Electronic Speed Controller (ESC). The X-Car 1:8 Scale 120A/150A
Build a Simple Handheld Throttle for the Digitrax Zephyr
 Build a Simple Handheld Throttle for the Digitrax Zephyr Here is a way to build a simple three button throttle for use with the Digitrax popular Zephyr. This handheld throttle is designed work with the
DH163PS Fits Many DCC-Ready HO Locomotives
 Digitrax Command Control Run Your Trains, Not Your Track! DH163PS Fits Many DCC-Ready HO Locomotives HO Scale Mobile Decoder DCC Plug N Play with 1.25 Harness 1.5 Amp/2 Amp Peak 6 FX3 Functions, 0.5 Amp
GETTING STARTED. You are now ready to go!
 I WARNING: This is an extremely powerful brushless motor system. We strongly recommend removing the pinion gear from the motor for your own safety and the safety of those around you before performing calibration
DH165IP Fits Many HO Locomotives with DCC 8pin Medium Socket
 Digitrax Command Control Run Your Trains, Not Your Track! DH165IP Fits Many HO Locomotives with DCC 8pin Medium Socket HO Scale Mobile Decoder DCC Plug N Play 1.0 Amp/1.5 Amp Peak 6 FX 3 Functions, 0.5
DCC 101. Getting Started in DCC By Dennis Turner, Superintendent Denver s RailRoads.
 DCC 101 Getting Started in DCC By Dennis Turner, Superintendent Denver s RailRoads http://denversrailroads.com/ Introduction We will cover in this clinic: The Origins of DCC What is DCC? DCC Starter Systems
Computer Interface. Advanced Users' Guide
 Computer Interface Advanced Users' Guide Phoenix Sound Systems, Inc. 3514 West Liberty Road Ann Arbor MI 48103 www.phoenixsound.com phone: 800-651-2444 fax: 734-662-0809 e-mail: phoenixsound@phoenixsound.com
MEGA WAY LCD 4-CHANNEL CAR ALARM SECURITY SYSTEM. Operation Manual MEGATRONIX CALIFORNIA, USA MEGA 2500 OPERATE 1
 MEGA 2500 2-WAY LCD 4-CHANNEL CAR ALARM SECURITY SYSTEM Operation Manual MEGATRONIX CALIFORNIA, USA MEGA 2500 OPERATE 1 OPERATION: A. TRANSMITTER OPERATION: Transmitter Button System Function Remark Lock
Quantum Engineer. Add-on Control System. For Analog Operation of Special 1 Quantum System Equipped Locomotives. Table of Contents
 Quantum Engineer Table of Contents Add-on Control System QUANTUM ENGINEER OPERATING INSTRUCTIONS 3 INTRODUCTION 3 INSTALLATION 4 OPERATION IN RUN MODE 5 Primary Operation Keys 5 Locomotive Feature Keys
with lcd display 12-42v
 instructions for: AUTO PROBE with lcd display 12-42v MODEL No: PP7 Thank you for purchasing a Sealey product. Manufactured to a high standard this product will, if used according to these instructions
Scorpion User guide for Commander Series ESC s
 Scorpion User guide for Commander Series ESC s. The Commander 6V SBEC series feature a inbuilt switching BEC that will convert the voltage from your battery pack to.7 volts to power your receiver and servos.
G203V / G213V MANUAL STEP MOTOR DRIVE
 G203V / G213V MANUAL STEP MOTOR DRIVE PRODUCT DIMENSIONS PHYSICAL AND ELECTRICAL RATINGS Minimum Maximum Units Supply Voltage 18 80 VDC Motor Current 0 7 A Power Dissipation 1 13 W Short Circuit Trip 10
PHOENIX Features of the Phoenix-25 : 2.3 Connecting the Motor. 2.4 Reversing Rotation. 2.5 Connecting the Receiver
 Warning! High power motor systems can be very dangerous! High currents can heat wires and batteries, causing fires and burning skin. Follow the wiring directions carefully! Model aircraft equipped with
EtronixPulseRXInstructions 6/6/11 09:17 Page 1
 EtronixPulseRXInstructions 6/6/11 09:17 Page 1 EtronixPulseRXInstructions 6/6/11 09:17 Page 2 Etronix Pulse EX2 Sport 2 Channel 2.4GHz Steer Wheel Transmitter 1) INTRODUCTION. Thank you for choosing this
1) Wire Cutters 1) Solder (Rosin Core Electronic Solder) 2) Wire Strippers 2) Battery Connector 3) watt soldering iron
 Wire Cutters 1) Solder (Rosin Core Electronic Solder) 2) Wire Strippers 2) Battery Connector 3) watt soldering iron") Thank you for purchasing the Electronic Speed Control (ESC). The V-Series ESC Line was designed to offer high power and high efficiency combined with low weight and a compact size. These instructions will
Thank you for purchasing the Electronic Speed Control (ESC). The V-Series ESC Line was designed to offer high power and high efficiency combined with low weight and a compact size. These instructions will
PHOENIX Features of the Phoenix-10 : 2.3 Connecting the Motor. 2.4 Reversing Rotation. 2.5 Connecting the Receiver
 Warning! High power motor systems can be very dangerous! High currents can heat wires and batteries, causing fires and burning skin. Follow the wiring directions carefully! Model aircraft equipped with
G213V STEP MOTOR DRIVE REV 7: March 25, 2011
 Thank you for purchasing the G213V drive. The G213V is part of Geckodrive s new generation of CPLD-based microstep drives. It has short-circuit protection for the motor outputs, over-voltage and under-voltage
Model 1:8 Beast-ZTWSS120A 1:8 Beast-ZTWSS150A. PN#Model Cont.Current 120A 150A. Burst Current 760A 1080A
 Alien Power System BEAST Series Sensored/Sensorless Brushless ESC for 1:8 scale Car or Truck Thank you for purchasing the Alien Power System Brushless Electronic Speed Controller (ESC). The Alien Power
Electrical Solutions for Model Railways
 Electrical Solutions for Model Railways By Colin Tanner-Tremaine, MIET Electric Motors and layout wiring. Some of the problems we experience in operating our model locomotives are deteriorating performance
INSTALLATION / MAINTENANCE
 ERPS Generation 2 11-06 Revision 16 INSTALLATION / MAINTENANCE & Trouble Shooting Manual www.erps.com.au INDEX Component Identification 3 Important Notes / Warranty 3 Introduction 4 Maintenance 4 Installing
Do isolate the power supply from other high power systems such as Stereos and Alarms
 Thank you for purchasing a Smart Ride Air Management System, AIRBAGIT.COM s premier flagship product. This system will meet all of your custom and utility needs and will provide you years of trouble free
RPK-1 RailPro Model Railroad Control System Starter Kit
 RPK-1 RailPro Model Railroad Control System Starter Kit User Manual Ring Engineering Inc. (219) 322-0279 www.ringengineering.com Revision 2.01 Copyright 2017 Ring Engineering Inc. All rights reserved.
Musical Surroundings Presents:
 Musical Surroundings Presents: The SuperNova 2 preamplifier Musical Surroundings Presents: The SuperNova 2 preamplifier table of contents Introduction the SuperNova 2 1 Standard configuration 1 Power Amp-Direct
Bachmann 38 Ton Shay
 Bachmann 38 Ton Shay Phoenix Sound Systems, Inc. 3514 West Liberty Road Ann Arbor MI 48103 www.phoenixsound.com phone: 800-651-2444 fax: 734-662-0809 e-mail: phoenixsound@phoenixsound.com 2005-2008 Phoenix
Installation and Maintenance Instructions. World Leader in Modular Torque Limiters. PTM-4 Load Monitor
 World Leader in Modular Torque Limiters Installation and Maintenance Instructions PTM-4 Load Monitor 1304 Twin Oaks Street Wichita Falls, Texas 76302 (940) 723-7800 Fax: (940) 723-7888 E-mail: sales@brunelcorp.com
GETTING STARTED EASY TO USE, SOPHISTICATED ENOUGH TO WIN EVERYTHING. You are now ready to go!
 WARNING: This is an extremely powerful brushless motor system. We strongly recommend removing the pinion gear from the motor for your own safety and the safety of those around you before performing calibration
 Train Tech overview - ask for free catalogue Signal kits - OO/HO low cost easy to make signals for DC s - easy automatic block signalling - DCC or DC Smart Lights - small effects built in - DC/DCC - just
for the Union Pacific Gas-Turbine Electric
 7/10/10 Tsunami Digital Sound Decoder User s Guide Addendum for the Union Pacific Gas-Turbine Electric Software Release 1.14 Notice The information in this document is subject to change without notice.
HC Model Railroad Handheld Controller
 HC Model Railroad Handheld Controller User Manual Ring Engineering Inc. (219) 322-0279 www.ringengineering.com Revision 2.00 Copyright 2017 Ring Engineering Inc. All rights reserved. Introduction...3 Warnings...3
20/40/60A V2 Brushless Electronic Speed Controller INSTRUCTION MANUAL. Copyright 2013 KY MODEL Company Limited.
 20/40/60A V2 Brushless Electronic Speed Controller INSTRUCTION MANUAL www.copterx.com Copyright 2013 KY MODEL Company Limited. MENU 1. 2. 3. 4. 5. 6. 7. Table of content Introduction Specifications Programmable
SAVANNAH EI & DELUXE SYSTEM TROUBLE SHOOTING GUIDE
 SAVANNAH EI & DELUXE SYSTEM TROUBLE SHOOTING GUIDE ***PLEASE MAKE SURE TO LEARN THE REMOTE TO THE SYSTEM (REFER TO PG 6) AND CHECK THE BATTERIES FIRST!!! (American Flame AF-4000 Series) Intermittent Pilot
User Manual. T6 Tachometer. Online: Telephone: P.O. Box St. Petersburg, Florida 33736
 User Manual T6 Tachometer Online: www.phareselectronics.com Telephone: 727-623-0894 P.O. Box 67251 St. Petersburg, Florida 33736 Table of Contents Overview... 1 Description... 1 Wiring... 1 T6 Tachometer
INSTALLATION GUIDE Table of Contents
 CT-3100 Automatic transmission remote engine starter systems. What s included..2 INSTALLATION GUIDE Table of Contents Door lock toggle mode..... 4 Notice...2 Installation points to remember. 2 Features..2
/08. Lionel GP-7 Diesel Locomotive Owner s Manual. Featuring
 72-8567-250 8/08 Lionel GP-7 Diesel Locomotive Owner s Manual Featuring Congratulations! Congratulations on your purchase of the Lionel GP7 Diesel Locomotive! On the outside, this locomotive features numerous
Release Paragon 3 Steam Technical Reference Manual
 Release 0.20 Paragon 3 Steam Technical Reference Manual INTRODUCTION Introduction The Paragon 3 sound unit is a multi-function DCC decoder that supports the following: DCC Characteristics 14 bit addressing
INSTALLATION MANUAL AP60B INSTALLATION MANUAL
 INSTALLATION MANUAL 2. TOOLS REQUIRED The following is a list of tools required to properly install the cruise control. While this unit may be installed without some of the tools listed, it is recommended
PHOENIX HV Features of the Phoenix HV-45 : 2.3 Connecting the Motor. 2.4 Reversing Rotation. 2.5 Connecting the Receiver
 PHOENIX HV -45 1.0 Features of the Phoenix HV-45 : Extremely Low Resistance (.003 ohms) High rate adjustable switching (PWM) Up to 45 Amps continuous current Dual Opto-Coupled (No BEC) Up to 36 cells or
Covers All 430, 440, 441 and CJ Series Advanced Security Systems.
 INSTALL GUIDE Covers All 430, 440, 441 and CJ Series Advanced Security Systems www.ultrastarters.com Technical Support: 866-698-5872 ext 0 support@ultrastarters.com FCC/ID Notice This device complies with