Bluefin Led Underwater lights.
|
|
|
- Roderick Ryan
- 5 years ago
- Views:
Transcription
1 Bluefin Led Underwater lights. P3 Installation manual. Thank you for choosing Bluefin LED underwater lights, our products have been designed and tested rigorously to ensure optimum performance and longevity. All Bluefin Led lights are water tested so please be aware there may be moisture present on the light. If you have ordered the Aluminium (A)option please be aware that these have been Hard PTFE Anodised to form a corrosion resistant coating. Please take care not to damage this coating when installing the light. Please ensure that your product is installed as per our instructions below, failure to do so may invalidate your warranty. Specs: electrical/fuse ratings Voltage Current Fuse rating Piranha P3 12v only 1.2 amp 3amp Warnings: Do not attempt to install the lights whilst the boat is in the water. Ensure that the correct voltage is used for the light. Ensure that an in line fuse is installed with the correct fuse rating per the light installed. Ensure that use the Screws provided (failure to do so will invalidate your warranty). Ensure all connections are made water tight. Do not hold the light by the cable. Do not use abrasives on the lenses. Do not look directly into the light at close proximity Tools required for installation: 2.5mm(3/32 ) drill bit 13mm(1/2 ) drill bit Drill Posi head hand screwdriver Marine sealant 3M 4200 or equivalent 1
 between the lights. Drill a 13mm (1/2 ) hole for the cable access through the hull, ensuring that there are no obstructions internally in the hull. Drill 2.")
 Key the area to where the light is to be mounted with abrasive sand paper to ensure there is a clean area for the marine")
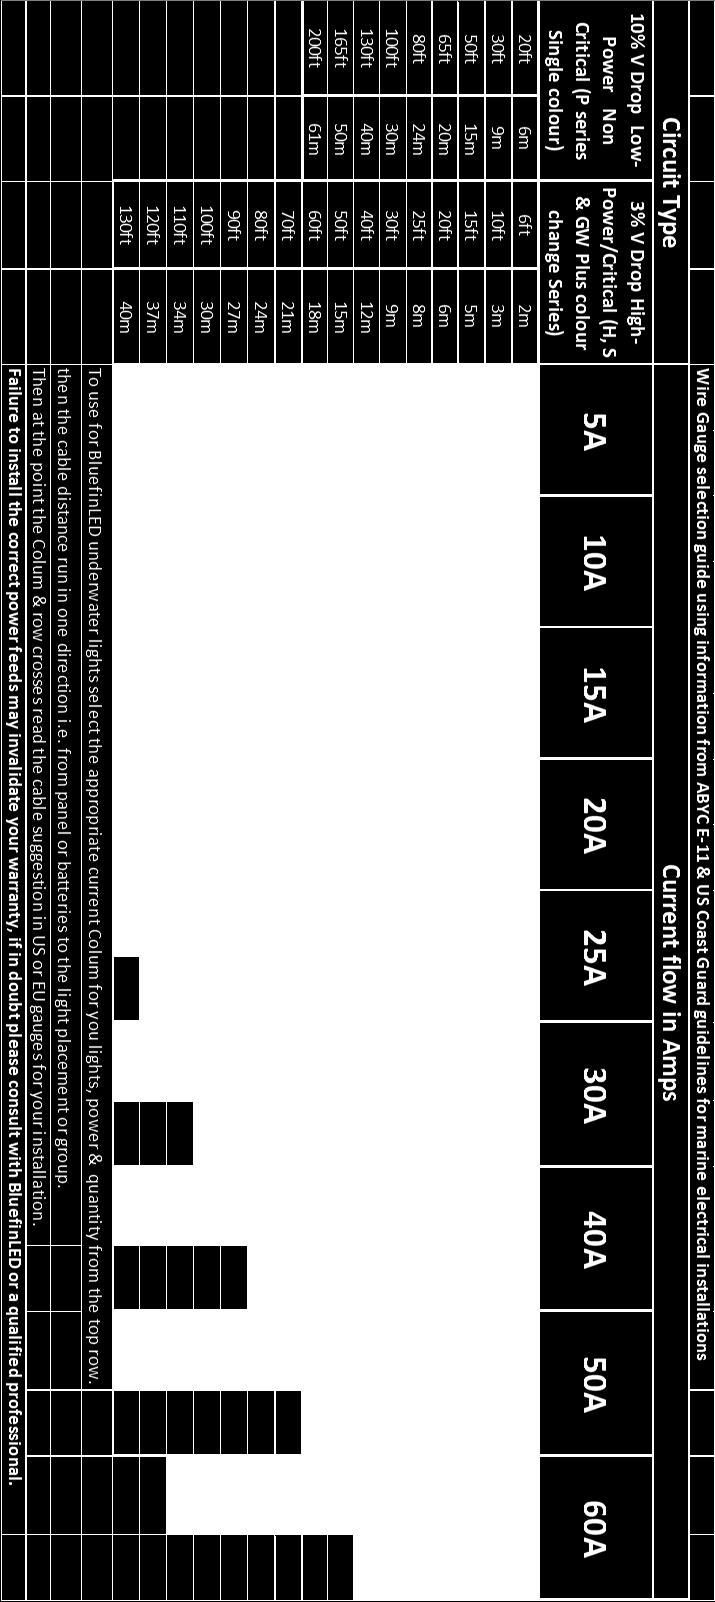
2 Installation: For optimum affect effect the light should be positioned between 8-12 ( mm) below the water line and at a 90 deg angle. Recommended spacing from 1-8 (0.5mtr) to 3-11 (1.2mtrs) between the lights. Drill a 13mm (1/2 ) hole for the cable access through the hull, ensuring that there are no obstructions internally in the hull. Drill 2.5mm ( 3/32 )pilot holes to match the mounting holes on the light. (Within the packaging there is a mounting template for drilling these holes) Key the area to where the light is to be mounted with abrasive sand paper to ensure there is a clean area for the marine sealant to bond to. Apply marine sealant to the rear of the light on the circumference of the light and around the base of the cable gland to ensure a complete continuous bead of sealant is applied in both areas. (see fig 1) Feed the cable through the hole and mount the light to the hull using the screws provided. Wipe off any excess sealant and ensure the light is seated correctly without any gaps in the sealant. (It is good practice to have excess marine sealant to clean off as this will help assure a water tight seal to the hull) Electrical connection: Only attach the light cable to a waterproof connection or junction box, the cable must have a watertight connection otherwise your warranty will be void. Care should be taken when planning your electrical feeds/cables to the lights so as to ensure voltage drop between the batteries or power supply is minimised, on 12V systems this is especially important as the lower system voltage means a high current requirement which in turn means the potential for more voltage drop in the cable runs & connections. If the cable gauge & connections are not sufficient for the lighting load attached you may experience incorrect operation of the lights & intermittent illumination as the supply dips below specification. Please see the wire gauge guide attached to the instruction manual. For help with calculations always consult with a qualified professional or contact Bluefin LED directly. Attach the light cable to the VDC power on the boat ensuring that you use the in line fuse supplied connected to the positive(red) wire, ensure that you use the heat shrink provided to create a water tight fit into the fuse holder. (see fig 2) Fig 1(P3) Apply Sealant around this edge and around the cable gland 2


3 Fig 2 Positive wire from Light Heat shrink for water tight seal to the fuse holder Fuse holder Crimps for positive wires (ensure that these are mounted into the holder before they are crimped) Testing: Test the light before installation ensuring that you use the correct voltage and the light is illuminated correctly. After installation ensure again that the light is illuminated correctly before the boat goes back into the water and the lens label is removed. After you boat goes back into the water check internally for water ingress around where the light is installed. Note: The light is designed to allow water into the outer cavity to assist cooling (Fig 3 below), this is a design feature and water will not pass this area into the light. Fig 3 Water will enter this area. Maintenance: Regularly check the installation for water ingress. Only clean the light with a soft bristle brush. Warranty: Your product has a 2 year limited warranty for defects. For any warranty issues please contact your point of sale retailer or go to for further advice. Installer please ensure that the SERIAL NUMBERS of the lights are written below and the manual is handed over to the end user. Please make a note of the serial numbers of the lights here. SERIAL NUMBERS Piranha Gel Connector Instruction Manual. Thank you for choosing Bluefin LED underwater lights, our products have been designed and tested rigorously to ensure the optimum performance and longevity. Please ensure that your product is installed as per our instructions below, failure to do so WILL INVALIDATE YOUR WARRANTY. Use these instructions in conjunction with the light instructions to ensure that all is fitted correctly. 3


4 Warnings: Do not attempt to install the lights whilst the boat is in the water. Installation: Fig 1 showing how the Gel connector is wired up. Please use the instructions supplied with the Gel Connector kit. Fig 2 showing how the finished Gel connector should look when finished. The IP68 GEL CONNECTOR MUST BE INSTALLED OR YOU WARRANTY WILL BE VOID. Fig 1 Positive power In from boat power Heatshrink Please ensure outer sheath is inside the gel box Light cable Please use fuse instructions within the manual to wire the fuse Negative wire to boat power Fig 2 Image showing how to wire the Gel Connector to the light and Fuse holder Bluefin LED Cottage Farm, Cottage Lane, Norton Juxta Twycross, Atherstone. CV9 3QH Sales - Tel: simon.steadman@bluefinled.com Service - Tel: mark.branson@bluefinled.com Administration - Tel: samantha.barrie@bluefinled.com Registered Address: Square Rig Limited, t/a Bluefin Led, Cottage Farm, Cottage Lane, Norton Juxta Twycross, Atherstone, CV9 3QH Company Registration Number: VAT Number:
5 5
Bluefin Led Underwater lights.
 Bluefin Led Underwater lights. P6N/P6CC Installation manual. Thank you for choosing Bluefin LED underwater lights, our products have been designed and tested rigorously to ensure optimum performance and
Bluefin Led Underwater lights.
 Bluefin Led Underwater lights. V12/V24CC Installation manual. Thank you for choosing Bluefin LED underwater lights, our products have been designed and tested rigorously to ensure the optimum performance
Bluefin Led Underwater lights.
 Bluefin Led Underwater lights. P24 Single/Dual and Colourchange Installation manual. Thank you for choosing Bluefin LED underwater lights, our products have been designed and tested rigorously to ensure
All Bluefin Led lights are water tested so please be aware there may be moisture present on the light.
 Bluefin LED Underwater lights. GW16IFM/GW20IFM/GW48CCIFM Installation manual. Thank you for choosing Bluefin LED underwater lights, our products have been designed and tested to ensure optimum performance
Bluefin Led Underwater lights.
 Bluefin Led Underwater lights. Domestic DL6 Installation manual. Thank you for choosing Bluefin LED underwater lights, our products have been designed and tested rigorously to ensure the optimum performance
Wireless Remote System RC-12v & 24v Standard RF Remote Control System INSTALLATION MANUAL AND OWNERS GUIDE Table of Contents:
 Wireless Remote System RC-12v & 24v Standard RF Remote Control System INSTALLATION MANUAL AND OWNERS GUIDE Table of Contents: Page: 1 Important Safety Instructions/Overview. Pages: 2 Quick Reference Specifications.
Surface Mount e-lites
 Surface Mount e-lites SMX90-CS Colour-SELECT Lights Installation and Operating Guide SMX90-CCP-2 Congratulations! You have purchased a LUMISHORE advanced LED technology underwater lighting system. Every
SMX 22, SMX52 & SMX 102 Installation and Operating Guide
 SUPRA Surface Mount Integrated System SMX, SMX5 & SMX Installation and Operating Guide Congratulations! You have purchased a LUMISHORE advanced LED technology underwater lighting system. Every care has
TIX 402, TIX 802 & TIX 1602 Thru-Hull Light Lumishore SUPRA (dual colour) light Installation and Operating Guide
 light Installation and Operating Guide") SUPRA Thru-Hull Integrated System TIX, TIX & TIX Thru-Hull Light Lumishore SUPRA (dual colour) light Installation and Operating Guide Congratulations! You have purchased a LUMISHORE advanced technology
SUPRA Thru-Hull Integrated System TIX, TIX & TIX Thru-Hull Light Lumishore SUPRA (dual colour) light Installation and Operating Guide Congratulations! You have purchased a LUMISHORE advanced technology
Single Colour Light. TIX202 Interchangeable Flush Fit Thru-Hull Light. Installation and Operation Guide. Rev
 Single Colour Light TIX202 Interchangeable Flush Fit Thru-Hull Light Installation and Operation Guide Rev 3 45-0038 Congratulations! You have purchased a LUMISHORE advanced technology LED underwater light.
TIX402 EOS Installation and Operating Guide
 TIX402 EOS Integrated System TIX402 EOS Installation and Operating Guide Congratulations! You have purchased a LUMISHORE advanced LED technology underwater lighting system. Every care has been taken to
THX 402, THX 802 & THX 1602 Thru-Hull Light Lumishore SUPRA (dual colour) light Installation and Operating Guide
 light Installation and Operating Guide") SUPRA Thru-Hull Integrated System THX, THX & THX Thru-Hull Light Lumishore SUPRA (dual colour) light Installation and Operating Guide Congratulations! You have purchased a LUMISHORE advanced technology
SUPRA Thru-Hull Integrated System THX, THX & THX Thru-Hull Light Lumishore SUPRA (dual colour) light Installation and Operating Guide Congratulations! You have purchased a LUMISHORE advanced technology
TIX 802 & TIX 1602 Thru-Hull Light Lumishore EOS Full Colour Change light Installation and Operating Guide
 EOS Thru-Hull Integrated System TIX & TIX Thru-Hull Light Lumishore EOS Full Colour Change light Installation and Operating Guide Congratulations! You have purchased a LUMISHORE advanced technology underwater
Single Colour Light. TIX301 Interchangeable Flush Fit Thru-Hull Light. Installation and Operation Guide
 Single Colour Light TIX301 Interchangeable Flush Fit Thru-Hull Light Installation and Operation Guide Congratulations! You have purchased a LUMISHORE advanced technology LED underwater light. Every care
SMX 92 & SMX 152 Installation and Operating Guide
 EOS Surface Mount Integrated System SMX 92 & SMX 152 Installation and Operating Guide Congratulations! You have purchased a LUMISHORE advanced LED technology underwater lighting system. Every care has
Neptune X6 12/24V SAE 316L Stainless Steel Low Profile Through-Hull Mounted Underwater LED Light Manual
 Neptune X6 12/24V SAE 316L Stainless Steel Low Profile Through-Hull Mounted Underwater LED Light Manual Thank you for purchasing Dr. LED s Neptune X6 underwater LED light. This 1500+ lumen Neptune X6 underwater
THX120-CCP. Colour-CHANGE Lights THX120-CCP Thru-Hull Installation and Operation Guide
 THX120-CCP Colour-CHANGE Lights THX120-CCP Thru-Hull Installation and Operation Guide Congratulations! You have purchased a LUMISHORE advanced technology LED underwater light. Every care has been taken
UltraSystem Series II INSTALLATION MANUAL PARTNERED WITH
 UltraSystem Series II INSTALLATION MANUAL PARTNERED WITH CONTENTS Important information. page 1 Planning the installation. page 2 Transducer positioning. page 3-7 Transducer installation. page 8-10 Control
TFL Gas Log Lighter (TFLGLL)
") TFL Gas Log Lighter (TFLGLL) For Jetmaster Metal Fireboxes and Logpans CONTENTS Description Page No. Important information 2 Operation and Design 3 Controller Solenoid Cavity 4 Contents of a Kit 5 To install
TFL Gas Log Lighter (TFLGLL) For Jetmaster Metal Fireboxes and Logpans CONTENTS Description Page No. Important information 2 Operation and Design 3 Controller Solenoid Cavity 4 Contents of a Kit 5 To install
SV10 LED. The US manufactured SV10 LED is. SV10 LED technical specifications
 The US manufactured SV10 LED is the brightest thru hull LED underwater light available to owners of GRP and wood boats. The industry leading SV10 combines the unique qualities of the latest high density
Digital Intelligent Battery Charger OPERARATOR S MANUAL
 Digital Intelligent Battery Charger OPERARATOR S MANUAL WARNING! Before you install and use your Nitro Battery Charger, be sure to read and save these safety instructions. INTRODUCTION The Sinergex Nitro
CV41. Vehicle Mounting Kit. Reference Guide
 CV41 Vehicle Mounting Kit Reference Guide CV41 Vehicle Mounting Kit Reference Guide........... 3 Secure the Smart Dock to a Vehicle.................... 3 Supply Power to the Smart Dock......................
OceanLED This installation manual covers the following products:
 OceanLED Marine Product Support OceanLED This installation manual covers the following products: PRO SERIES HD Gen2 INSTALLATION MANUAL PRO SERIES HD Gen2 Thru-Hull Thru-Hull Thru-Hull 2010TH HD Gen2 3010TH
Colour-CHANGE Lights THX72-CCP Thru-Hull and THX72-CCP-FF Flush Fit Installation and Operation Guide
 Colour-CHANGE Lights THX72-CCP Thru-Hull and THX72-CCP-FF Flush Fit Installation and Operation Guide THX72-CCP THX72-CCP-FF Congratulations! You have purchased a LUMISHORE advanced technology LED underwater
Solid-State Compass with GPS Receiver
 Owner s Guide & Installation Instructions Solid-State Compass with GPS Receiver Model GH2183 Record the serial number found on the sensor. Serial No. Date of Purchase 17-489-01 rev. 01 04/22/08 1 WARNING
ENSURE THAT THE TEMP PROBE FITS YOUR OUTDRIVE BEFORE BEGINNING INSTALLATION.
 715 Center Street Grayslake IL 60030 P: 847-752-2700 F: 847-752-2415 E: info@livorsi.com Drive temp gauge installation instructions Model Number: DCSDT (color) The Livorsi drive temp gauge kit easily installs
PIRANHA I & 2 INSTALL GUIDE
 TOP Use 5/32" drill bit DO NOT LET DEADRISE INTERSECT THIS LINE PLACE EITHER CORNER ON DEADRISE ANGLE PIRANHA I & 2 INSTALL GUIDE Two components need to be installed on the boat: the transducer and the
Automotive: Lightheads
 ENGINEERING COMPANY INC. Winthrop Road Chester, Connecticut 00 Phone: (0) 0 Fax: (0) 07 Internet: www.whelen.com Sales email: autosale@whelen.com Canadian Sales email: canadiansales@whelen.com Customer
STL Ceptor Series Running Board Light Stick
 2809 Business Park Dr Buda TX 78610 Phone 800.757.2581 Fax 844.894.2652 Email customerservice@speedtechlights.com STL Ceptor Series Running Board Light Stick Operation Manual and Instructions Congratulations,
OceanLED This installation manual covers the following products:
 OceanLED Marine Product Support OceanLED This installation manual covers the following products: PRO SERIES HD Gen2 INSTALLATION MANUAL PRO SERIES HD Gen2 Thru-Hull Thru-Hull Thru-Hull 2010TH HD Gen2 3010TH
STL K-Force 18 and Micro 14 LED Mini Light Bar
 2809 Business Park Dr Buda TX 78610 Phone 800.757.2581 Fax 844.894.2652 Email customerservice@speedtechlights.com STL K-Force 18 and Micro 14 LED Mini Light Bar Operation Manual and Instructions Congratulations,
STL Mounting Brackets
 2809 Business Park Dr Buda TX 78610 Phone 800.757.2581 Fax 844.894.2652 Email customerservice@speedtechlights.com STL Mounting Brackets Operation Manual and Instructions Congratulations, you are the owner
In-Line Linear Actuator
 In-Line Linear Actuator Operating Instructions 12 Volt DC Input Australian Gas Springs - LiftEasy Actuators Address: 29 Tower Court Noble Park Victoria 3174 Australia Telephone: +61 3 9769 0288 Fax: +61
PIRANHA I & 2 INSTALL GUIDE
 PIRANHA I & 2 INSTALL GUIDE Two components need to be installed on the boat: the transducer and the control head. The control head displays sonar information, the transducer sends and receives sonar signals
GENUINE PARTS INSTALLATION INSTRUCTIONS
 GENUINE PARTS INSTALLATION INSTRUCTIONS 1. 2. 3. DESCRIPTION: APPLICATION: PART NUMBER: Accent light Kit Cube (MY2013+) 999F3 AW000 - Universal Accent Lighting Kit. 4. KIT CONTENTS: Item QTY Description
BEAMER MODEL VDC Spotlight with joystick control panel MODEL VDC Spot/flood light with joystick control panel
 formerly a marinco.com product 502-2 installation & 503-2 instructions 502-2 24 VDC Spotlight with joystick control panel 502-3 24 VDC Spot/flood light with joystick control panel BEAMER MODEL 502-2 24
Installationn Instruction Manual
 Table of Contents Supplied Kit Parts.Page 2 Required Tool List Page 2 Step by Step Installation Instructions Pages 3-6 Battery Requirements.Page 6 Operation Page 7 Maintenance Page 7 Wiring Diagrams..Page
Event Spot WW Triac. User Manual. Order codes: LEDJ237 - Black Housing LEDJ237A - White Housing
 Event Spot WW Triac User Manual Order codes: LEDJ237 - Black Housing LEDJ237A - White Housing Safety advice WARNING FOR YOUR OWN SAFETY, PLEASE READ THIS USER MANUAL CAREFULLY BEFORE YOUR INITIAL START-UP!
PIRANHA 5 INSTALLATION GUIDE
 PIRANHA 5 INSTALLATION GUIDE Two components need to be installed on the boat: the transducer and the control head. The control head displays sonar information, the transducer sends and receives sonar signals
PIL0478 ISSUE 01/ 07/16
 ISSUE 01/ 07/16 PIL0478 ZAFIR G9 CEILING FITTING PIL0478 ISSUE 01/ 07/16 PART C PART E PART 21 SELV 1 1.B 1 3.1 3.3 3.4 3.5 3.6, 3.8 3.10 3.12 3.14 3.16 3.17 3.18 3.19 3.19 ATTENTION! THE TABLE BELOW
Accessory Kit Estimated Fitting Time: 120 Minutes
 Landcruiser LC00 Tow-Pro Wiring Kit - Landcruiser LC00 Kit Part No: TPWKIT - 005 Accessory Kit Estimated Fitting Time: 0 Minutes FI88 Page 0 of Issue: Date: 7/09/07 07 General Notes Safety Notes Parts
instructions for roadstart units
 instructions for roadstart units model no: RS1.V5, RS102.V4, RS103.V3 Thank you for purchasing a Sealey product. Manufactured to a high standard, this product will, if used according to these instructions,
Exhaust Alert Installation & Operating Instructions THE SCIENCE OF SILENCE. Exhaust Alert Operating & Fitting Instructions 1
 Exhaust Alert Installation & Operating Instructions THE SCIENCE OF SILENCE Exhaust Alert Operating & Fitting Instructions 1 Contents Exhaust Alert Fitting Instructions Section Page 1 Introduction 2 1.1
STL Striker /Virtue Interior LED Traffic Series
 2809 Business Park Dr Buda TX 78610 Phone 800.757.2581 Fax 844.894.2652 Email customerservice@speedtechlights.com STL Striker /Virtue Interior LED Traffic Series Operation Manual and Instructions Congratulations,
NON MAINTAINED TWIN SPOTLIGHT WALL MOUNT LED EMERGENCY LIGHT
 Model No. PEL00581 NON MAINTAINED TWIN SPOTLIGHT WALL MOUNT LED EMERGENCY LIGHT 1 Please read these instructions carefully before starting installation and retain for future reference. The centre page
STL Raptor Series Interior LED Visor Light Bar
 2809 Business Park Dr Buda TX 78610 Phone 800.757.2581 Fax 844.894.2652 Email customerservice@speedtechlights.com STL Raptor Series Interior LED Visor Light Bar Operation Manual and Instructions Congratulations,
GENUINE PARTS INSTALLATION INSTRUCTIONS
 GENUINE PARTS INSTALLATION INSTRUCTIONS 1. 2. 3. 4. DESCRIPTION: Security Light Kit APPLICATION: Altima Coupe and Sedan (2011+) PART NUMBER: 999F4 AX008 - Universal Security Lighting Kit. KIT CONTENTS:
UL Ti MATE Range of underwater lights. (click on document required)
") UL Ti MATE Range of underwater lights (click on document required) Technical UL Ti MATE 75 SA (S.S) UL Ti MATE 75 SA (ALU) UL Ti MATE 75 Fixed (S.S) UL Ti MATE 75 Fixed (ALU) Brochure Info UL Ti MATE 75
UL Ti MATE Range of underwater lights (click on document required) Technical UL Ti MATE 75 SA (S.S) UL Ti MATE 75 SA (ALU) UL Ti MATE 75 Fixed (S.S) UL Ti MATE 75 Fixed (ALU) Brochure Info UL Ti MATE 75
GENUINE PARTS INSTALLATION INSTRUCTIONS
 GENUINE PARTS INSTALLATION INSTRUCTIONS 1. 2. 3. 4. DESCRIPTION: Accent light Kit APPLICATION: R42H (2011) PART NUMBER: 999F3 AW000 - Universal Accent Lighting Kit. KIT CONTENTS: Item QTY Description Service
STL Raptor - X TIR Interior LED Visor Light Bar
 2809 Business Park Dr Buda TX 78610 Phone 800.757.2581 Fax 844.894.2652 Email customerservice@speedtechlights.com STL Raptor - X TIR Interior LED Visor Light Bar Operation Manual and Instructions Congratulations,
Installation Service INSTRUCTIONS
 Installation Service INSTRUCTIONS type 4 rudder bearings Aluminium hull : p2 Composite hull : p3 Instructions for both versions : p4to 13 TYPE 4 BEARING INSTALLATION IN METAL HULLS For a new installation
Race Sport Lighting RSUKIT LED UNDERBODY KIT INSTALLATION GUIDE
 Race Sport Lighting RSUKIT LED UNDERBODY KIT INSTALLATION GUIDE PARTS LIST (INCLUDED IN THE KIT) 1 x LED Control Center Box 2 x 48 RGB Aluminum Channel LED Bars 2 x 36 RGB Aluminum Channel LED Bars 1 x
PRODUCT INSTALLATION GUIDE
 PRODUCT INSTALLATION GUIDE MODEL: PRODUCT CODE: PRODUCT DESCRIPTION: 4COMM 4COMMSFK CouplerTec Commercial Heavy Duty Electronic Rustproofing System 12V / 24V Four Capacitive Couplers KIT CONTENTS: ITEM
Operator Instructions for Tension Links
 Operator Instructions for Tension Links Page 1 of 9 Table of Contents Introduction... 3 Markings CE... 3 Electromagnetic Compatibility (EMC)... 3 Tension Link Type/Model Number... 3 Supplier... 3 Service...
UltraSystem Series II INSTALLATION MANUAL
 UltraSystem Series II INSTALLATION MANUAL Manual ref: 02-12-2013 CONTENTS Important information. page 1 Planning the installation. page 2 Transducer positioning. page 3-7 Transducer installation. page
Boat drive assembly manual
 Boat drive assembly manual Bluefin Dual configuration Design and Manufacture of bespoke electric drive solutions Parts list 1. Boat drive Master controller assembly 2. Boat drive Slave controller assembly
Installation and Maintenance Manual MRW-01. Radial Winch 20 ST
 MRW-01 Index Introduction Technical characteristics Weight Maximum working load Outline Installation Procedure 1 Procedure 2 Installation procedure Positioning the self-tailing arm Maintenance Washing
Duo water control system
 Duo water control system Installation and maintenance guide DUOINSTRUCT Contents Important and safety information Pack contents / Tools required Duo trim plate dimensions Flow performance Typical wall
Installation Instructions
 Installation Instructions These instructions cover the following kits: 64-66 Mustang Sequential Turn Signal LED kit 67-68 Mustang Sequential Turn Signal LED kit Kit Contents 2 x LED Tail Light Panels 2
M670/M680BD MAGNALOCK SERIES Installation Instructions
 Securitron www.securitron.com Tel 800.624.5625 techsupport@securitron.com M670/M680BD MAGNALOCK SERIES Installation Instructions Page 1 Rev. D, 12/14 Table of Contents Package Contents... 3 Mounting Hardware...
Installation and Maintenance Manual MRW-01. Radial Winch 40.2 PT
 MRW-01 Index Introduction Technical characteristics Weight Maximum working load Outline Installation Procedure 1 Procedure 2 Installation procedure Maintenance Washing Maintenance table Disassembly procedure
LED Area Light. This is the fixture of choice for all of our dealerships. Contact Us:
 LED Area Light This is the fixture of choice for all of our dealerships. Contact Us: 7057 Marcelle St, Paramount, CA 90723 800-640-0386 www.altechefficiency.com sales@altechefficiency.com Specifications
Underwater Lights Technical Bulletin No. 7
 Page 1 of 7 7.1 Parts List a. Lights Kit b. Additional Parts Included (2) Underwater pool lights (for UK and other countries with same electrical requirements) (1) 3 1 / 2 hole saw w/ 1/4 drill bit (1)
TYPE 4 BEARING INSTALLATION IN COMPOSITE HULLS.
 TYPE 4 BEARING INSTALLATION IN COMPOSITE HULLS. Our tapered Type 4 bearings designed to be installed with our GRP housings These bearings and housings are available in two mounting styles, designed to
OWNERS GUIDE 12V / 24V DC ELECTRIC WINCH. 12,000lb (6124kg) TWO SPEED VERY IMPORTANT
 TWO SPEED VERY IMPORTANT") OWNERS GUIDE 12V / 24V DC ELECTRIC WINCH. 12,000lb (6124kg) TWO SPEED VERY IMPORTANT IT IS ESSENTIAL THAT YOU READ AND UNDERSTAND THIS GUIDE BEFORE INSTALLING AND OPERATING YOUR WINCH WINCHMAX UK WWW.WINCHMAX.CO.UK
OWNERS GUIDE 12V / 24V DC ELECTRIC WINCH. 12,000lb (6124kg) TWO SPEED VERY IMPORTANT IT IS ESSENTIAL THAT YOU READ AND UNDERSTAND THIS GUIDE BEFORE INSTALLING AND OPERATING YOUR WINCH WINCHMAX UK WWW.WINCHMAX.CO.UK
Installation and Maintenance Manual MRW-02. Radial Winch 20 ST
 MRW-02 Index Introduction 3 Technical characteristics 3 Weights 3 Maximum working load 3 Outline 3 Installation 4 Procedure 1 5 Procedure 2 6 Installation procedure 8 Positioning the self-tailing arm 9
DC Master 24/ A
 USERS MANUAL DC Master 24/12 50-60A DC-DC converter MASTERVOLT Snijdersbergweg 93, 1105 AN Amsterdam The Netherlands Tel.: +31-20-3422100 Fax.: +31-20-6971006 www.mastervolt.com ENGLISH Copyright 2015
Hydro-Sync Slide-Out System
 Hydro-Sync Slide-Out System SERVICE MANUAL Rev: 08.14.2018 Hydro-Sync Slide-out System Service Manual TABLE OF CONTENTS Safety Information 3 Product Information 3 Operation 4 Extending Slide-Out Room 4
MODEL 22040, REMOTE CONTROL STAINLESS STEEL OR CHROME SPOT/FLOOD LIGHT INSTALLATION AND OPERATION INSTRUCTIONS IMPORTANT!
 R R MODEL 22040, 22044 REMOTE CONTROL STAINLESS STEEL OR CHROME SPOT/FLOOD LIGHT INSTALLATION AND OPERATION INSTRUCTIONS IMPORTANT! READ THESE INSTRUCTIONS BEFORE INSTALLING AND USING THIS PRODUCT. KEEP
DURA-PANEL W OUTPUT: 12 VDC, 20 Watt W OUTPUT: 12 VDC, 50 Watt W OUTPUT: 12 VDC, 100 Watt
 INSTRUCTION MANUAL DURA-PANEL RIGID SOLAR PANEL CHARGING SYSTEM 20W, 50W & 100W SOLAR PANELS SERIES 091-246-20W OUTPUT: 12 VDC, 20 Watt 091-246-50W OUTPUT: 12 VDC, 50 Watt Charge Controller 091-246-100W
Spectra C3 Light Bar Installation Instructions
 Light Bar Hardware Tools Required Universal Clamp Inserts 1.9, 2 3/8 - OD 5 Amp Fuse 1.25 Hole Saw Philips Screw Driver 7/64 Drill Bit Fish Tape Countersink Pencil Pigtail Wiring Harness Clamp Washer Wire
100 Watt LED Light lumens Volts DC - Adjustable Surface Mount - Flood LED Light
 100 Watt LED Light - 9000 lumens - 9-48 Volts DC - Adjustable Surface Mount - Flood LED Light Part #: LED10W-10R-F Buy American Compliant The Larson Electronics LED10W-10R-F LED Light Bar offers high light
LED Light - 24 LED - 72 Watts lumens - Amber, Red, Blue or Green - Surface Mount
 LED Light - 24 LED - 72 Watts - 4320 lumens - Amber, Red, Blue or Green - Surface Mount Part #: LEDLB-24C Buy American Compliant The Larson Electronics LEDLB-24C LED Light Bar offers high light output
Technical Installation Manual
 Lighting Step and Aisle Safety Lighting Technical Installation Manual 1 Contents Page 3 Tools required 4 Installation detail & planning 5 Adhesives, silicone & crimps 6 General cinema layout 7 Basic wiring
SP904/3/4/5/7/8/10/11/13 Integrated Wireless Side Warning System
 Fig 1 Operation Guide & Recommended Fitting Instructions. SP904/3/4/5/7/8/10/11/13 Integrated Wireless Side Warning System The SP904 integrated is a fully flexible, easily expandable vehicle blind spot
SWING ARM MAGNIFYING LAMP MODEL NO: SAM170
 SWING ARM MAGNIFYING LAMP MODEL NO: SAM170 PART NO: 54605338 ASSEMBLY & OPERATING INSTRUCTIONS ORIGINAL INSTRUCTIONS GC0217 INTRODUCTION Thank you for purchasing your CLARKE swing arm magnifying lamp,
LED Area Light. scratch that. This is the fixture of choice for all of our dealerships. Contact Us:
 LED Area Light scratch that. This is the fixture of choice for all of our dealerships. Contact Us: 7057 Marcelle St, Paramount, CA 90723 800-640-0386 www.altechelectronics.com sales@altechelectronics.com
INSTALLATION & MAINTENANCE MANUAL HBL
 INSTALLATI & MAINTENANCE MANUAL HBL series 230V 50Hz IP 65 122 1 GENERAL INSTRUCTIS These instructions should be read carefully and retained after installation by the end user for future reference and
Installation & Operation Instructions. Deluxe LED Spot Light
 Installation & Operation Instructions Deluxe LED Spot Light 405626-3 To avoid the risk of accidents or damage to this product, it is essential to read these instructions thoroughly SDG Edition before this
SMX Lumi-Hub Installation Guide
 SMX Lumi-Hub SMX Lumi-Hub Installation Guide 85mm (3.35in) 70mm (2.76in) 85mm (3.35in) 70mm (2.76in) 151mm (5.94in) Lid Removed 53mm (2.09in) Tools Required Small Flat-Blade Screwdriver Large Screwdriver
START HERE FRONT BUMPER REMOVAL. 1) Turn off engine and chalk tires with stop block. Open Hood. Disconnect Battery.
 Turn off engine and chalk tires with stop block. Open Hood. Disconnect Battery.") BILLET Main Grille Parts included (1) Billet Grille - Main Overlay Polished - Part #6211270 OR Black - Part #6211271 DOES NOT FIT Z71 Models Hardware included (1) #8 x 2.5 (6) #8 x 2 (7) #8 U Nut (7) Bracket
BILLET Main Grille Parts included (1) Billet Grille - Main Overlay Polished - Part #6211270 OR Black - Part #6211271 DOES NOT FIT Z71 Models Hardware included (1) #8 x 2.5 (6) #8 x 2 (7) #8 U Nut (7) Bracket
SunLink PV System Disconnect with Arc Fault Detection Installation and Operations Manual
 Combiner Box Installation & Operations Manual SunLink PV System Disconnect with Arc Fault Detection Installation and Operations Manual TABLE OF CONTENTS Notices and Safety Precautions Pages 1-2 Combiner
Installation and Maintenance Manual MRW-01. Radial Winch 40.2 ST
 MRW-01 Index Introduction Technical characteristics Weight Maximum working load Outline Installation Procedure 1 Procedure 2 Installation procedure Positioning the self-tailing arm Maintenance Washing
Classic Top. Mitsubishi L200 Mk6-7
 Classic Top FITTING INSTRUCTIONS Mitsubishi L200 Mk6-7 All Cabs 2 nd EDITION Classic Top Please read these instructions carefully. If you have any questions regarding the fitting of this item call 0845
STL Dart TIR Exterior LED Traffic Advisor Arrow Stick
 2809 Business Park Dr Buda TX 78610 Phone 800.757.2581 Fax 844.894.2652 Email customerservice@speedtechlights.com STL Dart TIR Exterior LED Traffic Advisor Arrow Stick Operation Manual and Instructions
Sight Addvantage by Rostra License Plate Backup Camera
 80.00 mm Customer Name Installing Dealer Date Purchased Date Installed VIN# Vehicle Mileage 2016 Rostra Precision Controls 2519 Dana Dr. Laurinburg, NC 28352 300-81LPB-M Sight Addvantage by Rostra License
SECTION M. ELECTRICAL. Section Description Page No.
 SECTION M. ELECTRICAL. Section Description Page No. M.1 General Page 2 M.2 Alternator Page 2 M.3 Battery Page 7 M.4 Hazard Warning System Page 7 M.5 Brake Fail Warning System Page 8 M.6 Seat Belt Warning
1PC TONNEAU COVER INSTALLATION INSTRUCTIONS. Ford Ranger (with bedliner)
") PC TONNEAU COVER INSTALLATION INSTRUCTIONS Ford Ranger (with bedliner) Care Instructions: Clean Tonneau Cover with a mild detergent and water solution. Do not use abrasive cleaners or solvents. Place these
PC TONNEAU COVER INSTALLATION INSTRUCTIONS Ford Ranger (with bedliner) Care Instructions: Clean Tonneau Cover with a mild detergent and water solution. Do not use abrasive cleaners or solvents. Place these
MODEL NUMBER: MEDIUM DUTY ONBOARD AIR SYSTEM
 MODEL NUMBER: 10003 MEDIUM DUTY ONBOARD AIR SYSTEM IMPORTANT: It is essential that you and any other operator of this product read and understand the contents of this manual before installing and using
START HERE BEFORE YOU BEGIN. START HERE: Turn off engine, chalk tires with stop block, open the hood and disconnect the battery.
 PROFESSIONAL INSTALL RECOMMENDED 2009-2017 RAM 1500 / 2500 / 3500 PART#: Z334521 / Z334521-KIT-C FRONT ROOF LED LIGHT MOUNTS Parts included (1) - Driver Side Roof Mount Upright (1) - Passenger Side Roof
75- Retro. IPX8 Underwater RATED. underwater lights limited TM. CUTE on size BIG on light. Aluminium / Steel.
 underwater lights limited TM Manufacturer of the original underwater lights TM Brand marine lighting products since 1991. 75- Retro cute on size big on light Aluminium / Steel 30 meter + Max 20,000 *The
The safety you rely on.
 Cable Glands Global Solutions Catalogue The safety you rely on. Cable Glands & Accessories Global Solutions Introducing Crouse-Hinds by Eaton The leader in electrical products for hazardous, industrial
ULTRASONIC ANTIFOULING SYSTEM INSTALLATION MANUAL
 ULTRASONIC ANTIFOULING SYSTEM YS-5600 YS-5602 INSTALLATION MANUAL Page 1 DISCLAIMER This product needs to be correctly installed in a confined space i.e. in the bottom or bilge of a boat. There may be
Congratulations on your purchase of your new Ultra-SoniTec Antifouling System! Ultra-SoniTec Antifouling System! Ultra-SoniTec Advanced Ultrasonic
 Congratulations on your purchase of your new Ultra-SoniTec Antifouling System! Ultra-SoniTec Antifouling System! Ultra-SoniTec Advanced Ultrasonic Antifouling Systems are designed algae and other sea growth.
tyre changer - automatic
 instructions for tyre changer - automatic model no: TC10 Thank you for purchasing a Sealey product. Manufactured to a high standard, this product will, if used according to these instructions, and properly
Light Source User Guide
 Light Source User Guide Compact Light Source Range Models covered by this manual: UFO 70/150 CG Glass, White Light - 240V UFO 70/150 CP Plastic, White Light - 240V UFO 70/150 CGC Glass, Colour Wheel (continuous)
HYDRAULIC SLIDEOUT SYSTEM OPERATION AND SERVICE MANUAL
 HYDRAULIC SLIDEOUT SYSTEM OPERATION AND SERVICE MANUAL TABLE OF CONTENTS SYSTEM...... Warning...... Description..... Prior to Operation... Preventative Maintenance..... OPERATION... Warning... Extending
CRS1, CRS2 and CRS3. For additional information please call our. PRO CHARGING SYSTEMS, LLC 1551 Heil Quaker Boulevard, LaVergne, TN
 CRS1, CRS2 and CRS3 For additional information please call our Technical Support Group 800.742.2740 PRO CHARGING SYSTEMS, LLC 1551 Heil Quaker Boulevard, LaVergne, TN 37086-3539 110310 Installation and
START HERE GRILLE REMOVAL. 1) Turn off engine and chalk tires with stop block. Open Hood. 1. Disconnect negative battery terminal.
 Turn off engine and chalk tires with stop block. Open Hood. 1. Disconnect negative battery terminal.") GRILLE REMOVAL & Grille Installation Guide Parts included (1) LASER TORCH - Main Part #7315711 (1) LASER TORCH STEALTH - Main Part #7315711-BR (1) 30 LED Light Bar (1) Power Cable Wiring Harness Hardware
GRILLE REMOVAL & Grille Installation Guide Parts included (1) LASER TORCH - Main Part #7315711 (1) LASER TORCH STEALTH - Main Part #7315711-BR (1) 30 LED Light Bar (1) Power Cable Wiring Harness Hardware
Your Guide to the Installation, Care and maintenance of PERFORMA. Electronic Self Closing Fittings - Mains Powered 886V (343029) 885V (343027)
 885V (343027)") Your Guide to the Installation, Care and maintenance of PERFORMA Electronic Self Closing Fittings - Mains Powered 886V (343029) 885V (343027) Pegler Limited, St Catherine s Avenue, Doncaster DN4 8DF Telephone
Your Guide to the Installation, Care and maintenance of PERFORMA Electronic Self Closing Fittings - Mains Powered 886V (343029) 885V (343027) Pegler Limited, St Catherine s Avenue, Doncaster DN4 8DF Telephone