Bluefin Led Underwater lights.
|
|
|
- Estella Boyd
- 6 years ago
- Views:
Transcription
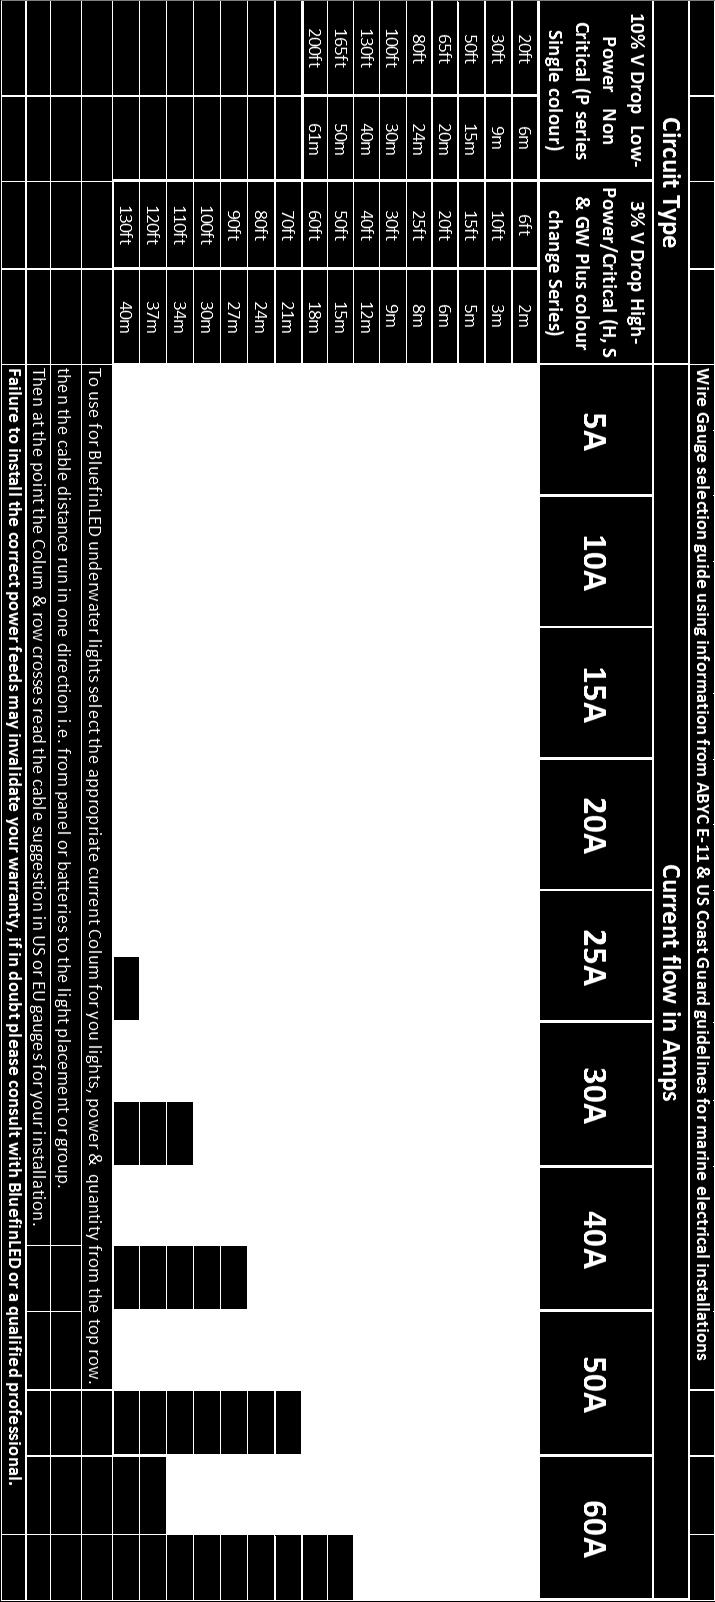
1 Bluefin Led Underwater lights. Domestic DL6 Installation manual. Thank you for choosing Bluefin LED underwater lights, our products have been designed and tested rigorously to ensure the optimum performance and longevity. All Bluefin Led lights are water tested so please be aware there may be moisture present on the light. Please ensure that your product is installed as per our instructions below, failure to do so may invalidate your warranty. Specs: electrical/fuse ratings Voltage Current Fuse rating DL6 24V ONLY 24V-1.8amp 3 amp DL6CC 24V ONLY 24v-2amp 8 amp Warnings: Do not under any circumstances hold the light by the cable.(the light is not designed to be hung by the cable and will result in damage to the unit). Ensure that the correct input voltage is used for the light (Power supplies can be supplied by BluefinLed at additional cost.part No: PSU 24V-UNI, PSU 24v/200w-110to220v SINGLE COLOUR 1XPSU per 5 lights. COLOURCHANGE 1XPSU per 4 lights. 1 Ensure that a fuse or breaker is installed with the correct fuse/breaker rating per the light is installed. Care should be taken when planning your electrical feeds/cables to the lights so as to ensure voltage drop between the batteries or power supply is minimised, on 12V systems this is especially important as the lower system voltage means a high current requirement which in turn means the potential for more voltage drop in the cable runs & connections. If the cable gauge & connections are not sufficient for the lighting load attached you may experience incorrect operation of the lights & intermittent illumination as the supply dips below specification. For help with calculations always consult with a qualified professional or contact BluefLED directly. The cable must be protected with an outer tube or pipe to the standards specified in this manual (which can be supplied by BluefinLed at additional cost Part No: DL-PP-M1, DOCK LIGHT PVCU 1MTR PIPE/GLAND 4MM WALL THICKNESS. Part No: DL-PP-M2, DOCK LIGHT PVCU 2MTR PIPE/GLAND 4MM WALL THICKNESS). Ensure all connections made are water tight, all connections MUST be above the waterline Do not use abrasives on the lenses. Tools required for installation: 3mm(1/8 ) drill bit Drill Posi head hand screwdriver Marine sealant 3M 4200 or equivalent 3/4 NPT TAP/THREAD (if threading your own pipe or cutting down the pipe supplied). Installation:
2 There are two mounting methods to the dock light product which will depend on your mounting point, these are show below as option 1 and 2. The light can be mounted with a top or side entry, either can be used depending on your cable exit route. All lights are configured for top or side entry as standard. Ensure that you plan your cable piping and fitment before progressing with the light installation. The light must remain underwater at all times so please ensure that you take into consideration tides and the water line. Ensure that your pipe is threaded to the Dock Light puck before installation to the dock. Seal the threads with Marine sealant 3M 4200 or equivalent and then tighten to create a water tight seal. (See Fig 1) Option 1 screw mounting Drill 3mm(1/8 ) pilot holes to match the mounting holes on the Dock light puck. (See Fig 1) Screw the dock light puck to the dock or piling using the 4 countersink screws provided. (See Fig 1) Option 2 Strap/wire mounting. The dock light puck has side entry holes for strapping to pilings or docks. (See Fig 2) Strap the Dock light puck to the dock or piling using an appropriate strap or wire to hold the dock light in position securely, please ensure that you do not modify the light to achieve this and use wire or straps that will fit the hole size diameter on the Dock light puck. For both Option 1 and 2 Feed the light cable through Dock light puck and the pipe.(see fig 3) Apply marine sealant to the rear of the light on the circumference of the light and around the base of the cable gland to ensure a complete continuous bead of sealant is applied in both areas. (see fig 3) Mount the light to the Dock light puck using the 3 screws provided. (see fig 3) Tighten the cable gland at the top of the pipe to ensure a water tight seal.(if using your own pipe ensure that the ends of the pipes are sealed from the elements). (See Fig 4) Protective Tubing/pipe The cable of the light must be protected by pipe or tubing as the harsh water environment will erode the cable and damage will occur. Bluefin Led supply optional protective tube/piping at additional cost(please contact your local dealer or distributor for information) If you choose to supply your own pipe protection please ensure that the specified material and cable glands are used. The pipe must be threaded using a 3/4 NPT TAP/THREAD, all pipe connections and threads must be sealed using a Marine sealant 3M 4200 or equivalent to create a water tight seal then screwed into the Dock Light. Electrical connection: Only attach the light cable to a waterproof connection or junction box, the cable must have a watertight connection otherwise your warranty will be void. Care should be taken when planning your electrical feeds/cables to the lights so as to ensure voltage drop between the batteries or power supply is minimised, on 12V systems this is especially important as the lower system voltage means a high current requirement which in turn means the potential for more voltage drop in the cable runs & connections. If the cable gauge & connections are not sufficient for the lighting load attached you may experience incorrect operation of the lights & intermittent illumination as the supply dips below specification. Please see the wire gauge guide attached to the instruction manual. For help with calculations always consult with a qualified professional or contact Bluefin LED directly. Attach the light cable to suitable VDC power,ensuring that you protect the light with an inline fuse or breaker connected to the positive(red) wire, ensure that you create a water tight connection at this point. DL6CC Only 2


3 When installing DL6CC lights it is advised to wire the lights up to a single switch so that all of the lights operate in sequence with each other. It is also advised that you choose an appropriate switch that has the correct power rating for the amount of lights being installed (please see the P6CC current values above). Fig 1 Dock Light Puck Mounting Screw holes for mounting with the 4 countersink screws provided. Light showing threaded pipe being installed, apply marine sealant at this point Fig 2 Strap/wire mounting holes Fig 3 Apply Sealant around this edge and around the cable gland Pass the light cable through the rear of the Puck and through the pipe and cable gland Mount the light to the puck using the 3 screws provided into the pilot holes in the puck. 3
 After installation ensures again that the light is illuminated correctly and the lens label is removed.")

4 Fig 5 Cable gland, ensure to tighten when cable is passed through Testing: Test the light before installation ensuring that you use the correct input voltage and the light is illuminated correctly.(take care to not look directly at the light as this could cause damage to eyes) After installation ensures again that the light is illuminated correctly and the lens label is removed. The Dock Light is fully IP68,care must be taken to ensure that all electrical and pipe connection are water tight. DL6CC (Colour change) Operation. 1. When powered up for the first time or from reset the light will turn on in white and scroll through the colour range and keep scrolling until stopped by any of the steps below. 2. To pick a particular colour turn the light off and on again quickly and the chosen colour will be selected. 3. If you turn off and on again quickly for the second time the light will start to strobe. 4. When you turn off the light and leave for over 10 seconds when turned on again the light will reset back in the white mode. 5. If the lights ever get out of sync i.e. either colour or mode, repeat step 4 to re-set to initial colour cycle mode, the more lights installed this process may need to be more frequently repeated. The light has internal indicator Led s for fault finding, these are as follows: Over voltage will flash red.(check the voltage to the light) 4 Under voltage will show a constant red. (check the voltage to the light) Over temperature will show amber.(allow the light to cool down and check if submerged) Maintenance: Regularly check the installation for water tightness. Only clean the light with a soft bristle brush. Warranty: Your product has a 2 year limited warranty for defects. Please ensure if returning your product that the cable is fully intact and not cut off. For any warranty issues please contact your point of sale retailer or go to for further advice. Installer please ensure that the SERIAL NUMBERS of the lights are written below and the manual is handed over to the end user.


5 Please make a note of the serial numbers of the lights here. SERIAL NUMBERS Dock lights Gel Connector Instruction Manual. Thank you for choosing Bluefin LED underwater lights, our products have been designed and tested rigorously to ensure the optimum performance and longevity. Please ensure that your product is installed as per our instructions below, failure to do so WILL INVALIDATE YOUR WARRANTY. Use these instructions in conjunction with the light instructions to ensure that all is fitted correctly. Warnings: Do not attempt to install the lights whilst the boat is in the water. Installation: Fig 1 showing how the Gel connector is wired up. Please use the instructions supplied with the Gel Connector kit. Fig 2 showing how the finished Gel connector should look when finished. The IP68 GEL CONNECTOR MUST BE INSTALLED OR YOU WARRANTY WILL BE VOID. Fig 1 Heatshrink Power In from shore power Light cable Please use fuse instructions within the manual to wire the fuse Negative wire to boat power Fig 2 Image showing how to wire the Gel Connector to the light and Fuse holder Bluefin LED Cottage Farm, Cottage Lane, Norton Juxta Twycross, Atherstone. CV9 3QH Sales - Tel: Service - Tel: Administration - Tel: simon.steadman@bluefinled.com mark.branson@bluefinled.com samantha.barrie@bluefinled.com Registered Address: Square Rig Limited, t/a Bluefin Led, Cottage Farm, Cottage Lane, Norton Juxta Twycross, Atherstone, CV9 3QH Company Registration Number: VAT Number:
6 6
Bluefin Led Underwater lights.
 Bluefin Led Underwater lights. P24 Single/Dual and Colourchange Installation manual. Thank you for choosing Bluefin LED underwater lights, our products have been designed and tested rigorously to ensure
Bluefin Led Underwater lights.
 Bluefin Led Underwater lights. P6N/P6CC Installation manual. Thank you for choosing Bluefin LED underwater lights, our products have been designed and tested rigorously to ensure optimum performance and
Bluefin Led Underwater lights.
 Bluefin Led Underwater lights. P3 Installation manual. Thank you for choosing Bluefin LED underwater lights, our products have been designed and tested rigorously to ensure optimum performance and longevity.
Bluefin Led Underwater lights.
 Bluefin Led Underwater lights. V12/V24CC Installation manual. Thank you for choosing Bluefin LED underwater lights, our products have been designed and tested rigorously to ensure the optimum performance
All Bluefin Led lights are water tested so please be aware there may be moisture present on the light.
 Bluefin LED Underwater lights. GW16IFM/GW20IFM/GW48CCIFM Installation manual. Thank you for choosing Bluefin LED underwater lights, our products have been designed and tested to ensure optimum performance
Wireless Remote System RC-12v & 24v Standard RF Remote Control System INSTALLATION MANUAL AND OWNERS GUIDE Table of Contents:
 Wireless Remote System RC-12v & 24v Standard RF Remote Control System INSTALLATION MANUAL AND OWNERS GUIDE Table of Contents: Page: 1 Important Safety Instructions/Overview. Pages: 2 Quick Reference Specifications.
Surface Mount e-lites
 Surface Mount e-lites SMX90-CS Colour-SELECT Lights Installation and Operating Guide SMX90-CCP-2 Congratulations! You have purchased a LUMISHORE advanced LED technology underwater lighting system. Every
SMX 22, SMX52 & SMX 102 Installation and Operating Guide
 SUPRA Surface Mount Integrated System SMX, SMX5 & SMX Installation and Operating Guide Congratulations! You have purchased a LUMISHORE advanced LED technology underwater lighting system. Every care has
TIX 402, TIX 802 & TIX 1602 Thru-Hull Light Lumishore SUPRA (dual colour) light Installation and Operating Guide
 light Installation and Operating Guide") SUPRA Thru-Hull Integrated System TIX, TIX & TIX Thru-Hull Light Lumishore SUPRA (dual colour) light Installation and Operating Guide Congratulations! You have purchased a LUMISHORE advanced technology
SUPRA Thru-Hull Integrated System TIX, TIX & TIX Thru-Hull Light Lumishore SUPRA (dual colour) light Installation and Operating Guide Congratulations! You have purchased a LUMISHORE advanced technology
THX 402, THX 802 & THX 1602 Thru-Hull Light Lumishore SUPRA (dual colour) light Installation and Operating Guide
 light Installation and Operating Guide") SUPRA Thru-Hull Integrated System THX, THX & THX Thru-Hull Light Lumishore SUPRA (dual colour) light Installation and Operating Guide Congratulations! You have purchased a LUMISHORE advanced technology
SUPRA Thru-Hull Integrated System THX, THX & THX Thru-Hull Light Lumishore SUPRA (dual colour) light Installation and Operating Guide Congratulations! You have purchased a LUMISHORE advanced technology
TIX 802 & TIX 1602 Thru-Hull Light Lumishore EOS Full Colour Change light Installation and Operating Guide
 EOS Thru-Hull Integrated System TIX & TIX Thru-Hull Light Lumishore EOS Full Colour Change light Installation and Operating Guide Congratulations! You have purchased a LUMISHORE advanced technology underwater
TIX402 EOS Installation and Operating Guide
 TIX402 EOS Integrated System TIX402 EOS Installation and Operating Guide Congratulations! You have purchased a LUMISHORE advanced LED technology underwater lighting system. Every care has been taken to
SMX 92 & SMX 152 Installation and Operating Guide
 EOS Surface Mount Integrated System SMX 92 & SMX 152 Installation and Operating Guide Congratulations! You have purchased a LUMISHORE advanced LED technology underwater lighting system. Every care has
Single Colour Light. TIX202 Interchangeable Flush Fit Thru-Hull Light. Installation and Operation Guide. Rev
 Single Colour Light TIX202 Interchangeable Flush Fit Thru-Hull Light Installation and Operation Guide Rev 3 45-0038 Congratulations! You have purchased a LUMISHORE advanced technology LED underwater light.
Single Colour Light. TIX301 Interchangeable Flush Fit Thru-Hull Light. Installation and Operation Guide
 Single Colour Light TIX301 Interchangeable Flush Fit Thru-Hull Light Installation and Operation Guide Congratulations! You have purchased a LUMISHORE advanced technology LED underwater light. Every care
THX120-CCP. Colour-CHANGE Lights THX120-CCP Thru-Hull Installation and Operation Guide
 THX120-CCP Colour-CHANGE Lights THX120-CCP Thru-Hull Installation and Operation Guide Congratulations! You have purchased a LUMISHORE advanced technology LED underwater light. Every care has been taken
STL Ceptor Series Running Board Light Stick
 2809 Business Park Dr Buda TX 78610 Phone 800.757.2581 Fax 844.894.2652 Email customerservice@speedtechlights.com STL Ceptor Series Running Board Light Stick Operation Manual and Instructions Congratulations,
EMF INSTALLATION & OWNER S MANUAL ULTRA COMPACT NICHE LIGHT FOR FIBREGLASS POOLS STORE THIS MANUAL IN A SAFE PLACE FOR FUTURE REFERENCE
 INSTALLATION & OWNER S MANUAL ULTRA COMPACT NICHE LIGHT SPA ELECTRICS PTY LTD w w w. s p a e l e c t r i c s. c o m. a u EMF FOR FIBREGLASS POOLS STORE THIS MANUAL IN A SAFE PLACE FOR FUTURE REFERENCE
Measurements are expressed in millimeters.
 T-Rex user manual Measurements are expressed in millimeters. 1 Lamp access 2 Focus adjustment 3 Mounting bracket 4 Swivel locks 5 Clamp hole 6 Air vent 190 285 7 AC input & main fuse 8 Microphone 490 164
UltraSystem Series II INSTALLATION MANUAL PARTNERED WITH
 UltraSystem Series II INSTALLATION MANUAL PARTNERED WITH CONTENTS Important information. page 1 Planning the installation. page 2 Transducer positioning. page 3-7 Transducer installation. page 8-10 Control
Colour-CHANGE Lights THX72-CCP Thru-Hull and THX72-CCP-FF Flush Fit Installation and Operation Guide
 Colour-CHANGE Lights THX72-CCP Thru-Hull and THX72-CCP-FF Flush Fit Installation and Operation Guide THX72-CCP THX72-CCP-FF Congratulations! You have purchased a LUMISHORE advanced technology LED underwater
BEAMER MODEL VDC Spotlight with joystick control panel MODEL VDC Spot/flood light with joystick control panel
 formerly a marinco.com product 502-2 installation & 503-2 instructions 502-2 24 VDC Spotlight with joystick control panel 502-3 24 VDC Spot/flood light with joystick control panel BEAMER MODEL 502-2 24
LDT Digital Temperature Gauge. Installation & Operation Instructions
 Pub. 988-0099-071 LDT-3200 Digital Temperature Gauge Installation & Operation Instructions The LDT-3200 combines a temperature gauge, voltmeter and clock in one housing. It displays the temperature in
Rescue Pac. Please read and fully understand the instructions in this manual before operation. Keep this manual safe for future reference
 Please dispose of Packaging for the product in a responsible manner. It is suitable for recycling. Help to protect the environment, take the packaging to the local amenity tip and place into the appropriate
AeroVironment Universal Solar Pump Controllers
 AeroVironment Universal Solar Pump Controllers (Installer s business information to be affixed here.) User Manual Models: USPC-2000 (AV Part Number 03747-001 Rev. D) USPC-5000 (AV Part Number 03747-002
Neptune X6 12/24V SAE 316L Stainless Steel Low Profile Through-Hull Mounted Underwater LED Light Manual
 Neptune X6 12/24V SAE 316L Stainless Steel Low Profile Through-Hull Mounted Underwater LED Light Manual Thank you for purchasing Dr. LED s Neptune X6 underwater LED light. This 1500+ lumen Neptune X6 underwater
Digital Intelligent Battery Charger OPERARATOR S MANUAL
 Digital Intelligent Battery Charger OPERARATOR S MANUAL WARNING! Before you install and use your Nitro Battery Charger, be sure to read and save these safety instructions. INTRODUCTION The Sinergex Nitro
Pro Booster 802Li. Please read and fully understand the instructions in this manual before operation. Keep this manual safe for future reference.
 Please dispose of packaging for the product in a responsible manner. It is suitable for recycling. Help to protect the environment, take the packaging to the local amenity tip and place into the appropriate
Camec Keyless Entry System Installation Instructions
 Camec Keyless Entry System Installation Instructions Fitment of this Keyless Entry System can be complex. Installation is recommended to be performed by certified RV installers or competent DIY. Damage
instructions for roadstart units
 instructions for roadstart units model no: RS1.V5, RS102.V4, RS103.V3 Thank you for purchasing a Sealey product. Manufactured to a high standard, this product will, if used according to these instructions,
MODEL 22040, REMOTE CONTROL STAINLESS STEEL OR CHROME SPOT/FLOOD LIGHT INSTALLATION AND OPERATION INSTRUCTIONS IMPORTANT!
 R R MODEL 22040, 22044 REMOTE CONTROL STAINLESS STEEL OR CHROME SPOT/FLOOD LIGHT INSTALLATION AND OPERATION INSTRUCTIONS IMPORTANT! READ THESE INSTRUCTIONS BEFORE INSTALLING AND USING THIS PRODUCT. KEEP
STL K-Force 18 and Micro 14 LED Mini Light Bar
 2809 Business Park Dr Buda TX 78610 Phone 800.757.2581 Fax 844.894.2652 Email customerservice@speedtechlights.com STL K-Force 18 and Micro 14 LED Mini Light Bar Operation Manual and Instructions Congratulations,
UL Ti MATE Range of underwater lights. (click on document required)
") UL Ti MATE Range of underwater lights (click on document required) Technical UL Ti MATE 75 SA (S.S) UL Ti MATE 75 SA (ALU) UL Ti MATE 75 Fixed (S.S) UL Ti MATE 75 Fixed (ALU) Brochure Info UL Ti MATE 75
UL Ti MATE Range of underwater lights (click on document required) Technical UL Ti MATE 75 SA (S.S) UL Ti MATE 75 SA (ALU) UL Ti MATE 75 Fixed (S.S) UL Ti MATE 75 Fixed (ALU) Brochure Info UL Ti MATE 75
MODEL NUMBER: MEDIUM DUTY ONBOARD AIR SYSTEM
 MODEL NUMBER: 10003 MEDIUM DUTY ONBOARD AIR SYSTEM IMPORTANT: It is essential that you and any other operator of this product read and understand the contents of this manual before installing and using
LED Dome Light VDC - IP67 - Dimmable - Dual Color
 LED Dome Light - 10-30VDC - IP67 - Dimmable - Dual Color Part #: LED-DL290 Buy American Compliant The LED-DL290 LED Flush Mount Down Light is designed as an extremely efficient and versatile lighting solution
Automotive: Lightheads
 ENGINEERING COMPANY INC. Winthrop Road Chester, Connecticut 00 Phone: (0) 0 Fax: (0) 07 Internet: www.whelen.com Sales email: autosale@whelen.com Canadian Sales email: canadiansales@whelen.com Customer
User Guide for Viridian EV Charging Stations
 User Guide for Viridian EV Stations Iss 3 - JULY 2015 Page 2 of 8 Thank you for purchasing a Viridian EV station. This guide is intended to instruct in the proper use of all models of Viridian stations.
HP10098 BASIC INDEPENDENT AIR SPRING ACTIVATION KIT
 HP10098 BASIC INDEPENDENT AIR SPRING ACTIVATION KIT Thank you and congratulations on the purchase of a Pacbrake basic independent air spring activation kit. Please read the entire installation manual prior
Installation Instructions
 Installation Instructions These instructions cover the following kits: 64-66 Mustang Sequential Turn Signal LED kit 67-68 Mustang Sequential Turn Signal LED kit Kit Contents 2 x LED Tail Light Panels 2
DC Master 24/ A
 USERS MANUAL DC Master 24/12 50-60A DC-DC converter MASTERVOLT Snijdersbergweg 93, 1105 AN Amsterdam The Netherlands Tel.: +31-20-3422100 Fax.: +31-20-6971006 www.mastervolt.com ENGLISH Copyright 2015
STL Mounting Brackets
 2809 Business Park Dr Buda TX 78610 Phone 800.757.2581 Fax 844.894.2652 Email customerservice@speedtechlights.com STL Mounting Brackets Operation Manual and Instructions Congratulations, you are the owner
LIGHTNING PLUS 120 WATT / 6 OUTLET VOLT POWER SUPPLY & STROBE LIGHT KIT 6 Different Light Patterns 8006 SERIES INSTALLATION INSTRUCTIONS
 LIGHTNING PLUS 120 WATT / 6 OUTLET 12-24 VOLT POWER SUPPLY & STROBE LIGHT KIT 6 Different Light Patterns 8006 SERIES INSTALLATION INSTRUCTIONS Your purchase of Wolo s LIGHTNING PLUS strobe light system
OWNERS GUIDE 12V / 24V DC ELECTRIC WINCH. 12,000lb (6124kg) TWO SPEED VERY IMPORTANT
 TWO SPEED VERY IMPORTANT") OWNERS GUIDE 12V / 24V DC ELECTRIC WINCH. 12,000lb (6124kg) TWO SPEED VERY IMPORTANT IT IS ESSENTIAL THAT YOU READ AND UNDERSTAND THIS GUIDE BEFORE INSTALLING AND OPERATING YOUR WINCH WINCHMAX UK WWW.WINCHMAX.CO.UK
OWNERS GUIDE 12V / 24V DC ELECTRIC WINCH. 12,000lb (6124kg) TWO SPEED VERY IMPORTANT IT IS ESSENTIAL THAT YOU READ AND UNDERSTAND THIS GUIDE BEFORE INSTALLING AND OPERATING YOUR WINCH WINCHMAX UK WWW.WINCHMAX.CO.UK
SV10 LED. The US manufactured SV10 LED is. SV10 LED technical specifications
 The US manufactured SV10 LED is the brightest thru hull LED underwater light available to owners of GRP and wood boats. The industry leading SV10 combines the unique qualities of the latest high density
NOTE. Installation and Service Manual Dual Planetary Gearmotor Slim Rack Slide Out System
 Installation & Service Manual Slim Rack In-Wall Slide Out System Control Box Part Number 1510000199 Content Copyright LCI/Power Gear Issued: December 2014 #3010002588, Rev. 0E Installation and Service
P/N Wheeler. user manual
 P/N 35000068 Wheeler user manual 1998, 1999 Martin Professional A/S, Denmark. All rights reserved. No part of this manual may be reproduced, in any form or by any means, without permission in writing from
GHP 12 Installation Instructions
 GHP 12 Installation Instructions To obtain the best possible performance and to avoid damage to your boat, install the Garmin GHP 12 marine autopilot system according to the following instructions. Professional
SlimRack Bed Lift System OEM INSTALLATION MANUAL
 SlimRack Bed Lift System OEM INSTALLATION MANUAL Rev: 07.11.2018 TABLE OF CONTENTS System Information 2 Safety Information 3 Resources Required 3 General Requirements 3 Installation 4 SlimRack Bed Lift
NON MAINTAINED TWIN SPOTLIGHT WALL MOUNT LED EMERGENCY LIGHT
 Model No. PEL00581 NON MAINTAINED TWIN SPOTLIGHT WALL MOUNT LED EMERGENCY LIGHT 1 Please read these instructions carefully before starting installation and retain for future reference. The centre page
STL Raptor Series Interior LED Visor Light Bar
 2809 Business Park Dr Buda TX 78610 Phone 800.757.2581 Fax 844.894.2652 Email customerservice@speedtechlights.com STL Raptor Series Interior LED Visor Light Bar Operation Manual and Instructions Congratulations,
Maximiser Progressive Controller
 Maximiser Progressive Controller Street & Race Model Owner's Manual 44 (0) 01302 834343 www.noswizard.com Introduction Congratulations on purchasing the Maximiser for the ultimate in progressive nitrous
Spectra C3 Light Bar Installation Instructions
 Light Bar Hardware Tools Required Universal Clamp Inserts 1.9, 2 3/8 - OD 5 Amp Fuse 1.25 Hole Saw Philips Screw Driver 7/64 Drill Bit Fish Tape Countersink Pencil Pigtail Wiring Harness Clamp Washer Wire
Hydro-Sync Slide-Out System
 Hydro-Sync Slide-Out System SERVICE MANUAL Rev: 08.14.2018 Hydro-Sync Slide-out System Service Manual TABLE OF CONTENTS Safety Information 3 Product Information 3 Operation 4 Extending Slide-Out Room 4
In-Line Linear Actuator
 In-Line Linear Actuator Operating Instructions 12 Volt DC Input Australian Gas Springs - LiftEasy Actuators Address: 29 Tower Court Noble Park Victoria 3174 Australia Telephone: +61 3 9769 0288 Fax: +61
INSTALLATION MANUAL SPECTRUM BRAKE CONTROL
 INSTALLATION MANUAL 51170 SPECTRUM BRAKE CONTROL TABLE OF CONTENTS Controls & Components Tools List Before You Begin Wiring Wiring Diagram Mounting the LED Display Rotary Knob Wiring the Plug Connector
EC400 Power Control System
 1 Introduction This section of the handbook will guide you through the operation of the electrical system. Further technical details are contained in section 3 or in the supporting technical manual available
PROFESSIONAL CORDLESS IMPACT SCREWDRIVER
 PROFESSIONAL CORDLESS IMPACT SCREWDRIVER Model CIS00 Part No 4500625 OPERATING & MAINTENANCE INSTRUCTIONS GC0309 INTRODUCTION Thank you for purchasing this CLARKE Impact Screwdriver. Before attempting
KIT-STCS60D KIT-STCS100D Solar Suitcase 60W and 100W Owner s Manual
 KIT-STCS60D KIT-STCS100D Solar Suitcase 60W and 100W Owner s Manual RNG Group Inc. (Renogy) 14288 Central Ave., Suite A Chino, CA 91710 1-800-330-8678 Product Description The Renogy Solar Suitcases combine
LED Twister II. User manual UK Version 1.0
 LED Twister II User manual 152.624UK Version 1.0 LED DUOPLEX: For indoor use only CAUTION! Please read this manual carefully before operating! Pay special attention to Sections 3 & 5 of this document.
8-STAGE AUTOMATIC BATTERY CHARGER MCU CONTROLLED - HIGH FREQUENCY SWITCHMODE MODELS: KACHG1207, KACHG1212, KACHG1220, KACHG2410. Instruction Manual
 8-STAGE AUTOMATIC BATTERY CHARGER MCU CONTROLLED - HIGH FREQUENCY SWITCHMODE MODELS: KACHG1207, KACHG1212, KACHG1220, KACHG2410 Instruction Manual Please read user manual carefully before use. WARNING
INSTALLATION I N S T R U C T I O N S
 www.lightmirrors.co.uk Bathroom Cabinet Installation & User Guide Thank you for purchasing our illuminated Cabinets. To avoid product damage or personal injuries, carefully read, understand, and follow
Verti Blast. User Manual. Order code: EQLED355
 Verti Blast User Manual Order code: EQLED355 Safety advice WARNING - FOR YOUR OWN SAFETY, PLEASE READ THIS USER MANUAL CAREFULLY BEFORE YOUR INITIAL START-UP! Before your initial start-up, please make
Model 2300DL Installation Guide
 Model 2300DL Installation Guide POWER ACCESS CORPORATION 4 HERSHEY DRIVE, DOCK 4 ANSONIA, CT 06401 800-344-0088 WEBSITE: www.power-access.com EMAIL: salesinfo@power-access.com 1 STANDARD PARTS MODEL 2300DL
Solid-State Compass with GPS Receiver
 Owner s Guide & Installation Instructions Solid-State Compass with GPS Receiver Model GH2183 Record the serial number found on the sensor. Serial No. Date of Purchase 17-489-01 rev. 01 04/22/08 1 WARNING
STL Striker /Virtue Interior LED Traffic Series
 2809 Business Park Dr Buda TX 78610 Phone 800.757.2581 Fax 844.894.2652 Email customerservice@speedtechlights.com STL Striker /Virtue Interior LED Traffic Series Operation Manual and Instructions Congratulations,
Installation and Operating Instructions (for chargers shown below)
") Installation and Operating Instructions (for chargers shown below) For additional information please call our Technical Support Group 800.742.2740 PRO CHARGING SYSTEMS, LLC 1551 Heil Quaker Boulevard,
Installation and Operating Instructions (for chargers shown below) For additional information please call our Technical Support Group 800.742.2740 PRO CHARGING SYSTEMS, LLC 1551 Heil Quaker Boulevard,
DURA-PANEL W OUTPUT: 12 VDC, 20 Watt W OUTPUT: 12 VDC, 50 Watt W OUTPUT: 12 VDC, 100 Watt
 INSTRUCTION MANUAL DURA-PANEL RIGID SOLAR PANEL CHARGING SYSTEM 20W, 50W & 100W SOLAR PANELS SERIES 091-246-20W OUTPUT: 12 VDC, 20 Watt 091-246-50W OUTPUT: 12 VDC, 50 Watt Charge Controller 091-246-100W
SCION xd INTERIOR LIGHTING UPGRADE Preparation
 Preparation Part Number: PTS21-52085 Light Guide Kit Contents Item # Quantity Reqd. Description 1 1 Controller Board, 4 color programmed w/ Bracket 2 1 RGB, LED Engine wire harness 3 2 14mm Light Rod,
Installation Instructions & Users Manual
 Installation Instructions & Users Manual UTILITY/ BUILDING INPUT 120 VAC ( OPTION) 15-20A N L CONTROL BOARD G SECURITY LIGHTING POWER SUPPLY (OPTION) CHARGER- POWER SUPPLY ASSBY XFMR (OPTION) CBM MODEL
type r remote drive for auxiliary
 type r remote drive for auxiliary KICKER MOTORs installation MANUAL OC15374 03/08/2013 Revision NEW First Edition Revision History Description 2013 Canada Metal (Pacific) Limited. All rights reserved.
GLM SERIES CONTROL Users Manual Rev:
 GLM SERIES CONTROL Users Manual Rev: 808062 Connecting Power Page 2 Motor Terminal Wiring Diagrams Page 3 Getting Started / Setup Page 4 1. Obstruction Detection Devices Page 4 2. Checking Power and Direction
The Power Systems Industry Experts. Installation Instructions. PT100 Stationary Generator Monitoring System
 The Power Systems Industry Experts Installation Instructions PT100 Stationary Generator Monitoring System PLEASE READ ALL INSTRUCTIONS PRIOR TO INSTALLATION Planning the Installation The monitoring unit
Your Guide to the Installation, Care and maintenance of PERFORMA. Electronic Self Closing Fittings - Mains Powered 886V (343029) 885V (343027)
 885V (343027)") Your Guide to the Installation, Care and maintenance of PERFORMA Electronic Self Closing Fittings - Mains Powered 886V (343029) 885V (343027) Pegler Limited, St Catherine s Avenue, Doncaster DN4 8DF Telephone
Your Guide to the Installation, Care and maintenance of PERFORMA Electronic Self Closing Fittings - Mains Powered 886V (343029) 885V (343027) Pegler Limited, St Catherine s Avenue, Doncaster DN4 8DF Telephone
75- Retro. IPX8 Underwater RATED. underwater lights limited TM. CUTE on size BIG on light. Aluminium / Steel.
 underwater lights limited TM Manufacturer of the original underwater lights TM Brand marine lighting products since 1991. 75- Retro cute on size big on light Aluminium / Steel 30 meter + Max 20,000 *The
Grid Tied Limiter User Manual
 Grid Tied Limiter User Manual Manual Version: GTL-2016-2 TABLE OF CONTENTS 1. GENERAL DESCRIPTION... 3 2. GRID TIED LIMITER OVERVIEW... 3 3. SYSTEM WITHOUT THE GRID TIED LIMITER... 4 4. SYSTEM WITH THE
ENSURE THAT THE TEMP PROBE FITS YOUR OUTDRIVE BEFORE BEGINNING INSTALLATION.
 715 Center Street Grayslake IL 60030 P: 847-752-2700 F: 847-752-2415 E: info@livorsi.com Drive temp gauge installation instructions Model Number: DCSDT (color) The Livorsi drive temp gauge kit easily installs
LOOKOUT LED LIGHT BAR INSTALLATION MANUAL 7900 SERIES
 LOOKOUT LED LIGHT BAR INSTALLATION MANUAL 7900 SERIES Your purchase of a Wolo warning light is the perfect choice to compliment your vehicle. Wolo s warning lights are manufactured with the finest materials.
STL Raptor - X TIR Interior LED Visor Light Bar
 2809 Business Park Dr Buda TX 78610 Phone 800.757.2581 Fax 844.894.2652 Email customerservice@speedtechlights.com STL Raptor - X TIR Interior LED Visor Light Bar Operation Manual and Instructions Congratulations,
SERVICE MANUAL. Chairman. Playman/Robo
 SERVICE MANUAL Chairman Playman/Robo US How to contact Permobil Permobil Inc. USA 6961 Eastgate Blvd. Lebanon, TN 37090 USA Phone: 800-736-0925 Fax: 800-231-3256 Email: info@permobilusa.com Head Office
STL Z - 3 TIR LED Surface Mount
 2809 Business Park Dr Buda TX 78610 Phone 800.757.2581 Fax 844.894.2652 Email customerservice@speedtechlights.com STL Z - 3 TIR LED Surface Mount Operation Manual and Instructions Congratulations, you
BGA Monocular User Instructions and Warranty North America. Models 8x42 10x42
 BGA Monocular User Instructions and Warranty North America Models 8x42 10x42 Main Features A B A 3 stage locking rotating retractable eyecup assembly B Wide band focusing C Objective lens D Lug for connecting
USE AND CARE GUIDE 15 INCH WHITE ROUND FLAT PANEL FIXTURE WITH SELECTABLE COLOR TEMPERATURE
 74212 USE AND CARE GUIDE 15 INCH WHITE ROUND FLAT PANEL FIXTURE WITH SELECTABLE COLOR TEMPERATURE FEIT ELECTRIC COMPANY PICO RIVERA, CA (800) 543-3348 FAX (562) 908-6360 www.feit.com Table of Contents
GENUINE PARTS INSTALLATION INSTRUCTIONS
 GENUINE PARTS INSTALLATION INSTRUCTIONS 1. 2. 3. 4. DESCRIPTION: Security Light Kit APPLICATION: Altima Sedan (2013+) PART NUMBER: 999F4 AX010 - Universal Security Lighting Kit. KIT CONTENTS: Item QTY
INSTALLATION GUIDE KT-CDR2 & KT-CDR3. For COOLDOME ENCLOSURE SERIES
 INSTALLATION GUIDE KT-CDR2 & KT-CDR3 Including Mounting & Sealing of Housing & Electrical Details For COOLDOME ENCLOSURE SERIES KT-CDR2 For D2 COOLDOME KT-CDR3 For D3 COOLDOME PRODUCT INSTALLATION PRECAUTIONS
LC I LIPPERT COMPONENTS HYDRAULIC FULL WALL SLIDEOUT SYSTEM OPERATION AND SERVICE MANUAL
 LC I LIPPERT COMPONENTS HYDRAULIC FULL WALL SLIDEOUT SYSTEM OPERATION AND SERVICE MANUAL TABLE OF CONTENTS SYSTEM...... 3 Warning...... 3 Description..... 3 Prior to Operation... 4 4 OPERATION... Main
INSTALLATION AND OWNER S MANUAL MODEL ASW Actuator Swing Gate Operator
 INSTALLATION AND OWNER S MANUAL MODEL ASW Actuator Swing Gate Operator Serial #: Date Installed: Your Dealer: READ THIS MANUAL CAREFULLY BEFORE INSTALLATION OR USE. SAVE THESE INSTRUCTIONS. Introduction
EC400 / EC450 series Power Control System
 1 Introduction This section of the handbook will guide you through the operation of the electrical system. Further technical details are contained in section 3 or in the supporting dealer technical manual
80W &100W Folding Solar Panel Kit
 80W &100W Folding Solar Panel Kit CONTENTS Introduction Safety Instructions Installation Operating Features FAQs Troubleshooting Cleaning INTRODUCTION Thank you for purchasing the Navitron 80W/100W Folding
EC225 Power Control System
 1 Key Features 200W (~16A) combined Power Converter / Battery Charger - Converts the 230V mains supply into 12v DC power to run the leisure equipment and charge the battery using an intelligent two-stage
ILED Dorado. User Manual
 10NM U-code Medium Intensity Obstruction Light Helideck Status Light 15NM U-code Contents 1. Safety... 3 2. Warranty... 3 2.1 General... 3 2.2 Life span... 3 3. Type plate... 4 4. Product Description...
GENUINE PARTS INSTALLATION INSTRUCTIONS
 GENUINE PARTS INSTALLATION INSTRUCTIONS 1. 2. 3. 4. DESCRIPTION: Security Light Kit APPLICATION: Altima Coupe and Sedan (2011+) PART NUMBER: 999F4 AX008 - Universal Security Lighting Kit. KIT CONTENTS:
WARNING. This product uses High Brightness LEDs. Direct viewing of the SMD LEDs at close range should be avoided. Keep product away from children.
 WARNING Before use please remove the LED Tape from its bag and allow the odour to dissipate in an unused room or outdoor building. Wash Hands after handling. This product uses High Brightness LEDs. Direct
PHASE CONVERTERS OPERATING & MAINTENANCE INSTRUCTIONS. MODEL NO: PC40 and PC60. PART Nos:
 PHASE CONVERTERS MODEL NO: PC40 and PC60 MODEL PART No: NO: 6012805 PC20 and PC40 6012810 PC60 PART Nos: 6012800 6012805 6012810 OPERATING & MAINTENANCE INSTRUCTIONS 0107 Specifications PC20 PC40 PC60
EC200 ELECTRONIC CONTROL SYSTEM
 1 INTRODUCING THE EC200 ELECTRONIC CONTROL SYSTEM With the use of new technology and an innovative approach to user interfacing, the EC200 Power Control System provides a complete control solution for
Rental Industry Safety Tester Safe Check 5s
 Rental Industry Safety Tester Safe Check 5s Feb 2006 2006 Clare Instruments Inc. Issue 2.0 Firmware Version : 1.2a Limited Warranty & Limitation of Liability Clare Instruments Inc, guarantees this product
PIRANHA I & 2 INSTALL GUIDE
 TOP Use 5/32" drill bit DO NOT LET DEADRISE INTERSECT THIS LINE PLACE EITHER CORNER ON DEADRISE ANGLE PIRANHA I & 2 INSTALL GUIDE Two components need to be installed on the boat: the transducer and the
Switch Pro w/ Compact Junction Box A_1_ Series Owner s Manual
 Warranty, Service & Repair To register your product with the manufacturer, go to the Flowline website for on-line registration. The website address is as follows: www.flowline.com On-line Warranty Registration
VERTICAL PLATFORM LIFT USER GUIDE
 VERTICAL PLATFORM LIFT USER GUIDE VER: 090817 TABLE OF CONTENTS Warnings...2 Aspire Features...3 Lift use......4 Emergency Situation...4 Moving the Vehicle in an Emergency...4 Battery Charger Testing Procedure...5
STL Dart TIR Exterior LED Traffic Advisor Arrow Stick
 2809 Business Park Dr Buda TX 78610 Phone 800.757.2581 Fax 844.894.2652 Email customerservice@speedtechlights.com STL Dart TIR Exterior LED Traffic Advisor Arrow Stick Operation Manual and Instructions
CONGRATULATIONS ON YOUR PURCHASE OF YOUR THUNDER BATTERY CHARGER! For your personal safety read, understand and follow the information provided in
 CONGRATULATIONS ON YOUR PURCHASE OF YOUR THUNDER BATTERY CHARGER! For your personal safety read, understand and follow the information provided in this instruction manual & on the battery charger. This