Roller Shade Installation Instructions
|
|
|
- Anthony Jackson
- 6 years ago
- Views:
Transcription
1 Roller Shade Installation Instructions Standard Installation p Cordless Installation p Cassette Installation p Motorization Solar Panel Installation p Motorization Remote Control Programming p


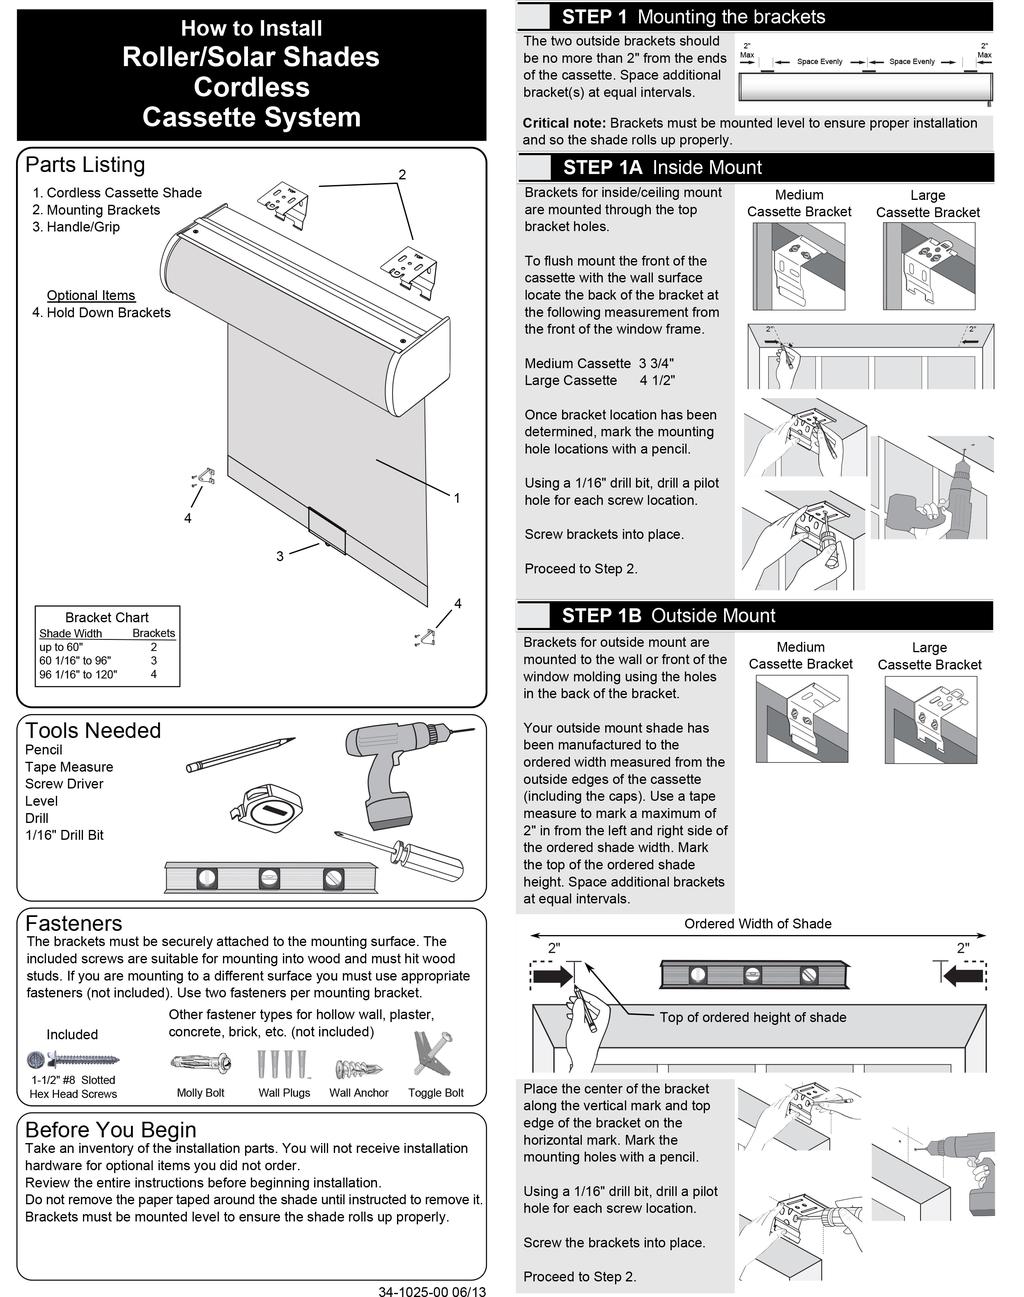
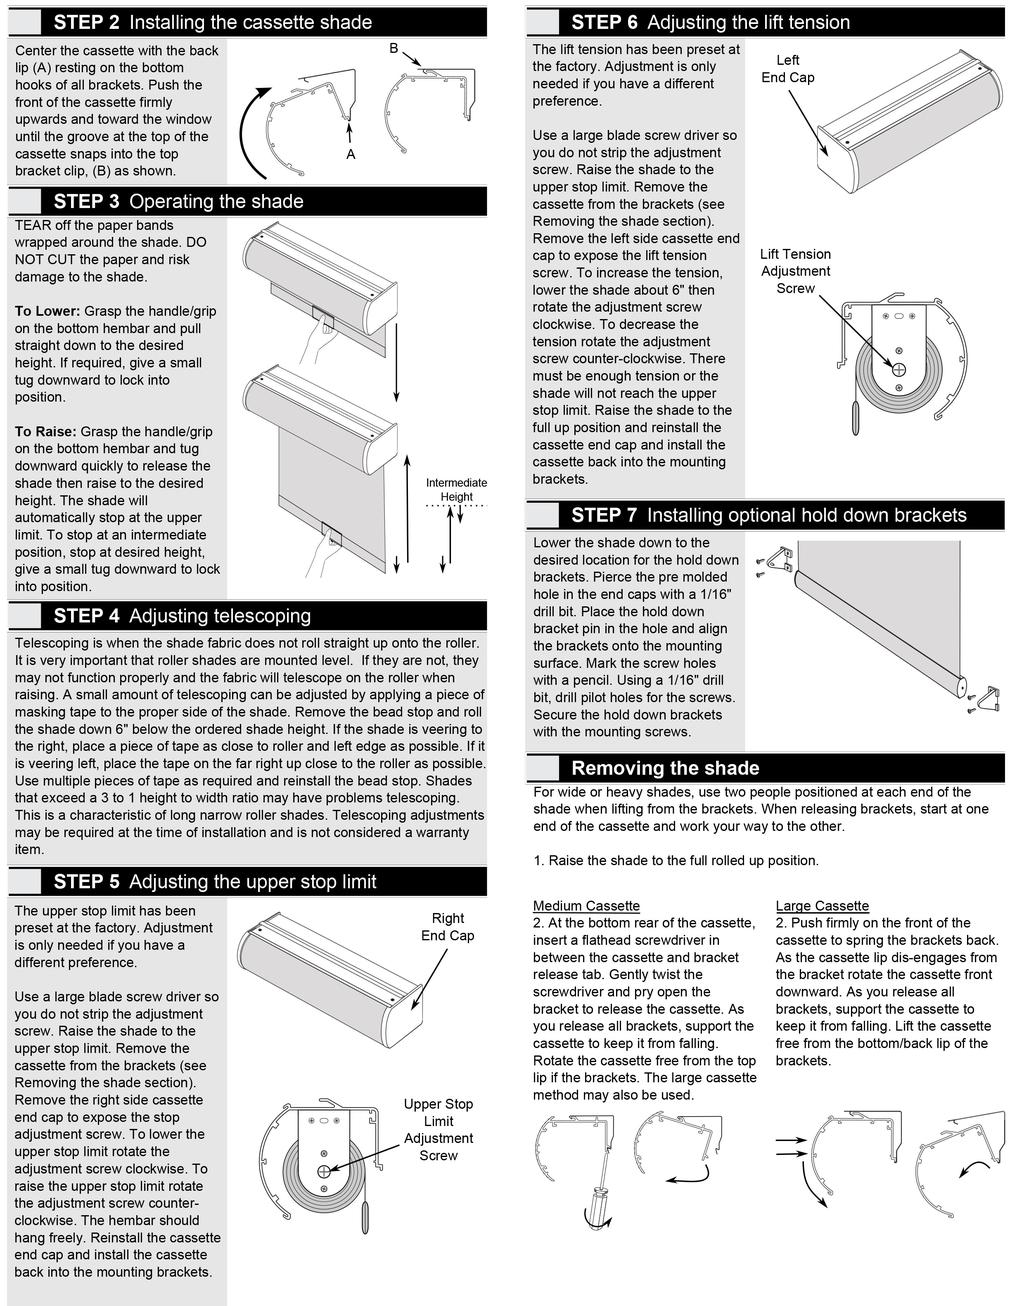
2 Parts Listing 1. Continuous Loop Shade 2. Chain Guide 3. Mounting Brackets Optional Items 4. Bracket Covers 4 5. Channel Valance Sa. Valance Corners v \ Sb. Valance Returns Sc. Valance Mounting Brackets 6. Hold Down Brackets / 3 Sa Sb Valance Bracket Chart / (Outside Mount Only) Ordered Width Brackets 6 up to 36" /16" to 60" /16" to 84" /16" to 108" /16" to 132" /16" to 144" 7 2 r«:'j: 4 Tools Needed Pencil Tape Measure Screw Driver Level Drill 1 /16" Drill Bit 3/16" Drill Bit Needle Nose Pliers Fasteners e e Safety The brackets must be securely attached to the mounting surface. The included screws are suitable for mounting into wood and must hit wood studs. If you are mounting to a different surface you must use appropriate fasteners (not included). Use two fasteners per mounting bracket. Before You Begin Other fastener types for hollow wall, plaster, concrete, brick, etc. (not included) II l Wall Plugs Wall Anchor Toggle Bolt Removing the shade Take an inventory of the installation parts. You will not receive installation hardware for optional items you did not order. Review the entire instructions before beginning installation. Do not remove the paper taped around the shade until instructed to remove it. Leave the bead chain bundled for easier installation. Brackets must be mounted level to ensure the shade rolls up properly. Inside mount start at Step 1A. Outside mount start at Step 1 B. AWARNING Young children can STRANGLE in cord and bead chain loops. They can also wrap cords around their necks and STRANGLE. Always keep cords and bead chains out of children's reach. Move cribs, playpens, and other furniture away from cords and bead chains. Children can climb furniture to get to cords. Attach chain guide to wall or floor. This can prevent children from pulling cords and bead chains around their necks. Included Fasteners provided with the chain guide may not be appropriate for all mounting surfaces. Use appropriate anchors for the mounting surface conditions. 1-1 /2" #8 Slotted Hex Head Screws For wide or heavy shades, use two people positioned at each end of the shade. Molly B 1. Raise the shade to the full rolled up position. 2. Uninstall the chain guide by removing the two mounting screws. 3. Press upward on the clutch end of the shade to unlock the tabs from the mounting bracket and push lightly toward the spring pin end until the clutch tabs are clear of the mounting bracket. Drop down the clutch side below the bracket and pull the spring pin end clear of its mounting bracket.


3 :I Brackets for inside mount can be Side Mount oriented for side, ceiling or top mounting to the window frame. Determine the best orientation for - your application. a I,, Measure the largest radius of the shade. Depending on the size of your shade it may be the clutch or the rolled fabric. Side mount will generally give you the smallest light gap along the top of the shade. Add 1 /4" for clearance to the shade radius, measure down from the top window frame and make a mark. If you have a channel valance increase the clearance to 5/16". Locate the center hole of the bracket on this mark. Ceiling/Top Mount e i\ Determine largest shade radius. It may be the fabric or clutch Mark mounting holes 1 Take the valance down from the window and turn upside down. Measure 6" in from each end and a minimum of 1/2" up and mark with a pencil. Space additional screws equally across the width of the valance. If window frame depth is available, another row of screws will provide additional support. Using a 3/16" drill bit, drill a hole at each marked location. If brackets are ceiling/top mounted, position them far enough forward away from the window to accommodate the largest shade radius and so the shade will clear any window frames, locks or other obstacles. Critical note: Brackets must be mounted level to ensure the shade rolls up properly. Mount brackets Place the valance into the window and align the back edge to the pencil mark in the window frame. Use the valance as a template to mark the valance hole locations on the inside of the window frame. Once bracket location has been determined, mark the mounting hole locations with a pencil, drill pilot holes with a 1/16" drill bit and screw brackets into place. If you do not have a channel valance proceed to Step 3. STEP 2A Mounting the optional channel valance Hold the valance up with the fabric facing the room and center over the window opening. The top of the valance must extend into the window frame at least 1 3/8". To mount the valance face flush with the wall, mark at 3" from the front. The corners and returns are not used with a flush mounted valance. The fabric insert is made 1/4" larger on each side to extend into the valance corner. If desired, the fabric can be peeled back and the the vinyl insert can be cut with scissors. The valance must be mounted far enough in front of the brackets to accommodate the largest shade radius. Measure from the center of the round hole in the bracket plus 1/4" clearance. Mark the back of the valance along the top of the window frame with a pencil. 1 3/f!t' Using a 1 /16" drill bit, drill a pilot hole for the screw at each mark. Screw the valance into place. If the valance extends in front of the wall surface, attach the valance corners and valance returns. The valance returns can be trimmed to length with a scissor. Proceed to Step 3.
4
5
6
7
8
9
10
11

12 Instruction Booklet WireFree TM Solar Pack # by


13 Solar Pack Installation The WireFree TM Solar Pack harnesses renewable solar energy to power WireFree TM motorized window coverings. This innovative product from Somfy is easy to install, and provides a maintenance free, longer life alternative as compared to standard lithium battery options. This product is designed to meet the energy requirements for new and existing Somfy 12 Volt WireFree TM motorized window coverings, and should not be used in conjunction with any other motor systems. Parts Overview 1 Photovoltaic (Solar) Panel (with window mounting adhesive tape and surface prep-pads) 2 Y -Harness Connector 3 Rechargeable Ni-MH Battery + Battery Tube Optional Accessories: Battery Tube Mounting Clip Pack A. Mounting Clips B. Securing Bands C. Screws Item # A B C Solar Panel Mounting Bracket Kit (for off-the-glass mounting) A. 2 Brackets B. 4 Brackets C. Mounting Screws Item # A C B 24 & 48 Inch Extension Cable (for extending battery or solar panel connection) 24 Inch Item # Inch Item #

14 Step 1: Installing Battery Tube If your motorized window covering does not have provisions to mount the battery tube, you will need to purchase the optional wall mount battery clips as pictured on previous page. New Installations: The location of battery tube must be determined prior to installation of window covering. Existing Installations: Simply replace the existing (Lithium) battery tube with the new Solar Pack battery tube. (NOTE: Lithium battery tubes are not compatible with Solar Pack) NOTE: Battery should be fully charged prior to installation with battery charger (Somfy Item # ) sold separately. The following depicts the most common installation options, however the battery tube may be installed in a location that is most convenient. Option 1: Horizontal Mount Inside or Outside of Window Frame Option 2: Vertical Mount Inside or Outside of Window Frame Option 3: Any other location that works for your specific installation NOTE: If the battery tube is located more than 10 inches from the motor (motor side of window covering) an extension cable may be used. Inside Window Frame Mounting Only: A. Find the Window Depth. Measure the depth of the window return (front to back) and note. B. Find the Overall Depth. Measure the depth of the window covering (front to back) including window covering mounting brackets. Add 1 inch and note. Is the Window Depth SMALLER than the Overall Depth? YES NO Inside Window Frame mounting is not possible. Inside Window Frame mounting is acceptable, GO TO STEP 2. 3

 may have to be")
15 Step 2: Installing Solar Panel Determine the location of the Solar Panel The Solar Panel must always be installed INDOORS, in most cases, directly against the window glass to ensure maximum exposure to sunlight NOTE: To prevent damage to Solar Panel and/or window hardware, DO NOT MOUNT Solar Panel directly to window glass if it will cause an obstruction to moveable window frames and hardware! Optional: Solar Panel should be mounted on the same side as the battery tube (see Option 1 and 2). Extension cables may be purchased to accommodate other locations. The following depicts the most common installation options, however if Solar Panel CANNOT be mounted directly to window glass, the Optional Solar Panel Bracket Kit (previous page) may have to be purchased. The bracket kit will enable the Solar Panel to be mounted directly to the inside window-return or directly to the window covering enclosure/headrail (if one is used). See Option 4 (below). Solar Panel Solar Panel Option 1: Horizontal Mount Inside or Outside of Window Frame Option 2: Vertical Mount Inside or Outside Frame Option 3: Any other location that works for your specific installation NOTE: If the Solar Panel is located more than 10 inches from the motor (motor side of the window covering) an optional extension cable (previous page) may be used. Option 4 4
 corners of the Solar Panel frame (See Figure 2). Then adhere to window surface.")
16 Step 3: Installing Solar Panel to Window Glass 1. Clean Solar Panel frame and proposed window glass location with alcohol prep pad (included). Let dry for 2 minutes. 2. Position Solar Panel face-up and apply the adhesive tape to (4) corners of the Solar Panel frame (See Figure 2). Then adhere to window surface. NOTE: Adhesive tape is precut for your convenience. Direct contact with skin may contaminate tape. It is important that your skin does not come in contact with adhesive. Always peel away the master liner (first) while handling/positioning tape with upper liner. This will allow you to easily position tape onto frame of Solar Panel. (See Figures 1 and 2) Figure 1. Upper Liner Adhesive Master Liner Adhesive must stay with upper liner when peeled away from master liner Figure 2. 5
17 Step 4: Connecting Solar Panel and Battery Tube 1. Connect Wire Harness Motor Connector to motorized window covering. 2. Connect Battery Tube to Wire Harness. 3. Connect Solar Panel to Wire Harness. Motor Connector Solar Panel and Battery Tube Connectors Motorized Blind Window Covering 1 Battery Tube Solar Cell 2 Wire Harness 3 6
18 Step 5: Commissioning Motorized Window Covering ACTIVATION OF MOTORIZED WINDOW COVERING: New Installations: Please reference Window Covering Product Guide (Usually included with Motorized Window Covering) for instructions on initial activation and/or programming of product. Existing Installations: Simply operate the window covering as normal. Once initial command (UP and DOWN) is sent, window covering will respond with a brief jog, (UP and DOWN movement). All controls will now operate as previously. There is no need to reprogram the motorized window covering. somfy For existing installations, simply activate the UP or DOWN button to operate the motorized window covering! 7
19 Somfy Systems, Inc. North America Headquarters 121 Herrod Blvd Dayton, NJ (P) SOMFY (P) (F) Florida 6100 Broken Sound Pkwy Northwest Suite 14 Boca Raton, FL (P) (P) (F) California Barranca Pkwy Irvine, CA (P) (F) Somfy Canada 5178 Everest Drive Mississauga, Ontario L4W2R4 CN (F) by C-0025 Copyright Somfy Systems, Inc. 10/2012


20 TM Roll Up WireFree RTS Programming & Operation Instructions LT-30RT Round Head Before you begin Motors are shipped without limit switch settings and transmitter ID s Steps (1-6) must be completed to ensure proper shade programming and functionality. It may be necessary to disconnect shades from their respective power while programming is in progress. While programming (step 4), shade should not be inactive for longer than 2 minutes or motor will exit programming mode. Programming Instructions are for use with Telis 1&4, Decora 1&4 or Chronis Timer The following illustrations and instructions represent the Telis hand-held remote, and may also be applied to the Decora wireless wall switch and Chronis Timer. Telis 1 Transmitter Decora 1 Chronis Timer STEP ONE Connect Power to Motor 1) Connect 12V battery wand or transformer to the motor. Motor should already be installed in shade. UP MY (stop) DOWN Channel Selector Telis 4 Transmitter STEP TWO Initiate Programming (for use with Telis 1 & 4, Decora 1 & 4 or Chronis Timer) For Single Channel Transmitters (Telis 1, Decora 1, or Chronis Timer) 1) On the transmitter, press and hold the UP and DOWN buttons simultaneously until the shade jogs (shade has a short up and down movement). For Multi-Channel Transmitters (Telis 4 or Decora 4) 1) Using the channel selector, select the desired channel. 2) On the transmitter, press and hold the UP and DOWN buttons simultaneously until the shade jogs. NOTE: This step cannot be performed if the transmitter has already been programmed (memorized) to shade. Press and hold UP & DOWN

21 TM Roll Up WireFree RTS Programming & Operation Instructions LT-30RT Round Head STEP THREE Check Polarity (Shade direction) MUST BE DETERMINED BEFORE SETTING SHADE LIMITS Press and hold the DOWN button and confirm the shade moves down. Press and hold the UP button and confirm the shade moves up. If shade direction is correct, continue to Step 4. If shade direction is not correct (in reverse), press and hold the MY (stop) button on the transmitter for 2 seconds until the shade jogs. Shade direction is now corrected. Shade movement should now correspond to the direction button on the transmitter. Press and hold DOWN Press and hold UP STEP FOUR Setting Limits (Shade Positions) Starting with shade in down position. 1) Press and hold the UP or DOWN button on the transmitter to reach the desired lower limit (shade position). NOTE: During limit setting, shade operates in approximately 3ft. increments only. If shade stops prior to reaching desired limit (final shade position) release then press and hold the down button until the shade begins to move Press & hold UP or DOWN 2 ) Once the desired lower limit (shade position) is reached, press and hold the MY (stop) and UP buttons simultaneously until the shade begins to move up, then release. Press MY (stop) and UP 3. 3) Press the MY (stop) when the shade reaches the desired upper limit (shade position). If necessary, adjust the desired shade position with a brief press of either the UP or DOWN button. Press MY (stop) 4) Once desired upper limit (shade position) is reached, press and hold the MY (stop) and DOWN buttons simultaneously until the shade begins to move down, then release. 4. Press MY (stop) and DOWN P.2
22 TM Roll Up WireFree RTS Programming & Operation Instructions LT-30RT Round Head STEP FOUR Setting Limits (Shade Positions) continued. 5) Once shade stops at previously set lower limit (shade position), press the MY (stop) button for 2 seconds until the shade jogs. This confirms both limits (shade positions). To complete programming, proceed to STEP FIVE 5. Press MY (stop) for 2 seconds Starting with shade in up position 1) Press and hold the DOWN or UP button on the transmitter to reach the desired upper limit (shade position). NOTE: During limit setting, shade operates in 3ft. increments only. If shade stops prior to reaching desired limit (final shade position) release then press and hold the down button until the shade begins to move. 1. Press and hold UP or DOWN 2) Once the desired upper limit (shade position) is reached, press and hold the MY (stop) and DOWN buttons simultaneously until the shade begins to move down, then release. 2. Press MY (stop) and DOWN 3) Press the MY (stop) button when the shade reaches the desired lower limit (shade position). If necessary, adjust the desired shade position with a brief press of either the UP or DOWN button. 3. Press MY (stop) 4) Once desired lower limit (shade position) is reached, press and hold MY (stop) and UP buttons simultaneously until the shade begins to move up, then release. 4. Press MY (stop) and UP 5) Once shade stops at previously set upper limit (shade position), press and hold the MY (stop) button for 2 seconds until the shade jogs. This confirms both limits (shade positions). To complete programming proceed to STEP FIVE 5. Press MY (stop) P.3
23 TM Roll Up WireFree RTS Programming & Operation Instructions LT-30RT Round Head STEP FIVE Completing & Exiting Programming Mode Using a paperclip, press and hold the PROGRAM button on the back of the transmitter until the shade jogs. TRANSMITTER IS NOW MEMORIZED AND PROGRAMMING IS COMPLETE. Program Program Program Note: If power is disconnected from shade before Step 5 is completed, TRANSMITTER WILL NOT BE MEMORIZED to the programmed shade however limits (shade positions) will remain programmed. If this occurs, go back and repeat step 2 (Initiate Programming). Then omit step 4 (Setting Limits) and resume with step 5. Telis Transmitter (back view) Chronis RTS Timer with cover removed Decora Wireless Wall Switch, (side view) STEP SIX Adding Additional Transmitters, Assigning or Deleting Channels Adding Additional Transmitters (Single Channel) With a Remote Control 1) Using a paperclip, press and hold the PROGRAM button on the previously addressed transmitter until the shade jogs. 2) Using a paperclip, press and hold the PROGRAM button on the Additional (new) transmitter until the shade jogs. Additional (new) transmitter is now added to shade memory and can be used to operate shade. With the Program on the Motor 1) Using a paperclip, press and hold the PROGRAM button on the motor head, LED will blink once then remain on, release button and motor will jog. If you cannot see LED light (because of certain mounting constraints) press and hold Programming button for 2 seconds then release, shade will then jog. 2) Using a paperclip, press and hold the PROGRAM button on the Additional (new) transmitter until the shade jogs. The Additional (new) transmitter is now added to shade memory and can be used to operate shade. Assigning Specific Channels to Shade (Multi-channel transmitters only) 1) Using a paperclip, press and hold the PROGRAM button on the previously addressed transmitter until the shade jogs. 2) Select the desired channel (1-4 or all) by momentarily pressing the Channel Selector button on the multi-channel transmitter. 3) Press and hold the PROGRAM button on the multi-channel transmitter until the shade jogs. Additional (new) channel is now added to shade memory and can be used to operate shade. Note: To prevent unwanted Channel/Transmitter assignments, it may be necessary to unplug power from all previously programmed shades until programming is complete. Previous transmitter Program New transmitter Previous transmitter Program New transmitter Program Program Channel Selector P.4
24 TM Roll Up WireFree RTS Programming & Operation Instructions LT-30RT Round Head STEP SIX Adding Additional Transmitters, Assigning or Deleting Channels (continued). Deleting Specific Channels/Transmitters 1) Using a paperclip, press and hold the PROGRAM button on the previously addressed transmitter until the shade jogs. 2) Select the desired channel (1-4 or all) or transmitter (single channel) to be deleted. 3) Press and hold the PROGRAM button on the transmitter until the shade jogs. Channel or transmitter is now deleted from shade memory and will not operate shade. Previous transmitter Program Channel Selector To delete ALL transmitter channels: Using a paperclip, press and hold the PROGRAM located on the motor head until LED light begins to flash on and off, release button and motor will jog. If you cannot see LED light (because of certain mounting constraints) press and hold Programming button for 7 seconds then release, shade will then jog. Program STEP SEVEN Resetting Motor (Erasing all Previously Programmed Limit Settings and Channels) To delete all previous settings: Using a paperclip, press and hold the PROGRAM button, located on the motor head for 12 seconds. All transmitters and limits will be erased.(motor is now reset to factory mode.) Motor limits will need to be reestablished. Program () Program OPTION ONE Setting an Intermediate Position (IP) 1) Press the UP or DOWN directional button on the previously addressed transmitter until the shade reaches a desired intermediate position, then press the MY (stop) button to stop. If necessary adjust the desired position with a brief press of either the UP or DOWN button. 1. Press UP or DOWN P.5
25 TM Roll Up WireFree RTS Programming & Operation Instructions LT-30RT Round Head OPTION ONE Setting an Intermediate Position (IP) continued. 2) Once the desired Intermediate position is reached, Press and hold the MY (stop) button on the transmitter until the shade jogs. Intermediate position is now added to memory 2. Press & hold MY (stop) 3) Activate the shade intermediate position by pressing the MY (stop) button from ANY shade position. 3. Press MY (stop) Note: Shade should be stationary prior to activating intermediate position function. If shade is actively moving (in-motion) MY (stop) button should be pressed twice. To Delete: Activate shade to (IP) position, then press and hold the MY (stop) button for 5 seconds. Shade will jog to confirm deletion. OPTION TWO Re-adjusting Upper Limit (UP Shade Position) 1) Press the UP directional button on the transmitter. Shade will travel to the pre-set UP limit. 1. Press UP 2) Once shade stops at pre-set up limit, press and hold the UP and DOWN buttons simultaneously on the transmitter until the shade jogs. 2. Press & hold UP & DOWN 3) Press and hold either the UP or DOWN button on the transmitter to adjust shade to new position. 3. Press & hold Either UP or DOWN 4) Press and hold the MY (stop) button until the shade jogs. New Upper Limit (Up stop Position) is now added to memory. 4. Press & hold My (stop) P.6
26 TM Roll Up WireFree RTS Programming & Operation Instructions LT-30RT Round Head OPTION THREE Re-adjusting Lower Limit (DOWN Shade Position) 1. 1) Press the DOWN directional button on the transmitter. Shade will travel to the pre-set DOWN limit. Press DOWN 2) Once shade stops at pre-set down limit, press and hold the UP and DOWN buttons simultaneously on the transmitter until the shade jogs. 2. Press & hold UP & DOWN 3) Press and hold either the UP or DOWN button on the transmitter to adjust shade to new position. 3. Press & hold Either UP or DOWN 4) Press and hold MY (stop) button until shade jogs. New lower limit (Down stop position) is now added to memory. 4. Press & hold MY (stop) OPTION FOUR Manual Activation of Shade 1) Using a paperclip. Press the Programming button on motor head momentarily. Shade will begin to operate. 2) Press the Programming button again to STOP. 3) Press the Programming button again to activate in opposite direction. Program NOTE: Shade should already be programmed in order to activate manually. OPTION FIVE Activating Step (Tilting) Feature for Sheer Shade Applications 1) Press the Down directional button on the transmitter. Shade will travel to pre-set DOWN limit. 2) Press and hold the DOWN button on the transmitter until shade begins to step or tilt. 3) Release the DOWN button on the transmitter once new position is reached. NOTE: Shade must be already programmed to activate tilting feature. C SOMFY SYSTEMS, INC. 2/07 P.7 REV.1
Instruction Booklet. WireFree TM Solar Pack #
 Instruction Booklet WireFree TM Solar Pack #9015575 by Solar Pack Installation The WireFree TM Solar Pack harnesses renewable solar energy to power WireFree TM motorized window coverings. This innovative
Solar Pack Installation
 Solar Pack Installation The WireFree TM Solar Pack harnesses renewable solar energy to power WireFree TM motorized window coverings. This innovative product from Somfy is easy to install, and provides
p wered BLINDS control at your fingertips Installation, Programming & Operation Guide 12Vdc Powered Roman Blind
 p wered BLINDS control at your fingertips Installation, Programming & Operation Guide 12Vdc Powered Roman Blind www.poweredblinds.co.uk Contents The contents of your order... Page 3 Blind fitting & position...
Glydea Range. High Performance Motorization Solutions for Draperies
 Glydea Range High Performance Motorization Solutions for Draperies G l y d e a E x p a n ds Y o u r Opp o r t u n i t i e s Today, drapery motorization is becoming the standard for hotel rooms, meeting
INSTALLATION INSTRUCTIONS. - Spring Loaded Tube - Beaded Chain Loop - Cordless
 INSTALLATION INSTRUCTIONS ROLLER SHADES SPRING CLUTCH TOUCHLIFT REMOTELIFT - Spring Loaded Tube - Beaded Chain Loop - Cordless - Lift Motorization Thank you for your purchase. This shade has been custom
Glydea TM Range. Motorization for draperies
 Glydea TM Range E x p a n d i n g h o r i z o n s Motorization for draperies Glydea broadens your horizons Today, drapery motorization is becoming the standard for hotel rooms, meeting venues, conference
Motorized Skylight Installation Instructions
 Motorized Skylight Installation Instructions Getting Started A few simple tools are required: - Measuring tape - Power drill, drill bits - Hex head and/or Phillips driver bit - Pencil Additional fasteners
comfort Designed for success
 Sonesse & Sonesse ULTRA The range of quiet and ULTRA quiet motors. Sonesse 30 WireFree, Sonesse 30, Sonesse 40, Sonesse 50 Sonesse ULTRA 50 Designed for Sonesse 30 Sonesse 40 Sonesse 50 comfort Designed
Sonesse & Sonesse ULTRA The range of quiet and ULTRA quiet motors. Sonesse 30 WireFree, Sonesse 30, Sonesse 40, Sonesse 50 Sonesse ULTRA 50.
 Sonesse & Sonesse ULTRA The range of quiet and ULTRA quiet motors. Sonesse 30 WireFree, Sonesse 30, Sonesse 40, Sonesse 50 Sonesse ULTRA 50 Sonesse 30 Sonesse 40 Sonesse 50 comfort success Designed for
with Touch & Go Feature
 Cellular Shades Veronica Valencia Blackout Cellular Shades POWER TOUCHTM RECHARGEABLE with Touch & Go Feature Installation & Care Instructions 152730 4/19/2017 GETTING STARTED A few simple tools are required:
Installation Operation Care
 Installation Operation Care Standard Clutch CONTENTS Getting Started: Product View... 1 Tools and Fasteners Needed... Installation: Mounting Types and Window Terminology... Mount the Installation Brackets
Solar & Roller Shades
 STEP BY STEP INSTALLATION INSTRUCTIONS Solar & Roller Shades Loop Control, Loop Control with Cassette/2 on 1 Headrail & Loop Control with Metal Valance Table of Contents Step 1 - Getting Started....3 Everything
Cellular Shades MOTORIZED SHADE Top Down - Bottom Up. Installation & Care Instructions
 Cellular Shades MOTORIZED SHADE Top Down - Bottom Up ucontact@udoblinds.com 1-855-205-8442 Installation & Care Instructions 152746A 7/2/2018 GETTING STARTED A few simple tools are required: - Measuring
Solar Pack EN - Installation instructions
 www.somfy.com Solar Pack EN - Installation instructions Ref : 5066778A EN Contents. Introduction. Safety. Safety and Responsibility. Specifi c Safety Advice. Installation. Determine Location of Solar Panel.
Installation Operation Care
 Installation Operation Care Alustra Woven Textures Standard and Cassette Roller Shades CONTENTS Getting Started: Product View...1 Tools and Fasteners Needed...2 Installation: Installation Overview...3
Solar & Roller Shades
 STEP BY STEP INSTALLATION INSTRUCTIONS Solar & Roller Shades Side by Side Shades Loop Control & Motivia Motorization Everything You Need A Smooth Set-Up We want you to love your new window coverings and
Rollstar Shade Installation Instructions
 Rollstar Shade Installation Instructions All Lifting Systems Inside or Outside Mount Thank you for purchasing your new Rollstar shade. It has been custom-made from the highest quality materials to the
Continuous Cord Loop Designer Series Roller Shades
 Shade Maintenance Leveling a Crooked Shade 1. Pull down shade until roller is exposed. Do not pull further to avoid pulling cloth off roller. 2. Stick a 5" strip of masking tape into the roller at opposite
Solar & Roller Shades
 STEP BY STEP INSTALLATION INSTRUCTIONS Solar & Roller Shades Motivia Motorization Remote Control Everything You Need Table of Contents Step 1 - Getting Started....3 Overview - Motorization with No Headrail...4
SOMFY POWERS Smart Living. Motorized Window Coverings
 SOMFY POWERS Smart Living Motorized Window Coverings Who is Somfy? 8 manufacturing plants 125 subsidiaries spread across 5 continents in 58 countries About Somfy Somfy Systems is the leading global manufacturer
Top Down Rollstar Shade Installation Instructions
 Top Down Rollstar Shade Installation Instructions Thank you for purchasing your new Rollstar shade. It has been custom-made from the highest quality materials to the dimensions you specified. With proper
Solar & Roller Shades
 STEP BY STEP INSTALLATION INSTRUCTIONS Solar & Roller Shades 1 2 3 4 5 Motivia Motorization Table of Contents Step 1 - Getting Started....3 Everything You Need A Smooth Set-Up We want you to love your
Standard Roller Shades
 Standard Roller Shades Dual Link System Multi Link System Double Bracket System Installation & Operating Instructions New pictures TC01-06.2011 TABLE OF CONTENTS Getting Started: Mounting Types...1 Installation
Somfy powers silence. for ALL interior applications
 Ultra QUIET & ULTRA POWERFUL MOTORIZATION for interior shades Somfy powers silence for ALL interior applications Somfy designed for Silence Silence brings well-being and comfort which Somfy understands.
CordLift WireFree CL32 RTS. Tilt WireFree RTS. Roll Up WireFree RTS. HOME MOTION by
 WireFree Databook CordLift WireFree CL RTS Tilt WireFree RTS Roll Up WireFree RTS HOME MOTION by Somfy is the leading global manufacturer of strong, intelligent, quiet motors and electronic controls for
Solar & Roller Shades
 STEP BY STEP INSTALLATION INSTRUCTIONS Solar & Roller Shades Motivia Motorization Remote Control Everything You Need Table of Contents Step 1 - Getting Started....3 Overview - Motorization with No Headrail...4
Roller Shades MOTORIZED SHADE. Simplicity. Installation & Care Instructions
 Roller Shades MOTORIZED SHADE Simplicity Installation & Care Instructions 152140 J 1/13/2016 GETTING STARTED A few simple tools are required: - Measuring tape - Power drill, drill bits - 1 4 Hex head and/or
Roller Shades CORD LOOP. Head Rail, Fascia and No Head Rail. Installation & Care Instructions
 Roller Shades CORD LOOP Head Rail, Fascia and No Head Rail Installation & Care Instructions 152038 H 5/30/2017 GETTING STARTED A few simple tools are required: - Measuring tape - Power drill, drill bits
Radio Technology Somfy
 Radio Technology Somfy Revolutionizing Home Comfort Control What is Radio Technology Somfy (RTS)? Radio Technology Somfy (RTS) is Somfy s exclusive control platform which enables users to adjust motorized
Solar & Roller Shades
 STEP BY STEP INSTALLATION INSTRUCTIONS Solar & Roller Shades 1 2 3 4 5 Motivia Motorization Table of Contents Step 1 - Getting Started....3 Everything You Need A Smooth Set-Up We want you to love your
Radio Technology Somfy. Revolutionizing Home Comfort Control
 Radio Technology Somfy Revolutionizing Home Comfort Control What is Radio Technology Somfy (RTS)? Radio Technology Somfy (RTS) is Somfy s exclusive control platform which enables users to adjust motorized
Solar Roller & Classic Roller Shades
 STEP BY STEP INSTALLATION INSTRUCTIONS Solar Roller & Classic Roller Shades 1 2 3 4 5 Motivia Motorization Table of Contents Step 1 - Getting Started....3 Everything You Need A Smooth Set-Up We want you
STEP BY STEP INSTALLATION INSTRUCTIONS. Sheer Shadings. Motivia Motorization Remote Control
 STEP BY STEP INSTALLATION INSTRUCTIONS Sheer Shadings 1 2 3 4 5 Motivia Motorization Remote Control Everything You Need A Smooth Set-Up We want you to love your new window coverings and that includes having
Roller Shades MOTORIZED SHADE. Simplicity. Installation & Care Instructions
 Roller Shades MOTORIZED SHADE Simplicity Installation & Care Instructions 152140 I 8/12/2015 GETTING STARTED A few simple tools are required: - Measuring tape - Power drill, drill bits - 1 4 Hex head and/or
Horizontal Shadings. Continuous Cord Loop Beaded Chain Loop Cordless Lift. Installation & Operating Instructions
 Horizontal Shadings Continuous Cord Loop Beaded Chain Loop Cordless Lift Installation & Operating Instructions TABLE OF CONTENTS Getting Started: Mounting Types...3 Installation Components...3 Tools and
Retail Pricelist. roller & solar shades - woven wood shades roman shades - cellular shades - 2 & 2 1/2 horizontal blinds MOTORIZATION
 Retail Pricelist roller & solar shades - woven wood shades roman shades - cellular shades - 2 & 2 1/2 horizontal blinds MOTORIZATION ASSEMBLED IN THE UNITED STATES April 10, 2016 phone number 800-888-6680
Fabric Studio Custom Roll Shades Installation Instructions
 Fabric Studio Custom Roll Shades Installation Instructions Cassette System Battery Motor Lifting System Inside or Outside Mount Thank you for purchasing your new roll shade. It has been custom-made from
DUETTE POWERRISE SHADES
 DUETTE POWERRISE SHADES A B OPEN CLOSE INSTALLATION OPERATION CARE PRODUCT VIEW Spacer Blocks Installation Brackets End Cap Sensor Eye and Manual Button Fabric-Covered Valance PowerRise with Platinum Technology
Installation and Care Instructions
 WARDS WARDS REPLACE BATTERIES, REPLACE BATTERIES, WARDS WARDS REPLACE BATTERIES, REPLACE BATTERIES, THANK YOU for purchasing a Hunter Douglas Brilliance PowerRise shade. Your new shade has been custom
WireFree. Battery Powered Motorisation For Interior Window Coverings
 WireFree Battery Powered Motorisation For Interior Window Coverings The WireFree Range Battery powered interior blinds solutions Bring your solutions to life, with WireFree blinds motorisation Add an extra
Sonesse Series. Databook
 Sonesse 40 400 Series Databook Why Somfy? Somfy is the leading global manufacturer of strong, quiet, motors with electronic and app controls for interior and exterior window coverings. Over 270 million
WireFree. Databook. Roll Up WireFree R28 RTS. Tilt 50 WireFree RTS. CordLift WireFree CL32 RTS
 WireFree Databook Roll Up WireFree R28 RTS Tilt 50 WireFree RTS CordLift WireFree CL32 RTS Why Somfy? Somfy is the leading global manufacturer of strong, quiet, motors with electronic and app controls
RADIO TECHNOLOGY SOMFY THE RANGE OF CONTROLS. Revolutionizing home. comfort. AVOUTLET.com.
 RADIO TECHNOLOGY SOMFY THE RANGE OF CONTROLS Revolutionizing home comfort What is Radio Technology Radio Technology Somfy (RTS) is Somfy s exclusive control platform which enables users to adjust motorized
Sonesse 30 WireFree RTS. Instructions
 Sonesse 30 WireFree RTS EN Instructions EN. PRIOR INFORMATION ORIGINAL INSTRUCTIONS Sonesse 30 WireFree RTS These instructions apply to all Sonesse 30 WireFree RTS drive, the different versions of which
Cord Lift WireFree RTS. Tilt WireFree RTS. Roll Up WireFree RTS. HOME MOTION by
 WireFree Databook Cord Lift WireFree RTS Tilt WireFree RTS Roll Up WireFree RTS HOME MOTION by Somfy Systems, Inc., is a global leader in the manufacturing of strong, intelligent and quiet motors for
Eazipole Cordless. Installation & Set Up Instructions. Electric Blinds & Curtains
 Eazipole Cordless Installation & Set Up Instructions Electric Blinds & Curtains Pole Installation - Deciding The Best Position Points to consider when planning the installation of your pole It may be easiest
9-I DUETTE SHADES POWERVIEW MOTORISATION
 SECTION: 9-I DUETTE SHADES POWERVIEW MOTORISATION 9-I DUETTE SHADES POWERVIEW MOTORISATION Product View Installation Brackets End Cap Manual Control Button Fabric-Covered Headrail Bottom Rail Battery Wand
Owner s Guide. Duette And Applause Cordlock Shades. Standard Shades
 Owner s Guide Duette And Applause Cordlock Shades Standard Shades CONTENTS Introduction...2 Get Started...3 Product View...4 Mount The Installation Brackets...5 Install The Shade...9 Install The Hold-Down
Clutch Operated Roller Shade with Fascia Installation Instructions
 Clutch Operated Roller Shade with Fascia Installation Instructions Tools Required for Installation: Power Drill & Drill Bits Installation Screws Level Pliers Measuring Tape Step #1 Bracket Installation
Clutch Operated FlexShade NEXD Window shade with heavy duty clutch and 3 hardware profile. Cassette option.
 INSTRUCTIONS INSTALLATION & OPERATION Overview - FlexShade Components Idler 1¼ Roller with Spline Atachment Clutch TOOLS REQUIRED Clutch PENCIL POWER DRILL Idler 1 Eliptical Hem Bar TAPE MEASURE LEVEL
Honeycomb Luxe Linen Shades
 Step by Step Installation Instructions Honeycomb Luxe Linen Shades Customer Service 800.248.8888 or visit us online at smithandnoble.com Our window fashions represent a design breakthrough in style, efficiency
ROLLER SHADES. Operating Systems Brochure. Barberton, OH P: / F:
 Operating Systems Brochure Barberton, OH 44203 P: 330.983.0220 / F: 330.294.4121 OPERATING SYSTEMS STANDARD MANUAL SHADE A cord loop opens and closes the shade smoothly and evenly. A special clutch system
Auto-Lift Operating System
 Installation Instructions Parasol Cellular Shades Auto-Lift Operating System CONTENTS Getting Started: Product View... 1 Tools and Fasteners Needed... 2 Installation: Installation Overview... 3 STEP 1
EASYSHADE OWNER S MANUAL & INSTALLATION INSTRUCTIONS. Do Not Discard, Retain for Future Reference. Motorized EasyShade WARNING:
 EASYSHADE OWNER S MANUAL & INSTALLATION INSTRUCTIONS Do Not Discard, Retain for Future Reference Motorized EasyShade WARNING: FAILURE TO FOLLOW THESE INSTRUCTIONS COULD RESULT IN PERSONAL INJURY! For Technical
Trackstar Motorized Folding Shade Installation Instructions
 Trackstar Motorized Folding Shade Installation Instructions Thank you for purchasing your new Trackstar folding shade. It has been custom-made from the highest quality materials to the dimensions you specified.
Battery-Powered Motorized System
 Installation, Operation and Care Instructions Battery-Powered Motorized System CONTENTS Getting Started: Product View... 1 Tools and Fasteners Needed... 2 Installation: Installation Overview... 3 STEP
Shangri-La SoftTones Sheer Shadings
 Comfortex Sheer Solutions featuring Shangri-La Sheer Horizontal Window Shadings, Shangri-La SoftTones Sheer Shadings and Ballet Performance Drapery Sheers Price List and Reference Guide Effective June
Glydea TM. Motor Range
 GlydeaTM Databook Glydea TM Motor Range This document presents the technical information and related accessories for Somfy s Glydea motor range designed specifically for draperies. It provides detailed
Installation Instructions Roller Shades. 451 N. Cota St, Corona, CA
 Installation Instructions Roller Shades 451 N. Cota St, Corona, CA 92880 800-281-3013 Installing Your New Roller Shades Please take a moment to review the contents of your parts package. Your parts package
Do not dispose of packaging until the shades are operating to your satisfaction.
 for purchasing from smith+noble. Your new shade has been custom-crafted to your exact window dimensions from the highest quality materials. Once in your windows, they will provide you with a lifetime of
INSTALLING YOUR MOTORIZED ROLLER/SOLAR SHADE
 ROLLER/SOLAR SHADE PARTS INCLUDED: 4x Screws (per shade) 2x Mounting Brackets (per shade) 1x Plug-In Charger w/extension Cable* 1x Motor Cap Cover Remote Control(s) *Battery Motor Only TOOLS YOU WILL NEED:
Honeycomb Shades Skylight
 STEP BY STEP INSTALLATION INSTRUCTIONS Honeycomb Shades Skylight 1 2 3 4 5 Motivia Motorization Everything You Need A Smooth Set-Up We want you to love your new window coverings and that includes having
Sivoia QS Wireless Drapery Lite System
 Sivoia QS Wireless Drapery Lite System English Installation Guide Please Read Before Installing Important Notes - Please Read Before Installing A. Lutron systems are intended for use with only Lutron hardware
Serena Remote Controlled Shades
 Prepare to Install Important Notes Please Read Before Installing! WARNING: SHOCK HAZARD. Can cause serious injury or death. Read and follow all instructions.! CAUTION: RISK OF FALLING OBJECTS. Securely
DOOR LIMITS A) ENGAGE CHAIN/BELT CONNECTOR TO CARRIAGE CAUTION B) CLOSE TRAVEL LIMIT
 ENGAGE CHAIN/BELT CONNECTOR TO CARRIAGE CAUTION B) CLOSE TRAVEL LIMIT") 20 6 DOOR LIMITS Severe injury or death can result if the door closing force is set too high. Never increase the door closing force above the minimum required to move the door. Never adjust force to compensate
20 6 DOOR LIMITS Severe injury or death can result if the door closing force is set too high. Never increase the door closing force above the minimum required to move the door. Never adjust force to compensate
SWFcontract SOLAR SHADE SYSTEMS COMPONENTS AND ACCESSORIES LIST
 SWFcontract SYSTEMS COMPONENTS AND ACCESSORIES LIST SWFcontract TM TRUEPERFORMANCE TM Brackets & Accessories...3 Fascia...4 Idle Ends...5 R SERIES Brackets & Accessories...5 Fascia...7 Idle Ends...8 MOTORIZED
L-SERIES CLUTCHES L-SERIES CLUTCHES. Getting Started INSTALLATION INSTRUCTIONS INSTALLATION INSTRUCTIONS
 L-SERIES CLUTCHES INSTALLATION INSTRUCTIONS Thank you for purchasing your new L-Series Clutches. They have been custom-made from the highest quality materials. to the dimensions you specified. With the
STEP BY STEP INSTALLATION INSTRUCTIONS. Pleated Shades. Standard Control, Top Down/Bottom Up & Standard 2-on-1
 STEP BY STEP INSTALLATION INSTRUCTIONS Pleated Shades Standard Control, Top Down/Bottom Up & Standard 2-on-1 Everything You Need A Smooth Set-Up We want you to love your new window coverings and that includes
Motivia Motorization
 STEP BY STEP INSTALLATION INSTRUCTIONS Luxe Linen Honeycomb Shades Skylight 1 2 3 4 5 Motivia Motorization Everything You Need Table of Contents Step 1 - Getting Started....3 Overview - Motorized Honeycomb
STEP BY STEP INSTALLATION INSTRUCTIONS. Honeycomb Shades. Motivia Motorization
 STEP BY STEP INSTALLATION INSTRUCTIONS Honeycomb Shades 1 2 3 4 5 Motivia Motorization Table of Contents Everything You Need A Smooth Set-Up We want you to love your new window coverings and that includes
LEVOLOR. Sheer Shadings. Persianas traslúcidas Stores diaphanes INSTALLATION OPERATION CARE
 LEVOLOR Sheer Shadings Persianas traslúcidas Stores diaphanes INSTALLATION OPERATION CARE INSTALACIÓN FUNCIONAMIENTO CUIDADO INSTALLATION FONCTIONNEMENT ENTRETIEN all 1 2 3 open close Battery Powered Motorized
Glydea Range AC Plug-in. High Performance Motorization Solutions for Draperies
 Glydea Range AC Plug-in High Performance Motorization Solutions for Draperies GLYDEA EXPANDS YOUR OPPORTUNITIES Today, drapery motorization is becoming the standard for hotel rooms, meeting venues, conference
INSTALLATION INSTRUCTIONS TOOLS YOU WILL NEED TABLE OF CONTENTS
 INSTALLATION INSTRUCTIONS HONEYCOMB SHADES CORDLESS LIFT SYSTEM CONTINUOUS CORD LOOP SYSTEM REMOTELIFT 2.0 SYSTEM Thank you for your purchase. This shade has been custom built for you from the highest
Duette & Applause EasyRise Honeycomb Shades Field Repair Manual
 Duette & Applause EasyRise Honeycomb Shades Field Repair Manual Replace the Cord Loop Replace the Clutch Replace the Spool Assemblies (For EasyRise Lifting Systems prior to May 2009) Page 1 Table of Contents
GENUINE PARTS INSTALLATION INSTRUCTIONS
 GENUINE PARTS INSTALLATION INSTRUCTIONS 1. 2. 3. 4. DESCRIPTION: Security Light Kit APPLICATION: Altima Sedan (2013+) PART NUMBER: 999F4 AX010 - Universal Security Lighting Kit. KIT CONTENTS: Item QTY
Installation Instructions
 Roller & Roman Shades Lifting Systems Cassette and Sure-Lift EZ Lift Cordless EZ Pull Standard and Cassette R-Series Clutch SL-Series Clutch Spring Roller Fascias and Valances 3, 4 Flat and 4 Curved Fascia
INSTALLATION INSTRUCTIONS TOOLS YOU WILL NEED GETTING STARTED
 INSTALLATION INSTRUCTIONS HONEYCOMB SHADES STANDARD RECTANGULAR CORDLESS LIFT & LOCK Thank you for your purchase. This shade has been custom built for you from the highest quality materials. To avoid errors
SILHOUETTE POWERVIEW MOTORISATION
 SILHOUETTE POWERVIEW MOTORISATION Product View Installation Brackets Battery Wand Power Cable Limit Stop Battery Wand Clips Manual Control Button Magnetic Hold-Down Brackets (Optional) Weight Clip Bottom
7C MERGER M40/50RF SYSTEM INSTALLERS GUIDE
 7C MERGER M40/50RF SYSTEM INSTALLERS GUIDE Contents Glossary... 3 M40/50RF Motor... 3 SUITE Remote... 3 Battery Installation... 3 Introduction... 4 1) Install the Shade... 4 2) Create the Hub Motor...
Glydea TM. Motor Range
 GlydeaTM Databook Glydea TM Motor Range This document presents the technical information and related accessories for Somfy s Glydea motor range designed specifically for draperies. It provides detailed
WARNING. Installation Panel cord operated. rtube.nl/red403 PTC17C2/PTC17C3/ PTC17C4/PTC17C5/ PTC17C6 INSTALLATIONMANUAL
 Installation Panel cord operated Read the instructions carefully before assembling and using the product. Assembling process can be completed by non-professionals. For indoor use only. WARNING Young children
2011 Cadillac CTS Coupe EGX Exhaust Tip & Rear Valance Mesh Accent Kit Part #: Complete E
 BILLET GRILLS IMPORTANT: PLEASE KEEP THIS INSTRUCTION MANUAL FOR FUTURE REFERENCE! 2011 Cadillac CTS Coupe EGX Exhaust Tip & Rear Valance Mesh Accent Kit Part #: Complete 5122-1900-11E TOOLS REQUIRED Automotive
GENUINE PARTS INSTALLATION INSTRUCTIONS
 GENUINE PARTS INSTALLATION INSTRUCTIONS DESCRIPTION: APPLICATION: PART NUMBER: Electronic Tailgate Lock Kit Nissan Titan 999M2-W3005 KIT CONTENTS: Item Qty. Part Description Service Part Number A 1 Electronic
JEEVES. JEEVES Installation Manual. Installation Manual The Easiest Do-It-Yourself Dumbwaiter on the Market
 1 888-323-8755 www.nwlifts.com JEEVES Installation Manual The Easiest Do-It-Yourself Dumbwaiter on the Market This manual will cover the installation procedure step-by-step. The installation of this dumbwaiter
HONEYCOMB & PLEATED SHADES
 INSTALLATION INSTRUCTIONS HONEYCOMB & PLEATED SHADES CONTINUOUS CORD LOOP Thank you for your purchase. This shade has been custom built for you from the highest quality materials. To avoid errors and save
Automatic Roof Hatch Opener
 Automatic Roof Hatch Opener Installation Guide REQUIRED TOOLS (These tools are required to complete the installation) Cordless Drill 1/8 1/4 Drill Bits 1/8 Pin Punch #2 Philips Bit Rachet Sharpie Hammer
INSTALLATION INSTRUCTIONS TOOLS YOU WILL NEED GETTING STARTED
 INSTALLATION INSTRUCTIONS HONEYCOMB SHADES STANDARD RECTANGULAR Thank you for your purchase. This shade has been custom built for you from the highest quality materials. To avoid errors and save valuable
Thunder Power Tarp Kit Operation
 Thunder Power Tarp Kit Operation Dual Arm Curb Side Stowing Single Arm Curb Side Stowing 011-52476 Rev. H P a g e 2 In this booklet you will find: OPERATING INSTRUCTIONS... 3 Powering up or down the system...
Eazidraw Cordless. Installation & Set Up Instructions. Electric Blinds & Curtains
 Eazidraw Cordless Installation & Set Up Instructions Electric Blinds & Curtains Features Quiet, DC battery motor with low power consumption. Rechargeable battery with up to 500 uses between charges Fully
INSTALLATION GUIDES OUTDOOR LIVING
 S OUTDOOR LIVING TABLE OF CONTENTS 12 Volt 12 Watt DC Transformer Page 2 12 Volt 50 Watt DC Smart Transformer Page 3 12 Volt 50 Watt Smart Transformer Control Page 4-5 Waterproof Dimmer For 12W Transformer
smithandnoble.com
 The most affordable & user-friendly motorized blinds, shades & motorized hardware available. smithandnoble.com 800.248.8888 SOLUTIONS Motivia Motorization is the perfect solution for wide or tall windows,
GENUINE PARTS INSTALLATION INSTRUCTIONS
 GENUINE PARTS INSTALLATION INSTRUCTIONS 1. 2. 3. 4. DESCRIPTION: Accent light Kit APPLICATION: Infiniti JX (2013) PART NUMBER: 999F3 YY000 - Universal Accent Lighting Kit. KIT CONTENTS: Item QTY Description
GARAGE DOOR OPENER OWNER S MANUAL S3/S4
 GARAGE DOOR OPENER OWNER S MANUAL S3/S4 Features! Locking door during power failure: If power failure occurs while the door is operating, the door can be released by pulling the clutch down, allowing
The Valencia Roller Shade
 featuring 16 patterns with 103 sku s from which to choose. A mixture of Light Filtering and Room Darkening fabrics displays Elite Window Fashion s commitment to new and trendy design in the roller shade
UNDERSTANDING Window Covering Motorization
 UNDERSTANDING Window Covering Motorization Technology for residential applications is constantly progressing. Movements that seem natural to us, such as closing a blind manually by hand, are today considered
Installation Guide Section1
 Certification Test Report 908.42 MHz Low Power Communication Device Transceiver 372 MHz Discrete Receiver FCC ID: KJ8-0001715 IC: 3540A-0001715 FCC Rule Part: 15.249 IC Radio Standards Specification: RSS-210
Installation Instructions
 Roller & Roman Shades Lifting Systems Cassette EZ Lift Cordless EZ Pull Standard and Cassette R-Series Clutch SL-Series Clutch Spring Roller Fascias and Valances 3, 4 Flat and 4 Curved Fascia 5 Fascia
One- Touch Installation Instructions
 One- Touch Installation Instructions 1 1 Height Adjustable Pivot w/ screws 9 Upper Work Surface 2 Rail Mount Knobs 10 Back Cover 3 Transformer 11 Center Pivot w/ screws 4 Support Legs 12 Left Monitor Arm
The Radiance Roller Shade Collection
 The Radiance Roller Shade Collection Beautiful, durable and available in an assortment of colors and patterns, Elite s Radiance Roller Shade Collection offers a host of attractive features: u Plain bottom
Thunder Power Tarp Kit Operation. Dual Arm Curb Side Stowing Single Arm Curb Side Stowing Flex Arm Curb Side Stowing.
 Thunder Power Tarp Kit Operation Dual Arm Curb Side Stowing Single Arm Curb Side Stowing Flex Arm Curb Side Stowing 011-52475 Rev - 2 P a g e USE THE PROCEDURES BELOW TO OPERATE THE TARP SYSTEM Powering