Big Block Installation Instructions
|
|
|
- Alexander Farmer
- 6 years ago
- Views:
Transcription


1 Vegas Carts & Performance 2995 Coleman St North Las Vegas, NV VegasCarts.com Big Block Installation Instructions EXGO TXT / MEDALIST / CUSHMAN / WORKHORSE / ST-Series For use with: -Honda GX390 & Clone Single Cylinder Engines -VRX 460cc Engine Revised 10/19/2017 1
2 Frequently Asked Questions: 1. How much oil does my engine take? Approximately 1 Quart of generic 10W-30, avoid overfilling. Overfilling will cause your engine to smoke Will I benefit from Synthetic Oil? Yes and No. The main advantage of Synthetic oil is that it does NOT break down as fast as conventional. However, Our engines do not have oil filters and so any particles in the oil will stay suspended in it instead of being caught by a filter. For this reason, we recommend changing the oil religiously with conventional oil, instead of spending more for Synthetic and letting it sit in the engine longer. 2. What should I set my belt tension to? Set your drive belt so that there is no slack in it. Do not tension it beyond this point or you may side-load the engine. Starter belts should be tensioned slightly. Loose drive belts will cause dramatic losses in top speed! 3. When does my warranty expire? Your full warranty expires 90 Days from the date of delivery. Full Warranty means that we will repair or replace the engine and assume responsibility for shipping both ways. In most cases, its fastest to send out replacement parts if you are confident in doing the repair yourself. 4. My engine is popping/backfiring on deceleration, what do I do? This is caused by a lean condition (not enough fuel) on your idle circuit. Our engines comes with adjustable idle mixture screws on the carburetor. The screw is covered by a small black plastic square on the side of the carburetor, next to the valve cover. Turn the screw Counter-Clockwise until the popping goes away. You can also use this screw to make it easier to start the engine in the winter months. 2
3 5. How can I set up my choke? Our engines SHOULD not need a choke if used with the factory starter/generator and pedal start. The carburetors on our engine are adjustable and should be richened up to provide adequate fuel during startup to eliminate the need for a choke. Read FAQ #4 above for more details. 6. Do I need to install a return fuel line on my carburetor? Only if you have fuel overflowing out of the carburetor. Due to the variances in fuel pumps, some pumps may produce too much pressure and cause fuel to blow past the needle & seat and overflow the bowl. This is the only circumstance which requires a fuel return. Putting a fuel return on an engine that is not overflowing will end up starving the engine of fuel, causing a lean condition. In some cases, an adjustable check valve on the pulse line accomplishes the same task and is much simpler. 7. My engine runs for a small period of time and then losses power, how do I fix it? This is a classic case of running the carburetors bowl dry, you should look at the fuel pump and the pulse lines going to it. Make sure there are no vacuum leaks between the connections on the pulse isolator and the fuel pump. Many times, the vacuum line doesn't fit tight enough to the pulse fitting on the engine and this will cause a vacuum leak and erratic operation of your fuel pump. Likewise, if you have an old/weak fuel pump, it may also cause this issue. In rare cases, we have seen the pulse fitting clog with debris and limit vacuum. An easy check is to run a very small drill bit down through the pulse fitting to make sure its clear. 8. My engine starts when I press the gas pedal, but I cant get the engine to turn off on its own! Simply back out the idle screw on the carburetor, there is a picture reference towards the end of this instruction guide. If you've backed the idle out and the engine is still idling/dieseling, it means that you have a vacuum leak somewhere between the carburetor and cylinder head (9 times out of 10 its your pulse fitting). Check the pulse line from the engine to the fuel pump and ensure it is tight and leak free. A loose vacuum line will draw in un-metered air. This can be tested by spraying "brake-cleaner" or a similar flammable aerosol around the direct pulse fitting area. If the engine rpm rises immediately after spraying, you have a vacuum leak and the aerosol is being sucked into the engine. 9. My cart is not reaching the top speeds that it should! Top speeds vary greatly with altitude, terrain, tire diameter, clutching, gearing, belt tension, and carburetor tuning. A cart with factory 18" tires should be realizing top speeds of 27-29mph on EZGO TXTs & Workhorses. Oversize tires (22"+) will usually add 5-6mph to those numbers. 3
4 Always make sure your tires are fully inflated and the brakes are NOT dragging! To start, Make sure you have bypassed your factory axle governor and your throttle linkage goes directly from your throttle box to the back of your engine. If this has been done, check to see if your carburetor is opening completely when the gas pedal is at max travel. Next, check to make sure your belt is tight. You want to remove the slack from the belt, but not put tension on it. A loose belt will cause significant speed loss, but an increase in torque. Lastly, verify that your choke is NOT enabled. It may seem simple, but it happens to the best of us. If you still aren't reaching the proper speeds, you probably have a fueling/engine tuning issue. The fastest way to troubleshoot this is with a Tachometer. We sell tachometers specifically designed for these engines on our website for $ My starter/gen wont turn over my engine OR my starter/gen will not charge my battery! This is usually caused by lack of a proper ground path, make sure that you have a good ground from the battery to the frame and starter/gen. Sometimes the factory grounding cable is worn or in bad shape, its best to replace or re-make it if you are having intermittent starting or charging issues. 4
 drive clutch, you should remove and replace with the factory spring")
5 It is highly recommended to take pictures of your engine bay prior to removing the OEM engine and its components. This will save time if you ever need to revert back to the stock setup. If you currently have a Torque Spring or any spring with extra tension above the OEM specs, installed in your rear (Secondary) drive clutch, you should remove and replace with the factory spring before installing this kit. The extra tension will delay shift out and limit the top speed of your cart. In some cases, it can be as much as 10mph Please read through the entire instructions prior to starting on your installation. There are many ways to install our kit, depending on the current state of your cart, you may be able to skip some steps or move some around. NEVER START YOUR ENGINE WITHOUT THE DRIVE BELT INSTALLED! The outer clutch sheave will slam into the inner sheave and damage your clutch. If you want to test your engine or run it without a belt, you must first remove the primary drive clutch. Tools Required: (2) 14mm or 9/16 Wrenches (Open-End or Closed) or Socket & Ratchet Drill with various drill bits including 3/8 Saw capable of cutting steel (Sawzall, Die Grinder, hacksaw, etc) 10mm wrench or Socket & Ratchet High Temp Loctite or nickel equivalent Ft-Lb Torque Wrench 5
6 Installing an engine OTHER than a VRX460? If you purchased our installation kit and plan on using an engine from another manufacturer, here are a few things you need to be aware of: 1. There are over 50 different Chinese engine manufacturers who sell 390cc or 420cc clone engines. Likewise, many of these manufacturers make changes to their engines from time to time. Therefore, we cannot guarantee 100% fitment compatibility with an engine other than our own. We do our absolute best to make sure our kits are as universal as possible, however, due to many factors out of our control, this is not always possible. We have successfully tested the Harbor Freight 420cc Predators. 2. In order for your clone engine to work properly in your cart, you will need to remove the fuel tank, airbox(in most cases), muffler and the electric starter with its associated wiring/control box (in most cases). We can provide blockoff plates to block off the open hole from where the starter used to be, at your request. 3. By attaching the throttle directly to your governor arm, you are circumventing the engine speed governor. Without proper modification, you can over-rev your engine and cause major damage(which likely isnt covered under warranty). Make sure you've installed 35lb valve springs before running your engine over 4200rpm. 6
7 Your Kit Includes: EZ-GO Cradle and Front Drop Mount Bracket 3Pc Adjustable Engine Mount w/rubber Isolators Low Profile Airbox Starter Generator Bracket w/ Tensioner Arm 1-3/16 Drive belt Exhaust Header W/ Clamp Muffler Throttle Linkage and Clamp Packet (May be installed on your engine) Shift Cable Relocation Bracket Set (2001+ Only) 780R Clutch 1-3/16 w/bolt & Washers Billet V-Pulley & Machined Key 7

8 1. Remove the original engine, all original bracketry and hardware from the axle, leaving brake and shifter cables attached. In some cases, removing shifter cables will make the installation easier...but keep them attached for now! All electrical lines going to the original engines ignition coil can be bundled together and tucked away. Its most convenient to keep the starter/generator wires attached so there is no chance of a wire mix up during re-connection. Make sure to save the U-Bolts from the rear axle as they will be reused during your installation. This instruction guide assumes that your engine bay looks something like this : 8
 usually use the bottom 2 holes.")
9 2. Install the "Front Cradle Drop Mount" on the frame using your factory hardware and in the factory location. This mount has 5 adjustment holes in it and will allow you to adjust the angle of your engine cradle. You want your engine to sit relatively level. Lifted Carts (4-6") usually use the bottom 2 holes. Non-lifted Carts usually use the top 2 holes. For carts with a lift larger than 6", you may need a custom drop bracket to get your engine level. Please call Customer Service to have an extended front drop mount made for you. 9


10 3. In order to remove the 2 mounting nuts, you will need to pull up your rubber floor to access the throttle box. The red arrow shows the location of the bolt head for the factory front mounting bolts. 10

11 4. Using the factory hardware and U-Bolts, install the new engine cradle to the rear axle. Leave the U-bolts loose enough to adjust the cradle. 11

12 5. You will need to connect the cradle to the front drop mount using the provided Heim Joint, 1/2" flange bolt, aluminum spacers, and lock nuts. Attach the heim joint to the mount at the hole position that keeps the cradle the most level. It is VERY important to get your engine cradle relatively level. An engine that sits at a very steep angle will not get proper lubrication! In some cases (usually with lifted carts), the axle will have been rotated upwards and you will not be able to line the heim joint up with the mounting holes. The simple solution to this problem is to loosen the leaf spring U-bolts on the rear suspension, align the cradle to the front drop mount, and then re-tighten the leaf spring bolts. 12


13 6. The "Anti-Wrap Bracket" keeps the cradle from moving upwards during acceleration. It is bolted to the cradle with a carriage bolt and has 4 mounting holes in it. 2 of the 4 holes will be used to attach to the rear axle using the factory axle bolts. Holes A are used on all EZ-GOs up to 1999, Holes B are used for EZGO Workhorse and the ST-Series of utility carts from There is a small factory aluminum spacer that goes on the bottom bolt to keep the bracket aligned. 7. Once you have everything lined up to your satisfaction, tighten all of the hardware. 13

14 8. Once the cradle frame is installed, you will need to attach the engine mount to it. The engine mount is held on by (4) 3/8 x 1" carriage bolts. This allows you to adjust for side to side differences in clutches, engines, and belts without having to use 2 wrenches. Do not tighten these bolts at this time, just get them snug enough to where you can still move the engine mount into your desired position while installing the engine. The latest engine mount to be released (October 2016) is a 3 piece mount with (4) rubber vibration isolators. This "Anti-Vibration Mount" considerably dampens most of the vibration that is unique to single cylinder engines. Additionally, the belt tension can be easily adjusted by loosening the outward facing nylon locking nuts and moving the center section of the mount forward or back. In previous versions, you would have to completely loosen the engine and physically slide it back and forth to adjust belt tension. The mount is reversible so if the engine does not line up and the slots in the L brackets are maxed out, you can flip the mount around 180 degrees to get additional side to side adjustment. 14
 in between the")

15 9. Be sure to route the brake and shifter cables(2001 and Older) in between the cradle and the engine mount so that it doesn't drag or get caught on anything while driving. 15


16 (FOR CARTS WITH SINGLE CABLE SHIFTERS ONLY:) If you have a 2001 or newer EZ-GO, you likely have a single shifter cable setup that comes from the top instead of the dual cables that run under the cradle. In order for this cable to clear the cylinder head of the new engine, youll need to relocate the factory brackets and re-adjust the shift cable. The procedure is very straight-forward. Simply remove the old brackets and replace them with the new brackets included with your kit using your existing hardware. Our brackets are nearly 2x thicker than the factory ones and customers notice a more rigid feel to their shifter as it no longer flexes. 16

17 10. The governor linkage that protrudes above the transaxle will need to be removed in order for the engine to travel far enough back towards the axle that the belt will fit. In most cases you will need to cut off the linkage arm coming out of the transaxle. In this photo you can see what the end result should look like. A die grinder is the best tool for this job. A good starting point is to begin your cut 1/4" up from the aluminum casting. You may have to cut lower if your engine hits the stub on acceleration. 17

18 11. Install the provided airbox to the carburetor by unlocking the outer cover, removing the foam pads and using the nuts to fasten the airbox to the studs coming out from the carburetor. You may remove the plastic material on the inside of the airbox that is blocking the airflow to the carb for a slight performance increase. Its easiest to do this with a dremel tool or sharp knife. 18
 If you are using your OEM clutch instead of our 780R, you should have a Tapered Shaft Adapter.")
19 12. Install the Starter/Generator Tensioner bracket directly to your engine using the M10 Hex bolt provided, in the bolt hole pictured below. (High Temp Loc-Tite Recommended) If you are using your OEM clutch instead of our 780R, you should have a Tapered Shaft Adapter. This adapter slides over the 1" output shaft on your 460cc or GX390/Clone engine. You will need to align the clutch in the proper position so the starter belt is straight. In many cases, you will have to trim the excess crankshaft length along with drilling & tapping the bolt hole to fit the larger size of your factory clutch bolt... Please refer to our Taper Adapter Instructions for more details! 19

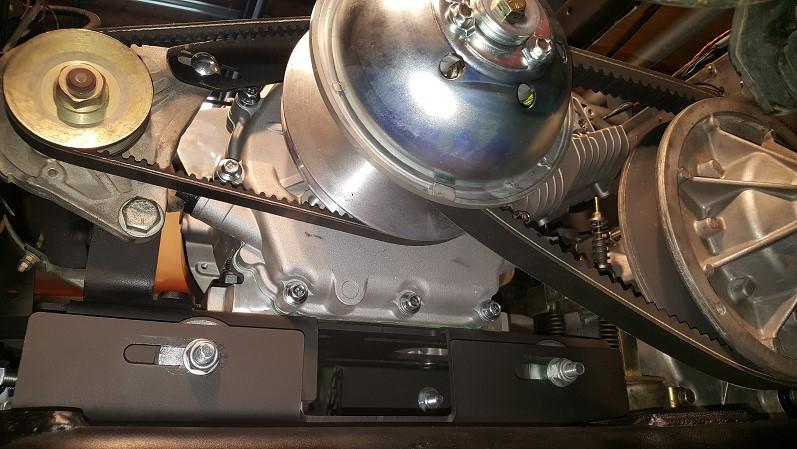
20 13. Slide the V-Pulley onto your engines Output Shaft with the side engraved "VEGASCARTS.COM" facing the engine and the Non-Engraved side away from the engine. If the V-Pulley is installed backwards, your Starter/Gen pulley will not line up and your belt will be offset. Once your V-Pulley is installed, tap the machined drive key into your crankshaft key slot and then into your V-Pulley using a hammer. The machined key has a radius profiled into it that matches the negative radius on the output shaft. There is only one way to install this key and it should be self-explanatory. Try not to hit the key too hard as it will deform and make installing the clutch much more difficult. Slide your clutch onto the output shaft after the V-Pulley and secure the clutch using the provided 2 large washers and the 3/8-24 grade 8 (GOLD) bolt. ( It is advised to use Anti-Seize lubricant on the crankshaft to make removal of the clutch easier.) 20

21 (Torque the 3/8-24 clutch bolt to 40 ft-lbs coat the threads with loctite) This is one of those situations where you can install the clutch in the cart after the engine is in it or install it on the bench. We prefer to install the Pulley and Clutch on the bench and drop the entire assembly into the cart. 21
 3/8 x 2\"carriage bolts with the engine, so now is a good time to place it. You will need to secure the assembly with the (4) 3/8 x 2\" carriage bolts provided.")
22 14. If you haven't already done so, It is now time to place the engine/clutch setup into your engine bay and on top of the engine mount with the cylinder head facing the rear axle. The Starter/Gen bracket shares (2) 3/8 x 2"carriage bolts with the engine, so now is a good time to place it. You will need to secure the assembly with the (4) 3/8 x 2" carriage bolts provided. Do not tighten more than snug at this time to allow for adjustment. There are (2) 3/8 x 1" carriage bolts that hold the Starter/Gen bracket directly to the engine mount, Install and snug those as well. 15. Install the Starter belt onto the V-Pulley and then install the Drive belt over the front clutch and wrap it around the rear clutch. 22

23 16. At this point, the centers of both clutches need to be lined up by moving the engine mount assembly side to side. If you cannot get the engine over far enough to get the belt straight, you may need to flip the engine mount around 180 degrees to get more adjustment. There is no scientific way to do this other than with your eyes and maybe a straight edge...if you have one. Once the drive belt is straight on both clutches, tighten all (4) carriage bolts from engine mount to cradle. This locks the engine from moving side to side. Adjust your belt tension by sliding the engine towards the front of the golf cart. You do not want any slack in the belt, likewise, you don t want to side-load the engine by over-tightening. This is now the time to double check your belt alignment and tighten the rear engine mounting bolts. Leave the front bolts loose for now. 23


24 17. In order to be able to use our Starter/Gen tensioner, you will need to remove the OEM arm coming off of the Starter/Gen: 24

25 18. Insert your factory Starter/Gen bolt into the provided bracket and through the Starter/Gen, thread on the nut finger tight. Loop the Starter Belt over the Starter/Gen and visually align your OEM Starter/Gen pulley with the installed V-Pulley. Make any adjustments to the alignment of the bracket at this time. Once you feel that the starter belt is straight and parallel, you can tighten the (4) 3/8 bolts sandwiching the S/G bracket, engine, and engine mount. On some occasions, the Starter/Gen will have to be shimmed outward to align it with the V-Pulley, this can be accomplished using washers in between the starter generator and Starter/Generator bracket. If the belt is not straight, it will flip upside and fail to start the engine. You may need to trim the engine dipstick in order for the Starter/Gen to come forward far enough to slide the belt onto its pulley. Check for clearance issues at the dipstick if the belt isn't long enough. 25

26 26

27 19. Upon successful installation of the starter belt, you must now install the 5/16 hardware for the tensioner. The tensioner has a slot in it to allow you to adjust your belt tension. Setting your belt tension can be a difficult job for one person, you must put as much pressure onto the starter/gen to get the belt tight and simultaneously tighten the 5/16 lock nut on the back of the tensioner. If the belt is too loose, it will slip when trying to start your engine. Put some muscle into it, but not enough to start breaking things! Once your belt is properly aligned and tensioned, it s time to tighten the large Starter/Gen bolt. Make sure to use your original nut with the lock washer! 27


28 20. The provided exhaust is mounted to the engine via (2) Allen head bolts with lock washers. It is also a good idea to use High-Temp Loc-tite on these bolts so they don t back out. Tighten them liberally, there is nothing more annoying than an exhaust leak. Make sure the exhaust gasket is installed before installing the header. 28

29 21. Install the 10mm retaining bolt for the support strap in the same method as the flange bolts, make sure to use High-Temp Loc-tite! Headers are intentionally made longer than necessary to allow for different exhaust setups, you will want to cut it down as they usually stick out too far. 29

30 22. Your kit came with a grey side-exit muffler, now is the time to attach it to the header with the provided muffler clamp. They can also be welded if you desire. Muffler Installation: 1. Walker mufflers are an economical solution to quieting your engine. 2. Care must be taken to support your muffler from the side opposite where it mounts to your header. If you do not support your muffler, it will break! 3. When supporting your walker, make sure it is braced or strapped to the same range of motion of your header and engine, failure to mount it to the same range of motion, will cause the header to flex when going over bumps and your header will crack or break apart. 4. If you are unsure of how to properly support your muffler, we recommend having a professional such as a muffler shop, install and brace it. 30
 (OPTIONAL SPACERS: If")

31 (In this example, we used a spring looped around a bolt on the rear axle to support the muffler from the exit side) (OPTIONAL SPACERS: If you have clearance issues with the exhaust header hitting the rear clutch or belt, insert these 1/2" spacers under the rear of the engine mount. ) 31

32 When setting up your fuel system, make sure the vent screen on the fuel pump is pointed upwards. (See RED ARROW) Green Arrow represents the hose to the fuel pump from the gas tank. Blue arrow represents the hose from the fuel pump to the carburetor. Yellow Arrow represents the hose from the fuel pump to the pulse fitting on the top of the engine in-between the carburetor and cylinder head. (NOTE: It is Important the all lines fit tightly to their respective fittings, a loose vacuum line from the pulse fitting on the engine can cause all sorts of fuel delivery issues.) 32

33 23. Some EZ-GO carts have a spring at end of their throttle cable, for those carts, run your throttle cable through the provided throttle linkage bracket and continue to the carburetor arm. Start by drilling a 1/8 hole approximately 1.5 from the end of the arm and hook the spring through the hole. You may have to drill multiple holes in the throttle arm to get your desired throttle opening. Make sure that the carburetor opens fully when you press the accelerator pedal down all the way. The closer the throttle cable is located to the shaft coming out of the engine, the faster the carburetor will open. Other EZ-GO carts have a threaded rod molded to the cable, if you have this style throttle cable, cut off the threaded rod so you are left with a bare cable. Drill the engines throttle arm and insert the provided cable clamp as shown below. The cable slides into the clamp and tightens down with the set screw shown. NOTE: The further away you drill your holes from the pivot point (governor shaft), the slower the throttle will open. 33
 Make sure you've disconnected all governor linkage going to and from the rear axle.")
34 24. Before initial startup, make sure your throttle linkage moves freely and is not binding to where the cart will drive off on its own. (We recommend jacking the rear of your cart up off the ground as a safety precaution!) Make sure you've disconnected all governor linkage going to and from the rear axle. You want to run the throttle cable that comes out of your throttle box directly to the new engine. Using the throttle linkage coming off of the rear transaxle will cause all sorts of drivability issues. Ensure that the throttle is opening fully when the gas pedal is depressed and the cable is not stretching or over-extended. 34

35 The Black plastic screw on the top of your carburetor controls your idle speed. If you want your engine to turn off when you remove your foot from the accelerator, you will need to back this screw out completely so it is not touching the throttle blade lever. The Plastic black square (YELLOW ARROW) can be removed and the screw underneath it controls your idle fuel/air mixture. Turn Clockwise for less fuel. Turn Counter-Clockwise for more fuel. You will need to adjust your carburetor based on your elevation. A popping noise on deceleration indicates a lean mixture (needs more fuel turn Counter-Clockwise) 35

36 MANUAL KILL SWITCH (optional): We highly recommend that you install a manual kill switch in the rare event that the throttle sticks and you are unable to stop the cart. A manual kill switch also acts as a theft deterrent and will prevent the engine from starting. Simply connect any ground source (frame bolt, bolt that touches the engine, etc) to one end of your switch and a wire from the other end of your switch to the black wire coming from the top of your engine. Once you connect a ground to the black wire, it will immediately kill the spark to the engine until the ground is removed. 36
 before making any adjustments.")
37 Your complete installation should look something like the picture below: You are now ready for initial startup and carburetor tuning. Make sure to warm the engine to full operating temperature (15+ mins of idle or light cruise) before making any adjustments. We advise watching for oil and air leaks while the engine is warming up. 37
Big Block Installation Instructions
 Vegas Carts & Performance 2995 Coleman St North Las Vegas, NV 89032 702-530-7753 VegasCarts.com Big Block Installation Instructions 1985-1996 Yamaha G2, G9 & G14 For use with: -Honda GX390 & Clone Single
1996+ Yamaha G16 / G20 / G21 / G22 & G29
 Vegas Carts & Performance 2995 Coleman St North Las Vegas, NV 89032 702-530-7753 VegasCarts.com Big Block Installation Instructions 1996+ Yamaha G16 / G20 / G21 / G22 & G29 For use with: -Honda GX390 &
Big Block Installation Instructions Club Car DS / Carryall Club Car DS / Carryall
 Vegas Carts & Performance 2995 Coleman St North Las Vegas, NV 89032 702-530-7753 VegasCarts.com Big Block Installation Instructions 1984-1996 Club Car DS / Carryall 1997+ Club Car DS / Carryall For use
1996+ Yamaha G16 / G22 Yamaha G29/YDRA Drive
 Vegas Carts & Performance 2995 Coleman St North Las Vegas, NV 89032 702-530-7753 VegasCarts.com 625cc Big Block Installation Instructions 1996+ Yamaha G16 / G22 Yamaha G29/YDRA Drive Revised 8/6/2018 1
625cc Big Block Installation Instructions Club Car DS / Carryall
 Vegas Carts & Performance 2995 Coleman St North Las Vegas, NV 89032 702-530-7753 VegasCarts.com 625cc Big Block Installation Instructions 1984-1996 Club Car DS / Carryall (DOES NOT FIT INGERSOLL RAND BOBCAT)
WEBER CARBURETOR TROUBLESHOOTING GUIDE
 This guide is to help pinpoint problems by diagnosing engine symptoms associated with specific vehicle operating conditions. The chart will guide you step by step to help correct these problems. For successful
WARNING: the engine does not come with oil in it. Please fill the oil before starting. The 200cc hardknock requires 9/10 of a quart of oil.
 WARNING: the engine does not come with oil in it. Please fill the oil before starting. The 200cc hardknock requires 9/10 of a quart of oil. Things needed for assembly. -2 tubes of blue loc-tite. I don
RHINO SUSPENSION SYSTEM INSTALLATION INSTRUCTIONS
 PARTS INCLUDED: 2 FRONT UPPER A-ARMS 2 FRONT LOWER A-ARMS 2 UNI-BALL JOINTS 2 UNI-BALL JOINT STUDS 2 UNI-BALL JOINT CAPS 2 RETAINING RINGS 1 FRONT SHOCK ASSEM. 2 DELRON STEERING STOPS 2 SHOCK MOUNT SPACERS
460cc Do-It-Yourself Assembly Guide
 2995 Coleman St North Las Vegas, NV 89032 702-530-7753 702-643-7517 FAX VegasCarts.com 460cc Do-It-Yourself Assembly Guide *DIY Engines do not come with a warranty, these kits are intended for experienced
OIL COOLER KIT INSTALLATION INSTRUCTIONS PART NUMBER D
 OIL COOLER KIT INSTALLATION INSTRUCTIONS PART NUMBER D570-0907 APPLICATION: 2011-12 E90 335i/xi (N55 engine) with BMW M-Technic bumper and without stock oil cooler Congratulations for being selective enough
Backwater Performance Systems Large Vanguard Mikuni Twin Carburetor Kit
 Backwater Performance Systems Large Vanguard Mikuni Twin Carburetor Kit 1. Throttle Cable Twin (CKC-41) 2. Carburetor VM30mm (CKC-40) 3. Loctite 242.5mL (A-210) 4. Air Cleaner Filter 6000 (EC-86) 5. Rev
HP10207 KIT. Ram WD*
 HP10207 KIT Ram 1500 4WD* (For 2WD call customer service 800.663.0096 for assistance) * See application guide for proper fitment. Use the most advanced air springs on the market to eliminate your vehicle
Geared Drives 200Z PSRU Zero Offset Gearbox with Centrifugal Clutch Assembly
 Instructions for Removing and replacing Gen X Gearbox with Geared Drives 200Z Prior to your gear box arriving: Using a strap or chain and an engine hoist to hold your engine up in the mount, remove your
ALL AMERICAN BILLET. Front Drive System - Small Block Ford Installation Instructions
 ALL AMERICAN BILLET Front Drive System - Small Block Ford Installation Instructions Small Block Ford with AC & PS All American Billet Store (800) 764-0926 www.allamericanbilletstore.com Items needed for
DIY: Shiver Valve Check, Illustrated
 DIY: Shiver Valve Check, Illustrated By Petemoss, AF1 Forum Tools needed: 4mm allen wrench to remove all the fairing pieces 2.5mm allen wrench to remove battery holder 5mm allen wrench for valve cover
PORSCHE 928. PKT Installation 1.6. No air pump version. Air pump version
 PORSCHE 928 PKT Installation No air pump version Air pump version 1.6 Tools Torque wrench 10mm socket 12mm socket 13mm socket 5mm allen socket 6mm allen socket 8mm allen key Caliper Supplies Blue Loctite
Slingshot Rotrex Supercharger Kit
 Slingshot Rotrex Supercharger Kit This supercharger kit improves on the Slingshot by forcing more dense air into the engine and creating more power. Installation time of the supercharger depends on you
Slide the billet aluminum cap over the bushing and secure with the 3/8-16 x 2 1/2 socket head allen and locknuts provided.
 Slide the billet aluminum cap over the bushing and secure with the 3/8-16 x 2 1/2 socket head allen and locknuts provided. Put the urethane bushings into the upper antiroll-bar-link eyebolt. Coat the bushings
EDELBROCK THUNDER SERIES AVS CARBURETORS Part #1801, 1802, 1803, 1804, 1805, 1806, 1812, 1813, 1825, 1826 INSTALLATION INSTRUCTIONS
 EDELBROCK THUNDER SERIES AVS CARBURETORS Part #1801, 1802, 1803, 1804, 1805, 1806, 1812, 1813, 1825, 1826 INSTALLATION INSTRUCTIONS IMPORTANT NOTE: Proper installation is the responsibility of the installer.
Setting up and adjusting SU/Hitachi carbs on the Datsun Roadster by Keith Williams. Service screw
 Setting up and adjusting SU/Hitachi carbs on the Datsun Roadster by Keith Williams Service screw This is the service screw it s only use it to raise the engine speed while adjusting the carbs. In normal
BA /02/03/04/06/07/08/13/13B/15 BIG AIR KIT (BAK) - Yamaha Road Star (99-07)
 - Yamaha Road Star (99-07)") BA-2020-00/02/03/04/06/07/08/13/13B/15 BIG AIR KIT (BAK) - Yamaha Road Star (99-07) Page: 1 Revision: 6.2-02/23/2011 Install Time: 1.5 Hours We recommend a qualified Yamaha technician install this kit
BA-2020-00/02/03/04/06/07/08/13/13B/15 BIG AIR KIT (BAK) - Yamaha Road Star (99-07) Page: 1 Revision: 6.2-02/23/2011 Install Time: 1.5 Hours We recommend a qualified Yamaha technician install this kit
OIL COOLER KIT INSTALLATION INSTRUCTIONS PART NUMBER D
 OIL COOLER KIT INSTALLATION INSTRUCTIONS PART NUMBER D570-0904 APPLICATION: 2011-2012 E90 335i/xi (N55 engine) with BMW standard bumper and with stock oil cooler Congratulations for being selective enough
Olson Kustom Works th St SE #M, Monroe, WA (949)
") Olson Kustom Works 17404 147 th St SE #M, Monroe, WA 98272 (949)742-0613 Jesse@OKW-Inc.com FOR REVISIONS ALL 2017 BRACKET REVISIONS, revised July 2017 Thank you for your purchase from OKW. If you have
Olson Kustom Works 17404 147 th St SE #M, Monroe, WA 98272 (949)742-0613 Jesse@OKW-Inc.com FOR REVISIONS ALL 2017 BRACKET REVISIONS, revised July 2017 Thank you for your purchase from OKW. If you have
Porsche 928 with 16v LH-Jetronic Fuel System
 Porsche 928 with 16v LH-Jetronic Fuel System Toll-Free Tech Hot Line: 877-FOR-928M 877-367-9286 Please do not copy this manual and give copies to your friends. Our ability to bring you this supercharger
Front Drive System - Big Block Chevy Installation Instructions Big Block Chevy with AC & with PS
 Front Drive System - Big Block Chevy Installation Instructions Big Block Chevy with AC & with PS All American Billet Store (800) 764-0926 www.allamericanbilletstore.com Items needed for install Jack Jack
PRODUCT USE INFORMATION
 9RC61000 Jeep YJ Body Lift Thank you for choosing Rough Country for all your suspension needs. This body lift fits both manual and Automatic equipped vehicles!!! Refer to last page of this Instruction
Our goal is to make the install a breeze. Please read the entire guide before beginning.
 www.airkewld.com Page 1 of 6 IRS Axle Kit Install IRS Axle Kit Install Our goal is to make the install a breeze. Please read the entire guide before beginning. KITS SHOULD INCLUDE 2 - Control-arm mounting
Powerglide Automatic Floor Mount Shifter Installation Instructions
 Powerglide Automatic Mount Installation Instructions Building American Quality With A Lifetime Warranty! TOLL FREE 1-877-469-7440 (865) 966-2269 FAX (865) 671-1999 tech@lokar.com www.lokar.com Powerglide
Mikuni RS Carburetor Conversion
 Mikuni RS Carburetor Conversion After putting your carbies on the bench or the kitchen table if the wife is out, you will see that the linkages may be in different positions depending on which brand of
LPE C5 Battery Relocation Kit
 LPE C5 Battery Relocation Kit The LPE C5 Corvette battery relocation kit improves vehicle weight distribution by moving weight to the rear of the vehicle. The improved weight distribution increases traction
INSTALLATION INSTRUCTIONS
 INSTALLATION INSTRUCTIONS REAR DISC BRAKE CONVERSION KIT A126-1 1973-87 CHEVROLET 1/2 TON 2WD Thank you for choosing STAINLESS STEEL BRAKES CORPORATION for your braking needs. Pleases take the time to
PPM-8023 / PPM-8043 JEEP JK SYNERGY STAGE 3 SUSPENSION SYSTEM Version 1
 SYNERGY MFG. 870 INDUSTRIAL WAY, SAN LUIS OBISPO, CA (805) 242-0397 PPM-8023 / PPM-8043 JEEP JK SYNERGY STAGE 3 SUSPENSION SYSTEM Version 1 GENERAL NOTES: These instructions are also available on our website;
Installation Instructions for the EVO3 Height-Adjustable Ultimate Short Shifter
 Installation Instructions for the EVO3 Height-Adjustable Ultimate Short Shifter for 1992-2005 325, 323, 318 and 1986-1994 525, 528, 535, 540 5-speed models only. (part number USSE3 and USSE5) Thank you
1 Green Pressure Regulator Spring Automatic transmissions operate at temperatures between 150ºF and
 Installation Instructions for 603107 Valve Body Kit C-4 1970 & Later Tools Required Speed Handle or Ratchet 3/8 Drive 1/2 Socket 3/8 Drive 7/16 Socket 3/8 Drive 5/16 Socket 3/8 Drive Small Screwdriver
INSTALLATION INSTRUCTIONS
 INSTALLATION INSTRUCTIONS REAR DISC CONVERSION KIT A126-2 1988-98 C1500 2WD 10" REAR DRUM Thank you for choosing STAINLESS STEEL BRAKES CORPORATION for your braking needs. Pleases take the time to read
OIL COOLER KIT INSTALLATION INSTRUCTIONS PART NUMBER D E92 335i/xi (N55 engine) with BMW Standard bumper and with stock oil cooler
 with BMW Standard bumper and with stock oil cooler") OIL COOLER KIT INSTALLATION INSTRUCTIONS PART NUMBER D570-0924 APPLICATION: 2011-12 E92 335i/xi (N55 engine) with BMW Standard bumper and with stock oil cooler Congratulations for being selective enough
OIL COOLER KIT INSTALLATION INSTRUCTIONS PART NUMBER D570-0924 APPLICATION: 2011-12 E92 335i/xi (N55 engine) with BMW Standard bumper and with stock oil cooler Congratulations for being selective enough
PARTS LIST: 8581 DODGE LONG ARM BRACKETS 03-13
 SYNERGY MFG. 870 INDUSTRIAL WAY, SAN LUIS OBISPO, CA (805) 242-0397 8580 03-12 DODGE 2500/3500 4X4, 06-08 1500 MEGACAB 4X4 LONG ARM SUSPENSION KIT V3.0 GENERAL NOTES: These instructions are also available
GM A-Body Instructions 3 & 2½ Header Applications w/ Balance Tube Crossover
 GM A-Body Instructions 3 & 2½ Header Applications w/ Balance Tube Crossover Included with this kit are the following: 2 Collector Reducers 1 Balance Tube Kit A 2 Headpipes 2 Tailpipes 2 Tailpipe Extensions
DODGE OFF ROAD T-STYLE STEERING KIT INSTALLATION INSTRUCTIONS
 Dodge Off Road, LLC Specializing in Dodge Ram Solid-Axle 4x4 Suspension and Steering for Off Road Applications 855.9009.DOR sales@dodgeoffroad.com dodgeoffroad.com DODGE OFF ROAD T-STYLE STEERING KIT INSTALLATION
Prerequisites: Shop Manual (recommended) pages 3-9 through 3-13.
 pages 3-9 through 3-13.") Prerequisites: Order your gaskets average about $25.00 bucks X 2 so $50.00 4NK-11193-00-00 Obtain a shim kit (Should have several 265 and 270s) (Some dealers will exchange) Obtain a Valve Bucket Tool YM-33961
Prerequisites: Order your gaskets average about $25.00 bucks X 2 so $50.00 4NK-11193-00-00 Obtain a shim kit (Should have several 265 and 270s) (Some dealers will exchange) Obtain a Valve Bucket Tool YM-33961
Installation Instructions Dual Perimeter Plate Nitrous System (#82185)
") Installation Instructions Dual Perimeter Plate Nitrous System (#82185) Thank you for choosing ZEX. If at any time you have questions regarding this or any of our products, please call our ZEXTEK support
Installation Instructions Dual Perimeter Plate Nitrous System (#82185) Thank you for choosing ZEX. If at any time you have questions regarding this or any of our products, please call our ZEXTEK support
Installation Instructions
 Installation Instructions Rear Disc Brake Conversion Kit Item # RC2001, RC2001X Applications: Mopar 8-3/4 & 9-3/4 Rear Axles Thank you for choosing Leed Brakes for your automotive product needs. Before
Installation Manual TWM Performance Short Shifter Cobalt SS/SC, SS/TC, HHR SS, Ion Redline and Saab 9-3
 Page 1 Installation Manual TWM Performance Short Shifter Cobalt SS/SC, SS/TC, HHR SS, Ion Redline and Saab 9-3 Please Note: It is preferable to park on a flat surface, as you will have to engage and disengage
Procharger Stage II Intercooled Supercharger System (11-14 GT)
") Procharger Stage II Intercooled Supercharger System (11-14 GT) Installation Time: Approximately one day. Installed on 2012 Mustang GT 5.0/Manual Required Tools 3/8 Socket Set (Standard and Metric) 1/2
Procharger Stage II Intercooled Supercharger System (11-14 GT) Installation Time: Approximately one day. Installed on 2012 Mustang GT 5.0/Manual Required Tools 3/8 Socket Set (Standard and Metric) 1/2
PPM-8022 / PPM-8042 JEEP JK STAGE 2 SYNERGY SUSPENSION SYSTEM Version 1
 POLY PERFORMANCE MFG. 870 INDUSTRIAL WAY, SAN LUIS OBISPO, CA (805) 242-0397 PPM-8022 / PPM-8042 JEEP JK STAGE 2 SYNERGY SUSPENSION SYSTEM Version 1 GENERAL NOTES: These instructions are also available
Installation Instructions
 Installation Instructions Rear Disc Brake Conversion Kit Item # RC4001, RC4001X Applications: Mopar 7.25, 8.25, 9.25 Axles Thank you for choosing Leed Brakes for your automotive product needs. Before you
97-06 JEEP TJ/LJ LONG ARM UPGRADE KIT
 921663U00 97-06 JEEP TJ/LJ LONG ARM UPGRADE KIT Thank you for choosing Rough Country for your suspension needs. This kit is an upgrade kit only. This kit includes frame mounting points and adjustable long
Ford C4 and C6 Floor Mount Automatic Transmission Shifter Installation Instructions
 Ford C4 and C6 Mount Automatic Transmission Shifter Installation Instructions Building American Quality With A Lifetime Warranty! TOLL FREE 1-877-469-7440 tech@lokar.com www.lokar.com Ford C4 and C6 Mount
AEV30308AA Last Updated: 05/31/18. 4 DUALSPORT sc SUSPENSION system for RAM 1500 air ride standard and rebel INSTALLATION GUIDE
 AEV30308AA Last Updated: 05/31/18 4 DUALSPORT sc SUSPENSION system for RAM 1500 air ride standard and rebel INSTALLATION GUIDE PLEASE READ BEFORE YOU START TO GUARANTEE A QUALITY INSTALLATION, WE RECOMMEND
OVER THE KNUCKLE 1-TON STEERING INSTALLATION INSTRUCTIONS
 OVER THE KNUCKLE 1-TON STEERING INSTALLATION INSTRUCTIONS TOOLS NEEDED Grinder with cutoff wheel, sawzall, cutting torches, or a plasma cutter Welder (for optional sway bar mounts) Hand drill with a ½
2. With the rear door open remove pull-style clip from the passenger side just below the door latch.
 LoD Offroad FJ Cruiser Rear Bumper with Tire Carrier Installation Instructions 1. Begin with removing factory spare from the rear door. 2. With the rear door open remove pull-style clip from the passenger
For all Ram x4 Trucks, and all Ram x4 trucks.
 Dodge Off Road, LLC Specializing in Dodge Ram Solid-Axle 4x4 Suspension and Steering for Off Road Applications 855.9009.DOR sales@dodgeoffroad.com dodgeoffroad.com DODGE OFF ROAD 5 th GEN STEERING KIT
Installation Instructions
 Instructions Created by an: Revised 7-11-17 LRT 2005-2017 3/1 Leveling/ Lift Kit for Toyota Tacoma by Low Range Off-Road (SKU# LR-LRTACO) Installation Instructions Suggested Tools: CAUTION: Safety glasses
ENG JL CC1 ENGINE KIT INSTALLATION INSTRUCTIONS 24 HP Honda Engine Installation Kit For Gas Powered Club Car Models
 ENG JL CC1 ENGINE KIT INSTALLATION INSTRUCTIONS 24 HP Honda Engine Installation Kit For Gas Powered Club Car Models Thank you for purchasing the this quality product from Buggies Unlimited. The engine
MAZDASPEED3 Intercooler Instructions
 MAZDASPEED3 Intercooler Instructions Congratulations on your purchase of the COBB Tuning Front Mount Intercooler System for your 2007-2009 Mazdaspeed3. The following instructions should assist you through
Subaru Front Mount Intercooler Kit STI Subaru Front Mount Intercooler Kit STI
 Subaru Front Mount Intercooler Kit STI 2008-2014 715500 Subaru Front Mount Intercooler Kit STI 2008-2014 Congratulations on your purchase of the Subaru Front Mount Intercooler Kit STI 2008-2014. The following
STOP---READ THIS FIRST!
 STOP---READ THIS FIRST! **Read These Entire Instructions Before Starting Anything** 2003-2013 DODGE Ram 2500/3500, 8 LIFT KIT NOTE: * The factory wheels and tires WILL fit on the front of the vehicle once
GM Floor Mount Automatic Transmission Shifter Installation Instructions
 GM Mount Automatic Transmission Shifter Installation Instructions Building American Quality With A Lifetime Warranty! TOLL FREE 1-877-469-7440 tech@lokar.com www.lokar.com GM Mount Automatic Transmission
Chrysler 727, 904, 518 Floor Mount Automatic Transmission Shifter Installation Instructions
 Chrysler 727, 904, 518 Mount Automatic Transmission Shifter Installation Instructions Building American Quality With A Lifetime Warranty! TOLL FREE 1-877-469-7440 tech@lokar.com www.lokar.com Release Button
PPM 8069 JK FRONT TRACKBAR BRACE / SECTOR SHAFT BRACE INSTALLATION INSTRUCTIONS
 Poly Performance MFG, 870 Industrial Way, San Luis Obispo, CA 93401, (805) 242-0397 PPM 8069 JK FRONT TRACKBAR BRACE / SECTOR SHAFT BRACE INSTALLATION INSTRUCTIONS **DISCLAIMER** The Synergy Suspension
INSIDE YOUR HOLLEY CARBURETOR FUEL INLET SYSTEM
 INSIDE YOUR HOLLEY CARBURETOR The carburetor is quite simply a fuel metering device that operates under the logical and straightforward laws of physics. It has evolved over the years from a very simple
Bag 1. Bag 1. Center Pivot. Center Pivot
 8 00734 01901 5 Center Pivot Bag 1 3374 - Center Pivot Socket 4019 - Alum Pivot ball 3254-2-56 Button Head *Note - Sometimes it is helpful to slightly over-tighten the top clamp screws, then work the ball
Timing belt change. Timing belt change
 Timing belt change Put 2 new Gates T275 timing belts on today. Tensioner drilled smooth and tight with less than 16,000 miles on her decided not to change the tensioners just the belts. You'll need some
»Product» Safety Warning
 D1402 Installation Instructions 2013-14 Ram 3500, 2014 Ram 2500 4.5" Replacement Radius Arm Suspension Lift Read and understand all instructions and warnings prior to installation of product and operation
HP10220 KIT. See application guide for proper fitment.
 HP10220 KIT Dodge Dakota* (2WD/4WD) * 2005 All Dodge Dakotas 2006 - All Dodge Dakotas except Night Runner and R/T sub models 2007 - All Dodge Dakotas except SXT and TRX4 sub models 2008 - All Dodge Dakotas
2013+ DODGE RAM " Kit PART# STOP! READ THIS FIRST!
 NOTE: 2013+ DODGE RAM 3500 4" Kit PART# 54346 STOP! READ THIS FIRST! **READ THESE ENTIRE INSTRUCTIONS BEFORE STARTING ANYTHING** or chroming, which can damage the strength and structure of the metal, any
Trike Conversion Installation Guide for Indian Scout Motorcycles 2016 & Up Revision 2
 Trike Conversion Installation Guide for Indian Scout Motorcycles 2016 & Up Revision 2 Warning - This product was not intended for more than one rider. Weight limit on this product has been set at 400 lbs.
1501 Industrial Way N., Toms River, NJ Fax: PACKING LIST MUSTANG LONG TUBE HEADERS (M30000)
") 2/18/04 1501 Industrial Way N., Toms River, NJ 08755 732-349-2109 Fax:732-244-0867 ADVANCED - Installation requires professional-type tools and advanced automotive-service skills. If you lack experience
2/18/04 1501 Industrial Way N., Toms River, NJ 08755 732-349-2109 Fax:732-244-0867 ADVANCED - Installation requires professional-type tools and advanced automotive-service skills. If you lack experience
RS-2 SINGLE ACTION REAR BUMPER WITH TIRE CARRIER INSTALL MANUAL FOR JEEP WRANGLER ALL MODELS.
 RS-2 SINGLE ACTION REAR BUMPER WITH TIRE CARRIER INSTALL MANUAL FOR 2007-2016 JEEP WRANGLER ALL MODELS. Rear Bumper Installation Instructions 1) Remove factory rear bumper, (this includes all tow hitch
MG T-Series Supercharger System Installation Instructions For MG-TC & MG-TD
 MG T-Series Supercharger System For MG-TC & MG-TD PART # 150-030 440 Rutherford St. Goleta, CA 93117 1-800-667-7872 FAX 805-692-2525 www.mossmotors.com NOTE 1: Before beginning the installation, run the
Ford AOD-4R70W-AODE Cable Operated Shifter Installation Instructions
 Ford AOD-4R70W-AODE Cable Operated Shifter Installation Instructions Building American Quality With A Lifetime Warranty! TOLL FREE 1-877-469-7440 tech@lokar.com www.lokar.com Ford AOD-4R70W-AODE Cable
Assembly Manual. 1/10th World GT car
 Assembly Manual 1/10th World GT car Center Pivot Bag 1 3374 - Center Pivot Socket 40194 - Hard Anodized Alum Pivot ball 3254-2-56 Button Head *Note - Sometimes it is helpful to slightly over-tighten the
Typical Install Instructions
 Typical Install Instructions Read & understand all steps of these instructions before beginning this installation. WEBER Conversion Kit, VW T-1/2, up to 1835cc 32 / 36 DFEV Weber Carburetor These instructions
Holley High Performance Intake System* For Port 13B Engines (Includes B 6-Port engines converted to 4-Port)
") Holley High Performance Intake System* For 1974-1978 4-Port 13B Engines (Includes 1984-85 13B 6-Port engines converted to 4-Port) Installation Instructions I-18038 Note: These instructions assume: The
Holley High Performance Intake System* For 1974-1978 4-Port 13B Engines (Includes 1984-85 13B 6-Port engines converted to 4-Port) Installation Instructions I-18038 Note: These instructions assume: The
TR-1 Gold Throttle Actuator Installation Instructions
 TR-1 Gold Throttle Actuator Installation Instructions Honda 8 HP 1987-2000 PN 906-1160-00 Parts: Kit Number: 120-0052-01 8 1 6 7 4 5 2 3 ITEM PART NUMBER DESCRIPTION QTY 1 130-0029-01 Throttle Actuator
INSTALLATION INSTRUCTIONS
 INSTALLATION INSTRUCTIONS FX4 ELITE REAR DISC CONVERSION KITS WITH INTERNAL PARKING BRAKE A110-14, A111-25, A111-29 for FORD 8" & 9" REAR ENDS Thank you for choosing STAINLESS STEEL BRAKES CORPORATION
Detroit Speed, Inc. Selecta-Speed Wiper Kit Corvette P/N:
 Detroit Speed, Inc. Selecta-Speed Wiper Kit 1968-72 Corvette P/N: 121621 A downpour of rain will no longer hinder your ability to clearly see the road. The Detroit Speed Selecta-Speed Wiper Kit provides
Thank you for purchasing the Dezod Motorsports Return Fuel System for your Scion tc.
 Thank you for purchasing the Dezod Motorsports Return Fuel System for your Scion tc. We took much pride in putting together a fuel system that would deliver a maximum amount of fuel as simply as possible
2013+ DODGE RAM LIFT KIT PART# STOP! READ THIS FIRST!
 NOTE: 2013+ DODGE RAM 3500 8 LIFT KIT PART# 54324 STOP! READ THIS FIRST! **READ THESE ENTIRE INSTRUCTIONS BEFORE STARTING ANYTHING** or chroming, which can damage the strength and structure of the metal,
QUICK FUEL TECHNOLOGY HOT ROD SERIES CARBURETORS SLAYER SERIES CARBURETORS SUPER STREET SERIES CARBURETORS
 QUICK FUEL TECHNOLOGY Installation Instructions HOT ROD SERIES CARBURETORS SLAYER SERIES CARBURETORS SUPER STREET SERIES CARBURETORS HR-580-VS 580 CFM Vac. Secondary!!! SS-680-VS 680 CFM Vac. Secondary
»Product» Safety Warning
 D1402 Installation Instructions 2013-14 Ram 3500, 2014 Ram 2500 4.5" Replacement Radius Arm Suspension Lift Read and understand all instructions and warnings prior to installation of product and operation
M52tu-M54 VANOS Assembly & Timing Using G.A.S. Professional Cam Tool Kit
 Home BMW Solutions Porsche Solutions DIY Tech Engine Services Dyno Services Machining About Contact Store Tool Rental M52tu-M54 VANOS Assembly & Timing Using G.A.S. Professional Cam Tool Kit This procedure
Installation Instructions
 Preparing your vehicle to install your brake system upgrade 1. Rack the vehicle. 2. If you don t have a rack, then you must take extra safety precautions. 3. Choose a firmly packed and level ground to
EDELBROCK THUNDER SERIES AVS CARBURETORS Part #1801, 1802, 1803, 1804, 1805, 1806, 1812, 1813, 1825, 1826 INSTALLATION INSTRUCTIONS
 EDELBROCK THUNDER SERIES AVS CARBURETORS Part #1801, 1802, 1803, 1804, 1805, 1806, 1812, 1813, 1825, 1826 INSTALLATION INSTRUCTIONS PLEASE study these instructions carefully before beginning this installation.
Installation Instructions For: Part Number EFK1 K-series Mount Kit for Civic and CR-X
 HASPORT PERFORMANCE Installation Instructions For: Part Number EFK1 K-series Mount Kit for 1988 1991 Civic and CR-X HASPORT PERFORMANCE Inc. 2849 S. 44 th St. Phoenix, AZ 85040 Phone: (602) 470-0065 Fax:
Global West Suspension 655 South Lincoln Ave San Bernardino Ca Phone Fax Web address globalwest.
 Global West Suspension 655 South Lincoln Ave San Bernardino Ca. 92408 Phone 877-470-2975 Fax 909-890-0703 Web address globalwest.net Mustang coilover instruction sheets for 64-66 Kit includes the following
GM C10 Street Grip
 Part # 11365010/11365110-1973-1987 GM C10 StreetGrip Front Components 11369590 Delrin Control Arm Bushings 11369300 Drop Spindles 11362350/11362351 Front CoilSpring Kit 11369515 Front HQ Series Shocks
TCI TRANS-SCAT
 Page 1 of 9 Return to Instruction Sheet index TCI 360000 TRANS-SCAT Installation Instructions for FORD C-6 Transmissions TCI s TRANS-SCAT kit will allow you to calibrate the performance of your transmission.
Kysor On/Off Rear Air Fan Drive
 . Proper precautions must be taken to prevent personal injury from contact with moving parts, unintended engine start or other hazards present when working with powered equipment. Refer to the vehicle
Z-Gate Universal Shifter
 Installation Instructions Z-Gate Universal Shifter Fits: GM, Ford, Lincoln and Chrysler Transmissions See Application Guide for Specific Applications Part #80681 Rev 06/01/2018 WORK SAFELY! For maximum
v Porsche 928
 1985-86 32v Porsche 928 Toll-Free Tech Hot Line: 877-FOR-928M 877-367-9286 Please do not copy this manual and give copies to your friends. Our ability to bring you this supercharger kit at this price relies
INSTALLATION GUIDE. Doc ID: C Doc Rev:
 REKLUSE MOTOR SPORTS The Rekluse Core EXP Kit INSTALLATION GUIDE Doc ID: 191-7700C Doc Rev: 012213 2012 Rekluse Motor Sports Rekluse Motor Sports, Inc. 12000 W Franklin Rd Boise, Idaho 83709 208-426-0659
CONTROL SYSTEM FOR THE PHYSICALLY DISABLED
 INSTALLATION Push/Rock HAND CONTROL SYSTEM FOR THE PHYSICALLY DISABLED With Howell Ventures Ltd Sure Grip Hand Control Systems and Accessories are warranted against manufacturing or material defects for
PRODUCT: JL Dual Rate Lift Kit, RockSport Edition READ INSTRUCTIONS IN FULL BEFORE INSTALLATION. QUESTIONS? CALL M-F 7:00 AM 5:00 PM PST
 PRODUCT: JL Dual Rate Lift Kit, RockSport Edition READ INSTRUCTIONS IN FULL BEFORE INSTALLATION. QUESTIONS? CALL 916-631-8071 M-F 7:00 AM 5:00 PM PST REV: A 08-07-2018 II-7633 The MetalCloak experience
»Product» Safety Warning
 F2650 Installation Instructions 2017-18 Ford F150 4WD 4-6" Suspension Systems Read and understand all instructions and warnings prior to installation of product and operation of vehicle. Zone Offroad Products
JK REAR BUMPER AND TIRE CARRIER
 JK REAR BUMPER AND TIRE CARRIER Installation Guide AEV30105AA (Updated 5/10/10) Page 1 of 20 Page 2 of 20 EXPLODED VIEW PLEASE READ BEFORE YOU START IN ORDER TO INSTALL THIS PART PROPERLY YOU OR YOUR INSTALLER
Jeep JK Dana 44 and 30 Front Axle Truss Axle Truss Installation Instructions
 THE INFORMATION CONTAINED IN THIS DRAWING IS THE SOLE PROPERTY OF SYNERGY MFG. ANY REPRODUCTION IN PART OR WHOLE WITHOUT THE WRITTEN PERMISSION OF SYNERGY MFG IS PROHIBITIED. Revisions Rev. Description
Suzuki Samurai to Toyota Front Spring Swap Kit, with Missing Link Shackles (SKU#SSP-TSFM) Installation Instructions
 Installation Instructions") Suzuki Samurai to Toyota Front Spring Swap Kit, with Missing Link Shackles (SKU#SSP-TSFM) Installation Instructions CAUTION: Safety glasses should be worn at all times when working with vehicles and related
Suzuki Samurai to Toyota Front Spring Swap Kit, with Missing Link Shackles (SKU#SSP-TSFM) Installation Instructions CAUTION: Safety glasses should be worn at all times when working with vehicles and related
PRODUCT: JL Game Changer Suspension, RockSport READ INSTRUCTIONS IN FULL BEFORE INSTALLATION. QUESTIONS? CALL M-F 7:00 AM 5:00 PM PST
 PRODUCT: JL Game Changer Suspension, RockSport READ INSTRUCTIONS IN FULL BEFORE INSTALLATION. QUESTIONS? CALL 916-631-8071 M-F 7:00 AM 5:00 PM PST REV: A 06-19-2018 II-7631 The MetalCloak experience includes
Z1 Motorsports 370Z/G37 Oil Cooler Kit Installation Manual
 Z1 Motorsports 2877 Carrollton Villa Rica Hwy Carrollton GA 30116 770.838.7777 Z1 Motorsports 370Z/G37 Oil Cooler Kit Installation Manual For 19, 25 and 34 Row Oil Cooler Kits Parts Included: 1 SETRAB