RIT Arm V2 Supinating/Pronating Wrist
|
|
|
- Noreen Nash
- 5 years ago
- Views:
Transcription
1 RIT Arm V2 Supinating/Pronating Wrist Derek Gagnon RIT BioPrint & Limb Forge Rochester Institute of Technology Rochester, New York June 26, 2018
2 Table of Contents: I. Purpose/Overview II. Design Considerations/Goals (Design Brief) III. Printing Settings IV. Assembly Instructions V. Lifespan Testing VI. Design Feedback/Revisions VII. Conclusion I. Purpose The purpose of this document is to provide an overview of the RIT Arm V2 supinating/pronating wrist assembly. The design integrates into the existing design while adding the additional functionality of: 180 degrees of wrist rotation and a modular accessory attachment terminal. The design accomplishes these improvements with easily 3D printable components and no additional hardware. Governable rotation of the wrist and hand gives users an additional degree of control, allowing for a higher level of functionality. The current design adds no additional bulk and is controlled via fishing line and elastic cord, the same as the other actions of the RIT Arm. An automated testing fixture was designed to determine the number of actuations the design can endure before failure. From this data, an expected lifespan can be extrapolated to improve the design and create maintenance plans. The goal is to create an assistive device capable of a lifespan greater than 10,000 uses.
3 II. Design Brief Design Statement: To design a device that allows for the supination and pronation of the RIT Arm V2 wrist 180 degrees Deliverables: Printed arm with additional functionality 3D model Constraints/Goals: Cost - $15-$20 Function - Rotation stops at 180 degrees (pronated is default position) Automatic return to original relaxed position with no sticking Low profile and doesn t contribute much to the weight of the design Load - Static and dynamic max everyday load: 10N Lifespan - Cyclic testing of rotation: ~10,000 rotations Durability - Capable of withstanding 6-foot drop 10 times Capable of maintaining wrist function after falling with a force equivalent to an average person (analyzed through test with hammer or compression test) Can still work if completely submerged in water for a temporary time (60 seconds) and 12 hours after being submerged Modularity - Connect to existing forearm through standard connection Scalability - Easily scalable for different sized people: 100%-150% Actuation - Strap/fishing line for rotation will be attached to opposite shoulder from amputation Actuation of wrist through flexion of pectoralis major (bringing arm forward away from body) about ~1.5 in. of motion. Dependent on size of rotating part Comfort - Comfortable to wear for entire day with no abrasion on skin with fishing line through use strap or line routing
 Top Layers: 7 Bottom Layers: 5 Perimeter Shells: 2 Brim:")


4 III. Print Settings Encasement: Material: PLA Layer Height: 0.15 mm (highly recommended) Top Layers: 7 Bottom Layers: 5 Perimeter Shells: 2 Brim: None Infill: 35% No supports required Hand Receptor (forearm to palm connector): Material: PLA Layer Height: 0.15 mm to 0.25 mm Top Layers: 7 Bottom Layers: 5 Perimeter Shells: 2 Brim: None Infill: 35% No supports required Modular Connector: Material: PLA Layer Height: 0.15 mm to 0.25 mm Top Layers: 7 Bottom Layers: 5 Perimeter Shells: 2 Brim: None Infill: 35% No supports required Wrist Pin: Material: PLA Layer Height: 0.15 mm to 0.25 mm Top Layers: 7 Bottom Layers: 5 Perimeter Shells: 2 Brim: None Infill: 50% No supports required
 30 lb 50 lb fishing line is needed for assembly too, the same as that used in the assembly of the rest of the RIT Arm V2.")

5 IV. Assembly Instructions Step 1: In addition to the printed parts elastic cord (0.8mm for 100% scaled, 1.5mm for 150% scale) 30 lb 50 lb fishing line is needed for assembly too, the same as that used in the assembly of the rest of the RIT Arm V2. A pair of wire cutters and thin needle nose pliers (not pictured) are recommended tools. About 6 inches of elastic cord and 48 inches of fishing line will be used. The parts picture above are the 3D printed components of the design, each is labeled with the part name. They will be referred to by these names in the assembly process.


6 Step 2: There are two rotation stop nubs on the hidden face of the modular connector. One of these rotation stops has two holes present. Insert the 6 inch length of elastic cord into the hole closest to the internal cylinder and route the cord through the second hole in the same rotation stop. The ends of the cord should come out of the nub as shown above. Make sure the free ends of the cord exit the side of the nub facing away from the second rotation stop. Step 3: Run the length of fishing line through the remaining rotation stop nub and knot it tightly as show. The knot should be able to sit in the space between the nubs. Snip the extra length of the knot, being sure to snip enough where it will fit into the space but not too much where the knot will become undone.


7 Step 4: Route the free end of the fishing line through the routing hole in the encasement. A pin can be helpful in guiding the line out of the hole, in the direction of the red arrow. Route the free ends of the elastic cord through the holes in the post circled above in blue.


8 Match up the holes on the modular connector with the holes on the encasement to ensure they don t entangle. This is easiest if you place the parts together as shown above. Step 5: Route the fishing line through the semi-circular slot in the modular connector. Keep the ends of the elastic cord accessible. Knot the two ends of the elastic cord together, making sure to pull the knot tight to seat it in the encasement. A square knot works well here. Cut the ends of the elastic cord quite close to the knot, while keeping some space to keep the cord secure.

9 Step 6: Assembly the hand receptor and modular connector by aligning the holes and pressing the two parts together. Insert the wrist pin into the hole in the hand receptor to lock the two parts together. The assembly is now complete. The fishing line will still have a free end after this assembly, the line gets routed through the forearm cup printed part.
10 V. Lifespan Testing To test the lifespan of the supinating wrist design, an Arduino controlled testing fixture was designed to track the rotations a wrist could perform before failure. This data is useful for determining and addressing weak points in the design as well as to assign an expected life to the assembly. The wrist is tested at 100% print scale with 0.8mm elastic cord and 50lb fishing line. 1. Bill of Materials ID # Part Vendor Price/Unit Quantity Total Price Make/Buy 1 Arduino Uno Mouser $ $24.95 Buy 2 Nema 23 Stepper Motor MPJA $ $23.95 Buy 3 Stepper Driver Shield Adafruit $ $19.95 Buy 4 12v 30a Power Supply ebay $ $18.96 Buy 5 C14 Plug Module ebay $ $3.00 Buy 6 12v Blower Fan ebay $ $5.00 Buy 7 12v 40mm Fan ebay $ $5.00 Buy 8 10kΩ Resistor DigiKey $ $0.10 Buy 9 Endstop Micro Switch DigiKey $ $0.50 Buy 10 Stepper Pulley Printed 11 Heatsink ebay $ $1.30 Buy 12 Aluminum Extrusions (Donated) 13 Power Supply Cover Printed 14 Fan Mounts Printed 15 Thermal Adhesive ebay $ $7.99 Buy TOTAL $110.70

11 2. Schematic The schematic above demonstrations the full electrical system of the testing apparatus. Power is supplied to the Arduino Uno via the USB (5v). The stepper motor and both cooling fans are power via a 12v power supply. A 12v blower fan was used in conjunction with a heatsink applied with thermal adhesive to cool the TB6612FNG motor driver. This was necessary because the Nema 23 pulled 2.3A when holding and the TB6612FNG driver can provide 1.2A per channel with a peak of 3.0A for ~20ms. Without cooling the chip quickly overheated and shutdown to protect the chipset. With cooling the chip had no problem running the Nema 23 for two days continuously. The 5.7v rated stepper motor was supplied with 12v because it s torque was insufficient to rotate the wrist in the setup, but also to simplify the design. To remedy this, a 12v fan was used to cool the stepper motor also mounted with heatsinks. The rotation of the wrist was detected and recorded via a snap action limit switch and pull-down resistor. The limit switch was connected to the 5v output and Pin 2 in the Arduinos header. Most of these limit switches have both Normally Open (NO) and Normally Closed (NO) pins. It is important that the NO pin is used so the Arduino receives a 5v signal when the switch is activated by the rotating wrist. A pull-down resistor is needed to hold the Pin 2 voltage at zero until the switch is closed. The pull-down resistor is connected between the ground and Pin 2 on the Arduino, and its resistance value is negligible.


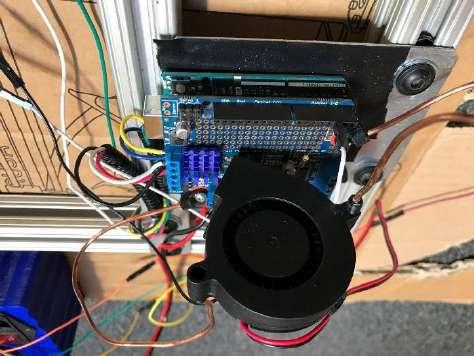
12 3. Completed Testing Fixture

13 4. Arduino Program The Arduino programming was quite simple for the longevity testing of the wrist. The Adafruit Stepper Shield had custom libraries that made controlling the stepper motor very straightforward. The programming for the switch and recording the number of switch presses was relatively simple as well. Look to the comments in the code above for more detailed information.
14 5. Results: Line-break due to scrolling When the wrist was tested, the design was able to withstand more than 28,310 rotations of the wrist. After only 10,000 rotations the elastic cord had deformed and expanded to 150% of its original length, meaning the wrist couldn t return to a neutral position. Note that the weakest aspect of the design is the elastic cord used to return the wrist to a neutral position. At 100% scale, the wrist design uses 0.8mm elastic cord, but at 150% (about adult small size) 1.5mm cord can be used. The 1.5mm cord is significantly more durable and less prone to deformation, therefore should sustain even more rotations. The 3D printed parts survive the test unscathed and could be refitted with elastic cord for more use.
15 VI. Design Revisions The only revision that was shown to be necessary was the ability to use larger diameter elastic cord. The design only needs very minor revisions, and even with the current design printed at an adult sized scale, larger elastic cord can be used. The use of 1.2mm or 1.5mm elastic cord should greatly increase the life cycle of the design. The main take away from the testing is that the 3D printed parts performed flawlessly and weren t the failing aspect of the design. VII. Conclusion The conclusions derived from the testing done on the RIT Arm V2 wrist supination/pronation assembly are: The 3D printed parts require no supports and are easy to print. The 3D printed parts of the assembly are more than capable of withstanding the 10,000 cycle (rotations) goal set. More than 28,000 cycles were completed continuously without any noticeable wear on the 3D printed parts. The elastic cord is the weak point in the design, luckily many different diameters and options are available, therefore for larger scale RIT Arm prints more durable cord can be used. The Wrist assembly process is on the same level of difficulty as the rest of the RIT Arm, requires few specialty tools, and uses the same hardware as the rest of the design.
e-nable Hand Test Rig
 enable Hand Test Rig P606 David Schwartz, Tia Parks, Shannon Barry, Samantha Mason, Charles Rumfola Agenda Recap Customer Requirements Engineering Requirements Effective Access Technology Conference Subsystems
Prusa i3 Printer Assembly Guide
 Prusa i3 Printer Assembly Guide Special thanks to Carlos Sanchez and Miguel Sanchez for the graphics. All graphics captured from their great animation: http://www.carlos-sanchez.com/ Prusa3/ For copyright
e-nable Hand Test Rig
 enable Hand Test Rig P606 David chwartz, Tia Parks, hannon Barry, amantha Mason, Charles Rumfola Agenda Recap Problem tatement Customer Requirements Engineering Requirements ubsystems Clamp election Controller/Processor
K Wiring and Electronics
 HKBay.com K Wiring and Electronics Written By: HKBay 2017 hkbay.dozuki.com Page 1 of 12 TOOLS: Hex key; ball ended, long arm, 2.5mm (1) PARTS: Arduino Mega (blue) (1) RAMPS board (red) (1) glass tabs (3)
SolarSheat Wall Installation Manual
 SolarSheat Wall Installation Manual Version 1.5 April 23, 2013 Copyright 2013 Your Solar Home, All Rights Reserved SolarSheat products must be installed in accordance to all local building, plumbing, electrical,
An ISO 9001 Company. BOP 1KW-MG FIRMWARE RETROFIT KIT
 INSTRUCTION MANUAL 1. DESCRIPTION KEPCO An ISO 9001 Company. BOP 1KW-MG FIRMWARE RETROFIT KIT BOP 1KW-MG RETROFIT KIT 219-0562 Kepco KIT 219-0562 contains the PROMs used to upgrade the firmware for BOP
SolarSheat Wall Installation Manual
 SolarSheat Wall Installation Manual Version 3.2 December 15, 2015 Copyright 2015 Your Solar Home, All Rights Reserved SolarSheat products must be installed in accordance to all local building, plumbing,
ARDUINO 2WD SMART ROBOT CAR KIT
 EN ARDUINO 2WD SMART ROBOT CAR KIT P a g e 2 PARTS LIST Please make sure that the following pieces are included in your kit Component Quantity Remarks Arduino Sensor Shield v5.0 1 Align pins using needle
MESA USA and LIMBS International Prosthetic Arm Project
 MESA USA and LIMBS International Prosthetic Arm Project On behalf of LIMBS International, Lucas Galey designed and assembled a prototype prosthetic arm following a $20 budget, and integrating a SparkFun
Agilent G1554A On-Column Capillary Inlet with EPC
 Agilent G1554A On-Column Capillary Inlet with EPC 6890 Gas Chromatograph Installation Guide Agilent Technologies Notices Agilent Technologies, Inc. 2002 No part of this manual may be reproduced in any
Introduction Safety precautions for connections... 3 Series 3700 documentation... 4 Model 3732 overview... 5 Accessories...
 Keithley Instruments, Inc. 28775 Aurora Road Cleveland, Ohio 44139 1-888-KEITHLEY http://www.keithley.com Model 3732 Quad 4x28 Reed Relay Card Connection Information Table of contents Introduction... 3
Caution Improper installation could result in tape failure, mounting hardware, and reader. Please read instructions before installing!
 Elgo Sensor Mounting Motion High Speed Landing/Positioning System The encoded tape used for the landing system is suspended between two mounting brackets that attach to the car rail using forged clips
1. SUBJECT: Cyclic Trim System Cyclic Trim Assembly Kit for the Lateral and Longitudinal Trim Actuator Assemblies
 DATE: January 23, 2012 SERVICE DIRECTIVE BULLETIN NO. 0110 Page 1 of 9 1. SUBJECT: Cyclic Trim System Cyclic Trim Assembly Kit for the Lateral and Longitudinal Trim Actuator Assemblies 2. MODEL: All F-28F,
CAPT JT Elder Commanding Officer NSWC Crane
 KeyMod vs. M-LOK Modular Rail System Comparison Abstract #19427 Presented By: Caleb McGee Date: 4 May 2017 CAPT JT Elder Commanding Officer NSWC Crane Dr. Brett Seidle, SES Technical Director NSWC Crane
WANHAO Duplicator i3. User Manual V1.2. Wanhao USA
 WANHAO Duplicator i3 User Manual V1.2 Wanhao USA 2015 www.wanhaousa.com Safety WARNING: The components on the Duplicator i3 generate high temperatures and move extremely fast. Reaching inside of the Duplicator
Arlo Power Distribution Board Kit Rev B (#28996)
") Web Site: www.parallax.com Forums: forums.parallax.com Sales: sales@parallax.com Technical: support@parallax.com Office: (916) 624-8333 Fax: (916) 624-8003 Sales: (888) 512-1024 Tech Support: (888) 997-8267
Web Site: www.parallax.com Forums: forums.parallax.com Sales: sales@parallax.com Technical: support@parallax.com Office: (916) 624-8333 Fax: (916) 624-8003 Sales: (888) 512-1024 Tech Support: (888) 997-8267
User s Manual. For. BH-MSD-4.5A Micro Stepping Driver
 User s Manual For BH-MSD-4.5A Micro Stepping Driver Product Number Code For Micro step drive Page 2 BH MSD 4.5A BHOLANATH MICRO STEP DRIVE 4.5 Amp 1:DC power input :20V~50VDC 2.Output current:1.5a-4.5a
TEL:1-866-XANATOS INSTALLATION INSTRUCTIONS PART#: SR-FOR SPARTAN RUNNING BOARD FORD ECONOLINE 99-14
 TEL:1-866-XANATOS INSTALLATION INSTRUCTIONS PART#: SR-FOR203796 SPARTAN RUNNING BOARD FORD ECONOLINE 99-14 PARTS LIST: 1 Driver/Left Side Spartan Running Board 2 10mm Lock Washers 1 Passenger/Right Side
Arlo Power Distribution Board Kit Rev B (#28996)
") Web Site: www.parallax.com Forums: forums.parallax.com Sales: sales@parallax.com Technical: support@parallax.com Office: (916) 624-8333 Fax: (916) 624-8003 Sales: (888) 512-1024 Tech Support: (888) 997-8267
Web Site: www.parallax.com Forums: forums.parallax.com Sales: sales@parallax.com Technical: support@parallax.com Office: (916) 624-8333 Fax: (916) 624-8003 Sales: (888) 512-1024 Tech Support: (888) 997-8267
Required tools General hand tools 21/64" drill bit Torque wrench Threadlocker Center punch
 Slipper Spring Kit (part numbers 2560, 2570 and 2580) Item Qty Part number Description 1... 8... 350054-50...3/8-16 x 1" grade 8 self-tapping screw 2... 4... 350084-00...7/16-14 x 4" grade 5 3... 6...
The Go Baby Go Build Manual
 The Go Baby Go Build Manual The step-by-step guide to creating your own Go Baby Go Car 4488 Shockwave Robotics and Pacific University Index 1. List of Mat erials 2. Mechanical Assembly a. Installing the
Shaver Industries. Assembly Instructions Vertical Vinyl Curtain Door DT2 Wire Rope Replacement
 Shaver Industries 20 Steckle Place, Kitchener, ON N2E 2C3 Ph 1(888) 766 8328 www.shaverinc.com Assembly Instructions Vertical Vinyl Curtain Door DT2 Wire Rope Replacement Overview: Preparation: Installation:
3.0 bebionic glove 20
 20 3.0 bebionic glove The bebionic glove is made from a multi-layered, variable hardness, silicone-based material, lined with fabric mesh. This construction resists soiling, wear and puncture damage.!
TL4076 Top 5 Tips Get to know your TL4076
 TL4076 Top 5 Tips Get to know your TL4076 Thermal Break with Teflon liner (behind fan) Hot End Assembly Fan Heat Block Extruder with toothed gear(brass) and idler (steel) Filament Guide Tube Nozzle Cable
Arlo Power Distribution Board Kit (#28996)
") Web Site: www.parallax.com Forums: forums.parallax.com Sales: sales@parallax.com Technical: support@parallax.com Office: (916) 624-8333 Fax: (916) 624-8003 Sales: (888) 512-1024 Tech Support: (888) 997-8267
Web Site: www.parallax.com Forums: forums.parallax.com Sales: sales@parallax.com Technical: support@parallax.com Office: (916) 624-8333 Fax: (916) 624-8003 Sales: (888) 512-1024 Tech Support: (888) 997-8267
Biomedical Engineering. Arm Prosthesis. Signals TEAM 2: CHARLES BROWN, ASHLEY LEMUS,TOM PROKOP AND ARIUM ROSE
 Biomedical Engineering Arm Prosthesis Controlled by EEG Signals TEAM 2: CHARLES BROWN, ASHLEY LEMUS,TOM PROKOP AND ARIUM ROSE Overview: OBJECTIVES PROCESS CHALLENGES SOLUTIONS IF THE DESIGN MEET THE EXPECTATIONS
Guide for Primary Injection Testing WL Circuit Breakers. Document No. : 11-C
 s Guide for Primary Injection Testing WL Circuit Breakers Document No. : 11-C-9036-00 Before Beginning... Qualified Person Siemens type WL circuit breakers should only be only be operated, inspected, and
Installation Instructions for John Deere cotton picker models: 9986 & 2-row and All-row systems included.
 Ag Leader Technology Cotton Picker Installation Installation Instructions for John Deere cotton picker models: 9986 & 9996 2-row and All-row systems included. IMPORTANT: Ensure the model numbers shown
EGG 101L INTRODUCTION TO ENGINEERING EXPERIENCE
 EGG 101L INTRODUCTION TO ENGINEERING EXPERIENCE LABORATORY 11: AUTOMATED CAR PROJECT DEPARTMENT OF ELECTRICAL AND COMPUTER ENGINEERING UNIVERSITY OF NEVADA, LAS VEGAS GOAL: This section combines the motor
AmTryke Adult Recumbent Model JT2000 #50-FC-2000
 AmTryke Adult Recumbent Model JT2000 #50-FC-2000 TOOLS Needed for Assembly 5 mm Allen Wrench 8 mm Socket or Wrench 10 mm Socket or Wrench 14 mm Socket or Wrench 15 mm Socket or Wrench 22 mm Socket or Adjustable
accqpulse Velocity Profiler Sensor Installation Guide
 accqpulse Velocity Profiler Sensor Installation Guide Instruction Sheet #69-7403-012 Released May 2016 Overview This instruction guide is for the installation of the accqpulse shallow water and deep water
Reliable Reach. Robotics Unit Lesson 4. Overview
 Robotics Unit Lesson 4 Reliable Reach Overview Robots are used not only to transport things across the ground, but also as automatic lifting devices. In the mountain rescue scenario, the mountaineers are
Battery Pack & Electrical Examples. What other teams saw that you don t need to see Steve McMullen
 Battery Pack & Electrical Examples What other teams saw that you don t need to see Steve McMullen Some Functions of the Pack Design Provide electrical Connection Cells to Module Modules to Pack Pack to
Build Manual. for Studying Electrical Conductivity using a 3D Printed 4-Point Probe Station
 Build Manual for Studying Electrical Conductivity using a 3D Printed 4-Point Probe Station 1 Materials 1. 3D printed parts Head support Trigger Front Probe head panel Right panel Middle panel Left panel
Day Tank Controller Design Details by David Lynn s/y Nine of Cups
 Day Tank Controller Design Details by David Lynn s/y Nine of Cups A day tank controller is a pretty simple device. It should sense when the level of fuel in the day tank drops to somewhere around ¼ full
Electronics. Electronics docs.imade3d.com/ Page 1 of 15
 Electronics 2018 docs.imade3d.com/ Page 1 of 15 Step 1 Wire Comb 4" zip ties Wire comb Step 2 Align the wire comb with the corresponding annotations (ie. filament fan, heat block, etc.), and secure it
Setup and Configuration Guide Universal Switch Interface
 Table of Contents J1939 inmotion Cell Setup and Configuration Guide Universal Switch Interface Overview... 2 Warnings... 3 J1939 inmotion Cell Technical Details... 4 inmotion Cell Installation Steps...
Installation of Raxiom Switchback Turn Signal Conversion Kit w/resistors
 Installation of Raxiom Switchback Turn Signal Conversion Kit w/resistors Overview: Below are the steps involved in the installation of the Raxiom Switchback Turn Signal LED lights in the 1987 1993 Ford
Linear Stepper Driver v0.9.2 Assembly Instructions
 Linear Stepper Driver v0.9.2 Assembly Instructions Here's what's included in the kit: 1x Printed Circuit board 1x Heatsink bracket 5x 0.1uF capacitors 1x 6-pin ISP header 1x 10-pin configuration header
Data Sheet. Motorized Test Stand w/pc Control ESM303
 Page 1 of 5 The ESM303 is a highly configurable single-column force tester for tension and compression measurement applications up to 300 lbf [1.5 kn], with a rugged design suitable for laboratory and
EGG 101L INTRODUCTION TO ENGINEERING EXPERIENCE
 EGG 101L INTRODUCTION TO ENGINEERING EXPERIENCE LABORATORY 8: DC MOTOR CONTROL DEPARTMENT OF ELECTRICAL AND COMPUTER ENGINEERING UNIVERSITY OF NEVADA, LAS VEGAS GOAL: This section will introduce DC motors
User s Manual. For. BH-MSD-2A Micro Stepping Driver
 User s Manual For BH-MSD-2A Micro Stepping Driver Product Number Code For Micro step drive Website:-www.bholanath.in Page 2 BH MSD 2A BHOLANATH MICRO STEP DRIVE 2 Amp 1:DC power input :12V~36VDC 2.Output
OIL COOLER KIT INSTALLATION INSTRUCTIONS PART NUMBER D E92 335i/xi (N55 engine) with BMW Standard bumper and with stock oil cooler
 with BMW Standard bumper and with stock oil cooler") OIL COOLER KIT INSTALLATION INSTRUCTIONS PART NUMBER D570-0924 APPLICATION: 2011-12 E92 335i/xi (N55 engine) with BMW Standard bumper and with stock oil cooler Congratulations for being selective enough
OIL COOLER KIT INSTALLATION INSTRUCTIONS PART NUMBER D570-0924 APPLICATION: 2011-12 E92 335i/xi (N55 engine) with BMW Standard bumper and with stock oil cooler Congratulations for being selective enough
Operating Manual For Stepper Driver
 Contents Table of Contents Operating Manual For Stepper Driver 5042 High Performance Micro stepping Driver Attention: Please read this manual carefully before using the driver! E L E C T R O N I C S 54
OIL COOLER KIT INSTALLATION INSTRUCTIONS PART NUMBER D
 OIL COOLER KIT INSTALLATION INSTRUCTIONS PART NUMBER D570-0904 APPLICATION: 2011-2012 E90 335i/xi (N55 engine) with BMW standard bumper and with stock oil cooler Congratulations for being selective enough
Modix Big-60 Assembly Manual Part 2
 Modix Big-60 Assembly Manual Part 2 Version 1.0, October 2017 Menu 1. Motors & End Stop Wiring... 3 2. Controller Wiring Check... 6 3. Extruder Wiring... 7 4. Electronic Box Cover... 9 5. Filament Sensor...
5. E-axis assembly. 5. E-axis assembly. Written By: Jakub Dolezal manual.prusa3d.com/ Page 1 of 40
 5. E-axis assembly Written By: Jakub Dolezal 2018 manual.prusa3d.com/ Page 1 of 40 Step 1 Tools necessary for this chapter Needle-nose pliers for zip tie trimming. 2.5mm Allen key for M3 screws 2mm Allen
2-row and All-row systems included.
 Ag Leader Technology Cotton Picker Installation Installation Instructions for John Deere cotton picker models: 2-row and All-row systems included. IMPORTANT: Ensure the model numbers shown above correspond
A B C D E F. Tools Required (supplied by others)
") Page 1 of 17 Parts List Below Deck Automatic Retractable Security Cover Kit (1) Tube End Bearing Plate (A) (1) Rope Reel and Cover Drum Motor Assembly (B) (1) Cover Drum (1) Pulley Support Channel (2)
Page 1 of 17 Parts List Below Deck Automatic Retractable Security Cover Kit (1) Tube End Bearing Plate (A) (1) Rope Reel and Cover Drum Motor Assembly (B) (1) Cover Drum (1) Pulley Support Channel (2)
Is it Magnetic? 1. Fill in each table. List things ATTRACTED by a magnet on the LEFT and things NOT ATTRACTED on the RIGHT.
 Is it Magnetic? 1. Fill in each table. List things ATTRACTED by a magnet on the LEFT and things NOT ATTRACTED on the RIGHT. MAGNETIC NON-MAGNETIC # Object Made from check # Object Made from check --- ------------
INSTALLATION INSTRUCTIONS
 2705 INSTALLATION INSTRUCTIONS 5-6 ! IMPORTANT PLEASE DON T HURT YOURSELF, YOUR KIT OR YOUR VEHICLE. TAKE A MINUTE TO READ THIS IMPORTANT INFORMATION. This kit is to be used on a pickup truck only, and
Agilent G3510A/G3511A Multimode Inlet
 For the Agilent 7890A Gas Chromatograph Installation Instructions Parts Supplied Table Liquid Carbon Dioxide (CO 2 ) Kit G350A Description Liquid CO2 MMI inlet assembly (MMI Inlet weldment assembly, EPC
Installation Manual TWM Performance Short Shifter Cobalt SS/SC, SS/TC, HHR SS, Ion Redline and Saab 9-3
 Page 1 Installation Manual TWM Performance Short Shifter Cobalt SS/SC, SS/TC, HHR SS, Ion Redline and Saab 9-3 Please Note: It is preferable to park on a flat surface, as you will have to engage and disengage
Single-end Porting Head 1 ITEM A/R 2 A/R A/R A/R
 MXP50N Internal Bearing 50mm ( inch) Bore Models: MXP50NTP MXP50NGP MXP50NNP MXP50NST MXP50NSG MXP50NSN Both Metric and Inch models Parts Sheet 000_0_MXP5 0 5 7 5 9 0 5 7 9 0 Singleend Porting Head Return
TOYOTA Runner (17 Beadlock ) ALLOY WHEEL Preparation
 ALLOY WHEEL Preparation") Preparation Part Number: PTR45-35010 Kit Contents Item # Quantity Reqd. Description 1 1 Forged Al Wheel 17 x7.5 x 6mm Hardware Bag Contents Item # Quantity Reqd. Description 1 1 per wheel TRD Center Cap
Preparation Part Number: PTR45-35010 Kit Contents Item # Quantity Reqd. Description 1 1 Forged Al Wheel 17 x7.5 x 6mm Hardware Bag Contents Item # Quantity Reqd. Description 1 1 per wheel TRD Center Cap
S&C: Understanding Root Causes & Assessing Effective Remedies C4R Final Dissemination Event, Paris 15 th March 2017
 Capacity for Rail S&C: Understanding Root Causes & Assessing Effective Remedies C4R Final Dissemination Event, Paris 15 th March 2017 Presenter: Dr Yann Bezin Institute of Railway Research, University
OIL COOLER KIT INSTALLATION INSTRUCTIONS PART NUMBER D E92 335i/xi (N55 engine) with M-Technic bumper and without stock oil cooler
 with M-Technic bumper and without stock oil cooler") OIL COOLER KIT INSTALLATION INSTRUCTIONS PART NUMBER D570-0925 APPLICATION 2011-12 E92 335i/xi (N55 engine) with M-Technic bumper and without stock oil cooler Congratulations for being selective enough
OIL COOLER KIT INSTALLATION INSTRUCTIONS PART NUMBER D570-0925 APPLICATION 2011-12 E92 335i/xi (N55 engine) with M-Technic bumper and without stock oil cooler Congratulations for being selective enough
Overvoltage protection and voltage stabilization for Motion Control terminals
 Keywords Buffer capacitor Brake chopper Fieldbus Drive Stepper DC motor Output stage DC link Overload Recovery EtherCAT K-Bus Bus Terminal PLC Overvoltage protection and voltage stabilization for Control
SWITCH PRODUCTS SAFETY & SIGNAL MATS SENSING EDGES SENSING BUMPERS INTERFACE CONTROLLERS LIGHT CURTAINS CUSTOM DESIGNS
 Celebrating 50 Years of Excellence A full spectrum of sensing and signaling products for protection, detection, and safety 1957 In Safety and Sensing 2007 SWITCH PRODUCTS SAFETY & SIGNAL MATS SENSING EDGES
Heat Engines Lab 12 SAFETY
 HB 1-05-09 Heat Engines 1 Lab 12 1 i Heat Engines Lab 12 Equipment SWS, 600 ml pyrex beaker with handle for ice water, 350 ml pyrex beaker with handle for boiling water, 11x14x3 in tray, pressure sensor,
INSTALLATION INSTRUCTIONS
 2807 INSTALLATION INSTRUCTIONS SECTION - AIR SPRING SECTION 2 - AIR ACCESSORY -6 ! IMPORTANT PLEASE DON T HURT YOURSELF, YOUR KIT OR YOUR VEHICLE. TAKE A MINUTE TO READ THIS IMPORTANT INFORMATION. This
Actuator Products Rodless Cylinders. GDL Series. Material specifications. Specifications OSP-P. Series. Series P1X. Series P1Z.
 Catalog PDN1-3US High Performance : (s FDC12HP-... thru FDC45HP-...) The High Performance series is the basis for s development, which is used in the majority of applications. High Performance guides consist
Project Report Cover Page
 New York State Pollution Prevention Institute R&D Program 2015-2016 Student Competition Project Report Cover Page University/College Name Team Name Team Member Names SUNY Buffalo UB-Engineers for a Sustainable
Throttle Cable Pull - Patent Pending By: NetGain Controls, Inc.
 Throttle Cable Pull - Patent Pending By: NetGain Controls, Inc. Powering the future! Installation Guide 2011 All Rights Reserved NetGain Controls, Inc. 1 of 8 Introduction Thank you for purchasing a NetGain
LOAD CELL TROUBLESHOOTING
 Technical Notes LOAD CELL TROUBLESHOOTING The objective of this Technical Note is to perform a simple check to identify troubleshooting of a load cell on the field, by using simple instrumentation as a
INSTALLATION INSTRUCTIONS
 270 INSTALLATION INSTRUCTIONS 5-6 ! IMPORTANT PLEASE DON T HURT YOURSELF, YOUR KIT OR YOUR VEHICLE. TAKE A MINUTE TO READ THIS IMPORTANT INFORMATION. This kit is to be used on a pickup truck only, and
ROTARY MOTION SENSOR FOR ULI
 Instruction Manual and Experiment Guide for the PASCO scientific Model CI-6625 012-06099A 9/96 ROTARY MOTION SENSOR FOR ULI 1996 PASCO scientific $5.00 Table of Contents Section Page Copyright Warranty,
Retrofit Instructions for Replacing an In-Tube Motor from within a Face Mount Shaver Door
 Retrofit Instructions for Replacing an In-Tube Motor from within a Face Mount Shaver Door 1. Remove all Garage Door Style rollers from the curtain door s pultrusion tubes. This will be most easily done
EksoVest Operator Manual
 EksoVest Operator Manual February 2018 2 This Page Intentionally Left Blank 3 Copyright 2018 Part Number 2 All Rights Reserved No part of this publication may be reproduced, transmitted, transcribed, stored
Please read the safety instructions carefully before get started.
 Safety Instructions Please read the safety instructions carefully before get started. ANYCUBIC 3D printer generates high temperature. Do not reach inside of the printer during operation. Allow time for
Quick Start Guide. Three-phase brushless DC motor driver expansion board based on L6230 for STM32 Nucleo (X-NUCLEO-IHM07M1)
") Quick Start Guide Three-phase brushless DC motor driver expansion board based on L6230 for STM32 Nucleo (X-NUCLEO-IHM07M1) Version 1.0 (September 18, 2015) Overview 2 1 Introduction to the STM32 Open Development
Quick Start Guide Three-phase brushless DC motor driver expansion board based on L6230 for STM32 Nucleo (X-NUCLEO-IHM07M1) Version 1.0 (September 18, 2015) Overview 2 1 Introduction to the STM32 Open Development
Maker's Tool Works. Written By: Micro. Wiring methods used by MTW Printers using the Rambo Electronics. Wiring Rambo Electronics & Power Supply
 Maker's Tool Works Wiring Rambo Electronics & Power Supply Wiring methods used by MTW Printers using the Rambo Electronics. Written By: Micro 2017 mtw.dozuki.com Page 1 of 10 TOOLS: Screw Drivers (1) Wire
Substation Equipment (Bushings)
") Substation Equipment (Bushings) Mark B. Goff, P.E. Tennessee Valley Authority ABSTRACT Bushings provide a point of interface such that electrical current can pass to and from an electrical apparatus. Much
Substation Equipment (Bushings) Mark B. Goff, P.E. Tennessee Valley Authority ABSTRACT Bushings provide a point of interface such that electrical current can pass to and from an electrical apparatus. Much
G203V / G213V MANUAL STEP MOTOR DRIVE
 G203V / G213V MANUAL STEP MOTOR DRIVE PRODUCT DIMENSIONS PHYSICAL AND ELECTRICAL RATINGS Minimum Maximum Units Supply Voltage 18 80 VDC Motor Current 0 7 A Power Dissipation 1 13 W Short Circuit Trip 10
Control Box Wiring For PRSstandard Tool
 888-680-4466 ShopBotTools.com Control Box Wiring For PRSstandard Tool Copyright 2018 ShopBot Tools, Inc. page 1 Table of Contents Introduction...5 Installation...5 Powering the PRSstandard Control Box...5
BLAST CAPACITY ASSESSMENT AND TESTING A-60 OFFSHORE FIRE DOOR
 BLAST CAPACITY ASSESSMENT AND TESTING Final Report December 11, 2008 A-60 OFFSHORE FIRE DOOR Prepared for: JRJ Alum Fab, Inc. Prepared by: Travis J. Holland Michael J. Lowak John R. Montoya BakerRisk Project
Automatic Roof Hatch Opener
 Automatic Roof Hatch Opener Installation Guide REQUIRED TOOLS (These tools are required to complete the installation) Cordless Drill 1/8 1/4 Drill Bits 1/8 Pin Punch #2 Philips Bit Rachet Sharpie Hammer
Quick Start Guide. Three-phase brushless DC motor driver expansion board based on L6230 for STM32 Nucleo (X-NUCLEO-IHM07M1)
") Quick Start Guide Three-phase brushless DC motor driver expansion board based on L6230 for STM32 Nucleo (X-NUCLEO-IHM07M1) Version 1.1.0 (May 16, 2016) Quick Start Guide Contents 2 X-NUCLEO-IHM07M1: Three-phase
Quick Start Guide Three-phase brushless DC motor driver expansion board based on L6230 for STM32 Nucleo (X-NUCLEO-IHM07M1) Version 1.1.0 (May 16, 2016) Quick Start Guide Contents 2 X-NUCLEO-IHM07M1: Three-phase
Edition Manual Chapter Page Workshop Manual, Stiga Park 5 Belts 11
 2008-05-19 Workshop Manual, Stiga Park 5 Belts 11 Pro 20 1. Dismantle the belts A and B as described above. 2. Block up the rear frame and remove the right rear wheel. Clean carefully the insex hole in
riderite.com INSTALLATION INSTRUCTIONS
 2528 INSTALLATION INSTRUCTIONS 4-16 ! IMPORTANT PLEASE DON T HURT YOURSELF, YOUR KIT OR YOUR VEHICLE. TAKE A MINUTE TO READ THIS IMPORTANT INFORMATION. This kit is to be used on a pickup truck only, and
READ INSTRUCTIONS COMPLETELY BEFORE BEGINNING INSTALLATION
 INSTALLATION INSTRUCTIONS Hot Fox In-Tank Fuel Warmer READ INSTRUCTIONS COMPLETELY BEFORE BEGINNING INSTALLATION Models covered by these instructions include: HFG 0-0 HFG 0- SHFT--0- SHH--0 TWHF 0- HFG
Instructions for 2-row monitoring only
 Installation Instructions for CaseIH cotton picker models: Instructions for 2-row monitoring only CAUTION: Ensure the model numbers shown above correspond to the machine model. If you receive the incorrect
Installation Guide. Nitrogen-Phosphorus Detector on 6890 GC Accessories G1575A, G1576A, G1594A, G1599A
 Installation Guide Nitrogen-Phosphorus Detector on 6890 GC Accessories G1575A, G1576A, G1594A, G1599A Agilent Technologies 2001 All Rights Reserved. Reproduction, adaptation, or translation without permission
ROYAL LOW-PROFILE ACCU-LENGTH CNC COLLET CHUCKS
 ROYAL LOW-PROFILE ACCU-LENGTH High RPM All Royal CNC collet chucks are balanced by design for high-speed operation, and can often be run at higher speeds than conventional 3-jaw chucks because they are
EMG SpikerShield v1.2 Instructions
 EMG SpikerShield v1.2 Instructions Prepare yourself. In 2-4 hours, you will have built your own Arduino compatible EMG SpikerBox, so you can control robots and anything you wish with your EMG muscle activity.
Assembly Guide for RedBot with Shadow Chassis
 Page 1 of 32 Assembly Guide for RedBot with Shadow Chassis Introduction The SparkFun RedBot is a platform for teaching basic robotics and sensor integration! It is based on the SparkFun RedBoard and fully
*Friedman Research Corporation, 1508-B Ferguson Lane, Austin, TX ** Center for Injury Research, Santa Barbara, CA, 93109
 Analysis of factors affecting ambulance compartment integrity test results and their relationship to real-world impact conditions. G Mattos*, K. Friedman*, J Paver**, J Hutchinson*, K Bui* & A Jafri* *Friedman
Futura 20/60. Car Seat OWNER S MANUAL. Models 79013, 79014
 Futura 20/60 Car Seat OWNER S MANUAL Models 79013, 79014 Message to Parents Thank you for choosing the Fisher-Price Futura 20/60 Car Seat. Before you use this car seat, please take time to read and understand
The DIY Smart Saw Desktop Version - Troubleshooting and Appendices
 1 Page Contents Troubleshooting:... 3 Appendices:... 13 DIY Desktop CNC Machine Master Bill of Materials:... 13 DIY Desktop CNC Machine Stepper Driver Module Bill of Materials:... 17 DIY Desktop CNC Machine
AmTryke Adult Recumbent Model HP1000 #50-HC-1000
 AmTryke Adult Recumbent Model HP1000 #50-HC-1000 TOOLS Needed for Assembly 5 mm Allen Wrench 8 mm Socket or Wrench 10 mm Socket or Wrench 14 mm Socket or Wrench 15 mm Socket or Wrench 22 mm Socket or Adjustable
Instructions for 2-row monitoring only
 Installation Instructions for CaseIH cotton picker models: Instructions for 2-row monitoring only Ensure the model numbers shown above correspond to the machine model. If you receive the incorrect installation
App Manual Solution Features
 App Manual Solution Features REGISTERING A FLEET Registration form Go to the Registration page: https://fleetpulse.app/register Select the desired language Directs to the Registration Form, where you can
HP Modular Cooling System 200/100 Options Installation Guide
 HP Modular Cooling System 200/100 Options Installation Guide Abstract This document is intended for the person who installs racks and rack products, is qualified in performing installations, and trained
Lower Adjuster Small Black Header Sensor Reversed
 Parts List for Combine Quantity by Model Early Late Early Late Note: Indented items indicate parts included M M M M M M in an assembly listed above F F F F F F 7 7 8 8 8 8 5 6 5 5 6 6 Part Name/Description
TOWARDS A UNIVERSAL COUPLER DESIGN FOR MODERN POWERED PROSTHESES
 TOWARDS A UNIVERSAL COUPLER DESIGN FOR MODERN POWERED PROSTHESES Levi G. Sutton 1, Adam Clawson 2, T. Walley Williams III 3, James H. Lipsey 1, Jonathon W. Sensinger 1,4 1. Rehabilitation Institute of
Build Instructions and User Guide
 Build Instructions and User Guide Getting Started To build the Rock Drill 4069 you will need: Solder Wire Cutters Soldering Iron Small pliers The kit is suitable for beginners or more experienced builders
RAIN SENSING AUTOMATIC CAR WIPER
 International Journal of Technical Innovation in Modern Engineering & Science (IJTIMES) Impact Factor: 5.22 (SJIF-2017), e-issn: 2455-2585 Volume 4, Issue 8, August-2018 RAIN SENSING AUTOMATIC CAR WIPER
TIRES AND WHEELS 22-1 TIRES AND WHEELS CONTENTS
 ZJ TIRES AND WHEELS 22-1 TIRES AND WHEELS CONTENTS TIRES... 1 WHEELS... 7 TIRES INDEX DESCRIPTION AND OPERATION RADIAL-PLY TIRES... 2 REPLACEMENT TIRES... 3 SPARE TIRE TEMPORARY... 2 TIRE INFLATION PRESSURES...
Detailed Design Review
 Detailed Design Review P16241 AUTONOMOUS PEOPLE MOVER PHASE III Team 2 Agenda Problem Definition Review Background Problem Statement Project Scope Customer Requirements Engineering Requirements Detailed
Illinois Space Society Flight Readiness Review. University of Illinois Urbana-Champaign NASA Student Launch March 30, 2016
 Illinois Space Society Flight Readiness Review University of Illinois Urbana-Champaign NASA Student Launch 2015-2016 March 30, 2016 Team Managers Project Manager: Ian Charter Structures and Recovery Manager: