baker+1 oil Pan installation
|
|
|
- Emory Knight
- 5 years ago
- Views:
Transcription


1 Installation Instructions
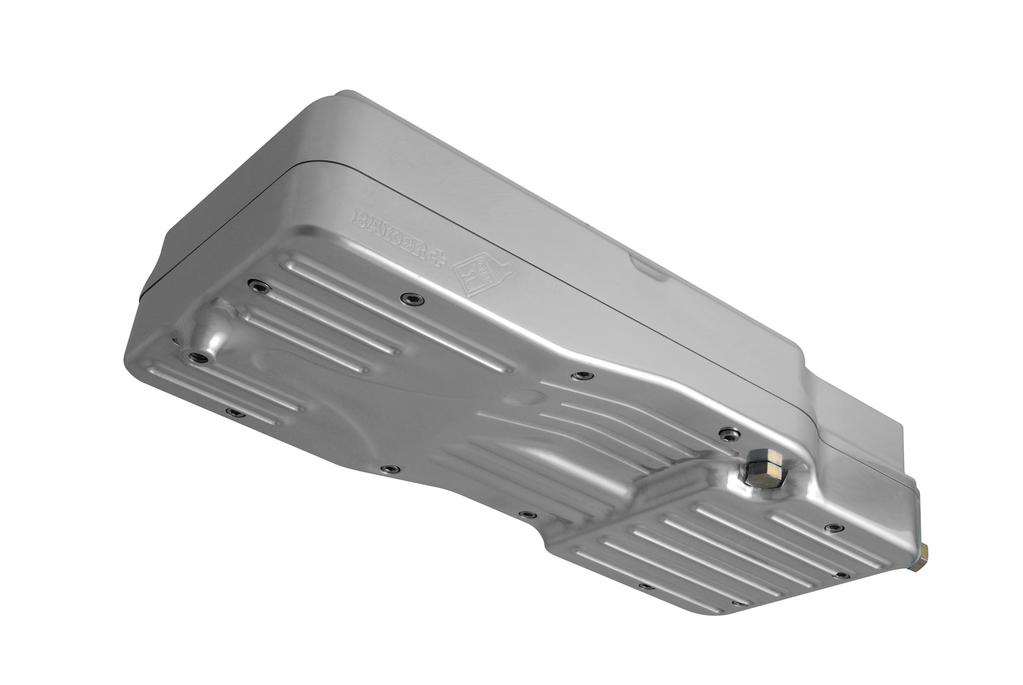
2 over view baker+1 oil Pan installation V FEATURES: 2 piece Billet Aircraft Grade 6061-T6 Aluminum Reduces engine oil temperature by 10 degrees on an 80 degree day. Multiple integral baffles eliminate the stock plastic baffle with springs. BAKER +1 Pan has the feed located in the rear and return in the front for more complete system circulation. Structurally located integral boss for Alloy Art TXR stabilizer. Website: APPLICATION: FLH MODELS SKILL LEVEL: As with most things in life there is no substitute for skill and experience. It is highly recommended by BAKER Drivetrain that when performing this task or any task related to the Drivetrain components on your motorcycle, that you refer to your Factory Service Manual for your specific model of bike. SOME HAND TOOLS AND shop supplies REQUIRED: 5/8 wrench or socket 3/16 Allen Socket Torque Wrench 3/16 Allen Transmission Fluid - BAKER recommends: Spectro 75W 140 for best performance. other options are: Belray, Redline, or H-D transmission fluid. Motor Oil (20W50) Blue Thread locker PAGE 1 OVERVIEW
3 baker+1 oil pan installation: table of contents: 1. Overview 2. Table of Contents 3. Included Parts Detail 4-7. Preparation and Installation 8. Terms 9. Disclaimer PAGE 2 TABLE OF CONTENTS

4 included parts Figure 1 THE FOLLOWING PARTS ARE INCLUDED AS SHOWN IN FIGURE 1 NUMBER QTY P/n DESCRIPTION a Gasket (H-D) TP-5 top Oil Pan /4-20 x 1 SHCS R50PD0 5/16 x 1/2 Dowel 5 1 5QT-Gas Gasket BP-5 bottom Oil Pan C175KCSS/P 1/4-20 x 1 3/4 SHCS S.S C150KCSS/P 1/4-20 x 1 1/2 SHCS S.S C125KCSS/P 1/4-20 x 1 1/4 SHCS S.S H-S05M Zero Leak Drain Plug 11 * /8 NPT Plug 12 * MM /8 NPT Elbow Fitting *= Customer Preference, Year, and Model Specific. PAGE 3 PARTS
5 Preparation and dissassembly: PREPARATION: Support motorcycle on a proper lift or jack. Take extra precautions to make sure motorcycle stays stable and stationary. For your safety place motorcycle in 1st gear. DISSASSEMBLY: 1. FOR YOUR SAFETY, DISCONNECT BOTH BATTERY CABLES (FAILURE TO DUE SO COULD RESULT IN PERSONAL INJURY). 2. Remove your transmission and oil drain plug, drain fluids and dispose of at your local recycler. 3. Remove your rear wheel following the Factory Service Manual using proper safety precautions and tools. 4. Some models and or aftermarket exhaust systems might have to be removed in order to remove rear wheel/pivot shaft bolt. 5. With the rear of the motorcycle in the air; rear wheel removed, place a block of wood or two under the motorcycle frame toward the rear (a couple of 4x4 s will work well) this will enable you to lower and remove the jack while keeping the motorcycle raised in the rear. 6. Place the jack under the motor area with a small block of wood (small enough so it just contacts the bottom of the motor not the frame). 7. Remove your swing arm pivot shaft ¾ of the way or enough to clear the transmission tail section following your Factory Service Manual. 8. Raise the jack under the motor until the tail shaft of the transmission is about an inch above its original location. This will give you the necessary room for removal and installation of the oil pan. TAKE PRECAUTION WHEN RAISING THE MOTOR AND TRANSMISSION TAIL SECTION THAT YOU DO NOT BIND OR KINK ANY CONNECTORS OR MOTOR MOUNT LINKAGE. 9. Remove the factory oil pan following the Factory Service Manual. FAILURE TO TAKE PRECAUTIONS WHEN LOWERING THE MOTORCYCLE, MOVING JACKS COULD RESULT IN GREAT PERSONAL INJURY. MAKE SURE MOTORCYCLE REMAINS STABLE WHEN PREFORMING TASKS. PAGE 4 PARTS

6 Preparation and installation: BAKER + ONE OIL PAN PREP: 1. Separate the oil pan by removing the 4 ¼ -20 x 1 ¾ SHCS (one in each corner). 2. Place the bottom pan and middle gasket aside for now. 3. Check for any debris inside the oil pans from shipping, the oil pans must be clean of all debris to avoid engine damage. 4 Clean gasket surface area on transmission with brake cleaner or suitable cleaning solvent using a putty knife. Figure 2 INSTALLATION: 1. Install the top piece of the oil pan with top gasket supplied in kit (p/n A). (See Figure 2) 2. Install the 12 ¼ -20 x 1 SHCS (see figure 1) using Blue Thread Lock. 3. Make sure gasket is aligned with pan before tightening, snug all bolts evenly. Torque all bolts to 110 in lbs. following figure Apply a small amount of grease to the bottom pan gasket in each corner. (this will help hold it in place and aid in installation of the bottom pan) 5. Place the BAKER supplied gasket on top of the bottom pan, lining up all holes. 6. Install the bottom pan by sliding it under the top pan and then lining up the dowels, pushing into position until fully seated. (Figure 4) IT IS CRITICAL THAT CARE IS TAKEN WHEN INSTALLING THE BOTTOM PAN SO THAT THE GASKET DOES NOT GET DAMAGED OR TORN. Figure 3 PAGE 5 Prep and INstallation


7 i n sta l l at i o n: 8. Install the bolts with Blue Thread Lock referring to figure 1, making sure gasket stays lined up, snug bolts. 9. Torque to 110 in lbs. following figure Reinstall the swing arm pivot bolt following the Factory Service Manual. 11. Reinstall the rear wheel following the Factory Service Manual. 12. Fill transmission with fl oz of transmission fluid for , or 32 fl oz for 2007-newer. Fluid can be checked by removing the oil level plug. Figure Fill oil pan with 4 ½ quarts of 20W50 H-D oil or customer preferred oil. Check oil level and add as required. Figure 5 PAGE 6 assembly

8 i n sta l l at i o n: Once the maiden voyage had been made around the block or down the road. Take the time to double check all fasteners for tightness. Also with the bike as close to level as you can safely get it, and the transmission fluid / oil warmed up, double check the level of the fluids. Top-off if necessary. Figure 4- Shown with Alloy Art TRX PAGE 7 INstallation
9 terms SPECIAL ORDERS A minimum $500 deposit is required with all special orders. Special orders include unique case finishes, unique side door requests (i.e.; wrinkle black door or no logo). ALL OTHER ORDERS Orders can be pre-paid using VISA, Mastercard or American Express. Prices shown are F.O.B. Haslett, MI. BAKER TM provides free UPS ground shipping on all retail orders for complete transmissions or transmission kit. UPS air shipment is available upon request. Customer is responsible for air shipment premiums. LIMITED WARRANTY BAKER TM Inc. transmission assemblies, transmission kits, primaries, belt drives and wide tire kits are guaranteed to the original purchaser to be free of manufacturing defects in materials and workmanship for a period of 5 years from the date of purchase or up to 60,000 miles - whichever is sooner. If the product is found by BAKER TM to be defective, such products will, at the option of BAKER TM, be replaced or repaired at cost to BAKER TM. In the event warranty service is required, the original purchaser must call or write BAKER TM immediately with the problem. If it is deemed necessary for BAKER TM to make an evaluation to determine whether the transmission assembly or transmission kit is defective, the entire transmission assembly, whether originally purchased as an assembly or kit, must be properly packaged and returned prepaid to BAKER TM with a copy of the original invoice of purchase. If after an evaluation has been made by BAKER TM and a defect in materials and/or workmanship is found, BAKER TM will, at BAKER s option, repair or replace the defective part of the assembly. Warranty card must be returned within 45 days of purchase to be valid. ADDITIONAL WARRANTY PROVISIONS This limited warranty does not cover labor or other costs or expenses incidental to the repair and or replacement of BAKER TM products. This warranty does not apply if one or more of the following situations is judged by BAKER TM to be relevant: improper installation, accident, modification (including but not limited to use of unauthorized parts), racing, high performance application, mishandling, misapplication, neglect (including but not limited to improper maintenance), or improper repair. BAKER TM shall not be liable for any consequential or incidental damages arising out of or in connection with a BAKER TM transmission assembly, transmission kit, swingarm, fender, component or part. Consequential damages shall include without limitation, loss of use, income or profit, or losses sustained as the result of injury (including death) to any person or loss of or damage to property. BAKER TM transmissions, transmission kits, primaries, belt drives, and Wide Tire Kits are designed exclusively for use in Harley-Davidson motorcycles. BAKER TM shall have no warranty or liability obligation if a BAKER TM part is used in any other application. If it is determined that a BAKER TM transmission assembly has been disassembled during the warranty period for any reason, this limited warranty will no longer apply. PAGE 8 TERMS
10 discl aimer The words Harley, and H-D are registered trademarks and are for reference only. Use of H-D model designations and part numbers are for reference only. BAKER Drivetrain has no association with, and makes no claim against, these words, trademarks, or companies. It is the sole responsibility of the user to determine the suitability of this product for his or her use, and the user shall assume all legal, personal injury risk and liability and all other as well as all other obligations, duties and risks associated therewith. customer support For any installation or service questions, please contact our BAKER technical department toll free: Baker Drivetrain 9804 E. Saginaw Haslett, MI On the web: PAGE 9 DISCLAIMER
Installation Instructions
 Installation Instructions INSTALLATION INSTRUCTIONS over view V.031407 FEATURES BAKER FUNCTION FORMED PRIMARY ALL BILLET 6061-T6 AIRCRAFT GRADE ALUMINUM CONSTRUCTION One piece STARTER jackshaft (INCLUDED)
BAKER 9 PLATE AND BIG DOG CLUTCH PACK SERVICE KIT
 BAKER 9 PLATE AND BIG DOG CLUTCH PACK SERVICE KIT PAGE 1 BAKER 9 PLATE AND BIG DOG CLUTCH PACK SERVICE KIT TABLE OF CONTENTS: 1. Cover 2. Table of Contents 3. Exploded view 9plate 4. Exploded view BDM
BAKER CRUISE DRIVE TOP COVER BAKER 1.5 OIL PAN
 BAKER BAKER CRUISE 1.5 DRIVE OIL TOP PAN COVER PN: BD-1.5B Wrinkle Black Highlighted Pan Assembly BD-1.5CVO Granite Highlighted Pan Assembly CVO Models BD-1.5P Show Polished Pan Assembly BD-1.5C Chrome
Function Formed FL Oil Spout
 Installation Instructions Function Formed FL Oil Spout over view Function Formed FL Oil Spout v.102516 FEATURES: The new line of BAKER FL Oil Spouts follows on the heels of other BAKER Function Formed
BAKER 9 PLATE AND BIG DOG CLUTCH PACK SERVICE KIT
 BAKER 9 PLATE AND BIG DOG CLUTCH PACK SERVICE KIT P/N: CPRK-9P CPRK-BDM (9 PLATE CLUTCH SERVICE PACK) (BIG DOG CLUTCH SERVICE PACK) PAGE 1 TABLE OF CONTENTS 1. Cover 2. Table of Contents 3. Exploded View
KING KONG CLUTCH INSTALLATION INSTRUCTIONS
 KING KONG CLUTCH INSTALLATION INSTRUCTIONS over view BAKER KING KONG CLUTCH V.05_091008 FEATURES: 1 Piece steel clutch basket design 66 tooth ring gear configuration, 23% thicker than stock 20 massive
BAKER ATTITUDE CHAIN ADJUSTER
 PN 177-67K INSTALLATION INSTRUCTIONS FEATURES TAG PN QTY DESCRIPTION 1 13061 2 5/16-18 X 2, Hex Bolt, Zinc 2 6100 2 5/16 ID AN Washers, SS 3 25CNTE8Y 1 1/4-20 Low Head Nylock Nut 4 178-67 1 Support Plate,
V PN 4-155N1-K (N1 Shift Drum Kit For Ratchet Style Top Covers) PAGE 1 COVER
 PAGE 1 COVER") BAKER 4-SPEED CRUISE N1 DRIVE SHIFT TOP DRUM COVER KIT V3-05222014 PN 4-155N1-K (N1 Shift Drum Kit For Ratchet Style Top Covers) PAGE 1 COVER FEATURES Tired of stalling your jockey shift bike while trying
BAKER 4-SPEED CRUISE N1 DRIVE SHIFT TOP DRUM COVER KIT V3-05222014 PN 4-155N1-K (N1 Shift Drum Kit For Ratchet Style Top Covers) PAGE 1 COVER FEATURES Tired of stalling your jockey shift bike while trying
baker drivetrain speedometer recalibration unit instructions
 baker drivetrain 2007-2009 speedometer recalibration unit instructions baker drivetrain - www.bakerdrivetrain.com - 1-877-640-2004 table of contents: 2) Table of Contents 3-4) Wiring Diagrams 5) Recalibration
INSTALLATION INSTRUCTIONS
 INSTALLATION INSTRUCTIONS v.102306 BAKER COMPENSATING SPROCKET for 1985-2006 h-d FLT & FXR P/N 155-56S P/N 156-56S P/N 157-56S for 1985-2006 H-D SOFTAIL & DYNA P/N 155-56L P/N 156-56L P/N 157-56L BAKER
PV BAKER HYDRAULIC SIDE COVERS FOR FACTORY 6-SPEED INSTALLATION INSTRUCTIONS
 BAKER HYDRAULIC SIDE COVERS FOR FACTORY 6-SPEED INSTALLATION INSTRUCTIONS BAKER HYDRAULIC SIDE COVERS FOR FACTORY 6-SPEED TABLE OF CONTENTS 1. CD6 Hydraulic Side Cover Detail View 2. M8 Hydraulic Side
BAKER CRUISE DRIVE TOP COVER BAKER 4 SPEED TRANSMISSION
 BAKER CRUISE 4 SPEED DRIVE TRANSMISSION TOP COVER P/N: 4-7085 (4 Speed Transmission; 1970-1985 Tapered Mainshaft) 4-70E84 (4 Speed Transmission; 1970-E1984 Splined Mainshaft) 4-6569 (4 Speed Transmission;
Factory 5 Speed Kicker kit
 Factory 5 Speed Kicker kit 578-56MP-K Shown V4.010416 FEATURES 6061-T6 Aluminum billet bearing boor in show polish, raw finish, black finish 6061-T6 Aluminum billet side cover in show polish finish Clutch
BAKER CRUISE DRIVE TOP COVER BAKER 4 SPEED TRANSMISSION P/N:
 BAKER CRUISE 4 SPEED DRIVE TRANSMISSION TOP COVER P/N: 4-7090 (4 Speed Transmission; 1970-E1984 Splined Mainshaft) 4-70E84 (4 Speed Transmission; 1970-E1984 Tapered Mainshaft) 4-6569 (4 Speed Transmission;
OVERVIEW FEATURES APPLICATION AND REQUIRED HARDWARE
 PV0-908 OVERVIEW TM FEATURES The BAKER DD6 Transmission Builder s Kit comes with all of the necessary components to convert your stock 5-Speed into a 6-Speed, providing smoother shifting, positive neutral-finding,
BAKER DD7 INSTALLATION INSTRUCTIONS
 BAKER DD7 INSTALLATION INSTRUCTIONS PAGE 1 OVERVIEW OVERVIEW FEATURES The all new BAKER DD7 is more than just another gear added to the mix for the sake of one-upmanship. That 7th gear enables the motorcycle
BAKER DD7 INSTALLATION INSTRUCTIONS
 BAKER DD7 INSTALLATION INSTRUCTIONS v.13-032917 PAGE 1 OVERVIEW OVERVIEW v.13-032917 FEATURES The all new BAKER DD7 is more than just another gear added to the mix for the sake of one-upmanship. That 7th
S&S. S&S Oil Supply Line Installation Kit PN (For Harley-Davidson Dyna Models) PN (For FLT Models)
 PN (For FLT Models)") Instruction 510-0039 03-07-13 Copyright 2011, 2013 by S&S Cycle, Inc. All rights reserved. Printed in the U.S.A. S&S Cycle, Inc. 14025 County Highway G PO Box 215 Viola, Wisconsin 54664 Phone: 608-627-1497
Instruction 510-0039 03-07-13 Copyright 2011, 2013 by S&S Cycle, Inc. All rights reserved. Printed in the U.S.A. S&S Cycle, Inc. 14025 County Highway G PO Box 215 Viola, Wisconsin 54664 Phone: 608-627-1497
BAKER FRANKENTRANNY BUILDER S KIT
 BAKER FRANKENTRANNY BUILDER S KIT BAKER Drivetrain s 1999 Road King w/part Numbers: FT106SL (Frankentranny Kit), 478-56CP-U84 (Kicker Cover), 3511-64 (Kick Arm/Pedal Assembly, 475-56P (Oil Spout Assembly),
S&S. Installation Instructions for S&S Single Bore Tuned Induction Kit for 2008-Up Touring Models with Electronic Throttle Control
 Instruction 106-4891 06-24-14 Copyright 2009, 2014 by S&S Cycle, Inc. All rights reserved. Printed in the U.S.A. S&S Cycle, Inc. 14025 County Highway G PO Box 215 Viola, Wisconsin 54664 Phone: 608-627-1497
S&S. Cycle, Inc. Installation Instructions: Cam Support Plate for 2017-up M8 Models. Instruction
 Instruction 0-0 0-0- Version 0 by S&S Cycle, Inc. All rights reserved. Printed in the U.S.A. S&S Cycle, Inc. 0 Cty Hwy G Viola, Wisconsin Phone: 0-- Fax: 0-- Technical Service Phone: 0--TECH () Technical
S&S. Instruction Copyright 2014, Version 4 by S&S Cycle, Inc.
 Instruction 510-0295 10-02-2017 Copyright 2014, 2016. 2017 Version 4 by S&S Cycle, Inc. All rights reserved. Printed in the U.S.A. S&S Cycle, Inc. 14025 Cty Hwy G PO Box 215 Viola, Wisconsin 54664 Phone:
S&S. Installation Instructions: S&S Stealth Air Cleaner Covers. Instruction IMPORTANT NOTICE:
 Instruction 510-0226 09-03-13 Copyright 2013 by S&S Cycle, Inc. All rights reserved. Printed in the U.S.A. S&S Cycle, Inc. 14025 Cty Hwy G PO Box 215 Viola, Wisconsin 54664 Phone: 608-627-1497 Fax: 608-627-1488
S&S. Instruction IMPORTANT NOTICE:
 Instruction 106-4426 10-31-08 Copyright 2008 by S&S Cycle, Inc. All rights reserved. Printed in the U.S.A. S&S Cycle, Inc. 235 Causeway Blvd. La Crosse, Wisconsin 54603 Phone: 608-627-1497 Fax: 608-627-1488
left-side-drive hydraulic side cover installation manual
 left-side-drive hydraulic side cover installation manual rear feed and front feed models rear feed front feed for baker OD6, dd5, dd6, and stock H-D 5-speeds v3-021307 DD5, DD6, and Stock H-D Instructions
CRUSHER MAVERICK 2 INTO 2, BLACK 566
 CRUSHER MAVERICK 2 INTO 2, BLACK 566 THANK YOU FOR CHOOSING CRUSHER! PROTECT YOURSELF AND OTHERS FROM POTENTIAL INJURY AND PROPERTY DAMAGE OR LOSS. PAY CLOSE ATTENTION TO ALL INSTRUCTIONS, WARNINGS, CAUTIONS,
S&S. Installation Instructions: S&S Billet Air Cleaner Kit PN for Victory Motorcycles. Instruction IMPORTANT NOTICE:
 Instruction 106-1330 06-23-10 Copyright 2008, 2009, & 2010 by S&S Cycle, Inc. All rights reserved. Printed in the U.S.A. S&S Cycle, Inc. 14025 Cty Hwy G PO Box 215 Viola, Wisconsin 54664 Phone: 608-627-1497
Slimline Duals Installation Instructions Harley-Davidson Touring Models 2009-Current
 Slimline Duals Installation Instructions Harley-Davidson Touring Models 2009-Current Thank you for buying a Rinehart Racing exhaust system. We are committed to providing premium products that with proper
Right Side Drive Builder s Kits
 INSTALLATION INSTRUCTIONS FOR Right Side Drive Builder s Kits Ground-up Construction Only Big Twin Applications 9804 E. Saginaw Haslett, MI. 48840 - Phone: (517) 339-3835 - Fax: (517) 339-4590 - Toll Free:
S&S. Installation Instructions for S&S VFI Knock Sensor Kit for 2001-'07 Delphi Style VFI Module (with USB) Instruction
 Instruction") Instruction 106-1544 9-28-07 Copyright 2007 by S&S Cycle, Inc. All rights reserved. Printed in the U.S.A. S&S Cycle, Inc. 235 Causeway Blvd. La Crosse, Wisconsin 54603 Phone: 608-627-1497 Fax: 608-627-1488
Instruction 106-1544 9-28-07 Copyright 2007 by S&S Cycle, Inc. All rights reserved. Printed in the U.S.A. S&S Cycle, Inc. 235 Causeway Blvd. La Crosse, Wisconsin 54603 Phone: 608-627-1497 Fax: 608-627-1488
POWER CELL FOR DYNA WITH CLEAN CHROME COVER 562
 POWER CELL FOR DYNA WITH CLEAN CHROME COVER 562 THANK YOU FOR CHOOSING CRUSHER! PROTECT YOURSELF AND OTHERS FROM POTENTIAL INJURY AND PROPERTY DAMAGE OR LOSS. PAY CLOSE ATTENTION TO ALL INSTRUCTIONS, WARNINGS,
TeraFlex JK Complete HD Steering Kit
 1 Kit: 1853900 1853905 TeraFlex JK Complete HD Steering Kit www.teraflex.com Important Notes: Prior to beginning this or any installation read these instructions to familiarize yourself with the required
TCI Ford C-6 TransBrake Valve Body Shift Pattern: Park, Reverse, Neutral, First, Second, Third
 1 INSTRUCTIONS TCI 421500 Ford C-6 TransBrake Valve Body Shift Pattern: Park, Reverse, Neutral, First, Second, Third Thank you for choosing TCI products; we are proud to be your manufacturer of choice.
V (LSD Transmission with Hydraulic Clutch) (LSD R-Ratio Transmission with Hydraulic Clutch) P/N: PBL701PN PBL7211PN PAGE 1 COVER
 (LSD R-Ratio Transmission with Hydraulic Clutch) P/N: PBL701PN PBL7211PN PAGE 1 COVER") BAKER BAKER LEFT CRUISE SIDE DRIVE DRIVE (LSD) TOP POWERBOX COVER P/N: PBL701PN PBL7211PN (LSD Transmission with Hydraulic Clutch) (LSD R-Ratio Transmission with Hydraulic Clutch) PAGE 1 COVER BAKER LSD
BAKER BAKER LEFT CRUISE SIDE DRIVE DRIVE (LSD) TOP POWERBOX COVER P/N: PBL701PN PBL7211PN (LSD Transmission with Hydraulic Clutch) (LSD R-Ratio Transmission with Hydraulic Clutch) PAGE 1 COVER BAKER LSD
Installation Guide. Fits Models: RF-2 Touring Models 2009-Present. Revised 12.15
 Oil Cooler Installation Guide Fits Models: RF-2 Touring Models 2009-Present Revised 12.15 Welcome To UltraCool Oil Cooling Systems Thank you for making UltraCool your oil cooling system of choice. We hope
INSTALLATION INSTRUCTIONS
 MINIMUM REQUIRED TOOLS: INSTALLATION INSTRUCTIONS PRO DUALS TOURING FLAT HEAD SCREWDRIVER 1/2, 9/16, 14mm, 7/8 or 22mm WRENCHES 5/16, 1/2, 9/16 SOCKETS AND RATCHET SNAP RING PILERS 3/16, 1/4, 5/16 ALLEN
Quality Work with Quailty People
 Manuafactured by : DRM Industries Corp. Quality Work with Quailty People 231 W. Adams St. PO Box 758 Lake Delton, WI 53959 Call for Customer Sevice at 608-254-8158 7am to 4pm Monday - Friday Email: framelock@drmindustries.com
PVI 1800/PVI Residential/Commercial Grid-Tied Photovoltaic Inverter WARRANTY MANUAL. Subject to Change REV , Solectria Renewables
 PVI 1800/PVI 2500 WARRANTY MANUAL Residential/Commercial Grid-Tied Photovoltaic Inverter 2009, Solectria Renewables Subject to Change REV 10.09 1 Product Warranty & RMA Policy 1.1 Warranty Policy The Solectria
JL 2 Shock Extensions
 1 JL 2 Shock Extensions # 198200 - Jeep JL Wrangler, 2 Shock Extensions www.teraflex.com Important Notes: Prior to beginning this install, or any installation, read the instructions thoroughly to familiarize
BAKER FACTORY 5 SPEED REVERSE
 INSTALLATION INSTRUCTIONS FITMENT & OPTIONS PN F5-RV-1 PN F5-RV-2 PN F5-RV-3* 1990-1997, All Factory 5 Speed Models 1998-1999 Softail, 1998-2000 FLT, FLH & Dyna, 1999 FXR 2000-2006 Softail, 2001-2006 FLT,
Be sure to refer to instruction supplements provided in any included mounting hardware. Installation Instructions 412CRZ Series Rear Shocks
 Installation Instructions 412CRZ Series Rear Shocks ATTENTION Statements in these instructions that are preceded by the following words are of special significance: W a r n i n g This means there is the
VERTICAL AND HORIZONTAL SPLIT CASE FIRE PUMPS
 480 MODELS VERTICAL AND HORIZONTAL SPLIT CASE FIRE PUMPS REPAIR PARTS INDEX NOTE! Read and understand the pump and driver instructions before attempting to install, disassemble or repair the pump. Part
DODGE CUMMINS Air-Boss CR Intake Plenum
 Installation Manual P/N 0307-ABIP 2003-07 DODGE CUMMINS Air-Boss CR Intake Plenum Installation Instructions P/N 0307-ABIP GDP Air-Boss CR Plenum Installation PLEASE READ ALL INSTRUCTIONS BEFORE BEGINNING
TeraFlex JK Premium HD Tie Rod Kit
 1 TeraFlex JK Premium HD Tie Rod Kit www.teraflex.com Kit #1853910 Important Notes: Prior to beginning this or any installation read these instructions to familiarize yourself with the required steps and
INSTALLATION MANUAL. TORQ Locker TL GM 14 Bolt Installation Instructions. Made in USA By: Page 1 of 8
 INSTALLATION MANUAL TORQ Locker TL-19035 GM 14 Bolt Installation Instructions Made in USA By: Page 1 of 8 Page 2 of 8 INSTALLATION MANUAL TORQ Locker TL-19035 GM 14 Bolt Installation Instructions By: INTRODUCTION
TeraFlex JK Complete HD Steering Instructions
 KIT: TeraFlex JK Complete HD Steering Instructions #1853900 JK Premium HD Complete Steering Kit #1853905 JK Premium HD Complete Steering with Flipped Drag Link Kit 1 IMPORTANT NOTES: Prior to beginning
ALTA CARGO RACK. Important Notes:
 1 ALTA CARGO RACK www.teraflex.com # 4830000 - Silver Rails (shown) # 4830010 - Black Rails Accessory Mounts Sold Separately # 4830020 - CB Antenna Mount Kit # 4830030 - Hi-Lift Jack Mount Kit Important
Installation Instructions
 85-3511 rev. 04 11-15 Installation Instructions Polyurethane Bushing Kit for Ford F-53 (Front) (replaces OE bushings and brackets) part #4139-127 1-5/8 diameter INTRODUCTION Thank you for purchasing this
900 SERIES SPLIT CASE FIRE PUMP REPAIR PARTS INDEX
 900 SERIES SPLIT CASE FIRE PUMP REPAIR PARTS INDEX Read and understand the pump and motor instructions before attempting to install, disassemble or repair the pump. Part # AF-03-326 2015 Pentair Ltd. 01/30/15
INSTALLATION INSTRUCTIONS
 MINIMUM REQUIRED TOOLS: INSTALLATION INSTRUCTIONS ROCKSTAR TOURING FLAT HEAD SCREWDRIVER 1/2, 9/16, 14mm, 7/8 or 22mm WRENCHES 5/16, 1/2, 9/16 SOCKETS AND RATCHET SNAP RING PILERS 3/16, 1/4, 5/16 ALLEN
HR-20P Pneumatically Controlled Pressure Regulator
 HR-20P Pneumatically Controlled Pressure Regulator Instruction and Service Manual Hydroplex Corporation 230 West Gloria Switch Rd. Lafayette, LA 70507 337-233-0626 www.hydroplexpumps.com I. General Instructions
Installation Instructions
 85-3847 rev. 01 09-09 Installation Instructions Thank you for purchasing this anti-sway bar kit. Please read through these instructions before installation. Front Anti-Sway Bar TruTrac Bar Combo Kit for
PIAA Multi-Fit 005/1100X Light Bracket Kits
 ENGLISH PIAA Multi-Fit 005/1100X Light Bracket Kits Thank you for your purchase. Please read all the instructions before beginning.! WARNING Lighting laws vary state to state, check your local laws before
Installation Instructions
 85-3214 rev. 07 03-11 Installation Instructions Thank you for purchasing this anti-sway bar kit. Please read through these instructions before installation. Rear Anti-Sway Bar Kit Freightliner FL Series
RACE PPE Manifolds and Up-Pipes
 RACE ONLY High-Flow Exhaust Manifolds with Up-pipes GM DURAMAX 6.6L 2001-2015 DISCLAIMER OF LIABILITY This is a performance product which increases horsepower above factory specifications. Additional horsepower
JK Nebo Raised Rack Instructions
 JK Nebo Raised Rack Instructions www.teraflex.com Kit # 722070 JK Nebo Raised Rack Kit (Silver) Kit # 722075 JK Nebo Raised Rack Kit (Black) 1 Important Notes: Prior to beginning this installation, read
DYNA EVO & T.C. MODELS 91-05
 ASSEMBLY DIAGRAM AND ASSEMBLY REFERENCE ULTIMA OLD SCHOOL 2 BELT DRIVE UNITS DYNA EVO & T.C. MODELS 91-05 Part # 58-900 2 BELT DRIVE ASSEMBLY REV 1-20-10 ASSEMBLY DIAGRAM AND ASSEMBLY REFERENCE ULTIMA
Installation Instructions
 85-4209 rev. 05 11-18 Installation Instructions Thank you for purchasing this anti-sway bar kit. Please read through these instructions before installation. Factory Replacement Anti-Sway Bar Kit part #1129-135
INSTALLATION INSTRUCTIONS
 INSTALLATION INSTRUCTIONS ROCKSTAR SOFTAIL MINIMUM REQUIRED TOOLS: FLAT HEAD SCREWDRIVER 1/2, 9/16, 14mm, 7/8 or 22mm WRENCHES 5/16, 1/2, 9/16 SOCKETS AND RATCHET SNAP RING PILERS 3/16, 1/4, 5/16 ALLEN
Installation Instructions
 85-3909 rev. 01 09-09 Installation Instructions Thank you for purchasing this anti-sway bar kit. Please read through these instructions before installation. Rear Anti-Sway Bar Kit for Chevrolet G30 part
advanced FLOW engineering Instruction Manual P/N: &
 advanced FLOW engineering Instruction Manual P/N: 46-70031 & 46-70032 Make: Dodge Model: 2500/3500 Year: 94-02 Engine: L6-5.9L (td) Cummins Make: Dodge Model: 2500/3500 Year: 94-02 Engine: V8-5.9L & V10-8.0L
Installation Instructions
 85-4341 rev. 04 10-15 Installation Instructions Thank you for purchasing this antisway bar kit. Please read through these instructions before installation. Rear Anti-Sway Bar Kit for Chevy 2500/3500/4500
INSTALLATION INSTRUCTIONS
 THANK YOU FOR CHOOSING KURYAKYN! Protect yourself and others from possible injury and property damage or loss. Pay close attention to all instructions, warnings, cautions, and notices regarding the installation,
(WILL NOT FIT VEHICLES WITH X-REAS SUSPENSION)
") 2003-2016 TOYOTA 4RUNNER/2007-2014 FJ CRUISER 4WD INSTRUCTIONS 3 SUSPENSION LIFT KIT P/N 40021 (WILL NOT FIT VEHICLES WITH X-REAS SUSPENSION) WARNING!!!! PRODUCT SAFETY LABEL MUST BE INSTALLED INSIDE THE
2003-2016 TOYOTA 4RUNNER/2007-2014 FJ CRUISER 4WD INSTRUCTIONS 3 SUSPENSION LIFT KIT P/N 40021 (WILL NOT FIT VEHICLES WITH X-REAS SUSPENSION) WARNING!!!! PRODUCT SAFETY LABEL MUST BE INSTALLED INSIDE THE
INSTALLATION INSTRUCTIONS
 THANK YOU FOR CHOOSING KURYAKYN! Protect yourself and others from possible injury and property damage or loss. Pay close attention to all instructions, warnings, cautions, and notices regarding the installation,
Highly Styled, Low Cost Serpentine Drive
 Revised 10-13-08 Highly Styled, Low Cost Serpentine Drive Installation Instructions Chevy Big Block #21200 (without Power Steering) #21250 (with Remote Power Steering) #21255 (with Saginaw Power Steering)
JK HD Skid Plate for Rear Falcon Shocks
 1 JK HD Skid Plate for Rear Falcon Shocks Kit # 36-07-01-300 Important Notes: Prior to beginning this or any installation read these instructions to familiarize yourself with the required steps and evaluate
AEROMOTIVE Part # & Mustang 5.0L Stealth Fuel System Kit INSTALLATION INSTRUCTIONS
 AEROMOTIVE Part # 18653 & 18654 86-93 Mustang 5.0L Stealth Fuel System Kit INSTALLATION INSTRUCTIONS CAUTION: Installation of this product requires detailed knowledge of automotive systems and repair procedures.
203 TRANSFER CASE CONVERSION
 203 TRANSFER CASE CONVERSION PN:501 OUR FOUR TRANSFER CASE WEDGES REPLACE THE SPIDER GEARS AND CONNECT THE PLANETARY GEAR AND REAR OUTPUT SHAFT MAKING ONE UNIT. SIMILAR IN DESIGN & FUNCTION TO THE BEST
CRUSHER TRUE DUAL HEADPIPES 513
 CRUSHER TRUE DUAL HEADPIPES 513 THANK YOU FOR CHOOSING CRUSHER! PROTECT YOURSELF AND OTHERS FROM POTENTIAL INJURY AND PROPERTY DAMAGE OR LOSS. PAY CLOSE ATTENTION TO ALL INSTRUCTIONS, WARNINGS, CAUTIONS,
Highly Styled, Low Cost Serpentine Drive Chevy Small Block Alternator & Power Steering Kit #21085 and 21090
 Revised 4-2-08 Highly Styled, Low Cost Serpentine Drive Installation Instructions Chevy Small Block Alternator & Power Steering Kit #21085 and 21090 Included Parts List Hardware Qty P/N... Description
Installation Instructions
 85-3195 rev. 12 04-18 Installation Instructions Thank you for purchasing this antisway bar kit. Please read through these instructions before installation. Part #1139-117 Rear Anti-Sway Bar Kit 1½ diameter
Installation Instructions Pet Barrier
 Installation Instructions Pet Barrier Vehicle Application Jeep Wrangler 2007-2010 Part Number: 42502 www.bestop.com - We re here to help! Visit our web site and click on Ask a Question. Click here for
Air-Boss VP Intake Plenum
 Installation Manual P/N 98502-ABIP 98.5-02 DODGE CUMMINS Air-Boss VP Intake Plenum Installation Instructions P/N 98502-ABIP GDP Air-Boss VP Plenum Installation PLEASE READ ALL INSTRUCTIONS BEFORE BEGINNING
INSTALLATION INSTRUCTIONS
 MINIMUM REQUIRED TOOLS: F-BOMB SOFTAIL INSTALLATION INSTRUCTIONS FLAT HEAD SCREWDRIVER 1/2, 9/16, 14mm, 7/8 or 22mm WRENCHES INCLUDED HARDWARE: 1. (2) 02 ADAPTER 2. (3) 02 PLUG SOCKET 3. (1) NUT PLATE
Installation Instructions SRC Over-Size Tire Carrier Jeep Wrangler/Unlimited Part # 2743
 NOTE: Carefully read instructions entirely before assembling/installing this product. Parts Included Qty Parts Included Qty Tire Carrier 1 8 x 70mm Hex Bolt 4 Brake Light Bracket 1 8mm Flat Washer 4 Tire
Installation manual. 2 front / 1 rear spacer kit Jeep Wrangler JK 2 & 4 door Part # 42005
 Part # 42005 2007-2015 Jeep Wrangler JK 2 & 4 door 2 front / 1 rear spacer kit Parts list: Part # Description Qty. 42005-01 Front coil spring spacers 2 42005-02 Rear coil spring spacers 2 42005INST Instruction
DYNA EVO & T.C. MODELS 91-05
 ASSEMBLY DIAGRAM AND ASSEMBLY REFERENCE ULTIMA OLD SCHOOL 2 BELT DRIVE UNITS DYNA EVO & T.C. MODELS 91-05 Part # 58-900 2 BELT DRIVE ASSEMBLY REV 10-22-14 ASSEMBLY DIAGRAM AND ASSEMBLY REFERENCE ULTIMA
Harley Davidson FL Touring Current Xtreme
 ITEMS SUPPLIED Description Part # Qty Front Header (Chr/Blk) 100-0119/100-0123 1 Rear Header (Chr/Blk) 100-0120/100-0124 1 Front Heat Shield (Chr/Blk) 100-0121/100-0125 1 Rear Heat Shield (Chr/Blk) 100-0122/100-0126
INSTALLATION INSTRUCTIONS
 MINIMUM REQUIRED TOOLS: INSTALLATION INSTRUCTIONS LOWDOWN SOFTAIL FLAT HEAD SCREWDRIVER 1/2, 9/16, 14mm, 7/8 or 22mm WRENCHES 5/16, 1/2, 9/16 SOCKETS AND RATCHET SNAP RING PILERS 3/16, 1/4, 5/16 ALLEN
CARBURETOR REBUILD KIT (Vacuum Secondary) Models Demon Carburetors & Holley Model 4160 LIT704
 Models Demon Carburetors & Holley Model 4160 LIT704") CARBURETOR REBUILD KIT 190000 (Vacuum Secondary) Models Demon Carburetors & Holley Model 4160 LIT704 INSTRUCTIONS: Before getting to the actual rebuild, it should be noted that the carbs shown here are
CARBURETOR REBUILD KIT 190000 (Vacuum Secondary) Models Demon Carburetors & Holley Model 4160 LIT704 INSTRUCTIONS: Before getting to the actual rebuild, it should be noted that the carbs shown here are
Highly Styled, Low Cost Serpentine Drive
 Revised 8-20-11 Highly Styled, Low Cost Serpentine Drive Installation Instructions Chevy Big Block (Style Track) #21200 (without Power Steering) #21250 (with Remote Power Steering) #21255 (with Saginaw
MOVE ON TO THE REAR BAR INSTALLATION
 22410 STREET SWAY BAR SET 2001-UP LEXUS IS300 Thank you for your purchase from our line of Lexus parts. Please call us at (877) 4NO-ROLL if you have any questions regarding the service or installation
AEROMOTIVE Part # & Generic Fuel System Kit INSTALLATION INSTRUCTIONS
 AEROMOTIVE Part # 17135 & 17136 Generic Fuel System Kit INSTALLATION INSTRUCTIONS CAUTION: Installation of this product requires detailed knowledge of automotive systems and repair procedures. We recommend
Doing Our Best to Provide You the Best. Toyota Tacoma. Pin height: 17 Centers: 30-1/2. BOlT TORQuE specifications TP20190,Rev 7
 10-13 TP20190,Rev 7 Toyota Tacoma BOlT TORQuE specifications standard BOlTs: metric BOlTs: size grade Torque size Torque 5/16 5 20 ft/lbs. 8mm 22 ft/lbs. 3/8 5 35 ft/lbs. 10mm 42 ft/lbs. 7/16 5 56 ft/lbs.
advanced FLOW engineering Instruction Manual P/N: & Make: Ford Model: F-150 Year: Transmission: 6R80
 advanced FLOW engineering Instruction Manual P/N: 46-70170 & 46-70172 Make: Ford Model: F-150 Year: 2009-2015 Transmission: 6R80 Please read the entire instruction manual before proceeding. Ensure all
1800,1900 MODELS VERTICAL AND HORIZONTAL SPLIT CASE FIRE PUMPS
 1800,1900 MODELS VERTICAL AND HORIZONTAL SPLIT CASE FIRE PUMPS REPAIR PARTS INDEX NOTE! Read and understand the pump and driver instructions before attempting to install, disassemble or repair the pump.
INSTALLATION INSTRUCTIONS
 MINIMUM REQUIRED TOOLS: INSTALLATION INSTRUCTIONS LOWDOWN SPORTSTER FLAT HEAD SCREWDRIVER 1/2, 9/16, 14mm, 7/8 or 22mm WRENCHES 5/16, 1/2, 9/16 SOCKETS AND RATCHET SNAP RING PILERS 3/16, 1/4, 5/16 ALLEN
Ref. Part Number Description Qty
 PARTS INCLUDED Ref. Part Number Description Qty 1) 00-200-00110 Carbon Fiber Muffler Assembly - Right 1 2) 00-200-00112 Carbon Fiber Muffler Assembly - Left 1 3) 04-11-42895 Muffler Adapter Bracket 2 4)
Mustang Billet Aluminum Pedal Cover Kit P/N R (Manual) and R (Automatic) Installation Instructions
 and R (Automatic) Installation Instructions") 2005-06 Mustang Billet Aluminum Pedal Cover Kit P/N R08050020 (Manual) and R08050021 (Automatic) Installation Instructions 1305-R08050026-AA Page 1 of 7 1-800-59-ROUSH Before installing this Roush Performance
2005-06 Mustang Billet Aluminum Pedal Cover Kit P/N R08050020 (Manual) and R08050021 (Automatic) Installation Instructions 1305-R08050026-AA Page 1 of 7 1-800-59-ROUSH Before installing this Roush Performance
HATCHGRIP Installation Instructions/Operation and Maintenance Manual
 HATCHGRIP Installation Instructions/Operation and Maintenance Manual Models: HTG-PCG Contact Information Table of Contents: Safety Precautions... 2 Product Information... 2 Operation... 3 Installation
WARRANTY REGISTRATION FORM
 WARRANTY REGISTRATION FORM Please read & fill out attached warranty registration form to activate warranty This warranty registration must be received within 45 days from the time of purchase. Your New
JK CARGO STORAGE RACK
 1 JK CARGO STORAGE RACK #4820020 Important Notes: Prior to beginning this or any installation read these instructions to familiarize yourself with the required steps and evaluate if you are experienced
HP30 Slab Saw Owner s Manual and Operating Instructions
 HP30 Slab Saw Owner s Manual and Operating Instructions MADE IN USA Revision 07 09.0 Manual Part No. 67 Caution: Read all safety and operating instructions before using this equipment. This manual MUST
PVI 60KW, PVI 82KW, PVI 95KW
 PVI 60KW PVI 82KW PVI 95KW WARRANTY MANUAL Commercial, Grid-Tied Photovoltaic Inverters 2008, Solectria Renewables LLC Subject to Change DOC-020099 rev 024 1 1 Product Warranty & RMA Policy Warranty Policy
AEROMOTIVE Part # L 4V Fuel Rails INSTALLATION INSTRUCTIONS
 AEROMOTIVE Part # 14130 5.0L 4V Fuel Rails INSTALLATION INSTRUCTIONS CAUTION: Installation of this product requires detailed knowledge of automotive systems and repair procedures. We recommend that this
231 SYE Heavy Duty Short Shaft Kit
 1 231 SYE Heavy Duty Short Shaft Kit www.teraflex.com Kit #4444401 Important Notes: Prior to beginning this or any installation read these instructions to familiarize yourself with the required steps and
A S S E M B L Y I N S T R U C T I O N S
 A S S E M B L Y I N S T R U C T I O N S Please Do Not Return This Product to the Store! Contact Escalade Sports customer service department at: Phone: 1-888-USA-GOAL Toll-Free! Fax: 1-866-873-3536 Toll-Free!
Highly Styled, Low Cost Serpentine Drive
 Revised --12 Highly Styled, Low Cost Serpentine Drive Installation Instructions Ford 1 Cleveland Kit #040 (Chrome Alternator and Power Steering) Kit #0460 (Billet Alternator and Power Steering) Included
INSTALLATION/OWNER'S MANUAL DP " Woofer in Enclosure
 INSTALLATION/OWNER'S MANUAL DP1000 10" Woofer in Enclosure Installation Thank you for purchasing the DP1000 10" Woofer with enclosure. Although Dual has attempted to make sure all of the information contained