Charge controller SUNNY ISLAND CHARGER
|
|
|
- Kristin Mathews
- 5 years ago
- Views:
Transcription

1 Charge controller SUNNY ISLAND CHARGER Installation Guide SIC50-IA-IEN IMEN-SIC50 Version 1.0 EN
2
3 SMA Solar Technology AG Table of Contents Table of Contents 1 Notes on this Manual Validity Target Group Storage of the Manual Symbols Used Safety Instructions Appropriate Usage General Safety Instructions Unpacking Scope of Delivery Check for Transport Damage Identifying the Charge Controller Battery Management and Charge Control SMA Operation Stand-Alone Operation Assembly Selecting the Mounting Location Dimensions Ambient Conditions Safety Clearances Position Mounting Instructions Electrical Connection Safety Overview of the Connection Area Grounding Installation Guide SIC50-IA-IEN
4 Table of Contents SMA Solar Technology AG Grounding the Charge Controller Grounding the Battery and the PV Plant PV Array Connection (DC) Battery Connection (DC) Communication Interface Connection to PC Serial Interface SMA Operation Stand-alone Operation Additional Connections Signaling Contact Battery Temperature Sensor (First) Commissioning Configuring the Charge Controller Operating Mode Battery System Device Address Battery Type Commissioning Opening and Closing Opening the Charge Controller Closing the Charge Controller Maintenance and Cleaning Replacing the Thermal Fuses Cleaning the Cooling Fins Meaning of the Light Emitting Diodes (LEDs) Multicolored LED Internal LEDs SIC50-IA-IEN Installation Guide
5 SMA Solar Technology AG Table of Contents 11 Failure Search SMA Operation Stand-alone Operation Decommissioning Disassembly Packaging Storage Disposal Technical Data Contact Installation Guide SIC50-IA-IEN
6 Table of Contents SMA Solar Technology AG 6 SIC50-IA-IEN Installation Guide
7 SMA Solar Technology AG Notes on this Manual 1 Notes on this Manual This manual describes how to install, commission and service the Sunny Island Charger. 1.1 Validity This manual applies to the following Sunny Island Charger type: SIC50-MPT 1.2 Target Group This manual is intended for the installer and the operator. 1.3 Storage of the Manual All manuals for the device and for the installed components must be stored in the immediate vicinity of the charge controller and must be accessible at all times. Installation Guide SIC50-IA-IEN
8 Notes on this Manual SMA Solar Technology AG 1.4 Symbols Used The following types of safety messages and general information appear in this document: DANGER! DANGER indicates a hazardous situation which, if not avoided, will result in death or serious injury. WARNING! WARNING indicates a hazardous situation which, if not avoided, could result in death or serious injury. CAUTION! CAUTION indicates a hazardous situation which, if not avoided, could result in minor or moderate injury. NOTICE! NOTICE indicates a situation that can result in property damage if not avoided! Information Information provides tips that are valuable for the optimal installation and operation of your product. 8 SIC50-IA-IEN Installation Guide
9 SMA Solar Technology AG Safety Instructions 2 Safety Instructions 2.1 Appropriate Usage The charge controller is a DC/DC converter that reduces the direct current of the PV array to the direct current of a battery in order to charge it. The SIC50-MPT replaces the SIC40-MPT. The charge controller can be operated in two different operating modes: SMA operation Stand-alone operation The "SMA" operating mode must be selected if The "Stand-alone" operating mode must be the charge controller is operated in a system selected if the charge controller is operated in a equipped with a Sunny Island 5048/2012/ stand-alone grid system equipped with a Sunny Island 3324/4248 or without a Sunny Island. Section "Operating mode" (28) explains how to set the operating mode. The charge controller may only be operated with PV array (modules and cabling) of protection class II. Do not connect any sources of energy other than PV modules to the charge controller. Already when designing the PV plant, ensure that the values comply with the permitted operating range of all components at all times. The maximum open circuit voltage of the PV array may not be greater than the maximum input voltage of the charge controller (140 V), even at very low ambient temperatures. The voltage of the PV array must always be at least 5 V higher than the battery voltage during operation. The charge controller is suitable for battery currents of up to 50 A at 48 V/24 V/ 12 V nominal battery voltage. The suitability of a PV array for the charge controller primarily depends on the output voltage and output power of the PV array. In this regard, observe the limits specified by the module manufacturer. Appropriate usage also includes observing all documentation. Installation Guide SIC50-IA-IEN
10 Safety Instructions SMA Solar Technology AG 2.2 General Safety Instructions DANGER! Danger to life due to high voltages in the charge controller. All work on the charge controller must only be carried out by an electrically skilled person. CAUTION! Danger of burn injuries due to hot enclosure parts. Do not touch the enclosure of the charge controller during operation. Grounding the PV array Observe all local regulations for grounding the PV array. SMA Solar Technology AG connecting the array frame and other electrically conductive surfaces so that there is continuous conduction and to ground them in order to ensure optimal protection for plants and persons. 10 SIC50-IA-IEN Installation Guide
11 SMA Solar Technology AG Unpacking 3 Unpacking 3.1 Scope of Delivery Object Quantity Description A 1 Charge controller B 1 Document set C 1 Technical description D 2 Thermal fuse (30 A) E 1 SIC-PB communication interface and RJ45 cable (5 m) * F 1 Battery temperature sensor ** * optional, required for SMA operation ** optional 3.2 Check for Transport Damage Check the charge controller for visible external damage, such as cracks in the enclosure. Contact your dealer if you find any damage. 3.3 Identifying the Charge Controller You can identify the charge controller by the type label. The type label is on the right side of the enclosure. Installation Guide SIC50-IA-IEN
12 Battery Management and Charge Control SMA Solar Technology AG 4 Battery Management and Charge Control 4.1 SMA Operation The SIC-PB communication interface must be installed and connected to the Sunny Island 5048/ 2012/2224 for SMA operation. If a communication connection is established, the Sunny Island will control of battery management, including charge control. The charge controller receives the current and temperature-compensated nominal charging voltage from the Sunny Island and transmits the battery's present charging current back to the Sunny Island. This ensures that the battery is always optimally charged and that the Sunny Island calculates the correct charging state. For further details on battery management see the Sunny Island documentation. If communication does not function in SMA operation, the battery will only be charged with voltages of 13.5/27/54 V. Working principle of a Sunny Island system with a charge controller Battery Charge controller Array Sunny Island Sync bus (CAN) Sunny Boy 12 SIC50-IA-IEN Installation Guide
13 SMA Solar Technology AG Battery Management and Charge Control 4.2 Stand-Alone Operation During stand-alone operation or during operation with the 3324/4248 Sunny Island inverters, the charge controller automatically controls the charging voltage of the battery, depending on the battery type set and current charging phase, according to the "four-phase charging process" (MPP, boost, continuous, float). During the first phase, charging is carried out using the maximum power provided by the PV array. During the second phase, the charging current is reduced and the battery voltage is regulated to the charging voltage set for the boost phase. This phase is only completed if the battery voltage ever drops below 2.08 V/cell during the preceding discharging phase. Otherwise, the charging process is immediately continued with the third phase, "continuous". The continuous and the boost charging phases are identical, except that the continuous phase has a slightly lower charging voltage. Once continuous charging is completed, the charge controller switches to float charging until the next complete discharge. If a battery temperature sensor is connected, the charging voltage is adjusted to the temperature using -4 mv/ C and cell. Working principle of the charge controller in stand-alone operation Battery Charge controller PC Installation Guide SIC50-IA-IEN
14 Assembly SMA Solar Technology AG 5 Assembly CAUTION! Risk of injury due to the charge controller's heavy weight. Take the weight of the charge controller of approx. 10 kg into account. 5.1 Selecting the Mounting Location DANGER! Danger to life due to fire or explosion. The charge controller enclosure can become hot during operation. Do not mount the charge controller on flammable construction materials. Do not mount the charge controller near highly flammable materials. Do not mount the charge controller in potentially explosive areas. CAUTION! Danger of burn injuries due to hot enclosure parts. Mount the charge controller in such a way that it cannot be touched inadvertently during operation Dimensions 14 SIC50-IA-IEN Installation Guide
15 SMA Solar Technology AG Assembly Ambient Conditions The mounting location and method must be suitable for the weight and dimensions. Mount on a solid surface. The mounting location must be accessible at all times. The charge controller must be easy to remove from the mounting location at any time. The ambient temperature should be between -25 C and +60 C to guarantee optimal operation. Do not expose the charge controller to direct sunlight to avoid power losses due to overheating Safety Clearances Observe the following safety clearances to walls, other devices or objects to ensure sufficient heat dissipation. Direction Sides Top Bottom Safety clearance 20 cm 30 cm 20 cm Multiple charge controllers installed in areas with high ambient temperatures If necessary, increase the clearances between the individual charge controllers. In addition, make sure there is enough ventilation to ensure sufficient cooling of the charge controller. Installation Guide SIC50-IA-IEN
16 Assembly SMA Solar Technology AG Position Mount vertically or tilted backwards by max. 45. Install at eye level in order to allow operation conditions to be read at all times. Never mount the device with a forward tilt. Do not mount horizontally. 5.2 Mounting Instructions 1. Mark the position of the drill holes. 16 SIC50-IA-IEN Installation Guide
17 SUNNY ISLAND CHARGER SMA Solar Technology AG Assembly 2. Drill the holes (diameter: at least 8 mm) at the indicated positions and use wall anchors (at least M8). 3. Screw the charge controller onto the wall using the three mounting plates. Use fastening material suitable for the surface. 4. Make sure that the device is securely in place. Installation Guide SIC50-IA-IEN
18 Electrical Connection SMA Solar Technology AG 6 Electrical Connection 6.1 Safety DANGER! Danger to life due to high voltages in the charge controller. Disconnect the PV array using a disconnection unit and secure it against accidental reactivation. Disconnect the miniature circuit breaker and ensure that it cannot be reconnected. Ensure that no voltage is present in the system. WARNING! Risk of injury due to electric shock. If all cables with different voltages are routed in parallel, damaged cable insulations may lead to a short circuit. Route all cables separately. NOTICE! Electrostatic discharges may damage the charge controller. Ground yourself before touching a component inside the charge controller. NOTICE! Overvoltage can destroy the system. Use an external overvoltage protector in areas with an increased risk of thunderstorms and lightning. 18 SIC50-IA-IEN Installation Guide
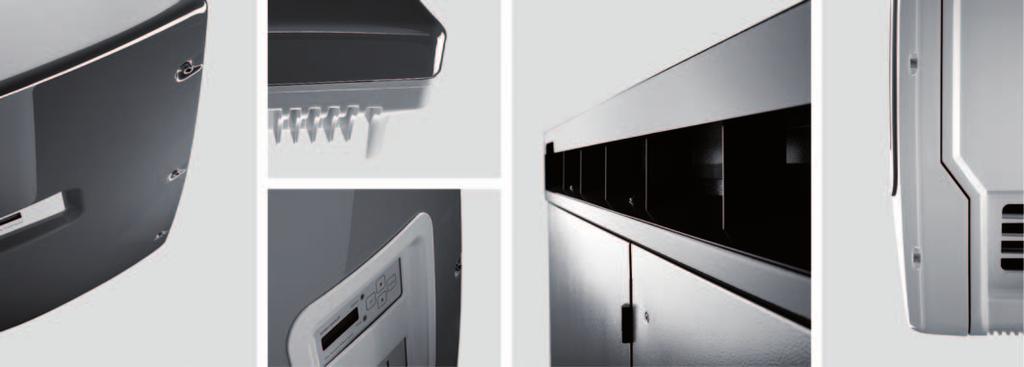
19 SMA Solar Technology AG Electrical Connection 6.2 Overview of the Connection Area Object A B C D E F G H I K L M Description "PV+" connection terminal for "PV+" cable of the PV array "PV " connection terminal for "PV " cable of the PV array "BAT " connection terminal for "BAT " cable of the battery "BAT+" connection terminal for "BAT+" cable of the battery Thermal fuses "EARTH" connection terminal for grounding Connection terminal for the battery temperature sensor cables Connection terminal for the signaling contact cables DIL switch for configuration Internal LEDs (only visible to the installer) LED connection of the multicolored LED in the lid M20 metric-thread cable glands for the battery, PV array and PE cables Installation Guide SIC50-IA-IEN
20 Electrical Connection SMA Solar Technology AG Object N O Description M25 metric-thread cable gland for the signaling contact and the battery temperature sensor cables M25 metric-thread cable gland for communication cable 6.3 Grounding Grounding the Charge Controller DANGER! Risk of lethal electric shock. The charge controller has the protection class I. Ground the charge controller properly, regardless of whether the battery and PV are grounded. 1. Open the charge controller. Loosen the screws of the enclosure lid and remove the lid. 2. Unscrew the lock nut of the metric-thread cable gland (B) and slide it along the PE cable. 3. Route the PE cable through the cable gland into the charge controller and connect it to the "EARTH" connection terminal (A). 4. Retighten the lock nut of the cable gland. 20 SIC50-IA-IEN Installation Guide
21 SMA Solar Technology AG Electrical Connection Grounding the Battery and the PV Plant DANGER! Danger to life due to high voltages at the battery's negative ground terminal. Ground the battery. Not grounding the battery is permitted only if the battery connections have protection against accidental contact. NOTICE! Grounding the positive pole may lead to destruction of the battery. Never ground the positive pole of the battery or the PV plant. Cross-section of the Protective Conductor SMA Solar Technology AG cannot make any general statements regarding the required cross-section of the protective conductor for external grounding of the battery. The conductor dimensions depend on the type and size of the battery connected, the external fuse (DC side) and the material used in the protective conductor. Determining the cross-section When determining the cross-section of the protective conductor, all standards and guidelines that apply at the installation location must be observed. The required cross-section of the protective conductor can be calculated using the following formula. Tripping times for short-circuit currents of between A and A are typically about 25 ms. t = short-circuit duration in seconds I SC = maximum battery current (short-circuit current) in amperes S = conductor cross-section in mm² A protective conductor with a cross-section of 16 mm² is therefore sufficient for short-circuit currents up to A. Installation Guide SIC50-IA-IEN
22 Electrical Connection SMA Solar Technology AG 6.4 PV Array Connection (DC) NOTICE! Improperly connecting the charge controller to the PV array may irreparably damage it. Never connect several charge controllers in parallel on the side of the PV array. The following threshold values at the DC input of the charge controller may not be exceeded: Maximum input voltage Maximum input current 140 V (DC) 40 A (DC) Connection Procedure Sectioning point between PV array and charge controller The DIN VDE standard stipulates that an all-pole sectioning point must be installed between the PV array and the charge controller. Observe this standard as well as all standards and guidelines that apply at the installation location for connecting the PV array. 1. Unscrew the lock nut of the metric-thread cable gland (C) and slide it along the PV array's "PV+" cable. 2. Route the "PV+" cable of the PV array through the cable gland into the charge controller and connect it to the "PV+" connection terminal (A). 3. Retighten the lock nut of the cable gland. 4. Unscrew the lock nut of the metric-thread cable gland (D) and slide it along the PV array's "PV-" cable. 5. Route the "PV-" cable of the PV array through the cable gland into the charge controller and connect it to the "PV-" connection terminal (B). 6. Retighten the lock nut of the cable gland. 22 SIC50-IA-IEN Installation Guide
23 SMA Solar Technology AG Electrical Connection 6.5 Battery Connection (DC) Connection Requirements Battery capacity The battery capacity depends on the connected PV power. Observe the following table. Nominal battery voltage Battery capacity per kwp PV 48 V at least 120 Ah/kWp PV 24 V at least 200 Ah/kWp PV 12 V at least 400 Ah/kWp PV Excessively long battery cables reduce system efficiency The cables leading from the battery to a DC distributor to which both the Sunny Island and the charge controller are connected may not be longer than 5 m. Observe all standards and guidelines that apply at the installation location (e.g. DIN VDE 0510 "Rules for Accumulators and Battery Systems"). Observe all specifications of the battery manufacturer. Cable Requirements NOTICE! Irreparable damage of the cable leading from the charge controller to the battery. Do not lay the battery cables under plaster or in armored plastic pipes. Cable Protection In addition to the thermal fuses in the charge controller, install a separate fuse as close to the battery as possible. Install a suitable fuse according to the maximum specified DC currents. You can, for example, install a 63 A miniature circuit breaker. NOTICE! Irreparable damage of the cable leading from the charge controller to the battery. Lay the battery cables so that they are protected against ground faults and short circuits if no line circuit breaker is present. Make sure that the cable cross-section is sufficient. Installation Guide SIC50-IA-IEN
24 Electrical Connection SMA Solar Technology AG Connection Procedure NOTICE! Reversing the poles when connecting the battery may irreparably damage the charge controller. Make sure that the poles of the cables leading to the battery are correct. 1. Unscrew the lock nut of the metric-thread cable gland (A) and slide it along the battery's "BAT-" cable. 2. Route the "BAT-" cable of the battery through the cable gland into the charge controller and connect it to the "BAT-" connection terminal (C). 3. Retighten the lock nut of the cable gland. 4. Unscrew the lock nut of the metric-thread cable gland (B) and slide it along the battery's "BAT+" cable. 5. Route the "BAT+" cable of the battery through the cable gland into the charge controller and connect it to the "BAT+" connection terminal (D). 6. Retighten the lock nut of the cable gland. Replacing the thermal fuses when reversing the poles of the DC cables If the poles of the DC cables are reversed when connecting, the thermal fuse will be irreparably damaged. Proceed as described in section 9.1 Replacing the Thermal Fuses (page 38) to replace the thermal fuses. Multicolored LED Once the battery has been connected, the multicolored LED of the charge controller will glow red. If the LED is not glowing, the poles of the DC cables are reversed and the thermal fuses must be replaced. If this is not the case, the charge controller is defective and must be replaced. In this case, contact the SMA Service Line. See section 14 Contact (page 45). 24 SIC50-IA-IEN Installation Guide
25 SMA Solar Technology AG Electrical Connection 6.6 Communication Interface Object A B C D E Description MSTE bus output MSTE bus input RJ45 socket for connecting a serial interface Socket for SIC-PB communication interface Socket for communication interface connection Connection to PC Serial Interface Connecting a PC to the charge controller is possible in both operating modes (SMA operation and stand-alone operation). Measured values can only be read. The connection is established via the RJ45 socket of the first charge controller (device address 0) to the PC's serial interface. Use a RJ45 to RS232 adapter cable for this. Installation Guide SIC50-IA-IEN
26 Electrical Connection SMA Solar Technology AG Configuring the Software Use a terminal program in order to display the measured values on the PC. There are various terminal programs available, e.g., Hyper Terminal. Hyper Terminal is a Microsoft Windows standard program and is located under Start\Programs\Accessories\Communication. The following table shows the connection settings for the terminal program: Setting Value Bits per second 300 Data bits 8 Parity none Stop bits 1 Flow control none Pin Assignment of the RJ45 Socket on the Charge Controller Pin Function Level Description 1 Short circuit with PIN 2 must be established for activating RS232 2 Short circuit with PIN 1 must be established for activating RS232 3 TXD RS232, +9 V, 9 V charge controller output 4 GND 0 V reference potential 9 Shield, protective earth Pin Assignment of the PC's Serial Interface Pin Function Level Description 5 GND 0 V reference potential 2 RXD RS232, +9 V, 9 V PC input 26 SIC50-IA-IEN Installation Guide
27 SMA Solar Technology AG Electrical Connection SMA Operation The communication between the charge controller and the Sunny Island 5048/2012/2224 allows the charge controller to be controlled in a coordinated manner. This ensures precise calculation of the state of charge in the Sunny Island without an additional battery current measuring shunt. All important operating data of the charge controller can be read on the Sunny Island display. In addition, the most important values are saved on the Sunny Island SD card. Up to four charge controllers can be connected in parallel to one Sunny Island system. SIC50-MPT 1 SIC50-MPT 2 SIC50-MPT 3 SIC50-MPT 4 Sunny Island More information on installing and connecting the SIC-PB communication interface can be found in the SIC-PB installation guide. Pin Assignment of the Micro Ribbon Cable Pin Function Level Description 8 GND 0 V reference potential 10 GND 0 V reference potential 11 RXD TTL charge controller input 12 TXD TTL charge controller output Installation Guide SIC50-IA-IEN
28 Electrical Connection SMA Solar Technology AG Stand-alone Operation Up to 8 charge controllers can be connected to each other. Connect the MSTE bus input of the charge controller with the MSTE bus output of the following charge controller. Use an RJ45 cable for this. Pin Assignment of the MSTE Bus Pin Function Level Description 4 GND 0 V reference potential 3 TXD bus / RXD bus TTL, open collector resting potential: +5 V active: 0 V 9 Shield, protective earth 28 SIC50-IA-IEN Installation Guide
29 SMA Solar Technology AG Electrical Connection Communication Protocol The charge controller sends and receives data through the TXN bus and the RXD bus. The data is coded in ASCII format. Character Sequence of the Request The character sequence of the request consists of 4 characters. The code letter and the device address must be coded in ASCII format Control character 13 Control character 10 Code letter Device address (carriage return) (line feed) Character Sequence of the Response The character sequence of the response consists of 14 characters. It begins with the control characters 13 and 10 (carriage return and line feed) They are followed by the code letter of the measured value and the device address. The following table shows an example for the character sequence of the response (device SIC50-MPT 0 with operating voltage of V): V 0 = V! Code Letter of the Measured Values Code letter Description D Temperature of the charge controller E Device fault (see section 11 Failure Search (page 40)) I Charging current L Charging threshold of the battery voltage P Charging power S Voltage at the PV array T Temperature of the battery V Operating voltage Installation Guide SIC50-IA-IEN
30 Electrical Connection SMA Solar Technology AG 6.7 Additional Connections Signaling Contact You can connect a signaling contact to your charge controller that automatically closes in case of battery overvoltage (battery voltage > 65 V). The signaling contact operates like a make contact and can be loaded with voltages of up to 200 V (DC) and a contact load of 1 A/15 W. NOTICE! If a switch in the charge controller short circuits, the battery may be irreparably damaged. If a short circuit occurs in the charge controller, the battery is no longer protected against overcharging. SMA Solar Technology AG recommends using the signaling contact to ensure that, in case of a failure, the battery is disconnected from the charge controller by a relay or contactor. If several charge controllers are connected to the stand-alone grid system, a signaling contact must be connected between each charge controller and the battery. Cable Requirements Signaling Contact Cable To maintain the IP65 protection rating, use a cable with an outer diameter of 5 mm - 7 mm to connect the signaling contact. 30 SIC50-IA-IEN Installation Guide
31 SMA Solar Technology AG Electrical Connection Connection Procedure 1. Unscrew the lock nut of the M25 metric-thread cable gland (A) and slide it along the signaling contact cables. 2. Remove the seal insert from the cable gland and remove the filler plug. 3. Route the signaling contact cable through a cable opening into the seal insert. 4. Insert the seal insert along with signaling contact cables into the cable gland. 5. Route the cables of the signaling contact through the cable gland into the charge controller and connect them to the connection terminal (B). 6. Retighten the lock nut of the cable gland. B A Installation Guide SIC50-IA-IEN
32 Electrical Connection SMA Solar Technology AG Battery Temperature Sensor To allow a temperature-independent charge control during stand-alone operation or during operation with a Sunny Island 3324/4248, you can connect an external battery temperature sensor (BAT- TEMP-SENSOR: replacement battery temperature sensor, KTY type with 10 m connection cable for Sunny Island, Sunny Backup or Sunny Island Charger) to the charge controller. SMA Operation No external battery temperature sensor is required when operating in "SMA operation" mode. NOTICE! Damage to battery due to excessive or insufficient charging. In "Stand-alone operation" mode, a battery temperature sensor must be connected. Otherwise, the battery may be excessively or insufficiently charged if temperatures outside of the temperature range +15 C to 25 C occur frequently. Connect an external battery temperature sensor if the charge controller is operated in stand-alone mode or together with a Sunny Island 3324/ kω resistor A 2 kω resistor is connected by default to the connection terminal for the battery temperature sensor. If neither the resistor nor a battery temperature sensor are connected during stand-alone operation or during operation with a Sunny Island 3324/4248, the charge controller cannot be commissioned. 32 SIC50-IA-IEN Installation Guide
33 SMA Solar Technology AG Electrical Connection Connection Procedure 1. Remove the resistor. 2. Unscrew the lock nut of the M25 metric-thread cable gland (A) and slide it along the cable of the battery temperature sensor. 3. Remove the seal insert along with the cable opening from the cable gland. 4. Route the cables through the cable openings in the seal insert. 5. Connect the battery temperature sensor cables to the connection terminal (B). 6. Retighten the lock nut of the cable gland. B A Installation Guide SIC50-IA-IEN
34 (First) Commissioning SMA Solar Technology AG 7 (First) Commissioning 7.1 Configuring the Charge Controller Configure the charge controller before commissioning. You can carry out the basic configuration using the operating switch (DIL switch). The operating mode, battery system, battery type, device address of the charge controller and a fault diagnosis can be configured by changing the position of the DIL switch. Assignment of the DIL Switches The DIL switches have the following assignments: Operating Mode The operating mode is set using the "D4" DIL switch. Operation with Sunny Island 3324/4248 If the charge controller is operated in the stand-alone grid system together with a Sunny Island 3324/4248, set the DIL switch D4 to "OFF", since this Sunny Island does not support the charge controller's type of communication. The following table displays the switch position for the required operating mode. Switch SMA operation Stand-alone operation (operation with Sunny Island) D4 ON OFF 34 SIC50-IA-IEN Installation Guide
35 SMA Solar Technology AG (First) Commissioning Battery System The battery system is set using the C1, C2 and C3 DIL switches. The following table displays the switch position of the required battery system. Switch 12 V battery system 24 V battery system 48 V battery system C1 ON OFF OFF C2 OFF ON OFF C3 OFF OFF ON Device Address The sequential order of the devices is determined by configuring the device address. The device address is set using the D1, D2 and D3 DIL switches. Stand-alone operation In the "Stand-alone operation" mode, the device address must be set to 0. SMA operation In the "SMA operation" mode, up to four charge controllers may be connected to the Sunny Island. The device addresses intended for these four devices are one to four. The following table displays the switch position of the device addresses: Device address D3 D2 D1 0 OFF OFF OFF 1 OFF OFF ON 2 OFF ON OFF 3 OFF ON ON 4 ON OFF OFF 5 ON OFF ON 6 ON ON OFF 7 ON ON ON Installation Guide SIC50-IA-IEN
36 (First) Commissioning SMA Solar Technology AG Battery Type In stand-alone operation, the battery type and the charging voltage must be set. The battery type and charging voltage are set using the B1, B2, B3 and B4 DIL switches. When performing these settings, observe all the specifications of the manufacturer. The possible settings for the charging voltage/cell can be found in the following tables. Battery type Charging process Switch Boost Continuo Float B1 B2 B3 B4 us Typical flooded battery V 2.35 V 2.3 V OFF OFF OFF OFF Type 2 flooded battery V 2.35 V V OFF OFF ON OFF Type 3 flooded battery V 2.35 V V OFF ON OFF OFF Type 4 flooded battery V 2.33 V 2.25 V OFF ON ON OFF Typical sealed battery 2.4 V V 2.33 V ON OFF OFF OFF Type 2 sealed battery 2.4 V 2.35 V 2.3 V ON OFF ON OFF Type 3 sealed battery V 2.35 V 2.3 V ON ON ON OFF Type 4 sealed battery V 2.35 V 2.3 V OFF OFF OFF ON 7.2 Commissioning Check the following requirements before commissioning: Fuses designed correctly All DC cables completely connected (PV strings and batteries) Battery temperature sensor connected (only in stand-alone operation or when operated with a Sunny Island 3324/4248) DIL switches configured Commissioning Procedure 1. Check the polarity of the battery and the PV array. 2. Close the charge controller. Fasten the lid to the enclosure using four screws. 3. Connect the cables leading from the charge controller to the battery to the battery. 4. Switch on the miniature circuit breaker and the disconnection unit. 5. The LED changes its color from red to green. The green LED indicates that the device is operating. This means that the commissioning procedure was successful. If the PV voltage drops and falls below the battery voltage, the LED will change from green to orange. If the PV voltage exceeds the battery voltage, the device will restart and the LED will change from orange to green. 36 SIC50-IA-IEN Installation Guide
37 SMA Solar Technology AG Opening and Closing 8 Opening and Closing 8.1 Opening the Charge Controller DANGER! Danger to life due to high voltages in the charge controller. Disconnect the miniature circuit breaker and ensure that it cannot be reconnected. Switch off power supply to the signaling contact and ensure that it cannot be reactivated (if applicable). Ensure that no voltage is present in the system. 1. Remove the screws from the lid and set them aside. 2. Pull the lid slightly forward. 3. Disconnect the PE connection from the lid. 4. Carefully remove the multicolored LED from the charge controller's "LED" socket. 5. Remove the enclosure lid and set it aside. 8.2 Closing the Charge Controller 1. Create a PE connection to the lid. 2. Carefully insert the plug of the multicolored LED into the charge controller's "LED" socket. 3. Close the charge controller. Fasten the lid to the enclosure using four screws. 4. Switch on the miniature circuit breaker and the disconnection unit. 5. Check the LED to see if the charge controller is operating correctly. Installation Guide SIC50-IA-IEN
38 Maintenance and Cleaning SMA Solar Technology AG 9 Maintenance and Cleaning 9.1 Replacing the Thermal Fuses NOTICE! Using incorrect thermal fuses may irreparably damage the charge controller. Only use the thermal fuses included in the scope of delivery. 1. Open the charge controller as described in section 8.1 Opening the Charge Controller (page 37). 2. Remove broken thermal fuses from the sockets (A). 3. Insert new thermal fuses (included in the scope of delivery). 4. Close the charge controller as described in section 8.2 Closing the Charge Controller (page 37). 9.2 Cleaning the Cooling Fins It is only necessary to clean the cooling fins if the charge controller's heat dissipation is restricted by dirt. Carefully remove dirt with a suitable soft brush. 38 SIC50-IA-IEN Installation Guide
39 SMA Solar Technology AG Meaning of the Light Emitting Diodes (LEDs) 10 Meaning of the Light Emitting Diodes (LEDs) 10.1 Multicolored LED LED Green Red Orange Meaning Operation (PV voltage > battery voltage) Fault/error Low PV voltage (PV voltage < battery voltage) 10.2 Internal LEDs Internal LEDs The internal LEDs are located inside the charge controller and are only visible to the installer. Yellow (ERROR) Yellow (ERROR) Green (RXD) Green (TXD) Meaning Is glowing Is glowing error/stop charge controller is charging Is blinking charge controller is receiving data from Sunny Island Is blinking charge controller is transmitting data Installation Guide SIC50-IA-IEN
40 Failure Search SMA Solar Technology AG 11 Failure Search 11.1 SMA Operation You can find the description of all parameters and errors in the Sunny Island manual Stand-alone Operation You can read the error messages through the serial interface using the terminal program. The device number is shown as x in the following. Error code Ex= Ex= Ex= Ex= Ex= Description no error DC input voltage missing (also at night and during periods with low solar irradiation) overvoltage at DC input voltage battery temperature too high or sensor cable interrupted battery temperature too low or short circuit in the sensor cable Ex= charge controller temperature is higher than 90 C Ex= battery temperature is lower than -30 C Ex= battery voltage is lower than 8.1 V Ex= short circuit, overload or overcurrent at battery or PV array (also before first commissioning) 40 SIC50-IA-IEN Installation Guide
41 SMA Solar Technology AG Decommissioning 12 Decommissioning 12.1 Disassembly CAUTION! Risk of injury due to the charge controller's heavy weight. 1. Wait until the LED on the charge controller has gone out. 2. Open the charge controller. Loosen the screws of the enclosure lid and remove the lid. 3. Disconnect the PV array from the charge controller. 4. Disconnect the battery from the charge controller. 5. Remove the communication cable from the charge controller. 6. Close the charge controller. Fasten the lid to the charge controller using four screws. 7. Remove the charge controller Packaging If possible, always package the charge controller in the original packaging. If this is no longer available, you can also use an equivalent box that fulfills the following requirements: Suitable for loads up to 10 kg Can be closed fully 12.3 Storage Store the charge controller in a dry place with ambient temperatures between -25 C and +60 C Disposal Take the weight of the charge controller of approx. 10 kg into account. DANGER! Danger to life due to high voltages in the charge controller. Switch off all fuses and ensure that they cannot be reactivated. Dispose of the charge controller at the end of its service life in accordance with the disposal regulations for electronic waste which apply at the installation site at that time. Alternatively, send it back to SMA Solar Technology AG with shipping paid by sender, and labeled "ZUR ENTSORGUNG" ("for disposal"). Installation Guide SIC50-IA-IEN
42 Technical Data SMA Solar Technology AG 13 Technical Data SIC50-MPT Input (PV array) Max. PV power (12 V / 24 V / 48 V) 630 W / W / W Max. DC voltage 140 V DC Optimal MPPT voltage range (12 V / 24 V / 48 V) 25 V 60 V / 40 V 80 V / 70 V 100 V Number of MPP trackers 1 Max. PV current for 12 V / 24 V / 48 V system 40 A / 40 A / 40 A PV current control unit MPPT (approximate current control every minute, fine control every two seconds) Clamping position screw terminals Recommended cable cross-section 10 mm² Max. cross-section of cables that can be 16 mm² connected Torque (bolt or screw terminals) 0.5 Nm Nm Output (battery) Nominal DC power up to 40 C 600 W / W / W (12 V / 24 V / 48 V) Power limitation at 50 C / 60 C 12 V : 600 W / 600 W 24 V : W / W 48 V : W / W Nominal battery voltage (adjustable) 12 V / 24 V / 48 V Battery voltage range 8 V 65 V Battery type flooded and sealed lead acid batteries Max. charging current (12 V / 24 V / 48 V) 50 A / 50 A / 50 A Permanent charging current (12 V / 24 V / 48 V) 50 A / 50 A / 50 A Charge control IUoU Clamping position screw terminals Recommended cable cross-section 10 mm² Max. cross-section of cables that can be 16 mm² connected Fuse type (max. contact unit) thermal fuse (2 x 30 A) Torque (bolt or screw terminals) 0.5 Nm Nm 42 SIC50-IA-IEN Installation Guide
43 SMA Solar Technology AG Technical Data SIC50-MPT Efficiency / Power consumption Max. efficiency 98 % Euro-Eta 97.3 % Self-consumption during the day < 5 U Bat nom = 48 V DC Internal consumption at night < 3 Bat nom = 48 V DC General Dimensions (W x H x D) 421 mm x 310 mm x 143 mm Protection rating according to IEC IP65 Weight 10 kg Device protection short circuit / reverse polarity / overload / overvoltage and undervoltage / overtemperature and undertemperature EC Declaration of Conformity download area Display 1 x multicolored LED Mounting type suspended Configuration plug & play in combination with Sunny Island (CAN Piggy-Back required) DIL switch with standalone applications and in SMA operation Parallel operation up to four devices through CAN bus Battery temperature compensation -4 mv/ C Interfaces CAN Piggy-Back (optional) External temperature sensor KTY type (optional) Ambient conditions Permissible ambient temperature during 25 C +60 C operation Air humidity 0 % % Altitude (operational) m above mean sea level Transport height m above mean sea level Installation Guide SIC50-IA-IEN
44 Technical Data SMA Solar Technology AG SIC50-MPT Safety Device overtemperature derating/deactivation Device undertemperature deactivation at -30 C Overvoltage (PV) deactivation > 140 V Undervoltage (PV) deactivation at U PV < U Bat reconnection at U PV = U Bat +5 V Overvoltage (battery) deactivation U Bat > 65 V Undervoltage (battery) deactivation < 8 V; reconnection > 8.5 V Short circuit PV deactivation Battery short-circuit deactivation Reverse polarity PV deactivation Reverse polarity in battery fuse tripping Displays Operation display Transmitted data display Received data display Sunny Island display multicolored LED internal LED (not visible from outside) internal LED (not visible from outside) battery current, PV power, PV voltage, operating mode, error 44 SIC50-IA-IEN Installation Guide
45 SMA Solar Technology AG Contact 14 Contact If you have technical problems concerning our products, contact the SMA Service Line. We need the following information in order to provide you with the necessary assistance: Serial number of the charge controller Quantity of additional charge controllers Type and quantity of connected PV modules Type of connected stand-alone grid inverter Type of battery connected Nominal battery capacity Nominal battery voltage Communication products connected SMA Solar Technology AG Sonnenallee Niestetal, Germany SMA Serviceline Tel Fax SunnyIsland.Service@SMA.de Installation Guide SIC50-IA-IEN
46
47 SMA Solar Technology AG Legal Restrictions The information contained in this document is the property of SMA Solar Technology AG. Publishing its content, either partially or in full, requires the written permission of SMA Solar Technology AG. Any internal company copying of the document for the purposes of evaluating the product or its correct implementation is allowed and does not require permission. Exclusion of liability The general terms and conditions of delivery of SMA Solar Technology AG shall apply. The content of these documents is continually checked and amended, where necessary. However, discrepancies cannot be excluded. No guarantee is made for the completeness of these documents. The latest version is available online at or from the usual sales channels. Guarantee or liability claims for damages of any kind are excluded if they are caused by one or more of the following: Damages during transportation Improper or inappropriate use of the product Operating the product in an unintended environment Operating the product whilst ignoring relevant, statutory safety regulations in the deployment location Ignoring safety warnings and instructions contained in all documents relevant to the product Operating the product under incorrect safety or protection conditions Altering the product or supplied software without authority The product malfunctions due to operating attached or neighboring devices beyond statutory limit values In case of unforeseen calamity or force majeure The use of supplied software produced by SMA Solar Technology AG is subject to the following conditions: SMA Solar Technology AG rejects any liability for direct or indirect damages arising from the use of software developed by SMA Solar Technology AG. This also applies to the provision or non-provision of support activities. Supplied software not developed by SMA Solar Technology AG is subject to the respective licensing and liability agreements of the manufacturer. SMA Factory Warranty The current guarantee conditions come enclosed with your device. These are also available online at and can be downloaded or are available on paper from the usual sales channels if required. Trademarks All trademarks are recognized even if these are not marked separately. Missing designations do not mean that a product or brand is not a registered trademark. The Bluetooth word mark and logos are registered trademarks owned by Bluetooth SIG, Inc. and any use of such marks by SMA Solar Technology AG is under license. SMA Solar Technology AG Sonnenallee Niestetal Germany Tel Fax info@sma.de 2004 to 2011 SMA Solar Technology AG. All rights reserved Installation Guide SIC50-IA-IEN
48
Accessories for Wind Power Inverter WINDY BOY PROTECTION BOX 400 / 500 / 600
 Accessories for Wind Power Inverter WINDY BOY PROTECTION BOX 400 / 500 / 600 Installation Guide WBP-Box-IEN103320 IMEN-WBP-BOX Version 2.0 EN SMA Solar Technology AG Table of Contents Table of Contents
Accessories for Stand-alone inverter SUNNY ISLAND GENMAN
 Accessories for Stand-alone inverter SUNNY ISLAND GENMAN Technical Description GenMan-TEN082730 98-2001230 Version 3.0 EN SMA Solar Technology AG Table of Contents Table of Contents 1 Notes on this manual..............................
Wind Power Inverter WINDY BOY 5000A/6000A
 Wind Power Inverter WINDY BOY 5000A/6000A User Manual WB5A-6A-BA-BEN114530 TBEN-WB50-60A Version 3.0 EN SMA Solar Technology AG Table of Contents Table of Contents 1 Information on this Manual.........................
System Monitoring SCHOOLMETERBOX AU
 System Monitoring SCHOOLMETERBOX AU Installation Guide SMETER-IEN084710 98-00013210 Version 1.0 EN SMA Solar Technology AG Table of Contents Table of Contents 1 Notes on this Manual..............................
PV inverter SUNNY MINI CENTRAL 7000HV
 PV inverter SUNNY MINI CENTRAL 7000HV User Manual SMC70HV11-BA-BEN112930 TBEN-SMC70HV Version 3.0 EN SMA Solar Technology AG Table of Contents Table of Contents 1 Information on this Manual.........................
PV Inverter SUNNY MINI CENTRAL 9000TL / 10000TL / 11000TL with Reactive Power Control
 PV Inverter SUNNY MINI CENTRAL 9000TL / 10000TL / 11000TL with Reactive Power Control User Manual SMC9-11TLRP-BA-en-30 TBEN-SMCTLRP Version 3.0 EN SMA Solar Technology AG Table of Contents Table of Contents
PV Inverter SUNNY BOY 3300/3800
 PV Inverter SUNNY BOY 3300/3800 Installation Guide SB33_38-IEN111851 IME-SB3800 Version 5.1 EN SMA Solar Technology AG Table of Contents Table of Contents 1 Notes on this Guide...............................
PV inverter SUNNY BOY 2100TL
 PV inverter SUNNY BOY 2100TL Installation Guide SB2100TL-IEN091730 IME-SB21TL Version 3.0 EN SMA Solar Technology AG Table of Contents Table of Contents 1 Notes on this Manual..............................
Wind Power Inverter WINDY BOY 1100LV
 Wind Power Inverter WINDY BOY 1100LV Installation Guide WB1100LV-IA-IEN104130 IME-WB1100LV Version 3.0 EN SMA Solar Technology AG Table of Contents Table of Contents 1 Notes on this Guide...............................
PV Inverter SUNNY BOY 3300/3800
 PV Inverter SUNNY BOY 3300/3800 Installation Manual SB33-38-11-IA-en-62 IMEN-SB33-38-11 Version 6.2 EN SMA Solar Technology AG Table of Contents Table of Contents 1 Information on this Manual.........................
Sunny Boy Accessories SUNNY BOY COMBINER BOX TLUS SBCBTL6
 Sunny Boy Accessories SUNNY BOY COMBINER BOX TLUS SBCBTL6 Installation Guide SBCBTLUS-IUS094510 IMUS-SBCBTLUS Version 1.0 US SMA America, LLC Legal Restrictions Copyright 2010 SMA America, LLC. All rights
Multi-Function Interface MULTI-FUNCTION RELAY
 Multi-Function Interface MULTI-FUNCTION RELAY Installation Manual MFR-NR-IA-en-20 98-1000220 Version 2.0 EN SMA Solar Technology AG Table of Contents Table of Contents 1 Information on this Document...........................
Installation and operating instructions. Solar charge controller MPPT 10 A / 20 A Z Z
 Installation and operating instructions Solar charge controller MPPT 10 A / 20 A EN 1 Contents 1. About these instructions... 3 1.1 Applicability... 3 1.2 Users... 3 1.3 Description of symbols... 3 2.
Wind Power Inverter WINDY BOY 1200/1700
 Wind Power Inverter WINDY BOY 1200/1700 Installation Manual WB12-17-IA-IEN111840 IME-WB11-17 Version 4.0 EN SMA Solar Technology AG Table of Contents Table of Contents 1 Information on this Document.......................
User Manual. Solar Charge Controller 3KW
 User Manual Solar Charge Controller 3KW 1 CONTENTS 1 ABOUT THIS MANUAL... 3 1.1 Purpose... 3 1.2 Scope... 3 1.3 SAFETY INSTRUCTIONS... 3 2 INTRODUCTION... 4 2.1 Features... 4 2.2 Product Overview... 5
Installation and operating instructions. Solar charge controller 10 A / 15 A / 0 A / 30 A PHOTOVOLTAIK - PHOTOVOLTAICS - PHOTOVOLTAIQUE - FOTOVOLTAICA
 PHOTOVOLTAIK - PHOTOVOLTAICS - PHOTOVOLTAIQUE - FOTOVOLTAICA Installation and operating instructions Solar charge controller 10 A / 15 A / 0 A / 30 A EN 74.86 08.4 1. About this manual These operating
System Description SMA FLEXIBLE STORAGE SYSTEM in the United Kingdom
 System Description SMA FLEXIBLE STORAGE SYSTEM in the United Kingdom Adjustment of electrical connection and configuration for the low-voltage grid in the United Kingdom of Great Britain and Northern Ireland
Accessories for power generation plants in Italy SMA GRID GATE
 Accessories for power generation plants in Italy SMA GRID GATE Installation Manual GridGate-11-IA-en-12 Version 1.2 EN SMA Solar Technology AG Table of Contents Table of Contents 1 Information on this
NEW SOLAR CHARGE CONTROLLERS
 190 SOLAR CHARGE CONTROLLERS Steca Solarix 2020-x2 Dual battery charge controller The Steca Solarix 2020-x2 is a state-of-the-art dual battery charge controller that is ideal for use in leisure applications.
User Manual Solar Charge Controller 3KW
 User Manual Solar Charge Controller 3KW Version: 1.3 CONTENTS 1 ABOUT THIS MANUAL... 1 1.1 Purpose... 1 1.2 Scope... 1 1.3 SAFETY INSTRUCTIONS... 1 2 INTRODUCTION... 2 2.1 Features... 2 2.2 Product Overview...
SOLAR CHARGE CONTROLLER
 SOLAR CHARGE CONTROLLER SCE 1010 / SCE 1515 / SCE 2020 / SCE 3030 Instruction Manual Please read user manual carefully before use. 1.About this manual These operating instructions are part of the product.
Wind Power Inverter WINDY BOY 3600TL / 5000TL
 Wind Power Inverter WINDY BOY 3600TL / 5000TL Installation Guide WB36TL_50TL-IEN102011 IMEN-WB36_50TL Version 1.1 EN SMA Solar Technology AG Table of Contents Table of Contents 1 Notes on this Manual..............................
Installation and operating instructions. Solar charge controller Solarix MPPT 1010 and Z Z
 Installation and operating instructions Solar charge controller Solarix MPPT 1010 and 2010 EN 730927 Z04 1440 730927 Z04 1440 1 Contents 1. About these instructions...3 1.1 Applicability...3 1.2 Users...3
System description Off-Grid Systems with SUNNY ISLAND 4.4M / 6.0H / 8.0H
 System description Off-Grid Systems with SUNNY ISLAND 4.4M / 6.0H / 8.0H ENGLISH SI44M-80H-12-OffGrid-IA-en-11 Version 1.1 Legal Provisions SMA Solar Technology AG Legal Provisions The information contained
Battery Charger. Series EASY Charger. User s manual
 Battery Charger Series EASY Charger User s manual 1 Warranty RIPEnergy is not manufacturer of these units. All technical information s, data s and dimensions rely on information s given by the manufacturer.
Central Inverter SUNNY CENTRAL 500HE-20/630HE-20/720HE-20/ 760HE-20/800HE-20
 Central Inverter SUNNY CENTRAL 500HE-20/630HE-20/720HE-20/ 760HE-20/800HE-20 Maintenance Manual SC500-800HE20-WH-en-10 98-4110410 Version 1.0 EN SMA Solar Technology AG Table of Contents Table of Contents
Battery Charger Series EASY Charger
 Battery Charger Series EASY Charger User s manual 1 Warranty RIPEnergy is not manufacturer of these units. All technical information s, data s and dimensions rely on information s given by the manufacturer.
GEatom306KHF-5U Three-phase Grid-Tied Battery Inverter. Version 1.1. Global Mainstream Dynamic Energy Technology Ltd. 1
 GEatom306KHF-5U Three-phase Grid-Tied Battery Inverter Version 1.1 Global Mainstream Dynamic Energy Technology Ltd. 1 Content Prelude... 4 1. Safety... 5 1.1 How to Use This Manual... 5 1.2 Safety Rules...
System description Multicluster Systems with Stand-Alone Grid or Increased Self-Consumption and Battery-Backup Function
 System description Multicluster Systems with Stand-Alone Grid or Increased Self-Consumption and Battery-Backup Function Sunny Island 6.0H / 8.0H and Multicluster-Box 12 / NA-Box 12 / Grid-Connect-Box 12
T Series (N6052T) Solar Battery Hybrid System. Installation Manual Version 1.1
 Solar Battery Hybrid System. Installation Manual Version 1.1") T Series (N6052T) Solar Battery Hybrid System Installation Manual Version 1.1 Content 1. Safety... 1 1.1 How to Use This Manual... 1 1.2 Safety Rules... 1 1.3 Warning Notices Affixed to the Device... 2
T Series (N6052T) Solar Battery Hybrid System Installation Manual Version 1.1 Content 1. Safety... 1 1.1 How to Use This Manual... 1 1.2 Safety Rules... 1 1.3 Warning Notices Affixed to the Device... 2
Operating Manual SUNNY BOY 3600 / 5000 SMART ENERGY BATTERY PACK SMART ENERGY
 Operating Manual SUNNY BOY 3600 / 5000 SMART ENERGY BATTERY PACK SMART ENERGY SB36-50SE-BE-en-11 98-112900.02 Version 1.1 AMERICAN ENGLISH Legal Provisions SMA Solar Technology AG Legal Provisions The
Installation - Quick Reference Guide Off-Grid Systems
 Installation - Quick Reference Guide Off-Grid Systems Off-Grid Systems with Sunny Island 6.0H / 8.0H Off-Grid-IAS-en-20 Version 2.0 ENGLISH Legal Provisions SMA Solar Technology AG Legal Provisions The
Sinewave Inverters. SWING pro 200VA and 350VA. User s manual
 Sinewave Inverters SWING pro 200VA and 350VA User s manual 1 Warranty RIPEnergy is not manufacturer of these units. All technical information s, data s and dimension s rely on information s given by the
Central Inverter SUNNY CENTRAL 500CP-JP / 500CP XT / 630CP XT / 720CP XT / 760CP XT / 800CP XT / 850CP XT / 900 CP XT
 Central Inverter SUNNY CENTRAL 500CP-JP / 500CP XT / 630CP XT / 720CP XT / 760CP XT / 800CP XT / 850CP XT / 900 CP XT Maintenance Manual SCCP-WH-B4-en-20 98-4046720 Version 2.0 EN SMA Solar Technology
User Manual. Hybrid PV Inverter. Version: 2.1
 User Manual Hybrid PV Inverter Version: 2.1 Table Of Contents 1. Introduction...1 2. Important Safety Warning...2 3. Unpacking & Overview...4 3-1. Packing List... 4 3-2. Product Overview... 4 4. Installation...5
Manual. BlueSolar Grid Inverter 1500 / / / / / 230
 Manual EN BlueSolar Grid Inverter 1500 / 230 2000 / 230 2800 / 230 4000 / 230 5000 / 230 Before you start This manual contains important information regarding installation and safe operation of this unit.
MPPT Solar Charge Controller
 MPPT Solar Charge Controller Automatic Recognition 40A 50A 60A Series Manual Contents 1 Notes on This Manual...3 2 Safety Instructions... 4 3 Unpacking...6 4 Assembly... 7 5 MPPT Controller Connection...8
Operating Manual NA-BOX 12
 Operating Manual NA-BOX 12 NA-BOX-12-3-20-BE-en-11 Version 1.1 ENGLISH Legal Provisions SMA Solar Technology AG Legal Provisions The information contained in this document is the property of SMA Solar
The Traveler Series: Adventurer
 The Traveler Series: Adventurer RENOGY 30A Flush Mount Charge Controller Manual 2775 E. Philadelphia St., Ontario, CA 91761 1-800-330-8678 Version: 2.2 Important Safety Instructions Please save these instructions.
Inverter / Charger Accessory for Steca Solarix PLI Phase / Parallel Kit. Installation and operating instructions Z01 17.
 Inverter / Charger Accessory for Steca Solarix PLI 5000-48 3-Phase / Parallel Kit Installation and operating instructions GB Z01 17.31 Table of Contents About this Manual... 2 Purpose... 2 Scope... 2 Keywords
Sinewave Inverters. SWING 150VA and 300VA. User s manual
 Sinewave Inverters SWING 150VA and 300VA User s manual 1 Warranty RIPEnergy is not manufacturer of these units. All technical information s, data s and dimension s rely on information s given by the manufacturer.
Maximum Power Point Tracking (MPPT) KA1224MPPT20A KA1224MPPT40A. Solar Charge Controller. User Manual 20A
 KA1224MPPT20A KA1224MPPT40A. Solar Charge Controller. User Manual 20A") Maximum Power Point Tracking (MPPT) KA1224MPPT20A - KA1224MPPT40A Solar Charge Controller User Manual Model Battery voltage Max. solar panel voltage Charging current KA1224MPPT20A KA1224MPPT40A 12V/24V
Maximum Power Point Tracking (MPPT) KA1224MPPT20A - KA1224MPPT40A Solar Charge Controller User Manual Model Battery voltage Max. solar panel voltage Charging current KA1224MPPT20A KA1224MPPT40A 12V/24V
SMT. Installation and Operation Manual. Model:SMT WITH MPPT TECHNOLOGY
 SMT WITH MPPT TECHNOLOGY Installation and Operation Manual Model:SMT SMT Dimensions Specification Summary System Voltage 12 V/24V Rated Battery Current 12V, 5A 8A 10A 15A 20A 25A 24V, 5A 8A 10A 15A Rated
User Manual. 3kW Hybrid PV Inverter HX-3000
 User Manual 3kW Hybrid PV Inverter HX-3000 Table Of Contents 1. Introduction...1 2. Important Safety Warning...2 3. Unpacking & Overview...4 3-1. Packing List... 4 3-2. Product Overview... 4 4. Installation...5
Electronic Ballast EVG 2000-T
 Electronic Ballast EVG 2000-T Operating Manual Table of contents 1 Description 1.1 Advantages of this ballast... 3 1.2 Functional principle... 3 1.3 Energization... 4 1.4 Visualization... 5 1.5 Indications
Wind power inverter WINDY BOY 5000-US/6000-US WINDY BOY 7000-US/8000-US. 1 Notes on this addendum. 1.1 Validity. 1.2 Target group
 Wind power inverter WINDY BOY 5000-US/6000-US WINDY BOY 7000-US/8000-US Addendum operating requirements 1 Notes on this addendum 1.1 Validity This addendum does not replace the attached Sunny Boy installation
Installation and Operating Instructions. MPPT Solar System Controller ISC3040
 Installation and Operating Instructions MPPT Solar System Controller ISC3040 ABOUT THIS MANUAL These operating instructions come with the product and should be kept with it as a reference to all user s
Appendix. Introduction. Symbol and Signs
 Product Manual Appendix Introduction 18 Software Control through PC (communication port) Input Overvoltage Protection Input Polarity Reversal Protection Output Overvoltage Protection Output Polarity Reversal
Operating parameters WINDY BOY
 Operating parameters WINDY BOY Technical Description WB_Par-TEN093910 Version 1.0 EN SMA Solar Technology AG Table of Contents Table of Contents 1 Information about this Manual...................... 5
Installation and Operating Instructions. Solar System Controller ISC3020
 Installation and Operating Instructions Solar System Controller ISC3020 ABOUT THIS MANUAL These operating instructions come with the product and should be kept with it as a reference to all user s of
LS0512R Solar Light Controller
 LandStar LS0512R Solar Light Controller Nominal system voltage Maximum PV input voltage Nominal charge / discharge current 12VDC 35V 5A Contents 1 Important Safety Information... 1 2 General Information...
Micro Inverter with Communication Unit SUNNY BOY 240-US SUNNY MULTIGATE-US
 Micro Inverter with Communication Unit SUNNY BOY 240-US SUNNY MULTIGATE-US Installation Manual SMG-SB240US-IA-en-11 Version 1.1 CA US Legal Provisions Legal Provisions Copyright 2013. All rights reserved.
Rover Series. Rover 20A 40A Maximum Power Point Tracking Solar Charge Controller
 Rover Series Rover 20A 40A Maximum Power Point Tracking Solar Charge Controller 0 2775 E. Philadelphia St., Ontario, CA 91761 1-800-330-8678 Version 1.5 Important Safety Instructions Please save these
Operating Manual SUNNY ISLAND 3.0M / 4.4M / 6.0H / 8.0H SUNNY REMOTE CONTROL. SI30M-44M-60H-80H-BE-en-33 Version 3.3 SUNNY REMOTE CONTROL
 Warning Operating Manual SUNNY ISLAND 3.0M / 4.4M / 6.0H / 8.0H SUNNY REMOTE CONTROL SUNNY REMOTE CONTROL Grid / Generator Memory Card Load ENGLISH SI30M-44M-60H-80H-BE-en-33 Version 3.3 Legal Provisions
Duo Battery Charge Controller
 Duo Battery Charge Controller RENOGY 10A 20A Pulse Width Modulation Solar Charge Controller Manual 1 2775 E. Philadelphia St., Ontario CA 91761 1-800-330-8678 Version: 1.2 Important Safety Instructions
User Manual Rittal PMC UPS 6kVA
 User Manual Rittal PMC UPS 6kVA Germany Rittal GmbH & Co. KG Auf dem Stützelberg D-35745 Herborn Tel.: ++49-27 72-5 05-0 Fax: ++49-27 72-5 05-23 19 Internet: www.rittal.de 26 Contents 1. Introduction...
LS0512 Solar Charge Controller
 LandStar LS0512 Solar Charge Controller Nominal system voltage Maximum PV input voltage Nominal charge / discharge current 12VDC 35V 5A Contents 1 Important Safety Information... 1 2 General Information...
SOLAR CHARGE CONTROLLER N 2010 IN 2011/ N 2012/ N 2014
 SOLAR CHARGE CONTROLLER N 2010 IN 2011/ N 2012/ N 2014 Instruction Manual Please read user manual carefully before use. CE 1.About this manual These operating instructions are part of the product. ~ Read
The Traveler Series TM : Adventurer
 The Traveler Series TM : Adventurer 30A PWM Flush Mount Charge Controller w/ LCD Display 2775 E. Philadelphia St., Ontario, CA 91761 1-800-330-8678 Version: 3.4 Important Safety Instructions Please save
i-energy i-micro inverter GT260
 i-energy i-micro inverter GT260 This installation guide contains important instructions on safety matters and the installation of the i-energy i-micro inverter GT260. Please read this guide carefully and
PV Generation System. Solar Charge Controller SPECIFICATION
 PV Generation System Solar Charge Controller SPECIFICATION Home application type Version: V5.0 Thank you very much for selecting our product! This manual offers important information and suggestions with
Sinewave Inverters. Jazz 700VA and 1000VA. User s manual
 Sinewave Inverters Jazz 700VA and 1000VA User s manual 1 Warranty RIPEnergy is not manufacturer of these units. All technical information s, data s and dimension s rely on information s given by the manufacturer.
The Traveler Series: Wanderer
 The Traveler Series: Wanderer RENOGY 30A PWM Charge Controller Manual 2775 E. Philadelphia St., Ontario, CA 91761 1-800-330-8678 1 Version: 2.3 Important Safety Instructions Please save these instructions.
Assembly instructions
 Please carefully read the assembly instructions before beginning the installation, operation and maintenance of the solar facility. Noncompliance could cause injury to persons or damage to the equipment.
PHOTOVOLTAIK - PHOTOVOLTAIC - PHOTOVOLTAIQUE - FOTOVOLTAICA. Operating instructions. Solar Charge Controller 8 A / 12 A / 20 A / 30 A
 PHOTOVOLTAIK - PHOTOVOLTAIC - PHOTOVOLTAIQUE - FOTOVOLTAICA Operating instructions Solar Charge Controller A / A / 0 A / 0 A UK. 0. Contents. Safety instructions and exclusion of liability.... Charge controller
User Manual 1KVA/ 2KVA/ 3KVA INVERTER / CHARGER
 User Manual 1KVA/ 2KVA/ 3KVA INVERTER / CHARGER CONTENTS ABOUT THIS MANUAL... 1 Purpose... 1 Scope... 1 SAFETY INSTRUCTIONS... 1 INTRODUCTION... 2 Features... 2 Basic System Architecture... 2 Product Overview...
MAKING MODERN LIVING POSSIBLE. UniLynx Indoor Installation Manual. ULX 1800i ULX 3000i ULX 3600i ULX 5400i SOLAR INVERTERS
 MAKING MODERN LIVING POSSIBLE UniLynx Indoor Installation Manual ULX 1800i ULX 3000i ULX 3600i ULX 5400i SOLAR INVERTERS Contents Contents 1. Introduction 2 Introduction 2 Installation Sequence 2 Important
10A / 15A / 20A Solar Charge Controller. PU1024 / PU1524 / PU2024 series INSTRUCTION MANUAL
 10A / 15A / 20A Solar Charge Controller PU1024 / PU1524 / PU2024 series INSTRUCTION MANUAL Dear Customer, Thank you very much for choosing our product. This manual contains important information about
GV-4 Manual 4A / 50W IMPORTANT SAFETY INSTRUCTIONS SAVE THESE INSTRUCTIONS. Solar Charge Controller with Maximum Power Point Tracking.
 GV-4 Manual Solar Charge Controller with Maximum Power Point Tracking For models: GV-4-Pb-12V: 12V Lead-Acid/AGM/Gel/Sealed/Flooded http://genasun.com Genasun Inc. 1035 Cambridge st. Suite 16B Cambridge,
Assembly and Maintenance Manual Type ASNU
 Assembly and Maintenance Manual Type ASNU Hatschekstr.36 69126 Heidelberg Germany Tel +49(0)6221 30470 Fax +49(0)6221 304731 info@stieber.de www.stieber.de Date of issue: 30.05.2018 GB Revision: 0 U:\EngUsers\!ProduktDoku\1AAA_Einbauerklaerung_Wartungsanleitung_Konformitaetserklaerung\1AAA_Wartungsanleitungen\Orginal_Worddatei\_ASNU.docx
HANGKAI GROUP HOYMILES MICRO-INVERTER MI-250
 HANGKAI GROUP HOYMILES MICRO-INVERTER MI-250 TECHNICAL MANUAL CONTENTS INTRODUCTION... 3 SAFETY... 4 SYMBOL ILLUSTRATION... 4 INSTALLATION WARNINGS... 6 PREPARE FOR INSTALLING... 7 TRANSPORT AND INSPECT...
Uninterruptible power supply Supply MEg101.4
 Uninterruptible power supply Supply MEg101.4 MEgA Měřící Energetické Aparáty, a.s. 664 31 Česká 390 Czech Republic Uninterruptible power supply Supply MEg101.4 Uninterruptible power supply MEg101.4 1/
8 Troubleshooting and Maintenance
 8 Troubleshooting and Maintenance 8.1 Troubleshooting 8.1.1 Troubleshooting of LED Indicators See Tab. 7-4 State Descriptions of LED Indicators for the definition. Fault Type LED indicators and LCD screen
System Monitoring SUNNY SENSORBOX
 System Monitoring SUNNY SENSORBOX Installation Manual Sensorbox-eng-IA-IUS-112515 98-0003915 Version 1.5 CA US SMA America, LLC Legal Restrictions Copyright 2011 SMA America, LLC. All rights reserved.
Operating Manual (Edition 04/2004) sinamics. Braking Module / Braking Resistor SINAMICS G130
 sinamics. Braking Module / Braking Resistor SINAMICS G130") Operating Manual (Edition 04/2004) sinamics Braking Module / Braking Resistor SINAMICS G130 04/04 Contents Contents 1 Safety Information 1-1 2 General 2-1 3 Mechanical Installation 3-1 4 Connection 4-1
Operating Manual (Edition 04/2004) sinamics Braking Module / Braking Resistor SINAMICS G130 04/04 Contents Contents 1 Safety Information 1-1 2 General 2-1 3 Mechanical Installation 3-1 4 Connection 4-1
Eclipse Solar Suitcase
 Eclipse Solar Suitcase Renogy 100W 200W 2775 E. Philadelphia St., Ontario, CA 91761 1-800-330-8678 Version 1.0 Important Safety Instructions Please save these instructions. This manual contains important
INSTALLATION INFORMATION
 INSTALLATION INFORMATION BMS ZE6000i-PCBT.xxxx / ver. 2 Programmable battery management system for Lithium Ion battery cells, for up to 32 round or prismatic cells, 10 to 400Ah NOTE: This installation
Installation manual wall-mounted distributor
 EN Installation manual wall-mounted distributor EN 60003233 Issue 11.2016 2016-14-11 Table of contents 1 About this manual 3 1.1 Structure of the warnings 3 1.2 Symbols used 4 1.3 Signal words used 4 2
Off-Grid Inverter SUNNY ISLAND 4548-US/6048-US
 Off-Grid Inverter SUNNY ISLAND 4548-US/6048-US Technical description SI4548_6048-US-TB_en-13 Version 1.3 US SMA America, LLC Legal Provisions Legal Provisions Copyright 2013 SMA America, LLC. All rights
LS1024BP/ LS2024BP. Solar Charge Controller USER MANUAL
 EPSOLAR LS1024BP/ LS2024BP Solar Charge Controller USER MANUAL Thank you very much for selecting our product! This manual offers important information and suggestions with respect to installation, use
USER MANUAL GEBRUIKSAANWIJZING. Phoenix 12/150 Phoenix 24/150 Phoenix 48/150
 USER MANUAL GEBRUIKSAANWIJZING Phoenix 12/150 Phoenix 24/150 Phoenix 48/150 Copyrights 1999, 2000 Victron Energie B.V. All Rights Reserved This publication or part thereoff, may not reproduced in any
Sinewave Inverter. HIPHOP pro 1500 HIPHOP pro User s manual
 Sinewave Inverter HIPHOP pro 1500 HIPHOP pro 2000 User s manual 1 Warranty RIPEnergy is not manufacturer of these units. All technical information s, data s and dimension s rely on information s given
User s Manual. Automatic Switch-Mode Battery Charger
 User s Manual Automatic Switch-Mode Battery Charger IMPORTANT Read, understand, and follow these safety rules and operating instructions before using this battery charger. Only authorized and trained service
Version: 1.0 Mat.-Nr.: DBUS-WB50-80US
 WINDY BOY 3000-US / 5000-US / 6000-US / 7000-US / 8000-US Addendum operating requirements Version: 1.0 Mat.-Nr.: DBUS-WB50-80US 1 Notes on this addendum 1.1 Validity This addendum does not replace the
SMPPT. Solar Charge Controller with Maximum Power Point Tracking. Installation & Operation Manual
 SMPPT Solar Charge Controller with Maximum Power Point Tracking 10A/20A/30A 12V/24V Installation & Operation Manual 1 Dear Consumer: Thank you very much for using our product! We will offer you the permanent
Original Operating Manual
 2010-10-29 Original Operating Manual Control Panel Comfort for Pedelecs Series 4313 Save for future use! Marquardt GmbH Schlossstraße 16 78604 Rietheim-Weilheim E-mail: marquardt@marquardt.de Website:
System Description SMA FLEXIBLE STORAGE SYSTEM with BatteryBackup Function
 System Description SMA FLEXIBLE STORAGE SYSTEM with BatteryBackup Function Battery-Backup Systems including Increased Self-Consumption with SUY ISLAD 4.4M / 6.0H / 8.0H and SUY HOME MAAGER EGLISH SI44M-80H-2-BBF-IA-en-0
9.1.4 Troubleshooting of Faults in LCD Screen
 User Manual 9 and Maintenance 9.1.2 Arc Detection Self-test An auto-test circuit is included in the module design of the inverter s AFDI function. If a DC arc fault is detected, the corresponding fault
LIGHTNING PROTECTION UNIT (LPU)
") LIGHTNING PROTECTION UNIT (LPU) Photovoltaic Lightning Protection Device Installation and Operation Manual SPECIALTY CONCEPTS, INC. 8954 Mason Ave. Chatsworth, CA 91311 USA MODELS COVERED: LPU-50, LPU-150,
LIGHTNING PROTECTION UNIT (LPU) Photovoltaic Lightning Protection Device Installation and Operation Manual SPECIALTY CONCEPTS, INC. 8954 Mason Ave. Chatsworth, CA 91311 USA MODELS COVERED: LPU-50, LPU-150,
Emergency Power Supply for the OMEGA ACTIVE-System. Operating Instructions
 Emergency Power Supply for the OMEGA ACTIVE-System Operating Instructions Preface Preface These Operating Instructions will help you using the Emergency Power Supply as intended, safely, and advantageously.
Type Operating Instructions. Bedienungsanleitung Manuel d utilisation. 2/2-Way Solenoid Valve 2/2-Wege-Magnetventil Électrovanne à 2/2 voies
 Type 5282 2/2-Way Solenoid Valve 2/2-Wege-Magnetventil Électrovanne à 2/2 voies Operating Instructions Bedienungsanleitung Manuel d utilisation 1 OPERATING INSTRUCTIONS The operating instructions contain
Sunny Island 3324/4248 Installation Guide
 Sunny Island 3324/4248 Installation Guide Installation Guide Version 4.0 SI3324/4248-14:SE2406 IME-SI4248 Table of Contents 1 Notes on this Manual...................9 1.1 Validity.....................................
SUNNY BACKUP System. Solar Power Even in the Event of Grid Failure
 SUNNY BACKUP System Solar Power Even in the Event of Grid Failure SUNNY BACKUP System The "Blackout Blocker" Power outage means: Disconnection of the PV system from the grid No light, no heating, no computer:
Fuse state indicator MEg72. User manual
 Fuse state indicator MEg72 User manual MEg Měřící Energetické paráty, a.s. 664 31 Česká 390 Czech Republic Fuse state indicator MEg72 User manual Fuse state indicator MEg72 INTRODUCTION The fuse state
Installation Manual SUNNY CENTRAL 500CP XT/630CP XT/720CP XT/ 760CP XT/800CP XT/850CP XT/900CP XT/1000CP XT
 Installation Manual SUNNY CENTRAL 500CP XT/630CP XT/720CP XT/ 760CP XT/800CP XT/850CP XT/900CP XT/1000CP XT ENGLISH SCCPXT-E7-IA-en-46 98-105500.05 Version 4.6 Legal Provisions SMA Solar Technology AG
SPARKSCAN1 HIGH VOLTAGE CLAMP OPERATING MANUAL
 SPARKSCAN1 HIGH VOLTAGE CLAMP OPERATING MANUAL MOTORTECH Tools & Test Equipment for Ignition Systems P/N 01.10.019 Rev. 01/2013 Copyright Copyright 2012 MOTORTECH GmbH. All rights reserved. Distribution
7 MODES OF OPERATION INVERTER STATUS Standby: The PV string can only provide just enough voltage to minimum requirements of the controller.
 7 MODES OF OPERATION INVERTER STATUS 8 There are 3 different modes of operation. 7. Normal mode In this mode, Inverter works normally. Whenever the supplied power from PV panel is sufficient (voltage>50vdc),
Manual. EN Appendix. Lynx Ion BMS 400A / 1000A
 Manual EN Appendix Lynx Ion BMS 400A / 1000A 1. SAFETY INSTRUCTIONS 1.1 In general Please read the documentation supplied with this product first, so that you are familiar with the safety signs en directions
CPS Energy Balancer. Version: 1.0
 CPS Energy Balancer Version: 1.0 CHINT POWER SYSTEMS AMERICA CO., LTD. Address: 700 International Parkway, Suite 102 Richardson, Texas Zip Code: 75081 Web: www.chintpower.com/na Email: americasales@chintpower.com
User Manual 1.5KVA-3KVA INVERTER / CHARGER. Version: 1.1
 User Manual 1.5KVA-3KVA INVERTER / CHARGER Version: 1.1 Table Of Contents ABOUT THIS MANUAL... 1 Purpose... 1 Scope... 1 SAFETY INSTRUCTIONS... 1 INTRODUCTION... 2 Features... 2 Basic System Architecture...