Read Instructions Before Using Your New E-bike
|
|
|
- Branden McDonald
- 5 years ago
- Views:
Transcription


1 Read Instructions Before Using Your New E-bike
2 NOTICE! Before using your new E-bike the first time, Charge 6hours for Li-ion batteries and 8 hours for SLA(Sealed Lead Acid) batteries Always recharge the battery before the power indicator shows no power. Failure to follow these instructions voids any warranty, whether stated or implied. Before operating your E-bike Warning! This product does not conform to Federal Motor Vehicles Standards and Is not intended for operation on public streets, roads or highways. Serious injury can result from the unsafe operations of this vehicle. This product is not designed to be jumped. If jumped, even from the curb, The E-bike Frame could break causing serious injury or death. If jumped, the warranty is void. Do not operate this product in traffic, on wet, frozen, oily or Unpaved surfaces or under the influence of drugs and/or alcohol. Avoid uneven surfaces, potholes, surface cracks and obstacles. It is recommended that the rider wear leather gloves, kneepads And leather boots. Always wear a DOT approved helmet. Never carry passengers on your E-bike. Check your state and local laws governing the use of motorized vehicles in your area. Yukon Trail, Inc. is not responsible for your Failure to comply with state and local ordinances Relating to the use of the E-bike. Failure to follow these operation instructions can result in serious injury or death.


3 Congratulations on your new purchase! Our service department is dedicated to your satisfaction with For questions regarding performance, assembly, operation, parts or return, contact the Manufacturer directly by calling toll free DO NOT RETURN TO STORE
4 Before You Ride About this Manual It is important for you to understand your new bicycle. By reading this manual before you go out on your first ride, you will know how to get better performance, comfort, and enjoyment from your new bicycle. It is also important that your first ride on your new bicycle is taken in a controlled environment, away from cars, obstacles, and other cyclists. General Warning Bicycles can be hazardous activity even under the best of circumstances. Proper maintenance of your cycles is your responsibility as it helps reduce the risk of injury. This manual contains many Warnings and Cautions concerning the consequences of failure to maintain or inspect your bicycle. Many of the warning and cautions say you may lose control and fall. Because any fall can result in serious injury or even death, we do not repeat the warning of possible injury or death whenever the risk of falling is mentioned. A Special Note for Parents It is a tragic fact that most bicycle accidents involve children. As a parent or guardian, you bear the responsibility for the activities and safety of your minor child. Among these responsibility are to make sure that the bicycle which your child is riding is properly fitted to the child; that is in good repair and safe operating condition; that you and your child have learned, understand and obey not only the local motor vehicle, bicycle, and traffic laws, but also the common sense rules of safe and responsible bicycling, As a parent, you should read this manual before letting your child ride the bicycle. Please make sure that your child always wears and ANSI, ASTM, SNELL approved helmet when riding.
5 Safety Checklist Before you ride, it is important to carry out the following safety checks: 1. Brakes Ensure front and rear brakes work properly Ensure brake shoe pads are not over worn and are correctly position in relation o the rims. Ensure brake control cables are lubricated, correctly adjusted and display no obvious wear. Ensure brake control levers are lubricated and tightly secured to the handlebar. 2. Wheel and Tires Ensure tires are inflated to within the recommended limit as displayed on the tire sidewall Ensure tires have tread and have no bulges or excessive wear. Ensure rims run true and have no obvious wobbles or kinks. Ensure all wheels spokes are tight and not broken. Check that axle nuts are tight. If your bicycle is fitted with quick release axles, make sure locking levers are correctly tensioned and in the closed position. 3. Steering Ensure handlebar and stem are correctly adjusted and tightened, and allow proper steering. Ensure that the handlebars are set correctly in relation to the forks and direction of travel. Check that the headset locking mechanism is properly adjusted and tightened. If the bicycles is fitted with handlebar end extensions, ensure they are properly position and tightened.
6 4. Chain Ensure chain is oiled, clean and runs smoothly. Extra care is required in wet or dusty conditions. 5. Bearing Ensure pedals are securely tightened to the cranks. Check headset, wheel bearings, pedals bearing and bottom bracket bearings. 6. Cranks and Pedals Ensure pedals are securely tightened to the cranks Ensure cranks are secure to axle and are not bent. 7. Derailleurs Check that front and rear mechanisms are adjusted and function properly. Ensure shift and brake levers are attached to the handlebar. Ensure derailleur, shift levers and shift and brake cables are properly lubricated. 8. Frame and Fork Check that the frame and fork are not bent or broken If either are bent or broken, they should be replaced.
7 9. Accessories Ensure that all reflectors are properly fitted and not obscured. Ensure all other fittings on the bike are properly and securely fastened, and functioning. Ensure the rider is wearing a helmet. 10. Motor Drive Assembly and Throttle Ensure all motor drive components are correctly mounted and functioning properly. 11. Battery Pack Ensure the batteries are in good operation condition and kept fully charged and properly secured and locked.
8 Helmets It is strongly advised that a properly fitting, ANSL or SNELL approved, bicycle safety helmet be worn at all times when riding your bicycle. In addition, if you are carrying a passenger on a child safety seat, they must also be wearing a helmet. The correct helmet should: -be comfortable -be lightweight -have good ventilation -fit correctly -cover forehead Always wear a properly fitted helmet which covers the forehead when riding a bicycle. Many states require specific safety devices. It is your responsibility to familiarize yourself with the law of the state where you ride and to comply with all applicable laws, including properly equipping yourself and your bikes as the law requires. Reflectors are important safety devices which are designed as an integral part of your bicycle. Federal regulations require every bicycle to be equipped with front, rear, wheel, and pedal reflectors. Theses reflectors are designed to pick up and reflect street lights and car lights in a way that helps you to be seen and recognized as a moving bicyclist. Check reflectors and their mounting brackets regularly to make sure they are clean, straight, unbroken and securely mounted, Have your dealer replace damaged reflectors and straighten or tighten and that are bent or broken.

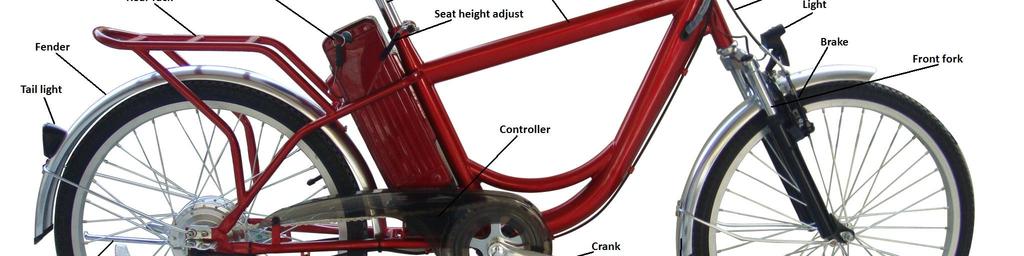
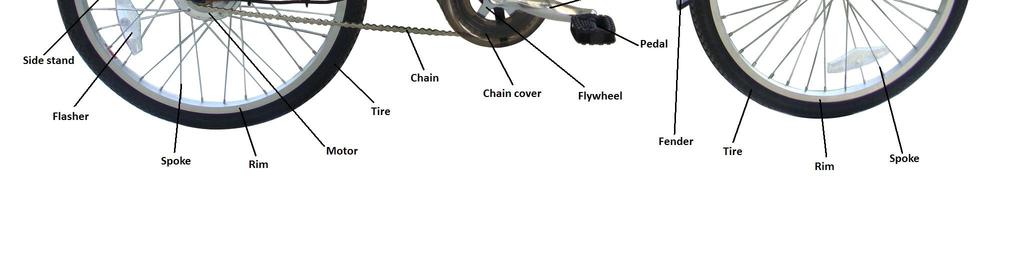

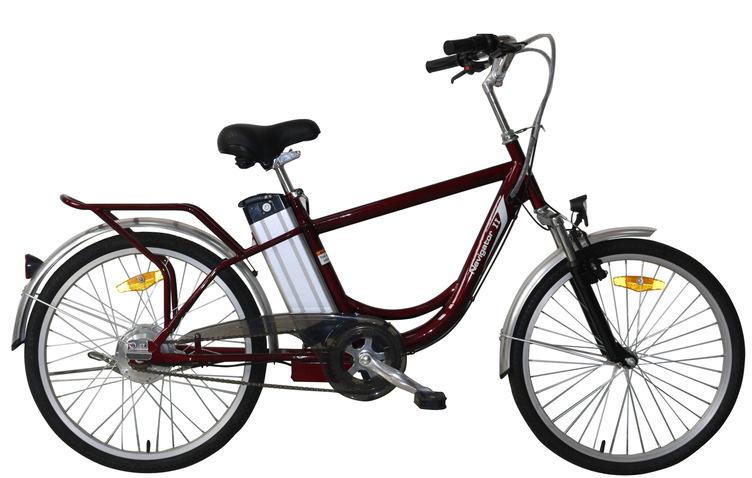
9 Component List


10
11
 indicate instantaneous line voltage as measured at the battery terminals- and not the")


12 Battery Gauge When the throttle or sensor is engaged (Powering the motor) and the bicycle is in motion, the LED s on the battery gauge (on the throttle or separate unit) indicate instantaneous line voltage as measured at the battery terminals- and not the available energy in the battery pack. The line voltage will fluctuate depending on the instantaneous load that the motor is under. For example,when starting out from a dead stop, or going up a steep hill, the motor will be under a high load and may show a reduced number of LED s or show the Yellow or even Red LED. When the throttle is disengaged (i.e. no power to the motor due to the bicycle being stationary or coasting) the LED s on the throttle will indicate the voltage of the battery pack. The voltage of the battery pack will rise when no load is on the motor. The best indication of how much battery life is remaining is to check the throttle LED s, after reaching cruising speed, on a flat straight road as this will allow the battery voltage to stabilize and give a much more accurate reading.


13 The LED s 790 type with 3 speed you can also choose on the LED s 790, MODE (LOW, MED,HIGH). TAG Throttle with Battery Gauge for SLA battery E-bike TAG Throttle and Individual Battery Gauge for Li-ion battery E-bike Throttles Throttle, are equipped on some models of electric bicycles. Throttles operate be rotating the throttle much like a motorcycle. They generally are the inner half of the right side handlebar grip and may also contain a battery gauge. The more you twist the throttle, the faster the motor system will propel bicycle. TAG Throttle TAG (Twist and Go) Before you begin riding, turn the main power switch on, then start riding as you would ride a regular, non-motor assisted bicycle. After you have begun to ride, slowly twist the throttle (on equipped models) towards you.the more
.")
14 you twist the throttle, the more motor power will be applied to the wheels. You may feel the pedals get a lighter feel than riding without the motor assisting you. Once you have twisted the throttle all the way, the motor will accelerate you to its full speed of about 15mph (24km/h). PAS (Pedal Activated System) Electric bicycles with this system have a throttle that is only active when the pedals are in forward motion. A sensor ring on the bottom bracket spindle rotates and a sensor reads this rotation. Begin by first riding as if you are on a normal non-electric bicycle, then while the pedal are in motion slowly twist the throttle towards you the activate the motor power. Taking Care of Your Batteries Proper maintenance of the batteries will maximize their lifespan and available ride time. We use SLA (Sealed Lead Acid) or Li-Ion (Lithium Ion) batteries in all of our electric bicycles. These are very user friendly types of batteries when cared for properly. Batteries should be fully charged immediately when they are received for the recommended charger times. FULLY CHARGE BATTERIES BEFORE FIRST USE. Below are the recommended charge times for each type of the batteries. Li-Ion(Lithium Ion) batteries 4-6 hours SLA(Sealed Lead Acid) 6-8 hours Charge batteries at least very 90 days for Li-ion and every 30 days for SLA until normal use is resumed. Always store bicycle with fully charged batteries. Never charge the batteries for more than 24 hours
 Bikes are equipped with a 5 minute sleep mode.")

15 Always disconnect the charger form the wall outlet and bicycle when charging is complete (as indicated by the status on the charger) before storing the bicycle. Do not store the batteries below 50 Fahrenheit and never allow batteries to freeze (Below 32 Fahrenheit) Bikes are equipped with a 5 minute sleep mode.if no activity is detected after 5 minutes the bike will go into sleep mode to conserve the batteries. To Restart, cycle the power switch Off then On. Bikes are not to be stored in the 5 minutes sleep mode.be sure to turn the power switch OFF when the bike in not in use. Always be sure to turn the bike OFF after each use via the ON/OFF power switch. If you have left the power switch on or your product have not been charged for a long period of time, the batteries may reach a stage at which it will no longer hold charge. Be friendly to the environment! Be sure to recycle your old batteries at a local battery recycling center. Do not throw them in the garbage. Frequent stops and starts will drain a battery more quickly than sustained. long term use. Even with proper care, rechargeable batteries do not last forever. Average battery life depends on use and conditions. The Li-Ion battery rear lights power is directly on the rear of battery. The Battery power switch is the Red Button under the rear battery (beneath LED Light). The Li-Ion battery charger connector is covered by a rubber cover when you lift the battery handle.
 SLA battery packs: 24V 10Ah Sealed Lead Acid Battery, First time charging time: 8 hours, Recharging time: 6~8 hours, Do not charge longer than 24 hours!")
16 The SLA Switch for On/Off is the key, rotate clockwise to turn on the battery power. SLA charger connector and Fuse on opposite side. SLA Battery Packs (Sealed Lead Acid battery) SLA battery packs: 24V 10Ah Sealed Lead Acid Battery, First time charging time: 8 hours, Recharging time: 6~8 hours, Do not charge longer than 24 hours! Last about 350 recharge cycles. 1. Turn the key to unlock the battery box. 2. Lift up Seat via lever, Pull out the battery box along the rail & remove, the battery can now be charged separately.


 Li-ion")


17 3. Push the battery box into the compartment along the rail, turn the key to lock the box. Li-Ion Battery Packs (Lithium-ion battery) Li-ion battery packs: 36V 10Ah Lithium Battery, First time charging time: 6 hours, Recharging time: 4~6 hours, Do not charge longer than 24 hours! Last over 1000 recharge cycles. 1. Turn the key to unlock the battery box.


18 2. Pull out the battery box along the rail & remove, the battery can now be charged separately. 3. Push the battery box into the compartment along the rail, turn the key to lock the box. Li battery of zhe sun cruzer & E-Fold model 1.Push the battery box into compartment along zhe rail,turn the key to lock the box first then second turn on the power. 2.Turn the key to unlock the battery box by first pushing the key
19 Charger The electric bike comes with its own Smart Charger that connects with an easy-access charger port for recharging the batteries. This charger has lights which show the battery charge status. Batteries work best when they have a full charge, so always be sure to recharge them fully after each ride. If you leave then in a run-down condition, without recharging them, it will shorten their life expectancy. Li-Ion (Lithium ion ) batteries charge for 4-6 hours SLA (Sealed Lead Acid) batteries-charge for 6-8 hours The charger may get warm to the touch, so make sure you charge they are in an open area and do not lay anything on the charger unit while charging. Although you cannot over-charge the batteries using the Smart Charger, We recommend that you do not leave the charger plugged in for more the 24 hours. If your charger shows a solid green light after charging for a short period of time, your battery may have been only partially discharged (Short ride), or this may be the sign of a partially worn out battery reduced charge capacity. Continue charging for the full time, to cover all the bases. If the battery still has not charged, you may need to replace it. Even with Proper care, a rechargeable battery dose not last forever. Average battery life depends of use and conditions. The charger and charger port should be regularly inspected for damage (Cord, plug, enclosure, etc.). If damage is found stop using until the damage part can be repaired or replaced.
 47/63Hz 4. Output: DC29.2V 2.0A 5. Plug the charger into the outlet.")
20 How to use the SLA Chargers (Standard) CAUTION CHARGE ONLY LEAD ACID TYPE RECHARGEABLE BATTERY.RISK OF ELECTRIC SHOCK, DRY LOCATION USE ONLY. SEE INSTRUCTION MANUAL FOR USE. 1. Red light means charging 2. Green light means charge-full 3. Input: AC V~, 1.5A (Max) 47/63Hz 4. Output: DC29.2V 2.0A 5. Plug the charger into the outlet. The indicator light on the top of the charger will illuminate when the charger is working properly. Refer to the sticker on the charger for actual status light indication. 6. Insert the Plug into the charger port on the bike being sure the charger plug is fully seated in the charger port. The light should be solid red or blinking green to indicate charging however you will need to refer to the sticker on the charger for actual status light indication. 7. Once the battery reaches full charge, the lights will return the solid green however you will need to refer to the sticker on the charger for actual status light indication. 8. When charging is complete, unplug the charger from the wall before removing it from the charger port. Charge, for the full time. If the battery still has not charged, you may need to replace it. Use only Yukon Trail Authorized SLA battery chargers with bicycles equipped with SLA batteries. Using any other charger will damage the batteries and void your warranty.
 50/60Hz 4. Output: 42.00V 2.0A 5. Plug the charger into the outlet and turn the charger ON via the switch on the black side.")
21 How to use the Li-ion battery charger CAUTION RISK OF ELECTRIC SHOCK, DRY LOCATION USE ONLY. SEE INSTRUCTION MANUAL FOR USE. 1. Red light means charging 2. Green light means charge-full 3. Input: AC V~, 1.6A (Max) 50/60Hz 4. Output: 42.00V 2.0A 5. Plug the charger into the outlet and turn the charger ON via the switch on the black side. The red power light on the front of the charger will illuminate when the charger is working properly. 6. Insert the XLR plug into the charger port on the bike being sure the charger plug is fully seated in the charger port. The second light will start to flash orange for several seconds while the charger is seeking the battery. 7. Once the charger has found the battery the blinking orange light will stop flashing and turn solid orange and cooling fan will start. At this point the charger process has begun. 8. Once the battery reaches full charger, the orange light will turn solid green. 9. When charging is complete, unplug the charger from the wall before removing it from the charger port. Charge for the full time. If the battery still has not charged, you may need to replace it. Use only Yukon Trail Authorized Li-Ion chargers with bicycles equipped with Li-Ion batteries. Using any other charger will damage the batteries and void your warranty.
22 Battery Care Battery Storage How to store your battery for a extended time? Charge the battery every 3 months to avoid capacity loss. Batteries slowly self-discharge when left unused for a long time; if battery cells are allowed to reach a critically low voltage, their lifespan and capacity will be permanently reduced. Always disconnect your charger from the wall outlet and battery before storing the battery. Avoid storing your battery in extreme temperatures, whether hot or cold. Batteries are best kept in a cool, dry place. Do not allow batteries to accumulate condensation, as this could cause shorting and corrosion. The recommended storage temperature for both SLA and Li-ion batteries is between 32~77 F. Avoid exposing the battery to extreme heat (104 F or higher) for long time. Battery FAQ Q; Do I need to charge the batteries before using them? A; Yes, You should charge the batteries fully before first using them. Q: Do I need to break-in my batteries? A: Yes, the batteries will need to have a break-in cycle consisting of-three discharge/charge cycles before then will reach optimum performance. This involves three complete discharges and three complete recharges. After this initial break-in cycle batteries will have maximum possible performance and less line voltage fluctuations under load. Q: How long will the batteries hold their charge? A: All batteries will self-discharge when not in use. The self-discharge rate depends on the temperature at which they are stored. Excessively cold or hot storage temperature will drain the batteries faster than normal. Ideally the batteries should be stored at room temperature. Q: Why should I recharge my batteries at least 90 days (Li-ion) and every 30 days (SLA) when I am not using them? A: Batteries naturally loose their charge over time. To keep batteries in optimal condition and extend their life, it is recommended that a top-off
23 recharge be performed at least every 90 days for Li-ion batteries and at 30 days for SLA batteries. Q: Will I get more performance for my bike if I leave the batteries to charge longer? A: No, once the batteries are fully charged ( as indicated by the light on the charger) it is best to unplug them from the charger, leaving the batteries charging longer than necessary is called overcharging and will not increase performance. Our bikes supplied chargers are designed to avoid over-charging a battery. Still we recommended that you always unplug a charger after the units is fully charged to avoid the possibility of unanticipated circumstances such as an unexpected power surge from a lighting strike(or other power line anomaly) potentially causing damage. Only use YUKON TRAIL supply chargers. Q; Is it normal that the batteries get warm when recharging? A: Yes, it is normal that the batteries will become warm to the touch during the recharging process. This is because the increase of internal resistance and less energy conversion efficiency from electric energy to chemical energy. Q; How long will my batteries last before needing replacement? A; Average battery life depends on use and conditions. Even with proper care, recharge batteries does not last forever. BATTERY DISPOSAL Please recycle your old batteries The SLA battery pack is included 2x12V sealed lead acid batteries. They must be recycled or disposed of in an environmentally safe and legal manner. The batteries used in the SLA battery packs are chemically identical to common automotive starter batteries and can be returned to any site that accepts automotive lead acid batteries for recycling. Examples include automotive service stores, automotive service center, battery recyclers, etc. To find a battery recycling facility in your area please visit either of these websites:

 and non-lead batteries (example: lithium ion, nickel metal hydride, etc.")


24 When recycling lead batteries do not mix them with non-lead batteries. Non-lead batteries pose a fire/explosion hazard if brought to a lead battery recycling facility. Lead batteries (example: sealed lead acid batteries, etc.) and non-lead batteries (example: lithium ion, nickel metal hydride, etc.) are recycled at different facilities. Do not dispose of batteries in a fire due to risk of explosion. In the event of disposal, dispose only in accordance with federal, state and local regulations. Seat Adjustment Use the 13mm wrench to adjust the angle of the seat which is comfortable for you. (SLA or Li-ion battery same) Use the quick release to adjust the height of the seat post.(navigator & Dirt Hawk Models)
.")

25 Quick release to adjust the height of the seat which is comfortable for you.(xplorer & Outback Models). The Navigator & Dirt Hawk seat, you can lift the seat and take out of the battery to recharge separately.
26 Braking Adjustment V-Brake 1. If fitted with V-brakes, insert the brake body into the center spring hole in the frame mounting boss, and then secure the brake body to the frame with the link fixing bolt. 2. While holding the shoe against the rim, adjust the amount of shoe protrusion by interchanging the position of the B washers (i.e 6mm and 3mm) so that dimension A is kept at 39mm or more.
27 3. While holding the shoe against the rim, tighten the shoe fixing nut. 4. Pass the inner cable through the inner cable lead. Set the cable with a clearance of 1mm between each brake pad and the rim, tighten the cable fixing bolt. 5. Adjust the balance with the spring tension adjustment screws
28 6. Depress the brake lever about 10 times as far as the grip to check that everything is operating correctly and that the shoe clearance is corrected before riding the bike. Chain Adjustment Inspection The chain must be kept clean, rust free and frequently lubricated in order to extend its life as long as possible. It require replacement if it stretches, breaks,or causes inefficient gear shifting. Make sure that there are no stiff links, they must all move freely. Lubrication The chain should be lubricated with light oil at least every month, or more often in wet, muddy, or dusty conditions. Take care to wipe off excess oil, and not to get oil on the tires or rim braking surfaces
29 Adjustment and Replacement On derailleur geared bicycles the rear derailleur automatically tensions the chain. To adjust the chain on single speed freewheel, coaster hub braked or 3 speed hub geared bicycles: 1. Loosen the rear axle nuts ( and coaster brake arm clip ) and move the wheel forward to loosen, or backward to tighten, in the frame. 2. When correctly adjusted, the chain should have approximately 10mm(3/8 ) of vertical movement when checked in the center between the chain wheel and rear sprocket. Center the wheel in the frame and re-tighten the axle nuts after any adjustment. Bicycles which have a single speed freewheel, coaster brake or 3- speed hub, generally use a wider type chain than derailleur geared bicycles. These chains can be disconnected by way of a special U-shaped joining link, that can be pried off of the master link with a screwdriver. To replace, feed the chain around the chain wheel and rear sprocket, fit the master link into the rollers into each end of the chain, position the master link side plate, and slip on the U-shaped snap-on plate. Make sure the open end of the U-shaped plate is trailing as the link approaches the chain wheel when pedaling forward. Derailleur geared bicycle use narrower chains and require a special tool to fit and remove chain links, or to change the length. To remove, fit the rivet tool so that punch pin is centered over any one of the chain rivets. Push the rivet almost all the way out, then back out the punch and remove the tool. Holding the chain on both sides of the punched rivet, bend it slightly to release link form the rivet. To install, feed chain around chain wheel, rear sprocket and derailleur cage with rivet facing away from the bicycle. Bring the two ends together within the special tool and punch the rivet into place. Be sure not to push rivet too for through side plate.


30 Fuse All Yukon Trail electric bicycles are equipped with fuse. The fuse may be located, depending on the model of the bike, in the following locations: SLA fuse (40A glass type fuse) on the battery pack, externally accessible. li-ion, 30A blade type fuse & 5A blade type fuse- inside the bottom end of the down tube, remove down tube cap to access. In the event of an overload the fuse will pop and need to be replaced. In this instance replace only approved part from Yukon Trail. Risk of fire. Do not bypass fuse.

31 Tools Bag 1. 1pcs Open ended wrench: 13mm/15mm 2. 2pcs Allen key wrenches: 5mm/6mm 3. 1pc Standard flat head screwdriver
32 Troubleshooting Failure symptoms Cause of Problem Solution Battery voltage is too low Immediately charge The battery indicator light on the meter is off, and the motor does not work Motor is operating when battery lock is unlocked The motor stops intermittently Reduced Ride Time Battery is not fully charging Headlights doesn t work Controller does not function Battery is not providing proper power The battery lock does not work, preventing battery from being properly secured The throttle handle is connected incorrectly to the controller Controller is damaged Poor or loose battery connection Battery moving due to vibration Battery is unable to hold charge properly Battery supplying lower voltage Battery has gone bad The charger has no output Poor contact between the charger plug and the charger socket Switch of the headlights doesn't work or connection short-circuit in the controller Replace the battery Replace of the battery lock Reconnect per wiring diagram Replace the controller Adjust or clean contacts Check or replace Battery lock Replace of the battery Battery maintenance or replacement Replace the battery Check connections or Replace the charger Clean or Replace charger socket Replacing of the switch, check connection Replacing of the controller Wiring Diagram
33 (Diagram is for representational purpose only. Your bicycles wiring system may differ) WARRANTY REGISTRATION
34 RETURN THE PRODUCT REGISTRATION WITH A COPY OF YOUR SALES RECEIPT TO : Yukon Trail, Inc Lynx Place, Ontario, CA Name: Address: City: State: Zip Phone: Date Purchased: Model#: Store Where Purchased: Store Address: Receipt or Transaction #: The registration must be returned to Yukon Trail, Inc. within 10days of purchase. It is the only information Yukon Trail will have for notification to you of any information regarding this product. This information is for the sole purpose of product/registration and will not be sold or used for any other purpose. A COPY OF THE SALES RECEIPT AND UPC BAR CODE MUST BE INCLUDED WITH THIS REGISTRATION CARD. Thank you for purchasing a Yukon Trail, Inc. E-bike. If there are parts missing or if your E-bike does not run properly, do not return your E-bike to the place of purchase. Please call Yukon Trail, Customer Service at PLEASE DO NOT RETURN PRODUCT TO RETAILER FOR WARRANTY OR REPLACEMENT PARTS. *or register online at using the warranty link Yukon Trail,, Inc. LIMITED WARRANTY Your E-bike is warranted to be free of manufacturing defects in Material or workmanship for a period of (Navigator 90 Days and Xplorer / Outback Models 1 year). During the warranty period Yukon Trail, Inc. will at its option, repair, provide replacement parts or replace your E-bike at no charge. This warranty does not cover normal wear and tear, or damage caused by neglect, or misuse of the product. Should you experience a problem or need to return your E-bike for repair, please call the Yukon Trail customer service department TOLL FREE AT between the hours of 9AM and 4PM PST Monday thru Friday. You will be instructed how to proceed. A copy of receipt is required. You may also contact Yukon Trail, Inc. by writing. Yukon Trail, Inc. Ontario, CA Or Made in China
Bisek Cycle. Read Instructions Before Using Your New E-bike BSKS02/04/05
 Read Instructions Before Using Your New E-bike BSKS02/04/05 Specification Motor: BAFANG high speed brushless motor Power: 36V 250W/48V 500W Wheel Size: 26inch Tyre: 26inch * 4.0 width Color: Black, Red,
Product Handbook. Electric Power Board. Powered Personal Transportation FOR THE BLADEZ ION 150 ELECTRIC POWER BOARD
 Powered Personal Transportation Electric Power Board Product Handbook FOR THE BLADEZ ION 150 ELECTRIC POWER BOARD Model: PB-SM812 PLEASE BE SAFE WHEN RIDING... ALWAYS WEAR A HELMET AND OBEY ALL LAWS! IMPORTANT
Product Handbook. Electric Power Board. Powered Personal Transportation. FOR THE BLADEZ XTR Lite 250 ELECTRIC POWER BOARD
 ` Powered Personal Transportation Electric Power Board Product Handbook FOR THE BLADEZ XTR Lite 250 ELECTRIC POWER BOARD Model: PB-SM805-S PLEASE BE SAFE WHEN RIDING... ALWAYS WEAR A HELMET AND OBEY ALL
Product Handbook. Electric Power Board. Powered Personal Transportation FOR THE BLADEZ ION 350 ELECTRIC POWER BOARD
 Powered Personal Transportation Electric Power Board Product Handbook FOR THE BLADEZ ION 350 ELECTRIC POWER BOARD PLEASE BE SAFE WHEN RIDING... ALWAYS WEAR A HELMET AND OBEY ALL LAWS! IMPORTANT BATTERY
User Manual of Bagibike Electric Bicycles
 User Manual of Bagibike Electric Bicycles Model: Bagibike B16. http://www.bagibike.com Page 1 FOREWORD The following operation manual is a guide to assist you. This manual is not a complete document on
PLEASE BE SAFE WHEN RIDING... ALWAYS WEAR A HELMET AND OBEY ALL LAWS!
 Powered Personal Transportation Electric Power Board Product Handbook FOR THE BLADEZ XTR Street ELECTRIC POWER BOARD Model: PB-SM1806 PLEASE BE SAFE WHEN RIDING... ALWAYS WEAR A HELMET AND OBEY ALL LAWS!
PLEASE BE SAFE WHEN RIDING... ALWAYS WEAR A HELMET AND OBEY ALL LAWS!
 Powered Personal Transportation Electric Power Board Product Handbook FOR THE BLADEZ XTR Street II ELECTRIC POWER BOARD Model: PB-SM1816 PLEASE BE SAFE WHEN RIDING... ALWAYS WEAR A HELMET AND OBEY ALL
Platinum Folding Bike
 Platinum Folding Bike Thank you for purchasing a Dillenger Platinum Folding Bike, please read this manual before using your new electric bike. Before the first use, please fully charge the battery, this
PLEASE BE SAFE WHEN RIDING ALWAYS WEAR A HELMET AND OBEY ALL LAWS!
 X-Treme TM Electric Scooters X-10 Electric Scooter Owner s Manual PLEASE BE SAFE WHEN RIDING ALWAYS WEAR A HELMET AND OBEY ALL LAWS! Page1 IMPORTANT BATTERY MAINTENANCE and CHARGING INSTRUCTIONS 1. You
Product Handbook FOR THE BLADEZ XTR Lite ELECTRIC POWER BOARD
 Portable Electric Power Board Product Handbook FOR THE BLADEZ XTR Lite ELECTRIC POWER BOARD PLEASE BE SAFE WHEN RIDING... ALWAYS WEAR A HELMET AND OBEY ALL LAWS! Page 1 IMPORTANT PLEASE READ THIS BEFORE
P R E M I U M E L E C T R I C B I C Y C L E S INSTRUCTION MANUAL
 WWW.BIGCATUSA.COM 631 285 2298 P R E M I U M E L E C T R I C B I C Y C L E S INSTRUCTION MANUAL Congratulations On Your Purchase & Thank You For Choosing Big Cat Warning: This manual is only a guide to
User s Manual. Table of Contents CAUTION. Model No. MTSC11700
 Model No. MTSC11700 Table of Contents Important Precautions..........2 Before You Begin.............3 How to Set Up and Fold the Scooter...............4 How to Operate the Scooter......5 Part List.....................6
Thank you for purchasing a Dillenger F1 Folding Bike, please read this manual before using your new electric bike.
 F1 Folding Bike Thank you for purchasing a Dillenger F1 Folding Bike, please read this manual before using your new electric bike. Before the first use, please fully charge the battery, this can take up
INSTRUCTION MANUAL
 WWW.BIGCATUSA.COM 631 285 2298 INSTRUCTION MANUAL Congratulations On Your Purchase & Thank You For Choosing Big Cat Warning: This manual is only a guide to assist you. This Guide is not a complete or comprehensive
User s Manual. Table of Contents CAUTION. Model No. MTSC20000
 Model No. MTSC20000 Table of Contents Important Precautions..........2 Limited Warranty..............2 Before You Begin.............3 How to Set Up and Fold the Scooter...............4 How to Operate the
EW-04. Owner s Manual. ewheels Service (888)
") EW-04 Owner s Manual ewheels Service (888) 571-2845 0 Table of Contents Page 2 - Feature Guide Page 3 - Technical Specifications Page 4 - Operation of Scooter Page 8 - Folding Instructions Page 9 - Charging
EW-04 Owner s Manual ewheels Service (888) 571-2845 0 Table of Contents Page 2 - Feature Guide Page 3 - Technical Specifications Page 4 - Operation of Scooter Page 8 - Folding Instructions Page 9 - Charging
EW-20 Black. Owner s Manual. (888) Sales (888) Service
 Sales (888) Service") EW-20 Black Owner s Manual www.ewheelsdealers.com (888) 305-0881 Sales 0 (888) 571-2845 Service Table of Contents Page 2 - Feature Guide Page 3 - Product Specifications Page 4 - Operation of Scooter Page
EW-20 Black Owner s Manual www.ewheelsdealers.com (888) 305-0881 Sales 0 (888) 571-2845 Service Table of Contents Page 2 - Feature Guide Page 3 - Product Specifications Page 4 - Operation of Scooter Page
USER MANUAL QFT-7. Folding Bicycle. RILU Trading Pty
 P a g e 1 USER MANUAL QFT-7 Folding Bicycle RILU Trading Pty Unit 2, No 2 Caulson Close Maribyrnong 3032 Melbourne, Victoria Australia (03) 8395 2616 info@rilu-e-bike.com.au Rev.18.5409.QF7-UM P a g e
read and understand this entire manual before riding! For assistance contact razor. Do not return to store.
 OWNER S MANUAL read and understand this entire manual before riding! For assistance contact razor. Do not return to store. note: manual illustrations are for demonstration purposes only. illustrations
Owner s Manual for 16 Slider
 Owner s Manual for 16 Slider This manual contains important safety, assembly, operation and maintenance information. Please read and fully understand this manual before operation. Save this manual for
ELECTRIC ROSE USER MANUAL ELECTRIC BICYCLE MODEL #: JERO16 VERSION #: 1
 USER MANUAL ELECTRIC ROSE ELECTRIC BICYCLE MODEL #: JERO16 VERSION #: 1 Congratulations on your new Jetson Electric Rose Electric Bicycle! Before your first ride, please check whether the wheels are damaged,
Table of Contents. Technical Information Warning Statement
 Table of Contents Technical Information-----------------------------------1 Warning Statement--------------------------------------2 Read Before Riding-------------------------------------3 List of Parts-----------------------------------------------4
Owner s Manual Read and keep this manual. Patents World Wide
 Owner s Manual Read and keep this manual. Patents World Wide S & S Industries, Inc., Sarasota, FL, USA www.trail-gator.com Copyright 2006 All Rights Reserved The following manual is provided to assist
EW-09. Owner s Manual. (888) Customer Service. (888) Service
 Customer Service. (888) Service") EW-09 Owner s Manual www.ewheelsdealers.com (888) 305-0881 Customer Service (888) 571-2845 0 Service Table of Contents Page 2 - Feature Guide Page 3 - Product Specifications Page 4 - Operation of Scooter
EW-09 Owner s Manual www.ewheelsdealers.com (888) 305-0881 Customer Service (888) 571-2845 0 Service Table of Contents Page 2 - Feature Guide Page 3 - Product Specifications Page 4 - Operation of Scooter
DO NOT RETURN TO STORE! ROSSO MOTORS ELECTRIC ATV OWNERS MANUAL. Read and understand this manual Prior to Riding!
 ROSSO MOTORS ELECTRIC ATV OWNERS MANUAL Read and understand this manual Prior to Riding! DO NOT RETURN TO STORE! Illustrations may not be exact appearance of actual product. Table of Contents General information:...3
DO NOT RETURN TO STORE.
 Caster Trike Owner s Manual Read and understand this entire manual before riding! For assistance contact Razor. DO NOT RETURN TO STORE. Item Number: 20036540 Contents Safety Warnings... 1 Before You Begin...
Spotlight 1,000,000 Power Series Cordless Rechargeable
 VEC156CFL_Manual_012405 1/24/05 4:29 PM Page iv VEC156 Spotlight 1,000,000 Power Series Cordless Rechargeable OWNER S MANUAL & WARRANTY INFORMATION 53SB E231887 IMPORTANT SAFETY INFORMATION, SAVE THESE
Electric Car User Manual
 Electric Car User Manual The owner s manual contains important safety information as well as assembly, use and maintenance instructions. The Ride-on Car must be assembled by an adult who has read and understands
Power Assisted Bikes. Owner s Manual
 Power Assisted Bikes Owner s Manual Version 2 April 2016 Introduction Thank you for buying a PowaCycle Windsor electric bike. We hope it brings you many hours of enjoyment. For safe and compact shipping,
UNIVERSAL EBIKE CONVERSION KIT INSTALLATION
 UNIVERSAL EBIKE CONVERSION KIT INSTALLATION! TABLE OF CONTENTS Part detail...2 Installation steps...3 System usage description...20 Instructions for the use of a charger...26 Things you must know before
ODK U500 (V2) Electric Bicycle
 Electric Bicycle") ODK U500 (V2) Electric Bicycle Ownerʼs Manual (English) Juiced Riders Inc. R130101 8724 Approach Road, San Diego, CA 92154, U.S.A. mail@juicedriders.com Tel: +1 (619) 746-8877 www.juicedriders.com How
ODK U500 (V2) Electric Bicycle Ownerʼs Manual (English) Juiced Riders Inc. R130101 8724 Approach Road, San Diego, CA 92154, U.S.A. mail@juicedriders.com Tel: +1 (619) 746-8877 www.juicedriders.com How
Fifield Seaside 3.0. Electric Bicycle Owner s Manual
 Fifield Seaside 3.0 INTRODUCTION Electric Bicycle Owner s Manual THIS MANUAL CONTAINS IMPORTANT SAFETY, PERFORMANCE, AND MAINTENANCE INFORMATION. READ THE MANUAL BEFORE TAKING YOUR FIRST RIDE ON YOUR NEW
Powerboard TM by Exkate
 Powerboard TM by Exkate OWNERS MANUAL Introduction to The Powerboard TM Dear Customer: Congratulations and thank you for purchasing the Powerboard TM (electric skateboard). For the greatest pleasure and
Tel: +44 (O) Customer Service hours: Monday - Friday 9am-5pm
 Customer Service hours: Monday - Friday 9am-5pm") Congratulations on your new scooter! Proper assembly and operation of your scooter is important for your safety and enjoyment. Our customer service department is dedicated to your satisfaction with Pacific
Congratulations on your new scooter! Proper assembly and operation of your scooter is important for your safety and enjoyment. Our customer service department is dedicated to your satisfaction with Pacific
Lil Kick scooter. Read and understand this entire manual before riding!
 Lil Kick scooter Owner s Manual Read and understand this entire manual before riding! DO NOT RETURN TO STORE! NOTE: Manual illustrations are for demonstration purposes only. Illustrations may not reflect
KODA USER MANUAL. Please read before operating your new bicycle.
 KODA USER MANUAL Please read before operating your new bicycle. INTRODUCTION Congratulations on the purchase of your new e-bike! We want to make you happy and believe your new e-bike will bring you lots
6V BMW Motorcycle. Owner s Manual and Assembly Instructions
 6V BMW Motorcycle Owner s Manual and Assembly Instructions Model #: W348AC Read and understand the entire manual before assembly and operation. The vehicle must be assembled by an adult who has read and
Foldable Electric E-bike Instruction Manual
 Foldable Electric E-bike Instruction Manual This manual contains important safety, assembly, operation and maintenance information. Please read this manual before operation and save this manual for future
Daymak warranties, services, and stocks parts for everything it sells. We support our products.
 EC1 User Manual About Daymak Daymak is one of Canada s largest Alternative Vehicle providers. We design, engineer, manufacture, import and repair everything from recreational dirt bikes, go-karts and electric
read and understand this entire manual before riding! For assistance contact razor. Do not return to store.
 OWNER S MANUAL read and understand this entire manual before riding! For assistance contact razor. Do not return to store. note: manual illustrations are for demonstration purposes only. illustrations
POWER ASSISTED BICYCLES OWNERS MANUAL
 OWNERS MANUAL Simply explained this is how your e.life bike basically works. Firstly may we congratulate you on purchasing your new electric power assisted e.bike. Please take time to read your manual.
BFLEB ELECTRIC BIKE
 TAICANG YUEBO ELECTRIC TECHNOLOGY CO., LTD BFLEB70 700C-00-001 ELECTRIC BIKE USER MANUAL Please read the manual carefully before using. contents 1 Introduction......1 2 EPAC legal requirements... 2 3 Introductions
ELECTRIC BICYCLE OWNER S MANUAL
 ELECTRIC BICYCLE OWNER S MANUAL For Owners of EG Zurich 350 IX and 350 IX Step-thru Electric Bicycle Table of Contents Descriptions: Page Installation Instructions 2 How to install the bicycle out of the
3 WHEELED SCOOTER. FOR AGES THREE TO FIVE MAXIMUM WEIGHT: 50 lbs. (22.6 kgs.) OWNER S MANUAL
 OWNER S MANUAL") OWNER S MANUAL 3 WHEELED SCOOTER THIS MANUAL CONTAINS IMPORTANT SAFETY, PERFORMANCE AND MAINTENANCE INFORMATION. READ THE MANUAL BEFORE LETTING YOUR CHILD HAVE THEIR FIRST RIDE ON THEIR NEW SCOOTER, AND
OWNER S MANUAL 3 WHEELED SCOOTER THIS MANUAL CONTAINS IMPORTANT SAFETY, PERFORMANCE AND MAINTENANCE INFORMATION. READ THE MANUAL BEFORE LETTING YOUR CHILD HAVE THEIR FIRST RIDE ON THEIR NEW SCOOTER, AND
GT MAGNETIC POWER BICYCLES (SMART CYCLE)
") GT MAGNETIC POWER BICYCLES (SMART CYCLE) Congratulations on selecting the GT Magnetic Power Bicycle (Smart Cycle in short). In order to use and enjoy your Smart Cycle safely and to get the best performance
GT MAGNETIC POWER BICYCLES (SMART CYCLE) Congratulations on selecting the GT Magnetic Power Bicycle (Smart Cycle in short). In order to use and enjoy your Smart Cycle safely and to get the best performance
FUZION V1000 LITHIUM POWERED owner s manual. 500 W of Power 18 MPH Full Suspension Disc Brake
 FUZION V1000 LITHIUM POWERED 500 W of Power 18 MPH Full Suspension Disc Brake Maximum Weight: 220 lbs (100 kilograms) Manual Version 1A-2015 CONTENTS WELCOME / Before You Start page 1 Components & Parts
Read and understand this entire manual BEFORE allowing children to use this product!
 Lil Kick scooter Owner s Manual Read and understand this entire manual BEFORE allowing children to use this product! NOTE: Manual illustrations are for demonstration purposes only. Illustrations may not
Owner s Manual Folding Trike
 Owner s Manual Folding Trike THIS MANUAL CONTAINS IMPORTANT SAFETY, ASSEMBLY, OPERATION AND MAINTENANCE INFORMATION. PLEASE READ AND FULLY UNDERSTAND THIS MANUAL BEFORE OPERATION. SAVE THIS MANUAL FOR
OWNER S MANUAL Soco TS1200R Soco TS800R
 OWNER S MANUAL Soco TS1200R Soco TS800R Version 1.0 May 2017 Congratulations on purchasing your Soco electric motorcycle. We wish you an enjoyable and safe riding experience. For your safety and comfort,
OWNER S MANUAL Soco TS1200R Soco TS800R
 OWNER S MANUAL Soco TS1200R Soco TS800R Congratulations on purchasing your Soco electric motorcycle. We wish you an enjoyable and safe riding experience. For your safety and comfort, we recommend that
AmTryke Adult Recumbent Model HP1000 #50-HC-1000
 AmTryke Adult Recumbent Model HP1000 #50-HC-1000 TOOLS Needed for Assembly 5 mm Allen Wrench 8 mm Socket or Wrench 10 mm Socket or Wrench 14 mm Socket or Wrench 15 mm Socket or Wrench 22 mm Socket or Adjustable
USER MANUAL. Your ZINGO DRIFTA 360 warranty must be registered online within 7 days of purchase.
 USER MANUAL Your ZINGO DRIFTA 360 warranty must be registered online within 7 days of purchase. To activate your warranty visit www.tevo.co.za and click the Register your warranty tab at the top of the
Owner s Manual and Assembly Instructions
 RollPlay 6V Mini Quad Owner s Manual and Assembly Instructions Model #: ACQUAD-P, ACQUAD-CAM, ACQUAD Read and understand the entire manual before assembly and operation. The vehicle must be assembled by
AmTryke Adult Recumbent Model JT2000 #50-FC-2000
 AmTryke Adult Recumbent Model JT2000 #50-FC-2000 TOOLS Needed for Assembly 5 mm Allen Wrench 8 mm Socket or Wrench 10 mm Socket or Wrench 14 mm Socket or Wrench 15 mm Socket or Wrench 22 mm Socket or Adjustable
Electrically Assisted Pedal Cycles. Assembly Instructions
 Electrically Assisted Pedal Cycles Assembly Instructions Version 1 December 2005 Introduction Thank you for buying a PowaCycle Edinburgh electric bike. We hope it brings you many hours of enjoyment. For
6V 3-Wheel City Scooter
 6V 3-Wheel City Scooter Owner s Manual and Assembly Instructions Model #: W326-P Read and understand the entire manual before assembly and operation. The vehicle must be assembled by an adult who has read
DO NOT RETURN TO STORE.
 Caster Trike Owner s Manual Read and understand this entire manual before riding! For assistance contact Razor. DO NOT RETURN TO STORE. Item Number: 20036540 Safety Warnings WARNING: Riding the RipRider
Operating Instructions. Page 12 eazi-rider - Mountain eazi-rider - Mountain Page 1
 Operating Instructions Page 12 Page 1 Registration Your Durabike is guaranteed for 1 year. Please fill in the following details and return to the address below. Your Details Name: Address: Contact Number:
Falcon. Owner s Manual
 Falcon Owner s Manual Your ebike can provide years of use as long as you take care of it. The most common issues you will face will be battery care and small hardware adjustments. The most important thing
Triaxe Sport. By Enhance Mobility
 Triaxe Sport By Enhance Mobility User Manual April 2016 Thank you for choosing the Triaxe Sport Folding Scooter. Please read this manual carefully before operating the the Triaxe Sport. If you have any
INSTRUCTION MANUAL. 12V Ride on ATV Quad SKY SKY SKY3754. Ver. 4
 Ver. 4 INSTRUCTION MANUAL 2V Ride on ATV Quad SKY207 + SKY2580 + SKY3754 Charge for 8 hrs before initial use. After initial charge, follow the normal recommended charging time. bestchoiceproducts.com SAFETY
Bigfoot Sport Quad Ba ery Operated Ride On Instruc on / Assembling Manual
 Bigfoot Sport Quad Ba ery Operated Ride On Instruc on / Assembling Manual Item No.: KL-40048 Adult Assembly Required. Please read this manual carefully before giving this toy to your child. This manual
EW-27 Crossover Pre-Mobility Scooter
 EW-27 Crossover Pre-Mobility Scooter Owner s Manual www.ewheelsdealers.com Before (888) 305-0881 you operate Customer the Service scooter (888) 571-2845 Service 0 Locate the below listed materials in rear
Owner s Manual. Operation and Maintenance Instructions. Wisper 806fe. April st edition
 Owner s Manual Operation and Maintenance Instructions Wisper 806fe April 2009 1 st edition We strongly recommend that you read this entire manual before using your Wisper bike Wisper Limited - 1 - User
US Patent 0540, 400 Other Patents Pending. Read this manual completely before assembling and riding our PET PRO-FLEX 500. Always wear a Helmet!
 US Patent 0540, 400 Other Patents Pending Read this manual completely before assembling and riding our 500 Always wear a Helmet! Priority Electric Transportation, LLC. 1007 West College Ave. #293 Santa
ELECTRIC SCOOTER OWNER S MANUAL DO NOT RETURN TO STORE! QUESTIONS OR COMMENTS? CALL (866)
") ELECTRIC SCOOTER OWNER S MANUAL FOR USE WITH THE FOLLOWING PULSE PERFORMANCE PRODUCTS SCOOTERS SONIC DO NOT RETURN TO STORE! QUESTIONS OR COMMENTS? CALL (866)-434-6067 NOTE: Manual illustrations are for
ELECTRIC SCOOTER OWNER S MANUAL FOR USE WITH THE FOLLOWING PULSE PERFORMANCE PRODUCTS SCOOTERS SONIC DO NOT RETURN TO STORE! QUESTIONS OR COMMENTS? CALL (866)-434-6067 NOTE: Manual illustrations are for
MODEL SST1 JOGGER/BIKE TRAILER. Owner s Manual should be kept for future reference
 PRODUCT REGISTRATION: MAKE SURE TO REGISTER YOUR PURCHASE AT http://allensportsusa.com/about/product-registration TO QUALIFY FOR PRODUCT WARRANTY AND TO RECEIVE IMPORTANT PRODUCT NOTIFICATIONS 1 MODEL
INSTRUCTION MANUAL. Kids Ride-On Motorcycle SKY Ver. 3
 INSTRUCTION MANUAL Kids Ride-On Motorcycle Ver. 3 SKY785 + 89 Pg. 2 Thank you for choosing us! Since 2002, Best Choice Products has been bringing customers high-quality products at the absolute lowest
THANK YOU FOR CHOOSING ATOM ELECTRIC.
 THANK YOU FOR CHOOSING ATOM ELECTRIC. We have worked hard to make sure your board meets or exceeds your expectations. If for any reason it doesn t, or if you have any suggestions for improvements please
Electrically Assisted Pedal Cycles. Assembly Instructions
 Electrically Assisted Pedal Cycles Assembly Instructions Version 4 23 Sept 2005 Introduction Thank you for buying a PowaCycle Freeway electric bike. We hope it brings you many hours of enjoyment. For safe
Owner e s Manual Raven
 Owner s Manual Raven Marketed in Australia and New Zealand by Bzooma Pty Ltd ABN 37 640 907 507 TABLE OF CONTENTS Table of Contents... 1 BZOOMA PTY LTD... 2 Manufacturing Company Profile... 2 General Cautions
Rocket. Two Seat Bicycle Trailer. Model Number ACIS99ROCKTBLU
 Rocket Two Seat Bicycle Trailer Model Number ACIS99ROCKTBLU User s Manual This manual contains safety, assembly, use and maintenance instructions. Read these instructions carefully before use and keep
Product Handbook GAS POWERBOARD. Powered Personal Transportation GAS POWERBOARD PLEASE BE SAFE WHEN RIDING FOR THE BLADEZ MOBY 35/40
 Powered Personal Transportation GAS POWERBOARD ` Product Handbook FOR THE BLADEZ MOBY 35/40 GAS POWERBOARD Models: PB-SE802 PB-SE803 PB-SE1802 PB-SE1803 PLEASE BE SAFE WHEN RIDING ALWAYS WEAR A HELMET
Owner s Manual. This manual contains important safety, assembly, operation and maintenance information.
 Owner s Manual This manual contains important safety, assembly, operation and maintenance information. Please read and fully understand this manual before operation. Save this manual for future reference.
Specifications Page 3. User Guide Page 4. Riding Precautions Page 5. Assembling Your E-Bike Page 6. Maintenance Page 9
 Thank you for purchasing the Z1. Your new Zipper e-bike is made with a strong aluminium alloy frame, making it light yet durable, and comes with a lithium battery pre-installed, which has a range of up
Riding Your Halo Go Before You Begin Safety Alerts
 HALO GOTM Before You Begin---------------------01 Riding Your Halo Go-----------07-10 Main Components-------------------02 Safety Alerts--------------------------11 Charging Your Batteries------------03
Warning Statement Read Before Riding
 Table of Contents Technical Information-----------------------------------1 Warning Statement--------------------------------------2 Read Before Riding------------------------------------- List Of Parts-----------------------------------------------4
Bigfoot Mini Quad Battery Operated Ride On Instruction / Assembling Manual
 Bigfoot Mini Quad Battery Operated Ride On Instruction / Assembling Manual BF CHILDREN S PRODUCTS Adult Assembly Required Please read this manual carefully before assembly and use. This manual contains
DUNE BUGGY. Read and understand this entire manual BEFORE riding!
 DUNE BUGGY OWNER S MANUAL Read and understand this entire manual BEFORE riding! NOTE: Manual illustrations are for demonstration purposes only. Illustrations may not reflect exact appearance of actual
INSTRUCTION MANUAL. Ride-On Convertible SKY907 + SKY908 + SKY2308. Ver. 3
 Ver. 3 INSTRUCTION MANUAL Ride-On Convertible SKY907 + SKY908 + SKY2308 SAFETY Please retain these instructions for future reference. This vehicle must be assembled by an adult who has read and understood
Please make sure you pay close attention to any details in this manual for instructions on proper maintenance and overall usage of our product.
 NEW YORKER LAB Introduction Please always remember to wear an approved safety helmet and other safety gear when operating this electric bicycle. Make sure you comply with all road regulations and any local
6V Chevy Silverado. Owner s Manual and Assembly Instructions
 6V Chevy Silverado Owner s Manual and Assembly Instructions Model #: W460-C, W460-C-F Read and understand the entire manual before assembly and operation. The vehicle must be assembled by an adult who
900 PEAK AMP PORTABLE JUMP STARTER
 900 PEAK AMP PORTABLE JUMP STARTER Item Number W1665 OWNER S MANUAL WARNING It is the owner and/or operators responsibility to study all WARNINGS, operating, and maintenance instructions contained on the
USER S MANUAL & WARRANTY INFORMATION
 VEC117BD_Manual_122905 2/20/06 3:31 PM Page 8 VEC117BD TWO YEAR LIMITED WARRANTY PROGRAM This limited warranty program is the only one that applies to this product, and it sets forth all the responsibilities
THIS VEHICLE MUST BE ASSEMBLED BY AN ADULT. PLEASE READ THE MANUAL CAREFULLY BEFORE OPERATION. WARNING CALIFORNIA PROPOSITION 65 WARNING
 TABLE OF CONTENTS A Electric Car Specifications 2 B List of Parts 4 C Assembly 5 D Battery Charging 7 E How to Use 9 F Safety Precautions 9 G Simple Repairs 10 H Maintaining your Vehicle 10 I About Thermal
SCOOTER OWNER'S MANUAL
 SCOOTER OWNER'S MANUAL THIS MANUAL CONTAINS IMPORTANT SAFETY, PERFORMANCE AND MAINTENANCE INFORMATION. READ THE MANUAL BEFORE TAKING YOUR FIRST RIDE ON YOUR NEW SCOOTER, AND KEEP THE MANUAL HANDY FOR FUTURE
Owner s Manual with Assembly Instructions Please read this manual and save it. For Model RC09075
 Product features may vary from the pictures above Owner s Manual with Assembly Instructions Please read this manual and save it. For Model RC09075 Use only with a 12 Volt (7.0 Amp/Hr.) Battery, 12 Volt
ELECTRIC BICYCLE USER MANUAL
 ELECTRIC BICYCLE USER MANUAL 1 Main Technical Parameters and Specification Weight: 23 kg Wheel size: 20 Maximum speed: 25 km/h E BIKE URBAN Range: Up to 45km (with pedal assist) Type: lithium Voltage:
ELECTRIC BICYCLE OWNER S MANUAL
 ELECTRIC BICYCLE OWNER S MANUAL For Owners of EG Kyoto 350 Electric Bicycle Table of Contents Descriptions: Page Installation Instructions 2 How to install the bicycle out of the box 2 Operation Instructions
INSTRUCTION MANUAL. Ride-On Convertible Truck SKY SKY SKY2581. Ver. 2
 Ver. 2 INSTRUCTION MANUAL Ride-On Convertible Truck SKY2069 + SKY2338 + SKY2581 SAFETY Please retain these instructions for future reference. This vehicle must be assembled by an adult who has read and
Owner s Manual with Assembly Instructions Please read this manual and save it. For Model RC09037
 Product features may vary from the pictures above Owner s Manual with Assembly Instructions Please read this manual and save it. For Model RC09037 Use only with a 12 Volt (7.0 Amp/Hr.) Battery, 12 Volt
OWNER S MANUAL (DIRECT DRIVE SCOOTER SERIES)
") CURRIE TECHNOLOGIES 500 DD Series 750 DD Series 1000 DD Series Scoot-E DD Series OWNER S MANUAL (DIRECT DRIVE SCOOTER SERIES) You must read and understand this manual before using this scooter ATTENTION
CURRIE TECHNOLOGIES 500 DD Series 750 DD Series 1000 DD Series Scoot-E DD Series OWNER S MANUAL (DIRECT DRIVE SCOOTER SERIES) You must read and understand this manual before using this scooter ATTENTION
ELECTRIC WAGON OWNER S MANUAL. Read and understand this entire manual before allowing child to use this product! Item Numbers:
 ELECTRIC WAGON OWNER S MANUAL Read and understand this entire manual before allowing child to use this product! Item Numbers: 25144070 CONTENTS Safety Warnings... 1 Before You Begin... 2 Set-Up... 3-4
rtable Electric Scooter USER MANUAL A new era in urban mobility PLEASE CAREFULLY READ THE USER MANUAL AND WARRANTY BOOK BEFORE USING!
 rtable Electric Scooter USER MANUAL A new era in urban mobility PLEASE CAREFULLY READ THE USER MANUAL AND WARRANTY BOOK BEFORE USING! The most economical vehicle in history User Manual Page 1 / 20 04/2017
Assembly Instructions
 1/12 BEAST MANUAL Table of Contents Bike Specs - pg. 3 Bike Assembly: Assembling the Wheels- pg. 4 Assembling the Stem- pg. 5 Assembling the Handlebar- pg.6 Attaching the Seat- pg. 6 Attaching the Pedals-
USER MANUAL. To activate your warranty visit
 USER MANUAL Your ZINGO X100 warranty must be registered online within 7 days of purchase. To activate your warranty visit www.tevo.co.za, click the Outdoor tab, then click the ZINGO X100 icon, then click
Single Seat Bicycle Trailer
 Single Seat Bicycle Trailer User s Manual This manual contains safety, assembly, use and maintenance instructions. Read these instructions carefully before use and keep them for future reference. Your
ELECTRIC BICYCLE OWNER S MANUAL
 ELECTRIC BICYCLE OWNER S MANUAL For Owners of EG Oahu 500EX and EG Maui 500EX Electric Bicycle Table of Contents Descriptions: Page Installation Instructions 2 How to install the bicycle out of the box
(R86049) WARNING: To reduce the risk of injury, the user must read and understand the operator s manual before using this product.
 WARNING: To reduce the risk of injury, the user must read and understand the operator s manual before using this product.") OPERATOR S MANUAL 12 VOLT LITHIUM-ION BATTERY CHARGER 140446001 (R86049) Your charger has been engineered and manufactured to our high standards for dependability, ease of operation, and operator safety.
OPERATOR S MANUAL 12 VOLT LITHIUM-ION BATTERY CHARGER 140446001 (R86049) Your charger has been engineered and manufactured to our high standards for dependability, ease of operation, and operator safety.
12V Jaguar CX-75. Owner s Manual and Assembly Instructions
 12V Jaguar CX-75 Owner s Manual and Assembly Instructions Model #: W466AC, W466AC-F Read and understand the entire manual before assembly and operation. The vehicle must be assembled by an adult who has