Drive Unit Intuvia PowerPack 300 PowerPack 400 Charger
|
|
|
- Jonah Cox
- 5 years ago
- Views:
Transcription


1 S MIN MIN OBJ_BUCH book Page 1 Friday, February 13, :42 PM Performance Line Performance Line RESET TURBO TURBO SPORT SPORT TOUR TOUR ECO ECO OFF OFF MPH MPH KM/H KM/H AMM AMM PMWH PMWH MPH MPH KM/H KM/H Reichweite Robert Bosch GmbH Bosch ebike Systems Reutlingen GERMANY SPI ( ) T / 196 WEU Drive Unit Intuvia PowerPack 300 PowerPack 400 Charger en Original instructions


2 OBJ_BUCH book Page 2 Friday, February 13, :44 PM 2 h g f i TURBO SPORT TOUR ECO OFF MPH KM/H a b c e Reichweite AMM PMWH MIN MPH KM/H d 7 8 TURBO TURBO SPORT SPORT TOUR TOUR ECO ECO OFF OFF MPH KM/H KM/H AMM PMWH MIN MPH KM/H AMM PMWH MIN MPH KM/H RESET Reichweite SPI ( ) Bosch ebike Systems


3 OBJ_BUCH book Page 3 Friday, February 13, :44 PM A B 17 O EC PH MKM/H /H KM T RESE eite chw Rei Bosch ebike Systems mm SPI ( )


4 OBJ_BUCH book Page 4 Friday, February 13, :44 PM 4 A1 C7 C6 A6 A5 A2 A3 A4 A7 C1 A6 A5 A8 A4 A3 A9 C7 C SPI ( ) Bosch ebike Systems


5 OBJ_BUCH book Page 5 Friday, February 13, :44 PM 5 C A6 A5 A7 7 A8 A9 D A1 A6 A5 A2 Bosch ebike Systems SPI ( )


6 OBJ_BUCH book Page 6 Friday, February 13, :44 PM 6 C2 C3 C1 C5 C4 ebike Battery Charger 36-4/230 Active/Performance Line Input: 230V 50Hz 1.5A Output: 36V 4A Made in PRC Robert Bosch GmbH, Reutlingen WARNING For safe operation see manual. Risk of electric shock. Dry location use only. Charge only batteries of the Bosch ebike Systems. Other batteries may burst causing personal damage. Do not replace the plug assembly as risk of fire or electric shock may result. PRECAUCION Para un funcionamiento con seguridad, ver el manual. Peligro de sacudida eléctrica. Utilice solamente en lugares secos. Cargar únicamente baterías de sistemas ebike de Bosch. Otras baterías podrían reventar, causando lesiones personales y daños. No reemplace el ensamblaje del enchufe, ya que el resultado puede ser riesgo de incendio o sacudidas eléctricas. ATTENTION Pour un fonctionnement sûr, reportez-vous au manual. Risque de choc électrique. Utiliser en lieu sec uniquement. A utiliser uniquement avec les batteries des systèmes d assistance électrique ebike de Bosch. D autres batteries risqueraient d éclater et de causer des blessures corporelles et des dommages. Ne pas remplacer la connectique car un risque d incendie ou de choc électrique pourrait en résulter SPI ( ) Bosch ebike Systems


7 OBJ_BUCH book Page 7 Friday, February 13, :44 PM 7 E C2 C3 F A8 C6 A3 A4 C5 C6 A2 Bosch ebike Systems SPI ( )


8 OBJ_BUCH book Page 8 Friday, February 13, :44 PM 8 G A8 C7 C6 C5 A2 C7 C6 C SPI ( ) Bosch ebike Systems
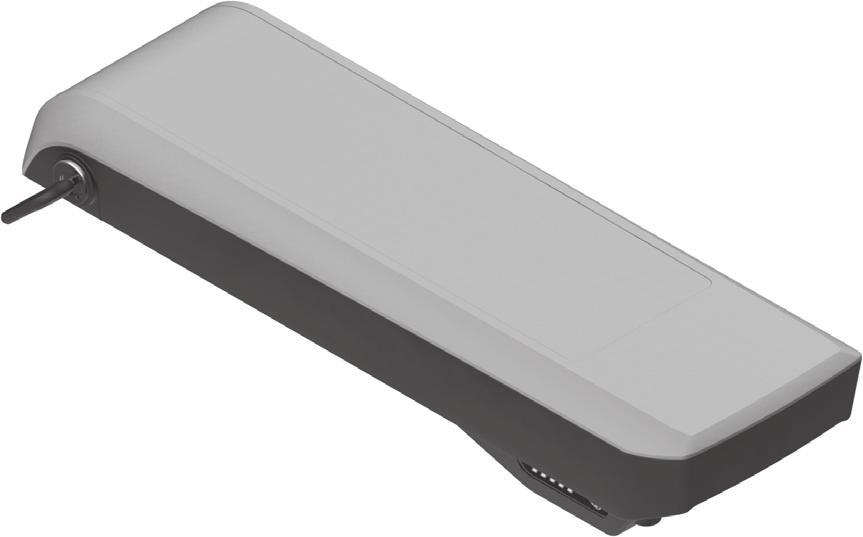
9 OBJ_BUCH book Page 1 Friday, February 13, :44 PM English 1 Drive Unit/ On-board computer Intuvia Safety Notes Read all safety warnings and all instructions. Failure to follow the warnings and instructions may result in electric shock, fire and/or serious injury. Save all safety warnings and instructions for future reference. The term battery pack used in these operating instructions, irrespective of model, refers both to standard battery packs (battery packs with holder on the bike frame) and to rack-type battery packs (battery packs with holder in the rear rack/carrier). Do not open the drive unit yourself. The drive unit is maintenance-free and must be repaired only by qualified experts and only with original spare parts. This will ensure that the safety of the drive unit is maintained. Unauthorised opening of the drive unit will void warranty claims. All components mounted to the drive unit and all other components of the ebike drive (e.g., the chainwheel, chainwheel seat, pedals) may be replaced only with identical components or components specifically approved for your ebike by the bicycle manufacturer. This protects the drive unit against overload and damage. Remove the battery pack from the ebike before beginning work (e.g. inspection, repair, assembly, maintenance, work on the chain, etc.) on the ebike, transporting it by car or plane, or storing it. Unintentional activation of the ebike system poses a risk of injury. The ebike system can switch itself on when the ebike is pushed backwards. The push/start aid feature may only be used when pushing or starting the ebike. There is danger of injury if the wheels of the ebike do not have ground contact while using the push/start aid feature. Use only original Bosch battery packs approved for your ebike by the manufacturer. Using other battery packs can lead to injuries and pose a fire hazard. When using other battery packs, Bosch shall not assume any liability and warranty. Do not make any modifications to your ebike system or fit any other products which would be suitable for increasing the performance of your ebike system. This normally reduces the lifetime of the system and risks damage to the drive unit and the bike. There is also a risk of losing the guarantee and warranty claims on the bike you have purchased. By handling the system improperly you are also endangering your safety and that of other road users, thus running the risk of high personal liability costs and possibly even criminal prosecution in the event of accidents attributable to manipulation. Please observe all national regulations on registering and using ebikes. Please read and observe the safety warnings and instructions enclosed in the operating instructions of the battery pack as well as in the operating instructions of your ebike. Product Description and Specifications Intended Use The drive unit is intended exclusively for your ebike and may not be used for other purposes. The ebike is intended for use on paved paths. It is not permitted for use in competition. Product Features (see page 2 3) The numbering of the components shown refers to the illustrations on the graphic pages at the beginning of the manual. All illustrations of bike parts except for the drive unit, on-board computer including operating unit, speed sensor and the corresponding holders are schematic and may differ on your ebike. 1 Display-function button i 2 Bike lights button 3 On-board computer 4 Holder for on-board computer 5 On/Off button for on-board computer 6 RESET button 7 USB port 8 Protective cap of USB port 9 Drive unit 10 Operating unit 11 Display-function button i on the operating unit 12 Decrease assistance level/scroll down button 13 Increase assistance level/scroll up button + 14 Push-assistance/start-assistance button WALK 15 Lock latch for on-board computer 16 Locking screw for on-board computer 17 Speed sensor 18 Spoke magnet of the speed sensor Bosch ebike Systems SPI ( )
10 OBJ_BUCH book Page 2 Friday, February 13, :44 PM English 2 Display elements of on-board computer a Drive unit assistance indicator b Assistance-level indicator c Light indicator d Text indication e Value indication f Speed indication g Shift recommendation: higher gear h Shift recommendation: lower gear i Battery charge-control indicator Technical Data Drive Unit Drive Unit Cruise Article number Rated continuous output W 250 Torque at drive, max. Nm 60 Rated voltage V 36 Operating temperature C Storage temperature C Degree of protection IP 54 (dust and splash water protected) Weight, approx. kg 4 Drive Unit Drive Unit Speed Article number Power W 350 Torque at drive, max. Nm 60 Rated voltage V 36 Operating temperature C Storage temperature C Degree of protection IP 54 (dust and splash water protected) Weight, approx. kg 4 On-board computer Intuvia Article number Max. charging current, USB connection ma 500 Charging voltage, USB connection V 5 Operating temperature C Storage temperature C Charging temperature C Degree of protection IP 54 (dust and splash water protected) Weight, approx. kg 0.15 Bosch ebike system uses FreeRTOS (see Bike lights* Rated voltage V 6 Power output Front light Rear light Assembly W W Inserting and removing the battery pack * Not possible via the ebike battery pack in all country-specific versions, depending on the statutory regulations For inserting and removing the ebike battery pack in/from the ebike, please read and observe the battery pack operating instructions. Inserting and removing the on-board computer (see figure A) To insert the on-board computer 3, slide it from the front into the holder 4. To remove the on-board computer 3, press the lock latch 15 and slide the on-board computer toward the front out of the holder 4. Remove the on-board computer when you park the ebike. It is possible to secure the on-board computer against removal in the holder. To do so, remove the holder 4 from the handlebar. Put the on-board computer in the holder. Screw the locking screw 16 (thread M3, 8 mm long) from below into the thread provided in the holder. Mount the holder back onto the handlebar. Checking the Speed Sensor (see figure B) The speed sensor 17 and its spoke magnet 18 must be mounted in such a manner that the spoke magnet, after a turn of the wheel, moves past the speed sensor with a clearance of at least 5 mm, yet no more than 17 mm. Note: If the distance between speed sensor 17 and spoke magnet 18 is too small or too large, or if the speed sensor 17 is not properly connected, the speed indication f will fail, and the ebike drive unit will operate in emergency mode. In this case, loosen the screw of the spoke magnet 18 and fasten the spoke magnet to the spoke in such a manner that it runs past the mark of the speed sensor at the correct clearance. If the speed is still not being indicated in the speed indication f after this, please contact an authorised bicycle SPI ( ) Bosch ebike Systems
11 OBJ_BUCH book Page 3 Friday, February 13, :44 PM English 3 Operation Initial Operation Requirements The ebike system can only be activated when the following requirements are met: A sufficiently charged battery pack is inserted (see battery pack operating instructions). The on-board computer is properly inserted in the holder (see Inserting and removing the on-board computer, page English 2). The speed sensor is connected properly (see Checking the Speed Sensor, page English 2). Switching the ebike System On/Off Options for switching on the ebike system: If the on-board computer is already switched on when you insert it into the holder, then the ebike system will be switched on automatically. When the on-board computer and the ebike battery pack are inserted, briefly press the On/Off button 5 of the onboard computer. When the on-board computer is inserted, press the On/Off button of the ebike battery pack (see battery pack operating instructions). The drive is activated as soon as you step on the pedals (except when in the push aid feature, see Switching the Push/Start Aid On/Off, page English 4). The motor output depends on the settings of the assistance level on the onboard computer. As soon as the system is activated, Performance Line will appear briefly on the display. As soon as you stop pedaling when in normal operation, or as soon as you have reached a speed of 25/45 km/h, the assistance from the ebike drive is switched off. The drive is automatically re-activated as soon you start pedaling again and the speed is below 25/45 km/h. Options for switching off the ebike system: Press the On/Off button 5 of the on-board computer. Switch the ebike battery pack off by its On/Off button (see battery pack operating instructions). Remove the on-board computer out of its holder. If no power is drawn from the drive unit for about 10 minutes (e.g. because the ebike is not moving), the ebike system will shut down automatically to save energy. Displays and configurations of the on-board computer Energy supply of the on-board computer If the on-board computer is in the holder 4, a sufficiently charged battery pack is inserted in the ebike and the ebike system is turned on, then the on-board computer is powered by the battery pack of the ebike. If the on-board computer is removed from the holder 4, the energy is supplied via an internal battery pack. If the internal battery pack is weak when the on-board computer is switched on, Attach to bike will appear in text indication d for 3 s. The on-board computer will then turn off again. To charge the internal battery pack, put the on-board computer back in the holder 4 (when a battery pack is inserted in the ebike). Switch the ebike battery pack on by its On/Off button (see battery pack operating instructions). You can also charge the on-board computer via the USB port. Open the protective cap 8. Connect the USB port 7 of the onboard computer via a suitable USB cable to a standard USB charger or the USB port of a computer (5 V charging voltage, max. 500 ma charging current). USB connected will appear in text indication d of the on-board computer. If you do not use your ebike for a prolonged period of time, remove the on-board computer from its holder. Store the on-board computer in a dry environment at room temperature. Regularly recharge the on-board computer s battery pack. Switching on/shutting down the on-board computer To switch on the on-board computer, briefly press the On/Off button 5. The on-board computer can also be switched on when it is not inserted in the holder (if the internal battery pack is sufficiently charged). To switch off the on-board computer, press the On/Off button 5. If the on-board computer is not inserted in the holder, it automatically switches off after 1 minute to save energy if no button is pressed. Battery Charge-control Indicator The battery charge-control indicator i displays the charge level of the ebike battery pack, not that of the on-board computer s internal battery pack. The charge level of the ebike battery pack can also be checked on the LEDs of the battery pack itself. On indicator i, each bar of the battery pack symbol is equivalent to a capacity of approx. 20 %: The ebike battery pack is fully charged. The ebike battery pack should be recharged. The LEDs of the charge-control indicator on the battery pack extinguish. The capacity for assisting the drive has been used up, and assistance is gently switched off. The remaining capacity is made available for the lighting and the on-board computer. The indicator flashes. The capacity of the ebike battery pack is enough for about 2 hours of lighting. This does not account for other consumers (e.g. automatic gearbox, charging external devices at the USB port). If the on-board computer is removed from the holder 4, the last displayed battery charge level is saved. Bosch ebike Systems SPI ( )
12 OBJ_BUCH book Page 4 Friday, February 13, :44 PM English 4 Setting the Assistance Level On the operating unit 10 you can set how much the ebike drive assists you while pedalling. The assistance level can be changed at any time, even while cycling. Note: For individual versions, it is possible that the assistance level is pre-set and cannot be changed. It is also possible that less assistance levels are available for selection than listed here. The following assistance levels (max.) are available: OFF : The motor assistance is switched off, the ebike can be operated as a normal bicycle through pedaling. ECO : Effective assistance at maximum efficiency for maximum cruising range TOUR : Uniform assistance, for touring with long cruising range SPORT : Powerful assistance for sportive riding off road as well as for urban traffic TURBO : Maximum assistance, supporting highest cadence for sportive riding To increase the assistance level, press the + 13 button on the operating unit until the desired assistance level appears in the display b. To decrease the assistance level, press the button 12. The requested motor output is displayed in indicator a. The maximum motor output depends on the selected assistance level. Assistance Level Assistance Factor* (Derailleur) ECO 50 % TOUR 120 % SPORT 190 % TURBO 275 % * The motor output can vary for individual versions. When the on-board computer is removed from the holder 4, the last indicated assistance level is stored; the motor-output indicator a remains empty. Switching the Push/Start Aid On/Off With the speed version, the push aid can also be used as a start aid. The start aid is switched off at 18 km/h. The push/start aid can make it easier for you to push or start the ebike. The speed of this feature depends on the selected gear and depending on the model, can reach a maximum of 6 km/h or 18 km/h. The lower the selected gear, the lower the speed of this function (at full capacity). The push/start aid function may only be used when pushing or starting the ebike. If the wheels of the ebike have no contact with the ground when using the push aid, then there is risk of injury. To switch on the push/start aid, press and hold the WALK 14 button on the operating unit. The ebike drive is switched on. The push/start aid is switched off if one of the following occurs: you release the WALK 14 button, the wheels of the ebike are blocked (e.g. by actuating the brakes or impacting against an obstacle), the speed exceeds 6/18 km/h. Switching bike lights on/off In the model in which the lighting is powered by the ebike system, the front and rear lights can be switched on and off at the same time via the on-board computer with button 2. When the lighting is switched on Light on appears and when the lighting is switched off Light off appears for approx. 1 s in text indication d. The lighting symbol c is displayed when the light is on. Switching the bike light on and off has no effect on the back lighting of the display. Version Speed: Daytime running lights are always provided in this option. When you switch on the ebike system (see Switching the ebike System On/Off, page English 3), the lights will also be switched on. The bike lights cannot be switched off with button 2. Speed and Distance Indication The speed indication f always displays the current speed. The following functions are available in the function indication (combination of text indication d and value indication e): Clock : Current time Max. speed : Maximum speed achieved since the last reset Avg. speed : Average speed achieved since the last reset Trip time : Trip time since the last reset Range : Estimated range of the available battery-pack charge (for constant conditions such as assistance level, route profile, etc.) Odometer : Display of the total distance travelled with the ebike (cannot be reset) Trip distance : Distance covered since the last reset To switch between display functions, press button i 1 on the on-board computer or button i 11 on the operating unit repeatedly until the required function is displayed. To reset Trip distance, Trip time and Avg. speed, switch to any of the three functions and then press and hold the RESET button 6 until the indication is set to zero. This also resets the values of the other two functions. To reset the Max. speed, switch to this function and then press and hold the RESET button 6 until the indication is set to zero. To reset Range, switch to this function and then press the RESET 6 button until the display is reset to the value of the factory setting. If the on-board computer is removed from the holder 4, all values of the features are saved and can still be displayed SPI ( ) Bosch ebike Systems
13 OBJ_BUCH book Page 5 Friday, February 13, :44 PM English 5 Displaying/Adapting Basic Settings The basic settings can be displayed and changed regardless of whether the on-board computer is inserted in the holder 4 or not. To access the basic settings menu, press and hold the RESET button 6 and the i button 1 until Configuration is displayed in text indication d. To switch between the basic settings, press button i 1 on the on-board computer repeatedly until the required basic setting is displayed. If the on-board computer is inserted in the holder 4, you can also press button i 11 on the operating unit. To change the basic settings, press the On/Off button 5 next to indication to reduce or scroll down, or the lighting button 2 next to indication + to increase or scroll up. If the on-board computer is inserted in the holder 4, it is also possible to change using buttons 12 and + 13 on the operating unit. To exit the function and save a changed setting, press the RESET button 6 for 3 s. The following basic settings are available: Error Code Indication The components of the ebike system are continuously and automatically monitored. When an error is detected, the respective error code is indicated in text indication d. Press any button on the on-board computer 3 or on the operating unit 10 to return to the standard indication. Clock : The current time can be set here. Pressing and holding the setting buttons fast-forwards the setting speed. Wheel circum. : You can change this value pre-set by the manufacturer by ± 5 %. This value is displayed only when the on-board computer is in the holder. English : You can change the language of the text indications. You can choose between German, English, French, Spanish, Italian, Dutch and Danish. Unit km/mi : The speed and distance can be displayed either in kilometres or miles. Time format : The time can be displayed either in the 12 hour or 24 hour format. Shift recom. on/off : You can switch the indication of a shift recommendation on and off. Power-on hours : Indicates the total travel duration with the ebike (not changeable). Displ. vx.x.x.x : This is the software version of the display. DU vx.x.x.x : This is the software version of the drive unit. This value is displayed only when the on-board computer is in the holder. Bat vx.x.x.x : This is the software version of the battery pack. This value is displayed only when the on-board computer is in the holder. Depending on the type of error, the drive unit is automatically shut off, if required. Continued travel without assistance from the drive unit is possible at any time. However, have the ebike checked before attempting new trips. Trouble-shooting actions may be performed by the owner except those explicitly noted as Contact your Bosch ebike dealer. Code Cause Corrective Measure 410 One or more buttons of the on-board computer are blocked. 414 Connection problem of the operating unit 418 One or more buttons of the operating unit are blocked. Check if any buttons are blocked, e. g. from dirt or debris. Clean the buttons, if required. Have connections and contacts checked. Check if any buttons are blocked, e. g. from dirt or debris. Clean the buttons, if required. 422 Connection problem of the drive unit Have connections and contacts checked. 423 Connection problem of the ebike Have connections and contacts checked. battery pack 424 Communication error among the Have connections and contacts checked. components 426 Internal time-out error Restart the system. If the problem persists, contact your Bosch ebike 430 internal battery pack of the on-board Charge the on-board computer (in the holder or via the USB port). computer is empty 440 Internal error of the drive unit Restart the system. If the problem persists, contact your Bosch ebike 450 Internal software error Restart the system. If the problem persists, contact your Bosch ebike 490 Internal error of the on-board computer Have the on-board computer checked. Bosch ebike Systems SPI ( )
14 OBJ_BUCH book Page 6 Friday, February 13, :44 PM English 6 Code Cause Corrective Measure 500 Internal error of the drive unit Restart the system. If the problem persists, contact your Bosch ebike 502 Bike lighting error Check the light and the associated wiring. Restart the system. If the problem persists, contact your Bosch ebike 503 Error of the speed sensor Restart the system. If the problem persists, contact your Bosch ebike 510 Internal sensor error Restart the system. If the problem persists, contact your Bosch ebike 511 Internal error of the drive unit Restart the system. If the problem persists, contact your Bosch ebike 530 Battery pack error Switch off the ebike, remove the ebike battery pack and reinsert the ebike battery pack. Restart the system. If the problem persists, contact your Bosch ebike 531 Configuration error Restart the system. If the problem persists, contact your Bosch ebike 540 Temperature error The ebike is outside of the permissible temperature range. Switch off the ebike system and allow the drive unit to either cool down or heat up to the permissible temperature. Restart the system. If the problem persists, contact your Bosch ebike 550 An improper load was detected. Remove load. Restart the system. If the problem persists, contact your Bosch ebike 602 Internal battery pack error while charging Unplug the charger from the battery pack. Restart the ebike system. Plug the charger into the battery pack. If the problem persists, contact your Bosch ebike 602 Internal battery pack error Restart the system. If the problem persists, contact your Bosch ebike 603 Internal battery pack error Restart the system. If the problem persists, contact your Bosch ebike 605 Battery pack temperature error The ebike is outside of the permissible temperature range. Switch off the ebike system and allow the drive unit to either cool down or heat up to the permissible temperature. Restart the system. If the problem persists, contact your Bosch ebike 605 Battery pack temperature error while charging Unplug the charger from the battery pack. Allow the battery pack to cool. If the problem persists, contact your Bosch ebike 606 External battery pack error Check the wiring. Restart the system. If the problem persists, contact your Bosch ebike 610 Battery pack voltage error Restart the system. If the problem persists, contact your Bosch ebike 620 Charging error Replace the charger. Contact your Bosch ebike 640 Internal battery pack error Restart the system. If the problem persists, contact your Bosch ebike 655 Multiple battery pack errors Switch off the ebike system. Remove the battery pack and reinsert it. Restart the system. If the problem persists, contact your Bosch ebike 656 Software version error Contact your Bosch ebike dealer so that he can perform a software update. No display Internal error of the on-board computer Restart your ebike system by switching it off and back on SPI ( ) Bosch ebike Systems
15 OBJ_BUCH book Page 7 Friday, February 13, :44 PM English 7 Power Supply of External Devices via USB Connection With the USB connection, it is possible to operate and charge most devices whose power supply is possible via USB (e.g., various mobile phones). Prerequisite for charging is that the on-board computer and a sufficiently charged battery pack are inserted in the ebike. Open the protective cap 8 of the USB port on the on-board computer. Connect the USB connection of the external device to the USB port 7 on the on-board computer using a standardcompliant Micro A/Micro B USB 2.0 cable. Using a USB cable that is not standard-compliant or a cable/adapter combination can lead to damage to the on-board computer. Notes on Riding with the ebike System When does the ebike Drive Unit Operate? The ebike drive unit assists you when riding, as long as you step into the pedals. Without pedaling, there is no assistance. The motor output always depends on the amount of your pedaling power. When applying less pedaling power, the assistance or support will be lower than when applying a lot of pedaling power. This applies independent of the assistance Level. The ebike drive automatically switches off at speeds in excess of 25/45 km/h. When the speed falls below 25/45 km/h, the drive is automatically available again. An exception applies to the push-assistance function, in which the ebike can be pushed at low speed without pedalling. The pedals may also rotate when the push assistance is used. The ebike can also be ridden as a normal bicycle without assistance at any time, by either switching off the ebike system or setting the assistance level to OFF. The same applies when the battery pack is empty. Interaction of the ebike System with the Bicycle Gears The bicycle gears should be used as with a normal bicycle, even with ebike motor assistance (please observe the operating instructions of your ebike). Independent of the type of gearing, it is recommended to briefly interrupt the pedaling while changing gears. This makes changing gears easier and reduces the wear of the drive train. By selecting the right gear, you can increase the speed and range with the same pedaling effort. For this reason, follow the shift recommendations provided by indications g and h on your display. If indication g is displayed, you should shift to a higher gear with lower cadence. If indication h is displayed, you should select a lower gear with higher cadence. Gathering First Experience It is recommended to gather first experience with the ebike away from roads with heavy traffic. Try out the different assistance levels. As soon as you feel safe, you can participate in traffic with the ebike as with any other bicycle. Test the operating range of your ebike under different conditions before planning longer and more challenging rides. Influences on the Operating Range The operating range depends on many factors, such as: Assistance level, Gear-switching behaviour, Bicycle tyres and tyre pressure, Age and condition of the battery pack, Route profile (inclines) and road or path conditions (road or path surface), Head wind and ambient temperature, Weight of the ebike, rider and equipment/luggage. For this reason, it is not possible to precisely predict the range before and during a trip. General rules: For the same motor output of the ebike drive unit: The less power or force that you have to bring about to reach a certain speed (e.g. through optimal use of the gears), the less energy the ebike drive unit will consume, and the greater the range for a battery-pack charge. The higher the assistance level under otherwise same conditions, the lower the range. Careful Handling of the ebike Please observe the operating and storage temperatures of the ebike components. Protect the drive unit, on-board computer and battery against extreme temperatures (e.g. from intense sunlight without adequate ventilation). The components (especially the battery pack) can become damaged through extreme temperatures. Bosch ebike Systems SPI ( )
16 OBJ_BUCH book Page 8 Friday, February 13, :44 PM English 8 Maintenance and Service Maintenance and Cleaning Keep all components of your ebike clean, especially the battery-pack contacts and corresponding holder contacts. Clean them carefully with a soft, damp cloth. All components including the drive unit may not be immersed in water or cleaned with a high-pressure cleaner. For service or repairs on the ebike, please refer to an authorised bicycle After-sales Service and Application Service In case of questions concerning the ebike system and its components, please refer to an authorised Bosch ebike For contact data of authorised Bosch ebike dealers, please refer to Transport The battery packs are subject to the Dangerous Goods Legislation requirements. Private users can transport undamaged battery packs by road without further requirements. When being transported by commercial users or third parties (e.g. air transport or forwarding agency), special requirements on packaging and labelling must be observed (e.g. ADR regulations). If necessary, an expert for hazardous materials can be consulted when preparing the item for shipping. Dispatch battery packs only when the housing is undamaged. Tape or mask off open contacts and pack up the battery pack in such a manner that it cannot move around in the packaging. Inform your parcel service that the package contains dangerous goods. Please also observe the possibility of more detailed national regulations. In case of questions concerning transport of the battery packs, please refer to an authorised Bosch ebike The Bosch ebike dealers can also provide suitable transport packaging. Disposal The drive unit, on-board computer including operating unit, battery pack, speed sensor, accessories and packaging should be disposed of in an environmentally correct manner. Do not dispose of ebikes and their components into household waste! Only for EC countries: According to the European Guideline 2012/19/EU, electrical devices/tools that are no longer usable, and according to the European Guideline 2006/66/EC, defective or used battery packs/batteries, must be collected separately and disposed of in an environmentally correct manner. The integrated battery pack in the on-board computer may only be removed for disposal. Opening the housing shell can destroy the on-board computer. Please return battery packs and on-board computers that are no longer usable to an authorised bicycle Li-ion: Please observe the instructions in section Transport, page English 8. Subject to change without notice SPI ( ) Bosch ebike Systems
17 OBJ_BUCH book Page 9 Friday, February 13, :44 PM English 9 Lithium-ion battery pack PowerPack Safety Notes Read all safety warnings and all instructions. Failure to follow the warnings and instructions may result in electric shock, fire and/or serious injury. Save all safety warnings and instructions for future reference. The term battery pack used in these operating instructions refers both to standard battery packs (battery packs with holder on the bike frame) and to rack-type battery packs (battery packs with holder in the rear rack/carrier), except when explicitly referring to the design type. Remove the battery pack from the ebike before beginning work (e.g. inspection, repair, assembly, maintenance, work on the chain, etc.) on the ebike, transporting it by car or plane, or storing it. Unintentional activation of the ebike system poses a risk of injury. Do not open the battery pack. Danger of short-circuiting. Opening the battery pack voids any and all warranty claims. Protect the battery pack against heat (e.g., also against continuous intense sunlight), fire and immersing into water. Danger of explosion. Keep the battery pack not being used away from paper clips, coins, keys, nails, screws or other small metal objects, that can make a connection from one terminal to another. Shorting the battery-pack terminals together may cause burns or a fire. For short-circuiting damage caused in this manner, any and all warranty claims through Bosch shall be invalid. Under abusive conditions, liquid may be ejected from the battery pack. Avoid contact. If contact accidentally occurs, flush with water. If liquid contacts eyes, additionally seek medical help. Liquid ejected from the battery pack may cause skin irritations or burns. Battery packs must not be subjected to mechanical impacts. There is a risk that the battery pack will be damaged causing vapours to escape. The vapours can irritate the respiratory system. Provide for fresh air and seek medical attention in case of complaints. Vapours can escape in case of damage and improper use of the battery pack. Provide for fresh air and seek medical attention in case of complaints. The vapours can irritate the respiratory system. Charge the battery pack only with original Bosch battery chargers. When using non-original Bosch chargers, the danger of fire cannot be excluded. Use the battery pack only together with ebikes that have an original Bosch ebike drive system. This is the only way to protect the battery pack against dangerous overload. Use only original Bosch battery packs approved for your ebike by the manufacturer. Using other battery packs can lead to injuries and pose a fire hazard. When using other battery packs, Bosch shall not assume any liability and warranty. Read the safety warnings and instructions in the operating instructions of the charger and the drive unit / onboard computer as well as in the operating instructions of your ebike. Keep the battery pack out of reach of children. Product Description and Specifications Product Features (see page 4 5) The numbering of the product features refers to the illustrations on the graphics pages. All representations of bike components, with exception of the battery packs and their holders, are schematic and can deviate from your ebike. A1 Holder of the rack-type battery pack A2 Rack-type battery pack A3 Operation and charge-control indicator A4 On/Off button A5 Key of the battery pack lock A6 Battery-pack lock A7 Upper holder of the standard battery pack A8 Standard battery pack A9 Bottom holder of the standard battery pack C1 Battery charger C6 Socket for charge connector C7 Charge socket cover Bosch ebike Systems SPI ( )
18 OBJ_BUCH book Page 10 Friday, February 13, :44 PM English 10 Technical Data Lithium-ion battery pack PowerPack 300 PowerPack 400 Article number Standard battery pack Rack-type battery pack Rated voltage V= Rated capacity Ah Energy Wh Operating temperature C Storage temperature C Allowable charging temperature range C Weight, approx. kg 2.0/ /2.6 Degree of protection IP 54 (dust and splash water protected) IP 54 (dust and splash water protected) Assembly Place down the battery pack only on clean surfaces. In particular, avoid soiling the charge socket and the contacts, e.g. by means of sand or soil. Checking the Battery Pack Before Using for the First Time Check the battery pack before charging it or using it with your ebike for the first time. For this, press the On/Off button A4 to switch on the battery pack. When no LED of the charge-control indicator A3 lights up, the battery pack may be damaged. When at least one, but not all LEDs of the charge-control indicator A3 is lit, then fully charge the battery pack before using for the first time. Do not attempt to charge or use a damaged battery pack. Please refer to an authorised Bosch ebike Charging the Battery Pack Use only the Bosch charger provided with your ebike or an identical original Bosch charger. Only this charger is matched to the lithium-ion battery pack used in your ebike. Note: The battery pack is supplied partially charged. To ensure full battery pack capacity, completely charge the battery pack in the charger before using for the first time. For charging the battery pack, read and observe the operating instructions of the charger. The battery pack can be recharged at any time on its own or on the bike without shortening the lifespan. Interrupting the charging process does not damage the battery pack. The battery pack is equipped with a temperature control indicator, which enables charging only within a temperature range between 0 C and 40 C. When the battery pack is not within the charging-temperature range, three LEDs of the charge-control indicator A3 flash. Disconnect the battery pack from the charger until its temperature has adjusted. Do not connect the battery pack to the charger until it has reached the allowable charging temperature. Charge-control Indicator When the battery pack is switched on, the five green LEDs of the charge-control indicator A3 indicate the charge condition of the battery pack. In this, each LED indicates approx. 20 % capacity. When the battery pack is completely charged, all five LEDs light up. The charge level of the switched on battery pack is also shown on the display of the on-board computer. When doing so, read and observe the operating instructions of the drive unit and on-board computer. If the capacity of the battery pack is below 5 %, all LEDs of the charge-control indicator A3 on the battery pack go out. However there is another display function of the on-board computer SPI ( ) Bosch ebike Systems
19 OBJ_BUCH book Page 11 Friday, February 13, :44 PM English 11 Inserting and removing the battery pack (see figures C D) Always switch the battery pack off when inserting or removing it from the holder. In order for the battery pack to be inserted, the key A5 must be inserted into the lock A6 and the lock must be unlocked. To insert the standard battery pack A8, place it with the contacts on the lower holder A9 on the ebike (the battery pack can be inclined up to 7 to the frame). Tilt it into the upper holder A7 until it engages. To insert the rack-type battery pack A2, slide it with the contacts facing ahead until it engages in the holder A1 of the rear rack/carrier. Check if the battery pack is tightly seated. Always lock the battery pack with lock A6, as otherwise the lock can open and the battery pack could fall out of the holder. After locking, always remove the key A5 from the lock A6. This prevents the key from falling out and the battery pack from being removed from unauthorised persons when the ebike is parked. To remove the standard battery pack A8, switch it off and unlock the lock with the key A5. Tilt the battery pack out of the upper holder A7 and pull it out of the lower holder A9. To remove the rack-type battery pack A2, switch it off and unlock the lock with the key A5. Pull the battery pack out of the holder A1. Operation Initial Operation Use only original Bosch battery packs approved for your ebike by the manufacturer. Using other battery packs can lead to injuries and pose a fire hazard. When using other battery packs, Bosch shall not assume any liability and warranty. Switching On and Off Switching on the battery pack is one of the ways of switching on the ebike system. When doing so, read and observe the operating instructions of the drive unit and on-board computer. Before switching on the battery pack or the ebike system, check that the lock A6 is locked. To switch on the battery pack, press the On/Off button A4. The LEDs of indicator A3 light up and at the same time indicate the charge condition. Note: If the capacity of the battery pack is below 5 %, no LED on the charge-control indicator A3 lights up. It is only visible on the on-board computer, if the ebike system is switched on. To switch off the battery pack, press the On/Off button A4 again. The LEDs of indicator A3 go out. This also switches off the ebike system. If no power is drawn from the ebike drive for about 10 minutes (e.g. because the ebike is not moving) and no button is pressed on the on-board computer or the operating unit of the ebike, the ebike system and therefore also the battery pack will shut down automatically to save energy. The battery pack is protected against deep discharging, overcharging, overheating and short-circuiting through the Electronic Cell Protection (ECP). In case of hazardous situations, a protective circuit automatically switches off the battery pack. When a defect of the battery pack is detected, two LEDs of the charge-control indicator A3 flash. In this case, please refer to an authorised Bosch ebike Notes for Optimum Handling of the Battery Pack The battery-pack life can be prolonged when being properly maintained and especially when being operated and stored at the right temperatures. With increasing age, however, the battery-pack capacity will diminish, even when properly maintained. A significantly reduced operating period after charging indicates that the battery pack is worn out and must be replaced. You can replace the battery pack yourself. Recharging the Battery Pack prior to and during Storage When not using the battery pack for a longer period, charge it to approx. 60 % (3 to 4 LEDs lit on the charge-control indicator A3). Check the charge condition after 6 months. When only one LED of the charge-control indicator A3 lights up, recharge the battery pack again approx. 60 %. Note: When the battery pack is stored discharged (empty) for longer periods, it can become damaged despite the low selfdischarging feature and the battery-pack capacity may be strongly reduced. It is not recommended to have the battery pack connected permanently to the charger. Storage Conditions Store the battery pack in a dry, well-ventilated location. Protect the battery pack against moisture and water. Under unfavourable weather conditions, it is recommended e.g. to remove the battery pack from the ebike and store it in an enclosed location until being used again. The battery pack can be stored at temperatures between 10 C and +60 C. For a long battery-pack life, however, storing the battery pack at a room temperature of approx. 20 C is of advantage. Take care that the maximal storage temperature is not exceeded. As an example, do not leave the battery pack in a vehicle in summer and store it out of direct sunlight. It is recommended to not store the battery pack on the bike. Bosch ebike Systems SPI ( )
20 OBJ_BUCH book Page 12 Friday, February 13, :44 PM English 12 Maintenance and Service Maintenance and Cleaning Keep the battery pack clean. Clean the battery pack carefully with a soft, damp cloth. The battery pack may not be immersed in water or cleaned with a water jet. When the battery pack is no longer operative, please refer to an authorised Bosch ebike After-sales Service and Application Service In case of questions concerning the battery packs, please refer to an authorised bicycle Note down the manufacturer and the number of the key A5. In case of loss of the keys, please refer to an authorised bicycle Please provide the name of the manufacturer and the number of the key. For contact data of authorised Bosch ebike dealers, please refer to Transport The battery packs are subject to the Dangerous Goods Legislation requirements. Private users can transport undamaged battery packs by road without further requirements. When being transported by commercial users or third parties (e.g. air transport or forwarding agency), special requirements on packaging and labelling must be observed (e.g. ADR regulations). If necessary, an expert for hazardous materials can be consulted when preparing the item for shipping. Dispatch battery packs only when the housing is undamaged. Tape or mask off open contacts and pack up the battery pack in such a manner that it cannot move around in the packaging. Inform your parcel service that the package contains dangerous goods. Please also observe the possibility of more detailed national regulations. In case of questions concerning transport of the battery packs, please refer to an authorised Bosch ebike The Bosch ebike dealers can also provide suitable transport packaging. Disposal Battery packs, accessories and packaging should be sorted for environmental-friendly recycling. Do not dispose of the battery packs into household waste! Only for EC countries: According to the European Guideline 2012/19/EU, electrical devices/tools that are no longer usable, and according to the European Guideline 2006/66/EC, defective or used battery packs/batteries, must be collected separately and disposed of in an environmentally correct manner. Please return battery packs that are no longer usable to an authorised bicycle Li-ion: Please observe the instructions in section Transport, page English 12. Subject to change without notice SPI ( ) Bosch ebike Systems
21 OBJ_BUCH book Page 13 Monday, February 16, :46 PM English 13 Charger Safety Notes Read all safety warnings and all instructions. Failure to follow the warnings and instructions may result in electric shock, fire and/or serious injury. Save all safety warnings and instructions for future reference. The term battery pack used in these operating instructions refers both to standard battery packs (battery packs with holder on the bike frame) and to rack-type battery packs (battery packs with holder in the rear rack/carrier). Keep the charger away from rain or moisture. The penetration of water into a battery charger increases the risk of an electric shock. Only charge ebike-approved Bosch lithium-ion battery packs. The battery-pack voltage must match the battery-pack charging voltage of the charger. Otherwise there is danger of fire and explosion. Keep the battery charger clean. Contamination can lead to danger of an electric shock. Before each use, check the battery charger, cable and plug. If damage is detected, do not use the battery charger. Never open the battery charger yourself. Have repairs performed only by a qualified technician and only using original spare parts. Damaged battery chargers, cables and plugs increase the risk of an electric shock. Do not operate the battery charger on easily inflammable surfaces (e.g., paper, textiles, etc.) or surroundings. The heating of the battery charger during the charging process can pose a fire hazard. Vapours can escape in case of damage and improper use of the battery pack. Provide for fresh air and seek medical attention in case of complaints. The vapours can irritate the respiratory system. Supervise children during use, cleaning and maintenance. This will ensure that children do not play with the charger. Children or persons that owing to their physical, sensory or mental limitations or to their lack of experience or knowledge, are not capable of securely operating the charger, may only use this charger under supervision or after having been instructed by a responsible person. Otherwise, there is danger of operating errors and injuries. Please read and observe the safety warnings and instructions enclosed in the operating instructions of the battery pack and drive unit/on-board computer as well as in the operating instructions of your ebike. A short version of important safety warnings in English, French and Spanish with the following content can be found on the bottom side of the charger (marked with number C4 in the representation on the graphics page): For safe operation see manual. Risk of electric shock. Dry location use only. Charge only batteries of the Bosch ebike Systems. Other batteries may burst causing personal damage. Do not replace the plug assembly as risk of fire or electric shock may result. Product Description and Specifications Product Features (see page 6 8) The numbering of the product features refers to the illustration of the battery charger on the graphics page. C1 Battery charger C2 Charger socket C3 Plug-in connector C4 Safety warnings, charger C5 Charge connector C6 Socket for charge connector C7 Charge socket cover A2 Rack-type battery pack A3 Operation and charge-control indicator A4 Battery on/off button A8 Standard battery pack Bosch ebike Systems SPI ( )
Introduction... 3 General Warnings... 3 Using Your Operator s Manual... 3
 English 2 Introduction......................................................... 3 General Warnings................................................ 3 Using Your Operator s Manual.....................................
Robert Bosch GmbH Bosch ebike Systems Reutlingen Germany
 Performance Line Robert Bosch GmbH Bosch ebike Systems 72703 Reutlingen Germany www.bosch-ebike.com 0 276 001 USPen (2014.09) T / 34 S Performance Line RESET TURBO TURBO SPORT SPORT TOUR TOUR ECO ECO OFF
Manual Gazelle with Bosch Active Line (plus) system
 system") Manual Gazelle with Bosch Active Line (plus) system TURBO SPORT TOUR ECO OFF MPH KM/H Reichweite AMM PMWH MIN MPH KM/H RESET TURBO SPORT S TOUR ECO OFF MPH KM/H Reichweite AMM PMWH MIN MPH KM/H TURBO SPORT
Manual Gazelle with Bosch Active Line (plus) system TURBO SPORT TOUR ECO OFF MPH KM/H Reichweite AMM PMWH MIN MPH KM/H RESET TURBO SPORT S TOUR ECO OFF MPH KM/H Reichweite AMM PMWH MIN MPH KM/H TURBO SPORT
Manual Gazelle with Bosch system
 Manual Gazelle with Bosch system 2 Table of contents 1. Safety 5 1.1 General 5 1.2 Legal requirements 5 1.2.1 Significance for the user 5 1.2.2 Safety and warranty 6 1.2.3 Waste disposal 6 1.3 Battery
Age: 18+ Owner s Manual The Bosch Drive System Drive Unit Intuvia PowerPack Charger
 S Performance Line 28 mph Performance Line 28 mph RESET TURBO TURBO SPORT SPORT TOUR TOUR ECO ECO OFF OFF MPH MPH KM/H KM/H AMM AMM PMWH PMWH MIN MIN MPH MPH KM/H KM/H Reichweite Reichweite Robert Bosch
Li-Ion. Robert Bosch GmbH Power Tools Division Leinfelden-Echterdingen Germany X22 (2011.
 OBJ_DOKU-23401-001.fm Page 1 Friday, April 15, 2011 8:48 AM Li-Ion Robert Bosch GmbH Power Tools Division 70745 Leinfelden-Echterdingen Germany www.bosch-pt.com 1 609 929 X22 (2011.04) O / 165 UNI OBJ_DOKU-26322-001.fm
E-Bike components User manual Rear wheel motor
 E-Bike components User manual Rear wheel motor Contents Safety information 3 Riding the E-Bike 5 Product features and specifications 6 Display / lighting 7 Battery 8 Battery charger 8 Charging the battery
The Brose e-bike system. Instructions for use
 The Brose e-bike system Instructions for use Instructions for use of Brose e-bike system Reference number: BDA_BeBS_MY2017_en_v4.0 (valid for software of display unit.321) 2 Table of contents Figures...
E-Bike components User manual Rear wheel motor
 E-Bike components User manual Rear wheel motor Contents Safety information 3 Riding the E-Bike 4 Product characteristics and specifications 5 Display 6 Battery 7 Battery charger 7 Charging the battery
The Brose e-bike System. Instructions for Use
 The Brose e-bike System Instructions for Use Instructions for Use of Brose e-bike System Reference number: BDA_BeBS_MY2014_en_v1.0 2 Table of contents Figures... 4 Quick Start Instructions... 6 Drive unit...
Battery Charger JCB-FCH12Li
 Safety and operating manual Battery Charger JCB-FCH12Li ORIGINAL INSTRUCTIONS SAFETY INSTRUCTIONS WARNING: Read all safety warnings and all instructions.failure to follow the warnings and instructions
Pedelec Operating Instructions Pedelec handleiding Pédélec manuel
 Pedelec Operating Instructions Pedelec handleiding Pédélec manuel Introduction ( GB ) Dear Customer, congratulations on the purchase of your new KETTLER Pedelec Cycle. These instructions will help you
GlassVAC. Robert Bosch Power Tools GmbH Stuttgart GERMANY. F 016 L ( ) O / 17. Original instructions
 O / 17. Original instructions") OBJ_DOKU-65433-001.fm Page 1 Friday, February 2, 2018 10:05 AM Robert Bosch Power Tools GmbH 70538 Stuttgart GERMANY www.bosch-pt.com GlassVAC F 016 L81 779 (2018.02) O / 17 en Original instructions OBJ_BUCH-3480-001.book
OBJ_DOKU-65433-001.fm Page 1 Friday, February 2, 2018 10:05 AM Robert Bosch Power Tools GmbH 70538 Stuttgart GERMANY www.bosch-pt.com GlassVAC F 016 L81 779 (2018.02) O / 17 en Original instructions OBJ_BUCH-3480-001.book
CORDLESS TACKER MODEL NO: CCT48 OPERATION & MAINTENANCE INSTRUCTIONS PART NO: LS0414
 CORDLESS TACKER MODEL NO: CCT48 PART NO: 6485070 OPERATION & MAINTENANCE INSTRUCTIONS LS0414 INTRODUCTION Thank you for purchasing this CLARKE product. Before attempting to use this product, please read
Original Operating Manual
 2010-10-29 Original Operating Manual Control Panel Comfort for Pedelecs Series 4313 Save for future use! Marquardt GmbH Schlossstraße 16 78604 Rietheim-Weilheim E-mail: marquardt@marquardt.de Website:
18V CORDLESS STAPLER/NAILER
 18V CORDLESS STAPLER/NAILER MODEL NO: CONSN18LI PART NO: 6487055 OPERATION & MAINTENANCE INSTRUCTIONS LS1213 INTRODUCTION Thank you for purchasing this CLARKE product. Before attempting to use this product,
BMZ Drive Systems V7 Operating Instructions
 BMZ Drive Systems V7 Operating Instructions Addresses, identification and notes Masthead BMZ Batterien-Montage-Zentrum GmbH Am Sportplatz 28 63791 Karlstein am Main Germany Phone: +49 6188 9956-0 Fax:
Cordless Rechargeable Saw Instructions for Use
 Technical data Voltage: DC 10.8V Weight: 1.25Kg Stroke rate: 0-2100/min Stroke: 15mm Cutting capacity: max diameter in wood 80mm / in soft metal 7mm Charging time: Between 5.0-5.5 Hours Battery: 1.3Ah
60V RECHARGEABLE LITHIUM-ION BATTERY
 60V RECHARGEABLE LITHIUM-ION BATTERY LB60A00/LB60A03/LB60A01/LB60A02 Owner s Manual TOLL-FREE HELPLINE: 1-855-345-3934 www.greenworkstools.com Read all safety rules and instructions carefully before operating
Qualcast V Lithium-Ion Cordless Rotary Mower (Model: CLMF2433M)
") Qualcast 4689128 24V Lithium-Ion Cordless Rotary Mower (Model: CLMF2433M) Instruction Manual After Sales Support UK/Ireland 0345 640 0800 Web www.argosspares.co.uk Important - Please read these instructions
Qualcast 4689128 24V Lithium-Ion Cordless Rotary Mower (Model: CLMF2433M) Instruction Manual After Sales Support UK/Ireland 0345 640 0800 Web www.argosspares.co.uk Important - Please read these instructions
Instruction Manual. CORDLESS DRILL 18V Li-ion WITH IMPACT FUNCTION. Model SROM 1172
 Instruction Manual CORDLESS DRILL 18V Li-ion WITH IMPACT FUNCTION Model SROM 1172 Our tool range has you covered for DIY. Whatever the job, make light work of it with MAKO tools. Product Features: 1. Keyless
OWNER S MANUAL TOLL-FREE HELPLINE: (Monday - Friday / 8am - 4:30pm CST)
") LITHIUM ION BATTERY OWNER S MANUAL TOLL-FREE HELPLINE: 1-877-572-7278 (Monday - Friday / 8am - 4:30pm CST) READ ALL SAFETY RULES AND INSTRUCTIONS CAREFULLY BEFORE OPERATING STRIKEMASTER LITHIUM 40v BATTERY
LITHIUM ION BATTERY OWNER S MANUAL TOLL-FREE HELPLINE: 1-877-572-7278 (Monday - Friday / 8am - 4:30pm CST) READ ALL SAFETY RULES AND INSTRUCTIONS CAREFULLY BEFORE OPERATING STRIKEMASTER LITHIUM 40v BATTERY
TOOLPRO 18V Li-Ion Brushless Impact wrench
 TOOLPRO 18V Li-Ion Brushless Impact wrench Instruction Manual CIW180HB.9 After Sales Support FREE CALL 1300 889 028 EMAIL:salesau@positecgroup.com Important - Please read these instructions fully before
GARDENA. N FIN P E I DK S NL F GB D
 GARDENA AccuCut 400 Li Art. 8840 D Betriebsanleitung Operating Instructions F Mode d emploi Coupe bordures NL Instructies voor gebruik S Bruksanvisning freeetrim DK Brugsanvisning freeetrim I Istruzioni
Operating instructions Accu Jet
 Operating instructions Accu Jet Keep for future use! Ident number: 04.8800.000 Air Line Table of contents 1 Scope of delivery... 4 2 Operator instructions... 5 3 Safety... 6 3.1 Intended use...8 4 Description
Instruction Manual CORDLESS DRILL & DRIVER 18V. Model SROM 1170
 Instruction Manual CORDLESS DRILL & DRIVER 18V Model SROM 1170 Product Features: Dear Valued Customer, Thank you for purchasing this Samson Power Tool. We are dedicated to providing quality Samson Power
RMi34 36V Lithium-Ion Cordless Rotary Mower (Model: CLMB3634M)
") RMi34 36V Lithium-Ion Cordless Rotary Mower (Model: CLMB3634M) Instruction Manual Safety Warning Warning! Read these instructions carefully, familiarize yourself with the controls and the correct usage
RMi34 36V Lithium-Ion Cordless Rotary Mower (Model: CLMB3634M) Instruction Manual Safety Warning Warning! Read these instructions carefully, familiarize yourself with the controls and the correct usage
C3 Operating Instructions
 Version 3.1 Stand 09.2014 Robert Bosch (Australia) Pty. Ltd. 1555 Centre Road Clayton, Victoria 3168 C3 Operating Instructions For further information please contact Bosch at: Australia 1300 30 70 40 www.boschautoparts.com.au
Battery Charger JCB-FCH20LI2
 Safety and operating manual Battery Charger JCB-FCH20LI2 ORIGINAL INSTRUCTIONS SAFETY INSTRUCTIONS WARNING: Read all safety warnings and all instructions.failure to follow the warnings and instructions
Installation and operating instructions. Solar charge controller MPPT 10 A / 20 A Z Z
 Installation and operating instructions Solar charge controller MPPT 10 A / 20 A EN 1 Contents 1. About these instructions... 3 1.1 Applicability... 3 1.2 Users... 3 1.3 Description of symbols... 3 2.
Originalbedienungsanleitung/Ersatzteilliste 5. Original operating manual/spare parts list 11
 Originalbedienungsanleitung/Ersatzteilliste 5 Original operating manual/spare parts list 11 Notice d utilisation d origine/liste de pièces de rechange 17 Manual de instrucciones original/lista de piezas
- Keep children and other people away while operating the rivet tool. Distractions can cause you to lose control of the tool.
 PLEASE SPEND 5 MINUTES READING THESE INSTRUCTIONS BEFORE USING YOUR NEW BATTERY RIVET TOOL. TRUST US, IT WILL SAVE YOU TIME AND INCONVENIENCE IN THE LONG RUN. Please read the following safety information
MP V 8A Electronic Smart Charger. Instruction and Information Manual
 MP7428 12V 8A Electronic Smart Charger Instruction and Information Manual In order to ensure correct and safe usage of your battery charger, you should read these instructions carefully. Please retain
CORDLESS WORK LIGHT CORDLESS WORK LIGHT. Operation and Safety Notes IAN
 CORDLESS WORK LIGHT CORDLESS WORK LIGHT Operation and Safety Notes IAN 288518 GB / IE / NI Operation and Safety Notes Page 5 A HG01386A-BS 5 1 2 6 3 4 7 8 10 9 B C 11 12 13 List of pictograms used...page
JUMP STARTER OPERATION & MAINTENANCE INSTRUCTIONS MODEL NO: JSM350 PART NO: ORIGINAL INSTRUCTIONS LS1117-ISS 1
 JUMP STARTER MODEL NO: JSM350 PART NO: 6239010 OPERATION & MAINTENANCE INSTRUCTIONS ORIGINAL INSTRUCTIONS LS1117-ISS 1 INTRODUCTION Thank you for purchasing this CLARKE product. Please read this manual
Electric Bike Supplement
 Electric Bike Supplement Electric Bike Instruction. Congratulations on your purchase of a pedal assisted bicycle. This is a supplement to the general bicycle user manual. Please make sure that your new
ELECTRIC FOLDING BIKE OWNERS MANUAL. e-power 36v. Go City-Lite
 P o w e r ELECTRIC FOLDING BIKE OWNERS MANUAL e-power 36v Go City-Lite Thank you for purchasing a Seago electric folding bike. In order to get the best out of your new bike you must read and fully understand
CORDLESS WORK LIGHT CORDLESS WORK LIGHT. Operation and Safety Notes IAN
 CORDLESS WORK LIGHT CORDLESS WORK LIGHT Operation and Safety Notes IAN 279345 GB / IE / NI Operation and Safety Notes Page 5 A HG01386A-BS HG01386B-BS 1 5 2 6 3 4 7 8 10 9 B C 11 12 13 Introduction...Page
TOOLPRO 18V 2 Speed Drill Driver
 TOOLPRO 18V 2 Speed Drill Driver Instruction Manual CDT218G.1 After Sales Support FREE CALL 1300 889 028 EMAIL:salesau@positecgroup.com Important - Please read these instructions fully before operating
CORDLESS COMPRESSOR WITH SPOTLIGHT + JUMP START
 CSS1 - Spotlight compressor (08-0540-2).book Page 1 Thursday, June 17, 2010 10:26 AM CORDLESS COMPRESSOR WITH SPOTLIGHT + JUMP START MODEL NO: CSS1 PART NO: 6240055 OPERATION & MAINTENANCE INSTRUCTIONS
Operator s manual Manuel d utilisation Manual de instrucciones. BLi520x BLi940x
 Operator s manual Manuel d utilisation Manual de instrucciones BLi520x BLi940x Please read the operator s manual carefully and make sure you understand the instructions before using the machine. Lire attentivement
E-P3 POLINI MOTOR USER S MANUAL
 E-P3 POLINI MOTOR USER S MANUAL - Thank you for choosing an E-bike equipped with E-P3 Polini motor - Only drive your vehicle using protective clothing CONTENTS 1.0- IMPORTANT NOTICE 1.1- Important information
20V Lithium-Ion Battery Pack
 20V Lithium-Ion Battery Pack 252-8034 OPERATOR S MANUAL CAUTION: To Reduce The Risk Of Injury, User Must Read And Understand Operator s Manual. Save These Instructions For Future Reference. For questions
RMT1201. ORIGINAL INSTRUCTIONS Cordless Multi-Tool
 RMT1201 ORIGINAL INSTRUCTIONS Cordless Multi-Tool Important! It is essential that you read the instructions in this manual before operating this machine. Subject to technical modifications. Safety GENERAL
Electric Assist System Manual
 Electric Assist System Manual evobicycle.com // promovec.com // 1 ELECTRIC ASSIST SYSTEM MANUAL Activate your warranty Within 8 days of purchase, you must register your EVO Pro-Movec ebike battery to receive
SAFETY AND OPERATING MANUAL
 SAFETY AND OPERATING MANUAL ORIGINAL INSTRUCTIONS 1 7 6 2 5 4 2 3 A1 A2 1 2 A3 B A3 B C1 C2 3 C3 D 1. FORWARD/ REVERSE ROTATION CONTROL 2. SOFT GRIP HANDLE 3. BATTERY PACK RELEASE BUTTON 4. BATTERY PACK*
56V BATTERY 2.0AH/2.5AH/4.0AH/6.0AH MODEL NUMBER BA1120E/BA1400/BA2240E/BA3360 CHARGE BEFORE FIRST USE
 OPERATOR S MANUAL 56V BATTERY 2.0AH/2.5AH/4.0AH/6.0AH MODEL NUMBER BA1120E/BA1400/BA2240E/BA3360 CHARGE BEFORE FIRST USE WARNING: To reduce the risk of injury, the user must read and understand the Operator
MULTI FUNCTION POWER PAK PLUS
 MULTI FUNCTION JUMP START UP TO V8 PETROL & DIESEL 600A PEAK CURRENT RECHARGE USB POWER TOOLS TABLETS LAPTOPS MOBILE PHONES RECHARGE DEVICES ON-SITE VEHICLE JUMP STARTER KP1404 ED2 (June 15) Table of Contents
Nyon operating instructions. Online version. en Original instructions Wen ( ) T / 63
 T / 63") Nyon operating instructions Online version en Original instructions 1 270 020 Wen (2016.05) T / 63 2 Table of Contents Safety Notes................................................ 5 General Safety Rules..........................................
Nyon operating instructions Online version en Original instructions 1 270 020 Wen (2016.05) T / 63 2 Table of Contents Safety Notes................................................ 5 General Safety Rules..........................................
5 IN 1 JUMP START OPERATION & MAINTENANCE INSTRUCTIONS MODEL NO: JS5IN1 PART NO: LS0810
 5 IN 1 JUMP START MODEL NO: JS5IN1 PART NO: 6240005 OPERATION & MAINTENANCE INSTRUCTIONS LS0810 INTRODUCTION Thank you for purchasing this CLARKE product. Before attempting to use this product, please
SAFETY AND OPERATING MANUAL. Lithium-Ion cordless hammer drill WX372 WX372.1 WX372.9
 SAFETY AND OPERATING MANUAL 2 Original Instructions General Power Tool Safety Warnings WARNING: Read all safety warnings and all instructions. Failure to follow the warnings and instructions may result
SSW 18 LTX 600 SSW 18 LTX 400 BL
 SSW 18 LTX 600 SSW 18 LTX 400 BL en Operating Instructions 5 fr Mode d'emploi 9 es Instrucciones de manejo 13 www.metabo.com SSW 18 LTX 400 BL 1 SSW 18 LTX 600 1 2 3 2 3 4 5 7 4 7 6 6 9 8 9 8 10 2 11.
40 V LITHIUM-ION BATTERY ATTACH YOUR RECEIPT HERE AB13786C 1. kobalttools.com ITEM # /
 ITEM #0506882 / 0506883 40 V LITHIUM-ION BATTERY MODEL #KB 240-06 / KB 440-06 Français p. 7 Español p. 13 ATTACH YOUR RECEIPT HERE Serial Number Purchase Date AB13786C 1 PRODUCT SPECIFICATIONS Battery
RBC-121 Battery Charger and RB-1225 Batteries
 Battery Charger Manual and RB-1225 Batteries 99 Washington Street Melrose, MA 02176 Phone 781-665-1400 Toll Free 1-800-517-8431 Visit us at www.testequipmentdepot.com Safety Symbols In this operator s
RECHARGEABLE BATTERY GUIDE
 Rechargeable Battery Guide 2019 THE ebike RECHARGEABLE BATTERY GUIDE FEEL THE FLOW Bosch ebike Systems EN bosch-ebike.com/us Contents Succinctly stated PowerTube and PowerPacks are the energy sources for
2.0Ah BATTERY INSTRUCTION MANUAL
 BATTERY SAFETY WARNINGS THIS MANUAL CONTAINS IMPORTANT SAFETY AND OPERATING INSTRUCTIONS FOR YOUR BATTERY. 2.0Ah BATTERY INSTRUCTION MANUAL SPECIFICATIONS Input: Battery Capacity: Power Consumption: Weight:
4V LITHIUM-ION SCREWDRIVER OWNER S OPERATING MANUAL
 CSD-4107BG 4V LITHIUM-ION SCREWDRIVER OWNER S OPERATING MANUAL Your screwdriver has been engineered and manufactured to our high standard for dependability, ease of operation, and operator safety. When
RECHARGEABLE BATTERY GUIDE
 Rechargeable Battery Guide 219 THE ebike RECHARGEABLE BATTERY GUIDE FEEL THE FLOW Bosch ebike Systems EN bosch-ebike.com Contents Succinctly stated PowerTube and PowerPacks are the energy sources for the
Functional Description and Specifications. Intended Use. Packing List
 Functional Description and Specifications Intended Use The Nemo Submersible Hammer Drill is intended to drill tough materials such as cement, brick, blocks, or stone, and can be used underwater, in wet
Battery Charger JCB- SCH20LI.2
 Safety and operating manual Battery Charger JCB- SCH20LI.2 ORIGINAL INSTRUCTIONS SAFETY INSTRUCTIONS WARNING: Read all safety warnings and all instructions.failure to follow the warnings and instructions
SOLAR CHARGE CONTROLLER
 SOLAR CHARGE CONTROLLER SCE 1010 / SCE 1515 / SCE 2020 / SCE 3030 Instruction Manual Please read user manual carefully before use. 1.About this manual These operating instructions are part of the product.
4-VOLT LITHIUM-ION AUTO-LOAD SCREWDRIVER w/led WORKLIGHT
 SKU 241-1394 4-VOLT LITHIUM-ION AUTO-LOAD SCREWDRIVER w/led WORKLIGHT Operation Manual WARNING! Please read this manual before using this product. Failure to do so can result in serious injury. SAVE THIS
1815 CV 1830 CV. Robert Bosch GmbH Power Tools Division Leinfelden-Echterdingen GERMANY A 2KK (2016.
 Robert Bosch GmbH Power Tools Division 70764 Leinfelden-Echterdingen GERMANY www.bosch-pt.com 1 609 92A 2KK (2016.02) I / 206 AL 1815 CV 1830 CV de en fr es pt it nl da sv no fi el tr pl cs sk hu Originalbetriebsanleitung
PSR 18 LI. Robert Bosch GmbH Power Tools Division Leinfelden-Echterdingen Germany X (2011.
 OBJ_DOKU-27603-001.fm Page 1 Monday, August 22, 2011 5:27 PM Robert Bosch GmbH Power Tools Division 70745 Leinfelden-Echterdingen Germany www.bosch-pt.com PSR 18 LI 1 619 X06 940 (2011.08) O / 10 XXX en
original instructions 18V Torch RFP1801
 original instructions 18V Torch RFP1801 Important! It is essential that you read the instructions in this manual before operating this machine. Subject to technical modifications. Safety GENERAL POWER
TRICKLE CHARGER MODEL NO: ATC12VB OPERATION & MAINTENANCE INSTRUCTIONS PART NO: ORIGINAL INSTRUCTIONS LS0618 ISS 2
 TRICKLE CHARGER MODEL NO: ATC12VB PART NO: 6266012 OPERATION & MAINTENANCE INSTRUCTIONS ORIGINAL INSTRUCTIONS LS0618 ISS 2 INTRODUCTION Thank you for selecting this Clarke Trickle Charger. Read this manual
Functional Description and Specifications. Intended Use. Packing List. Technical Specifications
 Functional Description and Specifications Intended Use The Nemo Submersible Angle Grinder is the world s first and only waterproof electric grinder, designed for performing cutting, grinding, polishing,
Mid-Drive Electric Bicycle Kit EVBIKE-SET-CMS-48 EVBIKE-SET-CMS-36
 INSTALLATION MANUAL Mid-Drive Electric Bicycle Kit EVBIKE-SET-CMS-48 EVBIKE-SET-CMS-36 Thank you for purchasing EVBIKE product and we hope that you will become a happy user. Carefully read the entire manual
7 Handle Tubes. 10 Charging Jack 11 LED Indicator 12 ON/OFF button
 SW04 customer helpline 01905 345891 support@greytechnology.co.uk www.gtechonline.co.uk 7 10 11 12 8 9 6 1 5 2 3 4 1 Main Unit 2 Brush Bar 3 Front Visor 4 Dust Tray 5 Edge Wheel 6 Upper Handle 7 Handle
HDE 500-A22. English. Printed: Doc-Nr: PUB / / 000 / 03
 HDE 500-A22 English 1 Information about the documentation 1.1 About this documentation Read this documentation before initial operation or use. This is a prerequisite for safe, trouble-free handling and
OPERATION & MAINTENANCE INSTRUCTIONS
 AUTOMATIC BATTERY CHARGER / MAINTAINER MODEL NO: CBO9-6/12 PART NO: 6267020 OPERATION & MAINTENANCE INSTRUCTIONS LS0615 INTRODUCTION Thank you for purchasing this CLARKE product. Before attempting to use
PowerPlex 40V MAX Standard Battery Pack/Charger
 Form No. 3417-974 Rev C PowerPlex 40V MAX Standard Battery Pack/Charger Model No. 88540 Serial No. 318000001 and Up Model No. 88541 Serial No. 318000001 and Up Model No. 88542 Serial No. 318000001 and
C O R D L E S S I M PA C T D R I V E R W I T H 1 2 V LI- I O N B AT T E RY OWNER S MANUAL
 C O R D L E S S I M PA C T D R I V E R W I T H 1 2 V LI- I O N B AT T E RY OWNER S MANUAL WARNING: Read carefully and understand all ASSEMBLY AND OPERATION INSTRUCTIONS before operating. Failure to follow
Daymak warranties, services, and stocks parts for everything it sells. We support our products.
 EC1 User Manual About Daymak Daymak is one of Canada s largest Alternative Vehicle providers. We design, engineer, manufacture, import and repair everything from recreational dirt bikes, go-karts and electric
OPERATION & MAINTENANCE INSTRUCTIONS
 AUTOMATIC BATTERY CHARGER / MAINTAINER MODEL NO: CBO9-12 PART NO: 6267025 OPERATION & MAINTENANCE INSTRUCTIONS LS0315 INTRODUCTION Thank you for purchasing this CLARKE product. Before attempting to use
Display. Specifications and Parameters of the Display. Appearance and Dimensions. Function Overview and Key Definitions. Materials and Dimensions
 Display Specifications and Parameters of the Display 48V Power Supply; Rated Current: 10.4mA Maximum Operating Current: 30mA Power-off Leakage Current:
Manual / Safety notes for your E-Bike Vision Power Pack, compatible with Bosch* Classic (+) drive system with 36 V
 drive system with 36 V") Manual / Safety notes for your E-Bike Vision Power Pack, compatible with Bosch* Classic (+) drive system with 36 V Power information: 13 Ah / 468 Wh Battery downtube and carrier version 17 Ah / 612 Wh
Manual / Safety notes for your E-Bike Vision Power Pack, compatible with Bosch* Classic (+) drive system with 36 V Power information: 13 Ah / 468 Wh Battery downtube and carrier version 17 Ah / 612 Wh
THIS VEHICLE MUST BE ASSEMBLED BY AN ADULT. PLEASE READ THE MANUAL CAREFULLY BEFORE OPERATION. WARNING CALIFORNIA PROPOSITION 65 WARNING
 TABLE OF CONTENTS A Electric Car Specifications 2 B List of Parts 4 C Assembly 5 D Battery Charging 7 E How to Use 9 F Safety Precautions 9 G Simple Repairs 10 H Maintaining your Vehicle 10 I About Thermal
OPERATOR'S MANUAL M12 TC M12B4 M12B6 M12 COMPACT CHARGER AND POWER SOURCE M12 REDLITHIUM-ION BATTERY PACKS WARNING. Cat. No. Cat. No.
 OPERATOR'S MANUAL Cat. No. M12B2 M12B3 Cat. No. M12 TC Cat. No. M12B4 M12B6 New batteries must be charged before first use. M12 COMPACT CHARGER AND POWER SOURCE M12 REDLITHIUM-ION BATTERY PACKS WARNING
ENGLISH: Original instructions INSTRUCTION MANUAL. Cordless Cleaner CL106FD. Read before use.
 ENGLISH: Original instructions INSTRUCTION MANUAL Cordless Cleaner CL06FD Read before use. WARNING This appliance can be used by children aged from 8 years and above and persons with reduced physical,
LCD video-goggle with 5,8 GHz diversity receiver HIVR 101
 Manual LCD video-goggle with 5,8 GHz diversity receiver HIVR 101 EN Index Introduction...3 Service Centre...3 Intended use...4 Package content...4 Symbols explication...5 Safety notes...5 Charge the Lithium
30,000mWh LITHIUM-POLYMER CAR JUMP STARTER USER S MANUAL PLEASE READ THIS MANUAL CAREFULLY BEFORE OPERATION
 Lithium Battery Disposal: This product contains a lithium battery. A lithium battery should not be thrown away in the trash. Please dispose of the battery at an authorized disposal or recycle center. Check
Manual / Safety notes for your E-Bike Vision Power Pack, compatible with Panasonic 26V* drive system
 Manual / Safety notes for your E-Bike Vision Power Pack, compatible with Panasonic 26V* drive system Power information: 18 Ah / 454 Wh Battery seattube version 21 Ah / 529 Wh Battery seattube version 25
Safety instructions. Always... Never... Fire hazard! Dear customer,
 Dear customer, Safety instructions Danger can occur when working with this punch driver due to improper handling and/or poor maintenance, which may damage the device and cause severe physical injuries.
SAFETY AND OPERATING MANUAL ORIGINAL INSTRUCTIONS
 SAFETY AND OPERATING MANUAL ORIGINAL INSTRUCTIONS 1 2 3 4 9 8 5 6 7 A1 A2 1 2 1 3 2 A3 B1 3 2 1 B2 C1 2 3 1 C2 C3 C2 C3 D F E 1. KEYLESS CHUCK 2. TORQUE ADJUSTMENT RING 3. TWO-SPEED GEAR CONTROL 4. FORWARD/REVERSE
c-go 24V/6A 24V/8A 24V/12A
 c-go 24V/6A 24V/8A 24V/12A Battery charger GB Instruction manual 1 Index 1. Product description... 2 2. Safety advices... 3 3. Quick start guide... 4 4. Operation... 4 5. Problem solving... 6 6. Specifications...
Mid-Drive Electric Bicycle Kit EVBIKE-SET-CMS-36 EVBIKE-SET-CMS-48 EVBIKE-SET-CMS-68 EVBIKE-SET-CMS-100
 INSTALLATION MANUAL Mid-Drive Electric Bicycle Kit EVBIKE-SET-CMS-36 EVBIKE-SET-CMS-48 EVBIKE-SET-CMS-68 EVBIKE-SET-CMS-100 Thank you for purchasing EVBIKE product and we hope that you will become a happy
Model: SW02 Advanced OPERATING MANUAL
 Powerful Cordless Model: SW02 Advanced OPERATING MANUAL What is in the box 1 2 3 4 5 6 7 8 9 10 11 Main unit Brush Bar Front Visor Dust Tray Upper Handle Telescopic Handle Tubes Lower Handle Charger (inside
Operating instructions in the back. PD1420LP
 Operating instructions in the back www.blackanddecker.co.uk PD1420LP 2 ENGLISH (Original instructions) Intended use Your Black & Decker Dustbuster handheld vacuum cleaner has been designed for vacuum cleaning
EDITION : A. Description: SCALE : 100% (L4 FFL-201 ANZ) manual artwork PART NO COLOR ITEM ID. MATERIAL 50gsm recycle paper REV.
 manual artwork PART NO COLOR ITEM ID. MATERIAL 50gsm recycle paper REV.") Description: EDITION : A 018331003(L4 FFL-201 ANZ) manual artwork SCALE : 100% PART NO ITEM ID REV. 961001550 MODEL NO 018331003 COLOR Black CM00166845 DIELINE 01 SIZE unfold:280mmx203mm; fold:70mmx26mm(+/-2mm)
Description: EDITION : A 018331003(L4 FFL-201 ANZ) manual artwork SCALE : 100% PART NO ITEM ID REV. 961001550 MODEL NO 018331003 COLOR Black CM00166845 DIELINE 01 SIZE unfold:280mmx203mm; fold:70mmx26mm(+/-2mm)
The ebike Rechargeable Battery Guide
 The ebike Rechargeable Battery Guide Everything you need to know about Bosch batteries Bosch ebike Systems 218 EN Content Succinctly stated Bosch batteries The energy carriers PowerPacks are the energy
Instruction Manual 4.0V Li-Ion Screwdriver. Part #: ECLIPSE ENTERPRISES, INC Chula Road, Amelia Court House, VA 23002, U.S.
 Instruction Manual 4.0V Li-Ion Screwdriver Part #: 902-588 ECLIPSE ENTERPRISES, INC. 13302 Chula Road, Amelia Court House, VA 23002, U.S.A 2 3 Intended use Your ECLIPSE ENTERPRISES, INC. 902-588 screwdriver
Get Cleaning... User Guide Vax Careline: (UK) (ROI) Cordless Handheld. H90-LF Series. vax.co.uk
 (ROI) Cordless Handheld. H90-LF Series. vax.co.uk") H90-LF Series LiFE Handvac User Guide v4.qxd:user guide 10/3/10 09:55 Page 1 Cordless Handheld User Guide Vax Careline: (UK) Get Cleaning... What s your Vax s model number? H 9 0 L F What s your serial
H90-LF Series LiFE Handvac User Guide v4.qxd:user guide 10/3/10 09:55 Page 1 Cordless Handheld User Guide Vax Careline: (UK) Get Cleaning... What s your Vax s model number? H 9 0 L F What s your serial
ELECTRIC BICYCLE OWNER S MANUAL
 ELECTRIC BICYCLE OWNER S MANUAL For Owners of EG Kyoto 350 Electric Bicycle Table of Contents Descriptions: Page Installation Instructions 2 How to install the bicycle out of the box 2 Operation Instructions
Installation and operating instructions. Solar charge controller 10 A / 15 A / 0 A / 30 A PHOTOVOLTAIK - PHOTOVOLTAICS - PHOTOVOLTAIQUE - FOTOVOLTAICA
 PHOTOVOLTAIK - PHOTOVOLTAICS - PHOTOVOLTAIQUE - FOTOVOLTAICA Installation and operating instructions Solar charge controller 10 A / 15 A / 0 A / 30 A EN 74.86 08.4 1. About this manual These operating
c-go 12V/10A 12V/20A Power supply and battery charger Instruction manual
 c-go 12V/10A 12V/20A Power supply and battery charger GB Instruction manual 1 Index 1. Product description... 2 2. Safety advices... 3 3. Mounting and installation... 4 4. Operation... 5 5. Problem solving...
DIGITAL BATTERY TORQUE WRENCH (BC-RAD SELECT) USER GUIDE
 USER GUIDE") DIGITAL BATTERY TORQUE WRENCH (BC-RAD SELECT) USER GUIDE W.CHRISTIE (INDUSTRIAL) LTD CHRISTIE HOUSE, MEADOWBANK ROAD, ROTHERHAM, SOUTH YORKSHIRE, S61 2NF, UK T: +44(0)1709 550088 F: +44(0)1709 550030 E:
DIGITAL BATTERY TORQUE WRENCH (BC-RAD SELECT) USER GUIDE W.CHRISTIE (INDUSTRIAL) LTD CHRISTIE HOUSE, MEADOWBANK ROAD, ROTHERHAM, SOUTH YORKSHIRE, S61 2NF, UK T: +44(0)1709 550088 F: +44(0)1709 550030 E:
B-RAD Select USER MANUAL TABLE OF CONTENTS
 TABLE OF CONTENTS TABLE OF CONTENTS... 1 MANUAL REVISION HISTORY... 2 IMPORTANT SAFETY NOTICE... 3 1.0 General Information... 5 1.1 System Components... 5 1.2 Specifications... 5 1.2.1 Torque Ranges...
Operating instructions in the back. PD1820LF
 Operating instructions in the back www.blackanddecker.co.uk PD1820LF 2 ENGLISH (Original instructions) Intended use Your BLACK+DECKER Dustbuster handheld vacuum cleaner has been designed for vacuum cleaning
T.E.C. PACK FOR SHIMANO STEPS E8000 TAYLORED ENERGY CONCEPT ORIGINAL USER GUIDE EN
 T.E.C. PACK TAYLORED ENERGY CONCEPT FOR SHIMANO STEPS E8000 ORIGINAL USER GUIDE EN FOR SAFETY, BE SURE TO READ THIS USER S MANUAL THOROUGHLY BEFORE USE, AND FOLLOW THEM FOR CORRECT USE. Version 1 I 22.02.2017