RMi34 36V Lithium-Ion Cordless Rotary Mower (Model: CLMB3634M)
|
|
|
- Priscilla Lucas
- 5 years ago
- Views:
Transcription


1 RMi34 36V Lithium-Ion Cordless Rotary Mower (Model: CLMB3634M) Instruction Manual
2

3
4


5 Safety Warning Warning! Read these instructions carefully, familiarize yourself with the controls and the correct usage of the machine. Please keep the instructions safe for later use. Explanation of symbols on the machine Beware of hazard, Read instruction manual. Pay attention that bystanders are not injured by objects thrown out from the machine. Keep bystanders a safe distance away from the machine. Sharp blade. Beware of injury to toes or fingers. Switch off and remove the isolator key before adjusting, cleaning or before leaving the product unattended for any period. Not applicable. Wait until all moving parts have stopped completely before touching them. The blade continues to rotate for a moment after the machine is switched off, a rotating blade can cause injury. Do not use the machine in the rain or leave it outdoors when it is raining.

 with reduced physical, sensory or mental capabilities, or lack of experience and knowledge, unless they are closely supervised")
6 Warning. Beware of electric shocks. Only use the battery charger indoors. The battery charger contains a safety transformer. Intended Use This garden appliance is intended for domestic lawn mowing. General safety Never allow children or people unfamiliar with these instructions to use the machine. Local regulations may restrict the age of the operator. When not in use, store the machine out of reach of children and remove the isolator key. This appliance is not intended for use by persons (including children) with reduced physical, sensory or mental capabilities, or lack of experience and knowledge, unless they are closely supervised or have received sufficient instruction concerning the use the of the appliance by a person responsible for their safety. Children should be supervised to ensure that they do not play with the appliance. Never mow while people, especially children or pets, are nearby. The operator or user is responsible for accidents or hazards occurring to other people or their property. Do not operate the machine when barefoot or wearing open sandals, always wear substantial footwear and long trousers. Thoroughly inspect the area where the machine is to be used and remove all stones, sticks, wires, bones and other foreign objects. Before usage, always visually inspect to check that the blades, blade bolts and cutter assembly are not worn or damaged. Replace worn or damaged blades and bolts in sets to preserve balance. Mow only in daylight or in good artificial light. Avoid operating the machine in wet grass, where feasible. Walk, never run. Never operate the appliance with defective guards or shields. Only operate the device if all original safety devices, such as deflectors and/or
7 grass catchers, are correctly fitted. Working on sloping areas can be dangerous. Do not mow on excessively steep slopes. Always be sure of your footing on slopes or wet grass. Mow across the face of slopes never up and down. Exercise extreme caution when changing direction on slopes. Use extreme caution when stepping back or pulling the machine towards you. Never mow by pulling the mower towards you. Stop the motor and blade if the machine has to be tilted for moving across surfaces other than grass and when transporting the machine to and from areas to be mowed. Do not tilt the machine when starting or switching the motor on, except if the machine has to be tilted for starting in long grass. In this case, do not tilt it more than absolutely necessary and tilt only the part which is away from the operator. Always ensure that both hands are in the operating position on the handle before returning the machine to the ground. Switch the motor on according to the instructions with feet well away from rotating parts. Do not put hands or feet near or under rotating parts. Always stand clear of the discharge zone when operating the machine. Never pick up or carry the machine while the motor is running. Do not modify this appliance. Unauthorized modifications may impair the safety of your product and may result in increased noise and vibration. Remove the isolator key: whenever you leave the machine, before clearing a blockage, before checking, cleaning or working on the machine, after striking a foreign object. Inspect the machine for damage and make repairs as necessary, if the machine starts to vibrate abnormally ( and check it immediately). Maintenance Always wear gardening gloves when handling or working near the sharp blade. Ensure all nuts, bolts and screws are tight before each operation to ensure the machine is in a safe working condition. Check the grass collector frequently for wear or deterioration. Examine the machine and replace worn or damaged parts. Ensure that replacement parts are correctly fitted. Only use approved replacement parts.
8 Recommendations for Optimal Handling of the Battery Ensure the switch is in the off position and the key removed before inserting the battery pack. Inserting the battery pack into a machine while the key is inserted could result in an accident. Keep the battery charger away from rain or moisture. Water penetration inside the battery charger increases the risk of an electric shock. Store in a dry environment. Recharge only with the charger specified by the manufacturer. A charger that is suitable for one type of battery pack may create a risk of fire when used with another battery pack. Do not charge other batteries with this charger. This is could cause fire or an explosion. Keep the battery charger clean. Contamination can lead to danger of an electric shock. Before each use, check the battery charger, cable and plug. If damage is detected, do not use the battery charger. Never open the battery charger yourself. Have repairs performed only by a qualified technician and only using original spare parts. Damaged battery chargers, cables and plugs increase the risk of an electric shock. Do not operate the battery charger on easily inflammable surfaces (e. g. paper, textiles, etc.) or surroundings. The heating of the battery charger during the charging process could pose a fire hazard. When the battery pack is not in use, keep it away from other metal objects such as paper clips, coins, keys, nails, screws or other small metal objects that could create a connection from one terminal to another. Shorting the battery terminals together can cause burns or a fire. Under abusive conditions, liquid may be ejected from the battery. Avoid any contact with this liquid. If contact accidentally occurs, flush with water. If liquid contacts eyes, also seek medical help. Liquid ejected from the battery may cause irritations or burns. Do not open the battery. Danger of short-circuiting. Protect the battery from heat, e. g. from continuous intense sunlight, fire or other heat source. Danger of explosion. Do not short-circuit the battery. There is danger of explosion. In case of damage or improper use of the battery, vapours may be emitted. Ensure the area is well ventilated and seek medical help in case of complaints. The vapours can irritate the respiratory system. Protect the battery against moisture and water. Store in a dry environment. Make sure it s out of reach of children. Store the battery only within a temperature range between 0 C and 45 C. For example, do not leave the battery in the car in summer. Occasionally clean the venting slots of the battery using a soft, clean and dry brush.
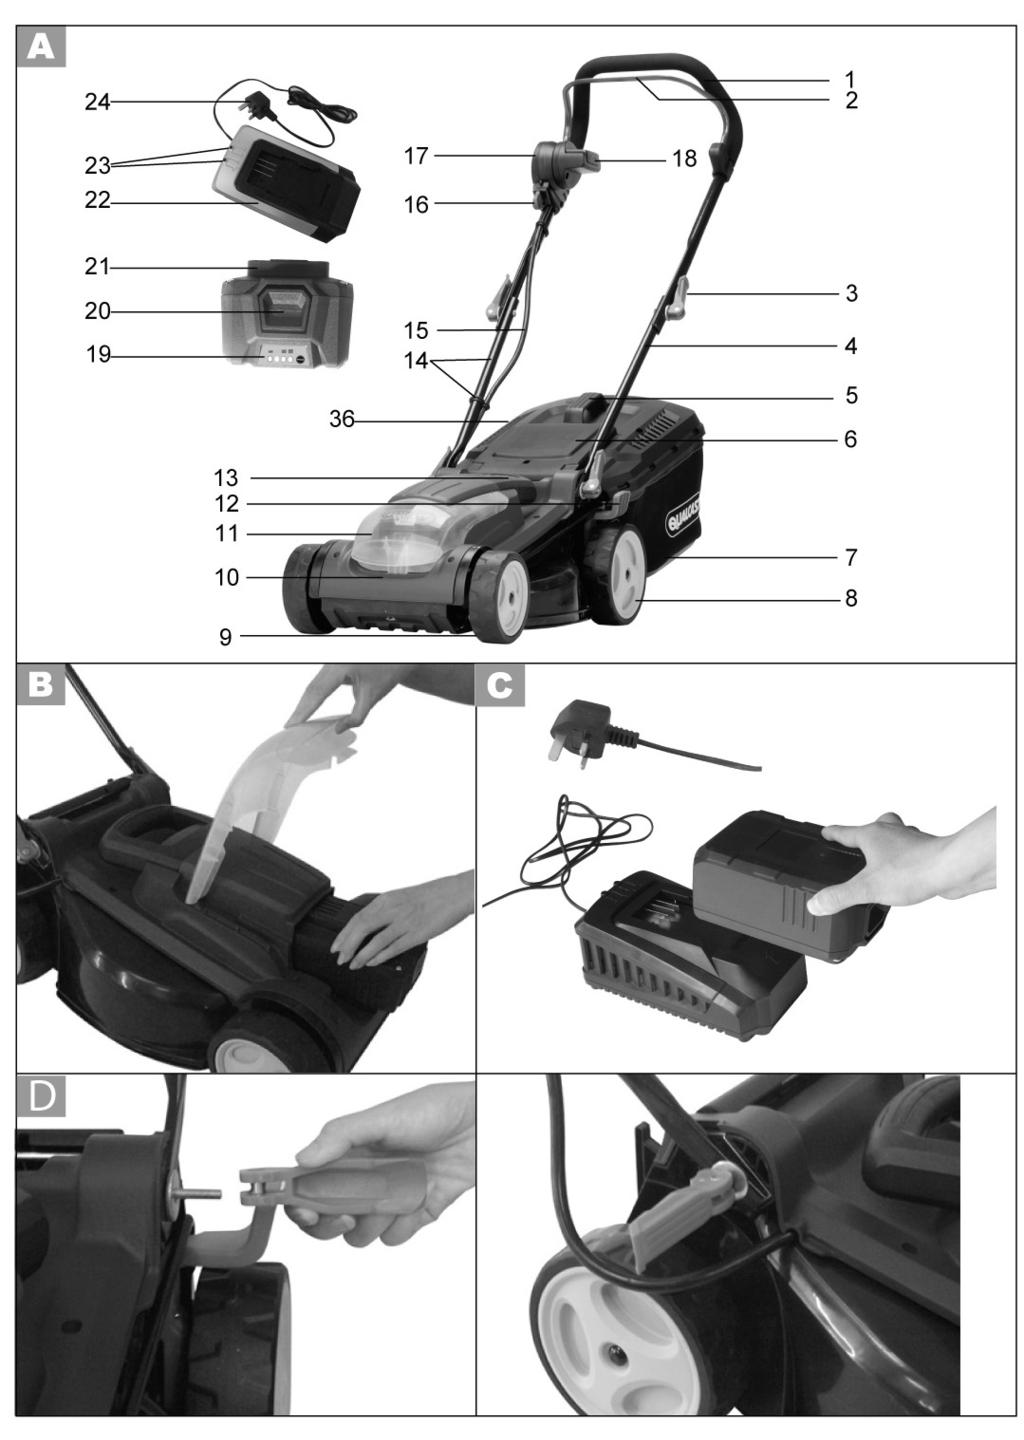
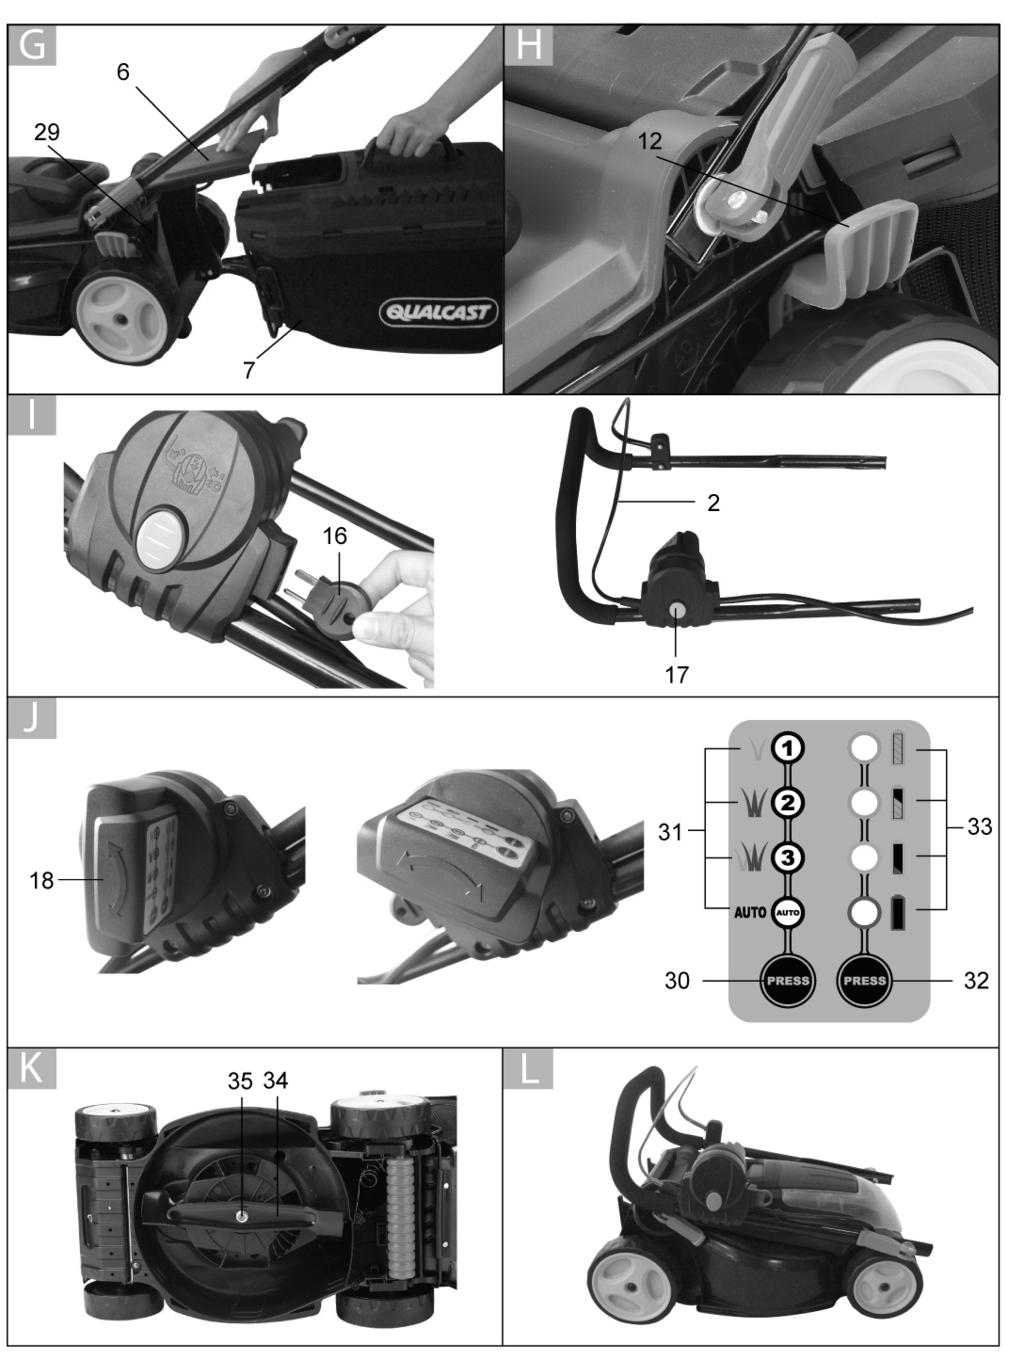
9 Component Identification (Fig. A to L) 1. Top handle 2. Switch lever 3. Handle release fastener 4. Handle base section 5. Grass collector handle 6. Deflector guard 7. Grass collector 8. Rear wheel 9. Front wheel 10. Front of motor housing 11. Battery cover 12. Height of cut adjustment lever 13. Carrying handle 14. Cable clip 15. Cable 16. Isolator key 17. Safety button 18. ipower control panel 19. Battery LED charge indicators 20. Battery release button 21. Battery latch 22. Charger 23. Battery charge status display 24. The main Plug of battery charger 25. Grass collector steel frame 26. Grass collector base 27. Flexible slots for grass collector steel frame base 28. Flexible slots for grass collector steel frame sides 29. Support hook for grass collector 30. ipower cutting mode selector button 31. ipower cutting mode LED 32. Battery charge indicator button 33. Battery charge indicator LEDs 34. Blade 35. Blade bolt 36. Grass collector full indicator
10 Technical Data Blade width: 34cm Height of cut: 20/30/40/50/60/70mm Grass collector capacity: 35 liters Speed: Various Weight: 15kg Rated voltage of battery: 36V Capacity of battery: 2.6Ah Charging period (battery fully discharged) 60mins Number of battery cells: 20 Charging current of charger: 3.7A Permitted charging temperature range (for charger): -5 C~50 C Weight of charger: 0.6kg Insulation protection of charger: II Battery Charging Do not use other battery chargers. The battery charger supplied is specifically designed for the Lithium-Ion battery used in this garden appliance. Check the mains voltage! The voltage of the power supply must correspond with the data on the nameplate of the battery charger. Battery chargers operate on V. The battery is equipped with a temperature monitor that allows charging only within a temperature range between -5 C and 50 C. This ensures an optimum battery service life. Note: The battery is supplied partially charged. To ensure full capacity of the battery, charge the battery in the battery charger before using your appliance for the first time. The Lithium Ion battery can be charged at any time without reducing its service life. Interrupting the charging procedure does not affect the battery. Charging Procedure (Fig. C) Charger LEDs Preparation: The charging process starts as soon as the mains plug of the battery charger is plugged into a mains socket and the battery is inserted into the charging compartment. If the battery is not inserted, a continuous red light indicates that the mains plug is plugged into a mains socket and the battery charger is ready for operation.
11 Charging: a flashing green LED on the charger indicates that the battery is charging normally. Charged: continuous green LED on the charger indicates that the battery is ready for use. The ipower intelligent charger measures the charge level of the battery and charges the battery accordingly with the required current and voltage based on battery temperature and voltage. This ensure maximum battery life and always leaves it fully charged if kept in the charger for storage. A flashing red LED light on the charger indicates that the battery temperature is not within the charging temperature range of -5 C 50 C or the charging current is too high. As soon as the permitted temperature and the charging current ranges are reached, the battery charger will automatically switch to charging. After continuous or repeated charging cycles without interruption, the charger may warm up. This is normal and does not indicate a technical defect of the battery charger. Battery LED Panel The battery is equipped with a charge-level indicator panel which indicates its charge condition. This charge-level indicator panel consists of 4 LEDs on the battery. Press and hold the charge indicator button on the battery to actuate the charge level indicator. The charge level indicator LEDs goe out after releasing the button. The battery s charge level can be checked either when the battery is fitted on the machine or removed from the machine. LED indicators on battery Battery Capacity Continuous lighting of 4 LEDs (inc 2 green) Fully charged Continuous lighting of 3 LEDs (inc 1 green) 50% Continuous lighting of 2 LEDs (orange & red) 25% Continuous lighting of 1 LED (red only) 25%. Recharge required.
12 Assembly Do not connect the battery and/or the isolator key before the product is completely assembled. Some models have the handles partially fitted inside the box. In this case unfold the handles and tighten the 4 fasteners. If handles are no pre-assembled, proceed as follows: D Handle base assembly. Fit the handle base to the deck with the bolts, washers and fasteners Ensure that the cable clips supplied are used to fix the cable to the handle. E Top handle assembly and adjustment for operator height Attach the top handle with the bolts, washers and quick release levers to the base handle. Note that the fasteners can be fitted through holes at different heights to make the handle longer or shorter to suit the operator s height. F Assemble the grass collector Slid the grass collector steel frame into the recesses in the grass collector top, and fix it with the washers and screws supplied. Push the grass collector steel frame into the flexible plastic slots(27, 28) around the edges of the grass collector. Lock the grass collector base onto the grass collector top by pushing all the snap locks together around the edges. G Fitting, removing and emptying the grass collector Fitting the grass collector: Lift the deflector guard (6) and hold it up. Fit the grass collector onto the supporting hooks on the rear of the mower, then, release the deflector guard. Ensure the deflector fits snuggly on the grass collector. Removing and emptying the grass collector: Lift the deflector guard and hold it up, grip the grass collector handle and lift it off to empty it. B Fitting and removing the battery Fitting the battery: Lift the battery cover (B) and slide the battery into the battery chamber. Ensure it slides smoothly along the support rails and locks into position. Close the battery cover. Removing battery: Stop the machine. Pull out the isolator key. Lift the battery cover, activate the release latch on the battery and slide the battery out. Close the battery cover.
13 Adjusting the Cutting Height (Fig. H) Stop the machine, release the switch lever and wait until the blade stops before adjusting the cutting height. Remember, the blade may continue to rotate after the machine is switched off. A rotating blade can cause injury. Caution do not touch rotating blades. H For the first cut each season, a higher cutting setting should be selected. Using a cutting height setting of 20 0r 30mm in longer grass will use more power and shorten the time the battery will run on each charge. It is recommended to cut longer grass in 2 times or more. This method will also cause less stress to your grass for a healthier lawn. Starting and Stopping (Fig. I) Always remember that the may blade continues to rotate for a few seconds after the machine is switched off. Allow the motor/blade to stop rotating before switching on again. Do not rapidly switch off and on. Staring: Insert the isolator key. Press and hold the safety lock-off button, squeeze the switch lever towards the handle, release the safety button. Note: There is a short delay before the motor starts after engaging the switch lever. Stopping: Release the switch lever. If the mower is not going to be used immediately pull out the isolator key. The mower is fitted with a safety blade brake. This safety feature stops the blade from rotating more quickly when the switch lever is released.
14 Mowing When mowing do not allow the motor to labour, particularly in heavy conditions. When the motor labours the speed of the motor drops and you will hear a change in the motor sound. If the problem persists, set the cutting height to a higher setting. Protect the battery from heat, from continuous exposure to sun and keep away from radiation or other heat sources. Do not leave the battery in the mower in direct sunlight over long periods. The mower will not function if temperature is below -5 or above 70! The Electronic Cell Protection (ECP) protects the Lithium-ion battery against deep discharging. When the battery is run down or discharged, a protective circuit shuts power off to the motor. The motor will not run and the blade will not rotate until the battery is recharged. Warning! A flashing LED on the cutting mode control panel indicates that the current is too high. A flashing LED on the battery indicates that the voltage is too low. In either case the motor will be shut down automatically. Do not continue to activate the On/Off switch if the motor has been shut down automatically. The battery may be damaged. Warning! Switch the machine off, remove the isolator key and the battery before adjusting or cleaning or if the cable is cut, damaged or entangled. J ipower Control Panel on mower handle Panel rotation: the control panel on the handle can be rotated for better readability. Setting the cutting mode: The cutting mode button and the cutting mode LEDs are for setting the required cutting mode based on the grass mowing conditions. These settings control the amount of power delivered to the motor. The mode selected is shown by the LED that lights up. The cutting mode changes in sequence, from top to bottom, each time the cutting mode button is pressed.
15 LED Indicator Power Mowing conditions 1 Low Short or fine grass 2 Normal Normal grass 3 High High or thick grass AUTO Auto Varying grass length or thickness Auto mode: automatically varies the amount of power delivered to the motor while you work as grass conditions vary Note: The battery will run for longer on lower power settings than on higher power settings. Grass full indicator: When the grass level indicator situated on the top of the grass collector remains open during operation, it means that the collector is not full. When the grass fill indicator remains closed during operation, the grass collector is full and should be emptied. Size of work area (battery run time): The size of the area that can be cut on a single charge depends on lawn condition, grass thickness, moisture, grass length and height of cut selected. Switching the machine on and off frequently during cutting may also reduce the battery run time. To maximise the area that can be cut it is recommended to mow frequently and to not cut the grass too low. Walk at a normal pace. After Mowing / Storage (Fig. L) Clean the exterior of the machine thoroughly using a soft brush and cloth. Do not use water, solvents or polishes. Remove all grass and debris, especially from the ventilation slots. Turn the machine on its side and clean the blade area. If grass cuttings are compacted in the blade area, remove with a wooden or plastic implement. Store the machine in a dry place. Do not place other objects on top of the machine. To aid storage lift then loosen the quick release fasteners and fold the handles. Ensure cables are not trapped when folding/unfolding top handles, do not drop the handles onto the mower body.
16 Maintenance Always wear gardening gloves when handling or working near sharp blades. Switch off, remove the isolator key, battery and grass collector before adjusting or cleaning. General Maintenance Note: To ensure long and reliable product life, carry out the following maintenance regularly: Check for obvious defects such as loose, dislodged or damaged blade, loose fixings, and worn or damaged components. Check that covers and guards are undamaged and correctly fitted. Carry out necessary maintenance or repairs before using. Repairs should only be carried out by a qualified service agent. Battery Maintenance The following maintenance will ensure a long battery life: Protect the battery against moisture and water. Store in a cool dry environment. Store the battery only within a temperature range between 0 C and 45 C. For example, do not leave the battery in a car in summer. Do not leave the battery in the product in direct sunlight. The ideal storage condition for the battery is -20 C~25 C. Occasionally clean the venting slots of the battery using a soft, clean and dry brush. A significantly reduced battery working time after a full charge indicates that the battery is worn and should be replaced.
17 Blade Maintenance (Fig. K) Turn the machine carefully onto its right side and inspect the blade. If blunt or damaged, replace it. Use the following procedure to remove and replace the blade: Wear thick gardening gloves. Hold the blade using a spanner (not provided) to loosen the blade bolt and remove the blade. Fit the new blade and the blade bolt. Ensure that the blade is the correct way up (so that the blade number can be seen.) and tighten the bolt securely. If the blade is difficult to remove or fit, insert a screwdriver intothe hole to help prevent blade rotation. Ensure the screwdriver is removed before attempting to turn the machine on. Do not lubricate blade or blade bolt during refitting.
18 Troubleshooting Problem Possible Cause Corrective Action Possible clogging Check underneath the mower and clear as necessary (always wear gardening gloves) Battery not fully charged Charge battery Battery not inserted (properly) Ensure battery is correctly inserted Increase height of cut and tilt Mower Grass too long garden product to reduce starting fails to operate load Battery too hot/cold Allow to cool/warm Isolator key not Fit key correctly Motor starts and stops immediately Garden product functions intermittently inserted correctly/fully There is a short delay in the motor starting after engaging the On/Off switch Battery not fully charged Isolator key not inserted correctly/fully Battery not inserted (properly) Battery too hot/cold Internal wiring of garden product damaged Motor protector has activated Height of cut too low This is normal. Hold On/Off switch for 1 3secs to start motor. Charge battery Fit correctly Ensure battery is correctly inserted Allow to cool/warm Increase height of cut Contact a service agent/helpline Allow motor to cool and increase height of cut Increase height of cut Garden product leaves ragged Cutting blade blunt Replace the blade
19 finish and/or motor labours Area of cut (battery duration) not large enough Possible clogging Blade fitted upside down Height of cut too low Grass too high Grass wet or damp Grass is dense Check underneath the mower and clear out as necessary (always thick gardening gloves) Refit blade correctly Increase height of cut and walk slower Increase height of cut and walk slower Wait until grass is dry and walk slower Increase height of cut, walk slower and cut more frequently Cutting blade Switch off garden product not Cutting blade Clear obstruction (always wear rotating while obstructed gardening gloves) garden product switched on Blade nut/bolt loose Tighten blade nut/bolt (17 Nm) Excessive Blade nut/bolt loose Tighten blade nut/bolt (17 Nm) vibrations/noise Cutting blade damaged Replace the blade No charging procedure possible The charge control LEDs do not light up after inserting the mains plug into the socket Battery contacts contaminated The battery is defective, due to a disconnection in the battery (individual cells) Mains plug of battery charger not plugged in (properly) Socket outlet, mains cable or battery charger defective Clean the battery contacts (e.g. by inserting and removing the battery several times) or replace the battery Replace the battery Insert mains plug (fully) into the socket outlet Check the mains voltage and if necessary, have the battery charger checked by an authorized customer service station.


20 Transport Only post or dispatch a battery if the housing is undamaged.. Tape or mask off open contacts and pack up the battery in such a manner that it cannot move around in the packaging. Pack carefully to avoid damage in transit When dispatching lithium-ion batteries, compulsory labeling may be required. Please observe the respective national regulations. Disposal Do not dispose of any garden product, battery charger, battery, or recharger into household waste! Only for EC countries: According to the European law 2002/96/EC, electrical and electronic equipments that are no longer usable, and according to the European law 2006/66/EC, defective or used battery packs/batteries, must be collected separately and disposed of in an environmentally correct manner. Li-Ion batteries: Please observe the instructions in section Transport. Do not dispose of with household waste. Dispose of safely according to local legal requirements. Due to a program of continuous product improvement features and instructions are liable to change without notice.

, Dongting, Wuxi, 214100, Jiangsu, P.R.C Number (Lab code for CE license): 0123 Technical documentation holder: Suzhou Cleva Electric Appliance Co.,Ltd.")
21 Argos Cat No. : Supplier Model No.: CLMB3634M Product Description: Lawn mower Complies with the requirement of the following directives: 2006/42/EC 2006/95/EC 2004/108/EC ----Machinery Directive ----Low Voltage Directive ----EMC Directive Test Lab Name: TÜV Product Service Ltd. Jiangsu Address: 10 Huaxia Road(M), Dongting, Wuxi, , Jiangsu, P.R.C Number (Lab code for CE license): 0123 Technical documentation holder: Suzhou Cleva Electric Appliance Co.,Ltd. Standards and technical specifications referred to: EN /A13:2008 EN :2006 EN 62233:2008 EN :2006 EN /A2:2008 EN :2006 EN :2008 Authorized Signatory Date: 29/09/11 Signature: Name: Roger Panton-Kent Head of Quality Assurance
22 After sales helpline number: Spare parts purchases:
Qualcast V Lithium-Ion Cordless Rotary Mower (Model: CLMF2433M)
") Qualcast 4689128 24V Lithium-Ion Cordless Rotary Mower (Model: CLMF2433M) Instruction Manual After Sales Support UK/Ireland 0345 640 0800 Web www.argosspares.co.uk Important - Please read these instructions
Qualcast 4689128 24V Lithium-Ion Cordless Rotary Mower (Model: CLMF2433M) Instruction Manual After Sales Support UK/Ireland 0345 640 0800 Web www.argosspares.co.uk Important - Please read these instructions
Cordless Lawn Mower Instructions for Use
 IMPORTANT: Read and understand this manual before assembling or operating this appliance. Improper use of this appliance can cause severe injury. Description Battery pack Battery type: Charger time: No-load
SAFETY AND OPERATING MANUAL
 SAFETY AND OPERATING MANUAL 2 General Power Tool Safety Warnings WARNING! Read all safety warnings and all instructions. Failure to follow the warnings and instructions may result in electric shock, fire
RLM36X40H25 ORIGINAL INSTRUCTIONS. Cordless Lawn Mower
 RLM6X40H5 ORIGINAL INSTRUCTIONS Cordless Lawn Mower Important! It is essential that you read the instructions in this manual before assembling, operating and maintaining this machine. Subject to technical
Li-Ion. Robert Bosch GmbH Power Tools Division Leinfelden-Echterdingen Germany X22 (2011.
 OBJ_DOKU-23401-001.fm Page 1 Friday, April 15, 2011 8:48 AM Li-Ion Robert Bosch GmbH Power Tools Division 70745 Leinfelden-Echterdingen Germany www.bosch-pt.com 1 609 929 X22 (2011.04) O / 165 UNI OBJ_DOKU-26322-001.fm
RLM36X46L50HI RLM36X46L40 RLM36B46L ORIGINAL INSTRUCTIONS. Cordless Lawn Mower
 RLM36X46L50HI RLM36X46L40 RLM36B46L ORIGINAL INSTRUCTIONS Cordless Lawn Mower Important! It is essential that you read the instructions in this manual before assembling, operating and maintaining this
ENGLISH (Original instructions) INSTRUCTION MANUAL. Cordless Lawn Mower BLM430 LM430D. IMPORTANT: Read Before Using.
 INSTRUCTION MANUAL. Cordless Lawn Mower BLM430 LM430D. IMPORTANT: Read Before Using.") ENGLISH (Original instructions) INSTRUCTION MANUAL Cordless Lawn Mower BLM40 LM40D 095 IMPORTANT: Read Before Using. ENGLISH (Original instructions) SPECIFICATIONS Dimensions (L x W x H) Model Mowing width
ENGLISH (Original instructions) INSTRUCTION MANUAL Cordless Lawn Mower BLM40 LM40D 095 IMPORTANT: Read Before Using. ENGLISH (Original instructions) SPECIFICATIONS Dimensions (L x W x H) Model Mowing width
RLM1836H40 OLM1836H. ORIGINAL INSTRUCTIONS Cordless Lawn Mower
 RLM836H40 OLM836H ORIGINAL INSTRUCTIONS Cordless Lawn Mower Important! It is essential that you read the instructions in this manual before assembling, operating, and maintaining the product. Subject to
Cordless Rechargeable Saw Instructions for Use
 Technical data Voltage: DC 10.8V Weight: 1.25Kg Stroke rate: 0-2100/min Stroke: 15mm Cutting capacity: max diameter in wood 80mm / in soft metal 7mm Charging time: Between 5.0-5.5 Hours Battery: 1.3Ah
CORDLESS LAWN MOWER KIT INSTRUCTION MANUAL
 WHAT S IN THE BOX Cordless Lawn Mower CORDLESS LAWN MOWER KIT INSTRUCTION MANUAL SPECIFICATIONS Voltage: 18V x 2 Battery: 4.0Ah Li-ion Charge Time: 80min Cutting Diameter: 360mm Cutting Heights: 25-75mm
USER S MANUAL LAWN MOWER PSLCLM60
 USER S MANUAL LAWN MOWER PSLCLM60 2 1 Safety Button 11 Battery Pack 2 Switch Lever 12 Safety Key 3 Handle Knob 13 Power Cord for Charger 4 Cable Clip 14 Charger 5 Battery Cover 15 Battery Temperature Indicator
CORDLESS LAWN MOWER KIT INSTRUCTION MANUAL
 WHAT S IN THE BOX Cordless Lawn Mower CORDLESS LAWN MOWER KIT INSTRUCTION MANUAL SPECIFICATIONS Voltage: 18V x 2 Battery: 2.0Ah Li-ion Charge Time: 2.5 hours Cutting Diameter: 330mm Cutting Heights: 25-65mm
18V CORDLESS STAPLER/NAILER
 18V CORDLESS STAPLER/NAILER MODEL NO: CONSN18LI PART NO: 6487055 OPERATION & MAINTENANCE INSTRUCTIONS LS1213 INTRODUCTION Thank you for purchasing this CLARKE product. Before attempting to use this product,
Battery Charger JCB-FCH12Li
 Safety and operating manual Battery Charger JCB-FCH12Li ORIGINAL INSTRUCTIONS SAFETY INSTRUCTIONS WARNING: Read all safety warnings and all instructions.failure to follow the warnings and instructions
CORDLESS LAWN MOWER KIT. 2 x 18V Lithium Ion INSTRUCTION MANUAL SPECIFICATIONS. ozito.com.au PXCLMK-018 WHAT S IN THE BOX.
 WHAT S IN THE BOX CORDLESS LAWN MOWER KIT 2 x 18V Lithium Ion INSTRUCTION MANUAL SPECIFICATIONS Voltage: 18V x 2 Battery: 3.0Ah Li-ion Charge Time: 1 Hour Cutting Diameter: 360mm Cutting Heights: 25-75mm
Instruction Manual. 36V Lithium Push Mower PMLI-14
 Instruction Manual 36V Lithium Push Mower PMLI-14 This Manual Contains Important Information Regarding: SAFETY, ASSEMBLY, OPERATION AND MAINTENANCE. Please Read And Keep This Book For Future Reference.
TOOLPRO 18V Li-Ion Brushless Impact wrench
 TOOLPRO 18V Li-Ion Brushless Impact wrench Instruction Manual CIW180HB.9 After Sales Support FREE CALL 1300 889 028 EMAIL:salesau@positecgroup.com Important - Please read these instructions fully before
F016J10018A page 1. Models C12E & C14E. Qc electric cylinder mower OPERATING INSTRUCTIONS
 F016J10018A page 1 Models C12E & C14E Qc electric cylinder mower OPERATING INSTRUCTIONS F016J10018A page 2 3 XX L BA xx.xx kg IPX4 XXXX 1/min xxxxxxxxxxxx TYP F016 xxx xxx 579 230V ~ 50/60Hz XXXXW Made
CORDLESS TACKER MODEL NO: CCT48 OPERATION & MAINTENANCE INSTRUCTIONS PART NO: LS0414
 CORDLESS TACKER MODEL NO: CCT48 PART NO: 6485070 OPERATION & MAINTENANCE INSTRUCTIONS LS0414 INTRODUCTION Thank you for purchasing this CLARKE product. Before attempting to use this product, please read
RLM18X36L40 OLM1836H. ORIGINAL INSTRUCTIONS Cordless Lawn Mower
 RLM8X6L40 OLM86H ORIGINAL INSTRUCTIONS Cordless Lawn Mower Important! It is essential that you read the instructions in this manual before assembling, operating, and maintaining the product. Subject to
7.2V Cordless Grass Shear/Shrub
 7.2V Cordless Grass Shear/Shrub 1600002 Owner s Manual TOLL-FREE HELPLINE: 1-888-90WORKS (888.909.6757) www.greenworkstools.com Read all safety rules and instructions carefully before operating this tool.
Instruction Manual. Cordless Grass Shear and Detail Trimmer. Model GSLI-10
 Instruction Manual Cordless Grass Shear and Detail Trimmer Model GSLI-10 For correct usage, read these instructions carefully and keep in a safe place for future reference. Driven By Solar Inc., Mississauga,
60V RECHARGEABLE LITHIUM-ION BATTERY
 60V RECHARGEABLE LITHIUM-ION BATTERY LB60A00/LB60A03/LB60A01/LB60A02 Owner s Manual TOLL-FREE HELPLINE: 1-855-345-3934 www.greenworkstools.com Read all safety rules and instructions carefully before operating
RLM36X50HP RLM36B50HP ORIGINAL INSTRUCTIONS. Cordless Lawn Mower
 RLM36X50HP RLM36B50HP ORIGINAL INSTRUCTIONS Cordless Lawn Mower Important! It is essential that you read the instructions in this manual before assembling, operating, and maintaining the product. Subject
GARDENA. N FIN P E I DK S NL F GB D
 GARDENA AccuCut 400 Li Art. 8840 D Betriebsanleitung Operating Instructions F Mode d emploi Coupe bordures NL Instructies voor gebruik S Bruksanvisning freeetrim DK Brugsanvisning freeetrim I Istruzioni
ITEM # V SNOW SHOVEL. MODEL #KSS 2540A-06 Español p. 18. ATTACH YOUR RECEIPT HERE Serial Number. Purchase Date
 ITEM #0727249 40 V SNOW SHOVEL MODEL #KSS 2540A-06 Español p. 18 ATTACH YOUR RECEIPT HERE Serial Number Purchase Date Questions, problems, missing parts? Before returning to your retailer, call our customer
4V LITHIUM-ION SCREWDRIVER OWNER S OPERATING MANUAL
 CSD-4107BG 4V LITHIUM-ION SCREWDRIVER OWNER S OPERATING MANUAL Your screwdriver has been engineered and manufactured to our high standard for dependability, ease of operation, and operator safety. When
Cordless Line Trimmer
 RLT6X RLT6B ORIGINAL INSTRUCTIONS Cordless Line Trimmer Important! It is essential that you read the instructions in this manual before assembling, maintaining and operating this machine. Subject to technical
SAFETY AND OPERATING MANUAL
 SAFETY AND OPERATING MANUAL GENERAL POWER TOOL SAFETY WARNINGS WARNING: Read all safety warnings and all instructions. Failure to follow the warnings and instructions may result in electric shock, fire
Rechargeable Battery-Powered Lawn Mower EVO1536Li. This manual contains important information regarding SAFETY, ASSEMBLY, OPERATION AND MAINTENANCE.
 Instruction Manual Rechargeable Battery-Powered Lawn Mower EVO1536Li This manual contains important information regarding SAFETY, ASSEMBLY, OPERATION AND MAINTENANCE. Please read and keep this book for
SAFETY AND OPERATING MANUAL. Lithium-Ion cordless hammer drill WX372 WX372.1 WX372.9
 SAFETY AND OPERATING MANUAL 2 Original Instructions General Power Tool Safety Warnings WARNING: Read all safety warnings and all instructions. Failure to follow the warnings and instructions may result
Instruction Manual. CORDLESS DRILL 18V Li-ion WITH IMPACT FUNCTION. Model SROM 1172
 Instruction Manual CORDLESS DRILL 18V Li-ion WITH IMPACT FUNCTION Model SROM 1172 Our tool range has you covered for DIY. Whatever the job, make light work of it with MAKO tools. Product Features: 1. Keyless
ITEM # V CORDLESS SNOW SHOVEL MODEL #KSS 1280B-06 Español p. 19. ATTACH YOUR RECEIPT HERE Serial Number. Purchase Date
 ITEM #0533632 80 V CORDLESS SNOW SHOVEL MODEL #KSS 1280B-06 Español p. 19 ATTACH YOUR RECEIPT HERE Serial Number Purchase Date Questions, problems, missing parts? Before returning to your retailer, call
Operating Instructions
 Please Read These Instructions Before Using Your Mower Operating Instructions for SP470 ES Lawnmower with Briggs & Stratton engine Product Code: 99468/BQ Call our Helpline if you have any problems: Helpline
OPERATING INSTRUCTIONS ELECTRIC LAWNMOWER MODEL : LSM 1200 EL
 OPERATING INSTRUCTIONS ELECTRIC LAWNMOWER MODEL : LSM 1200 EL Thank you for purchasing the Lawn Star Lawnmower which is one of the finest and most advanced lawnmowers today s technology can produce. Before
OWNER S MANUAL TOLL-FREE HELPLINE: (Monday - Friday / 8am - 4:30pm CST)
") LITHIUM ION BATTERY OWNER S MANUAL TOLL-FREE HELPLINE: 1-877-572-7278 (Monday - Friday / 8am - 4:30pm CST) READ ALL SAFETY RULES AND INSTRUCTIONS CAREFULLY BEFORE OPERATING STRIKEMASTER LITHIUM 40v BATTERY
LITHIUM ION BATTERY OWNER S MANUAL TOLL-FREE HELPLINE: 1-877-572-7278 (Monday - Friday / 8am - 4:30pm CST) READ ALL SAFETY RULES AND INSTRUCTIONS CAREFULLY BEFORE OPERATING STRIKEMASTER LITHIUM 40v BATTERY
KNOW YOUR PRODUCT SETUP & PREPARATION CORDLESS LAWN MOWER 1. Wheels 8. Upper Handle 2. Battery Cover 9. Lock-off Button 3. Battery Cover Securing Latc
 WHAT S IN THE BOX Cordless Lawn Mower CORDLESS LAWN MOWER KIT INSTRUCTION MANUAL SPECIFICATIONS Voltage: 18V x 2 Battery: 2.0Ah Li-ion Charge Time: 2.5 hours Cutting Diameter: 330mm Cutting Heights: 25-65mm
SAFETY AND OPERATING MANUAL. 3 in 1 Grass Trimmer/Edger WG169E WG169E.5 WG169E.9
 SAFETY AND OPERATING MANUAL 2 General Power Tool Safety Warnings WARNING: Read all safety warnings and all instructions. Failure to follow the warnings and instructions may result in electric shock, fire
Operating Instructions
 Please Read These Instructions Before Using Your Mower Operating Instructions for model HP470 & SP470 Lawnmowers with Briggs & Stratton engine Product Codes: 99646/BQ 97646/BQ Call our Helpline if you
SAFETY AND OPERATING MANUAL. 3 in 1 Grass Trimmer/Edger WG160E.5
 SAFETY AND OPERATING MANUAL 3 in 1 Grass Trimmer/Edger WG160E.5 2 General Power Tool Safety Warnings WARNING: Read all safety warnings and all instructions. Failure to follow the warnings and instructions
ENGLISH (Original instructions) INSTRUCTION MANUAL. Cordless Lawn Mower DLM380. IMPORTANT: Read Before Using.
 INSTRUCTION MANUAL. Cordless Lawn Mower DLM380. IMPORTANT: Read Before Using.") ENGLISH (Original instructions) INSTRUCTION MANUAL Cordless Lawn Mower DLM80 04477 IMPORTANT: Read Before Using. ENGLISH (Original instructions) SPECIFICATIONS Dimensions (L x W x H) Model Mowing width
ENGLISH (Original instructions) INSTRUCTION MANUAL Cordless Lawn Mower DLM80 04477 IMPORTANT: Read Before Using. ENGLISH (Original instructions) SPECIFICATIONS Dimensions (L x W x H) Model Mowing width
KNOW YOUR PRODUCT SETUP & PREPARATION CORDLESS LAWN MOWER 1. Wheels 8. Upper Handle 2. Battery Cover 9. Lock-off Button 3. Battery Cover Securing Latc
 WHAT S IN THE BOX Cordless Lawn Mower CORDLESS LAWN MOWER INSTRUCTION MANUAL SPECIFICATIONS Voltage: 18V x 2 Battery: 2.0Ah Li-ion Charge Time: 40min Cutting Diameter: 330mm Cutting Heights: 25-65mm (5
SAFETY AND OPERATING MANUAL. Cordless Hedge Trimmer WG259E WG259E.5 WG259E.9
 SAFETY AND OPERATING MANUAL 2 General Power Tool Safety Warnings WARNING: Read all safety warnings and all instructions. Failure to follow the warnings and instructions may result in electric shock, fire
EN Operator's manual PRLM21i
 EN Operator's manual 2-12 PRLM21i Contents INTRODUCTION... 2 SAFETY... 3 ASSEMBLY...6 OPERATION...8 MAINTENANCE...9 TRANSPORTATION AND STORAGE...12 Operator's manual The initial language of this operator's
Instruction Manual 4.0V Li-Ion Screwdriver. Part #: ECLIPSE ENTERPRISES, INC Chula Road, Amelia Court House, VA 23002, U.S.
 Instruction Manual 4.0V Li-Ion Screwdriver Part #: 902-588 ECLIPSE ENTERPRISES, INC. 13302 Chula Road, Amelia Court House, VA 23002, U.S.A 2 3 Intended use Your ECLIPSE ENTERPRISES, INC. 902-588 screwdriver
SAFETY AND OPERATING MANUAL. Cordless Lawn Trimmer Lawn Edge Trimmer WG168E
 SAFETY AND OPERATING MANUAL 2 General Power Tool Safety Warnings WARNING: Read all safety warnings and all instructions. Failure to follow the warnings and instructions may result in electric shock, fire
BRUSHLESS LAWN MOWER ORIGINAL INSTRUCTIONS
 STANDARD EQUIPMENT Brushless Lawn Mower BRUSHLESS LAWN MOWER ORIGINAL INSTRUCTIONS Safety Key SPECIFICATIONS Voltage: 18V Cutting Diameter: 300mm Cutting Heights: 30, 50 & 70mm No Load Speed: 3,300/min
Mountfield. Princess Lawnmower Owner s Manual
 DEUTSCH D Princess Lawnmower Owner s Manual 8211-0408-01 GB ENGLISH SAFETY INSTRUCTIONS SYMBOLS The following symbols can be found on the machine to remind you of the care and attention that are required
RPS1215 ORIGINAL INSTRUCTIONS. Cordless Pruner
 RPS5 ORIGINAL INSTRUCTIONS Cordless Pruner Important! It is essential that you read the instructions in this manual before assembling, operating and maintaining the product. Subject to technical modification.
Mountfield El 33 Lawnmower Owner s Manual
 DEUTSCH D Mountfield El 33 Lawnmower Owner s Manual 811-0400-01 S SVENSKA 4 1 3 1 = 0 mm = 30 mm 3 = 40 mm 4 = 50 mm 1 130 mm 4 3 3. 160 mm 1 A C B 1. 4. 1 8 4 3 5 9. SVENSKA S 5. 6.. 3 STOP SAFETY INSTRUCTIONS
- Keep children and other people away while operating the rivet tool. Distractions can cause you to lose control of the tool.
 PLEASE SPEND 5 MINUTES READING THESE INSTRUCTIONS BEFORE USING YOUR NEW BATTERY RIVET TOOL. TRUST US, IT WILL SAVE YOU TIME AND INCONVENIENCE IN THE LONG RUN. Please read the following safety information
.$/,7*76(7$ /HDI %ORZHU USER MANUAL
 USER MANUAL Technical Data Voltage No Load Speed Weight Max Blow Speed Charging Time Battery Sound Level Run Time DC 18v 13000/min (2-High); 9000/min (1-Low) 2kg 120kph (2-High); 80kph (1-Low) 3-5 hours
c-go 24V/6A 24V/8A 24V/12A
 c-go 24V/6A 24V/8A 24V/12A Battery charger GB Instruction manual 1 Index 1. Product description... 2 2. Safety advices... 3 3. Quick start guide... 4 4. Operation... 4 5. Problem solving... 6 6. Specifications...
SAFETY AND OPERATING MANUAL
 SAFETY AND OPERATING MANUAL ORIGINAL INSTRUCTIONS 1 7 6 2 5 4 2 3 A1 A2 1 2 A3 B A3 B C1 C2 3 C3 D 1. FORWARD/ REVERSE ROTATION CONTROL 2. SOFT GRIP HANDLE 3. BATTERY PACK RELEASE BUTTON 4. BATTERY PACK*
c-go 12V/10A 12V/20A Power supply and battery charger Instruction manual
 c-go 12V/10A 12V/20A Power supply and battery charger GB Instruction manual 1 Index 1. Product description... 2 2. Safety advices... 3 3. Mounting and installation... 4 4. Operation... 5 5. Problem solving...
TOOLPRO 18V 2 Speed Drill Driver
 TOOLPRO 18V 2 Speed Drill Driver Instruction Manual CDT218G.1 After Sales Support FREE CALL 1300 889 028 EMAIL:salesau@positecgroup.com Important - Please read these instructions fully before operating
Rotak R Ergo 37 R F 016 L ( ) O / 17 XXX. Robert Bosch Power Tools GmbH Stuttgart GERMANY.
 O / 17 XXX. Robert Bosch Power Tools GmbH Stuttgart GERMANY.") OBJ_DOKU-42623-002.fm Page 1 Thursday, January 21, 2016 12:58 PM Robert Bosch Power Tools GmbH 70538 Stuttgart GERMANY www.bosch-garden.com Rotak 34-13 36 R 37-14 Ergo 37 R F 016 L81 431 (2014.10) O /
OBJ_DOKU-42623-002.fm Page 1 Thursday, January 21, 2016 12:58 PM Robert Bosch Power Tools GmbH 70538 Stuttgart GERMANY www.bosch-garden.com Rotak 34-13 36 R 37-14 Ergo 37 R F 016 L81 431 (2014.10) O /
HDE 500-A22. English. Printed: Doc-Nr: PUB / / 000 / 03
 HDE 500-A22 English 1 Information about the documentation 1.1 About this documentation Read this documentation before initial operation or use. This is a prerequisite for safe, trouble-free handling and
Pac a Mow IMPORTANT INFORMATION. Read before use. & retain for future reference. Original Instructions
 Pac a Mow Original Instructions IMPORTANT INFORMATION Read before use & retain for future reference Carton Contents cable hook x cam lock x 4 cable clip barrel nut x 4 lower handle square headed bolt x
Rotak. 37 Ergoflex 40 Ergoflex Ergo 43 Ergoflex 430 Ergo-Power. Robert Bosch Power Tools GmbH Stuttgart GERMANY.
 OBJ_DOKU-36002-005.fm Page 1 Monday, January 25, 2016 2:45 PM Robert Bosch Power Tools GmbH 70538 Stuttgart GERMANY www.bosch-garden.com F 016 L81 421 (2014.10) O / 15 XXX Rotak 37 Ergoflex 40 Ergoflex
Functional Description and Specifications. Intended Use. Packing List
 Functional Description and Specifications Intended Use The Nemo Submersible Hammer Drill is intended to drill tough materials such as cement, brick, blocks, or stone, and can be used underwater, in wet
20V Lithium-Ion Battery Pack
 20V Lithium-Ion Battery Pack 252-8034 OPERATOR S MANUAL CAUTION: To Reduce The Risk Of Injury, User Must Read And Understand Operator s Manual. Save These Instructions For Future Reference. For questions
RBL1851S OBL1820S. ORIGINAL INSTRUCTIONS Cordless Blower
 RBL85S OBL80S ORIGINAL INSTRUCTIONS Cordless Blower Important! It is essential that you read the instructions in this manual before assembling, operating, and maintaining the product. Subject to technical
Parklander Cylinder Mower
 Parklander Cylinder Mower WARNING: To reduce the risk of injury, the user must read and understand the Operator s Manual before using this product. Save these instructions for future reference. Table of
ENGLISH: Original instructions INSTRUCTION MANUAL. Cordless Cleaner CL106FD. Read before use.
 ENGLISH: Original instructions INSTRUCTION MANUAL Cordless Cleaner CL06FD Read before use. WARNING This appliance can be used by children aged from 8 years and above and persons with reduced physical,
40 V LITHIUM-ION BATTERY ATTACH YOUR RECEIPT HERE AB13786C 1. kobalttools.com ITEM # /
 ITEM #0506882 / 0506883 40 V LITHIUM-ION BATTERY MODEL #KB 240-06 / KB 440-06 Français p. 7 Español p. 13 ATTACH YOUR RECEIPT HERE Serial Number Purchase Date AB13786C 1 PRODUCT SPECIFICATIONS Battery
EVO181B1. English
 EVO181B1-TW EVO181B1-KR EVO181B1 English 4 10 16 A B 8 C EVO181B1-KR EVO181B1-TW D 2 E 13 8 9 EVO181B1-KR EVO181B1-TW F 3 ENGLISH (Original instructions) EVO181B1 MULTI TOOL Technical data Multi Tool Voltage
3.6V SCREWDRIVER INSTRUCTION MANUAL CSD36F
 3.6V SCREWDRIVER INSTRUCTION MANUAL CSD36F ORIGINAL INSTRUCTIONS GENERAL POWER TOOL SAFETY WARNINGS WARNING! Read all safety warnings and all instructions. Failure to follow the warnings and instructions
MULTI FUNCTION POWER PAK PLUS
 MULTI FUNCTION JUMP START UP TO V8 PETROL & DIESEL 600A PEAK CURRENT RECHARGE USB POWER TOOLS TABLETS LAPTOPS MOBILE PHONES RECHARGE DEVICES ON-SITE VEHICLE JUMP STARTER KP1404 ED2 (June 15) Table of Contents
Qc electric cylinder mower ORIGINAL INSTRUCTIONS
 F016J10733 page 1 Classic 12E Plus Sandringham 14E Qc electric cylinder mower ORIGINAL INSTRUCTIONS F016J10733 page 2 3 XX L BA xx.xx kg IPX4 XXXX 1/min xxxxxxxxxxxx TYP F016 xxx xxx 579 230V ~ 50/60Hz
Cordless Grass Trimmer
 Cordless Grass Trimmer Model number: ST20 OPERATING MANUAL ORIGINAL INSTRUCTIONS 2016 IMPORTANT SAFEGUARDS: IMPORTANT: READ ALL INSTRUCTIONS BEFORE USE. RETAIN INSTRUCTIONS FOR FUTURE REFERENCE. Do not
120v. 22" Cordless Lawn Mower Self Propelled LITHIUM-ION. Model: Y0LMX22S300 OPERATOR S MANUAL
 Model: Y0LMX22S300 OPERATOR S MANUAL 22" Cordless Lawn Mower Self Propelled READ & UNDERSTAND INSTRUCTION MANUAL. SAVE ALL WARNINGS AND INSTRUCTIONS FOR FUTURE REFERENCE. Merotec Inc. 3655 Kennesaw North
Battery Charger JCB-FCH20LI2
 Safety and operating manual Battery Charger JCB-FCH20LI2 ORIGINAL INSTRUCTIONS SAFETY INSTRUCTIONS WARNING: Read all safety warnings and all instructions.failure to follow the warnings and instructions
CORDLESS DRILL User Manual EN
 CORDLESS DRILL User Manual EN B1 7 1 6 9 11 2 3 5 8 4 B2 B3 5 4 4 B4 1 B5 8 6 Lo Hi 9 3 2 2 B6 B7 7 7 b a 7 B8 10 1 Description of the tool 1 Selection Torque 2 Inverter Switch 3 ON/OFF 4 Battery 5 Pushlock
BRUSHLESS LAWN MOWER ORIGINAL INSTRUCTIONS
 STANDARD EQUIPMENT Brushless Lawn Mower BRUSHLESS LAWN MOWER ORIGINAL INSTRUCTIONS Safety Key SPECIFICATIONS Voltage: 18V Cutting Diameter: 300mm Cutting Heights: 30, 50 & 70mm No Load Speed: 3,300/min
Instruction Manual PSLGR18 Cordless Shears
 Instruction Manual PSLGR18 Cordless Shears Cordless Grass and Shrub Shears Please read and save these instructions. Safety Instructions General safety regulations for electric tools This equipment is
WG170 WG170.1 WG170.9 P02 P15 P25
 3 in : Trimmer / Edger / Mini mower 3 outils en : taille-haie, coupe-bordure, mini-tondeuse à gazon 3 en : Recortadora / Cortabordes / Minicortadora de césped EN F ES P0 P5 P5 WG70 WG70. WG70.9 WARNING:
OPERATING MANUAL 18V Ni-Cd Battery Pack
 OPERATING MANUAL 18V Ni-Cd Battery Pack 054-3105-6 Toll-free Helpline : 1-800-689-9928 IMPORTANT : Read this Operating Manual carefully before using the charger. Pay close attention to all Safety Instructions,
ENGLISH (Original instructions) INSTRUCTION MANUAL. Cordless Lawn Mower BLM430 LM430D. IMPORTANT: Read Before Using.
 INSTRUCTION MANUAL. Cordless Lawn Mower BLM430 LM430D. IMPORTANT: Read Before Using.") ENGLISH (Original instructions) INSTRUCTION MANUAL Cordless Lawn Mower BLM40 LM40D 095 IMPORTANT: Read Before Using. ENGLISH (Original instructions) SPECIFICATIONS Dimensions (L x W x H) Model Mowing width
ENGLISH (Original instructions) INSTRUCTION MANUAL Cordless Lawn Mower BLM40 LM40D 095 IMPORTANT: Read Before Using. ENGLISH (Original instructions) SPECIFICATIONS Dimensions (L x W x H) Model Mowing width
18V Lithium-ion Cordless Grass Trimmer
 Qualcast 18V Lithium-ion Cordless Grass Trimmer Instruction Manual After Sales Support UK/Ireland 0845 077 8888 Republic of Ireland 0124 77708 Web www.homebasespares.co.uk Important - Please read these
TR3 Series: EJ - 26" Cutting Units - Engine type: Kubota D1105-E - Product code: TR30001
 24745G-GB (rev.0) Fitting Instructions For Backlap Kit LMAC161 TR3 Series: EJ - 26" Cutting Units - Engine type: Kubota D1105-E - Product code: TR30001 WARNING: If incorrectly used this machine can cause
IMPORTANT! Safety Instructions. m WARNING. Grass Shear/Shrubber. All Operators Must Read These Instructions Before Use
 Grass Shear/Shrubber Model No. HJ602C Form No. SJ-HJ602C-880E A Division of Snow Joe, LLC IMPORTANT! Safety Instructions All Operators Must Read These Instructions Before Use Always follow these safety
R18DDBL ORIGINAL INSTRUCTIONS. 18V Brushless Drill Driver
 R18DDBL ORIGINAL INSTRUCTIONS 18V Brushless Drill Driver Important! It is essential that you read the instructions in this manual before assembling, operating and maintaining the product. Subject to technical
GlassVAC. Robert Bosch Power Tools GmbH Stuttgart GERMANY. F 016 L ( ) O / 17. Original instructions
 O / 17. Original instructions") OBJ_DOKU-65433-001.fm Page 1 Friday, February 2, 2018 10:05 AM Robert Bosch Power Tools GmbH 70538 Stuttgart GERMANY www.bosch-pt.com GlassVAC F 016 L81 779 (2018.02) O / 17 en Original instructions OBJ_BUCH-3480-001.book
OBJ_DOKU-65433-001.fm Page 1 Friday, February 2, 2018 10:05 AM Robert Bosch Power Tools GmbH 70538 Stuttgart GERMANY www.bosch-pt.com GlassVAC F 016 L81 779 (2018.02) O / 17 en Original instructions OBJ_BUCH-3480-001.book
4-VOLT LITHIUM-ION AUTO-LOAD SCREWDRIVER w/led WORKLIGHT
 SKU 241-1394 4-VOLT LITHIUM-ION AUTO-LOAD SCREWDRIVER w/led WORKLIGHT Operation Manual WARNING! Please read this manual before using this product. Failure to do so can result in serious injury. SAVE THIS
V3700UK OWNER S GUIDE.
 V3700UK OWNER S GUIDE IMPORTANT SAFETY INSTRUCTIONS For Household Use Only WHEN USING YOUR SHARK CORDLESS SWEEPER, BASIC SAFETY PRECAUTIONS SHOULD ALWAYS BE FOLLOWED, INCLUDING THE FOLLOWING: READ ALL
7 Handle Tubes. 10 Charging Jack 11 LED Indicator 12 ON/OFF button
 SW04 customer helpline 01905 345891 support@greytechnology.co.uk www.gtechonline.co.uk 7 10 11 12 8 9 6 1 5 2 3 4 1 Main Unit 2 Brush Bar 3 Front Visor 4 Dust Tray 5 Edge Wheel 6 Upper Handle 7 Handle
Classic Petrol - Seite 3 Seite 1 Montag, 23. Februar :37 15 STOP
 Classic Petrol - Seite 3 Seite 1 Montag, 23. Februar 2004 3:37 15 STOP 1 2 3 4 5 6 7 8 9 10 Classic Petrol - GB Seite 2 Mittwoch, 25. Februar 2004 8:18 08 Product Specification Cylinder Mower Qualcast
SAFETY AND OPERATING MANUAL ORIGINAL INSTRUCTIONS
 SAFETY AND OPERATING MANUAL ORIGINAL INSTRUCTIONS 1 2 3 4 9 8 5 6 7 A1 A2 1 2 1 3 2 A3 B1 3 2 1 B2 C1 2 3 1 C2 C3 C2 C3 D F E 1. KEYLESS CHUCK 2. TORQUE ADJUSTMENT RING 3. TWO-SPEED GEAR CONTROL 4. FORWARD/REVERSE
135CC PETROL LAWN MOWER INSTRUCTION MANUAL DYM-1773
 135CC PETROL LAWN MOWER INSTRUCTION MANUAL DYM-1773 CONTENTS Warranty 2 Introduction 3 Environmental protection 3 Description of symbols 3 Specifications 4 Safety rules for petrol lawn mowers 4 Operation
20V Cordless Shrub Shear & Grass Shear P02 P10 P15 WG801 WG801.9
 P02 P0 P5 WG80 WG80.9 2 WARNING: Some dust created by power sanding, sawing, grinding, drilling and other construction activities contains chemicals known to the state of California to cause cancer, birth
18V CORDLESS DRILL MODEL NO: CON18LiC
 18V CORDLESS DRILL MODEL NO: CON18LiC PART NO: 6479531 OPERATION & MAINTENANCE INSTRUCTIONS ORIGINAL INSTRUCTIONS GC0817 - ISS 2 INTRODUCTION Thank you for purchasing this CLARKE Cordless Drill. Before
BAD BOY GRASS BAGGING SYSTEM
 BAD BOY GRASS BAGGING SYSTEM TABLE OF CONTENTS WILL FIT ALL 2019 OUTLAW SERIES MOWERS SAFETY RULES AND INFORMATION.. 2 GENERAL OPERATION.... 3 WARRANTY INFORMATION.... 5 INSTALLATION INSTRUCTIONS.. 6 PAGE
Instruction Manual CORDLESS DRILL & DRIVER 18V. Model SROM 1170
 Instruction Manual CORDLESS DRILL & DRIVER 18V Model SROM 1170 Product Features: Dear Valued Customer, Thank you for purchasing this Samson Power Tool. We are dedicated to providing quality Samson Power
m WARNING: READ ALL m WARNING: This unit can be dangerous! Careless or m DANGER: Risk of cut. Keep hands and feet away IMPORTANT! Safety Instructions
 16-Inch Manual Reel Mower with Catcher Model No. MJ500M Form No. SJ-MJ500M-880E A Division of Snow Joe, LLC IMPORTANT! Safety Instructions m WARNING: READ ALL INSTRUCTIONS BEFORE USE. m WARNING: This unit
eclipse Instruction Manual 4.0V Li-Ion Screwdriver Part #:
 eclipse Instruction Manual 4.0V Li-Ion Screwdriver Part #: 902-588 Test Equipment Depot - 800.517.8431-99 Washington Street Melrose, MA 02176 TestEquipmentDepot.com Test Equipment Depot - 800.517.8431-99
Parts missing or damaged? Questions? Toll-free Helpline
 INSTRUCTION MANUAL Multi-Charger 054-3107-2 Parts missing or damaged? Questions? Toll-free Helpline 1-800-689-9928 Important: Carefully read this Instruction Manual before using this tool. Pay close attention
Worldlawn Power Equipment, Inc. Industrial Park 2415 Ashland Ave. Beatrice, NE Toll Free Number:
 Operator s Manual R WYZ48/52/60CS BAGGER Worldlawn Power Equipment, Inc. Industrial Park 2415 Ashland Ave. Beatrice, NE 68310 Toll Free Number: 1-800-267-4255 OPERATOR S MANUAL This catcher manual is for
Operating instructions in the back. PD1420LP
 Operating instructions in the back www.blackanddecker.co.uk PD1420LP 2 ENGLISH (Original instructions) Intended use Your Black & Decker Dustbuster handheld vacuum cleaner has been designed for vacuum cleaning
SAFETY AND OPERATING MANUAL
 SAFETY AND OPERATING MANUAL ORIGINAL INSTRUCTIONS 1 2 3 4 9 5 8 7 6 A2 A1 1 2 B1 A3 3 2 1 C1 B2 2 3 1 C2 C3 C2 C3 D E F G -- -- -- = 1. CHUCK 2. TORQUE ADJUSTMENT RING 3. TWO-SPEED GEAR CONTROL 4. FORWARD/REVERSE