Impulse 2.0 pedelec. EPAC Electrically power assisted cycle. Original User Guide EN Version 4 05/10/2016
|
|
|
- Vernon Chambers
- 5 years ago
- Views:
Transcription

1 Impulse 2.0 pedelec EPAC Electrically power assisted cycle Original User Guide EN Version 4 05/10/2016
2 CONTENTS I. Introduction EN-4 I.I Explanation of the safety information symbols EN-4 I.II The Impulse 2.0 pedelec EN-5 II. Information pack EN-5 II.I Booklet and CD EN-5 II.II Component guides EN-6 II.III Service book EN-6 II.IV EU Declarations of Conformity EN-7 II.V Guarantee card* EN-7 III. Dealers EN-7 IV. Legal regulations EN-7 IV.I International EN-7 IV.II Germany EN-8 IV.II.I Lighting EN-8 IV.II.I.I Replacement bulbs EN-9 IV.II.II Disposal EN-9 V. Intended purpose EN-9 V.I Pedelec EN-9 V.II E-mountain bike EN-10 VI. Pedelec weights* EN-10 VI.I Total weight EN-10 VII. The pedelec and its components* EN General safety information EN Protection from theft, manipulation and loss EN Before your first ride EN Attaching the pedals EN Adjusting the saddle height EN Determining the correct saddle height EN Adjusting the saddle height: Saddle clamp(s)* EN Adjusting the saddle height: Quick-release clamps* EN Shifting and tilting the saddle EN Screw supports: Shifting and tilting the saddle EN Twin-screw supports: Shifting and tilting the saddle EN Clamp attachment: Shifting and tilting the saddle EN Adjusting the sprung saddle post EN Adjusting the height and angle of the handlebars EN Switching the lighting on/off* EN Braking EN Chain* EN Chain tension EN Checking for wear EN Cleaning and maintenance EN Drive belt* EN Belt tension EN Checking for wear EN Cleaning EN Gears EN Wheel EN Changing the wheel EN Axle nut* EN Quick-release wheels* EN Quick-release axle* EN Rims EN Tyres EN Suspension fork* EN Lockout system EN Air system* EN Before every trip EN Quick-start guide EN Charging the battery EN Inserting and locking the battery EN Switching on the pedelec EN Battery charge level EN Big Display: Remaining range EN Changing assist mode EN Enabling push assist EN Displaying favourite settings EN Configuring settings in the main menu EN Accessing the main menu EN Navigating within a menu EN Returning from a menu EN Switching off the pedelec EN Unlocking and removing the battery EN-38 EN-2 Original User Guide Impulse 2.0 Pedelec Version 3 *depending on model
3 6. Drive unit, display and easy-reach control EN Safety information EN Technical details EN Overview and basic functions EN Switching on the pedelec EN Switching off the pedelec EN Battery charge level EN LCD Big Display: Remaining range EN Changing assist mode EN Enabling push assist EN LCD Compact Display EN LCD Big Display: Favourite settings EN Displaying favourite settings EN Preselecting favourite settings EN LCD Big Display: Main menu EN Configuring settings in the main menu EN Accessing the main menu EN Navigating within a menu EN Returning from a menu EN Menu structure EN Display ride data EN Delete trip data EN Delete tour data EN Contrast EN Brightness EN Language EN Unit EN Wheel circumference EN Shift sensor EN Climb assist EN Factory settings EN Version EN Update EN Name EN Favourite settings EN Fuel price EN Fuel consumption Ø EN Fuel type EN Power cost EN Tips EN Transporting your pedelec EN Trailer bikes and trailers EN Luggage rack EN Safety information EN Storage EN Cleaning EN Battery EN Safety information EN Technical details EN Overview and basic functions EN Display panel EN Battery charge level EN Capacity EN Sleep mode EN Inserting and locking the battery EN Unlocking and removing the battery EN Tips EN Range EN Storage EN Cleaning EN Battery charger EN Safety information EN Technical data and overview EN Functions EN Charging the battery EN Charging the seat tube battery with charger type 1 EN Charging the seat tube battery with charger type 1 and charging station type 1 EN Charging the seat tube battery with charger type 2 EN Charging the down tube battery with charger type 3 EN Charging the down tube battery with charger type 4 EN Battery display during charging EN Tips EN Cleaning EN Storage EN Faults EN Drive unit, display and easy-reach control EN Battery EN Battery charger EN Torque settings EN-86 *depending on model Original User Guide Impulse 2.0 Pedelec Version 3 EN-3
4 I. Introduction This user guide contains information on how to use, maintain and look after your Impulse 2.0 pedelec. DANGER Before using your pedelec for the first time, carefully read this user guide. Please also read the other items in the information pack II. Information pack P. EN-5. Familiarise yourself with the meaning of the safety information symbols. Should you have queries please contact your dealer III. Dealers P. EN-7. Failure to comply with safety information and instructions can result in death, severe injuries and/or damage to the pedelec. The manufacturer shall not be liable for injury and damage caused by the failure to comply with safety information and instructions. Furthermore, it will invalidate the manufacturer s warranty and guarantee (where applicable). Make sure your dealer has provided you with all of the documentation that was delivered with the pedelec. Keep this user guide and information pack safe for future use. Please pass on the guides and information pack to other people who will use, maintain or repair this pedelec, otherwise uncertainties can arise that could result in death, severe injuries and/or damage to the pedelec. I.I DANGER You can download this guide, the 'Original User Guide General' and parts of the information pack as PDFs from our website: downloads.html. There you will also find links to the websites of the various component manufacturers. Explanation of the safety information symbols This symbol combined with the signal word "DANGER" indicates a potentially dangerous situation. Failure to comply with this safety instruction can result in death or very serious injuries. WARNING This symbol in conjunction with the signal word "WARNING" indicates a potentially dangerous situation. Failure to comply with this safety warning can result in serious injury. CAUTION This symbol combined with the signal word "CAUTION" indicates a potentially dangerous situation. Failure to comply with this safety instruction can result in minor injuries. EN-4 Original User Guide Impulse 2.0 Pedelec Version 3
5 IMPORTANT II. Information pack This symbol combined with the signal word "IMPORTANT" indicates a potentially dangerous situation. Failure to comply with this safety instruction can result in damage to the pedelec and its components. I.II This symbol indicates helpful tips, useful or important information about the product or its additional uses. It does not indicate a dangerous or harmful situation. The Impulse 2.0 pedelec Your Impulse 2.0 pedelec is an electrically power assisted cycle (EPAC). When the assist mode is switched on, the electric motor provides assistance as long as you are pedalling. You can control the degree of assistance, which is adjusted using various assist modes 5.6 Changing assist mode P. EN-35. The drive assistance is dependent on the force and speed of your pedalling and the speed you are travelling. The motor assistance stops as soon as you stop pedalling and when the battery is discharged or if you reach a speed of 25 km/h. If you want to travel faster than 25 km/h it is therefore necessary to pedal harder. In addition to this user guide, your Impulse 2.0 pedelec comes with a booklet, CD, a service book, two declarations of conformity, and if you have bought a Kalkhoff or Raleigh pedelec, a guarantee card. The following points describe the contents of the information pack in more detail. II.I Booklet and CD The booklet contains a quick-start guide which describes how to check the torque settings, attach the pedals and adjust the height of the saddle. At the back of the booklet there is a CD on which you will find the 'Original User Guide General' in several languages with general information about the various types of bike and their components. If you go online you can follow a link to our website. The CD can be played with any conventional PC or laptop. To do this, proceed as follows: Procedure A 1. Insert the CD. 2. Double click the left mouse button on the file: shelexec.exe. 3. Select your desired language. 4. Select 'Open user guide from CD' or 'Go online and check for latest version of user guide'. Original User Guide Impulse 2.0 Pedelec Version 3 EN-5
6 Procedure B 1. Insert the CD. 2. Click once with the right mouse button on 'Open folder to display files'. 3. Double click with the left mouse button on 'Start'. 4. Select your desired language. 5. Select 'Open user guide from CD' or 'Go online and check for latest version of user guide'. To open the user guide you need to have Adobe Reader installed. It is on the CD or can be downloaded free of charge at The paper version of 'Original User Guide General' can be ordered free of charge from: Derby Cycle Werke GmbH Siemensstraße 1-3 D Cloppenburg info@derby-cycle.com II.II Component guides In the component guides you will find important information about the use and maintenance of components of your pedelec. They also often contain information about any warranties. If there is no specific user guide included for the particular component you are interested in, look on our 'Original User Guide General' CD II.I Booklet and CD S. EN-5 or on the manufacturer's website. You will find a list of our component manufacturers at www. downloads.html. II.III Service book The accompanying service book contains the warranty conditions, a list of consumable parts, a bike passport and forms to use for the transfer, maintenance and change of ownership of the pedelec. DANGER Make sure the service book is kept carefully up to date and observe the maintenance intervals. If wear and damage are not detected in good time, components may fail. If that happens while you are riding the bike you could be severely injured or killed. Have worn, damaged or bent components replaced before you use the bike again. EN-6 Original User Guide Impulse 2.0 Pedelec Version 3
7 II.IV EU Declarations of Conformity IV. Legal regulations The EU declarations of conformity confirm that we have complied with all of the safety requirements of the regulations applicable to the pedelec and the battery charger. II.V Guarantee card * Since the model year 2014 we provide a guarantee of ten years for the brands Kalkhoff and Raleigh on all pedelec and s-pedelec frames. You will find the terms of the guarantee on the guarantee card. III. Dealers Ask our dealers for advice. On the second page you can find a link to our brand website with a list of all dealers in your region. IV.I International DANGER Never ride the bike 'no hands'. You could fall off and seriously injure or even kill yourself and also be liable for prosecution. You must always have at least one hand on the handlebars. Observe the respective national road traffic regulations, otherwise you run the risk of a serious accident. Before using your pedelec abroad, find out about the regulations applicable in that country. Like all bicycles, the pedelec must comply with the respective national road traffic regulations and applicable standards. If you make technical modifications to the bike, take into account the respective national road traffic regulations and applicable standards. If the cutoff speed and/or the speed of the push assist exceed the specified values, the pedelec will become liable to mandatory registration and insurance. Technical modifications can impair the function of your pedelec, resulting in damage to components. If this happens while you are riding the bike you could be severely injured or killed. Furthermore, it will invalidate the manufacturer's liability, warranty and guarantee (where applicable). Observe the respective national regulations regarding the disposal of the drive system, display, easy-reach control, battery and charger. Otherwise you will be committing an offence and run the risk of a fine. *depending on model Original User Guide Impulse 2.0 Pedelec Version 3 EN-7
8 IV.II Germany At the time of writing (October 2016) the following regulations apply in Germany:»» The motor may only be used as an aid to pedalling, i.e. it may only "help" when the rider is actively pedalling.»» The average motor power must not exceed 250 W.»» The motor power must continue to fall as the speed of the bike continues to increase.»» The motor must cut out automatically at 25 km/h. What this means for you:»» There is no obligation to wear a helmet. DANGER However, for your own safety you should never ride a bike without a suitable cycle helmet. A cycle helmet can protect you from severe injuries. Make sure the helmet is correctly positioned.»» You do not require a driving licence.»» There is no requirement for compulsory insurance.»» The use of cycle paths is regulated as for normal bicycles.»» The use of children trailers and cycle trailers is generally permitted for pedelecs. DANGER Before you use a trailer bike or trailer make sure you read Chapter Trailer bikes and trailers P. EN-58. Otherwise there is a risk of serious injury or death. IV.II.I Lighting In Germany the requirements for lighting on bicycles is regulated in Section 67 of the Road Traffic Licensing Regulation (StVZO) and in the Technical Requirements for vehicle parts. Lighting includes both battery and dynamo-powered lights, and includes reflectors that work without a power supply and simply reflect external light. Light type Number Position Characteristics Front light 1 Front White light Reflector At least 1 Front The illuminance must be at least 10 lux at the centre of the beam at a distance of 10 metres. White Rear light 1 Rear Red light The reflector can be integrated into the front light. The lowest point of the illuminating surface must not be lower than 250 mm above the road surface. A standlight function is also permitted. Reflector At least 1 Rear Red The highest point of the illuminating surface must not be higher than 600 mm above the road surface. EN-8 Original User Guide Impulse 2.0 Pedelec Version 3
9 Light type Number Position Characteristics IV.II.II Disposal Large reflector 1 Rear Red Reflector Reflector (or reflective wheel stripes) Reflective stripes (or wheel reflectors) 2 per pedal At least 2 Pedals Per wheel IV.II.I.I Replacement bulbs The large reflector is marked with a Z. It can be integrated in the rear light. Yellow Effective forwards and backwards. Yellow Attached to the spokes at 180 to each other. Effective sideways on. 1 Per wheel Circular continuous, reflective white stripe. The replacement bulbs you will need depend on the type of lighting fitted on your bike. The table below tells you what type of bulb you will need: Type Front light (LED, incandescent) Power supply 6 V 2.4 W Do not dispose of the display, easy-reach control, pedelec battery and charger in the household waste. Hand them in at the designated place (e.g. recycling centre, battery collection point, cycle dealer). V. Intended purpose V.I Pedelec Electrical devices marked with this symbol must not be disposed in household waste. This bicycle is designed and equipped for use on public roads and paved paths. It can also be used on easy terrain. The manufacturer and dealer accept no liability for damage resulting from any use beyond this definition and/or failure to comply with the safety information and instructions in the user guide. This applies particularly to off-road use, overloading and failure to properly rectify faults. Intended use also includes conformance with the specified operating, service and repair conditions in the user guides and service book II.III Service book P. EN-6. Fluctuations in the consumption and power of the battery and a reduction of capacity with increasing age Capacity P. EN-66 are common and technically unavoidable, and as such, do not constitute material defects. Front light halogen 6 V 2.4 W Rear light 6 V 0.6 W Rear light with standlight function Lighting with LED lamps 6 V 0.6 W LED lamps are not replaceable Hub dynamo 6 V 3 W Original User Guide Impulse 2.0 Pedelec Version 3 EN-9
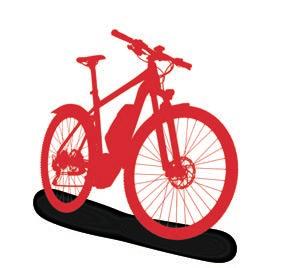
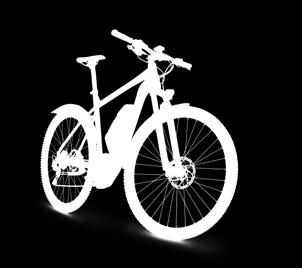
10 V.II E-mountain bike This bicycle is not designed and equipped for use on public roads. Before it can be used on public roads it must be fitted with the legally prescribed equipment. It is designed to be used off-road, but not for competitions. The manufacturer and dealer accept no liability for damage resulting from any use beyond this definition and/or failure to comply with the safety information and instructions in the user guide. This applies particularly to the use of this bicycle in competitions, overloading and the failure to properly rectify faults. Intended use also includes conformance with the specified operating, service and repair conditions in the user guides and service book II.III Service book P. EN-6. Fluctuations in the consumption and power of the battery and a reduction of capacity with increasing age Capacity P. EN-66 are common and technically unavoidable, and as such, do not constitute material defects. VI. Pedelec weights * VI.I Total weight DANGER Do not exceed the total weight of the pedelec, because it can lead to the fracture or failure of safety-relevant parts (such as the brakes). If this happens while you are riding the bike, it can lead to severe falls with fatal consequences. Total weight = Weight of the bike + weight of the rider + weight of the trailer bike or trailer + weight of luggage and/or child Bike type Maximum permissible total weight Weight of rider** Impulse 2.0 pedelec 130 kg Max. 102 kg Impulse 2.0 pedelec XXL 170 kg Max. 142 kg ** for a pedelec weighing 28 kilograms. Pedelecs are heavier than normal bicycles. The exact weight depends on the equipment fitted. If you want to know the precise weight of your pedelec, we recommend that you have your pedelec weighed by a dealer. The majority of dealers have professional and very accurate bicycle scales. EN-10 Original User Guide Impulse 2.0 Pedelec Version 3 *depending on model
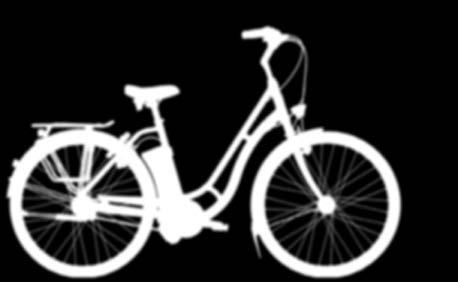
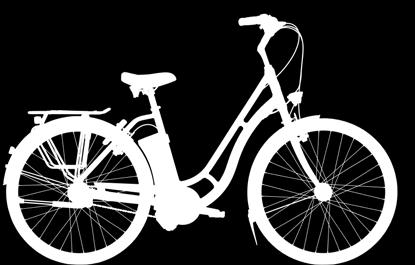
 11 Easy-reach control 12 LCD Big Display 13 Brake lever 14")

11 VII. The pedelec and its components * Rear light 2 Luggage rack 3 Saddle 4 Saddle post 5 Saddle clamp 6 Seat tube 7 Seat tube battery 8 Down tube 9 Handlebar stem 10 Gears (rotary handle*) 11 Easy-reach control 12 LCD Big Display 13 Brake lever 14 Handlebars 15 Front light 16 Rim brake* 17 Suspension fork 18 Drop-outs (suspension fork) 19 Front wheel hub 20 Reflective stripes 21 Wheel 22 Pedal 23 Pedal crank 24 Motor 25 Docking station 26 Belt 27 Side stand 28 Drop-outs 29 Wheel rim 30 Tyre 31 Axle nut 32 Gear hub 33 Reflector *depending on model Original User Guide Impulse 2.0 Pedelec Version 3 EN-11
12 1. General safety information Comply with the safety and user instructions at the start of the following sections. DANGER We discourage allowing children under the age of 14 years to ride pedelecs. They may not be able to cope with the speed. It can result in serious accidents and falls. Wear a cycle helmet. While there is no legal obligation to wear one, you should always wear a suitable cycle helmet for your own safety. A cycle helmet can protect you from severe injuries. Make sure the helmet is correctly positioned. Keep your hands and other body parts and clothing away from moving parts, otherwise you could catch yourself in them, fall off and/or injure yourself. Adapt your riding style to the prevailing traffic conditions, otherwise you could fall off and involve yourself and others in a serious accident. Take into consideration the longer braking distances needed on wet or icy roads. Think ahead, anticipating the actions of other road users and reduce your speed. Avoid sudden jerky movements of the handlebars and braking actions. Dismount if you are unsure about a situation. Only use the bicycle for its intended purpose V. Intended purpose P. EN-9, otherwise it can lead to component failure. If that happens while you are riding the bike you could be severely injured or killed. DANGER Check that the brakes work and that the handlebars can move freely before every ride. Do not use the bike if it is not in perfect technical condition. If you are unsure, ask your cycle dealer to check it, if necessary. Inspect your pedelec before every trip, and after each time it has been transported anywhere or has been left unattended 4. Before every trip P. EN-31. If wear and damage are not detected in good time, components may fail. If that happens while you are riding the bike you could be severely injured or killed. Due to the additional power, wearing parts on a pedelec are subject to more stress than a normal bike. Have worn, damaged or bent components replaced before you use the bike again. Do not exceed the total weight of the pedelec, because it can lead to the fracture or failure of safety-relevant parts VI.I Total weight P. EN-10. If this happens while you are riding the bike, it can lead to severe falls with fatal consequences. Contact your cycle dealer when it is necessary to replace wearing parts and other components. We recommend that all assembly and adjustment work is carried out by your dealer, as incorrect assembly could cause components to become loose. If that happens while you are riding the bike you could be severely injured or killed. If you do have to tighten something, you will find a complete list of the required torque settings in Section 10. Torque settings P. EN-86, which must be strictly followed. Only use original replacement parts. Replacement parts from other manufacturers can impair the function of your pedelec. It can result in serious accidents. EN-12 Original User Guide Impulse 2.0 Pedelec Version 3
13 DANGER Ask your dealer to show you the operation and features of the components. Please also read the component guides. We recommend that all assembly and adjustment work is carried out by your dealer, as incorrect assembly could cause components to become loose. If that happens while you are riding the bike you could be severely injured or killed. If you do have to tighten something, you will find a complete list of the required torque settings in Section 10. Torque settings P. EN-86, which must be strictly followed. IMPORTANT Always park your pedelec so that it cannot tip over. If the bike tips over components can be damaged. If your bike is not equipped with a kick stand, one can be retrofitted. Please ask your dealer. Do not clean the pedelec with a water hose or high pressure washer. Although the components are sealed, you could damage the bike. Clean the pedelec with a soft damp cloth. WARNING Do not ride in unfavourable lighting conditions (fog, rain, dusk, darkness) without adequate lighting IV.II.I Lighting P. EN-8; it can lead to accidents and serious injuries. Always remove the battery before starting to work on the pedelec. The pedelec could switch on unexpectedly and you could be seriously injured. CAUTION Do not attempt to open the motor, display, battery or charger; you could injure yourself. Furthermore, parts may be destroyed, invalidating the warranty. If problems arise please contact your dealer. Original User Guide Impulse 2.0 Pedelec Version 3 EN-13
14 2. Protection from theft, manipulation and loss DANGER Protect your pedelec from unauthorised access. If third parties alter components (e.g. the brakes) without your knowledge, you could be seriously injured. Inspect your pedelec before every trip, and after each time it has been transported anywhere or has been left unattended 4. Before every trip P. EN-31. If your bike is damaged, do not ride it again before the damage has been rectified. If your bike is lost or stolen it will not be replaced under the warranty. The following measures can help you to protect your pedelec from theft and manipulation and to recover it if it has been stolen: Always lock the bike and battery even if you are only leaving it for a short while. Ideally, the lock(s) should block the wheel powered by the motor. Do not leave the key in. To be on the safe side, you can also remove the battery. The pedelec must also be secured with a lock when it is parked outside the home (e.g. sheds, basement). Do not park your pedelec in deserted locations especially for long periods. If possible, park your pedelec in manned private or communal garages or individual bike lockers. Attach the pedelec to a fixed object such as a tree, street lamp or fence, so that it cannot be carried away. Quick-release wheels should be attached to a fixed object together with the frame. That way the wheel cannot be stolen. Alternatively, the quick-release levers can be replaced by an anti-theft device. For questions about this please contact your dealer. Use a high quality bike lock: you should invest approximately 10% of the purchase price of the bike in locks. Your dealer will be able to fit a suitable frame lock if your bike does not already have one. Alternatively, you can also use other types of bike locks. Ask your dealer for advice. Make a note of the important details of your pedelec (e.g. in the service book II.III Service book P. EN-6, bike passport) and get it registered with the police. This makes it easier to identify if it is stolen. Have the police encode your pedelec; the address and initials of the owner are engraved on the frame in an encrypted form. Encoding makes the illegal resale of the bike more difficult and deters thieves. An encoded bike also makes it easier to identify the owner. Bicycle theft is often covered by household contents insurance. Check the terms of your insurance policy as soon as possible. EN-14 Original User Guide Impulse 2.0 Pedelec Version 3
15 3. Before your first ride Make sure that your pedelec is adjusted to suit your height and is ready to use. Familiarise yourself with the basic functions of your pedelec. DANGER Adjusting the pedelec to your height. If the bike is not correctly adjusted to your height you can lose control over the bike and fall off. Ask your dealer to show you the operation and features of the pedelec and its components. Please also read the component guides. We recommend that all assembly and adjustment work is carried out by a dealer, as incorrect assembly could cause components to become loose. If that happens while you are riding the bike you could be severely injured or killed. If you do have to tighten something, you will find a complete list of the required torque settings in Section 10. Torque settings P. EN-86, which must be strictly followed. 3.1 Attaching the pedals 1. Screw the right hand pedal (marked 'R') into the right hand pedal crank in a clockwise direction. 2. Screw the left hand pedal (marked 'L') into the left hand pedal crank in an anticlockwise direction. DANGER Make sure you screw the pedals in straight otherwise you could damage the thread on the pedal crank if that happens while you are riding the bike you could fall off. 3. Tighten both pedals towards the front wheel with a torque setting of 40 Nm. Practise braking and riding with assistance in a safe place before venturing into traffic. If you do not familiarise yourself with the operation and higher speed of your pedelec you could cause a serious accident. Ride in ECO mode until you feel confident enough to try the higher modes 5.7 Enabling push assist P. EN-35. Dismount if you are unsure about a situation. Original User Guide Impulse 2.0 Pedelec Version 3 EN-15
16 3.2 Adjusting the saddle height Determining the correct saddle height 1. Sit on the pedelec and at the same time lean against a wall Adjusting the saddle height: Saddle clamp(s) * 1. Loosen the saddle clamp(s) by turning it anticlockwise with an Allen key. 2. Move the saddle post to the desired position. 2. Turn the pedal crank on the side away from the wall to its lowest point. 3. Put your heel on the pedal. Your leg should be fully extended. 3. Extend leg 4. Raise the saddle if your leg is not fully extended when your heel is on the pedal. Lower the saddle if you cannot reach the pedals. The following sections explain how to adjust the saddle height on your bike. The saddle post can be fastened using the saddle clamp Adjusting the saddle height: Saddle clamp(s)* P. EN-16 or quickrelease lever Adjusting the saddle height: Quick-release clamps* P. EN Tighten the saddle clamp(s) again by turning it clockwise 10. Torque settings P. EN Test the tightness of the saddle by trying to move it. 1. Loosen the saddle clamp(s) 3. Tighten the saddle clamp(s) WARNING Saddle post marking There is a mark on the saddle post showing the maximum amount you can pull the saddle post out of the frame. Never pull out the saddle post beyond this mark, otherwise it can buckle or break and you could fall off. EN-16 Original User Guide Impulse 2.0 Pedelec Version 3 *depending on model


17 3.2.3 Adjusting the saddle height: Quick-release clamps * DANGER All quick-release clamps must be correctly tightened before you set off, otherwise the components can loosen or fracture if that happens while you are riding the bike you could fall off and it could result in serious injury. 1. Open the quick-release lever by turning it down 180. You will now usually be able to see the word 'OPEN' on the inside of the lever. 2. Close the quick-release lever by turning it up 180. You will now usually be able to see the word 'CLOSE' on the outside of the lever. Quick-release lever 1. Quick-release lever open DANGER Closing the quick-release lever should be so hard that you need to use the ball of your hand to do it (120 N: corresponds to a weight force of 12 kg). You should have the mark of the lever imprinted on your hand. If not, it can open and loosen the saddle while you are riding the bike, which could result in you falling off the bike. If you have overtightened the quick-release lever the seat post can fracture which could also result in serious injury if it happens while you are riding the bike. Quick-release lever closes too easily Quick-release lever too stiff 1. Turn the adjustment nut clockwise. 2. Close the quick-release lever again. 1. Turn the adjustment nut anticlockwise. 2. Close the quick-release lever again. 3. Test the tightness of the saddle by trying to move it. Adjustment nut Quick-release lever Quick-release lever opened 2. Quick-release lever closed *depending on model Original User Guide Impulse 2.0 Pedelec Version 3 EN-17
. Fig. 1 Clamping screw correct Fig. 2 wrong Use a torque wrench to tighten the clamping screws. Observe the specified torque setting.")
![If no value is shown on the component, use the torque settings from the following table: Thread Tightening torque [Nm] M5 / M6 / M8 M5: 5.5 / M6: 5.](/docs-images/92/108410956/images/18-1.jpg "5 / M7: 14 / M8: 20 Failure to comply can result in screws/bolts becoming loose, tearing away or fracturing.")


18 3.3 Shifting and tilting the saddle DANGER Never clamp the saddle in the curve of the saddle rail; always do it in the straight section. Only shift the saddle within the straight section (fig. 1). Saddles that stay clamped outside this area can fail (fig. 2). Fig. 1 Clamping screw correct Fig. 2 wrong Use a torque wrench to tighten the clamping screws. Observe the specified torque setting. If no value is shown on the component, use the torque settings from the following table: Thread Tightening torque [Nm] M5 / M6 / M8 M5: 5.5 / M6: 5.5 / M7: 14 / M8: 20 Failure to comply can result in screws/bolts becoming loose, tearing away or fracturing. If that happens while you are riding the bike, components may come off and you could have a severe crash. If screws are overtightened, other components can also be damaged Screw supports: Shifting and tilting the saddle 1. Loosen the clamping screw by turning it anti-clockwise. Turn the screw completely two to three times at most or the whole mechanism could fall apart. 2. Shift the saddle forwards or backwards as desired. 3. Tilt the bicycle saddle to the desired angle. 4. Tighten the clamping screw by turning it clockwise with a torque wrench. 5. Ensure that the newly-tightened saddle does not tip; test it by pressing down on the front and back alternately Twin-screw supports: Shifting and tilting the saddle DANGER Screw the clamping screws fully in a straight position in the nuts. Failure to do so can result in the screws tearing out of the nuts. correct For 1. Loosen the clamping screw wrong Clamping screw Fig. 1 Fig. 2 EN-18 Original User Guide Impulse 2.0 Pedelec Version 3
19 1. To shift the saddle, loosen the front and rear screws by turning them anticlockwise. Turn the screws completely two to three times at most or the whole mechanism could fall apart. 2. Shift the saddle forwards or backwards as desired. 3. Tighten the screws using a torque wrench to turn them clockwise. 4. To alter the angle of the saddle, loosen the front screw by turning it anti-clockwise. Turn the screw completely two to three times at most or the whole mechanism could fall apart. 5. Tighten the front screw with the same number of turns. 6. Ensure that the newly-tightened saddle does not tip; test it by pressing down on the front and back alternately Clamp attachment: Shifting and tilting the saddle 1. Turn the clamping nut clockwise to loosen it. You may need to keep the nut on the other side in place with a second key. 2. Shift the saddle forwards or backwards as desired. 3. Tilt the bicycle saddle to the desired angle. For 1. Loosen screws For 1. Loosen clamping nut 4. Turn the clamping nut clockwise to tighten it. You may need to keep the nut on the other side in place with a second key. Observe the correct torque setting. 5. Ensure that the newly-tightened saddle does not tip; test it by pressing down on the front and back alternately. 3.4 Adjusting the sprung saddle post DANGER Ask your cycle dealer to adjust the suspension elements of the seatpost. 1. Remove the saddle post 3.2 Adjusting the saddle height P. EN Tighten the suspension adjustment screw with an Allen key (6 mm) in the clockwise direction to reduce the suspension or loosen anticlockwise to increase the suspension. DANGER The suspension adjustment screw must not protrude from the saddle post, otherwise the screws/saddle post can loosen if that happens while riding you could fall off and it could result in serious injury. Screw must not protrude from the saddle post Suspension adjustment screw Original User Guide Impulse 2.0 Pedelec Version 3 EN-19


20 3.5 Adjusting the height and angle of the handlebars DANGER Ask your dealer to do this, otherwise there is a risk of the handlebars loosening, leading to falls and serious injuries. DANGER Practise braking in a safe place before venturing into traffic. The braking action may be stronger or weaker than you are used to. Serious accidents can happen if you do not familiarise yourself with the braking action. Practise until you feel confident enough. Dismount if you are unsure about a situation. 3.6 Switching the lighting on/off * A slider control is located on the rear of the front light. Depending on which way you move it, the front and rear light will be on or off when you are riding. 3.7 Braking Rim brake Rim brakes: Avoid continuous braking on long downhill stretches. It can lead to a loss in braking power and/or damage to the tyres. Brake intermittently with intervals in between to allow the airflow to cool the braking system. If necessary, make regular stops to ensure adequate cooling. Make sure that you can always reach the brakes comfortably and that you are familiar with their operation and position. Note which brake lever operates the front and rear brakes. If your pedelec is fitted with a back pedal or coaster brake you can operate it by pedalling backwards. Replace the brake pads when they reach the safe wear limit. The use of worn brake pads can lead to serious injuries with fatal consequences. CAUTION Disc brakes: Avoid touching the brake discs after intensive use of the brakes: they can become very hot. You could burn yourself if you touch them. Disc brake EN-20 Original User Guide Impulse 2.0 Pedelec Version 3 *depending on model


21 3.8 Chain * Chain tension Measuring chain tension 1. Remove the pedelec battery. 2. Press the chain up or down at its tautest point. The tension is correct if you can move the chain up and down by about 5 mm. Bicycle chain WARNING Always remove the battery before starting to work on the pedelec. The system could switch itself on unexpectedly and you could be seriously injured. 3. Check the chain at four or five points over a complete revolution of the crank. Adjusting chain tension 1. Remove the pedelec battery. 2. Undo the rear wheel nuts. CAUTION Check the chain for signs of wear before every trip. A worn or damaged chain can break. If that happens while you are riding the bike you could be thrown off and seriously injured. 3. If necessary remove the brake anchor. 4. Pull the rear wheel back in the drop-outs until the chain just has the permissible amount of play. 5. Carefully tighten all bolts in a clockwise direction to a torque setting of Nm. Make sure the wheel is reinstalled straight. *depending on model Original User Guide Impulse 2.0 Pedelec Version 3 EN-21


22 3.8.2 Checking for wear 3.9 Drive belt * 1. Remove the pedelec battery. 2. Check chain wear with a chain wear indicator or a vernier calliper. 3. Replace the chain if it is worn Cleaning and maintenance Lubricate the chain after riding in the rain. Clean and lubricate it when you clean the wheel. 1. Remove the pedelec battery. 2. Roughly brush the chain with a hand brush. 3. Then remove the old chain oil with a dry cloth. 4. You can now lubricate the chain. How you lubricate the chain depends on the product you have chosen. 5. When you have finished, turn the crank to distribute the chain oil. Bicycle belt WARNING Always remove the battery before starting to work on the pedelec. The system could switch itself on unexpectedly and you could be seriously injured. CAUTION Check the drive belt for signs of wear before every trip. A worn or damaged drive belt can break. If that happens while you are riding the bike you could be thrown off and seriously injured. IMPORTANT When you are cleaning the belt, make sure that no water gets into the motor. Water ingress can damage the motor. EN-22 Original User Guide Impulse 2.0 Pedelec Version 3 *depending on model
 of the belt length. 6. Pluck the belt so that it vibrates like a guitar string.")


23 3.9.1 Belt tension Measuring belt tension There are various methods of measuring the tension of the drive belt. One of these is the Carbon Drive app, which measures the tension based on the natural frequency (Hz) of the belt length. 6. Pluck the belt so that it vibrates like a guitar string. The app converts the sound into the natural frequency of the belt. 7. Turn the crank a quarter of a revolution and repeat the measurement. 8. Compare the frequency of the belt with the reference value to see if the tension needs adjusting. Smartphone operating system ios Android Download com/cds/products/ ACCESSORIESANDTOOLS Specified tension values Small, lighter riders Hub gear 50 Hz 60 Hz Adjusting the belt tension Tall, heavier riders The Carbon Drive app works best in a quiet environment. 1. Remove the pedelec battery. 2. Undo the bolts from the drop-out by turning them anticlockwise. 2. Undo bolts 1. Remove the pedelec battery. 2. Load the app on to your smartphone. 3. Start the app. 3. Increase or reduce the tension with the set screw. Make sure the wheel is reinstalled straight. Set screw 4. Select the tension icon. 3. Set screw 5. Switch on the microphone, click on "Measure" and hold the phone over the middle of the belt making sure that the microphone is pointing at the belt. Original User Guide Impulse 2.0 Pedelec Version 3 EN-23
24 IMPORTANT Checking for wear 1. Remove the pedelec battery. 2. Check the belt for wear. This belt is in good condition. The loss of blue colour is not a sign of wear. Correct alignment CDC sprockets are not correctly aligned CDX sprockets are not correctly aligned Belt with no wear When adjusting the tension, the correct alignment of the belt must be maintained. Otherwise, it can cause noise, premature wear of the belt or sprocket, and the belt to come off the drive. Fig.: Gates Corporation: Gates Carbon Drive Owner's Manual. 2014, Page 13. URL: (Version 07/01/2016) Missing teeth and cracks in the tooth root: This belt is in a very poor condition. Carbonfasern liegen frei Nicht Worn Symmetrisch belt Fehlender Abgenutztes Material Riemenzahn mit freigelegtem Urethan Fig.: Gates Corporation: Gates Carbon Drive Owner's Manual. 2014, Page 14. Haizahn URL: (Version 07/01/2016) 3. When the safe wear limit has been reached, the belt must be replaced. 4. Tighten the drop-out screws to a torque setting of Nm in a clockwise direction 10. Torque settings P. EN Tighten screws When the middle guide on the sprocket is more worn on one Bruchrisse side than the other, this is a sign of a poorly adjusted belt line. On black anodized front sprockets, this is relatively easy to see, because the anodizing on the abrasive side is worn down to the aluminium. EN-24 Original User Guide Impulse 2.0 Pedelec Version 3
.")

25 3.9.3 Cleaning 1. Remove the pedelec battery. 2. Clean the belt with a soft, damp cloth. IMPORTANT When you are cleaning the belt, make sure that no water gets into the motor. Water ingress can damage the motor. 3. Leave to dry Gears The gears are operated by controls on the handlebars (gear lever, twist grips,...). The gear shift allows you to adjust the gear of your bicycle and the transmission to the current situation. On a straight level stretch a higher gear is sensible to achieve and maintain a higher speed without having to pedal too much. As soon as you start going uphill a lower gear is beneficial, because it is important to be able to climb the hill with little effort. Select the gears so that your legs are always moving at a steady pace. Derailleur* With this system the chain is lifted on to a sprocket when changing gear. The chain must continue moving so that the teeth of the sprocket can engage with the chain links easily and smoothly. For a successful gear change you must therefore keep pedalling forwards, never backwards! but at the same time pedalling lightly and without force. Derailleur Hub gear* Here the change of gear takes place inside the rear wheel hub. Space is very tight inside the hub, therefore it is sensible to pedal lightly when changing gear. *depending on model Hub gear Original User Guide Impulse 2.0 Pedelec Version 3 EN-25

.")
26 3.11 Wheel Changing the wheel Axle nut * Removing the rear wheel 1. Remove the pedelec battery. 2. Change the gear to the one recommended by the gear manufacturer for disassembly. 3. Remove the gear shift cable from the rear wheel. 4. Undo the axle nuts using a 15 mm spanner, turning anticlockwise. 5. If necessary remove the brake anchor. 6. Take off the belt/chain. 7. Remove the rear wheel. 3. Remove shift cable from rear wheel Axle nut Shift cable Quick-release wheels * DANGER wrong Quick-release lever and brake disc clash Front wheel: The quick-release lever must be positioned on the opposite side to the brake disc (where fitted). If the quick-release lever is on the same side as the brake disc, there is a risk that they can clash and lock the front wheel (see diagram), which can cause a serious accident. All quick-release clamps must be correctly tightened before you set off, otherwise the components can loosen if that happens while riding you could fall off and it could result in serious injury. Replacing the rear wheel 4. Undo axle nuts Removing the front wheel 1. Attach the belt/chain. 2. Insert the rear wheel centrally in the drop-outs as far as it will go. 3. Re-attach the gear shift cable. 4. If necessary fasten the brake anchor. 5. Tighten the axle nuts using a 15 mm spanner, turning clockwise. Make sure that your wheel is correctly centred. 6. Reinsert the battery. 1. Remove the pedelec battery. 2. Open the quick-release lever by turning it down 180. You will now usually be able to see the word 'OPEN' on the inside of the lever. 3. Carefully undo the adjustment nut, turning it anticlockwise. Adjustment nut Quick-release clamp 2. Open quick-release clamp EN-26 Original User Guide Impulse 2.0 Pedelec Version 3 *depending on model
27 IMPORTANT Detach all cables from the wheel (e.g. lighting cables), otherwise you could tear them. If your bike is fitted with rim brakes it is sensible to release them before you remove the front wheel. Otherwise you may not be able to remove the front wheel. 4. Remove the front wheel. Quick-release lever closes too easily Quick-release lever too stiff 1. Open the quick-release lever. 2. Turn the adjustment nut clockwise. 3. Close the quick-release lever again. 4. Repeat if necessary. 1. Open the quick-release lever. 2. Turn the adjustment nut anticlockwise. 3. Close the quick-release lever again. 4. Repeat if necessary. Replacing the front wheel 1. Insert the wheel into the front fork ends. 2. Gently turn the adjustment nut on the quick-release lever in a clockwise direction. Make sure that your wheel is correctly centred. 3. Close the quick-release lever by turning it up 180. You will now usually be able to see the word 'CLOSE' on the outside of the lever. DANGER Adjustment nut Quick-release clamp 3. Close quick-release clamp DANGER Quick-release levers cannot be closed just by simple turning. If you have released the rim brakes to remove the wheel, you must close them again, otherwise you will not be able to brake and run the risk of serious injury. WARNING Reattach any previously disconnected cables (e.g. lighting cables ), otherwise they can get caught in the spokes. If that happens while you are riding the bike you could be thrown off and seriously injured. Closing the quick-release lever should be so hard that you need to use the ball of your hand to do it (120 N: corresponds to a weight force of 12 kg). You should have the mark of the lever imprinted on your hand. If not, it can open and loosen the wheel while you are riding the bike, which could result in you falling off the bike. Original User Guide Impulse 2.0 Pedelec Version 3 EN-27
28 Quick-release axle * Removing the front wheel Replacing the front wheel 1. Apply a thin layer of grease to the quick-release axle. 1. Remove the pedelec battery. 2. Open the quick-release lever on the front wheel by turning it down 180. Quick-release clamp 2. Open quick-release clamp 2. Push the wheel into the front forks and align with the axle holes. 3. Reinsert the quick-release axle. Quick-release clamp 6. Close quick-release clamp 3. Hook the quick-release lever into the slot and turn it anticlockwise until the quick-release axle protrudes from the axle hole about 1 cm. 4. Lift out the front wheel and remove the quick-release axle. IMPORTANT Detach all cables from the wheel (e.g. lighting cables), otherwise you could tear them. If your bike is fitted with rim brakes you must release them. Alternatively, you can deflate the front tyre. Otherwise you may not be able to remove the front wheel. 5. Remove the front wheel. 4. Move the quick-release lever to the open position. 5. Hook the quick-release lever into the slot and turn it clockwise. This screws the axle into the thread. Make sure that your wheel is correctly centred. 6. Close the quick-release lever by turning it up 180. DANGER Closing the quick-release lever should be so hard that you need to use the ball of your hand to do it (120 N: corresponds to a weight force of 12 kg). You should have the mark of the lever imprinted on your hand. If not, it can open and loosen the wheel while you are riding the bike, which could result in you falling off the bike. EN-28 Original User Guide Impulse 2.0 Pedelec Version 3 *depending on model

29 1. Open the quick-release lever Rims Quick-release lever closes too easily 2. Hook the quick-release lever into the slot and turn it clockwise. This screws the axle into the thread. Make sure that your wheel is correctly centred. 3. Close the quick-release lever. Wear WARNING Quick-release lever too stiff 4. Repeat if necessary. 1. Open the quick-release lever. 2. Hook the quick-release lever into the slot and turn it anticlockwise until the quickrelease axle protrudes from the axle hole about 1 cm. 3. Close the quick-release lever. Look out for deep grooves on both rims. The rims could fracture and cause a fall. Replace rims as soon as you detect signs of wear. Many rims have a wear indicator. If it can no longer be felt at a certain point, the rim is worn. Wear indicator 4. Repeat if necessary. WARNING Reattach any previously disconnected cables (e.g. lighting cables ), otherwise you could tear them. Cleaning 1. Remove the pedelec battery. 2. Brush the rims with a hand brush. Heavier soiling can be removed with a soft, damp cloth. IMPORTANT When you are cleaning the belt, make sure that no water gets into the motor. Water ingress can damage the motor. 3. Leave to dry. Original User Guide Impulse 2.0 Pedelec Version 3 EN-29


30 Tyres DANGER Do not either overinflate or underinflate the tyres. If the tyre pressure is too high, at worst, the tyre could burst, causing you to fall off. On the other hand, if the tyre pressure is continuously too low, the tyre can wear out prematurely. The maximum permissible pressure is marked on the side of tyre in bar and pounds per square inch. You can check the tyre pressure for yourself using a tyre pressure gauge. Alternatively, you can ask your dealer Suspension fork * The suspension forks support the front wheel. The distance travelled by the wheel between its unloaded and fully loaded positions is called the total suspension travel. Brand Fork type Total suspension travel Fox 32 Float Evo 120 mm Fox 32 F CTD 120 mm Postmoderne HG mm RST Pulse 50 mm RST Verso 3 50 mm Brand Fork type Total suspension travel Sram Recon Silver 100 mm I 120 mm Sram Reba Rl 100 mm I 120 mm Sram XC 32 TK 120 mm Sram XC 100 mm Suntour XCR Air 120 mm Suntour XCR 100 mm Suntour CR85 63 mm Suntour NCX-D 63 mm Suntour NEX 63 mm Suntour CR-8V 50 mm Suntour CR-7V 40 mm Model year 2015/2016 Version 18/12/ Lockout system If your suspension forks are fitted with a lockout system it is possible to lock the suspension. There are some riding situations where that can be useful: for example, if you are riding up a hill or if you are standing up from the saddle when accelerating. To switch the suspension to fixed, turn the rotary control on the right hand side of the fork to 'LOCK' (or alternatively: $). To reactivate the suspension, turn the control to the 'OPEN' position. EN-30 Original User Guide Impulse 2.0 Pedelec Version 3 *depending on model

31 LOCK/$ OPEN Suspension locked Suspension activated 4. Before every trip DANGER DANGER Do not ride over rough terrain with the suspension locked. It can damage the suspension forks. A broken fork could cause you to fall off and seriously injure yourself Air system * On some suspension forks it is possible to alter the air pressure. To do that you will need the assistance of your dealer or if you feel confident of doing it yourself a suspension fork pump with a pressure gauge and the suspension fork manufacturer's installation manual. The valve with cap (e.g. marked 'AIR') is usually located on the left hand side of the fork. Have damaged components (tears, cracks etc.) replaced before you use the bike again. If not, important components may fail, causing you to fall off. Do not ride the pedelec if it is not in a technically satisfactory condition. If you are not sure, have it checked out by your dealer. We recommend asking your cycle dealer to assemble and adjust the bike. Otherwise, components could become loose due to a faulty assembly. Should this happen whilst you are cycling, you could injure yourself seriously or even die. Inspect your pedelec before every trip, and after each time it has been transported anywhere or has been left unattended. Use the following checklist to help you. Checklist Typ Frame/forks Characteristics Check the frame and forks for visible warping, cracks and damage. Handlebars / front stem Check they are seated securely Check that the bell is working and attached correctly and securely. Saddle / saddle post Check that the quick-release skewers / through-axles (if available) are secure. *depending on model Original User Guide Impulse 2.0 Pedelec Version 3 EN-31
32 Typ Wheels Chain or belt Brakes Lights Threaded joints Luggage Characteristics Check the condition (damage, foreign bodies), concentricity and pressures of the tyres. The maximum permissible pressure is marked on the side of a tyre in bar and psi (pounds per square inch). Check the valves are seated securely. Visually inspect the rims for damage and wear. Check that the quick-release skewers / through-axles (if available) are secured correctly. Check the chain, belt, pinions and sprockets for wear and damage. Check that the brake system (including brake levers) is working and attached correctly and securely. Visual inspection of the brake pads/disks. Check that the light system is adjusted and in working order. Check that reflectors are affixed in accordance with applicable national traffic regulations. Check that all threaded joints are tightened as specified. Check it is attached securely. 5. Quick-start guide 5.1 Charging the battery IMPORTANT If you only want to go for a quick test run, you do not need to charge the battery. You should definitely charge it before the first long trip, because for technical reasons, the battery is supplied only partially charged (approximately 50%). Perform a 'learning cycle': You should completely run down a new, fully charged battery once until the drive assistance stops and without recharging it in between. In that way the battery 'learns' its capacity, and the actual capacity will agree with the level indicated on the battery status display. As soon as the battery enters Sleep mode, press the battery button for 1 second. Then the learn cycle can be continued. Please perform a learn cycle every six months or 5,000 kilometres. If you do not repeat this from time to time, the actual capacity of the battery will increasingly diverge from the value on the battery status display. EN-32 Original User Guide Impulse 2.0 Pedelec Version 3

33 5.2 Inserting and locking the battery IMPORTANT Grasp the battery firmly, so that it does not fall out of your hand. It can be damaged if you drop it. Seat tube battery 1. Hold the battery with the discharge plug downwards in front of the docking station at an angle of 80, slightly tilted to the left. 1. Hold in front of the docking station Down tube battery 1. Hold the battery with the discharge plug down on to the docking station. 2. Push the battery into the docking station until it engages. 3. Turn the battery key clockwise. The battery is now locked. 1. Hold at docking station 2. Push battery into docking station 2. Insert the battery nibs into the recesses provided. Battery nibs 3. Push the battery forwards and upwards into the docking station until the locking mechanism engages. Recesses 2. Battery nibs into recesses 3. Locking the battery 4. Turn the battery key clockwise. The battery is now locked. 3. Push battery into docking station IMPORTANT It is recommended that you remove the key to prevent it breaking off and getting lost. Make a note of the key number on the sales receipt or proof of purchase. You can order a replacement with this number if you lose the key 9. Faults P. EN Locking the battery Original User Guide Impulse 2.0 Pedelec Version 3 EN-33
34 5.3 Switching on the pedelec Do not switch on the pedelec when you are riding. Otherwise, the motor can stop and you will not be provided with the full assist level. 1. Press the button on the easy-reach control for 1 second. The display lighting comes on for about 30 seconds. A welcome message appears in the information field of the display. If you have an Impulse 2.0 system with a back pedal brake the screen shows: "Please start pedalling " or "PEDAL". You can configure other settings from the start menu. Press the button Down tube battery: After switching on, wait five seconds before you set off. Otherwise, you will not be provided with the full assist level. 5.4 Battery charge level The battery charge level is shown in the top right of the display. Information is displayed on a battery-shaped icon with seven segments, telling you how full the battery is charged. The lower the battery charge level, the fewer segments are displayed. If the battery falls below the minimum charge level, the assist function is also switched off by the motor. Display Battery charge level % % Start menu % If the system does not switch on despite pressing the button, press the battery button for 1 second. The pedelec will switch on. If it still does not switch on, check the battery Display panel P. EN-66. Seat tube battery Battery button % % % Down tube battery EN-34 Original User Guide Impulse 2.0 Pedelec Version 3
35 5.5 Big Display: Remaining range The display for the remaining range is below that for the battery charge level. The remaining range tells you the number of kilometres the system will still assist you. While you are riding measurements are taken every 50 m. The display computes an average value from measurements taken over the last 20 kilometres, which is separately stored for each assist level. This value is then used as a basis for calculating the remaining range. This means that the remaining range largely depends on your riding style over the last 20 kilometres. 5.6 Changing assist mode 1. You must be in the start menu to change the assist mode. Select the level of assist you require by briefly pressing the / buttons. Display Assist Power consumption No assist Very low 2. Assist starts working as soon as you start pedalling. Assist cuts out as soon as you stop pedalling or when you have reached a speed of 25 km/h. 5.7 Enabling push assist WARNING Push assist may only be used when pushing the pedelec. Otherwise you could seriously injure yourself. Push assist is not designed to provide assistance when someone is sitting on the pedelec. On back pedal models the pedal crank also turns. Display Assist Power consumption Assist function is working hard High Push assist helps you when pushing the bike (up to max. 6 km/h). This is particularly helpful when you want to push your pedelec uphill. Assist is working with medium power Assist is working with low power Medium Low 1. Press and hold the button. The push assist is activated after three seconds. "Pushing assistance" appears on the display. Keep the button pressed until you no longer need push assist. Pushing assistance activated Original User Guide Impulse 2.0 Pedelec Version 3 EN-35
36 5.8 Displaying favourite settings 5.9 Configuring settings in the main menu You cannot configure any settings in the main menu while you are riding. Favourite settings If you are in the start menu and want to change to other favourite settings proceed as follows: Accessing the main menu 1. If you are in the start menu, press the button for three seconds: You will go to the main menu. 1. While in the start menu, briefly press the button. If you have selected several favourite settings in the start menu Preselecting favourite settings P. EN-45, the next favourite is now displayed. 2. Keep pressing the button until the desired favourite setting is displayed. Start menu Main menu Navigating within a menu 1. Use the / buttons to navigate to the required option. The selected option is highlighted in bold. 2. To confirm your selection, briefly press the button. You will then either move to the next lowest menu level or confirm your setting. EN-36 Original User Guide Impulse 2.0 Pedelec Version 3
37 5.9.3 Returning from a menu There are four different ways to return to the next highest level or the start menu: Back option 1. Use the / buttons to navigate to the 'Back' option. The selected option is highlighted in bold. 2. Confirm by pressing the button. You will return to the next highest level. Briefly pressing the button 1. If there is no 'Back' option, and one of the displayed options is selected, briefly press the button to return to the next highest level. Prolonged pressing of the button 1. If you press the button for three seconds, you will return to the start menu. Start riding 5.10 Switching off the pedelec DANGER Only ride the Pedelec when you can safely reach the brakes 3.7 Braking P. EN-20. Your Pedelec does not have an Emergency stop button. You must activate the brakes to stop the cycle quickly in a dangerous situation. The maximum brake force is greater than the propulsion force possible. This means stopping is guaranteed at all times by pressing the brakes. Note that the drive system does not disable automatically after braking. Switch the drive system to idle after braking. On the easy-reach control 1. Press the button on the easy-reach control for one second. The Impulse 2.0 system switches off. Via the battery 1. Briefly press the battery button twice. The Impulse 2.0 system switches off after a few seconds. 1. The start menu is displayed as soon as you start moving. Original User Guide Impulse 2.0 Pedelec Version 3 EN-37
38 5.11 Unlocking and removing the battery DANGER Hold the battery tight so it does not fall. It can be damaged if you drop it. IMPORTANT It is recommended that you remove the key to prevent it breaking off and getting lost. Seat tube battery 1. Grip the battery firmly, put the key into the lock and turn anticlockwise. The battery is unlocked. 2. Grip the battery and tilt it out of the docking station on the side. 1. Unlocking the battery 6. Drive unit, display and easy-reach control 6.1 Safety information DANGER Do not let yourself become distracted by the display. If you do not concentrate exclusively on the traffic, you run the risk of a serious accident or fall with fatal consequences. Down tube battery 1. Grip the battery firmly, put the key into the lock and turn anticlockwise. The battery is unlocked. 2. Grip the battery and lift it upwards out of the docking station. 2. Removing the battery 1. Unlocking the battery WARNING Do not attempt any modifications to the drive unit. For example, it is not permitted to raise the cut-off speed above 25 km/h. Furthermore, the speed of the push assist must not exceed 6 km/h. Pedelecs with modified drive power no longer comply with the legal requirements of their relevant country. You may be liable to prosecution if you ride on public roads with a 'tuned' pedelec. There is also the risk of a technical failure. Modified bikes of this type are excluded from the warranty and guarantee. Always remove the battery before starting to work on the pedelec. Accidental activation of the button may lead to severe injuries. EN-38 Original User Guide Impulse 2.0 Pedelec Version 3 2. Removing the battery
39 CAUTION Do not open the drive unit. There is a risk of electric shock. It will also invalidate any warranty claim. Repairs to the drive unit should only be carried out by trained dealers. Do not touch the motor after a long downhill stretch. It can become extremely hot. You could burn yourself if you touch it. IMPORTANT All components mounted on the drive unit, and all other drive components, may only be replaced with identical components or those approved specially for your pedelec by the manufacturer. Otherwise it may result in overloading and damage. Do not open the display; you may damage it beyond repair. At low temperatures the display can react slowly. Observe the operating temperature of the display 6.2 Technical details P. EN Technical details Drive unit Type Brushless electric motor Back pedal Free-wheel Offroad Nominal power 250 W 250 W 250 W Nominal torque 35 Nm 35 Nm 35 Nm Max. torque 80 Nm 80 Nm 80 Nm Nominal voltage 36 V 36 V 36 V Cut-off speed 25 km/h 25 km/h 25 km/h Permitted ambient temperature range during operation -10 to +40 C -10 to +40 C -10 to +40 C Storage temperature -10 to +50 C -10 to +50 C -10 to +50 C Recommended storage temperature 18 to 23 C 18 to 23 C 18 to 23 C Protection class IP 54 IP 54 IP 54 Weight 3.9 kg 3.8 kg 3.9 kg LCD Big Display Type Permitted ambient temperature range during operation LCD display -10 to +40 C Storage temperature -10 to +50 C Recommended storage temperature Dimensions L W H D 18 to 23 C 9.6 cm 6.3 cm 3.3 cm 11.5 cm Original User Guide Impulse 2.0 Pedelec Version 3 EN-39

40 Protection class IP 54 Weight Languages 150 g DE EN NL FR ES IT FI DA 6.3 Overview and basic functions LCD Compact Display Type Permitted ambient temperature range during operation LCD display -10 to +40 C 4 5 Storage temperature -10 to +50 C Recommended storage temperature Dimensions L W H D Protection class IP 54 Weight Languages Easy-reach control Type Permitted ambient temperature range during operation 18 to 23 C 4.8 cm 4.8 cm 2.5 cm 6.8 cm 45 g EN DE Easy-reach control with 4 buttons -10 to +40 C Storage temperature -10 to +50 C Recommended storage temperature 18 to 23 C LCD Big Display No. Function 1 Speed 2 Assist mode 5.6 Changing assist mode P. EN-35 3 Battery charge level Battery charge level P. EN-66 4 Range Range P. EN-69 5 a) Information field b) Favourite settings Preselecting favourite settings P. EN-45 To learn more about the LCD Big Display, watch our video on YouTube: Protection class IP 54 Weight 27 g EN-40 Original User Guide Impulse 2.0 Pedelec Version 3
 Information field b) Total kilometres 6.4 LCD Compact Display P. EN-44 c) Trip distance 6.4 LCD Compact Display P. EN-44 Easy-reach control No. Symbol Function 1 a) On 6.3.")
 Activates display lighting for 30 seconds. 3 a) Decrease value/scroll down. b) Activates display lighting for 30 seconds. c) LCD Compact Display: Reset trip distance to zero 6.")
41 LCD Compact Display No. Function 1 Speed 2 Assist mode 5.6 Changing assist mode P. EN-35 3 Battery charge level Battery charge level P. EN-66 4 a) Information field b) Total kilometres 6.4 LCD Compact Display P. EN-44 c) Trip distance 6.4 LCD Compact Display P. EN-44 Easy-reach control No. Symbol Function 1 a) On Switching on the pedelec P. EN-42 b) Off Switching off the pedelec P. EN-42 2 a) Increase value/scroll up. b) Push assist 5.7 Enabling push assist P. EN-35 c) Activates display lighting for 30 seconds. 3 a) Decrease value/scroll down. b) Activates display lighting for 30 seconds. c) LCD Compact Display: Reset trip distance to zero 6.4 LCD Compact Display P. EN a) Configure/confirm. b) LCD Big Display: Switches between favourite settings in main menu Preselecting favourite settings P. EN-45. c) LCD Compact Display: Switches between kmh/km and mph/mi 6.4 LCD Compact Display P. EN-44. d) Activates display lighting for 30 seconds. e) LCD Compact Display: Switches between total kilometres and trip distance 6.4 LCD Compact Display P. EN-44. Original User Guide Impulse 2.0 Pedelec Version 3 EN-41
42 6.3.1 Switching on the pedelec The system can only be activated if a sufficiently charged battery has been inserted. Do not switch on the pedelec when you are riding. Otherwise, the motor can stop and you will not be provided with the full assist level. 1. Press the button on the easy-reach control for one second. The display lighting comes on for about 30 seconds. A welcome message appears in the information field of the display. If you have an Impulse 2.0 system with a back pedal brake the screen shows: "Please start pedalling" or "PEDAL". You can configure other settings from here. Start menu Switching off the pedelec DANGER Only ride the Pedelec when you can safely reach the brakes 3.7 Braking P. EN-20. Your Pedelec does not have an Emergency stop button. You must activate the brakes to stop the cycle quickly in a dangerous situation. The maximum brake force is greater than the propulsion force possible. This means stopping is guaranteed at all times by pressing the brakes. Note that the drive system does not disable automatically after braking. Switch the drive system to idle after braking. On the easy-reach control 1. Press the button on the easy-reach control for one second. The Impulse 2.0 system switches off. Via the battery If the system does not switch on despite pressing the button, press the battery button for 1 second. The pedelec will switch on. If it still does not switch on, check the battery Display panel P. EN-66. Down tube battery: After switching on, wait five seconds before you set off. Otherwise, you will not be provided with the full assist level. Seat tube battery Down tube battery Battery button 1. Briefly press the battery button twice. The Impulse 2.0 system switches off after a few seconds. You can switch off your Impulse 2.0 pedelec from any level in the menu. You do not have to display the start menu to do this. The last configured settings remain saved. If the pedelec remains stationary for about 20 minutes the Impulse 2.0 switches itself off. EN-42 Original User Guide Impulse 2.0 Pedelec Version 3
43 6.3.3 Battery charge level The battery charge level is shown in the top right of the display. Information is displayed on a battery-shaped icon with seven segments, telling you how full the battery is charged. The lower the battery charge level, the fewer segments are displayed. If the battery falls below the minimum charge level, the assist function is also switched off by the motor. Display Battery charge level % % % % % % LCD Big Display: Remaining range The display for the remaining range is below that for the battery charge level. The remaining range tells you the number of kilometres the system will still assist you. While you are riding measurements are taken every 50 m. The display computes an average value from measurements taken over the last 20 kilometres, which is separately stored for each assist level. This value is then used as a basis for calculating the remaining range. This means that the remaining range largely depends on your riding style over the last 20 kilometres Changing assist mode 1. You must be in the start menu to change the assist mode. Select the assist level you require by briefly pressing the / buttons. Display Assist Power Consumption Assist function is working hard High Assist is working with medium power Medium Assist is working with low power Low No assist Very low Original User Guide Impulse 2.0 Pedelec Version 3 EN-43
44 2. Assist starts working as soon as you start pedalling. Assist cuts out as soon as you stop pedalling or when you have reached a speed of 25 km/h. Big Display: You can have the ride profile (assistance behaviour) of your pedelec changed by your dealer Enabling push assist Push assist helps you when pushing the bike. WARNING Push assist may only be used when pushing the pedelec. Otherwise you could seriously injure yourself. Push assist is not designed to provide assistance when someone is sitting on the pedelec. On back pedal models the pedal crank also turns. 6.4 LCD Compact Display Trip distance To reset the trip distance to zero, press the Unit button for three seconds. To switch between kmh/km (kilometres) and mph/mi (miles), press the button for three seconds. Display total kilometres and trip distance To switch the display of total kilometres and trip distance, briefly press the SET button. 6.5 LCD Big Display: Favourite settings Push assist helps you when pushing the bike (up to max. 6 km/h). This is particularly helpful when you want to push your pedelec uphill. Favourite settings 1. Press and hold the button. The push assist is activated after three seconds. "Pushing assistance" appears on the display. Keep the button pressed until you no longer need push assist. Pushing assistance activated EN-44 Original User Guide Impulse 2.0 Pedelec Version 3
45 6.5.1 Displaying favourite settings If you are in the start menu and want to change to other favourite settings proceed as follows: 1. While in the start menu, briefly press the button. If you have selected several favourite settings in the start menu Preselecting favourite settings P. EN-45, the next favourite is now displayed. 2. Keep pressing the button until the desired favourite setting is displayed Preselecting favourite settings Path: Personalise I Favourite settings You can select which of the following favourite settings you want displayed in the start menu. Favourite settings Display Meaning Trip km/time Trip (in km) Trip (e.g. day trip, short trip) in kilometres. Favourite settings Display Meaning Tour km/ø Tour (in km) Tour (e.g. cycle tour over several days) in kilometres. Tour Ø (in km/h) Average speed (in kilometres per hour) achieved on the tour (e.g. cycle tour over several days). Cadence/Assistance Cadence (in rpm) The number of crank revolutions per minute. Assist The five equal-sized boxes indicate the assist level you are currently receiving. The greater the number of black boxes, the higher the assist level being provided. Power cost Trip cost (in ) Cost in euro, incurred during the trip (e.g. day trip, short trip). Tour cost (in ) Total saving (in ) (in CO2) Cost saving compared with travelling by car. Cost in euro, incurred during the tour (e.g. cycle tour over several days). Total CO2 savings compared with travelling by car. Total km (in km) Total number of kilometres ridden. Trip time (in 00:00:00 format) Duration of trip (e.g. day trip, short trip) in hours, minutes and seconds. Trip max/ø Trip max (in km/h) Maximum speed (in kilometres per hour) achieved on the trip (e.g. day trip, short trip). Trip Ø (in km/h) Average speed (in kilometres per hour) achieved on the trip (e.g. day trip, short trip). Original User Guide Impulse 2.0 Pedelec Version 3 EN-45
46 You can select all or just one of the available options. Proceed as follows: 1. While in the start menu, press the button for three seconds. You are now in the main menu. 2. Use the / buttons to select the "Personalise" option. The selected option is highlighted in bold. 3. Confirm by briefly pressing the button. You are now in sub-menu Use the / buttons to select the "Favourite settings" option. The selected option is highlighted in bold. 5. Confirm by pressing the button. You are now in sub-menu LCD Big Display: Main menu Configuring settings in the main menu You cannot configure any settings in the main menu while you are riding Accessing the main menu 1. If you are in the start menu, press the button for 3 seconds. You will go to the main menu. 6. Use the / buttons to select the required option. It will be highlighted in bold. 7. Briefly press the button to set or remove the option in the box. 8. Once you have made your selection, you can return to the sub-menu 2 level by choosing the 'Back' option. 7. Selecting favourite settings Start menu Main menu Navigating within a menu 1. Use the / buttons to navigate to the required option. The selected option is highlighted in bold. 2. To confirm your selection, briefly press the button. You access the next-lowest menu level. EN-46 Original User Guide Impulse 2.0 Pedelec Version 3
47 Returning from a menu There are four different ways to return to the next highest level or the start menu: Back option 1. Use the / buttons to navigate to the 'Back' option. The selected option is highlighted in bold. 2. Confirm by pressing the button. You return to the next-highest level. Briefly pressing the button 1. If there is no 'Back' option, and one of the displayed options is selected, briefly press the button to return to the next highest level. Prolonged pressing of the button 1. Pressing the button for 3 seconds returns you to the start menu. Start riding 1. The start menu is displayed as soon as you start moving. Original User Guide Impulse 2.0 Pedelec Version 3 EN-47
48 6.6.2 Menu structure Main menu Sub-menu 1 Display ride data Display ride data P. EN-50 Delete trip data Delete trip data P. EN-51 Delete tour data Delete tour data P. EN-51 Trip (in km) Trip time (in 00:00:00 format) Trip max. (in km/h) Trip Ø (in km/h) Trip cost (in ) Tour (in km) Tour Ø (in km/h) Tour cost (in ) Total (in km) Total savings (in ) Tot. sav. CO2 (in kg) Confirm delete? Confirm delete? No Yes No Yes EN-48 Original User Guide Impulse 2.0 Pedelec Version 3
49 Main menu Sub-menu 1 Sub-menu 2 Sub-menu 3 Device settings Display Contrast Contrast P. EN-52-35% to 20% Brightness Brightness P. EN-52 50% to 20% Language Language P. EN-52 Deutsch English Français Nederlands Español Italiano Suomi Dansk Unit Unit P. EN-53 Kilometres Miles Drive Wheel circumference Wheel circumference P. EN-53 1,510 mm to 2,330 mm Personalise Shift sensor Shift sensor P. EN-54 Climb assist Climb assist P. EN-54 1 to 7 OFF, 50 ms to 300 ms Other Factory settings Factory settings P. EN-55 Reset to factory settings? No Software Name Name P. EN-56 Favourite settings Favourite settings P. EN-56 Trip max/ø Tour km/ø Cadence/Assistance Power cost Total saving Total km Version Version P. EN-55 Yes Update Update P. EN-56 Software version Test display Serial no. motor Original User Guide Impulse 2.0 Pedelec Version 3 EN-49
50 Main menu Sub-menu 1 Sub-menu 2 Target cost Fuel price Fuel price P. EN-56 0 to 9 0 to 99 ct Fuel consumption Ø Fuel consumption Ø P. EN-57 Fuel type Fuel type P. EN-57 0 to 20 litres Petrol Diesel Power cost Fuel consumption Ø P. EN-57 0 to 99 ct Display ride data In the main menu option "Display ride data" you can display the following items: Sub-menu 1 Trip (in km) Trip time (in 00:00:00 format) Trip max (in km/h) Trip Ø (in km/h) Trip cost (in ) Tour (in km) Tour Ø (in km/h) Tour cost (in ) Total (in km) Total savings (in ) Tot. sav. CO2 (in kg) Meaning Trip (e.g. day trip, short trip) in kilometres. Duration of trip (e.g. day trip, short trip) in hours, minutes and seconds. Maximum speed (in kilometres per hour) achieved on the trip (e.g. day trip, short trip). Average speed (in kilometres per hour) achieved on the trip (e.g. day trip, short trip). Cost in euro, incurred during the trip (e.g. day trip, short trip). Tour (e.g. cycle tour over several days) in kilometres. Average speed (in kilometres per hour) achieved on the tour (e.g. cycle tour over several days). Cost in euro, incurred during the tour (e.g. cycle tour over several days). Total number of kilometres ridden. Cost saving compared with travelling by car (petrol/diesel). Total CO2 savings compared with travelling by car. EN-50 Original User Guide Impulse 2.0 Pedelec Version 3
51 1. In the main menu, navigate to the option "Display ride data" as described under Navigating within a menu P. EN-46. In order to calculate the cost savings and CO2 savings compared with travelling by car, the display needs the fuel price Fuel price P. EN-56, the fuel consumption Fuel consumption Ø S. EN-57, the fuel type Fuel type S. EN-57 and the power cost Power cost S. EN Select the required option using the / buttons. The selected option is highlighted in bold. 3. Briefly press the button to return to the main menu Delete tour data In main menu option "Delete tour data", you can reset to 0 options: Tour (in km), Tour Ø (in km) and Tour cost (in ). Proceed as follows: 1. In the main menu, navigate to the option "Delete tour data" as described under Navigating within a menu P. EN The following question appears on the display: "Confirm delete?" with "Yes" and "No" underneath. 3. Select the required option using the / buttons. The selection is highlighted in bold. 4. Confirm your selection by briefly pressing the button. You will then return to the main menu options Delete trip data In main menu option "Delete trip data", you can reset to 0 options: Trip (in km), Trip time (in 00:00:00), Trip max (in km/h), Trip Ø (in km/h) and Trip cost (in ). Proceed as follows: 1. In the main menu, navigate to the option "Delete trip data" as described under Navigating within a menu P. EN The following question appears on the display: "Confirm delete?" with "Yes" and "No" underneath. 3. Select the required option using the / buttons. The selection is highlighted in bold. 4. Confirm your selection by briefly pressing the button. You will then return to the main menu options. Original User Guide Impulse 2.0 Pedelec Version 3 EN-51
52 Contrast Path: Device settings I Display I Contrast You can adjust the contrast of the display to improve legibility: 1. In the main menu, navigate to the option "Contrast" as described under Navigating within a menu P. EN-46. You can choose between: -35% -30% -25% -20% -15% -10% - 5% Default 5% 10% 15% 20% You can choose between: 0% 5% 10% 15% 20% Default 30% 35% 40% 45% 50% Very dark 2. Use the / buttons to select the brightness required. The selected brightness level is highlighted in bold. Very bright 3. Press the button to confirm. You will return to the sub-menu 2 level. Weak contrast Strong contrast Language 2. Use the / buttons to select the contrast strength required. The selected contrast level is highlighted in bold. 3. Press the button to confirm. You will return to the sub-menu 2 level Brightness Path: Device settings I Display I Brightness You can adjust the brightness of the display to improve legibility: 1. In the main menu, navigate to the option "Brightness" as described under Navigating within a menu P. EN-46. Path: Device settings I Display I Language The option "Language" allows you to select the language in which the display text appears. You can choose between:»» Deutsch»» Español»» English»» Italiano»» Français»» Suomi»» Nederlands»» Dansk 1. In the main menu, navigate to the option "Language" as described under Navigating within a menu P. EN Use the / buttons to select the desired language. The selected language is highlighted in bold. 3. Confirm by briefly pressing. You will return to the sub-menu 2 level. EN-52 Original User Guide Impulse 2.0 Pedelec Version 3
53 Unit Path: Device settings I Display I Unit 1. In the main menu, navigate to the option "Unit" as described under Navigating within a menu P. EN-46. You can choose between:»» Kilometres»» Miles 2. Use the / buttons to select the desired unit. It will be highlighted in bold. 3. Confirm by briefly pressing. You will return to the sub-menu 2 level Wheel circumference Path: Device settings I Drive I Wheel circumference Ask your dealer for the wheel circumference. Alternatively, you can measure it yourself: 1. Wheel diameter in mm x 3.14 = wheel circumference in mm. mm x 3,14 2. Push the bike for one complete revolution of the wheel and measure the distance travelled on the ground in mm. 1x Calculation (Tyre thickness x 2 + rim diameter in mm) x 3.14 = wheel circumference e.g. [( 42 mm x 2 ) mm ] x 3.14 = 2037 mm Original User Guide Impulse 2.0 Pedelec Version 3 EN-53
54 1. In the main menu, navigate to the option "Wheel circumference" as described under Navigating within a menu P. EN-46. You can choose between:»» 1,540 mm to 2,330 mm 2. Use the / buttons to select the option required. The selected option is highlighted in bold. 3. If you have confirmed the wheel circumference with, you will return to sub-menu 2 level Shift sensor Path: Device settings I Drive I Shift sensor The shift sensor detects gear changes and interrupts the motor assist for a fraction of a second (ms = milliseconds). This enables smoother and quicker gear changes especially with a hub gear. The higher the value selected, the longer the interruption to the motor assist and the more time the gear has to change. 1. In the main menu, navigate to the option "Shift sensor" as described under Navigating within a menu P. EN Use the / buttons to select the desired option. The selected option is highlighted in bold. 3. If you have confirmed with, you will return to sub-menu 2 level Climb assist Path: Device settings I Drive I Climb assist The power sensor in the motor registers your pedalling force as you ride. The motor controller interprets the pedalling force signals and responds according to the climb assist setting. The lower the set value (e.g. 1), the more sluggish the reaction of the motor when assist is enabled. With a high value (e.g. 7), the motor reacts very responsively to the pedal force. When riding uphill it can be an advantage if the power sensor does not react so sensitively, so as to provide the motor assist as evenly and smoothly as possible. 1. In the main menu, navigate to the option "Climb assist" as described under Navigating within a menu P. EN-46. You can choose between: You can choose between: Slow comportment Sensitive comportment OFF 50 ms 100 ms 150 ms 200 ms 250 ms 300 ms Short interruption Long interruption 2. Use the / buttons to select the option required. The selected option is highlighted in bold. 3. If you have confirmed with, you will return to sub-menu 2 level. EN-54 Original User Guide Impulse 2.0 Pedelec Version 3
55 Factory settings Path: Device settings I Other I Factory settings 1. In the main menu, navigate to the option "Factory settings" as described under Navigating within a menu P. EN The following question appears on the display: "Reset factory settings?" with "Yes" and "No" underneath. 3. Select the required option using the / buttons. The selection is highlighted in bold. 4. Confirm your selection by briefly pressing the button. You will return to the sub-menu 2 level Version Path: Device settings I Other I Version If you want to display the name of the current software version on your display and motor, proceed as follows: Test display It is advisable to access the test display in order to clearly identify pixel errors. 1. In the main menu, navigate to the option "Version" as described under Navigating within a menu P. EN-46. This shows the current display and motor software. 2. Briefly press the button. The test display is shown. 3. Briefly pressing the button takes you back to the option "Version" in the main menu. Display serial number of the motor 1. In the main menu, navigate to the option "Version" as described under Navigating within a menu P. EN-46. This shows the current display and motor software. 2. Briefly press the button. The serial number of the motor will be displayed. 3. Briefly pressing the button takes you back to the option "Version" in the main menu. 1. In the main menu, navigate to the option "Version" as described under Navigating within a menu P. EN-46. This shows the current display and motor software. 2. Pressing the button returns you to the sub-menu 2 level. Ask if there is a software update for your pedelec in the course of regular maintenance checks listed in the service book. Original User Guide Impulse 2.0 Pedelec Version 3 EN-55
56 Update Path: Device settings I Other I Update "Memory card required" - in this area, dealers can carry out a software update. 1. Pressing the button returns you to the sub-menu 2 level Name Path: Personalise I Name The "Name" option allows you to enter a name or text with a maximum of 21 characters, which is displayed when you switch the pedelec on or off. 1. In the main menu, navigate to the option "Name" as described under Navigating within a menu P. EN Use the / buttons to select the desired letters. The selected letter is highlighted in bold. Setting the name 3. Confirm by briefly pressing the button. No space character is permitted, instead please use the underscore character. Use to delete the last letter entered. 4. When you have made your selection choose "OK" in order to return to sub-menu Favourite settings Preselecting favourite settings P. EN Fuel price Path: Target cost I Fuel price The option "Fuel price" allows you to enter the price for the fuel (petrol/ diesel) in euros and cents. 1. In the main menu, navigate to the option "Fuel price" as described under Navigating within a menu P. EN Use the / buttons to select the desired value in euros. You can specify 0 to 9 euros, in steps of 1 euro. 3. The selection is highlighted in bold. 4. Confirm by pressing the button. 5. Use the / buttons to select the desired value in cents. You can specify 0 to 99 cents, in steps of 1 cent. The selection is highlighted in bold. 6. Confirm by pressing the button. You will return to the sub-menu 1 level. EN-56 Original User Guide Impulse 2.0 Pedelec Version 3
57 Fuel consumption Ø Path: Target cost I Fuel consumption Ø You can enter the average fuel consumption that would result in the use of a car. 1. In the main menu, navigate to the option "Fuel consumption Ø" as described under Navigating within a menu P. EN Use the / buttons to select the desired value in euros. You can specify 0 to 9 euros, in steps of 1 euro. 3. The selection is highlighted in bold. 4. Confirm by pressing the button. 5. Use the / buttons to select the desired value. The consumption can be set in half-litre increments from 0 to 20 litres. 6. Confirm by pressing the button. You will return to the sub-menu 1 level Power cost Path: Target cost I Power cost The option "Power cost" allows you to enter the electricity price in cents. 1. In the main menu, navigate to the option "Power cost" as described under Navigating within a menu P. EN Use the / buttons to select a value between 0 and 99 cents. This can be set in 1 cent increments. The selection is highlighted in bold. 3. Confirm by pressing the button. You will return to the sub-menu 1 level Fuel type Path: Target cost I Fuel type 1. The option "Fuel type" allows you to choose between petrol and diesel. 2. In the main menu, navigate to the option "Fuel type" as described under Navigating within a menu P. EN Use the / buttons to select petrol or diesel. The selection is highlighted in bold. 4. Confirm by pressing the button. You will return to the sub-menu 1 level. Original User Guide Impulse 2.0 Pedelec Version 3 EN-57
58 6.7 Tips Transporting your pedelec WARNING Remove panniers and other attachments during transport, as they can come off and cause serious accidents. Always remove the battery before transporting the pedelec. There is a risk of injury due to accidental activation of the button. Furthermore, the battery can fall out of the docking station and become damaged. Use a special battery bag that protects the battery from heat, shocks and impacts. By car: The bike rack must be designed for the higher weight of the pedelec VI.I Total weight P. EN-10, otherwise it can break and cause a serious accident. It is imperative to follow the guidance of the bike rack manufacturer. IMPORTANT Pedelecs carried on a rear-mounted bike rack must have suitable weather protection. This applies particularly to the docking, which must be protected from water ingress. Water ingress can damage the motor and its components. You can find suitable protection at your dealer or in the online shop. Bus, train and plane: Find out from your travel company well in advance if their regulations allow you to take your pedelec with you Trailer bikes and trailers The use of trailer bikes and trailers is generally permitted for the Impulse 2.0 pedelec, but please observe the following safety instructions: DANGER Do not exceed the total weight of the pedelec, because it can lead to the fracture or failure of safety-relevant parts. If this happens while you are riding the bike, it can lead to severe falls with fatal consequences VI.I Total weight P. EN-10. Trailer bikes and trailers alter the riding characteristics. Adapt your riding style accordingly. If you do not adapt your riding style, you could seriously injure or kill yourself or the child in the trailer. The braking distance is longer, so you have to start braking earlier, and the steering response becomes more sluggish. Practise starting, braking, going round corners, and up and down hills, starting with an empty trailer bike or trailer. Only use trailer bikes and trailers that conform to the relevant national regulations. Cycle trailers should also be designed and have been tested in accordance with DIN EN 15918, otherwise components could break while you are riding the bike, resulting in serious or even fatal injuries for you and/or the child. If you are interested in purchasing a trailer bike or trailer please consult your dealer Luggage rack Position Maximum carrying capacity Over the rear wheel 25 kg* Tested in accordance with DIN EN EN-58 Original User Guide Impulse 2.0 Pedelec Version 3
59 DANGER *Check for different specifications on the luggage rack itself or in the luggage rack manufacturer's installation instructions. Otherwise it may result in the luggage rack fracturing. If that happens while you are riding the bike you could be seriously injured. The maximum carrying capacity is specified on the luggage rack carrier or on the mounting of the rear light. DANGER Luggage alters the handling characteristics of the bike. Adapt your riding style accordingly. If you do not adapt your riding style, you could seriously injure or kill yourself. The braking distance is longer, so you have to start braking earlier, and the steering response becomes more sluggish Safety information DANGER Make sure the luggage is securely attached and carry out regular checks to see it is correctly positioned, otherwise loose straps can get caught in the spokes or rotating wheels, resulting in a serious fall. Do not exceed the total weight of the pedelec, because it can lead to the fracture or failure of safety-relevant parts. If this happens while you are riding the bike, it can lead to severe falls with fatal consequences. VI.I Total weight P. EN-10. It is not permitted to modify the luggage rack in any way, otherwise it may result in the luggage rack fracturing. If that happens while you are riding the bike you could be seriously injured. WARNING Make sure that the luggage does not obscure the view of the reflectors and rear lights, and that they are easily visible to other road users. Otherwise there is a risk of not being seen in unfavourable lighting conditions (fog, dusk, darkness), which could result in you being seriously injured. Carry your luggage in side-mounted panniers. Distribute the weight evenly to ensure safer riding characteristics. The luggage rack on your Pedelec might be delivered without a flap. One can be fitted later. Please contact your cycle dealer. Visit for more luggage rack accessories. The maximum carrying capacity of the luggage rack must not be exceeded, otherwise it may result in the luggage rack fracturing. If that happens while you are riding the bike you could be seriously injured. Original User Guide Impulse 2.0 Pedelec Version 3 EN-59
60 6.7.4 Storage 1. Remove the battery from the pedelec. 2. Store the battery in a dry, not excessively warm room. The battery should not be exposed to direct sunshine. The recommended storage temperature range is 18 to 23 C. Drive unit Do not allow dirt to dry out. It is best to clean the cycle immediately after your ride Cleaning WARNING Remove the battery before cleaning the pedelec. Accidental activation of the button may lead to severe injuries. IMPORTANT Do not clean the pedelec and its components with a water hose or high pressure washer. Although the components are sealed off, damage may still result. Clean the bike with a soft damp cloth. CAUTION Do not clean the drive unit when it is warm (e.g. straight after a ride). You may burn yourself otherwise. Wait until the drive unit has cooled down. 1. Remove the battery from the pedelec. 2. Clean the outside of the drive unit with a soft, damp cloth. Display and easy-reach control 1. Clean the outside of the display and easy-reach control with a soft, damp cloth. Do not immerse the drive unit or components into water. Although the components are sealed off, damage may still result. Do not use any cleaners which contain alcohol or solvent, or which scour. No coarse sponges or brushes may be used either. They leave scratches and cause the surface to become matt. Clean the bike with a soft damp cloth. EN-60 Original User Guide Impulse 2.0 Pedelec Version 3
61 7. Battery 7.1 Safety information DANGER People (including children) who, because of their physical, sensory or intellectual capabilities, or because of their lack of experience or knowledge, are unable to use batteries, are prohibited from using them unless supervised or under the instruction of a responsible person. Otherwise there is a risk of mishandling with consequential very serious injuries. WARNING Only operate your pedelec with a suitable original battery. The use of other batteries can cause explosions, serious burns and fires. Further consequences can include malfunctions and a limited battery life. You can find a list of approved batteries in 6.2 Technical details P. EN-39. Only use the correct original battery charger to charge your battery. The use of other battery chargers can cause explosions, serious burns and fires. Further consequences can include malfunctions and a limited battery life. You can find a list of permitted chargers in 6.3 Overview and basic functions P. EN-40. WARNING Keep batteries away from sparks and fires. Do not expose batteries to high temperatures. They can explode and cause serious burns and fires. Further consequences can include malfunctions and a limited battery life. Keep batteries away from sources of heat (e.g. direct sunlight and radiators). When charging the battery make sure there is sufficient ventilation and observe the permitted ambient temperature range: 0 to +4 C.Do not extinguish a burning battery with water, only the surrounding burning material. Class D extinguishers (for use on metal fires) are better suited for this. If it is possible to take the battery safely outside, smother the fire with sand. Batteries must not be short-circuited. They can explode and cause serious burns and fires. Further consequences can include malfunctions and a limited battery life. Do not store batteries in a box or drawer where they can be short-circuited by contact with each other or with conductive materials (screws, paper clips, keys, coins, nails or other small metal objects). Batteries must not be destroyed, shredded, taken apart, opened up or repaired. They can explode and cause serious burns and fires. If you have problems with the battery, please contact your dealer. They will be able to assist you. Always remove the battery before starting to work on the pedelec. Accidental activation of the button may lead to serious injuries. Original User Guide Impulse 2.0 Pedelec Version 3 EN-61
62 WARNING Damaged batteries must not be charged, used or transported.»» They can explode and cause serious burns and fires.»» Gases can be released and irritate the airways. Ensure there is a supply of fresh air and consult a doctor in the event of discomfort.»» Liquid can escape and cause skin irritation. Prevent contact with it. In the event of accidental contact, wash off the liquid with water. If the liquid gets into the eyes, flush out with plenty of water and seek medical help. Do not send batteries by post. Batteries are dangerous goods that under certain conditions may explode, causing severe burns and fires. The preparation and dispatch of batteries must only be carried out by trained personnel. If you want to complain about a battery, please do this via your dealer. Dealers are able to have the battery collected free of charge under the terms of the dangerous goods regulations. CAUTION Batteries must not be immersed in water. This presents a risk of explosion. Do not extinguish a burning battery with water, only the surrounding burning material. Class D extinguishers (for use on metal fires) are better suited for this. If it is possible to take the battery safely outside, smother the fire with sand. You need have no worries that the battery beneath you could explode while you are riding in the rain it is protected from ingress of moisture and condensation. IMPORTANT Batteries must not be subjected to mechanical impact. This poses a risk of damage. A battery can still be damaged after a drop or impact even if there are no visible signs of damage. Even apparently perfect batteries should be inspected. Please ask your dealer. Perform a 'learning cycle': A new, fully charged battery should be run down once until the motor assist stops and without recharging in between. In that way the battery 'learns' its capacity, and the actual capacity will agree with the level indicated on the battery status display. As soon as the battery enters Sleep mode, press the battery button for 1 second. Then the learn cycle can be continued. Please perform a learn cycle every six months or 5,000 kilometres. When the battery becomes older and you do not repeat the cycle from time to time, the difference between actual battery capacity and charge level display will become greater and greater. Only use the battery to operate this pedelec, otherwise there is a risk of damage to the device. Batteries are subject to the dangerous goods regulations. Private users are permitted to transport them on the road without further conditions. If transported by commercial third parties (e.g by air freight, hauliers or logistics companies) special conditions apply to packing and labelling. For questions about transporting batteries, please contact your dealer. EN-62 Original User Guide Impulse 2.0 Pedelec Version 3


63 7.2 Technical details Comfort down tube battery * With a 3 A charger, until battery is fully charged (95% battery capacity). ** Measured in the lowest assist mode under optimal conditions and with a fully charged battery of the highest capacity. Compact seat tube battery * With a 3 A charger, until battery is fully charged (95% battery capacity). ** Measured in the lowest assist mode under optimal conditions and with a fully charged battery of the highest capacity. Type 11 Ah 15 Ah 17 Ah Position Seat tube Seat tube Seat tube Nominal capacity Ah 15.5 Ah Ah Nominal voltage 37 V 36 V 36 V Power 416 Wh 558 Wh 603 Wh Weight 3200 g 3200 g 3265 g Charge cycles 1,100 full cycles 1,100 full cycles 1,100 full cycles Charge time* Approx. 5 hours Approx. 6.5 hours Approx. 7 hours Cell Li-ion Li-ion Li-ion Range** 135 km 180 km 205 km Permitted ambient temperature range during operation Permissible ambient temperature when charging -10 to 40 C -10 to 40 C -10 to 40 C 0 to 40 C 0 to 40 C 0 to 40 C Storage temperature -10 to +50 C -10 to +50 C -10 to +50 C Recommended storage temperature 18 to 23 C 18 to 23 C 18 to 23 C Type 11 Ah 14.5 Ah Position Seat tube Seat tube Nominal capacity Ah 14.5 Ah Nominal voltage 37 V 36 V Power 416 Wh 522 Wh Weight 2950 g 2950 g Charge cycles 1,100 full cycles 1,100 full cycles Charge time* Approx. 5 hours Approx. 6.5 hours Cell Li-ion Li-ion Range** 135 km 180 km Permitted ambient temperature range during operation Permissible ambient temperature when charging -10 to 40 C -10 to 40 C 0 to 40 C 0 to 40 C Storage temperature -10 to +50 C -10 to +50 C Recommended storage temperature 18 to 23 C 18 to 23 C Original User Guide Impulse 2.0 Pedelec Version 3 EN-63


64 Offroad down tube battery * With a 4 A charger, until battery is fully charged (95% battery capacity). ** Measured in the lowest assist mode under optimal conditions and with a fully charged battery of the highest capacity. 7.3 Overview and basic functions Comfort down tube battery Discharge plug Type 11 Ah 17 Ah Position Down tube Down tube Nominal capacity Ah Ah Nominal voltage 37 V 36 V Power 416 Wh 603 Wh Weight 2950 g 2950 g Charge cycles 1,100 full cycles 1,100 full cycles Charge time* Approx. 3.5 hours Approx. 5.5 hours Cell Li-ion Li-ion Range** 135 km 205 km Permitted ambient temperature range during operation -10 to 40 C -10 to 40 C Permissible ambient temperature when charging 0 to 40 C 0 to 40 C Storage temperature -10 to +50 C -10 to +50 C Battery charging socket with protective cap Display panel Label Recommended storage temperature 18 to 23 C 18 to 23 C EN-64 Original User Guide Impulse 2.0 Pedelec Version 3


65 Compact seat tube battery Offroad down tube battery Discharge plug Discharge plug Battery charging socket with protective cap Display panel Label Display panel Power jack Protective cap for power jack Label Original User Guide Impulse 2.0 Pedelec Version 3 EN-65
66 7.3.1 Display panel Down tube battery Seat tube battery Battery button On the outside of the battery are a button and a display panel with five LEDs. The LEDs light up when you press the battery button. The number lighting up, and how, provides information on the battery. Display Description Battery charge level 5 LEDs light up % 4 LEDs light up 80-61% 3 LEDs light up 60-41% 2 LEDs light up 40-21% 1 LED lights up 20-11% 1 LED flashes 10-0% Down tube battery Capacity Battery charge level 1. Briefly press the battery button in standby mode Seat tube battery Display Description Battery charge level 5 LEDs light up % 4 LEDs light up % 3 LEDs light up 67-51% 2 LEDs light up 50-34% 1 LED lights up 33-17% 1 LED flashes 16-0% Capacity indicates the quantity of electric charge that a battery can deliver or store. It is given in ampere hours (Ah). Even when used properly, capacity diminishes over time due to chemical reactions (ageing). So it reduces with every charging cycle. A battery also ages slightly when it is not used. A charging cycle is the complete charging of a battery from 0 to 100% capacity. It follows that not every charging process equates to a charging cycle. For example, a charge from 50 to 100% capacity is only half a charging cycle. 1. Press the battery button for five seconds. The maximum available capacity (state of health) of the battery will be displayed. EN-66 Original User Guide Impulse 2.0 Pedelec Version 3

67 Seat tube battery Display Description Capacity 3 5 LEDs light up The battery has a capacity of over 60% 0 2 LEDs light up The capacity of the battery is below 60%. Down tube battery Display Description Capacity The 1st LED lights up. The 5th LED lights up. The battery has a capacity of over 60% The capacity of the battery is below 60%. 5. LED 1. LED To wake from sleep mode 1. Press the battery button for one second. The following appears: Display Description The first, second, third, fourth and fifth LEDs come on in order and then all go off. 2. The battery has now "woken up". If no LED flashes, or all 5 LEDs flash several times, the battery may be faulty 7. Battery P. EN-61. Initiating sleep mode (seat tube battery) If fewer than three LEDs come on, or the 5th LED lights up, the battery may need to be replaced. To discuss the next steps speak to your dealer Sleep mode 1. Press the battery button twice. The following appears: Display Description The first and fifth LEDs flash twice. 2. The battery is now in sleep mode. To prevent a total discharge, the battery management system (BMS) switches the battery to sleep mode. After ten days (seat tube battery) or after two days (down tube battery), your battery will revert to sleep mode depending on the charge level. 7.4 Inserting and locking the battery IMPORTANT Grasp the battery firmly, so that it does not fall out of your hand. It can be damaged if you drop it. Original User Guide Impulse 2.0 Pedelec Version 3 EN-67
68 One-key system: The same key can be used for both the battery and bike locks (where fitted). Down tube battery 1. Hold the battery with the discharge plug down on to the docking station. Seat tube battery 1. Hold the battery with the discharge plug downwards in front of the docking station at an angle of 80, slightly tilted to the left. 2. Push the battery into the holder until it engages. 3. Turn the battery key clockwise. The battery is now locked. 1. Hold at docking station 2. Insert the battery nibs into the recesses provided. 1. Hold in front of the docking station Battery nibs 2. Push battery into docking station 3. Push the battery forwards and upwards into the docking station until the locking mechanism engages. Recesses 4. Turn the battery key clockwise. The battery is now locked. 2. Battery nibs into recesses IMPORTANT 3. Locking the battery It is recommended that you remove the key to prevent it breaking off and getting lost. 3. Push battery into docking station EN-68 Original User Guide Impulse 2.0 Pedelec Version 3 4. Locking the battery

69 7.5 Unlocking and removing the battery Seat tube battery 1. Grip the battery firmly, put the key into the lock and turn anticlockwise. Hold the key. The battery is unlocked. 2. Grip the battery and tilt it out of the docking station on the side. 1. Unlocking the battery IMPORTANT Hold the battery tight so it does not fall. It can be damaged if you drop it. 7.6 Tips Range Various factors determine how far you can go with your battery: When you go on a long trip it is worth taking a spare battery or battery charger with you. 2. Removing the battery Down tube battery 1. Grip the battery firmly, put the key into the lock and turn anticlockwise. The battery is unlocked. 2. Grip the battery and lift it upwards out of the docking station. 1. Unlocking the battery 2. Removing the battery Assist mode: You consume the most battery power in the highest assist mode. The range decreases, the higher the selected assist mode. Vary the assist modes you use. If there is a tailwind when going down hill or on the level, you can still go fast with a lower assist mode. Tyre pressure: If the tyre pressure is too low it is harder for the tyres to rotate. The drive unit needs to provide more assistance and the range decreases. Riding style: A low cadence (pedalling rate) combined with high gears consumes the most battery power. Original User Guide Impulse 2.0 Pedelec Version 3 EN-69
70 Change down in good time to maintain constant cadence, especially when starting. Your fitness level: The fitter you are, the less assistance you will need. Total weight: The lower the total weight supported by the bike, the easier it will be to ride VI.I Total weight P. EN-10. Outside temperatures: The lower the outside temperatures (e.g. cold in winter), the shorter the range. Insert the battery just before starting off with your pedelec. This way you prevent low temperatures shortening the range. Battery capacity: A significantly reduced operating time after charging indicates that the battery has lost a considerable amount of capacity Capacity P. EN Storage 1. Remove the battery from the pedelec. 2. Store the battery in a dry, not excessively warm room. The battery should not be exposed to direct sunshine. The recommended storage temperature range is 0 to 20 C. IMPORTANT The battery should not be stored in a fully charged state. A charge level of 50 70% ( ) is ideal. Since the battery loses charge very slowly, you should only recharge it when only one or two LEDs come on, but after six months at the latest Cleaning DANGER If you wipe the battery avoid touching the contacts, otherwise there is the risk of an electric shock. The battery may have to be replaced. To discuss the next steps speak to your dealer. WARNING Remove the battery from the pedelec before cleaning. Unintentionally pressing the button represents a risk of injury. Route selected: You need to pedal harder when cycling uphill or against strong head wind. This is registered by the power sensor, which in turn requires the motor to work harder. EN-70 Original User Guide Impulse 2.0 Pedelec Version 3
71 CAUTION Batteries must not be immersed in water. This presents a risk of explosion. Do not extinguish a burning battery with water, only the surrounding burning material. Class D extinguishers (for use on metal fires) are better suited for this. If it is possible to take the battery safely outside, smother the fire with sand. You need have no worries that the battery beneath you could explode while you are riding in the rain it is protected from ingress of moisture and condensation. Do not allow dirt to dry out. It is best to clean the battery immediately after your ride. 1. Remove the battery from the pedelec. 2. Clean the casing with a slightly damp, soft cloth. 3. If the battery terminals are dirty, clean them with a dry, soft cloth. IMPORTANT Do not spray the battery with a water hose or wash it with a highpressure cleaner. Although the components are sealed off, damage to the battery may still result. Clean the battery with a soft, damp cloth. Do not use any cleaners which contain alcohol or solvent, or which scour. No coarse sponges or brushes may be used either. They leave scratches and cause the surface to become matt. Clean the battery with a soft, damp cloth. Original User Guide Impulse 2.0 Pedelec Version 3 EN-71
72 8. Battery charger 8.1 Safety information DANGER Battery chargers are not a toy and must not be used by children under the age of 8 years. Older children must be sufficiently trained on how to use the battery charger. People who, because of their physical, sensory or intellectual capabilities, or because of their lack of experience or knowledge, are unable to use battery chargers, are prohibited from using them unless supervised or under the instruction of a responsible person. Otherwise there is a risk of mishandling with consequential very serious injuries. WARNING Only use the correct, original charger to charge the battery. The use of other battery chargers can cause explosions, serious burns and fires. Further consequences can include malfunctions and a limited battery life. You can find a list of permitted chargers in 8.3 Functions P. EN-75. Only charge the correct, original battery with the charger. The use of other batteries can cause explosions, serious burns and fires. Further consequences can include malfunctions and a limited battery life. You can find a list of approved batteries in 7.2 Technical details P. EN-63. WARNING Check the charger, cable and plug before each use. Do not use the charger if you detect signs of damage. Do not open the charger yourself, and only have it repaired by qualified experts using original spare parts. This poses a risk of fire and explosion. Damaged chargers, cables and plugs also increase the risk of electric shock. The charger is only intended to be used indoors. Keep the charger away from rain and moisture. If water gets into the charger there is a risk of electric shock. If water has penetrated the casing, unplug the device immediately and have it checked out by your dealer. Condensation may form on the charger when the temperature suddenly changes from cold to warm. When this happens, wait about an hour. This is the time a charger needs to reach the temperature of the warm surroundings. Prevent this happening by storing the charger where it is used. The charger and battery may not be covered during the charging process. Do not use the charger and battery on materials which can catch fire easily (such as paper and textiles) or within a combustible environment. This also applies when the battery is charged when fitted to the pedelec. In this case, the pedelec must be positioned such that a potential fire cannot spread quickly (exercise caution with carpeted floors). Do not expose the Pedelec with battery to direct sunshine above 40 degrees. The charger heat generated during the charge process represents a risk of fire. When the temperature is very high, or there is smoke or an unusual smell, immediately unplug the mains connector of the charger from the socket and disconnect the battery from the charger. An overheated battery is damaged and may not be used again. Always stay with the charger when it is in use. EN-72 Original User Guide Impulse 2.0 Pedelec Version 3


73 WARNING Keep battery chargers away from sparks and fires. It can explode causing severe burns and fires. Further consequences can include malfunctions and a reduced service life. Make sure there is sufficient ventilation when charging. IMPORTANT The mains voltage must match the supply voltage of the battery charger, otherwise there is a risk of damage to the device. The supply voltage for the charger is specified on the label on the back of the device. Do not charge batteries for a long period if they are already fully charged or are not being used. Electrical storms, voltage fluctuations and short circuits can damage the battery. Keep the battery charger clean. If the contacts are dirty, the dirt can burn during charging, leaving burn marks. In such cases the charger may have to be replaced Cleaning P. EN Technical data and overview Charger type 1 and charging station for type 1 seat tube battery (Comfort/ Compact) Battery voltage AC input voltage Frequency Max. DC output voltage Max. charge current Dimensions ( L I W I H) Permitted ambient temperature range during charging Recommended storage temperature Weight Protection class 36 V V Hz 42 V 3 A 168 mm I 108 mm I 43 mm (battery charger) mm I 128 mm I 36 mm (charging station) 0 to +40 C 0 to 20 C 706 g (charger) g (charging station) The charger and the charging station is only intended for interior use. Keep the charger away from rain and moisture. If water gets into the charger there is a risk of electric shock. Power cable LED Charging station Mains connector Battery charger Charging cable Original User Guide Impulse 2.0 Pedelec Version 3 EN-73
 36 V 230 V 50 Hz 42 V 3 A 171 mm I 77 mm I 40 mm Permitted ambient temperature range during 0 to +40 C charging Storage temperature -10 to +50 C Recommended")

 Permitted ambient temperature range during 0 to +40 C charging Storage temperature -10 to +50 C Recommended storage temperature 18 to 23 C Weight 520 g")
74 Charger type 2 for seat tube battery (Comfort/Compact) Battery voltage AC input voltage Frequency Max. DC output voltage Max. charge current Dimensions ( L I W I H) 36 V 230 V 50 Hz 42 V 3 A 171 mm I 77 mm I 40 mm Permitted ambient temperature range during 0 to +40 C charging Storage temperature -10 to +50 C Recommended storage temperature 18 to 23 C Weight 552 g Protection class The charger and the charging station is only intended for interior use. Keep the charger away from rain and moisture. If water gets into the charger there is a risk of electric shock. Charger type 3 for down tube battery Battery voltage 36 V AC input voltage V Frequency Hz Max. DC output voltage 42 V Max. charge current 4 A Dimensions ( L I W I H) Permitted ambient temperature range during 0 to +40 C charging Storage temperature -10 to +50 C Recommended storage temperature 18 to 23 C Weight 520 g Protection class 171 mm I 78 mm I 42 mm The charger is only intended to be used indoors. Keep the charger away from rain and moisture. If water gets into the charger there is a risk of electric shock. Charger connected to power supply the green LED flashes Mains connector Power cable! Battery being charged the green LED flashes Fully charged the green LED continually ON Charging fault the red LED flashes LEDs Charging cable Description of charging indicator Power cable Charging cable Mains connector EN-74 Original User Guide Impulse 2.0 Pedelec Version 3
 36 V 230 V 50 Hz 42 V 4 A 202 mm I 90 mm I 55 mm Permitted ambient temperature range during charging Storage temperature -10 to +50 C Recommended storage")
75 Charger type 4 for down tube battery Battery voltage AC input voltage Frequency Max. DC output voltage Max. charge current Dimensions ( L I W I H) 36 V 230 V 50 Hz 42 V 4 A 202 mm I 90 mm I 55 mm Permitted ambient temperature range during charging Storage temperature -10 to +50 C Recommended storage temperature 18 to 23 C Weight 745 g Protection class 0 C to +40 C The charger is only intended to be used indoors. Keep the charger away from rain and moisture. If water gets into the charger there is a risk of electric shock. 8.3 Functions Charging the battery DANGER Read and follow the information on the charger specification plate, otherwise there is a risk of misuse resulting in serious injuries. Damaged batteries must not be charged. The battery can remain on the pedelec during charging. It can also be removed and charged elsewhere. Before charging, please remove the plastic foil from the battery charger and charging station type 1. Charger connected to power supply the green LED flashes Battery being charged the green LED flashes Charging cable Power cable! Fully charged the green LED continually ON Charging fault the red LED flashes LEDs Description of charging indicator Mains connector Original User Guide Impulse 2.0 Pedelec Version 3 EN-75


76 Charging the seat tube battery with charger type 1 1. Connect the power cable to the battery charger. 2. Remove the protective cap on the battery. 3. Connect the charging cable to the battery charging socket until it engages. 4. Insert the mains plug into a power socket. The LED on the battery charger briefly lights up red, then permanently green : The charging process has started. 5. Remove the power cable from the socket after completing the charging process. 6. Remove the charging cable from the battery charging socket. 7. Replace the protective cap Charging the seat tube battery with charger type 1 and charging station type 1 1. Connect the power cable to the battery charger. 2. Connect the charging cable of the charger to the charging station socket. 3. Insert the battery with the discharge plug down on to the charging station. 4. Insert the mains plug of the battery charger into a power socket. The LED on the battery charger briefly lights up red, then permanently green : The charging process has started. 5. Remove the power cable from the socket after completing the charging process. 6. Remove the battery from the charging station. 7. Remove the charging cable of the charger from the charging station socket. EN-76 Original User Guide Impulse 2.0 Pedelec Version 3


77 Charging the seat tube battery with charger type 2 1. Connect the power cable to the battery charger. 2. Remove the protective cap on the battery. 3. Connect the charging cable to the battery charging socket until it engages. 4. Insert the mains plug into a power socket. The red LED briefly lights up, then the green LED flashes steadily. 5. The charger switches off once the battery is fully charged. The green LED is permanently on. No LED flashes. If the battery now stays on the charger, the charger irregularly checks whether the battery is still fully charged. The charger LED starts to flash again. After checking and ascertaining that the battery is full, the charger switches back to a steady light. 6. Remove the power cable from the socket after completing the charging process. 7. Remove the charging cable from the battery charging socket. 8. Replace the protective cap Charging the down tube battery with charger type 3 1. Connect the power cable to the battery charger. 2. Remove the protective cap on the battery. 3. Connect the charging cable to the battery charging socket until it engages. 4. Insert the mains plug into a power socket. 5. Remove the power cable from the socket after completing the charging process. 6. Remove the charging cable from the battery charging socket. 7. Replace the protective cap on the battery charging socket. Original User Guide Impulse 2.0 Pedelec Version 3 EN-77


78 Charging the down tube battery with charger type 4 1. Connect the power cable to the battery charger. 2. Remove the protective cap on the battery. 3. Connect the charging cable to the battery charging socket until it engages. 4. Insert the mains plug into a power socket. The red LED briefly lights up, then the green LED flashes steadily. 5. The charger switches off once the battery is fully charged. The green LED is permanently on. No LED flashes. If the battery now stays on the charger, the charger irregularly checks whether the battery is still fully charged. The charger LED starts to flash again. After checking and ascertaining that the battery is full, the charger switches back to a steady light. 6. Remove the power cable from the socket after completing the charging process. 7. Remove the charging cable from the battery charging socket. 8. Replace the protective cap on battery charging socket Battery display during charging Display Description Battery charge level 5 LEDs light up and no LED flashes % 4 LEDs light up and the 5th LED flashes 80 96% 3 LEDs light up and the 4th LED flashes 60 79% 2 LEDs light up and the 3rd LED flashes 40 59% 1 LED lights up and the 2nd LED flashes 20 39% 1 LED flashes 0 19% EN-78 Original User Guide Impulse 2.0 Pedelec Version 3
79 8.4 Tips Cleaning DANGER Storage 1. Store the battery charger in a dry, not excessively warm room. The charger should not be exposed to direct sunshine. The recommended storage temperature range is 18 to 23 C. Always unplug the charger from the mains before cleaning and especially before wiping it, otherwise you could get an electric shock if you touch the contacts. IMPORTANT Do not immerse the charger in water. Although the components are sealed off, damage may still result. Do not use any cleaners which contain alcohol or solvent, or which scour. No coarse sponges or brushes may be used either. They leave scratches and cause the surface to become matt. Clean the charger with a soft damp cloth. 1. Remove the charging cable from the battery charging socket. 2. Unplug the charger from the mains socket. 3. Clean the casing with a slightly damp, soft cloth. 4. If the contacts are dirty, clean them with a soft dry cloth. Original User Guide Impulse 2.0 Pedelec Version 3 EN-79
80 9. Faults 9.1 Drive unit, display and easy-reach control Description Cause Remedy Display does not light up and is not functioning, no motor assist a) Battery is in sleep mode. a) Wake battery from sleep mode Sleep mode P. EN-67. If the battery does not respond, briefly connect it to the battery charger Charging the battery P. EN-75. If the battery still does not respond or the LEDs flash in an unusual way the battery is damaged and must be removed from the charger. b) Battery is not charged/ defective. b) Insert a new or fully charged battery. c) The pedelec is OFF. The Impulse 2.0 switches itself off after 20 minutes if there is no call for power from the drive (e.g. because the pedelec is stationary). c) Switch on the pedelec Switching on the pedelec P. EN-42. d) Ambient temperature too high/low. d) The operating temperature of the battery is in range -10 to 40 C. There is no speed display a) The spoke magnet has slipped. a) Check whether the spoke magnet has slipped. It should be as close as possible to the speed sensor on the chain stay (max. 10 mm). Align the magnet on the marker point with the speed sensor. Speed sensor b) The speed sensor is faulty. b) Contact your dealer. He will be able to replace the speed sensor. c) Spoke magnet missing. c) Contact your dealer. They can fit a new spoke magnet to your pedelec. d) Speeds below 10 km/h are not always displayed due to the inertia of the system. d) Check whether a speed is displayed when riding at a higher speed. If that is the case, the display is not faulty. Spoke magnet Speed display incorrect a) Incorrect unit set. a) Check the mph and km/h settings Unit P. EN LCD Compact Display P. EN-44. b) Wheel circumference setting incorrect. b) Set the correct wheel circumference Wheel circumference P. EN-53. EN-80 Original User Guide Impulse 2.0 Pedelec Version 3

81 Description Cause Remedy Some of the display is missing The display is faulty. Enable the test display Version P. EN-55. The display may have to be replaced. Please ask your dealer. Display lighting not working The display is faulty. Please ask your dealer. The display may have to be replaced. The display is misted up Moisture has got in. Dry out the pedelec complete with display at room temperature (19 21 C). If the display is still misted up, contact your dealer. The display may have to be replaced. Motor assist level is too weak a) Climb Assist is set too low. a) Change the value Climb assist S. EN-54. b) Battery is flat. b) Install new/charged battery Charging the battery P. EN-75. c) Unsuitable ride profile. c) Please ask your dealer. They can set another ride profile on your pedelec. Motor idles a) Gear changing is not properly set. a) Check the setting. If necessary, ask your dealer. b) Chain/belt has come off. b) Lift the chain/belt on to the sprocket and adjust the tension. If necessary, ask your dealer Chain tension P. EN Belt tension P. EN-23. Power assist sporadically cuts out a) The spoke magnet has slipped. a) Check whether the spoke magnet has slipped. It should be as close as possible to the speed sensor on the chain stay (max. 10 mm). Align the magnet on the marker point with the speed sensor. Speed sensor b) Climb Assist is set too high. b) Change the value Climb assist S. EN-54. Spoke magnet Original User Guide Impulse 2.0 Pedelec Version 3 EN-81
PEDELEC IMPULSE EVO / IMPULSE EVO NEXT EPAC ELECTRICALLY POWER ASSISTED CYCLE
 PEDELEC IMPULSE EVO / IMPULSE EVO NEXT EPAC ELECTRICALLY POWER ASSISTED CYCLE Original User Guide EN 1-102 Version 3 19.10.2016 CONTENTS I. Introduction EN-4 I.I Explanation of the safety information symbols
SHIMANO STEPS E6000 BATTERY AND CHARGER
 www.kalkhoff-bikes.de DERBY CYCLE WERKE GMBH Siemensstraße 1-3 49661 Cloppenburg, Germany + 49 (4471) 966-0 info@derby-cycle.com www.derby-cycle.com SHIMANO STEPS E6000 BATTERY AND CHARGER Original User
PEDELEC IMPULSE EVO / IMPULSE EVO NEXT EPAC ELECTRICALLY POWER ASSISTED CYCLE
 PEDELEC IMPULSE EVO / IMPULSE EVO NEXT EPAC ELECTRICALLY POWER ASSISTED CYCLE Original User Guide EN Version 5 26.04.2018 CONTENTS I. Introduction EN-4 I.I Explanation of the safety information symbols
Impulse 2.0 pedelec. EPAC Electrically power assisted cycle. Original User Guide EN Version 3 11/01/2016
 Impulse 2.0 pedelec EPAC Electrically power assisted cycle Original User Guide EN Version 3 11/01/2016 CONTENTS I. Introduction EN-4 I.I Explanation of the safety information symbols EN-4 I.II The Impulse
PEDELEC BOSCH INTEGRALE 0.5
 PEDELEC BOSCH INTEGRALE 0.5 EPAC ELECTRICALLY POWER ASSISTED CYCLE Supplementary guide EN Version 1 18.12.2017 CONTENTS I. Introduction EN-4 I.I Explanation of the safety information symbols EN-4 I.II
PEDELEC GROOVE NEXT EPAC ELECTRICALLY POWER ASSISTED CYCLE. Original User Guide EN Version
 PEDELEC GROOVE NEXT EPAC ELECTRICALLY POWER ASSISTED CYCLE Original User Guide EN Version 1 16.10.2017 CONTENTS I. Introduction EN-4 I.I Explanation of the safety information symbols EN-4 I.II The Pedelec
User Manual of Bagibike Electric Bicycles
 User Manual of Bagibike Electric Bicycles Model: Bagibike B16. http://www.bagibike.com Page 1 FOREWORD The following operation manual is a guide to assist you. This manual is not a complete document on
SERVICE BOOKLET. 1. Terms and conditions of the warranty. 2. Handover document. 3. Service intervals. 4. Bike passport. 5. Change of ownership
 SERVICE BOOKLET 1. Terms and conditions of the warranty 2. Handover document 3. Service intervals 4. Bike passport 5. Change of ownership 6. Other Terms and conditions of the warranty // 2 Congratulations
Power Assisted Bikes. Owner s Manual
 Power Assisted Bikes Owner s Manual Version 2 April 2016 Introduction Thank you for buying a PowaCycle Windsor electric bike. We hope it brings you many hours of enjoyment. For safe and compact shipping,
Electrically Assisted Pedal Cycles. Assembly Instructions
 Electrically Assisted Pedal Cycles Assembly Instructions Version 4 23 Sept 2005 Introduction Thank you for buying a PowaCycle Freeway electric bike. We hope it brings you many hours of enjoyment. For safe
POWER ASSISTED BICYCLES OWNERS MANUAL
 OWNERS MANUAL Simply explained this is how your e.life bike basically works. Firstly may we congratulate you on purchasing your new electric power assisted e.bike. Please take time to read your manual.
Pedelec Impulse Evo Speed. Original User Guide EN Version 1 29/04/2015
 Pedelec Impulse Evo Speed Original User Guide EN Version 1 29/04/2015 Notes TABLE OF CONTENTS I. Introduction I.I CD I.II Service book I.III Declarations of conformity I.IV Explanation of safety symbols
Original Operating Manual
 2010-10-29 Original Operating Manual Control Panel Comfort for Pedelecs Series 4313 Save for future use! Marquardt GmbH Schlossstraße 16 78604 Rietheim-Weilheim E-mail: marquardt@marquardt.de Website:
Electrically Assisted Pedal Cycles. Assembly Instructions
 Electrically Assisted Pedal Cycles Assembly Instructions Version 1 December 2005 Introduction Thank you for buying a PowaCycle Edinburgh electric bike. We hope it brings you many hours of enjoyment. For
ELECTRIC BICYCLE OWNER S MANUAL
 ELECTRIC BICYCLE OWNER S MANUAL For Owners of EG Zurich 350 IX and 350 IX Step-thru Electric Bicycle Table of Contents Descriptions: Page Installation Instructions 2 How to install the bicycle out of the
INSTALLATION AND MAINTENANCE MANUAL Rev. 12/2015 Deda Elementi. seat post. seat post
 INSTALLATION AND MAINTENANCE MANUAL Rev. 12/2015 Deda Elementi seat post UK seat post Thank you for choosing a DEDA ELEMENTI and MUD product. We at DEDA ELEMENTI develop, manufacture, and constantly test
The Bike with Bite. Directions for use Notice D Utilisation Manual De Usario Gebruikershandleiding
 The Bike with Bite Directions for use Notice D Utilisation Manual De Usario Gebruikershandleiding Introduction (1.2) Dear Customer, We are delighted that you have chosen this top quality QUICKIE product.
Owner s Manual Read and keep this manual. Patents World Wide
 Owner s Manual Read and keep this manual. Patents World Wide S & S Industries, Inc., Sarasota, FL, USA www.trail-gator.com Copyright 2006 All Rights Reserved The following manual is provided to assist
OPERATIONS MANUAL LEVER CHAIN HOIST
 OPERATIONS MANUAL LEVER CHAIN HOIST IMPORTANT SAFETY INFORMATION Please read, understand and follow all safety information contained in these instructions prior to the use of this hoist. Retain these instructions
SANTA CRUZ BICYCLES MY18 Hightower Suspension Setup
 SANTA CRUZ BICYCLES MY18 Hightower Suspension Setup Copyright Santa Cruz Bicycles 2017 TABLE OF CONTENTS SAFETY INSTRUCTIONS... 3 SAG SETUP...3 AIR SPRING FORKS...3 AIR SHOCKS...3 FORK SETUP... 4 FOX 36
ELECTRIC FOLDING BIKE OWNERS MANUAL. e-power 36v. Go City-Lite
 P o w e r ELECTRIC FOLDING BIKE OWNERS MANUAL e-power 36v Go City-Lite Thank you for purchasing a Seago electric folding bike. In order to get the best out of your new bike you must read and fully understand
ELECTRIC BICYCLE OWNER S MANUAL
 ELECTRIC BICYCLE OWNER S MANUAL For Owners of EG Kyoto 350 Electric Bicycle Table of Contents Descriptions: Page Installation Instructions 2 How to install the bicycle out of the box 2 Operation Instructions
Foldable Electric E-bike Instruction Manual
 Foldable Electric E-bike Instruction Manual This manual contains important safety, assembly, operation and maintenance information. Please read this manual before operation and save this manual for future
POWER ASSISTED BICYCLES LA GRANDE OWNERS MANUAL
 LA GRANDE OWNERS MANUAL Welcome to the World of e.bike cycling. Firstly may we congratulate you on purchasing your new electric power assisted e.bike. Please take time to read your manual. We have tried
Owner s Manual for 16 Slider
 Owner s Manual for 16 Slider This manual contains important safety, assembly, operation and maintenance information. Please read and fully understand this manual before operation. Save this manual for
SANTA CRUZ BICYCLES MY17 Nomad Suspension Setup
 SANTA CRUZ BICYCLES MY17 Nomad Suspension Setup Copyright Santa Cruz Bicycles 2017 TABLE OF CONTENTS SAFETY INSTRUCTIONS... 3 SAG SETUP...3 AIR SPRING FORKS...3 AIR SHOCKS...3 FORK SETUP... 4 LYRIK SOLO
HALOGEN FLOODLIGHTS Models CHL1260C & 1260T Part Nos: &
 HALOGEN FLOODLIGHTS Models CHL1260C & 1260T Part Nos: 5460600 & 5460595 OPERATING & MAINTENANCE INSTRUCTIONS GC0610 INTRODUCTION Thank you for purchasing this CLARKE Halogen Floodlight. Before attempting
Final Assembly Instructions: Bikes with Threadless Headsets
 Final Assembly Instructions: Bikes with Threadless Headsets Thank you for buying your new bicycle from L.L.Bean. Read these instructions carefully before beginning the final assembly. Prior to shipping,
Final Assembly Instructions: Runaround Cruiser
 Final Assembly Instructions: Runaround Cruiser Thank you for buying your new bicycle from L.L.Bean. Read these instructions carefully before beginning the final assembly. Prior to shipping, our expert
SANTA CRUZ BICYCLES MY18 Nomad Suspension Setup
 SANTA CRUZ BICYCLES MY18 Nomad Suspension Setup Copyright Santa Cruz Bicycles 2017 TABLE OF CONTENTS SAFETY INSTRUCTIONS... 3 SAG SETUP...3 AIR SPRING FORKS...3 AIR SHOCKS...3 COIL SHOCKS...4 FORK SETUP...
Owner e s Manual Raven
 Owner s Manual Raven Marketed in Australia and New Zealand by Bzooma Pty Ltd ABN 37 640 907 507 TABLE OF CONTENTS Table of Contents... 1 BZOOMA PTY LTD... 2 Manufacturing Company Profile... 2 General Cautions
BICYCLE BABY TRAILER & JOGGER
 BICYCLE BABY TRAILER & JOGGER Please read these instructions before attempting to construct your newly purchased trailer. DO NOT RETURN THIS TRAILER TO THE PLACE OF PURCHASE If you should experience a
PLEASE BE SAFE WHEN RIDING ALWAYS WEAR A HELMET AND OBEY ALL LAWS!
 X-Treme TM Electric Scooters X-10 Electric Scooter Owner s Manual PLEASE BE SAFE WHEN RIDING ALWAYS WEAR A HELMET AND OBEY ALL LAWS! Page1 IMPORTANT BATTERY MAINTENANCE and CHARGING INSTRUCTIONS 1. You
ELECTRIC BICYCLE OWNER S MANUAL
 ELECTRIC BICYCLE OWNER S MANUAL For Owners of EG Oahu 500EX and EG Maui 500EX Electric Bicycle Table of Contents Descriptions: Page Installation Instructions 2 How to install the bicycle out of the box
evinci ELECTRIC BICYCLE USER MANUAL infinity Series PLEASE READ CAREFULLY
 evinci ELECTRIC BICYCLE USER MANUAL infinity Series PLEASE READ CAREFULLY Table of Contents Safety Instructions...3 Symbols...3 Introduction...4 Mode of operation and extent of electronic power assistance...4
Giant Hydraulic Disc Brake System
 Giant Hydraulic Disc Brake System INSTALLATION INSTRUCTI IMPORTANT NOTICE Contact the place of purchase or Authorized Giant Retailer for information on detail of installation and maintenance. Read this
Assembly Instructions
 1/12 BEAST MANUAL Table of Contents Bike Specs - pg. 3 Bike Assembly: Assembling the Wheels- pg. 4 Assembling the Stem- pg. 5 Assembling the Handlebar- pg.6 Attaching the Seat- pg. 6 Attaching the Pedals-
Model year 2014 USER MANUAL
 Model year 2014 USER MANUAL WARRANTY Terms and conditions BOS MTB offers warranty on its products on the following terms: BOS MTB guarantees to the original purchaser that the BOS product for which they
Marzocchi Suspension MZ I MZ I. Technical instructions
 Technical instructions Exploded view - MZ I - 100 Rif. Code Quantity Spare part list - MZ I - 100 Rif. Code Description Q.ty in the model Technical characteristics: Technical characteristics Single-crown
CLEAN QUIET LIGHT STRONG
 CLEAN QUIET LIGHT STRONG Gates Carbon Drive Owner s Manual WARNING Read this entire manual before using, replacing, or installing the Gates Carbon Drive belt. Improper installation, adjustment, alteration,
User s Manual. Table of Contents CAUTION. Model No. MTSC11700
 Model No. MTSC11700 Table of Contents Important Precautions..........2 Before You Begin.............3 How to Set Up and Fold the Scooter...............4 How to Operate the Scooter......5 Part List.....................6
User s Manual. Table of Contents CAUTION. Model No. MTSC20000
 Model No. MTSC20000 Table of Contents Important Precautions..........2 Limited Warranty..............2 Before You Begin.............3 How to Set Up and Fold the Scooter...............4 How to Operate the
EN USER MANUAL
 R3 EN USER MANUAL - 01 - Check Packing Contents Bike body Tool Battery holder Charger Pedal Saddle components Instruction Packing list Bike body 1 pcs Tool 1 unit Charger 1 pcs Saddle components 1 unit
GT MAGNETIC POWER BICYCLES (SMART CYCLE)
") GT MAGNETIC POWER BICYCLES (SMART CYCLE) Congratulations on selecting the GT Magnetic Power Bicycle (Smart Cycle in short). In order to use and enjoy your Smart Cycle safely and to get the best performance
GT MAGNETIC POWER BICYCLES (SMART CYCLE) Congratulations on selecting the GT Magnetic Power Bicycle (Smart Cycle in short). In order to use and enjoy your Smart Cycle safely and to get the best performance
Team Trike Assembly Instructions for 8142 Models
 Team Trike Assembly Instructions for 84 Models paper! Tools required for adult assembly Printed on 00% recycled KETTLER International Inc 355 London Bridge Road Virginia Beach, Virginia 3453 USA www.kettlerusa.com
Australia s best value ebikes
 IMPORTANT NOTICE Read manual, Instructions and Terms carefully before use. It is the buyer s responsibility to make sure the drift trike is safe to ride. If necessary ask for help at any good local bicycle
Pedelec Operating Instructions Pedelec handleiding Pédélec manuel
 Pedelec Operating Instructions Pedelec handleiding Pédélec manuel Introduction ( GB ) Dear Customer, congratulations on the purchase of your new KETTLER Pedelec Cycle. These instructions will help you
GHOST-BIKES ORIGINAL OPERATING MANUAL
 EN GHOST-BIKES ORIGINAL OPERATING MANUAL Cycle (all categories including city/trekking/mtb/racing/fitness bikes) User manual Pedelec/S-Pedelec Supplementary user manual Children s bike Supplementary user
Final Assembly Instructions Portside Cruiser
 Final Assembly Instructions Portside Cruiser Thank you for buying your new bicycle from L.L.Bean. Read these instructions carefully before beginning the final assembly. Prior to shipping, our expert cycling
Product Handbook FOR THE BLADEZ XTR Lite ELECTRIC POWER BOARD
 Portable Electric Power Board Product Handbook FOR THE BLADEZ XTR Lite ELECTRIC POWER BOARD PLEASE BE SAFE WHEN RIDING... ALWAYS WEAR A HELMET AND OBEY ALL LAWS! Page 1 IMPORTANT PLEASE READ THIS BEFORE
Tel: +44 (O) Customer Service hours: Monday - Friday 9am-5pm
 Customer Service hours: Monday - Friday 9am-5pm") Congratulations on your new scooter! Proper assembly and operation of your scooter is important for your safety and enjoyment. Our customer service department is dedicated to your satisfaction with Pacific
Congratulations on your new scooter! Proper assembly and operation of your scooter is important for your safety and enjoyment. Our customer service department is dedicated to your satisfaction with Pacific
SECTION 3 INFORMATION BEFORE DRIVING YOUR TOYOTA
 INFORMATION BEFORE DRIVING YOUR TOYOTA SECTION 3 Off road vehicle precautions................................. 130 Break in period............................................ 131 Operation in foreign countries................................
SWX02 48V (REAR) Hub Kit Fitting Guide
 Hub Kit Fitting Guide") SWX02 48V (REAR) Hub Kit Fitting Guide Important: For your own safety you must read this manual before attempting to fit any part of the motor kit to your bike. You must also ensure that you fit the kit
SWX02 48V (REAR) Hub Kit Fitting Guide Important: For your own safety you must read this manual before attempting to fit any part of the motor kit to your bike. You must also ensure that you fit the kit
Marzocchi Suspension D-Street 24" D-Street 24" Technical instructions
 Technical instructions Exploded view - D-Street 24" 80 Rif. Code Quantity D-Street 24" 80 - Oil levels Position Oil type Quantity (cc) Right fork leg SAE 7,5-550013 185 Left fork leg SAE 7,5-550013 185
Table of Contents. Technical Information Warning Statement
 Table of Contents Technical Information-----------------------------------1 Warning Statement--------------------------------------2 Read Before Riding-------------------------------------3 List of Parts-----------------------------------------------4
Owners Manual Öhlins road & track front fork FG 43 Including:
 Owners Manual Öhlins road & track front fork FG 43 Including: Safety Adjusters Setting up your fork Changing springs Oil level adjustment Technical information Inspection & maintenance Service Tools 1
VOLTO ELECTRIC BICYCLE USER MANUAL. TD-Series (TUI / FALCON / ROBIN) PLEASE READ CAREFULLY
 PLEASE READ CAREFULLY") VOLTO ELECTRIC BICYCLE USER MANUAL TD-Series (TUI / FALCON / ROBIN) PLEASE READ CAREFULLY Table of Contents Safety Instructions...3 Symbols...3 Introduction...4 Mode of operation and extent of electronic
VOLTO ELECTRIC BICYCLE USER MANUAL TD-Series (TUI / FALCON / ROBIN) PLEASE READ CAREFULLY Table of Contents Safety Instructions...3 Symbols...3 Introduction...4 Mode of operation and extent of electronic
The following procedures should be observed to ensure safe driving.
 Driving the vehicle The following procedures should be observed to ensure safe driving. n Starting the hybrid system ( P. 162) n Driving STEP 1 With the brake pedal depressed, shift the shift lever to
ELECTRIC ROSE USER MANUAL ELECTRIC BICYCLE MODEL #: JERO16 VERSION #: 1
 USER MANUAL ELECTRIC ROSE ELECTRIC BICYCLE MODEL #: JERO16 VERSION #: 1 Congratulations on your new Jetson Electric Rose Electric Bicycle! Before your first ride, please check whether the wheels are damaged,
USER AND SAFETY MANUAL
 USER AND SAFETY MANUAL HANDLE- BARS STEM COLLAR ROD SADDLE SAFETY HOOK- STRIP BRAKE SUPPORT BARS AFT TUBE FRONT TUBE SAFETY RULES SECURE THE ROD AND ATTACH SAFETY HOOK-STRIP before every ride. RIDE WHEELA
Brake System H TX, H2.0TXS [B475]; H TX [B466] Safety Precautions Maintenance and Repair
![Brake System H TX, H2.0TXS [B475]; H TX [B466] Safety Precautions Maintenance and Repair](/thumbs/86/93834005.jpg "Brake System H TX, H2.0TXS [B475]; H TX [B466] Safety Precautions Maintenance and Repair") HMM180001 Brake System H1.5-1.8TX, H2.0TXS [B475]; H2.5-3.5TX [B466] Safety Precautions Maintenance and Repair When lifting parts or assemblies, make sure all slings, chains, or cables are correctly fastened,
HMM180001 Brake System H1.5-1.8TX, H2.0TXS [B475]; H2.5-3.5TX [B466] Safety Precautions Maintenance and Repair When lifting parts or assemblies, make sure all slings, chains, or cables are correctly fastened,
Owner s Manual. Operation and Maintenance Instructions. Wisper 806fe. April st edition
 Owner s Manual Operation and Maintenance Instructions Wisper 806fe April 2009 1 st edition We strongly recommend that you read this entire manual before using your Wisper bike Wisper Limited - 1 - User
QiCycle Electric Folding Bike
 QiCycle Electric Folding Bike Overview Shifter Brake Handlebar Steering tube Steering tube fixer Steering tube fixer Headlight Front brake Motor Clip of saddle pin Backlight Saddle pin Saddle Schematic
Product Handbook. Electric Power Board. Powered Personal Transportation. FOR THE BLADEZ XTR Lite 250 ELECTRIC POWER BOARD
 ` Powered Personal Transportation Electric Power Board Product Handbook FOR THE BLADEZ XTR Lite 250 ELECTRIC POWER BOARD Model: PB-SM805-S PLEASE BE SAFE WHEN RIDING... ALWAYS WEAR A HELMET AND OBEY ALL
TERRAIN. Electric Bike User Manual. westhillbikes.com. HAVE A QUESTION? NEED HELP? Contact us on Facebook for a quick reply.
 TERRAIN Electric Bike User Manual HAVE A QUESTION? NEED HELP? Contact us on Facebook for a quick reply. westhillbikes.com Warranty Westhill bikes are covered by a limited 3-year warranty. Aside from general
Wheel Horse. 44 Snowthrower. for 5xi Lawn and Garden Tractors. Model No & Up. Operator s Manual
 FORM NO. 8 Rev A Wheel Horse Snowthrower for 5xi Lawn and Garden Tractors Model No. 7966 890050 & Up Operator s Manual IMPORTANT: Read this manual, and your tractor manual, carefully. They contain information
ELECTRIC BICYCLE USER MANUAL
 ELECTRIC BICYCLE USER MANUAL 1 Main Technical Parameters and Specification Weight: 23 kg Wheel size: 20 Maximum speed: 25 km/h E BIKE URBAN Range: Up to 45km (with pedal assist) Type: lithium Voltage:
Compact, lightweight folding electric bike. User manual
 Compact, lightweight folding electric bike User manual Specification Bike Weight: 20 kg Wheel size: 20 Maximum speed: Range: 25 km/h Up to 40km (with pedal assist) Battery Type: Voltage: lithium 24V Capacity:
Thule Glide Instructions
 Thule Glide Instructions A 51100988 CONTENTS 1 Introduction 1.1 Manual Intended Use 04 1.2 Carrier Intended Use 04 1.3 Specifications 04 2 Safety 2.1 Symbols and Instructions 05 2.2 General Safety Instructions
Mechanical Disc Brakes
 (English) DM-BR0009-00 Dealer's Manual ROAD MTB Trekking City Touring/ Comfort Bike URBAN SPORT E-BIKE Mechanical Disc Brakes BR-CX77 BR-CX75 BR-R517 BR-R515 BR-R317 BR-R315 CONTENTS IMPORTANT NOTICE...
Instructions for Fitting, Operating and Maintenance
 EN Instructions for Fitting, Operating and Maintenance Retractable Door 1 818 024 RE / 10.2011 ENGLISH Contents 1 Safety Instructions... 3 1.1 Qualified persons... 3 1.2 Symbols and signal words used...
AERO AIR TIRE PEDAL CAR. Assembly Instructions Model # USA. Tools Required: Recommended for children up to 200 lbs, ages 5-9
 AERO AIR TIRE PEDAL CAR Assembly Instructions Model # 998-700 USA Printed on 00% recycled paper! Recommended for children up to 200 lbs, ages 5-9 Tools Required: (pliers) (phillips head screwdriver) AERO
Electric Bike Supplement
 Electric Bike Supplement Electric Bike Instruction. Congratulations on your purchase of a pedal assisted bicycle. This is a supplement to the general bicycle user manual. Please make sure that your new
Sectional and Tilting Door Opener
 Sectional and Tilting Door Opener Installation Instructions and User Guide 600 800 1000 S/N WARNING Please read the manual carefully before installation and use. The installation of your new door opener
Instructions for Fitting, Operating and Maintenance Canopy Door RE / (St.: )
") EN Instructions for Fitting, Operating and Maintenance Canopy Door 1 818 012 RE / (St.: 12.2010) 12.2010 ENGLISH Contents 1 Safety Instructions... 3 1.1 Qualified persons... 3 1.2 Symbols and signal words
EN Instructions for Fitting, Operating and Maintenance Canopy Door 1 818 012 RE / (St.: 12.2010) 12.2010 ENGLISH Contents 1 Safety Instructions... 3 1.1 Qualified persons... 3 1.2 Symbols and signal words
ProLine. 44 Mower. for 120 Traction Unit. Model No & Up. Operator s Manual
 FORM NO. 9 ProLine Mower for 0 Traction Unit Model No. 05 99000 & Up Operator s Manual IMPORTANT: Read this manual carefully. It contains information about your safety and the safety of others. Also become
Mobility Scooters. Owners Manual
 Mobility Scooters Owners Manual 1 Electromagnetic Interference ( EMI ) It is very important that you read this manual before using the scooter for the first time including the following information regarding
Sectional And Tilting Door Opener
 Sectional And Tilting Door Opener Installation Instructions and User Guide FS 600 FS 1000 FS 1200 600N 1000N 1200N FS 600-Speed FS 1000-Speed 600N 1000N S/N WARNING Please read the manual carefully before
Owner s Manual for. Puma LPX & Lynx LPX. Lithium Polymer Powered Electric Folding Bikes
 Owner s Manual for Puma LPX & Lynx LPX Lithium Polymer Powered Electric Folding Bikes Model Shown PowaCycle Puma LPX Main Technical Specification Summary Bicycle Motor Weight: 17.8 kg Puma 20kg Lynx Type:
MODEL : QUICK 3 USER GUIDE MANUAL
 MODEL : QUICK 3 USER GUIDE MANUAL EN 6100-6-3:2007 + A1 EN 6100-6-1:2007 3 Table of Contents: QUICK 3 Features........... 3 QUICK 3 Main Parts...4-5 Warnings & General information............ 6-7 Serial
USER MANUAL QFT-7. Folding Bicycle. RILU Trading Pty
 P a g e 1 USER MANUAL QFT-7 Folding Bicycle RILU Trading Pty Unit 2, No 2 Caulson Close Maribyrnong 3032 Melbourne, Victoria Australia (03) 8395 2616 info@rilu-e-bike.com.au Rev.18.5409.QF7-UM P a g e
Daymak warranties, services, and stocks parts for everything it sells. We support our products.
 EC1 User Manual About Daymak Daymak is one of Canada s largest Alternative Vehicle providers. We design, engineer, manufacture, import and repair everything from recreational dirt bikes, go-karts and electric
PLEASE BE SAFE WHEN RIDING... ALWAYS WEAR A HELMET AND OBEY ALL LAWS!
 Powered Personal Transportation Electric Power Board Product Handbook FOR THE BLADEZ XTR Street ELECTRIC POWER BOARD Model: PB-SM1806 PLEASE BE SAFE WHEN RIDING... ALWAYS WEAR A HELMET AND OBEY ALL LAWS!
Hub Kit Fitting Guide 2016
 Hub Kit Fitting Guide 2016 Important: For your own safety you must read this manual before attempting to fit any part of the motor kit to your bike. You must also ensure that you fit the kit in strict
FREE INTELLIGENT LIFE EN FR IT DE NL ES RU / / / / / / / 85-98
 USER MANUAL R5 R5 FREE INTELLIGENT LIFE EN FR IT DE NL ES RU / 01-14 / 15-28 / 29-42 / 43-56 / 57-70 / 71-84 / 85-98 EN R5 USER MANUAL - 01 - Check Packing Contents Saddle components Bike body Front and
Hub Kit Fitting Guide 36V/HL
 Hub Kit Fitting Guide 36V/HL Important: For your own safety you must read this manual before attempting to fit any part of the motor kit to your bike. You must also ensure that you fit the kit in strict
MOTOX 70cc Assembly Manual
 MOTOX 70cc Assembly Manual Assembly Manual This manual should be considered a permanent part of the motorcycle and should remain if it is resold. This manual contains the latest product information available
RST fork should not be used if any parts appear to be or are damaged. Contact your local dealer or distributor for replacement parts.
 Proper care and maintenance of your RST product is necessary for longevity and optimum performance. Failing to perform normal maintenance will greatly decrease the performance of the product and may lead
Assembly Instructions
 www.rockymounts.com TandemMount R4 Installation Manual Guidelines/Restrictions: - This carrier is intended for Thule rectangular and Yakima round bars only. - Bicycles must be equipped with quick release
GROUNDSMASTER. 52 Recycler. for 120 Traction Unit. Model No & UP. Operator s Manual
 FORM NO. 8-980 Rev A GROUNDSMASTER 5 Recycler for 0 Traction Unit Model No. 077 79000 & UP Operator s Manual IMPORTANT: Read this manual carefully. It contains information about your safety and the safety
Operating Instructions. Page 12 eazi-rider - Mountain eazi-rider - Mountain Page 1
 Operating Instructions Page 12 Page 1 Registration Your Durabike is guaranteed for 1 year. Please fill in the following details and return to the address below. Your Details Name: Address: Contact Number:
Apache. User Manual. This manual describes how to safely complete final assembly and includes tips for use and maintenance.
 Apache User Manual This manual describes how to safely complete final assembly and includes tips for use and maintenance English THANK YOU Thank you for purchasing your new Dillenger electric bike! We
V XTRA WATT EVO_NYON_EN OWNER S MANUAL
 V2018.07 TRA WATT EVO_NYON_EN OWNER S MANUAL 1 11 12 2 3 4 5 6 7 13 14 15 8 9 10 16 17 18 19 20 21 1 Frame 11 Stem 2 Saddle 12 Handlebar 3 Seat post 13 Front light 4 Saddle clamp 14 Mudguard 5 Pannier
Mid-Drive Electric Bicycle Kit EVBIKE-SET-CMS-48 EVBIKE-SET-CMS-36
 INSTALLATION MANUAL Mid-Drive Electric Bicycle Kit EVBIKE-SET-CMS-48 EVBIKE-SET-CMS-36 Thank you for purchasing EVBIKE product and we hope that you will become a happy user. Carefully read the entire manual
Marzocchi Suspension MZ III MZ III. Technical instructions
 Technical instructions Exploded view - MZ III - 100 Rif. Code Quantity Spare part list - MZ III - 100 Rif. Code Description Q.ty in the model Technical characteristics: Technical characteristics Single-crown
The Grasshopper. Golf Buggy. Owners Manual Classic - Cobra - Junior (Twin Motor)
") The Grasshopper Golf Buggy Owners Manual Classic - Cobra - Junior (Twin Motor) Grasshopper Golf Buggies Ltd 86-88 Mason Street Sutton-in-Ashfield Nottinghamshire NG17 4HP Tel: (+44) 01623 404730 email:
The Grasshopper Golf Buggy Owners Manual Classic - Cobra - Junior (Twin Motor) Grasshopper Golf Buggies Ltd 86-88 Mason Street Sutton-in-Ashfield Nottinghamshire NG17 4HP Tel: (+44) 01623 404730 email:
Electric Bike D9908, D9909, D9979, D9980, D9981, D9982, D9983 and D9984
 Electric Bike D9908, D9909, D9979, D9980, D9981, D9982, D9983 and D9984 Thank you for purchasing this product, which has been made to demanding high quality standards and is guaranteed for domestic use
Read and understand this entire manual before allowing child to use this product!
 FLASHRIDER 360 OWNER S MANUAL Read and understand this entire manual before allowing child to use this product! NOTE: Manual illustrations are for demonstration purposes only. Illustrations may not reflect
Table of contents. Safety instructions...2. Diagram with e-bike specific components...3. Control panel...4
 E-RIDE User s Guide Table of contents Safety instructions... Diagram with e-bike specific components...... Control panel... Important safety notes regarding battery charger...5 Charger function...6 Battery
User Manual. Liberty 123 Electric Bike 24 Volt Lead Acid. Liberty 123 Liberty 24v FoldNGo. Thank you for your decision to buy this product.
 Liberty 123 Liberty 24v FoldNGo User Manual Thank you for your decision to buy this product Please use this product according to the instructions Please keep the instructions in a handy place Liberty 123