Instruction Manual. Auto Breeze
|
|
|
- Philip Benedict Wheeler
- 5 years ago
- Views:
Transcription
1 Instruction Manual Auto Breeze Model No Medallion Drive, Cincinnati, Ohio USA 2016 Gold Medal Products Co. Part No
2 SAFETY PRECAUTIONS DANGER Machine must be properly grounded to prevent electrical shock to personnel. Failure to do so could result in serious injury, or death. DO NOT immerse any part of this equipment in water. DO NOT use excessive water when cleaning. Keep cord and plug off the ground and away from moisture. Always unplug the equipment before cleaning or servicing. Make sure all machine switches are in the OFF position before plugging the equipment into the receptacle. 008_ DANGER Improper installation, adjustment, alteration, service, or maintenance can cause property damage, injury, or death. Any alterations to this equipment will void the warranty and may cause a dangerous condition. This appliance is not intended to be operated by means of an external timer or separate remote-control system. NEVER make alterations to this equipment. Read the Installation, Operating, and Maintenance Instructions thoroughly before installing, servicing, or operating this equipment. 014_ WARNING Floss head rotates at high speeds. Operator MUST keep hands and face clear of the floss head to avoid injury. Operator must wear eye protection. Keep all spectators at a reasonable distance, and use a Floss Bubble for added customer protection. 015_ WARNING Keep all foreign objects out of floss head. To avoid eye injury, DO NOT fill floss head with sugar while the head is on and rotating. 016_ WARNING Burn Hazard. DO NOT touch spinner head. Allow to cool before cleaning or servicing. Avoid contact with molten sugar. 006_ WARNING ALWAYS wear safety glasses when servicing this equipment. 010_ Page 2

3 SAFETY PRECAUTIONS (continued) WARNING No user serviceable parts inside. Refer servicing to qualified service personnel. 011_ WARNING Read and understand operator s manual and all other safety instructions before using this equipment. To order copies of the operator s manual go to or write to Gold Medal Products Co., Medallion Drive, Cincinnati, OH USA 1-(800) _ WARNING DO NOT allow direct contact of this equipment by the public when used in food service locations. Only personnel trained and experienced in the equipment operation may operate this equipment. Carefully read all instructions before operation. 012_ WARNING This machine is NOT to be operated by minors. 007_ Note: Improvements are always being made to Gold Medal s equipment. This information may not be the latest available for your purposes. It is critical that you call Gold Medal s Technical Service Department at for any questions about your machine operations, replacement parts, or any service questions. (Gold Medal Products Co. does not assume any liability for injury due to careless handling and/or reckless operation of this equipment.) Page 3
, check thoroughly for any damage which may have occurred in")

.")

-543-0862.")
")
4 INSTALLATION INSTRUCTIONS Inspection of Shipment After unpacking (reference unit Quick Start Guide), check thoroughly for any damage which may have occurred in transit. Claims should be filed immediately with the transportation company. The warranty does not cover damage that occurs in transit, or damage caused by abuse, or consequential damage due to the operation of this machine, since it is beyond our control (reference warranty in back of manual). Manual Read and understand the operator s manual and all other safety instructions before using this equipment. To order copies of the operator s manual go to or write to Gold Medal Products Co., Medallion Drive, Cincinnati, OH USA 1-(800) Model Description : Auto Breeze cotton candy machine with aluminum floss pan. Items Included with this Unit Power Cord Whirlgrip Floss Stabilizer (PN 3010) Aluminum Floss Pan (PN 42040) Cotton Candy Cone Samples (PN 3021M/case of 1000) Instruction Manual Registration Warranty Card Page 4


5 Setup for Use (General reference images shown) Bell Housing Lock-N-Go Handle Transport Position Operate Position Step 1: Set unit on a level surface. Step 2: Unit features new Lock-N-Go handles for easy carrying and a quick-lock into transport position. Rotate both Lock-N-Go handles into the vertical position for use. This allows bell housing to "float" freely on the springs during operation. DO NOT operate with handles in the transport position. Step 3: Place floss pan on unit. Step 5: Install Floss Stabilizer (see instructions on next page). Unit should be cleaned prior to use (reference Care and Cleaning section of this manual). Page 5


 as shown below.")
, and (6) Whirlgrip Clips (P/N")


6 Installation Instructions Whirlgrip Floss Stabilizer Unit must be OFF, and cool to install Floss Stabilizer. Place Floss Pan on unit and install Whirl Grip Floss Stabilizer (Item No. 3010) as shown below. Kit includes: Floss Stabilizer/screening (P/N 43032), and (6) Whirlgrip Clips (P/N 77470). Clips are designed to provide air space between screening and floss pan. Step 1: Place Whirl Clips over rim of pan with hooks facing inside. Step 2: Hang Stabilizer on top, up facing hook. Screening should be about flush with top of pan. Step 3: Gently pull screening down and attach to bottom, down facing hook. Allow air space for proper operation. Top View of Floss Pan Step 4: Repeat for all clips keeping equal spacing around pan (number of clips varies by model). Allow air space between pan and screening for proper operation. Page 6
7 Electrical Requirements The following power supply must be provided: : 120 V~, 1440 W, 60 Hz DANGER Machine must be properly grounded to prevent electrical shock to personnel. Failure to do so could result in serious injury, or death. DO NOT immerse any part of this equipment in water. DO NOT use excessive water when cleaning. Keep cord and plug off the ground and away from moisture. Always unplug the equipment before cleaning or servicing. Make sure all machine switches are in the OFF position before plugging the equipment into the receptacle. 008_ A certified electrician must furnish sufficient power for proper machine operation and install any supplied receptacle. We recommend this equipment be on a dedicated and protected circuit. Failure to wire properly will void the warranty and may result in damage to the machine. It is Gold Medal Products Co. s recommendation that this machine be plugged directly into a wall outlet. The use of extension cords is not recommended due to safety concerns, and may cause sacrificed and/or reduced performance. Make sure cord is located to prevent a trip hazard or unit upset. Before You Plug In Machine 1. Make sure all machine switches are OFF before plugging equipment into receptacle. 2. Make sure wall outlet can accept the grounded plugs (where applicable) on the power supply cord. 3. The wall outlet must have the proper polarity. If in doubt, have a competent electrician inspect the outlet and correct if necessary. 4. DO NOT use a grounded to un-grounded receptacle adapter (where applicable). 5. Install unit in a level position. CAUTION If the supply cord is damaged, it must be replaced by a special cord or assembly available from Gold Medal Products Co. or its service agent. 038_ Page 7
8 Auto Breeze Model No OPERATING INSTRUCTIONS Controls and Their Functions (3052 Auto Breeze) POWER SWITCH Two position, ON/OFF lighted rocker switch - supplies power to the Candy Switch. The green switch light ON indicates there is power to the unit. Immediate Power Off: To bypass the cooling cycle and immediately remove power from the machine, turn the Power Switch OFF. CANDY SWITCH Two position, White rocker switch - turns the motor and heating element ON/OFF. When turned OFF, the cooling cycle will start. After one (1) minute the cooling cycle completes, and the spinner head will stop rotating. Cooling is necessary to keep carbon from forming in the spinner head. AUTO COOLING INDICATOR LIGHT When lit, this amber light indicates the unit is in the cooling cycle. During the cooling cycle the spinner head will remain spinning. If the Auto Cooling Light is blinking during machine operation, it indicates there is a low voltage supply to the machine (less than 105 VAC). The machine may not operate properly (see Troubleshooting section of this manual). Power Switch Auto Cooling Indicator Light Candy Switch Page 8
9 Sugar for Your Candy Ready to Use Flossugar Our ready to use Flossugar is the preferred sugar for your new cotton candy machine; however 100% pure cane or beet sugar will do just fine. Our Flossugar gives you good rich colors, and great flavors, too. It is packed in handy half-gallon sealed cartons, with an E-Z pour spout for filling your machine. Flossugar comes in many flavors, and you can easily change flavors for greatest variety, and best sales. Mix Your Own If you want to mix your own, use our Flossine, and please follow our directions. If you want a deeper color, slightly dampen the mixed sugar. Use a tablespoon of water per five pounds of sugar, sprinkle water over sugar, and mix well. DO NOT USE EXCESS COLOR! Too much color will ruin the element on your machine and could create a bitter taste to the candy. There is a limit as to how dark you can make cotton candy. That s because cotton candy is 98% air, and we cannot color the air. Sugar Considerations Today 99% of the sugar manufactured is extra fine granulated, which does have some small particles which can slip thru the ribbons without being melted. If this becomes objectionable, you can seek out medium coarse or sanding sugars. The larger crystal size will require a little more heat to melt. Read the label on the bag of sugar, today we see some free flowing sugars for restaurants. Free flowing sugars contain cornstarch which will burn onto your element/band clogging them rapidly. We have also seen some off-brand sugars that are a blend of sugar and dextrose or corn syrup. This product makes very poor cotton candy. Please make sure you get good sugar for your cotton candy machine. Page 9
10 Machine Operation Floss Machine Operation (3052 Auto Breeze) WARNING Floss head rotates at high speeds. Operator MUST keep hands and face clear of the floss head to avoid injury. Operator must wear eye protection. Keep all spectators at a reasonable distance, and use a Floss Bubble for added customer protection. 015_ Follow the guidelines described in the Electrical Requirements Section for supplying power to machine. 2. With the Candy Switch OFF, turn the Power Switch ON. The spinner head will not start to rotate. 3. With the spinner head stopped, pour flossugar into the spinner head. Always fill it 90% full with sugar. This 90% level is necessary to obtain a balanced condition in the floss head. DO NOT OVERFILL! IMPORTANT: NEVER add sugar when motor is running. 4. Turn the Candy Switch ON. The spinner head will rotate and heat. After about 30 seconds the machine will start to make cotton candy. 5. When the spinner head needs to be refilled with sugar, or to stop making cotton candy, turn the Candy Switch OFF. The cooling cycle will start. After 1 minute the cooling cycle completes, and the spinner head will stop rotating. When the spinner head is stopped, refill with flossugar. Turn the Candy Switch ON, and continue to make cotton candy. Note: During the cooling cycle the spinner head will remain spinning. Cooling is necessary to keep carbon from forming in the spinner head. DO NOT use the Power Switch for normal operation of the machine. This will bypass the cooling cycle. IMPORTANT: Failure to cool down the floss head could result in leaving melted sugar in the floss head. If the motor is restarted, this melted sugar will exit the floss head and could cause burns. In addition, sugar left in the floss head may smoke or cause carbon build up. Immediate Power Off: To bypass the cooling cycle and immediately remove power from the machine, turn the Power Switch OFF. When completing operation for the day (or any prolonged period), follow the instructions in the Shutdown Procedure/Cleaning and Care section of this manual. Page 10


11 Making Floss Pick a cone, if it sticks in the stack of cones, twist it off the stack. CAUTION Keep hands away from spinning head! 031_ Hold an inch or two of the pointed end of a cone between two fingers and a thumb. With a light flicking action, roll cone in the web of floss building up in the pan. Lift the cone up with the ring of floss attached and rotate the cone to wrap the floss. DO NOT roll floss while the cone is inside the pan. This will pack the floss too tightly. See steps 1 thru 8 shown below. If the floss fails to stick to the cone, pass the cone near the spinner head to pick up a starter of melted sugar. Lift the cone out of the pan and wrap the floss with a "figure eight" movement of the hand. This leaves giant pockets and makes the final product appear larger. Make sure room humidity is not too high, or product will be "heavy". 1. Grip cone as shown. 2. Break into web of floss with the cone. 3. Wind the sugar onto the cone. 4. Lift web of floss from the pan and roll onto the cone WARNING DO NOT PUT HANDS OR OBJECTS IN ROTATING SPINNER HEAD. DO NOT FILL SPINNER HEAD WITH SUGAR WHILE IT IS ROTATING. WEAR EYE PROTECTION. DO NOT PUT HANDS NEAR ROTATING SPINNER HEAD. USE FLOSS CONE TO COLLECT COTTON CANDY. 032_ Page 11
12 Floater Adjustments In operation, the floss will collect on the FLOSS STABILIZER. If the floss collects low on the stabilizer, twist the front (leading) edge of the leather floaters down. You get more lift and the floss will collect higher. Form leather floaters as shown below. This creates a lifting action to float the floss higher on the wall of the floss pan. Rotation Leather Floater Leading Edge of Leather Floaters seen twisted down. Page 12
13 Shut Down Procedure/ Care and Cleaning Shut Down Procedure (3052 Auto Breeze) 1. When completing operation for the day (or any prolonged period), run the floss head completely empty of sugar. 2. Turn the Candy Switch OFF. The cooling cycle will start. When the cooling cycle completes, the spinner head will stop rotating. 3. When the spinner head is stopped, turn the Power Switch OFF. 4. NEVER put water in the floss head. Care and Cleaning DANGER Machine must be properly grounded to prevent electrical shock to personnel. DO NOT immerse in water. Always unplug the equipment before cleaning or servicing. 025_ WARNING Burn Hazard. DO NOT touch spinner head. Allow to cool before cleaning or servicing. Avoid contact with molten sugar. 006_ Good sanitation practice demands that all food preparation equipment be cleaned regularly (only use non-toxic, food grade cleaners). A clean looking, well-kept machine is one of the best ways of advertising your product. Follow the directions below to clean and sanitize the unit each day after use. 1. Unplug the machine and wait for the floss head to cool down to room temperature. 2. Make sure to clean all pans/accessories in order to sanitize them before each use. 3. Wipe all surfaces with a clean, damp cloth. 4. Wipe the stainless steel parts with a clean cloth and cleaner designed for stainless steel, such as Gold Medal Watchdog Stainless Cleaner (Item No. 2088). DO NOT use oven cleaners or abrasive materials as they will damage parts of the machine. Page 13

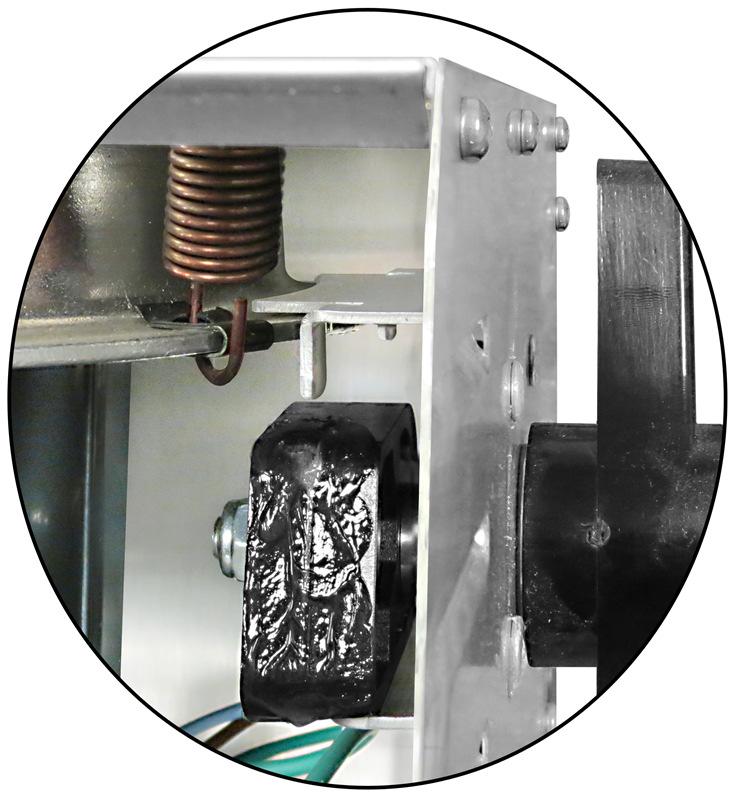
14 Floss Band and Element Disassembly and Removal of Floss Band 1. Unplug the machine from the power source and allow floss head to cool completely. 2. Remove all sugar from the head of the machine before disassembling. If needed, carefully turn the machine on its side and shake the sugar out. 3. Remove the four spinner cap retainer screws and spinner cap. In some cases, the sugar has caused the cap and band to stick together. Applying gentle pressure with the heel of the hand should free the parts for removal. 4. Remove the nylon acorn nut, lock nut, and terminal guard. 5. Remove the retaining screws which fasten the element lead wires to the terminals (use a 1/4 (9.5mm) nut driver); then remove the band and element. (See next page for reconnecting element leads.) 6. If there is excessive sugar build-up, run hot water over band and element until the sugar dissolves (be careful to keep element leads dry). When the sugar has been removed, allow the band and element to air dry overnight. Note: For models with separate heat and motor switches, the best way to dry the floss head after reassembly is to spin it dry for 10 minutes WITHOUT HEAT (use motor switch only). Nylon Acorn Nut Lock Nut Terminal Guard Floss Band and Element Element Lead Wire and Retaining Screw Reference next page for reassembly instructions. Tubular Element View Page 14

. 2.")

. 3.")


15 Reassembly of Floss Band 1. The band is marked to show correct orientation for installation (see image below). 2. Always attach one element lead to the far connection on each terminal assembly (see image below). 3. Reassemble terminal guard, lock nut, and nylon acorn nut. 4. When reinstalling the spinner cap, DO NOT OVERTIGHTEN SCREWS. Initially snug down each screw evenly; be careful not to over apply pressure on any single point. Once snug, tighten all screws evenly to secure spinner cap to floss head. Band is marked to show correct orientation. Floss Band Orientation Element Lead Wire and Retaining Screw Models 3038 and ALWAYS connect Element Leads on the far side of each terminal assembly as shown in example below. Terminal Assemblies CORRECT Connect ONE element lead to EACH terminal assembly. INCORRECT DO NOT connect both element leads to the same terminal assembly. Page 15
16 Troubleshooting Issue Possible Cause Solution Low Production A. Excessive carbon on the element. A. Follow the instructions for removing and cleaning band and element (see Floss Band and Element section). B. Low line voltage. B. If the Auto Cooling Light is blinking during machine operation, it indicates there is low wall line voltage to the machine (less than 105 VAC). A primary reason for low production and poor equipment performance is low line voltage. Have a qualified electrician check the wall line voltage (where the machine is plugged in), and add new lines for all the various equipment plugged into the electric circuit if there is not enough current for the requirement listed on the equipment nameplate. The use of extension cords is not recommended due to safety concerns, and may cause sacrificed and/or reduced performance. If the use of an extension cord cannot be avoided then be sure it is no longer than 10 to 12 ft., and is at least 14 AWG wire. Excessive Smoke C. Foreign objects in the spinner head. A. Bypassing the cooling cycle. C. Foreign objects in the head assembly can short out an element or cause an out-of-balance condition. A. Bypassing the cooling cycle will cause excessive smoke and melting sugar. This can cause carbon buildup. See Floss Band and Element section of this manual for cleaning the band and element. Excessive Vibration B. Product mixture. B. Check the product mixture being used. For best results, use nothing with a cornstarch base. C. Excessive sugar buildup. C. Check the band for excessive sugar buildup and remove if needed as described in the Floss Band and Element section of this manual. A. Packing material not removed. B. Lock-N-Go Handles not in operating position. A. If the equipment is new, check that all packing materials were removed from the machine. B. Verify that the Lock-N-Go Handles have been rotated into the operating position. C. Low on sugar. C. Refill the floss head; this will normally eliminate excessive vibration. When adding sugar to the floss head, always fill it 90% full to obtain a balanced condition in the head and eliminate vibration. Do not add sugar with the motor running! Page 16
17 Issue Possible Cause Solution Lock-N-Go Handles are Hard to Rotate D. Foreign objects or sugar lumps. E. Stretched or uneven suspension springs. D. Run the sugar completely out, then check for foreign objects or sugar lumps in the head assembly. E. If the suspension springs are stretched or uneven this can cause unwanted vibrations. Have Qualified Service Personnel replace if needed. A. Clamping Cam friction. A. If handles are hard to move, Qualified Service Personnel may need to apply Petro Gel (Gold Medal Item No. 1110), or a food safe lubricant, to the top surface of the Clamping Cam to reduce friction where the cam contacts the bell housing. Page 17
18 MAINTENANCE INSTRUCTIONS DANGER Machine must be properly grounded to prevent electrical shock to personnel. Failure to do so could result in serious injury, or death. DO NOT immerse any part of this equipment in water. DO NOT use excessive water when cleaning. Keep cord and plug off the ground and away from moisture. Always unplug the equipment before cleaning or servicing. Make sure all machine switches are in the OFF position before plugging the equipment into the receptacle. 008_ DANGER Improper installation, adjustment, alteration, service, or maintenance can cause property damage, injury, or death. Any alterations to this equipment will void the warranty and may cause a dangerous condition. This appliance is not intended to be operated by means of an external timer or separate remote-control system. NEVER make alterations to this equipment. Read the Installation, Operating, and Maintenance Instructions thoroughly before installing, servicing, or operating this equipment. 014_ WARNING No user serviceable parts inside. Refer servicing to qualified service personnel. 011_ CAUTION THE FOLLOWING SECTIONS OF THIS MANUAL ARE INTENDED ONLY FOR QUALIFIED SERVICE PERSONNEL WHO ARE FAMILIAR WITH ELECTRICAL EQUIPMENT. THESE ARE NOT INTENDED FOR THE OPERATOR. 027_ Page 18
19 How to Check a Triac Triac - Top View 1. Set the Multimeter for ohms or continuity. 2. Disconnect all machine leads from the Triac. 3. Connect the positive ohmmeter lead to MT2 and the negative lead to MT1. The ohmmeter should indicate no continuity (OL) through the Triac. 4. Using a separate jumper lead, connect the gate of the Triac to MT2. The ohmmeter should indicate continuity (less than 100 ohms). 5. Reconnect the Triac so MT1 is connected to the positive ohmmeter lead and the negative lead to MT2. The ohmmeter should indicate no continuity (OL) through the Triac. 6. Using a separate jumper lead, connect the gate of the Triac to MT2. The ohmmeter should indicate continuity (less than 100 ohms). Page 19
20 ORDERING SPARE PARTS 1. Identify the needed part by checking it against the photos, illustrations, and/or parts list. 2. Use only approved replacement parts when servicing this unit. 3. When ordering, please include part number, part name, and quantity needed. 4. Please include your model number, serial number, and date of manufacture (located on the machine nameplate/data plate) with your order. 5. Address all parts orders to: Parts Department Gold Medal Products Co Medallion Drive Cincinnati, Ohio Or, place orders by phone or online: Phone: (800) (513) Fax: (800) (513) Web Page: Page 20


21 Auto Breeze Model No Cabinet Exterior and Lock-N-Go Handle Assembly , , , * 12 *CAUTION: If supply cord is damaged, it must be replaced by Gold Medal Products Co., its service agent, or similarly qualified persons in order to avoid a hazard Page
22 Cabinet Exterior and Lock-N-Go Handle Assembly Parts List Item Part Description Part No SPINNER HEAD, TUBULAR 5IN HEAD (Complete Assembly) See Spinner Head Assembly section for individual parts breakdown. 2 BRUSH HOLDER ASSY (includes Brushes, Caps and Holders) See Brush Assembly Breakdown section for individual parts breakdown W 3 BELL HOUSING, DUAL BRUSH LABEL,FLOSS ADVERTISEMENT BOWL, SEAL RETAINER BELL HOUSING SEAL THREADED BUMPER,1/ NAME,INSTRUCTION OVERLAY SWITCH, LIGHTED ROCKER GR PILOT LIGHT, AMBER 125V SWITCH, ROCKER DPDT RUBBER FOOT 3/4IN HIGH LOCK N GO HANDLE, NEW CAB /16-18 X 1/2 PH TR M/S WASHER SS.5 ID X 1.10 OD CLAMPING SHAFT, LOCK N GO CLAMPING CAM /16 FLAT WASHER ZINC PLT HEX NUT 5/16-18 ESLOK * POWER SUPPLY CORD STRAIN RELIEF SR-6P WARNING LABEL CORD X 3/8 PHIL PAN HEAD /4-20 X 3/4 GRADE 5 BOLT (w/lock Washer) TINNERMAN NUT 1/ X 3/8 SLT. HWH M/S #8-32 TINNERMAN FASTENER INSPECTION BRUSH COVER LABEL,CLEAN EVERY 500 LBS Page 22
 Parts Breakdown 1 2 3")
 15 5 6 7 8 9,")


23 5 Spinner Head (Model No ) Parts Breakdown Spinner Head Complete (Model 55139) , * *Uses two Set Screws 25 Floss Head Band Interior View Spinner Head Bottom Page 23
24 5 Spinner Head (Model No ) Parts List Item Part Description Part No LEATHER FLOATER SCREW 8-32 X 5/16 PH PAN MS HIGH CAPACITY SPINNER CAP X 31/4 PHIL PAN MS BAND ASSY, SUPER BREEZE (includes element) /4 20 NYLON ACORN NUT /4 20 SERRATED LOCK NUT PHENOLIC TERMINAL GUARD FLOSS ELEMENT BRACKET LOCKNUT, REVERSIBLE X 1/4 HX HD WHIZ LOCK #8 INTERNAL TOOTH L/W 410SS COUNTER WEIGHT ID FLATWASHER SPINNER HEAD BOTTOM (Complete assembly 15 includes 2 element lead screws, Terminal Guard, Nylon Nut, Lock Nut, and items listed below.) 16 UPPER SPINNER HEAD /4-20 X 2-3/4 SET SCREW HEX NUT #10-32 BRASS #10 INTERNAL TOOTH WASHER TERMINAL ASSEMBLY SLIP RING STUD SLIP RING MACHINED 42126HD 23 LOWER SPINNER HEAD 1/ SET SCREW 1/4-20 X 3/8 (2 required for the 24 Lower Spinner Head) BOTTOM PHENOLIC WASHER Page 24

25 Bell Housing Interior Brush Assembly 1, , Item Part Description Part No HEX NUT #10-24 ESLOK ID FLATWASHER MOTOR MTG PLATE MOTOR, FLOSS MACHINE X 1/2 PH PAN HD M/S GRIP NUT ZINC PLATED BRUSH HOLDER ASSEMBLY (includes Brushes, Caps and Holders) 42382W 8 DUAL BRUSH HOLDER W/LEADS 42436W 9 CARBON BRUSH CAP, BRUSH HOLDER Page 25


26 Auto Breeze Model No Cabinet Interior Parts Breakdown , , 10 8, 6, When reassembling the unit: 5 6, 7 Be sure the Bell Housing is located UNDER the Clamping Brackets as shown here. Be sure to keep wiring clear of the locking mechanism. Page 26


27 Cabinet Interior - Parts List Item Part Description Part No MOTOR, FLOSS MACHINE SWITCH, ROCKER DPDT PILOT LIGHT, AMBER 125V SWITCH, LIGHTED ROCKER GR AUTO WATT CONTROLLER X 3/8 PHIL PAN M/S WASHER #6 INTERNAL TOOTH TRIAC, 35A 600V HEAT SINK X 1/2 PH TRUSS M/S TERMINAL BLOCK, 2 POS X 3/4 PHIL PAN MS SS HEX NUT #8-32 STAINLESS ACORN NUT 1/ SPRING, SUSPENSION MEDIUM SCREW 1/4-20X3/8 PN HD PH TINNERMAM FASTENER Floss Pan and Whirlgrip Stabilizer Whirgrip Stabilizer (includes Floss Stabilizer and Clips) 1 Item Part Description Part No FLOSS PAN, ALUM WHIRLGRIP STABILIZER (Includes Floss Stabilizer and Clips) FLOSS STABILIZER (Web) WHIRLGRIP CLIPS Page 27
28 Model No Wiring Diagram Page 28
29 WARRANTY Gold Medal Products Co. warrants to the original purchaser each item of its manufacture to be free of defects in workmanship and material under normal use and service. Gold Medal Products Co. s obligation under this warranty is limited solely to repairing or replacing parts, f.o.b. Cincinnati, Ohio, which in its judgment are defective in workmanship or material and which are returned, freight prepaid, to its Cincinnati, Ohio factory or other designated point. Except for Perishable Parts on specific machines, the above warranty applies for a period of two (2) years from the date of original sale to the original purchaser of equipment when recommended operating instructions and maintenance procedures have been followed. These are packed with the machine. Parts warranty is two (2) years, labor is six (6) months. THIS WARRANTY IS IN LIEU OF ALL OTHER WARRANTIES EXPRESSED OR IMPLIED, AND OF ALL OTHER OBLIGATIONS OR LIABILITIES ON OUR PART, INCLUDING THE IMPLIED WARRANTY OF MERCHANTABILITY. THERE ARE NO WARRANTIES WHICH EXTEND BEYOND THE DESCRIPTION ON THE FACE HEREOF. In no event shall Gold Medal Products Co. be liable for special, incidental or consequential damages. No claim under this warranty will be honored if the equipment covered has been misused, neglected, damaged in transit, or has been tampered with or changed in any way. No claim under this warranty shall be honored in the event that components in the unit at the time of the claim were not supplied or approved by Gold Medal Products Co. This warranty is effective only when electrical items have been properly attached to city utility lines only at proper voltages. This warranty is not transferable without the written consent of Gold Medal Products Co. The term Original Purchaser as used in this warranty shall be deemed to mean that person, firm, association, or corporation who was billed by the GOLD MEDAL PRODUCTS CO., or their authorized distributor for the equipment. THIS WARRANTY HAS NO EFFECT AND IS VOID UNLESS THE ORIGINAL PURCHASER FIRST CALLS GOLD MEDAL PRODUCTS CO. AT TO DISCUSS WITH OUR SERVICE REPRESENTATIVE THE EQUIPMENT PROBLEM, AND, IF NECESSARY, FOR INSTRUCTIONS CONCERNING THE REPAIR OR REPLACEMENT OF PARTS. NOTE: This equipment is manufactured and sold for commercial use only Medallion Drive, Cincinnati, Ohio USA Phone: (800) Fax: (800) (513) (513) The text, descriptions, graphics, layout, and other material in this publication are the exclusive property of Gold Medal Products Co. and shall not be used, copied, reproduced, or published in any fashion, including website display, without its express written consent. Page 29
AUTO-BREEZE Cotton Candy Machine Instruction Manual Model #3052
 Part No. 55147 Revised: August 2004 AUTO-BREEZE Cotton Candy Machine Instruction Manual Cincinnati, OH 45241-4807 USA Safety Precautions Auto-Breeze 2 INTRODUCTION Your Floss Machine warranty is described
Super Floss Instruction Manual Model #3038 and 3038EX
 Part No. 88761 Revised Aug 2003 Super Floss Instruction Manual Cincinnati, OH 45241-4807 USA Safety Precautions 2 INTRODUCTION Your Floss Machine warranty is described on the back page of this manual.
Instruction Manual. Whirlwind SHO
 Instruction Manual Whirlwind SHO Model No. 3009 10700 Medallion Drive, Cincinnati, Ohio 45241-4807 USA Part No. 63898 SAFETY PRECAUTIONS Page 2 INSTALLATION INSTRUCTIONS Inspection of Shipment After unpacking,
Part No Revised May 2002
 Part No. 42231 Revised May 2002 Electronic Tornado Deluxe Whirlwind X15 Instruction Manual Model #3015A, #3015AX, #3005E, 3005XE, #3008E, #3008XE, #3007E, #3007XE, #3009E, and #3009XE Cincinnati, OH 45241-4807
Instruction Manual. Fudge Puppy Display Case
 Instruction Manual Fudge Puppy Display Case Model No. 5535 10700 Medallion Drive, Cincinnati, Ohio 45241-4807 USA 2014 Gold Medal Products Co. Part No. 89074 SAFETY PRECAUTIONS DANGER Machine must be properly
Instruction Manual. Tornado and Deluxe Whirlwind
 Instruction Manual Tornado and 10700 Medallion Drive, Cincinnati, Ohio 45241-4807 USA Part No. 42231 SAFETY PRECAUTIONS DANGER Machine must be properly grounded to prevent electrical shock to personnel.
Instruction Manual. Tornado and Deluxe Whirlwind
 Instruction Manual Tornado and 10700 Medallion Drive, Cincinnati, Ohio 45241-4807 USA Part No. 42231 SAFETY PRECAUTIONS Page 2 INSTALLATION INSTRUCTIONS Inspection of Shipment After unpacking, check thoroughly
Countertop B.I.B. Butter Dispenser Instruction Manual Model #2496
 Part No. 39177 Countertop B.I.B. Butter Dispenser Instruction Manual Cincinnati, OH 45241-4807 USA SAFETY PRECAUTIONS Installation Instructions Countertop B.I.B. Checking Shipment Unpack all cartons and
Part No DROP IN POPCORN WARMERS Instruction Manual Model #2343, 2344, 2345
 Part No. 39406 DROP IN POPCORN WARMERS Instruction Manual Model #2343, 2344, 2345 SAFETY PRECAUTIONS 2 INSTALLATION INSTRUCTIONS Inspection of Shipment: Unpack all cartons and check thoroughly for any
!"" #$% "!&' ( ( ) *
 *") !"" #$% "!&' (( ) * FunPop CART Assembly Manual Model # 2689 CARTS Part No. 59411 Revised: FEB 2009 Cincinnati, OH 45241-4807 USA INSTALLATION INSTRUCTIONS Checking Shipment Unpack all cartons and check
!"" #$% "!&' (( ) * FunPop CART Assembly Manual Model # 2689 CARTS Part No. 59411 Revised: FEB 2009 Cincinnati, OH 45241-4807 USA INSTALLATION INSTRUCTIONS Checking Shipment Unpack all cartons and check
Giant Cone Display Case
 Instruction Manual Model #8211 Part No. 76132 Revised June 1996 Cincinnati, OH 45241-4807 USA SAFETY PRECAUTIONS This equipment is designed and sold for commercial use only. This equipment is not to be
Cincinnati, OH USA
 Astro Pop Warmer Instruction Manual Model #2002 Part No. 61987 Revised July 2000 Cincinnati, OH 45241-4807 USA e-mail: goldme19@eos.net www.gmpopcorn.com SAFETY PRECAUTIONS INTRODUCTION Your new #2002
Hot Dog Roller Grills Instruction Manual Model #8023, Model #8024 and Model #8025 Model #8023SL, Model #8024SL and Model #8025SL
 Part No. 87630 Revised November 2007 Hot Dog Roller Grills Instruction Manual Model #8023, Model #8024 and Model #8025 Model #8023SL, Model #8024SL and Model #8025SL Model #8023 shown Cincinnati, OH 45241-4807
Cincinnati, OH USA
 Part No. 87630PE Revised November 2007 Hot Dog Roller Grills Non-Stick Instruction Manual Model #8023PE, Model #8024PE and Model #8025PE Model #8023SLPE, Model #8024SLPE and Model #8025SLPE Model #8023PE
FUNNEL CAKE FRYER Instruction Manual Models: 8078 / FC-4, 8082 / FC-6, and 8090 / FC-4
 Part No. 89784 Revised: December 2005 FUNNEL CAKE FRYER Instruction Manual Models: 8078 / FC-4, 8082 / FC-6, and 8090 / FC-4 Cincinnati, OH 45241-4807 USA GAS SAFETY PRECAUTIONS INSTALLATION INSTRUCTIONS
Automatic Butter Dispenser Instruction Manual Model #2395NS
 Automatic Butter Dispenser Instruction Manual Part No. 39642 Revised: July 2006 Cincinnati, OH 45241 USA Safety Precautions Automatic Butter Dispenser 2 INTRODUCTION Automatic Butter Dispenser This manual
Bag-In-A-Box Oil Pump System
 Bag-In-A-Box Oil Pump System Part No. 79285 Revised February 2000 INSTRUCTION MANUAL MODEL #2257 AND MODEL #2257H Cincinnati, OH 45241-4807 USA e-mail: goldme19@eos.net www.gmpopcorn.com SAFETY PRECAUTIONS
Export Bucket Pump Instruction Manual Models: 2114XE & 2114XD
 Part No. 79064XE Revised: August 2006 Export Bucket Pump Instruction Manual Cincinnati, OH 45241 USA SAFETY PRECAUTIONS INTRODUCTION This manual provides instruction for installation and operation of the
ROLLER GRILL Instruction Manual Model #8223, 8224, Part No Revised:March 2008
 ROLLER GRILL Instruction Manual Model #8223, 8224, 8225 Part No. 88189 Revised:March 2008 Safety Precautions Models #8223, 2 #8224, #8225 FORWARD This manual covers the model # 8223, # 8223, 8225 ROLLER
!"" #$% "!&' ( ( ) *
 *") !"" #$% "!&' (( ) * FunPop Assembly Manual Model # 2649CR Part No. 59406CR Revised: October 2004 Cincinnati, OH 45241-4807 USA INSTALLATION INSTRUCTIONS Checking Shipment Unpack carton and check thoroughly
!"" #$% "!&' (( ) * FunPop Assembly Manual Model # 2649CR Part No. 59406CR Revised: October 2004 Cincinnati, OH 45241-4807 USA INSTALLATION INSTRUCTIONS Checking Shipment Unpack carton and check thoroughly
Sno Konette. Instruction Manual Deluxe Model #1002EX Standard Model #1003EX DC Battery Model #1009EX. Cincinnati, OH USA.
 Sno Konette Instruction Manual Deluxe Model #1002EX Standard Model #1003EX DC Battery Model #1009EX Part No. 22045EX Revised June 1996 Model #1002EX Model #1003EX Cincinnati, OH 45241-4807 USA SAFETY PRECAUTIONS
SAM S CLUB POPPER UniMaxx Kettle Popcorn Machine Instruction Manual Model #2085CL
 SAM S CLUB POPPER UniMaxx Kettle Popcorn Machine Instruction Manual Model #2085CL Part No. 49388 Revised: March 2009 Cincinnati, OH 45241-4807 USA SAFETY PRECAUTIONS 2 Model #2085CL UniMaxx INSTALLATION
Color Wheel Instruction Manual Model #7767
 Part No. 52179 Revised: April 2004 Color Wheel Instruction Manual Model #7767 Cincinnati, OH 45241-4807 USA SAFETY PRECAUTIONS INSTALLATION INSTRUCTIONS CHECKING SHIPMENT The Color Wheel is shipped in
Accu-Meter Oil Pump. Instruction Manual. Model #2114. Cincinnati, OH USA. Part No Revised June 1996
 Instruction Manual Model #2114 Part No. 79064 Revised June 1996 Cincinnati, OH 45241-4807 USA SAFETY PRECAUTIONS INSTALLATION CHECKING SHIPMENT Your new Accu-Meter Oil Pump is completely assembled and
PEANUT ROASTER Instruction Manual Model #5081
 Part No. 46355 Revised: September 2004 Instruction Manual Model #5081 Cincinnati, OH 45241-4807 USA SAFETY PRECAUTIONS 2 MODEL # 5081 OPERATING INSTRUCTIONS Unpacking and Assembly After unpacking your,
 WARNING!! The attached Gold Medal Manual is for reference only and is not intended for any other purpose. The information contained in these on line manuals is subject to change at any time. Improvements
Dispenser & Warmer RIC-1909 RIC-1909EXP
 Dispenser & Warmer RIC-1909 RIC-1909EXP Safety Precautions CAUTION This equipment is designed and sold for commercial use only. This equipment is not to be used by the consumer in home use. Do not allow
PLINKO Instruction Manual Model #7760
 Part No. 52148 Revised November 2002 Instruction Manual Model #7760 Cincinnati, OH 45241-4807 USA SAFETY SHEET 2 INSTALLATION INSTRUCTIONS CHECKING SHIPMENT The is shipped in two corrugated cartons. One
Film-Tech. The information contained in this Adobe Acrobat pdf file is provided at your own risk and good judgment.
 Film-Tech The information contained in this Adobe Acrobat pdf file is provided at your own risk and good judgment. These manuals are designed to facilitate the exchange of information related to cinema
Gay 90 s Whiz Bang. Instruction Manual Model #2014. Cincinnati, OH USA. Part No Revised June 1996
 Gay 90 s Whiz Bang Instruction Manual Model #2014 Part No. 47700 Revised June 1996 Cincinnati, OH 45241-4807 USA SAFETY PRECAUTIONS INSTALLATION Your new Antique Popcorn Machine is completely assembled.
INSTALLATION INSTRUCTIONS, PARTS LIST AND CONFIGURATION GUIDE FOR THE CARBONATOR. Large Model No
 Please refer to the Schroeder America website (www.schroederamerica.com) for information relating to Schroeder America installation and Service Manuals, Instruction Sheets, Technical Bulletins, Service
Reach ins, Freeezers & Refrigerators Installation & Operation Manual
 Reach ins, Freeezers & Refrigerators Installation & Operation Manual BSR23 BSF23 BSR49 BSF49 BSR72 BSF72 IMPORTANT SAFETY INSTRUCTIONS (SAVE THESE INSTRUCTIONS) Visit us on the web at www.blueairinc.com
Linear Actuator. Installation Manual. warranty installation parts list. Linear Actuator Installation Manual Page 1
 Linear Actuator Installation Manual warranty installation parts list January 2004 Linear Actuator Installation Manual Page 1 MA1221B12 Warranty Information Chore-Time Equipment ( Chore-Time ) warrants
OPW Installation and Maintenance Instructions OPW Series Primary and Secondary Bucket Replacement Instructions
 OPW Installation and Maintenance Instructions OPW 1-3100 Series Primary and Secondary Bucket Replacement Instructions IMPORTANT: Please read these warnings and follow the assembly instructions completely
Blue Air. Commercial Refrigeration Inc. Installation & Operation Manual Chef Bases
 Blue Air Commercial Refrigeration Inc. Installation & Operation Manual Chef Bases Please read this manual completely before installing or operating this unit! BACB53 BACB71 BACB74 BACB83 BACB86 BACB96
Model G14SD Vapor Management System
 Instruction Manual Model G14SD Vapor Management System (For Models: DSD and SSD 110/115v) Manufactured in USA for Medivators Reprocessing Systems by: PCI Medical Inc. 12 Bridge Street, PO Box 188 Deep
CRD610 Automatic Fitting Inserter
 CRD610 Automatic Fitting Inserter OPERATIONS MANUAL VERSION 1.2 LAST EDITED 12.12.2018 cleanroomdevices.com 1 Table of Contents Title Page. 1 Table of Contents...2 1.0 General Product & Safety Information....3
Tissue Master. User Manual
 Tissue Master User Manual This page left blank intentionally This manual is a guide for the use of the Omni International Tissue Master and accessories. Data herein has been verified and validated. It
CRD600 Automatic Fitting Inserter
 CRD600 Automatic Fitting Inserter OPERATIONS MANUAL VERSION 2.3 LAST EDITED 12.07.2018 cleanroomdevices.com 1 Table of Contents Title Page.. 1 Table of Contents. 2 1.0 General Product & Safety Information...3
Power Controller IMPORTANT INFORMATION. What s In the Box? Assembly, Operation, & Maintenance
 Power Controller Assembly, Operation, & Maintenance Congratulations on your purchase, and thank you for selecting the Power Controller from Blichmann Engineering. We are confident that it will provide
OWNER & OPERATOR INSTRUCTION MANUAL
 OWNER & OPERATOR INSTRUCTION MANUAL Model No. RHW-450 FOOD WRAPPER www.turboairinc.com For service contact: German Knife Inc. 1-800-500-3519 www.turboairinc.com TABLE OF CONTENTS PAGE INSTALLATION MAINTENANCE
AS-57FMH Flush Mount Kit AS-57EBDBP
 AS-57FMH Flush Mount Kit AS-57EBDBP Table of Contents GrowerSELECT General Page...3 Safety...4 Warning Labels...4 Installation...5 Operation Safety...5 Maintenance Safety...5 Installation...6 Framing...6
R E A D T H I S F I RST SAW USER GUIDE MODEL SVC4
 READ THIS FIRST SAW USER GUIDE MODEL SVC4 USER GUIDE This manual covers the description, cautions, operation, and maintenance of the Super Vac SV3. Please take the time to read this manual before operating
EBG Series Surface Preparation Machines
 Owner s Manual EBG Series Surface Preparation Machines EBG-20/Q EBG-20/C EBG-20/E EBG-28 EBG-20/R EBG-28/R EBG-28 EBG-20/C / 800.557.6822 Square Scrub EBG Series Surface Preparation Machines Owner s Manual
Henny Penny Hand Breader/Sifter Model HB-11
 Henny Penny Hand Breader/Sifter Model HB-11 TECHNICAL MANUAL TABLE OF CONTENTS Section Page Section 1. MAINTENANCE... 1-1 1-1. Introduction....1-1 1-2. Safety... 1-1 1-3. Replacement of Belt...1-2 1-4.
Model HPX60 Series Automatic Battery Charger User s Manual Rev. 1.0 October 17, 2006
 B R A N D Model HPX60 Series Automatic Battery Charger User s Manual Rev. 1.0 October 17, 2006 For Sales, Support and Service phone: 407-331-4793 fax: 407-331-4708 website: www.xenotronix.com email: information@xenotronix.com
Air Curtain. Installation, Operating and Maintenance Instructions
 Installation, Operating and Maintenance Instructions Save this manual for future reference. Air Curtain Model Numbers: ES026, ES036, ES042, ES048, ES060, ES072 READ THIS OWNER S MANUAL CAREFULLY BEFORE
Heated Bakery Merchandiser Series. Series: WBC Operation Manual
 Heated Bakery Merchandiser Series Series: WBC Operation Manual WHAT IS COVERED WHO IS COVERED COVERAGE PERIOD WARRANTY COVERAGE EXCEPTIONS EXCLUSIONS INSTALLATION BKI LIMITED WARRANTY 2812 Grandview Drive
DeZURIK AFR3 Filter Regulator Used on Pneumatic Cylinder Actuators
 AFR3 Filter Regulator Used on Pneumatic Cylinder Actuators Instructions D11033 August 2013 Instructions These instructions provide information about AFR3 Filter Regulators. They are for use by personnel
Installation & Operation Manual Chef Base
 Installation & Operation Manual Chef Base Please read this manual completely before installing or operating this unit! BACB53 BACB53M BACB71 BACB71M BACB74 BACB74M BACB83 BACB83M BACB86 BACB86M BACB96
Part Number Mini Linear Lift Assembly Installation & Operator s Instruction Manual
 Part Number 39644 Mini Linear Lift Assembly Installation & Operator s Instruction Manual April 1999 MV1505C Chore-Time Warranty Mini Linear Lift Assembly Manual Chore-Time Warranty Chore-Time Equipment
OWNER S MANUAL. Model YUA2AMPCH 2 AMP Dual-Bank Automatic Battery Charger & Maintainer READ ENTIRE MANUAL BEFORE USING THIS PRODUCT
 Model YUA2AMPCH 2 AMP Dual-Bank Automatic Battery Charger & Maintainer Certified by California BCS Regulations OWNER S MANUAL READ ENTIRE MANUAL BEFORE USING THIS PRODUCT READ ENTIRE MANUAL BEFORE USING
p.t.o. Slip clutch Read this material before using this product. Failure to do so can result in serious injury. Save this manual.
 p.t.o. Slip clutch 65517 Installation Instructions Distributed exclusively by Harbor Freight Tools. 3491 Mission Oaks Blvd., Camarillo, CA 93011 Visit our website at: http://www.harborfreight.com Read
36" Galvanized Direct Drive Hyflo Fan Installation and Operators Instruction Manual. Fan and Framing Dimensions
 6" Galvanized Direct Drive Hyflo Fan Installation and Operators Instruction Manual Fan and Framing Dimensions Planning the layout of the spacing between Fans is very important. Spacing too close together
Model NTX7 Series Automatic Battery Charger User s Manual Rev. 1.0 October 17, 2006
 B R A N D Model NTX7 Series Automatic Battery Charger User s Manual Rev. 1.0 October 17, 2006 For Sales, Support and Service phone: 407-331-4793 fax: 407-331-4708 website: www.xenotronix.com email: information@xenotronix.com
CLEAN ROOM DEVICES, LLC "WHERE TUBING AND FITTINGS COME TOGETHER"
 CLEAN ROOM DEVICES, LLC "WHERE TUBING AND FITTINGS COME TOGETHER" CRD600AF Automatic Fitting Inserter With Auto Feed OPERATIONS MANUAL (Shown with optional alcohol dispenser) 1 VERSION 1.1 LAST EDITED
DeZURIK KUL KNIFE GATE VALVES
 KUL KNIFE GATE VALVES Instruction D11025 September 2013 Instructions These instructions are intended for personnel who are responsible for the installation, operation and maintenance of your KUL knife
COMPACT GLYCOL FEED SYSTEMS OPERATION & MAINTENANCE MANUAL
 COMPACT GLYCOL FEED SYSTEMS OPERATION & MAINTENANCE MANUAL Model Number: Service: Serial Number: Installation Date: Installation Location / Application: PLEASE RECORD THE FOLLOWING DATA (Information is
Automatic Emergency Light
 Automatic Emergency Light Item 38013 Read this material before using this product. Failure to do so can result in serious injury. Save this manual. When unpacking, make sure that the product is intact
CLEAN ROOM DEVICES, LLC "WHERE TUBING AND FITTINGS COME TOGETHER"
 CLEAN ROOM DEVICES, LLC "WHERE TUBING AND FITTINGS COME TOGETHER" CRD600 Automatic Fitting Inserter OPERATIONS MANUAL VERSION 2.1 LAST EDITED 7.25.14 DOCUMENT NUMBER 001 cleanroomdevices.com 1 Table of
INSTALLATION AND SERVICE MANUAL FOR TURBO-CARB HIGH CAPACITY CARBONATOR
 Please refer to the Lancer web site (www.lancercorp.com) for information relating to Lancer Installation and Service Manuals, Instruction Sheets, Technical Bulletins, Service Bulletins, etc. INSTALLATION
5 Gallon Tall Tea Dispenser 3 Gallon Tall Tea Dispenser TALL TEA DISPENSERS. Cleaning & Sanitizing Instructions
 5 Gallon Tall Tea Dispenser 3 Gallon Tall Tea Dispenser TALL TEA DISPENSERS Cleaning & Sanitizing Instructions DAILY CLEANING/SANITIZATION TALL TEA DISPENSERS DO NOT KEEP BREWED BEVERAGES OVERNIGHT CLEANING
FD Conveyor for FD 260 Tabber
 FD 260-20 Conveyor for FD 260 Tabber Operator Manual 1/2011 First Edition TABLE OF CONTENTS 1. INTRODUCTION... 1 1.1 FD 260-20 DESCRIPTION... 1 1.2 ITEMS INCLUDED... 1 1.3 OPERATING MANUAL SAFETY TERMS...
ESE Series Cast Iron Sewage Pumps
 Owner s Manual ESE Series Cast Iron Sewage Pumps TABLE OF CONTENTS General Safety.................... 2 Specifications..................... 3 Installation.................... 4 & 5 Troubleshooting...................
HL4K PONTOON LIFT INSTRUCTIONS
 HL4K PONTOON LIFT INSTRUCTIONS REIMANN & GEORGER CORPORATION MARINE PRODUCTS P/N 6114179 5/02/14 BUFFALO, NY TABLE OF CONTENTS CHAPTER TITLE PAGE 1 SAFETY... 1 1.1 Introduction... 1 1.2 Safety Definitions...
Blue Air. Commercial Refrigeration Inc. Installation & Operation Manual Glass Door Countertop Refrigerator
 Blue Air Commercial Refrigeration Inc. Installation & Operation Manual Glass Door Countertop Refrigerator Please read this manual completely before installing or operating this unit! BAGR7 Blue Air reserves
OUTDOOR SPEAKERS OWNER S MANUAL
 OUTDOOR SPEAKERS OWNER S MANUAL UNPACKING 1. Carefully unpack the speakers. If you suspect damage from transit, report it immediately to your dealer and/or delivery service. Keep the shipping carton and
Effective June 1, 2013 This guide supersedes all previous versions
 Effective June 1, 2013 This guide supersedes all previous versions 3842 Redman Drive 1-800-797-7974 Fort Collins, CO 80524 www.commandlight.com L-CAS THANK YOU Please allow us to express a simple thank
Automatic Burnout Furnaces 115 to 230-volt Models OPERATOR S MANUAL
 Automatic Burnout Furnaces 115 to 230-volt Models OPERATOR S MANUAL TABLE OF CONTENTS Introduction...3 Warranty...3 On-Line Warranty Registration...3 Safety Instructions........................................................3
READ AND SAVE THESE INSTRUCTIONS. ComfortBreeze UV360-1 SYSTEM 24V Ultra-Violet Air Cleaner. Trion
 READ AND SAVE THESE INSTRUCTIONS ComfortBreeze UV360-1 SYSTEM 24V Ultra-Violet Air Cleaner Trion www.trioniaq.com Installation, Operation, & Maintenance Manual 1. Warranty 2. Safety & Warnings ComfortBreeze
Series: PFUEG 1/12HP, 5000 RPM, 60 Hz Utility Pumps
 INSTALLATION MANUAL Series: 1/12HP, 5000 RPM, 60 Hz ISP No: - 6/09 General Safety Information Before installation, read the following instructions carefully. Failure to follow instruction and Safety information
The Da-Lite Difference.
 The Da-Lite Difference. Instruction Book for Large Advantage Electrol DA-LITE SCREEN COMPANY, INC. 3100 North Detroit Street Post Office Box 137 Warsaw, Indiana 46581-0137 Phone: 574-267-8101 800-622-3737
Instruction Manual for Globe Price Computing Scale Models GS30 and GS30T
 Model GS30 Model #: Serial #: Model GS30T NTEP Approved Meets NIST Handbook 44 Criteria Legal for Trade Instruction Manual for Globe Price Computing Scale Models GS30 and GS30T For Service on Your Scale:
250 Portable Extractor/Spotter
 250 Portable Extractor/Spotter INTRODUCTION OPERATING & MAINTENANCE INSTRUCTIONS This operator s book has important information for the use and safe operation of this machine. Read this book carefully
EV-2051-M Electric Motor. Operation and Maintenance Manual
 EV-2051-M Electric Motor Operation and Maintenance Manual Table of Contents Safety... 3 General...3 Safety Notices...6 Cautions, Warnings and Dangers...7 Cautions...8 Warnings...11 Dangers...13 Important
Operator's Manual. Storage System. Ultrasound Probe Cabinet. Manufactured by:
 Storage System Ultrasound Probe Cabinet Operator's Manual Manufactured by: CIVCO Medical Solutions 102 First Street South Kalona, IA 52247 USA 319.248.6757 / 800.445.6741 WWW.CIVCO.COM Copyright 2018 All
Swing Arm Magnifying Lamp
 Owner s Manual & Safety Instructions Save This Manual Keep this manual for the safety warnings and precautions, assembly, operating, inspection, maintenance and cleaning procedures. Write the product s
GARDEN HOSE UTILITY PUMP
 GARDEN HOSE UTILITY PUMP MODEL #HPP360, HPP12V, 473707 MODEL #HPP360, 473707 MODEL #HPP12V ATTACH YOUR RECEIPT HERE Purchase Date SAFETY INFORMATION Please read and understand this entire manual before
6 OFF ROAD LIGHT BAR
 6 OFF ROAD LIGHT BAR LOUD speaker Model 95953 Set up And Operating Instructions Diagrams within this manual may not be drawn proportionally. Due to continuing improvements, actual product may differ slightly
PUSH BUTTON KEY CABINET
 PUSH BUTTON KEY CABINET Model 95689 INSTALLATION And Operation Instructions Due to continuing improvements, actual product may differ slightly from the product described herein. 3491 Mission Oaks Blvd.,
Heavy Duty Engine Cranes
 Heavy Duty Engine Cranes Operating Instructions & Parts Manual Model Number Atd-7484 Atd-7485 (Foldable Legs) Capacity 2 Ton 2 Ton Model Atd-7484 Model Atd-7485 Atd Tools Inc. 160 Enterprise Drive, Wentzville,
Operating Instructions & Parts Manual
 Aluminum / Steel Hybrid Service Jack Operating Instructions & Parts Manual Model 26017 26028 26033 Capacity 1.5 Ton 2.5 Ton 3 Ton! This is the safety alert symbol. It is used to alert you to potential
INSTALLATION/OWNER'S MANUAL DP " Woofer in Enclosure
 INSTALLATION/OWNER'S MANUAL DP1000 10" Woofer in Enclosure Installation Thank you for purchasing the DP1000 10" Woofer with enclosure. Although Dual has attempted to make sure all of the information contained
Cleaning & Sanitizing Instructions
 VCT-50 with Optional Stand VCT-30 with Optional Stand VCT-15 with Optional Stand VCT SERIES STACKABLE TEA DISPENSERS Cleaning & Sanitizing Instructions DAILY CLEANING/SANITIZATION STACKABLE TEA DISPENSERS
14", 18" & 24" Fiberglass Turbo Fans Installation & Operator s Instruction Manual
 14", 18" & 24" Fiberglass Turbo Fans Installation & Operator s Instruction Manual 09484:09#52
Air Actuated Hydraulic Bottle Jack on Wheels
 Operating Instructions & Parts Manual Air Actuated Hydraulic Bottle Jack on Wheels Model Number 18127 18207 Capacity 12 Ton 20 Ton Shinn Fu Co. of America, Inc. 2002 10939 N. Pomona Avenue Kansas City,
Electronic Service Manuals
 Electronic Service Manuals This electronic document is provided as a service to our customers. We do not create the contents of the information contained in this document. Should you have detailed questions
INSTALLATION AND MAINTENANCE MANUAL FORM #PM-126 REV A 12/09
 HAND CRANK & MOTORIZED POWER CORD REELS: SERIES 1125PC SERIES: 1125PC HAND CRANK SERIES: 1125PC MOTORIZED COXREELS The technical data and images which appear in this manual are for informational purposes
Hydraulic Transmission Jacks
 Hydraulic Transmission Jacks Operating Instructions & Parts Manual Model Number Atd-7435 Atd-7436 Atd-7437 Capacity 1100 Lb. 2000 Lb. 3000 Lb. Model Atd-7435 Model Atd-7436 Model Atd-7437 Atd Tools Inc.
APCO CRF-100A RUBBER FLAPPER SWING CHECK VALVES
 APCO CRF-100A RUBBER FLAPPER SWING CHECK VALVES Instruction D12043 June 2016 DeZURIK Instructions These instructions provide installation, operation and maintenance information for APCO CRF-100A Rubber
TactAir 4-Stage PCP Hand Pump. Operation Manual
 TactAir 4-Stage PCP Hand Pump Operation Manual INTRODUCTION Thank you for choosing the TactAir 4-Stage PCP Hand Pump! Always exercise caution when operating this pump. It will allow you to fill your PCP
APCO ASR-400/450 SEWAGE AIR RELEASE VALVES
 APCO ASR-400/450 SEWAGE AIR RELEASE VALVES Instruction D12005 December 2012 Instructions These instructions provide installation, operation and maintenance information for the APCO ASR- 400/450 Sewage
Instruction Manual for Globe Price Computing Scale Models GS30 and GS30T
 Model GS30 Model #: Serial #: Model GS30T NTEP Approved Meets NIST Handbook 44 Criteria Legal for Trade Instruction Manual for Globe Price Computing Scale Models GS30 and GS30T For Service on Your Scale:
SUBMERSIBLE MINI-PUMP
 SUBMERSIBLE MINI-PUMP Model 41287 Set up And Operating Instructions Diagrams within this manual may not be drawn proportionally. Due to continuing improvements, actual product may differ slightly from
MOTORIZED FOLDING CAMPER WINCH
 OWNER'S MANUAL MOTORIZED FOLDING CAMPER WINCH With 1200lb Lift Capacity The 12 Volt Motorized Folding Camper Winch is used to raise and lower folding campers with the touch of the switch, eliminating hand
Gen 2 Electrically Released Motor Brake Module for EM-MBFB and EUM-MBFB
 Gen 2 Electrically Released Motor Brake Module for EM-MBFB and EUM-MBFB P-273-8 819-0531 Installation Instructions Vented Enclosed Version Optional An Altra Industrial Motion Company Warner Electric s
MV Series Motors Operation & Parts Manual. Models M3V, M5V, M5V-US
 MV Series Motors Operation & Parts Manual Models M3V, M5V, M5V-US Introduction This manual pertains to drum pump motors MV Series. Finish Thompson, Inc. thanks you for choosing our products. We believe
INSTALLATION INSTRUCTIONS AND OWNER S MANUAL
 INSTALLATION INSTRUCTIONS AND OWNER S MANUAL Thank you for purchasing ADARAC Truck Bed Rack. Agri-Cover, Inc. proudly manufactured this product using superior quality materials and workmanship. With proper
StormPro BA Series Sump Pump
 Page 1 of 8 Marks & Meanings DANGER: Keep the pump equipment out of the reach of children! Warns that the failure to follow the directions given could cause serious risk to individuals or objects. WARNING:
Hydraulic Truck Jack
 Operating Instructions & Parts Manual Hydraulic Truck Jack Model Capacity 23221C 22 Ton 23222C (Low Profile) 22 Ton 23301 30 Ton Models 23221C & 23222C Model 23301! U.S. Patent No's. 5,341,723 & 5,94,912