Installation and Operation Manual
|
|
|
- Antony Blair
- 5 years ago
- Views:
Transcription


1 4000 Nanotechnology Certified Under Counter Filtration System How to install, operate and maintain your Microbiological Drinking Water Purifier Installation and Operation Manual System tested and certified to meet the requirements of NSF Protocol P231 and NSF/ANSI Standards 42 & 53. See performance data sheet for details. Manufactured by B. David Company 9333 Sheridan Avenue South * Bloomington, MN (952) * Info@bdavidwater.com Rev: 02/02/2017
2 TABLE OF CONTENTS Page What the Microbiological Drinking Water Purifier Will Do Before You Start Precautions Specifications & Dimensions Parts of the System Materials & Tools Needed Installation Instructions Step 1 Installing the Saddle Valve Step 2 Selecting the Faucet Location Step 3 Mounting the Faucet Step 4 Mounting the System Step 5 Connecting the Faucet Step 6 Attaching Tube Step 7 - Connecting the Saddle Valve Step 8 Connecting the Inlet Line to System Step 9 Setting the Effective Life Indicator Step 10 Putting the System into Operation Filter Cartridges Filter Cartridge Life Filter Cartridge Replacement Troubleshooting the System Parts List Exploded View & Parts List WARRANTY ONE YEAR LIMITED WARRANTY ON MICROBIOLOGICAL DRINKING WATER PURIFIER Warrantor: B. David Company, 9333 Sheridan Ave. S., Bloomington, MN B. David Company warrants to the original owner (under normal use): all products and parts to be free from defects in material and workmanship for a period of one (1) year from the date of purchase. Any replacement products furnished will be free from defects in material and/or workmanship for the remainder of the original warranty period or 30 days, whichever is longer. This warranty does not cover: (1) defects not reported within the above time period, (2) problems arising from failure to comply with B. David Company instructions, (3) problems and/or damage arising from acts of nature, abuse, misuse, negligence or accident by any party other than B. David Company, (4) problems and/or damage resulting in whole or in part from alteration, modification, repair or attempted alteration, modification or repair by any party other than B. David Company, (5) noncompliance with applicable codes/ordinances. If a defect in workmanship and/or material in a product or part covered by the warranty should arise, B. David Company, at its sole discretion, will repair or replace the defective product or part (B. David Company will consider the customer s preference in good faith). All claimed defective product must: (1) be authorized for return by B. David Company with an RGA number (2) include proof of the purchase date of the product or part (3) returned to B. David Company prior to the expiration of the warranty date at the customer s expense, shipment pre-paid (4) be accompanied by a letter detailing the Model Number, Serial Number (if any), and a brief description of the problem. TO THE MAXIMUM EXTENT PERMITTED BY APPLICABLE LAW, B. DAVID COMPANY DISCLAIMS ALL OTHER WARRANTIES, WHETHER EXPRESS OR IMPLIED, INCLUDING, BUT NOT LIMITED TO THE IMPLIED WARRANTY OF MERCHANTABILITY AND FITNESS FOR A PARTICULAR PURPOSE, WITH REGARD TO THE PRODUCTS, PARTS AND ANY ACCOMPANYING WRITTEN MATERIALS. To the maximum extent permitted by applicable law, B. David Company shall not be liable for any damages whatsoever (including, but not limited to, loss of time, inconvenience, expenses, labor or material charges incurred in connection with the removal or replacement of the products or parts, special, incidental, consequential, or indirect damages for personal injury, loss of business profits, business interruption, loss of business information, or any other pecuniary loss) arising out of the use of or inability to use the defective products or parts even if B. David Company has been advised of the possibility of such damages. The B. David Company maximum liability under any provision of this Limited Warranty shall be limited to the amount actually paid for the products or parts. This warranty is effective if the Microbiological Drinking Water Purifier is operated at water pressured between psig and a water temperature between F. Furthermore, the purifier must not be subject to mistreatment, system modification, disregard, freezing, carelessness, or damage as a result of any unusual force of nature (i.e. hurricane, flood, earthquake, or tornado). Warrantor is excused if failure to perform its warranty obligations is the result of material shortages, government regulation, strikes, or any other circumstances beyond its control.

3 What the Drinking Water Purifier Will Do The 4000 Nanotechnology Certified Under Counter Filtration System is a water purification treatment system. This system uses a triple filter design to reduce unwanted elements in your drinking water. Possible elements may include chlorine, lead, virus, bacteria, cysts, particulates and numerous organic compounds. The 4000 Nanotechnology Certified Under Counter Filtration System utilizes the patented Nano and other technologies in a systematic approach to ensure the water supply conforms to EPA Guide Standard for the removal of % Bacteria, 99.99% Viruses, and 99.95% Cysts. The 4000 Nanotechnology Certified Under Counter Filtration System is designed to discontinue water flow when its capability to filter unwanted elements has been exhausted. This will help safeguard the consumer against contaminated water. Replace all filters every 12 months or 1000 gallons. NOTE: A performance data sheet is included and lists what elements will be reduced from the water supply. (Please note that not all elements may be present.) This data sheet lists the individual contaminants and microbial reduction performance. The drinking water purifier system is designed to fit under the kitchen or bathroom sink or any other area that is suitable. A COLD water supply pipe is required within a few feet. If water supply pipe is farther than what the tube will reach, you can purchase longer lengths of tubing from your local home improvement center. NOTE: Make sure the tubing is acceptable for use on potable water supplies. Before You Start v In order to receive all of the benefits of your microbiological drinking water purifier, be sure to read all steps in this guide carefully and follow steps exactly. v This system is intended for use with municipal and/or well-supplied water only. It is not intended for use with surface water such as from a lake or runoff. v Do not use for the treatment of water that is visually contaminated (cloudy) or has an obvious contamination source, such as contamination by raw sewage. v Systems certified for cyst reduction may be used on disinfected waters that may contain filterable cysts. v System is not intended to convert wastewater or raw sewage into drinking water. v Installation and plumbing should comply with all local laws and regulations. Consult with your licensed plumber. NOTE: In Massachusetts, plumbing code 248 CMR 3.00 and shall be adhered to. v The microbiological drinking water purifier works on water pressure of 30 psig (minimum) to 100 psig (maximum). If your house water pressure is over the maximum, install a pressure reducing valve in the water supply pipe to the filter system. v Do not install the microbiological drinking water purifier outside, or in extreme hot or cold temperatures. Temperature of the water supply to the under-sink drinking water filter system must be between 40 F and 100 F. Do not install on hot water. v Do not use with water that is microbiologically unsafe or of unknown quality without disinfection before or after the system. v Systems certified for cyst reduction may be used on disinfected waters that may contain filterable cysts. Precautions This system is for cold water use only. Protect filters against freezing, which can cause cracking of the filter and water leakage. The rubber O-ring provides the water-tight seal between the cap and the bottom of the housing. It is important that the O-ring be properly seated in the groove below the threads of the housing or a water leak could occur. To prevent costly repairs or possible water damage, the sump of plastic housings must be replaced every ten years. If sump is older than recommended, replace immediately. Date sump for reference and indicate replacement date. Supply Water Pressure psig Min - Max ( bar) Supply Water Temperature F Min. Max. ( C) Service Flow psig (0.5 bar) Rated Service Life gallons (3,785 L) Dimensions H x 5.25 D x 14 L (394mm x 133mm x 356mm) Weight (filled with water) 19lbs (8.6kg) Specifications & Dimensions
 tubing Lead-free faucet Materials and Tools Needed Note: Gather the required tools before starting installation. Read and follow the instructions provided with any tools listed here.")
4 Parts of the System Filter system with filter cartridges Installation hardware (mounting screws, saddle valve, flow restrictor, fittings) 1/4-inch (6.35mm) tubing Lead-free faucet Materials and Tools Needed Note: Gather the required tools before starting installation. Read and follow the instructions provided with any tools listed here. Safety glasses Hand or electric drill (cordless recommended) File or sandpaper Phillips Head screwdriver 2 adjustable wrenches Tube cutters or utility knife **If sink does not have hole for separate faucet: Center punch 3/4-inch (19mm) drill bit Masking tape IMPORTANT: To avoid damaging the sink, consult a qualified plumber or installer for drilling procedures in porcelain, granite, or stainless steel. Installation Instructions NOTE: A squeaking sound when tightening a compression nut is normal. NOTE: If fittings are removed, Teflon tape must be used for pipe threaded connections. NOTE: Be sure to wear safety glasses when using a drill. System is designed for standard under-sink installation on 3/8 -inch (10mm) cold water line. Numbered diagrams correspond with numbered steps. Step 1 Installing the Saddle Valve Use of a cordless drill is recommended. To protect yourself from serious injury or fatal shock when using an electric drill, be sure the drill and the outlet it is plugged into are properly grounded. When using a drill, follow the manufacturer s guidelines and procedures. NOTE: Saddle valve must be installed on a 2-inch (51mm) long, straight-walled section of 3/8-inch to 7/8-inch (10-22mm) steel, brass, copper, or PVC pipe a) Turn off cold water supply and turn on nearest faucet before starting installation. Place a tray or towels under the cold water line to catch excess water. b) Drill a 1/8-inch (3mm) hole in the cold water line. Remove any burrs with sandpaper or file. c) Turn handle on the saddle valve to expose lance no more than 3/16-inch (5mm) above black rubber gasket. d) Place valve body over hole in cold water line so lance fits into hole. e) Attach back plate of clamp and tighten bolts evenly and firmly so brackets are parallel. f) Turn valve handle clockwise to closed position and leave closed until installation is compete. NOTE: All nuts must be retightened when the system reaches projected operating temperature.
 hole.")
 Place masking tape over the area to be drilled to prevent scratches if drill bit slips.")
 drill bit for a pilot hole, then, using a 3/4-inch (13mm) drill bit or hole saw, drill a hole completely through the sink. Smooth rough edges with a file.")
 Slide the threaded shaft of the faucet into drilled hole. c) From under the sink, slide the metal washer on and thread on the wing nut. Tighten wing nut by hand until tight.")
5 Installation Instructions Step 2 Selecting the Faucet Location NOTE: The drinking water faucet should be positioned with function, convenience, and appearance in mind. An adequate flat area is required to allow faucet base to rest securely. The faucet fits through a 3/4-inch (19mm) hole. Most sinks have pre-drilled 1-inch (35 or 38mm) diameter holes that may be used for faucet. a) Line bottom of sink with newspaper to prevent metal shavings, parts, or tools from falling down drain. b) Place masking tape over the area to be drilled to prevent scratches if drill bit slips. IMPORTANT: To avoid damaging the sink, consult a qualified plumber or installer for drilling procedures in porcelain, granite, or stainless steel. c) Mark hole with center punch. Use a 1/4-inch (6mm) drill bit for a pilot hole, then, using a 3/4-inch (13mm) drill bit or hole saw, drill a hole completely through the sink. Smooth rough edges with a file. Step 3 Mounting the Faucet a) Remove wing nut (C) and metal washer (B) from the threaded shaft of the faucet. Leave the black rubber washer (A) on the threaded shaft. b) Slide the threaded shaft of the faucet into drilled hole. c) From under the sink, slide the metal washer on and thread on the wing nut. Tighten wing nut by hand until tight. It may be necessary to have a second person hold the faucet while tightening the wing nut. d) Install the faucet spout into the base by pushing firmly into hole in base then screw fitting cover hand tight. Caution: Do not over-tighten the wing nut. Hand tighten only. Do not use pliers or wrench to tighten. Step 4 Mounting the system a) Center system between water supply adapter and drinking water faucet. NOTE: Allow 1.5 inches (38mm) clearance below system to enable filter cartridge changes. NOTE: In the following step, leave enough space (approximately 1/2-inch (13mm)) between the head of the screw and the wall to easily slip system into place. b) Install mounting screws at least 15-inches (380mm) from cabinet floor and 9 1/4-inches (235mm) apart. Place system over screws on wall and slide sideways. Tighten screws. Caution: Make certain system is firmly attached to wall to prevent possible damage from falling. Step 5 Connecting Tubing to the Faucet Caution: Do not over-tighten compression nut. Use caution not to bend or crimp tubes when securing. a) Locate compression nut in installation kit and faucet package. b) Attach compression nut pieces (3) to one end of tubing. Caution: Tube must be fully inserted in the compression fitting base to the tube stop on the faucet stem. c) Attach tube with compression nut assembly to faucet stem by inserting tube into the faucet stem opening. Gently push the tubing until it comes to a stop. NOTE: All nuts must be retightened when the system reaches projected operating temperature.


6 Installation Instructions Step 6 Attaching Tube to Effective Life Indicator (ELI) a) Determine the length of tubing needed from the faucet to the ELI. A slight sag in the line will allow for some ease in installation. Cut the tubing to required length. b) Insert other end of tubing firmly into the outlet port (John Guest fitting) of the ELI until fully engaged. c) Pull tube gently to ensure the tubing is fully seated. Caution: Tube must be fully inserted in the compression fitting base on the outlet stem of the ELI. Step 7 Connecting the Saddle Valve a) Determine the length of plastic tubing needed to connect the inlet (left) side of the filter with the saddle valve. Be sure to allow enough tubing to prevent kinking and cut the tubing squarely. Slide brass compression nut onto tubing, followed by plastic ferrule. The long tapered end of the ferrule should face towards the end of the tubing. Place insert into tubing. b) Insert tubing into saddle valve and hand-tighten compression nut. Using a wrench, tighten nut 1 to 1 ½ turns. NOTE: All nuts must be retightened when the system reaches projected operating temperature. Step 8 Connecting Inlet Line to System a) Insert other end of tubing firmly into inlet port (John Guest fitting) until fully engaged. b) Pull tube gently to ensure the tubing is fully seated. Step 9 Setting the Effective Life Indicator NOTE: The effective life indicator is the white dial located on the center of the mounting bracket. Each black mark on the dial represents 100 gallons (378.5 L). a) Move the dial clockwise so that the black indicator arrow lines up with the 1100 gallon (4,164 L) mark. Important: Set flow meter to 1100 gallons after each new filter replacement. NOTE: To prevent indicator malfunctions, only move the dial when the system is depressurized. NOTE: Based on the settings sensitivity of the Effective Life Indicator (ELI), user should set the ELI to 1,100 gallons to assure a 1,000 gallon cycle. Step 10 Putting the System into Operation a) Slowly turn on cold water supply. b) Rotate handle on base of drinking water faucet counter-clockwise to ON position. Allow water to run for 10 minutes to flush air and carbon fines from filter cartridges. Check system for leaks before completing installation. c) Make sure that all nuts are tightened. NOTE: A drinking water cartridge may contain carbon fines (very fine black powder). It is recommended that you run the tap at least 20 seconds prior to using water for drinking or cooking purposes. NOTE: Initially, filtered water may appear cloudy. If you set a glass of water on a level surface, you should be able to watch the cloudiness disappear from the bottom of the glass upwards. This harmless cloudiness results from the release of trapped air with the cartridge and will disappear within a few weeks after installation. INSTALLATION IS NOW COMPLETE.
7 Filter Cartridges Filter Cartridge Life It is recommended to replace filter cartridges every 12 months or 1,000 gallons of use. However, your water quality can lead to circumstances such as diminished water flow, visible sediment, or unwanted taste and/or odor in your water, requiring the cartridges be replaced sooner. NOTE: Based on the settings sensitivity of the Effective Life Indicator (ELI), user should set the ELI to 1,100 gallons to assure a 1,000 gallon cycle. There are several variables that determine how long a cartridge will last. These include: 1. How much water you use, and 2. How much sediment, chlorine, or other unwanted substances is in the water. Filter Cartridge Replacement NOTE: Contact your system supplier for replacement filter parts. 1. Turn off cold water supply to system and turn on faucet to release pressure. NOTE: Due to water leakage, place pan or towel under sump. 2. Unscrew and remove bottom of filter housing. Locate and remove large O-ring, wipe clean of lubricant, and set aside. Repeat for second and third housings. 3. Discard used filter cartridges. Caution: Read "WARNING" information on the bleach container before using. 4. Using a non-abrasive sponge or cloth, scrub the bottom of each housing, O-ring grooves, and caps with dish soap and warm water. Rinse thoroughly. Then fill bottom of each housing 1/3 full with water. Add 1TBSP (14.7ML) of household bleach and scrub to disinfect. 5. Lubricate O-rings with clean silicone grease. Insert each O-ring in groove and press into place. NOTE: This step is important to ensure a proper housing seal. Make certain each O-ring is seated level in its groove or a leak may occur. 6. Screw bottom of housing(s) with bleach water onto cap(s) without filter cartridge(s) and hand-tighten. DO NOT OVER- TIGHTEN. 7. Turn on water supply. Let faucet run for about 10 seconds, then turn off faucet and let stand for minutes. 8. Turn on faucet and allow bleach water to run out (about 3-5 minutes) 9. Turn off water supply to system. Remove bottom of housings and empty out water. 10. Insert each filter cartridge in bottom of appropriate filter housing. IMPORTANT: Be sure to remove any protective covering from the filters before inserting. 11. Screw bottom of housing(s) onto cap(s) and hand-tighten. DO NOT OVER-TIGHTEN. Make certain cap standpipe slips into cartridge(s). 12. Reset effective life indicator to 1,100 gallons (see instruction under Setting Effective Life Indicator on Page 6.) 13. Turn on water to system. Let faucet run for 10 minutes to remove trapped air and carbon fines. Check system for leaks. REPLACEMENT FILTERS ( Pack) 4001 First Stage Nano Filter 4002 Second Stage FI Filter 4003 Third Stage DE Block
8 Troubleshooting the System Problem: Leaks between cap and bottom of filter housing Correction: Turn off water supply and turn on drinking water faucet to release pressure in system. Remove bottom of housing. Clean O-ring groove (located directly beneath threads of housing). Lubricate O-ring with silicone grease and replace securely into groove. Screw bottom of housing onto cap and hand-tighten. DO NOT OVER-TIGHTEN. Turn on water supply and check for leaks Problem: Leaks on system inlet/outlet connections Correction: Turn off water supply and turn on drinking water faucet to release pressure in system. Remove tubing from fitting and make sure end of tubing is cut squarely and free of burrs. Reinsert tubing into fitting, making sure to push tubing to a hard stop. Hand-tighten compression nut first, then tighten 1 to 1 1/2 turns for new compression nut. Tighten only 1/2 to 1 turn with wrench for previously tightened compression nut. NOTE: If leaks persist, or if there are other leaks in system, turn off water supply. Problem: Leaks on faucet / tubing connection Correction: Turn off water supply and turn on drinking water faucet to release pressure in system. Loosen and remove compression nut fitting on faucet stem. Make sure tubing is inserted firmly into end of faucet stem, then retighten compression nut with fingers until secure. Turn on saddle valve, and then turn off faucet to check for leaks. NOTE: If leaks persist, or if there are other leaks in system, turn off water supply. Problem: No water or decreased water flow. Correction: Check flow at faucet. The 4000 Nanotechnology Certified Under Counter Filtration System system should fill a gallon jug in approximately 2 minutes. Flow rates will vary with individual household water pressure. Correction: Correction: Check filter cartridge installation. Make certain all filter cartridges are properly oriented in filter housings. Replace filter cartridges. Parts List ITEM# QTY PART# DESCRIPTION ITEM# QTY PART# DESCRIPTION MTG BRACKET, 3 HOUSING WHITE THIRD STAGE DE BLOCK MTG BRACKET, 3 HOUSING WHITE (ALTERNATIVE) SECOND STAGE FI FILTER 2 2 SH ELBOW, 1/4" NPT X 1/4" QC WH PP FIRST STAGE NANO FILTER 3 2 SH NIPPLE, MALE HEX 1/4" NPT X 1/4" NPT FILTER TIMER MONITOR, 12 MONTH /4" #10 SL WHITE WO/PR 12/C INSTRUCTION SHEET, TIME STRIP 5 4 SH SCREW #6X 1/4" LG PHIL PAN RL SH MACHINE TAPE, TEFLON 1/4" WIDE LUBRICANT, SILICONE, PACKET MANUAL, B. DAVID COMPANY 4000 NANOTECHNOLOGY CERTIFIED UNDER COUNTER FILTRATION SYSTEM WRENCH SW-1A FT SH TUBE, 1/4" OD WHITE PE 8 12 PW SCREW, #10-32 X 3/4" PAN HEAD DM FITTING; 1/4" X 1/4" QC; NPT VALVE, SADDLE 1/4 COMPRESSION 24 N/A 10 2 SH SCREW #10-12 X 1.5 TYPE A FT SH TUBE, 1/4" OD WHITE PE 11 3 C LOCAL "O-RING" FT SH TUBE, 1/4" OD WHITE PE DEFENG FAUCET, STANDARD INLINE FLOW RESTRICTOR, 0.5 GPM METER, 1800 GALLON, 1/4 NPT

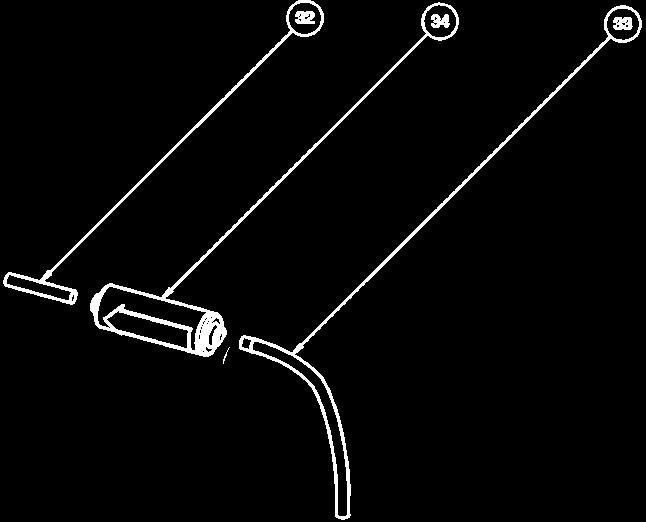
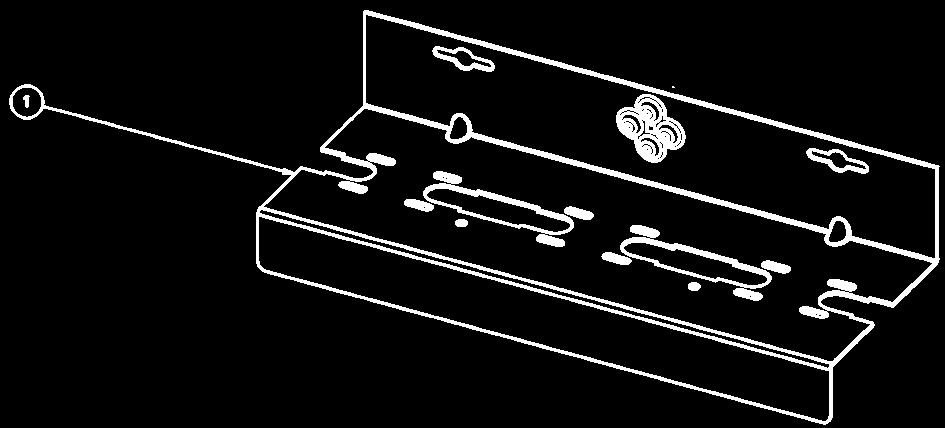
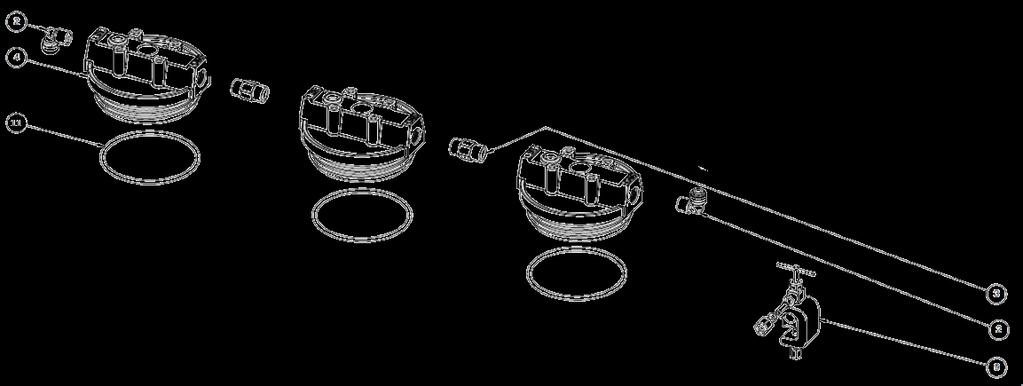
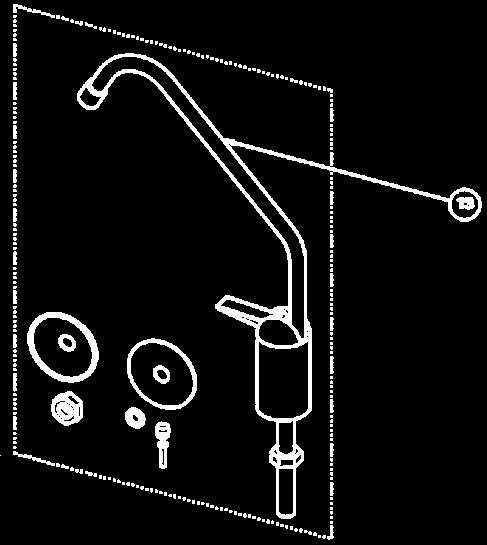


9 EXPLODED PARTS VIEW
10

11
F3000-B2B, F3000-B2M FILTRATION SYSTEM INSTRUCTION MANUAL
 F3000-B2B, F3000-B2M FILTRATION SYSTEM INSTRUCTION MANUAL waterpurification.pentair.com SPECIFICATIONS Temperature Range:...40-100 F (4.4-37.8 C) Pressure Range:...40-100 psi (2.75-6.89 bar) Service Flow
Full Flow Drinking Water System Model: 3MFF100
 Installation and Operating Instructions For Full Flow Drinking Water System Model: 3MFF100 System tested and Certified by NSF International against NSF/ANSI Standard 42 and 53 for the reduction of the
NSF MODELS: CTP200, CTP100. This System does not require the services of a plumber. Read and Save these Instructions. Important
 INDEPENDENTLY Installation, Use & Care Guide Countertop Filter Systems MODELS: CTP200, CTP100 This System does not require the services of a plumber. Important Read and Save these Instructions CTP200 shown
PURE WATER. Installation, Operation and Maintenance Manual. 3-Stage Under Counter Filtration with UV Model PWSYS-UV-3STG. Important.
 Installation, Operation and Maintenance Manual 3-Stage Under Counter Filtration with UV Model PWSYS-UV-3STG IOM-WQ-PWSYS-UV-3STG PURE WATER Important Please read the entire manual before proceeding with
ONLINE WARRANTY INFORMATION CrystalQuest.com/warranty.html
 Crystal Quest Point-of-Entry (POE) Whole House Compact Water Filter Systems INSTALLATION AND OPERATION GUIDE ONLINE WARRANTY INFORMATION CrystalQuest.com/warranty.html Copyright 2018 Crystal Quest All
Owner s Manual WARNING
 Filter Housing Models: AWP20C-V, AWP30C-V, AWP32B-V. Overview: Owner s Manual VIQUA offers a variety of housing sizes and styles in durable, molded polymer that defies rust and corrosion, and ensures a
Installation, Operation and Maintenance Manual
 IOM-HS-QTColdBevMax Installation, Operation and Maintenance Manual QT TM Cold Bev Max TM Models: QTCLDBMX-1S-.5M, QTCLDBMX-2S-.5M, QTCLDBMX-3S-.5M, QTCLDBMX-4S-.5M, QTCLDBMX-5S-.5M Tested and Certified
Installation Instructions
 Important The Drinking Water Filter with MACguard will not make biologically unsafe water safe to drink since activated carbon will not kill bacteria. When applying the filter to non-chlorinated water
Dual/Triple Manifold Water Filtration Systems Instruction Manual
 3M TM Water Filtration Products Dual/Triple Manifold Water Filtration Systems Instruction Manual High Flow Series Water Filtration Systems Installer: Please leave this manual with owner/operator. 3M Water
Installation Kitchen Faucet Filtration System Instructions GXK285JBL
 Installation Kitchen Faucet Filtration System Instructions GXK285JBL BEFORE YOU BEGIN Read these instructions completely and carefully. IMPORTANT Save these instructions for local inspector s use. IMPORTANT
MULTI-STAGE FILTRATION SYSTEM INSTALLATION INSTRUCTIONS
 MULTI-STAGE FILTRATION SYSTEM INSTALLATION INSTRUCTIONS Model #: 30101 Model #: 30102 Replacement Cartridge INSTALLATION GUIDE ABOUT THIS SYSTEM Congratulations on your purchase of the 30101 Multi-Stage
INSTALLATION INSTRUCTION & OWNER S MANUAL
 CS-2500 & CS-2500P Water Filtration System INSTALLATION INSTRUCTION & OWNER S MANUAL Ver 1.2 All Rights Reserved APEC Water Systems Please keep this Owner s Manual for future reference. It contains useful
Scale Feeder Manifold Water Filtration System Instruction Manual
 3M TM Water Filtration Products Scale Feeder Manifold Water Filtration System Instruction Manual For SF1XX High Flow Series Water Filtration Systems Installer: Please leave this manual with owner/operator.
Dual Flow Manifold Systems Instruction Manual
 3M TM Water Filtration Products Dual Flow Manifold Systems Instruction Manual For DF1XX and DF2XX High Flow Series manifolds and water filtration systems Installer: Please leave this manual with owner/operator.
Installation, Operation and Maintenance Manual
 IOM-HS-QTCubeMax Installation, Operation and Maintenance Manual QT TM Cube Max TM Models: QTCBMX-1S-1M, QTCBMX-2S-1M, QTCBMX-3S-1M, QTCBMX-4S-1M, QTCBMX-1L-1M, QTCBMX-2L-1M, QTCBMX-3L-1M, QTCBMX-4L-1M,
Value Super Filter Max Installation Manual
 Value Super Filter Max Installation Manual Barrie, Ontario, Canada, L4N 4Y8 www.excaliburwater.com EXCALIBUR VALUE SUPER FILTER MAX INSTALLATION MANUAL INSTALLATION PROCEDURES: The Value Super Filter Max
SAVE FOR CONSUMER INSTALLATION / OWNER'S MANUAL. Single Handle Kitchen Faucet Model # LK2500. Important! You choose the flow rate!
 INSTALLATION / OWNER'S MANUAL Single Handle Kitchen Faucet Model # LK500 Important! You choose the flow rate! This faucet ships with an eco-friendly.5gpm flow regulator installed. If you desire higher
Water Filtration System
 GE Appliances Water Filtration System Faucet & Base Owner s Manual and Installation GNUL30B GNUT05B GXEM01B GNUT05B and GNUL30B are Tested and Certified by NSF International against ANSI/NSF Standard 42
Installation and Operation Manual
 Model EPWHE How to install, operate and maintain your No Mess Whole Home Filtration System Do not return unit to store If you have any questions or concerns when installing, operating or maintaining your
Dual Port Manifold Water Filtration Systems Instruction Manual
 M TM Water Filtration Products Dual Port Manifold Water Filtration Systems Instruction Manual For DP1XX, DP2XX and DPXX High Flow Series Water Filtration Systems Installer: Please leave this manual with
INSTALLATION INSTRUCTIONS CARE AND MAINTENANCE
 1 2 3 4 5 6 7 8 9 10 11 12 13 14 15 16 17 18 19 20 21 22 23 24 INSTALLATION INSTRUCTIONS CARE AND MAINTENANCE CURVED APRON FRONT STAINLESS STEEL SINK Flush Mount or Under Mount Sink Thank you for selecting
Water Filtration. system. GEAppliances.com. Safety Instructions...2 Operating Instructions Specification Guidelines...3 Using the System...
 GEAppliances.com Water Filtration system Safety Instructions........... Operating Instructions Specification Guidelines.......3 Using the System............4 Installation Instructions...5 Battery Pack
EBF-750 Deck-Mounted Battery Powered Sensor Operated Gooseneck Faucets
 INSTALLATION INSTRUCTIONS BATTERY POWERED SENSOR OPERATED HAND WASHING FAUCETS EBF-750 I.I. Code No. 0816324 EBF-750 Deck-Mounted Battery Powered Sensor Operated Gooseneck Faucets Includes Instructions
Water Filtration System
 GE Appliances Water Filtration System Faucet Owner s Manual and Installation GNUT03A GXUT03A GNUT03A and GXUT03A are tested and certified to ANSI/NSF Standard 42 for particulate reduction Class I, chlorine
Installation Instructions
 Installation Instructions To ensure that your installation proceeds smoothly--please read these instructions carefully before you begin. P r o d u c t s Luxury Faucets and Accessories Savina Product Numbers
Owner s Manual FS-10/FreshSpa
 Owner s Manual FS-10/FreshSpa Table of Contents Product Features................ Page 2 Parts List....................... Page 3 Configuration................... Page 4 Installation.....................
4" 4" 4 1/4" 11" TOP VIE 3 1/8" Ø1/2" 2" 10 3/8" SIDE VIE VG05002 THE MEASUREMENTS IN INCHES ARE ROUNDED TO THE NEAREST 1/8"
 FAUCET SPECIFICATIONS all Mount Bathroom Faucet Model VG05002 MODEL VG05002 FEATURES Solid brass construction Single hole construction Ceramic disk cartridge Single lever faucet all mount installation
US Water Systems Magna Pre-Filter
 Visit us online at www.uswatersystems.com US Water Systems Magna Pre-Filter Owners Manual 320-USP-MF-10, 320-USP-MF-20 REVISION # 1.3 REVISION DATE October 9, 2018 US Water Systems Corporate Office 1209
Use & Care Manual D R I N K I N G W A T E R S Y S T E M S. IMPORTANT: Read and Save these Instructions
 MODELS F P5000/F P4500/F P4000 D R I N K I N G W A T E R S Y S T E M S Use & Care Manual System Tested and Certified by NSF International against NSF/ANSI Standard 42 for the reduction of Chlorine Taste
Owner s Manual. Pelican PC600/PC1000 Premium Whole House Water Filter
 Owner s Manual Pelican PC600/PC1000 Premium Whole House Water Filter Page 2 Copyright 2017 Enviro Water Solutions LLC. All rights reserved. All information contained herein is the property of Pelican Water
Instruction Sheet SRSR SERIES. Rotating Sliding Rail System
 Instruction Sheet SRSR SERIES Rotating Sliding Rail System THANK YOU Thank you for purchasing the SRSR Series Rotating Sliding Rail System. Please read these instructions thoroughly before assembling this
ONE. Cartridge Tank Filters
 ONE Cartridge Tank Filters TABLE OF CONTENTS Preinstallation Instructions....3 EF-835-1 Bypass Installation...3 Installation Instructions....5 Cartridge Replacement Instructions....7 EF-835-2 Installation
US Water ORP Booster Injection System
 US Water ORP Booster Injection System US Water Systems, Inc. 1209 Country Club Road Indianapolis, IN 46234 1-800-608-8792 info@uswatersystems.com www.uswatersystems.com REVISION 1.1, 9-14-15 Table of Contents
2-DOOR LAUNDRY CABINET KIT
 2-DOOR LAUNDRY CABINET KIT OWNER S MANUAL QL055 # 6725161 Table of Contents Table of Contents...2 Safety Information...2 Warranty...3 Warranty Claim Procedure...3 Pre-Installation...4 Tools/Materials Required...4
Installation Instructions To ensure that your installation proceeds smoothly--please read these instructions carefully before you begin.
 Widespread Lavatory Faucet Installation Instructions To ensure that your installation proceeds smoothly--please read these instructions carefully before you begin. P r o d u c t s L u x u r y F a u c e
SUPERPLUS WATER FILTRATION SYSTEM
 SUPERPLUS WATER FILTRATION SYSTEM For Model #: SP20-1 INSTRUCTIONS/ASSEMBLY USE AND CARE MANUAL (Important: Read this manual thoroughly before install) TABLE OF CONTENTS 2 3 4 6 8 9 10 11 12 General Notes
Installation Instructions
 Installation Instructions To ensure that your installation proceeds smoothly--please read these instructions carefully before you begin. P r o d u c t s Luxury Faucets and Accessories Savina Product Numbers
Installation Instructions To ensure that your installation proceeds smoothly--please read these instructions carefully before you begin.
 Single Lever Vessel Faucet Installation Instructions To ensure that your installation proceeds smoothly--please read these instructions carefully before you begin. P r o d u c t s Luxury Faucets and Accessories
INSTALLATION GUIDE. Rainier Coil Pull Down Kitchen Faucet PB-K01
 INSTALLATION GUIDE Rainier Coil Pull Down Kitchen Faucet PB-K01 RECOMMENDED TOOLS AND MATERIALS Plumbers Putty Adjustable Wrench Tape Measure Basin Wrench Phillips Screwdriver Pencil Masking Tape BEFORE
Installation Manual DIAPHRAGM WELL TANK
 Installation Manual DIAPHRAGM WELL TANK IN-LINE SERIES: 2-5 & 7 GALLON VERTICAL SERIES: 14-20-25-32-36-52-65-86-96-119 GALLON HORIZONTAL SERIES: 7-14 & 20 GALLON NO LEAD NO LEAD: The weighted average of
ETF-600 Sensor Operated Lavatory Faucet
 INSTALLATION INSTRUCTIONS OPTIMA SYSTEMS SENSOR OPERATED LAVATORY FAUCET ETF-600 I.I. Code No. 0816318 ETF-600 Sensor Operated Lavatory Faucet Includes Instructions for Installation of Optional Back Checks
FAUCET SPECIFICATIONS. Wall Mount Bathroom Faucet Model VG " 10 3/8" MODEL VG05002
 FAUCET SPECIFICATIONS all Mount Bathroom Faucet Model VG05002 MODEL VG05002 FEATURES Solid brass construction Single hole construction Ceramic disk cartridge Single lever faucet all mount installation
Installation Instructions / Warranty
 Installation Instructions / Warranty Axor Citterio 39133XX1 Axor Citterio 39135XX1 Axor Citterio 39233XX1 Axor Citterio 39235XX1 Axor Citterio Widespread Lavatory Faucet Axor Citterio Widespread Bidet
Aquila Single Lever Vessel Faucet
 INSTALLATION GUIDE Aquila Single Lever Vessel Faucet FVS-13900 www.kraususa.com I Toll Free: 1.800.775.0703 I 2017 Kraus USA Inc. I REV. October 24, 2017 Congratulations on the purchase of your new Kraus
2-DOOR LAUNDRY CABINET KIT
 2-DOOR LAUNDRY CABINET KIT OWNER S MANUAL QL054 # 6725159 Table of Contents Table of Contents....2 Safety Information....2 Warranty....3 Warranty Claim Procedure....3 Pre-Installation....4 Tools/Materials
Nelsen Filtration Cartridge Systems
 Nelsen Filtration Cartridge Systems NFS-HF Residential/Light Commercial Cartridge Tank System NFS-HF-PLUS Commercial Cartridge Tank System Installation & Maintenance Manual ! Important Dealer/Homeowner
Installation Instructions / Warranty
 Installation Instructions / Warranty Citterio 39136XX1 39156XX1 Citterio 39236XX1 Axor Citterio Widespread Lav Mixer 39136XX1 Axor Citterio Bidet Mixer 39236XX1 39136XX1 User instructions Turn the right
Single Lever Pull-Out Kitchen Faucet
 INSTALLATION GUIDE Single Lever Pull-Out Kitchen Faucet KPF-1621 www.kraususa.com I Toll Free: 1.800.775.0703 I 2017 Kraus USA Inc. I REV. October 25, 2017 Congratulations on the purchase of your new Kraus
Installation Instructions / Warranty
 Installation Instructions / Warranty 3-Hole Roman Tub Rough 3-Hole Roman Tub Trim Kits 3-Hole Roman Tub Rough 06607000 Technical Information Recommended water pressure 45-80 psi Max. water pressure 145
Aplos Single Lever Basin Faucet
 INSTALLATION GUIDE Aplos Single Lever Basin Faucet KEF-15301 www.kraususa.com I Toll Free: 1.800.775.0703 I 2017 Kraus USA Inc. I REV. October 25, 2017 Congratulations on the purchase of your new Kraus
MIZU QUICK CHANGE DUAL FILTER SYSTEM
 QUICK CHANGE DUAL FILTER SYSTEM page 1 of 5 130mm 290mm 70mm 380mm 100mm (filter unit depth) 180mm Dimensions are nominal measurements only. 1. 3/4 Multifunction valve 2. Filter isolating valve 3. 90 deg
INSTALLATION GUIDE KPF Single Lever Kitchen Faucet With Pull-Out Sprayer
 INSTALLATION GUIDE KPF-21 Single Lever Kitchen Faucet With Pull-Out Sprayer www.kraususa.com I Toll Free: 1.800.775.0703 I 2017 Kraus USA Inc. I REV. August 7, 2017 Congratulations on the purchase of your
Owner s Manual Nitrate Series Salt Based Filter System
 Owner s Manual Nitrate Series Salt Based Filter System Page 2 Copyright 2012 Enviro Water Solutions Inc. All rights reserved. All information contained herein is the property of Pelican Water Systems.
PACIFICA Shower Cabin Installation Instructions
 PACIFICA Shower Cabin Installation Instructions IMPORTANT Please read carefully the following instructions before installing your shower cabin. If you have any questions on this shower cabin installation
INSTALLATION GUIDE. Tenino Retro Pot Filler Hi-Rise Kitchen Faucet PB-K05
 INSTALLATION GUIDE Tenino Retro Pot Filler Hi-Rise Kitchen Faucet PB-K05 RECOMMENDED TOOLS AND MATERIALS Sink Hole Cover (Optional) Allen Wrench Set Plumbers Putty Adjustable Wrench Tape Measure Basin
Installation Instructions / Warranty
 Installation Instructions / Warranty Axor Citterio 39144XX1 Axor Citterio 39148XX1 Axor Citterio Wall Mount Lav Mixer with Cross Handles 39144XX1 Axor Citterio Wall Mount Lav Mixer with Lever Handles 39148XX1
MetroPrime 22MPC Self-Priming Centrifugal Pump
 Page 1 of 6 prevent priming or reduce pump capacity. OPERATION The 22 MPC-Metropolitan Pump is a self-priming centrifugal pump and only requires priming prior to its initial start. The pump will retain
6-12 WIDESPREAD 6-12 W. Cleopatra Series INSTRUCTION GUIDE SAVE THIS INSTRUCTION GUIDE
 INSTRUCTION GUIDE STEP-BY-STEP ILLUSTRATED INSTALLATION INSTRUCTIONS TROUBLE SHOOTING & REPAIR TIPS 20 YEAR LIMITED WARRANTY PROPER FINISH CARE Read these instructions carefully before installing your
5 5 8 " Description Part # Description Part # O-ring. Tee Connector. Widespread Handle * 1.5 GPM Flow Restrictor PM-080
 VOGUE COLLECTION WIDESPREAD LAVATORY SET WITH VO HANDLES MODEL: 6520VO10 6520VO PARTS BREAKDOWN 10 18 2 19 1 5 5 11 16 4 17 12 9 8 13 6 13 14 3 14 7 15 7 15 5 5 8 " Description Part # Description Part
Installation Instructions
 85-3195 rev. 12 04-18 Installation Instructions Thank you for purchasing this antisway bar kit. Please read through these instructions before installation. Part #1139-117 Rear Anti-Sway Bar Kit 1½ diameter
Installation and Maintenance Instructions
 Limited One Year Warranty T&S warrants to the original purchaser (other than for purposes of resale) that such product is free from defects in material and workmanship for a period of one (1) year from
A171 Series Barrier Free, Wall Mounted Fountain
 Series Barrier Free, Wall Mounted Fountain 100F / 400F / 100S / 400S TECHNICAL ASSISTANCE TOLL FREE TELEPHONE NUMBER: 1.800.591.9360 Technical Assistance Fax: 1.626.855.4894 NOTES TO INSTALLER: 1. Please
Installation Instructions
 Installation Instructions To ensure that your installation proceeds smoothly--please read these instructions carefully before you begin. P r o d u c t s Luxury Faucets and Accessories Contemporary Floor
BMK-30. Heavy-Duty By-Pass Filtration System Installation and Servicing Instructions
 BMK-30 Heavy-Duty By-Pass Filtration System Installation and Servicing Instructions IMPORTANT NOTICE Read all instructions completely before attempting to install this unit. Improper installation could
ONE. Cartridge Tank Filters
 ONE Cartridge Tank Filters TABLE OF CONTENTS Preinstallation Instructions...................................... 3 Bypass Installation for EF-835-1................................ 3-4 Bypass Installation
Artec Pro Single Handle Commercial Kitchen Faucet
 INSTALLATION GUIDE Artec Pro Single Handle Commercial Kitchen Faucet KPF-603 www.kraususa.com I Toll Free:.800.775.0703 I 208 Kraus USA Inc. I REV. Aug 2, 208 Congratulations on the purchase of your new
AQUA2000 ADVANCED WATER TREATMENT SYSTEMS OWNER S MANUAL INCLUDES: Restrictions. Installation. Operation. Maintenance. Changing the Filter
 The world leader in products for a healthy and comfortable environment - bringing the Garden of Eden into your home. AQUA2000 OWNER S MANUAL INCLUDES: Restrictions Installation Operation Maintenance Changing
Geo Arch Single Lever Pull-Down Kitchen Faucet With Soap Dispenser
 INSTALLATION GUIDE Geo Arch Single Lever Pull-Down Kitchen Faucet With Soap Dispenser KPF-1702 www.kraususa.com I Toll Free: 1.800.775.0703 I 2017 Kraus USA Inc. I REV. October 25, 2017 Congratulations
The ionpia H 2 Owner s Manual
 Hydrogen Enhanced Living The ionpia H 2 Owner s Manual Only from AlkaViva Warning: Incorrect installation and/or operation could void your valuable warranty. Please protect your investment! READ THIS MANUAL
AQUA2000 From O3PURE
 AQUA2000 From O3PURE OWNER S MANUAL INCLUDES: RESTRICTIONS INSTALLATION OPERATION MAINTENANNCE CHANGING THE FILTER CHANGING THE UV LAMP SPECIFICATIONS WARRANTY ADVANCED WATER TREATMENT SYSTEMS CAUTION:
Owner s Manual. Calcite ph Neutralizer
 Owner s Manual Page 2 Copyright 2012 Enviro Water Solutions Inc. All rights reserved. All information contained herein is the property of Pelican Water Systems. Pelican Water Systems makes no warranty
Installation Instructions To ensure that your installation proceeds smoothly--please read these instructions carefully before you begin.
 Installation Instructions To ensure that your installation proceeds smoothly--please read these instructions carefully before you begin. P r o d u c t s Luxury Faucets and Accessories Stoic Product Numbers
Single Lever Pull-Out Kitchen Faucet
 INSTALLATION GUIDE Single Lever Pull-Out Kitchen Faucet KPF-1602 www.kraususa.com I Toll Free: 1.800.775.0703 I 2017 Kraus USA Inc. I REV. October 25, 2017 Congratulations on the purchase of your new Kraus
Owner s Manual. Soda Ash ph Neutralizer System
 Owner s Manual Page 2 Copyright 2011 Enviro Water Solutions Inc. All rights reserved. All information contained herein is the property of Pelican Water Systems. Pelican Water Systems makes no warranty
model 2000SN FEATURES & BENEFITS SPECIFICATIONS OPTIONS APPLICATIONS Recessed Wall-Mount Bottle Filling Station
 model 2000SN Recessed Wall-Mount Bottle Filling Station FEATURES & BENEFITS QUALITY CONTROL The Haws bottle filling station is pre-built and fully water and pressure tested to ensure no leaks and proper
Britt Single Handle Commercial Kitchen Faucet
 INSTALLATION MANUAL Britt Single Handle Commercial Kitchen Faucet KPF-1690 www.kraususa.com I Toll Free: 1.800.775.0703 I 2017 Kraus USA Inc. I REV. August 10, 2017 Thank you for your purchase We would
HALLMARK INDUSTRIES INC
 Performance Part No. HP. CONVERTIBLE JET PUMP USER S MANUAL GPH of Water @ Total Discharge Pressure of 40 psi Max. Pressure Max suction (shallow well) Max Suction (deep well) Max GPM (@0 head) Max Discharge
INSTALLATION AND OPERATION MANUAL
 INSTALLATION AND OPERATION MANUAL Models S120U & S240U Read all instructions before assembling or using the SunHeater system. Retain this manual for future use. TABLE OF CONTENTS Important Safety Information...2
Ino Single Handle Basin Bathroom Faucet
 INSTALLATION GUIDE Ino Single Handle Basin Bathroom Faucet KEF-15701 www.kraususa.com I Toll Free: 1.800.775.0703 I 2017 Kraus USA Inc. I REV. October 25, 2017 Congratulations on the purchase of your new
INSTALLATION MANUAL IMPORTANT CONSIDERATIONS TECHNICAL INFORMATION. Tools you may need
 Model: IS102, IS102-1-X Two Way Pressure Balance Valve 1/2 Rough and Trim Set INSTALLATION MANUAL U P C C Compliance: ASME A112.18.1 CSA B125.1 IMPORTANT CONSIDERATIONS This product and other additional
Surface Mounted Bottle Fillers
 BF & BF6 Series Surface Mount Bottle Fillers BF Series BF6 Series TECHNICAL ASSISTANCE TOLL FREE TELEPHONE NUMBER:.800.9.960 Technical Assistance Fax:.66.8.89 NOTES TO INSTALLER:. Please leave this documentation
Battery Powered Sensor Operated Lavatory Faucets. Plug-in Transformer Powered Sensor Operated Lavatory Faucets PARTS LIST
 1A 1B 8 EAF-100/150 I.I. Rev. 0a (11/02) Code No. 0816542 INSTALLATION INSTRUCTIONS ELECTRONIC, SENSOR OPERATED LAVATORY FAUCETS EAF-150 Series Battery Powered Sensor Operated Lavatory Faucets 2 3 7 10
FAUCET SPECIFICATIONS. Pull-Down Spray Kitchen Faucet Model VG " * 12" 8 5/8" * = +/- 1" MODEL VG02006 FEATURES PACKING LIST DIMENSIONS
 FAUCET SPECIFICATIONS PullDown Spray Kitchen Faucet Model VG02006 MODEL VG02006 FEATURES Solid brass construction Spiral pulldown spray head Spray face that resist mineral build up Finish resist corrosion
Installation Instructions
 85-4592 rev. 08 02-18 Installation Instructions Thank you for purchasing our sway bar kit. Please read through these instructions before installation. Auxiliary Rear Anti-Sway Bar Kit for Ford F53 part
Installation Instructions / Warranty
 Installation Instructions / Warranty Axor Montreux 16532XX1 Axor Montreux 16534XX1 Axor Montreux Wall-Mounted Widespread Lavatory Set 16532XX1 Cross handles 16534XX1 Lever handles 16532XX1 16534XX1 Technical
Shower System. Dual Head INSTRUCTION GUIDE
 INSTRUCTION GUIDE Step-By-Step Illustrated Installation Instructions Jet Cleaning Instructions Proper Finish Care Limited Warranty Read these instructions carefully before installing your new shower system
Owner s Manual Pelican Whole House Iron and Manganese Filtration System
 Owner s Manual Pelican Whole House Iron and Manganese Page 2 Copyright 2011 Enviro Water Solutions Inc. All rights reserved. All information contained herein is the property of. makes no warranty of any
65 Series. Valve Operation Manual
 65 Series Valve Operation Manual Note: 1. Read all instructions carefully before operation. 2. Avoid pinched o-rings during installation by applying (provided with install kit) NSF certified lubricant
Installation Instructions
 TIMES SQUARE Spread Lavatory Faucet with Speed Connect Drain Installation Instructions 8.80 8.8 Congratulations on purchasing your American Standard faucet with Speed Connect drain, a feature found only
Oletto Single Lever Bar/Prep Faucet
 INSTALLATION GUIDE Oletto Single Lever Bar/Prep Faucet KPF-2600 www.kraususa.com I Toll Free: 1.800.775.0703 I 2017 Kraus USA Inc. I REV. January 23, 2018 Congratulations on the purchase of your new Kraus
Installation Instructions / Warranty
 Installation Instructions / Warranty Axor Uno 38020XX1 Axor Uno 38025XX1 Axor Uno 38210XX1 Uno Single-control Lavatory Faucet 38020XX1 Uno Single-control Tall Lavatory Faucet 38025XX1 Uno Single-control
Sheven Single Lever Vessel Faucet
 INSTALLATION GUIDE Sheven Single Lever Vessel Faucet FVS-1002 www.kraususa.com I Toll Free: 1.800.775.0703 I 2017 Kraus USA Inc. I REV. October 24, 2017 Congratulations on the purchase of your new Kraus
MODEL VG08001 CONTENT PACKING LIST / TOOLS NEEDED PANEL DIMENSIONS FITTINGS / TECHNICAL DATA WALL/CORNER INSTALLATION CARE AND TROUBLE SHOOTING
 CONTENT PACKING LIST / TOOLS NEEDED PANEL DIMENSIONS FITTINGS / TECHNICAL DATA WALL/CORNER INSTALLATION CARE AND TROUBLE SHOOTING WARRANTY 1 PACKING LIST DESCRIPTION MODEL NUMBER - PANEL HOUSING 88057
Bolden Single Handle Commercial Kitchen Faucet
 INSTALLATION MANUAL Bolden Single Handle Commercial Kitchen Faucet KPF-1610 www.kraususa.com I Toll Free: 1.800.775.0703 I 2017 Kraus USA Inc. I REV. June 22, 2017 Thank you for your purchase We would
Installation Instructions / Warranty
 Installation Instructions / Warranty Hansgrohe HighArc Bar Faucets HighArc Bar Faucets These instructions cover the following models: 06688XX0 06696XX0 06699XX0 06857XX0 06980XX0 Solaris Stratos Metro
US Water ph Booster-Reducer Injection System
 US Water ph Booster-Reducer Injection System 410-PHBOOST 410-PHREDUCER US Water Systems, Inc. 1209 Country Club Road Indianapolis, IN 46234 1-800-608-8792 info@uswatersystems.com www.uswatersystems.com
Installation Instructions / Warranty. Citterio 39115XX1
 Installation Instructions / Warranty Citterio 39115XX1 Citterio Wall-Mount Lavatory Trim 39115XX1 Technical Data Maximum incoming water pressure 145 psi Recommended incoming pressure 14.5-72 psi Recommended
Installation Instructions JASMINE Spread Lavatory Faucet with the EverClean Finish & Speed Connect Drain
 Installation Instructions JASMINE 80. Spread Lavatory Faucet with the EverClean Finish & Speed Connect Drain Congratulations on purchasing your American Standard faucet with the EverClean finish and Speed
BC Brake Caliper. (i) MEX (55) QRO (442) MTY (81) DIST. AUTORIZADO
 MEX (55) QRO (442) MTY (81) DIST. AUTORIZADO") MEX (55) 5 6 QRO (44) 95 7 60 MTY () 54 0 BC Brake Caliper (i) FORM NO. L-0066-B-040 In accordance with Nexen s established policy of constant product improvement, the specifications contained in this
MEX (55) 5 6 QRO (44) 95 7 60 MTY () 54 0 BC Brake Caliper (i) FORM NO. L-0066-B-040 In accordance with Nexen s established policy of constant product improvement, the specifications contained in this
NEUTRALIZATION SYSTEM FOR OPA & GLUTARALDEHYDE MEDI-NEWT. User Manual. Endoscope reprocessing the the way way it it should be be
 NEUTRALIZATION SYSTEM FOR OPA & GLUTARALDEHYDE MEDI-NEWT User Manual Endoscope reprocessing the the way way it it should be be 1 Medi-Newt Neutralization System Instruction Manual 50096-951 Rev C 2011,