HEALTH IN MOTION, LLC. 255 AIRPORT CIRCLE, SUITE 101 CORONA, CA
|
|
|
- Charlene Owens
- 5 years ago
- Views:
Transcription
1
2 TABLE OF CONTENTS BEFORE YOU BEGIN 1 IMPORTANT SAFETY NOTICE 2 CONTENTS OF PACKAGING 3 LABEL PLACEMENT 4 HARDWARE PACK 5 ASSEMBLY INSTRUCTIONS 6-15 PRODUCT FEATURES COMPUTER OPERATION GUIDELINE PARTS LIST ALTERNATE PLUG PART NUMBERS 26 EXPLODED DIAGRAMS WARRANTY BEFORE YOU BEGIN Thank you for selecting the INSPIRE CS2 CARDIOSTRIDER. For your safety and benefit, read this manual carefully before using the machine. As a manufacturer, we are committed to providing you complete customer satisfaction. If you have any questions, or find there are missing or damaged parts, please call our TOLL-FREE customer service number. Our Customer Service Agents will provide immediate assistance to you. HEALTH IN MOTION, LLC. 255 AIRPORT CIRCLE, SUITE 101 CORONA, CA Toll-Free Customer Service Number Mon. - Fri. 8 a.m. - 5 p.m. PST 1
3 PRECAUTIONS IMPORTANT SAFETY NOTICE This exercise machine is built for optimum safety. However, certain precautions apply whenever you operate a piece of exercise equipment. Be sure to read the entire manual before you assemble or operate your machine. In particular, note the following safety precautions: Keep children and pets away from the machine at all times. DO NOT leave children unattended in the same room with the machine. The linkages on this machine can cause serious injury or death if used improperly. Engage Child Safety Lock, detailed in this manual, after each use. Never place your hands or feet in the path of the linkages because injury may occur to you or damage may occur to the equipment. Never allow children to come near or approach the moving linkages while in use. If the user experiences dizziness, nausea, chest pain, or any other abnormal symptoms, STOP the workout at once. CONSULT A PHYSICIAN IMMEDIATELY. Position the machine on a clear, leveled surface. DO NOT use the machine near water or outdoors. Keep hands away from all moving parts. Always wear appropriate workout clothing when exercising. DO NOT wear robes or other clothing that could become caught in the machine. Running or aerobic shoes are also required when using the machine. Use the machine only for its intended use as described in this manual. DO NOT use attachments not recommended by the manufacturer. Do not place any sharp object around the machine. Disabled persons should not use the machine without a qualified person or physician in attendance. Before using the machine to exercise, always do stretching exercises to properly warm up. Never operate the machine if the machine is not functioning properly. Maximum user weight 300 lbs. Allow 24 (61 cm) of space on each side of the unit. Never place body parts under pivot area (directly behind pedal). Ensure that all pull pins, locks, and safety latches are fully engaged before use. CARE AND MAINTENANCE 1. Keep seat slider clean 2. Inspect and tighten all parts before using the machine. 3. The Frame and Seat Pad of the machine can be cleaned using a damp cloth and mild non-abrasive detergent. DO NOT USE SOLVENTS. WARNING: BEFORE BEGINNING ANY EXERCISE PROGRAM, CONSULT YOUR PHYSICIAN. THIS IS ESPECIALLY IMPORTANT FOR INDIVIDUALS OVER THE AGE OF 35 OR PERSONS WITH PRE-EXISTING HEALTH PROBLEMS. READ ALL INSTRUCTIONS BEFORE USING ANY FITNESS EQUIPMENT. NEITHER HEALTH IN MOTION, LLC. NOR FG1, LLC. ASSUMES ANY RESPONSIBILITY FOR PERSONAL INJURY OR PROPERTY DAMAGE SUSTAINED BY OR THROUGH THE USE OF THIS PRODUCT. 2
4 CONTENTS OF PACKAGING 3

5 WARNING/PATENT LABEL PLACEMENT The warning and patent labels have been placed on the unit in location shown. If the labels are missing or illegible, please call customer service at for replacements. Apply the labels in location shown. 4
6 HARDWARE PACK NOTE: The following parts are not drawn to scale. Please use your own ruler or scale to measure the size. 5

7 6
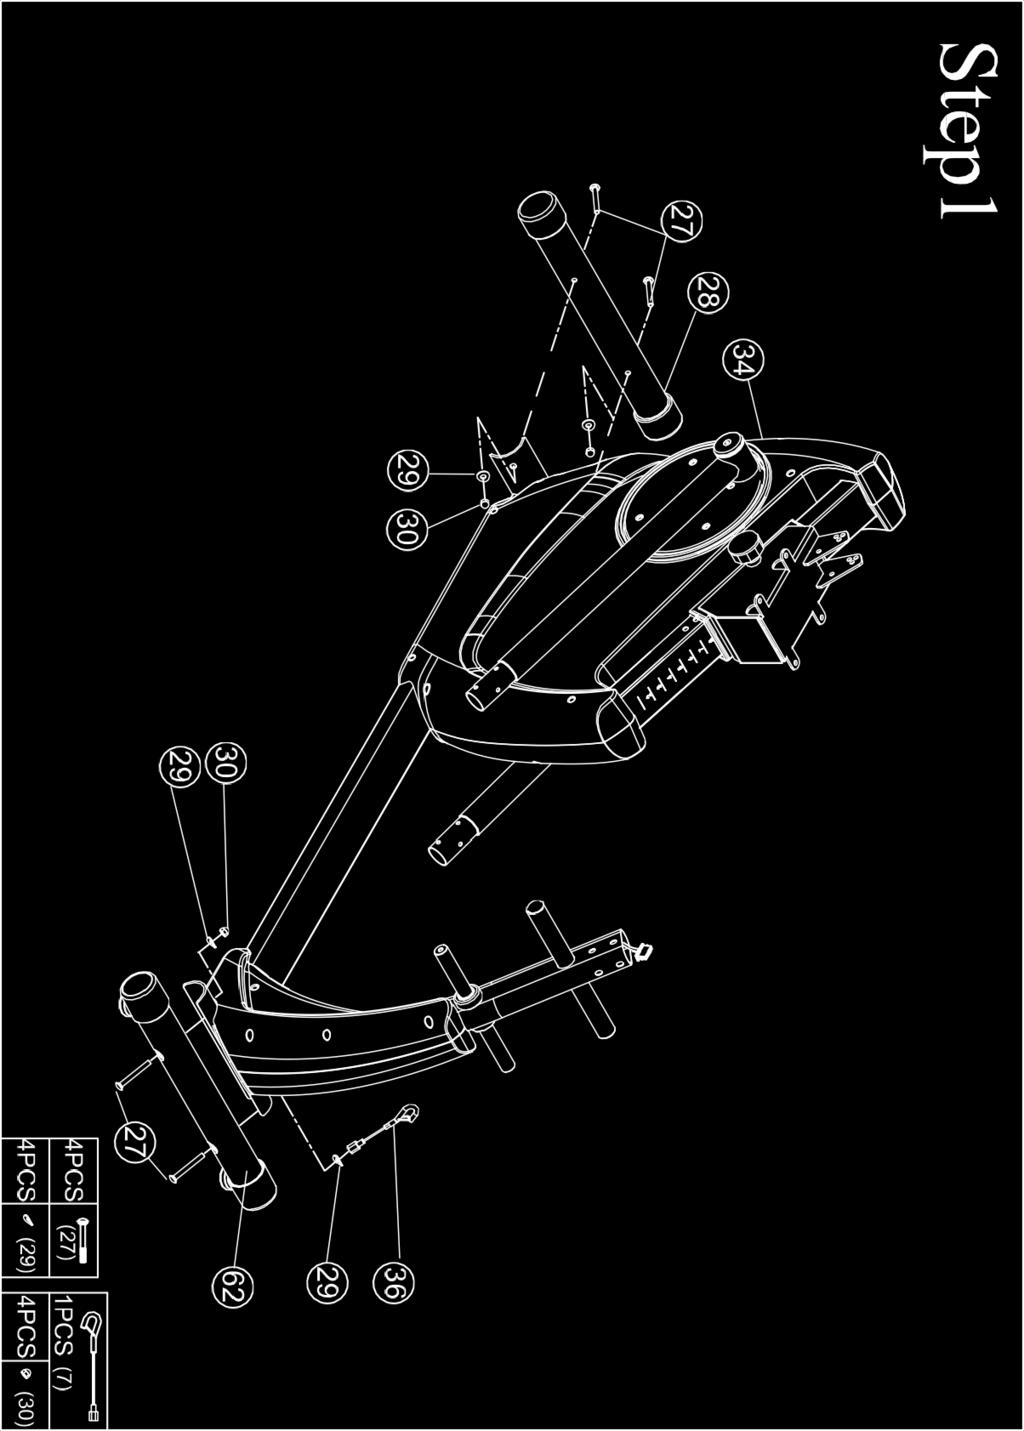
8 STEP 1: FRAME STABILIZER ASSEMBLY (See Step 1 Figure) Required Hardware: STEP 1 4x (#27) M8x 70 Carriage Bolts 3x (#30) Acorn Nut 4x (#29) Curved Washer 1x (#36) Child Safety Lock Required Parts: (#28) Rear Stabilizer Tube (#62) Front Stabilizer Tube Installing Stabilizers A.) Carefully unpack contents of box leaving the 3 large styrofoam frame support blocks in place. B.) Remove large styrofoam support from REAR portion of frame. The Rear Stabilizer mounting bracket should now be exposed. C.) Place (#28) Rear Stabilizer underneath the Rear Mounting Bracket. Ensure that the transport wheels are facing away from the unit. D.) Attach the (#28) Rear Stabilizer to the frame as shown in FIGURE 1 with: 2 x (#27) M8x 70 Carriage Bolts 2x (#29) Curved Washers 2 x (#30) Acorn Nuts E.) Remove large styrofoam support from FRONT portion of frame. The Front Stabilizer mounting bracket should now be exposed. F.) Place (#62) Front Stabilizer underneath the Front Mounting Bracket. G.) Attach (#62) Front Stabilizer to the frame as shown in FIGURE 1 with: 2 x (#27) M8x 70 Carriage Bolts 2x (#29) Curved Washers 1 x (#30) Acorn Nuts 1x (#36) Child Safety Lock NOTE: (#36) Child Safety Lock is used instead of a nut on USER left side of the Front Stabilizer. 7

9 8
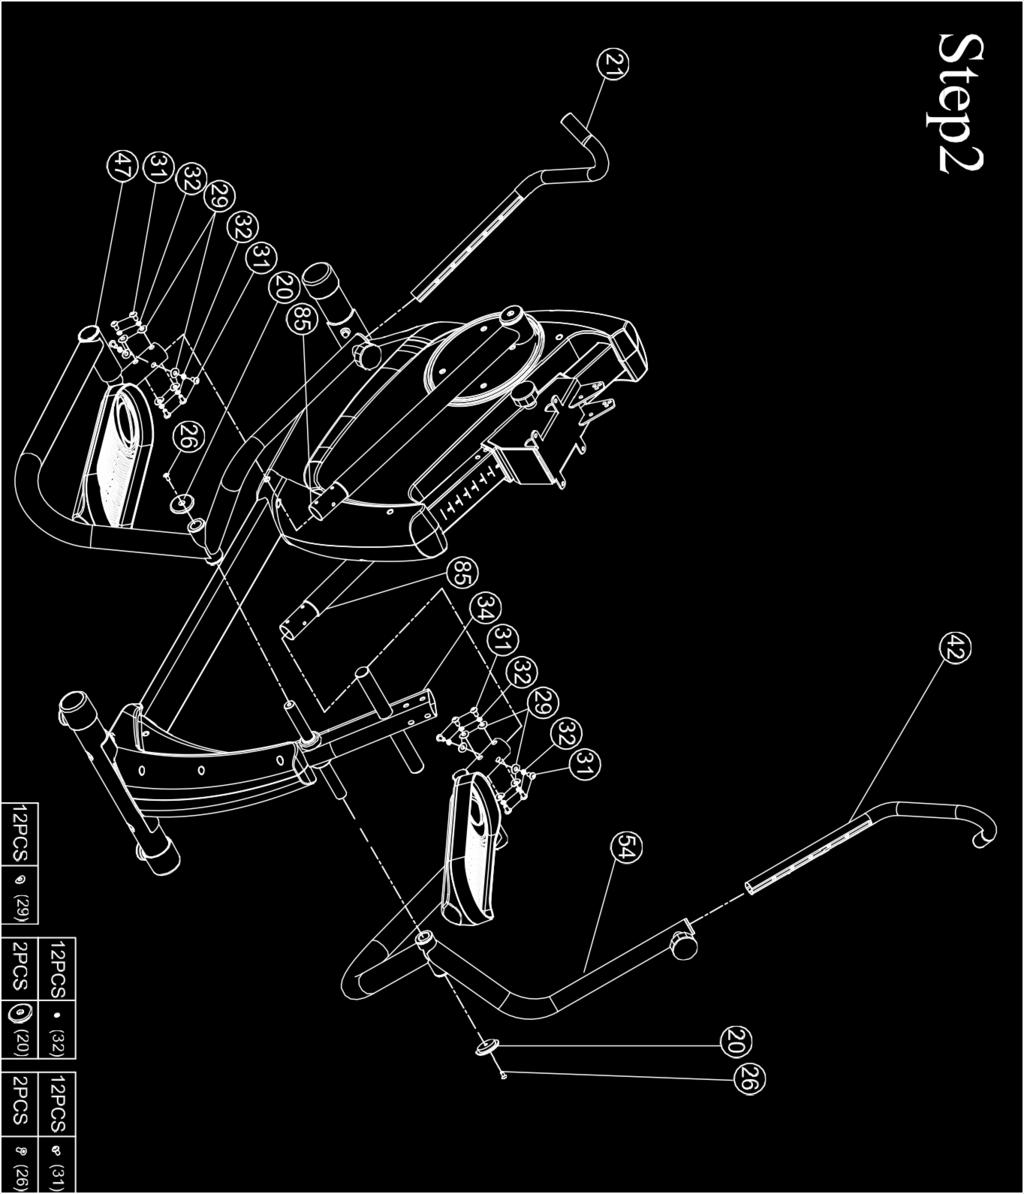
10 STEP 2: SWING ARM ASSEMBLY Required Hardware: STEP 2 2x (#20) Aluminum End Cap 12x (#29) Curved Washer 12x (#32) Spring Washer (See Step 2 Figure) 2x (#26) Flat Head Socket Screw 12x (#31) M8 * 17 Hex Screw Required Parts (#47) Swing Arm Assembly R (#54) Swing Arm Assembly L A.) Slide (#47) Swing Arm Assembly R over the pivot shaft of main frame, as shown in Step 2. NOTE: Lift spacer between bearings to allow insertion. B.) Secure using: 1x (#20) Aluminum End Cap As seen in Step 2 Figure 1x (#26) Flat Head Socket Screw C.) Place the (#47) Swing Arm Assembly R on top of a styrofoam support block, so the swing arm doesn t touch the floor. D.) Slide the (#85) Pedal Arm that is already attached to unit, into the (#47) Swing Arm Assembly R E.) Secure using: 6x (#29) Curved Washers 6x (#31) M8 * 17 Hex Screw 6x (# 32) Spring Washer As seen in Step 2 Figure F.) Slide (#54) Swing Arm Assembly L over the pivot shaft of main frame as shown in Figure 2. G.) Secure using: 1x (#20) Aluminum End Cap As seen in Figure 2 1x (#26) Flat Head Socket Screw H.) Place the (#54) Swing Arm Assembly L on top of the styrofoam support block with the red dot, so the swing arm doesn t touch the floor. I.) Slide the (#85) Pedal Arm that is already attached to unit, into the (#54) Swing Arm Assembly L J.) Secure using: 6x (#29) Curved Washers 6x (# 32) Spring Washer 6x (#31) M8 * 17 Hex Screw 9

11 HANDLE ASSEMBLY (See Step 2 Figure) A) Loosen handle adjustment knob 2-3 turns. This will allow the arm to slide in. B.) Slide the Right Handle Assembly (#21) into the (#47) Swing Arm Assembly R. Adjust to desired position and tighten. WARNING: Check to make sure the Right Handle Assembly has an R Sticker on it. Accidental switching of the Right and Left Handle Assemblies can result in serious injury. C.) Loosen handle adjustment knob 2-3 turns. This will allow the arm to slide in. D.) Slide the Left Handle Assembly (#42) into the Left Swing Arm Sleeve (#54). Adjust to desired position and tighten. WARNING: Check to make sure the Left Handle Assembly has an L Sticker on it. Accidental switching of the Right and Left Handle Assemblies can result in serious injury. 10
12 11
13 12
14 STEP 3: ASSEMBLING THE SEAT BACK & SEAT (See FIGURE 3) Required Hardware: Step 3 1x (# 86) Hex Bolt 1x (#24) Lock Nut 5x (#33) Flat Washer 4x (#31) M8 * 17 Hex Screw 4x (#32) Spring Washers Required Parts: (# 50) Seat Back Assembly (#35) Seat Pad, Charcoal Installing Seat Back Assembly A.) Assemble Seatback Assembly (#50) onto Seat Slider Assembly. Align lower hole and secure using: 1x (#24) Lock Nut 1x (#86) Hex Bolt 1x (#33) Flat Washer Installing Seat B.) Secure (#35) Seat to Seat Slider Assembly using: 4x (#31) M8 * 17 Hex Screw 4x (#33) Flat Washer 4x (#32) Spring Washers 13

15 14
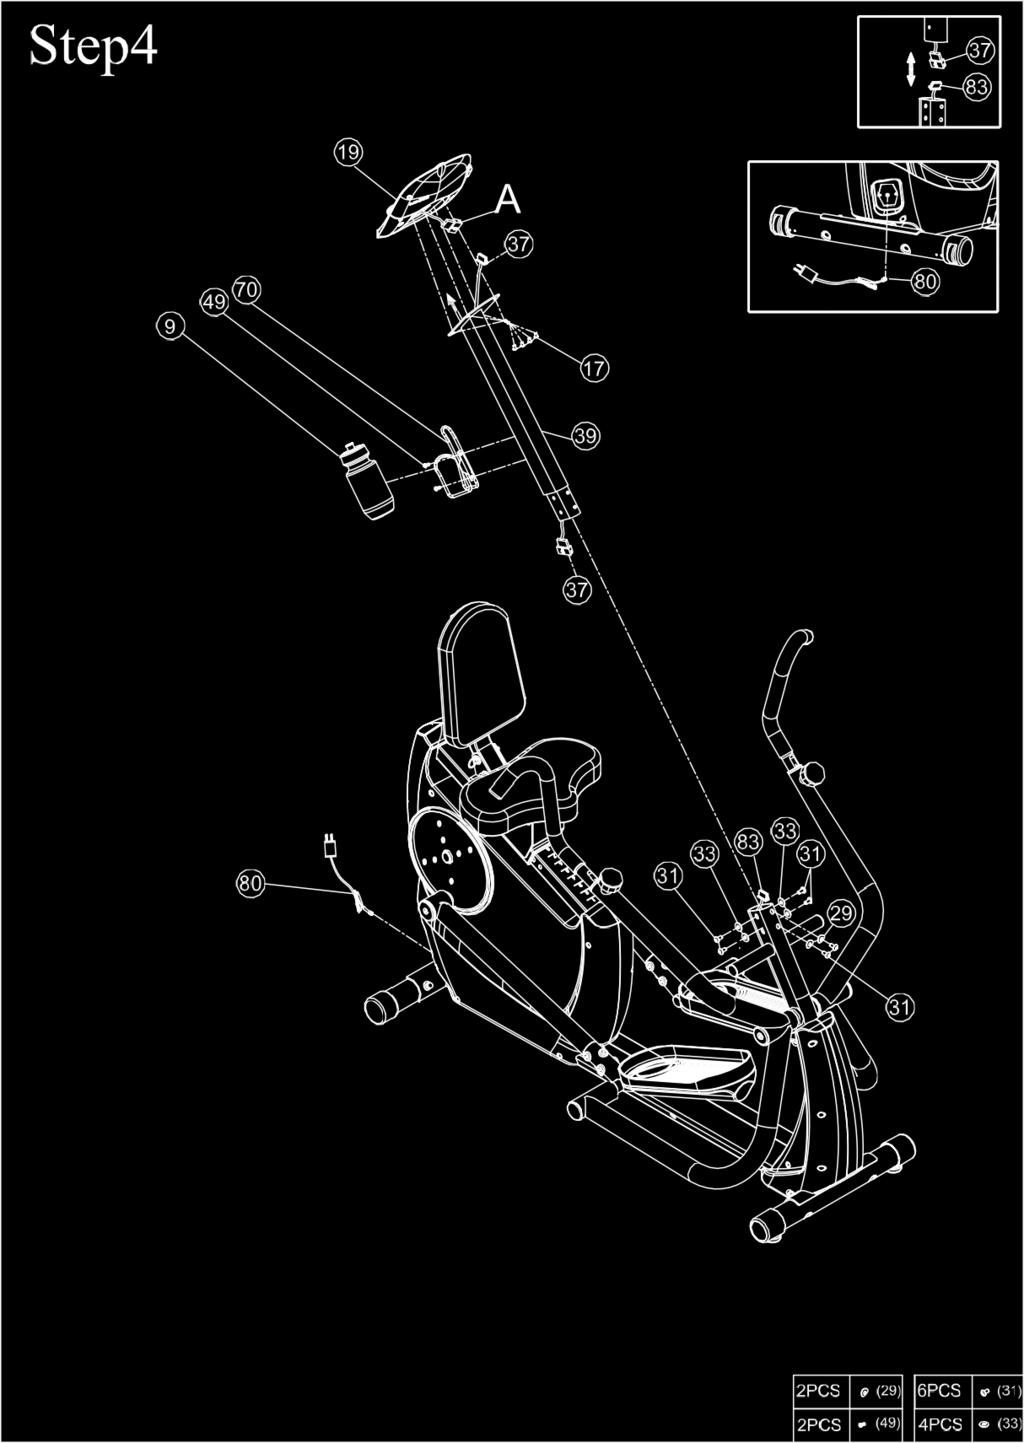
16 STEP 4: MAST ASSEMBLY (See STEP 4) Required Hardware: STEP 5 2x (#29) Curved Washers 6x (#31) M8 * 16 Allen Head Screw 4x (#33) Flat Washers 2x (#49) M5 * 10 Phillips Head Screw Required Parts: (#39) Console Mast (#19) Console (#70) Bottle Holder Attaching the Mast A.) Locate the ends of the included cable that should be sticking out of the top and bottom of the (#39) Console Mast, labeled (#37) as seen in Step 4 Figure. B.) Orient the bottom end of (#39) Console Mast near the top of the opening of the Main Frame. C.) Connect cable end of (#37) to the input connector (#83) that is inside the frame, as seen in Step 4 Figure. D.) Slide (#39) Console Mast onto the Main Frame. NOTE: Make sure not to pinch the cable assembly when attaching the console onto the mounting bracket. E.) Secure both assemblies by using: 2x (#29) Curved Washers 4x (#33) Flat Washers 6x (#31) M8 * 17 Hex Screw As seen in Step 4 Figure Note (#29) Curved Washer in only used on the curved front of the mast. Attaching the Bottle Holder F.) Locate the two threaded holes along the inside of the mast G.) Attach (#70) Bottle Holder onto the mast using: 2x (#49) M5 * 10 Phillips Head Screw H.) Slide (#9) Water Bottle into the water bottle holder. 15
 Remove the four screws, these will be used to mount the console onto the console mount. K.) Orient the console near the top of the mast ; Connect cable ends A to the cables coming from the frame L.")
17 Attaching the Console I.) Located, on the backside of (#19) Console, will be 4x (#17) Phillips Head Screws threaded into four corners of the console. J.) Remove the four screws, these will be used to mount the console onto the console mount. K.) Orient the console near the top of the mast ; Connect cable ends A to the cables coming from the frame L.) Tuck cable away neatly inside the mast to avoid pinching, then mount the console onto the mounting plate. M.)Secure the console using the four screws removed in Step I. FINAL STEPS Level the unit by unscrewing the leveler feet under (#62) Front Stabilizer so that both sit flat on the ground. Unscrew center leveler (located under the center point of the unit) so that it touches the ground. Failure to do so could cause damage to your unit. 16
18 PRODUCT FEATURES Handle Orientation INVERTED HANDLES: Place handles in inverted position. This will focus on your biceps and triceps muscles. UPRIGHT HANDLES: Place handles in upright position. This will focus on your chest and back muscles. Seat Back Orientation Choose a preferred Seatback Recline Angle. The seatback (#8) may be adjusted in 3 different Recline Angles (UPPER, MIDDLE, LOWER) Based on the users preferred position. Align upper seatback tube hole with preferred hole based on the below figure. Secure using the pin (b) as shown in to the left. 17
19 ENGAGING THE CHILD SAFETY LOCK ASSEMBLY 1. ALWAYS engage the CHILD SAFETY LOCK ASSEMBLY after each use by clipping the hook onto the loop located UNDERNEATH the LEFT PEDAL ASSEMBLY. (see FIGURE B below). 2. Before each workout, disengage the hook from the loop. The CHILD SAFETY LOCK ASSEMBLY can hang freely during your workout and will not interfere with the mechanism. 18
. Press and hold the STOP/RESET key for 2 seconds to RESET the computer.")
20 CS2 COMPUTER OPERATION AND FEATURES BASIC OPERATION Press QUICK START to immediately begin workout in Manual Mode. Press the STOP/RESET key at any time to PAUSE the workout. Press ENTER to resume exercise. (Press STOP/RESET twice to reset program). Press and hold the STOP/RESET key for 2 seconds to RESET the computer. RESISTANCE: Press the UP or DOWN key to change the Resistance Level during a workout. The Resistance may be adjusted from LEVEL 1 (Lowest) to LEVEL 20 (Highest). The Resistance level is displayed in the top center of the LCD. VIEWING WORKOUT DATA: During a workout RPM and CALORIES are displayed on the scrolling text bar. Press the VIEW button to display WATTS and DISTANCE. Press and hold the VIEW buttons for 2 seconds to toggle on/off Autoscan (the computer will switch between RPM/CALORIES and WATTS/DISTANCE every 10 seconds). English/Metric Units: This computer uses a default of English Units of measurements. To toggle between English / Metric Units: -Press and hold RESET for 2 seconds to reset the computer 19
21 -While computer is rebooting, immediately press and hold the ENTER and VIEW button at the same time -Press UP and DOWN to toggle between Km and MILE. Press ENTER to accept setting and reset the computer. STANDARD PROGRAMS: The CS2 CardioStrider has 6 Standard workout programs that will automatically adjust the resistance. At startup, press PROGRAMS. Press UP or DOWN to scroll through the PROGRAMS. 20

22 o ROLLING HILL o PEAK o PLATEAU o MOUNTAIN CLIMB o HILL INTERVAL o STRENGTH INTERVAL After selecting your program press ENTER LEVEL: Press UP or DOWN to set maximum resistance level. The resistance will not go above this level during the workout. You may adjust the maximum resistance during your workout. Press ENTER to accept maximum resistance level. Press STOP/RESET to go back to PROGRAM selection. WORKOUT TIME: Press UP or DOWN to set total workout time. Press ENTER to accept workout time and begin. Press STOP/RESET to go back to LEVEL. NOTE: The WORKOUT TIME may be changed during a workout by pressing the TIME +/- key. Press UP/DOWN to modify the WORKOUT TIME. Press ENTER to begin workout. 20


23 FOCUS PROGRAMS: The CS2 CardioStrider has 2 programs to focus workout on your upper body (Upper Body Focus, Arms Focus). During the workout, the computer will beep and a scrolling message will give you instructions. A list of messages and their definitions are described below: FEET ON PEDALS: Place feet on the moving pedals. FEET ON PEGS: Place feet on the pegs. Round tube located at the front of the unit. PALMS UP: Place handles in INVERTED MODE. In INVERTED MODE, keep palms facing upward to focus workout on the biceps muscle. PALMS DOWN: Place handles in INVERTED MODE. In INVERTED MODE, keep palms facing downward to focus workout on the triceps muscle. 21


24 FOCUS PROGRAM SETUP: Press PROGRAMS. Press UP or DOWN to scroll through the PROGRAMS. o UPPER BODY FOCUS: Focusing on upper body workout, including the chest, back and arms. Also includes lower body workout. o ARMS FOCUS: Focusing on upper body workout only. Feet remain on pegs. After selecting your FOCUS program press ENTER LEVEL: Press UP or DOWN to set maximum resistance level. This resistance will not go above this level during the workout. You may adjust the maximum resistance during your workout. Press ENTER to accept maximum resistance level. Press STOP/RESET to go back to PROGRAM selection. WORKOUT TIME: Press UP or DOWN to set total workout time. Press ENTER to accept workout time and begin workout. Press STOP/RESET to go back to LEVEL. 22
25 PARTS LIST EXP NO. EVS CODE Description Qty/Item 1 RC Back Pad Tube Assembly 1 2 CN-S EMS Flywheel 1 3 RC A Front Shroud R Hex Nut 2 5 RC Grip Shifter Tension Wire Cross Head Tap Bolt 6 7 RC Shroud L 1 8 RC SK Pad 1 9 BC Q Water Bottle 1 10 RC Ring Wire Pop pin φ8* Spring Washer φ A Allen Head Bolt M8* RC Pedal Arm Hex Flange Nut M10* Cross Head Bolt M4* BC Tension Bolt M RC SK Phillips Head Screw M5* Phillips Head Screw ST4.2* RC A Console 1 20 RC Aluminum End Cap φ50* RC Right Handle Assembly Cross Head Bolt M6* BC B End Cap Lock Nut M Inner Hex Socket Bolt M6*
26 Flat Head Socket Screw M8* M8*70 Carriage Bolt 4 28 RC PZ Rear Stabilizer Tube Curved Washer Acorn Nut M8 * 17 Hex Screw Spring Washer φ Flat Washer φ RC Main Frame Assembly 1 35 RC SK Seat Pad Assembly 1 36 RC Child Safety Lock 1 37 RC B Console Upper Wire 1 38 RC Shroud R 1 39 RC Console Mast 1 40 RC Five-way Tube Ball Bearing 6004ZZ 2 42 RC Left Handle Assembly A Hex Bolt M8* A Flat Washer φ8*φ RC Five-way Tube RC Hex Nut M20* RC PZ Swing Arm Assembly R 1 48 RC Foot Tube End Cap φ50* M5*10 Phillips Head Screw 2 50 RC PZ Seat Back Assembly 1 51 RC Pedal Arm Assembly Hex Flange Nut M12* RC Upper Pedal L 1 54 RC PZ Swing Arm Assembly L 1 55 RC Foot Pedal Tube Assembly R Cross Self-Tap Bolt ST4.2*
27 Cross Self-Tap Bolt ST4.2* RC R Lower Pedal 1 59 RC R Upper Pedal 1 60 RC C Console Wire 1 61 RC Adjustment Foot M RC PZ Front Stabilizer Assembly 1 63 RC Upper Bushing φ48* RC L Lower Pedal 1 65 RC Foot Pedal Tube Assembly L 1 66 BC Sensor Bracket Flange Nut M12* BC Tension U Plate A Inner Hex Socket Bolt ST4.2* B Bottle Holder 1 71 RC A Knob 3 72 RC D Resistance Motor 1 73 BE A End Cap 2 74 RC A Front Shroud L 1 75 RC PZ Seat Support Assembly 1 76 RC Power supply socket 1 77 RC Switch Strength Bracket 1 78 RC Belt 470,J8(VEGA) 1 79 RC PZ Belt Pulley Assembly 1 80 RC E Power Inlet 1 81 RM Seat 2 82 RC Connection Tube 1 83 RC F Console Lower Wire 1 84 RC Aluminum Plate RC PZ Foot Pedal Connection Tube Assembly Hex Bolt M8*
 TYPE PART NUMBER COUNTRIES PHOTO A- type")


28 ALTERNATE ADAPTER CABLE OPTIONS (to be ordered separately) TYPE PART NUMBER COUNTRIES PHOTO A- type RC United States, Japan, Phillipines, Canada, Columbia, Ecuador, Honduras, Mexico, Panama, Peru, Taiwan I-type RC Australia, New Zealand, China C- type RC Europe, Argentina, Russia, Brazil, Egypt, India, Indonesia, Israel, Pakistan, South Korea, South Africa G- type RC United Kingdom, Hong Kong, Singapore 26

29 27


30 28
31 29
: Includes Main Frame and Welds 3 YEAR PARTS (CS2): Excluding Paint and Finish (unless defective out of box) 1 YEAR LABOR (all cardio units) Inspire Fitness")
32 Warranty This Warranty applies to Inspire Cardio products manufactured or distributed by Health In Motion LLC. RESIDENTIAL WARRANTY: 10 YEAR FRAME (CS2): Includes Main Frame and Welds 3 YEAR PARTS (CS2): Excluding Paint and Finish (unless defective out of box) 1 YEAR LABOR (all cardio units) Inspire Fitness warrants that the Product you have purchased from Health In Motion or from an authorized Inspire reseller is free from defects in materials or workmanship under normal use during the warranty period. Your sales receipt, showing the date of purchase of the Product, is your proof of the date of purchase. You must demonstrate proof of purchase to obtain a warranty. This warranty extends only to you, the original purchaser. It is not transferable to anyone who subsequently purchases the product from you. It excludes expendable parts such as paint and finish and cosmetic items, including, but not limited to the following: grips, seats and labels. This Warranty becomes VALID ONLY if the Product is assembled / installed following the instructions / directions included with the Product. Replacement and repair of parts During the warranty period Inspire will, at no additional charge, repair or replace the product if it becomes defective, malfunctions, or otherwise fails to conform with this warranty under normal personal, family, or household use. In repairing the product, Inspire Fitness may replace defective parts with, at the option of Inspire Fitness, serviceable used parts that are equivalent to new parts in performance, or new parts. All exchanged parts and products replaced under this warranty will become the property of Inspire Fitness. Inspire Fitness reserves the right to change manufacturers and or specification of any part to cover any existing warranty. Service procedures To obtain warranty parts, you must return the parts to Inspire Fitness or an authorized Inspire Fitness retailer in its original container (or equivalent). You must pre-pay any shipping charges, taxes, or any other charges associated with transportation of the product. In addition, you are responsible for insuring any product shipped or returned. You assume the risk of loss during shipment. You must present Inspire Fitness with proof-of-purchase documents (including the date of purchase, Model, and Serial Number). Any evidence of alteration, erasing or forgery of proof -of-purchase documents will be cause to void this warranty. You may be charged a trip charge if you are outside a reseller s service area. Register your warranty online visit Conditions and Exceptions This warranty does not extend to any product not purchased from Inspire Fitness or from an authorized Inspire Fitness reseller. Labor claims must be authorized prior to performing service or they may be denied. This warranty does not extend to any product missing a serial number or with a serial tag that has been altered or defaced. This warranty does not extend to service calls to correct installation of the equipment or instruct owners on how to use the equipment. This warranty does not extend to any product that has been damaged or rendered defective; (a) as a result of accident, misuse, or abuse; (b) by the use of parts not manufactured or sold by Inspire Fitness; (c) by modification of the product; (d) as a result of service by anyone other than Inspire Fitness, or an authorized Inspire Fitness warranty service provider; (e) product that has not been properly maintaine d (follow maintenance schedule found on product); (f) as a result of neglect. Should any product submitted for warranty service be found to be ineligible, an estimate of repair cost will be furnished and the repair will be made if requested by you upon Inspire Fitness receipt of payment or acceptable arrangement of payment. 30
33 Disclaimer EXCEPT AS EXPRESSLY SET FORTH IN THIS WARRANTY INSPIRE FITNESS MAKES NO OTHER WARRANTIES; EXPRESSED OR IMPLIED INCLUDING ANY IMPLIED WARRANTIES OF MERCHANTABILITY AND FITNESS FOR A PARTICULAR PURPOSE. INSPIRE FITNESS EXPRESSLY DISCLAIMS ALL WARRANTIES NOT STATED IN THIS WARRANTY. ANY IMPLIED WARRANTIES THAT MAY BE IMPOSED BY LAW ARE LIMITED TO THE TERMS OF THIS WARRANTY. NEITHER INSPIRE FITNESS NOR ANY OF ITS AFFILIATES SHALL BE RESPONSIBLE FOR INCIDENTAL OR CONSEQUENTIAL DAMAGES. INSPIRE FITNESS IS NOT RESPOSIBLE FOR THE REPAIR OR REPLACEMENT OF ANY PARTS THAT INSPIRE FITNESS DETERMINES HAVE BEEN SUBJECTED AFTER THE DATE OF MANUFACTURE TO ALTERATION, NEGLECT, ABUSE, MISUSE, NORMAL WEAR & TEAR, ACCIDENT, DAMAGE DURING TRANSIT OR INSTALLATION, FIRE, FLOOD, OR ANY ACT OF GOD. SOME STATES DO NOT ALLOW LIMITATIONS ON HOW LONG AN IMPLIED WARRANTY LASTS OR THE EXCLUSION OR LIMITATION OF INCIDENTAL OR CONSEQUENTIAL DAMAGES, SO THE ABOVE LIMITATIONS OR EXCLUSION MAY NOT APPLY TO YOU. This warranty gives you specific legal rights and you may also have other rights that may vary from state to state. This is the only express warranty applicable to Inspire Fitness Inspire branded cardio products. Inspire Fitness neither assumes nor authorizes anyone to assume for it any other express warranty. 31
CS1 CARDIOSTRIDER USER MANUAL
 CS1 CARDIOSTRIDER USER MANUAL 2 TABLE OF CONTENTS BEFORE YOU BEGIN..... 3 IMPORTANT SAFETY NOTICES. 4 WARNING LABEL PLACEMENT.. 5 CONTENTS OF PACKAGING.... 6 HARDWARE PACK 7 ASSEMBLY INSTRUCTIONS 8 18
Toll-Free Customer Service Number Mon. - Fri. 8 a.m. - 5 p.m. PST
 TABLE OF CONTENTS BEFORE YOU BEGIN.... 2 IMPORTANT SAFETY NOTICES...3 WARNING LABEL PLACEMENT...4 HARDWARE PACK... 5 ASSEMBLY INSTRUCTIONS...6-16 COMPUTER OPERATION GUIDELINE.....17-18 PARTS LIST..........19-21
ASSEMBLY & OPERATION MANUAL. CDVK2 Power Tower RECORD SERIAL NUMBER HERE
 ASSEMBLY & OPERATION MANUAL CDVK2 Power Tower RECORD SERIAL NUMBER HERE www.inspirefitness.net by Health In Motion LLC Feb. 2011 TABLE OF CONTENTS Section Description.. Page Instructions.. 1 Tools Required
MARCY SMITH MACHINE SM Model SM Retain This Manual for Reference OWNER'S MANUAL
 NOTE: Please read all instructions carefully before using this product Table of Contents Safety Notice Hardware Pack Assembly Instruction MARCY SMITH MACHINE SM-4008 Parts List Warranty Ordering Parts
DELUXE SMITH MACHINE MSS Model MSS Retain This Manual for Reference
 NOTE: Please read all instructions carefully before using this product Table of Contents Safety Notice DELUXE SMITH MACHINE MSS-1280 Hardware Identifier Assembly Instruction Parts List Warranty Ordering
WEIGHT BENCH MSS-7500
 NOTE: Please read all instructions carefully before using this product Table of Contents Safety Notice WEIGHT BENCH MSS-7500 Hardware Pack Assembly Instruction Exploded Diagram Parts List Warranty Ordering
DELUXE OLYMPIC BENCH EVE Model EVE Retain This Manual for Reference OWNER'S MANUAL
 NOTE: Please read all instructions carefully before using this product Table of Contents Safety Notice Hardware Identifier Assembly Instruction Parts List Warranty DELUXE OLYMPIC BENCH EVE-1000 Ordering
PT1 Power Trainer ASSEMBLY & OPERATION MANUAL RECORD SERIAL NUMBER HERE
 PT1 Power Trainer ASSEMBLY & OPERATION MANUAL RECORD SERIAL NUMBER HERE www.inspirefitness.net by Health In Motion LLC Dec. 2010 TABLE OF CONTENTS Section Description.. Page Instructions.. 1 Tools Required
IRON GRIP STRENGTH SMITH MACHINE
 NOTE: Please read all instructions carefully before using this product Table of Contents Safety Notice Hardware Identifier Assembly Instruction IRON GRIP STRENGTH SMITH MACHINE IGS-4350 Parts List Warranty
MARCY WEIGHT BENCH WM-367. Model WM-367. Retain This Manual for Reference OWNER'S MANUAL
 NOTE: Please read all instructions carefully before using this product Table of Contents Safety Notice Hardware Identifier Assembly Instruction Parts List MARCY WEIGHT BENCH WM-367 Warranty Ordering Parts
MARCY DIAMOND WEIGHT BENCH MD-844
 NOTE: Please read all instructions carefully before using this product Table of Contents Safety Notice Hardware Pack Assembly Instruction MARCY DIAMOND WEIGHT BENCH MD-844 Exploded Diagram Parts List Warranty
MARCY DIAMOND ELITE SMITH MACHINE
 NOTE: Please read all instructions carefully before using this product Table of Contents Safety Notice Hardware Identifier Assembly Instruction MARCY DIAMOND ELITE SMITH MACHINE SM-1050 Parts List Warranty
OWNER S MANUAL. Dick s Sporting Goods 345 Court Street Coraopolis, PA Tools Required: Allen Wrench
 Tools Required: Adjustable Wrench Allen Wrench OWNER S MANUAL Retain This Manual For Reference Dick s Sporting Goods 345 Court Street Coraopolis, PA 15108 TABLE OF CONTENTS BEFORE YOU BEGIN..... 1 IMPORTANT
MD-3401 HOME GYM MARCY DIAMOND ELITE. Model MD Retain This Manual for Reference OWNER'S MANUAL
 NOTE: Please read all instructions carefully before using this product Table of Contents Safety Notice Hardware Identifier MARCY DIAMOND ELITE MD-3401 HOME GYM Assembly Instruction Parts List Warranty
MARCY SMITH MACHINE MWB Model MWB Retain This Manual for Reference OWNER'S MANUAL
 NOTE: Please read all instructions carefully before using this product Table of Contents Safety Notice Hardware Identifier Assembly Instruction MARCY SMITH MACHINE MWB-4360 Parts List Warranty Ordering
MARCY PLATINUM MP-3500 HOME GYM
 NOTE: Please read all instructions carefully before using this product Table of Contents Safety Notice Hardware Identifier MARCY PLATINUM MP-3500 HOME GYM Assembly Instruction Parts List Warranty Ordering
MARCY DIAMOND ELITE OLYMPIC BENCH MD-857. Model MD-857. Retain This Manual for Reference OWNER'S MANUAL
 NOTE: Please read all instructions carefully before using this product Table of Contents Safety Notice Hardware Identifier Assembly Instruction MARCY DIAMOND ELITE OLYMPIC BENCH MD-857 Parts List Warranty
Marcy Diamond Home Gym
 NOTE: Please read all instructions carefully before using this product Table of Contents Safety Notice Hardware Identifier Assembly Instruction Marcy Diamond Home Gym MD-2109 Parts List Resistance Chart
EVERLAST EVE-840 WEIGHT BENCH
 NOTE: Please read all instructions carefully before using this product Table of Contents Safety Notice Hardware Pack Assembly Instruction EVERLAST EVE-840 WEIGHT BENCH Exploded Diagram Parts List Warranty
IVK-2155 HOME GYM. Model IVK Retain This Manual for Reference OWNER'S MANUAL
 NOTE: Please read all instructions carefully before using this product Table of Contents Safety Notice Hardware Identifier IVK-2155 HOME GYM Assembly Instruction Parts List Warranty Ordering Parts Model
WMGG-224. GOLD S GYM Multi Purpose Bench. Model WMGG-224. Retain This Manual for Reference OWNER'S MANUAL
 NOTE: Please read all instructions carefully before using this product Table of Content Safety Notice Hardware Identifier Assembly Instruction Parts List Warranty Ordering Parts GOLD S GYM Multi Purpose
EVERLAST SMITH BENCH EVE-890. Model EVE-890. Retain This Manual for Reference OWNER'S MANUAL
 NOTE: Please read all instructions carefully before using this product Table of Contents Safety Notice Hardware Pack Assembly Instruction Parts List Warranty Ordering Parts EVERLAST SMITH BENCH EVE-890
MARCY PLATINUM MP 1105 HOME GYM
 NOTE: Please read all instructions carefully before using this product Table of Contents Safety Notice Hardware Pack MARCY PLATINUM MP 1105 HOME GYM Assembly Instruction Parts List Resistance Chart Warranty
POWERHOUSE CORNER GYM GS 9
 NOTE: Please read all instructions carefully before using this product Table of Contents Safety Notice Hardware Pack Assembly Instruction Parts List POWERHOUSE CORNER GYM GS 9 Resistance Chart Warranty
MARCY BODY CYCLE MCPL-105
 NOTE: Please read all instructions carefully before using this product Safety Notice Hardware Identifier MARCY BODY CYCLE MCPL-105 Assembly Instruction Parts List Warranty Ordering Parts Model MCPL 105
MARCY WEIGHT BENCH MWB 715B. Model MWB 715B. Retain This Manual for Reference OWNER'S MANUAL
 NOTE: Please read all instructions carefully before using this product Safety Notice Hardware Identifier Assembly Instruction MARCY WEIGHT BENCH MWB 715B Parts List Warranty Ordering Parts Model MWB 715B
APEX JD-3.1 HYPER EXTENSION BENCH
 NOTE: Please read all instructions carefully before using this product Safety Notice Hardware Identifier Assembly Instruction APEX JD-3.1 HYPER EXTENSION BENCH Parts List Warranty Ordering Parts Model
MARCY Elliptical Machine PL-21930
 NOTE: Please read all instructions carefully before using this product Table of Contents Safety Notice Hardware Identifier MARCY Elliptical Machine PL-21930 Assembly Instruction Parts List Computer Warranty
MARCY PREMIER HOME GYM
 NOTE: Please read all instructions carefully before using this product Table of Contents Safety Notice Hardware Identifier Assembly Instruction MARCY PREMIER HOME GYM Parts List Resistance Chart Warranty
MARCY WEIGHT BENCH WM PRO. Model WM PRO. Retain This Manual for Reference OWNER'S MANUAL
 NOTE: Please read all instructions carefully before using this product Table of Contents Safety Notice Hardware Identifier Assembly Instruction MARCY WEIGHT BENCH WM PRO Parts List Warranty Ordering Parts
BODYFLEX GYM WM Model WM Retain This Manual for Reference OWNER'S MANUAL
 NOTE: Please read all instructions carefully before using this product Table of Contents Safety Notice Hardware Identifier Assembly Instruction BODYFLEX GYM WM 1407 Parts List Resistance Chart Warranty
SMITH MACHINE F-SM. Model F-SM. Retain This Manual for Reference OWNER'S MANUAL
 -- NOTE: Please read all instructions carefully before using this product Table of Contents Safety Notice SMITH MACHINE F-SM Hardware Identifier Assembly Instruction Parts List Model F-SM Retain This Manual
MARCY Recumbent Bike PL-960
 NOTE: Please read all instructions carefully before using this product Table of Contents Safety Notice Hardware Identifier MARCY Recumbent Bike PL-960 Assembly Instruction Parts List Computer Warranty
M5.2 ASSEMBLY & OPERATION MANUAL
 M5.2 ASSEMBLY & OPERATION MANUAL RECORD SERIAL NUMBER HERE www.inspirefitness.net by Health In Motion LLC Mar. 2015 CONGRATULATIONS You ve just taken the first step to a healthier and stronger body. This
MARCY SMITH MACHINE SM Model SM Retain This Manual for Reference OWNER'S MANUAL
 NOTE: Please read all instructions carefully before using this product Table of Contents Safety Notice Important Assembly Information MARCY SMITH MACHINE SM-4008 Care and Maintenance Parts List Warranty
GS5 GYM MULTI STATION USER MANUAL
 GS5 GYM MULTI STATION USER MANUAL Product may vary slightly from the item pictured due to model upgrades Read all instructions carefully before using this product. Retain this owner s manual for future
ASSEMBLY INSTRUCTIONS. Magne c Resistance Rowing Machine
 ASSEMBLY INSTRUCTIONS Magne c Resistance Rowing Machine Thank you for your purchase of this Harvil Product! We work around the clock and around the globe to ensure that Harvil products maintain the highest
Deluxe Folding Bike XRB271 / XRB261. * This item is for consumer use only and it is not meant for commercial use. OWNER S MANUAL
 Deluxe Folding Bike XRB271 / XRB261 * This item is for consumer use only and it is not meant for commercial use. OWNER S MANUAL General Information Safety Before you undertake any exercise program, please
USER'S MANUAL QUESTIONS? TABLE OF CONTENTS CAUTION. Model No. GGSY49230 Serial No. Serial Number Decal (Under Seat)
") Model No. GGSY4920 Serial No. Write the serial number in the space above for reference. USER'S MANUAL Serial Number Decal (Under Seat) QUESTIONS? As a manufacturer, we are committed to providing complete
Model No. GGSY4920 Serial No. Write the serial number in the space above for reference. USER'S MANUAL Serial Number Decal (Under Seat) QUESTIONS? As a manufacturer, we are committed to providing complete
USER'S MANUAL QUESTIONS?
 Model No. WESY19510 Serial No. (Write the serial number in the space above for reference.) USER'S MANUAL Serial Number Decal QUESTIONS? As a manufacturer, we are committed to providing complete customer
Magnetic Elliptical Trainer
 Magnetic Elliptical Trainer ITEM NO.: 400 OWNER S MANUAL IMPORTANT: Read all instructions carefully before using this product. Retain this owner s manual for future reference. The specifications of this
RECUMBENT BIKE IMPORTANT: Read all instructions carefully before using this product. Retain this
 RECUMBENT BIKE IMPORTANT: Read all instructions carefully before using this product. Retain this owner s manual for future reference. The specifications of this product may vary from this photo, subject
FLAT BENCH OWNER S MANUAL QUESTIONS? CAUTION. Visit our website at.
 Model No. GZFW20611 Serial No. Write the serial number in the space above for future reference. Serial Number Decal QUESTIONS? As a manufacturer, we are committed to providing complete customer satisfaction.
BRF 700 BRF 701. Fan Bike OWNER S MANUAL. * This item is for consumer use only and it is not meant for commercial use.
 BRF 700 Fan Bike BRF 701 * This item is for consumer use only and it is not meant for commercial use. OWNER S MANUAL General Information Safety Before you undertake any exercise program, please be sure
HF4145 FOLDING MULTI-POSITION WORKOUT BENCH
 HF4145 FOLDING MULTI-POSITION WORKOUT BENCH Note: Both Serial Number and Model Number are Required when Ordering Parts RECORD SERIAL NUMBER HERE CATALOG NUMBER 0406-001 Customer Service (800) 548-5438
USER'S MANUAL QUESTIONS? CAUTION. Model No. GGSY Serial No. Write the serial number in the space above for reference.
 Æ Model No. GGSY91.0 Serial No. Write the serial number in the space above for reference. USER'S MANUAL Serial Number Decal QUESTIONS? As a manufacturer, we are committed to providing complete customer
FLAT BENCH OWNER S MANUAL QUESTIONS? CAUTION. Visit our website at.
 Model No. GZFW21410 Serial No. Write the serial number in the space above for future reference. Serial Number Decal QUESTIONS? As a manufacturer, we are committed to providing complete customer satisfaction.
Gym Dandy TEETER TOTTER TT-360. Model TT-360. Retain This Manual for Reference OWNER'S MANUAL
 NOTE: Please read all instructions carefully before using this product Table of Contents Safety Notice Gym Dandy TEETER TOTTER TT-360 Important Assembly Information Care and Maintenance Parts List Warranty
QUESTIONS? PATENT PENDING. Model No. WESY85100 Serial No. Write the serial number in the space above for future reference.
 PATENT PENDING Model No. WESY85100 Serial No. Write the serial number in the space above for future reference. Serial Number Decal-- QUESTIONS? As a manufacturer, we are commiffed to providing complete
XINGGUI Elliptical Cross Trainer
 XINGGUI Elliptical Cross Trainer ITEM NO.: 93040 OWNER S MANUAL IMPORTANT: Read all instructions carefully before using this product. Retain this owner s manual for future reference. The specifications
ACCORD ELLIPTICAL TRAINER ITEM NO: 93470
 ACCORD ELLIPTICAL TRAINER ITEM NO: 93470 OWNER S MANUAL IMPORTANT: Read all instructions carefully before using this product. Retain this owner s manual for future reference. The specifications of this
Foldable Semi-Recumbent Bike
 Foldable Semi-Recumbent Bike IMPORTANT: Read all instructions carefully before using this product. Retain this owner s manual for future reference. The specifications of this product may vary from this
ASSEMBLY MANUAL 9GU - COMMERCIAL UPRIGHT BIKE
 ASSEMBLY MANUAL 9GU - COMMERCIAL UPRIGHT BIKE IMPORTANT SAFETY INSTRUCTIONS Read this Owner s Manual and follow it s instructions carefully before using the machine. Make sure that it is properly assembled
Be Strong. Assembly Manual Commercial Series Bike U916. Model: U916. P/N: Rev D (03/28/07)
") Be Strong. Assembly Manual Commercial Series Bike U916 Model: U916 P/N: 001-6883 Rev D (03/28/07) preface Thank you for purchasing the Nautilus Commercial Series U916 bike. For more than 30 years Nautilus,
Be Strong. Assembly Manual Commercial Series Bike U916 Model: U916 P/N: 001-6883 Rev D (03/28/07) preface Thank you for purchasing the Nautilus Commercial Series U916 bike. For more than 30 years Nautilus,
ADDAX RX3200. Assembly Instructions & Manual PN: Configuration subject to change
 ADDAX RX3200 Assembly Instructions & Manual PN: 32-1018 Configuration subject to change WARNING DECAL PLACEMENT The decals shown here have been placed on the equipment in indicated locations. If any of
Swing Arm Magnifying Lamp
 Owner s Manual & Safety Instructions Save This Manual Keep this manual for the safety warnings and precautions, assembly, operating, inspection, maintenance and cleaning procedures. Write the product s
OPERATOR'S MANUAL. MODEL #73500i PARALLEL OPERATION KIT REGISTER YOUR PRODUCT ONLINE. at championpowerequipment.com
 OPERATOR'S MANUAL MODEL #73500i PARALLEL OPERATION KIT REGISTER YOUR PRODUCT ONLINE at championpowerequipment.com or visit championpowerequipment.com READ AND SAVE THIS MANUAL. This manual contains important
OWNERS MANUAL MODEL ECT-2100 ELLIPTICAL CROSSTRAINER
 OWNERS MANUAL MODEL ECT-00 ELLIPTICAL CROSSTRAINER QUESTION? As a quality home gym supplier we are committed to your complete satisfaction. If you have questions, or find missing or damaged parts, we will
LSA-WMB7HD. Wall-Mounted Boom Arm 7, HD INSTRUCTIONS
 LSA-WMB7HD Wall-Mounted Boom Arm 7, HD INSTRUCTIONS 1 Introduction Thank you for choosing Impact. The Impact wall-mounted boom arm offers a quick and safe way to mount a light or camera without setting
OX2 RX2000. Assembly Instructions & Manual PN: Configuration subject to change
 OX2 RX2000 Assembly Instructions & Manual PN: 32-1013 Configuration subject to change WARNING DECAL PLACEMENT The decals shown here have been placed on the equipment in indicated locations. If any of the
TRIPULL RX2500T. Assembly Instructions & Manual DOC: T. Configuration subject to change
 TRIPULL RX2500T Assembly Instructions & Manual DOC: 32-1005T Configuration subject to change 32-100 5 T R E V. A WARNING DECAL PLACEMENT The decals shown here have been placed on the equipment in indicated
Model AS-RC3260 TV Cart. Rolling Cart for Audio Mount System & Flat Panel TVs
 Model AS-RC3260 TV Cart Rolling Cart for Audio Mount System & Flat Panel TVs GETTING STARTED Introduction Congratulations on the purchase of your new Helios AS-RC3260 Rolling Cart. For maximum benefit,
AXIS Free Trainer Owner's Manual
 Revision 0 Nov 2017 Free Trainer Owner s Manual Serial Number Here Date of Purchase www.batcafitness.com AXIS Free Trainer Owner's Manual Congratulations on the purchase of your new Batca AXIS Free Trainer.
OWNER S MANUAL & Assembly Instructions
 OWNER S MANUAL & Assembly Instructions EWT- Olympic Plate Tree L2 X W 2 X H1 EWT-_Rev0 Revision Date -27-12 Table of Contents DANGER, WARNING, & CAUTION LABELS INFORMATION...Page - IMPORTANT SAFETY INSTRUCTIONS...Page
AXIS Smith Trainer Owner's Manual
 Revision 0 June 2018 Smith Trainer Owner s Manual Serial Number Here Date of Purchase www.batcafitness.com AXIS Smith Trainer Owner's Manual Instructions Congratulations on the purchase of your new Batca
AXIS Kettlebell/Ball Storage Owner's Manual
 Revision 0 June 2018 Kettlebell/Ball Storage Owner s Manual Serial Number Here Date of Purchase www.batcafitness.com AXIS Kettlebell/Ball Storage Owner's Manual Page Instructions 2 Tools Required/Hardware
Or call us at: Hours: 8:00 am to 5:00 pm Monday thru Friday
 Bench IMPORTANT: Read all instructions carefully before using this product. Retain this owner s manual for future reference. The specifications of this product may vary from this photo, subject to change
TABLE OF CONTENTS. Important Safety Information 3. Parts List 4
 1 TABLE OF CONTENTS Important Safety Information 3 Parts List 4 Assembling THERACK 5 7 How To Unfold THERACK 8 How To Fold THERACK 9 THERACK Levels 10 Warranty 11 2 IMPORTANT SAFETY INFORMATION IMPORTANT:
Model:M5B/M5W/M5N. Installation Guide. Specifications Desktop Weight Capacity Keyboard Tray Weight Capacity Height Adjustable Range
 Model:M5B/M5W/M5N Installation Guide Website: www.flexispot.com Tel: 1-855-421-2808 Specifications Desktop Weight Capacity Keyboard Tray Weight Capacity Height Adjustable Range 33 Ibs (15 KG) 4.4 Ibs (2
OWNERS MANUAL HF4261
 OWNERS MANUAL HF4261 ADJUSTABLE AB BENCH Note: Both Serial Number and Model Number are Required when Ordering Parts RECORD SERIAL NUMBER HERE CATALOG NUMBER 0905-000 Customer Service (800) 548-5438 (858)
Deluxe Inversion Table Model IT9300/ITX9300
 Deluxe Inversion Table Model IT9300/ITX9300 CAUTION: WARNING: Do not use this inversion table without a physician s approval. Do not let children use the inversion table unsupervised. Read all instructions
Your grill isn t afraid of the dark any more. BBQ Grill Light
 Your grill isn t afraid of the dark any more BBQ Grill Light for great grilling at night Table of contents Warnings and Battery Precautions........................................... 1 Location of Parts...........................................................
USER S MANUAL CAUTION. Visit our website at. new products, prizes, fitness tips, and much more!
 Patent Pending Model No. 831.159730 Serial No. The serial number is found in the location shown below. Write the serial number in the space above. USER S MANUAL Serial Number Decal SEARS, ROEBUCK AND CO.
AXIS Accessory Module Owner's Manual
 Revision 0 June 2018 Accessory Module Owner s Manual Serial Number Here Date of Purchase www.batcafitness.com AXIS Accessory Module Owner's Manual Page Instructions 2 Tools Required/Hardware Sheet 3 AXIS
INSTALLATION INSTRUCTIONS AND OWNER S MANUAL
 INSTALLATION INSTRUCTIONS AND OWNER S MANUAL Thank you for purchasing the AlloyCover from WeatherTech. Manufactured with pride using superior quality materials and workmanship. With proper care, your cover
Gym Dandy TEETER TOTTER TT-320. Model TT-320. Retain This Manual for Reference OWNER'S MANUAL
 NOTE: Please read all instructions carefully before using this product Gym Dandy Table of Contents Safety Notice Hardware Pack TEETER TOTTER TT-320 Assembly Instruction Parts List Operation Tips Warranty
PRO INDOOR CYCLING BIKE
 PRO INDOOR CYCLING BIKE SF-B901 USER MANUAL IMPORTANT! Please retain owner s manual for maintenance and adjustment instructions. Your satisfaction is very important to us, PLEASE DO NOT RETURN UNTIL YOU
HP14 Slab Saw Owner's Manual and Operating Instructions
 Slab Saw Owner's Manual and Operating Instructions MADE IN USA Revision 112 09.2018 Manual Part No. 1771 Caution: Read all safety and operating instructions before using this equipment. This manual MUST
Owner s Manual. Upper Body Unit. Serial Number Here. Date of Purchase New Hope Road, Raleigh, NC Fusion -
 Revision 1 March 2012 Upper Body Unit Owner s Manual Serial Number Here Date of Purchase www.batcafitness.com 1207 New Hope Road, Raleigh, NC - 919.255.1233 Fusion - www.batcafitness.com 4 Upper Body Station
Pivot Arm 20 Adjustable Wheel Lock Control INSTRUCTIONS
 Pivot Arm 20 Adjustable Wheel Lock Control INSTRUCTIONS Introduction Thank you for choosing Impact. The Impact Pivot Arm 20 with Adjustable Wheel Lock Control is a strong mounting arm with an elbow pivot
Innovation in Mobility. R1208 Six-Way Power Seat Base. Operator Manual. 03/25/02 32DSB01.A RICON CORPORATION All Rights Reserved
 Innovation in Mobility R1208 Six-Way Power Seat Base Operator Manual 03/25/02 32DSB01.A 92-2002 RICON CORPORATION All Rights Reserved Printed in the United States of America This RICON product must be
Be Strong. NS 200X. Assembly Manual. Model: NS 200X. P/N: Rev A (10/04/2006)
") Be Strong. Assembly Manual NS 00X Model: NS 00X P/N: 00-700 Rev A (0/0/00) TABLE OF CONTENTS Before You Assemble... 3 Product Specifications... Product Features... Parts List / Box Contents... 5 Exploded
Be Strong. Assembly Manual NS 00X Model: NS 00X P/N: 00-700 Rev A (0/0/00) TABLE OF CONTENTS Before You Assemble... 3 Product Specifications... Product Features... Parts List / Box Contents... 5 Exploded
stroller kit Burley Stroller Kit Owner s Instruction and Safety Manual For D Lite, Solo, Encore, Cub, Honeybee, and Tailwagon
 stroller kit Burley Stroller Kit Owner s Instruction and Safety Manual For D Lite, Solo, Encore, Cub, Honeybee, and Tailwagon Congratulations! By purchasing the Burley Stroller Kit, you ve increased the
BRF 650 BRF 750. Upright Fan Bike OWNER S MANUAL. * This item is for consumer use only and it is not meant for commercial use.
 BRF 650 Upright Fan Bike BRF 750 * This item is for consumer use only and it is not meant for commercial use. OWNER S MANUAL PLEASE KEEP THESE INSTRUCTIONS FOR FUTURE USE & REFERENCE. DO NOT DISCARD. WARNING:
OUTDOOR TABLE TENNIS TABLE ASSEMBLY INSTRUCTIONS
 OUTDOOR TABLE TENNIS TABLE ASSEMBLY INSTRUCTIONS Please Do Not Hesitate to Contact Our Consumer Hotline at 800-759-0977 with Any Questions That May Arise During Assembly or Use of This Product! NG2336P
ONE YEAR LIMITED WARRANTY
 TABLE OF CONTENTS ONE YEAR LIMITED WARRANTY Warranty 1 Overview Drawing 3 Parts List 4 Hardware List 7 Assembly Instructions 9 How to Fold-Up the Extrusion 14 How to Fold-Down the Extrusion 15 Adjustment
Heavy Duty Four Wheeled Walker
 Heavy Duty Four Wheeled Walker Weight Capacity: 500 lbs. ITEM # W1802 Made in China 2011 ESSENTIAL MEDICAL SUPPLY, INC. Manufactured for Orlando, FL 32822 -- SAVE THESE INSTRUCTIONS -- Do not attempt to
Owner s Manual. Upper Body Unit. Serial Number Here. Date of Purchase New Hope Road, Raleigh, NC Fusion -
 Revision 3 April 2015 Upper Body Unit Owner s Manual Serial Number Here Date of Purchase www.batcafitness.com 1207 New Hope Road, Raleigh, NC - 919.255.1233 Fusion - www.batcafitness.com 4 Upper Body Station
SUNNY PRO INDOOR CYCLING BIKE
 SUNNY PRO INDOOR CYCLING BIKE SF-B901 USER MANUAL IMPORTANT! Please retain owner s manual for maintenance and adjustment instructions. Your satisfaction is very important to us, PLEASE DO NOT RETURN UNTIL
BELT DRIVE PRO INDOOR CYCLING BIKE SF-B901B USER MANUAL
 BELT DRIVE PRO INDOOR CYCLING BIKE SF-B901B USER MANUAL IMPORTANT! Please retain owner s manual for maintenance and adjustment instructions. Your satisfaction is very important to us, PLEASE DO NOT RETURN
Heavy Duty Deluxe Inversion Therapy Table Model ITX9600/IT9600
 Heavy Duty Deluxe Inversion Therapy Table Model ITX9600/IT9600 WARNING: DO NOT USE this equipment without a licensed physician s approval. READ ALL INSTRUCTIONS carefully before using. Misuse of this equipment
SLAB SAW SERIES PARTS LIST
 SLAB SAW SERIES PARTS LIST MODELS: HP Part# 020 HP20 Part# 02020 HP2 Part# 0202 MADE IN USA MADE IN USA Revision 09.20 Manual Part No. 6269 Caution: Read all safety and operating instructions before using
Model AS-FM64 Wall Mount. Full Motion Television Wall Mount
 Model AS-FM64 Wall Mount Full Motion Television Wall Mount Getting Started Introduction Congratulations on the purchase of your new Audio Solutions AS-FM64 Television Wall Mount. For maximum benefit, please
EASY ADJUSTABLE SEAT RECUMBENT BIKE
 EASY ADJUSTABLE SEAT RECUMBENT BIKE SF-RB4616 USER MANUAL IMPORTANT! Please retain owner s manual for maintenance and adjustment instructions. Your satisfaction is very important to us, PLEASE DO NOT RETURN
Flat/Incline/Decline Bench Owner s Manual
 Revision 0 June 2018 Flat/Incline/Decline Bench Owner s Manual Serial Number Here Date of Purchase www.batcafitness.com AXIS F.I.D. Bench Owner's Manual Page Instructions 2 Tools Required/Hardware Sheet
OWNERS MANUAL HF4263
 OWNERS MANUAL HF4263 ADJUSTABLE AB / BACK HYPER BENCH Note: Both Serial Number and Model Number are Required when Ordering Parts RECORD SERIAL NUMBER HERE CATALOG NUMBER 0805-000 Customer Service (800)
OWNER S MANUAL F-G3-BASE CAUTION!
 OWNER S MANUAL F-G3-BASE CAUTION! ASSEMBLY MANUAL BEFORE YOU START Remove all parts from the packaging and separate and count each various component to ensure everything has been correctly provided. Follow
CROSS TRAINING MAGNETIC RECUMBENT BIKE
 CROSS TRAINING MAGNETIC RECUMBENT BIKE SF-RB4708 USER MANUAL IMPORTANT! Please retain owner s manual for maintenance and adjustment instructions. Your satisfaction is very important to us, PLEASE DO NOT
AXIS Dip/Plyo Platform Owner's Manual
 Revision 0 June 2018 Dip/Plyo Platform Owner s Manual Serial Number Here Date of Purchase www.batcafitness.com AXIS Dip/Plyo Platform Owner's Manual Page Instructions 2 Tools Required/Hardware Sheet 3
HP30 Slab Saw Owner s Manual and Operating Instructions
 HP30 Slab Saw Owner s Manual and Operating Instructions MADE IN USA Revision 07 09.0 Manual Part No. 67 Caution: Read all safety and operating instructions before using this equipment. This manual MUST