Genuine Metaris PTO INSTALLATION MANUAL. Place in Glove Box After Installation.
|
|
|
- George Wilson
- 5 years ago
- Views:
Transcription

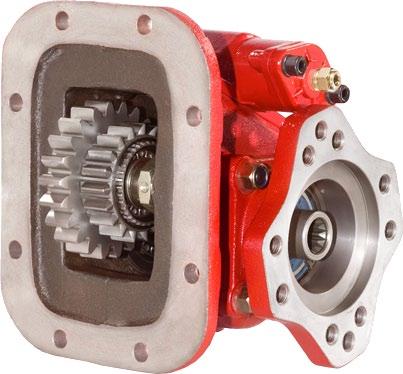


1 Genuine Metaris PTO INSTALLATION MANUAL Place in Glove Box After Installation
2 Contents General Information Section Page Safety Information 3 Foreword 4 Application Questions 5 Mounting PTO to Transmission 6 Backlash Procedures 8 Backlash Procedures & Spacer Blocks 9 Shifting Information 10 Notes 11 2 Hydraulex Global Genuine Metaris PTO Installation Manual PTOISM-Rev
3 Safety Information Safety Instructions Caution: DO NOT go underneath the vehicle with engine running. Possible injury may occur. SHUT DOWN engine before attempting removal or installation of Power Take-Off. DO NOT operate any remote controllers while engine is running and you re under the truck. RESTRAIN from operating any controllers on the P.T.O. or any driven equipment. Getting caught in moving machinery may result in injury. Make sure to block and secure any equipment being serviced. Injury or death may result from inproper support of equipment. The proper installation of the P.T.O. and its associated equipment and the decisions of whether to install guards and/or warning signs shall be the responsibility of the designers or installers. 3 A Hydraulex Global Company


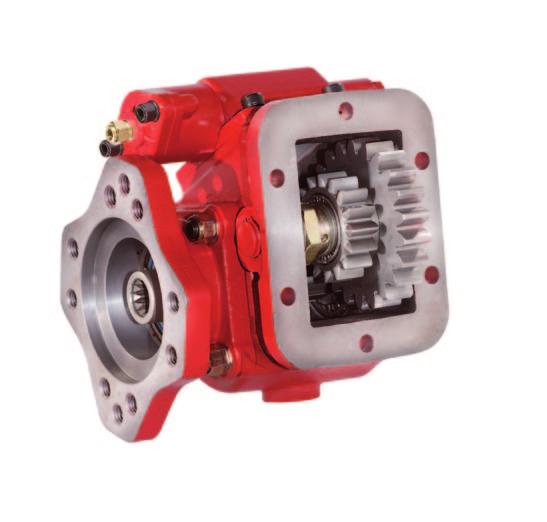
4 General Foreword It is our intention to make sure that we provide you with the most current information for removal and intallation of both the 6 & 8 bolt Power Take-Offs. When ordering P.T.O.`s for new trucks it is very important to have the proper type, size and design of P.T.O. for the application being used. Proper transmission specifications and the torque requirements of the driven equipment is also a vital factor in P.T.O. optimum performance. Customer Service is here to advise and discuss your specific requirements. They can inform you on everything you will need to do the right job. 4 Hydraulex Global Genuine Metaris PTO Installation Manual PTOISM-Rev
5 General Application Questions Here are a few questions to be asked when specifing a Power Take-Off application: 1. What is the make and model of your transmission? 2. Which P.T.O. opening will be used? 3. What accessory is to be driven? 4. How much horsepower is required to drive the accessory? 5. What is the required rotation of the P.T.O.? 6. What is the requiree P.T.O. output shaft speed as a percent of engine speed? 7. What is the required method of shifting the P.T.O., mechanical or pneumatic? After all questions are answered a P.T.O. can be selected. Then we are ready to start the P.T.O. installation process. 5 A Hydraulex Global Company


.")
6 Installation Instructions Mounting of PTO to the Transmission 1. Drain oil from transmission. Remove 6 or 8 bolt aperture plate. 2. Keep aperture plate and bolts in safe place for future use. Clean pad around aperture hole with a gasket scraper. Note: Putting a rag in the aperture hole is recommended to prevent loose gasket material from entering the transmission. 3. Rock the P.T.O driver gear in the transmission. This will show proper backlash of the transmission gears. This is only a guideline for feeling P.T.O. backlash (Later in Installation). NOTE: This should not replace checking backlash with a dial indicator measurement. 6 Hydraulex Global Genuine Metaris PTO Installation Manual PTOISM-Rev

 should be torqued at 17-19 Ft. Lbs. (2.35-2.63 kg.")
7 Installation Instructions Mounting of PTO to the Transmission Cont. 4. It s time to install the Studs for (6 Bolt Installation) or Cap Screws for (8 Bolt Installation). Studs may be put in with a stud driver. Cap Screws will come later when the P.T.O. is ready to hang. Thread / Locking compound is recommended on every stud or bolt that goes in the transmission aperture holes. 5. Tapped holes in transmission cases require thread/locker compound to keep oil from leaking by the stud or bolt threads. 6. Tighten the studs (6) should be torqued at Ft. Lbs. ( kg. meters). The cap screws (8) should be torqued at Ft. Lbs. ( kg. meters). 7. It is now time to install mounting gasket (.010,.015,.032 come with P.T.O.). Place the.015 gasket over the studs. Mount the P.T.O. (with the shifter cover taken off) on the transmission and secure with the front and rear stud. Take a preliminary reading with your dial indicator gauge. If it comes between.006 and.012 (0.15mm- 0.30mm) the backlash is set. If the backlash is more or less than.006 to.012 than a thinner or thicker gasket may be required. Do not stack more than 3 gaskets together. Note: A.010 gasket will change backlash about If spacer blocks are required, a gasket must be placed on each side of the spacer block. 7 A Hydraulex Global Company


 and the 8 bolt Cap screws to 45-50 Ft. Lbs. ( 6.22-6.91 kg Meters). After the P.")

8 Installation Instructions Mounting of PTO to the Transmission Cont. When the backlash is correct fasten the rest of the P.T.O. with the nuts or cap screws provided with the P.T.O. Tighten with a crosshatch pattern so the gaskets compress evenly. Torque the 6 bolt nuts to Ft. Lbs. ( kg. Meters) and the 8 bolt Cap screws to Ft. Lbs. ( kg Meters). After the P.T.O. is secure check the backlash once again with a dial indicator gauge to insure the best mesh possible has been established. 8. Re-attach the shifter housing to the P.T.O. with the 4 Allen head bolts. Then fill the transmission with oil. 8 Hydraulex Global Genuine Metaris PTO Installation Manual PTOISM-Rev
 by using the gasket/ shims supplied.")

9 Installation Instructions Checking Backlash Note: Establish backlash at 0.006``-0.012`` (0.15mm-0.30mm) by using the gasket/ shims supplied..010 gaskets will change backlash approx..006 It may be necessary to use filter blocks to mount a P.T.O. to particular types of transmission. 9 A Hydraulex Global Company
10 Shifting Information Shift Instructions CAUTION The vehicle has been equipped with a Power Take-Off device before working on the P.T.O. or working under the vehicle shut the engine off and make sure the vehicle is blocked to prevent injury or death. Power Take-Off Operation with the vehicle stopped. Mechanical Transmission: Before shifting the P.T.O. into or out of gear, depress the clutch and wait for the transmission and P.T.O. gears to stop turning. Automatic Transmission with Air or Manual PTO Shift: With Automatic Transmissions, the gears inside the transmission remain turning when the transmission is shifted to neutral. If the P.T.O is shifted at this time gear clashing will occur. With Converter Driven Gear: 1. Shift the transmission into any drive position NOTE this will stop the transmission gears from turning. 2. Shift the P.T.O into position. 3. Shift the transmission into neutral to restart the transmission gears turning. 4. With the engine stopped the P.T.O. can be shifted into gear then restart the engine this will avoid gear clashing. Automatic Transmission with Power Shift PTO: Engage the P.T.O with the engine at idle speed. Important Failure to follow proper shift operation may result in premature P.T.O. failure. 10 Hydraulex Global Genuine Metaris PTO Installation Manual PTOISM-Rev
11 General Notes 11 A Hydraulex Global Company


12 Hydraulex Global - A Recognized Global Leading Provider of High Quality Hydraulic Components Products We Offer Inline Piston Pumps Radial Piston Pumps & Motors Bent Axis Piston Pumps & Motors Fixed Volume Vane Pumps Variable Volume Vane Pumps Gear Pumps Vane Motors Axial Piston Motors High Speed Motors Servo Motors Orbital Motors Directional Valves Flow Control Valves Pressure Control Valves Relief Valves Check Valves Stack Valves Servo Valves Proportional Valves PTOs (Power Take-offs) Cylinders Hydraulex Global Corporate Gratiot Ave Chesterfield, MI Toll Free: Tel: Hydraulex Global - Michigan Tel: sales@ahx1.com Hydraulex Global - Mississippi Tel: sales@metarisusa.com Hydraulex Global - ON, Canada Tel: sales@metaris.com Hydraulex Global - Washington Tel: sales@h-r-d.com Hydraulex Global - Tennessee Tel: sales@flinthydrostatics.com Connect with us: All manufacturers names, symbols and descriptions in this document are used for reference purposes only, and it is not implied that any parts listed is the product of these manufacturers. PTOISM-Rev Hydraulex Global. All Rights Reserved.
Komatsu HPV Series Aftermarket Parts Catalog. Parts Lists and Breakdowns
 Komatsu HPV Series Aftermarket Parts Catalog www.flinthydrostatics.com Contents HPV Series Section PC200-3/220-3 3 Page PC200-5/220-5 4 PC200-6/220-6 5 PC200-7/220-7 6 PC300-3/400-3 7 PC300-5/400-5 8 PC300-6/400-6
Hitachi HPV Series Parts Catalog
 Hitachi HPV Series Parts Catalog WE CAN ALSO SUPPLY www.hydraulicrepair.net Contents HPV Series Section HPV102 Parts Breakdown 3 Page HPV116 Parts Breakdown 4 HPV145 Parts Breakdown 5 2 Hydraulex 1-800-323-8416
Hyco. Single Acting Telescopic Cylinders. Proven, Dependable Hoist Solutions
 Hyco Single Acting Telescopic Cylinders Proven, Dependable Hoist Solutions www.h-r-d.com Take a Closer Look The Performance Difference Start with the best materials and you end up with the highest quality
CEI JET PIPE SERVO VALVE CATALOG
 OEM & Replacement Units CEI JET PIPE SERVO VALVE CATALOG www.ceivalve.com JP SERIES Contents Section Page JP Series Configurator 3 JP-5 Series 4 JP-10 Series 6 JP-15 Series 8 JP-20 Series 10 JP-25 Series
Genuine Metaris MA10VO/VSO Technical Catalog. Variable Displacement Piston Pump - A10V Series 31 & 52
 Genuine Metaris MA10VO/VSO Technical Catalog www.metaris.com Contents General Series MA10VO/VSO Series 31 4 Page Features 4 Technical Data 5 Performance Information 6 Model Code Breakdown 9 Fluid Info
Fuller Mid-Range Transmissions TRDR0100
 Driver Instructions Video Instruction Available Instructional videos are available for download at no charge at roadranger.com Videos are also available for purchase. To order, call 1-888-386-4636. Ask
TCI Turbo 400 Full Manual Valve Body. Shift Pattern: Park Reverse Neutral First Second Third. NOTE: You must reuse stock manual control valve.
 TCI 221100 Turbo 400 Full Manual Valve Body Shift Pattern: Park Reverse Neutral First Second Third This Kit Contains: (1) Turbo 400 Full Manual Valve Body (1) Separator Plate & Gaskets (1) Pressure Regulator
IMCO SCX SERIES INFORMATION, OPERATION & MAINTAINANCE
 IMCO SCX SERIES INFORMATION, OPERATION & MAINTAINANCE Warning! Warning! Warning! Danger! Warning! 1. SCX & SCX4 Drives will not fit on a standard gimbal helmet, IMCO HELMET: #05-8025 Black or #05-8027
For the most current information, visit the Roadranger web site at
 Eaton Fuller Heavy Duty Transmissions 8 - Speed Direct Drivers Instructions TRDR-0310 March 2004 For the most current information, visit the Roadranger web site at www.roadranger.com Warnings Warnings
Filling and Flushing the Hydraulic System - Test
 Filling and Flushing the Hydraulic System - Test Personal injury or death can result from improperly checking for a leak. Always use a board or cardboard when checking for a leak. Escaping air or fluid
Rekluse Motor Sports. The z-start Clutch. Cannondale
 Rekluse Motor Sports The z-start Clutch Cannondale Installation Guide Copyright 2002-2004 Rekluse Motor Sports z-start Revision 3.000 RMS105 Cannondale 191-205 Manual Revision: 091304 Rekluse Motor Sports,
WATER PUMP INSTALLATION INSTRUCTIONS WEIAND WATER PUMPS ACTION PLUS & TEAM G APPLICATIONS FOR SMALL BLOCK & BIG BLOCK CHEVROLETS
 WATER PUMP INSTALLATION INSTRUCTIONS WEIAND WATER PUMPS ACTION PLUS & TEAM G APPLICATIONS FOR SMALL BLOCK & BIG BLOCK CHEVROLETS APPLICATIONS: Weiand Action Plus aluminum water pumps are designed for street/performance
Rekluse Motor Sports. The z-start Clutch DRZ400 KLX400. Installation Guide Copyright 2002 Rekluse Motor Sports z-start Revision 3.
 Rekluse Motor Sports The z-start Clutch DRZ400 KLX400 Installation Guide Copyright 2002 Rekluse Motor Sports z-start Revision 3.000 RMS160 KLX400 DRZ400 z-start Clutch 191-260 Manual Revision: 103105 Rekluse
Transmission Overhaul Procedures-Bench Service
 How to Assemble the Lower Reverse Idler Gear Assembly Special Instructions In 1996 Eaton changed the reverse idler system design. In the nut design, the reverse idler bearing was lubricated through a hole
Media Number -SENR Publication Date -01/10/1977 Date Updated -12/10/2001
 - - 55, 56, 57, 58 & 59 TOWING WINCHES Page 1 of 21 Testing and Adjusting 55, 56, 57, 58 & 59 TOWING WINCHES Media Number -SENR7217-01 Publication Date -01/10/1977 Date Updated -12/10/2001 Testing And
Finishing Mower Estate 72
 Finishing Mower Estate 72 Owners/Operators Manual & Spare Parts List Issue Date: October 2011 1 Introduction Your FIELDMASTER Estate 72 Finishing Mower has been designed to do a range of work to your satisfaction.
Installation Instructions for TJ Jeep s Fiberglass Replacement Bodies and Parts
 Installation Instructions for 1997-2006 TJ Jeep s Fiberglass Replacement Bodies and Parts Getting started: We recommend that you take pictures as you dismantle your Jeep. These pictures will help you when
INSTALLATION GUIDE TCP RCKM-01
 READ ALL INSTRUCTIONS COMPLETELY AND THOROUGHLY UNDERSTAND THEM BEFORE DOING ANYTHING. CALL TOTAL CONTROL PRODUCTS TECH SUPPORT (916) 388-0288 IF YOU NEED ASSISTANCE. INSTALLATION GUIDE TCP RCKM-01 Manual
1 M-3000-H4 F150 4X4 Lowering Kit
 READ INSTRUCTIONS COMPLETELY THROUGH BEFORE STARTING. IT IS RECOMMENDED THAT INSTALLATION BE DONE BY A QUALIFIED MECHANIC. REPLACE ALL STOCK PARTS THAT ARE DAMAGED OR WORN. ALWAYS WEAR EYE PROTECTION.
Wheel Horse. 36 Tiller. Model No & Up. Operator s Manual
 FORM NO. 8 9 Rev. A Wheel Horse 6 Tiller for Classic Garden Tractors Model No. 7970 690000 & Up Operator s Manual IMPORTANT: Read this manual carefully. It contains information about your safety and the
Rekluse Motor Sports. The z-start Clutch KTM LC4 ( )
") Rekluse Motor Sports The z-start Clutch KTM LC4 (1999 2005) Installation Guide Copyright 2002-2004 Rekluse Motor Sports z-start Revision 3.000 RMS630 KTM LC4 191-280 Manual Revision: 103105 Rekluse Motor
Rekluse Motor Sports The z-start Clutch KTM LC4 (1999 2005) Installation Guide Copyright 2002-2004 Rekluse Motor Sports z-start Revision 3.000 RMS630 KTM LC4 191-280 Manual Revision: 103105 Rekluse Motor
Take off case cover.
 33 14 520 Replacing complete locking differential (Type M) - final drive removed - Removing and installing final drive, included in Repair Manual MF, model-dependent, from '85, refer to 33 10 010. Drain
DISASSEMBLY & REASSEMBLY INSTRUCTIONS
 DISASSEMBLY & REASSEMBLY INSTRUCTIONS FOR SINGLE ACTING TELESCOPIC CYLINDERS MUNCIE POWER PRODUCTS, INC. Telescopic Cylinder Disassembly & Reassembly Instructions TABLE OF CONTENTS Warning & Safety Recommendations...
Howard Tarmac Sweeper HTS
 2 Howard Tarmac Sweeper HTS Serial Number The Serial and Model numbers are stamped on the frame of your TARMAC SWEEPER. For future reference record the numbers. ALWAYS quote them when ordering spareparts.
Rekluse Motor Sports, Inc. The z-start Clutch. Husaberg ( )
") Rekluse Motor Sports, Inc. The z-start Clutch Husaberg (1989-2003) Installation Guide Copyright 2002-2004 Rekluse Motor Sports z-start Revision 3.000 RMS125 Husaberg 89-03 191-225 Manual Revision: 012805
Rekluse Motor Sports, Inc. The z-start Clutch Husaberg (1989-2003) Installation Guide Copyright 2002-2004 Rekluse Motor Sports z-start Revision 3.000 RMS125 Husaberg 89-03 191-225 Manual Revision: 012805
Rekluse Motor Sports. The z-start Clutch. Husaberg
 Rekluse Motor Sports The z-start Clutch Husaberg Installation Guide Copyright 2002-2004 Rekluse Motor Sports z-start Revision 3.000 RMS126 Husaberg 04+ 191-226 Rekluse Motor Sports, inc. 110 E. 43 rd Street
Roller Camshaft Installation
 Installation Instructions Roller Camshaft Installation For more information, see www.cranecams.com READ CAREFULLY AND COMPLETELY BEFORE INSTALLATION Prior to installation, immerse lifters in a premium
TC 142 & TC 1421 TRANSFER CASE
 AUTO MO TIVE CORPORATION TC 4 & TC 4 TRANSFER CASE PARTS MAN UAL FABCO AUTOMOTIVE CORPORATION, Livermore, CA Ph: (95) 454-9500 Fax: (95) 454-950 -(800) 967-888 www.fabcoautomotive.com 8.0 ILLUSTRATED PARTS
Comfort Ride Shock absorber system part numbers 2450, 2460 and 2470 Installation Instructions
 Comfort Ride Shock absorber system part numbers 2450, 2460 and 2470 Installation Instructions All specifications are subject to change without notice. MOUNTING FLANGE CENTER HOLE FRONT OF Item Qty Part
OPE R AT O R S MANU A L QUICK-HITCH ADAPTER. 5BP (Field conversion kit)
") OPE R AT O R S MANU A L 5BP006750 (Field conversion kit) Manual 5BP97378B Date 06/8/05 SAFETY Take note! This safety alert symbol found throughout this manual is used to call your attention to instructions
OPE R AT O R S MANU A L 5BP006750 (Field conversion kit) Manual 5BP97378B Date 06/8/05 SAFETY Take note! This safety alert symbol found throughout this manual is used to call your attention to instructions
CALIFORNIA TRIMMER MOWER MAINTENANCE MANUAL
 CALIFORNIA TRIMMER MOWER MAINTENANCE MANUAL 2 Table of Contents Section 1: General Information Page Handle Assembly Instructions 4 Maintenance All Models 6 Oil Change Procedures All Models 9 Height Adjustment
Installation Instructions
 Installation Instructions Rear Disc Brake Conversion Kit Item # RC2001, RC2001X Applications: Mopar 8-3/4 & 9-3/4 Rear Axles Thank you for choosing Leed Brakes for your automotive product needs. Before
JRC ENGINEERING INC 3110 Indian Ave Suite E Perris, California
 JRC ENGINEERING INC 3110 Indian Ave Suite E Perris, California 92571 800-634-3250 Thank you for choosing our 750 conversion for your Triumph 650. Careful assembly and running in will greatly extend the
ADESCO.LLC January 21, 2011
 ADESCO.LLC January 21, 2011 Starting Instructions - Extremely important, if not followed, package can and/or will be damaged. Package should be set on a level ground, no exception. 1 Check Fluids daily:
Turbo 400 Trans Brake Valve Body Shift Pattern: Park Reverse Neutral 1st 2nd 3rd
 TCI 221500 Turbo 400 Trans Brake Valve Body Shift Pattern: Park Reverse Neutral 1st 2nd 3rd This Valve Body will neutralize at shut-down by putting shifter In 2nd gear position This Kit Contains: (1) Turbo
WARNING: Only perform this installation if you are experienced, fully equipped mechanic.
 DYNATRAC V3.2 2005-Present Ford Super Duty 250/350-4x4, Front Axle, Free Spin Conversion Kit Some of the less common tools, which will be required: 6 point Spanner socket (OTC #7090-A or equivalent). These
OPERATORS MANUAL FOR KAFURTER ROTARY TOPPERS MODELS: TP110, TP140, TP160, TP170
 OPERATORS MANUAL FOR KAFURTER ROTARY TOPPERS MODELS: TP110, TP140, TP160, TP170 SAFETY WARNING: Do not use or operate this this manual and assembly instructions (where applicable) has been read and understood.
MODEL:D-1000X D-1000XLD D-1000Y D-1000YLD D-1000Z
 INSTALLATION & OPERATION MANUAL MODEL:D-1000X D-1000XLD D-1000Y D-1000YLD D-1000Z INDEX WARNINGS BEFORE INSTALLATION INSTALLATION OPERATION MAINTENANCE TROUBLE SHOOTING OUTSIDE DIMENSIONS ACCESSORIES &
Tidland Air Brake. Installation, Operation, and Maintenance. Models 200, 250, 305, 380, 460, 610
 Tidland Air Brake Installation, Operation, and Maintenance Models 200, 250, 305, 380, 460, 610 TABLE OF CONTENTS TIDLAND CUSTOMER SERVICE... 2 RECOMMENDED TOOLS... 2 CAUTION... 2 INSTALLATION... 3 Caliper
ALLISON 1000 SIGNATURE SERIES
 ALLISON 1000 SIGNATURE SERIES 2001-2010 DURAMAX GPZ 1 FLUID CAPACITY INSTALLATION In our RevMax performance transmission we require you to use DEXRON 3 fluid and are shipped empty due to the regulations
INSTALLATION AND OPERATING MANUAL
 Publication T3-76, Rev. 1 Dated: May 9, 21 INSTALLATION AND OPERATING MANUAL MODEL: T3-I TURBOTWIN Engine Air Starter AN96-419 From Tech Development Inc 68 Poe Ave. Dayton OH 45414 Tel: (937) 898-96 Fax:
RUBICRAWLER - JEEP TJ & JK ( ) W/ UNIVERSAL SHIFTER KIT CONSISTS OF: No. Qty Part No. Description
 W/ UNIVERSAL SHIFTER KIT CONSISTS OF: No. Qty Part No. Description") KIT CONSISTS OF: No. Qty Part No. Description 1. 1 RUBICRAWLER - GEAR BOX 2. 1 42R-UNIV - UNIVERSAL SHIFTER KIT PAGE 1 OF 8 Page Rev. Date: 11-06-18 Optional Items: Part No. Description 15-1000 - UNI-RAISE,
KIT CONSISTS OF: No. Qty Part No. Description 1. 1 RUBICRAWLER - GEAR BOX 2. 1 42R-UNIV - UNIVERSAL SHIFTER KIT PAGE 1 OF 8 Page Rev. Date: 11-06-18 Optional Items: Part No. Description 15-1000 - UNI-RAISE,
4.2 WATER PUMP (GEAR CASE MOUNTED AND LATER) (GCM)
 (GCM)") SERIES 60 SERVICE MANUAL 4.2 WATER PUMP (GEAR CASE MOUNTED - 1991 AND LATER) (GCM) The centrifugal-type water pump circulates the engine coolant through the cooling system. The pump is mounted on the rear
SERIES 60 SERVICE MANUAL 4.2 WATER PUMP (GEAR CASE MOUNTED - 1991 AND LATER) (GCM) The centrifugal-type water pump circulates the engine coolant through the cooling system. The pump is mounted on the rear
RM SERIES PTO INSTALLATION AND OPERATOR S MANUAL KEEP IN VEHICLE FOR ALLISON TC10 READ OPERATING INSTRUCTIONS INSIDE BEFORE OPERATING PTO
 KEEP IN VEHICLE READ OPERATING INSTRUCTIONS INSIDE BEFORE OPERATING PTO RM SERIES PTO INSTALLATION AND OPERATOR S MANUAL FOR ALLISON TC10 Muncie Power Products, Inc. WARNING! ALWAYS READ AND UNDERSTAND
Installation Instructions
 Installation Instructions BW Seals RIS Seal Rubber in shear slurry seal Experience In Motion 1 Equipment Check 1.1 Follow plant safety regulations prior to equipment disassembly: lock out motor and valves.
INSTALLATION AND OPERATING MANUAL
 Dated: May 10, 2001 INSTALLATION AND OPERATING MANUAL MODEL: T30-Y TURBOTWIN Engine Air Starter From Tech Development Inc AN96-425 6800 Poe Ave. Dayton OH 45414 Tel: (937) 898-9600 Fax: (937) 898-8431
Eaton Fuller Heavy Duty Transmissions
 Eaton Fuller Heavy Duty Transmissions 13 Speed Models Driver Instructions TRDR-0630 May 2004 For the most current information, visit the Roadranger web site at www.roadranger.com General Information Warnings
INSTALLATION & OWNER S MANUAL
 Rev. R p. 1 of 16 INSTALLATION & OWNER S MANUAL V4211 HARD SIDED CAB KIT and/or V4275 CAMO HARD SIDED CAB KIT INSTALLATION & OWNER S MANUAL The contents of this envelope are the property of the owner.
BA-4 AIR-JECT AERATOR OPERATOR S MANUAL & PARTS BREAKDOWN
 BA-4 AIR-JECT AERATOR OPERATOR S MANUAL & PARTS BREAKDOWN Table of Contents Page 02 Table of Contents Page 03 - Welcome to Bannerman Page 04 Declaration of CE Conformity Page 05 Warranty Statement Page
Driver Instructions. Fuller Heavy Duty Transmissions. Video Instruction Available
 Fuller Heavy Duty Transmissions More time on the road Video Instruction Available Instructional videos are available for download at no charge at roadranger.com Videos are also available in DVD format
Operating Instructions - Electric Pow'r-Riser Models
 ADivisionOf Templeton, Kenly& Co., Inc. Operating Instructions - Electric Pow'r-Riser Models Table of Contents 1.0 Recieving Instructions 2.0 Safety 3.0 Specifications 4.0 Initial Installation Before Operating
SECTION Front Drive Axle/Differential
 205-03-i Front Drive Axle/Differential 205-03-i SECTION 205-03 Front Drive Axle/Differential CONTENTS PAGE Axle... 205-03-2 205-03-2 Front Drive Axle/Differential 205-03-2 Axle Special Tool(s) C-Frame
Rekluse Motor Sports. The z-start Clutch GAS GAS. 200, 250, and strokes. 400 and strokes
 Rekluse Motor Sports The z-start Clutch GAS GAS 200, 250, and 300 2-strokes 400 and 450 4-strokes Installation Guide Copyright 2002-2004 Rekluse Motor Sports z-start Revision 3.000 RMS100 Gas Gas z-start
INSTRUCTION MANUAL AND PARTS LIST FOR SERIES 8L-630J AND 630M WARNING
 INSTRUCTION MANUAL AND PARTS LIST FOR SERIES 8L-630J AND 630M WARNING READ CA-l AND TIDS INSTRUCTION MANUAL PRIOR TO INSTALLATION, OPERATION OR MAINTENANCE WARNING This Instruction Manual and General Instructions
Eaton 9-Speed Synchronized Transmissions Single H Shift Control Configuration TRDR0072
 Driver Instructions Eaton 9-Speed Synchronized Transmissions Single H Shift Control Configuration TRDR0072 February 2008 FS(O) 6109 FS(O) 6209 FS(O) 6309 FS(O) 8209 FS(O) 8309 FS(O) 10209 FS(O) 10309 Warnings
INSTALLATION AND OPERATING
 Publication T5-704, Rev. 4 Dated: November 1, 2006 INSTALLATION AND OPERATING MANUAL T50-P TURBOTWIN Engine Air Starter AN 99-448 TABLE OF CONTENTS Section Subject Page 1.0 General Information. 1 2.0 Orientation
Disassembly and Assembly
 K EN R 623 2-00 August 2006 Disassembly and Assembly 2506-15 Industrial Engine M G A (Engine) MGB (Engine) M G D (Engine) Important Safety Information Most accidents that involve product operation, maintenance
HOLLEY LS-SWAP WATER PUMPS WATER PUMP INSTALLATION INSTRUCTIONS FOR GM LS-ENGINE APPLICATIONS:
 HOLLEY LS-SWAP WATER PUMPS WATER PUMP INSTALLATION INSTRUCTIONS FOR GM LS-ENGINE APPLICATIONS: Holley LS- Swap cast water pumps are designed for street/performance applications and provide optimum performance
Comfort Ride Shock absorber system part numbers 2450, 2460 and 2470 Installation Instructions
 Comfort Ride Shock absorber system part numbers 2450, 2460 and 2470 Installation Instructions All specifications are subject to change without notice. Item Qty Part number Description 1... 4... 204000-00...shock
1400LB Capacity Jumbo Wagon Owner s Manual ITEM# 59701
 1400LB Capacity Jumbo Wagon Owner s Manual ITEM# 59701 WARNING: Read carefully and understand all INSTRUCTIONS before operating. Failure to follow the safety rules and other basic safety precautions may
GENUINE PARTS INSTALLATION INSTRUCTIONS
 GENUINE PARTS INSTALLATION INSTRUCTIONS 1. DESCRIPTION: Bed Extender 2. APPLICATION: 2005 Frontier Crew and King Cab 3. PART NUMBER: 999T7 BX290 and 999T7 BX190 4. KIT CONTENTS: Item Qty Description A
DRIVE AXLE Nissan 240SX DESCRIPTION & OPERATION AXLE RATIO & IDENTIFICATION AXLE SHAFT & BEARING R & I DRIVE SHAFT R & I
 DRIVE AXLE 1990 Nissan 240SX 1990 DRIVE AXLES Rear Axle - R200 240SX, 300ZX DESCRIPTION & OPERATION The axle assembly is a hypoid type gear with integral carrier housing. The pinion bearing preload adjustment
REAR DIFFERENTIAL LOCATION INDEX
 2007 DRIVELINE/AXLES Differential - MX-5 Miata REAR DIFFERENTIAL LOCATION INDEX Fig. 1: Identifying Location Of Rear Differential Components DIFFERENTIAL OIL INSPECTION 1. Park the vehicle on level ground
Highly Styled, Low Cost Serpentine Drive
 Highly Styled, Low Cost Serpentine Drive Installation Instructions Chevy Big Block #21200 Style Track (without Power Steering) #21250 Style Track (with Remote Power Steering) #21255 Style Track (with Saginaw
MODEL HD-BTC. Installation, Operation & Repair Parts Information REV041416
 MODEL HD-BTC Installation, Operation & Repair Parts Information REV041416 TABLE OF CONTENTS SAFETY INSTRUCTIONS 1 DEFINITIONS 1 SPECIFICATIONS 2 INSTALLATION INSTRUCTIONS 2 OPERATING INSTRUCTIONS 2 MAINTENANCE
Required tools General hand tools 21/64" drill bit Torque wrench Threadlocker Center punch
 Slipper Spring Kit (part numbers 2560, 2570 and 2580) Item Qty Part number Description 1... 8... 350054-50...3/8-16 x 1" grade 8 self-tapping screw 2... 4... 350084-00...7/16-14 x 4" grade 5 3... 6...
MAINTENANCE MANUAL DP-265
 MAINTENANCE MANUAL DP-265 Drive Gears Sisu Axles, Inc. Autotehtaantie 1 P.O. Box 189 FIN-13101 Hämeenlinna Finland Phone int + 358 204 55 2999 Fax int + 358 204 55 2900 DP265DG.PDF (2/2003) k Table of
Locking Differential Adjustment (8.6 Inch Axle)
") Page 1 of 9 2003 Chevrolet Chevy K Silverado - 4WD Sierra, Silverado (VIN C/K) Service Manual Driveline/Axle Rear Drive Axle - Locking/Limited Slip Rear Axle Repair Instructions Document ID: 890757 Locking
Page 1 of 9 2003 Chevrolet Chevy K Silverado - 4WD Sierra, Silverado (VIN C/K) Service Manual Driveline/Axle Rear Drive Axle - Locking/Limited Slip Rear Axle Repair Instructions Document ID: 890757 Locking
Front Drive System - Big Block Chevy Installation Instructions Big Block Chevy with AC & with PS
 Front Drive System - Big Block Chevy Installation Instructions Big Block Chevy with AC & with PS All American Billet Store (800) 764-0926 www.allamericanbilletstore.com Items needed for install Jack Jack
I-731-D/W731-D. Suction Diffuser. Important Installation Information. series 731-D and W731-D
 Important Installation Information WARNING Read and understand all instructions before attempting to install, remove, adjust, or maintain any Victaulic piping products. Depressurize and drain the piping
INSTRUCTIONS. Disassembly. Shifter Cam Assembly. Shifter Forks
 INSTRUCTIONS Disassembly To protect against accidental start-up of vehicle, always disconnect the negative battery cable before working on the motorcycle. Failure to disconnect the battery cable could
Take off case cover.
 33 14 520 Removing complete locking differential. (Type K) - final drive removed - Removing and installing final drive, refer to 33 10 010 Drain off fluid. Secure final drive to special tool 33 1 010 (retaining
1200 Southeast Ave Tallmadge, Ohio to 2015 Camaro (V6 & V8) Summit Racing Roll Stop Install Instructions.
 Summit Racing Roll Stop Install Instructions.") 1200 Southeast Ave Tallmadge, Ohio 44278 2010 to 2015 Camaro (V6 & V8) Summit Racing Roll Stop Install Instructions Part # SUM-760006 Parts Included in System: Qty Description Qty Description 2 Stainless
1200 Southeast Ave Tallmadge, Ohio 44278 2010 to 2015 Camaro (V6 & V8) Summit Racing Roll Stop Install Instructions Part # SUM-760006 Parts Included in System: Qty Description Qty Description 2 Stainless
WARNING: the engine does not come with oil in it. Please fill the oil before starting. The 200cc hardknock requires 9/10 of a quart of oil.
 WARNING: the engine does not come with oil in it. Please fill the oil before starting. The 200cc hardknock requires 9/10 of a quart of oil. Things needed for assembly. -2 tubes of blue loc-tite. I don
Fisher 657 Diaphragm Actuator Sizes and 87
 Instruction Manual 657 Actuator (30-70 and 87) Fisher 657 Diaphragm Actuator Sizes 30 70 and 87 Contents Introduction... 1 Scope of Manual... 1 Description... 2 Specifications... 2 Installation... 3 Mounting
ENGINE LUBRICATION & COOLING SYSTEMS SECTIONLC CONTENTS. ENGINE LUBRICATION SYSTEM...2 Precautions...2
 ENGINE LUBRICATION & COOLING SYSTEMS SECTIONLC CONTENTS ENGINE LUBRICATION SYSTEM...2 Precautions...2 LIQUID GASKET APPLICATION PROCEDURE...2 Preparation...2 SPECIAL SERVICE TOOLS...2 Lubrication Circuit...3
PV Series E, J, & L Piston Pump Installation Tips and Procedures
 Sept. 9, 2005 PV Series E, J, & L Piston Pump Installation Tips and Procedures Oil recommendations Do not use automatic transmission fluid (ATF), bio-degradable oil, or fire resistant fluids due to the
DIAGNOSTICS OF TRANSMISSION HYDRAULIC CIR- CUITS, TRAVEL CLUTCH AND ELECTRONIC CONTROL UNIT OF PROXIMA POWER TRACTOR
 DIAGNOSTICS OF TRANSMISSION HYDRAULIC CIR- CUITS, TRAVEL CLUTCH AND ELECTRONIC CONTROL UNIT OF PROXIMA POWER TRACTOR TABLE OF CONTENT 1 DESCRIPTION OF DISTRIBUTOR... 4 1.1 DESCRIPTION OF INPUTS, OUTPUTS
REMY TECHNICAL SERVICE BULLETIN
 June 2018 REMY TECHNICAL SERVICE BULLETIN Remy Power Products is continuously adding technical training and technical information. We welcome suggestions. If there is something technical you would like
Installation Instructions TH700-R4 (4L60) Transkit Part No thru 1986 Part No thru 1993 non-electronic models
 Transkit Part No thru 1986 Part No thru 1993 non-electronic models") Installation Instructions TH700-R4 (4L60) Transkit Part No. 70232 1982 thru 1986 Part No. 70233 1987 thru 1993 non-electronic models B&M Racing and Performance Products 2009 Congratulations! You have just
Installation Instructions TH700-R4 (4L60) Transkit Part No. 70232 1982 thru 1986 Part No. 70233 1987 thru 1993 non-electronic models B&M Racing and Performance Products 2009 Congratulations! You have just
CH.4 Basic Components of Hydraulic and Pneumatic System/16 M HAP/17522/AE5G
 Content : 4.1 Hydraulic and Pneumatic actuators. 10 Marks Hydraulic Actuators - Hydraulic cylinders (single, double acting and telescopic) construction and working, Hydraulic motors (gear and piston type)
Amarillo PUMP DRIVES (250 HP THROUGH 350 HP) INSTRUCTIONS FOR REPAIRING MODELS 250, 300, and 350
 INSTRUCTIONS FOR REPAIRING MODELS 250, 300, and 350") Amarillo PUMP DRIVES (250 HP THROUGH 350 HP) INSTRUCTIONS FOR REPAIRING MODELS 250, 300, and 350 Amarillo Right Angle Pump Drives, if properly installed and maintained, should provide years of service
Amarillo PUMP DRIVES (250 HP THROUGH 350 HP) INSTRUCTIONS FOR REPAIRING MODELS 250, 300, and 350 Amarillo Right Angle Pump Drives, if properly installed and maintained, should provide years of service
CROWERGLIDE AUTOMATIC CLUTCH Instruction Manual
 CROWERGLIDE AUTOMATIC CLUTCH Instruction Manual Crower Cams & Equipment Co., Inc 6180 Business Center Court San Diego, CA. 92154 Phone: 619.661.6477 ext. 148 Fax: 619.690.7846 www.crower.com TABLE OF CONTENTS
Eaton Fuller Advantage Heavy-Duty Manual Transmissions TRDR0970 EN-US
 Driver Instructions Video Instruction Available Instructional videos are available for download at no charge at Roadranger.com Videos are also available for purchase. To order, call 1-888-386-4636. Ask
ORIGINAL INSTRUCTIONS G715A. Pneumatic-hydraulic Riveter E. Warner Ave Santa Ana, CA
 ORIGINAL INSTRUCTIONS G715A Pneumatic-hydraulic Riveter 1224 E. Warner Ave Santa Ana, CA 92705 www.cherryaerospace.com DESCRIPTION The Cherry G715A Pneumatic-Hydraulic Riveter is designed specifically
PRODUCT SERVICE MANUAL FOR BK12DHZ PUMPS
 PRODUCT SERVICE MANUAL FOR BK12DHZ PUMPS WARNING This manual, and the GENERAL INSTRUCTION MANUAL SRM00046, should be read thoroughly prior to pump installation, operation or maintenance. Manual No. SRM00095
Installation Instructions
 Instructions Created by an: 2005+ Toyota Tacoma BTB Front Coilovers by Low Range Off Road SKU# TAC-SP-05CO-BTB-650 Diff Drop Kit (SKU# LR-2GDDK) Instructions included Installation Instructions Revised
BUCKET SWEEPER OPERATORS & PARTS MANUAL 2852 & 3174 SERIES
 OM628 BUCKET SWEEPER OPERATORS & PARTS MANUAL 2852 & 3174 SERIES MODEL 12002-5 FOOT WIDE X 24 INCH DIAMETER (SKID-STEER) MODEL 12004-6 FOOT WIDE X 24 INCH DIAMETER (SKID-STEER) MODEL 12017-6 FOOT WIDE
6066 OILLESS VACUUM PUMPS AND COMPRESSORS OPERATION & MAINTENANCE TECHNICAL MANUAL
 70-700 G45PL (Rev. B) ISO9001 D C E R T I F D I E 6066 OILLESS VACUUM PUMPS AND COMPRESSORS OPERATION & MAINTENANCE TECHNICAL MANUAL CONTENTS: General Information, Installation, and Wiring... Operation,
OPERATION AND MAINTENANCE INSTRUCTIONS
 OPERATION AND MAINTENANCE INSTRUCTIONS 334 SERIES THREE-PIECE BALL VALVES 1/4 to 2-1/2 Installation and Operation Always install your valve according to accepted industry standards and practices and operate
PowerSafe Two Wheel Tractors
 PowerSafe Two Wheel Tractors Manufactured by BCS S.p.A. Models 710 728 738 740 750 Operating Instructions Before commissioning the machine, read operating instructions and observe warning and safety instructions.
Slave Cylinder Weep Hole Drilling Procedure
 Slave Cylinder Weep Hole Drilling Procedure Tools Required: T20 Torx Driver T25 Torx Driver T25 Torx Bit with ¼ Ratchet Wrench 4mm Hex Key (Allen wrench) 5mm Hex Key 6mm Hex Key 8mm Hex Key 12mm Hex Key
Steer Axles. Spicer. Service Manual. AXSM-0070 November Front Drive Steer Axle Model 60
 Spicer Steer Axles Service Manual AXSM-0070 November 2017 Front Drive Steer Axle Model 60 General Information The description and specifications contained in this service publication are current at the
Operating Instructions. High Energy Vibratory Finishing Bowl. Model FSV-25/50. Vibra Finish Company
 Operating Instructions High Energy Vibratory Finishing Bowl Model FSV-25/50 TM FSV-25/50 Contents Machine Safety Requirements 2 Machine Specifications 3 Installation 4 Pre-Operating Adjustments 5 Operation
Rekluse Motor Sports. The z-start Clutch CRF 250X. Installation Guide Copyright 2002 Rekluse Motor Sports z-start Revision RMS116 CRF 250X
 Rekluse Motor Sports The z-start Clutch CRF 250X Installation Guide Copyright 2002 Rekluse Motor Sports z-start Revision 3.000 RMS116 CRF 250X 191-216 Manual Revision: 103105 Rekluse Motor Sports, inc.
Dismantling and assembling automatic transmission (A5S560Z) (transmission removed)
 (transmission removed)") 24 00 585 Dismantling and assembling automatic transmission (A5S560Z) (transmission removed) Secure transmission to assembly frame with special tool 24 0 180. Drain off transmission oil. Screw special
24 00 585 Dismantling and assembling automatic transmission (A5S560Z) (transmission removed) Secure transmission to assembly frame with special tool 24 0 180. Drain off transmission oil. Screw special
Disassembly and Assembly
 SENR9973-01 September 2007 Disassembly and Assembly 400C Industrial Engine HB (Engine) HD (Engine) HH (Engine) HL (Engine) HM (Engine) HN (Engine) HP (Engine) HR (Engine) Important Safety Information Most
For Toyota Tundra 4.7L V-8 Two and Four Wheel Drive
 Corporate Office: PerTronix Inc. 440 E. Arrow Highway, San Dimas, California 91773 * Phone 909.599.5955 FAX 909.599.6424 Installation Instructions and Warranty Information For 2000-2004 Toyota Tundra 4.7L
Instruction Sheet. 1/2 HP Portable Electric Pumps SAFETY FIRST. L2062 Rev. F 02/ IMPORTANT RECEIVING INSTRUCTIONS 2.
 Instruction Sheet 1/2 HP Portable Electric Pumps L2062 Rev. F 02/12 Index: English:...................................... 1-7 Français:.................................... 8-14 Deutsch:...................................
DIFFERENTIALS & AXLE SHAFTS
 DIFFERENTIALS & AXLE SHAFTS 2001 Chevrolet Camaro 2000-01 DRIVE AXLES General Motors Differentials & Axle Shafts Chevrolet; Camaro Pontiac; Firebird DESCRIPTION & OPERATION Drive axle is a semi-floating,