Installation Instructions TH700-R4 (4L60) Transkit Part No thru 1986 Part No thru 1993 non-electronic models
|
|
|
- Audrey McKenzie
- 5 years ago
- Views:
Transcription
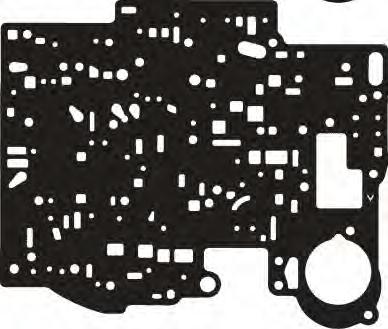
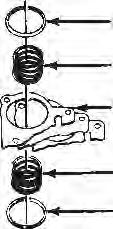
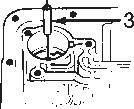
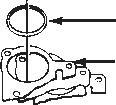
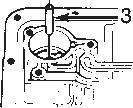
1 Installation Instructions TH700-R4 (4L60) Transkit Part No thru 1986 Part No thru 1993 non-electronic models B&M Racing and Performance Products 2009 Congratulations! You have just purchased the most versatile rebuilding kit available for the TH700 (4L60) transmission. The B&M TH700 (4L60) Transkit contains special parts and instructions to upgrade your stock TH700 (4L60) transmission to the same specifications used by B&M for building High Performance Street Strip TH700 s. For transmission assembly and disassembly procedures we recommend you consult the appropriate GM service manual for your particular model year transmission. The only parts that differ from the standard assembly and disassembly are the valve body and accumulators (covered in the instructions) and the 3-4 clutch and the drain plug (covered in these instructions). The TH700 (4L60) is a METRIC dimensioned transmission so you will need metric sockets and wrenches, in addition some of the overhaul procedures REQUIRE SPECIAL TOOLS for proper assembly and disassembly of the transmission. IMPORTANT: We suggest that you take the time to completely read through the instructions and check the parts list before beginning disassembly. You will need approximately 5 Qts Printed in U.S.A. ATF for the transmission and 6 Qts for the converter 3-4 CLUTCH INSTA.08LLATION The B&M 3-4 clutch pack uses the maximum number of standard thickness plates (6 friction and 5 steel) possible (see Figure 1). If the unit you are working on had 5 friction and 4 steel plates you will have to replace the 3-4 apply ring (see Figure 3) with G.M. part number This part number has been discontinued by GM, but is available from Transtar Industries, Cleveland, OH, as P/N D61975 Call for the location and number of their nearest location. This apply ring will accommodate the 6 friction and 5 steel plate package. The 6 friction plate package apply ring is 3.71" long compared to 3.88" for the (5 friction plate package). In some cases there is room to install a seventh friction plate in the clutch. See the section "Additional Clutch Plate" on the next page. A new 3-4 clutch apply plate is supplied with this kit. The new apply plate replaces both the apply plate and the 3-4 clutch retainer. Figure 4 shows the old and new parts. The selective 3-4 clutch backing plate is not included as part of this kit. If the existing backing plate does not 1 produce the required clutch pack clearance you will have to obtain the correct backing plate from a G.M. parts dealer. We have included a thin (.094") 3-4 clutch backing plate retaining ring that can be used in pre units in place of the thicker (0.125") ring to extend a particular backing plate s adjustment range. Installation of B&M s 3-4 CLUTCH PACK is similar to installing a stock 3-4 clutch pack. We recommend that you consult the appropriate transmission service manual for information regarding special tools, assembly procedures, bolt torques, service and diagnosis, etc. for items not covered here. The following instructions assume the input housing is assembled up to the point where the 3-4 clutch pack is to be installed. INSTALLATION (See Figure 3) STEP 1. Make sure the correct (3.71") 3-4 clutch apply ring (#100) is installed in input housing, then install the following: 1. A new 3-4 clutch apply plate (#102). NOTE: This apply plate does not require the use of the original 3-4 clutch apply ring retainer. 2. B&M supplied 3-4 clutch plates (#103), starting with composition faced plate first and alternate with
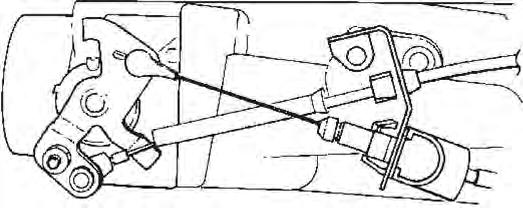
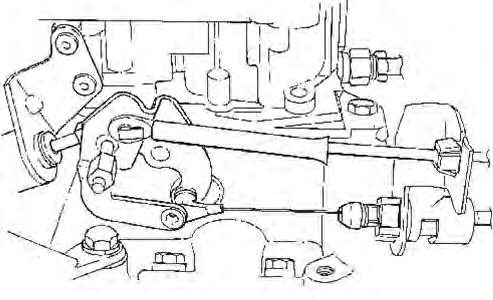
2 steel plates (EXCEPTION: '87-'93 install 15 tooth steel first). IMPORTANT: Index the five (5) wide slots on the steel plates with the wide slots in the input housing. The wide slots are clearance for the 3-4 clutch boost springs (#106) that will be installed after checking the clutch pack clearance. 3. Install original 3-4 clutch backing plate (#104) and thin (0.094 in.) retaining ring (#105) supplied with kit ('82-'86 only). The original backing plate may be too thick in which case you will have to use a thinner backing plate. Install the 3-4 clutch backing plate with chamfer side up. CLUTCH CLEARANCE CHECK STEP CLUTCH CLEARANCE WARNING: Do not omit this step, optimum 3-4 clutch operation and durability depends on proper clutch pack end clearance setting. 1. Check the end clearance between the 3-4 clutch backing plate (#104) and the first composition faced plate (#103) with a feeler gage. Check the clearance all the way around between the plates to insure that the gap is uniform (plates are parallel). If the gap is not uniform all around, recheck the installation of the individual 3-4 clutch parts to determine cause. 2. Select the proper backing plate (#104) thickness from the chart (Figure 2) to obtain the correct clutch clearance. You can use the thick (0.125 in.) or thin (0.094") 3-4 Backing plate retaining ring (#105) in combination with selective backing plates for additional clearance adjustment range ('82- '86 models only). IMPORTANT: The 3-4 clutch pack end clearance has a direct effect on 2-3 shift feel. For high performance applications the best 2-3 shift feel and 3-4 clutch pack life is obtained when the 3-4 clutch clearance is set as close to the low side of the chart tolerance as possible. CAUTION: DO NOT set the 3-4 clutch pack end clearance below the minimum dimension specified. ADDITIONAL CLUTCH PLATE If you need additional clutch capacity in the 3-4 clutch, it is possible to add a seventh friction plate to the clutch in many case. As normally assembled, there is a steel plate between the 3-4 clutch apply plate and the first friction plate. In many cases the stack up of the clutch allows room for an additional friction plate to be installed between the apply plate and the steel plate with the use of a thin backing plate. The correct clutch clearance must be maintained with the extra plate. 3-4 CLUTCH FINAL ASSEMBLY STEP 3. Once the correct 3-4 clutch clearance has been determined the 3-4 clutch boost springs can be installed. 1. Remove 3-4 clutch Retaining ring (#105) and Backing plate (#104). 2. Install the five (5) 3-4 clutch boost spring assemblies (#106) as shown in ( Figure 2). Install the boost spring assemblies so the captured end of the springs face the clutch backing plate. IMPORTANT: The 3-4 clutch boost springs are designed for use ONLY with the (3.71") long 3-4 clutch apply ring. The boost springs can be used in five (5) friction plate clutch packs BUT you must install two (2) extra steel plates in the clutch pack to prevent the boost springs from becoming coil bound (solid) as the clutch pack wears. 3. Install the 3-4 clutch backing plate (#104) then compress 3-4 clutch boost springs and install 3-4 clutch retaining ring (#105). BEFORE OPERATING VEHICLE Once the transmission is installed in the vehicle it is important to verify that the transmission s hydraulic system is functioning properly to prevent premature component failure. At B&M, every transmission we build is thoroughly tested on a commercial transmission test stand to verify proper operation and correct oil pressures. We realize that a test machine is not available to most people using this kit however, we strongly recommend checking for correct oil pressures. Checking the oil pressures BEFORE driving the vehicle should be considered cheap insurance when compared against the cost of rebuilding the transmission a second time because a minor problem was not detected. Oil pressure tap locations, appropriate pressure charts and trouble shooting guides are provided in most service manuals. You will need a PSI gage to check the pressures. Make sure the T.V. cable is properly connected and adjusted before checking oil pressures or operating the vehicle. DRAIN PLUG INSTALLATION Locate mounting position inside pan for B&M Drain Plug. Make sure to avoid locating plug where it could interfere with internal transmission parts, i.e. valve body, filter, servo, etc. Drill 1/2" diameter hole in position determined. Remove all burrs around hole and clean pan to avoid contamination of transmission fluid. Install Drain Plug as shown in figure. Tighten nut to 25 lb.ft. maximum. Use wrench on bolt head to prevent rotating entire assembly. (Figure 5) PLATE TYPE THICKNESS QUANTITY REQUIRED FLAT STEEL CLUTCH PLATE 1.97mm (.078") 5 COMPOSITION FACED CLUTCH PLATE 2.03mm (.079") 6 Figure 1: 3-4 Clutch Information Chart. 2
3 PLATE THICKNESS PART NO. ID NO mm (.281") mm (.241") mm (.202") mm (.162") USE BACKING PLATE WHICH GIVES A CLUTCH PACK CLEARANCE OF 1.00mm-2.50mm (.039"-.098") Figure 2: 3-4 Clutch Backing Plate Selection. 3.71" Clutch Apply Ring 102 B&M 3-4 Clutch Apply Plate Clutch Plates Figure 3: 3-4 Clutch Assembly Clutch Backing Plate Clutch Retaining Ring Clutch Boost Springs Original 3-4 clutch apply plate and retaining ring Figure 4: 3-4 Clutch Apply Plate New 3-4 clutch apply plate. (Does not need retaining ring) 3
4 Parts List Description Qty SKIN PACK CARD 1 PLATE, FRICTION REV INPUT CL.078" 4 PLATE, STEEL REV INPUT CL.078" 3 PLATE, FRICTION OVERRUN CL.078" 2 PLATE, STEEL OVERRUN CL.092" 2 PLATE, FRICTION FWD CL.070" SM 5 PLATE, STEEL FWD CL.090" 4 PLATE, FRICTION 3-4 CL.080" SM 6 PLATE, STEEL 3-4 CL.078" 20T 5 PLATE, FRICTION LO REV CL.088" SM 5 PLATE, STEEL LO REV CL.070" 4 BAND, PLATE, 3-4 CLUTCH APPLY 1 RING, RETAINING 3-4 CL (.094") 1 BAG ASSY TRANSKIT 1 SPRING, TH700 PRESSURE REG (BLUE) 1 RING, RETAINING PRESSURE REG 1 ROD, BLOCKER LINE BIAS 1 SPACER 5/16"ID X 3/8"LG RED 1 SPACER 5/16"ID X 5/8"LG YELLOW 1 SPACER 5/16"ID X 3/4"LG BLUE 2 DRILL,.094 (3/32") 1 DRILL,.125 (1/8") 1 SPRING, 3-4 CLUTCH BOOST 5 BUSHING, FR0NT PUMP 1 BUSHING, EXTENSION HOUSING 1 DRAIN PLUG 1 NUT, HEX JAM 1/2"-20 1 PLUG, 1/8" NPT STEEL 1 GASKET, DRAIN PLUG MISCELLANEOUS OVERHAUL SEAL AND GASKET KIT 1 FILTER, TRANSMISSSION OIL 1 INSTRUCTIONS, TRANSPAK 1 Description Qty SKIN PACK CARD 1 PLATE, FRICTION REV INPUT CL.068" 4 PLATE, STEEL REV INPUT CL.078" 4 PLATE, FRICTION OVERRUN CL.078" 2 PLATE, STEEL OVERRUN CL.092" 2 PLATE, FRICTION FWD CL.070" SM 5 PLATE, STEEL FWD CL.090" 5 PLATE, FRICTION 3-4 CL.080" SM 7 PLATE, STEEL 3-4 CL.078" 20 TOOTH 5 PLATE, STEEL 3-4 CL.078" 15 TOOTH 1 PLATE, FRICTION LO REV CL.088" SM 5 PLATE, STEEL LO REV CL.070" 4 BAND, PLATE, 3-4 CLUTCH APPLY 1 BAG ASSY TRANSKIT 1 SPRING, TH700 PRESSURE REG (BLUE) 1 RING, RETAINING PRESSURE REG 1 ROD, BLOCKER LINE BIAS 1 SPACER 5/16"ID X 3/8"LG RED 1 SPACER 5/16"ID X 5/8"LG YELLOW 1 SPACER 5/16"ID X 3/4"LG BLUE 2 DRILL,.094 (3/32") 1 DRILL,.125 (1/8") 1 SPRING, 3-4 CLUTCH BOOST 5 BUSHING, FR0NT PUMP 1 BUSHING, EXTENSION HOUSING 1 DRAIN PLUG, 1 NUT, HEX JAM 1/2"-20 1 PLUG, 1/8" NPT STEEL 1 GASKET, DRAIN PLUG MISCELLANEOUS OVERHAUL SEAL AND GASKET KIT 1 FILTER, TRANSMISSSION OIL 1 INSTRUCTIONS, TRANSPAK 1 NUT Figure 5: Drain Plug Installation GASKET BOLT 1/8"NPT PLUG 4
5
6
7

8
9
10
11
12
13
14
15
16
17
18
19
Part No amatic 350
 Watch our installation video on YouTube Installation Instructions Shift Improver Kit Part No. 30262 1968-1981 TurboHy urbohydr drama amatic 350 B&M Racing and Performance Products 2002 Congratulations!
Transpak. Torqueflite Part No (1978½-1996) Part No ( ) 2008, 2002 by B&M Racing and Performance Products
 Part No ( ) 2008, 2002 by B&M Racing and Performance Products") Installation Instructions Transpak for Torqueflite Part No. 10227 (1978½-1996) Part No. 10228 (1962-1978) 2008, 2002 by B&M Racing and Performance Products Congratulations. You have just purchased the
Installation Instructions Transpak for Torqueflite Part No. 10227 (1978½-1996) Part No. 10228 (1962-1978) 2008, 2002 by B&M Racing and Performance Products Congratulations. You have just purchased the
Chrysler TorqueFlite Shift Improver Kit Part No A-727 (V-8) A-904 (V-8) (A-998 & A-999)
 A-904 (V-8) (A-998 & A-999)") FORM # 9500606-03 Installation Instructions Chrysler TorqueFlite Shift Improver Kit Part No. 10225 1971-1977 A-727 (V-8) 1971-1977 A-904 (V-8) (A-998 & A-999) 1998, 2005, 2010 by B&M Racing & Performance
FORM # 9500606-03 Installation Instructions Chrysler TorqueFlite Shift Improver Kit Part No. 10225 1971-1977 A-727 (V-8) 1971-1977 A-904 (V-8) (A-998 & A-999) 1998, 2005, 2010 by B&M Racing & Performance
Rekluse Motor Sports. The ProStart Clutch. H-D Big Twin ( )
") Rekluse Motor Sports The ProStart Clutch H-D Big Twin (1990 1997) Installation Guide Copyright 2006 Rekluse Motor Sports ProStart Revision 1.000 RMS680 H-D Big Twin 195-680 Manual Revision: 121206 Rekluse
Rekluse Motor Sports The ProStart Clutch H-D Big Twin (1990 1997) Installation Guide Copyright 2006 Rekluse Motor Sports ProStart Revision 1.000 RMS680 H-D Big Twin 195-680 Manual Revision: 121206 Rekluse
2244 West McDowell Road Phoenix, AZ RACE (fax)
") 2244 West McDowell Road Phoenix, AZ 85009 602-257-9591 1-800-274-RACE 602-340-8429 (fax) www.hughesperformance.com HUGHES PERFORMANCE HP2211R VALVE BODY Installation Instructions rev. b 10-2016 For over
2244 West McDowell Road Phoenix, AZ 85009 602-257-9591 1-800-274-RACE 602-340-8429 (fax) www.hughesperformance.com HUGHES PERFORMANCE HP2211R VALVE BODY Installation Instructions rev. b 10-2016 For over
REPAIR PROCEDURES MANUAL
 REPAIR PROCEDURES MANUAL PVX Series Vane Pumps A Design Series Step-by-Step Guide to Troubleshooting and Repairing PVX Series Vane Pumps Introduction Thank you for choosing Continental Hydraulics PVX Vane
Crank Scraper & Windage Tray for GM LS & Vortec Engines
 Crank Scraper & Windage Tray for GM LS & Vortec Engines 3.622 Stroke & 4.000 Stroke Engines Made in USA Important: Read these instructions in their entirety prior to installation. Rev 160614 Applications
GM 4L80-E, 4L85-E SURE CURE KIT
 GM 4L80-E, 4L85-E SURE CURE KIT PART NUMBER SC-4L80E INSTALLATION GUIDE Parts are labeled here in order of installation. See page 2 for details on Sure Cure kit contents. See Sure Cure instruction booklet
GM 4L80-E, 4L85-E SURE CURE KIT
 GM 4L80-E, 4L85-E SURE CURE KIT PART NUMBER SC-4L80E INSTRUCTION BOOKLET Parts are labeled here in order of installation. See page 2 for details on Sure Cure kit contents. See Sure Cure instruction booklet
Vickers. Two-Stage Flapper Type Servo Valve. Valves. Overhaul Manual SF SF Revised 02/01/74 I-3063-S
 Overhaul Manual Vickers Valves Two-Stage Flapper Type Servo Valve SF-0-0-00-0 SF-00-30-00-0 Revised 0/0/7 I-3063-S Table of Contents Section Page I. Introduction.............................................................................................
AUTOMATIC TRANSMISSIONS Mitsubishi F3A20 Series TRANSMISSION APPLICATION TABLE
 Article Text ARTICLE BEGINNING AUTOMATIC TRANSMISSIONS Mitsubishi F3A20 Series APPLICATION TRANSMISSION APPLICATION TABLE Vehicle Application Transmission Model Colt 3-Speed (1990-94)... F3A21 Colt Vista
Installation Instructions for TCI Turbo 700R TCI Turbo 700R
 Installation Instructions for TCI 378805 Turbo 700R4 1982-1984 TCI 378905 Turbo 700R4 1985-1993 KIT INTRODUCTION Read all instructions first to familiarize yourself with the parts and procedures. Work
(C6) Chevrolet Corvette Crank Scraper and Oil Pan Baffle Kit
 Chevrolet Corvette Crank Scraper and Oil Pan Baffle Kit") 2005-2013 (C6) Chevrolet Corvette Crank Scraper and Oil Pan Baffle Kit Part No. EGM-21X Made in USA Important: Read these instructions in their entirety prior to installation. Rev 160614 Applications 2005-2013
2005-2013 (C6) Chevrolet Corvette Crank Scraper and Oil Pan Baffle Kit Part No. EGM-21X Made in USA Important: Read these instructions in their entirety prior to installation. Rev 160614 Applications 2005-2013
PRODUCT SERVICE MANUAL. BK6DHZ(C)-250, 275, 312 and 400 PUMPS
-250, 275, 312 and 400 PUMPS") PRODUCT SERVICE MANUAL BK6DHZ(C)-250, 275, 312 and 400 PUMPS WARNING This manual, and the GENERAL INSTRUCTION MANUAL, SRM00046, should be read thoroughly prior to pump installation, operation or maintenance.
PRODUCT SERVICE MANUAL BK6DHZ(C)-250, 275, 312 and 400 PUMPS WARNING This manual, and the GENERAL INSTRUCTION MANUAL, SRM00046, should be read thoroughly prior to pump installation, operation or maintenance.
2001 Chevrolet Corvette AUTOMATIC TRANSMISSIONS Hydra-Matic 4L60-E - Overhaul
 2001-03 AUTOMATIC TRANSMISSIONS Hydra-Matic 4L60-E - Overhaul APPLICATION CAUTION: Flush oil cooler and oil cooler lines prior to transmission installation. Oil cooling system contamination may cause premature
TRANSMISSION PARTS Instructions
 TRANSMISSION PARTS Instructions Sure Cure Kit Part No. SC-4T65E GM 4T65-E Valve Body Parts Boost Valve Kit 84754-30K Patent No. 6,832,632 TCC Apply Valve Kit 84754-43K Patent No. 7,100,753 TCC Regulated
Torqueflite Trans-Scat Kit
 TCI 220000 Torqueflite Trans-Scat Kit This kit can be installed in a few hours by carefully following directions. Read all instructions first to familiarize yourself with the parts and procedures. Work
Extreme Automatics Pressure Release Transbrake 2004R 54E10.1
 Extreme Automatics Pressure Release Transbrake 2004R 54E10.1 The Electric Trans brake will work with any 2004R VB or shift kit. The rd transmission being used must be dual feed 3. The Electric Trans brake
2244 West McDowell Road Phoenix, AZ RACE (fax)
") 2244 West McDowell Road Phoenix, AZ 85009 602-257-9591 1-800-274-RACE 602-340-8429 (fax) www.hughesperformance.com HUGHES PERFORMANCE HP2215 VALVE BODY Installation Instructions 9/24/16 For over 45 years
2244 West McDowell Road Phoenix, AZ 85009 602-257-9591 1-800-274-RACE 602-340-8429 (fax) www.hughesperformance.com HUGHES PERFORMANCE HP2215 VALVE BODY Installation Instructions 9/24/16 For over 45 years
Installation Manual. Model T675A Engine Brakes. For Mack 6 Cylinder, 2 valve Head ENDT-673, 675, 676 & E6 Series Engines.
 Engine Brakes Installation Manual Model T675A Engine Brakes For Mack 6 Cylinder, 2 valve Head ENDT-673, 675, 676 & E6 Series Engines TecBrake P.O. Box 27822 Houston, Texas 77227 INSTALLATION MANUAL TECBRAKE
TCI Turbo 400 Full Manual Valve Body. Shift Pattern: Park Reverse Neutral First Second Third. NOTE: You must reuse stock manual control valve.
 TCI 221100 Turbo 400 Full Manual Valve Body Shift Pattern: Park Reverse Neutral First Second Third This Kit Contains: (1) Turbo 400 Full Manual Valve Body (1) Separator Plate & Gaskets (1) Pressure Regulator
Size 9.4 Mesur-Fil Fluid Couplings P WC-97
 Size 9.4 Mesur-Fil Fluid Couplings P-1033-1 WC-97 Installation Instructions Size 9.4 Fluid Couplings Models HC, HCF, HCM, HBM 22 21 HCF Input (see page 5) 13 Input Side Optional Output Side Standard 13
PLEASE READ ALL INSTRUCTIONS BEFORE INSTALLATION
 1 68 RFE VALVE BODY UPGRADE Part #: 1030360 Part #: 1030361 2007-11 (Early Model) 2010-12 (Late Model) PLEASE READ ALL INSTRUCTIONS BEFORE INSTALLATION 2 K I T C O N T E N T S : Please check to make sure
Product Service Manual For DLH12DHT SERIES PUMPS
 Product Service Manual For DLH12DHT SERIES PUMPS Pump Size Bill of Material Assembly Drawing 275 3217 / 568 - DLH12DHTX-275 Figure 3 312 3220 / 561 - DLH12DHT 312 Figure 3 3220 / 567 - DLH12DHT - 312 P
# D: No Reverse, Second Gear or Fourth Gear (Replace Reaction Sun Shell with More Robust Heat Treated Parts) - (Jun 10, 2008)
 - (Jun 10, 2008)") Page of 5 200 Chevrolet Astro - 4WD Astro, Safari (VIN M/L) Service Manual Document ID: 250887 #00-07-30-022D: No Reverse, Second Gear or Fourth Gear (Replace Reaction Sun Shell with More Robust Heat Treated
Page of 5 200 Chevrolet Astro - 4WD Astro, Safari (VIN M/L) Service Manual Document ID: 250887 #00-07-30-022D: No Reverse, Second Gear or Fourth Gear (Replace Reaction Sun Shell with More Robust Heat Treated
LUBRICATION SYSTEM (April, 2003)
") SYSTEM (April, 2003) SYSTEM (April, 2003) ONVEHICLE INSPECTION 1. CHECK ENGINE OIL LEVEL (a) After warming up the engine and then 5 minutes after the engine stops, oil level should be between the L and
SYSTEM (April, 2003) SYSTEM (April, 2003) ONVEHICLE INSPECTION 1. CHECK ENGINE OIL LEVEL (a) After warming up the engine and then 5 minutes after the engine stops, oil level should be between the L and
INSTALLATION GUIDE. TCP PSP-FD Power Steering Pump Kit
 READ ALL INSTRUCTIONS COMPLETELY AND THOROUGHLY UNDERSTAND THEM BEFORE DOING ANYTHING. CALL TOTAL CONTROL PRODUCTS TECH SUPPORT (916) 388-0288 IF YOU NEED ASSISTANCE. INSTALLATION GUIDE TCP PSP-FD Power
PRODUCT SERVICE MANUAL FOR BK12DHZ PUMPS
 PRODUCT SERVICE MANUAL FOR BK12DHZ PUMPS WARNING This manual, and the GENERAL INSTRUCTION MANUAL SRM00046, should be read thoroughly prior to pump installation, operation or maintenance. Manual No. SRM00095
FRONT DRIVELINE MODIFICATION MAY BE NECESSARY!!!!
 INSTALLATION INSTRUCTIONS FOR 2009 DODGE 2500/3500 4WD & 1500 Mega Cab 6 SUSPENSION SYSTEM PART NUMBER 7206 Requires the following parts (sold separately) for a complete installation: Front Coil Spring
Installation Instructions Transpak Fits: GM Turbo-Hydramatic 400, Turbo-Hydramatic 375 and M40 Automatic Transmission Catalog # 20228
 Installation Instructions Transpak Fits: 1965-1987 GM Turbo-Hydramatic 400, Turbo-Hydramatic 375 and M40 Automatic Transmission Catalog # 20228 WORK SAFELY! For maximum safety, perform this installation
2005 Toyota RAV AUTOMATIC TRANSMISSIONS U240E & U241E Overhaul
 2001-05 AUTOMATIC TRANSMISSIONS U240E & U241E Overhaul APPLICATION CAUTION: Flush oil cooler and oil cooler lines prior to transaxle installation. Oil cooling system contamination may cause premature transaxle
Amarillo PUMP DRIVES (250 HP THROUGH 350 HP) INSTRUCTIONS FOR REPAIRING MODELS 250, 300, and 350
 INSTRUCTIONS FOR REPAIRING MODELS 250, 300, and 350") Amarillo PUMP DRIVES (250 HP THROUGH 350 HP) INSTRUCTIONS FOR REPAIRING MODELS 250, 300, and 350 Amarillo Right Angle Pump Drives, if properly installed and maintained, should provide years of service
Amarillo PUMP DRIVES (250 HP THROUGH 350 HP) INSTRUCTIONS FOR REPAIRING MODELS 250, 300, and 350 Amarillo Right Angle Pump Drives, if properly installed and maintained, should provide years of service
Size 7.0 Mesur-Fil Fluid Couplings P-1033 WC-96
 Size 7.0 Mesur-Fil Fluid Couplings P-1033 WC-96 Installation Instructions Size 7.0 Fluid Couplings Models HC, HCF, HCM, HBM 7 22 21 HCF Input (see page 5) Optional 13 Input Side Output Side Standard 13
Installation Instructions Sport Shifter
 The B&M Sport Shifter can be used in vehicles equipped with most popular three speed or four speed automatic transmissions. It is equipped with neutral safety and backup light switches, transmission brackets
Model No. 668D3. COFFEPUMP Part No Product Code: O/C GJAN21.DB6B-DC310B
 Model No. 668D3 COFFEPUMP Part No. 9168 Product Code: O/C GJAN21.DB6B-DC310B OVERHAUL MANUAL with ILLUSTRATED PARTS LIST Page 1 of 15 P/N 5914 Rev D 01/17/05 1.0 Introduction 1.1 Description 1.1.1 The
Installation Instructions Right Hand Drive Megashifter
 Installation Instructions Right Hand Drive Megashifter Part Number 80685 1995, 2001, 2006, 2010 by B&M Racing & Performance Products The B&M Right Hand Drive Megashifter is designed specifically for vehicles
DRIVE AXLE Volvo 960 DESCRIPTION & OPERATION AXLE IDENTIFICATION DRIVE AXLES Volvo Differentials & Axle Shafts
 DRIVE AXLE 1994 Volvo 960 1994 DRIVE AXLES Volvo Differentials & Axle Shafts 960 DESCRIPTION & OPERATION All 960 station wagon models use type 1041 rear axle assembly. All 960 4-door models use type 1045
Installation Instructions Z-Gate Shifter
 Installation Instructions Z-Gate Shifter Part Number 80681 1998, 2001 by B&M Racing and Performance Products The B&M Z-Gate shifter can be used in vehicles equipped with most popular three speed automatic
EP-2 Three-Piston Pump
 EP- Three-Piston Pump Customer Product Manual Issued 0/ For parts and technical support, call the Industrial Coating Systems Customer Support Center at (800) -99 or contact your local Nordson representative.
2002 F-Super Duty /Excursion Workshop Manual
 Page 1 of 25 SECTION 307-01: Automatic Transaxle/Transmission 2002 F-Super Duty 250-550/Excursion Workshop Manual ASSEMBLY Procedure revision date: 05/23/2001 Transmission Special Tool(s) Remover, O-Ring
Torqueflite Manual/Automatic Valve Body
 TCI 122400 Torqueflite Manual/Automatic Valve Body This valve body can be installed in a few hours by carefully following directions. Read all instructions first to familiarize yourself with the parts
Installation Instructions Megashifter
 Installation Instructions Megashifter The B&M Megashifter shifter can be used in vehicles equipped with most popular three speed or four speed automatic transmissions. Your B&M Megashifter comes equipped
Return to Instruction Sheet index TCI Torqueflite Trans-Scat Kit
 Page 1 of 11 Return to Instruction Sheet index TCI 220000 Torqueflite Trans-Scat Kit This kit can be installed in a few hours by carefully following directions. Read all instructions first to familiarize
Installation Instructions SHIFTER IMPROVER KIT Fits: Ford, Lincoln and Mercury w/e4od Automatic Transmission Catalog # 10025
 Installation Instructions SHIFTER IMPROVER KIT Fits: 1989-1997 Ford, Lincoln and Mercury w/e4od Automatic Transmission Catalog # 10025 WORK SAFELY! For maximum safety, perform this installation on a clean,
RUBICRAWLER - JEEP TJ & JK ( ) W/ UNIVERSAL SHIFTER KIT CONSISTS OF: No. Qty Part No. Description
 W/ UNIVERSAL SHIFTER KIT CONSISTS OF: No. Qty Part No. Description") KIT CONSISTS OF: No. Qty Part No. Description 1. 1 RUBICRAWLER - GEAR BOX 2. 1 42R-UNIV - UNIVERSAL SHIFTER KIT PAGE 1 OF 8 Page Rev. Date: 11-06-18 Optional Items: Part No. Description 15-1000 - UNI-RAISE,
KIT CONSISTS OF: No. Qty Part No. Description 1. 1 RUBICRAWLER - GEAR BOX 2. 1 42R-UNIV - UNIVERSAL SHIFTER KIT PAGE 1 OF 8 Page Rev. Date: 11-06-18 Optional Items: Part No. Description 15-1000 - UNI-RAISE,
Installation Instructions Shifter Improver Kit Fits:1988 and Later TurboHydramatic 400, TH-400/TH-475 (3L80/3L80-HD) Catalog # 20261
 Catalog # 20261") Installation Instructions Shifter Improver Kit Fits:1988 and Later TurboHydramatic 400, TH-400/TH-475 (3L80/3L80-HD) Catalog # 20261 WORK SAFELY! For maximum safety, perform this installation on a clean,
Installation Instructions Shifter Improver Kit Fits:1988 and Later TurboHydramatic 400, TH-400/TH-475 (3L80/3L80-HD) Catalog # 20261 WORK SAFELY! For maximum safety, perform this installation on a clean,
INSTALLATION GUIDE TCP RCKM-01
 READ ALL INSTRUCTIONS COMPLETELY AND THOROUGHLY UNDERSTAND THEM BEFORE DOING ANYTHING. CALL TOTAL CONTROL PRODUCTS TECH SUPPORT (916) 388-0288 IF YOU NEED ASSISTANCE. INSTALLATION GUIDE TCP RCKM-01 Manual
26 November 2009 Valve Body # / BD VALVE BODY. For Dodge 5.9L 12V Cummins Trucks
 26 November 2009 Valve Body #1030410 / 1030415 1 BD VALVE BODY For 1991-1995 Dodge 5.9L 12V Cummins Trucks - - I n s t a l l a t i o n I n s t r u c t i o n s - - 1030410 1991-1993 Dodge (4 Spd) 618 1030415
Hydraulic Motors Repair Instructions
 Hydraulic Motors Repair Instructions Motors for Global External Hydraulic Vibrators Models 2HC - pn #251020 5HC - pn #251050 Global Manufacturing, Inc. 101 E 22nd St Little Rock, Arkansas 2206 V I B R
Reproduction. Not for. Signature Pro Dual Stage Snowthrowers. Parts Manual. Attachment
 Parts Manual Attachment Signature Pro Dual Stage Snowthrowers Mfg. No. Description 1695656 P1628EX, 15.5TP 28" Two-Stage Snowthrower (CE/Export) 1695657 P1732EX, 16.5GT 32" Snowthrower (CE/Export) 1695658
INSTRUCTION MANUAL IM-422 For HTC/COUPLING ASSEMBLY HC-8088
 No Revision 2/22/18 INSTRUCTION MANUAL IM-422 HTC/COUPLING ASSEMBLY The Riverhawk Company reserves the right to make changes updating this document without dissemination or notice. The latest revision
Transmission Overhaul Procedures-Bench Service
 How to Assemble the Lower Reverse Idler Gear Assembly Special Instructions In 1996 Eaton changed the reverse idler system design. In the nut design, the reverse idler bearing was lubricated through a hole
Model 306B H&J Transfer Case Service Manual
 Model 306B H&J Transfer Case Service Manual For innovation using today s technology in demanding situations call: Phone: (877) 327-2116 Fax: (586) 601-1904 e-mail: info@mixerandplantparts.com Mixer & Plant
HIPSTER'S ALUMINUM POWERGLIDE TRANSBRAKE (P/N: 12748A) CAUTION
 CAUTION") W140N10145 Fond Du Lac Ave. Germantown, WI 53022 Phone: (262) 251-7777 Email: info@autotransdesign.com www.autotransdesign.com HIPSTER'S ALUMINUM POWERGLIDE TRANSBRAKE (P/N: 12748A) CAUTION Please read
W140N10145 Fond Du Lac Ave. Germantown, WI 53022 Phone: (262) 251-7777 Email: info@autotransdesign.com www.autotransdesign.com HIPSTER'S ALUMINUM POWERGLIDE TRANSBRAKE (P/N: 12748A) CAUTION Please read
CHEETAH E-SHIFT Pro Series Valve Body (Positively Not For Street Use) Fits Torqueflite 727 & (Non Lock-Up)
 Fits Torqueflite 727 & (Non Lock-Up)") 1535 Owens Road, Jacksonville, FL 32218 - (904)741-4850 - FAX (904)741-4853 www.turboaction.com CHEETAH E-SHIFT Pro Series Valve Body (Positively Not For Street Use) Fits Torqueflite 727 & 904 1966-90
1535 Owens Road, Jacksonville, FL 32218 - (904)741-4850 - FAX (904)741-4853 www.turboaction.com CHEETAH E-SHIFT Pro Series Valve Body (Positively Not For Street Use) Fits Torqueflite 727 & 904 1966-90
PRODUCT SERVICE MANUAL
 PRODUCT SERVICE MANUAL FOR AM322ICX-325AE, 350AN and 400A PUMPS WARNING This Special Instruction Manual and General Instructions Manual, SRM00046, should be read thoroughly prior to pump installation,
Inverted High Pressure Fluid Filters
 Instruction Sheet P/N 33290-03 Description See Figure. Nordson high-pressure fluid filters prevent nozzle-plugging by filtering contaminants out of coating materials. These stainless steel, wall-mounted
Reproduction. Not for PARTS LIST. Models. Manual Part No
 PARTS LIST Models Mfg. No. Description 1696063 ML761650, Murray 16.5TP 30" Dual Stage Snowthrower, CE (2011) Revision - Manual Part No. Rev. Date: 5/17/2011 Table Of Contents PRODUCT COMPONENTS PAGES
Jeep Wrangler (JK) Present
 Present") Suspension System RS66110B (3 SPORT SYSTEM w/ Progressive Coil Springs Front & Rear) 2012 NEWER JEEP MODELS EQUIPPED WITH 3.6L V6 ENGINE NEED EXHAUST MODIFICATION KIT RS720003. OR REPLACEMENT FRONT DRIVESHAFT
Suspension System RS66110B (3 SPORT SYSTEM w/ Progressive Coil Springs Front & Rear) 2012 NEWER JEEP MODELS EQUIPPED WITH 3.6L V6 ENGINE NEED EXHAUST MODIFICATION KIT RS720003. OR REPLACEMENT FRONT DRIVESHAFT
Installation Instructions. QuickSilver Shifter. Fits: GM, Ford, Chrysler Transmissions See Application Guide for Specific Applications Part # 80683
 Installation Instructions QuickSilver Shifter Fits: GM, Ford, Chrysler Transmissions See Application Guide for Specific Applications Part # 80683 WORK SAFELY! For maximum safety, perform this installation
TRANS-SCAT Installation Instructions for Ford AOD
 TCI 436000 TRANS-SCAT Installation Instructions for Ford AOD 1980-1993 TCI 436000 Kit Contains: Qty. Description Five (5) Gaskets: Three (3) Valve Body One (1) Filter One (1) Duraprene Pan Two (2) Springs:
Kinze 3000 Series Row Unit. Hydraulic Actuator Installation Instructions PN: ENG REV. A
 Kinze 3000 Series Row Unit Hydraulic Actuator PN: 2006428-ENG REV. A Installation Overview Required Parts Part Number Qty * Description 4003011 1 HYDRAULIC ACTUATOR ASSY. (INCLUDES MOUNTING HARDWARE) 4003458
Transmission Overhaul Procedures-Bench Service
 How to Install the Auxiliary Countershaft Assembly Special Instructions To make auxiliary section assembly easier, you can make an auxiliary section fixture out of a 2" x 12" piece of wood. 3' 1' 3" 4.56"
ASSEMBLY. Transmission Automatic Transmission 5R44E and 5R55E. Special Tool(s)
") 307-01-1 Automatic Transmission 5R44E and 5R55E 307-01-1 ASSEMBLY Transmission Special Tool(s) Holding Fixture, Transmission 307-262 (T93T-77002-AH) Special Tool(s) Installer, Transmission Extension Housing
307-01-1 Automatic Transmission 5R44E and 5R55E 307-01-1 ASSEMBLY Transmission Special Tool(s) Holding Fixture, Transmission 307-262 (T93T-77002-AH) Special Tool(s) Installer, Transmission Extension Housing
OPERATING INSTRUCTIONS AND SERVICE MANUAL
 OPERATING INSTRUCTIONS AND SERVICE MANUAL 55NAL--270-4 55NL--724-4 55RNL-2-LS-4- COMPLETE TOOL MODEL NO. CODE NO. 55NAL--270-4 20270 55NL--724-4 220724 READ SAFETY RECOMMENDATIONS 55RNL-2-LS-4-24089 BEFORE
Check Valve (Next Generation) A-180 and A-183 Series. Installation, Operation & Maintenance (IOM) Manual. P/N: A-180/A-183, Rev. 6.
 A-180 and A-183 Series. Installation, Operation & Maintenance (IOM) Manual. P/N: A-180/A-183, Rev. 6.") P/N: Issue Date: January 12, 2018 Supersedes: A-180/A-183, Rev. 6.1 Check Valve (Next Generation) A-180 and A-183 Series Installation, Operation & Maintenance (IOM) Manual Manual content is subject to
P/N: Issue Date: January 12, 2018 Supersedes: A-180/A-183, Rev. 6.1 Check Valve (Next Generation) A-180 and A-183 Series Installation, Operation & Maintenance (IOM) Manual Manual content is subject to
Part # WD Jeep Wrangler TJ Stage I 3 to 4 Lift Now Manufactured With Chromolly Arms PRO COMP SUSPENSION. Suspension Systems that Work!
 PRO COMP SUSPENSION Suspension Systems that Work! Part # 55495 97-2002 4WD Jeep Wrangler TJ Stage I 3 to 4 Lift Now Manufactured With Chromolly Arms This document contains very important information that
Mfg. No: P216020KWV, 21" 6 TP Steel Deck Series
 Parts Manual Mfg. No: 7800557 P216020KWV, 21" 6 TP Steel Deck Series Copyright Briggs and Stratton. All Rights reserved 28-Sep-2018 Model Components Table Of Contents Page Accessory Recycling Kits..............................................................................
IMCO SCX SERIES INFORMATION, OPERATION & MAINTAINANCE
 IMCO SCX SERIES INFORMATION, OPERATION & MAINTAINANCE Warning! Warning! Warning! Danger! Warning! 1. SCX & SCX4 Drives will not fit on a standard gimbal helmet, IMCO HELMET: #05-8025 Black or #05-8027
Technical Support (707)
") Installation Instructions CONSOLE MEGASHIFTER Fits: 1982-1992 Camaro & Firebird w/automatic Transmission *except 1988-1992 Firebird Formula Model Catalog # 80692 WORK SAFELY! For maximum safety, perform
Installation Instructions CONSOLE MEGASHIFTER Fits: 1982-1992 Camaro & Firebird w/automatic Transmission *except 1988-1992 Firebird Formula Model Catalog # 80692 WORK SAFELY! For maximum safety, perform
SATURN OVERDRIVE ASSEMBLY
 KIT CONSISTS OF: No. Qty Part No. Description P.O. Box 247, 4320 Aerotech Center Way Paso Robles, CA 93447 Telephone: (800) 350-2223 Fax: (805) 238-4201 PAGE 1 OF 11 Page Rev. Date: 07-26-18 P/N: SATURN
OVERLOAD CLUTCHES FOR INDEX DRIVES
 The Driving Force in Automation OVERLOAD CLUTCHES FOR INDEX DRIVES WARNING WARNING This is a controlled document. It is your responsibility to deliver this information to the end user of the CAMCO indexer.
HP7482X POWERGLIDE TRANSBRAKE KIT
 INSTALLATION INSTRUCTIONS FOR: HP7482X POWERGLIDE TRANSBRAKE KIT Please read all instructions carefully before beginning installation! Hughes Performance 2244 West McDowell Road Phoenix, Arizona 85009
Step 3: Remove the six 8mm retaining bolts for the pressure manifold switch assembly. The manifold switch will not be re-installed.
 1 INSTRUCTIONS TCI 274500/274501 4L80E Trans Brake Valve Body Thank you for choosing TCI products. We are proud to be your manufacturer of choice. Please read this instruction sheet carefully before beginning
Suspension System RS6509B
 88509 Rev H Requires the following for a complete installation: Quick disconnect end link kit RS6756B or solid end link kit RS6753B (for the Rubicon) Rancho exhaust kit RS720001 or RS720002 (or equivalent)
CHEETAH Competition Manual Valve Body - (PRN321) Part #27253
 Part #27253") 1535 Owens Road, Jacksonville, FL 32218 Phone 904-741-4850 * Fax 904-741-4853 CHEETAH Competition Manual Valve Body - (PRN321) Part #27253 Turbo Hydro 200-1976-Up FIRST, READ INSTRUCTIONS CAREFULLY, THEN
1535 Owens Road, Jacksonville, FL 32218 Phone 904-741-4850 * Fax 904-741-4853 CHEETAH Competition Manual Valve Body - (PRN321) Part #27253 Turbo Hydro 200-1976-Up FIRST, READ INSTRUCTIONS CAREFULLY, THEN
ASSEMBLY INSTRUCTIONS FOR SCION xa, xb SUPERLITE 4 BIG BRAKE FRONT BRAKE KIT WITH DIAMETER VENTED ROTOR* BASE PART NUMBER
 ASSEMBLY INSTRUCTIONS FOR 00-006 SCION xa, xb SUPERLITE BIG BRAKE FRONT BRAKE KIT WITH 1.88 DIAMETER VENTED ROTOR* BASE PART NUMBER 10-8335 DISC BRAKES SHOULD ONLY BE INSTALLED BY SOMEONE EXPERIENCED AND
Suspension System RS66102B
 890 Rev A Suspension System RS660B ( SPORT SYSTEM) 0 JEEP MODELS EQUIPED WITH 3.6L V6 ENGINE NEED EXHAUST MODIFYCATION KIT RS70003. OR REPLACEMENT FRONT DRIVESHAFT (DRIVESHAFT / EXHAUST CLERANCE ISSUE).
HORSTMAN GREASED LIGHTNING CLUTCH
 HORSTMAN GREASED LIGHTNING CLUTCH Horstman s Greased Lightning (GL) clutch is designed for ultra high performance, and requires expert setup and a serious commitment to maintenance. Warning!!! 1. Clutch
Ideal Installation. I & M Mark 67 (1/2 6 ) Control Line. Installation & Maintenance Instructions for Mark 67 Pressure Regulators
 Control Line. Installation & Maintenance Instructions for Mark 67 Pressure Regulators") I & M Mark (/ ) 0 Wasson Road Cincinnati, OH 0 USA Phone --00 Fax -8-00 info@richardsind.com www.jordanvalve.com Installation & Maintenance Instructions for Mark Pressure Regulators Warning: Jordan Valve
I & M Mark (/ ) 0 Wasson Road Cincinnati, OH 0 USA Phone --00 Fax -8-00 info@richardsind.com www.jordanvalve.com Installation & Maintenance Instructions for Mark Pressure Regulators Warning: Jordan Valve
INSTALLATION MANUAL FORD PI SEDAN PRISONER TRANSPORT SEAT WITH OS-BELT SEATBELTS (PI02) Required Tools:
 Required Tools:") INSTALLATION MANUAL FORD PI SEDAN PRISONER TRANSPORT SEAT WITH OS-BELT SEATBELTS (PI02) Required Tools: Drill Bits: 9/16 (.5625 ) Power Drill Socket Wrench Set Square #2 Driver Rubber Mallet Utility Knife
INSTALLATION MANUAL FORD PI SEDAN PRISONER TRANSPORT SEAT WITH OS-BELT SEATBELTS (PI02) Required Tools: Drill Bits: 9/16 (.5625 ) Power Drill Socket Wrench Set Square #2 Driver Rubber Mallet Utility Knife
Maintenance Instructions. World Leader in Modular Torque Limiters. JSE AEA Extruder Clutch
 World Leader in Modular Torque Limiters PROTECTING EQUIPMENT& MACHINERYYEARSInstallation and Maintenance Instructions JSE.5-0234AEA Extruder Clutch 1304 Twin Oaks Street Wichita Falls, Texas 76302 (940)
MODEL HD-P10000 PLANETARY WINCH
 OPERATING, SERVICE AND MAINTENANCE MANUAL MODEL HD-P10000 PLANETARY WINCH CAUTION: READ AND UNDERSTAND THIS MANUAL BEFORE INSTALLATION AND OPERATION OF WINCH. SEE WARNINGS! TABLE OF CONTENTS INTRODUCTIONS................................................................1
INSTRUCTIONS 1WARNING 6 SPEED TRANSMISSION SUPER KIT -J03481 REV General. Removal. Kit Number A
 INSTRUCTIONS -J03481 REV. 08-31-04 Kit Number 33100-03A 6 SPEED TRANSMISSION SUPER KIT General This kit fits 1990-1999 Softail and 1991-2000 Dyna model motorcycles. Requires separate purchase of cable
Hurst VMATIC3 INSTALLATION
 FORM 159 8530 07/12 Hurst VMATIC3 3-Speed & 4-Speed Automatic Shifter Catalog #3838530 2012 by Hurst Performance The Hurst Vmatic3 shifter can be used in vehicles equipped with most popular three speed
Take off case cover.
 33 14 520 Replacing complete locking differential (Type M) - final drive removed - Removing and installing final drive, included in Repair Manual MF, model-dependent, from '85, refer to 33 10 010. Drain
REFILL STATION REBUILD KIT P/N 14270NOS
 REFILL STATION REBUILD KIT P/N 14270NOS INSTRUCTION SHEET P/N 199R10338 1.0 DISASSEMBLY This procedure describes the removal of the air module from the fluid module and complete disassembly of the pump.
Tidland Air Brake. Installation, Operation, and Maintenance. Models 200, 250, 305, 380, 460, 610
 Tidland Air Brake Installation, Operation, and Maintenance Models 200, 250, 305, 380, 460, 610 TABLE OF CONTENTS TIDLAND CUSTOMER SERVICE... 2 RECOMMENDED TOOLS... 2 CAUTION... 2 INSTALLATION... 3 Caliper
RUBICRAWLER - JEEP TJ & JK ( ) W/ UNIVERSAL SHIFTER
 W/ UNIVERSAL SHIFTER") Paso Robles, CA 93447 PAGE 1 of 9 Telephone: (800) 350-2223 Fax: (805) 238-4201 Page Rev. Date: 09-25-15 KIT CONSISTS OF: No. Qty Part No. Description 1. 1 42R-JK - GEAR BOX Kit also includes: 1 42R350
Paso Robles, CA 93447 PAGE 1 of 9 Telephone: (800) 350-2223 Fax: (805) 238-4201 Page Rev. Date: 09-25-15 KIT CONSISTS OF: No. Qty Part No. Description 1. 1 42R-JK - GEAR BOX Kit also includes: 1 42R350
Light Truck MegaShifter
 Installation Instructions Light Truck MegaShifter The B&M Light Truck Megashifter shifter is designed to be used in most light trucks equipped with most popular three speed or four speed automatic transmissions.
Reproduction. Not for. Large Frame Dual Stage Snowthrowers. Parts Manual. Attachment
 Parts Manual Attachment Large Frame Dual Stage Snowthrowers Mfg. No. Description 1695987 (L1528E), 14.5TP 28" Dual Stage Snowthrower 1695988 (L1730E), 16.5GT 30" Dual Stage Snowthrower 1695996 (L1428EX),
AEROMOTIVE Part # INSTALLATION INSTRUCTIONS
 AEROMOTIVE Part # 14102 INSTALLATION INSTRUCTIONS CAUTION: Installation of this product requires detailed knowledge of automotive systems and repair procedures. We recommend that this installation be carried
MAINTENANCE MANUAL. Covering Models: Series (1/4-10 ) S Series (1/4-1 ) Series (3-10 )
 S Series (1/4-1 ) Series (3-10 )") BFMM4000 1-09 MAINTENANCE MANUAL Covering Models: 40-200 Series (1/4-10 ) 40-200S Series (1/4-1 ) 40-700 Series (3-10 ) REDUCED PRESSURE PRINCIPLE (RPZ) BACKFLOW PREVENTERS 1/4" - 10" AND REDUCED PRESSURE
BFMM4000 1-09 MAINTENANCE MANUAL Covering Models: 40-200 Series (1/4-10 ) 40-200S Series (1/4-1 ) 40-700 Series (3-10 ) REDUCED PRESSURE PRINCIPLE (RPZ) BACKFLOW PREVENTERS 1/4" - 10" AND REDUCED PRESSURE
Binks MODELS & AGITATOR DRIVE UNITS
 Binks MODELS 31-393 & 31-394 AGITATOR DRIVE UNITS for Agitator Equipped Drum MODEL 31-393 Includes the following items: 1, 2, and 3. 1 MODEL 31-394 shown. 17 4 3 2 12 13 14 15 2 3 8 5 9 11 8 10 6 7 17
36-1 Tooth Crank Trigger Systems for Small Block Chevy P/N Installation and Adjustment Instructions
 1.0 INTRODUCTION: 36-1 Tooth Crank Trigger Systems for Small Block Chevy P/N 556-116 Installation and Adjustment Instructions Congratulations on your purchase of a Holley 36-1 Tooth Crank Trigger System!
Easy Riser swing check valve Models E-1 & F-1
 Page 1 of 7 1. DESCRIPTION The Viking Easy Riser Swing Check Valve is a general purpose rubber-faced approved for use in fire service systems. The valve is for use in wet system risers, preaction system
Suspension System RS6507B (Rubicon models require end link kit RS6753B for a complete installation)
") 88507 Rev G Suspension System RS6507B (Rubicon models require end link kit RS6753B for a complete installation) Jeep Wrangler (JK) 88507 Rev G READ ALL INSTRUCTIONS THOROUGHLY FROM START TO FINISH BEFORE
88507 Rev G Suspension System RS6507B (Rubicon models require end link kit RS6753B for a complete installation) Jeep Wrangler (JK) 88507 Rev G READ ALL INSTRUCTIONS THOROUGHLY FROM START TO FINISH BEFORE
INSTALLATION INSTRUCTION 88088
 INSTALLATION INSTRUCTION 88088 For Rancho Suspension Systems RS6588 & RS6589: FORD F-150 READ ALL INSTRUCTIONS THOROUGHLY FROM START TO FINISH BEFORE BEGINNING INSTALLATION Rev B IMPORTANT NOTES! WARNING:
INSTALL ALL KIT COMPONENTS TO INSURE OPTIMUM PERFORMANCE OF THE REPAIRED PUMP.
 Repair Parts Sheet JL-4GBS Gas Power Units L1918 Rev. C 2/99 For Date Codes Beginning With "O" INSTALL ALL KIT COMPONENTS TO INSURE OPTIMUM PERFORMANCE OF THE REPAIRED PUMP. Repair parts that are included
Installation and Maintenance Instructions JSE MAEAD Extruder Clutch. World Leader in Modular Torque Limiters
 World Leader in Modular Torque Limiters Installation and Maintenance Instructions JSE.5-0104MAEAD Extruder Clutch 1304 Twin Oaks Street Wichita Falls, Texas 76302 (940) 723-7800 Fax: (940) 723-7888 E-mail: