JHYOCH MOTOR TECHNOLOGY CO.,LTD
|
|
|
- Roxanne Griffith
- 5 years ago
- Views:
Transcription
 USER S GUIDE www.")
1 E-BIKE MID DRIVE MOTOR SYSTEM (MODEL:MD.M11/12) USER S GUIDE 1
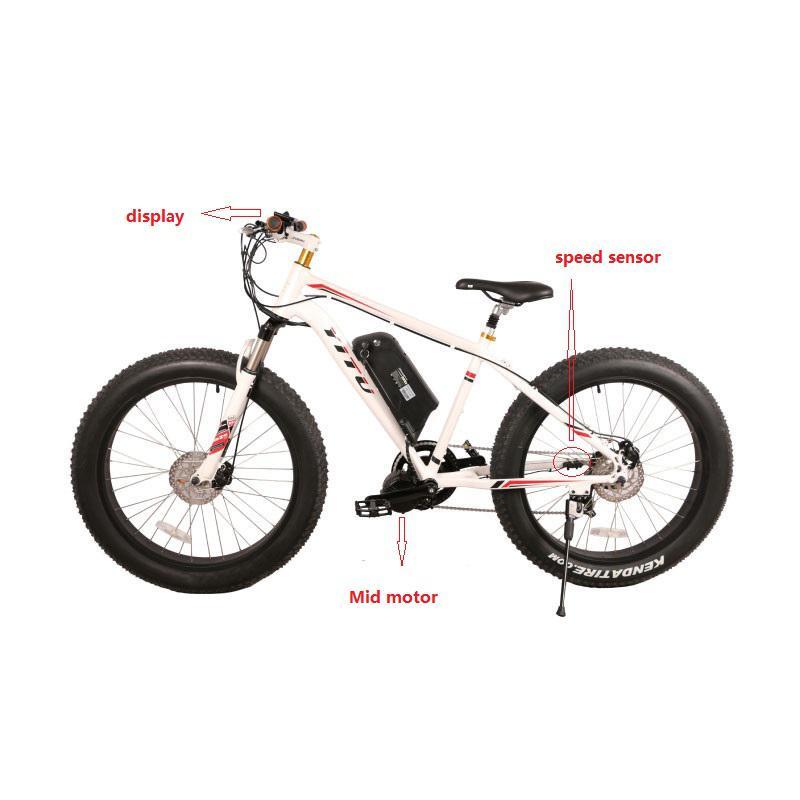
2 System composition 2
3 Catalog Central Motor 1 JHYOCH MOTOR TECHNOLOGY CO.,LTD 1.1 Scope of application and numbering rule Material and waterproof grade Main technical parameters Installation diagram Installation procedure 7-12 Display Material and waterproof grade 2.2 Dimension 2.3 Function 2.4 Button definition 2.5 Display Area 2.6 Power on/off 2.7 walking assist 2.8 Backlight and Capacity 2.9 Parameter setting 2.10 Malfunction Code Speed Sensor Installation dimension 3.2 Installation System connection diagram 4 4 System connection diagram 22 Notes 5 Notes 22 5 After service & Warranty 6 6 After service & warranty 23 Packing list 7 Packing list
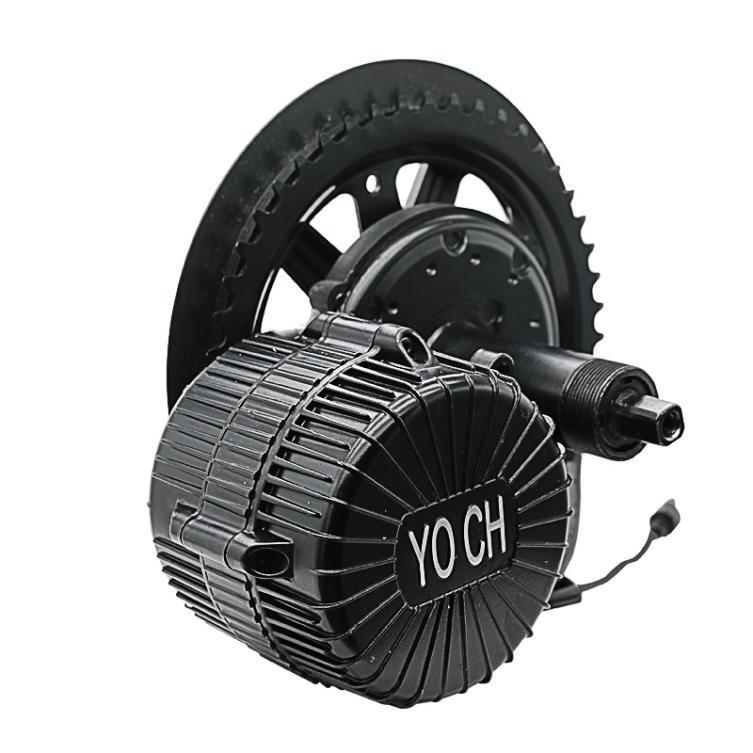
4 1.Central Motor Can be installed on standard bike frame easily. High starting torque, Max torque 80Nm, good performance on climbing. Double clutch is used on drive unit, more safety. Speed sensor and torque sensor can be applied, controller integrated. High efficiency, low consumption, long travel mileage. Countermark serial number on motor casing as following: MD.M V250W 1.1 Scope of application and numbering rule MD.M V350W;48V350W MD.M V500W;48V500W;48V750W;48V1000W 1.MD.M11 and MD.M12 all with speed sensor 2.The Bottom Bracket 68mm and 100mm is optional 3.MD.M11 and MD.M12 can be added your brand as your requirements. 1.2 Material and waterproof grade Die-cast aluminum electrophoresis black treatment, working environment temperature:-25-55, waterproof grade: IP Main technical parameters 4

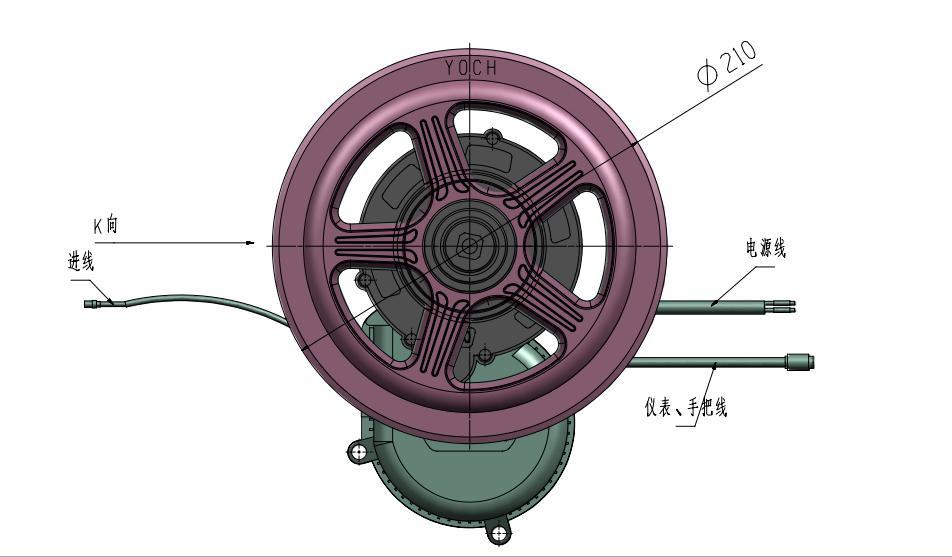
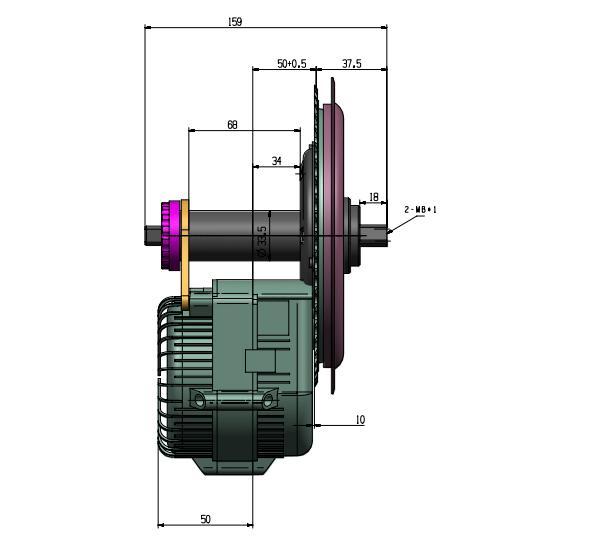
5 Above parameters as the default parameters, can be customized according to customer requirements. 1.4 Installation diagram 5
6 6

, then fix")
7 1.5 Installation procedure 1. Open the package and take out the drive unit and accessories; And check the specification whether it is correct. 2. Fix the chain wheel on drive unit with 5pcs screw M5*10, (see picture 1), then fix chain cover on chain wheel with 5pcs screw ST M5*10 High surface Lower surface Picture 1 7


8 3. Fix the drive unit axle tube on frame bottom bracket (see picture 2,picture 3) Left Right Picture 2 Drive unit axle tube Picture 3 ensure thread of axle tube extend bottom bracket more than 10mm 4. The surface with teeth of fixing plate towards inside, then fix the plate on drive unit with 2pcs M6*10.(see picture 4,picture 5) 8


9 the surface with teeth of fixing plate 2xM6 nut Outside surface without teeth Picture 4 Picture 5 5. Hold the drive unit near to bicycle fork, force less than 5KG, tight 1st nut M33 onto axle tube with force:30-40n.m (see picture 6) M33 nut Picture 6 6. Fix 2 nd nut M33 onto axle tube, tightening force:30-40n.m(see picture 7) 9

 M8 nut Left crank Picture 8 8.")
10 M33 nut Picture 7 7.Fix the left crank on the bike with M8 inner hexagon screw. Tightening force:35-40n.m (see picture 8) M8 nut Left crank Picture 8 8.Fix the right crank on the bike with M8 inner hexagon screw. Tightening force:35-40n.m (see picture 9) 10

 Connector")

11 M8 nut Right crank Picture 9 9.Connect all cables for battery, display, speed detecting sensor and so on (see picture 10-12) Connector for batetry Picture 10 Waterproof connector for 1T4 Picture

12 Waterproof connector for speed sensor Picture 12 2.Display D Material and waterproof grade Display s casing use black/silver ABS materials, display window use acrylic white transparent material. Working temperature of display: Waterproof grade: IP65. Ultrasonic is used for welding casing and display window. 2.2 Dimension(unit: mm) 12
13 2.3 Function D961 gets many functions for your enjoying riding. Show context: 1.Capacity 2.Speed (Speed/ MAX/AVG) 3.Distance (TRIP/ TOLTAL) 4.Time 5.Assist walking 6.Backlight 7.Error code 8.Levels setting 2.4 Button definition D961 display is equipped with integrated buttons. The three buttons are installed on the left side. The shape and location is as below: 13


14 D961 gets three buttons: 2.5 Display Area Display area includes battery capacity, riding mode, riding speed, single riding distance, total riding distance, and malfunction code of the electronic control system. Display area is as below: 14
, to start assist walking.highlights on scree. Vehicle goes at 6km/h. Only in case of pushing, can this function be used. Please don t abuse when riding.")
15 2.6 Power on/off Firstly, Long press Mode to start display. Long press M again to switch off. Then press to open system power(display below black font when power on) 2.7 Walking assist Long press (-), to start assist walking.highlights on scree. Vehicle goes at 6km/h. Only in case of pushing, can this function be used. Please don t abuse when riding. Secondly, press + add up speed level,press - cut down speed level. 2.8 Backlight and Capacity 15

16 Long pree (+) to switch on backlight on scree, and front light on as well if front light Note: Automatical backlight is available if controller gets this function. Backlight & front light on automatically according to the lightness outside if controller gets light sensor inside. Automatical function off when manual operation on. Level Press (+) or (-) to change the levels. Default range 0-3, 0 no output, 3 max output. Default level 1 when switch on. Capacity Four sections highlights when battery is full. Percentage of capacity for sections: <20% 20%-40% 40%-60% 60%-80% 80%-100% Frame flashes at 1 Hz when low power. 2.9 Parameter setting Makes sure good connection then power on. Long press M to start display. Long pree press (+) and (-) to setting mode. Unit Press (+) to change unit Km or Mile. Press M to save and skip to speed setting. Speed limit Limit range from 15Km/h to 40Km/h. Press press (+) or (-) to change the limit. Press M to save and skip to backlight setting. 16
 or (-) to change the hour, then press M to minute setting, press (+) or (-) to change the minute.")
 and (-) to setting mode, Then press (+) and (-) and no release, meanwhile press M eight times, to")
17 Backlight Press press (+) or (-) to change the brightness, range from 1 to 8. Press M to save and skip to time setting. Time Press (+) or (-) to change the hour, then press M to minute setting, press (+) or (-) to change the minute. Press M to save and exit. Setting effects after restart. Advanced setting Long press M to start display. Long pree press (+) and (-) to setting mode, Then press (+) and (-) and no release, meanwhile press M eight times, to advanced setting. 17
18 Wheel size setting Press (+) or (-) to change the wheel size. Range from 8 to 32 inch. Press M to save and skip to sleep time interval setting. Sleep time interval setting Press (+) or (-) to change the time, range from 0 to 60 munites. Display will sleep and cut off power after no operation on system for the setted time. Press M to save and skip to level amount setting. Level amount setting Press (+) or (-) to change the amount, range from 2 to 9 levels (excluding level 0). Press M to save and exit. 18
19 2.10 Malfunction Code 3. Speed Sensor By measuring the wheel RPM, the signal is transferred to the controller, the speed and mileage will be showed on the display. 3.1 Installation dimension 19

 of")
20 3.2 Installation 1. Speed sensor component 2. Fix the speed sensor on appropriate position (bottom fork is suggested) of frame by ribbon. 20


21 Tied by ribbon 3. Fix the magnet on spoke of rear wheel 4. Adjust the distance between speed sensor and magnet within 5mm Gap distance 5mm Fix the nut after adjust appropriate position 21
22 4 System connection diagram 5. Notes 1.Should be stocked in a dry ventilated warehouse, do not be stocked in a humid, acidic and alkaline area, not coexist with magnetic object 2.Each connector inserted according to arrow to arrow 3.Avoid sharp objects impact on display 4.Avoid overload for long time when using 5.Avoid wading and soaking 22
23 6 After service & warranty Timing and scope of warranty: Warranty period starts from date of Ex-factory, motor is within 24 months, controller, display, sensor and other electric components is within 18 months. YOCH limited warranty does not cover or apply to the following: 1) Damage, failure and/or loss caused by refitting, neglect, improper maintenance, competition or commercial purpose, misuse, abuse or accident; 2) Damage, failure and/or loss caused by shipping; 3) Damage, failure and/or loss caused by improper installation, adjusting or repairing. 4) Damage, failure and/or loss irrelevant to material and workmanship, e.g., failure to follow instructions by consumers; 5) Damage, failure and/or loss caused by product s appearance and surface change which doesn t affect its function. 6) Damage, failure and/or loss caused by unauthorized service or installation; 7) Damage, failure or loss caused by normal wear and tear. YOCH reserves the right to repair the components or replace the components, and is only responsible for repairing or replacing of the products. In case bike manufacturers or dealers encounter quality problems when using or selling YOCH products, they can report the purchase order number and products serial number to YOCH technology service department who makes sure that if the products are under warranty or not. If it is under warranty, YOCH will offer repair or replacement for free. If it is out of warranty, YOCH still can repair for customer, but the concerning material cost, labor cost, freight etc. will be paid by customer. If you have YOCH components on complete bikes need to be repaired, please contact the bike manufacturer or dealer directly. If this warranty statement is against to Chinese current law, the Chinese law shall prevail. YOCH reserves the right to modify the terms without any announcing in advance. 23
24 7.Packing list One set system per carton with packing list: 1.Mid motor 1 set 2.Didsplay 1 pcs 3.Brake 2 pcs 4.EB-BUS 1 pcs 5.Fixing plate 1 pcs 6.Chainwheel and chain cover 1 set 7.Crank 1 set 8.M5*10 nut 5 pcs 9.M6*16 nut 2 pcs 10.M33 nut 2 pcs 11.ST3.9 nut 5 cps 12.Speed sensor 1 pcs 13.Magnet 1 pcs 14.Specification 1 pcs Above components list is for reference only, it can be changed with different requirement. 24
Dillenger Electric Bikes
 E-BIKE CENTRAL MOTOR DRIVE SYSTEM (SYSTEM TYPE: BDS01) USER S GUIDE Version: V1.0 SUZHOU BAFANG ELECTRIC MOTOR SCIENCE-TECHNOLOGY CO.,LTD Dillenger Electric Bikes Continuously exceed customer expectations
BAFANG BBS01/BBS02 Installation Manual
 BAFANG BBS01/BBS02 Installation Manual Prepared for Customers of emax ebikes, Sydney, Australia. 1 Bafang About the Company Located in Suzhou Industrial Park, at the center of Yangtze River Delta, a convenient
EBikemarketplace. BAFANG BBS01/BBS02/BBSHD Installation Manual. Prepared for Customers of E-bike market place
 BAFANG BBS01/BBS02/BBSHD Installation Manual Prepared for Customers of E-bike market place Ebike Marketplace Arville 6585 Las Vegas, NV 89118 Page Number 1 Ebike Marketplace Arville 6585 Las Vegas, NV
dealer Manual MAX Drive System
 EN Suzhou Bafang Electric Motor Science-Technology Co., Ltd No. 9 Heshun Rd Suzhou Industrial Park 215122, Suzhou China bf@szbaf.com www.szbaf.com dealer Manual MAX Drive System 1 DEALER Manual Max Drive
Mid-Drive Electric Bicycle Kit EVBIKE-SET-CMS-48 EVBIKE-SET-CMS-36
 INSTALLATION MANUAL Mid-Drive Electric Bicycle Kit EVBIKE-SET-CMS-48 EVBIKE-SET-CMS-36 Thank you for purchasing EVBIKE product and we hope that you will become a happy user. Carefully read the entire manual
C600-LCD Instructions
 C600-LCD Instructions Content About the User Manual... 2 Outlook and Size... 2 Material and Color... 2 Button Definition... 3 Function Summary... 4 Function Summary... 4 Full View Area... 5 Normal View
Display. Specifications and Parameters of the Display. Appearance and Dimensions. Function Overview and Key Definitions. Materials and Dimensions
 Display Specifications and Parameters of the Display 48V Power Supply; Rated Current: 10.4mA Maximum Operating Current: 30mA Power-off Leakage Current:
Electric Bike Supplement
 Electric Bike Supplement Electric Bike Instruction. Congratulations on your purchase of a pedal assisted bicycle. This is a supplement to the general bicycle user manual. Please make sure that your new
C965 V5.0 DISPLAY English
 C965 V5.0 DISPLAY User Manual Dillenger C965 Display - V5.0 Speed mode Speed display Speed unit Battery indicator Lamp PAS Level Brake Error Mileage mode Mileage information English Please read through
Mid-Drive Electric Bicycle Kit EVBIKE-SET-CMS-36 EVBIKE-SET-CMS-48 EVBIKE-SET-CMS-68 EVBIKE-SET-CMS-100
 INSTALLATION MANUAL Mid-Drive Electric Bicycle Kit EVBIKE-SET-CMS-36 EVBIKE-SET-CMS-48 EVBIKE-SET-CMS-68 EVBIKE-SET-CMS-100 Thank you for purchasing EVBIKE product and we hope that you will become a happy
BB-LEISGER International GmbH
 Manual Display C6 BB-LEISGER International GmbH Function Display NORMAL OPERATION Section 4 4.1 PAS level selection 4.2 Error code indicator 4.3 SET operation Section 3 3.1 Speed indicator 3.2 KM/H & MPH
User Manual of Bagibike Electric Bicycles
 User Manual of Bagibike Electric Bicycles Model: Bagibike B16. http://www.bagibike.com Page 1 FOREWORD The following operation manual is a guide to assist you. This manual is not a complete document on
KODA USER MANUAL. Please read before operating your new bicycle.
 KODA USER MANUAL Please read before operating your new bicycle. INTRODUCTION Congratulations on the purchase of your new e-bike! We want to make you happy and believe your new e-bike will bring you lots
QiCycle Electric Folding Bike
 QiCycle Electric Folding Bike Overview Shifter Brake Handlebar Steering tube Steering tube fixer Steering tube fixer Headlight Front brake Motor Clip of saddle pin Backlight Saddle pin Saddle Schematic
LCD S900 User Manual. The Latest Version 2014
 LCD S900 User Manual The Latest Version 2014 1. Exterior Parameters Casing Material: ABS Display Material: High Hardness Acrylic (the same hardness value as tempered glass). Front View Side View Side View
GADIS USER MANUAL. Please, read before operating your new bicycle
 GADIS USER MANUAL Please, read before operating your new bicycle INTRODUCTION Congratulations on the purchase of your new electric bicycle! We want to make you happy and believe your new bicycle will bring
TERRAIN. Electric Bike User Manual. westhillbikes.com. HAVE A QUESTION? NEED HELP? Contact us on Facebook for a quick reply.
 TERRAIN Electric Bike User Manual HAVE A QUESTION? NEED HELP? Contact us on Facebook for a quick reply. westhillbikes.com Warranty Westhill bikes are covered by a limited 3-year warranty. Aside from general
F1 User Manual TDN15Z
 F1 User Manual 350-06740 TDN15Z 1 E-Tourer M1 User Manual Thank you for purchasing a E-Tourer E-Bike. With care and correct usage your electric bicycle will give many years of service. Please read this
1401 / 1402 / 1403 ADJUSTABLE TRAILING ARM MOUNT BRACES INSTALLATION OF HOTCHKIS PERFORMANCE ADJUSTABLE TRAILING ARM MOUNT BRACES
 1401 / 1402 / 1403 ADJUSTABLE TRAILING ARM MOUNT BRACES 1401 78-88 GM A/G-BODY / 1402 68-72 GM A-BODY / 1403 64-67 GM A-BODY Thank you for your purchase. Please call us at (562) 907-7757 if you have any
Electric Bike User Manual
 Electric Bike User Manual HAVE A QUESTION? NEED HELP? Contact us on Facebook for a quick reply. westhillbikes.com CLASSIC / ENERGISE / VOGUE WARRANTY Westhill bikes are covered by a limited 3-year warranty.
VLCD5 Manual. 1.Summar. 2.Specification. Specification Insta. Installation. llation Function Description... 3
 VLCD5 Manual 1.Summar Summary... 1 2.Specification Specification... 1 3.Insta Installation llation... 2 4.Function Description... 3 5. Operation Procedure... 4 5.1 Button Definition... 4 5.2 Operation
Torque sensing watt mid-drive motor installation manual.
 Torque sensing 250-350 watt mid-drive motor installation manual. SOLAR BIKE, 28 Cantonment street, FREMANTLE, WA, 6160, AUSTRALIA T: 0404 695 106 E: solbike@gmail.com Step 1. Motor installation Remove
EBIKE DIAGNOSIS FLOWS
 EBIKE DIAGSIS FLOWS 1 SUMMARY Check Tool Instructions 2 Display and Controller check tool 3 Display Holder check tool 7 Motor check tool 8 Battery check tool 9 Torque Sensor check tool 12 Customized controller
POWER ASSISTED BICYCLES OWNERS MANUAL
 OWNERS MANUAL Simply explained this is how your e.life bike basically works. Firstly may we congratulate you on purchasing your new electric power assisted e.bike. Please take time to read your manual.
UNIVERSAL EBIKE CONVERSION KIT INSTALLATION
 UNIVERSAL EBIKE CONVERSION KIT INSTALLATION! TABLE OF CONTENTS Part detail...2 Installation steps...3 System usage description...20 Instructions for the use of a charger...26 Things you must know before
XIAOMI-MI.COM. Xiaomi Yunbike C 1. Accessories XIAOMI-MI.COM. Battery Charging device Pedals х 2 Hex wrench Keys х 2 Wrench
 Xiaomi Yunbike C 1 Accessories Battery Charging device Pedals х 2 Hex wrench Keys х 2 Wrench 1. Wheel 2. Front sleeve 3. Fork 4. Front brake 5. Brake System 6. Headlights 7. Front steering cup 8. Wheel
Assembly Instructions
 1/12 BEAST MANUAL Table of Contents Bike Specs - pg. 3 Bike Assembly: Assembling the Wheels- pg. 4 Assembling the Stem- pg. 5 Assembling the Handlebar- pg.6 Attaching the Seat- pg. 6 Attaching the Pedals-
E-Bike components User manual Rear wheel motor
 E-Bike components User manual Rear wheel motor Contents Safety information 3 Riding the E-Bike 4 Product characteristics and specifications 5 Display 6 Battery 7 Battery charger 7 Charging the battery
Daymak warranties, services, and stocks parts for everything it sells. We support our products.
 EC1 User Manual About Daymak Daymak is one of Canada s largest Alternative Vehicle providers. We design, engineer, manufacture, import and repair everything from recreational dirt bikes, go-karts and electric
Attention! 1 Accessories. 2-1 Installation description ❹ ❺. Please proceed as follows
 Thank you for purchasing the TNT-B meter for Yamaha Bolt. Before installing, please read the instruction carefully and keep it for future reference. Attention! For installation, please follow the steps
MODEL MVX-2011 TANK MOUNT SPEEDOMETER/TACHOMETER
 MODEL MVX-2011 TANK MOUNT SPEEDOMETER/TACHOMETER Wiring Diagram The MVX-2011 gauges will work on 2011-up Softail models with 5 gauges or 2012-up Dyna models with 5 gauges. It is a direct plug in on these
4007 (Coupe) / 4008 (Convertible) Subframe Connectors Camaro/Firebird
 / 4008 (Convertible) Subframe Connectors Camaro/Firebird") 4007 (Coupe) / 4008 (Convertible) Subframe Connectors 67-69 Camaro/Firebird Thank you for your purchase from our new line of F-Body parts. Please call us at (877) 4NO - ROLL if you have any questions regarding
4007 (Coupe) / 4008 (Convertible) Subframe Connectors 67-69 Camaro/Firebird Thank you for your purchase from our new line of F-Body parts. Please call us at (877) 4NO - ROLL if you have any questions regarding
Where There is Miboxer There is Power. User Manual. Model No.: C4-12
 Where There is Miboxer There is Power User Manual Model No.: C4-12 Introduction C4-12 Is a highly advanced battery charger, that includes a power bank function. The charger automatically adapts the charge
Direct Drive EVBIKE-SET-36V - (26R, 26F, 28F)
") INSTALLATION MANUAL Direct Drive EVBIKE-SET-36V - (26R, 26F, 28F) Dear Customer, Congratulations on purchasing your EVBIKE. We believe that you will be fully satisfied with its operation. The electric
INSTALLATION MANUAL Direct Drive EVBIKE-SET-36V - (26R, 26F, 28F) Dear Customer, Congratulations on purchasing your EVBIKE. We believe that you will be fully satisfied with its operation. The electric
Installation Instructions
 Nov 3, 2017 G-Body Rear Coilover Conversion Kit 1 P a g e Installation Instructions The following instructions are intended for professional installers and are guidelines only. Speedtech Performance assumes
SUBARU OF TAIWAN WARRANTY EXTENDED PACKAGE
 SUBARU OF TAIWAN WARRANTY EXTENDED PACKAGE SUBARU vehicles are warranted for 3 years /100,000 km (whichever comes first) from the date of vehicle registration. This warranty extended package customers
PC60 Premium Multi-Parameter Tester (ph/ec/tds/salinity/temp.) Instruction Manual. APERA INSTRUMENTS, LLC V6.4
 Instruction Manual. APERA INSTRUMENTS, LLC V6.4") PC60 Premium Multi-Parameter Tester (ph/ec/tds/salinity/temp.) Instruction Manual APERA INSTRUMENTS, LLC www.aperainst.com V6.4 Thank you for purchasing Apera Instruments PC60 Premium Multi-Parameter Tester.
PC60 Premium Multi-Parameter Tester (ph/ec/tds/salinity/temp.) Instruction Manual APERA INSTRUMENTS, LLC www.aperainst.com V6.4 Thank you for purchasing Apera Instruments PC60 Premium Multi-Parameter Tester.
INSTALLATION, MAINTENANCE & SERVICE MANUAL
 INSTALLATI, MAINTENANCE & SERVICE MANUAL M151217L Product Specifications 20" (506mm) 3.3 (85mm) 9.8 (250mm) 38" (974mm) 4.2 (106mm) 9.8 (250mm) 48" (1208mm) 4.2 (106mm) 56" (1442mm) 4.2 (106mm) Wiring
V1.0. Showven Technologies Co.,Ltd.
 V1.0 Showven Technologies Co.,Ltd. SONICBOOM TM SMOKEJET USER MANUAL Foreword Thanks for choosing SHOWVEN SONICBOOM TM SMOKEJET. Please read following manual carefully and completely before operating this
EC1 Pocket Conductivity Tester Instruction Manual
 EC1 Pocket Conductivity Tester Instruction Manual OAKTON INSTRUMENTS www.4oakton.com v2.2 EC1 Pocket Conductivity Tester Instruction Manual 1. Battery Installation Please install batteries according to
NAVY REMOTE CONTROL USER MANUAL
 NAVY REMOTE CONTROL USER MANUAL Nov, 2018 Version 1.0 Copyright 2018 epropulsion All Rights Reserved Acknowledgement Thanks for choosing epropulsion products, your trust and support in our company are
Dummy Trailer Hitch Instructions
 Dummy Trailer Hitch Instructions Hiya. Thanks for buying a Surly Big Dummy trailer hitch. It is designed to replace the wheel yoke of your Surly Bill or Ted trailer, thereby making it possible to haul
Read this entire manual before operation begins.
 Rev. 12/12/2017 Read this entire manual before operation begins. Record below the following information which is located on the serial number data plate. Serial No. Model No. Date of Installation Contents
SPORT COIL SPRINGS Scion xa & xb Part #19412 INSTALLATION OF HOTCHKIS FRONT COIL SPRINGS
 SPORT COIL SPRINGS 2004+ Scion xa & xb Part #19412 Thank you for your purchase from our new line of Scion xa / xb parts. Please call us at (877) 4NO-ROLL if you have any questions regarding the service
TABLE OF CONTENTS TRAILER INFORMATION... 3 COUPLING TO THE TOW VEHICLE... 4 LOADING THE TRAILER... 9 CHECKING THE TRAILER... 10
 TABLE OF CONTENTS TRAILER INFORMATION... 3 COUPLING TO THE TOW VEHICLE... 4 COUPLING AND UNCOUPLING THE TRAILER FROM THE TOW VEHICLE... 4 BALL-HITCH COUPLER... 4 INSTRUCTIONS ON COUPLING TO THE TOWING
REMOVAL OF FACTORY GAUGE ULTRA FLHT & FLHX (STREET GLIDE
 MCL-36K-SPD Thank you for purchasing the Dakota Digital MCL-36K-SPD gauge for your Harley Davidson Touring bike. This kit is designed to be a direct, plug in replacement for all touring models from 2004
MODEL MCL /8 SPEEDOMETER/TACHOMETER for 2004 up
 MODEL MCL-3204 3-3/8 SPEEDOMETER/TACHOMETER for 2004 up IMPORTANT NOTE! This gauge has an odometer preset option that is only available one time in the first 100 miles (160km) of operation. See Odometer
CATEYE URBAN WIRELESS+
 CATEYE URBAN WIRELESS+ CYCLOCOMPUTER CC-VT5W Mounting the computer Setting up the computer Starting measurement This instruction manual is subject to change without notice. See our website for the latest
Chicane Coilover Kit For '64 to '72 Chevelle/ A Body. Installation Instructions
 Nov 3, 2017 Chicane Coilover Kit For '64 to '72 Chevelle/ A Body Installation Instructions Actual parts may vary from photo depending on application. 1 P a g e The following instructions are intended for
PACE 500 OWNER S MANUAL
 PACE 500 OWNER S MANUAL AVENTON PACE 500 OWNER S MANUAL Thank you for purchasing an Aventon Pace 500 E-Bike! Before riding, please take a moment to review these instructions. Need service or support? Visit
2000+ Silverado x4 P/N 2230
 2000+ Silverado 1500 4x4 P/N 2230 Thank you for your purchase of this Hotchkis product. Your Hotchkis Sway Bars were designed with the performance and durability you ve come to expect from Hotchkis Performance.
MODEL MCL-3212 SPEEDOMETER/TACHOMETER for 2012 up Dyna and Softail with 4 gauge
 MODEL MCL-3212 SPEEDOMETER/TACHOMETER for 2012 up Dyna and Softail with 4 gauge IMPORTANT NOTE! This gauge has an odometer preset option that is only available one time in the first 100 miles (160km) of
UTILITY INPUT MAINS OUTLET
 THIS MANUAL CONTAINS IMPORTANT SAFETY INSTRUCTIONS, KEEP THIS MANUAL HANDY FOR FUTURE REFERENCE. INSTALLATION AND OPERATION Before installation, please read and understand the following instructions: Inspect
'64-72 Chevelle/ A Body Rear Coilover Conversion Kit
 February 3, 2014 '64-72 Chevelle/ A Body Rear Coilover Conversion Kit Includes instructions for Currie Brand Axles The following instructions are intended for professional installers and are guidelines
JK CARGO STORAGE RACK
 1 JK CARGO STORAGE RACK #4820020 Important Notes: Prior to beginning this or any installation read these instructions to familiarize yourself with the required steps and evaluate if you are experienced
POWER ASSISTED BICYCLES LA GRANDE OWNERS MANUAL
 LA GRANDE OWNERS MANUAL Welcome to the World of e.bike cycling. Firstly may we congratulate you on purchasing your new electric power assisted e.bike. Please take time to read your manual. We have tried
Instruction Manual for E-bikes MD5
 Instruction Manual for E-bikes MD5 Table of contents 1. Your E-Bike..3 5 1.1 Introduction 1.2 General presentation of the vehicle 2. Function Display...6 13 2.1 Normal operation 2.2 Error code table 3.
Read this entire manual before operation begins.
 Read this entire manual before operation begins. Record below the following information which is located on the serial number data plate. Serial No. Model No. Date of Installation Contents Specifications.............
Rear Upper Camber Link (12425) Scion tc
 Scion tc") Rear Upper Camber Link (12425) Scion tc Thank you for your purchase from our new line of Scion tc parts. Please call us at (877) 4NO-ROLL if you have any questions regarding the service or installation
Rear Upper Camber Link (12425) Scion tc Thank you for your purchase from our new line of Scion tc parts. Please call us at (877) 4NO-ROLL if you have any questions regarding the service or installation
MODEL HLY-2001 rev. B TANK MOUNT SPEEDOMETER/TACHOMETER INFORMATION SYSTEM
 MODEL HLY-2001 rev. B TANK MOUNT SPEEDOMETER/TACHOMETER INFORMATION SYSTEM Please read this before beginning installation or wiring. POWER Connect the red wire from the main harness to accessory power
INSTALLATION INSTRUCTIONS
 INSTALLATION INSTRUCTIONS Thank you for purchasing ROXTERTM Hitch Mounted Mud Flaps. Agri-Cover, Inc. proudly manufactured these mud flaps using superior quality materials and workmanship. With proper
MCL-30K-SPD IMPORTANT NOTE!
 MCL-30K-SPD Thank you for purchasing the Dakota Digital MCL-30K-SPD gauge for your Harley Davidson Touring bike. This is designed to be a replacement for all touring models from 1996 2003. This is part
PIAA Multi-Fit 005/1100X Light Bracket Kits
 ENGLISH PIAA Multi-Fit 005/1100X Light Bracket Kits Thank you for your purchase. Please read all the instructions before beginning.! WARNING Lighting laws vary state to state, check your local laws before
GB C10WL. English page 1-18 D C10WL F C10WL I C10WL E C10WL NL C10WL. Deutsch Seite Français page Italiano pagine 57-74
 English page 1-18 Deutsch Seite 19-38 Français page 39-56 Italiano pagine 57-74 Español pagina 75-92 Nederlands pagina 93-1 D F I E NL ETRTO WS in mm KMH WS in inch MPH 47-305 16x1,75 1272 50,1 47-406
DLS-TP400 USER S MANUAL
 DLS-TP400 USER S MANUAL TPMS CONTENTS Safety Precautions...... 2 Packing List... 3 Standard Tools and Accessories... 4 Display Desktop Base Installation... 5 Cigarette Lighter Bracket Installation... 6
MCL-3014 gauge kit. Optional Readings: Boost Pressure with MBM-09, Front or Rear Air Suspension Pressure with MBM-19
 MCL-3014 gauge kit Thank you for purchasing the Dakota Digital MCL gauge kit for your Harley Davidson Touring bike. This kit is designed to be a direct plug in replacement for all touring models from 2014
Instruction Manual for DOHC 4-VALVE HEAD PISTON / CYLINDER KIT
 Instruction Manual for DOHC 4-VALVE HEAD PISTON / CYLINDER KIT Thank you for purchasing one of our TAKEGAWA s products. These piston and cylinder kits are for exclusive use in a motorcycle equipped with
Installation Instructions **THIS RAIL MOUNTING KIT USES 11 BOLTS**
 Installation Instructions CUSTOM QUICK INSTALL MOUNTING KIT FORD SUPER DUTY Part Numbers: 50074 WARNING:Under no circumstances do we recommend exceeding the towing vehicle manufacturers recommended vehicle
ELECTRIC BICYCLE USER MANUAL
 ELECTRIC BICYCLE USER MANUAL 1 Main Technical Parameters and Specification Weight: 23 kg Wheel size: 20 Maximum speed: 25 km/h E BIKE URBAN Range: Up to 45km (with pedal assist) Type: lithium Voltage:
EAGL 1-Touch Laser Level
 EAGL 1-Touch Laser Level Owner s Manual GENERAL INFORMATION Thank you for buying the EAGL 1-Touch laser. Although it is very simple to use, we recommend that you read this manual before operating the laser.
Interior Digital Load Scale 202-DDG-01. Installation and Operation Manual Please read carefully before installation
 Interior Digital Load Scale 202-DDG-01 Installation and Operation Manual Please read carefully before installation Contents Specifications:... 2 1.0 Installation and Set-up Overview... 3 2.0 Gauge Installation
MINI BIKE-2016 MB 200 Set-up Instruction
 MINI BIKE-2016 MB 200 Set-up Instruction 2016-06-01 1. Install rear shocks: open the crate and install the rear shocks with bolt M10x1.25x40 and self-locking nut M10x1.25. The requested torque is 37-44N.m
Interior Digital Load Scale 202-DDG-01. Installation and Operation Manual Please read carefully before installation
 Interior Digital Load Scale 202-DDG-01 Installation and Operation Manual Please read carefully before installation Specifications: Operating Temperature: -20 C to +85 C (-4 F to +185 F) Storage Temperature:
Sport Coil Springs (19425) Scion tc
 Scion tc") Sport Coil Springs (19425) Scion tc Thank you for your purchase from our new line of Scion tc parts. Please call us at (877) 4NO-ROLL if you have any questions regarding the service or installation of
Sport Coil Springs (19425) Scion tc Thank you for your purchase from our new line of Scion tc parts. Please call us at (877) 4NO-ROLL if you have any questions regarding the service or installation of
Warranty Statement. Global Commercial Warranty Statement. Commercial Generating Set Transfer Switch Switch Gear. A028U870 (Issue 1)
") Warranty Statement Global Commercial Warranty Statement Commercial Generating Set Transfer Switch Switch Gear English Effective Date: 01-March-2009 A028U870 (Issue 1) This page is intentionally left blank.
Warranty Statement Global Commercial Warranty Statement Commercial Generating Set Transfer Switch Switch Gear English Effective Date: 01-March-2009 A028U870 (Issue 1) This page is intentionally left blank.
User Manual of Solar LED Flood Light
 User Manual of Solar LED Flood Light HIGHLIGHT HL-FL-AUR SERIES Product Brief Introduction Thank you for using LED light SolarPath HIGHLIGHT HL-FL series. The design of Solar LED Light is the latest designed
LOUDSPEAKER OWNER'S MANUAL
 CDT ARCHITECTURAL LOUDSPEAKER OWNER'S MANUAL ARCHITECTURAL SPEAKERS IMPORTANT SAFETY INSTRUCTIONS 1. READ these instructions. 2. KEEP these instructions. 3. HEED all warnings. 4. FOLLOW all instructions.
A. Control Panel/Dash board buttons
 CONTENT I. Specifications II. Important Information III. Bike Overview IV. Safety guidelines V. Charging A. Indoor Charging B. Outdoor Charging VI. How to start the e-bike A. Key start B. Remote Start
Warranty Policy Omni United
 1 of 6 1/27/2017 3:14 PM omni-united.com Warranty Policy Omni United ABOUT RADAR TIRES LIMITED WARRANTY This limited warranty only applies to the original purchaser of new replacement Radar tires sold
94-96 Impala SS/ B-Body Rear Coilover Conversion Kit
 January 29, 2014 94-96 Impala SS/ B-Body Rear Coilover Conversion Kit The following instructions are intended for professional installers and are guidelines only. Speedtech Performance assumes NO responsibility
E-Bike components User manual Rear wheel motor
 E-Bike components User manual Rear wheel motor Contents Safety information 3 Riding the E-Bike 5 Product features and specifications 6 Display / lighting 7 Battery 8 Battery charger 8 Charging the battery
12/24 VOLT AUTOMATIC SOLAR CHARGE CONTROLLER
 12/24 VOLT AUTOMATIC SOLAR CHARGE CONTROLLER P/No.s SC320 & SC330 WARNING Please read these instructions completely prior to installation. Lead acid batteries can be dangerous. Ensure no sparks or flames
WARRANTY...1 NOTICE INTRODUCTION USE...8
 Contents WARRANTY...1 NOTICE...2 1 INTRODUCTION...3 1.1 ABOUT...3 1.2 UNPACKING...3 1.3 INCLUDED ITEMS...4 1.4 COMPONENTS...4 2 USE...8 2.1 POWER ON...8 2.2 SETTINGS...9 2.2.1 Setup Wizard...9 2.2.2 Set
MODEL MCL-2002 TANK MOUNT SPEEDOMETER/TACHOMETER
 MODEL MCL-2002 TANK MOUNT SPEEDOMETER/TACHOMETER *To avoid damage to motorcycle, please see Speedometer, Tachometer, and Status and Warning Indicators sections for details on locating VSS, Tachometer,
FRONT BAR INSTRUCTIONS
 2228, 2229, 2230, 2231 & 2232 Sway Bar Installation Instructions. 99+ Chevrolet Silverado/GMC Seirra Pickups FRONT BAR INSTRUCTIONS *NOTICE HOW THE STOCK SWAY BAR LOOKS i.e. BRACKET PLACEMENT, BENDS, etc.
Where There is Miboxer There is Power. User Manual. Model No.: C2-6000
 Where There is Miboxer There is Power User Manual Model No.: C2-6000 Introduction C2-6000 is a highly advanced battery charger, that includes a power bank function. The charger automatically adapts the
EX Series. Electric Actuators for Ball and Butterfly Valves
 EX Series Electric Actuators for Ball and Butterfly Valves Next-Generation Electric Actuator Realization of Upgraded General-Purpose Actuators The modularization and adoption of the common parts have brought
1401 / 1402 / 1403 ADJUSTABLE TRAILING ARM MOUNT BRACES INSTALLATION OF HOTCHKIS PERFORMANCE ADJUSTABLE TRAILING ARM MOUNT BRACES
 1401 / 1402 / 1403 ADJUSTABLE TRAILING ARM MOUNT BRACES 1401 78-88 GM A/G-BODY / 1402 68-72 GM A-BODY / 1403 64-67 GM A-BODY Thank you for your purchase. Please call us at (562) 907-7757 if you have any
Specifications. Product Name : LED Freezer Light. Model : Date : Version : A 1 ONN-X3F. Shenzhen Onn Semi-conductor lighting Co.
 Specifications Product Name : LED Freezer Light Model : ONN-X3F Date : 2016-9-7 Version : A 1 Introduction: 1. X3F have all the advantages of led fixture like Energy saving, long lifespan, CCT dimmable,
2406 SPORT LEAF SPRINGS 2WD EXT/QUAD CAB 97-UP DODGE DAKOTA
 2406 SPORT LEAF SPRINGS 2WD EXT/QUAD CAB 97-UP DODGE DAKOTA Thank you for your purchase from our line of Dodge Dakota & Durango suspension parts. Please call us at (877) 4NO-ROLL if you have any questions
Owner s Manual. CycloTricity Electric Bicycles. June 2016, 4 th edition. We strongly recommend you read this entire manual before using your bike.
 Owner s Manual CycloTricity Electric Bicycles June 2016, 4 th edition We strongly recommend you read this entire manual before using your bike. 1 Contents Part 1 Before use Page - Before first time use
INSTALLATION INSTRUCTIONS
 INSTALLATION INSTRUCTIONS Thank you for purchasing ROLTECTM Electric Hopper Conversion. Agri-Cover, Inc. proudly manufactured this hardware using superior quality materials and workmanship. With proper
System User Manual. Revision SRM GMBH
 System User Manual www.srm.de Revision 07132016 2016 SRM GMBH Checklist - Before Your First Ride To receive power data: Install the SRM PowerMeter crankset per manufacturers instructions Install cadence
Sport Sway Bar Kit VW Golf (GTI ), Jetta
, Jetta") Sport Sway Bar Kit 22813 VW Golf (GTI ), Jetta Thank you for your purchase from our new line of VW parts. Please call us at (877) 4NO - ROLL if you have any questions regarding the service or installation
Sport Sway Bar Kit 22813 VW Golf (GTI ), Jetta Thank you for your purchase from our new line of VW parts. Please call us at (877) 4NO - ROLL if you have any questions regarding the service or installation
MODEL MCL-2004(-R) TANK MOUNT SPEEDOMETER/TACHOMETER
 TANK MOUNT SPEEDOMETER/TACHOMETER") MODEL MCL-2004(-R) TANK MOUNT SPEEDOMETER/TACHOMETER Wiring Diagram The MCL-2004(-R) gauges will work on 2004-2011 models except 2011 Softail. It is a direct plug in on these models and requires no additional
MODEL MCL-2004(-R) TANK MOUNT SPEEDOMETER/TACHOMETER Wiring Diagram The MCL-2004(-R) gauges will work on 2004-2011 models except 2011 Softail. It is a direct plug in on these models and requires no additional
MoistureMatch A next generation grain tester
 MoistureMatch A next generation grain tester A next generation moisture tester incorporating new and unique technology. Finally, a portable tester that will more accurately match and track with the commercial
SERVICE BOOKLET. 1. Terms and conditions of the warranty. 2. Handover document. 3. Service intervals. 4. Bike passport. 5. Change of ownership
 SERVICE BOOKLET 1. Terms and conditions of the warranty 2. Handover document 3. Service intervals 4. Bike passport 5. Change of ownership 6. Other Terms and conditions of the warranty // 2 Congratulations
Interior Digital Load Scale 202-DDG-02. Installation and Operation Manual Please read carefully before installation
 Interior Digital Load Scale 202-DDG-02 Installation and Operation Manual Please read carefully before installation Contents Specifications:... 2 1.0 Installation and Set-up Overview... 3 2.0 Gauge Installation
AC Irrigation and Propagation Controllers I Four Station, 5006-I and 5006-IP Six Station
 AC Irrigation and Propagation Controllers 5004-I Four Station, 5006-I and 5006-IP Six Station I N S T R U C T I O N M A N U A L Table of contents Introduction 1 1. Specifications 1 2. Controller Mounting
ELECTRIC ROSE USER MANUAL ELECTRIC BICYCLE MODEL #: JERO16 VERSION #: 1
 USER MANUAL ELECTRIC ROSE ELECTRIC BICYCLE MODEL #: JERO16 VERSION #: 1 Congratulations on your new Jetson Electric Rose Electric Bicycle! Before your first ride, please check whether the wheels are damaged,