DUAL FLUSH VALVE SKIPPER 45 BOTTOM INLET VALVE COMPACT 99B ASSEMBLY INSTRUCTIONS
|
|
|
- Randell Walsh
- 6 years ago
- Views:
Transcription

1 DUAL FLUSH VALVE SKIPPER 45 BOTTOM INLET VALVE COMPACT 99B ASSEMBLY INSTRUCTIONS
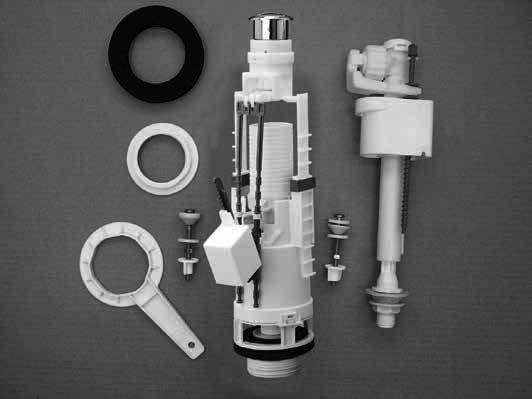

2 DESCRIPTION a b e f d i g h c j k l m o n
3 PARTS SUPPLIED FITTINGS SUPPLIED a b c d e f g h Dual pushbutton () Valve body () Rubber Washer () Fixing nut () Sealing Gasket () Inlet valve () Inlet Rubber Washer () Backnut () i j k l m n o Spanner () Bolt () Sealing washer () Washer (4) Nut () Butterfly nut () Spare Diaphragm Washer () Tools required (not spplied): Slotted screwdriver and adjustable spanner. Advice: Before you Start - Read these instructions carefully. - Check the pack and make sure you have all the parts on the pack list. - Remove all packaging from pottery and check for surface damage or defects. - Prepare a firm working surface (e.g; floor or bench) for cistern assembly, covering work surface with cloth to prevent scratching the glazed faces of the cistern. Care & Use - Wipe clean with a soft damp cloth around the WC suite. - Never use scourers or abrasives. Water connection - Water connection should be made only with an approved tap connector (not supplied). Preparatory sealing compounds should not be used. Maintenance Your new product is designed to have a long life span, however under certain conditions e.g. hard water, «water hammer», excessive water pressure or installation debris in the water pipe, it is possible that the life span of the diaphragm washer will be reduced. To ensure long lasting customer satisfaction, a spare diaphragm washer is included in this pack.
.")
 through washer (K) and sealing washer (L) then place through cistern and secure with washer (K) and nut (M) using adjustable spanner.")
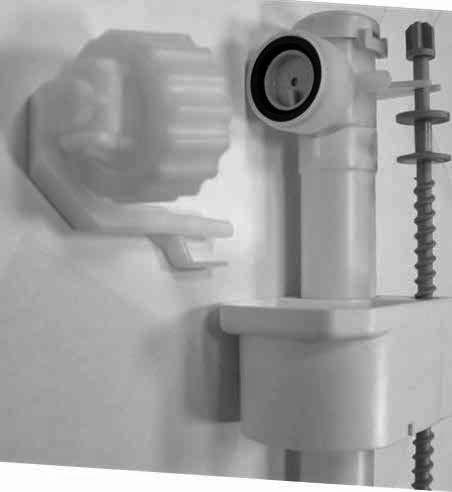
4 I - ASSEMBLING THE INLET VALVE Place Inlet valve (F) through Inlet hole with inlet Rubber Washer (G) inside the cistern. Secure with backnut (H) but ensure float moves freely up and down valve body. NB : Manually screw the backnut until it is in contact with the ceramic. If necessary give an extra quarter turn (maximum). Excessive tightening can damage the mechanism and would not be covered by the guarantee. Slide bolt (J) through washer (K) and sealing washer (L) then place through cistern and secure with washer (K) and nut (M) using adjustable spanner. WARNING : In case the suite purchased is Seattle, please turn the float of the inlet by 90. An approved double check valve or some other no less effective backflow prevention device shall be fitted at the point of connection(s) between the supply and the fitting. II - ASSEMBLING THE OUTLET VALVE Assemble the valve body (B) through cistern with rubber washer (C) on inside of the cistern. Secure Fixing nut (D). NB : Manually screw the flush valve nut until it is in contact with the ceramic. If necessary give an extra quarter turn (maximum) with the spanner (I). Excessive tightening can damage the mechanism and would not be covered by the guarantee. WARNING : The small float must be positioned on opposite side from inlet valve 4
.")
 () Unclip rods (x) () Adjust to correct height Replace")
5 III - ASSEMBLING CISTERN TO PAN Slide sealing gasket (E) over fixing nut Slide cistern onto W.C. backplate by locating screws through W.C. Cistern Secure using butterfly nut (N). Pan Butterfly nut (N) IV - ADJUSTMENT OF VALVE HEIGHT Try the lid on the cistern to see if the valve is too high or too low : To adjust : 4 5 Remove clips (x) () Unclip rods (x) () Adjust to correct height Replace clips (x) () Clip back rods (x) (). () () 5
.")


6 V - SETTING WATER LEVEL Connect the supply to the inlet valve. N.B. : Make connecting tightness with filter seal or seal of flexible hose (if supplied). WARNINGS: - Do not overtight in any case. - Do not use any sealing paste and/or compound in any case - Do not use connector handling the internal part of the inlet valve. SIAMP will be not responsible in case these warnings are not respected. Allow cistern to fill and by screwing the grey bolt slide the float to set water level to waterline. Ensure movement of float is not restricted. VI - ADJUSTING SMALL FLUSH Move the small float such it be cm under water level. Water level cm VII - ASSEMBLING THE BUTTON Put the lid on the cistern and screw the button down, without pushing the central part. WARNING : Wind tubular inner grey ring anti clockwise to its highest position 6


7 THE FINISHED ASSEMBLY INSIDE THE CISTERN MAINTENANCE Servicing the valve To access the valve, unscrew the assembly as shown. () () To change the diaphragm washer inside the inlet valve Turn off the water supply to the inlet valve. Unscrew the knurled nut at the top of the inlet valve Remove the black rubber diaphragm washer 4 Insert the replacement washer 5 Screw the nut back onto the inlet valve, ensuring that the lift arm is holding the float valve correctly 6 Turn the water supply back on 4 7


8 DUAL FLUSH VALVE SKIPPER 45 BOTTOM INLET VALVE COMPACT 99B Siamp UK Unit C, Meadowbank Business Park, Tweedale Way, Hollinwood Oldham, OL9 8EH Ref
Compact Concealed Toilet Cistern with Dual flush CNC1001
 Compact Concealed Toilet Cistern with Dual flush CNC1001 Compact Concealed Toilet Cistern with Dual flush Compact concealed toilet cistern with dual flush can be used with any of the back to wall toilets
WC-Unit. Assembly instructions I00128_NOV 16
 IföSign 6861 WC-Unit 6861 Assembly instructions I00128_NOV 16 Ifo Sign Toilet Increased Height - S Trap Free standing toilet with 460mm seat height for those who cannot easily sit down or stand up - especially
Height Adjustable Dual Flush Siphon
 No Code No Description 7 00 00 Macdee Motion Flush selector Macdee Motion siphon cap with chimney 00 Macdee Motion piston base and flaps 8 007 008 009 Macdee Motion Lock Macdee Motion bell housing Macdee
Versailles Walnut Toilet Seat Versailles Walnut Toilet Seat Soft Close
 Description Versailles High Level Toilet Fired Earth Product Code COMPLEMENTARY PRODUCTS Description Versailles White Toilet Seat Versailles White Toilet Seat Soft Close Versailles Walnut Toilet Seat Versailles
C25. Parts supplied: 1: Flush Valve installation
 urlington 440mm slimline close coupled cistern tank with back and bottom entry water supply with button flush C5 Parts supplied: Please read these instructions carefully to avoid damage to the valves,
Installation & aftercare instructions
 INSTRUCTIONS Whilst this item has a high quality durable finish, it should nevertheless be treated with care. Surfaces should be cleaned using only a soft damp cloth and clean water & dried using a soft
1901 Thermostatic Shower Mixer
 1901 Thermostatic Shower Mixer (Universal Valve with Adjustable Riser, Surface Mounted Valve with Rigid Riser or Recessed Valve with Fixed Head) Fitting Instructions & Contents List Before starting any
Excel Wall and Deck Mounted Bath Shower Mixers Installation and User Guide
 005 Excel Wall and Deck Mounted Bath Shower Mixers Installation and User Guide 1559.006 1559.007 MODEL NUMBERS Important :- Please quote the above model number(s) when ordering spares. IMPORTANT! Installer:
Pipe Flaring Tool Kit (for on-car use)
") 4850 Pipe Flaring Tool Kit (for on-car use) www.lasertools.co.uk Introduction Flaring Tool Kit Components 4850 Brake Pipe Flaring Tool Kit (for on-car use) 1: De-burr tool 2: Hydraulic ram 7 2 5 Designed
4850 Pipe Flaring Tool Kit (for on-car use) www.lasertools.co.uk Introduction Flaring Tool Kit Components 4850 Brake Pipe Flaring Tool Kit (for on-car use) 1: De-burr tool 2: Hydraulic ram 7 2 5 Designed
INSTALLATION INSTRUCTIONS
 INSTALLATION INSTRUCTIONS Concealed cistern equipped with a water saving Dual flush valve * Réf. W760B/C : SOLÉMUR Réf. 9770B : with universal support frame Réf. W751B/C : with self supporting frame Réf.
BATH FILLER & BATH / SHOWER MIXER Installation & aftercare instructions
 GENERAL NOTES This mixer should be installed in accordance with water regulations. Approved check valves should be fitted where required. For further details please contact your local water authority.
VOLKSWAGEN AMAROK MY17> 1 & 3 PIECE HARD TONNEAU REMOTE LOCKING KIT INSTALLATION INSTRUCTIONS
 VOLKSWAGEN AMAROK MY7> & PIECE HARD TONNEAU REMOTE LOCKING KIT INSTALLATION INSTRUCTIONS Care Instructions: Clean Tonneau Cover with a mild detergent and water solution. Do not use abrasive cleaners or
Close Coupled/Low Level Cistern 51cm Ceramic lever C1 Close Coupled/Low Level Cistern 51cm Ceramic Front Button C2. 1: Inlet Valve 2: Flush Valve
 Close Coupled/Low Level 5cm Ceramic lever C Close Coupled/Low Level 5cm Ceramic Front Button C : Inlet Valve : Flush Valve 0 Half flush float Should be set on the "" mark 5 4 "" scale Exposed "9" steps
INSTALLATION INSTRUCTIONS TOILET. Castello & Sienna Back-to-Wall
 INSTALLATION INSTRUCTIONS TOILET Castello & Sienna Back-to-Wall NOTE: Our Back-to-Wall toilet suites are suitable for both a rear & side entry water inlet. BEFORE YOU BEGIN Before proceeding with installation,
INSTALLATION, OPERATION, AND MAINTENANCE MANUAL
 INSTALLATION, OPERATION, AND MAINTENANCE MANUAL MODEL 4D-200 REDUCED PRESSURE PRINCIPLE (RPZ) & MODEL 4D-700 REDUCED PRESSURE DETECTOR ASSEMBLY (RPDA) BACKFLOW PREVENTERS 2 ½ 10 Conbraco Industries Inc.
MAZDA BT-50 (October 2011 Production Onwards) 1 & 3 PIECE HARD TONNEAU REMOTE LOCKING KIT INSTALLATION INSTRUCTIONS
 1 & 3 PIECE HARD TONNEAU REMOTE LOCKING KIT INSTALLATION INSTRUCTIONS") MAZDA BT-50 (October 0 Production Onwards) & 3 PIECE HARD TONNEAU REMOTE LOCKING KIT INSTALLATION INSTRUCTIONS Installation Time: Approx. 0 Minutes Care Instructions: Clean Tonneau Cover with a mild detergent
MAZDA BT-50 (October 0 Production Onwards) & 3 PIECE HARD TONNEAU REMOTE LOCKING KIT INSTALLATION INSTRUCTIONS Installation Time: Approx. 0 Minutes Care Instructions: Clean Tonneau Cover with a mild detergent
HYDRAULICS. TX420 & & lower. Hydraulic Tandem Pump Removal. 4. Remove the LH side panel (Fig. 0388).
.") TX420 & 425 240000299 & lower 4. Remove the LH side panel (Fig. 0388). Hydraulic Tandem Pump Removal Note: Cleanliness is a key factor in a successful repair of any hydraulic system. Thoroughly clean all
TX420 & 425 240000299 & lower 4. Remove the LH side panel (Fig. 0388). Hydraulic Tandem Pump Removal Note: Cleanliness is a key factor in a successful repair of any hydraulic system. Thoroughly clean all
G SERIES - E TOUCH MIXER / TAP
 PLUMBERS Installation and maintenance INSTRUCTIONS G SERIES - E TOUCH MIXER / TAP electronically operated MIXER / TAP G Series E Touch Basin Tap G Series E Touch Basin Mixer 1 IS1301C (03/15) INDEX 3 IMPORTANT
Primus Wind Power. AIR Circuit Replacement Instructions
 Primus Wind Power AIR Circuit Replacement Instructions Items included with this kit: (see Exploded View p. 3) ITEM ITEM NAME QUANTITY 1 SCREW - SOCKET HEAD - 10-24 X 1-1/2" 4 includes 1 spare 2 O-RING
DB4604 GMR-SD and GMR40-SD Disc Brake Caliper - Spring Applied, Air Released
 DB464 GMR-SD and GMR4-SD Disc Brake Caliper - Spring Applied, Air Released Nominal dimensions given. For specific dimensions please contact Twiflex Limited. For GMR Mk 2 caliper details see DB 364 Air
INSTALLATION, OPERATION AND MAINTENANCE MANUAL (IOM)
") INSTALLATION, OPERATION AND MAINTENANCE MANUAL (IOM) IOM-1088 03-16 Model 1088 Vacu-Gard Blanketing Valve ISO Registered Company SECTION I I. DESCRIPTION AND SCOPE The Model 1088 Vacu-Gard is a tank blanketing
INSTALLATION, OPERATION AND MAINTENANCE MANUAL (IOM) IOM-1088 03-16 Model 1088 Vacu-Gard Blanketing Valve ISO Registered Company SECTION I I. DESCRIPTION AND SCOPE The Model 1088 Vacu-Gard is a tank blanketing
3 litres. 6 litres. Lever Flush Cistern Fittings - Close Coupled / Low Level Cistern 51cm - Close Coupled / Low Level Cistern 44cm
 Lever lush ittings - Close Coupled / Low Level 5cm - Close Coupled / Low Level 44cm All WC s come with a 3/6 litre flush as standard which can be reduced to a.5/4.5 litre flush for the slimline cisterns
Ebony Tap Range. Installation Instructions & User Guide. Please keep these instructions for future reference
 Ebony Tap Range Installation Instructions & User Guide Please keep these instructions for future reference Contents Thank you for choosing Bristan, the UK s leading showers and taps expert. We have designed
GMR-S and GMR40-S Disc Brake Caliper - Spring Applied, Air Released
 (GMR) 9 (GMR) ø GMR-S and GMR-S Disc Brake Caliper - Spring Applied, Air Released DB Nominal dimensions given. For specific dimensions please contact Twiflex Limited. For GMR Mk caliper details see DB
Southwest Windpower Instruction Sheet AIR-X Circuit Replacement Kit
 Southwest Windpower Instruction Sheet AIR-X Circuit Replacement Kit Tools Required 5 / 32 Hex key 5 / 16 Hex key 7 / 64 Hex key Standard screwdriver Pair of external snap ring pliers Rubber mallet Hammer
Zip FlushMaster Surface mounted sensor
 Installation and Maintenance Instructions Zip FlushMaster Surface mounted sensor Water Saver Urinal Flushing System Keeps Urinals Clean & Reduces Water Wastage WS002 40090 Zip FlushMaster Surface Mounted
FlushMaster Cistern & Valve assembly
 Installation and operation instructions FlushMaster Cistern & Valve assembly Model 43099NZ - FlushMaster Std. Cistern* and Valve assembly (75mm Body) Model 41096NZ - FlushMaster Cistern Outlet valve 75mm
Introduction Date: October 2007 Pt No INSTRUCTION KIT JOINER RF 1 KIT COMPONENTS
 KIT COMPONENTS Part Illustration Rear Bracket Description Front Lower Bracket KIT APPLICATION This kit is designed for use on 1595mm / 62 & 1695mm / 66 high cabinet models, incorporating the B, C, D &
Maintenance Information
 Form 04584058 Edition 1 November 2004 Air Impactool 2141P and 2141PSP Maintenance Information Save These Instructions Disassembly General Instructions 1. Do not disassemble the tool any further than necessary
3PC TONNEAU COVER WITH SPORTS BAR INSTALLATION INSTRUCTIONS
 3PC TONNEAU COVER WITH SPORTS BAR INSTALLATION INSTRUCTIONS TC00d / Vehicle Description: NISSAN NAVARA D0 DUAL CAB 3-PIECE TONNEAU COVER PARTS LIST NO. PART NAME QTY. NO. PART NAME QTY. NO. PART NAME QTY.
Curvare Tap Range. Fitting Instructions & Contents List
 Curvare Tap Range Fitting Instructions & Contents List Please keep these instructions for future reference and request of replacement parts Contents Page 1. Introduction 03 2. Safety Note 03 3. Specification
3PC TONNEAU COVER INSTALLATION INSTRUCTIONS. Ford Ranger/Mazda BT-50 (without bedliner)
") 3PC TONNEAU COVER INSTALLATION INSTRUCTIONS Ford Ranger/Mazda BT-50 (without bedliner) Care Instructions: Clean Tonneau Cover with a mild detergent and water solution. Do not use abrasive cleaners or solvents.
3PC TONNEAU COVER INSTALLATION INSTRUCTIONS Ford Ranger/Mazda BT-50 (without bedliner) Care Instructions: Clean Tonneau Cover with a mild detergent and water solution. Do not use abrasive cleaners or solvents.
M&H VALVE RESILIENT SWING CHECK MAINTENANCE MANUAL
 M&H Valve Co. Division of McWANE, Inc. 605 West 23 rd Street P.O. Box 2088 Anniston, AL 36202 Telephone (256) 237-3521 Fax (888) 549-5309 M&H VALVE RESILIENT SWING CHECK MAINTENANCE MANUAL I. SELECTION
PERFORMANCE GPM of Water At Total Head in Feet
 Please read and save this Repair Parts Manual. Read this manual and the General Operating Instructions carefully before attempting to assemble, install, operate or maintain the product described. Protect
Installation must be in Accordance with AS/NZS
 Installation must be in Accordance with AS/NZS 3500.1. Contents 5 Step Easy Install... 3 Installation Requirements... 3 Cistern Service Access Options... 4 Button Service Access Options... 5 Installing
Cistern cover Cistern cover Cistern cover MIO Cistern cover TIGO
 8.2634.4.000.000.1 Cistern cover 826342 DINO NO NAME 8.2761.4.000.000.1 Cistern cover 827612 827613 8.2771.4.000.000.1 Cistern cover 8.2821.4.000.000.1 Cistern cover 8.2827.4.000.000.1 Cistern cover LYRA
1-1/2 Inch Self-Priming Centrifugal Pumps Refer to pump manual for General Operating and Safety Instructions.
 Please read and save this Repair Parts Manual. Read this manual and the General Operating Instructions carefully before attempting to assemble, install, operate or maintain the product described. Protect
TOYOTA TRUCKS / SUVs COLD AIR INTAKE Section I Installation Preparation. 4.0L V6 (1GR-FE) Part Number(s): PTR
 Part Number(s): PTR") Section I Installation Preparation Part Number(s): PTR05-35061 Kit Contents Item # Quantity Reqd. Description 1 1 Intake Tube 2 1 Air Filter Housing 3 1 TRD Air Filter w/ #096 clamp 4 1 Adapter, Filter
Section I Installation Preparation Part Number(s): PTR05-35061 Kit Contents Item # Quantity Reqd. Description 1 1 Intake Tube 2 1 Air Filter Housing 3 1 TRD Air Filter w/ #096 clamp 4 1 Adapter, Filter
VOLKSWAGEN AMAROK 3 PIECE HARD TONNEAU COVER INSTALLATION INSTRUCTIONS
 VOLKSWAGEN AMAROK 3 PIECE HARD TONNEAU COVER INSTALLATION INSTRUCTIONS Care Instructions: Clean Tonneau Cover with a mild detergent and water solution. Do not use abrasive cleaners or solvents. Place these
Engine Oil Cooler Hose/Pipe Replacement (4WD)
") Page 1 of 9 1998 Chevrolet Blazer - 4WD Blazer, Bravada, Jimmy, S10 Pickup, Sonoma (VIN S/T) Service Manual Engine Engine Mechanical - 4.3L Repair Instructions Document ID: 179331 Engine Oil Cooler Hose/Pipe
Page 1 of 9 1998 Chevrolet Blazer - 4WD Blazer, Bravada, Jimmy, S10 Pickup, Sonoma (VIN S/T) Service Manual Engine Engine Mechanical - 4.3L Repair Instructions Document ID: 179331 Engine Oil Cooler Hose/Pipe
DA Series Diaphragm Valve
 DA Series Diaphragm Valve Service Instructions Pneumatically Actuated Valve Toggle Valve Valve Valve Valves are shown with tube butt weld ends. These instructions also apply to DA series valves with any
Your Guide to the Installation, Care and maintenance of PERFORMA. Electronic Self Closing Fittings - Mains Powered 886V (343029) 885V (343027)
 885V (343027)") Your Guide to the Installation, Care and maintenance of PERFORMA Electronic Self Closing Fittings - Mains Powered 886V (343029) 885V (343027) Pegler Limited, St Catherine s Avenue, Doncaster DN4 8DF Telephone
Your Guide to the Installation, Care and maintenance of PERFORMA Electronic Self Closing Fittings - Mains Powered 886V (343029) 885V (343027) Pegler Limited, St Catherine s Avenue, Doncaster DN4 8DF Telephone
Lever Flush Cistern Fittings Arcade close coupled cistern ARC5C
 Lever Flush Cistern Fittings rcade close coupled cistern RC5C ll WC s come with a /6 litre flush as standard which can be reduced to a.5/4.5 litre flush for the slimline cisterns On the Close Coupled WC
Sachs shock manual. ( ) 2 & 4 Stroke RR Enduro. ( ) RS Dual Sport
 2 & 4 Stroke RR Enduro. ( ) RS Dual Sport") Sachs shock manual (2013 2015) 2 & 4 Stroke RR Enduro (2014-2015) RS Dual Sport 1 Introduction The procedures in this manual must take place in a clean environment using professional tools and some specific,
Sachs shock manual (2013 2015) 2 & 4 Stroke RR Enduro (2014-2015) RS Dual Sport 1 Introduction The procedures in this manual must take place in a clean environment using professional tools and some specific,
Self-Priming Centrifugal Pumps Refer to pump manual for General Operating and Safety Instructions.
 Please read and save this Repair Parts Manual. Read this manual and the General Operating Instructions carefully before attempting to assemble, install, operate or maintain the product described. Protect
D40C HINGE # x Support Plate x M8 Bolt 8 x M8 Washer 6 x M6 20mm Bolts 6 x M6 Washers 19 x Screws
 HINGE # 1017 2 x Support Plate 1018 8 x M8 Bolt 8 x M8 Washer 6 x M6 20mm Bolts 6 x M6 Washers 19 x Screws 2 x Lid mount gas strut bracket 1041 2 x Self tap strut mount 1040 1 x Central Lock bracket 1510
BMW N54 TWIN TURBO THROTTLE BODY HARD PIPE INSTALLATION INSTRUCTIONS
 BMW N54 TWIN TURBO THROTTLE BODY HARD PIPE INSTALLATION INSTRUCTIONS Tools needed: Short flat blade screwdriver T20, T25 Torxs 14mm spanner Needle nosed pliers 7mm hose clamp driver Safety eyewear, footwear,
Installation instructions
 Installation instructions Akrapovič Exhaust Systems: Racing and Evolution for the HONDA CRF250R *503981* www.akrapovic.com www.akrapovic.com Congratulations on purchasing an Akrapovič exhaust system. Please
500R MIXER SYPHON TYPE WATER TANK WORKSHOP MANUAL
 500R MIXER SYPHON TYPE WATER TANK WORKSHOP MANUAL WINGET LIMITED PO BOX 4 EDGEFOLD INDUSTRIAL ESTATE PLODDER LANE BOLTON LANCS BL4 OLS TEL: ++ 44 (0) 04 854650 FAX: ++ 44 (0) 04 854663 service@winget.co.uk
Vertico Sink Mixer. Installation Instructions & User Guide. Please keep these instructions for future reference and request of replacement parts
 Vertico Sink Mixer Installation Instructions & User Guide Please keep these instructions for future reference and request of replacement parts Contents Thank you for choosing Bristan, the UK s leading
Soft Touch Tap Range. Fitting Instructions & Contents List. Please keep these instructions for future reference and request of replacement parts
 Soft Touch Tap Range Fitting Instructions & Contents List Please keep these instructions for future reference and request of replacement parts Contents Page 1. Introduction 03 2. Safety Note 03 3. Specification
New Options Bath Shower Mixer
 New Options Bath Shower Mixer Fitting Instructions & Contents List Please keep these instructions for future reference and request of replacement parts Contents Page 1. Introduction 02 2. Safety Note 02
only white space between fixing screws: 160 mm cistern without valves, side inlet only white space between fixing screws: 160 mm
 H826344000000 8.2634.4.000.000. Cistern cover only white DINO H826344000000 8.2634.4.000.000. Cistern cover 826342 DINO NO NAME H826642000000 8.2664.2.000.000. Cistern without valves, side inlet only white
Dismantling and assembling automatic transmission (A5S560Z) (transmission removed)
 (transmission removed)") 24 00 585 Dismantling and assembling automatic transmission (A5S560Z) (transmission removed) Secure transmission to assembly frame with special tool 24 0 180. Drain off transmission oil. Screw special
24 00 585 Dismantling and assembling automatic transmission (A5S560Z) (transmission removed) Secure transmission to assembly frame with special tool 24 0 180. Drain off transmission oil. Screw special
WATER SOFTENER SEMI AUTOMATIC INSTALLATION & OPERATING INSTRUCTIONS. Serial No :
 WATER SOFTENER SEMI AUTOMATIC INSTALLATION & OPERATING INSTRUCTIONS Model : Serial No : SAS0922.. Manufacturer and Supplier of FILTRATION & WATER TREATMENT PRODUCTS for commercial, industrial and residential
Lights CONTINUED TURN SIGNAL/SIDE MARKER LIGHT HEADLIGHT PARKING LIGHT. Maintenance 237
 Check the operation of your car s exterior lights at least once a month. A burned out bulb can create an unsafe condition by reducing your car s visibility and the ability to signal your intentions to
EVAC Commercial Marine Equipment TOILET TECHNICAL DATA EVAC 90, STAINLESS STEEL, FLOOR MODEL, *SHOCK TESTED. Fresh water.
 16 Apr 2009 Doc. 1:141J TECHNICAL DATA 5327002 EVAC 90, STAINLESS STEEL, FLOOR MODEL, *SHOCK TESTED Fresh water connection Shut-off valve Strainer Vacuum breaker 390 Gasket Seat and cover Pneumatic push
Troubleshooting Guide HYBRIDFLUSH AEF-801 SERIES
 PUSH Troubleshooting Guide HYBRIDFLUSH AEF-80 SERIES AUTOMATIC/MANUAL FLUSH VALVE SYSTEM FOR WATER CLOSETS (TOILETS) AND URINALS Advanced Modern Technologies Corporation 9800 Nordhoff Place, Chatsworth,
Check valves are for the prevention of backflow. Particular check valves perform additional services as follows:
 KENNEDY VALVE Division of McWane, Inc. 1021 East Water Street P.O. Box 931 Elmira, New York 14902-0931 Telephone (607) 734-2211 Fax (607) 734-1003 KENNEDY VALVE RESILIENT SWING CHECK MAINTENANCE MANUAL
INSTALLATION INSTRUCTIONS for EXPOSED PULSAR FLUSH VALVES
 INSTALLATION INSTRUCTIONS for EXPOSED PULSAR FLUSH VALVES Pulsar Water Closet Flush Valve for 1 1/2 Top Spud Pulsar Urinal Flush Valve 3/4 Top Spud Prior to Installation All Plumbing is to be installed
Maintenance Information
 16573347 Edition 2 February 2014 Air Grinder Series 88H Maintenance Information Save These Instructions Product Safety Information WARNING Failure to observe the following warnings, and to avoid these
URGENT : Ensure that the precautions relating to safety and cleanliness are adhered to (refer to the brochure: RECOMMENDATIONS - PRECAUTIONS).
.") PAGE 1 - b1eg1xp0 - removing - refitting timing belt removing - refitting timing belt INJECTION ES9J4S URGENT Ensure that the precautions relating to safety and cleanliness are adhered to (refer to the
PAGE 1 - b1eg1xp0 - removing - refitting timing belt removing - refitting timing belt INJECTION ES9J4S URGENT Ensure that the precautions relating to safety and cleanliness are adhered to (refer to the
1PC TONNEAU COVER INSTALLATION INSTRUCTIONS IMPORTANT
 For use in cleaning painted metal, glass and other vehicle surfaces. For external use only. Dispose of properly after use. IMPREGNATED WITH 70% ISOPROPLY ALCOHOL TC0d PC TONNEAU COVER INSTALLATION INSTRUCTIONS
Compact Easy Rollator M66739
 User Instructions Compact Easy Rollator M66739 Maximum Safe Working Load 21st 135kg Please ensure these Instructions are fully read and understood before using this equipment. Retain these instructions
Insert the lower end of the flush pipe into the pan via the flush cone (supplied as part of the cistern fittings). HANDY HINT
. HANDY HINT") Low Level Flush Pipe kit T31 CHR Mount the cistern securely on the wall at the height of 750mm from the underside of the cistern to the floor using the fixing holes through the rear of the cistern and
Low Level Flush Pipe kit T31 CHR Mount the cistern securely on the wall at the height of 750mm from the underside of the cistern to the floor using the fixing holes through the rear of the cistern and
Series 100 Slam Shut Valve
 IMP 8775 Series 00 Slam Shut Valve Sizes ", ", 4" Installation & Maintenance Instructions Read carefully and follow all instructions shipped with this regulator. The incorrect installation of this equipment
FOR USE WITH SLOAN S ORIGINAL OPTIMA PLUS FLUSHOMETER PRODUCED FROM AND REGAL PRO OPTIMA PLUS PRODUCED AFTER MAY, 2003
 Maintenance Guide SENSOR OPERATED VALVES FOR USE WITH SLOAN S ORIGINAL OPTIMA PLUS FLUSHOMETER PRODUCED FROM 1992-2003 AND REGAL PRO OPTIMA PLUS PRODUCED AFTER MAY, 2003 The Sloan Valve Company introduced
SUNNY PRO INDOOR CYCLING BIKE
 SUNNY PRO INDOOR CYCLING BIKE SF-B901 USER MANUAL IMPORTANT! Please retain owner s manual for maintenance and adjustment instructions. Your satisfaction is very important to us, PLEASE DO NOT RETURN UNTIL
OWNER S MANUAL EVOLUTION 3500, 4500, 5500, & 8500 SERIES PUMPS
 OWNER S MANUAL EVOLUTION 3500, 4500, 5500, & 8500 SERIES PUMPS IMPORTANT SAFETY INSTRUCTIONS When installing and using this electrical equipment, basic safety precautions should always be followed, including
AKRAPOVIC SLIP-ON EXHAUST SYSTEM for the DUCATI MONSTER S4R (03-06) & DUCATI MONSTER S2R (05-06)
 & DUCATI MONSTER S2R (05-06)") Installation instructions: *350125* AKRAPOVIC SLIP-ON EXHAUST SYSTEM for the DUCATI MONSTER S4R (03-06) & DUCATI MONSTER S2R (05-06) Congratulations on purchasing an Akrapovic exhaust system. Please read
Installation instructions: *350125* AKRAPOVIC SLIP-ON EXHAUST SYSTEM for the DUCATI MONSTER S4R (03-06) & DUCATI MONSTER S2R (05-06) Congratulations on purchasing an Akrapovic exhaust system. Please read
PRO INDOOR CYCLING BIKE
 PRO INDOOR CYCLING BIKE SF-B901 USER MANUAL IMPORTANT! Please retain owner s manual for maintenance and adjustment instructions. Your satisfaction is very important to us, PLEASE DO NOT RETURN UNTIL YOU
Navigator ADS551 Low level dissolved oxygen Replacement / Upgrade procedures wet section spares
 Instruction replacement procedure INS/ANAINST/025 EN Rev. A Navigator ADS551 Low level dissolved oxygen Replacement / Upgrade procedures wet section spares Kit references: flowcell, tundish, flowmeter,
6-12 WIDESPREAD 6-12 W. Cleopatra Series INSTRUCTION GUIDE SAVE THIS INSTRUCTION GUIDE
 INSTRUCTION GUIDE STEP-BY-STEP ILLUSTRATED INSTALLATION INSTRUCTIONS TROUBLE SHOOTING & REPAIR TIPS 20 YEAR LIMITED WARRANTY PROPER FINISH CARE Read these instructions carefully before installing your
Installation Instructions Vantage Tap Range
 Installation Instructions Vantage Tap Range Models covered: VT 1/2 C, VT BASNW C, VT 3/4 C, VT BF C, VT BSM C Please keep this booklet for future reference. Installer, when you have read these instructions
These instructions are to be left with the user
 MIRA ADVANCE SHOWER FITTINGS Installation & User Guide These instructions are to be left with the user 1 ConTENTS Introduction...3 Specification...4 Pack Contents...5 Dimensions...6 Installation...7 Operation...14
VANDAL RESISTANT FITTINGS VR105, VR125, VR145 (VR106, VR115 Export only) PRODUCT MANUAL IMPORTANT
 PRODUCT MANUAL IMPORTANT") VANDAL RESISTANT FITTINGS VR105, VR125, VR145 (VR106, VR115 Export only) PRODUCT MANUAL SHOWER FITTINGS IMPORTANT Installer: This Manual is the property of the customer and must be retained with the product
VANDAL RESISTANT FITTINGS VR105, VR125, VR145 (VR106, VR115 Export only) PRODUCT MANUAL SHOWER FITTINGS IMPORTANT Installer: This Manual is the property of the customer and must be retained with the product
INSTALLATION GUIDE KPF Single Lever Kitchen Faucet With Pull-Out Sprayer
 INSTALLATION GUIDE KPF-21 Single Lever Kitchen Faucet With Pull-Out Sprayer www.kraususa.com I Toll Free: 1.800.775.0703 I 2017 Kraus USA Inc. I REV. August 7, 2017 Congratulations on the purchase of your
Maintenance Information
 04581245 Edition 2 May 2014 Air Grinder, Die Grinder and Sander Series G2 (Angle) Maintenance Information Save These Instructions Product Safety Information WARNING Failure to observe the following warnings,
6. Cylinder Head. 2-3 SERVICE PROCEDURE 5. Camshaft - 6. Cylinder Head A: REMOVAL
 2-3 SERVICE PROCEDURE 5. Camshaft - 3. RELATED PARTS 1) Install valve rocker assembly. B2M0418B Tightening torque: N m (kg-m, ft-lb) T1: 5±1 (0.5±0.1, 3.6±0.7) T2: 12±1 (1.2±0.1,
Quadra Single Lever Mono Basin Mixer. Telephone Parts and Specification
 Parts and Specification Part Number Screw cap P0001-11 Grub screw P0002-11 Lever P0008-9 Shroud P0051-1 Cartridge nut P0052-1 Filter holder P0057-1 Filter P0058-1 Cartridge P0014-2 Filter screws P0059-1
Maverick American 3085 Bluff Street Boulder, CO Tel: Fax: ML7.2 SHOCK SERVICE MANUAL
 Maverick American 3085 Bluff Street Boulder, CO 80301 Tel: 303-415-0370 Fax: 303-415-0676 www.maverickamerican.com ML7.2 SHOCK SERVICE MANUAL 1. OVERVIEW 1.1. The Maverick ML7.2 rear shock is an oil damped
Installation instructions
 Installation instructions Akrapovič Exhaust Systems: Slip-On for the HONDA CRF450R FOR CLOSED COURSE COMPETITION USE ONLY. NOT INTENDED FOR STREET USE. *503657* www.akrapovic.com www.akrapovic.com Congratulations
Installation, Operation and Maintenance Manual
 Installation, Operation and Maintenance Manual for the MOGAS ISOLATOR 2.0 Floating Ball Valve 1, 1.5, 2, 3 and 4 inch PREPARE THE VALVE FOR INSTALLATION INSTALL THE VALVE PROPERLY MAINTAIN THE VALVE FOR
C24 C30. Parts supplied: 1: Flush Valve installation
 urlington 50mm close coupled cistern tank with back and bottom entry water supply with lever flush urlington Extended depth 50mm close coupled cistern tank with back and bottom entry water supply with
DESCRIPTION MAINTENANCE
 Specifications Information and Repair Parts Manual 316F-95 and 316F-99 Please read and save this Repair Parts Manual. Read this manual and the General Operating Instructions carefully before attempting
Installation and Operation Instructions
 Installation and Operation Instructions FlushMaster Cistern & Valve Assembly Model 43099 - FlushMaster Std. Cistern* and Valve assembly (75mm Body) Model 41096 - FlushMaster Cistern Outlet valve 75mm dia.
AKRAPOVIC SLIP-ON & SLIP-ON STREET LEGAL EXHAUST SYSTEM for the SUZUKI GSX-R 1000 (2005, 2006)
") Installation instructions: *350154* AKRAPOVIC SLIP-ON & SLIP-ON STREET LEGAL EXHAUST SYSTEM for the SUZUKI GSX-R 1000 (2005, 2006) Congratulations on purchasing an Akrapovic exhaust system. Please read
Installation instructions: *350154* AKRAPOVIC SLIP-ON & SLIP-ON STREET LEGAL EXHAUST SYSTEM for the SUZUKI GSX-R 1000 (2005, 2006) Congratulations on purchasing an Akrapovic exhaust system. Please read
AKRAPOVIC SLIP-ON SP SERIES EXHAUST SYSTEM for the YAMAHA FZ6, FZ6 FAZER, FZ6 S2 ( )
") Installation instructions: *350115* AKRAPOVIC SLIP-ON SP SERIES EXHAUST SYSTEM for the YAMAHA FZ6, FZ6 FAZER, FZ6 S2 (2004-2008) Congratulations on purchasing an Akrapovic exhaust system. Please read these
Installation instructions: *350115* AKRAPOVIC SLIP-ON SP SERIES EXHAUST SYSTEM for the YAMAHA FZ6, FZ6 FAZER, FZ6 S2 (2004-2008) Congratulations on purchasing an Akrapovic exhaust system. Please read these
Sail Extension Tap Range
 Sail Extension Tap Range Installation Instructions & User Guide Please keep these instructions for future reference Contents Thank you for choosing Bristan, the UK s leading showers and taps expert. We
and 1/4 TURN SECOND STAGE REGULATOR TAL 502 (L) Rev. 0 MSA 2005 Prnt. Spec (I) Mat Doc
 Rev. 0 MSA 2005 Prnt. Spec (I) Mat Doc") and 1/4 TURN SECOND STAGE REGULATOR TAL 502 (L) Rev. 0 MSA 2005 Prnt. Spec. 10000005389 (I) Mat. 10064383 Doc. 10064383 REGULATOR COMPONENTS Item Part No. Description 1 MASK MOUNTED REGULATOR ASSEMBLY
and 1/4 TURN SECOND STAGE REGULATOR TAL 502 (L) Rev. 0 MSA 2005 Prnt. Spec. 10000005389 (I) Mat. 10064383 Doc. 10064383 REGULATOR COMPONENTS Item Part No. Description 1 MASK MOUNTED REGULATOR ASSEMBLY
Manual 28ST Version 1.2
 Manual 28ST Version 1.2 GENERAL INFORMATION Due to the best choice of materials and high precision in manufacturing, we recommend, dismantling, cleaning and lubricating the winch only every second year.
Operating & Maintenance Manual Compact Domestic Booster Set Model BTAF Arrow Valves
 Arrow Valves Ltd Tel 01442 823123 Fax 01442 823234 Installation Instructions/ Operating & Maintenance Manual Pent-A-Boost Compact Domestic Booster Set Models BTAF 700 900 1200 230-240 V Single Phase &
The Powermatic User Guide Test Sieve Shaker
 The Powermatic User Guide Test Sieve Shaker ISSUE 04-02 Contents Description Page 1 Setting Up: 2-8 Unpacking 2 Assembly 3-4 Levelling 4 Electrical Connections 5 Sieve Stacking 6-8 Operating Instructions
Tel: +44 (O) Customer Service hours: Monday - Friday 9am-5pm
 Customer Service hours: Monday - Friday 9am-5pm") Congratulations on your new scooter! Proper assembly and operation of your scooter is important for your safety and enjoyment. Our customer service department is dedicated to your satisfaction with Pacific
Congratulations on your new scooter! Proper assembly and operation of your scooter is important for your safety and enjoyment. Our customer service department is dedicated to your satisfaction with Pacific
5. Cylinder Head. 2-3a [W5A1] SERVICE PROCEDURE A: REMOVAL 1. RELATED PARTS 2. CYLINDER HEAD
![5. Cylinder Head. 2-3a [W5A1] SERVICE PROCEDURE A: REMOVAL 1. RELATED PARTS 2. CYLINDER HEAD](/thumbs/89/100992456.jpg "5. Cylinder Head. 2-3a [W5A1] SERVICE PROCEDURE A: REMOVAL 1. RELATED PARTS 2. CYLINDER HEAD") 2-3a [W5A1] SERVICE PROCEDURE A: REMOVAL 1. RELATED PARTS 1) Release fuel pressure. 2) Drain engine coolant. 3) Remove V-belt(s). 4) Remove generator and bracket.
2-3a [W5A1] SERVICE PROCEDURE A: REMOVAL 1. RELATED PARTS 1) Release fuel pressure. 2) Drain engine coolant. 3) Remove V-belt(s). 4) Remove generator and bracket.
KLINGER. Instructions for installation and operation of. Reflex level gauges K D asbestos-free. wt 3017/11 Page 1.
 Page 1 Instructions for installation and operation of KLINGER Reflex level gauges K D asbestos-free Edition: 06/2003 Fluid Control GmbH Am Kanal 8-10 A-2352 Gumpoldskirchen/AUSTRIA Telefon:++43(0) 2252
AKRAPOVIC SLIP-ON EXHAUST SYSTEM for the SUZUKI GSX-R1300 HAYABUSA (2008)
") Installation instructions: *502023* AKRAPOVIC SLIP-ON EXHAUST SYSTEM for the SUZUKI GSX-R1300 HAYABUSA (2008) Congratulations on purchasing an Akrapovic exhaust system. Please read these installation instructions
Installation instructions: *502023* AKRAPOVIC SLIP-ON EXHAUST SYSTEM for the SUZUKI GSX-R1300 HAYABUSA (2008) Congratulations on purchasing an Akrapovic exhaust system. Please read these installation instructions
GP-2000 : Trouble Shooting. Cause of problems
 VOL: MA-GP2000-2 Troubleshooting GP-2000 Technical Knowledge GP-2000 : Trouble Shooting Cause of problems 1: s related to other factors 2: s on the pressure reducing valve A : Reduced pressure exceed specified
Installation instructions
 Installation instructions Akrapovič Exhaust System Slip-On and Slip-On High Mounted for the Honda VFR 1200F 2010 *502653* www.akrapovic.com www.akrapovic.com Congratulations on purchasing an Akrapovič
Sub Section Title Page No.
 Sub Section Title Page No. 1 Introduction 3 2 Routine Maintenance 3 3 Disassembly 4 3.1 Disassembly of Double Crank Design 4 3.2 Disassembly of Scotch Yoke Design 5 3.3 Disassembly of Actuator Cylinder