Real "Cool" Avionics. Making a ducting tee for cooling air
|
|
|
- Patience Webb
- 6 years ago
- Views:
Transcription

1 Real "Cool" Avionics Making a ducting tee for cooling air TESTING HAS VERIFIED THAT FOR most electronic components or systems the equipment's life span can usually be correlated to operating temperature. That's why manufacturers often include a statement in their user's guides that suggest or require that an air source for cooling the electronic equipment be part of the hardware installation. From the baking heat of a summer tarmac and the close proximity of other heat-generating components to the biting chill at high altitudes, avionics are often subjected to more severe temperature variations than their ground-based counterparts, which live in more controlled environments. With that in mind, when technicians install avionics they often provide a source of cooling air. A common installation that provides this cooling air is a small air scoop riveted to the airframe just forward of the aircraft's door. The air scoop channels outside air through the fuselage wall to a plenum where scat tubing is connected. This tubing transfers the cooler air to the innards of an avionics box, like a transceiver. The installation of the scoop requires a 1/4-inch starter hole drilled into the fuselage skin and enlarged to 1/2 or 5/8 inches with a Greenlee punch. Additional small holes will also need to be drilled to accept the rivets that will hold the scoop to the fuselage skin. Although the scoop creates little drag, the real penalty is the cost and time needed to install the scoop. A low-cost alternative, which does not require drilling holes in the fuselage, is a ducting tee. Making a Ducting Tee Most aircraft have an air duct system that supplies outside cool air to the cabin. This air is carried from an air scoop or other port to a plenum, where it may be mixed with warm air for winter operations. The ducting tee is simply in- 91
.")
2 serted into the scat tubing before it reaches the heat-mixing plenum and siphons some of the cool air for the avionics. The tee is constructed from acrylic tubing, which you can purchase from various sources, like U.S. Plastic Corporation (visit The outside diameter (OD) is matched to the inside diameter (ID) of the vent system scat tubing (e.g., 2.25 inches). A common air input to the avionics bay consists of a 1-inch long nipple by 5/8-inch OD. The 92

3 nipple is welded or press-fit to the rear of the avionics tray. Thus, the scat tubing between the tee and the avionics must have a 5/8-inch inside diameter. For test purposes, our initial installation included tubing with ridges on the inside wall. Air flowing through the tubing created a whistling sound whose pitch changed with aircraft airspeed. 1 suspect that this may have been the first instance of a flying pipe organ. Changing the tubing type to CEET (scat with an inside, as well as outside, coating) eliminated the resonant sound since CEET (available from Aircraft Spruce & Specialty) has a smooth inner surface. Cut the large diameter acrylic tube to a length of 5 inches. Use a fine-tooth saw because acrylic has a tendency to shatter. 1 used a hacksaw to make most of the cut and finished the last few strokes with a fine-tooth hacksaw blade. Sand the cut surface with 100-grit sandpaper. Drill a starter hole with a 1/8-inch bit and gradually widen the hole to a 5/8-inch diameter. Elbow Bending The elbow that is mounted inside of the tee body is simply a 5- inch piece of 1/2-inch ID by 5/8-inch OD acrylic tubing bent to a 90-degree angle. Because the tubing is rigid, you must heat it before you bend it. Use a large diameter shallow pot filled with 3 93
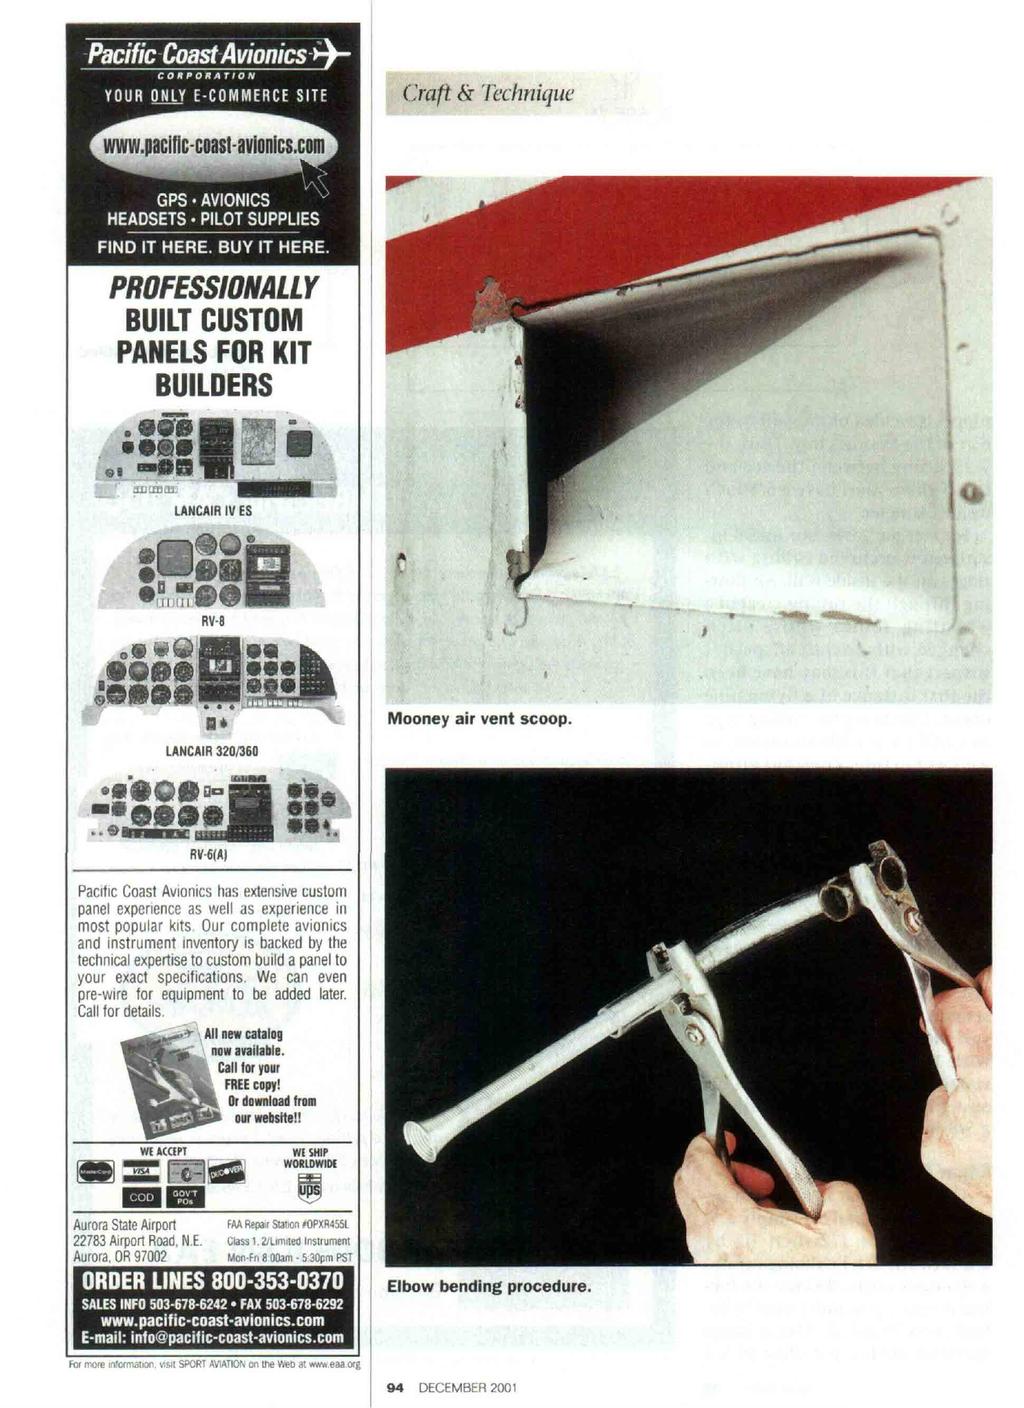
4 94

5 inches of water. A 10-inch diameter pot 5 inches high works well. Before heating the water, locate an expansion spring at least 6 inches long with an outside diameter of 1/2 inch. Slide the spring inside the cut acrylic tubing. This will prevent the acrylic tube from collapsing when it is heated. Bring the water to a light boil. Dip the acrylic tubing with the spring into the hot water so that approximately 3 inches of it is immersed. Hold the spring on one end with a pair of pliers and the middle of the tubing with another pair of pliers. After about one minute of immersion, remove the tubing and attempt to bend it. If it does not bend readily, the tubing is not warm enough. Give it another bath in the boiling water until it feels ready. After bending the tubing, hold it in the bent position until it cools approximately 30 seconds. Now you're ready for the final assembly. Insert the bent tube into the barrel through the drilled hole. Mix a small amount of auto body resin with hardener and dip the tip of a wooden pencil into the solution. Apply a drop to each side of the outside seam. Wait for several hours for the resin to harden and repeat the process; this time apply the resin to the inside seam. That should do the trick! If additional strength is desired, a 1/2-inch wide strip of auto body fiberglass cloth dipped in the mixed resin can be "laid-up" against the tubing junction. Finally, insert the assembled ducting tee into the scat tubing, and your avionics will keep their cool. E& I am Indebted to Dick Wilkinson who took the photographs for this and other articles I've written and who, in this instance, flew with me to gain a better understanding of the technical details. 95
Installing and Adjusting Cooling Baffles. Duct and Air Dam Construction. Firewall-Forward Instruction Manual--General
 Firewall-Forward Instruction Manual--General Installing and Adjusting Cooling Baffles Like most air-cooled engines, Jabiru engines rely on ram air moving through a properly-constructed air duct for adequate
327. Repairing the bent and cracked fenders Tap out the dents from the back side of the fender with a fender hammer.
 Chapter 11 - Fender Repair (Video Clip 11) 327. Repairing the bent and cracked fenders. 328. Tap out the dents from the back side of the fender with a fender hammer. 329. Reform the fender edges by tapping
AIRCRAFT FINISHING Assembling the Front Seat Frames
 AIRCRAFT FINISHING Assembling the Front Seat Frames Front Seat (shown with custom leather upholstery) The front seat frame assembly is supplied without upholstery. The seat back is hinged at the bottom
11. Completing the Fuselage Engine Installation
 11. Completing the Fuselage Engine Installation Engine Installations 11 1 230399 - Fit Engine Mount Reference: Photo 11.16(a) Parts Required: 4025094 Backing Plate Engine Mount (4) AN4-20A Bolt (4) AN3-11A
Aircraft Maintenance Prof. A.K Ghosh Prof. Vipul Mathur Department of Aerospace Engineering Indian Institute of Technology, Kanpur
 Aircraft Maintenance Prof. A.K Ghosh Prof. Vipul Mathur Department of Aerospace Engineering Indian Institute of Technology, Kanpur Lecture - 11 Inspection of Aircraft So, we are now on Cessna 206 edge
Flight Compartment. 1. General
 CIRRUS AIRPLANE MAINTENANCE MANUAL Flight Compartment CHAPTER 56-10: FLIGHT COMPARTMENT GENERAL 56-10: FLIGHT COMPARTMENT 1. General The windshield is manufactured of acrylic and is adhesive bonded to
NEW PRODUCT RELEASE. PRODUCT/KIT NAME: 12 Stabilator Tip Fairing Kit
 14401 Keil Road NE, Aurora, Oregon, USA 97002 PHONE 503-678-6545 FAX 503-678-6560 www.vansaircraft.com info@vansaircraft.com Service Letters and Bulletins: www.vansaircraft.com/public/service.htm NEW PRODUCT
Bumble Bee. Please read and understand all instructions before building!
 Bumble Bee The Bumble Bee kit contains all the parts necessary* to build a flying high power rocket: (1) Pre-slotted main airframe (1) Recovery tube (1) Nose cone (3) Fins (1) Piston ejection kit: (1)
Section 27. Altitude Compensation Induction System (ACIS) RotorWay International Exec 162F Construction Manual. Section 27. Page A Rev.
 RotorWay International Exec 162F Construction Manual. Section 27. Page A Rev.") RotorWay International Page A Rev. 2 5/05 Altitude Compensation Induction System (ACIS) Procedures covered in this section: Install stepper motor controller; install man/baro sensors and hoses; install
RotorWay International Page A Rev. 2 5/05 Altitude Compensation Induction System (ACIS) Procedures covered in this section: Install stepper motor controller; install man/baro sensors and hoses; install
1966 'Cuda Rally Hood
 1966 'Cuda Rally Hood By Roger Kizer I have been looking for ways to dress up the hood on my 1966 Barracuda and have seen many different hoods and scoops that came on the various Mopars over the years.
WOC-364 Installation Instructions Ranger XP Heater System
 WOC-364 Installation Instructions Ranger 2011-12 XP Heater System Order of installation for a Complete Enclosure Always install the Heater System first if possible NOTE: If installing the Heater System
OIL COOLER KIT INSTALLATION INSTRUCTIONS PART NUMBER D
 OIL COOLER KIT INSTALLATION INSTRUCTIONS PART NUMBER D570-0907 APPLICATION: 2011-12 E90 335i/xi (N55 engine) with BMW M-Technic bumper and without stock oil cooler Congratulations for being selective enough
FUSELAGE CABIN ASSEMBLY
 SECTION 3 Cabin Frame Ref Dwg 8FC-3 The Top of the Cabin Frame is level The distance between the front and rear wing attachment to fit the wings SECTION 3 - Page 1 of 10 CABIN FRAME 8F18-1 The TOP TUBES
OIL COOLER KIT INSTALLATION INSTRUCTIONS PART NUMBER D E92 335is (N54 engine) with BMW M-Technic bumper and with stock oil cooler
 with BMW M-Technic bumper and with stock oil cooler") OIL COOLER KIT INSTALLATION INSTRUCTIONS PART NUMBER D570-0923 APPLICATION: 2011 E92 335is (N54 engine) with BMW M-Technic bumper and with stock oil cooler Congratulations for being selective enough to
OIL COOLER KIT INSTALLATION INSTRUCTIONS PART NUMBER D570-0923 APPLICATION: 2011 E92 335is (N54 engine) with BMW M-Technic bumper and with stock oil cooler Congratulations for being selective enough to
STOL CH F8-2 Front Floor Stiffener. Cut and position the Front Floor Stiffener to the Floor 7F8-7. Back drill through the Floor 7F8-7.
 Wait to drill the ends of the Seat Front 7F11-1 to the L angle on the cabin side at location A-A Ref 7-F-9 until after the Cabin Frame is installed. Ref Fuselage Cabin Frame, Section 10, page 11. NOTE:
Safe-T-element Installation Instructions
 Safe-T-element Installation Instructions For: PTI STEZA (2x2 Burner Configuration) & PTI STEZB (3x1 Burner Configuration) Revision K (May. 3 2012) TABLE OF CONTENTS 1. PREPARATION... 3 1.1 General Safety
ZODIAC 601 XL. Trim the outboard corner of the front flange of the center spar 6W4-1. Corner should not touch the side of the cabin floor skin 6B10-1.
 Trim the outboard corner of the front flange of the center spar 6W4-1. Corner should not touch the side of the cabin floor skin 6B10-1. Tape the side skins to the cabin floor skin (area in front of the
Installation Instructions
 DODGE 20K Industry Standard Rail Custom Mounting Kit #2742 Gross Trailer Weight (Maximum)...20,000 lbs. Vertical Load Weight (Max. Pin Weight)...5,000 lbs. SYSTEM TOW CAPACITY Please note, in order to
COMANCHE GEAR Regent Circle Naples, FL Phone & fax 239/ Cell 239/ Main gear doors miscellaneous
 COMANCHE GEAR 10340 Regent Circle Naples, FL 34109 Phone & fax 239/593-6944 Cell 239/404-7524 www.comanchegear.com Main gear doors miscellaneous Here are a few thoughts to consider if you are having a
REVISION DESCRIPTION:
 REVISION DESCRIPTION: 1) Page: 12-03 REV 1: Step 1: and Figure 1: Final-Drill s.b. Match-Drill. Step 4: Updated flox mixture description to match later description (removed "peanut butter-like" description).
Weistec M157 WMI System
 Weistec M157 WMI System Installation Guide 2012-2013 E63 2014+ E63 4matic(S) 2011-2013 CLS63 2014+ CLS63 4matic(S) 2015+ S63 AMG (Without ABC Suspension) This product is legal in California for racing
Section 13. Tail Rotor Drive. RotorWay International A600 TALON Construction Manual. Section 13. Page A
 RotorWay International Page A Tail Rotor Drive Procedures covered in this section: Install driveshafts and gearboxes; install drive belt and tensioner; fabricate and install tail rotor pitch actuator arms;
Quad shift seal installation tips
 Quad shift seal installation tips Rev. B Effective: 31-DEC-2015 Unobtainium Supply Co. 523 Longley Rd Groton, MA 01450 978.448.2110 www.unobtainiumsupply.com Quad shift seal installation tips TIP#1: BREAK
Chapter 52 DOORS -Title
 Chapter 52 DOORS 52-Title Page 1 January 23, 2012 INTENTIONALLY LEFT BLANK 52-Title Page 2 January 23, 2012 LIST OF EFFECTIVE PAGES Chapter Section Page No. Date 52 52-Title 1 January 23, 2012 2 January
DESCRIPTION AND OPERATION
 FLIGHT COMPARTMENT 1. DESCRIPTION AND OPERATION The windshield is manufactured of acrylic and is adhesive bonded to the fuselage. Replacement is accomplished by removing the interior trim around the windshield,
INSTALLATION AND OPERATING INSTRUCTIONS
 COLEMAN -MACH AIR CONDITIONERS INSTALLATION AND OPERATING INSTRUCTIONS CHILLGRILLE DIRECT AIRFLOW REPLACEMENT CEILING ASSEMBLY PART NUMBER 7330-6331 FOR 6727, 6799 AND 7000 SERIES AIR CONDITIONERS DESIGNED
Tex-614-J, Testing Epoxy Materials
 Overview Effective: August 1999 May 2000. This method covers various test procedures for epoxy materials specified under the TxDOT Material Specification DMS-6100, Epoxies and Adhesives. The test to be
(6) Universal Mounting Brackets (NOTE: same bracket used for left or right side installation) Driver/left Running Board (example only)
 Universal Mounting Brackets (NOTE: same bracket used for left or right side installation) Driver/left Running Board (example only)") PARTS LIST: Qty Description Qty Description 6 Universal Left/Right Mounting Brackets 12 6-1.0mm x 20mm T-Bolts 12 8-1.25mm Clip-On Nuts 12 6mm x 22mm OD x 2mm Flat Washers 12 8-1.25mm x 25mm Hex Bolt 12
PARTS LIST: Qty Description Qty Description 6 Universal Left/Right Mounting Brackets 12 6-1.0mm x 20mm T-Bolts 12 8-1.25mm Clip-On Nuts 12 6mm x 22mm OD x 2mm Flat Washers 12 8-1.25mm x 25mm Hex Bolt 12
FRP Ductwork Model. Installation and Maintenance for
 Installation and Maintenance for FRP Ductwork Model WARNING! These installation instructions are for qualified and experienced technicians in the H.V.A.C. and Fire Protection field only. Failure to follow
Tex-614-J, Testing Epoxy Materials
 Overview Effective Date: January 2001 - July 2002. This method covers various test procedures for epoxy materials specified under the TxDOT Material Specification "DMS-6100, Epoxies and Adhesives." The
F3P Instruction Manual
 Before use, please read the explanations carefully! F3P Instruction Manual Specifications Fuselage length: 884mm ( 34. Bin ) Wingspan : 845mm ( 33. 2in) Flying Weight : 135-160g (with battery) Additional
Irunning Board Installation Instruction
 PARTS LIST: Item QTY Description Item QTY Description #1 2 Running Board(use for left or right) #8 13 8-1.25mm x 25mm Hex Bolt #2 1 Passenger/right Upper Bracket #9 13 8mm x 24mm x 2mm Flat Washer #3 1
INSTALL/REMOVAL INSTRUCTIONS: WINDOW LIFT MOTOR
 REMOVAL/INSTALL OF WINDOW REGULATOR (742-269) Ford Mustang 1996 2004 General Tech Tips: Use painter s tape rather than duct tape to secure window. It will not damage paint or leave sticky residue. A plastic
Installation Instructions
 DODGE 20K Industry Standard Rail Custom Mounting Kit #2740 Gross Trailer Weight (Maximum)...20,000 lbs. Vertical Load Weight (Max. Pin Weight)...5,000 lbs. SYSTEM TOW CAPACITY Please note, in order to
ZENITH 601, VLS INSTALLATION
 ZENITH 601, VLS INSTALLATION 09/99 DRWG. 6500-A READ INSTRUCTIONS COMPLETELY BEFORE BEGINNING INSTALLATION! The BRS installation for your Zenith 601 was designed to provide a high probability of the aircraft
Mustang Shaker
 2005-2009 Mustang Shaker CDC #110050 ( 05/ 06) or 0711-7000-01 ( 07/ 09) Component Check List: Quantity/Description Part # CDC Installer 1 - Engine Cover Assembly 114050 1 - Aluminum Shaker Scoop 183020
Main Gear Doors (Apr 2009) Matt Kurke, ICS #10288
 Matt Kurke, ICS #10288") Main Gear Doors (Apr 2009) Matt Kurke, ICS #10288 A few thoughts to consider if you are having a problem with the main gear doors retracting and/or fitting properly on your Comanche Read section 6-39 (below)
Main Gear Doors (Apr 2009) Matt Kurke, ICS #10288 A few thoughts to consider if you are having a problem with the main gear doors retracting and/or fitting properly on your Comanche Read section 6-39 (below)
HOLDER TOOL PARTS DIAGRAM
 HOLDER TOOL PARTS DIAGRAM This tool is used to make the check / tank mount unit. It serves the dual function of holding the 1 street ell #8 firmly, and sealing the resin when it is poured. The tool is
CIRRUS AIRPLANE MAINTENANCE MANUAL
 AERODYNAMIC FAIRINGS 1. DESCRIPTION This section describes those components which make up the aerodynamic fairings. A fixed, composite wing root fairing is installed around the wing root, enclosing the
Exhaust Heat Shield Instructions NC 06-15
 Exhaust Heat Shield Instructions NC 06-15 Thank you for purchasing the Track Dog Racing Exhaust Heat Shield for the 2006-2015 Mazda MX-5. Our TDR Heat Shield is designed to help maintain lower temperatures
I-Sheet Number Rev.B 3-1/2 OVAL BULL BAR DODGE RAM 1500
 PARTS LIST: 1 Bull Bar 2 10-1.5mm x 35mm Hex Bolts 2 Tube Brackets (Bull Bar) passenger or driver side 2 10mm Lock Washers 2 Upper Frame Brackets (models w/o tow hooks only) 4 10mm x 27mm OD x 3mm Flat
Figure 1. A CheapBot Robot
 A CheapBot controller needs a robot body to function. An ideal robot body for the beginner consists of two sheets of Syntra plastic, separated by four bolts. The bottom deck contains the robot controller
Flight Compartment. 1. General
 CIRRUS AIRPLANE MAINTENANCE MANUAL Flight Compartment CHAPTER 56-10: FLIGHT COMPARTMENT GENERAL 56-10: FLIGHT COMPARTMENT 1. General The windshield is manufactured of acrylic and is adhesive bonded to
argco.com
 800-854-1015 argco.com STRUT SUPORT SYSTEM STRUT SUPPORT CHANNEL US Strut Support Channel Quick, strong attachment of single or multiple pipes horizontally or vertically Unlimited applications - range
INSTRUCTIONS FOR INSTALLATION OF THE CH-2 and CH-3 DRIVE UNIT TO AN ENGINE WARNING
 INSTRUCTIONS FOR INSTALLATION OF THE CH-2 and CH-3 DRIVE UNIT TO AN ENGINE WARNING! Never reach hands or other body parts in or near moving parts!! Maintain a safe distance from any fixed or moving propeller!!
Installation Instructions Specialty Tigertop
 Installation Instructions Specialty Tigertop Vehicle Application Jeepster Commando 1967 1973 Part Number: 51311 www.bestop.com - We re here to help! Visit our web site and click on Ask a Question. Click
Precursor: Why Do This Particular Set of Hacks?
 Precursor: Why Do This Particular Set of Hacks? After using the LEGO NXT Robotics system for awhile, I discovered that the thing uses batteries fast. To reduce the expense and waste of one use batteries
OIL COOLER KIT INSTALLATION INSTRUCTIONS PART NUMBER D
 OIL COOLER KIT INSTALLATION INSTRUCTIONS PART NUMBER D570-0904 APPLICATION: 2011-2012 E90 335i/xi (N55 engine) with BMW standard bumper and with stock oil cooler Congratulations for being selective enough
 www.odometergears.com Mercedes-Benz Mechanical Odometer Repair This how to can be used for all mechanical repairs as the only difference will be the removal of the instrument cluster. http://www.dieselgiant.com/repairyourodometer.htm
2 Driver/left Front/Rear Mounting Brackets 6 10mm Lock Washer 2 Passenger/right Front/Rear Mounting 6 10mm Hex Nuts
 PARTS LIST: STX300 RUNNING BOARD BRACKET KIT 2 Driver/left / Mounting Brackets 6 10mm Lock Washer 2 Passenger/right / Mounting 6 10mm Hex Nuts Brackets 1 Driver/left Center Mounting Bracket 12 8-1.25mm
Mustang CDC Lightbar (94-04) - Installation Instructions
 - Installation Instructions") Mustang CDC Lightbar (94-04) - Installation Instructions The below installation instructions work for the following products: Classic Design Concepts Mustang Convertible Lightbar (94-04 Carbon Fiber) Classic
Mustang CDC Lightbar (94-04) - Installation Instructions The below installation instructions work for the following products: Classic Design Concepts Mustang Convertible Lightbar (94-04 Carbon Fiber) Classic
Installation, Operation, and Maintenance Manual. Welker Automatic Insertion Corrosion Coupon Device Model AID-1CC
 Installation, Operation, and Maintenance Manual Welker Automatic Insertion Corrosion Coupon Device Model The information in this manual has been carefully checked for accuracy and is intended to be used
INSTALLATION INSTRUCTIONS UNIVERSAL HEADACHE RACK
 INSTALLATION INSTRUCTIONS UNIVERSAL HEADACHE RACK PARTS LIST: 1 Headache Rack 2 Special 10mm "J" Bolts 1 Driver Mounting Base 6 10-1.5mm x 40mm Hex Bolts 1 Passenger Mounting Base 6 10mm x 34mm OD x 3mm
1 Engine nacelle kit with outrigger for A 10 and similar models 7249 /52 1 Taper collet, 3.17 mm bore, 2 locking screws and cap nut 7249 /69
 Instructions for Order no. 249/51 The impeller unit was developed by our team of experienced model flyers for semiscale electric-powered model jets. The result is that the is designed specifically to cater
Headlamp Adjusters motorised conversion by: Ant (Banjo1981)
") Headlamp Adjusters motorised conversion by: Ant (Banjo1981) What you will need: E30 adjuster switch assembly E30 Headlight adjusters E36 Adjuster motors (pref with the plugs still attached) Variable resistor
Headlamp Adjusters motorised conversion by: Ant (Banjo1981) What you will need: E30 adjuster switch assembly E30 Headlight adjusters E36 Adjuster motors (pref with the plugs still attached) Variable resistor
2005+ Roll Bar (Mm5RB-20.1 to -20.6) Recommended Center punch 1/8" pilot drill 1-3/4" Hole saw 2" Hole saw
 Recommended Center punch 1/8 pilot drill 1-3/4 Hole saw 2 Hole saw") 3430 Sacramento Dr., Unit D San Luis Obispo, CA 93401 Telephone: 805/544-8748 Fax: 805/544-8645 www.maximummotorsports.com 2005+ Roll Bar (Mm5RB-20.1 to -20.6) Recommended Center punch 1/8" pilot drill
3430 Sacramento Dr., Unit D San Luis Obispo, CA 93401 Telephone: 805/544-8748 Fax: 805/544-8645 www.maximummotorsports.com 2005+ Roll Bar (Mm5RB-20.1 to -20.6) Recommended Center punch 1/8" pilot drill
I - Sheet Number I-PW Rev. A
 I - Sheet Number I-PW013988 Rev. A Installation Instructions Part # 23948007/24048007 PARTS LIST: 1 Driver/left Sidebar 17 8-1.25mm x 25mm Hex Bolts 1 Passenger/right Sidebar 17 8mm x 24mm x 2mm Flat Washers
F3D-30 ARF ASSEMBLY MANUAL
 F3D-30 ARF ASSEMBLY MANUAL This Manuel is the sole property of Kangke Industrial USA, Inc. Reproducing any part without the consent of Kangke Industrial USA, Inc. is a lawful violation. Kangke Industrial
11 - Fairings. Fairings. February XLF Page 11-1
 11 - Fairings Fairings February 2003 11-XLF Page 11-1 11 - Fairings This Page Intentionally Left Blank Page 11-2 11-XLF February 2003 11 - Fairings Contents 11.0 - Chapter Preface... 11-4 11.0.1 - Parts
2011 Cadillac CTS Coupe EGX Exhaust Tip & Rear Valance Mesh Accent Kit Part #: Complete E
 BILLET GRILLS IMPORTANT: PLEASE KEEP THIS INSTRUCTION MANUAL FOR FUTURE REFERENCE! 2011 Cadillac CTS Coupe EGX Exhaust Tip & Rear Valance Mesh Accent Kit Part #: Complete 5122-1900-11E TOOLS REQUIRED Automotive
For Experimental Aircraft Only: Glastar, Sportsman 2+2, and Similar with Lycoming O320 or O360 Parallel Valve Engines
 REPORT NAME: KIT PFS-16104 INSTALLATION INSTRUCTIONS AND INSTRUCTIONS FOR CONTINUED AIRWORTHINESS APPROVAL PFS ENG DATE: REPORT NUMBER: PFS-16250-EXP REVISION: A REPORT DATE: 02/14/06 PREPARED BY: Tom
NISSAN #2744. Gross Trailer Weight (Maximum)...16,000 lbs. Vertical Load Weight (Max. Pin Weight)...4,000 lbs. SYSTEM TOW CAPACITY
...16,000 lbs. Vertical Load Weight (Max. Pin Weight)...4,000 lbs. SYSTEM TOW CAPACITY") NISSAN 16K Industry Standard Rail Custom Mounting Kit #2744 Gross Trailer Weight (Maximum)...16,000 lbs. Vertical Load Weight (Max. Pin Weight)...4,000 lbs. SYSTEM TOW CAPACITY Please note, in order to
NISSAN 16K Industry Standard Rail Custom Mounting Kit #2744 Gross Trailer Weight (Maximum)...16,000 lbs. Vertical Load Weight (Max. Pin Weight)...4,000 lbs. SYSTEM TOW CAPACITY Please note, in order to
(2) 12mm x 40mm Short Low Profile Bolt Plates. (2) Spacer Washers. (4) 12mm Plastic Retainers. Passenger/Right Front.
 12mm x 40mm Short Low Profile Bolt Plates. (2) Spacer Washers. (4) 12mm Plastic Retainers. Passenger/Right Front.") PARTS LIST: 1 Driver/Left Running Board with 1 Rubber Backing (use on SX & Limited models) 4 12mm Plastic Retainer 1 Passenger/Right Running Board with 1 Rubber 4 12mm Lock Washer Backing (use on SX &
PARTS LIST: 1 Driver/Left Running Board with 1 Rubber Backing (use on SX & Limited models) 4 12mm Plastic Retainer 1 Passenger/Right Running Board with 1 Rubber 4 12mm Lock Washer Backing (use on SX &
Deuce/Ace Installation Instructions
 HARDWARE KIT: Upper Mounting Plate: 2-7/16" (11mm) X 3.5" bolts 2-7/16" flange nuts 2-2" spacers 2-7/16" trim cap mounting washers 2 - plastic trim caps TOOLS NEEDED: safety glasses wrenches 16mm or 5/8"
Trainer Assembly Manual
 Trainer Assembly Manual www.pilot-rc.com -Pilot Trainer- 1 -Pilot Trainer- 2 -Pilot Trainer- 3 -Preliminary i wing & stab assembly- 1-) Locate both Plywood wing joiners (Large and small one) 2-) Insert
INSTALLATION INSTRUCTIONS 5" BENT END SIDEBARS ROCKER PANEL MOUNT SILVERADO/SIERRA CREW CAB INCLUDES DIESEL W/DEF PART NUMBER
 INSTALLATION INSTRUCTIONS 5" BENT END SIDEBARS ROCKER PANEL MOUNT PART NUMBER WB51010S WB51010B WB51019S WB51019B PARTS LIST: 1 Driver/left Sidebar 25 8-1.25mm x 25mm Hex Bolt 1 Passenger/right Sidebar
Rear Subframe Setup & Installation Instructions Camaro/Firebird
 Rear Subframe Setup & Installation Instructions 1967-69 Camaro/Firebird Introduction Congratulations on the purchase of your Art Morrison Enterprises rear subframe. This subframe is the result of 35+ years
Section 75-CA-2. Elevator Controls
 Section 75-CA-2 This manual has been prepared for assembly of the. This photo assembly manual is intended as a supplement to the drawings. If there is any discrepancy between this manual and the drawings,
REVISION LIST CHAPTER 14: CENTER CONSOLE
 REVISION LIST CHAPTER 14: The following list of revisions will allow you to update the Legacy construction manual chapter listed above. Under the Action column, R&R directs you to remove and replace the
Fitting HID Xenon Headlamp system to R75/MG-ZT
 Fitting HID Xenon Headlamp system to R75/MG-ZT By Ross R75 Time Required: 30-45 minutes Let me first of all start by saying that this subject in itself is an area of heated debate. The basic fact of the
RECOMMENDED MOTOR AND BATTERY SET UP
 SPECIFICATION - Wingspan: 1410mm (55.5 in) - Length: 1278mm (50.3 in) - Flying weight: 3.2-3.4 kg - Wing area: 41.3 dm2 - Wing loading: 75g/dm2 - Wing type: Naca airfoils - Covering type: Genuine ORACOVER
Exhaust Heat Shield Instructions ND
 Exhaust Heat Shield Instructions ND 2016 + Thank you for purchasing the Track Dog Racing Exhaust Heat Shield for the 2016 to Present Mazda MX-5. Our TDR Heat Shield is designed to help maintain lower temperatures
SECTION 4 NORMAL PROCEDURES CONTENTS
 CONTENTS Page Recommended Airspeeds....................... 4-1 Daily or Preflight Checks........................ 4-1 Before Starting Engine.......................... 4-6 Starting Engine and Run-Up......................
Installation Instructions
 2011-2013 LML DURAMAX COMPOUND-ADD 2011-2015 LML A Duramax TURBO KIT Add INSTALL A Turbo INSTRUCTIONS Compound Kit Installation Instructions 1-800-955-0476 - www.industrialinjection.com - info@industrialinjection.com
Drag Race Roll Bar (MMRB-6, -7)
") 3430 Sacramento Dr., Unit D San Luis Obispo, CA 93401 Telephone: 805/544-8748 Fax: 805/544-8645 www.maximummotorsports.com 1994-04 Drag Race Roll Bar (MMRB-6, -7) The Maximum Motorsports 6-point Drag Race
3430 Sacramento Dr., Unit D San Luis Obispo, CA 93401 Telephone: 805/544-8748 Fax: 805/544-8645 www.maximummotorsports.com 1994-04 Drag Race Roll Bar (MMRB-6, -7) The Maximum Motorsports 6-point Drag Race
TEL:1-866-XANATOS. INSTALLATION INSTRUCTIONS PART#: SR-DOR SPARTAN RUNNING BOARD DODGE PROMASTER 136 /159 wheel base 14-UP
 TEL:1-866-XANATOS INSTALLATION INSTRUCTIONS PART#: SR-DOR303285 SPARTAN RUNNING BOARD DODGE PROMASTER 136 /159 wheel base 14-UP PARTS LIST: 1 Driver/left Spartan Running Board 12 8-1.25mm x 25mm Hex Bolts
Installation Instructions
 DODGE 24K Industry Standard Rail Heavy Duty Custom Mounting Kit #2230 Gross Trailer Weight (Maximum)...24,000 lbs. Vertical Load Weight (Max. Pin Weight)...6,000 lbs. SYSTEM TOW CAPACITY Please note, in
Roll Bar (MMRB-6.1 to -6.7)
") 3430 Sacramento Dr., Unit D San Luis Obispo, CA 93401 Telephone: 805/544-8748 Fax: 805/544-8645 www.maximummotorsports.com 1994-04 Roll Bar (MMRB-6.1 to -6.7) NOTE: These instructions cover Roll Bars with
3430 Sacramento Dr., Unit D San Luis Obispo, CA 93401 Telephone: 805/544-8748 Fax: 805/544-8645 www.maximummotorsports.com 1994-04 Roll Bar (MMRB-6.1 to -6.7) NOTE: These instructions cover Roll Bars with
SK-50 ARF ASSEMBLY MANUAL
 SK-50 ARF ASSEMBLY MANUAL Kangke Industrial USA, Inc. 65 East Jefryn Blvd. Deer Park NY 11729 http://www.kangkeusa.com E-mail: info@kangkeusa.com Tel: 1-877-203-2377 Fax: 1-631-274-3296 Congratulations!
Airframe Group Item Description Part Number Size
 Parts List: LS-1 Airframe Group Canopy - LS1 Aluminum sheet, 6061 T6 1241-8.050" x 1.5" 8" Angle, aluminum 6061-T6 987-6 2" x 2" x.125" 6" Bar stock, acetal 42367 1" x 1.25" 3" Bar stock, alum 1125-8 1"
2004 Volvo C70 L5-2.4L Turbo VIN 63 B5244T7 Cylinder Head Assembly Service and Repair, Removal and Replacement: Cylinder Head/Gasket, Replacing
 1 of 25 8/18/2011 6:10 PM 2004 Volvo C70 L5-2.4L Turbo VIN 63 B5244T7 Cylinder Head Assembly Service and Repair, Removal and Replacement: Cylinder Head/Gasket, Replacing Cylinder head/gasket, replacement
Installation Instructions
 UNIVERSAL 20K Industry Standard Rail Universal Mounting Kit #2720 Gross Trailer Weight (Maximum)...20,000 lbs. Vertical Load Weight (Max. Pin Weight)...5,000 lbs. SYSTEM TOW CAPACITY Please note, in order
Section C75-CA-2. Elevator Controls
 Section C75-CA-2 This manual has been prepared for assembly of the. This photo assembly manual is intended as a supplement to the drawings. If there is any discrepancy between this manual and the drawings,
3651 N Highway 89 Chino Valley, AZ (928)
") 3651 N Highway 89 Chino Valley, AZ 86323 (928) 636-7080 www.p-a-g.net JEEP WRANGLER JK 2 DOOR JEEP WRANGLER JK 4 DOOR ROCKER PANEL W/BAR INSTALLATION INSTRUCTIONS 2 DOOR MODELS 07-10 KIT# 84207 4 DOOR
3651 N Highway 89 Chino Valley, AZ 86323 (928) 636-7080 www.p-a-g.net JEEP WRANGLER JK 2 DOOR JEEP WRANGLER JK 4 DOOR ROCKER PANEL W/BAR INSTALLATION INSTRUCTIONS 2 DOOR MODELS 07-10 KIT# 84207 4 DOOR
335i Upgrade Intercooler Installation Instructions
 335i Upgrade Intercooler Installation Instructions Part Number: D330-0015 Applications: 2011-12 E90/E92/E93 335i (N55) 2011-12 E92/E93 335is (N54) 2011-12 E90 335i (N55) with M-Technic bumpers (Except
SERVICE BULLETIN
 14401 Keil Road NE, Aurora, Oregon, USA 97002 PHONE 503-678-6545 FAX 503-678-6560 www.vansaircraft.com info@vansaircraft.com Service Letters and Bulletins: www.vansaircraft.com/public/service.htm SERVICE
!!! New Technology in Correction Officer Safety!!!
 THE MILLENNIUM PATENTED ACCESS CONTROL SYSTEM IS A REGISTERED PATENTED ITEM RECOGNIZED UNDER FEDERAL PATENT LAWS! ANY ATTEMPT TO DUPLICATE THE MILLENNIUM PATENTED ACCESS CONTROL SYSTEM, OR ANOTHER UNIT
Installation or Inspection Checklist
 Sequencing Batch Reactor Installation or Inspection Checklist Only modules bearing the NSF logo and designated PS1-XX are certified to NSF/ANSI Standards 40 and 245 2018 Anua 1-2018 Pre-installation and
Installation Instructions
 Installation Instructions For PTI STEZA C (2x2 Burner Configuration) & PTI STEZB C (3x1 Burner Configuration) Revision E Safe-T-Element Installation Instructions Table of Contents 1. PREPARATION..3 1.1
REVISION DESCRIPTION:
 REVISION DESCRIPTION: 14401 Keil Road NE, Aurora, Oregon, USA 97002 PHONE 503-678-6545 FAX 503-678-6560 www.vansaircraft.com info@vansaircraft.com Service Letters and Bulletins: www.vansaircraft.com/public/service.htm
OIL COOLER KIT INSTALLATION INSTRUCTIONS PART NUMBER D E92 335i/xi (N55 engine) with BMW Standard bumper and with stock oil cooler
 with BMW Standard bumper and with stock oil cooler") OIL COOLER KIT INSTALLATION INSTRUCTIONS PART NUMBER D570-0924 APPLICATION: 2011-12 E92 335i/xi (N55 engine) with BMW Standard bumper and with stock oil cooler Congratulations for being selective enough
OIL COOLER KIT INSTALLATION INSTRUCTIONS PART NUMBER D570-0924 APPLICATION: 2011-12 E92 335i/xi (N55 engine) with BMW Standard bumper and with stock oil cooler Congratulations for being selective enough
BMW E46 Convertible Hydraulic Line #23 Replacement Guide Created by taylor192 of E46Fanatics.com
 BMW E46 Convertible Hydraulic Line #23 Replacement Guide Created by taylor192 of E46Fanatics.com BMW E46 Line #23 Replacment Guide, page 1 of 23 Background: Line #23 runs from the valve block on the driver's
Aero Vent Cabin Ventilation System
 Aero Vent Cabin Ventilation System Model Applicability: Cessna Aircraft Company Models: 172, 172A, 172B, 172C, 172D, 172E, 172F, 172G, 172H, 172I, 172K, 172L, 172M, 172N, 172P, 172Q, P172D, R172E, R172F,
AEROMOTIVE Part # INSTALLATION INSTRUCTIONS
 AEROMOTIVE Part # 14102 INSTALLATION INSTRUCTIONS CAUTION: Installation of this product requires detailed knowledge of automotive systems and repair procedures. We recommend that this installation be carried
PARAVION TECHNOLOGY, INC AIRWAY AVENUE FORT COLLINS, COLORADO 80524
 Revision F PARAVION TECHNOLOGY, INC. 2001 AIRWAY AVENUE FORT COLLINS, COLORADO 80524 REPORT NO. INSTALLATION INSTRUCTIONS BELL MODEL 407 SERIES BLEED-AIR CABIN HEATER Page i Rev. F, 04/06/09 REVISIONS
Robinson R44. Systems
 Robinson R44 Systems The airframe is primarily a metal construction. The primary fuselage is welded steel tubing and riveted aluminium sheet. The tailcone is an aluminium semi-monocoque structure where
Section 75-FA-4. Forward Fuselage
 Section 75-FA-4 This manual has been prepared for assembly of the forward fuselage skins supplied with match drilled parts. This photo assembly manual is intended as a supplement to the drawings. If there
Service Bulletin No. 3063
 Service Bulletin No. 3063 MODEL TYPE SECTION/GROUP DATE J4500 Series Coaches Service Information 3--Body Aug. 03, 2011 SUBJECT CONDITIONS FENDER PANEL STUD ASSEMBLY Parts may be purchased from MCI Service
SAM-1 Fan Kit Installation Into HENG S Range Hood Model #R C David Jeffs June 2015
 SAM-1 Fan Kit Installation Into HENG S Range Hood Model #R0623500C David Jeffs June 2015 If you own an RV you probably have come to the same conclusion that I have. Everything related to an RV is plagued
---Optional Items---
 1 2 3 4 5 6 ---Optional Items--- 10 9 11 7 8 12 This package should contain: 1. One (1) CorkSport Crashbar Weldment 2. Eight (8) M8x1.25x20 mm Bolts 3. Eight (8) M8x1.25mm Nyloc Nuts 4. Sixteen (16) M8