How to repair damaged rims.
|
|
|
- Nelson Cross
- 5 years ago
- Views:
Transcription


1 How to repair damaged rims.

2 A Rim Repair is a machine used to correct defected rims/mags. It corrects and levels the rims and makes the surface smooth using the lathe. The lathe unit is designed to clean crusty sections of the repaired rim surface. Did you know that rims can be repaired? It depends upon the case and the situation, but rims can very often be repaired. If you find that your wheels are damaged, they will have to be either repaired or replaced. Your mechanic can generally repair a bent or broken rim most of the time. If your rim is bent, getting it straightened shouldn t be an issue. But if it is cracked or the lug holes are damaged, you may not be able to repair it.

3 What is a curbed wheel? It s a colloquial term used in the car world to describe the situation when a vehicle s wheel or hubcap has sustained damage from being rubbed along a curb, often referred to as curb rash. The process to repair a curbed wheel also can vary but typically involves removing all dirt, paint and protective finishes. The damaged area has to be sanded down, patched with filler if needed, and sanded or buffed to a smooth finish to remove scratches. Alloy wheel damage happens to almost all alloy wheels during their lifespan, replacing your alloy wheels can be a costly thing to do which you may not have the funds for. A Rim Repair machine can help you restore your wheels to their original OEM factory condition so you don t have to replace your rims. By using a Rim Repair machine you are able to restore and repair almost any alloy and standard rims in no time.

4 There are multiple reasons why your wheel may have been damaged Curb & cosmetic This type of rim damage occurs when you scuff your wheel on a pavement or also known as curb rash other reasons may include driving your vehicle on a flat Tyre or from road debris. Damage is usually found on the lip, spokes or face of the wheel. Bent wheel Bent wheel damage occurs on the inner lip of the mag but can also sometimes occur on the outer lip, spoke or face. Bent wheel damage to the vehicle s rim is usually caused by potholes, roadside curbs or other road hazards. Corrosion & delamination Corrosion to the motor vehicle s mag wheels are generally caused by roadside chemicals, salts, dust from the brakes and tire sealants however there are also many other external elements that can cause wheel corrosion

5 Warning signs Rim issues can often be easy to notice. Depending on the damage, you may hear a thumping sound when you drive or feel a constant vibration through your steering wheel. If you miss these cues but notice problems with your car s handling or changes in your fuel consumption, take a look at your wheels. Look for unusual wear on your tyres and check each wheel if it s cracked, broken, dented or bent. On top of causing uneven wear on your tyres, damaged wheels can make your car harder to handle and may reduce your fuel consumption. In a best-case scenario, this means that you will need to replace your tyres sooner; in a worst-case scenario, you risk a potentially deadly tyre blowout. Avoid these risks altogether by being proactive about rim maintenance. If you find that your wheels are damaged, they will have to be either repaired or replaced.


6 How to straighten A damaged rim Safety first! Make sure you are using the appropriate PPE, safety shoes, safety glasses & gloves. Start by cleaning any dirt off the rim and removing all the weights. Put the wheel onto the spigot of the flange and fasten it with the nuts. Special nuts is needed for certain wheels The rim is attached by means of the center spigot adaptors and wheel nuts. Select the proper wrench for the wrench holes. Fasten the rim by using the proper tools, Loosen nuts which fix flanges. Attach the metal pointer Turn the rim by hand and determine the defected sections and mark them with the help of the metal pointer. Start the hydraulic pump motor and select the proper press tip for the section to be straightened. Insert the selected axis/tip into the piston. The damaged area is heated with a blow torch. After the defected part is heated, you can then apply pressure to straighten the rim. After you have applied enough pressure, check the repair with the metal pointer. Continue with the same process until the rim is completely repaired.

7 Safety first! Wear your gloves and goggles while levelling rims. This precaution avoids your hands from cuts and protects your eyes from flying metal particles. Wear your goggles while lathing but NEVER wear your gloves! (Gloves may wrap around flanges and injure you) Be sure that working area has enough space Piston should fit exactly onto the rim and supports. Be sure that your clothes will not wrap around flanges.- (ties, shirts cuffs, coat buttons, etc.) Do not put your hands between the rim and piston during operation Fit the piston exactly onto the supportive channels. If not it may slide and injure you.


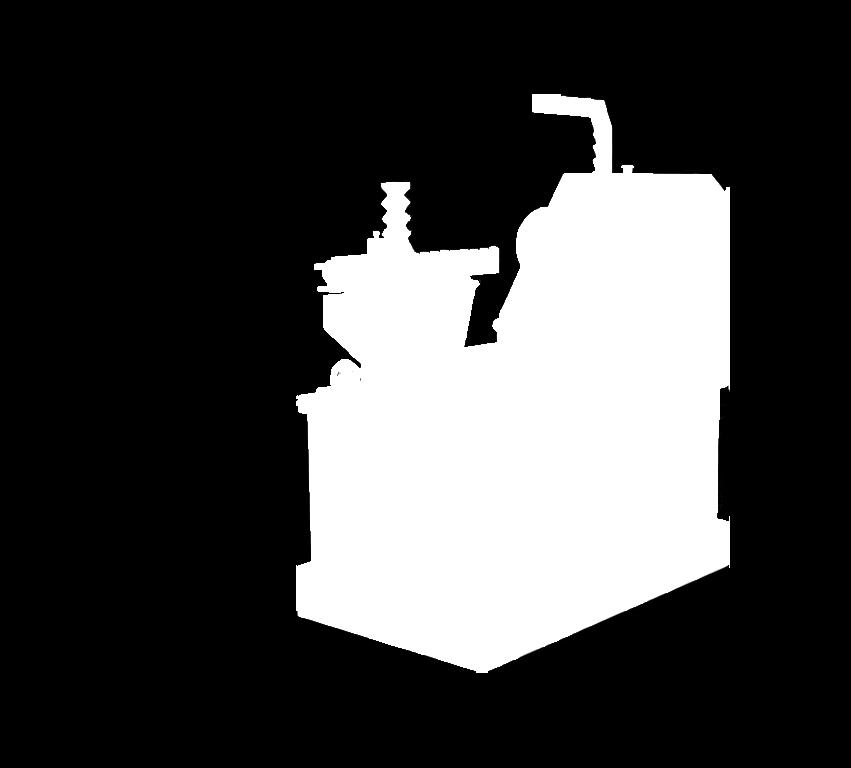
8 Rim repair products available RMS2200 Rim repair without lathe RMS2400 Rim repair with lathe RPK-Rim Polish Kit Rim Repair Kit with Tyre changer
Ultimate Care Protection
 Ultimate Care Protection Plan A Plan B Plan C Wheel Coverage 3 3 3 3 Ultimate Care Protection Key 3 Wheel Coverage A repair process that restores the appearance of your wheels. Repairs scrapes, scratches,
Wheel end service for greased wheel ends
 wheel ends Page 1 Tech tip Scope This document recommends procedures for servicing greased wheel ends. Included are SKF recommendations for manually adjusted, hard greased (NLGI 1, 2, and 3) and semi-fluid
Toyota Hydrobase Application
 Toyota Hydrobase Application Basecoat and Fade-out process 1, CLEANING After sanding the surfacer clean the fade-out area with Toyota Hydro Cleaner Dry thoroughly. 2, SANDING The leading edge of the fade-out
STEERING AND SUSPENSION SYSTEMS
 STEERING AND SUSPENSION SYSTEMS UNIT 12: WHEEL AND TIRE DESIGN LESSON 1: WHEEL DESIGN I. Basic wheel construction A. Wheels are made from stamped steel or cast or forged aluminum or alloys. B. A wheel
Brake Pad: Service and Repair Front PADS - BRAKE FRONT
 2005 Dodge Truck RAM 3500 4WD Pickup L6-5.9L DSL Turbo VIN C Page 1 Brake Pad: Service and Repair Front PADS - BRAKE FRONT REMOVAL 1. Raise and support vehicle. 2. Remove the wheel and tire assemblies.
Pre-Trip Inspection 2017 PRESENTED BY DON WEST
 Pre-Trip Inspection 2017 PRESENTED BY DON WEST Everyone knows how to do a pre-trip We do it everyday I ve been driving for twenty years Complacent Were they grandfathered in? Starting your Pre-Trip As
Rotate tires according to manufacturer's recommendations. (P-1) Reinstall wheel; torque lug nuts. (P-1)
 Reinstall wheel; torque lug nuts. (P-1)") JOB SHEET 8 Rotating Tires Name: Station: Date: NATEF Correlation This Job Sheet addresses the following NATEF task(s): 4.F.3 4.F.8 Rotate tires according to manufacturer's recommendations. (P-1) Reinstall
JOB SHEET 8 Rotating Tires Name: Station: Date: NATEF Correlation This Job Sheet addresses the following NATEF task(s): 4.F.3 4.F.8 Rotate tires according to manufacturer's recommendations. (P-1) Reinstall
MODEL EGA220 OWNERS MANUAL
 1/4 MINI RATCHET MODEL EGA220 OWNERS MANUAL www.eaglecompressor.com 1-800-551-2406 READ THE ENTIRE MANUAL BEFORE PUTTING THIS TOOL IN SERVICE Limited Air Tool Warranty Wood Industries, Inc. warrants air
ST21A Metal Repair. Copyright 1998 Inter-Industry Conference On Auto Collision Repair v.4.0
 Uniform Procedures For Collision Repair ST21A Metal Repair 1. Description This procedure describes repair methods and inspection requirements for straightening damaged aluminum. 2. Purpose The purpose
Exterior By Bev Gould
 Exterior By Bev Gould Coachwork: body panels and fit Judges may look for: Uniformity of gaps between body panels, Alignment between adjacent body panels and Dents and creases. Exterior paint Judges may
Lil Kick scooter. Read and understand this entire manual before riding!
 Lil Kick scooter Owner s Manual Read and understand this entire manual before riding! DO NOT RETURN TO STORE! NOTE: Manual illustrations are for demonstration purposes only. Illustrations may not reflect
ALLOY WHEEL. Installation Instructions PLEASE READ ALL INSTRUCTIONS BEFORE INSTALLING WHEELS
 ALLOY Installation Instructions PLEASE READ ALL INSTRUCTIONS BEFORE INSTALLING S Failure to comply with these instructions can cause serious injury or death to the installer or occupants of the vehicle.
FR11A Fender, Welded-On
 Uniform Procedures For Collision Repair FR11A Fender, Welded-On 1. Description This procedure describes the repair and complete replacement of a welded-on aluminum fender. Inspection and evaluation requirements
Read and understand this entire manual BEFORE allowing children to use this product!
 Lil Kick scooter Owner s Manual Read and understand this entire manual BEFORE allowing children to use this product! NOTE: Manual illustrations are for demonstration purposes only. Illustrations may not
MODEL EGA200 OWNERS MANUAL
 3/8 RATCHET WRENCH MODEL EGA200 OWNERS MANUAL www.eaglecompressor.com 1-800-551-2406 READ THE ENTIRE MANUAL BEFORE PUTTING THIS TOOL IN SERVICE Limited Air Tool Warranty Wood Industries, Inc. warrants
USER MANUAL. Keep this User Manual in the vehicle on which Halos are installed.
 Keep this User Manual in the vehicle on which Halos are installed. USER MANUAL 3 IMPORTANT SAFETY INFORMATION The Halo is not intended to replace regular pressure-checks and tire maintenance practices
REASONS YOUR BEARINGS WILL FAIL. Ritbearing CORPORATION
 12 REASONS YOUR BEARINGS WILL FAIL Ritbearing Things break. No matter what you do, there is always a chance that products you own will fail. The same holds true for bearings, but that doesn t mean that
12. FRONT WHEEL/FRONT BRAKE/
 12 12 12-0 SERVICE INFORMATION... 12-1 FRONT BRAKE... 12-7 TROUBLESHOOTING... 12-2 FRONT SHOCK ABSORBER... 12-18 STEERING HANDLEBAR... 12-3 FRONT FORK... 12-21 FRONT WHEEL... 12-4 SERVICE INFORMATION GENERAL
OWNER S / OPERATOR S MANUAL
 OWNER S / OPERATOR S MANUAL SAFETY PAGE 1 RECOGNIZE SAFETY INFORMATION This is the safety-alert symbol. When you see this symbol in this manual or on your EdgeMasterTM, be alert to the potential for personal
Emergency driving and its procedures
 Emergency driving and its procedures Prepared By (Name of the student) Enrol Number: ( ) Date: ( ) (Name of the school) How to Avoid Vehicle Malfunction Although some vehicle malfunctions may not be avoidable,
WH01S Wheel. Copyright 1998 Inter-Industry Conference On Auto Collision Repair v.4.0
 Uniform Procedures For Collision Repair WH01S Wheel 1. Description This procedure describes replacement and inspection requirements for a welded steel wheel. 2. Purpose The purpose of this procedure is
NOTE: The following are used throughout this manual to indicate important points in the operation and maintenance of the Atlas Bead Seater.
 TABLE OF CONTENTS INSTRUCTION... 3 GENERAL INFORMATION... 4 UNPACKING, TRANSPORT, AND STORAGE... 5 SAFETY... 6 GENERAL OPERATION... 7 MAINTENANCE... 10 NOTE: The following are used throughout this manual
Brake Fluid Exchange
 Brake Fluid Exchange OJT / Practice DTOG Proficiency Exam Date: Trainee: Trainer: Service Center: Brake Fluid Exchange 1. Prepare for service Wear proper Personal Protective Equipment Recommended PPE:
Tyre Care & Safety for Agricultural Tires
 Tyre Care & Safety for Agricultural Tires Operating Instructions Some Points Worth Remembering; The BKT Agricultural tires are designed for Agricultural tractors, Trailers & Implements. Before using them
4.2 Friction. Some causes of friction
 4.2 Friction Friction is a force that resists motion. Friction is found everywhere in our world. You feel the effects of when you swim, ride in a car, walk, and even when you sit in a chair. Friction can
ALLOY WHEEL. Installation Instructions PLEASE READ ALL INSTRUCTIONS BEFORE INSTALLING WHEELS
 ALLOY Installation Instructions PLEASE READ ALL INSTRUCTIONS BEFORE INSTALLING S Failure to comply with these instructions can cause serious injury or death to the installer or occupants of the vehicle.
2500 LB ELECTRIC A-FRAME JACK OWNER S MANUAL
 2500 LB ELECTRIC A-FRAME JACK OWNER S MANUAL SPECIFICATIONS: Models Applicable: 2500 lb Electric A-Frame Jack Maximum Lift Capacity: 2500 lbs (continuous use) Retracted Height: 31 3 /8 Vertical Travel:
Copyright 1998 Inter-Industry Conference On Auto Collision Repair v.4.0
 Uniform Procedures For Collision Repair BR11 Brakes 1. Description This procedure describes repair, replacement, and inspection requirements for collisiondamaged brake systems. 2. Purpose The purpose of
12. FRONT WHEEL/FRONT BRAKE/
 12 4.5kgm 0.9kg-m 4.5kg-m 12-0 SERVICE INFORMATION... 12-1 HYDRAULIC BRAKE... 12-10 TROUBLESHOOTING... 12-2 FRONT SHOCK ABSORBER... 12-16 FRONT WHEEL... 12-3 STEERING HANDLEBAR... 12-19 FRONT BRAKE...
 DRUM BRAKE RIMS Periodic inspection of drum brake rims is necessary to determine indications of uneven or excessive wear. In general, brake rim failures other that regular wear are caused by brake linings
Lubricating Oil Pan
 007-025 Lubricating Oil Pan Preparatory Steps Batteries can emit explosive gases. To reduce the possibility of personal injury, always ventilate the compartment before servicing the batteries. To reduce
Front Axle Pinion Seal Replacement
 Front Axle Pinion Seal Replacement by Flopster843 10 Apr 2016 The AAM 925 axle used on the front of Dodge Ram trucks is a decent unit, but it does have its flaws. This axle lacks lockout hubs on the front
Handout Activity: HA511
 Using a tire pressure gauge Engines: Motive Power Types: Handout Activity: HA511 HA511-2 Student/Intern information: Name Date Class Using a tire pressure gauge Summary There are two main types of tire
Installation Instructions
 Retrofit Steering Column Installation Instructions Second Series 1955-59 Chevy Trucks For # s 1120652010, 1120652020, 1120652051, 1140652010, 1140652020, 1140652051 www.ididitinc.com 610 S. Maumee St.,
FR11S Fender, Welded-On
 Uniform Procedures For Collision Repair UPCR FR11S Fender, Welded-On 1. Description This procedure describes the repair and complete replacement of a welded-on steel fender. Inspection and evaluation requirements
DC MOTOR MAINTENANCE ALL ELECTRIC LIFT TRUCKS PART NO SRM 294
 DC MOTOR MAINTENANCE ALL ELECTRIC LIFT TRUCKS PART NO. 897076 620 SRM 294 SAFETY PRECAUTIONS MAINTENANCE AND REPAIR When lifting parts or assemblies, make sure all slings, chains, or cables are correctly
Fluid-O-Tech ROTOFLOW ROTARY VANE PUMP REBUILD MANUAL
 Fluid-O-Tech PUMP TECHNOLOGY AT ITS BEST WWW.FLUID-O-TECH.COM Office: 161 Atwater St., Plantsville, CT 06479 Phone: (860) 276-9270 Fax: (860) 620-0193 ROTOFLOW ROTARY VANE PUMP REBUILD MANUAL 08/09 Ed.,
Ford Focus Front Brake Pad Replacement
 2005-2007 Ford Focus Front Brake Pad Replacement Replacing the brake pads on all 2005-2007 Focus models with rear drum brakes. Written By: David Hodson ifixit CC BY-NC-SA www.ifixit.com Page 1 of 16 INTRODUCTION
INSTALLATION, OPERATION, AND MAINTENANCE MANUAL RBK FRP FAN
 Bulletin 62-January-20-09 ROOF UPBLAST & SIDEWALL CENTRIFUGAL FIBERGLASS EXHAUST FAN INSTALLATION, OPERATION, AND MAINTENANCE MANUAL RBK FRP FAN The M.K. Plastics catalog on the above corrosion resistant
INSTALLATION INSTRUCTIONS WINCH MOUNTING KIT Part number: Application: Ford F150 Ecoboost
 INSTALLATION INSTRUCTIONS WINCH MOUNTING KIT Part number: 88070 Application: 2011+ Ford F150 Ecoboost GENERAL SAFETY PRECAUTIONS Your safety, and the safety of others, is very important. To help you make
DO NOT RETURN TO STORE. NOTE:
 Pro Series Scooters Owner s Manual Read and understand this entire manual before allowing child to use this product! For assistance contact Razor. DO NOT RETURN TO STORE. NOTE: Illustrations are for demonstration
A. Adapter A metal component that fastens the caliper to the knuckle. Some brake systems do not use adapters.
 BRAKES UNIT 5: DISC BRAKE DIAGNOSIS AND REPAIR LESSON 3: SERVICE DISC BRAKE CALIPERS I. Terms and definitions A. Adapter A metal component that fastens the caliper to the knuckle. Some brake systems do
DO NOT RETURN TO STORE.
 Caster Trike Owner s Manual Read and understand this entire manual before riding! For assistance contact Razor. DO NOT RETURN TO STORE. Item Number: 20036540 Safety Warnings WARNING: Riding the RipRider
Package Contents Part A (3) I-Beam (1) Base (2) Other parts
 I-Beam (1) Base (2) Other parts") Page 1 Installation Instructions for 81245 Adjustable Height Gantry Crane 1-Ton Capacity Table of Contents Important Safety Information pg. 2 Specific Operation Warnings pg. 2 Main Parts of Product pg.
Page 1 Installation Instructions for 81245 Adjustable Height Gantry Crane 1-Ton Capacity Table of Contents Important Safety Information pg. 2 Specific Operation Warnings pg. 2 Main Parts of Product pg.
(2) 10mm x 50mm T-Bolts (For Rear Brackets only) (6) 10mm Rod Bolts. (2) 10mm x 35mm Button Head Bolt Plates
 10mm x 50mm T-Bolts (For Rear Brackets only) (6) 10mm Rod Bolts. (2) 10mm x 35mm Button Head Bolt Plates") PARTS LIST: 1 Driver/Left side Running Board 2 10mm x 50mm T Bolts 1 Passenger/Right side Running Board 6 10mm Bent Threaded Rod Bolts 1 Driver/Left front Mounting Bracket 8 10mm Plastic Retainers 1 Passenger/Right
PARTS LIST: 1 Driver/Left side Running Board 2 10mm x 50mm T Bolts 1 Passenger/Right side Running Board 6 10mm Bent Threaded Rod Bolts 1 Driver/Left front Mounting Bracket 8 10mm Plastic Retainers 1 Passenger/Right
A-Type, S-Type, & Cruiser Scooters. Read and understand this entire manual before allowing child to use this product!
 A-Type, S-Type, & Cruiser Scooters OWNER S MANUAL Read and understand this entire manual before allowing child to use this product! NOTE: Manual illustrations are for demonstration purposes only. Illustrations
Vehicle protection and convenience when and where you need it.
 every package comes with. Your tailored plan could include the following vehicle protection options. 1 every package comes with Emergency Provides Roadside repair Assistance. or replacement Your tailored
(2) 10mm x 50mm T-Bolts (For Rear Brackets only) (6) 10mm Rod Bolts. (2) 10mm x 35mm Button Head Bolt Plates
 10mm x 50mm T-Bolts (For Rear Brackets only) (6) 10mm Rod Bolts. (2) 10mm x 35mm Button Head Bolt Plates") PARTS LIST: 1 Driver/Left side Running Board 2 10mm x 50mm T Bolts 1 Passenger/Right side Running Board 6 10mm Bent Threaded Rod Bolts 1 Driver/Left front Mounting Bracket 8 10mm Plastic Retainers 1 Passenger/Right
PARTS LIST: 1 Driver/Left side Running Board 2 10mm x 50mm T Bolts 1 Passenger/Right side Running Board 6 10mm Bent Threaded Rod Bolts 1 Driver/Left front Mounting Bracket 8 10mm Plastic Retainers 1 Passenger/Right
FSG175 FENCE STAPLE GUN
 Kencove Farm Fence Supplies 344 Kendall Rd Blairsville, PA 15717 1-800-KENCOVE sales@kencove.com www.kencove.com OPERATING MANUAL FSG175 FENCE STAPLE GUN To reduce the risk of possible injury, read the
Brake Caliper Rebuild - Part Numbers & Tips Per Jim Millet, 3/15/2005
 Per Jim Millet, 3/15/2005 Not too difficult a job. Rears are easier than fronts to access. You ll need the following gasket sets: Front caliper gasket set, P/N 34 11 1 157 037, MSRP $13.58 Rear caliper
7IR. Hosted and optimised by Wheels & Tyres. Section J /K. N.B. Suspension part numbers begin with (G)
") 7IR ---- - - - - - - - - - - -- - - - - - - - - Section J /K - Wheels & Tyres N.B. Suspension part numbers begin with (G \ contents... 11 Tyre Inspection... 0 Wheel Inspection... [1.... Valve Inspection.......
7IR ---- - - - - - - - - - - -- - - - - - - - - Section J /K - Wheels & Tyres N.B. Suspension part numbers begin with (G \ contents... 11 Tyre Inspection... 0 Wheel Inspection... [1.... Valve Inspection.......
3-Way Ball Valve Type 23H
 Serial No. H-V062-E-4 contents 3-Way Ball Valve Type 23H User s Manual (1) Be sure to read following warranty clauses of our product 1 (2) General operating instructions 2 (3) General instruction for transportation,
INSTALLATION INSTRUCTIONS
 INSTALLATION INSTRUCTIONS Trans4mer Grille Guard/Winch Mount For 2007 Toyota Tundra Kit 76380 (Black) and 76381 (Stainless) Your safety, and the safety of others, is very important. To help you make informed
BENCH GRINDER MODEL NO. OZBG150WA
 BENCH GRINDER 150mm MODEL NO. OZBG150WA OPERATING INSTRUCTIONS To view our entire range visit www.ozito.com.au SPECIFICATIONS MODEL NO. OZBG150WA Input Power: 150W Input Voltage: 230V ~ 50Hz No Load Speed:
DO NOT RETURN TO STORE.
 Caster Trike Owner s Manual Read and understand this entire manual before riding! For assistance contact Razor. DO NOT RETURN TO STORE. Item Number: 20036540 Contents Safety Warnings... 1 Before You Begin...
read and understand this entire manual before riding! For assistance contact razor. Do not return to store.
 OWNER S MANUAL read and understand this entire manual before riding! For assistance contact razor. Do not return to store. note: manual illustrations are for demonstration purposes only. illustrations
HexPro Series Low Profile Wrenches
 HexPro Series Low Profile Wrenches Operation and Maintenance Manual Model 2HP 4HP 8HP 14HP 30HP www.torquetoolsinc.com Use the HEXPRO Series Low Profile Wrenches Model 2HP 4HP 8HP 14HP 30HP to install
TECHNICAL INSTRUCTIONS
 TECHNICAL INSTRUCTIONS REPLACEMENT THE STEERING INTERMEDIATE SHAFT ASSEMBLY FJ CRUISER For LHD 1 OPERATION FLOWCHART... 3 2 IDENTIFICATION OF AFFECTED VEHICLES... 4 3 PREPARATION... 5 4 GENERAL DESCRIPTION...
CAUTION Fuel Lift Pump. Initial Check. Resistance Check. https://qsol2.cummins.com/qs2/pubsys2/xml/en/procedures/10/
 Page 1 of 16 View Related Topic 005-045 Fuel Lift Pump Initial Check Inspect the engine harness, the lift pump power connector, the lift pump relay power connector and the lift pump relay pins for the
INSTALLATION, OPERATION AND MAINTENANCE MANUAL WALL EXHAUST FANS BELT DRIVE XBL FANS
 INSTALLATION, OPERATION AND MAINTENANCE MANUAL WALL EXHAUST FANS BELT DRIVE XBL FANS The purpose of this manual is to aid in the proper installation and operation of the fans. These instructions are intended
FRONT SUSPENSION GROUP 33A 33A-1 CONTENTS GENERAL DESCRIPTION... 33A-2 FRONT SUSPENSION DIAGNOSIS. 33A-3 LOWER ARM... 33A-13 SPECIAL TOOLS...
 33A-1 GROUP 33A FRONT SUSPENSION CONTENTS GENERAL DESCRIPTION......... 33A-2 DIAGNOSIS. 33A-3 INTRODUCTION TO DIAGNOSIS........................ 33A-3 DIAGNOSIS TROUBLESHOOTING STRATEGY...... 33A-3 SYMPTOM
Engine Leaks and Cures
 Engine Leaks and Cures The following information, printed in blue, is taken with permission from the website of Antique Engine Rebuilding located in Skokie Illinois. I have inserted a few pictures within
18 GAUGE FLOORING STAPLER. Models: /13
 18 GAUGE FLOORING STAPLER Models: 7560 CALIFORNIA PROPOSITION 65 WARNING: You can create dust when you cut, sand, drill or grind materials such as wood, paint, metal, concrete, cement, or other masonry.
GROUP 33A 33A-1 CONTENTS GENERAL DESCRIPTION... 33A-2 FRONT SUSPENSION DIAGNOSIS. 33A-3 LOWER ARM... 33A-13 SPECIAL TOOLS... 33A-5
 33A-1 GROUP 33A CONTENTS GENERAL DESCRIPTION 33A-2 DIAGNOSIS 33A-3 INTRODUCTION TO FRONT SUSPENSION DIAGNOSIS 33A-3 DIAGNOSIS TROUBLESHOOTING STRATEGY 33A-3 SYMPTOM CHART 33A-3 SYMPTOM PROCEDURES 33A-3
read and understand this entire manual before riding! For assistance contact razor. Do not return to store.
 OWNER S MANUAL read and understand this entire manual before riding! For assistance contact razor. Do not return to store. note: manual illustrations are for demonstration purposes only. illustrations
CHASSIS CONTENTS EXTERIOR PARTS 6-1 FRONT WHEEL 6-2 FRONT BRAKE 6-6 HANDLEBARS 6-12 REAR WHEEL 6-30 REAR BRAKE 6-34 REAR SHOCK ABSORBER 6-36
 CHASSIS CONTENTS EXTERIOR PARTS 6-1 FRONT WHEEL 6-2 FRONT BRAKE 6-6 HANDLEBARS 6-12 FRONT FORK ( ) 6-14 FRONT FORK ( ) 6-20 STEERING 6-27 REAR WHEEL 6-30 REAR BRAKE 6-34 REAR SHOCK ABSORBER 6-36 6 SWING
Low Profile Wrenches Operation and Maintenance Manual
 Low Profile Wrenches Operation and Maintenance Manual http://www.torquetoolsinc.com Use the HEXPRO Series Low Profile Wrenches Model 2HP 4HP 8HP 14HP 30HP to install and remove large bolts that have minimal
CHASSIS CONTENTS EXTERIOR PARTS 6-1 FRAME COVER 6-2 REAR FRAME COVER 6-4 FRONT WHEEL 6-6 FRONT BRAKE 6-10 HANDLEBARS 6-17 FRONT FORK 6-19
 CHASSIS CONTENTS EXTERIOR PARTS 6- FRAME COVER 6- REAR FRAME COVER 6-4 FRONT WHEEL 6-6 FRONT BRAKE 6-0 HANDLEBARS 6-7 FRONT FORK 6-9 STEERING 6-6 REAR WHEEL 6-3 REAR BRAKE 6-39 6 REAR SHOCK ABSORBER 6-43
ROCK MONSTER Wheel Manual. 5/31/2017 MP ROCKMONSTER MANUAL - REV E 1
 ROCK MONSTER Wheel Manual www.rockmonsterwheels.com 1 Safety Notes Notice concerning tire selection for Hutchinson wheels and beadlocks Hutchinson does NOT select or recommend specific tires. The selection
OVERHAULING BRAKE CALIPERS GUIDE by Mr. Stefnwolf. This guide is for a 1982 GSX750ET but I expect most of the GS series to be similar if not the same.
 OVERHAULING BRAKE CALIPERS GUIDE by Mr. Stefnwolf This guide is for a 1982 GSX750ET but I expect most of the GS series to be similar if not the same. Badly corroded calipers (caused by moisture in the
Take care of your equipment
 363 Take care of your equipment This chapter has information about how women with certain disabilities can take care of their equipment so it will work well and last as long as possible. Hearing aids Hearing
BRAKES / CONTROLS. Replacement of brake cable, housing, ferrules and caps including setting of brake (front or rear)
") BRAKES / CONTROLS Brake Cable Replace Replacement of brake cable, housing, ferrules and caps including setting of brake (front or rear) Brake Hose Shorten Shorten hydraulic brake hose (bleeding excluded)
BRAKES / CONTROLS Brake Cable Replace Replacement of brake cable, housing, ferrules and caps including setting of brake (front or rear) Brake Hose Shorten Shorten hydraulic brake hose (bleeding excluded)
 Operation and Maintenance Manual http://www.torsionx.eu Use the MaxDrv Series Square Drive Torque Wrench Model.75, 1, 3, 5, 8, 10, 20, 25, 35, 50 to install and remove threaded fasteners requiring precise
The correct position of the bonding surface is: In the middle of the tire inner layer. In the area of the DOT stamp.
 5.4.6 Bonding position in the tire The correct position of the bonding surface is: In the middle of the tire inner layer. In the area of the DOT stamp. Dimensions of the bonding surface: Dimensions of
minimum allowable level, remove brake fluid to the midway point before proceeding.
 1 of 6 12/7/2011 6:45 PM aution: Refer to Brake Dust Caution in Service Precautions. Caution: Refer to Brake Fluid Irritant Caution in Service Precautions. Removal Procedure 1. Inspect the fluid level
BOSS ZONE 1 GRP MOBILE WORKING TOWER INSPECTION PROCEDURE. Youngman Group Ltd Issue B Date 23/03/09 Page 1 of 8 Pages
 BOSS ZONE 1 GRP MOBILE WORKING TOWER INSPECTION PROCEDURE Youngman Group Ltd Issue B Date 23/03/09 Page 1 of 8 Pages INTRODUCTION This inspection procedure applies to BoSS Zone 1 GRP Mobile Working Towers
RF81 Finish Defects. Copyright 1999 Inter-Industry Conference On Auto Collision Repair v.4.0
 Uniform Procedures For Collision Repair UPCR RF81 Finish Defects Copyright 1999 Inter-Industry Conference On Auto Collision Repair v.4.0 1. Description This procedure describes methods for correcting finish
Tire and Wheel Safety and Maintenance Aggregate Miner Safety Conference
 Tire and Wheel Safety and Maintenance 2018 Aggregate Miner Safety Conference Tire and Wheel Safety EXPLOSIVE POTENTIAL 4 Velocity and Energy Chart Tire PSI Energy 200 Lb Person 3,000 Lb Car Size Hot Ft/Lbs
CHASSIS CONTENTS EXTERIOR PARTS 7-1 FRONT WHEEL 7-2 FRONT BRAKE 7-6 HANDLEBARS 7-13 FRONT FORK 7-15 STEERING 7-23 REAR WHEEL 7-26 REAR BRAKE 7-30
 CHASSIS CONTENTS EXTERIOR PARTS 7- FRONT WHEEL 7-2 FRONT BRAKE 7-6 HANDLEBARS 7-3 FRONT FORK 7-5 STEERING 7-23 REAR WHEEL 7-26 REAR BRAKE 7-30 REAR SHOCK ABSORBER 7-32 SWING ARM 7-33 7 7- CHASSIS EXTERIOR
RUFNEX Series Low Profile Wrenches Operation and Maintenance Manual
 RUFNEX Series Low Profile Wrenches Operation and Maintenance Manual http://www.torsionx.com Use the RUFNEX Series Ultra-Low Profile Wrenches to install and remove large bolts that have minimal wrench clearance.
Best Practice Guideline. Tyre Handling in Surface Operations
 Best Practice Guideline Tyre Handling in Surface Operations www.aspasa.co.za June 2018 Introduction The job of tyre servicing can be extremely hazardous. An inflated large vehicle tyre contains tremendous
CHASSIS CONTENTS FRONT WHEEL 6-1 FRONT BRAKE 6-6 FRONT FORK 6-14 STEERING STEM 6-20 REAR WHEEL AND REAR BRAKE 6-25 SUSPENSION 6-31 REAR SWING ARM 6-36
 CHASSIS CONTENTS FRONT WHEEL 6-1 FRONT BRAKE 6-6 FRONT FORK 6-14 STEERING STEM 6-20 REAR WHEEL AND REAR BRAKE 6-25 SUSPENSION 6-31 REAR SWING ARM 6-36 6 6-1 CHASSIS FRONT WHEEL REMOVAL Support the machine
SAFETY. Read and understand all safety precautions and instructions before installing this product.
 SAFETY Installation Instructions Application: 2015+ FORD F150 Your safety and the safety of others is very important. In order to help you make informed decisions about safety, we have provided installation
PARTS LIST: VIEWPOINT RUNNING BOARD NISSAN MURANO EXCLUDES 2dr CROSSCABRIOLET CONVERTIBLE
 PARTS LIST: VIEWPOINT RUNNING BOARD Qty Description Qty Description 1 Driver/Left Running Board 14 10-1.5mm x 35mm Bolt Plates 1 Passenger/Right Running Board 6 10-1.50mm x 30mm Hex Bolt 1 Driver/Left
POWER STEERING PUMP REBUILDING SPK101 Read instructions completely before removal & disassembly
 POWER STEERING PUMP REBUILDING SPK101 Read instructions completely before removal & disassembly DISASSEMBLY: 1. Remove pump from car and allow to drain. 2. Remove pulley from front of pump. This requires
Cervélo Fork Owner's Manual
 FORK OWNERS MANUAL IMpOrtant CustOMer InFOrMatIOn Note to shops/assemblers: Please pass these instructions to the consumer along with the completed bicycle. WARNING: Carbon bicycle forks are subject to
Release the electrical wire from the bracket -2- toward the left -A- and remove.
 Page 1 of 8 Front Brake Pads, FBC-60, Removing and Installing Always replace on both axles. Special tools and workshop equipment required t Torque Wrench 5 50 Nm -V.A.G 1331- t Reversible Ratchet -V.A.G.
Pro Series Scooters, Black Label Scooters and El Dorado Scooter
 Pro Series Scooters, Black Label Scooters and El Dorado Scooter Owner s Manual Read and understand this entire manual before allowing child to use this product! For assistance contact Razor. DO NOT RETURN
Table of Contents. 4. Before a New Turbocharger is Installed
 Table of Contents 1. Turbocharger Overview ------------------------------------------------------------------ 1.1. Definition -----------------------------------------------------------------------------
Touring Suspension Installation Guide
 Touring Suspension Installation Guide Application Guide Description C7 A6 / A7 Touring Suspension Kit Part Number SE701-P60-01 Special Tools Required Qty Description Part Number 1 Torque Wrench VAG 1331
IBT Series Square Drive Torque Wrenches
 IBT Series Square Drive Torque Wrenches Operation and Maintenance Manual Model.75, 1, 3, 5, 8, 10, 20, 25, 35, 50 http://www.torsionx.com Use the IBT Series Square Drive Torque Wrenches Model.75, 1, 3,
Service Manual Blue Giant
 R 2000 Service Manual Blue Giant Models PT-50 and PT-55 Developed by Super Stores Service This manual is intended for basic service and maintenance of the Blue Giant pallet jack. The pallet jacks you are
Abrasive (Grinding) Wheels
 Wheels") A Health and Safety Guideline for Your Workplace Abrasive (Grinding) Wheels Introduction Whether they are portable or fixed, grinding wheels are designed to operate at very high speeds. If a grinding wheel
A Health and Safety Guideline for Your Workplace Abrasive (Grinding) Wheels Introduction Whether they are portable or fixed, grinding wheels are designed to operate at very high speeds. If a grinding wheel
440/880LB ELECTRIC HOIST STF-4488EH
 ELECTRIC HOIST 440/880LB WARNING: Read carefully and understand all ASSEMBLY AND OPERATION INSTRUCTIONS before operating. Failure to follow the safety rules and other basic safety precautions may result
DISC AND ELECTRIC BRAKE MAINTENANCE
 Purpose To maintain and extend the product life of the Disc Brake and Electric Brake product lines. Safety Failure to follow the instructions provided in this manual may result in death, serious personal
Recommended Practice
 Recommended Practice Proposed RP 261 (T) VMRS 004-013-001 CONSIDERATIONS FOR AERODYNAMIC WHEEL COVERS PREFACE The following Recommended Practice is subject to the Disclaimer at the front of TMC s Recommended
Rocker Lever Assembly
 003-009 Rocker Lever Assembly Preparatory Steps Remove the air piping from the intake manifold. Remove the rocker lever cover. Refer to Procedure 003-011 in Section 3. Remove the engine brakes, if equipped.
2-DOOR LAUNDRY CABINET KIT
 2-DOOR LAUNDRY CABINET KIT OWNER S MANUAL QL054 # 6725159 Table of Contents Table of Contents....2 Safety Information....2 Warranty....3 Warranty Claim Procedure....3 Pre-Installation....4 Tools/Materials
How to Keep your Treadmill Running
 How to Keep your Treadmill Running Buying a treadmill is hard enough. Choosing the best out of many treadmills in the market is nigh impossible. But once you ve got the treadmill you ve always wanted,
eurotechnik autoteile Technical Information Manual
 eurotechnik autoteile Technical Information Manual 1 Common Fitting Tips KYB, the world s largest supplier of shock absorbers to vehicle manufacturers, shares some technical tips and advice on handling