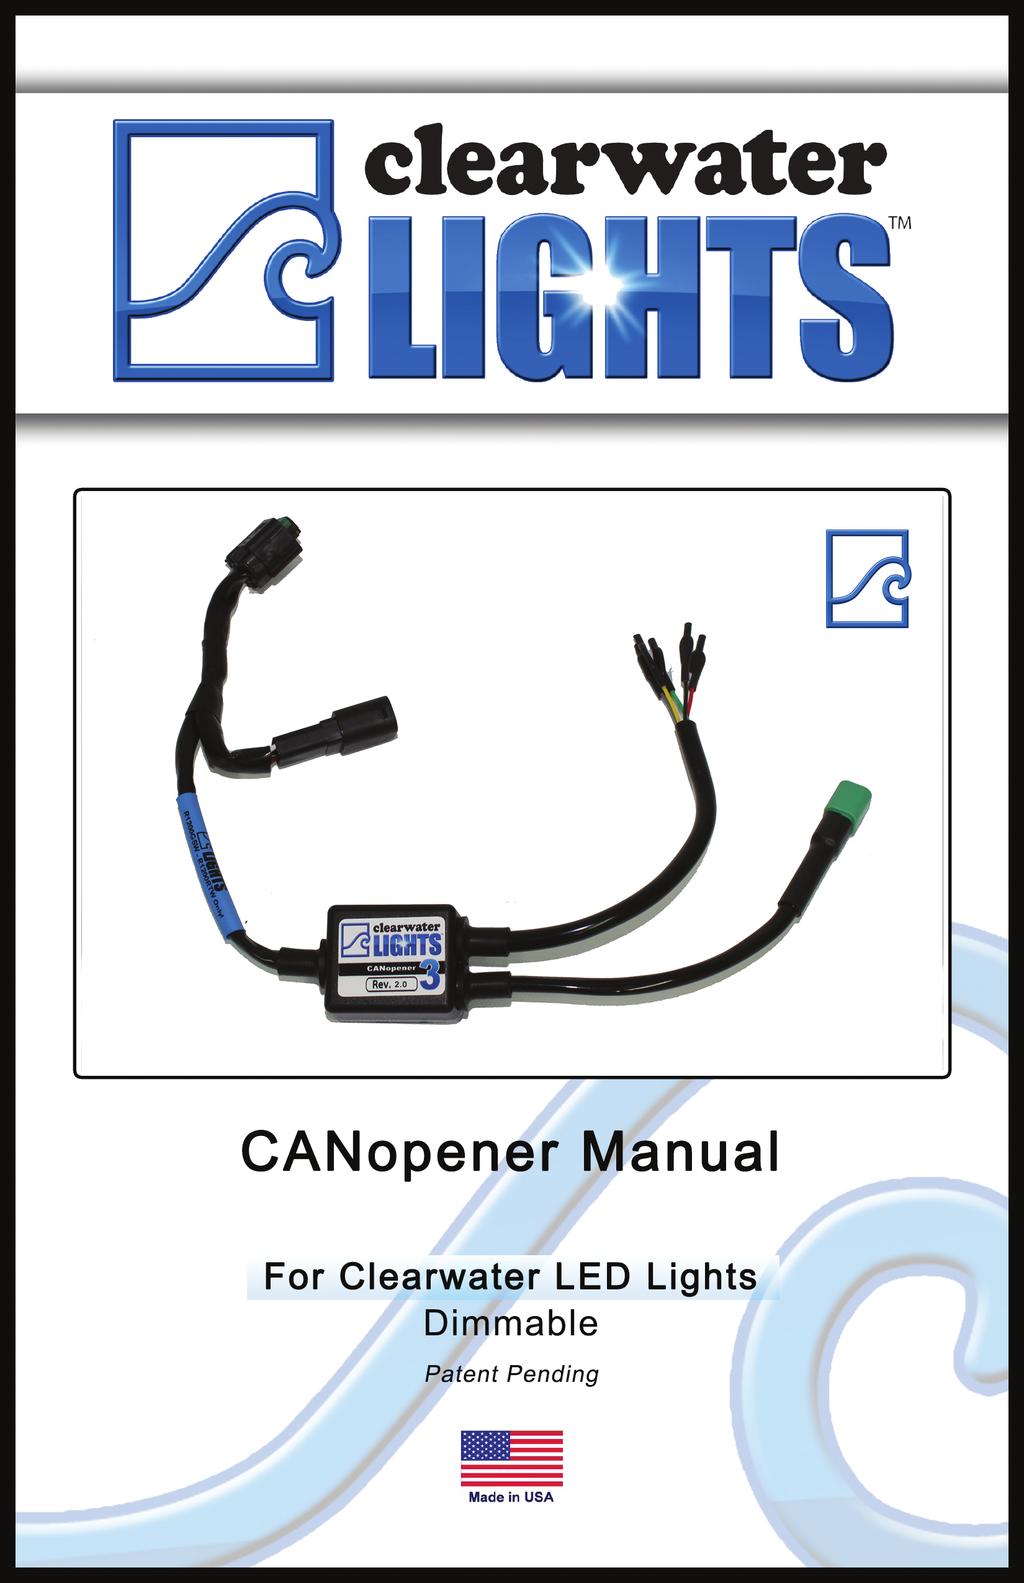
Step 1: Parts List and Bike Preparation
|
|
|
- Aleesha Freeman
- 5 years ago
- Views:
Transcription
1
2 **NOTE** The table below is only a quick summary guide of all the CANopener features. See Step 1: Parts List and Bike Preparation the details of each feature throughout this manual. Summary of CANopener features and operation VERSION 2.1 TSC = Turn Signal Cancel WW = Wonder Wheel (BMW multifunction controller) PM = Tire Pressure Monitor FTP = Flash To Pass OBL = Optional Brake Light Default setting in RED Function Command Modes Darla/Glenda Dimmer [Pg. 5] Erica/Krista/Sevina Dimmer [Pg. 5] Erica/Krista/Sevina On/off High Beam Mode [Pg. 7] Horn Activation Mode [Pg. 6] Hazard Flasher Alert Mode [Pg. 7] Turn Signal Dimming [Pg. 6] Clearwater Brake Light (optional) [Pg. 8] Inertial Braking [Pg. 8-9] Press and release (TSC), then Hold control wheel Left for 2 seconds and rotate to adjust. Press (TSC) again to lock in. Press and release (TSC), then hold control wheel right for 2 seconds and rotate to adjust. Press (TSC) again to lock in. Hold TSC for 2 seconds Press and release (TSC), hold brake lever and press & release FTP 5 times to toggle Hold brake lever and press & release TSC 5 times to toggle Press and release (TSC), hold hazard switch then press & release brake lever 5 times to toggle Press and release (TSC), hold right turn signal then press & release front brake lever 5 times While stationary, press & release TSC then press & release the front brake lever 5 times within 5 seconds to toggle Press & release TSC then press & release the foot brake lever 5 times within 5 seconds to toggle Rotate WonderWheel to select 10 brightness levels (10% to 100%) To adjust brightness on High Beam Mode, turn on high beam first. Dimmer control will cancel after 2 seconds or by pressing TSC Mode 1 - on and dimmable (default) Mode 2 - off Mode 1 - all lights on 100% with high beam or FTP, Krista/Erica/Sevina must be turned on Mode 2 - Same as Mode 1 except Krista/Erica/Sevina lights don t have to be turned on. (default) Mode 3 - Same as Mode 2 but lights will strobe for 2 seconds if FTP is pressed 3 times Mode 1 - horn does not affect lights Mode 2 - horn activates lights 100% (default) Mode 3 - lights strobe with horn Mode 1 - no flash (default) Mode 2 - lights strobe while holding hazard switch (Version 1.90 and earlier). Lights strobe when hazards are toggled on (Version 1.91) Mode 1 - off (default) Mode 2 - lights dim when turn signals are activated. Mode 1 - off (default on Version 1.6 and older) Mode 2 - functions identically to BMW brake light (default on Version 1.7 and later) Mode 3 - California legal strobe on brake activation (4Hz flash) Mode 4 speed sensitive (flashes faster and brighter with harder braking) Can be adjusted. Mode 1 - Inertial braking disabled Mode 2 Low sensitivity. Brake light activates when engine braking reaches.4g. Mode 3 High sensitivity. Brake light activates when engine braking reaches.2g. (default) Brake Dimming See brake light manual See brake light manual Reset Default Settings [Pg. 9] Press and release (TSC), hold left turn signal then press & release FTP 6 times within 6 seconds. Reset all functions to the default settings above. Page 2 Page 1
3 Step Clearwater 1: Parts CANopener List and Bike features Preparation and operations Summary of Features 1. Independent dimming feature Independent dimming of two sets of Clearwater lights using the BMW Wonder Wheel (handlebar mounted rotary dimmer is included for non-wonder Wheel bikes) The dimmer has 11 brightness levels. Starting at 3%, then increasing from % in 10% increments 2. Automatic Dimmer Dimmer setting compensates automatically using the bike s photocell Factory preset for day, night, and high beam illumination 3. On/Off function for Erica/Krista/Sevina lights No separate switch required, uses factory turn signal cancel button 4. Turn Signal Dimming Clearwater Lights can be set to dim while turn signals are activated. 5. Horn Activation Mode Programmable to illuminate or strobe with horn button (off road use only) 6. High Beam Mode Clearwater Erica/Krista/Sevina lights programmable to activate or strobe (off-road use only) with flash-to-pass button 7. Hazard Flasher Alert Mode Programmable to pulse when switching the hazard button on/off (off road use only) 8. Clearwater Brake Light Module (optional) Programmable LED brake module includes California-legal strobe mode and speed sensitive mode 9. Auxiliary CANopener relay drives Auxiliary turn on (1/4 amp maximum) -YELLOW wire Auxiliary horn (1/4 amp maximum) - GRAY wire Auxiliary high beam relay drive (1/4 amp maximum) - GREEN wire WARNING: Do not connect auxiliary accessories without a relay! 10. Factory Default Reset Reset all functions to the default settings Page 2 Page 3


4 CANopener Mounting Locations The CANopener module can be found mounted under the seat on most liquid cooled BMW s. Front of Bike Tire Pressure Monitor (Models w/ TPM) TPM location Front of Bike TPM location CANopener location on a R1200GSW/GSAW Page 4 Page 3


5 CANopener Mounting Locations CANopener location on a K1600GT. Lean angle sensor location. Front of Bike CANopener location on a R1200RTW. Front of Bike Tire Pressure Monitor hidden here under frame. CANopener location on a R1200R/RS Tire Pressure Monitor hidden here. Front of Bike Alarm module plug is hidden here. CANopener location on a S1000XR Front of Bike Page 4 Page 5
 brightness settings (3, 10-100%) in three different modes (day, night, and high beam).")

6 Clearwater CANopener operation and features DIMMING CONTROL (Wonder Wheel equipped bikes) Information on Dimming: Two modulated brightness channels are adjustable using the Wonder Wheel. Each channel is programmable for (11) brightness settings (3, %) in three different modes (day, night, and high beam). Settings are stored, and will be remembered when restarting the bike or disconnecting the battery. The dimmer is programmed at the factory for the most useful day/night settings. Follow the procedure below to enter dimming mode. Step 1: To enter into dimming mode, first press & release the TSC button shown in the figure to the right. Step 2: To adjust Glenda/Darla lights, hold the Wonder Wheel to the left for 2 seconds. To adjust Krista/Erica/Sevina lights, hold Wonder Wheel to the right for 2 seconds. The lights should flash twice. The brightness level can then be adjusted by rotating the wheel. Step 3: To exit dimming mode, press and release the TSC button again. This will lock in the brightness setting. Note - Remember that each set of lights is adjustable for day, night. Day and night settings are automatically selected by the ambient light level reaching the bike s photocell. To adjust the night dimmer, simply cover the photocell at the top right corner of the dash display using your hand or a piece of tape. Activate the high beam switches the lights to 100% WARNING: When configuring the dimmer, be sure that the Wonder Wheel is not making adjustments to other functions of the onboard systems. Turn off the entertainment system to prevent volume adjustment or unwanted channel changes, and select the home screen on the GPS. Page 6 Page 5
7 Clearwater CANopener operation and features DIMMING CONTROL (Non-Wonder Wheel If the motorcycle does not have the GPS Prep Package (Wonder Wheel), your light kit will come equipped with a handlebar mounted knob for dimming control. Separate day and night settings and the dual intensity dimmer will not be available. Default Settings: ON/OFF FUNCTION FOR ERICA/KRISTA/SEVINA The Krista/Erica/Sevina lights can be manually deactivated. Toggle these modes by holding the TSC button for two seconds. Mode 1 on and dimmable (default) Mode 2 off ( Krista/Erica/Sevina lights can automatically be shut off if the TSC button is pressed and released 3 times. This is great if the rider forgets is the lights are on or off.) TURN SIGNAL DIMMING The front Clearwater lights, and Billie tail light can be programmed to dim when the turn signals are activated. To toggle the Turn Signal Dimming mode on and off, press and release the (TSC) button, hold the right turn signal then press & release the brake lever 5 times. DIMMING CONTROL (except non-wonderwheel bikes) Mode 1 - Off (default) Mode 2 - All Clearwater lights dim when turn signals are activated. HORN ACTIVATION MODE The Clearwater lights can be programmed for three different modes when the horn button is pressed and released. Toggle these modes by holding the front brake lever and pressing and releasing the Turn Signal Cancel button (5) times. The brake and Clearwater lights will flash to indicate the mode selected: Mode 1 horn does not affect lights Mode 2 horn activates lights 100% (default) Mode 3 horn strobes lights (if two sets of Clearwater lights are installed, they will alternate flashing) WARNING: The use of strobe mode may not be legal on public highways. Check your local regulations. This mode is intended for parades and escorts under certain conditions. Page 6 Page 7
 button, holding the front brake lever then pressing and releasing the FTP button (See Fig.")
8 Clearwater CANopener operation and features HIGH BEAM MODE The Krista/Erica/Sevina lights can be programmed for three modes of operation in conjunction with high beams. Toggle these modes by pressing and releasing the (TSC) button, holding the front brake lever then pressing and releasing the FTP button (See Fig. A below) (5) times: Mode 1 All Clearwater lights turn on 100% when high beam or flash-topass is pressed. Krista/Erica/Sevina lights will not turn on with high beam or flash-to-pass if Krista/Erica/Sevina lights are switched off. Mode 2 HIGH BEAM ACTIVATION. All Clearwater lights turn on 100% when high beam or flash-to-pass is pressed. Krista/Erica/Sevina lights will turn on when High beam or flash-to-pass is pressed, even when Krista/ Erica/Sevina lights are switched off (default on Version 1.6 or greater). Mode 3 - HIGH BEAM FLASH MODE: Same as Mode 2, but lights will flash for 2 seconds when the flash-to-pass button is pressed 3 times. (Version 1.91 or later). FTP button Fig. A HAZARD FLASHER ALERT MODE The Clearwater lights can be programmed to strobe when the hazard flasher button is toggled on. Toggle these modes by pressing and releasing the (TSC) button, holding down the hazard flasher button, then press and release the brake lever (5) times: Mode 1 OFF, no flash with emergency flasher button (default) Mode 2 strobe with emergency flasher when button is held down (Version 1.90 or earlier), or toggled on (Version 1.91 and later). If two sets of Clearwater lights are installed, they will alternate flashing. WARNING: The use of strobe mode may not be legal on public highways. Check your local regulations. This mode is intended for parades and escorts under certain conditions. Page 8 Page 7
9 Clearwater CANopener operation and features CLEARWATER BRAKE LIGHT MODULE (OPTIONAL) The CANopener can also drive an optional Clearwater auxiliary brake light with license plate frame. There are four modes available for the brake light. Toggle these modes by pressing and releasing the TSC button then pressing and releasing the front brake lever five times while the bike is stationary. The brake lights will flash one, two, three or four times to indicate the mode selected. Mode 1 off Mode 2 functions identically to BMW brake and tail light (default) Mode 3 California legal strobe on brake activation (4Hz flash), then continuous on as long as the brake is held. Mode 4 Active brake light; flash rate depends on deceleration rate. Default Brightness Tail Brake Levels Day 20% 70% Night 10% 60% Dimming Control of the Brake Light: The brightness of the brake light and running light can be adjusted separately with the Wonder Wheel. This brightness level can be adjusted in 10% increments (10-100%). Settings are stored, and will be remembered when restarting the bike or disconnecting the battery. Entering Dimmer Program - Hold down the front brake, press and release the TSC button, then hold the Wonder Wheel to the right. The lights will flash twice indicating you have entered the brake dimming mode. Continue to hold the front brake down to adjust the brake brightness level. Release the front brake to adjust the running light brightness level. Adjust the output by rotating the WonderWheel. Exiting Dimmer Program - Press and release the TSC button. The lights will flash once to confirm. Inertial Braking Mode Sensitivity (CANopener Version 1.82 and up): There is an additional braking feature provided by the CANopener in which the brake lights automatically engage when the deceleration of the bike reaches a threshold value, even when the brakes are not engaged (engine braking). Page 8 Page 9
10 Clearwater CANopener operation and features There are three sensitivities of inertial braking modes. Switching between each mode requires the bike to be stationary. To change the sensitivity, press and release the TSC button, then press the rear brake foot lever 5 times (front brake released). Each mode will be signaled by a corresponding number of flashes by the brake light was well as by any forward running lights, if they are also installed. - Inertial Brake Mode 1: Inertial braking disabled. (Default Version 1.90 and earlier) The front and/or back brake lever must be engaged for the brake light to activate. -Inertial Brake Mode 2: Low sensitivity mode. The brake light will activate when the engine braking level reaches 0.4G. -Inertial Brake Mode 3: High sensitivity mode (Default Version 1.91 and later). The brake light will activate when the engine braking level reaches 0.2G. This will make the activation of the brake light during engine braking happen more frequently, under less deceleration. Inertial braking is disabled during standard brake light mirror mode (Brake Mode 2) but works equally well using the California 4-flash (Brake Mode 3) or variable flashing (Brake Mode 4) modes. In either of these modes, the brake light will appear just as if the rider had engaged the brake, including the programmed flashing and automatic brightness control. (Default) Adding mechanical braking at some point during the engine braking process provides seamless, uninterrupted action of the brake light. NOTE: The auxiliary brake light is configured as an always on running light at a reduced light level. When either the front or rear brake is activated, it activates at 100% brightness, or at customer set brake light brightness. All flashing light modes are deactivated below 5mph. AUXILIARY CANopener RELAY DRIVES Auxiliary turn on (1/4 amp maximum) Useful for turning on aux fuse boxes or a PDM-60. Auxiliary horn (1/4 amp maximum) Useful for adding an aux air horn. MUST use relay. Auxiliary high beam relay drive (1/4 amp maximum) Useful for adding an aux high beam. WARNING: Do not connect auxiliary accessories without a relay! Page 10 Page 9
11 Notes CANopener Wiring Key (For Billie/Accessory Cable) Ground Brake/Tail Light 12V Motory Start* High Beam* Horn* *Relay Drive FACTORY DEFAULT RESET To reset the CANopener to the factory settings, press and release the (TSC) button, hold the left turn signal switch and press and release the flash-to-pass button (6) times. All factory preset dimmer levels and modes will be selected. A successful reset is indicated by five flashes of all Clearwater lights. Page 10 9 Page 11

12 Version /3/17
Step 1: Parts List and Bike Preparation
 *NOTE* The table below is only a quick summary guide of all the CANopener features. See the details of Step 1: Parts List and Bike Preparation each feature throughout this manual. Summary of CANopener
Instruction Manual. What s In The Box? CANsmart Controller DNL.WHS BMW K1600 Series. Kit Contents DENALIELECTRONICS.COM
 Instruction Manual Instruction Rev0 Thank you for choosing DENALI We know you would rather be riding your bike than wrenching on it, so we go the extra mile to make sure our instructions are clear and
VC-4820 Programmable DC-DC Converter with Battery Charger function USER'S MANUAL
 1. INTRODUCTION VC-4820 Programmable DC-DC Converter with Battery Charger function USER'S MANUAL This MCU controlled Step Down DC-DC Converter has a digitally adjustable output in 0.2V increments. This
Exterior Lighting Systems Description and Operation. Exterior Lamps. The exterior lighting system consists of the following lamps: The headlamps
 Exterior Lighting Systems Description and Operation Exterior Lamps The exterior lighting system consists of the following lamps: The headlamps The daytime running lamps (DRL) The front fog lamps The park,
Table of Contents. Bikes with 2 handlebar switches. 12-pin plug for BMW models Installation tips. 15-pin plug for older BMW models Installation tips
 Table of Contents Bikes with 2 handlebar switches SM-5 12-pin plug for BMW models Installation tips 2 3 SM-6 15-pin plug for older BMW models Installation tips Special Features & Functions 4 5 4-Way Emergency
VC-30 / VC-40 Programmable DC-DC Converter with Battery Charger function USER'S MANUAL
 1. INTRODUCTION VC-30 / VC-40 Programmable DC-DC Converter with Battery Charger function USER'S MANUAL This MCU controlled Step Down 24V to 12V DC-DC Converter has a programmable 12.0 to 15.0V output in
Step 1: Parts List and Bike Preparation
 Step 1: Parts List and Bike Preparation Please be sure to read our instructions thoroughly before attempting installation. Check Parts list supplied with your kit to be sure all parts are handy. If something
545T Nite-Lite WIRING DIAGRAM
 545T Nite-Lite The 545T Nite-Lite system is designed to manage the vehicle s headlights and parking lights. It will automatically energize the vehicle's headlights and parking lights whenever it becomes
m.unit Comparison V.2 / Basic / Blue
 The m.unit Basic is the same as the m.unit Blue without any of the Bluetooth capabilities and functions. The only physical difference between them is the m.unit Basic will come with a red serial number
ADD-ON REMOTE STARTER TO AFTERMARKET SYSTEM
 MEGATRONIX RS 110 ADD-ON REMOTE STARTER TO AFTERMARKET SYSTEM Installation and Operation Manual MEGATRONIX CHATSWORTH, CA U.S.A. RS110 ADD-ON REMOTE CAR STARTER For Vehicles Equipped With Automatic Transmission
2 WAY REMOTE STARTER & ALARM SYSTEM INSTALLATION GUIDE FCC ID NOTICE
 REV. ARS. WAY REMOTE STARTER & ALARM SYSTEM INSTALLATION GUIDE FCC ID NOTICE This device complies with Part 5 of the FCC rules. Operation is subject to the following conditions:. This device may not cause
FORD MONDEO Quick Reference Guide
 FORD MONDEO Quick Reference Guide About This Quick Reference Guide We have created this guide to help you get to know certain features of your vehicle. It only contains basic instructions to get you started
INSTALLATION MANUAL. This unit is designed for professional installation only and must be installed by an authorized Silencer dealer.
 INSTALLATION MANUAL SL- 3 3-Channel Security with Keyless Entry System This unit is designed for professional installation only and must be installed by an authorized Silencer dealer. For Warranty information:
DLKEK3HN INSTALLATION INSTRUCTIONS
 DLKEK3HN INDEX: INSTALLATION INSTRUCTIONS WIRING INSTRUCTIONS... PG 2-5 LED STATUS INDICATOR... PG 6 VALET/OVERRIDE BUTTON... PG 6 SHOCK SENSOR... PG 7 PROGRAMMABLE JUMPER-PINS... PG 7 PROGRAMMING REMOTE
Indian Speedometer and Body Control Module Service Tool Users Guide
 Indian Speedometer and Body Control Module Service Tool Users Guide Installing speedometer software to your computer 1. Go to the Indian Motorcycle Website: WWW. Indianmotorcycle.com 2. Log in to Service
Step 1: Parts List and Bike Preparation
 Step 1: Parts List and Bike Preparation Please be sure to read our instructions thoroughly before attempting installation. Check Parts list supplied with your kit to be sure all parts are handy. If something
MEGA 462 REMOTE CONTROL AUTO ALARM SYSTEM INSTALLATION & OPERATION INSTRUCTIONS WIRING DIAGRAM. White. H1 5 Pin White. H6 2 Pin White.
 MEGA 462 REMOTE CONTROL AUTO ALARM SYSTEM INSTALLATION & OPERATION INSTRUCTIONS WIRING DIAGRAM H7/1 Green : (-) 200mA Pulse H7 3 Pin H7/3 Blue : (-) 200mA Unlock White LED Indicator Valet Switch H6 2 Pin
REC-11+ REMOTE RECEIVER UNIT
 Resetting The Programmable Features The installer may quickly and easily return all 17 programmable features back to the factory settings. Changing individual features were explained in detail in the previous
Power Take-Off (PTO) Description and Operation
 Description and Operation") Page 1 of 5 2007 Chevrolet Kodiak C-Series (Conventional) C4/C5 Kodiak, TopKick C-Series Service Manual Transmission/Transaxle Power Take-Off Description and Operation Document ID: 2033971 Power Take-Off
Page 1 of 5 2007 Chevrolet Kodiak C-Series (Conventional) C4/C5 Kodiak, TopKick C-Series Service Manual Transmission/Transaxle Power Take-Off Description and Operation Document ID: 2033971 Power Take-Off
Cruise control troubleshooting for the BMW K1200RS
 Cruise control troubleshooting for the BMW K1200RS Intro / background Starting in 2001, the K1200RS was offered with a cruise control option. Although the cruise control unit has been very reliable, a
INSTALLATION GUIDE Table of Contents
 CT-3100 Automatic transmission remote engine starter systems. What s included..2 INSTALLATION GUIDE Table of Contents Door lock toggle mode..... 4 Notice...2 Installation points to remember. 2 Features..2
WP141 AUTO-CANCEL TURN SIGNAL MODULE INSTALLATION INSTRUCTIONS
 P141 AUTO-CANCEL TURN SIGNAL MODULE INSTALLATION INSTRUCTIONS Turn Button R Turn Button L Turn Signal R Turn Signal Ground /V /BN Acc 12v+ *Brake input (optional) R\ O\ *The brake input feature provides
POWER MIRRORS - SERVICE INFORMATION
 2007 ACCESSORIES AND EQUIPMENT Power Mirrors - Service Information - Nitro POWER MIRRORS - SERVICE INFORMATION DESCRIPTION POWER MIRRORS Fig. 1: Power Operated Sideview Mirrors Switch The power operated
2007 XTERRA QUICK REFERENCE GUIDE. Shift_your limits
 2007 XTERRA QUICK REFERENCE GUIDE Shift_your limits 08 09 10 04 11 12 13 09 CLIMATE CONTROLS 06 14 10 FRONT-PASSENGER AIRBAG STATUS LIGHT 11 E-LOCK SWITCH 07 12 HILL DESCENT CONTROL SWITCH HEADLIGHT AND
VS 315 DELUXE 4-CHANNEL MOTORCYCLE ALARM. Installation And Operation Manual MEGATRONIX CALIFORNIA, U.S.A. VS 315 1
 VS 315 DELUXE 4-CHANNEL MOTORCYCLE ALARM Installation And Operation Manual MEGATRONIX CALIFORNIA, U.S.A. VS 315 1 VS 315 2 INSTALLATION We recommend insulating all your soldered or crimped connections
GTWY505 Fast Idle, Shift Interlock, I/O Ford E-Series
 An ISO 9001:2008 Registered Company GTWY505 Fast Idle, Shift Interlock, I/O 2009-2018 Ford E-Series Introduction The Gateway 505 is a wheelchair lift safety interlock which will only work with the ignition
Parts List. Please be sure to read our instructions thoroughly before attempting installation. D2/G2 Parts List. D31/G31 Parts List.
 Parts List Please be sure to read our instructions thoroughly before attempting installation. D2/G2 Parts List D31/G31 Parts List Page 2 1 Step 1: Bike Preparation Step 1: Bike Preparation There are two
INSTALLATION GUIDE. FCC ID NOTICE
 REV.5 RS. ADVANCED REMOTE STARTER INSTALLATION GUIDE www.security.soundstream.com FCC ID NOTICE This device complies with Part 5 of the FCC rules. Operation is subject to the following conditions:. This
INSTALLATION MANUAL. Remote Mobile Security System. Model: PL50
 Remote Mobile Security System INSTALLATION MANUAL Model: PL50 Copyright 2000 Magnadyne Corporation For Technical Assistance (800) 638-3600 For Fax on Demand Technical Assistance (800) 994-9977 (Must be
Part 1 OPERATION OF INSTRUMENTS AND CONTROLS
 Part 1 OPERATION OF INSTRUMENTS AND CONTROLS Chapter 1-4 Lights, Wipers and Defogger Headlights and turn signals Emergency flashers Instrument panel light control Front fog lights Interior lights Ignition
SP Switch Programmable Switch Panel Power System. Parts Included
 SP8100 8-Switch Programmable Switch Panel Power System Parts Included 1 Switch Panel 1 100 amp Power Module 1 Power Module Harness 1 Power Module Mounting Plate 1 Battery Cable w/100a MIDI fuse (Littlefuse
Emmo Urban. Owner s Manual
 Emmo Urban Owner s Manual 2 P a g e Table of Contents E-bike MTO Label..3 Specifications...4 Charging Your E-bike. 5-9 Brakes, Tire Pressure, and Front Carrying Case.....10 Adjusting Brakes 11 Kickstand,
GTWY515, GTWY516* Fast Idle, Shift Interlock, I/O Ford Transit Introduction
 An ISO 9001:2015 Registered Company GTWY515, GTWY516* Fast Idle, Shift Interlock, I/O 2015-2019 Ford Transit Introduction The Gateway 515 and 516 are wheelchair lift safety interlocks which allows lift
1 P age. Emmo Titan. Owner s Manual. T. Lac V 1.0
 1 P age Emmo Titan Owner s Manual T. Lac V 1.0 2 P age Table of Contents E-bike MTO Label..3 Specifications...4 Charging Your E-bike. 5-6 Brakes...7 Kickstand...8 Pedals 9 Greasing Bike Chain and Rear
2007 VERSA QUICK REFERENCE GUIDE. Shift_space
 2007 VERSA QUICK REFERENCE GUIDE Shift_space 04 05 06 12 13 14 11 07 08 15 09 10 HEADLIGHT AND TURN SIGNAL CONTROL 04 TWIN TRIP ODOMETER 07 INSTRUMENT BRIGHTNESS CONTROL* 10 HOOD RELEASE* 13 AUDIO SYSTEM
1 P age. Emmo Prestige. Owner s Manual. T. Lac V 1.0
 1 P age Emmo Prestige Owner s Manual T. Lac V 1.0 2 P age Table of Contents E-bike MTO Label..3 Specifications...4 Charging Your E-bike. 5-6 Brakes...7 Kickstand...8 Pedals 9 Greasing Bike Chain and Rear
Vehicle Security System
 Installation Instructions Vehicle Security System PROFESSIONAL INSTALLATION STRONGLY RECOMMENDED Installation Precautions: Roll down window to avoid locking keys in vehicle during installation Avoid mounting
PATRIOT 2009 QUICK REFERENCE GUIDE
 PATRIOT 2009 QUICK REFERENCE GUIDE vehicle feature Fuel Cap: Loose Gas Cap Message If a gas cap message (shown as gascap) appears, tighten the gas cap until a clicking sound is heard. Press the odometer
Three Function Remote Control System with Alarm (Model RCA-3)
") Golden RODtronics P.O. Box 146 Golden Colorado 80402-0146 Phone 303-423-8597 Fax 303-420-4575 Three Function Remote Control System with Alarm (Model RCA-3) Congratulations! You have just purchased one
Golden RODtronics P.O. Box 146 Golden Colorado 80402-0146 Phone 303-423-8597 Fax 303-420-4575 Three Function Remote Control System with Alarm (Model RCA-3) Congratulations! You have just purchased one
SECTION 1 2 INSTRUMENTS AND CONTROLS. Switches
 SECTION 1 2 INSTRUMENTS AND CONTROLS Switches Headlight switch.......................................... 16 Headlight dimmer and turn signal switch..................... 17 Fog light switch...........................................
STEP 2. STEP 4 Scroll to Vehicle Customization and press touchpad to select. Then select desired categories for customization.
 Lexus Personalized Settings Your vehicle includes a variety of electronic features that can be programmed to your preferences. The programming of these features is performed once at no charge by your Lexus
LEXUS App Suite. Phone. Setup
 Lexus Personalized Settings Your vehicle includes a variety of electronic features that can be programmed to your preferences. The programming of these features is performed once at no charge by your Lexus
1 P a g e. Emmo Urban 2.0. Owner s Manual. T. Lac V 1.0
 1 P a g e Emmo Urban 2.0 Owner s Manual T. Lac V 1.0 2 P a g e Table of Contents E-bike MTO Label..3 Specifications...4 Charging Your E-bike. 5-9 Brakes...10 Back Drum Brakes and Tires.... 11 Pedals, Center
2001 Chevrolet Corvette ACCESSORIES & EQUIPMENT Remote Keyless Entry Systems - Corvette
 DESCRIPTION 2001 ACCESSORIES & EQUIPMENT Remote Keyless Entry Systems - Corvette Remote Keyless Entry (RKE) system is controlled by Remote Function Actuation (RFA) system. Transmitter allows remote control
CS-2001 REMOTE CONTROL ALARM SYSTEM INSTALLATION & OPERATING INSTRUCTIONS INTRODUCTION
 CS-2001 REMOTE CONTROL ALARM SYSTEM INSTALLATION & OPERATING INSTRUCTIONS INTRODUCTION CONGRATULATIONS on your choice of a Gargoyle Remote Alarm System by Crimestopper Security Products Inc. This booklet
POLARSTART PS-3025 SH Multi-Channel Remote Starter System for AUTOMATIC Transmissions
 POLARSTART PS-3025 SH Multi-Channel Remote Starter System for AUTOMATIC Transmissions USER GUIDE INTRODUCTION...2 BASIC REMOTE OPERATION...2 REMOTE-STARTING YOUR VEHICLE...2 DRIVING OFF...2 IDLE MODE...2
FM SECURITY AND REMOTE START SYSTEM
 FM SECURITY AND REMOTE START SYSTEM INSTALLATION MANUAL BEFORE INSTALLING THIS PRODUCT PLEASE READ THIS INSTALLATION MANUAL THOROUGHLY!! This system is intended for installation on vehicles equipped with
Covers All 430, 440, 441 and CJ Series Advanced Security Systems.
 INSTALL GUIDE Covers All 430, 440, 441 and CJ Series Advanced Security Systems www.ultrastarters.com Technical Support: 866-698-5872 ext 0 support@ultrastarters.com FCC/ID Notice This device complies with
GTWY605 Fast Idle, Shift Interlock, I/O Chevy 610 Van - 6.0L and 6.6L Engines Contact InterMotive for additional vehicle applications.
 An ISO 9001:2008 Registered Company GTWY605 Fast Idle, Shift Interlock, I/O 2009-2017 Chevy 610 Van - 6.0L and 6.6L Engines Contact InterMotive for additional vehicle applications. Introduction The Gateway
TWO-WAY LED AUTOMATIC TRANSMISSION REMOTE STARTER. User Guide WARNING
 TWO-WAY LED AUTOMATIC TRANSMISSION REMOTE STARTER User Guide WARNING It is the responsibility of the vehicle operator to ensure their vehicle is parked in a safe and responsible manner. 1. When leaving
ALARM UPGRADE FOR FACTORY REMOTE KEYLESS ENTRY SYSTEM INSTALLATION PRECAUTIONS & WARNINGS
 CS-882 OEM ALARM UPGRADE FOR FACTORY REMOTE KEYLESS ENTRY SYSTEM INSTALLATI PRECAUTIS & WARNINGS NOTE: This system does not improve or affect the range of the factory remote keyless entry transmitters.
TWO-WAY LCD AUTOMATIC TRANSMISSION REMOTE STARTER. User Guide
 TWO-WAY LCD AUTOMATIC TRANSMISSION REMOTE STARTER User Guide A note concerning the battery inside the transmitter: Depending on your usage of the transmitter, the battery can last anywhere between 3 to
1 P age. Emmo Soho. Owner s Manual. T. Lac V 1.0
 1 P age Emmo Soho Owner s Manual T. Lac V 1.0 2 P age Table of Contents E-bike MTO Label..3 Specifications...4 Charging Your E-bike. 5-6 Brakes...7 Kickstand...8 Pedals 9 Greasing Bike Chain and Rear Drum
Manual Climate Controls
 2009 QUICK REFERENCE GUIDE CharGER Blower Push A/C Button Temp. Push Rear Window Defroster Button Mode Recirc. Manual Climate s Air Recirculation Use recirculation for maximum A/C operation. For window
Emmo S6. Owner s Manual
 Emmo S6 Owner s Manual 2 P a g e Table of Contents E-bike MTO Label..3 Specifications...4 Charging Your E-bike. 5-6 Brakes...7 Kickstand...8 Pedals 9 Greasing Bike Chain and Rear Drum Brakes..... 10 Front
INSTALLATION OVERVIEW:
 INSTALLATION OVERVIEW: signalminder is a 100% solid-state device, which replaces the existing turn signal relay of your bike - in many cases this a simple plug-in procedure. But depending on your bike,
Door Lock Settings. Settings that can be customized by: Using the Navigation System. Dealer. 1. Automatic Door Lock
 1. Automatic Door Lock The automatic door locks can be programmed as follows: The doors automatically lock when the vehicle speed is 12 mph or higher = By Speed The doors automatically lock when the vehicle
Vehicle Security System
 Installation Instructions Vehicle Security System PROFESSIONAL INSTALLATION STRONGLY RECOMMENDED Installation Precautions: Roll down window to avoid locking keys in vehicle during installation Avoid mounting
INSTALLATION MANUAL. Remote Mobile Security System. Model: PL30
 Remote Mobile Security System INSTALLATION MANUAL Model: PL30 Copyright 1998 Magnadyne Corporation For Technical Assistance (800) 638-3600 For Fax on Demand Technical Assistance (800) 994-9977 (Must be
CONTROL BOX. Wiring the control box into the vehicle. +12V
 CONTROL BOX Once the display panel is in place, mount the control box within the connecting cable's distance (approximately 3 feet) and secure to the underside of the dashboard. This case does not have
OPERATING INSTRUCTIONS
 LCPRO-3 and LCPRO-4 LOW CURRENT REMOTE START SYSTEM OPERATING INSTRUCTIONS CONGRATULATIONS on your choice of a PRO Start Remote Engine Starter and Keyless Entry by Crimestopper Security Products Inc. This
ram2500/3500 InformationProvidedby:
 2009 QUICK REFERENCE GUIDE TRUCK ram2500/3500 DIESEL Rotate Blower Control Rotate Mode Control Dual Zone Climate Control Air Recirculation A/C Button Slide Driver or Passenger Temp. Control Use recirculation
FORD ECOSPORT Quick Reference Guide
 FORD ECOSPORT Quick Reference Guide About This Quick Reference Guide We have created this guide to help you get to know certain features of your vehicle quickly. It only contains basic instructions to
Purpose of the System...3. System Components...3 Instrument Cluster Display...4
 meeknet.co.uk/e64 Table of Contents Active Cruise Control Workbook Subject Page Purpose of the System......................................3 System Components........................................3 Instrument
MODEL MCL-2002 TANK MOUNT SPEEDOMETER/TACHOMETER
 MODEL MCL-2002 TANK MOUNT SPEEDOMETER/TACHOMETER *To avoid damage to motorcycle, please see Speedometer, Tachometer, and Status and Warning Indicators sections for details on locating VSS, Tachometer,
Model PRO-9344FT Owner s Manual
 Model PRO-9344FT Owner s Manual 2 Button Remote Security System with Starter Disable FEATURES : 2 Two Button Programmable RF Transmitters Two Channel Receiver ( capable of accepting 4 transmitters ) Anti-scan
Please refer to the 2019 IS 300/350 Quick Guide or Navigation Owner s Manual for more information on Remote Touch operations.
 Lexus Personalized Settings Your vehicle includes a variety of electronic features that can be programmed to your preferences. The programming of these features is performed once at no charge by your Lexus
1 P a g e. Emmo Knight GTS. Owner s Manual. T. Lac V 1.0
 1 P a g e Emmo Knight GTS Owner s Manual T. Lac V 1.0 2 P a g e Table of Contents E-bike MTO Label..3 Specifications...4 Charging Your E-bike. 5-6 Brakes...7 Kickstand...8 Pedals 9 Greasing Bike Chain
EQUIPMENT - MAIN BODY 7-1 SECTION 7 EQUIPMENT CONTENTS
 EQUIPMENT - MAIN BODY 7-1 SECTION 7 EQUIPMENT CONTENTS Engine Immobiliser System...7-1 Exterior Lights...7-2 Combination Meter...7-2 Smart Wiring System (SWS)...7-3 General Information...7-3 Functions
RF-425LCD PROFESSIONAL VEHICLE SECURITY SYSTEM INSTALLATION MANUAL (FOR AUTHORIZED DEALERS ONLY)
") RF-425LCD PROFESSIONAL VEHICLE SECURITY SYSTEM INSTALLATION MANUAL (FOR AUTHORIZED DEALERS ONLY) THIS PRODUCT IS DESIGNED FOR PROFESSIONAL INSTALLATION ONLY 1 BLUE...TRUNK/HOOD TRIGGER (-) INPUT BLACK/BLUE...4TH
RF-425LCD PROFESSIONAL VEHICLE SECURITY SYSTEM INSTALLATION MANUAL (FOR AUTHORIZED DEALERS ONLY) THIS PRODUCT IS DESIGNED FOR PROFESSIONAL INSTALLATION ONLY 1 BLUE...TRUNK/HOOD TRIGGER (-) INPUT BLACK/BLUE...4TH
6R / 5-BUTTON SERIES VEHICLE SECURITY SYSTEM
 6R / 5-BUTTON SERIES VEHICLE SECURITY SYSTEM Button 1 Button 2 Button 5 Button 3 Button 4 Standard Features: Two 5-Button Remote Transmitters Status indicator (LED) Valet / override switch Multi-tone siren
INSTALLATION GUIDES OUTDOOR LIVING
 S OUTDOOR LIVING TABLE OF CONTENTS 12 Volt 12 Watt DC Transformer Page 2 12 Volt 50 Watt DC Smart Transformer Page 3 12 Volt 50 Watt Smart Transformer Control Page 4-5 Waterproof Dimmer For 12W Transformer
2009 QuiCK reference guide ramtruck2500/3500 gas _09_RAM2500_3500_QRG.indd 6 11/5/08 4:40:38 PM
 2009 QUICK REFERENCE GUIDE ram2500/3500 TRUCK GAS Rotate Blower Control Rotate Temperature Control Single Zone Climate Control Air Recirculation Rotate Air Recirc. Use recirculation for maximum A/C operation.
PROFESSIONAL INSTALLATION STRONGLY RECOMMENDED
 100755-2 Installation Instructions PC 4200 PROFESSIONAL INSTALLATION STRONGLY RECOMMENDED Installation Precautions: Roll down window to avoid locking keys in vehicle during installation Avoid mounting
PROCAL MODULE USER MANUAL JK WRANGLER
 PROCAL MODULE USER MANUAL 2007+ JK WRANGLER AEV ProCal Module User MANUAL Please consult the Troubleshooting Guide if you experience any issues. INCLUDED PARTS QTY REQUIRED TOOLS ProCal Module 1 Fine
KE 680 DELUXE 4-CHANNEL KEYLESS ENTRY SYSTEM DOOR LOCK RELAYS ON-BOARD. Installation And Operation Manual MEGATRONIX CALIFORNIA, U.S.A.
 KE 680 DELUE 4-CHANNEL KEYLESS ENTRY SYSTEM DOOR LOCK RELAYS ON-BOARD Installation And Operation Manual MEGATRONI CALIFORNIA, U.S.A. KE 680 1 INSTALLATION DIAGRAM H8: 10 Pin White Mini Connector H8 10
RR4T USA - RS4T USA
 RR4T - RS4T 400-450 - 525 RR4T - RS4T 400-450-525 The information described in this enclosure are updates to the Europe version Label location RR4T... 2 Label location RS4T... 3 Controls RR4T... 4 Controls
INSTALLATION MANUAL. Model: PLUS Vehicle Security
 R Vehicle Security INSTALLATION MANUAL Model: PLUS-5000 Copyright 1999 Magnadyne Corporation For Technical Assistance (800) 638-3600 For Fax on Demand Technical Assistance (800) 994-9977 (Must be a Registered
Owner s Guide CARS & CA2LCD5
 PROFESSIONAL SERIES Owner s Guide For Models: CARS & CA2LCD5 Deluxe Vehicle Remote Start and Keyless Entry System IMPORTANT NOTE: The operation of the Security and Convenience System as described in this
Model CSI-300 Owner s Manual
 Model CSI-300 Owner s Manual 4 Button Remote Security System with Dual Stage Shock Sensor IMPORTANT! In order to provide the highest possible level of security to your vehicle, this system is equipped
MM1 Installation Instructions
 MM1 Installation Instructions PROFESSIONAL INSTALLATION STRONGLY RECOMMENDED Installation Precautions: Roll down window to avoid locking keys in vehicle during installation Avoid mounting components or
Table of Contents. Owner s Guide
 Table of Contents Owner s Guide Arming the System...2 Disarming the System...3 Emergency Override... 4 System Armed & Activated...4 Remote Controller Icons...5-6 Panic... 6 Sensor By-Pass... 6 Auxiliary
Owner s Guide CARS & CA4B5
 PROFESSIONAL SERIES Owner s Guide For Model: CARS & CA4B5 Deluxe Vehicle Remote Start and Keyless Entry System IMPORTANT NOTE: The operation of the Security and Convenience System as described in this
OPERATING INSTRUCTIONS
 EZ-1 ONE BUTTON REMOTE START SYSTEM OPERATING INSTRUCTIONS CONGRATULATIONS on your choice of a Cool Start Remote Engine Starter and Keyless Entry with DP Technology by Crimestopper Security Products Inc.
AUTOMATIC AND MANUAL TRANSMISSION MODELS* *MUST USE M SERIES REMOTE STARTER!
 REV.2011.7.22 80 SERIES Advanced Remote Starters & Vehicle Security Systems AUTOMATIC AND MANUAL TRANSMISSION MODELS* *MUST USE M SERIES REMOTE STARTER! WARING: NEVER USE AN AUTOMATIC TRANSMISSION STARTER
FORD ECOSPORT Quick Reference Guide
 FORD ECOSPORT Quick Reference Guide About This Quick Reference Guide We have created this guide to help you get to know certain features of your vehicle quickly. It only contains basic instructions to
CS-865RKE Series II REMOTE KEYLESS ENTRY SYSTEM
 INTRODUCTION: CS-865RKE Series II REMOTE KEYLESS ENTRY SYSTEM INSTALLATION & OPERATING INSTRUCTIONS CONGRATULATIONS on your choice of a Remote Keyless Entry System by Crimestopper Security Products Inc.
OPERATING INSTRUCTIONS
 DS7 2-WAY REMOTE START SYSTEM OPERATING INSTRUCTIONS CONGRATULATIONS on your choice of a Data Start Remote Engine Starter and Keyless Entry by Crimestopper Security Products Inc. This system is designed
Model: APS-610a Owner s Manual 4 Button Remote Security System with Dual Stage Shock Sensor
 Model: APS-610a Owner s Manual 4 Button Remote Security System with Dual Stage Shock Sensor IMPORTANT! In order to provide the highest possible level of security to your vehicle, this system is equipped
This document describes:
 Thank you for purchasing this product from ERM. We appreciate your interest in our unique product line as we try to offer our customers an alternative to today s traditional products. This programmable
An ISO 9001:2008 Registered Company
 An ISO 9001:2008 Registered Company CVC501-A HVAC & Fast Idle CAN Vehicle Controller CVC502-A HVAC Control without Fast Idle 2011-2016 Ford F250-F550 (CVC501/502-A) 2017 Ford F-250-F550 (B-CVC501/502-A)
POWER DOOR LOCKS 8P - 1 POWER DOOR LOCKS CONTENTS
 PL POWER DOOR LOCKS 8P - 1 POWER DOOR LOCKS CONTENTS POWER DOOR LOCKS... 1 REMOTE KEYLESS ENTRY... 3 POWER DOOR LOCKS INDEX INTRODUCTION... 1 DOOR LOCK MOTOR... 1 DOOR LOCK SWITCH... 1 INTRODUCTION All
POWER MIRROR SYSTEMS
 WJ POWER MIRROR SYSTEMS 8T - 1 POWER MIRROR SYSTEMS TABLE OF CONTENTS OUTSIDE POWER MIRRORS... 1 INSIDE POWER MIRRORS... 6 OUTSIDE POWER MIRRORS TABLE OF CONTENTS AND POWER MIRROR SYSTEM...1 POWER MIRROR....2
Note: Do NOT mix LED and incandescent lamps in the same circuit!
 Light Up Your Modified Car Some Hot Rod lights are hard to see. Your teardrop lights may look cool, but the 5W incandescent lamp that came with it just doesn t light up bright enough to show others you
TWO-WAY LED MANUAL TRANSMISSION REMOTE STARTER. User Guide WARNING
 TWO-WAY LED MANUAL TRANSMISSION REMOTE STARTER User Guide WARNING It is the responsibility of the vehicle operator to ensure their vehicle is parked in a safe and responsible manner. 1. When leaving the
MEGA WAY LCD 4-CHANNEL CAR ALARM SECURITY SYSTEM. Operation Manual MEGATRONIX CALIFORNIA, USA MEGA 2500 OPERATE 1
 MEGA 2500 2-WAY LCD 4-CHANNEL CAR ALARM SECURITY SYSTEM Operation Manual MEGATRONIX CALIFORNIA, USA MEGA 2500 OPERATE 1 OPERATION: A. TRANSMITTER OPERATION: Transmitter Button System Function Remark Lock
Aftermarket Interface Module
 An ISO 9001:2008 Registered Company Aftermarket Interface Module (2015-2018 Ford Transit) AIM514-B High Side Solenoid type Coolant Valve Control AIM515-B Motor Reversing type Coolant Valve Control Introduction
2014 MIRAGE. Owner s Handbook
 2014 MIRAGE Owner s Handbook Please place copies of the following items in the pocket below: 1. Pre-Delivery Inspection Form (Customer Copy) 2. Triple Diamond Delivery Checklist (Customer Copy) 3. Salesperson
MEGA WAY LCD PAGER ALARM WITH REMOTE ENGINE STARTER. Operation Manual MEGATRONIX CHATSWORTH, CA U.S.A. MEGA 2700 OPERATE 1
 MEGA 2700 2-WAY LCD PAGER ALARM WITH REMOTE ENGINE STARTER Operation Manual MEGATRONIX CHATSWORTH, CA U.S.A. MEGA 2700 OPERATE 1 2 WARNINGS: As with any product that performs automatic functions, there
User Guide 1 WAY FM MANUAL TRANSMISSION REMOTE STARTER. Table of Contents. Introduction
 1 WAY FM MANUAL TRANSMISSION REMOTE STARTER User Guide Table of Contents... 1 Introduction... 1 Using the Remote Control... 2 Multi-Level Features (default state)... 2 Remote-Starting Your Vehicle... 3