TONNEAU INSTALLATION GUIDE
|
|
|
- Leslie Warren
- 5 years ago
- Views:
Transcription

")
1 TONNEAU INSTALLATION GUIDE Warranty, Care & Maintenance EASY AS 1-2-3! NORMAL INSTALLATION TIME 30 MINUTES For Warranty Issues, Contact UnderCover Directly (866)
2 Page Be sure to use only cleaners, waxes, etc., which are labeled Safe for Plastics. Make sure that chemicals or substances, which are not labeled safe for plastics, do not come in contact with your Undercover. Failure to do so could cause discoloration and/or structural damage to your Undercover and will void your warranty. Paint rubbing of the truck is normally not a problem, but is always a possibility with any tonneau. To ensure less chance of possible paint rubbing of the truck, it is suggested to install a tailgate protector and adhere Cab Skin, Scotch Cal, or similar product to the truck bed. These products can provide added assurance against paint rubbing. Undercover Tonneaus are designed from trucks that do not have a bed liner (spray-in bed liners pose no problem). Trucks that do have under-the-rail or over-the-rail bed liners will require some minor trimming of the bed liner to ensure proper placement of the mounting brackets. Due to the wide variety of bed liner manufacturers, the modifications will vary slightly between different brands. Any modifications must be made to the bed liner and NOT to the Undercover mounting hardware. Modifications to the mounting hardware will result in improper installation and will void your warranty.

3 Page 2 Note: If your Tonneau has already been installed, skip to Page 11 for removal and reinstallation instructions.
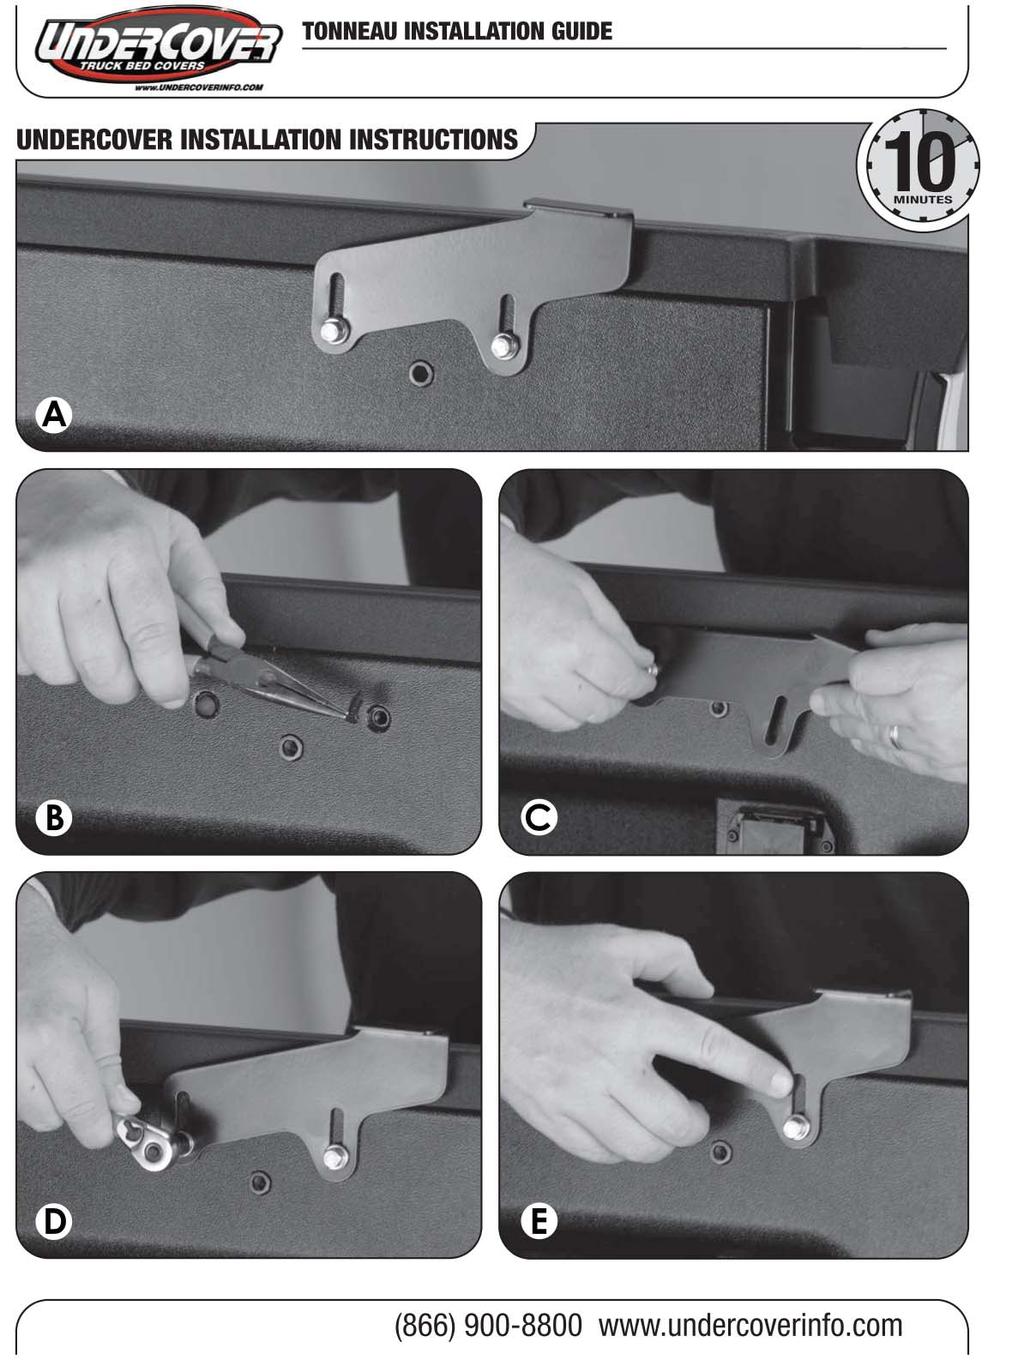
4 Page 3 A B C D E FACT: UnderCover is the lightest hardshell tonneau in the industry. Only 58-pounds for full size trucks. Installing your Ford Sport Trac hardware is simple and easy to do. The Sport Trac comes with the mounting holes already in place. Our hardware mounts right to the existing holes. Page 4, Picture A shows what the rear bracket will look like once it is installed. Remove the plastic plugs with a pair of needle-nose pliers. Save these for future use if you ever remove the bracket system. See Page 4, Picture B. Install the rear bracket using two 6mm bolts and two washers threaded into the preset mounting holes. See Page 4, Picture C. Once you have tightened the bolts by hand, use a 10mm wrench or ratchet/socket to firmly secure the bolts to the bed. See Page 4, Picture D. BE SURE NOT TO OVER TIGHTEN, DOING SO COULD SHEAR OFF THE BOLT HEAD. The mounting holes on the rear bracket are slotted to allow for adjustment of the lock cams. The best position to start with is the bracket in the highest position. You can make further adjustments once the cover is mounted. See Page 4, Picture E. Repeat steps A through E for the other side. WARNING! Be sure not to over tighten the rear mounting bolts. Doing so could shear off the bolt heads, creating a difficult procedure to remove the remaining thread.
5 Page 4

6 Page 5 A Mounting the Ball Stud for your hydraulic strut is simple and easy. Page 6, Picture A shows what the finished install will look like. B In the center of the bed there are two torx bolts, you will need to remove the one towards the rear of the truck. You will need a Torx T-30 bit to remove this bolt. See Page 6, Picture B. Again, like the plastic tabs from the rear mounting bracket proceedure, you should save this bolt for removal of brackets in the future. C Once you have removed the torx bolt you can now hand thread the ball stud included with the hardware. Secure the ball stud with a 1/2" wrench or socket/ratchet. BE SURE NOT TO OVER TIGHTEN. DOING SO CAN SHEAR OFF THE BALL STUD AND CAUSE SERIOUS DIFFICULTY CORRECTING. D Once you UnderCover is installed you will be able to lift the cover up and clip the strut to the ball mount. See Page 6, Picture C. WARNING! Be sure not to over tighten the rear mounting bolts. Doing so could shear off the bolt heads, creating a difficult procedure to remove the remaining thread.

7 Page 6
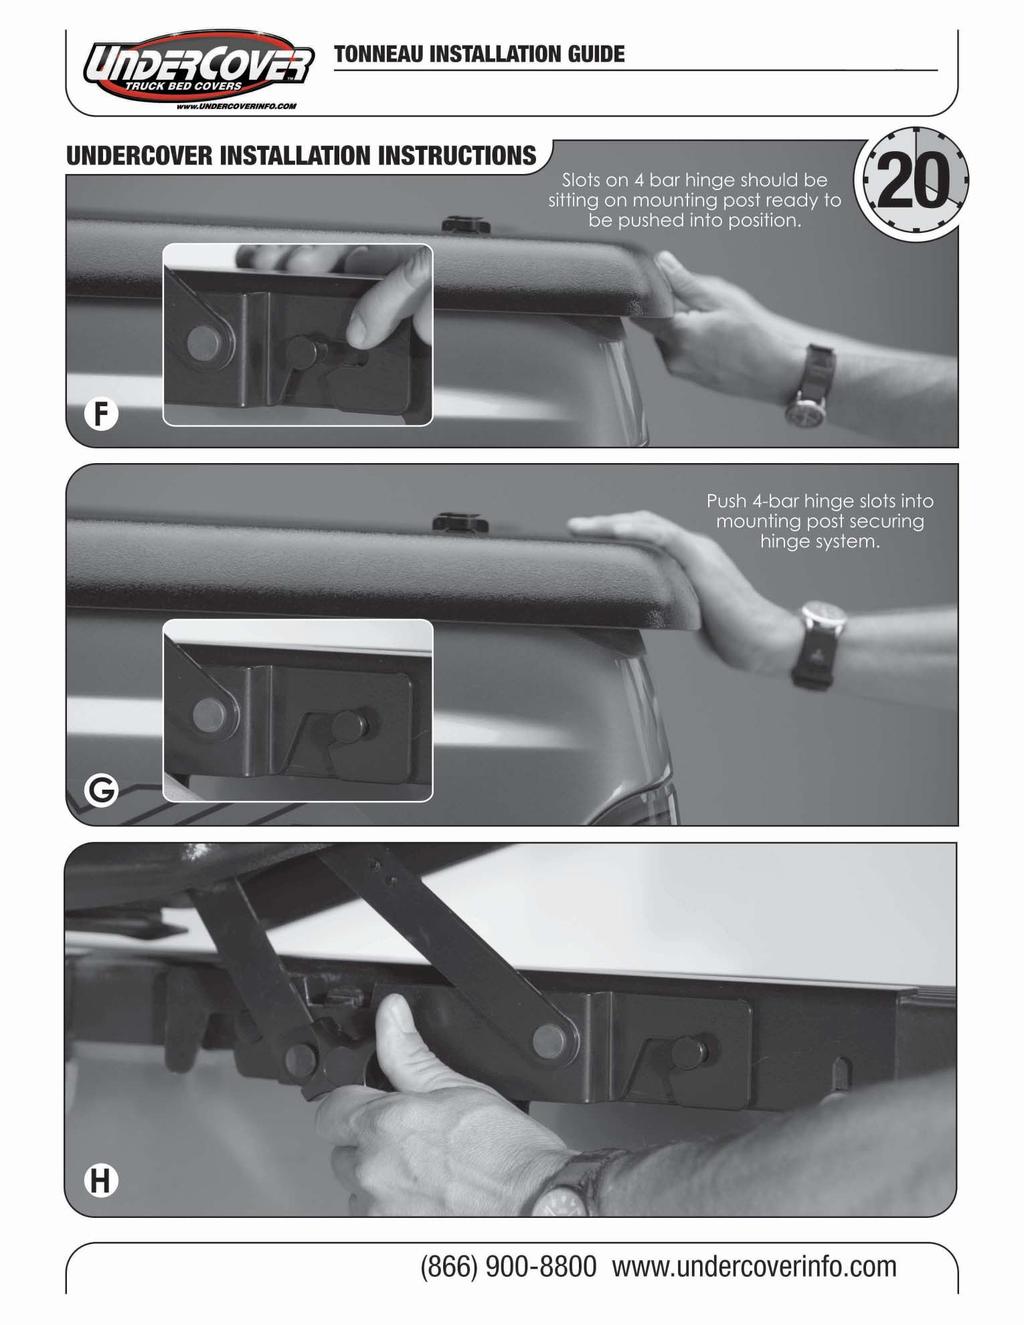
8 Page 7 FACT: UnderCover's ABS-Composite material makes it the strongest and most durable tonneau on the market. A Installation of the front bracket is very similar to the rear. Remove the plastic plugs exposing the 3 preset bolt holes located at the front of the bed. Page 8, Picture A shows how the front bracket will look once it is fully installed. B Position the front bracket over the three preset bolt holes. See Page 8, Figure 1. Attach the bracket to the truck using the three 6mm bolts and washers. The measurement is just a starting point, the brackets are slotted to allow for adjustment. See Page 8, Picture B. Tighten the three bolts using a 10mm wrench or socket/ratchet. See Page 8, Picture C. BE SURE NOT TO OVER TIGHTEN OR YOU COULD SHEAR OFF THE BOLT HEAD CREATING A VERY DIFFICULT PROCEDURE TO REMOVE THE REMAINING THREAD. C D Repeat process for other side. Now you are ready to set your cover on the truck. The hinge that is attached to the cover has slots in it that fit over the mounting posts on the bracket you just installed. See Page 8, Figure 2. E With the hinge slot over the post, the cover will be sitting about 1-inch past the tailgate. See Page 9, Picture F. With the cover sitting all the way down on the truck bed, push the cover forward securing the 4 bar hinge to the mounting posts. See Page 9, Picture G. F With some assistance, have someone hold the cover up at the rear and reach inside the cover and screw in the two fastening knobs. See Page 9, Picture H. WARNING! Be sure not to over tighten the rear mounting bolts. Doing so could shear off the bolt heads, creating a difficult procedure to remove the remaining thread.

9 Page 8
10 Page 9

11 Page 10 Not all truck beds are assembled 100% square, so it may be necessary to do some preliminary adjustments. The mounting holes in the front brackets are slotted to allow for adjustment. With your cover closed, take a quick inspection to make sure that it is not touching the bed on either side or the tailgate. If it appears square or close to square go on to Step 4, pages 11 and 12. If it is making contact with the side of the truck or the tailgate, you may wish to make some adjustments before going to the final step. To adjust the cover front to back evenly, move both of the front brackets forward or backward accordingly. To adjust one side or the other, move the front brackets forward or backward independently. Any questions you can call tech assistance Monday through Friday, 8 a.m. 5 p.m. Central Time (866) Very Important: Periodically check your truck for rubbing. Make slight adjustments when necessary.
12 Page 11 A B C D FACT: In less than one minute, you can both take on and off the Undercover tonneau. Fastest removal system in the industry. Install hydraulic struts making sure LARGE end of strut is attached to the tonneau, and SMALL or rod end is attached to the ball stud on rear bracket Page 10, Figure 7, Picture A. Be sure that the front flap seal hangs over the bulkhead of the truck and is not rolled under the tonneau after installation. If flap seal is rolled under the tonneau, open the tonneau, and from the inside push the flap seal out from under the tonneau and over the bulkhead Page 10, Figure 8, Picture B. Close tonneau and check length on the truck. There should be 1/8 -to- 3/8 gap between the tailgate and the tonneau. If this is not correct, adjust by moving front brackets forward or backward to achieve correct length. Front brackets may also have to be adjusted independently to square-up tonneau on some truck beds. Adjust lock strikes Page 10, Figure 9, Picture C. When adjusted properly you should be able to turn the key to the locked position without having to push down on the tonneau. There should be a very slight amount of play between the lock cam and lock strike. A good rule of thumb is to adjust the lock to have approximately 1/8 gap between the cam and lock strike with the truck tailgate down. This usually gives you the proper adjustment after the tailgate is shut Page 10, Figure 9, Picture D. WARNING: It is very important to be able to turn the key without any resistance. Do not try to force the lock cam to turn if you encounter resistance. This could result in a broken key or broken lock. Adjustment may be necessary to the lock strike plate to achieve a smooth turn without any resistance.

13 Page 12

14 Page 13 Congratulations! Your 30-minute installation job is now complete. Now, in less than one minute, you will be able to put on and take off your tonneau cover. STEP 1 Release strut off of ball stud Picture B. Holding tonneau up with one hand, place loose end of strut on storage clip Picture C. Repeat for the other side. STEP 2 Turn twist knobs until they release Picture A. STEP 3 Go to the rear of the truck and pull Tonneau cover back, releasing the post from the hinge slot, Picture D. You are now ready to lift the cover off. STEP 1 Place tonneau on the truck and follow instructions on Page 7. STEP 2 Be sure that the front flap seal is hanging over the bulkhead and not rolled under, see Picture E on this page. STEP 3 Reinstall struts as seen in pictures Pictures F and G on this page.

15 Page 14 STEP 1 Prior to removing the tonneau, mount the two J-Hooks provided on the garage wall. The hooks must have a minimum height from the floor of 84", and be 32 on center horizontally apart Picture A & B. STEP 2 Remove your tonneau from the truck bed according to instructions on Page 11. STEP 3 Hang tonneau vertically on the wall-mounted J-Hooks, with the underside against the wall inserting J-Hooks into the holes provided in Picture C & D.


16 TONNEAU INSTALLATION GUIDE Page 15 THANK YOU! Congratulations! You ve just installed the fastest-selling, highest-quality tonneau in the industry. Thank you very much for your purchase of UnderCover! David Wells President UnderCover, Inc. UnderCover, Inc. P.O. Box 620 Rogersville, MO (417) (866) For any Warranty issues, contact UnderCover directly UnderCover, Inc. All rights reserved.
TONNEAU INSTALLATION GUIDE
 TONNEAU INSTALLATION GUIDE Warranty, Care & Maintenance Model 1080 GMC Sierra Ext/Crew Cab 5.7' Short Bed 2007-Current EASY AS 1-2-3! NORMAL INSTALLATION TIME 30 MINUTES For Warranty Issues, Contact UnderCover
TONNEAU INSTALLATION GUIDE
 TONNEAU INSTALLATION GUIDE Warranty, Care & Maintenance Model 4056 Toyota Tacoma Double Cab 5' Short Bed 2005-Current (With Multi-Track System) EASY AS 1-2-3! NORMAL INSTALLATION TIME 30 MINUTES For Warranty
TONNEAU INSTALLATION GUIDE
 TONNEU INSTLLTION GUIE Warranty, are & Maintenance Model 2130 Ford F-150 6.5' Shortbed with new Hidden Hinge System 2009-urrent ESY S 1-2-3! NORML INSTLLTION TIME 30 MINUTES For Warranty Issues, ontact
TONNEAU INSTALLATION GUIDE
 TONNEU INSTLLTION GUIE Warranty, are & Maintenance Model 5040 Nissan Frontier, Extended ab with Hidden Hinge System 2005 urrent ESY S 1-2-3! NORML INSTLLTION TIME 30 MINUTES For Warranty Issues, ontact
TONNEAU INSTALLATION GUIDE
 Warranty, are & Maintenance Model 4010 Toyota Tundra, Extended, Standard ab Short ed 2000 urrent With ed Rails Only ESY S 1-2-3! NORML INSTLLTION TIME 30 MINUTES Page 1 PRE-INSTLLTION NOTES 1 2 3 e sure
TONNEAU INSTALLATION GUIDE
 Warranty, are & Maintenance Model Model 20602050 Ford Ford Flareside Sport Short Trac ed 1997 2000 2003 2005 ESY S 1-2-3! FORM # IG2050 IG2060 Modified June September 2005 2006 NORML INSTLLTION TIME 30
Installation Instructions
 Installation Instructions (2) 10-24 Black flathead Allen Screws Tailgate End Front Cover Passenger Side Rail (has inspected by sticker under rail) (4) 10-32 Screws (stainless) Front Cover Exploded View
Make sure the rail is clamped square as shown. Start at the front, and place the first clamp approx 6 to 9 inches back.
 INSTALLATION SHEET Any damaged or missing parts? Parts will be shipped to you directly. Call 844-779-8986 Mon - Fri 5:30 am - 4 pm Pacific Time TOOLS RECOMMENDED 9/16 Wrench or socket 7/8 Drill bit & drill
Installation Manual TWM Performance Short Shifter Cobalt SS/SC, SS/TC, HHR SS, Ion Redline and Saab 9-3
 Page 1 Installation Manual TWM Performance Short Shifter Cobalt SS/SC, SS/TC, HHR SS, Ion Redline and Saab 9-3 Please Note: It is preferable to park on a flat surface, as you will have to engage and disengage
Stowe Cargo Management System
 Installation Guide Stowe Cargo Management System Table of Contents 1. Pre-Installation (Page 2) a. Notes, Installation Kit contents & Tools needed 2. How to Install the Stowe Cargo Management System (Pages
James Barone Racing Aftermarket Parts and Accessories
 Page1 James Barone Racing Aftermarket Parts and Accessories What you will need: Jack and Jack Stands Drill 1/8 and 1/4 drill bits Ratchet wrench 11mm socket Philips head screw driver Flat head screw driver
Installation Guide. Stowe Cargo Management System. Table of Contents
 Installation Guide Stowe Cargo Management System Table of Contents 1. Pre-Installation (Page 2) a. Notes, Installation Kit contents & Tools needed 2. How to Install the Stowe Cargo Management System (Pages
PARTS LIST: Components. ` Bi-Fold Tonneau Cover
 ` Bi-Fold Tonneau Cover Fits: 2004-2014 TFX3401 - Ford F150 5.5 2004-2014 TFX3402 - Ford F150 6.5 2015 TFX3403 - Ford F150 5.5 2015 TFX3404 - Ford F150 6.5 1999-2007 TFX3405 - Ford F250/F350 6.5 2008-2015
DF Ford F Short Bed 2009-Current
 921019 DF921019 Ford F150 5.5 Short Bed 2009-Current Hardware (Box 1 of 2) 1. Tango front rail assembly 2. Tango left rail assembly 3. Tango right rail assembly 4. Rhino Rack cross bars (2) 5. Clamps (8)
C15C C15C. Page 1 of 20
 2 x Lid Front Hinge 1135 8 x M8 Bolt 8 x M8 Washer (3mm Thick) 4 x M6 Large washers 4 x M6 Spring washers 4 x M6 x 40mm Bolts 6 x M6 20mm Bolts 6 x M6 Washers 20 x Screws 2 x Lid mount gas strut bracket
Installation Instructions Table of Contents
 Installation Instructions Table of Contents Pre- Installation of Garage Storage Lift 2 Layout the Garage Storage Lift 3 Installing the strut Channels 3 Install the Drive Assembly 5 Install the Drive Shaft
Remove the 3-11mm nuts holding mirror on. Don t drop the nuts!
 2005-2012 Ford Mustang Puddle Lamp Kit Parts List: Quantity: Tool List: LED Lamps 2 Flat head screwdriver Seals 2 Ratchet & Socket set OR Nuts 2 Adjustable Wrench Wiring harness 1 Drill & 11/16 th bit
Marlon Xplore II / Xplore Pro II Deck Installation & Assembly Instructions
 Marlon Xplore II / Xplore Pro II Deck Installation & Assembly Instructions Marlon Recreational Products www.marlonproducts.com 1-800-663-7367 INSTALLATION INSTRUCTIONS: 1. Remove the ramp from underneath
MANUAL FOR THE NM100 ADJUSTABLE SHORT SHIFTER
 MANUAL FOR THE NM100 ADJUSTABLE SHORT SHIFTER P.O. BOX 313 ~ ODESSA, FL 33556 ~ 1-844-NUM-RACE Tools Needed T20 Torx Driver T27 Torx Driver Needle Nose Pliers ¼ Ratchet with 10MM Socket 3MM Allen Wrench
INSTALLATION INSTRUCTIONS
 INSTALLATION INSTRUCTIONS Thank you for purchasing ACCESS Original Roll-Up Cover. Agri-Cover, Inc. proudly manufactured this cover using superior quality materials and workmanship. With proper care, your
2017 Current Ford Raptor Bump Stop Kit Installation Instructions
 2017 Current Ford Raptor Bump Stop Kit Installation Instructions PREPARATION 1. Disconnect the negative terminal on the battery. Park the vehicle on level ground and set the emergency brake. 2. We recommend
Fog Lamp Instructions
 Fog Lamp Instructions 2011+ Ford Super Duty Congratulations on your purchase of a high quality PUTCO product. Should you need any application or technical assistance feel free to call us at: 1-800-247-3974
INSTALLATION INSTRUCTIONS JEEP 2011-UP JK SECURITY FULL CONSOLE #274
 INSTALLATION INSTRUCTIONS JEEP 2011-UP JK SECURITY FULL CONSOLE #274 PARTS CHECKLIST Tuffy Console #9 Left Front Mounting Bracket #10 Right Front Mounting Bracket #11 Electronics mounting bracket #12 Divider
Current Range Rover Sport STRUT Collection Installation Manual
 2014 - Current Range Rover Sport STRUT Collection Installation Manual 1 1. Removing Main Grille and Lower Fascia 1.1 Run a line of low tack masking tape across the front of the bumper below the grille
RAM BOX INSTALLATION SHEET
 RAM BOX INSTALLATION SHEET Any damaged or missing parts? Parts will be shipped to you directly. Call 844-779-8986 Mon - Fri 8:30 am - 7 pm EST or email support@bakindustries.com 6.5 bed Front (cab) 5.5
Installation Instructions
 Instructions Created by an: 2007-Present Toyota Tundra LRT Leveling Lift Kit - 4WD by Low Range Off-Road (SKU# LR-LRTundra) Instructions also apply to 2WD Kits. Installation Instructions Revised 7-11-17
H15P. Toyota Hilux A-DECK Dual Cab
 Toyota Hilux A-DECK Dual Cab Page 1 of 14 Fitting Instructions Part Number H15 Toyota Hilux A-DECK Dual Cab 2015+ To suit Sports Bars Check contents of kit before commencing fitment and report any discrepancies
HONDA RIDGELINE INSTALLATION INSTRUCTIONS. (866) RETRACTABLE TRUCK BED COVERS TABLE OF CONTENTS SWH2-1610
 RETRACTABLE TRUCK BED COVERS TABLE OF CONTENTS SWH2-1610") RETRACTABLE TRUCK BED COVERS HONDA RIDGELINE INSTALLATION INSTRUCTIONS TABLE OF CONTENTS SWH2-1610 (866) 338-3697 www.paceedwards.com Pace Edwards Company 2400 Commercial Blvd. Centralia WA 98531 Tools
RETRACTABLE TRUCK BED COVERS HONDA RIDGELINE INSTALLATION INSTRUCTIONS TABLE OF CONTENTS SWH2-1610 (866) 338-3697 www.paceedwards.com Pace Edwards Company 2400 Commercial Blvd. Centralia WA 98531 Tools
SPECIAL INSTALLATION INSTRUCTIONS
 SPECIAL INSTALLATION INSTRUCTIONS WARN 4X FLARES FRONT AND REAR '98 TOYOTA HILUX DUAL-CAB As you read these instructions, you will see NOTES, CAUTIONS and WARNINGS. Each message has a specific purpose.
MODEL 2604 WARNING <THESE INSTRUCTIONS MUST BE GIVEN TO THE END USER> Custom 5th Wheel Hitch Mounting Rail Installation Instructions
 B&W Trailer Hitches 1216 Hawaii Rd / PO Box 186 Humboldt, KS 66748 P:620.473.3664 F:620.869.9031 Custom 5th Wheel Hitch Mounting Rail Installation Instructions
Universal Tall HoneyBadger Chase Rack Installation Instructions
 PREPARATION Universal Tall HoneyBadger Chase Rack Installation Instructions 1. Disconnect the negative terminal on the battery. Park the vehicle on level ground and set the emergency brake. 2. We recommend
INSTALLATION INSTRUCTIONS
 INSTALLATION INSTRUCTIONS Thank you for purchasing TONNOSPORT Roll-Up Cover. Agri-Cover, Inc. proudly manufactured this cover using superior quality materials and workmanship. With proper care, your cover
INSTALLATION INSTRUCTIONS
 INSTALLATION INSTRUCTIONS Thank you for purchasing a LOMAX TM Hard Tri-Fold or Professional Series Cover. Agri-Cover, Inc. proudly manufactured this cover using superior quality materials and workmanship.
TUNDRA INSTALLATION INSTRUCTIONS
 RETRACTABLE TRUCK BED COVERS TUNDRA INSTALLATION INSTRUCTIONS TABLE OF CONTENTS (800) 338-3697 www.paceedwards.com Pace Edwards Company 2400 Commercial Blvd. Centralia WA 98531 Tools Required for Assembly...2
RAMPAGE POWER LIFT RAMP
 RAMPAGE POWER LIFT RAMP INSTALLATION AND OPERATING INSTRUCTIONS (3/10/07) The Rampage Power Lift Ramp is the fast, easy, and safe way to load a motorcycle into a truck. One person can load or unload a
Remove 4 circled pins. Route wiring along dashed line. Remove the 2 9mm nuts and black retaining plate that secure extractor.
 2015 Ford Mustang Turn Signal Hood Kit Parts List: Quantity: Tool List: Bracket & pre-installed lamp 2 Flat head screwdriver Wiring harness 1 Phillips screwdriver PB-3660 Parts Bag 1 Ratchet & Socket set
Installation Guide Current Ford F-250 & Ford F-350 Super Duty. Product Code: 109 & 119
 Installation Guide 2008 - Current Ford F-250 & Ford F-350 Super Duty Product Code: 109 & 119 September 1, 2012 Tools Needed Components Included 3/8" Drill P2 Tip #2 Philips Screwdriver 1/2" Drill Bit Hinged
HiBoy Maverick/Commander Doors Part # HiBoy4 Maverick/Commander Doors Black
 Racing 3191 N Washington St. Suite 2 Chandler, AZ 85225 1 (800) 708-9803 http://www.racing.com HiBoy Maverick/Commander Doors Part # 07-2001 HiBoy4 Maverick/Commander Doors Black Congratulations on your
Roll Bar (MMRB-6.1 to -6.7)
") 3430 Sacramento Dr., Unit D San Luis Obispo, CA 93401 Telephone: 805/544-8748 Fax: 805/544-8645 www.maximummotorsports.com 1994-04 Roll Bar (MMRB-6.1 to -6.7) NOTE: These instructions cover Roll Bars with
3430 Sacramento Dr., Unit D San Luis Obispo, CA 93401 Telephone: 805/544-8748 Fax: 805/544-8645 www.maximummotorsports.com 1994-04 Roll Bar (MMRB-6.1 to -6.7) NOTE: These instructions cover Roll Bars with
2015 COLORADO 1 /2 LEVELING KITS
 92921000 2015 COLORADO 1 /2 LEVELING KITS Thank you for choosing Rough Country for all your suspension needs. Rough Country recommends a certified technician install this system. In addition to these instructions,
INSTALLATION SHEET. TOOLS RECOMMENDED 9/16 Wrench or socket 7/8 Drill bit & drill (optional)
") INSTALLATION SHEET TOOLS RECOMMENDED 9/16 Wrench or socket 7/8 Drill bit & drill (optional) PARTS INCLUDED IN YOUR KIT 1 x Hard folding cover assembly 3 x D Shaped cab bumpers 1 x Bulkhead seal (¾ x ¾
INSTALLATION SHEET TOOLS RECOMMENDED 9/16 Wrench or socket 7/8 Drill bit & drill (optional) PARTS INCLUDED IN YOUR KIT 1 x Hard folding cover assembly 3 x D Shaped cab bumpers 1 x Bulkhead seal (¾ x ¾
INSTALLATION INSTRUCTIONS
 INSTALLATION INSTRUCTIONS Thank you for purchasing VANISH Roll-Up Cover. Agri-Cover, Inc. proudly manufactured this cover using superior quality materials and workmanship. With proper care, your cover
PARTS LIST: 8581 DODGE LONG ARM BRACKETS 03-13
 SYNERGY MFG. 870 INDUSTRIAL WAY, SAN LUIS OBISPO, CA (805) 242-0397 8580 03-12 DODGE 2500/3500 4X4, 06-08 1500 MEGACAB 4X4 LONG ARM SUSPENSION KIT V3.0 GENERAL NOTES: These instructions are also available
Because of the age and inconsistencies of the CJ/YJ models, slight adjustments to the Jeep windshield, lower metal doors or hardtop may be required.
 BULL DAWG SUV DOORS The Perfect Companion for your Sport SUV Another quality company by McLaughlin Manufacturing. 4737 Adams Road Chattanooga, TN 37411 www.bulldawgmfg.com 800-784-6478 423-875-4040 INSTALLATION
ROLL-TOP-COVER FORD EXPLORER SPORT TRAC INSTALLATION INSTRUCTIONS. (800) TABLE OF CONTENTS
 TABLE OF CONTENTS") ROLL-TOP-COVER RETRACTABLE HARD TRUCK BED COVERS FORD EXPLORER SPORT TRAC INSTALLATION INSTRUCTIONS TABLE OF CONTENTS (800) 338-3697 www.paceedwards.com Pace Edwards Company 2400 Commercial Blvd. Centralia
ROLL-TOP-COVER RETRACTABLE HARD TRUCK BED COVERS FORD EXPLORER SPORT TRAC INSTALLATION INSTRUCTIONS TABLE OF CONTENTS (800) 338-3697 www.paceedwards.com Pace Edwards Company 2400 Commercial Blvd. Centralia
HARD FOLDING TONNEAU COVER INSTALLATION GUIDE
 HARD FOLDING TONNEAU COVER INSTALLATION GUIDE GUIDE FOR FOLD-A-COVER FD3701, FD3702 TRUCK MODEL(S): 1998-2007 FORD F-150 NOTES TO INSTALLER: 70 F when installing. surface. Some trimming of bed liner may
CorkSport ort Mazda 3 Adjustable Shifter Mazdaspeed 3, Mazda 3 6-speed and Mazda3 SkyActiv 6-speed
 Part # Axl-6-963 CorkSport ort Mazda 3 Adjustable Shifter 2010-2013 Mazdaspeed 3, 2010-2013 Mazda 3 6-speed and 2012-2013 Mazda3 SkyActiv 6-speed Pre-Installation Notes: The CorkSport Adjustable Short
OWNER S MANUAL. Sentry & Sentry CT THREE YEAR WARRANTY. Phone: ( ) Fax: (605) SAFETY INSTRUCTIONS
 Fax: (605) SAFETY INSTRUCTIONS") OWNER S MANUAL Sentry & Sentry CT HARD ROLL-UP TRUCK BED COVER SAFETY INSTRUCTIONS 1. Do not place objects on or against cover or framework. 2. Do not tie cargo to truck bed cover framework. 3. Never allow
OWNER S MANUAL Sentry & Sentry CT HARD ROLL-UP TRUCK BED COVER SAFETY INSTRUCTIONS 1. Do not place objects on or against cover or framework. 2. Do not tie cargo to truck bed cover framework. 3. Never allow
Shur-Co. Owners & Installation Manual. READ INSTRUCTIONS - Failure to assemble cover properly will void warranty.
 Owners & Installation Manual READ INSTRUCTIONS - Failure to assemble cover properly will void warranty. Damaged or missing parts? Call 1-877-878-9336 Mon - Fri 8 am - 5 pm CT Parts will be shipped to you
6th generation (2015+) Mustang Harness Mount Bar Installation Instructions
 Mustang Harness Mount Bar Installation Instructions") R-1180 6th generation (2015+) Mustang Harness Mount Bar Installation Instructions A. Install harness bar 1. Remove front seats. First remove the plastic bolt covers front and rear using a small flat head
R-1180 6th generation (2015+) Mustang Harness Mount Bar Installation Instructions A. Install harness bar 1. Remove front seats. First remove the plastic bolt covers front and rear using a small flat head
<THESE INSTRUCTIONS MUST BE GIVEN TO THE END USER> Custom 5th Wheel Hitch Mounting Rail Installation Instructions
 B&W Trailer Hitches 1216 Hawaii Rd / PO Box 186 Humboldt, KS 66748 P:620.473664 F:620.869.9031 Custom 5th Wheel Hitch Mounting Rail Installation Instructions
Installation Manual Volvo C30 T5 Front Mount Intercooler System
 Installation Manual Volvo C30 T5 Front Mount System Volvo C30 T5 System / Installation Manual i C Contents Important Information i Parts List i Required Tools and Materials 1 1.0 - Vehicle Preparation
Installation Manual TWM Performance Short Shifter Subaru STi 2008+
 - 1 - Installation Manual TWM Performance Short Shifter Subaru STi 2008+ Please Note: It is preferable to park on a flat surface, as you will have to engage and disengage the hand brake and shift from
INSTALLATION MANUAL
 INSTALLATION MANUAL 2563000 Parts List 1 Carrier weldment 2 Support arm assembly 1 Third brake light assembly 1 Light extension bracket 1 Spare tire adjustment plate 1 Spare tire mount plate 1 Female spade
ASSEMBLY INSTRUCTIONS Reese Elite Series FIFTH WHEEL SLIDER HITCH
 ASSEMBLY INSTRUCTIONS Reese Elite Series FIFTH WHEEL SLIDER HITCH DEALER/INSTALLER: (1) Provide this Manual to end user. (2) Physically demonstrate procedures in this Manual to end user. (3) Have end user
FOR INSTALLATION ON DRIVER'S SIDE ONLY
 DZ 43301 DODGE RAM TAILGATE ASSIST 1500 2009- CURRENT 2500/3500 2010 - CURRENT PARTS LIST: ITEM QTY THREAD LOCK TUBE 1 SHOCK 1 BALL MOUNT PLATE 1 BLIND NUT TOOL 1 BALL MOUNT 1 BLIND NUT / NUTSERT 1 TORX
<THESE INSTRUCTIONS MUST BE GIVEN TO THE END USER> B&W
 B&W Trailer Hitches 1216 Hawaii Rd / PO Box 186 Humboldt, KS 66748 P:620.473.3664 F:620.869.9031 Turnoverball Gooseneck Hitch Installation Instructions
2015 Mustang Lightbar (All Models) CDC#
 CDC#") 2015 Mustang Lightbar (All Models) CDC# 1511-7000-01 Components: 1 CDC Lightbar Note: READ instructions before starting installation!!! CDC Part# Driver side bracket 0511-6001-05 Passenger side bracket
2015 Mustang Lightbar (All Models) CDC# 1511-7000-01 Components: 1 CDC Lightbar Note: READ instructions before starting installation!!! CDC Part# Driver side bracket 0511-6001-05 Passenger side bracket
MAZDASPEED3 Intercooler Instructions
 MAZDASPEED3 Intercooler Instructions Congratulations on your purchase of the COBB Tuning Front Mount Intercooler System for your 2007-2009 Mazdaspeed3. The following instructions should assist you through
»Product» Safety Warning
 D2201 Installation Instructions 2012-2014 Dodge Ram 1500 4WD 2" Adventure Series Suspension System Read and understand all instructions and warnings prior to installation of product and operation of vehicle.
Mustang Short Throw Sport Shifter (All 83 - Early 01 & V6 T-5/T-45 Transmission) - Installation Instructions
 - Installation Instructions") Mustang Short Throw Sport Shifter (All 83 - Early 01 & 01-04 V6 T-5/T-45 Transmission) - Installation Instructions The below installation instructions work for the following products: Mustang Short Throw
Mustang Short Throw Sport Shifter (All 83 - Early 01 & 01-04 V6 T-5/T-45 Transmission) - Installation Instructions The below installation instructions work for the following products: Mustang Short Throw
Jeep Wrangler TJ Bedrug/BedTred Interior Installation Instructions
 FRONT KIT: BRTJ97F and BTTJ97F Jeep Wrangler TJ Bedrug/BedTred Interior Installation Instructions Congratulations on choosing the finest interior flooring kit available for your Jeep. The Bedrug/Bedtred
SB-F-150-SPRCRW/13TW5v2 SKU# Up Ford F-150 SuperCrew & 2017-Up Ford SuperDuty Crew Cab
 If you choose to perform the installation yourself, it is absolutely vital that the Stealthbox be properly mounted to the vehicle according to these instructions. Failure to mount the enclosure properly
Drag Race Roll Bar (MMRB-6, -7)
") 3430 Sacramento Dr., Unit D San Luis Obispo, CA 93401 Telephone: 805/544-8748 Fax: 805/544-8645 www.maximummotorsports.com 1994-04 Drag Race Roll Bar (MMRB-6, -7) The Maximum Motorsports 6-point Drag Race
3430 Sacramento Dr., Unit D San Luis Obispo, CA 93401 Telephone: 805/544-8748 Fax: 805/544-8645 www.maximummotorsports.com 1994-04 Drag Race Roll Bar (MMRB-6, -7) The Maximum Motorsports 6-point Drag Race
Installation Manual TWM Performance Short Shift Kit 2006 and up Toyota Yaris
 Installation Manual TWM Performance Short Shift Kit 2006 and up Toyota Yaris 1. Unscrew the shift knob by rotating counter clockwise. 2. Remove the carpet or mat at the bottom of the cup holder at the
OIL COOLER KIT INSTALLATION INSTRUCTIONS PART NUMBER D
 OIL COOLER KIT INSTALLATION INSTRUCTIONS PART NUMBER D570-0904 APPLICATION: 2011-2012 E90 335i/xi (N55 engine) with BMW standard bumper and with stock oil cooler Congratulations for being selective enough
Low Range HD 2 Inch Body Lift Kit (Sidekick, GV, Vitara, Tracker, X90) SKU# KSP-BL2
 SKU# KSP-BL2") Low Range HD 2 Inch Body Lift Kit (Sidekick, GV, Vitara, Tracker, X90) SKU# KSP-BL2 Installation Instructions Background: These instructions are designed for installing the 2 body lift. They can also be
Low Range HD 2 Inch Body Lift Kit (Sidekick, GV, Vitara, Tracker, X90) SKU# KSP-BL2 Installation Instructions Background: These instructions are designed for installing the 2 body lift. They can also be
Installation Instructions Supertop NX Twill
 Installation Instructions Supertop NX Twill Vehicle Application: Jeep Wrangler Unlimited 2007-current Part Number 54823 Installation Tips Before you begin installing your new Supertop NX Twill, please
INSTALLATION INSTRUCTIONS FORD SUPER DUTY NOTE: (Vehicle Retains Tow Hook) PART # P3064
 PART # P3064") INSTALLATION INSTRUCTIONS 2011-14 FORD SUPER DUTY 250-550 NOTE: (Vehicle Retains Tow Hook) PART # P3064 PARTS LIST: Qty Description Qty Description 1 Grill Guard 2 10mm x mm Hex Bolts 1 Driver/Left Lower
INSTALLATION INSTRUCTIONS 2011-14 FORD SUPER DUTY 250-550 NOTE: (Vehicle Retains Tow Hook) PART # P3064 PARTS LIST: Qty Description Qty Description 1 Grill Guard 2 10mm x mm Hex Bolts 1 Driver/Left Lower
INSTALLATION GUIDE CRF150R Manual Revision:
 REKLUSE MOTOR SPORTS The z-start Pro Clutch INSTALLATION GUIDE CRF150R 191-810 Manual Revision: 032508 2002 Rekluse Motor Sports Rekluse Motor Sports, Inc. 110 E. 43rd Street Boise, Idaho 83714 208-426-0659
COLD AIR INTAKE INSTALLATION INSTRUCTIONS
 COLD AIR INTAKE INSTALLATION INSTRUCTIONS # D760-0029 Fits: 2009-10 335i/xi (E90; with N54 engine) Congratulations for being selective enough to use a Dinan Engineering Cold Air Intake. We have spent many
SDHQ F-150 Winch Mount System Installation
 SDHQ 2015+ F-150 Winch Mount System Installation Recommended Tools: Door panel removal tool Needle Nose Pliers 10mm Socket or Wrench 13 mm or ½ Socket (⅜ Drive) 14 mm or 9/16 Socket (⅜ Drive) 21 mm or
INSTALLATION INSTRUCTIONS RATTLER STEEL RUNNING BOARDS FORD TRANSIT VAN (FULL SIZE)
") INSTALLATION INSTRUCTIONS PARTS LIST: 1 32-inch Steel Running Board 1 8-1.25mm x 35mm Hex Bolt 1 96-inch Steel Running Board 13 8-1.25mm x 25mm Hex Bolt 5 Passenger Side/Driver Side Mounting Brackets 20
INSTALLATION INSTRUCTIONS PARTS LIST: 1 32-inch Steel Running Board 1 8-1.25mm x 35mm Hex Bolt 1 96-inch Steel Running Board 13 8-1.25mm x 25mm Hex Bolt 5 Passenger Side/Driver Side Mounting Brackets 20
Used on 564 SS Gas Fireplaces Only. #8 x 3/8 Sheet Metal Screws. Upper and. Lower Grills. Heat Shield
 Compatibility: 564 SS GS 564 DF GS 564 HO GS 564 Electric Fireplace Packing List: Used on Both Fireplaces Doors Used on 564 SS Gas Fireplaces Only Mounting Brackets #8 x 3/8 Sheet Metal Screws Used on
OIL COOLER KIT INSTALLATION INSTRUCTIONS PART NUMBER D E92 335is (N54 engine) with BMW M-Technic bumper and with stock oil cooler
 with BMW M-Technic bumper and with stock oil cooler") OIL COOLER KIT INSTALLATION INSTRUCTIONS PART NUMBER D570-0923 APPLICATION: 2011 E92 335is (N54 engine) with BMW M-Technic bumper and with stock oil cooler Congratulations for being selective enough to
OIL COOLER KIT INSTALLATION INSTRUCTIONS PART NUMBER D570-0923 APPLICATION: 2011 E92 335is (N54 engine) with BMW M-Technic bumper and with stock oil cooler Congratulations for being selective enough to
Haul-Your-Might T3. Product Name: Product Code: Please read all instructions carefully before assembly, installation and/or use of this product.
 WARNING: DO NOT exceed 800 lbs. (363 Kgs) WARNING: DO NOT exceed vehicle manufacturer s weight rating. Haul-Your-Might T3 Tools Required: 17mm Socket 5mm Hex Key 1/8 Hex Key Tape Measure 17mm Wrench 13mm
TESLA MODEL S REAR UNDER SPOILER & DIFFUSER SYSTEM
 TESLA MODEL S Thank you for purchasing your Unplugged Performance Rear Under Spoiler & Diffuser System for the Tesla Model S! Please read this manual carefully prior to installation. REAR UNDER SPOILER
Installation Manual TWM Performance Short throw shifter 2001 and up Hyundai Accent
 Installation Manual TWM Performance Short throw shifter 2001 and up Hyundai Accent 1. Place the vehicle on a flat surface with blocks in front and behind the wheels preventing unwanted movement. The car
<THESE INSTRUCTIONS MUST BE GIVEN TO THE END USER> B&W Trailer Hitches 1216 Hawaii Road / PO Box 186 Humboldt, KS P: F:
 B&W Trailer Hitches 26 Hawaii Road / PO Box 86 Humboldt, KS 6678 P:620.73.366 F:620.869.903 RAM OEM Mount System Installation Instructions 25,000 LBS.
INSTALLATION GUIDE. KTM 125, 144, Stroke KTM 250, Stroke KTM 250 SXF, XC, XC-W KTM 450, 505 SXF Manual Revision:
 REKLUSE MOTOR SPORTS The z-start Pro Clutch INSTALLATION GUIDE KTM 125, 144, 200 2-Stroke KTM 250, 300 2-Stroke KTM 250 SXF, XC, XC-W KTM 450, 505 SXF 191-836 Manual Revision: 050307 2002 Rekluse Motor
Jeep Wrangler TJ Bedrug/BedTred Interior Installation Instructions
 REAR KIT: BRTJ97R and BTTJ97R Jeep Wrangler TJ Bedrug/BedTred Interior Installation Instructions Congratulations on choosing the finest interior flooring kit available for your Jeep. The Bedrug/Bedtred
Installation Instructions
 FORD #3100 SuperRail Mounting Kit #3123 Gross Trailer Weight (Maximum)...12,000 lbs. Vertical Load Weight (Max. Pin Weight)...3,000 lbs. Installation Instructions SPECIFICATIONS Fits 2015-2018 Ford F-150
1 COPPERHEAD 3D PRINTER ASSEMBLY GUIDE WELCOME
 1 COPPERHEAD 3D PRINTER ASSEMBLY GUIDE WELCOME Thank you for choosing the Copperhead 3D printer from Acadian Robotics. Please read through this manual first before setting up your machine. If you have
1PC TONNEAU COVER INSTALLATION INSTRUCTIONS. Ford Ranger (with bedliner)
") PC TONNEAU COVER INSTALLATION INSTRUCTIONS Ford Ranger (with bedliner) Care Instructions: Clean Tonneau Cover with a mild detergent and water solution. Do not use abrasive cleaners or solvents. Place these
PC TONNEAU COVER INSTALLATION INSTRUCTIONS Ford Ranger (with bedliner) Care Instructions: Clean Tonneau Cover with a mild detergent and water solution. Do not use abrasive cleaners or solvents. Place these
INSTALLATION / OPERATING INSTRUCTIONS Reese Elite Series FIFTH WHEEL SLIDER HITCH
 INSTALLATION / OPERATING INSTRUCTIONS Reese Elite Series FIFTH WHEEL SLIDER HITCH DEALER/INSTALLER: (1) Provide this Manual to end user. (2) Physically demonstrate hitching and unhitching procedures in
Installation Instructions Camaro Level 2 Coilover. Part # Camaro Level 2 CoilOver System.
 Part # 00-99-00 Camaro Level CoilOver System Front Components: 0 Front CoilOver Strut Recommended Tools Rear Components: 60 Rear Coilover Miscellaneous Components: 85000000 Spanner Wrench 99-00 Camaro
VOLKSWAGEN AMAROK 3 PIECE HARD TONNEAU COVER INSTALLATION INSTRUCTIONS
 VOLKSWAGEN AMAROK 3 PIECE HARD TONNEAU COVER INSTALLATION INSTRUCTIONS Care Instructions: Clean Tonneau Cover with a mild detergent and water solution. Do not use abrasive cleaners or solvents. Place these
D40C HINGE # x Support Plate x M8 Bolt 8 x M8 Washer 6 x M6 20mm Bolts 6 x M6 Washers 19 x Screws
 HINGE # 1017 2 x Support Plate 1018 8 x M8 Bolt 8 x M8 Washer 6 x M6 20mm Bolts 6 x M6 Washers 19 x Screws 2 x Lid mount gas strut bracket 1041 2 x Self tap strut mount 1040 1 x Central Lock bracket 1510
CAUTION. INSTALLATION INSTRUCTIONS Part Number Hidden Winch Kit with special XD 9000 Short Drum Winch For Ford F-150 Truck
 INSTALLATION INSTRUCTIONS Part Number 69110 Hidden Winch Kit with special XD 9000 Short Drum Winch For Ford F-150 Truck As you read these instructions, you will see NOTES, CAUTIONS and WARNINGS. Each message
TORCH Main Grille Main grille INSERT - # / # Chevrolet Silverado
 Parts included (1) TORCH Grille - Main (1) 40 LED - Part #6311271 OR Stealth - Part #6311271-BR OR (1) 30 LED - Part #6311281 OR Stealth - Part #6311281-BR Hardware included (1) - Large Bottom Mounting
TEL:1-866-XANATOS INSTALLATION INSTRUCTIONS PART#: SR-FOR SPARTAN RUNNING BOARD FORD ECONOLINE 99-14
 TEL:1-866-XANATOS INSTALLATION INSTRUCTIONS PART#: SR-FOR203796 SPARTAN RUNNING BOARD FORD ECONOLINE 99-14 PARTS LIST: 1 Driver/Left Side Spartan Running Board 2 10mm Lock Washers 1 Passenger/Right Side
2016+ Mazda Miata Front & Rear Sway Bar Installation Instructions
 Page1 James Barone Racing Aftermarket Parts and Accessories 2016+ Mazda Miata Front & Rear Sway Bar Installation Instructions Tools Required: Jack Lift or ramps Ratchet wrench Torque Wrench 6 and 12 Extension
INSTALLATION INSTRUCTIONS GRILLE GUARD TOYOTA TUNDRA TOYOTA SEQUOIA PART # P2067
 INSTALLATION INSTRUCTIONS GRILLE GUARD 07-14 TOYOTA TUNDRA 08-14 TOYOTA SEQUOIA PART # P2067 PARTS LIST: GRILLE GUARD 1 Grille Guard 2 10mm Cam Lever Quick Release Bolts with Special Pivot Washer 1 Driver/left
UltraGroove Electric
 UltraGroove Electric Electric Retractable Tonneau Covers INSTALLATION INSTRUCTIONS CHEVROLET SILVERADO/SIERRA TABLE OF CONTENTS (800) 338-3697 www.paceedwards.com Pace Edwards Company 2400 Commercial Blvd.
NIS NAV AM (MY15 >) - Aluminium Tonneau Cover ATC0051 (silver) ATC0052 (Black) Installation Time: Approx. 60 Minutes WARNING!
 - Aluminium Tonneau Cover ATC0051 (silver) ATC0052 (Black) Installation Time: Approx. 60 Minutes WARNING!") Installation Time: Approx. 60 Minutes WARNING! When in the closed position, Aluminium Tonneau Cover must be latched and tailgate must be closed. Failure to do so could result in unexpected opening of the
Installation Time: Approx. 60 Minutes WARNING! When in the closed position, Aluminium Tonneau Cover must be latched and tailgate must be closed. Failure to do so could result in unexpected opening of the
BMS F1X M5/M6 S63TU Stage1 Install Guide
 BMS F1X M5/M6 S63TU Stage1 Install Guide Last updated 10/22/2018 Use subject to terms and conditions posted at http://www.burgertuning.com/terms.htm THIS PART IS LEGAL FOR USE ONLY IN COMPETITION RACING
FORD SUPERDUTY INSTALLATION INSTRUCTIONS
 RETRACTABLE TRUCK BED COVERS FORD SUPERDUTY INSTALLATION INSTRUCTIONS TABLE OF CONTENTS (800) 338-3697 www.paceedwards.com Pace Edwards Company 2400 Commercial Blvd. Centralia WA 98531 Tools Required for
<THESE INSTRUCTIONS MUST BE GIVEN TO THE END USER> B&W Trailer Hitches 1216 Hawaii Road / PO Box 186 Humboldt, KS P: F:
 B&W Trailer Hitches 26 Hawaii Road / PO Box 86 Humboldt, KS 66748 P:620.473.3664 F:620.869.903 Ford OEM Mount System Installation Instructions 20,000
»Product» Safety Warning
 #D1 / D2 Installation Instructions 2009-2010 Dodge 1500 4wd 4" and 6" Suspension Systems Read and understand all instructions and warnings prior to installation of product and operation of vehicle. Zone
Steeda Sport Mustang Lowering Springs (2005+) - Installation Instructions
 - Installation Instructions") Steeda Sport Mustang Lowering Springs (2005+) - Installation Instructions The below installation instructions work for the following products: Steeda Sport Mustang Lowering Springs (2005+) Please read
Steeda Sport Mustang Lowering Springs (2005+) - Installation Instructions The below installation instructions work for the following products: Steeda Sport Mustang Lowering Springs (2005+) Please read