Company Profile Hunan Xiang Yi Laboratory Instrument Development Co., Ltd is high technology enterprises mainly engaged in manufacturing centrifuge
|
|
|
- Phebe Taylor
- 5 years ago
- Views:
Transcription
1 Company Profile Hunan Xiang Yi Laboratory Instrument Development Co., Ltd is high technology enterprises mainly engaged in manufacturing centrifuge and laboratory instrument with 40 years. The first refrigerated centrifuge(50000r/min) and first high speed refrigerated centrifuge(20000r/min) of China were made in Xiang Yi. The company has already passed ISO9001:2000 and international safety certificate CE. The effective implementation of quality system guarantees ulteriorly the stability of product quality, reliable after-sale service and product safety. In the 80-90s of last century, our company had cooperated with Japan Tomy Company and America Beckman Company in technology field, which improve the technology level of Xiangyi up to domestic leading level. The super capacity rotors of angle rotor ml and swing rotor ml have already passed rotor service life cycle test by authority of the United States in 2009,and surpassed the US standard of life cycle. This marks some performance of Xiangyi centrifuge has already reached to international advance level. We will take this as a driving force, working hard to achieve further successes, make Xiangyi centrifuge reach to international advance level quickly and became the famous centrifuge manufacturer of the world. With Xiangyi centrifuge technology and brand familiarity increased in centrifugal industry, Xiangyi makes great effort to expand the market both at home and abroad, our products have already been exported to over 20 countries, such as USA, Germany, Japan, Turkey, India, Mexico, Vietnam and so on. In order to meet the increasing market demand, in 2006 Xiangyi has invested a large sum of money to establish Xiangyi Industry Park, which located at Taiwanese Investment Zone of Hunan Province. There are domestic advanced CNC and 6 centrifuge assembly lines, which have improved the annual centrifuge production capacity from 5000 sets to sets. We have established jointly a laboratory instrument development center with domestic famous university. And there are many domestic senior R&D talents in laboratory instrument field. w Xiangyi has become the production base of laboratory instrument in China. 1
2 RCF Calculation Method and Attention for Max. Speed Setting RCF Calculation Method RCF value is relation to the revolutions per minute and the centrifugal radius; you can apply following formula to calculate: RCF= n 2 r g n speed (r/min r max. centrifugal radius cm g acceleration of gravity 9.8m/s² Attention for Setting Max. Speed The standard max. speed on this product is gotten and verified based on the sample with density 1.2g/ml. The sample means the total contents of any compartment, including specimen, tubes, sealing assembly and adapters. If the density of centrifugation samples is greater than the required 1.2g/ml, the maximum allowable speed for the rotor should accordingly be reduced. It can be calculated by the following formula: N max allowable speed = N max. speed actual density g/ml te: Here explicitly emphasize that even if the sample mass is less than 1.2g/ml, it is forbidden to increase the maximum allowable speed on the rotor. In Formula Max speed means the maximum allowable speed for sample with density equal to 1.2g/ml. Please refer to the available rotor on section 2.3 for the standard maximum speed. 2
3 Respected Customers: Thank you very much for using our centrifuge. We are trying our best to provid products with good quality and performance. For easy operation, please read the manual carefully and conduct on the instruction steps before operation. Whatever questions do you have during operation, please contact us. We will try our best to solve your problems. Best regards! This manual tells how to use H2050R centrifuge correctly. Before using (installation, operation, maintenance and inspection etc.) please read the manual carefully. Operate the product after understanding the safety attentions. Attentions In order to describe the detailed parts, the graphic illustrations in this manual were showed without outer housing or protective cover. When you using this product, make sure the outer housing or protective cover is installed correctly and operate according to the instructions. The graphic illustrations in this manual only for explanation, maybe different with the product you purchased. In order to enhance the convenience and accuracy of the instruction manual, the content of the instruction manual would be changed with the product updating or specification changes. If the instruction manual is damaged or lost, please contact with the local agent or us directly. 3
4 Table of Contents Safety Information... 5 Chapter 1 Installation and Adjustment Inspect the centrifuge Identify the Installation Environment Installation Site Installation Steps Centrifuge Trial Operation Chapter 2 Operating Instructions Naming Rule Main Technical Parameters Available Rotors Structure Characteristics Structure for Main Machine and Display Control Panel Electric Control System Drive System Refrigerating System Chamber Panel Controls Instruction Control Panel Indicators Keys Operation Instruction Programming Operation Centrifugation Modes Selection Timing Modes Selection Operation Steps Chapter 3 Maintenance Chapter 4 Common Troubles and Troubleshooting Method Common Troubleshooting Method Trouble Code and Troubelshooting Method Chapter 5 Transportation and Storage After-sales Service and Warranty Packing List Quality Certificate Warranty Card Users Feedback Card
5 Symbol and its Meanings Symbol GB. Meanings ~ Alternating current Power on(general supply) Power off (general supply) Protective earthing(ground) 4793 Warning: Safety caution Safety Information Safety Information clarifies the requirements of safe operation in the instruction manual. Please carefully read it before installation, operation, maintenance and repairing. Understanding the warning and correct operation can avoid the personal injury and the damage of centrifuge. We are dedicated to the centrifuge development and improvement, thus our information and data subject to change without notice. Thank you! Rotor Service Life: rmally 5 years for aluminum alloy rotor and 7 years for titanium alloy rotor. The rotor over service life must be discarded or returned to the factory for inspection. It is forbidden to use the rotor with cracks, corrosion or over service life. Attention for installation and maintenance The rotor accessory and package may be placed in the centrifugal chamber. You should open the door lid to check and take out while installing. In the machine maintenance process, the parts that need remove cover may cause electrical shock or personal injury. Ensure that the power has been cut off and the power line has been removed from the socket, and qualified staff manipulates it. The replaced part must be consistent with the requirements of this centrifuge. If you are not sure, please contact our after service department. 5
6 Attention for electric system To reduce the risk of electric shock, the centrifuge adopts the plug with three points which must connect to the socket with ground lead. Make sure if the wall socket is connect with the ground wire. The voltage of power supply must accord with the voltage of centrifuge. Don t use the power adapter from three holes to two holes. It is forbidden to use the expanding socket with two lines or all-purpose power adaptor without ground wire. Don t put container with liquid on the centrifuge or around the centrifuge. If the container is knocked over, the liquid will infiltrate into centrifuge and damage the electrical or mechanical parts. Before moving the centrifuge, make sure to power off the centrifuge, in order to avoiding the possible damages caused by electric shock. If the centrifuge is damaged, please do not repair it by yourself. Please contact the professional technician in your company or distributor and our service engineer to handle it. Attention for fireproofing Please use the overload fuse with same model and specification. The centrifuge is not designed for the flammable and explosive matters. You cannot make centrifugation for the matters (chloroform, acetaldehyde), and cannot put the matters in the centrifuge or store them around centrifuge within 30cm. Attention for safe operation Please use the rotor and accessories which are designed for this centrifuge by our company. It is forbidden to use the rotor and accessories with cracks, corrosion or over service life. Make sure if the centrifugal chamber is cleaned before operation. Make sure if the screw (nut) of the rotor in the centrifugal chamber has been screwed down. t exceed its max speed of rotor during operation. Don t decelerate rotor speed or stop by hand. Don t open the door lid during centrifugation. Don t hold or move centrifuge when rotor is rotating. If the glass test tube is cracked in centrifuge chamber, please carefully check and clean the gasket and centrifugal chamber because the glass fragment may have inserted into their surface. 6
7 The distance between centrifuge and other objects must be kept 30cm during operation. You should not stand around centrifuge within 30cm unless adjusting it. Anything is not allowed to enter into centrifuge during operation. Attention for safety in chemistry and biology The routine manipulation may include all kinds of liquid and test sample which may be the disease-causing and poisonous matters. The centrifuge cannot be manipulated with the matters unless you have token the protection measures. Please pay attention to the liquid explanation in container before operation. Be careful of the infectious liquid. The infectious samples must be manipulated according to the manipulating program and method in lab for avoiding expanding disease. You should follow the environment security and protection requirements when destroying the discarded liquid. Users have the responsibility to clean and sterilize centrifuge and accessory if you need maintenance service from our company. Always be aware of possibility of contamination when using radioactive, toxic, or pathogenic materials. Take all necessary precautions and use appropriate decontamination procedures if exposure occurs. The use of sealed rotors, buckets and/ or sample containers will provide increased protection from contamination during routine operation. However, these items will not guarantee contamination protection from accidents resulting in damage to the rotor or buckets. Do not run hazardous materials in the centrifuge unless placed in a biohazard enclosure and operated using all appropriate safety precautions. Never use any materials capable of producing flammable or explosive vapors, or extreme exothermic reactions. 7
8 Chapter 1 Installation and Adjustment 1.1. Inspect the centrifuge Warning: Do not install the centrifuge around the place with flammable or explosive materials. Before power on, please open the door lid by door emergency release tool and check the chamber. Please do not power on before taking out the matters in the chamber Identify the Installation Environment Environment Temperature and Humidity: The surrounding environment would have extent impact on the centrifuge service and performance. The working environment temperature is 10 to 35, and the relative humidity is no more than 85%. It is prohibited to put lab equipment with large heating production and strong vibration around centrifuge. Avoid installing in the areas with humidity and direct sunlight. Avoid installing in the areas with corrosive, flammable or explosive gas. Avoid installing in the areas with greasy dirt, dust and metal dust Installation Site When centrifuge is in operation, the rotor and its accessories is in the high speed spinning state. A flat, level surface is critical for avoiding rotor imbalance during operation. Place centrifuge on a steady platform or table. Adequate space to allow for proper air circulation. Allow at least 30cm clearance around all sides of the centrifuge Installation Steps As soon as you receive the centrifuge, carefully inspect it for shipping damage. Report any damage immediately to the transportation company and file a damage claim, then notify our company. According to the packing list, to check the main machine, accessories, attached tools and files 8
9 and file whether any parts are missing. warning When moving the machine, do not hold the front panel. Unpacking package: Removing 8 pcs of M8 wooden screw on top door plank first (refer to Figure 1.4-1) and discharging the top door plank then, other side planks should be integrally unpacked after removing 4 or 6 pcs of M8 wooden screw on side planks. Take off the plastic cover, at last offload the main machine from packing baseboard and place it on the steady platform. Make four rubber cushions stand in balance. (This model usually is heavy, it is best to have three to four persons to moving it) At last, please take care of the package and packing materials to avoiding environment pollution. Figure Unpacking Steps Power requirements: For H2050R, it is AC220V 50Hz 15A. Make sure that the voltage of power supply must accord with the voltage of centrifuge (Please check the power supply label under the power socket on the back of the centrifuge. This centrifuge is adopted AC with single phase and three wires 220V power). Connect the power cord to the electric outlet on centrifuge back first, and then put the plug on the other end into the external mains jack. Press down one side marked ON on the switch on the centrifuge right side to power on. Open the door lid: if the centrifuge is powered on, press key to open the door lid automatically. If the power is off, pull the emergency door release string (Figure 2.4-2). Check 9
10 the chamber and take out of other materials except for the rotor. Clean up the chamber. Rotor Inspection Take out of the rotor from the package. Carefully inspect whether the rotor is damaged, deformed or with crack and corrosive spot. If it is, please stop using the rotor immediately and contact the supplier. Attention It is forbidden to use the rotor over service life or not designed by our company. Attention: It is forbidden to use the rotor and accessories with cracks, corrosion spot. Attention: During operation the cone of the rotor must mate with the cone of the motor shaft properly. Rotor Installation Hold the rotor bottom by both hands and install the rotor on the motor shaft correctly. Then hold up the rotor steadily (not shacking) by one hand, and put the T-shaped inner hexagon spanner into the rotor center by another hand. In the mean while turn the spanner for 3 to 6 rounds in clockwise direction until the rotor clamps the rotor base. Make sure that the coneof the rotor must mate with the cone of the motor shaft properly. See Figure Figure Rotor installation and disassembly on external cone shaft Rotor Disassembly As shown in the above figure: At first, hold up the rotor steadily (not shacking) by one hand, and put the T-shaped inner hexagon spanner into the rotor center by another hand. In the mean while turn the spanner for 3 to 6 rounds in counterclockwise direction until the rotor can be separated from driving shaft. Then hold up the rotor bottom by both hands, and rotor can be taken out from rotor base vertically. 10
11 When install the swing rotor, please place the buckets on the right place with same number according to the number on the bucket. Check whether the bucket is hanging on properly and rotate flexibly. If there are any electronic problems during operation, it should be inspected and repaired by the professional technicians 1.5. Centrifuge Trial Operation 1. Before starting the centrifuge, firstly confirm if there's any loose for rotor, the centrifuge is level or not, and if it is stable with the horizontal level. Closed the centrifuge door cover, if no abnormalities are empty load, the maximum speed is set to 1000 r/min, after the speed up to 1000 r/min, and then set the maximum speed to 2000 r/min, when the speed up to 2000 r/min, and then, in turn, additive 1000 r/min until the installed rotor s max.speed, if no abnormal phenomenon, according to the step 2 on load operation debugging. 2. Trial operation for max. load: If it is used with the swing rotor, firstly press the bucket to check if the buckets are blocked or not. If no this phenomenon, then start operation. Set the max speed to 1000rpm/min, and then set the maximum speed up to 2000 r/min, when the speed up to 2000 r/min, and then, in turn, additive 1000 r/min until the installed rotor s max.speed, if no abnormal phenomenon, the trail operation is success. 11
12 Chapter 2 Operating Instructions 2.1. Naming Rule H2050R is tabletop high speed refrigerated centrifuge driven by AC frequency-conversion motor, naming rule as shown in the figure 2.1 Figure 2.1 Naming Rule 2.2. Main Technical Parameters Model H2050R Max. Speed 20500r/min Max. RCF g Max. Capacity 4 750mL Control Microprocessor Motor AC Frequency-conversion Motor Speed Accuracy ±50r/min Time Setting Range Short-run Press PULSE Timing 10sec 99 min59sec Continuous HOLD Environment Requirement Temp:10 35 Relative Humidity Temp Setting Range Temp Controlling Accuracy ±1.5 12
13 Model H2050R Refrigeration System n-cfc imported compressor unit Power Supply 220 (1±10%)VAC 50Hz 15A (single phase, three wires) ise < 65dB(A) Centrifuge Dimension(L D H) (mm) Package Dimension(L D H) (mm) Net Weight/Gross Weight 118kg/170kg Form 2.2 H2050R 2.2. Main Technical Parameters 2.3. Available Rotors Available rotors for H2050R are shown in Form 2.3. According to this form you can confirm the used rotor s max. speed, max. RCF and the available adaptors, brackets, buckets for this rotor. Rotor. Max. Speed Max. RCF Rotor Type Capacity NO r/min g Angle Rotor /2.2ml NO r/min g Angle Rotor NO r/min g Angle Rotor 8 15ml Adaptor 8 5ml 12 10ml 6 30ml NO r/min g Angle Rotor 6 50ml NO r/min 3500 g NO r/min 3040 g Swing Rotor Adaptor available Rectangular Bucket Rotor Adaptor Round Bucket Rotor Swing Rotor Microplate Bucket 4 750ml ml ml ml ml ml 4 500ml ml ml well NO r/min g Angle Rotor /2.2ml NO r/min g Angle Rotor 6 85ml NO r/min g Angle Rotor 6 100ml Form2.3 Available Rotors for H2050R 13

14 2.4. Structure Characteristics Structure for Main Machine and Display Control Panel Figure H2050R Mainframe Appearance H2050R is tabletop high speed refrigerated centrifuge. This centrifuge is composed of main machine, rotor and other accessories. And main machine is composed of machine frame, chamber, drive system, electric control system, refrigerating system and display control panel. Rotor, tube (bottle) and etc. accessories would supplied by contract.(te: There is an emergency door release string over the power switch for emergency door opening Electric Control System The control system has adopted 8-digit CPU, and motor drive has adopted advanced VFC technology for stable speed and energy saving, with over-speed and over-temperature protection functions. Control Structure Relationship as shown in Figure 2.4-2: 14
15 PVC panel key LCD display screen Temp sensor Speed sensor 8-digit CPU Door protection Door lid tractor Rotor identification sensor AC brushless frequency conversion motor Solenoid valve Compressor Figure Electric control system for H2050R Drive System Rotor is driven directly by motor. Frequency conversion motor with high torque is equipped with special shocking absorber for reducing vibration and noise. Drive device reference figure Figure Drive System Refrigerating System Refrigerating compressor is located on the lower back of the centrifuge. The evaporator is revolved around the chamber. The temp sensor under the bottom of the chamber would detect the temperature of the gas in the chamber, and the system will control the compressor start/off state based on the detected temperature. The heat produced during operation is depended on frictional heating. This centrifuge is equipped imported compressor with two circuit control for good efficiency of heating and refrigerating. Refrigerating theory as shown in Figure


16 Evaporator Compressor Condenser Solenoid valve Capillary Figure Refrigerating theory Filter Chamber The chamber is made of stainless steel which is durable and incorrodible. It is sealed by EPDM or silicon-gel gasket. Rotor drive shaft and thermosensor/temp sensor are located in the bottom of the chamber. Refer to Figure Figure Chamber Figure Temp Control Curve The thermosensor would consistently monitor the temp in the chamber. Because of the difference of the rotor material, dimension, mass and the chamber diameter, depth, the thermal resistance in the chamber would be different, which would also cause the temperature of the rotor and chamber to be different. Aim to the sample temp the microprocessor would calculate the corresponding chamber temp, and through setting the compensation value of the rotor used to reach the required rotor temp. During operation the displayed rotor temp should be in the set value range of 2 tolerance (after compensation/correction). The microprocessor would monitor the thermosensor to confirm the temperature change of the chamber, please refer to Figure If the chamber temp is over 50 or the temp sensor is damaged, the system would give temp failure message and the rotor would decelerate or shut down. 16

17 2.5. Panel Controls Instruction Control Panel Figure H2050R Control Panel Indicators Light off: Stop state Light on: the start indicator is green and flashing, which means the centrifuge is started and is accelerating. Green indicator always light on means the centrifuge reaches the set speed and is running stably. Light off: Running state Light on: the stop indicator is red and flashing, which means the centrifuge stop working and is decelerating. Red indicator always light on means the centrifuge is completely stopped. 17
18 Keys Operation Instruction Set key Press the key, and then it shows " " on the LCD display window and the number is flashing. Press or key to select the rotor number. Press the key, then it shows " " on the LCD display window and the number is flashing. Press key to set the speed. or Press the key, then it shows " " on the LCD display window and the number is flashing. Press or key to set the centrifuge working time.(when the first two number on " " flashing, you can set the minute parameter. When the last two number on " " flashing, you can set the second parameter.) The time setting range is 1:00 99:59. Press to confirm the current setup, otherwise, the setup would be cancelled automatically in 5 seconds. Press the key, then it shows " " on the LCD display window and the number is flashing. Press or key to set the chamber temperature. Press the key, then it shows " " on the LCD display window and the number is flashing. Press or key to set the acceleration profile. Acceleration profile is from 1 to 9, the value is higher means the ACC time is shorter, usually choose5. Press the key, then it shows " " on the LCD display window and the number is flashing. Press or key to set the deceleration profile. Deceleration profile is from 1 to 9, the value is higher means the DEC time is shorter, usually choose5. 18
19 Start key Press key and the green start indicator is flashing. When the centrifuge reaches the set speed, the green indicator always light on. Stop key When the centrifuge is working (the time isn t counted down to 0 ), press key to stop it by manual and the red stop indicator is flashing. When the centrifuge is in the state of rest and rotor does not run (but the centrifuge is power on), press key to open the door lid. When it shows an error code on display window, press key to clear the error code. Program key With,,, keys together to realize program storing, using and modifying. Increase/Decrease key Press Press to increase the setting parameter value. to decrease the setting parameter value. Confirm/Enter key Press pressing key to confirm the setup parameter value. Usually after key to set rotor number, speed, time, ACC/DEC profiles, press key to confirm all parameters. If you do not press key, and then the setup parameters would be invalid. Pulse/Shortrun key Press the Release the key and hold on, then the centrifuge will run swiftly; key, the centrifuge will stop automatically. 19

20 LCD display window meaning Speed setup display window, to display the setup speed Real-time speed display window, to display the running speed. Time setup display window, to display the setup time. Running time display window, to display the running count-down time. Display the setup temperature parameter, unit: Display the running temperature parameter, unit: Rotor number display window, to display the setup rotor number Acceleration profile display window, to display the setup ACC profile. Deceleration profile display window, to display the setup DEC profile. Relative centrifugation force display window, to display the corresponding RCF during operation Program display window, to display the program number for current running parameters. Error/default code display window: only when the system is failure, the window and error code would be displayed. 20
21 Programming Operation Programming operation instruction State Display window Function Description Program storing: In the stopping status, press key once and the value flashes (character will not flash), then Storing press or to select the preset program number (preset programs are 1 to 25, total 25 programs). At last must press to confirm the current settings. Otherwise, it will automatically cancel the setup after 5 seconds. Program using: In the stopping status, press key twice and the value and character flash simultaneously, then Using press or to select the stored program number (preset programs are 1 to 25, total 25 programs). At last must press to confirm the program selection. Otherwise, it will automatically cancel the setup after 5 seconds. Program modifying: Refer to setting parameters instructions, press key to set rotor number, speed, time, temp, ACC and DEC profiles, and then press to confirm and the current program will automatically be stored at. If press in Modifying the status of parameters not being modified, digital value will flash (but the character will not flash) and press or to select the modified program number. At last press to confirm. The current program will automatically be stored to PROG XX (XX is 1 to 25, no more than 25 programs). 21
22 Centrifugation Modes Selection Centrifugation Modes Operation State Display window Function Description Timing Short-run Press the key and set time as any value between 00:01 99:99(Timing operation mode), and then press key to start centrifuge and the start indicator light is on. The value on running time window is the countdown centrifugation time (from XX: XX to 00:00, the time unit is minute:second). When time is counted down to 0, the centrifuge automatically slows down and stops running. When the speed is 0 r/min, the buzzer will tweet and the [STOP] indicator light is on. Press key, and set time as any value between 01:00 99:59. Press centrifuge. The to start the shows on time setting window and the [START] indicator light is on. The cumulated centrifugation time (increase from 00:00) is displayed in the running time window (the time unit is Continuous minute: second). When release the key, the centrifuge automatically slows down and stops running. The [STOP] indicator light is on. Press key, and set the time as A0:XX (continuous centrifugation mode) by press. Press to start the centrifuge and the [START] indicator light is on. The setting display window shows. The cumulated centrifugation time (increase from 00:00) is displayed in the running time window (the time unit is minute: second). When press key, the centrifuge automatically slows down and stops running. The [STOP] indicator light is on. 22

23 Timing Modes Selection The timing modes is defaulted on countdown timing once START key pressed when instrument leaving factory. If require starting timing until reaching the setup speed, you can realize it by following operation. How to realize timing until reaching the setup speed: Before the instrument power on press key and hold on, and then switches on. 5 seconds later release the key. Thus you can realize the mode of timing until reaching the setup speed. Timing modes check (Timing until reaching the setup speed): When the instrument power on and stand by, as well as the speed is zero, press and hold on. The LCD display window shows on the speed setting window, which means countdown timing until reaching the setup speed. Otherwise, it shows which means timing once START key pressed. How to realize timing once START key pressed: Before the instrument power on press key and hold on, and then switches on. 5 seconds later release the key. Thus you can realize the mode of timing once START key pressed. Timing modes check (Timing once START key pressed): When the instrument power on and stand by, as well as the speed is zero, press and hold on. The LCD display window shows which means timing once START key pressed.. Otherwise, it shows on the speed setting window, which means countdown timing until reaching the setup speed. 23
24 Operation Steps 1. Rotor and tube inspection: Before operation must carefully inspect the rotor and tubes. It is forbidden to use cracked and damaged rotor, tubes, which may cause instrument damage or personal injury. 2. Rotor installation 3. Hold the rotor bottom by both hands and install the rotor on the motor shaft correctly. Then hold up the rotor steadily (not shacking) by one hand, and put the T-shaped inner hexagon spanner into the rotor center by another hand. In the mean while turn the spanner for 3 to 6 rounds in clockwise direction until the rotor clamps the rotor base. Make sure that the cone of the rotor must mate with the cone of the motor shaft properly. See Figure Figure Rotor installation 4. Adding liquid and placing the tubes: Adding liquid into the tubes with the same weight and check their weight by balance. And then place them in the rotor symmetrically. The tubes must be placed central symmetrically. The two tubes central symmetrically placed must be with the same weight. Otherwise, there will be vibration and noise because of imbalance. When placed all loads, if the rotor has lid, please rotate and tighten the lid. Check whether the rotor is installed properly and tightly. All cavities in the swing rotor must be loaded with the same type tubes. The rotor form has marked what kind of tube capacity can be loaded in which rotor. Please load the tubes on the corresponding rotors according to the rotor specification form. Some swing rotors can equipped with different brackets or buckets. These accessories only be allowed to use in the specified rotor yoke. Swing rotor and tubes must be placed symmetrically. Tubes must be placed in the buckets in even. Refer to Available Rotors form for allowable combination. For angle rotor, all cavities also must be loaded. 24

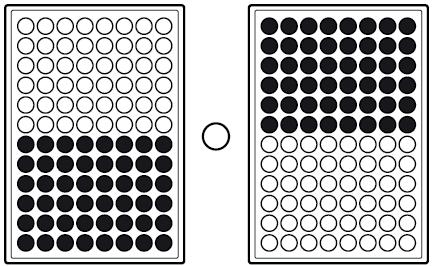

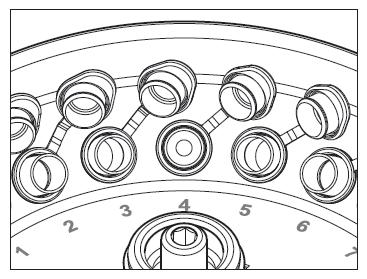
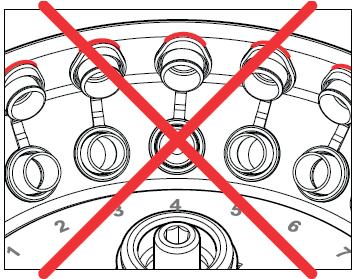
25 Symmetrically loaded rotor n-symmetrically loaded rotor (unallowed) 25


26 Symmetrically loaded rotor n-symmetrically loaded rotor (unallowed) In some buckets it marked the max. Load Weight or its max. Load Weight with the whole set of buckets. Do not over the limit. For exception, please refer to Attention for Setting Max. Speed. Max. Load weight includes adaptors, buckets, tubes and the total weight of load materials. If there are rubber pads under the tubes, each tube must has the same pads with the same quantity. It is not allowed to add liquid in centrifuge chamber. While adding liquid in the tube must be careful to avoiding spill the liquid in the chamber. Do not excess the max. load specified by tube manufacturer. Make sure that the sample height in tubes is almost equal. Try the best to mini the weight tolerance. te: Do not excess the max. imbalance tolerance. For high speed centrifuge the tolerance of each tube weight with liquid must be less than 0.5g. 5. Close the door lid: Press down the door lid until you hear clicking sound which means the door lid pin enter into the hook. Then lift the door lid by hand to check whether it is closed properly. If the door lid cannot be opened, it means it is closed properly. If press the key and centrifuge cannot run, the buzzer will tweet and the default window displays error code which means the door lid is not closed properly. Press key to clear the error show, and close the door lid properly again. 6. According to the operating instructions to set rotor number, speed, time and ACC/DEC profiles etc. 26
27 7. Start and stop operation Warning: Before inspect the chamber and take out of all materials except for the rotor, do not start the centrifuge. Otherwise, the centrifuge may be damage. Warning: It is forbidden to run the rotor exceed of its max speed, because overspeed may cause instrument damage and even the personal injury. a) Press key to run centrifuge and the [START] indicator light is on. b) Automatic stop: When time is counted down to 0, the centrifuge automatically slows down and stops running. When the speed is 0r/min, the buzzer will tweet and the [STOP] indicator light is on. At this time, you can unlock the door lid. c) Stop by manual: In the running status (the working time isn t counted down to 0 ), press key to slow down and stop running. The buzzer will not tweet, and the [STOP] indicator light is on. When the speed is 0r/min, you can unlock the door lid. 8. Take out tubes: When the rotor stops spinning, press the key to open the door lid (it is forbidden to open the door lid which the rotor is still spinning). Then take out tubes. te: During operation if the power failure leads to the electric lock not triggering and the door lid not open. Please wait the rotor coasting to 0rpm, and then pull the emergency door release string to open the door lid. 9. Uninstall the rotor: Unscrewing the bolt with T-shape spanner. Lift and take out the rotor. 10. Power off: After finished centrifugation, press down the power switch on the back of the centrifuge, and plug out the power cord after power off. Don t hold up or move the centrifuge during operation. Don t open the door lid when rotor is spinning. Every day take out the rotor after finishing the last operation 27
28 Chapter 3 Maintenance If it is leaving unused for long time, please take out the rotor of the chamber. Then wipe up the rotor with neutral cleaning mixture and stock it at dry and ventilated place. The motor shaft should be smeared with some lubricating oil for protection. All action on rotor (Install and take out) should be soft, and rotor should be taken out vertically Avoid falling the rotor to damage the shaft. In routine maintenance process use neutral cleaning mixture to clean the chamber and wipe up the water. Regularly inspect the rotor whether it is corrosive or cracked etc. and replace it in time. Every day after finishing the last operation, wipe up the condensation water in the chamber and keep it dry. 28
29 Chapter 4 Common Troubles and Troubleshooting Method 4.1. Common Troubleshooting Method During operation, maybe there are following failures, please refer to following methods for easy troubleshooting. Power on but no display 1) Check whether the input power is accordance with centrifuge rated voltage by multimeter. If it is the power problem, check and troubleshooting. 2) Check whether the power cord is connected with the mains jack. If it is loosen and not connected properly, check and troubleshooting. Loud noise or abnormal vibration 1) Check whether symmetrically placed tubes are with same weight. If the weight does not meet the tolerance requirement, please balancing weight again and make sure symmetrically placed tubes with the same weight. 2) Check whether the tube is broken or no. If it is, clear the rotor and place it with the same weight tube. 3) Check whether the tubes are symmetrically placed in the rotor. If not, please place them symmetrically. 4) Check whether the centrifuge is placed on a steady platform in level and the stress on four foot is in even or not. 5) Whether the rotor is bend or not. Whether the ground is stable and there is strong shock around. 6) Check whether damping absorber parts are damaged or not. If it is, replace them. Please conduct under the instruction of professional service engineer. 29
30 Poor refrigerating effect 1) Whether the environment temperature is too high. If it is, pleas lower the environment temperature by related device. Whether the chamber temperature is higher than the temp setting range of the centrifuge. 2) Whether the centrifuge is installed too near the wall. 3) Whether the heat sink in condenser is blocked by dust or condensing fan is broken and not run. 4) Whether the coolant in refrigerating system is leaked and interfused with air or the refrigerating pipeline is blocked and broken. 5) After reparation the quantity of refrigerant pumped in is too much or less, or not meet the requirement. Centrifuge not work 1) Check whether connecting terminals is connected with circuit board properly and the connection is loose or not. If it is, please fasten the connection wires properly. 2) Check whether the input/output voltage is correct with multimeter. If the power supply transformer is broken, please replace it with the same model and specification transformer. 3) Check whether the motor is energized with multimerter. If the motor is energized but not rotate, it means the motor is damaged and replace it. 4) If the motor can rotate but the rotor does not spin, please check whether the rotor is installed correctly. If no abnormal on the rotor, please contact our service engineer. For above four failures, please contact the local agent or our company directly, and do troubleshooting under professional engineer s instructions. 30
31 4.2. Trouble Code and Troubelshooting Method Imbalance protection failure Diagnostics: During operation if the vibration amplitude caused by imbalance exceeds a certain limitation value, the system will automatically enter into protection state by automatic shutdown and show on the display window. Troublshooting flows refer to figure Imbalance Protection Failure Whether the machine is not placed horizontally Please place it again and adjust horizontally Whether the symmetrically placed loads are not with the same weight Please weighting them again and make the symmetrically placed loads at same weight Whether the rotor installation method is not right Install it again Whether the rotor is deformed Replace it with a new rotor Please contact our company s agent or us directly Figure Imbalance Failure Troubleshooting Flows 31
32 Over-temperature protection failure Diagnostics When actual temperature exceeds the maximum allowable temperature 50 or the temp sensor is broken, the system will automatically shut down and while it shows error code in the display window. Troublshooting flows refer to figure Over-temperature Protection Failure Whether the environment temp is higher than 35 Please lower the environment temp Whether the setting temp is out of range Please reset the temperature Whether the temperature element is abnormal or not Please replace temp element Whether the compressor is abnormal or not Please repair or replace the compressor Please contact our company s agent or us directly Figure Over-temperature Failure Troubleshooting Flows 32
33 Rotor Protection Failure Diagnostics When the centrifuge is started, the system will identify the rotor number automatically while the speed is below 300rpm. If the rotor number is not same with the setting, the system would automatically shut down. In the display window, it shows error code. Troublshooting flows refer to figure Rotor Protection Failure Whether the rotor number is set wrongly Please reset the rotor number Whether the rotor identification sensor is bad contact Please reinstall the sensor Whether the rotor identification sensor is broken or not Please replace the sensor Please contact our company s agent or us directly Figure Rotor Failure Troubleshooting Flows 33
34 Door Lid Protection Failure Diagnostics As centrifuge belongs to high speed running equipment, if door lid is not closed, system will not be able to start; if we forced to open the door during the process of operation, the system will automatically stop and at the same time in the display window it will show error code. Troublshooting flows refer to figure Door Lid Protection Failure Whether the door lid is not closed properly Please close the door lid properly and restart Whether the micro-switch is broken or not Please replace the micro-switch Whether the door lid is open or not during running Please stop the machine immediately and close the door lid before operation Please contact our company s agent or us directly Figure Door Lid Failure Troubleshooting Flows 34
35 Overspeed Protection Failure Diagnostics When the setting speed exceeds the allowable speed of related rotor, the system shall not work; When the speed is over the setup speed by 500rpm during centrifuge operation, the system shall stop automatically and show error code on the display window. Troublshooting flows refer to figure Overspeed Protection Failure Whether the setting speed exceeds of the allowable speed of the using rotor Please reset the speed Whether the internal parameter F value is too big Please reset the internal parameter Whether the speed measuring system is abnormal or not Please replace the speed measuring sensor Whether the analogue interface port is consistent with the inverter model Please reset the inverter parameters Please contact our company s agent or us directly Figure Overspeed Failure Troubleshooting Flows 35
36 Speed Measuring Protection Failure Diagnostics When speed measuring is failure, the system shall not stop and only show error code on display window. Troublshooting flows refer to figure Speed Measuring Protection Failure Whether machine internal parts wires are loose Please connect the wires well Whether the motor can be rotated by hands but no speed showed on the window Please replace the speed measuring Whether the power supply board or drive module is broken Replace it Whether the motor is not working or blocked Please contact our company s agent or us directly Please replace the bearing or motor Figure Speed Measuring Failure Troubleshooting Flows 36
37 Mal-operation Protection Diagnostics If the mal-operation fault code shows before starting centrifuge, the system shall not work; if the mal-operation fault code shows during centrifuge operation, the system shall consider it as invalid setting; if press START key during stopping situation (Deceleration), the system shall consider it invalid operation and show error code. Troublshooting flows refer to figure Mal-operation Protection Failure Whether the parameters setting is wrong before operation Please reset parameters Whether press the START key during stopping process Please clear the error code when the speed is zero Whether the setup of parameters modification during operation is wrong Invalid setting, please reset Please contact our company s agent or us directly Figure Mal-operation Failure Troubleshooting Flows 37
38 Inverter Protection Diagnostics When inverter is failure, the system shall not start and show error code on the display window. Troublshooting flows refer to figure Inverter Protection Failure Check whether the environment temp is over 50 Please lower the temperature Check the fault code on inverter Solve according to related codes Whether the inverter parameters setting is wrong Please reset it Whether the connection between inverter and control board is bad Fix it and connect well Restart the machine in 5min after power off Please contact our company s agent or us directly Figure Inverter Failure Troubleshooting Flows 38
39 te: For the failure with color fill, please ask for service help. You can contact with the local agent where you purchase the centrifuge or contact us directly, and do troubleshooting under professional engineer s instructions. If there are other failures during operation, which make the centrifuge not working normally, please contact with the service office designated by our company. 39
40 Chapter 5 Transportation and Storage Transportation 1) You should use the wooden case and carton during long-distance transportation. Put centrifuge with dust helmet into the case, and fill with foam or plastic shock absorption materials. It is forbidden to be hit, inverted, and rolled, avoiding big vibration, rough handling, inverted and tilted. 2) You can directly move the centrifuge in room for short distance, but avoid big vibration, hitting, inversion and tilting. Storage 1) If it is leaving unused for long time, the centrifuge should be stored in ventilated, dry and clean room where no corrosive, flammable and explosive matters is. 2) If the centrifuge is unused for a long time, please try the best to pack it with the original packages. 3) If the centrifuge is unused over one week, you should take out the rotor, and then clean it with neutral cleaning mixture in time and wipe up with cloth. Version. V
41 After-sales Service and Warranty Attentions Respected customers, Thank you for purchase of our company s products. To protect your legal rights and avoid your worries, we provide warranty service for one year with the main machines. If it is broken under warranty with inartificial reason, we will supply free maintenance service. The customer needs to pay an amount of money if the product has exceeded the warranty period. We will not supply free maintenance if any following matter is happened: Exceed of the warranty period or without the warranty card. The trouble is caused by wrong installation, operation and maintenance. The trouble is caused by the unauthorized uninstalling and repairing by our company. The trouble is caused by using the rotor not equipped with this centrifuge. The trouble is caused by war, natural disasters or other irresistible factors. If you have any questions to consult during operation, or there are faults need repairing on the product, please contact us by or phone. We will reply your feedback in time. 41
42 Packing List Name Quantity Unit Remark Check 1 Main machine (LCD) 1 set 2 Swing rotor 4 750ml 1 pc 3 Adaptor 4 250ml 1 set Option of rotor Attached tool 6mm T-shaped inner hexagon spanner 1 pc Packing List 1 copy Attached file 12 Instruction Manual 1 copy 13 Qualified Certificate 1 copy 14 Inspector: Date: 42
43 Quality Certificate Product Name Tabletop High Speed Refrigerated Centrifuge Product Model H2050R Serial. This product is tested and qualified for delivery. Inspector: Date: 43
44 Warranty Card Name and Model Serial Number Filling in maintenance record under warranty Manufacturing Date Date Maintenance Content Service Engineer te: Please safekeep this card Date: Dec.,
45 Users Feedback Card Product Name Model Manufacturing Date Serial Number Purchasing Date User s name Signature and Stamping here Contact Address: Contact Person: Tel.: Fax: Suggestions and feedback on this product: 45
1580R User s Manual. Multi-Purpose, High Speed Centrifuge. Gyrozen Co., Ltd.
 Multi-Purpose, High Speed Centrifuge 1580R User s Manual Gyrozen Co., Ltd. B Station, 30-12 Gyeryong-ro 141-gil, Yuseoung-gu, Daejeon 305-301, Korea Tel: +82-42-719-8200 Fax: +82-42-826-9848 www.gyrozen.com
624R User s Manual. Compact Bench-Top Refrigerated Centrifuge
 Compact Bench-Top Refrigerated Centrifuge 624R User s Manual Manufacturer: GYROZEN Co., Ltd. 30-12 Gyeryong-ro 141beon-gil, Yuseong-gu, Daejeon 34187, Korea Tel: +82-42-719-8200 Fax: +82-42-826-9848 info@gyrozen.com
1236R User s Manual. Multi-Purpose, High Speed Centrifuge
 Multi-Purpose, High Speed Centrifuge 1236R User s Manual Manufacturer: GYROZEN Co., Ltd. 30-12 Gyeryong-ro 141beon-gil, Yuseong-gu, Daejeon, 34187, Korea Tel: +82-42-719-8200 Fax: +82-42-826-9848 info@gyrozen.com
Bio Lion Table Top Centrifuge XC-H165
 Bio Lion Table Top Centrifuge XC-H165 Operation Manual Table of contents Section Specification Page 1 Pictures Page 2-3 Starting Safety information Page 4 Set up Page 5-7 Operation Page 7-8 Troubleshooting
OPERATION & MAINTENANCE MANUAL FOR SCEN-206 LED & MULTI-FUNCTION TYPE CENTRIFUGE PLEASE READ THIS MANUAL CAREFULLY BEFORE OPERATION.
 OPERATION & MAINTENANCE MANUAL FOR SCEN-206 LED & MULTI-FUNCTION TYPE CENTRIFUGE PLEASE READ THIS MANUAL CAREFULLY BEFORE OPERATION. M.R.C.LTD. Hagavish 3 st. Israel 58817 Tel: 972 3 5595252, Fax: 972
Instruction Manual. Labnet Spectrafuge 16M Microcentrifuge
 Instruction Manual Labnet Spectrafuge 16M Microcentrifuge Labnet International PO Box 841 Woodbridge, NJ 07095 Phone: 732 417-0700 Fax: 732 417-1750 email: labnet@labnetlink.com Safety Precautions NEVER
Bio Lion Table Top Centrifuge XC-L5
 Bio Lion Table Top Centrifuge XC-L5 Operation Manual Table of contents Section Specification Page 1 Pictures Page 2-3 Starting Safety information Page 4 Set up Page 5-7 Operation Page 7-8 Troubleshooting
CONTENTS. 3 MAINTENANCE 3.1 Service and Maintenance Maintenance and cleaning Glass breakage Disinfection
 1 PRODUCT DESCRIPTION 1.1 Usage in accordance with safety standards 1.1.1 General Information 1.1.1.1 Hazards and precautions 1.1.1.2 Brief description 1.1.1.3 Safety standards 1.1.1.4 Included items 1.1.1.5
GLO GT416. Benchtop Centrifuge. User s Manual. Glotech Co., Ltd
 Benchtop Centrifuge GLO GT416 User s Manual Glotech Co., Ltd Contents 1. GLO GT416G Performance 2. Precautions 3. Technical Specifications 4. Installation 4 1. Delivery Checklist 4 2. Unpacking the Instrument
Ultra 5.0 Manufactured By Hanil Science Industrial Co., Ltd. In Korea
 INSTRUCTION MANUAL Ultra 5.0 Manufactured By In Korea 2 Ultra5.0 Instruction Manual Contents 1. Introduction 2. Note for Installation 3. Parts Description - Specifications - Caution - Safety Devices -
XCM12 Mini-Centrifuge
 Multi-speed Digital User Manual v. 1.0 C&A Scientific Disclaimer C & A Scientific owns the copyright of this user manual. No person shall reprint or distribute the contents of this user manual, including
BlueSpin Cryo. (Cat. No. BSD-CRYO)
") BlueLine Instruments for Electrophoresis INSTRUCTION MANUAL BlueSpin Cryo (Cat. No. BSD-CRYO) SERVA Electrophoresis GmbH - Carl-Benz-Str. 7 - D-69115 Heidelberg Phone +49-6221-138400, Fax +49-6221-1384010
BlueLine Instruments for Electrophoresis INSTRUCTION MANUAL BlueSpin Cryo (Cat. No. BSD-CRYO) SERVA Electrophoresis GmbH - Carl-Benz-Str. 7 - D-69115 Heidelberg Phone +49-6221-138400, Fax +49-6221-1384010
L550 Table-Top Low-Speed Large Capacity Centrifuge
 L550 Table-Top Low-Speed Large Capacity Centrifuge Operational Manual Madell Technology Corp. http://www.madelltech.com 1. Model and name: L550 Table-top low-speed large capacity centrifuge. 2. Application:
Operation Manual Supra R22
 Operation Manual Supra R22 High speed Centrifuge Copyright c 2017 Hanil Scientific Inc. All rights reserved. Contact Us If you have any questions, contact Hanil Scientific Inc. or place of purchase. info@ihanil.com
Multi-Purpose, High Speed Centrifuge 1248R/1580R User s Manual
 Multi-Purpose, High Speed Centrifuge 1248R/1580R User s Manual Gene Company Limited 8/F., Shell Industrial Building, 12 Lee Chung Street, Chai Wan, Hong Kong Tel:(852)-2896-6283 Fax:(852)-2515-9371 info@genehk.com
Model : LMHS-60 Please read this manual carefully before using the instrument Labnics Equipment
 HIGH SPEED CENTRIFUGES Instruction Manual Model : LMHS-60 Please read this manual carefully before using the instrument Labnics Equipment Before Installation The centrifuge can be damaged if connected
Centrifuge. Model XC-2000 Operating Manual
 Centrifuge Model XC-2000 Operating Manual Before using this product, please read this manual carefully to learn about the available features to obtain the best results of this equipment. Warning: To prevent
INSTRUCTION MANUAL. CAT Place Table Top Centrifuge
 1 INSTRUCTION MANUAL CAT. 72359-06 6-Place Table Top Centrifuge 2 CONTENTS IMPORTANT SAFETY GUIDELINES PLEASE READ BEFORE USE.. 3 SUPPLIED EQUIPMENT... 5 OPTIONAL ACCESSORIES... 5 SETUP... 5 UNPACKING...
On Line UPS. LUC 1000E / LUC 2000E / LUC 3000E User Manual
 On Line UPS LUC 1000E / LUC 2000E / LUC 3000E User Manual Save This Manual Please read this manual carefully prior to storage, installation, wiring, operation and maintenance of the UPS. This manual contains
INSTRUCTION MANUAL FOR BENCH TOP CENTRIFUGE Z 200 A
 INSTRUCTION MANUAL FOR BENCH TOP CENTRIFUGE Z 200 A Labnet International, Inc. PO Box 841 Woodbridge, NJ 07095 Phone: (732) 417-0700 Fax: (732) 417-1750 1 INDEX...Page 1. General Information 1.1 Precautions
Centrifuge. Model XC-1000 Operating Manual
 Centrifuge Model XC-1000 Operating Manual Before using this product, please read this manual carefully to learn about the available features to obtain the best results of this equipment. Warning: To prevent
INSTRUCTION MANUAL FOR THE CLINICAL 50 CENTRIFUGE
 INSTRUCTION MANUAL FOR THE CLINICAL 50 CENTRIFUGE 82013-800 January 2006 INDEX PAGE 1. General Information... 2 1.1 Description... 2 1.2 Safety precautions to be observed before operating the centrifuge...
OPERATING MANUAL. Mega 17R HIGH SPEED REFRIGERATED CENTRIFUGE HANIL SCIENCE INDUSTRIAL CO., LTD. PRINTED IN KOREA
 OPERATING MANUAL Mega 17R HIGH SPEED REFRIGERATED CENTRIFUGE HANIL SCIENCE INDUSTRIAL CO., LTD. PRINTED IN KOREA Mega17R OPERATING SPECIFICATION Mega 17R MAX RPM MAX RCF MAX CAPACITY SPEED DISPLAY 17,000
Operating Manual Cellspin
 Operating Manual Cellspin Clinical Centrifuge Date of Purchase Serial No. Place of purchase Copyright 2017 Hanil Scientific Inc. All rights reserved. Contact Us If you have and questions, contact Hanil
materials and workmanship for 2 years. Should the centrifuge require warranty or Phone: or Fax:
 WARRANTY The Drucker Company warranties that this centrifuge is free from defects in materials and workmanship for 2 years. Should the centrifuge require warranty or out-of-warranty service please contact:
OPERATIONS MANUAL. Mini Centrifuge Model MCF Certified
 OPERATIONS MANUAL Mini Centrifuge Model MCF-2360 Certified Contents 1. Safety 2 2. Introduction 7 3. Package Contents 7 4. Specifications 8 5. Features 8 6. Parts of the Mini Centrifuge 9 7. Installation
PV Generation System. Solar Charge Controller SPECIFICATION
 PV Generation System Solar Charge Controller SPECIFICATION Home application type Version: V5.0 Thank you very much for selecting our product! This manual offers important information and suggestions with
V1.0. Showven Technologies Co.,Ltd.
 V1.0 Showven Technologies Co.,Ltd. SONICBOOM TM SMOKEJET USER MANUAL Foreword Thanks for choosing SHOWVEN SONICBOOM TM SMOKEJET. Please read following manual carefully and completely before operating this
Active Controlled Cooling System
 Active Controlled Cooling System April 2011 3267 Progress Dr Orlando, FL 32826 www.apecor.com Preliminary www.apecor.com Table of Contents General Information... 3 Safety... 3 Introduction... 3 What s
Centrifuge Operator / Service Manual
 3000 Centrifuge Centrifuge Operator / Service Manual cat.# 26230 & 26231 The Q-sep 3000 centrifuge complies with all requirements of UL standard 3101 20, Can/CSA C22.2 No. 1010.1, and Can/CSA C22.2 No.
Model : LMHS-40 Please read this manual carefully before using the instrument Labnics Equipment
 HIGH SPEED CENTRIFUGES Instruction Manual Model : LMHS-40 Please read this manual carefully before using the instrument Labnics Equipment Table of Content CHAPTER CONTENT PAGE No. 1 Introduction 1 1.1
Simple design with easy-to-use features
 Simple design with easy-to-use features High Speed Refrigerated Centrifuge Model 7000 Compact High Speed Refrigerated Centrifuge Model 6000 Optional foot switch attachable for hands-free lid opening 2
 Low Speed Centrifuge www.labtron.com info@labtron.com Cyto-Low Speed Centrifuge LLS-A10 Cyto-low speed centrifuge has microprocessor controlled system with digital display to set RCF, speed and time required
Operation Manual. H6000 Series
 Operation Manual H6000 Series Foreword Thank you for purchasing s Incu-Mixer MP. This user manual contains all pertinent information concerning the function and operation of the instrument. In order to
CLEMENTS. Orbital 260 Benchtop Centrifuge. CEN V 50/60Hz. User Manual. Manual No. CEN Issue 5
 Orbital 260 Benchtop Centrifuge CEN 91800 240V 50/60Hz User Manual Manual No. CEN 91800 020 Issue 5 Safety Thank you for purchasing this Clements Orbital 260 Centrifuge For your safety it is imperative
10A / 15A / 20A Solar Charge Controller. PU1024 / PU1524 / PU2024 series INSTRUCTION MANUAL
 10A / 15A / 20A Solar Charge Controller PU1024 / PU1524 / PU2024 series INSTRUCTION MANUAL Dear Customer, Thank you very much for choosing our product. This manual contains important information about
CLEMENTS. Orbital 160 Benchtop Centrifuge. CEN V 50Hz. User Manual. Manual No. CEN Issue 4
 Orbital 160 Benchtop Centrifuge CEN 90200 240V 50Hz User Manual Manual No. CEN 90200 017 Issue 4 Safety Thank you for purchasing this Clements Orbital 160 Centrifuge For your safety it is imperative that
Rugged steel cabinet construction ensures quiet operation and long term reliability.
 1 LITER HIGH PERFORMANCE CENTRIFUGES Our 1 Liter High Performance Centrifuges are designed for a variety of medical, industrial, and scientific applications. Ventilated Models 5694 and 5695 and refrigerated
Large Capacity, High-Speed Centrifuge
 1736R Large Capacity, High-Speed Centrifuge High-Speed, Refrigerated Floor Centrifuge with space-saving compact design The 1736R, a multi-purpose, large capacity, floor-standing centrifuge designed for
1248/R, 1236R, 1580/R
 1248/R, 1236R, 1580/R Multi-Purpose, High-Speed Centrifuges Multi-Purpose, High-Speed Centrifuges 23 www.gyrozen.com Order & Inquiry +82-2-3452-7736 / info@gyrozen.com Multi-Purpose, High-Speed Centrifuges
SK-10. Features. Solar Charge Controller User Manual. Important Safety Information
 SK-10 Solar Charge Controller User Manual 12V/24V 10Amp Dear Users: Thank you for selecting our product. Please read this manual carefully before you use this product. This product is of cutting edge design,
USER MANUAL. IPS home inverters with UPS function. IPS home inverter manual
 USER MANUAL IPS home inverters with UPS function Suitable for UPS: - IPS300-SIN - IPS300-SIN-WM - IPS300-SIN-DC - IPS600-SIN - IPS600-SIN-WM - IPS600-SIN-DC - IPS1000-SIN - IPS1000-SIN-DC - IPS1600-SIN
Instruction Manual for Table Top Refrigerated Centrifuge Z 36 HK
 Instruction Manual for Table Top Refrigerated Centrifuge Z 36 HK CONTENTS 1 PRODUCT DESCRIPTION 2 OPERATION 3 MAINTENANCE 4 TROUBLE SHOOTING 1 PRODUCT DESCRIBTION 1.1 Usage in accordance with safety standards
Instruction Manual for the Revolutionary Science RS-200 RevSpin Microcentrifuge
 Instruction Manual for the Revolutionary Science RS-200 RevSpin Microcentrifuge REVOLUTIO NARY SCIENCE Manufacturer of Precision Laboratory Equipment Table of Contents Introduction 2 Recommended Safeguards
LS0512 Solar Charge Controller
 LandStar LS0512 Solar Charge Controller Nominal system voltage Maximum PV input voltage Nominal charge / discharge current 12VDC 35V 5A Contents 1 Important Safety Information... 1 2 General Information...
Operators Manual. Recirculating Chiller /06/08
 Operators Manual Recirculating Chiller 110-197 11/06/08 Table of Contents Section 1. General Information 1.1 Warranty 1.2 Unpacking 1.3 Package Contents 1.4 Description of the Recirculating Chiller 1.5
USER MANUAL. D2012 High Speed Mini Micro-Centrifuge SCILOGEX, LLC.
 USER MANUAL D2012 High Speed Mini Micro-Centrifuge SCILOGEX, LLC www.scilogex.com Before using centrifuge, please carefully read this user manual for efficient operation and safety. USER MANUAL Contents
DM1424 Hematocrit Centrifuge
 DM1424 Hematocrit Centrifuge SCILOGEX, LLC www.scilogex.com Before using centrifuge, please carefully read this user manual for efficient operation and safety. Contents Safety Reminder... 1 1. Specifications...
Dust cover. Plug. Outlet. Wire pole holder
 Thank you for choosingxtreme machine,baby -Mammoth (4 head), designing with double gear-driving, planetary grinding with four plates. The machine speed can reach 1800 rpm. Aluminum alloy gear box with
Micro. Centrifuges.
 Micro Centrifuges www.gyrozen.com Design Smart and sophisticated in design, GYROZEN Micro Centrifuges will transform the way you work. And they don t just work beautiful, they look beautiful. Operation
Instruction Manual for Table Top Centrifuge Z 366
 Instruction Manual for Table Top Centrifuge Z 366 CONTENTS 1 PRODUCT DESCRIPTION 2 OPERATION 3 MAINTENANCE 4 TROUBLE SHOOTING 1 PRODUCT DESCRIBTION 1.1 Usage in accordance with safety standards 1.1.1 General
Bio Lion CENTRIFUGES.
 Bio Lion CENTRIFUGES www.bio-lion.com Table of Contents Refrigerated High Speed Centrifuge Page 1-3 Refrigerated Low Speed Centrifuge Page 4 High Speed Centrifuges Page 5 - Page 8 Low Speed Centrifuges
DM0636 Multi-purpose Centrifuge
 DM0636 Multi-purpose Centrifuge Before using centrifuge, please carefully read this user manual for its efficient operation and safety. Contents Copyright:... 0 Safety Reminder... 1[ 1. Specifications...
BT403. A Geno Technology, Inc. (USA) brand name. BT-300 Power Supply. Cat. No. BT
 brand name. BT-300 Power Supply. Cat. No. BT") BT403 A Geno Technology, Inc. (USA) brand name BT-300 Power Supply Cat. No. BT403 1-800-628-7730 1-314-991-6034 info@btlabsystems.com WARNING... 3 SAFETY INFORMATION... 3 ENVIRONMENTAL CONDITIONS... 4
BT403 A Geno Technology, Inc. (USA) brand name BT-300 Power Supply Cat. No. BT403 1-800-628-7730 1-314-991-6034 info@btlabsystems.com WARNING... 3 SAFETY INFORMATION... 3 ENVIRONMENTAL CONDITIONS... 4
REFRIGERATED CENTRIFUGE. LRF-A1 Series
 REFRIGERATED CENTRIFUGE LRF-A1 Series www.labtron.com info@labtron.com Refrigerated Centrifuge LRF-A10 LRF-A10 is a microprocessor controlled floor standing refrigerated centrifuge having rpm speed. It
LCD Centrifuge MDCEN-302
 INSTRUCTION MANUAL FOR LCD Centrifuge MDCEN-0 PLEASE READ THIS MANUAL CAREFULLY BEFORE OPERATION, Hagavish st. Israel 58817 Tel: 97 55955, Fax: 97 559459 mrc@mrclab.com MRC.VER.0-10.10 (Ⅰ) SPECIFICATION
USER MANUAL. Blazer Vista 1000/1400/2000. Uninterruptible Power System
 USER MANUAL Blazer Vista 1000/1400/2000 Uninterruptible Power System IMPORTANT SAFETY INSTRUCTIONS SAVE THESE INSTRUCTIONS This manual contains important instructions for model Blazer Vista 1000/1400/2000
Outdoor UPS. User Manual. Contents. Please read carefully this manual before installing and using this product. 1 Introduction Safety...
 Contents 1 Introduction...1 2 Safety...4 3 Product Specifications...6 Outdoor UPS User Manual 4 Installation...8 4.1 Inspection...8 4.2 Installing the UPS Cabinet...8 4.3 Connecting the Power Supply...10
USER S MANUAL CONTENTS. Uninterruptible Power Supply 1. INTRODUCTION SAFTY INSTRUCTION SYSTEM DESCRIPTION... 4
 USER S MANUAL PowerWalker VFI 1000 / 3000VA CONTENTS 1. INTRODUCTION...... 1 2. SAFTY INSTRUCTION......... 2 3. SYSTEM DESCRIPTION......... 4 4. CABLE CONNECTION......... 7 5. OPERATION...... 8 6. TROUBLE
D3024 & D3024R High Speed (Refrigerated) Micro-Centrifuge DLAB Laboratory Instruments Limited
 Micro-Centrifuge DLAB Laboratory Instruments Limited") D3024 & D3024R High Speed (Refrigerated) Micro-Centrifuge DLAB Laboratory Instruments Limited Before using centrifuge, please carefully read this user manual for its efficient operation and safety. USER
D3024 & D3024R High Speed (Refrigerated) Micro-Centrifuge DLAB Laboratory Instruments Limited Before using centrifuge, please carefully read this user manual for its efficient operation and safety. USER
Operation Manual Cole-Parmer MPR16 Multipurpose Refrigerated and MP16 Multipurpose Ambient Centrifuges Models , -25, -50, -55
 Operation Manual Cole-Parmer MPR16 Multipurpose Refrigerated and MP16 Multipurpose Ambient Centrifuges Models 17406-20, -25, -50, -55 CE 1065z76_MAN_Rev.1 2016 Cole-Parmer Instrument Company, LLC Table
REFRIGERATED CENTRIFUGE. LRF-A2 Series
 REFRIGERATED CENTRIFUGE LRF-A2 Series www.labtron.com info@labtron.com Refrigerated Centrifuge LRF-A20 LRF-A21 is a microprocessor controlled low maintenance noiseless refrigerated centrifuge having flexible
Table of Contents Foreword I. Product Introduction II. Notice For Safety III. Main Technical Parameters IV.
 Foreword Thank you for choosing the LGK-ID IGBT Digital Air Plasma Cutter of Delixi (Hangzhou) Inverter Co., Ltd. Before use LGK-ID IGBT Digital Air Plasma Cutter, please carefully read this Manual to
Neofuge 13/13R. Laboratory Centrifuge. Applications. Heal Force leads you to healthier life
 Heal Force Life Science Instrument Neofuge 13/13R Laboratory Centrifuge Applications Pelleting DNA and RNA Pelleting of PCR amplified nucleic acids Antibody and protein precipitates Bacterial and yeast
USER MANUAL MPS 1-5KW SERIES
 USER MANUAL MPS 1-5KW SERIES Low Series Frequency Solar and Wind Power Charging Inverter CONTENTS 1 WWW.NEXTGENNRG.COM 1. Introduction... 3 2. Profile Structure 4 2.1. Working Principle 4 2.2.Product Features..5
Instructions For Use VATEA. Endodontic Irrigation Device
 Instructions For Use VATEA Endodontic Irrigation Device VATEA Irrigation System Instructions for use 1. Indications for use The VATEA system is intended to be attached to dental handpieces to deliver irrigation
MICRO CENTRIFUGES. Experts in Laboratory Equipment
 MICRO CENTRIFUGES Experts in Laboratory Equipment Contents 03 Features of GYROZEN Micro Centrifuges 04 Micro Centrifuge, mini 06 Micro Centrifuge, 1536 08 Refrigerated Micro Centrifuge, 1730R 10 Ordering
User Manual Rittal PMC UPS 6kVA
 User Manual Rittal PMC UPS 6kVA Germany Rittal GmbH & Co. KG Auf dem Stützelberg D-35745 Herborn Tel.: ++49-27 72-5 05-0 Fax: ++49-27 72-5 05-23 19 Internet: www.rittal.de 26 Contents 1. Introduction...
High Speed Micro-Centrifuge User manual
 High Speed Micro-Centrifuge User manual 400.003.205 Centrifuge Supplied With Rotor 400.003.221 (24 x 1.5ml/2ml) 400.003.210 Refrigerated with Rotor 400.003.221 24x1.5ml/2ml 400.003.220 Rotor 5ml x 18 400.003.221
Instruction Manual for Compact Centrifuge Z 206 A
 Instruction Manual for Compact Centrifuge Z 206 A Page 1 of 24 INSTRUCTION MANUAL Z 206 A HERMLE Labortechnik GmbH CONTENTS 1 PRODUCT DESCRIPTION 1.1 Usage in accordance with safety standards 1.1.1 General
D2012 & D2012 plus High Speed Mini Centrifuge
 D2012 & D2012 plus High Speed Mini Centrifuge DLAB Laboratory Instruments Limited USER MANUAL Before using centrifuge, please carefully read this user manual for its efficient operation and safety. Contents
Arm Fume Hood FHA-1. Operation Manual PLEASE READ THIS MANUAL CAREFULLY BEFORE OPERATION
 Arm Fume Hood FHA-1 Operation Manual PLEASE READ THIS MANUAL CAREFULLY BEFORE OPERATION Hagavish st. Israel 58817 Tel: 972 3 5595252, Fax: 972 3 5594529 mrc@mrclab.com MRC.9.16 Preface Dear users: Thank
User s Manual. Automatic Switch-Mode Battery Charger
 User s Manual Automatic Switch-Mode Battery Charger IMPORTANT Read, understand, and follow these safety rules and operating instructions before using this battery charger. Only authorized and trained service
User Manual Digital Energy Uninterruptible Power Supply ML Series UPS VA GE Digital Energy Power Quality
 GE Digital Energy Power Quality User Manual Digital Energy Uninterruptible Power Supply ML Series UPS 350-500-700-1000 VA GE imagination at work GB User Manual Digital Energy Uninterruptible Power Supply
ATOTH-G Series BLDC Motor Controller. User s Manual
 ATOTH-G Series BLDC Motor Controller User s Manual Contents Chapter One Summary...1 Chapter Two Main Features and Specifications.2 2.1 Basic Functions...2 2.2 Features... 5 2.3 Specifications...6 Chapter
SERIES OPERATION AND MAINTENANCE MANUAL
 SERIES OPERATION AND MAINTENANCE MANUAL This manual CONTAINS IMPORTANT WARNINGS, S and OTHER INSTRUCTIONS. Read and understand the instruction manual Carefully, before use and retain it for reference.
Three Lobes Roots Blower. Instruction Manual
 Three Lobes Roots Blower Instruction Manual Welcome to purchase the three lobes roots blower produced by us. You shall read this instruction manual seriously before you use this product in order to ensure
NANOPAC-300 & 500 Power Supply. Instruction manual NANOPAC-300 & NANOPAC-500
 NANOPAC-300 & 500 Power Supply Instruction manual NANOPAC-300 & NANOPAC-500 Version 01C Feb 5th, 2014 1 Packing list NANOPAC-300 or 500-1x NANOPAC-300 Power Supply or NANOPAC-500-1x Power Cord - 1x Instruction
Frontier TM Centrifuge FC5515 / FC5515R Instruction Manual
 Frontier TM Centrifuge FC555 / FC555R Instruction Manual Front and rear view of the centrifuge FC555 2 3 4 7 5 6 Figure. Front and rear view of the centrifuge FC555R 2 3 7 4 5 6 Figure.2 Centrifuge Lid
 www.labtron.com info@labtron.com Cyto-Low Speed Centrifuge LLS-A10 Cyto-low speed centrifuge has microprocessor controlled system with digital display to set RCF, speed and time required for the operations.
Operating manual UPS - System
 Operating manual UPS - System POWERMASTER M MIL 1000VA 7Min. BAX 3330 E UPS-Division Issued 15. August 2006 JOVYATLAS JOVYATLAS Elektrische Umformtechnik GmbH Groninger Straße 29-37 D-26789 Leer/Ostfriesland
NB NB 1511 NB NB 4031 TRUE ON-LINE DOUBLE CONVERSION UPS
 NB 0811 - NB 1511 NB 0831 - NB 4031 TRUE ON-LINE DOUBLE CONVERSION UPS LEN.MAN.UPS.069 Rev.2.00/2002 CONTENTS Safety Instructions 1 Introduction 3 2.1 FEATURE 3 2.2 UPS modules 4 How the UPS works 5 3.1
Operating Instructions ROTOFIX 32. Please enter the following details :: Stock no... Monitoring no... Location...
 Operating Instructions ROTOFIX 32 Please enter the following details :: Stock no.... Monitoring no.... Location... This operating instruction has to be used for the centrifuges bearing the following manufactoring
The VELOCITY Range BENCH TOP CENTRIFUGES
 A Brand of Precisa Gravimetrics AG Switzerland The VELOCITY Range BENCH TOP CENTRIFUGES Dynamica is the new benchmark for laboratory instrumentation. Utilizing Dynamica s extensive experience in marketing
6L Oil-less Air Compressor 53103
 6L Oil-less Air Compressor 53103 Operating Instructions Please read and save these instructions before attempting to assemble, install, operate or maintain the product. Protect yourself and others by observing
1236R // 1248R LOW. capacity. HIGH G-Force High g-force 25,910 x g for fast centrifugation and efficient separation FAST HIGH
 Centrifuges - From Simple Separation to Sequencing ScanSpeed... 1236R 1248// 1248R 1580//1580R...... MULTI Purpose High Speed Centrifuge with or without cooling... LOW NOISE LEVEL 54dBa with airflow damping
User Manual. Digital Energy Uninterruptible Power Supply ML Series UPS VA. GE Digital Energy Power Quality. GE imagination at work
 GE Digital Energy Power Quality User Manual Digital Energy Uninterruptible Power Supply ML Series UPS 350-500-700-1000 VA GE Consumer & Industrial SA General Electric Company CH 6595 Riazzino (Locarno)
Snapshot LX5 USER MANUAL. OK on Dimmer Outdoor OK Sound Activated DMX512 Master/Slave 115V/230V Switch Replaceable Fuse User Serviceable Duty Cycle
 LX5 Snapshot OK on Dimmer Outdoor OK Sound Activated DMX512 Master/Slave 115V/230V Switch Replaceable Fuse User Serviceable Duty Cycle USER MANUAL Chauvet, 5200 NW 108th Avenue, Sunrise, FL 33351 U.S.A.
DC TO AC POWER INVERTER PWRIC150012W INSTRUCTION MANUAL
 DC TO AC POWER INVERTER PWRIC150012W INSTRUCTION MANUAL SAVE THIS MANUAL You will need the manual for the safety warnings and precautions, assembly instructions, operating and maintenance procedures, parts
LS0512R Solar Light Controller
 LandStar LS0512R Solar Light Controller Nominal system voltage Maximum PV input voltage Nominal charge / discharge current 12VDC 35V 5A Contents 1 Important Safety Information... 1 2 General Information...
c-go 24V/6A 24V/8A 24V/12A
 c-go 24V/6A 24V/8A 24V/12A Battery charger GB Instruction manual 1 Index 1. Product description... 2 2. Safety advices... 3 3. Quick start guide... 4 4. Operation... 4 5. Problem solving... 6 6. Specifications...
Max. 22,000 rpm / 48,700 xg, full 3 liter capacity
 Max. 22,000 rpm / 48,700, full 3 liter capacity Easy-to-use Compact Design (only 50cm wide) Features 3 Liter Capacity 6 x 500mL bottles can be centrifuged at 12,090. Auto Interlock Lid To close lid Push
Beckman Coulter. GS-6 Series Centrifuges
 Beckman Coulter GS-6 Series Centrifuges In the Beckman Tradition, The GS-6 Centrifuge Sets the Standards. The GS-6 is available in both tabletop and kneewell design, making maximum use of our available
Z100A Clinical Centrifuge
 Z100A Clinical Centrifuge User Manual C0100-A Rev 2 August 2016 About This Manual This manual is designed to assist you in the optimal usage of your Labnet Z100A Clinical Centrifuge. The manual is available
Vetlab CombiSpin Centrifuge
 Vetlab CombiSpin Centrifuge User Manual 26.10.2017 Vetlab Supplies Ltd Unit 13 Broomers Hill Park Broomers Hill Lane Pulborough RH20 2RY Telephone: 01798 874567 Fax: 01798 874787 Email: info@vetlabsupplies.co.uk
LS1024BP/ LS2024BP. Solar Charge Controller USER MANUAL
 EPSOLAR LS1024BP/ LS2024BP Solar Charge Controller USER MANUAL Thank you very much for selecting our product! This manual offers important information and suggestions with respect to installation, use
PowerLink GW series Eddy Current Dynamometer User Manual
 PowerLink GW series Eddy Current Dynamometer User Manual XiangYi (Hong Kong) Power Testing Instrument Co. Ltd. 0 GW Series Eddy Current Dynamometer User Manual Transport, Storage, use of environmental
Lumitester PD-20 Control Kit
 日本語による取扱説明は 17 ページからとなります Lumitester PD-20 Control Kit Operation manual Thank you for purchasing the Lumitester PD-20 Control Kit. To use this kit safely and correctly, read this operation manual carefully
USER S MANUAL CONTENTS. Uninterruptible Power Supply 1. INTRODUCTION SAFTY INSTRUCTION CABLE CONNECTION... 4
 USER S MANUAL ON-LINE 1K/2K/3KVA CONTENTS 1. INTRODUCTION...... 1 2. SAFTY INSTRUCTION.......... 2 3. CABLE CONNECTION.......... 4 4. SYSTEM DESCRIPTION............ 5 5. UPS OPERATION...... 12 6. TROUBLE
PNL-MS Belt Conveyor with Metal Detector
 PNL-MS Belt Conveyor with Metal Detector Date: Apr, 2013 Version: Ver.B (English) Contents 1. General Description... 7 1.1 Coding Principle... 8 1.2 Features:... 8 1.2.1 Specifications Table... 10 1.2.2