INSTRUCTION MANUAL. Amadeus. Amadeus GT. Rev. IX
|
|
|
- Dwight Sims
- 5 years ago
- Views:
Transcription
1 INSTRUCTION MANUAL Amadeus Amadeus GT Rev. IX 1
2 Preliminary Before embarking on the relatively simple process of assembling the Amadeus, please take the time to fully read these instructions and follow the steps within. The old adage of "if all else fails read the instruction manual" needs to be applied from the onset. The Well Tempered Lab cannot be held responsible for consequences resulting from the failure to comprehend these instructions. If in doubt always consult with your dealer. The Well Tempered Lab s policy is the continuous improvements of its products. We therefore reserve the right of departure from illustration or specification that this might occasion. Contents Unpacking the Amadeus Pg 3 Assembly Pg 3 - Pg 4 Suspending the Tonearm Pg 4 - Pg 7 Installing the Platter Pg 8 - Pg 9 Installing the Belt Pg 9 Belt for Life Policy Pg 9 Fitting the Cartridge and Tonearm adjustments Pg 9 - Pg 10 Rear Panel Pg 11 Isolation Base Pg 11 Troubleshooting Pg 12 European Waste and Electrical and Electronic Directive Pg 12 Warranty and Service Pg 13 Registration Pg 13 2

 above plinth and tighten set screw. See Fig (1) Fig (1) 2. Install tonearm suspension pillar to approx 95mm (3.")
3 Unpacking the Amadeus We recommend the use of the white gloves provided when handling the plinth and platter assemblies. Take care that none of the fluids contaminate the finished surfaces of your Amadeus. The Amadeus packaging has been designed to protect it from the hazards of shipping. It is advisable to save it for further use. Assembly For ease of assembly we recommend a flat work surface, such as a table or bench. All necessary tools have been provided. 1. Install bearing cup in plinth adjust to approx 40mm (1.6in) above plinth and tighten set screw. See Fig (1) Fig (1) 2. Install tonearm suspension pillar to approx 95mm (3.8in) above plinth and tighten set screw. Complete with tonearm suspension rod. See Fig (2) Fig (2) 3

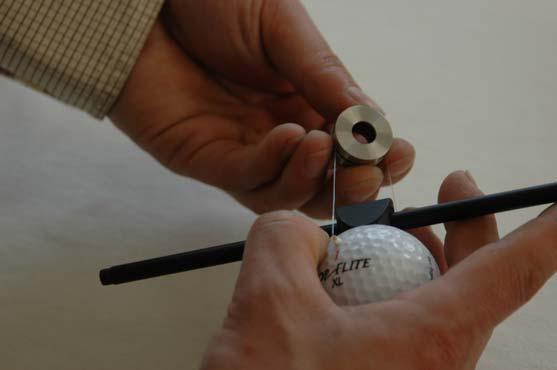
4 3. Install tonearm rest / lock in plinth approx 50mm (2in). See Fig (3) Fig (3) Suspending the Tonearm 1. Coarse azimuth adjustment if necessary can be achieved by rotating the tonearm within the golf ball. The Headshell should be parallel to the small nylon filament points. Correct bridle length when tonearm is suspended is 23mm from top of tonearm to bottom of suspension rod. See Fig (4) Fig (4) 2. With a small amount of care take tonearm and apply 2 turns of the nylon suspension from the golf ball around the azimuth adjustment collar install on rod, with 1/2 twist anti clockwise to apply "antiskate". See Fig (5) - (11) 4
")
5 Fig (5) Fig (6) Fig (7) 5
 Fig (10)")
6 Fig (8) Fig (9) Fig (10) 6

7 Fig (11) 5. Adjust pillar, rod and azimuth collar to allow golf ball to float central of bearing cup. Note: All the above adjustments can be fine tuned when cartridge is installed. Fit tonearm connector to socket making sure that the connector "locks" in place, failure to ensure this connector is firmly locked may result in a loss of signal on either channel. See Fig (12) Fig (12) 7
 - (14).")

8 Installing the Platter Fill spindle bearing with synthetic oil supplied to the level of approximately 10 to 15mm (1/2 in) below the upper Teflon spindle bearing. Over-filling the bearing will cause the oil to overflow the bearing housing when the platter spindle is lowered into the bearing housing. Gently lower platter into bearing. See Fig (13) - (14). It is most important that spindle is located correctly in the centre of the lower thrust bearing. Failure to locate the pivot point of the spindle correctly will cause the platter to rotate abnormally. The spindle has been designed to protrude through the platter to provide a central lifting point that enables the user to easily achieve this. Note: The zero clearance Well Tempered bearing can rotate for hours without oil. If you wish, you can complete other adjustments before applying the bearing oil. See Fig (15) Fig (13) Fig (14) Speed Control Speed change is effected by manual movement of the belt on the pulley RPM on the small diameter step on the pulley, 45 RPM on the larger diameter step on the pulley. 8
9 Fig (15) Installing the Belt Start with the belt around the motor pulley, take care the other end clears the centre spindle and rotate the platter, the belt will track around the platter. See Fig (16) Well Tempered belts if dropped are easily misplaced, we give you two but suggest you place the belt on something dark to make it easily seen. Fig (16) Belt for life The Well Tempered Lab offer a "belt for life policy" just send a self addressed envelope with stamp to your distributor or dealer for replacement. Fitting the Cartridge and Tonearm adjustments 1. We recommend fitting the cartridge with the tone arm in position. However it is possible to fit the cartridge before suspending the tone arm (see Fig 17). Great care needs to be taken when installing the cartridge as the Well Tempered Lab bears no responsibility for cartridge damage. 2. Install the cartridge to the manufacturer s specifications. The Amadeus features a head shell that requires no tracking alignment adjustment. Although we strongly recommend it remains firmly fixed in the correct position as supplied, for those who must experiment it can be gently loosened and retightened. 9
 4.")
10 3. The Amadeus tonearm has an effective length of 10.5 (267 mm). The headshell is fixed exfactory in the optimum position. There is no provision for over-hang adjustment. Some alignment protractors may well disagree. However, The Well Tempered Lab stands by their convictions. Fig (17) 4. There is an optional finger lift provided which can be attached to the cartridge fixing screw, adjacent to the right hand side of the plinth. 5. Apply damping fluid into bearing cup to approx halfway up golf ball. See Fig (18) Note: Damping can be altered by simply raising or lowering the damping cup, it is not critical and maybe adjusted to suit the listener s own preference. 6. Adjust tonearm for correct VTA by set screw on suspension pillar. 7. Set tracking force with stylus gauge, supplied to cartridge manufacturer s specification. 8. Correct Azimuth can be obtained by gently rotating the azimuth adjustment collar to allow the cartridge to track parallel to the record surface. This can be achieved whilst the record is rotating and requires only minor correction in both directions to achieve the correct result. Fig (18) 10

11 Rear Panel Earth screw and phono sockets colour coded and clearly marked are on the rear panel See Fig (19). Speed adjustment is also available on this panel. Connection for the AC adaptor is on this panel and clearly marked. Plug it in, you are ready to go. Enjoy! Fig (19) DC Power Supply We recommend a power supply with a maximum output of 12V and not less than 7V, with a minimum of 100mA, centre pin positive Isolation Base For the optimum performance from the Amadeus we recommend the use of the Isolation base and four proprietary feet. Feet should be placed within the outer extremities on the underside of the four corners of the base. 11

12 Troubleshooting 1. In the unlikely event that you wish to remove the tonearm, the golf ball can be lifted clear of the fluid, and left to drain. Surplus fluids may then be wiped from the golf ball with a paper towel. 2. Rubbing alcohol of 70% or above proof will remove all traces of fluid. All paper towels must be immediately discarded in a suitable receptacle. We also have it on good authority that Vodka of the highest proof can be pressed into service if rubbing alcohol is unavailable. Our chief designer also uses Ronsonol brand cigarette lighter fluid with excellent results. This is also known in some countries as white spirits or white gas. We suggest you first try cleaning fluid with caution and or the underside of the plinth. The Well Tempered Lab can bear no responsibility for damage caused by cleaning fluid. 3. Well Tempered Lab belts are easily lost. We recommend placing or hanging on a dark background, when not on the turntable. 4. For cartridges without threaded fixing holes we find it most convenient to attach the cartridge to the head shell in the slot closest to the platter. The other screw with the optional finger lift attached can then be passed through the head shell and remaining cartridge hole. A small "popsicle" stick or similar with a piece of double backed sticky tape on the end is invaluable. Just place the remaining cartridge nut on the tape at the end of the stick under the protruding screw and tighten. 5. The Amadeus motor has bearing tolerances that cause it to be noisy without the load of the belt and platter. It is sometimes possible during transit for the motor to shift within the isolating rubber mounting and vibrate against the motor mounting cover. This is easily remedied by gently moving the motor clear of the mounting cover plate. 6. If the platter rotates abnormally, please refer to page 8 Installing the Platter to centre the spindle. 7. Early Amadeus models were supplied with a vinyl coated foam plastic matt. Unfortunately, we could not guarantee the consistency of this material. After many hours and almost as many variables of matt materials we have concluded that the current version suits our design and sounds excellent. 8. Important: For optimum performance Well Tempered turntables require to operate on a flat and level surface. The European Waste Electrical and Electronic Directive This product can be recycled. Products bearing this symbol must NOT be thrown away with normal household waste. At the end of the product's life, take it to a collection point designated for recycling of electrical and electronic devices. Find out more about return and collection points through your local authority. The European Waste Electrical and Electronic (WEEE) Directive was implemented to dramatically reduce the amount of waste going to landfills, there by reducing the environmental impact on the planet and on human health. Please act responsibly by recycling used products. If this product is still useable, consider giving it away or selling it. 12

13 WARRANTY & SERVICE Valid on completion of warranty card and confirmed date or purchase. Details can be registered at thewelltemperedlab.net This Well Tempered Lab product is warranted against defects in material and workmanship for one year from date of purchase. This warranty does not cover normal wear and tear and is void if the Well Tempered product has been subject to mis-use, accident or negligence or if it has been tampered with or modified in anyway. Spillage of any fluids supplied by the Well Tempered Lab is not covered within the scope of this warranty. Warranty is restricted to the territory in which the product was purchased. Our distributors and dealers are under contractual obligation to service under warranty products only sold through them. They are entitled to make a non refundable charge for service to products purchased outside the territory if required. Claims Under This Warranty The product should be returned to the dealer or nearest Well Tempered distributor, complete with warranty card and confirmed date of purchase. Note special care is required with the fluids and the Well Tempered Lab and its agents can bear no responsibility for spillage or damage caused by incorrect handling and packaging of the fluids. REGISTRATION CARD Name Address City State Zip Telephone Model Serial Number Purchase Date Dealer 13
PRELIMINARY INSTRUCTION MANUAL. Simplex. Rev. April 10
 PRELIMINARY INSTRUCTION MANUAL Simplex Rev. April 10 1 Preliminary Simplex: Nothing could be simpler, yet we strongly recommend thoroughly reviewing this manual before embarking on assembling and playing
INSTRUCTION MANUAL LTD
 INSTRUCTION MANUAL LTD Rev. March 2014 1 Description The Well Tempered Lab LTD Tonearm is a stand alone refined version of our Amadeus and Simplex tonearms that are only available on Well Tempered Lab
Dynavector DV507MKII Tonearm. Instruction Manual
 Dynavector DV507MKII Tonearm Instruction Manual 1. Introduction DV507MKII Instruction Manual Thank you for your purchase of the DV-507MKII tonearm. DV507MKII is a high-performance tonearm with many advanced
European Audio Team INSTRUCTIONS FOR USE. E.A.T. C-Major
 European Audio Team INSTRUCTIONS FOR USE E.A.T. C-Major Dear Music Lover, Welcome! Congratulations on your purchase of our E.A.T. C-Major turntable. Your E.A.T. C-Major was handcrafted by our skilled technicians
European Audio Team INSTRUCTIONS FOR USE. E.A.T. C-Sharp
 European Audio Team INSTRUCTIONS FOR USE E.A.T. C-Sharp Dear Music Lover, Welcome! Congratulations on your purchase of our E.A.T. C-Sharp turntable. Your E.A.T. C-Sharp was handcrafted by our skilled technicians
European Audio Team INSTRUCTIONS FOR USE. E.A.T. E-Flat
 European Audio Team INSTRUCTIONS FOR USE E.A.T. E-Flat Dear Music Lover, Welcome! Congratulations on your purchase of our E.A.T. E-Flat turntable. Your E.A.T. E-Flat was handcrafted by our skilled technicians
Opera Audio products are based on a simple philosophy: The component shall reproduce the original musical sound, purely and naturally.
 air-1 Turntable User Guide Congratulations on your new CONSONANCE! Opera Audio products are based on a simple philosophy: The component shall reproduce the original musical sound, purely and naturally.
EuroAudioteam, s.r.o. INSTRUCTIONS FOR USE. EAT Forte S
 EuroAudioteam, s.r.o. INSTRUCTIONS FOR USE EAT Forte S Dear Music Lover, Welcome! Congratulations on your purchase of our EAT Forte S turntable. Your EAT Forte S was hand-crafted by our team of skilled
INSTRUCTIONS FOR USE Pro-Ject SIGNATURE 10
 INSTRUCTIONS FOR USE Pro-Ject SIGNATURE 10 Dear Music Lover, thank you for purchasing a Pro-Ject Audio System s record player. In order to achieve maximum performance and reliability with this record player
JMW 10 AND 12 Tonearms
 JMW 10 AND 12 Tonearms Setup and Instruction Manual VPI INDUSTRIES INC., 77 CLIFFWOOD AVE #3B, CLIFFWOOD NJ 07721 PHONE: 732-583-6895, FAX: 732-946-8578 www.vpiindustries.com BEFORE YOU BEGIN NOT FOLLOWING
INSTRUCTION MANUAL NAIM SLIDE Warranty
 V 1.2E INSTRUCTION MANUAL NAIM SLIDE Warranty Register your product at: www.avidhifi.com/register.htm Table of Contents Section Page Preface 3 Introduction 3 Packaging 3 Parts Checklist 3 Servicing 3 Cleaning
KUZMA STOGI S TONEARM ( with Stabi S turntable and cartridge) Instruction manual
 Instruction manual") KUZMA STOGI S TONEARM ( with Stabi S turntable and cartridge) Instruction manual 1 KUZMA LTD INSTRUCTION MANUAL FOR STOGI S tonearm The Stogi S tonearm is a very precisely engineered piece of equipment.
KUZMA STOGI S TONEARM ( with Stabi S turntable and cartridge) Instruction manual 1 KUZMA LTD INSTRUCTION MANUAL FOR STOGI S tonearm The Stogi S tonearm is a very precisely engineered piece of equipment.
KUZMA STABI R TURNTABLE (supplied without arm ) S/N Instruction manual
 S/N Instruction manual") KUZMA STABI R TURNTABLE (supplied without arm ) S/N.. 2018-09 Instruction manual 1 KUZMA LTD INSTRUCTION MANUAL FOR STABI R turntable The Stabi R turntable is a very precisely engineered piece of equipment.
KUZMA STABI R TURNTABLE (supplied without arm ) S/N.. 2018-09 Instruction manual 1 KUZMA LTD INSTRUCTION MANUAL FOR STABI R turntable The Stabi R turntable is a very precisely engineered piece of equipment.
INSTRUCTIONS FOR USE Pro-Ject Signature 12
 INSTRUCTIONS FOR USE Pro-Ject Signature 12 pic Controls, features and connections 1 Platter 2 Platter shaft 3 Drive pulley 4 Drive belt 5 Idler pulley shaft 6 Idler pulley 7 Platter belt 8 Transport screws
GOLDMUND ST4 TURNTABLE
 GOLDMUND ST4 TURNTABLE USER MANUAL WARNING! This high quality turntable possess new technical features which are necessary for an accurate tracking of the today's records. Only a careful use can provide
Tradition verpflichtet. User manual. High-end Belt Drive
 Tradition verpflichtet User manual Turntable PE 4040 High-end Belt Drive PE 2525 BELT DRIVE - MADE IN GERMANY CONTENTS: 1. SAFETY INFORMATION... 3 2. UNPACKING...4 3. SET-UP and ASSEMBLY... 5 4. CONNECTIONS...7
KUZMA STABI XL TURNTABLE (with Air line tonearm) Instruction manual
 Instruction manual") KUZMA STABI XL TURNTABLE (with Air line tonearm) Instruction manual 1 KUZMA LTD INSTRUCTION MANUAL FOR STABI XL turntable The Stabi XL turntable is a very precisely engineered piece of equipment. However
KUZMA STABI XL TURNTABLE (with Air line tonearm) Instruction manual 1 KUZMA LTD INSTRUCTION MANUAL FOR STABI XL turntable The Stabi XL turntable is a very precisely engineered piece of equipment. However
The best pick-up arm in the world INSTRUCTIONS SERIES M2 MODELS M
 The best pick-up arm in the world INSTRUCTIONS SERIES M2 MODELS M2-9-10-12 Introduction The Series M2 embraces three models the M2-9, M2-10 and M2-12 offering pivot to stylus dimensions covering virtually
KUZMA STABI S PS AC TURNTABLE (on photo with Stogi S tonearm and clamp).. Instruction manual
.. Instruction manual") KUZMA STABI S PS AC TURNTABLE (on photo with Stogi S tonearm and clamp).. Instruction manual 2016-10 1 KUZMA LTD INSTRUCTION MANUAL FOR STABI S PS AC turntable The Stabi S PS AC turntable is a very precisely
KUZMA STABI S PS AC TURNTABLE (on photo with Stogi S tonearm and clamp).. Instruction manual 2016-10 1 KUZMA LTD INSTRUCTION MANUAL FOR STABI S PS AC turntable The Stabi S PS AC turntable is a very precisely
INSTRUCTIONS FOR USE Ortofon Century
 INSTRUCTIONS FOR USE Ortofon Century 2 Ortofon Century 100 year jubilee edition turntable Controls, features and connections (1) MAIN PLATTER WITH PRO-JECT LEATHER IT (2) CHASSIS (3) RECORD CLAMP (4) SPEED
INSTRUCTION MANUAL DIVA II SP.
 V1.2E INSTRUCTION MANUAL DIVA II SP Extended 5-Year Warranty AVID is pleased to extend the normal warranty duration to 5-Years from the date of original shipping. This warranty is transferable in the unlikely
THE HR-X RIM DRIVE REFERENCE TURNTABLE & JMW-12.7 TONEARM
 THE HR-X RIM DRIVE REFERENCE TURNTABLE & JMW-12.7 TONEARM SETUP AND INSTRUCTION MANUAL IMPORTANT NEW INFORMATION: THE ACCURACY AND SOUND OF THE RIM DRIVE IS VERY DEPENDENT ON THE PERFECT ROUNDNESS OF THE
THE TNT HR-X REFERENCE TURNTABLE & TONEARM
 THE TNT HR-X REFERENCE TURNTABLE & TONEARM SETUP AND INSTRUCTION MANUAL VPI INDUSTRIES INC., 77 CLIFFWOOD AVE #3B, CLIFFWOOD N.J. 07721 PHONE: 732-583-6895, FAX: 732-946-8578 www.vpiindustries.com 1 HOW
KUZMA STABI S12 TURNTABLE
 KUZMA STABI S12 TURNTABLE Instruction manual 2009-7 1 KUZMA LTD INSTRUCTION MANUAL FOR STABI S12 turntable The Stabi S12 turntable is a very precisely engineered piece of equipment. The construction, however,
28W WORK LAMP Model: CTL28 Part No:
 28W WORK LAMP Model: CTL28 Part No: 4002905 INSTRUCTION MANUAL GC0609 INTRODUCTION Thank you for purchasing this CLARKE 28W Work Lamp. Before attempting to use the product, it is essential that you read
INSTRUCTIONS FOR USE
 INSTRUCTIONS FOR USE Thank you for purchasing the Musical Fidelity M1 turntable system. The M1 is made from very well finished top quality materials, and used properly and carefully will give you many,
VPI Classic 3 Turntable Setup and Instruction Manual
 VPI Classic 3 Turntable Setup and Instruction Manual VPI Industries, Inc., 77 Cliffwood Ave. #3B, Cliffwood, NJ 07721 Phone: 732-583-6895, Email: Sales@vpiindustries.com http://www.vpiindustries.com Important:
User Manual SPOTTING SCOPE X 60
 User Manual SPOTTING SCOPE 20-60 X 60 Scope of delivery / Parts of device A 1 2 4 3 B 6 7 5 9 8 WARNING! WARNING! Keep plastic films and bags well away from babies and small children. They present a risk
OPERATION & MAINTENANCE INSTRUCTIONS
 400W SUBMERSIBLE PUMP WITH FOLDING BASE AND FLOAT SWITCH MODEL NO: PSV6A PART NO: 7230695 OPERATION & MAINTENANCE INSTRUCTIONS LS0315 INTRODUCTION Thank you for purchasing this CLARKE 400W Submersible
HALOGEN FLOODLIGHTS Models CHL1260C & 1260T Part Nos: &
 HALOGEN FLOODLIGHTS Models CHL1260C & 1260T Part Nos: 5460600 & 5460595 OPERATING & MAINTENANCE INSTRUCTIONS GC0610 INTRODUCTION Thank you for purchasing this CLARKE Halogen Floodlight. Before attempting
Series Five arms. Audiomods tonearm setup. Unpacking the arm. Mounting the arm. Contents. Mounting the cartridge
 Series Five arms Audiomods tonearm setup Unpacking the arm The arm is packed fixed onto the centre partition of the box. To release it, loosen the brass locking nut and slide the arm upwards. Counterweights
music hall mmf-5.1 INSTRUCTION MANUAL
 music hall mmf-5.1 INSTRUCTION MANUAL music hall http://www.musichallaudio.com august 2007 CONGRATULATIONS ON YOUR PURCHASE You have selected an exceptional turntable. Each component used in the construction
Pontoon and Tri-Toon Bunk Assembly Instructions
 Pontoon and Tri-Toon Bunk Assembly Instructions INTRODUCTION The Starr line of Boat Lift Canopy Frames by Great Lakes Entry Systems has been engineered to provide the best possible performance, long term
BX7322 Adventurer Tow Bar Operator Manual & Installation Instructions
 Please visit www.blueox.com for the latest version of these installation instructions. BX7322 Operator Manual & Installation Instructions Serial Number (5,000 lb) 2 Inch Coupler 292-1263 Rev J Page 1 of
Eazipole Cordless. Installation & Set Up Instructions. Electric Blinds & Curtains
 Eazipole Cordless Installation & Set Up Instructions Electric Blinds & Curtains Pole Installation - Deciding The Best Position Points to consider when planning the installation of your pole It may be easiest
KAT d. o. o. Kuzma Audio Trade Hotemaže 17 a 4205 PREDDVOR SLOVENIA tel fax
 S T A B I T U R N T A B L E instruction manual KAT d. o. o. Kuzma Audio Trade Hotemaže 17 a 4205 PREDDVOR SLOVENIA tel. 386 4 2535450 fax 386 4 2535454 CONTENTS I. GENERAL DESCRIPTION 3 SPECIFICATIONS
Uplift Premium Power Lifting Seat
 Uplift Premium Power Lifting Seat User Guide Read all instructions before using the Uplift Power Seat DANGER - To reduce the risk of electric shock: IMPORTANT SAFETY INSTRUCTIONS Always unplug the Uplift
WARNING. Instructions for Guidelights and Chargers. How SnapPower Products Work
 Instructions for Guidelights and Chargers WARNING Failure to turn OFF electrical power prior to installing or removing the Guidelight or Charger can result in electrical shock, fires, and/or death. www.snappower.com
VPI Classic Turntable Manual
 VPI Classic Turntable Manual Setup and Instruction Manual VPI Industries, Inc., 77 Cliffwood Ave. #5D, Cliffwood, NJ 07721 http://www.vpiindustries.com Classic Turntable Packing List Serial #: Classic
Eazidraw Cordless. Installation & Set Up Instructions. Electric Blinds & Curtains
 Eazidraw Cordless Installation & Set Up Instructions Electric Blinds & Curtains Features Quiet, DC battery motor with low power consumption. Rechargeable battery with up to 500 uses between charges Fully
KUZMA STABI XL DC Turntable Instruction manual
 KUZMA STABI XL DC Turntable Instruction manual 2015-03 1 KUZMA LTD INSTRUCTION MANUAL FOR STABI XL DC turntable The Stabi XL DC turntable is a very precisely engineered piece of equipment. However the
Assembly and User Manual
 Champion LEVEL 1 Assembly and User Manual Page 1 clearaudio electronic GmbH 2006 DEAR AUDIO ENTHUSIAST Thank you for your decision to purchase a clearaudio Champion Level 1 turntable. This turntable is
BX7322 Adventurer Tow Bar Operator Manual & Installation Instructions
 Please visit www.blueox.com for the latest version of these installation instructions. BX7322 Operator Manual & Installation Instructions Serial Number (5,000 lb) 2 Inch Coupler 292-1263 Rev J Page 1 of
The EFL 2000/1 & 2 User Guide Test Sieve Shaker. Contents
 The EFL 2000/1 & 2 User Guide Test Sieve Shaker ISSUE 04-02 Contents Description Page 1 Setting Up: 2-8 Unpacking 2 Assembly 3 Clamping Assembly 4 Electrical Connections 5 Sieve Stacking 6 8 Operating
VPI Classic Signature Turntable Manual
 VPI Classic Signature Turntable Manual Setup and Instruction Manual VPI Industries, Inc., 77 Cliffwood Ave. #5D, Cliffwood, NJ 07721 http://www.vpiindustries.com Classic Signature Turntable Packing List
INSTALLATION AND OWNER S MANUAL MODEL ASW Actuator Swing Gate Operator
 INSTALLATION AND OWNER S MANUAL MODEL ASW Actuator Swing Gate Operator Serial #: Date Installed: Your Dealer: READ THIS MANUAL CAREFULLY BEFORE INSTALLATION OR USE. SAVE THESE INSTRUCTIONS. Introduction
BX Jeep Liberty Renegade 2012 Jeep Liberty Sport Installation Instructions
 Attachment Tab Height: 17.5 Attachment Tab Width: 24 Serial Number Please read BOTH these and the General Instructions prior to installing or operating this equipment. 1. Blue Ox towing products and accessories
C 558 Turntable. Owner s Manual ENGLISH PORTUGUÊS ESPAÑOL FRANÇAIS ITALIANO DEUTSCH NEDERLANDS SVENSKA РУССКИЙ
 C 558 Turntable РУССКИЙ ENGLISH DEUTSCH NEDERLANDS SVENSKA ITALIANO PORTUGUÊS ESPAÑOL FRANÇAIS Owner s Manual IMPORTANT SAFETY INSTRUCTIONS ENGLISH PORTUGUÊS FRANÇAIS ESPAÑOL ITALIANO DEUTSCH NEDERLANDS
Viking Use/Installation Guide
 Viking Use/Installation Guide Viking Range Corporation 111 Front Street Greenwood, Mississippi 38930 USA (662) 455-1200 For product information, call 1-888-VIKING1 (845-4641) or visit the Viking Web site
02OWNER S MANUAL 06 TROUBLESHOOTING 08LIMITED WARRANTY
 02OWNER S MANUAL 06 TROUBLESHOOTING 08LIMITED WARRANTY Owner s manual Introduction Thank you for choosing Scansonic loudspeakers, we hope they will bring you many years of enjoyment. Please read this manual
Canopy Frame Assembly Instructions
 Canopy Frame Assembly Instructions 14 Foot // 22 Foot // 24 Foot // 26 Foot // 28 Foot // 30 Foot // 32 Foot INTRODUCTION The Starr line of Boat Lift Canopy Frames by Great Lakes Entry Systems has been
ELECTRICAL. Moisture Meter User Guide
 ELECTRICAL Moisture Meter User Guide Contents 1. 2-3. Welcome Section General Information & Safety Instructions 4. 5. Contents & Features General Layout 6. 7. Setting Up Installing The Battery Turning
Geotech Hand Pump. Installation Guide. Rev. 2 6/18/02 Part #
 Geotech Hand Pump Installation Guide Rev. 2 6/18/02 Part #87500003 TABLE OF CONTENTS CHAPTER 1: SYSTEM DESCRIPTION... 4 FUNCTION AND THEORY... 4 CHAPTER 2: SYSTEM OPERATION... 5 SIPHONING PROCEDURE...
Certus Model 460 Turntable Manual. 25-Jun-2007
 Certus Model 460 Turntable Manual 25-Jun-2007 I. Bearing Assembly The Teres bearing was designed to have a lot of viscous damping. This damping helps swamp the effects of stylus drag, resulting in better
HONDA RIDGELINE INSTALLATION INSTRUCTIONS. (866) RETRACTABLE TRUCK BED COVERS TABLE OF CONTENTS SWH2-1610
 RETRACTABLE TRUCK BED COVERS TABLE OF CONTENTS SWH2-1610") RETRACTABLE TRUCK BED COVERS HONDA RIDGELINE INSTALLATION INSTRUCTIONS TABLE OF CONTENTS SWH2-1610 (866) 338-3697 www.paceedwards.com Pace Edwards Company 2400 Commercial Blvd. Centralia WA 98531 Tools
RETRACTABLE TRUCK BED COVERS HONDA RIDGELINE INSTALLATION INSTRUCTIONS TABLE OF CONTENTS SWH2-1610 (866) 338-3697 www.paceedwards.com Pace Edwards Company 2400 Commercial Blvd. Centralia WA 98531 Tools
Solar-on-Demand Birdbath / Fountain. * Styles may vary but assembly will be consistent with this manual. Fountain Heads. Warnings
 Solar-on-Demand Birdbath / Fountain * Styles may vary but assembly will be consistent with this manual Birdbath & Metal Stand with Ring Birdbath & Metal Stand with Bolts Birdbath 2-Tier Fountain Fountain
Use/Installation Guide
 Use/Installation Guide 5 Series Outdoor Gas Grill Carts IMPORTANT: PLEASE READ AND FOLLOW 1. Before beginning, please read these instructions completely and carefully. 2. Do not remove permanently affixed
OPERATION & MAINTENANCE INSTRUCTIONS
 750W SUBMERSIBLE PUMP WITH BUILT-IN FLOAT SWITCH MODEL NO: PSV5A PART NO: 7236046 OPERATION & MAINTENANCE INSTRUCTIONS ORIGINAL INSTRUCTIONS LS0917 iss 3 INTRODUCTION Thank you for purchasing this CLARKE
The MCS III system can only be assembled on Nolan helmets pre-set for N-Com.
 EN EN MCS III SAFETY AND INSTRUCTIONS FOR USE Congratulations on your purchase of an N-Com product. The N-Com MCS III was built adopting the latest technologies and the best materials. Long tests and thorough
15,000kg HYDRAULIC BOTTLE JACK
 Product Code: 2013 OWNER S MANUAL PRODUCT CODE: 2013 15,000kg HYDRAULIC BOTTLE JACK Lifting Capacity 15,000kg Max. Lifting Height 447mm Min. Lifting Height 227mm Hydraulic Lift 125mm Screw Adjustment 70mm
GLOSS WALL BATH SET PRODUCT CODE: FINISH: GS783 CHR CHROME CONTEMPORARY DESIGN PHOENIX WARRANTY STYLISH PREMIUM CHROME FINISH MATCH WITH...
 GLOSS WALL BATH SET PRODUCT CODE: FINISH: GS783 CHR CHROME STYLISH PREMIUM CHROME FINISH CONTEMPORARY DESIGN PHOENIX WARRANTY MATCH WITH... TECHNICAL SPECIFICATIONS CONSUMER INFORMATION RANGE: GLOSS PRODUCT:
BATTERYLESS JUMP STARTER CAPACITOR INSTRUCTION MANUAL. W 2 AFTER SALES SUPPORT
 CAPACITOR BATTERYLESS JUMP STARTER Suitable for vehicles up to: 5L Petrol and 3L Diesel INSTRUCTION MANUAL AFTER SALES SUPPORT AUS 1300 883 104 W 2 www.4x4tough.com.au sales@4x4tough.com.au MODEL: 17-031000
IN THE BOX. 6. Power Cord. 1. StudioDeck Turntable. 2. Dustcover. 7. Counterweight. 8. Additional Parts Hex Wrench (2) Anti-skate Weight Stylus Brush
 Anti-skate Weight Stylus Brush") 2 1 3 4 IN THE BOX 1. StudioDeck Turntable 6. Power Cord 5 6 7 2. Dustcover 7. Counterweight 3. Delrin Platter 4. Platter Belt 5. RCA Interconnects 8. Additional Parts Hex Wrench (2) Anti-skate Weight
2 1 3 4 IN THE BOX 1. StudioDeck Turntable 6. Power Cord 5 6 7 2. Dustcover 7. Counterweight 3. Delrin Platter 4. Platter Belt 5. RCA Interconnects 8. Additional Parts Hex Wrench (2) Anti-skate Weight
250W PUDDLE PUMP WITH AUTO SENSOR MODEL NO: PSP105
 250W PUDDLE PUMP WITH AUTO SENSOR MODEL NO: PSP105 PART NO: 7230693 OPERATION & MAINTENANCE INSTRUCTIONS ORIGINAL INSTRUCTIONS LS0917 -- iss 3 INTRODUCTION Thank you for purchasing this CLARKE 250W Puddle
ELECTRICAL. Laser Distance Measure User Guide
 ELECTRICAL Laser Distance Measure User Guide Contents 1. 2-3. Welcome Section General Information & Safety Instructions 4. 5-6. Contents & Features General Layout 7. 9-10. Setting Up Installing The Battery
CORDLESS IMPACT WRENCH
 CORDLESS IMPACT WRENCH MODEL NO: CIR450C PART NO: 4500633 OPERATING & MAINTENANCE INSTRUCTIONS GC0415 INTRODUCTION Thank you for purchasing this CLARKE Impact Wrench. Before attempting to use this product,
Installation Manual TWM Performance Short Shifter Cobalt SS/SC, SS/TC, HHR SS, Ion Redline and Saab 9-3
 Page 1 Installation Manual TWM Performance Short Shifter Cobalt SS/SC, SS/TC, HHR SS, Ion Redline and Saab 9-3 Please Note: It is preferable to park on a flat surface, as you will have to engage and disengage
Operating Instructions & Parts Manual. Supa-Lite Lever Grease Gun. Model 48UJ77
 Operating Instructions & Parts Manual EN Supa-Lite Lever Grease Gun Model 48UJ77 PLEASE READ AND SAVE THESE INSTRUCTIONS. READ CAREFULLY BEFORE ATTEMPTING TO ASSEMBLE, INSTALL, OPERATE OR MAINTAIN THE
Please visit for the latest version of these installation instructions.
 Please visit www.blueox.com for the latest version of these installation instructions. Attachment Tab Height: 15-1/2 Serial Number Attachment Tab Width: 24 Please read BOTH these and the General Information
The Fine Art of Playing Music
 The Fine Art of Playing Music Delphi Mk VI Owner s Manual FOREWORD This is your Delphi Mk VI Owner s Manual. The following pages will describe as succinctly as possible the assembly of your new turntable.
PROFESSIONAL CORDLESS IMPACT SCREWDRIVER
 PROFESSIONAL CORDLESS IMPACT SCREWDRIVER Model CIS00 Part No 4500625 OPERATING & MAINTENANCE INSTRUCTIONS GC0309 INTRODUCTION Thank you for purchasing this CLARKE Impact Screwdriver. Before attempting
3-TONNE GARAGE JACK OPERATION & MAINTENANCE INSTRUCTIONS MODEL NO: CTJ3000GB PART NO: ORIGINAL INSTRUCTIONS
 3-TONNE GARAGE JACK MODEL NO: CTJ3000GB PART NO: 7623032 OPERATION & MAINTENANCE INSTRUCTIONS ORIGINAL INSTRUCTIONS GC1216 2 INTRODUCTION Thank you for purchasing this CLARKE Garage Jack. Before attempting
95-97 Toyota Tercel & Paseo Short Throw Shifter Installation Manual
 95-97 Toyota Tercel & 92-97 Paseo Short Throw Shifter Installation Manual Estimated Installation Time: 40-60 Minutes Tools Required: -Philips head screwdriver and flat head screwdriver -Bench vise -10mm,
HYDRAULIC BENCH PRESS 50,000kg
 OWNER S MANUAL PRODUCT CODE: 2037T HYDRAULIC BENCH PRESS 50,000kg Working Capacity Height Width Depth Weight 50,000kg 1660mm 1220mm 800mm 236kg Made in China to TQB Brands Pty Ltd specifications WARNING
HYDRAULIC TROLLEY JACK K Distributed by Kincrome Tools and Equipment:
 HYDRAULIC TROLLEY JACK K12076 Distributed by Kincrome Tools and Equipment: www.kincrome.com.au Owner s Assembly and Operating Manual SPECIFICATIONS... 2 IMPORTANT SAFETY INFORMATION... 3 UNPACKING AND
MODEL HD-BTC. Installation, Operation & Repair Parts Information REV041416
 MODEL HD-BTC Installation, Operation & Repair Parts Information REV041416 TABLE OF CONTENTS SAFETY INSTRUCTIONS 1 DEFINITIONS 1 SPECIFICATIONS 2 INSTALLATION INSTRUCTIONS 2 OPERATING INSTRUCTIONS 2 MAINTENANCE
SUNTURA SOLAR TRACKER
 WindyNation SUNTURA SOLAR TRACKER SOT-TRKS-NF User s Manual Page 1 of 10 WindyNation 08/09/2012 Table of Contents 1 Introduction... 3 1.1 Limited Warranty... 3 1.2 Restrictions... 3 1.3 Warranty Claims
OWNER S OPERATING MANUAL
 OWNER S OPERATING MANUAL MIG 100 GASLESS WELDER TABLE OF CONTENTS Page Safety instructions 3-4 MIG Welders 5 Welder Information 5 Gasless welder set up 6 Operation 6-10 Troubleshooting Guide 11-12 Spare
HEAVY DUTY BATTERY BOOSTERS / CHARGERS. MODEL Nos. BC185N & BC205N OPERATING INSTRUCTIONS
 HEAVY DUTY BATTERY BOOSTERS / CHARGERS MODEL Nos. BC185N & BC205N OPERATING INSTRUCTIONS 0614 Thank you for purchasing this CLARKE Battery Charger. These units are suitable for charging and boosting 12
AK / AV 4 & 5 SERIES Metallic Vertical Centrifugal Pumps Installation and Maintenance Instructions
 AK / AV 4 & 5 SERIES Metallic Vertical Centrifugal Pumps Installation and Maintenance Instructions ASSEMBLY PUMPS WITH MOTORS 1. No assembly required. Simply unpack the pump and motor and examine for any
Giant Hydraulic Disc Brake System
 Giant Hydraulic Disc Brake System INSTALLATION INSTRUCTI IMPORTANT NOTICE Contact the place of purchase or Authorized Giant Retailer for information on detail of installation and maintenance. Read this
Certus Model 450 Turntable Manual. 21- Dec- 2006
 Certus Model 450 Turntable Manual 21- Dec- 2006 I. Bearing Assembly The Teres bearing was designed to have a lot of viscous damping. This damping helps swamp the effects of stylus drag, resulting in better
INSTALLATION AND OPERATION MANUAL
 TRANSMISSION JACKS MODELS: RTJ-1 RTJ-660 RTJ-1100 RTJ-3000 PLEASE READ THE ENTIRE CONTENTS OF THIS MANUAL PRIOR TO INSTALLATION AND OPERATION. BY PROCEEDING YOU AGREE THAT YOU FULLY UNDERSTAND AND COMPREHEND
music hall mmf-9.1 INSTRUCTION MANUAL
 music hall mmf-9.1 INSTRUCTION MANUAL music hall http://www.musichallaudio.com august 2007 CONGRATULATIONS ON YOUR PURCHASE You have selected an exceptional turntable. Each component used in the construction
MANLEY LABORATORIES, INC. MANLEY REFERENCE JUNIOR DAC OWNER'S MANUAL 20 BIT DIGITAL TO ANALOG CONVERTER
 MANLEY LABORATORIES, INC. MANLEY REFERENCE JUNIOR DAC OWNER'S MANUAL 20 BIT DIGITAL TO ANALOG CONVERTER CONTENTS SECTION PAGE INTRODUCTION 3 MAINS CONNECTIONS 4 FRONT PANEL 5 REAR PANEL 6 OPERATIONAL NOTES
Please visit for the latest version of these installation instructions.
 Please visit www.blueox.com for the latest version of these installation instructions. DH2400 (Long & Standard Box) Please read these in their entirety prior to installing or operating this equipment.
Operating Instructions & Parts Manual. Oil Control Gun. Models 48UJ82, 48UJ83, 48UJ84, 48UJ85 and 48UJ86
 Operating Instructions & Parts Manual EN Oil Control Gun Models 48UJ82, 48UJ83, 48UJ84, 48UJ85 and 48UJ86 PLEASE READ AND SAVE THESE INSTRUCTIONS. READ CAREFULLY BEFORE ATTEMPTING TO ASSEMBLE, INSTALL,
Please visit for the latest version of these installation instructions.
 Please visit www.blueox.com for the latest version of these installation instructions. Attachment Tab Height: 18 Serial Number Attachment Tab Width: 18 Please read BOTH these and the General Information
Innovation in Mobility. R1208 Six-Way Power Seat Base. Operator Manual. 03/25/02 32DSB01.A RICON CORPORATION All Rights Reserved
 Innovation in Mobility R1208 Six-Way Power Seat Base Operator Manual 03/25/02 32DSB01.A 92-2002 RICON CORPORATION All Rights Reserved Printed in the United States of America This RICON product must be
ELECTRIC HOIST MODEL NO: CH2500B, CH4000B OPERATION & MAINTENANCE INSTRUCTIONS PART NO: ,
 ELECTRIC HOIST MODEL NO: CH2500B, CH4000B PART NO: 7630386, 7630391 OPERATION & MAINTENANCE INSTRUCTIONS ORIGINAL INSTRUCTIONS LS0517 - Iss 5 INTRODUCTION Thank you for selecting this Clarke Electric Hoist.
Uplift Power Seat Users Guide
 Safety Precautions 1. Use the Uplift Power Seat only in armchairs or sofas with at least one armrest for optimum stability when sitting or rising. 2. Uplift Power Seat is not intended for use in rocking
SUBMERSIBLE WATER PUMP
 SUBMERSIBLE WATER PUMP MODEL NO: CSV1A, CSV2A PART NO: 7230582, 7230602 OPERATION & MAINTENANCE INSTRUCTIONS ORIGINAL INSTRUCTIONS 05/14 iss 4 INTRODUCTION Thank you for purchasing this CLARKE Submersible
The breath sample was not strong enough to detect a reading. After warm up, please blow strong and steadily into the mouthpiece.
 Personal mouthpiece The Zenith+ features a built-in permanent mouthpiece for personal use. Push the hook to the side to extend the mouthpiece for personal testing. To use a separate mouthpiece with the
LED144 - PRODUCT INFORMATION
 TECHNICAL SPECIFICATION RoHS PART CODE LED144-12V-IP20-27K LED144-12V-IP20-3K LED144-12V-IP20-4K LED144-12V-IP20-6K LED144-12V-IP20-27K LED144-24V-IP20-3K LED144-24V-IP20-4K LED144-24V-IP20-6K LED144-12V-IP65-27K
Please visit for the latest version of these installation instructions.
 Please visit www.blueox.com for the latest version of these installation instructions. Attachment Tab Height: 25 Serial Number Attachment Tab Width: 22-1/2 Please read BOTH these and the General Information
OWNER S OPERATING MANUAL
 OWNER S OPERATING MANUAL WELD AND CUT ARC/TIG INVERTER PLASMA 30 PLASMA CUTTER TABLE OF CONTENTS Safety instructions 3-4 Weld & Cut ARC/TIG and Plasma Cutter 5 Page Installation 6 Welder Information 6-8
analogue turntables Sophisticated Craftsmanship with attention to detail that makes a Dual turntable so special.
 Katalog Catalogue 2015 2016 analogue turntables Sophisticated...... Craftsmanship with attention to detail that makes a Dual turntable so special. 1 Production made in Germany Production The company history
Installation Manual TWM Performance Short Shifter Subaru STi 2008+
 - 1 - Installation Manual TWM Performance Short Shifter Subaru STi 2008+ Please Note: It is preferable to park on a flat surface, as you will have to engage and disengage the hand brake and shift from
Please visit for the latest version of these installation instructions.
 Please visit www.blueox.com for the latest version of these installation instructions. Attachment Tab Height: 16 Serial Number Attachment Tab Width: 35 Please read BOTH these and the General Information
SHORT-STOP. Electronic Motor Brake Type G. Instructions and Setup Manual
 Electronic Motor Brake Type G Instructions and Setup Manual Table of Contents Table of Contents Electronic Motor Brake Type G... 1 1. INTRODUCTION... 2 2. DESCRIPTION AND APPLICATIONS... 2 3. SAFETY NOTES...