Graduate 150 Scholar 175 Master 200
|
|
|
- Albert Richards
- 5 years ago
- Views:
Transcription


1 Instruction Manual for Graduate 150 Scholar 175 Master 200
2 Contents Unihoist Ltd Electric and Hydraulic illustrations Introduction.. 4 Assembly and commissioning instructions Safety precautions Electric hoist controls illustration. 8 Operating instructions Charging instructions Maintenance schedule & Daily check list Technical Specifications Slings for use with the Unihoist Sling chart Sizing and Washing Instructions Instruction guide for the Easifit Sling Instruction guide for the Easifit Deluxe Sling Instruction guide for the Trinity Toileting Sling Instruction guide for the Deluxe Hammock Sling Trouble Shooting Guide Servicing, Repairs, Inspections and Testing KEY SYMBOLS: The following symbols are used on the hoist: ATTENTION, consult accompanying documents. For indoor use only. Class II - double insulated Electric Shock Protection Type B WEEE Regulations. 1

3 Unihoist Ltd Range Graduate 150, Scholar 175 Master 200 2

4 Unihoist Ltd Range Graduate 150, Scholar 175 Master 200 Hydraulic Pump 3
5 The Unihoist Range of Mobile Lifts The Unihoist range of mobile lifts are available in both hydraulic and electrical versions. This manual covers both versions. A Unihoist will arrive partially dismantled. It has been fully assembled and load tested at the factory and is supplied with a certificate of testing. Documents relating to the lift are supplied in a wallet packed with each lift. They should be kept for future reference. Documents: Test Certificate Dealer Guarantee Card User Manual Customer Satisfaction Card The TEST CERTIFICATE is an important document and is valid for six months. When the certificate has expired it can be renewed after a satisfactory thorough examination and test carried out by a competent person. Servicing and periodic testing can be carried out by your supplier. The Unihoist Graduate 150, Scholar 175 and Master 200 are suitable for the following CATEGORIES of lift within the working parameters of the lifts specified in the TECHNICAL SPECIFICATIONS. Category A Wheelchair Category B Bed Category C Bath Category D Toilet/Shower Category E Floor Category F - 90 Rotation The Unihoist range is suitable for patients in the SITTING, SITTING/RECUMBENT and RECUMBENT positions. The Unihoist range carries the CE mark and complies with the following EC directives: INTENDED USE The University Graduate 150, Scholar 175 and Master 200 are for patient lifting. DO NOT use them, or allow them to be used, for any other purpose. All patients lifted with these hoists should be assessed for suitability by trained, professional staff and be attended by a carer during use. The University Graduate 150, Scholar 175 and Master 200 are used in conjunction with a range of slings, sized to suit patients of varying builds. The hoist can be used for lifting from the floor, wheelchair, chairs, bed and toilet. Whilst these hoists are capable of transporting patients from room to room, it is recommended other transportation methods are used in order to minimize the patient s time in the sling. We do not supply or fit any Weigh Scales on our hoist. The Master 200 should not be moved with the patient in the highest position. Only use the hoist on a flat surface and never attempt a lift on a slope. Medical Device Directive (93/42/EEC) EMC Directive (89/336/EEC) 4 CE Mark on this product demonstrates conformity with the Medical Devices Directive (93/42/EEC)
 Battery pack (electric version only) Charging cable (electric version only) 1.")
6 Assembly and Commissioning Instructions The packing carton contains: Wheeled base Mast and boom assembly Leg opening handle Document Wallet Handcontrol (electric version only) Battery charger/control box (electric version only) Battery pack (electric version only) Charging cable (electric version only) 1. Remove all the parts from the carton and place on the floor, taking care to protect the finish from damage. SAFETY NOTE: Some of the parts are heavy and will need to be lifted with care. Heavier assemblies may require two people to lift. 2. Apply the brakes on the rear castors of the base 3. Fit the mast to the base. The mast fits into a rectangular hole in the top of the base. SAFETY NOTE: Possible finger trap. Keep fingers away from the end of the mast when fitting to the base. 4. When the mast is fully engaged with the base, fit & fully tighten the mast locking knob. Holes to be lined up then the mast locking knob fitted 5
7 Assembly and Commissioning Instructions contd. 5. Remove the screw from the leg opening lever located at the rear of the chassis. Fit the leg opening handle through the gate on the mast and push the open end over the leg opening lever. Retain the handle with the screw removed earlier from the leg opening lever. 6. Check the legs of the lift open and close satisfactorily. Electric Hoists only 7. Check the RED emergency stop button located on the controller is in off (out) position. 8. Fit the handcontrol to the handcontrol socket located at the base of the power pack. Important The handcontrol plug is indexed and can only be fitted one way. Make sure the plug of the handcontrol is firmly pushed into the socket. Do Not Force 9. Fit the battery pack to the control box as illustrated on page 8, making sure that it clicks into position. 10. Plug the actuator jack plug into the actuator socket located at the base of the Control Box. The indicator label will identify the correct socket. 11. Push the up and down buttons on the hand control and confirm the boom rises and lowers. The lift is now ready for use. Hydraulic models only 7. Close the hydraulic unit release valve by turning the knurled aluminium knob on the unit fully clockwise. Note: The release valve requires only minimal tightening to operate and should only be closed finger tight. DO NOT apply excessive force to the valve knob as this will result in damage to the valve. 8. Pump the handle of the hydraulic unit and confirm the ram raises the boom. 9. Open the release valve fully anticlockwise and check the boom descends. An unloaded boom will not come down under its own weight, it will be necessary to apply some pressure to the boom before it will descend. Note: The release valve is fully open and encounters a positive end stop in less than two full turns of the knob. DO NOT force the valve past the end stop as this will result in damage to the valve. 10. Close the release valve. The lift is now ready for use. 6
8 Safety Precautions Please read and follow the safety precautions listed below. The operation and the use of the Unihoist patient lift is straightforward. These basic safety precautions will help make lifting operations easy and trouble free. ALWAYS carry out the risk assessment and plan your lifting operations before commencing. ALWAYS carry out the DAILY CHECK LIST before using the hoist. ALWAYS read this manual and familiarise yourself with the operating control and safety features of a hoist before lifting a patient. DO NOT use a sling unless it is recommended for use with the hoist. ALWAYS check the sling is suitable for the particular patient and is of the correct size and capacity. NEVER use a sling which is frayed or damaged. ALWAYS fit the sling according to the instructions in the user manual. ALWAYS check the safe working load of the hoist is suitable for the weight of the patient. ALWAYS carry out lifting according to the instructions in the user manual. NEVER disconnect or bypass a control or safety feature because is seems easier to operate the hoist. NEVER force an operating or safety control. Forcing will only strain or damage the hoist and may compromise safety. DO NOT lift a patient with the castor brakes on. DO NOT attempt to manoeuvre the hoist by pushing on the mast, boom or patient. ALWAYS manoeuvre the hoist with the handle provided. It is recommended that the hoist is pushed with the patient in front. ALWAYS lower the patient to the lowest comfortable position before transfers. DO NOT push a loaded hoist at speeds which exceed a slow walking pace. DO NOT push the hoist over uneven or rough ground, particularly if loaded. DO NOT attempt to push or pull a loaded hoist over a floor obstruction which the castors are unable to ride over easily. DO NOT bump the hoist down steps; loaded or unloaded, this will damage the castors. DO NOT attempt to negotiate a loaded hoist on a slope. ALWAYS apply the brakes when parking a hoist. NEVER use electric hoists in a shower. NEVER charge an electric hoist in a bathroom or shower room. YOUR hoist is for patient lifting. DO NOT use it, or allow it to be used, for any other purpose. ALWAYS ensure mast locking knob is in position before lifting a patient. ALWAYS use the hoist on a flat and level floor. FOLLOW a regular charging routine to prolong the life of the battery. 7

")
9 Control Box, Battery Pack and Hand control (Pre July 2012) Control Box and Hand control (after July 2012) 8
10 Operating a Unihoist Lift 1. Leg adjustment. The legs on a Unihoist lift can be opened for access around armchairs and wheelchairs etc. For transferring and negotiating narrow doorways and passages the legs should be in the closed position. The leg opening mechanism is located at the rear of the lift and leg adjustment is achieved by moving the leg opening handle to the left for open and the right for closed. It is easier to make the leg adjustment when the lift is moving. 2. Castors and Braking. The Unihoist lift is provided with two braked castors at the rear of the base. The brakes should only be applied when the lift is parked. The brakes should always be released when a lifting operation is taking place With the brakes released the lift will be able to move to the centre of gravity of the lift and prevent the client from swinging when completely lifted. Swinging can prove disconcerting and uncomfortable and may even cause injury. 3. Raising and lowering the boom. The boom is raised and lowered by a powerful electric actuator controlled by a simple handcontrol unit. The handcontrol has two buttons with directional arrows UP and DOWN. The actuator will stop automatically at the limit of travel in both directions. The handcontrol is plugged into a socket at the base of the Controller. The handcontrol can be hooked on the mast or boom when not in use. 4. Emergency stop. The large, red emergency stop button is located on the Control box and is activated by pressing in. This will cut all power to the Lift. It can be reset by twisting the button clockwise and releasing. 5. Emergency raise/descent. Emergency raise/descent buttons are provided. These are located underneath the emergency stop button. These can be activated by pushing with a ballpoint pen tip or similar. This will raise or lower the boom if the handcontrol fails. This function is to be used in an emergency only. Caution should be exercised when using this control as there is no automatic cut-out of the actuator when the bottom stop is reached. 6. Emergency descent on actuator (2012 Models onwards). An emergency descent handwheel is located at the top of the actuator. By turning it clockwise, this will lower the boom if the handcontrol fails. 7. Batteries. The batteries are protected from deep discharge by a LOW VOLTAGE ALARM. This will sound when the batteries need recharging and the handcontrol is being operated. It will not sound independently of the handcontrol being operated. DO NOT IGNORE THIS WARNING ALARM. Complete the lifting operation and place the Lift on charge (see charging instructions). 9
11 Operating a Unihoist Lift contd. 8. Raising and lowering the boom (hydraulic models). The raising and lowering of the boom is achieved by a powerful hydraulic ram which is operated by two simple controls. The release valve, which is identified by an aluminium knurled knob, and the pump handle which is a long lever on the side of the hydraulic unit. To raise the boom, ensure the release valve is closed. The valve is closed by gently turning the knurled knob fully clockwise. When closed, pump the handle with smooth even strokes for maximum effect. The handle strokes from an upright position through an arc of 90. Leave the handle in the upright position when not in use. DO NOT force the handle beyond the upper or lower stops. The hydraulic unit can be rotated to allow the handle to be used from either side of the lift. To lower the boom, turn the release valve anticlockwise. The release valve is progressive, the more it is opened the faster the descent. This facility allows for a "hands free" descent. If the release valve is opened a fraction (a quarter turn) a very slow speed of descent will allow the carer to work "hands free" while assisting or comforting the patient. REMEMBER to close the release valve before commencing lifting operations. The release valve only requires gentle pressure to open or close. DO NOT apply excessive force to the release valve, either to open or close. It is not necessary and will only damage the valve. 9. Slings. The selected sling is attached to the spreader bar hooks, each sling is supplied with instructions and they are reproduced in this manual. The instructions should be followed carefully. 10
12 Charging Instructions for the Unihoist Lift Two 12 vdc batteries are located in the power pack. They are charged through a figure of eight shaped socket in the base of the control unit. When charging is required the mains lead is plugged into a wall outlet and the socket in the base of the control box. 1. Fit the mains power lead to the small figure of eight shaped socket in the base of the control box. 2. Plug the charger mains plug into a suitable mains outlet and switch the mains supply ON. Note: The Emergency Stop button has to be out of the battery pack to charge. 3. Charging is automatic and will fully charge the batteries over a period of eight to twelve hours. Note: Even if the batteries are left on charge for extended periods the charger will not allow the batteries to "overcharge". 4. To return the Lift to service, switch OFF the mains supply. Remove the small plug from the socket in the control box. The Lift is now ready for use Please pay particular attention to the following points, they will help you avoid problems with discharged batteries. KEEP the batteries fully charged. Place the power pack on charge whenever it is not in use. If it is more convenient to do so, place on charge every night. The charger will not allow the batteries to "overcharge". NEVER run the batteries completely flat. As soon as the audible warning sounds, complete the lifting operation and place the batteries on charge. NEVER store the power pack for long periods without regular charging throughout the storage period. ALWAYS make sure the mains power to the charger is switched off before connecting or disconnecting the power pack. NEVER leave the power pack plugged in to the charger with the mains power off. ALWAYS check Battery Charger Indicator (LCD) screen. WARNING: Walking away with the hoist whle the charger is still plugged into the mains could cause the cable and the charger to short out. NEVER dispose of the Battery Pack in a fire as this may cause an explosion. If in doubt contact Unihoist Limited. 11

13 Correct way to charge the battery 12
14 Maintenance Schedule for Unihoist Lifts All Unihoist products are designed for minimum maintenance, however some safety checks and procedures are required. A schedule of DAILY checks and tasks are detailed below. Daily checks and biannual service, inspection and test will ensure a Lift is kept in optimum safe working condition. A list of spare parts is available upon request. The LOAD TEST and CERTIFICATION should only be carried out by qualified, competent personnel or an authorised service dealer. Daily Check List Unihoist Ltd strongly recommend the following daily checks are carried out before using the lift. MAKE sure the Lift moves freely on it s castors. MAKE sure the legs open and close correctly. MAKE sure the mast is fully engaged and the locking knob is fully tightened. MAKE sure the spreader bar is free to rotate and swing. Check the spreader bar is firmly attached to the boom. EXAMINE the sling hooks on the spreader bar and side suspenders for excessive wear. If in doubt do not use. OPERATE the handcontrol or hydraulic unit to confirm the boom raises and lowers satisfactorily. ON electric powered lifts check the operation of the emergency stop button. ON hydraulically operated lifts check for hydraulic fluid leakage. Any leakage should be reported to a service engineer immediately and the lift should not be used until it has been checked out. CONFIRM the Lift is not giving a low battery alarm when the handcontrol is operated. If the alarm sounds DO NOT use and place on charge immediately. EXAMINE slings for fraying or other damage. DO NOT use any sling with fraying or damage to the suspension straps or tears in the body of the sling. MAKE sure the User Manual is available. 13
15 Maintenance, Inspection and Test Unihoist Ltd recommend a through inspection and test of the Unihoist mobile lifting accessories, slings etc. is carried out every six months. The examination and test should be conducted according to the recommendations and procedures below. Unihoist Ltd recommend maintenance, inspection and certified testing is carried out by authorised service dealers only. Note: These recommendations are in compliance with the requirements of 1998 No.2307 Health and Safety: The Lifting Operations and Lifting Equipment Regulations This is a UK regulation. Outside the UK please check your local requirements. SPREADER BAR: Check the spreader bar for freedom of rotation and swing. Check the wear on the central pivot and the nylon washer. Check for firm attachment to the boom. Inspect for excessive wear on the sling hooks and any side suspenders used in conjunction with the spreader bar. BOOM: Check the attachment of the boom to the mast. Make sure there is only minimal side movement of the boom and the boom is free to rotate on the boom bearing. Check the actuator or hydraulic unit mounting on the boom. MAST: Check the operation of the mast locking device. Make sure the mast fully engages into the socket. Check the bottom actuator or hydraulic unit mounting. CONTROL BOX (Electric only): Check the function of the Emergency Stop Button. Inspect the hand control socket for correct fitting. Inspect the charging socket for correct fitting. Check functioning of hand control. LEG ADJUSTMENT: Check the leg linkages are secure and the leg adjustment handle is located correctly in the leg adjustment gate. Operate the leg adjusting handle and confirm smooth opening and closing of the legs. Adjust linkages if necessary. LEG PIVOTS: Check the leg pivots are secure and the legs pivot freely. Any stiffness must be investigated. Strip out the leg pivots and lubricate with a light mineral based grease if in any doubt. Make sure there is no excessive play in the leg pivots. CASTORS: Check all castors for firm attachment to the legs. Check for free rotation of castor and the wheels. Remove any build up of threads, hair or fluff. Lubricate if necessary with a light mineral based grease. Check correct operation of the brakes. ACTUATOR (Electric only): The actuator should require no maintenance other than checking for correct operation and listening for unusual noise and that it is correctly secured. 14
16 Maintenance, Inspection and Test contd. ENSURE all four castors are in contact with the floor when the hoist is moved. EMERGENCY DOWN: Check emergency down functions - control box and actuator (on 2012 models). HYDRAULIC UNIT: The hydraulic unit should require no maintenance other than checking for correct operation and leakage of hydraulic fluid. BATTERIES (Electric only): The batteries are located in the power pack and should not require maintenance other than the regular charging as detailed in the charging instructions. CLEANING: Clean thoroughly with ordinary soap and water and any hard surface disinfectant if required after cleaning (you cannot disinfect unless the hoist is already clean). Harsh chemical cleaners or abrasives should be avoided as these may damage the surface finish of the hoist. Avoid wetting any of the electrical parts. LOAD TEST: The load test should be carried out in accordance with the manufacturers test procedures. It is strongly recommended the testing is carried out by an authorised service dealer. CERTIFICATION: An authorised service dealer will issue a test certificate after satisfactory completion of the load test. This certificate will be valid for six months. 15
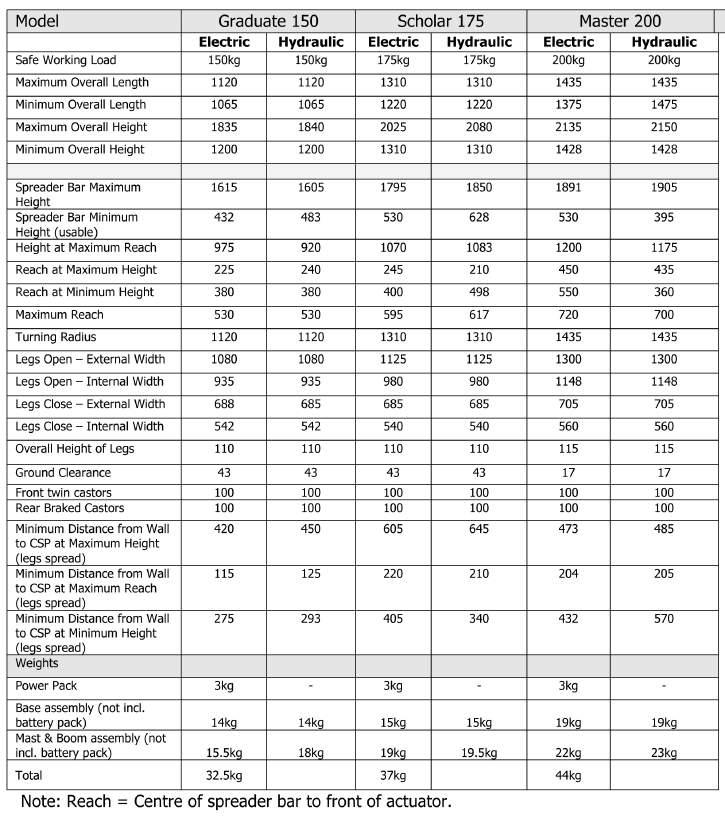
17 Technical Specifications 16
18 Technical Specifications Specifications are for reference only and may vary due to manufacturing tolerances Electrical Specifications Batteries 2 x 12 volt Rechargeable sealed lead acid type Battery Capacity 2.9 Ampere hours Charger Rated Input 230Vac 50/60 Hz Charger Rated Output 27.4/29.0 VDC@0.8A Electric Shock Protection Charger.. Class II Lift...Internal Power Source Degree of Shock Protection Charger Type B Lift... Type B Duty Cycle 10% (6 minutes per hour). Sound Levels Graduate Scholar Master Loaded 58.4dBA 58.7dBA 58.7dBA Unloaded 58.5dBA 58.5dBA 58.5dBA Dimensions (mm) A 17
19 Slings for use with the Unihoist Ltd Mobile Hoist Range Unihoist Ltd has designed a range of slings to be used with the Unihoist Ltd mobile hoist range: Easifit Sling Easifit Deluxe Sling Toileting Sling Deluxe Hammock Sling Special requirement slings can be made to customers own specifications. When selecting a sling from the Unihoist Ltd range ensure that the type of sling chosen is suitable for the patient to be lifted. The guides in the following pages will help in making the correct selection. Please Note The patient s final position in the sling can be adjusted by using varying combinations of the loops. Warning! A risk assessment should be carried out by a qualified person to ensure that the correct size, type and shape of Sling is being used for the patient. Warning! Always check the correct sling is appropriate as identified in the risk assessment/care plan. Warning! Always check that all the Sling straps are securely attached to the spreader bar before starting the lift. 18
20 Sling Chart 19
21 Sizing all slings Each sling is marked with the following coded symbols, two or three of which will be crossed out. Your sling will be the size that is not crossed out. In the example shown below, the size of the sling is small. (On the actual label, the symbol will be blue and the sling will have red piping) SMALL MEDIUM LARGE EXTRA LARGE (Red) (Yellow) (Green) (Blue) The straps on the sling are also colour coded. For example, a large sling will have green loops in the positions normally used for a large patient. The following sizing chart is offered as a guide only and each patient should be assessed individually. Small lbs kgs Medium lbs kgs Large lbs kgs Extra Large lbs kgs The maximum safe working load of the Easifit Sling is 210 kgs. Important: All slings in the Unihoist Ltd range are rated at a safe working load of 210kgs. This is to ensure that any of these slings can be used with safety. It is important to take the safe working load of the lift as the maximum permissible load of any lifting operation. Washing Instructions: Wash in a mild soap solution up to 71 C Do not use biological detergents Do not bleach Dry in a warm room or in the open air Do not place on convector heaters or steam pipes Do not dry in tumble dryers which exceed 120 C Please ensure that the velcro components on the Slings are stuck together before washing to ensure that the velcro does not rub against the sling material. SYMBOLS Do not exceed 71 degrees centigrade Do not bleach 20
22 User guide for the Easifit Sling The Easifit sling is a general purpose sling designed to suitable for most patients, but it is unsuitable for lifting amputees. Other patients must be assessed for suitability by a qualified person. The Easifit sling is suitable for the following categories of lift: Category A Wheelchair Category B Bed Category C Bath Category D Toilet/Shower chair Category E Floor The Easifit sling can be used for patients in the SITTING, SITTING/RECLINING and RECUMBENT positions. The Easifit sling has been designed to fit on the standard six hook spreader bar. Unihoist Ltd recommend slings are checked regularly and before use for fraying and damage. DO NOT use any slings which are worn or damaged. Fig. 1 Fig. 2 21
23 Sitting, Sitting/ Reclining Position Fig. 3 Ensure that the handgrips and seams are on the outside of the sling. Slide the sling down the back of the client. The commode aperture should be at the base of the back. The sling should be square across the shoulders Fig.4 Lift the patient s legs one by one and feed the leg straps under and between the legs. Fig. 5 Cross over the leg straps and attach the longest loops to the front hooks on the spreader bar Fig. 6 Raise the hoist and attach the shortest loops on the shoulder straps to the hooks on the spreader bar. The hoist may move towards the client as the operation is undertaken 22
24 Lying down position ( Recumbent) Fig.7 "Log roll" the patient onto the sling. The commode aperture should be at the base of the spine. Fig.8 Cross the leg straps between the legs and proceed to attach the sling as from the seated position. Use the shortest shoulder strap possible. Proceed to attach the sling to the spreader bar in the same way as for the sitting position. 23
25 Instruction guide for the Easifit Deluxe Sling The Easifit Deluxe sling is a development of the Easifit sling. It provides a more comfortable and supportive lift. It is also available with head support and can be fleece lined for additional comfort. This sling is suitable for the lifting of some amputees but patients must be assessed individually by a qualified person to determine whether this sling is suitable for their use. The Easifit Deluxe sling is suitable for the following categories of lift: Category A Wheelchair Category B Bed Category C Bath Category D Toilet/Shower chair Category E Floor The Easifit Deluxe sling can be used for patients in the SITTING, SITTING/ RECLINING and RECUMBENT positions. Fig.9 Fig. 10 The Easifit Deluxe sling has been designed for use with the six hook spreader bar. Unihoist Ltd recommend slings are checked regularly and before use for fraying and damage. DO NOT use any slings which are worn or damaged. 24
26 Sitting, sitting/ reclining Position Fig. 11 Ensure that the handgrips and seams are on the outside of the sling. Slide the sling down the back of the patient. The commode aperture should be at the base of the back. The sling should be square across the shoulders. Fig.12 Bring the longest leg piece forward so that it is parallel with the long leg bone of the thigh. Ensuring that the leg piece is not twisted, take the shortest leg piece stiffener under and up between the legs. Repeat this process with the other leg. Fig. 13 Pass strap C through strap B. Repeat for the other leg passing strap D through strap A Fig. 14 Check the sling is smooth under the client and confirm the position is comfortable. Move the hoist into position and attach the leg straps to the spreader bar by the coloured loops. This maintains the patient in an upright sitting position. The hoist may move towards the patient as you do this. When re-seating the patient, the handgrips may ensure a good position. 25


27 Alternative sitting, sitting/reclining Fig. 15 For closed leg position, straps may be crossed under both legs and attached as illustrated. Ensure leg straps C and D are passed through straps A and B and attached to the spreader bar. This can provide additional comfort and can be used for some amputees. Fig.16 The longer the length of the shoulder straps, the more reclined the client will be.cross strap A through strap B Fig. 17 "Log-roll" the client onto the sling, making sure that the commode aperture is at the base of the back. Fig. 18 Cross leg strap A and B under and between the legs and feed A through B. Feed C and D through the long loops on A and B. Then attach the sling to the spreader bar in the same way as the sitting position. Washing and sizing instructions are as the Sizing - All Slings page. 26
28 Instruction guide for the Toileting Sling The toileting sling has been designed specifically to facilitate toileting. It is an easy way to fit sling, padded for comfort, and allows access to and the removal of clothing. It is not a general purpose sling and will only suit approximately 25% of clients. The clients must be able to support themselves in the sling. This sling is unsuitable for lifting amputees. Other clients must be assessed for suitability by a qualified person. The toileting sling is suitable for the following categories of lift: Category A Wheelchair Category D Toilet/Shower chair The toileting sling can be used for clients in the SITTING position only. Toileting Sling The toileting sling has been designed for use with the six hook spreader bar. Unihoist Ltd recommend slings are checked regularly and before use for fraying and damage. DO NOT use any slings which are worn or damaged. 27
29 Sitting position Fig.19 Place the sling down the back to a position just beneath the shoulder blades and above the belt line. Fig.20 Raise the clients leg and feed the leg strap under and up between the legs. Make sure the sling is not twisted or creased under the thigh. Repeat the procedure for the other leg. Fig.21 Cross over the leg straps and attach the longest loops to the front hooks on the spreader bar. Raise the lift and attach the shoulder loops to the rear hooks (a more upright position can be achieved on the shortest loop). The lift may move towards the patient when you do this. Fig.22 Raise the lift to the required height. When re-seating the client light pressure on the thigh will ensure a good posture. Washing and sizing instructions are as the Sizing - All Slings page. 28
30 User Guide for the Deluxe Hammock Sling The Deluxe Hammock sling has been designed for amputees but it is also suitable for other clients who have to remain in the sling for an extended period, such as for bed making or bathing. It is available with or without a commode aperture. A head support attachment is also available. The sling can be fleece lined for additional comfort. The Deluxe Hammock sling is suitable for the lifting of amputees, but clients must be individually assessed for suitability by a qualified person. The Deluxe Hammock sling is suitable for the following catergories of lift: Category B Bed Category E Floor The Deluxe Hammock sling has been designed for use with the six hook spreader bar. Unihoist Ltd recommend slings are checked regularly and before use for fraying and damage. DO NOT use any slings which are worn or damaged. 29
31 Sitting Position Fig.23 Ensure the hand grips are on the outside, away from the client. Place the sling down the back so that the sling is square at the shoulders. Fig.24 Raise the clients leg and feed the 1st leg piece with the "A" straps under the leg. Do the same with the other leg, feeding the 2nd piece with the "B" straps under the 1st leg piece. Fig.25 Feed the back "B" strap through the "A" strap on both sides of the sling. Move the hoist into position and attach the four leg straps to the spreader bar. Raise the hoist and attach the shoulder straps. Fig.26 All six hooks on the spreader bar should now have a strap attached. Raise the hoist to the required height. Please note: the longer the shoulder strap is, the more reclined the client will be. Washing and sizing instructions are as the Sizing - All Slings page. 30
32 Trouble Shooting Guide Symptom Nothing happens when the handset buttons are pressed Hoist lacks lifting power Actuator stops intermittently during raising Actuator noisy Actuator runs but does not lift Actuator only runs in one direction Battery will not charge Possible Cause 1. Emergency stop button pressed in. 2. Handset not plugged in 3. Actuator not plugged in 4. Bad contact on handset 5. Battery fuse blown 6. Charger connected 7. Battery not seated on control box 1. Battery low 2. Actuator failing 3. Control box failing 1. Load too heavy 2. Battery low 3. Actuator overheating 4. Actuator failing 5. Control box failing 1. New actuator grease unevenly distributed (not run in) 2. Old actuator unit failing Gears damaged 1. Control box failure 2. Handset switch failure 3. Handset lead, plug or socket damaged 1. Mains lead unplugged 2. Mains socket not switched on 3. Mains lead damaged 4. Mains fuse blown 5. Battery fuse blown 6. Battery not seated on control box correctly 7. Battery discharged below minimum level 8. Battery charger failed Remedy 1. Reset emergency stop switch 2. Plug in correctly 3. Plug in correctly 4. Change handset 5. Call Service Engineer 6. Unplug charger 7. Reseat battery and check latch is engaged 1. Charge battery 2. Call Service Engineer 3. Call Service Engineer 1. Check Safe Working Load of hoist 2. Charge battery 3. Call Service Engineer 4. Call Service Engineer 5. Call Service Engineer 1. Cycle actuator on no load and on light load 2. Call Service Engineer Call Service Engineer 1. Call Service Engineer 2. Replace handset 3. Replace Handset 1. Plug in mains plug 2. Switch power on 3. Replace mains lead 4. Replace fuse (once only) 5. Call Service Engineer 6. Reseat battery and check latch is engaged 7. Call Service Engineer 8. Call Service Engineer Disposal of Waste Electrical and Electronic Equipment The WEEE Regulations (Waste and Electronic Equipment Regulations 2006) have been introduced to control how waste electrical and electronic equipment is disposed of. The regulations aim to promote reuse, recycling and recovery. 31
33 Servicing, Repairs, Inspections and Testing Unihoist Ltd has an established network of reputable distributors and dealers who will be pleased to handle all your purchasing, warranty, repair and maintenance enquiries. Included with each lift is a Customer Satisfaction card. Please take the time to fill it in and return it to Unihoist Ltd. Our products are guaranteed for a period of twelve months from the date of manufacture or twelve months from the date of purchase if commissioned by an authorised dealer. We recommend that all of our products are commissioned by your dealer and are supported by them for future servicing. The dealer or distributor operates the warranty programme, so it is important to keep a record of their name, address and telephone number so they can be contacted should any problem arise. If you are in doubt where your lift was purchased, Unihoist Ltd can trace the supplier if you quote the serial number of your lift. Remember: Contact your distributor for purchases, warranty, repairs, servicing and annual certified maintenance. When servicing a hoist only authorised Unihoist Ltd. parts should be used. 32

34 Unihoist Ltd Unit C, Anvil Court, Stanton Harcourt Road, Eynsham, Oxon. OX29 4UD Tel: Fax: or
Unihoist Ltd. Range of Electric & Hydraulic Hoists
 Unihoist Ltd. Range of Electric & Hydraulic Hoists Instruction Manual for Graduate 150 Scholar 175 Master 200 This manual covers the following models: Graduate 150 Scholar 175 Master 200 - Electric and
Oxford. Manufacturer s Contact Details. Contents. Oxford Presence. English
 English Manufacturer s Contact Details EUROPE Joerns Healthcare Limited Drakes Broughton Business Park, Worcester Road Drakes Broughton, Pershore, Worcestershire WR10 2AG United Kingdom Tel: 0844 811 1156
Contents. Oxford Calibre. English
 Oxford English Contents 1. The Oxford Patient Lift... 3 2. Introduction: About Your Lift... 4 3. Assembly and Commissioning Instructions... 5 4. Safety Precautions... 10 5. Smart Monitor & Handset... 12
User Instruction Manual Classic Lifts Mini Midi Major Maxi. To avoid injury, read user manual prior to use.
 User Instruction Manual Mini Midi Major Maxi To avoid injury, read user manual prior to use. Oxford English Contents 1. Oxford Classic Lift Range... 3 2. Introduction: About Your Lift... 5 3. Assembly
U S E R M A N U A L. To avoid injury, read user manual prior to use. enablelifecare.com.au. Joerns Hoyer Presence
 U S E R M A N U A L Hoyer Presence To avoid injury, read user manual prior to use. enablelifecare.com.au Contents 1. The Hoyer Presence Patient Lift... 3 2. Introduction: About Your Lift... 4 3. Assembly
The University Bath Hoist & University Transporter
 The University Bath Hoist & University Transporter University Electric Bath Hoist English The University Bath Hoist & University Transporter Contents Introduction 3 Side and End fitting illustration 4
User Instruction Manual Hoyer. HPL700 and HPL700WSC To avoid injury, read user manual prior to use.
 User Instruction Manual Hoyer HPL700 and HPL700WSC To avoid injury, read user manual prior to use. Hoyer English Contents 1. Introduction... 3 2. Safety Precautions... 4 3. Assembly and Commissioning Instructions...
U S E R M A N U A L. To avoid injury, read user manual prior to use. enablelifecare.com.au. Hoyer Journey. Joerns Hoyer Presence
 U S E R M A N U A L Hoyer Journey To avoid injury, read user manual prior to use. enablelifecare.com.au Contents 1. The Hoyer Journey Patient Lift... 3 2. Introduction: About Your Lift... 4 3. Assembly
Hoyer. Ascend User Instruction Manual & Warranty. Hoyer. Hoyer. Ascend Manuel de l utilisateur et garantie. Hoyer
 User Instruction Manual & Warranty To avoid injury, read user manual prior to use. Manuel de l utilisateur et garantie Afin d éviter tout accident, veuillez lire attentivement la notice avant utilisation.
Contents. Oxford Elevate. English
 Oxford English Contents 1. Oxford Patient Lift... 3 2. Introduction: About Your Lift... 4 3. Assembly and Commissioning Instructions... 5 4. Sling Guide... 9 5. Lifting with the Oxford... 11 6. Safety
User Manual. Use and Care Fault Finding Warranty Information. Unit 1, Tir Llwyd Industrial Estate, St Asaph Avenue, Kinmel Bay, Rhyl, Conwy, LL18 5JZ
 User Manual Use and Care Fault Finding Warranty Information Unit 1, Tir Llwyd Industrial Estate, St Asaph Avenue, Kinmel Bay, Rhyl, Conwy, LL18 5JZ SA160 Tel User +44 Manual (0)844-980 Rev 2296 06.2014
Oxford /Hoyer. Professional Series. Presence Lift SERVICE MANUAL Rev B
 Oxford /Hoyer Presence Lift Professional Series SERVICE MANUAL CONTENTS Pages 3-4 Inspection Criteria of the Oxford/Hoyer Presence Page 5 Testing of the Oxford/Hoyer Presence Pages 6-13 Service and Maintenance
M Series Mobile Lift. User Manual. 45 Progress Parkway, Maryland Heights, MO 63043, USA. M-Series User Manual Rev 10JAN2012 Page
 M Series Mobile Lift User Manual 45 Progress Parkway, Maryland Heights, MO 63043, USA Toll Free: 1-800-265-0677(CN) e-mail: info@prismmedicalltd.com M-Series User Manual Rev 10JAN2012 Page 1-866-891-6502(US)
All-in-One Hoist User Manual , , ,
 All-in-One Hoist User Manual 25-20010, 25-20020, 25-20030 25-20040, 25-20050 PDF 5946 Nov-2010 General about the hoist Index General about the hoist 3 Operation Operating instructions 4 Battery charging
Afin d éviter tout accident, veuillez lire attentivement la notice avant utilisation. Calibre Manual de Instrucciones y Garantia para el Usuario
 User Instruction Manual & Warranty To avoid injury, read user manual prior to use. Manuel de l utilisateur et garantie Afin d éviter tout accident, veuillez lire attentivement la notice avant utilisation.
Oxford /Hoyer. Journey User Instruction Manual & Warranty. Journey Manuel de l utilisateur et garantie
 User Instruction Manual & Warranty To avoid injury, read user manual prior to use. Manuel de l utilisateur et garantie Afin d éviter tout accident, veuillez lire attentivement la notice avant utilisation.
User Instruction Manual Hoyer. Manuel de l utilisateur Hoyer. Manual de Instrucciones Hoyer. Elevate. Elevate. Elevate
 User Instruction Manual To avoid injury, read user manual prior to use. Manuel de l utilisateur Afin d éviter tout accident, veuillez lire attentivement la notice avant utilisation. Manual de Instrucciones
The University Bath Hoist & University Transporter
 The University Bath Hoist & University Transporter University Bath Hoist 130 University Bath Hoist English The University Bath Hoist & University Transporter Contents Introduction 2 S ide and E nd fitting
USER MANUAL. Item: #13246 Stand-Aid Lift. Drive Medical Design and Manufacturing
 USER MANUAL Item: #13246 Stand-Aid Lift IMPORTANT SAFEGUARDS Your lift is for transferring patients only. Do not use the lift for any other purpose. Stand-Aid Lift is intended to be used for persons within
Roze Stand Up Patient Lift
 User Manual Roze Stand Up Patient Lift DEALER: This manual MUST be given to the user of this product. USER: BEFORE using this product, read this manual and save for future reference. For more information
A205 Patient Lifter - Aluminium USER MANUAL
 A205 Patient Lifter - Aluminium USER MANUAL IMPORTANT: Do not use the ASPIRE A205 Lifter without having first read this manual. TABLE OF CONTENTS 1. Overview 3 2. Safety Precautions 4 3. Parts Glossary
Stand Up Patient Lift RPS350-1
 User Manual Stand Up Patient Lift RPS350-1 DEALER: This manual MUST be given to the user of the product. USER: BEFORE using this product, read this manual and save for future reference. SYMBOL LEGEND DO
Oxford /Hoyer. Professional Series. Adaptive Power Cradle SERVICE MANUAL Rev A
 Oxford /Hoyer Adaptive Power Cradle Professional Series SERVICE MANUAL CONTENTS Pages 3-4 Inspection Criteria of the Oxford/Hoyer APC Page 5 Testing of the Oxford/Hoyer APC Pages 6-11 Service and Maintenance
Overhead lift Roomer 5200
 USER S MANUAL Overhead lift Roomer 5200 The Roomer 5200 offers you the unique ability to lift and move a patient from one room to another. The lift is equipped with two belts. When transferring from room
Instruction manual. RP800 - HYDRAULIC actuator, load 150Kg. RP815 - LINAK actuator, load 150Kg
 HYDRAULIC patient lift RP800 - HYDRAULIC actuator, load 150Kg MA RP800_805_806_ 807_810_811_815 02 A_12-2010 Electric patient lifts RP805 - LINAK actuator, load 150Kg RP806 - HIWIN actuator, load 150Kg
SONATA 150 ELS MOBILE PATIENT LIFTING HOIST USER MANUAL IMPORTANT:
 SONATA 150 ELS MOBILE PATIENT LIFTING HOIST USER MANUAL IMPORTANT: Do not use the SONATA 150 ELS PATIENT LIFTING HOIST Without having first read this manual. 30-32 James Street, Lidcombe, NSW 2141 Australia
atient lifters Assembly, Maintenance & Specifications Manual SUNRISE HML400 Hoyer Manual Patient Lift HPL400 Hoyer Power Patient Lift Sunrise Medical
 SUNRISE 800-556-5438 Oshkosh, WI 54901 2815 Oregon Street Continuing Care Group Sunrise Medical HML400 Hoyer Manual Patient Lift HPL400 Hoyer Power Patient Lift Assembly, Maintenance & Specifications Manual
USER MANUAL. Item: #13246 Stand-Aid Lift. Drive Medical Design and Manufacturing Push Handle. Base Width Adjustment Handle.
 USER MANUAL Item: #13246 Stand-Aid Lift Push Handle Base Width Adjustment Handle Mast Sling Attachment Hook Adjustable Knee Pad Front Caster W/Brake Foot Plate Front Caster W/O Brake Rev1.06.11.14 IMPORTANT
Visual inspection Inspect lift functions regularly. Check to ensure that material is free from damage.
 MiniLift200 Manual The MiniLift200 is an electrically powered stand-up lifter for people with impaired mobility and strength and who are unable to stand up unassisted. The MiniLift200 is designed for indoor
180 kg yoke or pivot diagnostic
 U S E R G U I D E 180 kg yoke or pivot diagnostic overview The Premium Lifter 180 is a compact mobile patient lifter for professional or home care use. This lightweight, easy to operate mobile hoist allows
Pallas/150. Stand-aid lifter. User instruction. Important - information. This user instruction must be read before the Pallas 150 is used.
 Pallas/150 Stand-aid lifter User instruction Important - information This user instruction must be read before the Pallas 150 is used. This user instruction is intended for technicians, installers, therapists
SGA-440 by Prism Medical
 SGA-440 by Prism Medical Introduction... 2 Overview... 2 Components of the Sit to Stand Lift... 3 Component List... 4 Specifications... 5 Cautions... 6 Assembly Instruction... 7 Operation Charging......12
Prism A-205. Owner s Manual. Aluminium Mobile Hoist. Use and Care Trouble Shooting Warranty Information. Introduction Overview...
 Prism A-205 Aluminium Mobile Hoist Introduction... 2 Overview... 2 Components of the Mobile hoist... 3 Component List... 4 Specifications... 5 Cautions... 6 Assembly Instruction... 7 Operation Charging......13
Swirl Wheelbase and Interface Workshop Manual.doc
 Swirl WHEELBASE AND INTERFACE WORKSHOP MANUAL IMPORTANT Please read these instructions carefully Before attempting to maintain the Wheelbase or Interface Document No: 056-02 v3 Page 1 of 34 June 2018 Fig
BATTERY OPERATED PATIENT LIFT MODEL:650HD OWNER S MANUAL
 BATTERY OPERATED PATIENT LIFT MODEL:650HD OWNER S MANUAL Thank you for choosing BestcareLift! To better serve you, please record the following information: Supplier Name: Telephone: Serial #: Date of Purchase:
Liko M220 / Liko M230
 Liko M220 / Liko M230 Instruction Guide English 7EN150106-04 2012-03-06 Applies to the following models: Liko M220 Prod. no. 2050010 Liko M230 Prod. no. 2050015 Liko M230 Product Description Liko M220
Elevate Manual de Instrucciones y Garantia para el Usuario
 User Instruction Manual & Warranty To avoid injury, read user manual prior to use. Manuel de l utilisateur et garantie Afin d éviter tout accident, veuillez lire attentivement la notice avant utilisation.
A200S Patient Stander - Aluminium USER MANUAL
 A200S Patient Stander - Aluminium USER MANUAL IMPORTANT: Do not use the ASPIRE A200S Stander without having first read this manual. TABLE OF CONTENTS 1. Overview 3 2. Safety Precautions 4 3. Parts Glossary
320 kg yoke diagnostic
 U S E R G U I D E 320 kg yoke diagnostic overview The Premium Lifter 320 is a heavy duty, fully featured mobile lifter designed for professional care and rehabilitation. Ideal for the majority of common
adopts a holistic approach to patient transfers and is organized in four categories: transfer, positioning, support and lifting.
 Manual - English 1 3 4 5 6 7 2 13 11 12 9 1. Boom 2. Mast 3. Handlebar 4. Battery pack 5. Emergency stop 6. Control box 7. Motor for base-width adjustment 8. Rear castors with brakes 9. SlingBar with safety
Mighty Mack Wheeled Walker
 Mighty Mack Wheeled Walker Handle with lever brake Backrest Handle height adjustment knob Brake cable Extra wide padded seat Shopping basket Side brace 7 inch (180 mm) wheels user guide Prior to use please
Tri-Wheel Wheeled Walker
 Tri-Wheel Wheeled Walker Handle with lever brake Brake cable Handle height adjustment knob Removable basket and tray Large vinyl bag 8 inch (203 mm) wheels user guide Prior to use please read all instructions.
DOC /500/600 Series Sit to Stand Lift Owner's Manual REV 001
 Page1 BESTCARE MODELS COVERED BestStand 400 Series Sit to Stand BestStand 500 Series Sit to Stand BestStand 600 Series Sit to Stand CONTENTS Product Features Assembly Operating Instructions Warranty BEFORE
Phoenix Buggy User Instructions
 Phoenix Buggy User Instructions Issued 1 st March 2015 Introduction Welcome to the Phoenix Buggy User Guide. The Phoenix Buggy has been designed to provide a robust, transportable mobility solution for
Euro Lightweight Wheeled Walker
 Euro Lightweight Wheeled Walker Handle with lever brake Backrest Brake cable Handle height adjustment button Removable shopping bag 8 inch (200 mm) wheels Cane holder user guide Prior to use please read
QA4 Surgery Trolley System Manual Function Operating Instructions
 QA4 Surgery Trolley System Manual Function Operating Instructions Catalogue No. 21310 Anetic Aid Ltd. Queensway Guiseley West Yorkshire, LS20 9JE United Kingdom T +44 (0) 1943 878647 F +44 (0) 1943 870455
2 in 1 Rollator and Transit Chair M58203
 User Instructions 2 in 1 Rollator and Transit Chair M58203 Maximum Safe Working Load Please ensure these Instructions are fully read and understood before using this equipment. Retain these instructions
AquaLift Bath Lift System MODEL #8100
 AquaLift Bath Lift System MODEL #8100 Thank you for Choosing Columbia! Your AquaLift Bath Lift has been built to the highest standards of quality to ensure years of superior service. Please take the time
Eva450EE. Functional inspection. Always read the manual. SystemRoMedic TM. Manual - English
 Eva450EE Manual - English 1 3 4 5 6 7 2 13 11 12 9 1. Boom 2. Mast 3. Handlebar 4. Battery pack 5. Emergency stop 6. Control box 7. Motor for base-width adjustment 8. Rear castors with brakes 9. SlingBar
AQUATEC R / AQUATEC F / AQUATEC XL. Bathlift Operating instructions
 AQUATEC R / AQUATEC F / AQUATEC XL Bathlift Operating instructions 1 2 3 4 5 6 7 8 9 10 11 Contents 1 General instructions................. 3 1.1 Introduction......................... 3 1.2 Proper use.........................
Owners Manual Unilift
 Owners Manual Unilift Contents Chapter Page Introduction 2 Safety Advise 3 Warranty 4 Using the Unilift 5 Fitting the Sling 6 Lifting and lowering 7 Emergency Controls 8 Battery and Charging Systems 9
Free Standing Track. Owner s Manual. Use and Care Trouble Shooting
 Free Standing Track Owner s Manual Use and Care Trouble Shooting VANCARE, INC. 1515 1ST STREET, AURORA, NE 68818 T (800) 694-4525 F (402) 694-3994 info@vancare.com www.vancare.com Table of Contents Free
ATLAS SIT-TO-STAND LIFT
 Direct Supply ATLAS SIT-TO-STAND LIFT Owner s Manual Please keep and refer to this Owner s Manual. Thank you for purchasing a Direct Supply Atlas Sit-to-Stand Lift from Direct Supply Equipment & Furnishings.
PRISM MEDICAL UK SA160C STAND AID
 PRISM MEDICAL UK SA160C STAND AID USER GUIDE Unit 1, Tir Llwyd Industrial Estate, St Asaph Avenue, Kinmel Bay, Nr Rhyl, Conwy, LL18 5JZ info@prismmedical.co.uk Tel +44 (0)1924 840100 www.prismmedical.co.uk
DOC /500/600 Series Patient Lift Owner's Manual REV 001
 Page1 BESTCARE MODELS COVERED 400 Series 500 Series 600 Series CONTENTS Product Features Assembly Operating Instructions Warranty BEFORE USE: Ensure the product has been assembled according to the instructions
SARA PLUS THE ADVANCED STANDING AND RAISING AID
 SARA PLUS THE ADVANCED STANDING AND RAISING AID OPERATING AND PRODUCT CARE INSTRUCTIONS KKX52180M-EN Issue 2 October 2006 ARJO ARJO products are patented or patent pending. Patent information is available
IMPORTANT INSTRUCTIONS FOR OPERATION & MAINTENANCE OF
 IMPORTANT INSTRUCTIONS FOR OPERATION & MAINTENANCE OF CONVEYORS EASIKIT 300 EASIKIT 450 EASIKIT 600, 900, 1200 & 1500 The manufacturer does not accept responsibility for any loss, damage to other equipment,
Ensure the product has been assembled according to the instructions in this manual.
 ConvaQuip S I T - T O - S T A N D L I F T MODELS ConvaQuip STS600E ConvaQuip STS600E-D PRODUCT FEATURES *ConvaQuip STS600E shown Ensure the product has been assembled according to the instructions in this
RESTWELL RISE & RECLINE ARMCHAIRS OWNER S HANDBOOK PARTS DESCRIPTION
 RESTWELL RISE & RECLINE ARMCHAIRS OWNER S HANDBOOK CONTENTS 1. Introduction 2. Parts Description 3. Personal Safety 4. Installation Instructions 5. Backrest Removal 6. Operating Instructions and Guidelines
INDEX INTRODUCTION 3 GUARANTEE 4 SAFETY INFORMATION 5 ACCESSORIES 7 ADJUSTMENTS OPERATIONAL 8 PRONE TABLE 11 SIDE TABLE 12 SPECIAL POSITIONS 13
 INSTRUCTION MANUAL The Helping Hand Company, Bromyard Road, Ledbury, HR8 1NS, UK Telephone: 01531 635388 Fax: 01531 635670 Email: sales@helpinghand.co.uk Web: www.symmetrikit.com INDEX INTRODUCTION 3 GUARANTEE
R710. R710 Product Manual
 R710 R710 Product Manual Contents Safety messages and important information 3 Recommended use and item dimensions 4 Check your order 5 Basic components 5-7 SoloVest 7 Directions for use 8 Operation and
Electric Portable Patient Lift - RPA600-1E
 Owner s Operator and Maintenance Manual Electric Portable Patient Lift - RPA600-1E DEALER: This manual MUST be given to the user of the patient lift. USER: BEFORE using this patient lift, read this manual
Viking L. Product Description. Instruction Guide
 Viking L Instruction Guide English 7EN136102-02 2009-07-06 Applies to the following model: Viking L Prod. No. 2040004 Product Description Viking L is a mobile lift that has been specially developed for
Safety, Care & Warranty Information
 Instruction for use part 1 of 2 Safety, Care & Warranty Information August 2017. Version 006 Read part 1 and part 2 before use. Please always refer to the manufacturer or distributor you purchased the
Tandem User Instructions
 Tandem User Instructions Issued 1 st November 2014 Tandem Buggy We designed the tandem buggy to enable families who have a disabled child and another younger child to enjoy the freedom they deserve. The
aks-goliath Operating manual (translation of the original operating manual)
") Operating manual (translation of the original operating manual) Date: 03/2007 Dear Customer, thank you for purchasing our hoist. You have acquired a functional hoist with simple handling and the highest
Operating manual (translation of the original operating manual) Date: 03/2007 Dear Customer, thank you for purchasing our hoist. You have acquired a functional hoist with simple handling and the highest
LF1090 BARIATRIC PATIENT LIFT
 LF1090 BARIATRIC PATIENT LIFT OWNER S MANUAL LF1090-INS-LABRevA05 Graham-Field Health Products 2005 IMPORTANT: READ THIS MANUAL BEFORE OPERATING YOUR PATIENT LIFT CONTENTS INTRODUCTION.................................................................4
QUALITY TESTED PRODUCT OWNERS MANUAL
 TM Est. 1965 QUALITY TESTED PRODUCT OWNERS MANUAL TM Est. 1965 This product is made in Australia by TOPFORM FURNITURE Pty Ltd who are a member of the FIAA and a signatory to the Residential Furnishing
Ensure the product has been assembled according to the instructions in this manual.
 ConvaLift F U L LB O D YPAT I E N TL I F T MODELS ConvaLift CL600E ConvaLift CL600E-D PRODUCT FEATURES t alif v Con ASSEMBLY OPERATING INSTRUCTIONS *ConvaQuip CL600E shown Ensure the product has been assembled
EZ Way Shower Trolleys
 EZ Way Shower Trolleys 2000/3000 Operator s Instructions EZ Way, Inc. PO Box 89 Clarinda, IA 51632 1-800-627-8940 www.ezlifts.com Form 2-207 Rev. 12/14/11 The EZ Way Shower trolley is unique with its side-mounted
Introduction. Components. Do the following
 User s Manual 1 2 3 C 4 5 6 B 7 8 9 10 11 12 2 Item Numbers Product Description 0816-21-788 Bathmaster Sonaris2 Bath Lift only 0816-21-796 Bathmaster Sonaris2 Bath Lift with Turquoise Cover 0816-21-812
User Instruction Manual Oxford Classic Digital Weigh Scale. To avoid injury, read user manual prior to use.
 User Instruction Manual Oxford Classic Digital To avoid injury, read user manual prior to use. Oxford English Contents 1. Introduction: About Your Scale... 3 2. Assembly and Commissioning Instructions...
Kidwalk Seating System User Instructions
 Kidwalk Seating System User Instructions The Kidwalk has been designed as a posturally supportive mobility system that moves with the child giving them the freedom to move and walk while keeping their
Multirall 200. Prod. No
 English Instruction Guide 7EN125103-01 2007-05-11 Multirall 200 Prod. No. 3130001 Multirall is a versatile new type of overhead lift with many different applications. Multirall can easily be moved between
BATTERY OPERATED PATIENT LIFT MODEL: 650HD OWNER'S MANUAL
 BATTERY OPERATED PATIENT LIFT MODEL: 650HD OWNER'S MANUAL Apex Dynamics Healthcare Products, LLC. 6225 Shiloh Road, Suite C Alpharetta, GA 30005 70-888-0796 or 1-800-742-0453 Copyright 2002 Apex Dynamics
2 TONNE GARAGE JACK Model No: CTJ2QLP PART NO:
 TONNE GARAGE JACK Model No: CTJQLP PART NO: 7680 OPERATING & MAINTENANCE INSTRUCTIONS GC03 INTRODUCTION Thank you for purchasing this CLARKE Garage Jack. Before attempting to use this product, please read
The Stannah Stairiser SX User Manual
 9 NOTES The Stannah Stairiser SX User Manual Make sure you understand the contents of this booklet. Keep it handy for reference. Your Stairlift Number is: Please quote this number on any correspondence
INDEX INTRODUCTION 3 GUARANTEE 4 SAFETY NOTICE 5 ACCESSORIES 6 ADJUSTMENTS OPERATIONAL 7 PRONE TABLE 10 SIDE TABLE 11 SPECIAL POSITIONS 12
 INSTRUCTION MANUAL The Helping Hand Company, Bromyard Road, Ledbury, HR8 1NS, UK Telephone: 01531 635388 Fax: 01531 635670 Email: sales@helpinghand.co.uk Web: www.symmetrikit.com INDEX INTRODUCTION 3 GUARANTEE
Petite Wheeled Walker
 Petite Wheeled Walker Handle with lever brake Brake cable Handle height adjustment knob Backrest Padded seat with concealed pouch Bag with shopping basket inside Side brace 6 inch (150 mm) wheels user
Molift Mover 300. EN - User manual. BM06101 Rev. F
 Molift Mover 300 EN - User manual BM06101 Rev. F 2016-06-01 English Manual Content Molift Mover 300...2 Lifter components...2 About Molift Mover 300...2 General...3 Declaration of conformity...3 Conditions
The Future of Homecare Lifting is Here!
 HYDRAULIC OR BATTERY OPERATED MODEL:400H / 400EL / 400LK The Future of Homecare Lifting is Here! Thank you for choosing the BestLift 400 To better serve you, please record the following information: Dealer
FreeSpan UltraTwin. Product Description. Instruction Guide
 FreeSpan UltraTwin Instruction Guide English 7EN10104-01 2009-07-0 Product Description Lifting very heavy people requires special techniques and specially designed lift equipment. Liko s lift system for
Compact Easy Rollator M66739
 User Instructions Compact Easy Rollator M66739 Maximum Safe Working Load 21st 135kg Please ensure these Instructions are fully read and understood before using this equipment. Retain these instructions
HEAVY DUTY CRANE HDC RANGE OPERATING G & MAINTENANCE INSTRUCTIONS
 HEAVY DUTY CRANE HDC RANGE OPERATING G & MAINTENANCE INSTRUCTIONS 0599 SPECIFICATIONS cont... No. Description Part No. No. Description Part No. MAXIMUM SAFE WORKING LOADS (kg) HDC50 HDC100 HDC150 HDC200
ELECTRIC HOIST MODEL NO: CH2500B, CH4000B OPERATION & MAINTENANCE INSTRUCTIONS PART NO: ,
 ELECTRIC HOIST MODEL NO: CH2500B, CH4000B PART NO: 7630386, 7630391 OPERATION & MAINTENANCE INSTRUCTIONS ORIGINAL INSTRUCTIONS LS0517 - Iss 5 INTRODUCTION Thank you for selecting this Clarke Electric Hoist.
Archimedes. user instructions. Simple solutions for everyday independence
 rchimedes user instructions Simple solutions for everyday independence rchimedes The rchimedes by Mangar International, is a light weight battery powered actuator driven bathlift, designed to be easily
SARA PLUS INSTRUCTIONS FOR USE
 SARA PLUS INSTRUCTIONS FOR USE 0086...with people in mind ArjoHuntleigh ArjoHuntleigh products are patented or patent pending. Patent information is available by contacting ArjoHuntleigh. The policy of
RESTWELL RISE & RECLINE ARMCHAIRS INTALIFT - OWNER S HANDBOOK PARTS DESCRIPTION
 RESTWELL RISE & RECLINE ARMCHAIRS INTALIFT - OWNER S HANDBOOK CONTENTS 1. Introduction 2. Model Description 3. Parts Description 4. Personal Safety 5. Installation Instructions 6. Backrest Removal 7. Operating
HD18F2M1.
 HD18F2M1 www.blackanddecker.com 3 2 1 5 A 4 5 B 4 7 10 9 C 4 6 D 4 8 1 11 12 E 2 F 3 2 G H 13 I 14 13 14 K 3 J 3 L M 16 15 4 Intended use Your Black & Decker hand held vacuum cleaner has been designed
2¼ TONNE TROLLEY JACK
 2¼ TONNE TROLLEY JACK Model No: CTJ2250LP PART NO: 7623070 OPERATING & MAINTENANCE INSTRUCTIONS GC01/12 INTRODUCTION Thank you for purchasing this CLARKE Trolley Jack. Before attempting to use this product,
USER MANUAL PRODUCT CODE: WC CareCo (UK) Ltd, Hubert Road, Brentwood, Essex, CM14 4JE PAGE 1
 Ltd, Hubert Road, Brentwood, Essex, CM14 4JE PAGE 1") by USER MANUAL PRODUCT CODE: WC01059 CareCo (UK) Ltd, Hubert Road, Brentwood, Essex, CM14 4JE PAGE 1 CONTENTS 1. INTRODUCTION 2. IDENTIFICATION OF PARTS 3. SAFETY REGULATIONS 4. SAFETY WARNINGS 5. USER
by USER MANUAL PRODUCT CODE: WC01059 CareCo (UK) Ltd, Hubert Road, Brentwood, Essex, CM14 4JE PAGE 1 CONTENTS 1. INTRODUCTION 2. IDENTIFICATION OF PARTS 3. SAFETY REGULATIONS 4. SAFETY WARNINGS 5. USER
Instruction Guide. English. Uno 100/102 - EM, EE, ES 7EN
 English Instruction Guide This Instruction Guide applies to: Name Prod. No. Uno 100 EE 2010011 Uno 100 EM 2010012 Uno 102 EM 2010003 Uno 102 EE 2010004 Uno 102 ES 2010005 7EN150104-01 2007-05-11 Uno 100/102
Model S888NR & Model S889NR USER MANUAL. Please ensure this manual is read and understood before using the scooter.
 Model S888NR & Model S889NR USER MANUAL Please ensure this manual is read and understood before using the scooter. CONTENTS Introduction 3 Feature Guide 3 Safety Advice 4 Adjustments 4 Tiller angle Seat
USER MANUAL. CareCo (UK) Ltd, Hubert Road, Brentwood, Essex, CM14 4JE PAGE 1 PRODUCT CODE WC01060.BLU
 Ltd, Hubert Road, Brentwood, Essex, CM14 4JE PAGE 1 PRODUCT CODE WC01060.BLU") by USER MANUAL PRODUCT CODE WC01060.BLU PAGE 1 CareCo (UK) Ltd, Hubert Road, Brentwood, Essex, CM14 4JE INFORMATION Thank you for purchasing a wheelchair from I-GO. This I-GO wheelchair has been designed
by USER MANUAL PRODUCT CODE WC01060.BLU PAGE 1 CareCo (UK) Ltd, Hubert Road, Brentwood, Essex, CM14 4JE INFORMATION Thank you for purchasing a wheelchair from I-GO. This I-GO wheelchair has been designed
Able Assist Transfer Aids User Manual
 www.drivemedical.co.uk The Team at Drive Medical develops its products to give our customers the freedom to live independently. This encompasses their daily home life and provides them with the opportunity
FGSH-450 by Prism Medical
 FGSH-450 by Prism Medical Introduction... 2 Overview... 2 Components of the Floor Lift... 3 Specifications... 4 Cautions... 5 Shipping & Transportation Instruction... 6 Assembly Instruction......7 Operation
Eva400EE/Eva400EM. Functional inspection. Always read the manual. SystemRoMedic TM. Manual - English
 DRAWN APPROVED BY STATUS: COMMENTS: NAME DATE TITLE SIZE MATERIAL: SCALE:1:10 DW Eva400EE/Eva400EM SystemRoMedic TM Manual - English 2 3 1 5 4 6 7 REVISION HISTO A REV. DESCRIPTION 3 4 5 6 7 2 B C D 13
Instructions for: FOLDING ENGINE CRANE PREMIER 2 TONNE. MODEL No: SPC2000
 Instructions for: FOLDING ENGINE CRANE PREMIER 2 TONNE MODEL No: SPC2000 Thank you for purchasing a Sealey product. Manufactured to a high standard, this product will, if used according to these instructions,
WHEELBASE USER MANUAL
 WHEELBASE USER MANUAL Please read these instructions carefully before setting up and using the NEO Wheelbase 1 Southwest Seating & Rehab Ltd. Introduction The NEO wheelbase is specially designed to accept
HALOGEN FLOODLIGHTS Models CHL1260C & 1260T Part Nos: &
 HALOGEN FLOODLIGHTS Models CHL1260C & 1260T Part Nos: 5460600 & 5460595 OPERATING & MAINTENANCE INSTRUCTIONS GC0610 INTRODUCTION Thank you for purchasing this CLARKE Halogen Floodlight. Before attempting