Free Software with this issue!
|
|
|
- Emmeline Ryan
- 5 years ago
- Views:
Transcription


1 The Official Publication of the NATIONAL LOCKSMITH AUTOMOBILE ASSOCIATION 1989 Mercedes Benz 500SEL Free Software with this issue! Part Two by Michael Hyde This is the second part of a multi-part series to show different areas of servicing this common high security car. This car uses the Mercedes Benz 4-track high security keyway. 2. There are a few variations of the Mercedes 4-track key. You have the master plastic bow key with an alarm indicator, and the master plastic bow key without an indicator. There is a wallet key with an alarm indicator and a valet key. The valet key is missing the center groove cut on the blade. The red dot alarm indicator is for models with a factory alarm. The red dot is plastic and has no other purpose except to indicate that the vehicle left the factory with an alarm, nothing else. Here are the two best websites for Automotive Locksmiths: Issue No.30 Chat, Forums, Editorial, Online Store, Tech Support Product & Technology Sales, Transponder Information Resources


2 Trunk Lock 3. The trunk lock is mounted into the outside trim of the trunk and rear body area. It s hard to tell with the trunk lid closed. National Locksmith Automobile Association Publisher Marc Goldberg Director Greg Mango Printed in the U.S.A. NLAA, a division of the National Publishing Company Publishers of THE NATIONAL LOCKSMITH 1533 Burgundy Parkway Streamwood, Illinois Phone Fax address: natllock@aol.com Unsolicited manuscripts are accepted, but must include SASE National Publishing Co. All rights reserved. Issue No There is a long black piece of plastic trim that covers the rear opening of the trunk ledge. The trim unsnaps by gently pulling out and up on the inside edge of the trim. 2 Automotive Edge National Locksmith Automobile Association


3 5. There is a red sticker on the plastic trim that informs the owner The trunk lock will also lock and unlock the doors. 6. One of the linkage rods on the trunk lock needs to be disconnected from the Central Locking system. After breaking a few of these, I finally figured out how they work. It seems so simple now, but at the time it wasn t. Gently pull out on the yellow connector. 7. While holding the linkage rod out, pull the yellow connector back and the middle black section that holds the linkage rod should slide out through the yellow connector. National Locksmith Automobile Association Issue No. 30 3


4 8. The outside trim has six nuts that will need to be removed, two on each side and there are two in the center. 9. Now the whole trim with the lock can be removed. 4 Automotive Edge National Locksmith Automobile Association


5 10. There are two linkage rods hooked up to the trunk lock cylinder. One of which we already disconnected from the Central Locking system. The other is a Ball type connector that can be unsnapped. It has a black plastic tip on it. 11. There are two large Phillips head bolts holding the lock cylinder to the outside trim. National Locksmith Automobile Association Issue No. 30 5


6 12. Here is a view of the trunk lock cylinder removed from the car. The good thing about this cylinder from other Mercedes trunk locks is that you can disassemble this lock without a working key. 13. Remove the tailpiece on the backside of the lock cylinder. It is always a good practice to mark the postioning of the pieces when you remove them. 14. Push in on the gray metal ring and twist to remove the ring. 6 Automotive Edge National Locksmith Automobile Association


7 15. Behind the ring is the plunger spring. 16. The lock cylinder housing is held to the chrome housing by tabs that are bent over the lock at the factory. The tabs can break if caution is not taken during disassembly. National Locksmith Automobile Association Issue No. 30 7


8 17. Since you will need to apply a lot of pressure, it is wise to stick the lock in a vise with a towel double wrapped around it to protect the chrome finish. I start out using a small flat bladed screwdriver to gently, but firmly pry out the tabs. It is also a good idea to rotate the lock so the tab you are prying out is solid with either the front part or rear of the vise. This will give you a firm base when tapping in a screwdriver to pry out the tabs. 18. After I went around the whole lock with the small screwdriver, I then switch up to the next size in screwdrivers. Remember not to over extend the tabs, since you will need to re-stake them when you put the lock back together. 19. The lock cylinder will separate from the chrome housing when there is enough room caused by the tabs being bent back. 8 Automotive Edge National Locksmith Automobile Association


9 2001 AutoSmart Full Version Price: $ AutoSmart Update Price: $45.00 All the new information on vehicles is here, current up to Don't hesitate and lose car car jobs unnecessarily. Get your 2001 AutoSmart now and you'll be in the driver's seat for automotive locksmithing! What's new for the 2001 book? FREE Mid-Year updates due out in Summer '01. Updated airbag info grid for EZ reference. All the latest transponder information. All new Strattec info: ignitions, door locks, trunk cylinders and more. All new ASP lock part info with EZ to read footnotes. Jet key applications now integrated throughout the keyblank charts. Gives you every new spec and method to make the first key. The Autosmart also contains Now with FREE Mid-Year Updates! Manufacturer divider tabs for EZ reference. The most accurate keyblank application guide in the world. EZ to read and use Making the first key to almost all cars and trucks, even high security. Code locations, spacing and depths, tumbler charts. Data and specs for almost every car on the road, foreign and domestic AutoSmart Is Here! A Must For Every Locksmith! Buy it in the online store! TheNationalLocksmith.com Copy or clip this coupon and send with payment to: The National Locksmith P.O. Box Chicago, IL Yes! Send me a new 2001 AutoSmart ($95) plus $5 s/h. Order total is $100. Yes! Send me the 2001 AutoSmart Update ($45) plus $5 s/h. Order total is $50. * Updates the AutoSmart or the 2000 AutoSmart only. CHECK PAYMENT METHOD: Check Charge My VISA Discover Money Order Foreign & Canada $20 s/h MasterCard American Express Card # Exp. Date Signature (Required) Your Name Shop Name Address (No P.O. Boxes) City State Zip Code Phone # ( ) OID: 02/01


10 20. Here is a closer look at the chrome housing tabs. Special care is needed with these, it is easy to break them off or split them in half. 21. With the cap removed the lock cylinder plug will now slide right out the front of the housing. 10 Automotive Edge National Locksmith Automobile Association


11 22. Be careful when removing the plug, some tumblers may fall out. There is also a springloaded ball bearing detent that will go flying if you are asleep at the wheel. 23. The trunk lock cylinder plug contains solid and split tumblers. There are 3 solid tumblers in the first three positions. Followed by 3 sets of split tumblers in positions 4, 5 & 7. This was not a typo; there are no tumbler chambers for this lock in position six from the bow. 24. There are solid and spilt tumblers used in all Mercedes locks with a 4-Track system, except the glove box lock. The tumbler depths go from 1 to 5, the number 5 tumbler being your deepest tumbler. National Locksmith Automobile Association Issue No


12 Glove Box Lock 25. The glove box lock cylinder is built into the door release. 26. To remove the lock handle, remove the 3 screws closest to the lower left hand corner of the glove box door, directly behind the handle. 12 Automotive Edge National Locksmith Automobile Association


13 27. With the screws removed the handle will pull off the door. 28. On the back of the lock handle is the plastic tailpiece for the cylinder plug. National Locksmith Automobile Association Issue No


14 29. The plug cannot be removed until you take the tailpiece off, which is a little bit of work. 30. Use a small screwdriver and/or a lock pick to gently pry underneath the 4 plastic tabs so you can slide the plug out. Take your time to get up underneath the tabs, as they are very brittle. 31. There are 4 tabs on the tailpiece. The plug will stay in with three tabs in case you break one. If you break 2 tabs it will still work, but it won t stay on with just 1 tab. 14 Automotive Edge National Locksmith Automobile Association


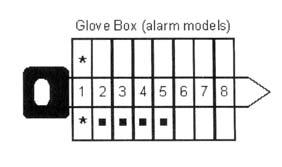
15 32. There are five tumblers in the glove box lock cylinder plug. All are solid tumblers in positions 1 through 5, from the bow Lock Decoding 33. One of the biggest problems with learning High Security auto work is not being able to properly decode the lock cylinders. Here is a way of always getting it right. First hold the cylinder plug so the entrance of the keyway is facing your chest. Next, turn the plug so the first tumbler chamber is springing upward towards the sky. Pull out that tumbler and identify it by the numbers stamped on it. 34. To remove the next tumbler you must rotate the plug 180 so that the next tumbler chamber in-line will spring upward. Take out that tumbler. Never take a tumbler out from the bottom because you will lose track of its placement. National Locksmith Automobile Association Issue No

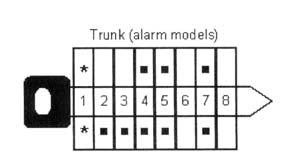
 will have trouble producing a good set.")
16 35. I make a diagram on a piece of paper where all the tumblers go. We know that this lock has 8 cuts on 2 different tracks. So I make a diagram from 1 through 8, bow to tip. Then I label the left side and right side. This comes in real handy when using Space & Depth Guide keys. 36. High Security Space & Depth Guide keys need to be made to the correct depths and positions. Somebody not knowing the MACS (Maximum Adjacent Cut System) will have trouble producing a good set. National Auto Lock produces all computer controlled cutting of guide keys with the proper MACS. All keys are originals and not copies of other sets. 16 Automotive Edge National Locksmith Automobile Association


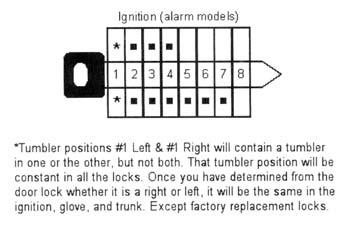
17 MAKING FIRST KEY: NOTE: Some Models the lock cylinder is integrated the door handle and newer models the Lock Cylinder sits up against the door handle. In either case the removal procedure without a key is the same. Method: It will be necessary to remove the door panel. We suggest removing the passenger side as this lock is the less worn of the two. Mercedes door panels have few screws attaching the panel to the door. The screws it does have are usually hidden. The panels have plastic hooks in them that lock into the door s sheet metal to hold the panel in place. The panel must be lifted up to remove, and do not lift outward, like standard panels. There is usually a hidden ten-millimeter bolt behind the top portion of the arm rest/door pull. The bolt can be seen after gently snapping out the seat control face plate and then getting behind the inside door release handle face plate. Unplug the panel light, to avoid breaking the wires attached to it. Once you have the panel off, there will be 3 or 4 screws holding the latch assembly in place. These screws will use a number 3 Phillips head. Remove these screws. Remove the retaining screw on the edge of the door that holds the key cylinder in place, it may be behind a black plastic plug. Remove the larger black plastic plug that contains the alarm connector and unsnap the connector. The long tailpiece on the end of the key cylinder will have a wing tip to it. The wing tip operates inside the latch assembly, and can only be removed by rotating the key in the lock cylinder and gently pulling outward. Since you do not have a key it will be necessary to gently pull out the key cylinder as far as it will go and then gently rotate the latch assembly. It may work better to have the latch in the locked position or in the unlocked position. Once again, you are trying to rotate the latch assembly in one direction while rotating the key cylinder in the other direction while gently pulling outward on the key cylinder. Be careful of the alarm connector wire. The part in the latch assembly that the key cylinder operates in is made of plastic, so you should keep this in mind at all times. Once you have the key cylinder out you will need to disassemble it until you can go no further. Be sure to mark all the pieces you take apart. You should be left with a plug and an inner housing. Prep a key with all number 5 cuts. You should be able to look down the tumbler chambers. Insert the prepped key and use four small pieces of metal to reach down in the tumbler chambers to bring the tumblers to the shear line in order to turn the plug for removal. Be patient as it may take some time to get all tumblers to the shear line so the plug will turn. After you have removed the plug you can then decode the wafers to make a working key to the doors. The tumblers will be stamped with a depth number. THERE ARE MANY VARIATIONS TO MERCEDES TUMBLERS DEPTH STAMPING: Some Right full tumblers are stamped 11, 12, 13, 14, 15. Some are not. Some Left full tumblers are stamped 21, 22, 23, 24, 25. Some are not. Usually all tumblers are stamped with at least a depth number. If there are two numbers stamped on the tumbler, the depth is always the number to the right Once you have made a working key to the doors, then progression cut position number 5R in the glove box. The glove box is all plastic, so do not force the key. Either it works smoothly or it doesn t. Once you have made a working key to the doors and glove box, then progression cut position 7R in the trunk. Once you have made a working key to the doors, glove box and trunk, then progression cut position number 6R in the ignition. Once you have a working key to the ignition, it will be the master key. National Locksmith Automobile Association Issue No.30 17


18 NOTES: 18 Automotive Edge National Locksmith Automobile Association
19 National Locksmith Automobile Association Issue No.30 19
20
The Official Publication of the NATIONAL LOCKSMITH AUTOMOBILE ASSOCIATION The 2001 Dodge Stratus by Michael Hyde
 The Official Publication of the NATIONAL LOCKSMITH AUTOMOBILE ASSOCIATION The 2001 Dodge Stratus by Michael Hyde 08.01 1. This time out we are taking apart a 2001 Dodge Stratus R/T, 2-door hardtop. The
Opening. The Official Publication of the NATIONAL LOCKSMITH AUTOMOBILE ASSOCIATION 1977 Mercedes Benz 450SL by Michael Hyde
 The Official Publication of the NATIONAL LOCKSMITH AUTOMOBILE ASSOCIATION 1977 Mercedes Benz 450SL by Michael Hyde 3.00 1. The Mercedes-Benz car line has been the sign of prestige and innovation. In this
The Official Publication of the NATIONAL LOCKSMITH AUTOMOBILE ASSOCIATION 2002 Lincoln LS by Tom Seroogy & Randy Mize
 The Official Publication of the NATIONAL LOCKSMITH AUTOMOBILE ASSOCIATION 2002 Lincoln LS by Tom Seroogy & Randy Mize 04.02 1. Virtually unchanged from its previous year s release, the Lincoln LS incorporates
Opening. The Official Publication of the NATIONAL LOCKSMITH AUTOMOBILE ASSOCIATION 1998 HONDA ODYSSEY, part 1. by Michael Hyde. Issue No.
 The Official Publication of the NATIONAL LOCKSMITH AUTOMOBILE ASSOCIATION 1998 HONDA ODYSSEY, part 1 by Michael Hyde 10.98 Due to the length and number of photographs in this article, this will be broken
1998 HONDA ODYSSEY, part 2
 The Official Publication of the NATIONAL LOCKSMITH AUTOMOBILE ASSOCIATION 11.98 1998 HONDA ODYSSEY, part 2 by Michael Hyde We conclude the Honda Odyssey this month covering the hatch, glove box and programming
NATIONAL LOCKSMITH AUTOMOBILE ASSOCIATION 2014 Kia Soul
 The Official Publication of the NATIONAL LOCKSMITH AUTOMOBILE ASSOCIATION 2014 Kia Soul 11.14 This auto article addresses how to make a side-milled key for the 2014 Kia Soul. The Key configuration, however,
1997 Ford Expedition XLT by Michael Hyde
 The Official Publication of the NATIONAL LOCKSMITH AUTOMOBILE ASSOCIATION 1997 Ford Expedition XLT...page 1 Director's Page...page 3 BMW Ignition Removal After Attempted Theft...page 18 1996 Toyota Avalon...page
Lockpicking Tools: User Guide
 Lockpicking Tools: User Guide Tips & Tricks for using Lockpicking Tools Contents Introduction..3 Padlock Shims..5 Comb Picks....7 Jiggler Keys...9 The Lock Gun..11 Bypass Sheets....13 Bump Keys...14 Other
Remove the 3-11mm nuts holding mirror on. Don t drop the nuts!
 2005-2012 Ford Mustang Puddle Lamp Kit Parts List: Quantity: Tool List: LED Lamps 2 Flat head screwdriver Seals 2 Ratchet & Socket set OR Nuts 2 Adjustable Wrench Wiring harness 1 Drill & 11/16 th bit
PLEASE READ THROUGH THE WHOLE WRITE UP BEFORE ACTUALLY USING IT!!!!
 JDM power folding mirror switch install into stock USDM harness. By: Greg L., Zeke21 on twinturbo.net PLEASE READ THROUGH THE WHOLE WRITE UP BEFORE ACTUALLY USING IT!!!! This is how I was able to get the
Looking at The 2005 Mustang By Steve Young
 Looking at The 2005 Mustang The latest generation of the Mustang is unlocked exactly like the previous generation. There is no lock on the passenger side of the vehicle, but the latch that Ford has chosen
The 1997 Mitsubishi Eclipse
 TM The Official Publication of the NATIONAL LOCKSMITH AUTOMOBILE ASSOCIATION The 1997 Mitsubishi Eclipse...page 1 Director's Page...page 3 The 1997 Nissan 200SX...page 4 Computer Software for the Automotive
Automatic trunk lid retrofit BMW F10 Bj.2011 by laser21 bimmerfest.com
 Automatic trunk lid retrofit BMW F10 Bj.2011 by laser21 bimmerfest.com lukasko@gmail.com This is a short guide to help you retrofit the option SA316 - automatic trunk lid mechanism into your F10. That
Instructions for Front Midrange / Tweeter Installation in BMW 3 Series/M3 (E36)
") Disclaimer: Bavarian Soundwerks highly recommends professional installation of the products we sell. We provide these installation instructions free of charge as a guide to assist those customers who choose
Disclaimer: Bavarian Soundwerks highly recommends professional installation of the products we sell. We provide these installation instructions free of charge as a guide to assist those customers who choose
Installing the Wireless Charging upgrade kit in a 2018 XT5 (Platinum version)
") Installing the Wireless Charging upgrade kit in a 2018 XT5 (Platinum version) September 2, 2018 Tools needed: Wireless charger upgrade kit Plastic trim tools 7 mm nut driver Background: I purchased the
Installing the Wireless Charging upgrade kit in a 2018 XT5 (Platinum version) September 2, 2018 Tools needed: Wireless charger upgrade kit Plastic trim tools 7 mm nut driver Background: I purchased the
Door Panel Removal & Window Stop Adjustment
 Door Panel Removal & Window Stop Adjustment By: Jeff Wolford Disclaimer: This is simply an article of how I fixed my car. I m not responsible if you break, scratch, or mess up anything following my example.
Stand Alone Fog Lights Installation Instructions
 Tools Required: 1. Trim Removal tool or protected flat screwdriver 2. #2 Phillips Screwdriver 3. 10mm socket 4. 10mm wrench 5. 8mm or 5/16 socket 6. Adjustable Pliers 7. Electrical Tape WARNING!!! Disconnect
This write-up is subject to revision. PM me, eb2143 at tdiclub.com and I will update it if there are inaccuracies, typos, missing information, etc.
 1 A4 Door Switch Replacement, 1.0 Notes on this guide: The following guide is mostly a combination of two write-ups by VgRt6 on Vwvortex.com. Specific threads located here: http://forums.vwvortex.com/showthread.php?1015107
Maintenance Information
 45530136 Edition 1 July 2008 Electric Screwdrivers EL 24V DC Series Maintenance Information Save These Instructions WARNING Always wear eye protection when operating or performing maintenance on this tool.
Mustang Clear Lens Instrument Cover (90-93) - Installation Instructions
 - Installation Instructions") Mustang Clear Lens Instrument Cover (90-93) - Installation Instructions The below installation instructions work for the following products: Mustang Clear Lens Instrument Cover (90-93) Please read through
Mustang Clear Lens Instrument Cover (90-93) - Installation Instructions The below installation instructions work for the following products: Mustang Clear Lens Instrument Cover (90-93) Please read through
GM 10-Cut Removal By A-1 Security Mfg. Fast ignition removal without the need for drilling or destroying the lock.
 TM The Official Publication of the NATIONAL LOCKSMITH AUTOMOBILE ASSOCIATION Publisher's Page...page 3 Director's Page...page 4 Starting Line...page 5 Fill It Up With Regular...page 11 Life In The Fast
The 1995 Chrysler LeBaron Some significant changes to thwart thieves, but not NLAA locksmiths.
 TM The Official Publication of the NATIONAL LOCKSMITH AUTOMOBILE ASSOCIATION Publisher's Page...page 3 Director's Page...page 4 Starting Line...page 5 Fill It Up With Regular...page 8 Life In The Fast
Mustang Radiator Conversion DIY. By GearHeadPeter. January 27, 2011
 1964-1966 Mustang Radiator Conversion DIY By GearHeadPeter January 27, 2011 We all know that the radiators in our cars are not the best, especially if you have done any customization to the engine, which
Instructions for Front Midrange Installation in BMW 3 Series/M3 Coupe, Cabrio without Harman Kardon Audio System (E46)
") Disclaimer: Bavarian Soundwerks highly recommends professional installation of the products we sell. We provide these installation instructions free of charge as a guide to assist those customers who choose
Disclaimer: Bavarian Soundwerks highly recommends professional installation of the products we sell. We provide these installation instructions free of charge as a guide to assist those customers who choose
1989 Jeep Cherokee. STEERING COLUMN' '1989 STEERING Jeep Steering Columns STEERING COLUMN STEERING Jeep Steering Columns
 STEERING COLUMN 1989 STEERING Jeep Steering Columns DESCRIPTION All models use collapsible steering columns. All columns have integral ignition switch and locking device. Optional tilt wheel is available
INSTALLATION INSTRUCTIONS JEEP 2011-UP JK SECURITY FULL CONSOLE #274
 INSTALLATION INSTRUCTIONS JEEP 2011-UP JK SECURITY FULL CONSOLE #274 PARTS CHECKLIST Tuffy Console #9 Left Front Mounting Bracket #10 Right Front Mounting Bracket #11 Electronics mounting bracket #12 Divider
Wiper Transmission Repair Charles Bernhardt
 Wiper Transmission Repair Charles Bernhardt When I purchased this '59 Corvette most of the parts were in boxes. The wiper transmissions were one of the first parts that I decided to look at to see if they
Trouble Shooting Guide for Hubbell Systems
 Trouble Shooting Guide for Hubbell Systems NOTE: Hubbell Special Products discontinued operations in 2008, so there is a very limited number of repair parts available for motor repair. In some ways, this
Improving the gearshift feel in an SW20.
 Improving the gearshift feel in an SW20. Part one In 3 parts. The SW20 gearshift can be often be greatly improved by eliminating play in the shift linkages, and this article covers three areas that need
2007 Crown Victoria Police Interceptor (P71) Blend Door Actuator Replacement (If I did it, you can too.)
 Blend Door Actuator Replacement (If I did it, you can too.)") 2007 Crown Victoria Police Interceptor (P71) Blend Door Actuator Replacement (If I did it, you can too.) I'm not saying this is the only way, or even the right way, but it worked for me. First time I've
2007 Crown Victoria Police Interceptor (P71) Blend Door Actuator Replacement (If I did it, you can too.) I'm not saying this is the only way, or even the right way, but it worked for me. First time I've
Workshop manual for removing and installing rear spoiler and pump unit Porsche 997 Turbo
 Workshop manual for removing and installing rear spoiler and pump unit Porsche 997 Turbo 3-different possibility to remove the upper spoiler part! -1 + 2 with drive module intact or half function + (2)emergency
Depress each tab as you pull the bezel off. The bezels are tight. L.H. shown.
 2013-2014 Ford Mustang V6 & Boss 302 Lower Valance Fog Light Kit Parts List: Quantity: Tool List: Fog light & bulb with bracket 2 Flat head & Phillips screwdriver Black bezels 2 Ratchet & Socket set OR
Installation Instructions: Epson 1400 CFS
 Installation Instructions: Epson 1400 CFS Epson 1400 with MIS CFS Installed *A perfect print with OEM cartridges is a must* Prerequisite - Before starting this installation, you MUST test your printer
BODY-24, Late Model 944 ( and Newer) Dash Replacement
 Dash Replacement") BODY-24, Late Model 944 (1985.5 and Newer) Dash Replacement Introduction Replacing the dash in a late model 944 is not overly difficult. However, it is very tedious and a lot of patience is required. It's
BODY-24, Late Model 944 (1985.5 and Newer) Dash Replacement Introduction Replacing the dash in a late model 944 is not overly difficult. However, it is very tedious and a lot of patience is required. It's
SIMPLEX 3000 NARROW STILE. Installation Instructions
 SIMPLEX 3000 NARROW STILE Installation Instructions TABLE OF CONTENTS Package Contents.....................................................2 Tools Required........................................................2
Walthers/Life-Like USRA Steam Locomotive
 North Raleigh Model Railroad Club Installing Decoders in N Scale Locomotives Detailed Instructions Walthers/Life-Like USRA 2-8-8-2 Steam Locomotive by David Derway May 17, 2010 Table of Contents Introduction...
Fanatec GT3RS V1 to GT3RS V2 Tutorial
 Fanatec GT3RS V1 to GT3RS V2 Tutorial by Roy Visser 1 How to update your Fanatec GT3RS V1 wheel to a GT3RS V2 wheel Welcome to this guided and detailed tutorial for upgrading your Fanatec GT3RS V1 wheel
The drawings are all available from the author or from the host websight. You will find these pictures and descriptions to be most helpful.
 Last Revision: 10JA2010 1969 THRU 1976 GM A & F-CAR STANDARD (NON-ADJUSTABLE) STEERING COLUMN DISASSEMBLY & REPAIR INSTRUCTIONS PAPER #1 Disassembly and Repair Instructions Addressed in this Paper Degree
Written By: Andrew Optimus Goldberg
 Remove the logic board from your iphone 5 Written By: Andrew Optimus Goldberg ifixit CC BY-NC-SA www.ifixit.com Page 1 of 27 INTRODUCTION Resurrect your iphone 5 with a new logic board. TOOLS: P2 Pentalobe
 Updated May 2015 Okay this is what I learned while converting several Yamaha SUV 1200 jet skis with a 2 stroke engine to a 4 stroke engine. I believe that you can use a Yamaha FX or VX four stroke for
10 Critical Paint Meter Mistakes That Cost Unsuspecting Car Dealers A Fortune
 10 Critical Paint Meter Mistakes That Cost Unsuspecting Car Dealers A Fortune What You Learn In This Report Can Add $1,000's Of Additional Profit To Your Bottom Line...Every Month And Help You Avoid Disastrous
Nissan GTR Alpha Fuel System
 Nissan GTR Alpha Fuel System Instructions V5 The goal of AMS is to provide the highest quality, best performing products available. By utilizing research and development, and rigorous testing programs
RedlineGoods Tacoma Installation Manual
 RedlineGoods 2016+ Tacoma Installation Manual AUTOMATIC SHIFT BOOT AND EBRAKE BOOT Press down on the factory shift boot collar to disconnect it from the shift knob. Unscrew shift knob Pull up on the rear
Fitting new lock and replacing a door latch assembly
 Fitting new lock and replacing a door latch assembly It has long been a problem with older MGBs and Midgets that once the door lock becomes worn the whole barrel assembly twists with the key as you try
Porsche 911/996/997 Carrera Do-It-Yourself Convertible Top Hydraulic Cylinder Inspection, Removal and Shipping Instructions
 Porsche 911/996/997 Carrera Do-It-Yourself Convertible Top Hydraulic Cylinder Inspection, Removal and Shipping Instructions Disclaimer: These instructions are intended as a guide. Cabriolet Hydraulics
CARBURETION. Tank Mount, Horizontal Crankshaft. Vacu-Jet - All
 Page 1 of 1 Vacu-Jet - All Carburetor Adjustment Initial 1. Turn adjustment needle clockwise until it makes light contact with the seat. Do not force. 2. The initial setting of adjustment needle is made
Mustang CDC Lightbar (94-04) - Installation Instructions
 - Installation Instructions") Mustang CDC Lightbar (94-04) - Installation Instructions The below installation instructions work for the following products: Classic Design Concepts Mustang Convertible Lightbar (94-04 Carbon Fiber) Classic
Mustang CDC Lightbar (94-04) - Installation Instructions The below installation instructions work for the following products: Classic Design Concepts Mustang Convertible Lightbar (94-04 Carbon Fiber) Classic
OEM Cruise Control Installation in GMC/Chevy NBS trucks
 OEM Cruise Control Installation in 99-02 GMC/Chevy NBS trucks May 2008 ~ Rampage_Rick Having just installed factory cruise control in my 00 Sierra, I thought I d share the fun. I followed the steps outlined
Bow Extension Cylinders
 Bow Extension Cylinders Level of difficulty: Fairly easy to intermediate very rewarding! Requires some patience. Tools needed: - 5-mm Allen wrench or socket (only for 90-95 models) - Needle nose pliers
Rear Speaker replacement.
 Rear Speaker replacement. First off you need the right rear speakers. The easy bit is 6x9 and better than a 15W paper cone, the difficult bit is getting a mounting depth under 74mm. Or to be more precise,
AURORA TABLE TENNIS. Replacement Parts
 AURORA TABLE TENNIS Replacement Parts Order direct at or call our Customer Service department at (800) 225-7593 8 am to 4:30 pm Central Standard Time July 2014 UPC Code 7-19265-51826-6 Staple your receipt
* * APPLICABLE MODELS: 2017 > CX-5
 PART NUMBER: 0000 8C R06(DIO) / 0000 89 R28(PIO) GENUINE ACCESSORIES INSTALLATION INSTRUCTIONS Rev. AAA *550-0681-000* APPLICABLE MODELS: 2017 > CX-5 REQUIRED COMPONENTS: ITEM QTY DESCRIPTION Usage Chart
TOYOTA PRIUS 2004 TVIP V2 (GBS ADD ON) Section I Installation Preparation
 Section I Installation Preparation") Section I Installation Preparation Part Number: 08586 47840 Section I Installation Preparation Kit Contents Item # Quantity Reqd. Description 1 1 Wire Harness 2 1 3 1 ECU Mounting Bracket Hardware Bag
Section I Installation Preparation Part Number: 08586 47840 Section I Installation Preparation Kit Contents Item # Quantity Reqd. Description 1 1 Wire Harness 2 1 3 1 ECU Mounting Bracket Hardware Bag
Part Number: TTU-BGB14-DRL TTU-BGP14-DRL
 11/15/16 TOYOTA TUNDRA 2014-17 Billet Grille w/led DRL Part Number: TTU-BGB14-DRL TTU-BGP14-DRL Kit Contents Item # Quantity Reqd. Description 1 2 LED DRL 2 1 Driver Box 3 1 Switch 4 1 User Card 5 2 Hardware
Connecting the rear fog light on the A4 Jetta, while keeping the 5 Light Mod
 Connecting the rear fog light on the A4 Jetta, while keeping the 5 Light Mod DISCLAIMER: I'm human and make mistakes. If you spot one in this how to, tell me and I'll fix it This was done on my 99.5 Jetta.
Evo X Walbro 450 Pump System
 Evo X Walbro 450 Pump System Installation Guide Please contact us at sales@wtftuned.com with any additional questions Tools required: 8 mm socket and wrench, needle-nose pliers, razor, drill w/ 5/64 bit,
Oreck Magnesium Series Service Manual. The Oreck Manufacturing Company
 Oreck Magnesium Series Service Manual The Oreck Manufacturing Company 08/2012 10/2011 The Oreck Manufacturing Company Contents Covering all Magnesium Upright Models Including: LW100, LW125, LW1000, AND
Light Truck MegaShifter
 Installation Instructions Light Truck MegaShifter The B&M Light Truck Megashifter shifter is designed to be used in most light trucks equipped with most popular three speed or four speed automatic transmissions.
BMW E46 AVIN Avant-2 Installation Guide
 BMW E46 AVIN Avant-2 Installation Guide You absolutely love your BMW but you find its time to refresh your e46 to newer technology. Maybe your existing OEM Nav system is getting tired or famously easy
HOW TO REPLACE THE SPOILER ON YOUR GEN 3 PRIUS
 HOW TO REPLACE THE SPOILER ON YOUR GEN 3 PRIUS Yup, it happened. The spoiler on your beloved Prius has departed this earth and now is in the great junkyard in the sky. This is how you make it all better
GruvenParts.com BRASS GM Power Folding Mirror Gear Replacement Instructions. Updated 8/25/2017 Additional Pictures / Tips Posted!
 Page 1 GruvenParts.com BRASS GM Power Folding Mirror Gear Replacement Instructions Updated 8/25/2017 Additional Pictures / Tips Posted! ** Latest Design is uses an ALL BRASS SPUR GEAR!!! ** ** If you don
VTCM Installation Manual Table of Contents
 VTCM Installation Manual Table of Contents 1. Introduction:... 2 2. Disclaimer:... 2 3. Software / Drivers:... 2 a. Plugging in the controller:... 2 b. Install 4.0.NET Frame work:... 3 c. Install COM port
* * APPLICABLE MODELS: 2016 > CX-3
 PART NUMBER: 0000 8C S01(DIO) / 0000 89 S07(PIO) GENUINE ACCESSORIES INSTALLATION INSTRUCTIONS Rev. AAA *550-0688-000* APPLICABLE MODELS: 2016 > CX-3 REQUIRED COMPONENTS: ITEM QTY DESCRIPTION Usage Chart
INSTALLATION INSTRUCTIONS FOR THE MOTOR TRIKE GL1500 RAKE KIT
 INSTALLATION INSTRUCTIONS FOR THE MOTOR TRIKE GL1500 RAKE KIT Thank you for choosing the Motor Trike GL1500 Rake Kit. We ask that you read the directions before you start and follow them very closely.
Combine Cover Manual
 Combine Cover Manual Installation Instructions Page 27 Operating Instructions Page 8 Warranty Page 8 Trouble Shooting Page 9 11 For Model s: Case I.H. 2388, 2188, 1688 and 1680 With a MAURER Hopper Extension
2. With the rear door open remove pull-style clip from the passenger side just below the door latch.
 LoD Offroad FJ Cruiser Rear Bumper with Tire Carrier Installation Instructions 1. Begin with removing factory spare from the rear door. 2. With the rear door open remove pull-style clip from the passenger
Z-Gate Universal Shifter
 Installation Instructions Z-Gate Universal Shifter Fits: GM, Ford, Lincoln and Chrysler Transmissions See Application Guide for Specific Applications Part #80681 Rev 06/01/2018 WORK SAFELY! For maximum
Fitting the Bell Auto Services (B-A-S) TDV6 EGR Blanking Kit to a 2006 model Discovery 3 TDV6 HSE
 TDV6 EGR Blanking Kit to a 2006 model Discovery 3 TDV6 HSE") Fitting the Bell Auto Services (B-A-S) TDV6 EGR Blanking Kit to a 2006 model Discovery 3 TDV6 HSE Before I describe how I did this, I must first thank other members of the Disco3.co.uk forum (namely J,moore
Fitting the Bell Auto Services (B-A-S) TDV6 EGR Blanking Kit to a 2006 model Discovery 3 TDV6 HSE Before I describe how I did this, I must first thank other members of the Disco3.co.uk forum (namely J,moore
FlexJet Carriage Circuit Board (PCB) Replacement
 Replacement") P/N: 111484 R0 14140 NE 200th St. Woodinville, WA. 98072 PH: (425) 398-8282 FX: (425) 398-8383 ioline.com FlexJet Carriage Circuit Board (PCB) Replacement Notices: Warning! Ensure that all AC power cables
P/N: 111484 R0 14140 NE 200th St. Woodinville, WA. 98072 PH: (425) 398-8282 FX: (425) 398-8383 ioline.com FlexJet Carriage Circuit Board (PCB) Replacement Notices: Warning! Ensure that all AC power cables
BMW Throttle Body Reconditioning. Reconditioning BMW 750il throttle assemblies./
 Reconditioning BMW 750il throttle assemblies./ My 1990 BMW 750il was not idling well, and I was starting to get "EML" errors on startup. The "EML" light would stay on when I started the car, and the engine
INSTALLATION INSTRUCTIONS
 INSTALLATION INSTRUCTIONS Accessory BACKUP S Application 2012 ODYSSEY Publications No. AII 46724 Issue Date SEP 2011 PARTS LIST Backup Sensor Attachment Kit P/N 08V67-TK8-100A Right center sensor clip
Changing the Struts on a WK Jeep CRD
 Changing the Struts on a WK Jeep CRD Step by Step By Chirpz Disclaimer: I do not claim that this procedure is the right way or even the best way to change your struts. This is what I did after reading
INSTALLATION INSTRUCTIONS
 INSTALLATION INSTRUCTIONS Accessory Application 2012 CIVIC 4-DOOR Publications No. AII 45625-46263 Issue Date MAY 2011 PARTS LIST Trunk spoiler Left trunk spring (marked yellow) Template 4 Clip grommets
Here we have the old lock on an exterior door (note more than one door was used for this article- taking the best pictures of the group)
") Alarm lock T2 Part 1 of 4 Installations Eugene Hansen 2004 This is the first part of four, 1st we will install a T2 Trilogy, 2 nd replacing the batteries, 3 rd replacing the solenoid and finally 4 th reprogramming
Alarm lock T2 Part 1 of 4 Installations Eugene Hansen 2004 This is the first part of four, 1st we will install a T2 Trilogy, 2 nd replacing the batteries, 3 rd replacing the solenoid and finally 4 th reprogramming
Installation Tips for your Remote Start/Keyless Entry (for Ford Vehicles) v3.3 Updated 1/13/2013
 v3.3 Updated 1/13/2013") Installation Tips for your Remote Start/Keyless Entry (for Ford Vehicles) v3.3 Updated 1/13/2013 Thank you for purchasing your remote start from MyPushcart.com - an industry leader in providing remote
Installation Tips for your Remote Start/Keyless Entry (for Ford Vehicles) v3.3 Updated 1/13/2013 Thank you for purchasing your remote start from MyPushcart.com - an industry leader in providing remote
Front Door Tweeter Cover Is Loose, Rattles, or Falls Off
 2 November 2011 Helping you fix it right the first time - every time Sandro Giordano Wins ASE Top 20 Award! Service tech Sandro Giordano s interest in mechanics began in his youth, when he took his father
Please read BOTH these Installation Instructions and the General Information sheet prior to installing or operating this equipment.
 2015-18 Chevy Suburban/Tahoe 2015-18 GMC Yukon/Yukon XL (Includes Denali) Please read BOTH these and the General Information sheet prior to installing or operating this equipment. 1. Blue Ox towing products
Installation Tips for your Remote Start/Keyless Entry (for Mazda Vehicles) v3.1 Updated 9/22/2012
 v3.1 Updated 9/22/2012") Installation Tips for your Remote Start/Keyless Entry (for Mazda Vehicles) v3.1 Updated 9/22/2012 Thank you for purchasing your remote start from MyPushcart.com - an industry leader in providing remote
Installation Tips for your Remote Start/Keyless Entry (for Mazda Vehicles) v3.1 Updated 9/22/2012 Thank you for purchasing your remote start from MyPushcart.com - an industry leader in providing remote
WOOD CHIPPER WC1103 5PQ (8/02/12)
") O P E R A T O R ' S M A N U A L WOOD CHIPPER WC1103 5PQ990101 (8/02/12) To the Owner; Thank-You for choosing a quality product from Frontier Equipment. We strive to give you the best equipment and the
O P E R A T O R ' S M A N U A L WOOD CHIPPER WC1103 5PQ990101 (8/02/12) To the Owner; Thank-You for choosing a quality product from Frontier Equipment. We strive to give you the best equipment and the
Raxiom Factory GPS Rear Back-up Camera Kit (07-17 Wrangler)
") Raxiom Factory GPS Rear Back-up Camera Kit (07-17 Wrangler) Installation Time: 2.5-3Hrs Tools Required: 7mm Socket & Driver 10mm Socket 10mm Open end wrench Knife / Razor blade Zip-ties Wire Cutters Needle
Raxiom Factory GPS Rear Back-up Camera Kit (07-17 Wrangler) Installation Time: 2.5-3Hrs Tools Required: 7mm Socket & Driver 10mm Socket 10mm Open end wrench Knife / Razor blade Zip-ties Wire Cutters Needle
STEALTH BIG AIR KIT - Yamaha Roadliner/Stratoliner and Raider
 Page: 1 If you question your abilities it may be best for an experienced service technician perform this installation. A Yamaha Service Manual would be helpful to have on hand for reference. Revision:
Fuel Pump & Sending Unit Repair
 If your C4 s fuel gauge reads full regardless of how much fuel you actually have, the sending unit in the tank is most likely at fault. If you have priced a new sending unit, you realize that they run
INSTALLATION INSTRUCTIONS
 INSTALLATION INSTRUCTIONS Accessory S P/N 08V67-SJC-101 Application 2012 RIDGELINE Publications No. AII 12006 Issue Date NOV 2011 PARTS LIST Back-up sensor harness 3 Wire ties with small clips (2 Not used)
2015 Copyright Maxspeed-Motorsports.com
 1 Porsche PCM 3.1 Backup Camera Installation Instructions. Thank you for purchasing your product at www.maxspeedmotorsports.com Before you start please understand that these installation instructions are
Troubleshooting Guide for Limoss Systems
 Troubleshooting Guide for Limoss Systems NOTE: Limoss is a manufacturer and importer of linear actuators (motors) hand controls, power supplies, and cables for motion furniture. They are quickly becoming
Troubleshooting Guide for Okin Systems
 Troubleshooting Guide for Okin Systems More lift chair manufacturers use the Okin electronics system than any other system today, mainly because they re quiet running and usually very dependable. There
Everything you need to know to operate your Sauce Master TM!
 Everything you need to know to operate your Sauce Master TM! See page 3 for assembly. See pages 4-5 for basic recipes and hints. See pages 6-10 for delicious recipes! See page 11 for accessories. See pages
Ford F-150 Speaker Replacement Instructions
 Ford F-150 Speaker Replacement Instructions This article was downloaded from http://www.fordf150.net Be sure to go there to view and download the other how-to articles. Thanks to John Meyer for contributing
The 1996 Volvo 850 Wagon, Part 2
 TM The Official Publication of the NATIONAL LOCKSMITH AUTOMOBILE ASSOCIATION Publisher's Page...page 3 Director's Page...page 4 Starting Line...page 5 Fill It Up With Regular...page 14 Joe s Garage...page
Fitting Instructions For The TDV6 EGR Blanking Kit To A 2006 Model Discovery 3 TDV6 GHSE
 Part Number DA1112 Fitting Instructions For The TDV6 EGR Blanking Kit To A 2006 Model Discovery 3 TDV6 GHSE You do this modification at your own risk. Britpart won t be held responsible for what is written
INSTALLATION INSTRUCTIONS
 INSTALLATION INSTRUCTIONS Accessory Application Publications No. AII 24642 BODY SIDE CLADDING 2003 CR-V P/N 08P21-S9A-100 Issue Date OCT 2002 PARTS LIST Right rear bumper piece Right front fender piece
INSTALLATION INSTRUCTIONS
 INSTALLATION INSTRUCTIONS Accessory S P/N 08V67-SJC-101 Application 2010 RIDGELINE Publications No. AII 42117 Issue Date AUG 2009 PARTS LIST Back-up sensor harness 3 Wire ties with small clip (2 Not used)
Main Lift Cylinders. Level of difficulty: Not very hard, only a number of steps involved requires some patience, but is very rewarding!
 Main Lift Cylinders Level of difficulty: Not very hard, only a number of steps involved requires some patience, but is very rewarding! Tools needed: - Stubby Phillips screwdriver, or ratchet with Phillips
Looking at The Chrysler 300C By Steve Young
 Looking at The 2008 2009 Chrysler 300C As the Chrysler Corporation battles for its life in this new era of bailouts for the auto industry, we seem to forget that it was the Chrysler Corporation that that
Installation Tips for RS1 + EVO-RIDE + SPDT. *(reglar key, automatic transmission vehicles ONLY)*
*") Installation Tips for RS1 + EVO-RIDE + SPDT TIP SHEET T1235 *(reglar key, automatic transmission vehicles ONLY)* Thank you for purchasing your remote start from MyPushcart.com - an industry leader in providing
Installation Tips for RS1 + EVO-RIDE + SPDT TIP SHEET T1235 *(reglar key, automatic transmission vehicles ONLY)* Thank you for purchasing your remote start from MyPushcart.com - an industry leader in providing
Mercedes Benz GL (W488AC) Customer Service Guide
 Customer Service Guide") Mercedes Benz GL (W488AC) Customer Service Guide MMXIII Copyright Aria Child Inc. Contents I) Check Battery... 3 II) Check Wiring Condition... 5 III) Check Foot Pedal.... 12 IV) Gearbox Replacement.. 14
Mercedes Benz GL (W488AC) Customer Service Guide MMXIII Copyright Aria Child Inc. Contents I) Check Battery... 3 II) Check Wiring Condition... 5 III) Check Foot Pedal.... 12 IV) Gearbox Replacement.. 14
Installation Tips for your Remote Start/Keyless Entry (for Honda/Acura Vehicles) [EVO-ALL] v1.02 updated 9/13/2013
![Installation Tips for your Remote Start/Keyless Entry (for Honda/Acura Vehicles) [EVO-ALL] v1.02 updated 9/13/2013](/thumbs/87/96035180.jpg "Installation Tips for your Remote Start/Keyless Entry (for Honda/Acura Vehicles) [EVO-ALL] v1.02 updated 9/13/2013") Installation Tips for your Remote Start/Keyless Entry (for Honda/Acura Vehicles) [EVO-ALL] v1.02 updated 9/13/2013 Thank you for purchasing your remote start from MyPushcart.com - an industry leader in
Installation Tips for your Remote Start/Keyless Entry (for Honda/Acura Vehicles) [EVO-ALL] v1.02 updated 9/13/2013 Thank you for purchasing your remote start from MyPushcart.com - an industry leader in
INSTALLATION INSTRUCTIONS
 INSTALLATION INSTRUCTIONS Accessory Application Publications No. in- ENTERTAINMENT SYSTEM 2004 TSX BII 24811 Issue Date APRIL 2003 PARTS LIST Attachment Kit P/N 08B23-SDA-101A Monitor bracket harness FM
Torqueflite Trans-Scat Kit
 TCI 220000 Torqueflite Trans-Scat Kit This kit can be installed in a few hours by carefully following directions. Read all instructions first to familiarize yourself with the parts and procedures. Work
 Page 1 of 14 This install requires work on your supplemental restraint system and could cause injury or damage to your car. If you are not comfortable performing the steps detailed here then do not attempt