RedlineGoods Tacoma Installation Manual
|
|
|
- Roxanne Caldwell
- 5 years ago
- Views:
Transcription


1 RedlineGoods Tacoma Installation Manual AUTOMATIC SHIFT BOOT AND EBRAKE BOOT Press down on the factory shift boot collar to disconnect it from the shift knob. Unscrew shift knob


2 Pull up on the rear of the console to separate it from the base Do the same in the front on both sides


3 Pull trip panel upwards and off the e-brake lever. (E-brake lever should be in full on position) Unplug this harness on the passenger side of shifter assembly to fully remove trim panel.


4 Remove these 4 screws to free the shifter boot surround from the trim panel. You will also need to release 2 plastic clips carefully with a screwdriver.


5 Once the shifter boot surround is free, it needs to further come apart. Gently pry these 5 plastic clips and pull the factory boot and plasic mounting ring from the surround.


6 Turn the shift boot inside out and cut this zip tie. Remove the chrome mounting ring collar and save. Remove the factory boot material from this plastic mounting bracket. It s glued on, so force may be
 with the narrow end pointing forward and zip")

7 necessary. Take your new leather boot and turn it inside out. Slide the plastic collar inside (upside down) with the narrow end pointing forward and zip tie the leather boot to the collar like so. Wrap the inside of the new leather boot with masking tape to keep overspray off and tape the surfaces of the shift boot mounting bracket that you don t want glue on.
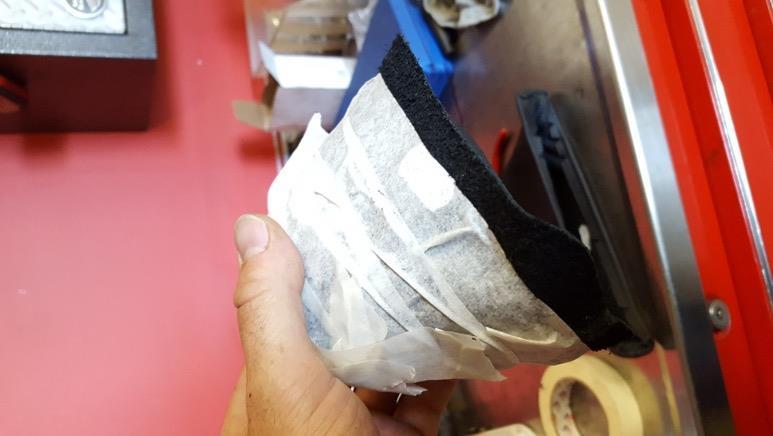
8 .


9 Spray booth the inside of the leather boot and the plastic ring with contact adhesive.

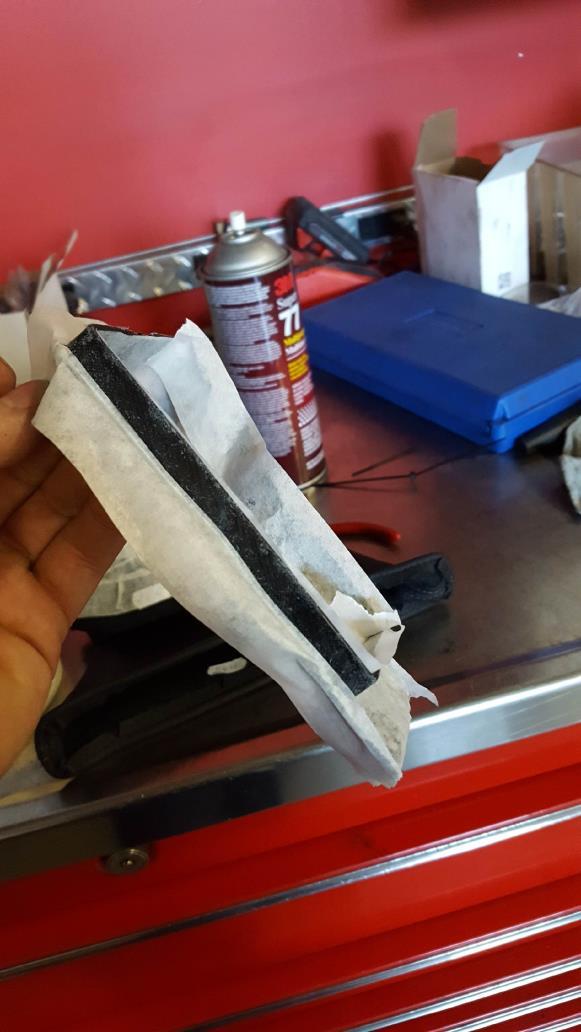
10 Flip the boot back to the correct orientation. It should look like this.

11 Once the adhesive is dry to the touch, remove all the tape and mate the leather boot to the trim ring. Remember this shift knob colar points forward! Also pay attention to the seam alingment. You may want to test fit the pieces into the console before you glue them to mark orientation with a piece or chalk or crayon. Take your time! Install the shift boot and trim ring, back into the shift boot bracket, then into the console trim panel in the reverse order you removed them. The leather may be thicker than the factory material that came out, so take care he to make sure the plastic clips snap back together.
12


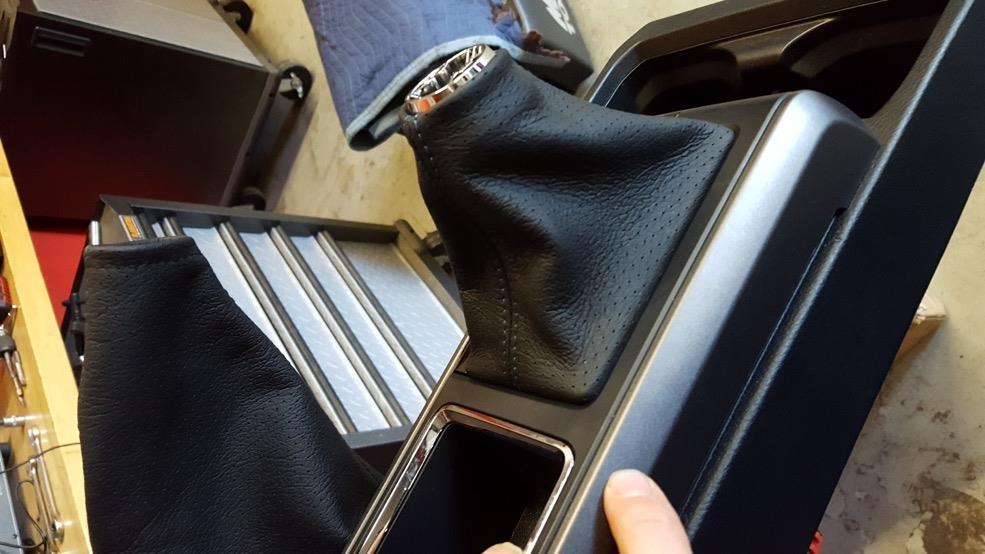
13 Screw the factory shift knob back into place and pull up on the shift boot trim ring to snap it back into place.

14 MANUAL SHIFT BOOT Use the trim removal tool to pry the center console edge in the armrest storage as shown in pictures below. Grab the back edge of the center console cover, and keep lifting it gently. The remaining 9 trim clips will pop loose.


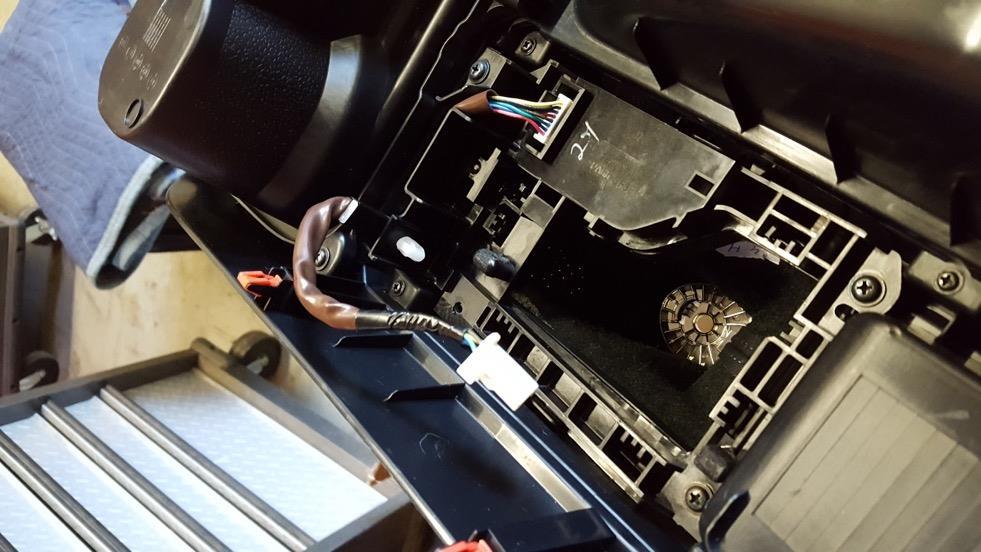
15 Remove the gear shift knob by grabbing the chrome ring between the boot and the shift knob, and twist it counter clockwise. Unscrew the the shift knob. Continue to lift the center console cover over the gearshift lever and handbrake handle. Depending on vehicle equipment you might have to disconnect an accessory connector before the console can be removed from the vehicle completely, so don t pull on the console too quickly.


16 Now that the center console cover is completely removed, you can take all the parts to a work bench/table to continue with the removal procedure. Remove the 6 screws holding the shifter boot bracket to the center console cover, then pry the bracket away from the center console


17 With the shifter mounting bracket separated from the console cover, remove the shift boot from the trim cover. Remove the frame and unstaple the boot from the bracket.

18 Flip the shift boot inside-out and cut the tie-wrap holding the collar in it. Replace the vinyl boot with the RedlineGoods boot. You can either glue it, staple it or just sandwich it between the bracket and the trim around it. Stapling is preferred if you have access to a heavy-duty stapler. Gluing is a #2 choice, and just sandwiching the boot is the lazy way about it, which might require you to re-do this when the boot slides out slightly due to the movement it s subject to when you operate the shifter. Your call. Prepare the shift knob for reinstallation by connecting the plastic chrome ring between the boot and shift knob to the shift knob, and mark the center of the ring that will face forward to the dashboard when installed. This will ensure that when the ring is locked again, it is pointing in the correct direction.


19 Re-install the shift boot bracket and trim by reversing the removal steps With the diagonal edge of the shift boot trim closest to you (same orientation as when it is installed in the vehicle), fold the top edge over, and mark the center of the top edge furthest away from you (edge that points to the front of the vehicle)


20 Insert the plastic chrome ring in the direction shown below after pulling the boot inside-out. Line up the center mark you made on the ring, with the center mark made on the shift boot. Tightly secure the top of the boot to the ring with a tie wrap, then cut off the excess tie wrap. Pull the boot back to outside out.


21 Re-install the shift boot along with the shift boot trim to the center console cover using the reverse of the removal above. Check that all 12 red trim clips of the center console cover are present and securely fastened before reinstallation back into the center console.


22 Replace the ebrake boot (see below) if you bought a RedlineGoods one, or just reassemble the console back into the vehicle. Use a little blue loctite to secure the gear shift knob correctly aligned and taught. Be careful to not drop the blue loctite onto the gear shift boot. Reattach the shift knob and enjoy!

23 EBRAKE BOOT Removal of the center console is required, and explained, in shift boot replacement manual. Once the console is out of the vehicle, turn trim panel over and remove the e-brake boot from the panel. A flexible wire is underneath that stitch, gently bend it from under the plastic clips. If you purchased the RedlineGoods ebrake boot with the bracket it just snaps in (see next step) If you didn't get the bracket, cut the bracket out of the stock boot, clip the bracket open in the middle of the front or rear walls, and use the hem on the bottom of the RedlineGoods shift boot to slide the bracket back into the boot. Alternatively, you can glue the bracket inside the boot. Once you have a wire (either RedlineGoods or you're the stock one) inside the boot, clip it back into the console assembly just as you removed the old one. Some bending of the wire may be required. Take your time here as well.


24 Reconnect the disconnected wired from dissasemly then slide the e-brake handle into the new leather booth while you put the console assembly back in place. Line up the plastic console clips and give each corner a firm push. You should feel all the clips snap into place.

25 ARMREST COVER Tools needed - trim removal tool, and philipps #1 & #2 screwdriver Open armrest cover and locate the 6 screws shown in the following picture. Remove the 6 screws with a #1 phillips screwdriver being careful not to drop any - they are very small. Use a trim removal tool to pry open the top of the armrest from the inner cover that was held by the 6 screws just removed

26 With the inner cover removed, remove the 4 screws on the hinge to the armrest cover with a #2 phillips screwdriver

27 Separate the armrest from the hinge

28 Remove the armrest vinyl cover as depicted in the following series of pictures (skip to step #13 if you are not replacing the armrest cover)
29


30 Install the new cover onto the armrest. The new cover needs to be glued. There are several kinds of glue that can be used, the 3M used below is just one of them. Set up a staging area because the adhesive sprays pretty well out of the can. Clean the console with a little soap and water to ensure that nothing interferes with the adhesive. PRACTICE lining the leather up on the armrest. Decide where you are going to lay the leather on the console after the adhesive has been applied - once you have sprayed the glue and put the parts together, it's very tough to pull apart. The leather pattern is cut precisely. Spray the adhesive on the console and the back of the leather. Follow the directions on the can. Be careful that you don't get any on the front of the leather. Don't worry if it looks like the adhesive seeps through to the finished side of the leather. It does leave some marks on the good side while it's wet, but that goes completely away when this dries in about an hour.

31 Line up the notches in the leather with the corresponding area on the console (what you practiced). Begin smoothing the leather from the edge and working your way toward the back of the console. Smooth back and forth with one hand while holding the leather in the other. You don't want to drop the whole leather cover on the console because the alignment won't work. You'll have to press and smooth - but occasionally peel it back to keep it lined up. Use the stitching as a guide - it should run along the edges of the console. Once the top is done begin smoothing the sides. Finally - work your way around the edge of the console and just fold the leather. The adhesive is tacky enough that it will hold just fine. Attach the armrest to the hinge win the 4 screws and a #3 phillips screwdriver. Install the armrest inner cover with the 6 small phillips screws
32
M-7210-Z3 Focus Short-Throw Shifter (fits 2000-April 2002) INSTALLATION INSTRUCTIONS
 INSTALLATION INSTRUCTIONS") Please visit www.fordracingparts.com for the most current instruction information!!! PLEASE READ ALL OF THE FOLLOWING INSTRUCTIONS CAREFULLY PRIOR TO INSTALLATION. AT ANY TIME YOU DO NOT UNDERSTAND THE
Please visit www.fordracingparts.com for the most current instruction information!!! PLEASE READ ALL OF THE FOLLOWING INSTRUCTIONS CAREFULLY PRIOR TO INSTALLATION. AT ANY TIME YOU DO NOT UNDERSTAND THE
These instructions were written for a North American specification MkVI Golf R. Other models are similar.
 Notes: These instructions were written for a North American specification MkVI Golf R. Other models are similar. When disassembling the car, be sure to keep all fasteners so they can be reused. It is recommend
Installation Manual TWM Performance Short Shifter Cobalt SS/SC, SS/TC, HHR SS, Ion Redline and Saab 9-3
 Page 1 Installation Manual TWM Performance Short Shifter Cobalt SS/SC, SS/TC, HHR SS, Ion Redline and Saab 9-3 Please Note: It is preferable to park on a flat surface, as you will have to engage and disengage
Chevrolet Cobalt Short Shifter Installation Manual
 Chevrolet Cobalt Short Shifter Installation Manual Pull shift boot down on the shifter shaft. Pull up on the shift knob to remove it. It requires some force. Remove the ebrake console, shifter console
Installation Instructions HURST COMPETITION AND BILLET/PLUS SHIFTER Mustang w/5-speed Manual Transmission (GT only)
") Installation Instructions HURST COMPETITION AND BILLET/PLUS SHIFTER 2005-2010 Mustang w/5-speed Manual Transmission (GT only) Catalog# 3915201 WORK SAFELY! For maximum safety, perform this installation
Installation Instructions HURST COMPETITION AND BILLET/PLUS SHIFTER 2005-2010 Mustang w/5-speed Manual Transmission (GT only) Catalog# 3915201 WORK SAFELY! For maximum safety, perform this installation
Subaru 5-Speed Double Adjustable Short Throw Shifter
 Subaru 5-Speed Double Adjustable Short Throw Shifter 1999+ Subaru Impreza 5-Speed 2004-2005 Subaru Forester XT 5-Speed Congratulations on your purchase of the COBB Tuning Double Adjustable Short Throw
Installation Manual TWM Performance Kia Forte Short Shifter
 Installation Manual TWM Performance Kia Forte 2009+ Short Shifter Begin the installation by parking on a flat surface, as you will have to engage and disengage the hand brake and shift from gears to neutral.
Lingenfelter Camaro SS Shift Knob Boot Adapter Kit Installation Instructions
 Lingenfelter 2010-2013 Camaro SS Shift Knob Boot Adapter Kit Installation Instructions PN: L350191410 Revision - 1.1 Lingenfelter Performance Engineering 1557 Winchester Road Decatur, IN 46733 (260) 724-2552
Installation Manual TWM Performance Short Shifter Nissan 350Z, 370Z Infiniti G35, G37
 Installation Manual TWM Performance Short Shifter Nissan 350Z, 370Z Infiniti G35, G37 It is preferable to park on a flat surface, as you will have to engage and disengage the hand brake and shift from
Installation Instructions PISTOL GRIP HANDLE Fits: Dodge Challenger and Charger w/ Automatic Transmission Catalog #
 Installation Instructions PISTOL GRIP HANDLE Fits: 2015-2018 Dodge Challenger and Charger w/ Automatic Transmission Catalog # 5380437 WORK SAFELY! For maximum safety, perform this installation on a clean,
Short Shifter Installation Instructions Miata 6-Speed manual
 Tools required: 10mm deep socket long extension ratchet small flathead screwdriver phillips-head screwdriver Short Shifter Installation Instructions 2006-14 Miata 6-Speed manual IMPORTANT NOTE: This shifter
iphone 5s Front Panel Replacement
 iphone 5s Front Panel Replacement Replace the cracked or broken screen on your iphone 5s. Note: DIY at your own risk. New beginner must be careful, screens got problems mostly due to wrong installation
Installation Instructions COMPETITION/PLUS SHIFTER Ford Mustang MT82 6-Speed Manual Transmission Catalog#
 Installation Instructions COMPETITION/PLUS SHIFTER 2015-2017 Ford Mustang MT82 6-Speed Manual Transmission Catalog# 3916037 Rev. 00 WORK SAFELY! For maximum safety, perform this installation on a clean,
Evora shiftr111 Installation Instructions Rev. B Page 1 of 14
 Evora shiftr111 Installation Rev. B Page 1 of 14 READ FITTING INSTRUCTIONS IN FULL BEFORE INSTALLATION This article is sold without warranty expressed or implied. No warranty or representation is made
iphone 5s Upper Component Cable Replacement
 iphone 5s Upper Component Cable Replacement Use this guide to replace the upper component cable containing the flash, microphone and sleep/power button cable. Written By: Sam Lionheart ifixit CC BY-NC-SA
Written By: Sam Lionheart
 iphone 5s Volume Controls Replacement Replace the volume buttons and ringer switch in your iphone 5s. Written By: Sam Lionheart ifixit CC BY-NC-SA www.ifixit.com Page 1 of 26 INTRODUCTION Use this guide
INSTALLATION INSTRUCTIONS JEEP 2011-UP JK SECURITY FULL CONSOLE #274
 INSTALLATION INSTRUCTIONS JEEP 2011-UP JK SECURITY FULL CONSOLE #274 PARTS CHECKLIST Tuffy Console #9 Left Front Mounting Bracket #10 Right Front Mounting Bracket #11 Electronics mounting bracket #12 Divider
Retro it Steering Column
 Retro it Steering Column INSTALLATION INSTRUCTIONS for 1976-86 CJ5 & CJ7 FOR PART NUMBER S: 1520800010, 1520800020, 1520800051, 1526800010, 1526800020, 1526800051 S I NCE 1986 Instruction # 8000000010
Installation Manual TWM Performance Shift Boot 2006 and up Honda Civic Si
 Page 1 Installation Manual TWM Performance Shift Boot 2006 and up Honda Civic Si Begin the installation by parking on a flat surface, as you may have to engage and disengage the hand brake and shift from
Mustang Short Throw Sport Shifter (All 83 - Early 01 & V6 T-5/T-45 Transmission) - Installation Instructions
 - Installation Instructions") Mustang Short Throw Sport Shifter (All 83 - Early 01 & 01-04 V6 T-5/T-45 Transmission) - Installation Instructions The below installation instructions work for the following products: Mustang Short Throw
Mustang Short Throw Sport Shifter (All 83 - Early 01 & 01-04 V6 T-5/T-45 Transmission) - Installation Instructions The below installation instructions work for the following products: Mustang Short Throw
Installing the Wireless Charging upgrade kit in a 2018 XT5 (Platinum version)
") Installing the Wireless Charging upgrade kit in a 2018 XT5 (Platinum version) September 2, 2018 Tools needed: Wireless charger upgrade kit Plastic trim tools 7 mm nut driver Background: I purchased the
Installing the Wireless Charging upgrade kit in a 2018 XT5 (Platinum version) September 2, 2018 Tools needed: Wireless charger upgrade kit Plastic trim tools 7 mm nut driver Background: I purchased the
BODY-24, Late Model 944 ( and Newer) Dash Replacement
 Dash Replacement") BODY-24, Late Model 944 (1985.5 and Newer) Dash Replacement Introduction Replacing the dash in a late model 944 is not overly difficult. However, it is very tedious and a lot of patience is required. It's
BODY-24, Late Model 944 (1985.5 and Newer) Dash Replacement Introduction Replacing the dash in a late model 944 is not overly difficult. However, it is very tedious and a lot of patience is required. It's
Written By: Sam Lionheart
 iphone 5s Front Panel Replacement Replace the cracked or broken screen on your iphone 5s. Written By: Sam Lionheart ifixit CC BY-NC-SA www.ifixit.com Page 1 of 33 INTRODUCTION For an easier repair, use
SUBARU STI SUBARU WRX V1.0
 2008-2018 SUBARU STI 2009-2018 SUBARU WRX V1.0 Congratulations on purchasing the finest automotive accessories on the market available for your vehicle. They will add a nice touch of class to your vehicle
Z-Truck (Vertical Moving) Z-truck Flag. Y-Truck (Horizontal Moving) FIGURE 1: VIEW OF THE Z-TRUCK. Flexshaft Assembly
 Z-truck Flag. Y-Truck (Horizontal Moving) FIGURE 1: VIEW OF THE Z-TRUCK. Flexshaft Assembly") Checking and Replacing the AC Motor To remove and replace the AC Motor you will need the following tools: #2 Phillips screwdriver (magnetic tip preferred) Removing the AC Motor 1. Ready the machine by
Checking and Replacing the AC Motor To remove and replace the AC Motor you will need the following tools: #2 Phillips screwdriver (magnetic tip preferred) Removing the AC Motor 1. Ready the machine by
JHP 04 GTO SPORTS BINNACLE KIT INSTALL GUIDE
 JHP 04 GTO SPORTS BINNACLE KIT INSTALL GUIDE NOTE: If you don't feel comfortable with any of the following steps, you should find a professional to do the installation. 1) Use a piece of tape as shown
INSTALLATION INSTRUCTIONS
 INSTALLATION INSTRUCTIONS Accessory Application Publications No. CASSETTE PLAYER 2000 ACCORD (EX) 2- AND 4-DOOR All 20497 Issue Date JULY 1999 PARTS LIST Cassette Player Attachment Kit Except V6: P/N 08B12-S84-100
Installation Instructions INDY SHIFTER Fits: Mustang Fastback & Convertible with MT-82 Transmission Catalog #
 Installation Instructions INDY SHIFTER Fits: 2015-2018 Mustang Fastback & Convertible with MT-82 Transmission Catalog # 3916036 Watch our installation video on YouTube WORK SAFELY! For maximum safety,
The Go Baby Go Build Manual
 The Go Baby Go Build Manual The step-by-step guide to creating your own Go Baby Go Car 4488 Shockwave Robotics and Pacific University Index 1. List of Mat erials 2. Mechanical Assembly a. Installing the
Installation Manual TWM Performance Short Shifter 2008 Mitsubishi Lancer
 Page 1 Installation Manual TWM Performance Short Shifter 2008 Mitsubishi Lancer Please Note: It is preferable to park on a flat surface, as you will have to engage and disengage the hand brake and shift
Door panel insert trim replacement Volvo V70
 Door panel insert trim replacement 1998-2000 Volvo V70 Tools needed: Torx Driver T25, Putty Knife, Bone Tool (optional), Heat gun or Dremel cutting tool, wire brush (or use a plastic tile and grout brush),
1464. Interior Installation. Cover Rear Seat Support Cut the vinyl to approximately the size of the rear seat support.
 Chapter 37 (Video Clip 37) - Interior Installation 1464. Interior Installation Cover Rear Seat Support 1465. Cut the vinyl to approximately the size of the rear seat support. 1466. Make a dry fit of the
Ford F-150 Speaker Replacement Instructions
 Ford F-150 Speaker Replacement Instructions This article was downloaded from http://www.fordf150.net Be sure to go there to view and download the other how-to articles. Thanks to John Meyer for contributing
*Some speedometers have these additional electronic connections. If yours does, then remove the smaller slotted screws shown.
 www.odometergears.com 1981-1985 240 Cable-Driven Speedometers (NOT for 1986 and later electronic units) http://www.davebarton.com/240-odometer-repair.html For this set of instructions below, I will not
Depress each tab as you pull the bezel off. The bezels are tight. L.H. shown.
 2013-2014 Ford Mustang V6 & Boss 302 Lower Valance Fog Light Kit Parts List: Quantity: Tool List: Fog light & bulb with bracket 2 Flat head & Phillips screwdriver Black bezels 2 Ratchet & Socket set OR
ITEM QTY CHECK PART NUMBER DESCRIPTION
 PART #21128 2010 Camaro Cold Air Induction Stage II PACKING LIST Before installation, use this check list to make sure all necessary parts have been included. ITEM QTY CHECK PART NUMBER DESCRIPTION 1.
Steeda S550 Mustang Street Short Throw Shift Lever Installation Instructions For Part:
 Steeda S550 Mustang Street Short Throw Shift Lever Installation Instructions For Part: 555-7316 Tools required 1. 7mm socket 2. 10mm socket 3. Small flathead screwdriver 4. T20 torx bit or driver 5. Vise
INSTALLATION INSTRUCTIONS
 INSTALLATION INSTRUCTIONS Accessory Application Publications No. AII 27871 CIVIC IN-DASH CD CHANGER 2- AND 4-DOOR Issue Date AUG 2004 PARTS LIST In-Dash CD Changer Attachment: P/N 08B06-S5D-110 CD Changer
Plastic Trim Removal Tool Phillips Screwdriver (for vehicles w/ shift boot) Wire Cutter. (FOR VEHICLES w/o A SHIFT BOOT)
 Wire Cutter. (FOR VEHICLES w/o A SHIFT BOOT)") INSTALLATION INSTRUCTIONS C10FL0 DESCRIPTION: STI CVT SHIFT KNOB STI CVT SHIFT KNOB TOOLS REQUIRED: PARTS IDENTIFICATION: Plastic Trim Removal Tool Phillips Screwdriver (for vehicles w/ shift boot) Wire
INSTALLATION INSTRUCTIONS C10FL0 DESCRIPTION: STI CVT SHIFT KNOB STI CVT SHIFT KNOB TOOLS REQUIRED: PARTS IDENTIFICATION: Plastic Trim Removal Tool Phillips Screwdriver (for vehicles w/ shift boot) Wire
SUBARU STI SUBARU WRX SHIFT BOOT INSTALL V1.0
 2008-2018 SUBARU STI 2009-2018 SUBARU WRX SHIFT BOOT INSTALL V1.0 Congratulations on purchasing the finest automotive accessories on the market available for your vehicle. They will add a nice touch of
Genuine Corvette Accessories Carbon Fiber Radio Surround Installation Instructions for Corvettes.
 Genuine Corvette Accessories Carbon Fiber Radio Surround Installation Instructions for 2005-2007 Corvettes. Difficulty: 3 out of 5. Time: Plan on about 1 hour. The tools used are: A small flashlight A
Installation Instructions QUICKSILVER CONSOLE SHIFTER Fits: Chevelle / El Camino
 WORK SAFELY! For maximum safety, perform this installation on a clean, level surface and with the engine turned off. Place blocks or wedges in front of and behind both rear wheels to prevent movement in
Raxiom Factory GPS Rear Back-up Camera Kit (07-17 Wrangler)
") Raxiom Factory GPS Rear Back-up Camera Kit (07-17 Wrangler) Installation Time: 2.5-3Hrs Tools Required: 7mm Socket & Driver 10mm Socket 10mm Open end wrench Knife / Razor blade Zip-ties Wire Cutters Needle
Raxiom Factory GPS Rear Back-up Camera Kit (07-17 Wrangler) Installation Time: 2.5-3Hrs Tools Required: 7mm Socket & Driver 10mm Socket 10mm Open end wrench Knife / Razor blade Zip-ties Wire Cutters Needle
Holden VE Pontiac G8 Vauxhall VXR8 & Chevrolet Lumina - Ripshift Installation Instructions
 Holden VE Pontiac G8 Vauxhall VXR8 & Chevrolet Lumina - Ripshift Installation Instructions 1 P a g e Thank you for purchasing a GM Motorsport RIPSHIFT Some of the feature of your new shifter are 1. Adjustable
How I installed new brake pads on my i with Sport Package (should be fine for other E39 s) By Robert B.
 By Robert B.") How I installed new brake pads on my 1999 528i with Sport Package (should be fine for other E39 s) How I installed new brake pads on my 1999 528i with Sport Package (should be fine for other E39 s) By
How I installed new brake pads on my 1999 528i with Sport Package (should be fine for other E39 s) How I installed new brake pads on my 1999 528i with Sport Package (should be fine for other E39 s) By
Written By: Sam Lionheart
 iphone SE Battery Replacement Replace the battery in your iphone SE. Written By: Sam Lionheart ifixit CC BY-NC-SA www.ifixit.com Page 1 of 24 INTRODUCTION Use this guide to bring life back to an iphone
Written By: Evan Noronha
 iphone 6s Battery Replacement Replace the battery in an iphone 6s. Written By: Evan Noronha ifixit CC BY-NC-SA www.ifixit.com Page 1 of 18 INTRODUCTION Use this guide to bring life back to your iphone
Ford Mustang GT-Style Fog Light Kit Parts List: Quantity: Tool List:
 2013-2014 Ford Mustang GT-Style Fog Light Kit Parts List: Quantity: Tool List: Fog light (Left& Right) 2 Flat head & Phillips screwdriver Upper grille with surround 1 Ratchet & Socket set OR Lower grille
INSTALLATION INSTRUCTIONS
 INSTALLATION INSTRUCTIONS Accessory Application Publications No. CD CHANGER ATTACHMENT KIT 2005 CIVIC SI AII 27936 Issue Date AUG 2004 PARTS LIST CD Changer Attachment Kit (sold separately): P/N 08B26-S5T-100
Procharger Stage II Intercooled Supercharger System (11-14 GT)
") Procharger Stage II Intercooled Supercharger System (11-14 GT) Installation Time: Approximately one day. Installed on 2012 Mustang GT 5.0/Manual Required Tools 3/8 Socket Set (Standard and Metric) 1/2
Procharger Stage II Intercooled Supercharger System (11-14 GT) Installation Time: Approximately one day. Installed on 2012 Mustang GT 5.0/Manual Required Tools 3/8 Socket Set (Standard and Metric) 1/2
We will be upgrading from the factory, paper-cone disgrace to an Infinity Kappa 62.9i:
 In order to fully round out your stereo upgrade, the factory rear speakers must go. This is another easy job to tackle, but the fitment of the package tray and being hunched over in the rear glass area
Instructions for Front Midrange / Tweeter Installation in BMW 3 Series/M3 (E36)
") Disclaimer: Bavarian Soundwerks highly recommends professional installation of the products we sell. We provide these installation instructions free of charge as a guide to assist those customers who choose
Disclaimer: Bavarian Soundwerks highly recommends professional installation of the products we sell. We provide these installation instructions free of charge as a guide to assist those customers who choose
IPSCO STS (Short Throw Shifter) Installation Instructions Dodge Viper WARNING
 Installation Instructions Dodge Viper WARNING") WARNING Modification of your vehicle with the parts identified above may alter its stock performance; the buyer hereby expressly assumes all risks associated with any such modification. DISCLAIMER OF WARRANTY
WARNING Modification of your vehicle with the parts identified above may alter its stock performance; the buyer hereby expressly assumes all risks associated with any such modification. DISCLAIMER OF WARRANTY
HURST COMP/PLUS SHIFTER 2015 Ford Mustang (Getrag MT82 six-speed manual transmission) Catalog # by Hurst Performance
 Catalog # by Hurst Performance") FORM 159 0205 07/15 HURST COMP/PLUS SHIFTER 2015 Ford Mustang (Getrag MT82 six-speed manual transmission) Catalog #391 0205 2015 by Hurst Performance Thank you for purchasing the Hurst Comp/Plus Shifter.
FORM 159 0205 07/15 HURST COMP/PLUS SHIFTER 2015 Ford Mustang (Getrag MT82 six-speed manual transmission) Catalog #391 0205 2015 by Hurst Performance Thank you for purchasing the Hurst Comp/Plus Shifter.
Installation Instructions QUICKSILVER SHIFTER Fits: Chevrolet Camaro Pontiac Firebird Catalog # 80688
 Installation Instructions QUICKSILVER SHIFTER Fits: 1973-1981 Chevrolet Camaro 1970-1981 Pontiac Firebird Catalog # 80688 WORK SAFELY! For maximum safety, perform this installation on a clean, level surface
How to Repair an Apple AC Adapter Broken
 How to Repair an Apple AC Adapter Broken Cable Learn how to repair a damaged AC Adapter cable. Written By: Angela Penaherrera ifixit CC BY-NC-SA www.ifixit.com Page 1 of 11 INTRODUCTION Sometimes the cable
CorkSport AluminumShift Knob Mazda's with manual transmissions.
 CorkSport AluminumShift Knob 2014+ Mazda's with manual transmissions. Thank you for purchasing the CorkSport Mazda Aluminum Shift Knob. Adjustable weights to adjust your throw, increase the response and
Installation Manual TWM Performance Toyota GT86 / Scion FRS / Subaru BRZ Direct Replacement Short Shifter
 Installation Manual TWM Performance Toyota GT86 / Scion FRS / Subaru BRZ Direct Replacement Short Shifter Begin the installation by parking on a flat surface, place wooden blocks in front or behind the
Written By: Sam Lionheart
 iphone 5s Battery Replacement Replace the battery in your iphone 5s. Written By: Sam Lionheart ifixit CC BY-NC-SA www.ifixit.com Page 1 of 23 INTRODUCTION Use this guide to bring life back to your iphone
INSTALLATION INSTRUCTIONS INFINITI CELLPORT UNIVERSAL HANDS FREE SYSTEM
 INSTALLATION INSTRUCTIONS 1. DESCRIPTION: INFINITI CELLPORT UNIVERSAL HANDS FREE SYSTEM 2. APPLICATION: 2002 Q45 3. PART NUMBER: 948T3CELLR95 (VPC) or 999Q2TN000 (PDC) 4. TOOLS REQUIRED: a. Loctite 242
ipod Touch 5th Generation Display Assembly Replacement
 ipod Touch 5th Generation Display Assembly Replacement Remove the display assembly from your ipod Touch 5th Generation. Written By: Andrew Optimus Goldberg ifixit CC BY-NC-SA www.ifixit.com Page 1 of 23
WARNING These following pages are instruction for C5 CE stripes; however, it is the same method applying vinyl. Please spend time to read thru these
 WARNING These following pages are instruction for C5 CE stripes; however, it is the same method applying vinyl. Please spend time to read thru these pages. At the end, it is your C5/C6 ME stripes' instruction.
INSTALLATION INSTRUCTIONS
 COLD AIR INTAKE INSTALLATION INSTRUCTIONS PART NUMBER D760-0620 & D760-0621 PARTS LIST APPLICATION: 9/98-2003 E39 540i 4.4L 4" Intake Tube Air Filter w/ clamp Silicone Hose 80-100mm Hose Clamp 90-110mm
INSTALLATION INSTRUCTIONS
 INSTALLATION INSTRUCTIONS Accessory Application Publications No. CD CHANGER ATTACHMENT KIT ODYSSEY AII 22030 Issue Date AUG 2000 PARTS LIST CD Changer Attachment Kit: P/N 08B12-S0X-100 Right side rail
M GT 2005 up Mustang ENGINE START Push-Button INSTRUCTION SHEET
 Please contact the Ford Racing Techline for the most current instruction information @ (800) FORD-788!!! PLEASE READ THE FOLLOWING INSTRUCTIONS CAREFULLY PRIOR TO INSTALLATION!!! OVERVIEW: The following
STEPS FOR REMOVING REAR ASHTRAY & CUP HOLDER, CENTER ARMREST, E- BRAKE CONSOLE, FRONT ASHTRAY, LOWER CENTER CONSOLE AND GLOVE BOX
 Please give credit where credit is due! This DIY was completed ENTIRELY by the hardest working VW Vortex moderator on the site!! Gary Thompson, Ph.D. - vortex ID VGRT6, email address vgrt6@yahoo.com. Please
INSTALLATION INSTRUCTIONS
 INSTALLATION INSTRUCTIONS Accessory Application Publications No. AUTOMATIC AII 27160 2005 CR-V Issue Date ATTACHMENT KIT SEP 2004 PARTS LIST Automatic Day/Night Mirror Attachment Kit (sold separately)
Mo- Doors Garage Door Opener Installation Victory Vision
 Mo- Doors Garage Door Opener Installation Victory Vision Your Mo- Door opener is the best garage door opener system out there for your Victory Vision. We hope you enjoy your opener as much as we do designing
DODGE SLT Installation Instructions
 1994-97 DODGE SLT 40-20-40 Installation Instructions Step 1. Driver and Passenger Bottoms/DB&PB: All the parts of the seat cover are labeled inside. Use the seat cover piece identification chart to ID
Front Bucket Seat Upholstery
 Specter Off-Road, Inc. 21600 Nordhoff St. Chatsworth, CA 91311 USA www.sor.com, (818)882-1238, Fax: (818) 882-7144 sor@sor.com Luxury Seat Upholstery Installation Instructions Front Bucket Seat Upholstery
Deuce/Ace Installation Instructions
 HARDWARE KIT: Upper Mounting Plate: 2-7/16" (11mm) X 3.5" bolts 2-7/16" flange nuts 2-2" spacers 2-7/16" trim cap mounting washers 2 - plastic trim caps TOOLS NEEDED: safety glasses wrenches 16mm or 5/8"
INSTALLATION INSTRUCTIONS
 INSTALLATION INSTRUCTIONS Accessory Application Publications No. AII 32664 TRUNK MOUNT 2007 ACCORD 4-DOOR Issue Date JULY 2006 PARTS LIST 17 Wire ties Attachment Kit (sold separately): P/N 08B26-SDA-100
Installation Instructions Jeep CJ-7
 Retrofit Steering Column Installation Instructions 1976-86 Jeep CJ-7 For Part # s 1520800010, 152800020, 1520800051 www.ididitinc.com 610 S. Maumee St., Tecumseh, MI 49286 (517) 424-0577 (517) 424-7293
SALEEN SPEEDLAB BOOST AND WATER TEMPERATURE GAUGE POD KIT
 = SALEEN SPEEDLAB BOOST AND WATER TEMPERATURE GAUGE POD KIT INSTALLATION MANUAL: 2005-09 Mustang 4.6L 3V P/N: 10-8002-C12000B KIT P/N: 10-2903-B11511* Saleen Performance, Inc. 1225 East Maple Rd. Troy,
GENUINE PARTS INSTALLATION INSTRUCTIONS
 GENUINE PARTS INSTALLATION INSTRUCTIONS 1. DESCRIPTION: Trailer Tow mirror kit (with power and heated) Trailer Tow mirror kit (with power, heated, and memory) 2. APPLICATION: 04 Titan, Armada, QX56 LE,
INSTALLATION INSTRUCTIONS
 INSTALLATION INSTRUCTIONS Accessory Application Publications No. SYSTEM ACCORD 2-DOOR (LX/EX L4, LX V6) AII 25749 Issue Date FEB 2004 PARTS LIST Double-sided adhesive tape XM Radio Attachment Kit : P/N
Written By: Evan Noronha
 iphone 6s Plus Battery Replacement Replace the battery in an iphone 6s Plus. Written By: Evan Noronha ifixit CC BY-NC-SA www.ifixit.com Page 1 of 18 INTRODUCTION Use this guide to bring life back to your
#TL T EA888 GEN 3 FUELING SYSTEM/ INSTALLATION INSTRUCTIONS
 #TL100069 2.0T EA888 GEN 3 FUELING SYSTEM/ INSTALLATION INSTRUCTIONS Notes: These instructions were written for a North American specification MkVII GTI. Other models, like the Golf R, are similar. When
Stand Alone Kit Installation Instructions
 Before installation: Stand Alone Kit Installation Instructions Read all information in this manual carefully Check the product for all components before starting the installation Remove the negative battery
GrilleGuy.com, LLC. Installation Instructions and Care Guide : Toyota Tacoma Grille UPPER GRILLE
 Installation Instructions and Care Guide : 2001 2004 Toyota Tacoma Grille Thanks again for purchasing your custom grille insert from GrilleGuy.com. The following are some general guidelines that will simplify
394: Handsfree, Bluetooth Handsfree, Bluetooth
 394: Handsfree, Bluetooth S80 (07-), 2008, B8444S, TF-80SC AWD, L.H.D, YV1AH852881073834, 073834 4/1/2013 PRINT 394: Handsfree, Bluetooth Handsfree, Bluetooth Installation instruction: 31310098 INTRODUCTION
INSTALLATION INSTRUCTIONS
 INSTALLATION INSTRUCTIONS Accessory Application 2015 CR-Z Publications No. VERSION 1 Issue Date SEP 2014 PARTS LIST Armrest console Armrest bracket 2 Collars 4 Washer-bolts 2 Caps TOOLS AND SUPPLIES REQUIRED
Installation Instructions Cable Top Twill Replace-a-top with Tinted Windows Upper Door Skins not included
 Installation Instructions Cable Top Twill Replace-a-top with Tinted Windows Upper Door Skins not included Vehicle Application Jeep Wrangler (JK) 2 Door 2011 and newer Part Number: 79846 Will fi t 54722
PLEASE READ THROUGH THE WHOLE WRITE UP BEFORE ACTUALLY USING IT!!!!
 JDM power folding mirror switch install into stock USDM harness. By: Greg L., Zeke21 on twinturbo.net PLEASE READ THROUGH THE WHOLE WRITE UP BEFORE ACTUALLY USING IT!!!! This is how I was able to get the
Push Start Ignition (05-10 All) Installation
 Installation") Tools Required: Phillips head screwdriver Flat head screwdriver Ratchet 7mm Socket Torx T20 bit Wire strippers/cutters Hand file Needle nose pliers Installation Instructions: Push Start Ignition (05-10
Tools Required: Phillips head screwdriver Flat head screwdriver Ratchet 7mm Socket Torx T20 bit Wire strippers/cutters Hand file Needle nose pliers Installation Instructions: Push Start Ignition (05-10
Cable Shift Linkage Kit
 Cable Shift Linkage Kit INSTALLATION INSTRUCTIONS ididit column to GM Trans FOR PART NUMBER S: 2801000010, 2802000010 ididit Column to 350 Trans...Pg 1-4 ididit Column to 400 Trans...Pg 5-8 ididit Column
Hard Bar Sport, M1/M2 Hard Core Hardtop, M2 Sport, and Xtreme Installation Instructions
 HARDWARE KIT: Hard Bar Sport, M1/M2 Hard Core Shoulder Harness Guide Relocation Assemblies: 2-3/8" X 1" grade 8 bolts 4-3/8" flat washers 2-3/8" lock nuts 2 - brass bushings 2 - plastic trim caps 2-3/8"
Installation Instructions for the EVO3 Height-Adjustable Ultimate Short Shifter
 Installation Instructions for the EVO3 Height-Adjustable Ultimate Short Shifter for 1992-2005 325, 323, 318 and 1986-1994 525, 528, 535, 540 5-speed models only. (part number USSE3 and USSE5) Thank you
DIY: Repairing/Replacing the Timing Chain Tensioner
 DIY: Repairing/Replacing the Timing Chain Tensioner By Saki GT - February 8, 2012 [youtube=http://www.youtube.com/watch?v=24cil5_9yvq] The above video is an example of how a bad Timing Chain Tensioner
Ford Mustang V6 OEM-Style Fog Light Kit Parts List: Quantity: Tool List:
 2015-2017 Ford Mustang V6 OEM-Style Fog Light Kit Parts List: Quantity: Tool List: LED Foglights/ Bezels 2 Flat head & Phillips screwdriver (if you ordered part#3600) Ratchet & Socket set OR Wiring harness
GENUINE PARTS INSTALLATION INSTRUCTIONS
 GENUINE PARTS INSTALLATION INSTRUCTIONS 1. 2. 3. 4. DESCRIPTION: Accent light Kit APPLICATION: R42H (2011) PART NUMBER: 999F3 AW000 - Universal Accent Lighting Kit. KIT CONTENTS: Item QTY Description Service
Illuminated Cup Holders Hyundai Elantra (GLS, Limited, Coupe)
") Illuminated Cup Holders 2011-2015 Hyundai Elantra (GLS, Limited, Coupe) Thanks for purchasing this Cup Holder Illumination Install Kit! If you have any questions or feedback please email me direct at info@accentglowled.com
Illuminated Cup Holders 2011-2015 Hyundai Elantra (GLS, Limited, Coupe) Thanks for purchasing this Cup Holder Illumination Install Kit! If you have any questions or feedback please email me direct at info@accentglowled.com
Chrysler 727, 904, and 518 Automatic Trans Mount Shifter Installation Instructions
 Chrysler 727, 904, and 518 Automatic Trans Mount Installation Instructions Building American Quality With A Lifetime Warranty! TOLL FREE 1-877-469-7440 tech@lokar.com www.lokar.com Chrysler 727, 904, and
5X Racing Mazda Miata Aluminum Shifter Bushing Installation Instructions
 5X Racing Mazda Miata Aluminum Shifter Bushing Installation Instructions Thank you for your purchase! These instructions will explain how to properly install a 5X Racing Aluminum Shifter Bushing in your
Mustang Headlight w/ CCFL Halo (05-09) - Installation Instructions
 - Installation Instructions") Mustang Headlight w/ CCFL Halo (05-09) - Installation Instructions The below installation instructions work for the following products: Chrome Mustang Headlight w/ CCFL Halo (05-09) Smoked Mustang Headlight
Mustang Headlight w/ CCFL Halo (05-09) - Installation Instructions The below installation instructions work for the following products: Chrome Mustang Headlight w/ CCFL Halo (05-09) Smoked Mustang Headlight
INSTALLATION INSTRUCTIONS C-VS-2000-DUR-1 20 VEHICLE SPECIFIC CONSOLE for 2018 Dodge Durango with Standard Shifter
 INSTALLATION INSTRUCTIONS C-VS-2000-DUR-1 20 VEHICLE SPECIFIC CONSOLE for 2018 Dodge Durango with Standard Shifter TOOLS REQUIRED: Phillips Screw Driver T-20 Torx bit Standard Socket set 9/64 Allen wrench
FlexJet Carriage Circuit Board (PCB) Replacement
 Replacement") P/N: 111484 R0 14140 NE 200th St. Woodinville, WA. 98072 PH: (425) 398-8282 FX: (425) 398-8383 ioline.com FlexJet Carriage Circuit Board (PCB) Replacement Notices: Warning! Ensure that all AC power cables
P/N: 111484 R0 14140 NE 200th St. Woodinville, WA. 98072 PH: (425) 398-8282 FX: (425) 398-8383 ioline.com FlexJet Carriage Circuit Board (PCB) Replacement Notices: Warning! Ensure that all AC power cables
INSTALLATION INSTRUCTIONS 97 FORD EXPEDITION
 INSTALLATION INSTRUCTIONS 97 FORD EXPEDITION 1. Read the instructions completely and carefully before you begin. Check the kit for proper contents (refer to the part s list and the picture diagrams). Before
INSTALLATION INSTRUCTIONS
 INSTALLATION INSTRUCTIONS Accessory Application Publications No. AII 27996 ATTACHMENT KIT 2005 CIVIC HYBRID Issue Date AUG 2004 PARTS LIST Changer Attachment Kit: P/N 08B26-S5B-100 4 Washer-screws, 4 x
Steeda S550 MT-82 Tri-Ax Race Short Throw Shifter Installation Instructions For Parts: ,
 Steeda S550 MT-82 Tri-Ax Race Short Throw Shifter Installation Instructions For Parts: 555-7317, 555-7318 Tools required 1. 7mm socket 2. 10mm socket 3. 13mm socket 4. 15mm socket 5. 18mm socket 6. 3/8