Installing front locking CDL housing. By Josh Salas jycsalas
|
|
|
- Scarlett Collins
- 5 years ago
- Views:
Transcription

1 Installing front locking CDL housing By Josh Salas jycsalas This set of instruction divides the installation of a locking CDL front out-put housing in a 2003 Discovery II into the following sections: 1. Removal of stock front out-put housing 2. Installation of locking front out-put housing 3. Turning on diff lock indictor light on 2003 Discovery CAUTION** Before unbolting anything, make sure the area you will work around and the bolts and nuts to be removed have been degreased, cleaned, and sprayed with liquid wrench. It is recommended to power scrub the underside of your Discovery first. Disclaimer: Proceed with this and any modifications at your own risk! Improper modification may damage or leave a vehicle immobilized. REMOVAL OF STOCK FRONT OUT-PUT HOUSING: 1. Drain transfer case- remove plug -½ inch drive- reinstall plug 2. Lift and properly support front end of your Discovery 3. Remove both cross beams 4. Remove front drive shaft-


2 Drive shaft Flange at T-case, pic. 1 Drive shaft Flange at front axle, pic Remove 4 oxygen sensors or disconnect from plug. 6. Remove down pipe collect 2 gaskets and 8 nuts (3 for each manifold, 2 for rear)- pic. 3


3 Driver side exhaust manifold pic Remove drive shaft flange at t-case. Collect metal washer and nut see pic Remove clevis pin securing shift cable to hi/lo selector lever on the hi/lo selector lever housing and if removing entire cable setup, remove second clevis pin at center console assembly -pic. 4 Shift cable disconnected from housing pic Remove passenger side t-case mount and support t-case with jack. This will allow up/down movement of t- case/transmission for easier removal of housing. -pic. 5


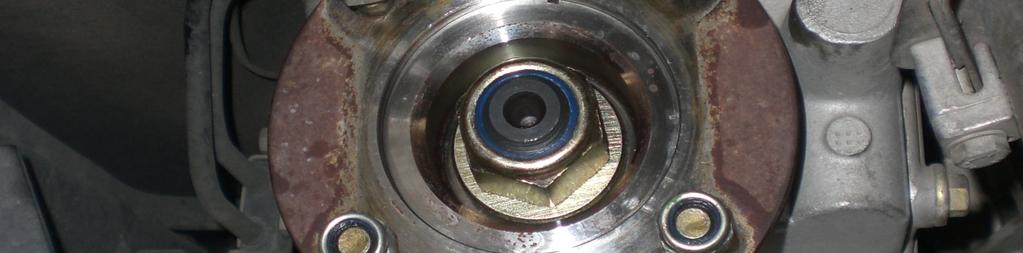


4 Pas. Side t-case mount pic Disconnect all switches on the black multi-plug bracket secured to the hi/lo selector lever housing- pic.6 Multi-plug bracket pic. 6


5 11. Remove 1 Banjo bolt on the transfer case breather tube - collect 2 washers. Pic.7 Banjo Bolt for breather tube pic Remove 6 bolts securing hi/lo selector lever housing - pic. 8 Remove hi/lo housing bolts pic. 8


6 13. The only thing left to remove on top of the hi/lo selector lever housing is the bolt for the shifter cable retaining bracket pic.9. Removing the 2 bolts in green gives access to the third bolt with a 10mm rachet-wrench. Remove high/low selector housing. Remove hi/lo housing bolts pic Remove 8 bolts securing front out-put housing Note the position of the longest one on top.

7 15. Remove one transmission oil sump pan bolt and anchor identified by red arrow pic Grab the housing with two hands and begin to wiggle, nudge, or use a flat head screw driver to pry it forwards. BE CAREFUL!! At this point the housing may un-lodge itself without warning an inch or two forward and some t- case oil will pour out. 17. Use a long screw driver or 10 ¼ drive extension bar, stick it in the hole identified by red arrow and hold the set of gears in the main casing. Pic.11 Retaining the gear, set, pic.11 The purpose of this is to only remove the front housing while leaving the gear set in to remove afterwards OR one can attempt to remove the housing and gear set together. 18. Pay attention to the angle of the housing as the hi/lo selector shaft may still be part way in the front or main housing. Use the jack to lower or raise the t-case to gain better clearance. Note to not lower it too much.


8 19. Once out, set aside. Inspect the inside of the main casing for metal shavings. Grab a magnet and stick it down this hole to retrieve the detent ball for the hi/lo selector. Free at last, pic.12 Or it can be accessed at the side of the main casing. See pic. 12a,b,c. Failing to remove the ball will inhibit engaging in Hi. Detent plug, pic.12a


9 Detent plug, pic.12b Detent plug, pic.12c Update : Make sure to Re-install the ball, spring and plug once final assembly of the CDL housing is complete. The ball helps keep the hi/lo selector shaft from moving during off road use. To re-install, shift the hi/lo selector lever to either hi range or low range to ensure ball sits in the groove of the selector shaft. Insert ball, then spring, then plug.


10 INSTALLATION OF LOCKING FRONT OUT-PUT HOUSING: 1. Take the new housing assembly and clean it up real good. 2. CAREFULLY remove the gear set from the housing and retain the hi/lo selector fork. Take this time to learn how the nipple actually engages the dog clutch on the front out-put shaft. Pic.13 Differential lock selector shaft, pic.13a 3. Take the gear set and noting its position, insert it into the main casing of the transfer case whilst aiming the hi/lo selector fork into the rear of the main casing. Ensure the selector fork shaft is lubed and that it is resting on the hi/lo selector sleeve. Pic. 13b Hi/lo selector sleeve, pic.13b

11 See pic. 11 as it should look like that when installing. Wiggle it and tap it lightly with a rubber mallet or wood until the low range gear (the big gear) is no longer sticking out of the main casing. 4. Lube the opposite end of the hi/lo selector shaft that will be inserted into the front out-put housing with gear oil. 5. Before installing the new housing, ensure it is fully engaged in the lock position to ensure the receiving end of the gear set fully slides forward onto the front out-put shaft. 6. Using high temp black RTV apply it on the front out-put housing following the instructions. Make sure you practice getting the housing in all the way once or twice before the final assembly. 7. Torque all 8 bolts to 25nm in a star like sequence 8. Installing the rest of the removed components is the reverse of removal. Make sure to re-fill the t-case with GEAR oil! TURNING ON DIFF LOCK INDICATOR LIGHT on 2003 Discovery: 1. If you were unfortunate to not have the diff-lock switch harness zip tied somewhere near your transmission or t- case and you have to cut and splice to get your diff light on, then read on. 2. Remove your center console. 3. Once removed, find connector C0681 and disconnect it from C0668


 5.")


12 4. Grab the connector and look for cavity # 7 which will have the black/blue wire for the diff lock circuit, (circuit 47) 5. Create a ground on the ground connector bolt by attaching a piece of electrical wire.

 Turn")
13 6. Going back to connector CO681. Splice a wire into the black/blue wire. Make sure to leave about 2 inches from the connector. (Again, this is my rough splice for testing purposes) Turn the ignition on, and push the diff lock switch...

14 7. Now all you have to do is connect female connectors and run the wiring as you see fit down to your diff-lock switch.
Transmission, disassembling and assembling
 Page 1 of 27 34-43 Transmission, disassembling and assembling Disassembly sequence Page 34-55. Transmission overview 1-1st gear 2-2nd gear 3-3rd gear 4-4th gear 5-5th gear 6 - Reverse gear Removing and
SLP Camaro ZL1 STAGE 3 (650 HP)
") SLP - 2012 Camaro ZL1 STAGE 3 (650 HP) PART #26002 PACKING LIST Before installation, use this check list to make sure all necessary parts have been included. ITEM QTY CHECK PART NUMBER DESCRIPTION 1. 1
SLP - 2012 Camaro ZL1 STAGE 3 (650 HP) PART #26002 PACKING LIST Before installation, use this check list to make sure all necessary parts have been included. ITEM QTY CHECK PART NUMBER DESCRIPTION 1. 1
Barton Short Throw Shifter 11/12 V6, GT Mustang:
 Barton Short Throw Shifter 11/12 V6, GT Mustang: Tools Required: 10mm deep socket Socket wrench 10 extension for socket wrench Jack Jack stand Small piece of wood Small hook tool (recommended) *can be
99-04 GT. Hellion Power Systems Mustang GT Kit Instructions
 Hellion Power Systems 99-04 Mustang GT Kit Instructions Part 1 Hellion recommends that the front suspension system be installed either by trained professionals or by 5.Remove rack bolts K-Member Installation
JEEP TJ & (XJ 84-01) ATLAS 2 SPEED CABLE SHIFTER units built before 4/30/12
 ATLAS 2 SPEED CABLE SHIFTER units built before 4/30/12") KIT CONSISTS OF: No. Qty Part No. Description 4320 Aerotech Center Way, Page 1 of 6 1 1 302051-RLE BASE- TWIN STICK MOUNT 42RLE 2 1 302080 STUD BOLT 1/2"-13 X 7 (XJ) 3 1 303120 SERRATED LOCK NUT 1/2"-
KIT CONSISTS OF: No. Qty Part No. Description 4320 Aerotech Center Way, Page 1 of 6 1 1 302051-RLE BASE- TWIN STICK MOUNT 42RLE 2 1 302080 STUD BOLT 1/2"-13 X 7 (XJ) 3 1 303120 SERRATED LOCK NUT 1/2"-
JEEP TJ & (XJ 84-01) ATLAS 2 SPEED CABLE SHIFTER units built before 4/30/12
 ATLAS 2 SPEED CABLE SHIFTER units built before 4/30/12") Paso Robles, CA 93447 PAGE 1 OF 6 Telephone: (800) 350-2223 Fax: (805) 238-4201 Page Rev. Date: 05-12-15 KIT CONSISTS OF: No. Qty Part No. Description 1 1 302051-RLE BASE- TWIN STICK MOUNT 42RLE 2 1 302075
Paso Robles, CA 93447 PAGE 1 OF 6 Telephone: (800) 350-2223 Fax: (805) 238-4201 Page Rev. Date: 05-12-15 KIT CONSISTS OF: No. Qty Part No. Description 1 1 302051-RLE BASE- TWIN STICK MOUNT 42RLE 2 1 302075
RUBICRAWLER - JEEP TJ & JK ( ) W/ UNIVERSAL SHIFTER KIT CONSISTS OF: No. Qty Part No. Description
 W/ UNIVERSAL SHIFTER KIT CONSISTS OF: No. Qty Part No. Description") KIT CONSISTS OF: No. Qty Part No. Description 1. 1 RUBICRAWLER - GEAR BOX 2. 1 42R-UNIV - UNIVERSAL SHIFTER KIT PAGE 1 OF 8 Page Rev. Date: 11-06-18 Optional Items: Part No. Description 15-1000 - UNI-RAISE,
KIT CONSISTS OF: No. Qty Part No. Description 1. 1 RUBICRAWLER - GEAR BOX 2. 1 42R-UNIV - UNIVERSAL SHIFTER KIT PAGE 1 OF 8 Page Rev. Date: 11-06-18 Optional Items: Part No. Description 15-1000 - UNI-RAISE,
Exedy Mach 400 Stage 1 Clutch and Pilot Bearing (Late GT, Bullitt, Mach 1; Cobra): SKUs: & 50116
: SKUs: & 50116") Exedy Mach 400 Stage 1 Clutch and Pilot Bearing (Late 01-04 GT, Bullitt, Mach 1; 99-04 Cobra): SKUs: 62502 & 50116 Tools Needed: Car Jack with high lift capabilities (If not, block of wood may be required)
Exedy Mach 400 Stage 1 Clutch and Pilot Bearing (Late 01-04 GT, Bullitt, Mach 1; 99-04 Cobra): SKUs: 62502 & 50116 Tools Needed: Car Jack with high lift capabilities (If not, block of wood may be required)
InstalL Instructions. trail-creeper 4.70 transfer case gear kit ( KIT and KIT) kit contents
 kit contents") InstalL Instructions trail-creeper 4.70 transfer case gear kit (105000-1-KIT and 105001-1-KIT) kit contents 5356 PINE AVE FRESNO, CA 93727 USA TOLL FREE: 877.4X4.TOYS WORLDWIDE: 559.252.4950 WWW.TRAIL-GEAR.COM
InstalL Instructions trail-creeper 4.70 transfer case gear kit (105000-1-KIT and 105001-1-KIT) kit contents 5356 PINE AVE FRESNO, CA 93727 USA TOLL FREE: 877.4X4.TOYS WORLDWIDE: 559.252.4950 WWW.TRAIL-GEAR.COM
LT230T TRANSFER GEARBOX. Overhaul Manual LT230T. Verdeelbak revisieboek LT230T. Boîte de transfert Manuel de révision LT230T
 LT230T TRANSFER GEARBOX Overhaul Manual LT230T Verdeelbak revisieboek LT230T Boîte de transfert Manuel de révision LT230T Verteilergetriebe Überholungsanleitung LT230T Riduttore Manuale di revisione LT230T
1999 Explorer/Mountaineer Workshop Manual
 Page 1 of 5 SECTION 307-01B: Automatic Transmission 5R55E 1999 Explorer/Mountaineer Workshop Manual REMOVAL Procedure revision date: 07/27/1998 Transmission Special Tool(s) Torque Converter Holding Tool
TRANSMISSION AND TRANSFER CASE
 XJ TRANSMISSION AND TRANSFER CASE 21-1 TRANSMISSION AND TRANSFER CASE TABLE OF CONTENTS page AX5 MANUAL TRANSMISSION... 1 NV3550 MANUAL TRANSMISSION... 42 AUTOMATIC TRANSMISSION 30RH... 88 page AW 4 AUTOMATIC
UNDERDOG RACING DEVELOPMENT URD Traction Bar Installation
 URD Traction Bar Installation Introduction: UNDERDOG RACING DEVELOPMENT Thank you for choosing the URD Traction Bar for two wheel drive street trucks. More models coming soon! This bar is a true bolt on
Engine, removing and installing
 Стр 1 из 16 10-1 Engine, removing and installing Special tools, testers and auxiliary items required Torque wrench VAG 1331 Torque wrench VAG 1332 Engine/transmission jack VAG 1383 A Spring type clip pliers
Prerequisites: Shop Manual (recommended) pages 3-9 through 3-13.
 pages 3-9 through 3-13.") Prerequisites: Order your gaskets average about $25.00 bucks X 2 so $50.00 4NK-11193-00-00 Obtain a shim kit (Should have several 265 and 270s) (Some dealers will exchange) Obtain a Valve Bucket Tool YM-33961
Prerequisites: Order your gaskets average about $25.00 bucks X 2 so $50.00 4NK-11193-00-00 Obtain a shim kit (Should have several 265 and 270s) (Some dealers will exchange) Obtain a Valve Bucket Tool YM-33961
Oil pan, oil strainer and valve body, removing and installing
 Page 1 of 44 38-1 Oil pan, oil strainer and valve body, removing and installing WARNING! Do not run engine with the oil pan removed or without ATF filling and do not tow vehicle. Notes: Always replace
2010 Camaro Long Tube Headers, Coated w/high Flow Cats Use w/#30220
 PART #30212 2010 Camaro Long Tube Headers, Coated w/high Flow Cats Use w/#30220 PACKING LIST Before installation, use this checklist to make sure all necessary parts have been included. ITEM CHECK PART
Ford Mustang 2013 GT500 Rear Break Install Guide for Mustang GT
 Ford Mustang 2013 GT500 Rear Break Install Guide for Mustang GT 2005-13 NOTE: Installation of this kit requires above average mechanical skills. This procedure should only be undertaken by a competent
SLP Camaro ZL1 STAGE 2 (625 HP)
") SLP - 2012 Camaro ZL1 STAGE 2 (625 HP) PART #26001 PACKING LIST Before installation, use this check list to make sure all necessary parts have been included. ITEM QTY CHECK PART NUMBER DESCRIPTION 1. 1
SLP - 2012 Camaro ZL1 STAGE 2 (625 HP) PART #26001 PACKING LIST Before installation, use this check list to make sure all necessary parts have been included. ITEM QTY CHECK PART NUMBER DESCRIPTION 1. 1
Direct Shift Gearbox (DSG) Mechatronic unit J743, removing and installing. - Loosen bolts - arrows - of oil pan - A - in diagonal sequence and remove.
 Mechatronic unit J743, removing and installing. - Loosen bolts - arrows - of oil pan - A - in diagonal sequence and remove.") - Loosen bolts - arrows - of oil pan - A - in diagonal sequence and remove. Note: Some transmission oil remains in the oil pan because not all of it can drain out. - Remove oil pan together with oil pan
- Loosen bolts - arrows - of oil pan - A - in diagonal sequence and remove. Note: Some transmission oil remains in the oil pan because not all of it can drain out. - Remove oil pan together with oil pan
Installation Guide for Rough Country 2.5 inch Lift Kit w/o Shocks (07-15 Wrangler JK) Item # J10212
 Item # J10212") Installation Guide for Rough Country 2.5 inch Lift Kit w/o Shocks (07-15 Wrangler JK) Item # J10212 Installation Time: 3 Hours Tools Required: Jack (2 helps, but not needed) Jack stands(2 3-ton, 2 2-ton)
Installation Guide for Rough Country 2.5 inch Lift Kit w/o Shocks (07-15 Wrangler JK) Item # J10212 Installation Time: 3 Hours Tools Required: Jack (2 helps, but not needed) Jack stands(2 3-ton, 2 2-ton)
Ford Racing Front Lower Control Arms (05-12 GT & GT500):
:") Ford Racing Front Lower Control Arms (05-12 GT & GT500): Tools needed: Floor jack Jack stands 18mm & 21mm box end wrench 18mm & 21mm socket 13/16 socket (2) Ratchets Breaker bar Torque wrench (0-150 ft/lbs)
Ford Racing Front Lower Control Arms (05-12 GT & GT500): Tools needed: Floor jack Jack stands 18mm & 21mm box end wrench 18mm & 21mm socket 13/16 socket (2) Ratchets Breaker bar Torque wrench (0-150 ft/lbs)
Moddit. How to Install an OS Giken Differential into a
 Moddit How to Install an OS Giken Differential into a Subaru BRZ This guide goes over the steps necessary to remove and install the OS Giken Limited Slip Differential into a Subaru BRZ. This guide may
2010 Camaro Long Tube Headers, Coated w/high Flow Cats/ Powerflo-X Crossover Assembly
 PART #30213/30214 2010 Camaro Long Tube Headers, Coated w/high Flow Cats/ Powerflo-X Crossover Assembly PACKING LIST Before installation, use this checklist to make sure all necessary parts have been included.
Installation Manual TWM Performance Short Shift Kit Stage 1 and Stage 2 MazdaSpeed 6
 Page 1 Installation Manual TWM Performance Short Shift Kit Stage 1 and Stage 2 MazdaSpeed 6 Please Note: It is preferable to park on a flat surface, as you will have to engage and disengage the hand brake
Installation Manual TWM Performance Short Shifter Subaru STi 2008+
 - 1 - Installation Manual TWM Performance Short Shifter Subaru STi 2008+ Please Note: It is preferable to park on a flat surface, as you will have to engage and disengage the hand brake and shift from
Long Tube Header Installation For Ford Mustang GT
 Long Tube Header Installation For 2005-2008 Ford Mustang GT Precision manufactured using aircraft quality T-304 stainless steel; this system is designed to endure years of heavy use. Installing a Borla
Audi B7 A4 2.oT Lightweight Flywheel. Installation Tutorial ES
 Audi B7 A4 2.oT Lightweight Flywheel Installation Tutorial ES2739501 Project Preparation Safety Leave the car in neutral. Park the vehicle in a safe, well lit, level area. Open the hood and place protective
Team Z Motorsports. K-Member installation instructions
 Team Z Motorsports K-Member installation instructions Parts Included: 1-Tubular K-Member Needed Items-Solid Steering Shaft Offset Steering Rack Bushings Optional-Heavy Duty Bolt Kit Tubular Front Lower
Engine Removal/Installation
 Engine Removal/Installation Make sure jacks and safety stands are placed properly and hoist brackets are attached to correct positions on the engine. (See Section 1). Apply parking brake and block rear
Technical Information Review
 Technical Information Review While every attempt is made to ensure that the technical information we supply is as accurate and up to date as possible, from time to time, errors do occur. There may also
Rear End Installation and Bearing Kit - 8.8in (86-12 V8; V6)
") Rear End Installation and Bearing Kit - 8.8in (86-12 V8; 11-13 V6) Tools Required: Jack Stands 5 Floor Jack 2 Oil Pans 1 Wheel Blocks 2 Differential Oil 3 qts Friction Modifier 3 bottles Tube of Black
Rear End Installation and Bearing Kit - 8.8in (86-12 V8; 11-13 V6) Tools Required: Jack Stands 5 Floor Jack 2 Oil Pans 1 Wheel Blocks 2 Differential Oil 3 qts Friction Modifier 3 bottles Tube of Black
SUZUKI SQ 416/420/625 M.Y TRANSMISSION SERVICE MANUAL - MANUAL - AUTOMATIC - TRANSFER - DIFFERENTIALS
 SUZUKI SQ 416/420/625 M.Y 1998-2005 TRANSMISSION SERVICE MANUAL - MANUAL - AUTOMATIC - TRANSFER - DIFFERENTIALS WARNING/CAUTION/NOTE IMPORTANT Please read this manual and follow its instructions carefully.
Performance Inlet Manifold
 Performance Inlet Manifold Tools needed (some tools not required on some models): 13mm Combination Wrench Flat Blade Screwdriver T30 Torx Driver T25 Torx Driver 10mm Combination Wrench and/or Socket with
TCI Turbo 400 Full Manual Valve Body. Shift Pattern: Park Reverse Neutral First Second Third. NOTE: You must reuse stock manual control valve.
 TCI 221100 Turbo 400 Full Manual Valve Body Shift Pattern: Park Reverse Neutral First Second Third This Kit Contains: (1) Turbo 400 Full Manual Valve Body (1) Separator Plate & Gaskets (1) Pressure Regulator
CHEETAH Competition Manual Valve Body - (PRN321) Part #27253
 Part #27253") 1535 Owens Road, Jacksonville, FL 32218 Phone 904-741-4850 * Fax 904-741-4853 CHEETAH Competition Manual Valve Body - (PRN321) Part #27253 Turbo Hydro 200-1976-Up FIRST, READ INSTRUCTIONS CAREFULLY, THEN
1535 Owens Road, Jacksonville, FL 32218 Phone 904-741-4850 * Fax 904-741-4853 CHEETAH Competition Manual Valve Body - (PRN321) Part #27253 Turbo Hydro 200-1976-Up FIRST, READ INSTRUCTIONS CAREFULLY, THEN
2007 Shelby GT500 Long Tube Headers Installation
 2007 Shelby GT500 Long Tube Headers Installation Precision manufactured using aircraft quality T-304 stainless steel; this system is designed to endure years of heavy use. Installing a Borla Performance
Step 3: Remove the six 8mm retaining bolts for the pressure manifold switch assembly. The manifold switch will not be re-installed.
 1 INSTRUCTIONS TCI 274500/274501 4L80E Trans Brake Valve Body Thank you for choosing TCI products. We are proud to be your manufacturer of choice. Please read this instruction sheet carefully before beginning
Installation Instructions HURST COMPETITION AND BILLET/PLUS SHIFTER Mustang w/5-speed Manual Transmission (GT only)
") Installation Instructions HURST COMPETITION AND BILLET/PLUS SHIFTER 2005-2010 Mustang w/5-speed Manual Transmission (GT only) Catalog# 3915201 WORK SAFELY! For maximum safety, perform this installation
Installation Instructions HURST COMPETITION AND BILLET/PLUS SHIFTER 2005-2010 Mustang w/5-speed Manual Transmission (GT only) Catalog# 3915201 WORK SAFELY! For maximum safety, perform this installation
SERVICE MANUAL Gearbox - Allison AT545 - Gearbox Installation
 Gearbox - Allison AT545 - Gearbox Installation Oil level dipstick Gearbox oil cooler Auxiliary oil filter Modulator Page 3.4 Gearbox - Allison AT545 Checking Oil Level The dipstick and filler are situated
1209A GM B-BODY Double Adjustable Trailing Arms
 1209A 78-96 GM B-BODY Double Adjustable Trailing Arms Warning: This installation should be performed by a trained professional. Tools Required for this Installation - 4 post lift or alignment rack preferable
FORD RACING DIFFERENTIAL COVER 8.8 IRS
 FORD RACING DIFFERENTIAL COVER 8.8 IRS Tools Needed: Socket set, metric and standard Sledge hammer Puller device, pitman puller Jack Jack stands Flat head screw drivers Torque wrench, capable of 8 ft/lbs
Installation Instructions Pro Bandit Shifter Fits: GM Powerglide Automatic Transmissions
 Installation Instructions Pro Bandit Shifter Fits: 1962-1973 GM Powerglide Automatic Transmissions Part # 80793 WORK SAFELY! For maximum safety, perform this installation on a clean, level surface and
Single Barrel Shotgun HPFP Install Guide
 Single Barrel Shotgun HPFP Install Guide Thank you for purchasing the VTT Single Barrel Shotgun HPFP upgrade kit! PLEASE READ THE ENTIRE GUIDE BEFORE BEGINNING INSTALLATION! The first thing you should
INSTALLATION INSTRUCTIONS
 INSTALLATION INSTRUCTIONS 2005-2012 Nissan Xterra/Frontier / Pathfinder PART NUMBERS: NP17500, NP17525, NP17550 FRONTIER PARTS & CORRESPONDING HARDWARE LIST XTERRA PATHFINDER ABOVE LISTED 1/2 Metal Lock
Installation Manual TWM Performance Short Shifter Cobalt SS/SC, SS/TC, HHR SS, Ion Redline and Saab 9-3
 Page 1 Installation Manual TWM Performance Short Shifter Cobalt SS/SC, SS/TC, HHR SS, Ion Redline and Saab 9-3 Please Note: It is preferable to park on a flat surface, as you will have to engage and disengage
The Driveshaft Shop Aluminum One Piece Driveshaft (05-10 GT)
") Install Time: 2-3 Hours Tools Needed: Metric Hex Key Set 10mm, 13mm, 15mm deep socket 12 point 12mm deep socket ⅜ Rachet 5 ½ Rachet Extensions ½ Drive Breaker Bar Blue Thread Locker Rubber Mallet Pry Bar
Install Time: 2-3 Hours Tools Needed: Metric Hex Key Set 10mm, 13mm, 15mm deep socket 12 point 12mm deep socket ⅜ Rachet 5 ½ Rachet Extensions ½ Drive Breaker Bar Blue Thread Locker Rubber Mallet Pry Bar
IAG Competition Series Air / Oil Separator (AOS) For 2017 STI
 For 2017 STI") P IAG Competition Series Air / Oil Separator (AOS) For 2017 STI Part# IAG-ENG-7251 Tools Required: Ratchet, torque wrench, extensions, needle nose pliers, hose cutter, snips/scissors, flat head screw driver,
P IAG Competition Series Air / Oil Separator (AOS) For 2017 STI Part# IAG-ENG-7251 Tools Required: Ratchet, torque wrench, extensions, needle nose pliers, hose cutter, snips/scissors, flat head screw driver,
GM Street Scraper Instructions
 GM 92-00 3500 Street Scraper Instructions 1. Remove bed from truck. 2. Using floor jack, jack up rear of truck at axle till the tires are off the ground. 3. Support truck at the frame in front of axle
Installation Instructions HURST BILLET COMPETITION/PLUS SHIFTER Dodge Challenger
 Installation Instructions HURST BILLET COMPETITION/PLUS SHIFTER 2009-2015 Dodge Challenger Catalog #3916020 WORK SAFELY! For maximum safety, perform this installation on a clean, level surface and with
Gearbox sectional drawing
 Gearbox sectional drawing BMW Grafik Design MT- KL39000 3.5 3.6 3 4 77 3 4 77 3473 3 4 7 3 4 7 3 4 73 KL300 Replacing the shaft sealing rings in the gearbox housing and gearbox cover All shaft sealing
8 Zip Tie Zip Tie 1 Union Fitting 1 ½ ½ Union Reducer Fitting Union 1 5/8 ½ (For Plastic Intake Manifold Vehicles)
") P IAG Street Series Air / Oil Separator (AOS) For 2017 STI Part# IAG-ENG-7151 Tools Required: Ratchet, torque wrench, extensions, needle nose pliers, hose cutter, snips/scissors, flat head screw driver,
P IAG Street Series Air / Oil Separator (AOS) For 2017 STI Part# IAG-ENG-7151 Tools Required: Ratchet, torque wrench, extensions, needle nose pliers, hose cutter, snips/scissors, flat head screw driver,
REMOVAL & INSTALLATION
 REMOVAL & INSTALLATION NOTE: For reassembly reference, label all electrical connectors, vacuum hoses and fuel lines before removal. Also place mating marks on engine hood and other major assemblies before
Changing the Struts on a WK Jeep CRD
 Changing the Struts on a WK Jeep CRD Step by Step By Chirpz Disclaimer: I do not claim that this procedure is the right way or even the best way to change your struts. This is what I did after reading
97-02 JEEP TJ BODY LIFT KIT INSTRUCTIONS
 92RC60500 97-02 JEEP TJ BODY LIFT KIT INSTRUCTIONS Congratulations on your purchase of a new Rough Country 2 /3 Body Lift. We are committed to providing you with the best product available for the best
CAT-BACK EXHAUST FORD FIESTA ST PARTS LIST AND INSTALLATION GUIDE WARNING PARTS INCLUDED INSTALL PROCEDURE TOOLS NEEDED
 PARTS LIST AND PARTS INCLUDED 1PC STAINLESS STEEL RESONATED MIDPIPE W/ 2-BOLT FLANGE 1PC STAINLESS STEEL MIDPIPE-TO-REAR MUFFLER SECTION 1PC STAINLESS STEEL REAR MUFFLER SECTION 1PC 3" DUAL OFFSET TIPS
1. General Description
 1. General Description A: SPECIFICATION 1. MANUAL TRANSMISSION AND FRONT DIFFERENTIAL Type Transmission gear ratio Front reduction gear Rear reduction gear Front differential Center differential Final
TOYOTA L/C TRANSFER CASE TWIN STICK
 KIT CONSITS OF: No: Qty Part No. Description PAGE 1 OF 5 Page Rev. Date: 10-16-18 1. 1 *715575 HIGH LOW PIVOT BLOCK 2. 1 715576 T/C HIGH LOW SHIFTER LEVER 3. 1 *715577 2WD/4WD PIVOT BLOCK 4. 1 715579 PIVOT
Installation Instructions INDY SHIFTER Fits: Mustang Fastback & Convertible with MT-82 Transmission Catalog #
 Installation Instructions INDY SHIFTER Fits: 2015-2018 Mustang Fastback & Convertible with MT-82 Transmission Catalog # 3916036 Watch our installation video on YouTube WORK SAFELY! For maximum safety,
Shotgun Single Barrel HPFP install guide
 Shotgun Single Barrel HPFP install guide Thank you for your purchase of the VTT Shotgun Single Barrel HPFP upgrade! First thing to do when you open your box is to make sure all parts are in their respective
Slave Cylinder Weep Hole Drilling Procedure
 Slave Cylinder Weep Hole Drilling Procedure Tools Required: T20 Torx Driver T25 Torx Driver T25 Torx Bit with ¼ Ratchet Wrench 4mm Hex Key (Allen wrench) 5mm Hex Key 6mm Hex Key 8mm Hex Key 12mm Hex Key
STEP 1 Clutch Slave Cylinder Piston Removal and Installation
 STEP 1 Clutch Slave Cylinder Piston Removal and Installation This step is mandatory as the Clutch Adjustment Screw will remain bolted in place and you will not be able to remove the Primary Drive Cover
***THE OWNER'S MANUAL MUST BE GIVEN TO THE END USE CUSTOMER AFTER COMPLETING THE INSTALLATION.***
 INSTALLATION INSTRUCTIONS FOR THE MOTOR TRIKE HARLEY MECHANICAL REVERSE 1999-2006 FIVE SPEED FLH LAST UPDATED: OCTOBER 2011 AS THE INSTALLER OF THIS MECHANICAL REVERSE, YOU MUST BECOME FAMILIAR WITH PROPER
1 of 1 7/1/17, 2:02 PM. Air Cleaner Assembly Replacement ALLDATA, LLC. All Rights Reserved. (Version )
") Air Cleaner Housing Service and Repair, Removal and Replacement: Ai... http://repair.alldata.com/alldata/article/display.action?componentid=367... 1 of 1 7/1/17, 2:02 PM Air Cleaner Assembly Replacement
Air Cleaner Housing Service and Repair, Removal and Replacement: Ai... http://repair.alldata.com/alldata/article/display.action?componentid=367... 1 of 1 7/1/17, 2:02 PM Air Cleaner Assembly Replacement
Model 4360 Teardown and Reassembly Instructions
 Clean the outside surface of the transaxle. Place the shifter in neutral position. Remove detent cover screw (item 3), detent cover (item 4), detent springs (item 5), and detent balls (item 6). Use a magnet
INSTALLATION PROCESS: FK003D945-7 Complete Front, Rear, and Clutch A.B.S. KIT Harley Davidson FLH Touring Models
 INSTALLATION PROCESS: FK003D945-7 Complete Front, Rear, and Clutch A.B.S. KIT 2014-2017 Harley Davidson FLH Touring Models Parts List: 4 Lines 1 Brake Light Switch Adapter 7 Single banjo bolts 2 Caliper
RUBICRAWLER - JEEP TJ & JK ( ) W/ UNIVERSAL SHIFTER
 W/ UNIVERSAL SHIFTER") Paso Robles, CA 93447 PAGE 1 of 9 Telephone: (800) 350-2223 Fax: (805) 238-4201 Page Rev. Date: 09-25-15 KIT CONSISTS OF: No. Qty Part No. Description 1. 1 42R-JK - GEAR BOX Kit also includes: 1 42R350
Paso Robles, CA 93447 PAGE 1 of 9 Telephone: (800) 350-2223 Fax: (805) 238-4201 Page Rev. Date: 09-25-15 KIT CONSISTS OF: No. Qty Part No. Description 1. 1 42R-JK - GEAR BOX Kit also includes: 1 42R350
Installation Instructions BILLET/PLUS PISTOL-GRIP SHIFTER Fits: 2016 Camaro V6 with Manual Transmission Catalog #
 Installation Instructions BILLET/PLUS PISTOL-GRIP SHIFTER Fits: 2016 Camaro V6 with Manual Transmission Catalog # 3916034 WORK SAFELY! For maximum safety, perform this installation on a clean, level surface
1988 Ford F-350 PICKUP
 1988 Ford F-350 PICKUP Submodel: Engine Type: V8 Liters: 7.5 Fuel Delivery: FI Fuel: GAS 1987 93 4.9L Engine The intake and exhaust manifolds on these engines are known as combination manifolds and are
ENGINE - V8. Seal - crankshaft - rear. Refit 1. Ensure both seal location and running surface on crankshaft are clean.
 REPAIRS Seal - crankshaft - rear 1. Ensure both seal location and running surface on crankshaft are clean. 1. Automatic gearbox models: converter drive plate. ENGINE - V8, REPAIRS, Plate - drive - automatic.
CERTAIN F-150 AND MARK LT VEHICLES EQUIPPED WITH 5.4L 3-VALVE ENGINES BRAKE BOOSTER VACUUM HOSE REPLACEMENT
 PAGE 1 OF 6 CERTAIN 2005-2006 F-150 AND MARK LT VEHICLES EQUIPPED WITH 5.4L 3-VALVE ENGINES REPLACEMENT OVERVIEW This program involves replacing the brake booster vacuum hose at the rear of the engine
Ford Mustang GT Long Tube Header Installation
 2005-2006 Ford Mustang GT Long Tube Header Installation Precision manufactured using aircraft quality T-304 stainless steel; this system is designed to endure years of heavy use. Installing a Borla Performance
ENG-16, Turbocharger Replacement (Including Tips on K27 Turbocharger Installation)
") ENG-16, Turbocharger Replacement (Including Tips on K27 Turbocharger Installation) Introduction Replacing the turbocharger on a 951 is not extremely difficult. However, it is very tedious because there
ENG-16, Turbocharger Replacement (Including Tips on K27 Turbocharger Installation) Introduction Replacing the turbocharger on a 951 is not extremely difficult. However, it is very tedious because there
JK 3 Install Kit Instruction Pack
 JK 3 Install Kit Instruction Pack 1 Contents: Rear Sway Bar Link Instructions Spring Instructions Bumpstop Instructions Rear Track Bar Bracket Instructions Extended Brake Line Instructions Quick Disconnect
Front seats. Special tools and equipment. VAS 5094 airbag adapter. Connecting page 72-9.
 Page 1 of 23 72-1 Front seats Special tools and equipment VAS 5094 airbag adapter Connecting page 72-9. Page 2 of 23 72-2 Front seats, removing and installing WARNING! Before starting work on seats, connect
Maintenance Manual MM Transfer Cases. MTC-4208X/XL/XP/XLEV, MTC-4210X/XL/XP/XLEV and MTC-4213X Series Revised 09-16
 Maintenance Manual MM-0861 Transfer Cases MTC-4208X/XL/XP/XLEV, MTC-4210X/XL/XP/XLEV and MTC-4213X Series Revised 09-16 Service Notes About This Manual This manual provides maintenance and service procedures
1991 TRANSMISSION SERVICING Automatic Transmission. Mitsubishi: Eclipse, Galant, Mirage, Montero, Pickup, Precis, 3000GT
 Article Text ARTICLE BEGINNING 1991 TRANSMISSION SERVICING Automatic Transmission Mitsubishi: Eclipse, Galant, Mirage, Montero, Pickup, Precis, 3000GT IDENTIFICATION MITSUBISHI AUTOMATIC TRANSMISSION APPLICATIONS
INSTALLATION INSTRUCTIONS LOKAR COLUMN SHIFT LINKAGE
 INSTALLATION INSTRUCTIONS LOKAR COLUMN SHIFT LINKAGE Part No. ACA-1807 (Ford AOD) STOP! PLEASE READ ALL INSTALLATION INSTRUCTIONS BEFORE BEGINNING INSTALLATION. CALL LOKAR FOR ANY QUESTIONS OR UNCERTAINTIES
REMOVAL TF REMOVE TRANSFER INDICATOR SWITCH (a) Remove the switches and gaskets. HINT: Indicator switch:
 Remove the switches and gaskets. HINT: Indicator switch:") 20 NO. 1 NO. 2 F043499 REMOVAL 1. DISCONNECT CABLE FROM NEGATIVE BATTERY TERMINAL CAUTION: Wait at least 90 seconds after disconnecting the cable from the negative (-) battery terminal to prevent airbag
20 NO. 1 NO. 2 F043499 REMOVAL 1. DISCONNECT CABLE FROM NEGATIVE BATTERY TERMINAL CAUTION: Wait at least 90 seconds after disconnecting the cable from the negative (-) battery terminal to prevent airbag
Photo 1. Shift pattern gate plate
 Installation Instructions MAGNUM GRIP STREET BANDIT SHIFTER Fits: GM, Chrysler, and Ford Automatic Transmissions See Application Guide for Specific Vehicles Catalog # 81050 WORK SAFELY! For maximum safety,
INSTRUCTIONS 1WARNING 6 SPEED TRANSMISSION SUPER KIT -J03481 REV General. Removal. Kit Number A
 INSTRUCTIONS -J03481 REV. 08-31-04 Kit Number 33100-03A 6 SPEED TRANSMISSION SUPER KIT General This kit fits 1990-1999 Softail and 1991-2000 Dyna model motorcycles. Requires separate purchase of cable
Mustang 7.5 Limited Slip Differential (28 Spline) V8; V6:
 V8; V6:") Mustang 7.5 Limited Slip Differential (28 Spline) 79-85 V8; 86-10 V6: Required Tools: Ratchet Wrench Torque Wrench 1/2", 5/16, 3/4", 12mm and 15mm Sockets Lug nut Wrench Dial Indicator Digital Measuring
Mustang 7.5 Limited Slip Differential (28 Spline) 79-85 V8; 86-10 V6: Required Tools: Ratchet Wrench Torque Wrench 1/2", 5/16, 3/4", 12mm and 15mm Sockets Lug nut Wrench Dial Indicator Digital Measuring
ALLOY USA AXLE INSTALLATION (99-04 GT, Mach 1)
") ALLOY USA AXLE INSTALLATION (99-04 GT, Mach 1) Time Necessary: Approximately 4 hours Tools Required: Wrenches: 8mm, 13mm, 15mm, 5.5 mm allen, 6mm allen Sockets: 5/8, 3/4 Ratchet Floor Jack Jack Stands
ALLOY USA AXLE INSTALLATION (99-04 GT, Mach 1) Time Necessary: Approximately 4 hours Tools Required: Wrenches: 8mm, 13mm, 15mm, 5.5 mm allen, 6mm allen Sockets: 5/8, 3/4 Ratchet Floor Jack Jack Stands
Z8004. KDT916 S197 Performance Watts Linkage
 Z8004 KDT916 S197 Performance Watts Linkage Kit Includes: Differential Cover o Magnetic Plug o Standard Plug o Main Brace o Center Pivot o Swivel Foot Bolts 2 o Swivel Foot Retaining nuts 2 o M12x30 Bolt
Installation Instructions COMPETITION/PLUS SHIFTER Ford Mustang MT82 6-Speed Manual Transmission Catalog#
 Installation Instructions COMPETITION/PLUS SHIFTER 2015-2017 Ford Mustang MT82 6-Speed Manual Transmission Catalog# 3916037 Rev. 00 WORK SAFELY! For maximum safety, perform this installation on a clean,
ASSEMBLY. Transmission Automatic Transmission 5R44E and 5R55E. Special Tool(s)
") 307-01-1 Automatic Transmission 5R44E and 5R55E 307-01-1 ASSEMBLY Transmission Special Tool(s) Holding Fixture, Transmission 307-262 (T93T-77002-AH) Special Tool(s) Installer, Transmission Extension Housing
307-01-1 Automatic Transmission 5R44E and 5R55E 307-01-1 ASSEMBLY Transmission Special Tool(s) Holding Fixture, Transmission 307-262 (T93T-77002-AH) Special Tool(s) Installer, Transmission Extension Housing
Revised 10/22/2014 Page 2 of?
 1.Remove side panels, hood, seat, fuel tank, and 2.Remove stock air box, remove fuel line muffler. Save exhaust springs and rubber muffler mounts for turbo bracket. Sand back surface flat for mounting.
Parts are labeled here in order of installation. See other side of sheet for details on Zip Kit contents. installation Diagram
 FORD 6R140 ZIP KIT PART NUMBER 6R140-ZIP QUICK GUIDE Parts are labeled here in order of installation. See other side of sheet for details on Zip Kit contents. installation Diagram WARNING WARNING: If ridge
03-04 Mach 1. Hellion Power Systems Mach 1 Kit Instructions
 Hellion Power Systems 03-04 Mach 1 Kit Instructions Part 1 Hellion recommends that the front suspension system be installed either by trained professionals or by 5.Remove rack bolts K-Member Installation
ADVANCE ADAPTERS INC. P/N: JEEP TJ & (XJ 84-01) ATLAS 4 SPEED CABLE SHIFTER units built after 5/1/12
 ATLAS 4 SPEED CABLE SHIFTER units built after 5/1/12") Paso Robles, CA 93447 PAGE 1 OF 9 Telephone: (800) 350-2223 Fax: (805) 238-4201 Page Rev. Date: 05-12-15 KIT CONSISTS OF: No. Qty Part No. Description 1 1 302051 BASE- TWIN STICK MOUNT 2 1 302080 STUD
Paso Robles, CA 93447 PAGE 1 OF 9 Telephone: (800) 350-2223 Fax: (805) 238-4201 Page Rev. Date: 05-12-15 KIT CONSISTS OF: No. Qty Part No. Description 1 1 302051 BASE- TWIN STICK MOUNT 2 1 302080 STUD
1994 Mazda MX-5 Miata. CLUTCH 1994 Clutch
 CLUTCH 1994 Clutch DESCRIPTION Miata uses a hydraulically operated clutch. HYDRAULIC SYSTEM BLEEDING 1. Remove bleeder screw cap, located at clutch release cylinder. Install vinyl hose onto bleeder screw.
Zoom and Print Options
 Vehicle» Engine, Cooling and Exhaust» Engine» Service and Repair» Removal and Replacement» Engine Replacement Engine Replacement ^ Tools Required - J 38185 Hose Clamp Pliers Removal Procedure 1. Remove
88-98 GM 2-3 SUSPENSION KIT
 92754500 Thank you for choosing Rough Country for your suspension needs. 88-98 GM 2-3 SUSPENSION KIT Rough Country recommends a certified technician installs this system. In addition to these instructions,
INSTALLATION INSTRUCTIONS 97 FORD EXPEDITION
 INSTALLATION INSTRUCTIONS 97 FORD EXPEDITION 1. Read the instructions completely and carefully before you begin. Check the kit for proper contents (refer to the part s list and the picture diagrams). Before
Sherco Setup and Lubrication Guide
 Sherco Setup and This guide is designed to provide the Sherco owner with instructions on how to: Set up a new bike Clean and re-oil the air filter Change the transmission oil Change the fork oil Repack
WD Dodge Suspension Kit
 92137600 02-05 2WD Dodge 1500 6 Suspension Kit Thank you for choosing Rough Country for your suspension needs. Rough Country recommends a certified technician installs this system. In addition to these
AUTO TRANS OVERHAUL - V.A.G. 01V Article Text 1998 Volkswagen Passat This file passed thru Volkswagen Technical Site -
 AUTO TRANS OVERHAUL - V.A.G. 01V Article Text 1998 Volkswagen Passat This file passed thru Volkswagen Technical Site - http://volkswagen.msk.ru ARTICLE BEGINNING 1997-98 AUTOMATIC TRANSMISSIONS Volkswagen/Audi
R O A D S M I T H TRIKE CONVERSIONS BY THE TRIKE SHOP
 R O A D S M I T H TRIKE CONVERSIONS BY THE TRIKE SHOP Please thoroughly review the instructions before and during installation. Keep in mind that this product was designed to be installed by trained dealer
DRIVE AXLE Volvo 960 DESCRIPTION & OPERATION AXLE IDENTIFICATION DRIVE AXLES Volvo Differentials & Axle Shafts
 DRIVE AXLE 1994 Volvo 960 1994 DRIVE AXLES Volvo Differentials & Axle Shafts 960 DESCRIPTION & OPERATION All 960 station wagon models use type 1041 rear axle assembly. All 960 4-door models use type 1045
Valve Body: Service and Repair
 2007 Chevy Truck TrailBlazer 2WD L6-4.2L Copyright 2013, ALLDATA 10.52SS Page 1 Valve Body: Service and Repair Valve Body and Pressure Switch Replacement Removal Procedure 1. Ensure that removal of the