Columbia does not recommend use with harsh chemicals. NSF/ANSI Standard 2 - Food Equipment and NSF/ANSI 372 low-lead.
|
|
|
- Charlene Rodgers
- 5 years ago
- Views:
Transcription


1 HANDS-FREE WALL MOUNTED WASH STATIONS AC OR BATTERY POWERED 1 Operating Manual for ADA Compliant Three-Person Hands-Free Wall Mounted Wash Stations AC Models 5A3A, 5A3A-1.0 and 5A3A-0.5 Battery Models 5A3B, 5A3B-1.0 and 5A3B-0.5 Columbia does not recommend use with harsh chemicals. NSF/ANSI Standard 2 - Food Equipment and NSF/ANSI 372 low-lead.
 Support brackets (3) Mixing check valves (1) Strainer assembly with basket Tools Required Tape Measure Adjustable Wrench Drill Motor and Drill Bits Pipe Wrench Level Safety")


2 COLUMBIA SPECIFICATIONS HANDS-FREE WALL MOUNTED WASH STATIONS AC OR BATTERY POWERED 2 Parts List (1) Three-person wall mount wash station (3) AC or battery powered sensor faucet assembly (2) Wall mounting brackets (2) Support brackets (3) Mixing check valves (1) Strainer assembly with basket Tools Required Tape Measure Adjustable Wrench Drill Motor and Drill Bits Pipe Wrench Level Safety Glasses Screw Drivers: 1 Phillips & 1 Standard Pencil Socket Wrench Installation Instructions Step 1 1. Establish sink location on the wall. 2. Determine desired height for the top of the backsplash from finished floor and draw a level line which will be the top edge of the wall mounting bracket. 3. Hold the wall mounting bracket against the wall and mark the wall where the holes are. Drill holes and secure bracket to the wall as shown in illustration A. Screws are not provided. Step 2 1. Install strainer assembly. 2. Install faucets to the sink following the instructions provided with sensor unit. 3. Attach supply tube with elbow to back of faucet. 4. Install mixing check valve and compression fitting to control box of each sensor faucet. Step 3 1. Position the sink onto wall bracket. 2. Loosely attach support brackets under sink and push against wall then mark holes for drilling as shown in illustration B. 3. Remove support brackets from sink and drill holes for mounting fasteners (not provided). 4. Re-mount support brackets to sink and fasten to wall. Step 4 1. Connect waste line to strainer assembly (s). 2. Mount sensor control box at desired location on wall. 3. Connect power line from sensor to control box. 4. Attach supply tube from faucet to control box. 5. Connect hot and cold water from the source to mixing check valve (s). 6. Remove aerator from the spout assemblies and flush water system. (see step 7 sensor installation instructions) 7. Check connections for leaks. 8. Replace aerator onto the spout (s). 9. We recommend sealing top of backsplash to wall as shown in illustration C. Illustration A Illustration B Illustration C 1622 Browning Irvine, CA Phone: Toll Free: Fax: info@columbiasinks.com 2016 Columbia Products
3 COLUMBIA SPECIFICATIONS HANDS-FREE WALL MOUNTED WASH STATIONS AC OR BATTERY POWERED 3 Top 34 (863.6mm) 68 (1727.2mm) 34 (863.6mm) 2 (51mm) (267 mm) 16.5 (407mm).25 R 6mm 20 (508mm) 1.5 (38mm) 65 (1651mm) 2 drain hole 1.5 (38mm) Front Side 20 (508mm) 2 (51mm) 45º 7.5 (191mm) 10 (254mm) 1.5 (38mm) 10 (254mm).437 (6mm).75 (19mm) slot.437 (6mm) dia. hole.25 R (6mm) ( mm) 5 (127mm) 35 (889mm) suggested floor to rim height ( mm) 7 (177.8mm) Hole Configurations Wall Mounting Detail 13 (330mm) 21 (533.4mm) 21 (533.4mm) 13 (330mm) 1.5 (38mm).875 (22mm) dia. holes (2) 6 (152.4mm) 2 (51mm).25 dia. hole (6mm) wall hanger back splash 1622 Browning Irvine, CA Phone: Toll Free: Fax: info@columbiasinks.com 2016 Columbia Products
4 HYDROTEK INTERNATIONAL, INC Forsyth Commerce Rd., Ste. 124, Orlando, FL Phone (800) / Fax (866) OPERATION & MAINTENANCE MANUAL HYDROTEK MODEL #H-6700C FAUCET TECHNICAL SUPPORT TEAM: Michael Hu & Armin Kharazi Phone (800) ext mike@hydrotekintl.com or armin@hydrotekintl.com


5 Solid Brass AC or Battery Powered Automatic Faucet 6700C Series ISO 9002 Certified High Technology For No Touch Operation ADA Compliant. Meets all barrier free codes Conserves water and energy Easily installed in new or retrofit applications Competitively priced for today's commercial market Promotes cleanliness & hygiene Proven Hydrotek craftsmanship and reliability 6700C Series U.S. Patent: B1 Features: ACCU-SENSE adjustable sensor eyes. Chrome plated, solid brass construction. Wall mountable, waterproof control box with armored, vandal resistant control and power cables. Preset/adjustable sensor range 6" - 30" for various installation requirements. Standard automatic time-out feature. Preset at 0 but adjustable to 15, 30 or 60 seconds. Prevents accidental sink overflow. Shut-off delay is adjustable from 1 second (preset) to 8 seconds. Includes in-line filters with clean-out trap to reduce maintenance costs. Standard 6" gooseneck spout and 2.0 GPM laminar flow control. Single-hole, wall/splash mounting. All parts are field replaceable to ensure quick and easy repair. Same faucet, field switchable to/from AC Powered or Battery Powered. Slow closing, piston-operated solenoid valve provides reliable and smooth operation without water hammer. Superior VSI silicone elastomer piston seals are unaffected by chlorine, chloromines or ammonia. Control module automatically performs a unique self-check of all electrical components. No-touch system enhances hygiene in the medical, institutional, food service industries, etc.
6 Hydrotek Automatic Gooseneck Faucet Non-Mixing / Wall Mounted Model H-6700C (AC) or HB-6700C (Battery) Meets ANSI/ASME A M-1989 Operation: 1. A continuous, invisible beam is emitted from the sensor. 2. The faucet is activated by placing hands under the spout within the effective range of the beam. Water starts to flow immediately for as long as the user s hands remain in the sensor range. 3. When hands are removed, the water flow stops. The sensor will automatically reset and be ready for the next user. 4. In battery powered mode, flashing red light will indicate low battery condition. HYDROTEK INTERNATIONAL, INC Forsyth Commerce Rd., Ste. 124 Orlando, FL (Phone) (Fax) Specifications: Faucet Construction: - Solid Brass, Chrome Plated Control Circuit - Solid state, AC or Battery, Switchable Auto. Time-out: - Preset and Adjustable for 0, 15, 30, or 60 seconds Sensor Range: - Preset and Adjustable Shut-Off Delay: - Preset and Adjustable from 1-8 seconds Control Cable: - Armored, Vandal Resistant Solenoid Valve: - 6V DC, Normally closed - Wattage: 0.4W (idle), 5W (in use) - Operating Pressure: 5psi to 125psi Flow Control: GPM, Laminar AC Mode Power Adapter Standard plug-in: - Input AC 120V 60 Hz or 220 V (UL/CSA) - Output DC 12V, 0.8A/Class 2 Power Cable: - Armored, Vandal Resistant Optional Multi-Unit Adapter - Serves up to 8 Faucets (UL/CSA) - Input AC 120V, Output DC 12V, 3A Battery Mode Battery Powered Models: Service Life: - (4) AA Alkaline Batteries Battery - 400,000 on/off cycles, up to 4 years Standard Package Includes: H-6700C (AC) HB-6700C (Bat) X (1) Faucet with Electronic Sensor X X (1) Control Box w/6v DC Solenoid X X (1) 12V DC Plug-in Power Adapter X (1) In-Line Filter with Clean-Out Trap X X (1) 18" Flex, S.S. Supply Tube, 3/8" X X (1) Mounting Hardware X X (1) 6" Gooseneck Spout X X (1) 2.0 GPM V.R. Laminar Flow Control X (4) AA Alkaline Batteries X (1) Battery Holder X Dimensions: Base Width (Outside Measurement) 2-1/4" Base Depth 2-1/2" Faucet Height (Aerator to Base) 8-3/4" Faucet Height Overall 12-3/4" Depth (Center of Aerator to Center of Faucet Base) 5-3/8" Mounting Bolt Length 1-7/16" Mounting Bolt Pattern Single-Hole Mount Optional Variations and Accessories: 1.6 GPM Soft-Flow Aerator 1.5 & 2.5 GPM Laminar Flow Control and Rose Spray Head HC-010 Multi-Unit Voltage Adapter (AC Powered Only) HC-001 Mixing/Check Valve (Mechanical) HBL-04 Thermostatic Mixing Valve with Checks 8" deep Gooseneck and 6" or 8" Swing Spout
7 INSTALLATION INSTRUCTIONS Hydrotek Non-Mixing Automatic Faucet (AC Powered) 1. Prior to installing this faucet, thoroughly flush all water lines and replace stop washers, if necessary. 2. To ensure proper operation, " DRY TEST " the faucet by plugging (17) Sensor eye cable connector into the matching connector on the PC board inside the (18) Control box. Plug (19) Power adapter output connector into matching connector on PC board located inside the (18) Control box. Plug (19) Power adapter into 120 V AC outlet. Place your hand in front of faucet sensor eye. If there is a clicking sound, the faucet is activating properly. If not, call the factory. 3. After successful DRY TEST," unplug connectors from both the Sensor eye cable and Power adapter to the PC board. 4. Loosen (1) Flow control device and assemble (2) Gooseneck spout using (4) Split washers and (3) Spout nut. Mount Gooseneck spout onto (5) Faucet body. Feed (17) Sensor eye cable through sink wall and mount faucet onto the sink using (8) O-ring, (9) Washer, and (10) Mounting nut. Attach (11) 90 Degree elbow to (7) Supply rod. 5. Connect electrical Sensor eye cable and Power adapter as described in STEP #2, making sure that the Sensor eye and Power adapter cables are seated into the Control box housing properly. 6. Attach (13) Compression fitting to (14) Solenoid valve and connect it to the (11) Elbow using (12) Supply tube. Insert (16) Nylon washer into the swivel nut located on the (15) In-line filter inlet (for pre-tempered or cold water only). Using a union fitting (not supplied), connect supply line (not supplied) from supply stop to (15) In-line filter inlet swivel nut (for tempered water). >>Attach optional Hydrotek HC-001 Mixing/Check Valve or HC-003 Mixing "T" w/checks to In-line filter inlet. Connect supply lines (not supplied) from hot and cold supply stops to Mixing valve or Mixing "T" inlets. Use Teflon Tape, not Pipe Dope for all connections. 7. Turn on water and check for leaks. Plug (19) Power adapter into 120V AC outlet. Reinstall Control box cover and tighten screws to insure that the box is water-resistant. Coil excess Power Adapter wire and secure in a safe, dry area. Place hand in front of Sensor eye to activate water flow. Remove hands and water should stop. If not, refer to troubleshooting guide. 8. Periodically clean the filter element located inside the In-line filter. 9. For minor adjustments, refer to the instructions located inside the Control box cover. Model H-6700C Part Number Descriptions 1. Laminar flow control Degree elbow 2. Gooseneck spout 12. Supply tube 3. Spout nut 13. Compression fitting 4. Split washer 14. Solenoid valve 5. Faucet body 15. In-line filter 6. LED sensor 16. Nylon washer 7. Supply rod 17. Sensor eye cable 8. O-ring 18. Control box 9. Washer 19. Power adapter 10. Mounting nut HYDROTEK INTERNATIONAL, INC Forsyth Commerce Rd., Ste. 124 Orlando, FL (Phone) (Fax)


8 HYDROTEK Model H-6700C
9 INSTALLATION INSTRUCTIONS Hydrotek Non-Mixing Automatic Faucet (Battery Powered) 1. Prior to installing this faucet, thoroughly flush all water lines and replace stop washers, if necessary. 2. To ensure proper operation, " DRY TEST " the faucet by plugging (17) Sensor Eye Cable connector into the matching connector on the PC board inside the (18) Control Box. Pull out PC board for easier access. Properly install batteries in Battery Holder and plug Battery Holder output connector into the corresponding connector on the PC board. Place your hand in front of faucet sensor eye. If there is a clicking sound, the faucet is activating properly. If not, call the factory. 3. After successful DRY TEST," unplug Sensor Eye Cable and Battery Holder connectors from the PC board. 4. **Use Teflon Tape, not Pipe Dope for all connections. Loosen (1) Flow Control Device and assemble (2) Gooseneck Spout using (4) Split Washers and (3) Spout Nut. Mount gooseneck spout onto (5) Faucet Body. Feed (17) Sensor Eye Cable through the sink wall and mount the faucet onto the sink using (8) O- ring, (9) Washer and (10) Mounting Nut. Attach (11) 90-Degree Elbow to (7) Supply Rod. 5. Connect Sensor Eye Cable as described in STEP #2, making sure that the Sensor Eye cable is seated into the Control box housing properly. 6. Attach (13) Compression Fitting to (14) Solenoid Valve outlet and connect it to (12) Supply Tube using (11) Elbow and (13) Compression Fitting. Insert (16) Nylon Washer into swivel nut located on (15) In-line Filter Inlet (for pre-tempered or cold water only). Using a union fitting (not supplied), connect supply line (not supplied) from supply stop to (15) In-line Filter inlet swivel nut (for tempered water). >>Attach optional Hydrotek HC-001 Mixing/Check Valve or HC-003 Mixing "T" w/checks to In-line filter inlet. Connect supply lines (not supplied) from hot and cold supply stops to Mixing valve or Mixing "T" inlets. Use Teflon Tape, not Pipe Dope for all connections. 7. Turn on water and check for leaks. Connect Battery holder to the PC board and reinstall the Control box cover. Tighten screws to ensure that the box is water resistant. Place hand in front of Sensor eye to activate water flow. Remove hands and water should stop. If not, refer to troubleshooting guide. 8. Periodically clean the filter element located inside the (15) In-line filter. 9. For minor adjustments, refer to the instructions located inside the Control box cover. Model HB-6700C HYDROTEK INTERNATIONAL, INC Forsyth Commerce Rd., Ste. 124 Orlando, FL (Phone) (Fax)


10 HYDROTEK Model HB-6700C
11 HYDROTEK AUTOMATIC FAUCET TROUBLESHOOTING GUIDE (AC Powered) Normal Operation: When power is connected or RESET button is pushed, the lights on the Printed Circuit Board (PCB) will blink in the following sequence: red red (with solenoid clicking) green red red. Green light will remain lit. When the user s hands are placed under the spout, the red indicator light on the faucet and PC board will illuminate and water will begin to flow. Water flow will stop when hands are removed. Always push the RESET button BEFORE attempting to diagnose any problem and AFTER taking corrective action. PROBLEM POSSIBLE CAUSE TO DIAGNOSE REMEDY Faucet will not turn on: Water not turned on. Check water supply. Turn water on. Power supply failure. Check power adapter voltage, polarity, wires, and connections. Replace power adapter and reconnect. Push RESET button. Sensor distance is too short. Use hand/palm to find focal point of sensor beam. To adjust sensor distance out, turn adjustment clockwise. Push RESET button. Electronic PCB is defective. With power adapter plugged in, push RESET button. No light, no action. Replace PCB. Sensor eyes are defective. With power adapter plugged in, place hands in front of sensor eyes. Indicator light on faucet does not blink. Replace sensor eyes and cable. Solenoid valve is clogged. Solenoid is clicking but no water is coming out. Clean solenoid and blow free all by-pass holes. Replace control disc. Push RESET button. In-line filter is clogged. Open clean-out trap and check filter screen. Clean or replace filter screen. Solenoid coil is defective. With power adapter plugged in, push the RESET button. Light blinks but no solenoid clicking. Replace solenoid coil. Push RESET button. Faucet will not shut off: Solenoid valve is normally closed. Turn off water and activate faucet. If there is a clicking sound, the solenoid valve is dirty. If there is no clicking sound, then replace solenoid valve. Other factors could be problematic (Sensor distance adjustment could be too long or electronic PCB could be defective). If the faucet is dripping, the solenoid valve needs a rebuild kit. Follow the same procedures as above for remedies. IMPORTANT: Periodic maintenance is required for smooth and trouble-free operation of this faucet. For more detailed remedy procedures, please call Hydrotek Tech Support at (800) ext. 105
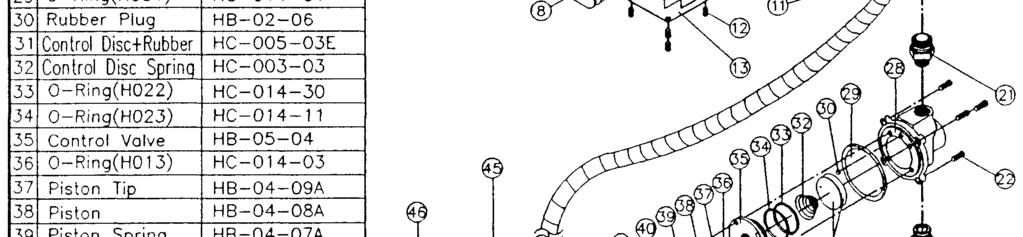
12 SOLENOID VALVE CLEANING FOR HYDROTEK 1000C, 2603C, 6000C, 6700C FAUCETS (AC AND BATTERY POWERED) 1. Turn off water supply at stop valve. 2. Remove control box (if possible) to gain access to the solenoid valve. 3. Remove four Screws (#21) and separate the valve from the box. 4. Remove four Coil Screws (#43) and separate Coil (#41) from Valve Seat (#27). 5. When separating Plastic Control Valve (#34) be careful to retain the small Orange Rubber Plug (#29). Re-install this on Brass Valve Seat (#27). 6. Clean or replace Control Disc (#30), Disc Spring (#31), Piston & Tip (#36 and 37), Piston Spring (#38), and check Sleeve (#39) for corrosion. 7. Re-install all parts in same order as the diagram below. 8. Re-install solenoid on the control box and re-mount box in water line. 9. Check and clean Filter Screen (#24) in Filter Body (#22). 10. Reset P.C. Board and make sure solenoid clicks open and thumps closed. 11. Turn on water and check for leaks and proper operation. (For further questions, please call Hydrotek Tech Support at ext. 105)
: Sw 1 Sw 2 Sw 3 Time Delay ON ON ON 1-Sec ON ON OFF 2-Sec ON OFF ON 3-Sec ON OFF OFF 4-Sec OFF ON ON 5-Sec OFF ON OFF 6-Sec OFF OFF ON 7-Sec OFF OFF OFF")
13 HYDROTEK AUTOMATIC FAUCET: DIP SWITCHES *NOTE: ALWAYS PUSH THE RESET BUTTON AFTER ANY ADJUSTMENTS* A. Shut Off Time Delay (After hands are removed): Sw 1 Sw 2 Sw 3 Time Delay ON ON ON 1-Sec ON ON OFF 2-Sec ON OFF ON 3-Sec ON OFF OFF 4-Sec OFF ON ON 5-Sec OFF ON OFF 6-Sec OFF OFF ON 7-Sec OFF OFF OFF 8-Sec B. Automatic Time Off (Maximum run time after activation): Sw 4 Sw 5 Time Off ON ON 0 Sec ON OFF 15 Sec OFF ON 30 Sec OFF OFF 60 Sec C. Sensor Distance: To increase distance, turn SDA screw clockwise. To decrease distance, turn screw counter-clockwise. D. Faucet Switch: Sw 6 Mode Distance ON Std 4 12 OFF Enhanced Sw 7 Sw 8 Product ON OFF Auto Faucet Control Module Diagram for C-Series Faucets 1. AC/DC Switch 2. Battery Holder Pin Connector (Red) 3. Dip Switches 4. Reset Button 5. Sensor Distance Adjustment (SDA) 6. Indicator LED (Green) 7. Indicator LED (Red) 8. Solenoid Pin Connector (White) 9. Sensor Eye Control Cable (White) 10. AC Power Adapter Pin Connector (Red) 11. Battery Holder Pin Connector (White)
14 Hydrotek International, Inc. Phone: / Fax: Suggested Backup Parts for 6700C Series Faucets AC or Battery Powered Lavatory Faucets Part Number From Drawing Hydrotek Item Code 49 HCC-002 Description AA 1.5V Battery *4 req. per faucet (for Battery Model) 52 HCC-008B 12V AC Adapter (for AC Model) HC-009B In-line filter 10 HCC-033 Sensor Eyes & Cable HCC-011A HCC-011B Module PCB for AC Model Module PCB for Battery Model HC-015C Mounting Kit 25 HC-020 Filter Screen 20 HC-025E Flexible Supply Tube 1 HB-003CF Laminar Flow Control 31,32,36,37,38,39 HCB-017A Valve Repair Kit HCC-019 Solenoid Coil Only HCC-003B Complete Control Box Assembly (Please visit to view our most current Products Pricing Sheet)
Operating Manual for Hands-Free Floor Mounted Scrub Sink Models 532FA and 532FB
 HANDS-FREE FLOOR MOUNTED SCRUB SINK AC OR BATTERY POWERED 1 Operating Manual for Hands-Free Floor Mounted Scrub Sink Models 532FA and 532FB Columbia does not recommend use with harsh chemicals. NSF/ANSI
HYDROTEK INTERNATIONAL, INC Forsyth Commerce Rd., Ste. 124, Orlando, FL Phone (800) / Fax (866)
 / Fax (866)") HYDROTEK INTERNATIONAL, INC. 5055 Forsyth Commerce Rd., Ste. 124, Orlando, FL 32807 Phone (800)922-9883 / Fax (866)670-5580 www.hydrotekintl.com OPERATION & MAINTENANCE MANUAL HYDROTEK MODEL #H-1000C FAUCET
HYDROTEK INTERNATIONAL, INC. 5055 Forsyth Commerce Rd., Ste. 124, Orlando, FL 32807 Phone (800)922-9883 / Fax (866)670-5580 www.hydrotekintl.com OPERATION & MAINTENANCE MANUAL HYDROTEK MODEL #H-1000C FAUCET
Operating Manual for Hands-Free Wall Mounted Scrub Sinks AC Models 504A and 504A-0.5 Battery Models 504B and 504B-0.5
 HANDS-FREE WALL MOUNTED SINKS AC OR BATTERY POWERED 1 Operating Manual for Hands-Free Wall Mounted Scrub Sinks AC Models 504A and 504A-0.5 Battery Models 504B and 504B-0.5 Columbia does not recommend use
Operating Manual for Three-Person Hands-Free Floor Mounted Wash Stations AC Models 56FAL and 56FAL-0.5 Battery Models 56FBL and 56FBL-0.
 HANDS-FREE FLOOR MOUNTED WASH STATIONS AC OR BATTERY POWERED 1 Operating Manual for Three-Person Hands-Free Floor Mounted Wash Stations AC Models 56FAL and 56FAL-0.5 Battery Models 56FBL and 56FBL-0.5
HYDROTEK INTERNATIONAL, INC Forsyth Commerce Rd., Ste. 124, Orlando, FL Phone (800) / Fax (866)
 / Fax (866)") HYDROTEK INTERNATIONAL, INC. 5055 Forsyth Commerce Rd., Ste. 124, Orlando, FL 32807 Phone (800)922-9883 / Fax (866)670-5580 www.hydrotekintl.com OPERATION & MAINTENANCE MANUAL HYDROTEK MODEL #H-4000C FAUCET
HYDROTEK INTERNATIONAL, INC. 5055 Forsyth Commerce Rd., Ste. 124, Orlando, FL 32807 Phone (800)922-9883 / Fax (866)670-5580 www.hydrotekintl.com OPERATION & MAINTENANCE MANUAL HYDROTEK MODEL #H-4000C FAUCET
OPERATION & MAINTENANCE MANUAL 6700C Series Faucet
 Sensor Faucets and Flush Valves OPERATION & MAINTENANCE MANUAL Faucet 5055 Forsyth Commerce Rd, Ste 124, Orlando, FL 32807 Phone (800) 922-9883 Fax (866) 670-5580 ISO 9001 Certified U.S. Patent 6192530B1
HYDROTEK INTERNATIONAL, INC Forsyth Commerce Rd., Ste. 124, Orlando, FL Phone (800) / Fax (866)
 / Fax (866)") HYDROTEK INTERNATIONAL, INC. 5055 Forsyth Commerce Rd., Ste. 124, Orlando, FL 32807 Phone (800)922-9883 / Fax (866)670-5580 www.hydrotekintl.com OPERATION & MAINTENANCE MANUAL HYDROTEK MODEL #HB-5000E
HYDROTEK INTERNATIONAL, INC. 5055 Forsyth Commerce Rd., Ste. 124, Orlando, FL 32807 Phone (800)922-9883 / Fax (866)670-5580 www.hydrotekintl.com OPERATION & MAINTENANCE MANUAL HYDROTEK MODEL #HB-5000E
OPERATION & MAINTENANCE MANUAL 5000E Series Faucet
 Sensor Faucets and Flush Valves OPERATION & MAINTENANCE MANUAL 5000E Series Faucet www.hydrotekintl.com 5055 Forsyth Commerce Rd, Ste 124, Orlando, FL 32807 Phone (800) 922-9883 Fax (866) 670-5580 Sensor
OPERATION & MAINTENANCE MANUAL HB-8000C Series Flush Valve (includes HB8RFKC)
") ISO 9001 Certified OPERATION & MAINTENANCE MANUAL HB-8000C Series Flush Valve (includes HB8RFKC) www.hydrotekintl.com 5055 Forsyth Commerce Rd, Ste 124, Orlando, FL 32807 Phone (800) 922-9883 Fax (866)
ISO 9001 Certified OPERATION & MAINTENANCE MANUAL HB-8000C Series Flush Valve (includes HB8RFKC) www.hydrotekintl.com 5055 Forsyth Commerce Rd, Ste 124, Orlando, FL 32807 Phone (800) 922-9883 Fax (866)
Operating Manual for Hands-Free Wall Mounted Sinks Models 504 and
 1 Operating Manual for Hands-Free Wall Mounted Sinks Models 504 and 504-0.5 Columbia does not recommend use with harsh chemicals. NSF/ANSI Standard 2 - Food Equipment and NSF/ANSI 372 low-lead. 2 Parts
Operating Manual for Hands-Free Wall Mounted Sinks Models 607D and 607D-0.5
 1 Operating Manual for Hands-Free Wall Mounted Sinks Models 607D and 607D-0.5 Columbia does not recommend use with harsh chemicals. NSF/ANSI Standard 2 - Food Equipment and NSF/ANSI 372 low-lead. 2 Parts
EBF-750 Deck-Mounted Battery Powered Sensor Operated Gooseneck Faucets
 INSTALLATION INSTRUCTIONS BATTERY POWERED SENSOR OPERATED HAND WASHING FAUCETS EBF-750 I.I. Code No. 0816324 EBF-750 Deck-Mounted Battery Powered Sensor Operated Gooseneck Faucets Includes Instructions
S-9100, S-9200, S-9300, S-9400, S-9700, S-9800
 SPEAKMAN COMPANY 1of 18 S-9100, S-9200, S-9300, S-9400, S-9700, S-9800 Series Installation, Maintenance & Operation Instructions SENSORFLO BATTERY or AC POWERED SLIM DESIGN FAUCETS with DIFFERENT OPTIONS
BASYS INSTALLATION INSTRUCTIONS FOR ELECTRONIC CAPACITANCE SENSING LAVATORY FAUCETS EFX-3XX Pedestal, Sensor Activated Lavatory Faucets
 BASYS INSTALLATION INSTRUCTIONS FOR ELECTRONIC CAPACITANCE SENSING LAVATORY FAUCETS EFX-3XX Pedestal, Sensor Activated Lavatory Faucets Any Application. Any Environment. Code No. 0816407 Rev. 5 (05/16)
Battery Powered Sensor Operated Lavatory Faucets. Plug-in Transformer Powered Sensor Operated Lavatory Faucets PARTS LIST
 1A 1B 8 EAF-100/150 I.I. Rev. 0a (11/02) Code No. 0816542 INSTALLATION INSTRUCTIONS ELECTRONIC, SENSOR OPERATED LAVATORY FAUCETS EAF-150 Series Battery Powered Sensor Operated Lavatory Faucets 2 3 7 10
Single Handle Faucet, 4 Plate, Ceramic Cartridge, Extended Lever Handle with Pop-Up
 LAVATORY Encore KN81, KH81and KP81 s 4 (102mm) center and single hole applications cartridge valves with hot limit stops 4-1/2 (114mm) spout length Solid cast brass construction 1/2 NPSM inlets Cartridge,
Milano AUTOMATIC FAUCET
 Milano AUTOMATIC FAUCET with Surround Sensor Technology Installation & Maintenance IMPORTANT: PLEASE READ ENTIRE INSTRUCTION BOOKLET BEFORE YOU BEGIN INSTALLATION! Looks Clean - Is Clean. AutoFaucet Parts
Installation Instructions
 Installation Instructions SELECTRONIC Proximity Infection Control Faucet 0 / 0 / 0 Infection Control Faucet shown Installed on American Standard. Infection Control Sink Certified to comply with ASME A..M
Installation Instructions
 Installation Instructions SELECTRONIC Proximity Faucets Cast Spout and Gooseneck Spout Certified to comply with ASME A.8. 0 American Standard 0X.0 0X. MODEL NUMBERS 0X.0 0X. 0X.0 0X. CAUTION: Use only
ETF-600 Sensor Operated Lavatory Faucet
 INSTALLATION INSTRUCTIONS OPTIMA SYSTEMS SENSOR OPERATED LAVATORY FAUCET ETF-600 I.I. Code No. 0816318 ETF-600 Sensor Operated Lavatory Faucet Includes Instructions for Installation of Optional Back Checks
Optima ETF-600/ETF-610
 Optima ETF-600/ETF-610 4B ETF-610 1C 4A 5 6 7 7 6 ETF-600 1A 1C PARTS LIST ETF-600 AND ETF-610 FAUCETS Item No. Code No. Part No. Description 1A. 065086 ETF-54-A Faucet and Sensor Assembly (ETF-600). 065117
AutoFaucet. with Surround Sensor Technology. Installation & Maintenance
 AutoFaucet with urround ensor Technology Installation & Maintenance Instalaion y Mantenimiento Installation Et Maintenance on www.technicalconcepts.com or call 800-551-5155 Looks Clean - Is Clean. AutoFaucet
Installation Instructions
 Installation Instructions SERIN Deck Mount Electronic Proximity Lavatory Faucet Certified to comply with ASME A.. 0 American Standard Optional 0P00.XXX, " Deck Plate Optional 0P00.XXX, " Deck Plate 0.
Installation Instructions
 Installation Instructions SERIN Deck Mount Electronic Proximity Lavatory Faucet Optional 0P00.XXX, " Deck Plate Optional 0P800.XXX, 8" Deck Plate Certified to comply with ASME A.8. 0 AS America, Inc. MODEL
LIGATURE RESISTANT SENSOR FAUCET
 LIGATURE RESISTANT SENSOR FAUCET PATENT #US D635, 386 #SF370/SAL-5011 INSTALLATION, MAINTENANCE & OPERATION INSTRUCTIONS SENSORFLO BATTERY OR AC POWERED The Ligature Resistant Sensor Faucet was designed
MAC FAUCETS FA400 WALL MOUNT FAUCETS
 MAC FAUCETS FA400 WALL MOUNT FAUCETS Installation Procedure: Take a moment to view drawings and read special Installation note on pages 4 and 5 of this manual before proceeding with installation. Connect
SPEAKMAN. SEF-1800-CA, SEF-1800-CA-TW, SEF-1800-CA-8, SEF-1800-CA-8-TW Installation, Maintenance & Operation Instructions EYESAVER FAUCET
 SEF-1800-CA, SEF-1800-CA-TW, SEF-1800-CA-8, SEF-1800-CA-8-TW Installation, Maintenance & Operation Instructions EYESAVER FAUCET DESCRIPTION The SEF-1800-CA Eyesaver faucet combines a gooseneck faucet with
Installation. Aerada 1200 Series CS Faucet S Battery-Operated Capacitive Sensing Gooseneck Faucet IMPORTANT
 Installation erada 1200 Series CS Faucet S53-325 Battery-Operated Capacitive Sensing Gooseneck Faucet Centershank with 4-inch Trim Plate (Optional: 8-inch or No Trim Plate) Table of Contents Supplies Required..................
Installation Instructions
 Instructions Aerada 900 Series Futura Faucet With Battery (BIR) Infrared Control S53-284 4" Centerset/Centershank S53-289 Centerset/Centershank w/plate Table of Contents Pre- Information............2 900
Installation Instructions
 Installation Instructions SELECTRONIC Moments Proximity Faucets MODEL NUMBERS 0.X 0.X 0B.0X CAUTION: Use only American Standard supplied cable sets. Using non-as supplied cables, or cutting, splicing or
Installation Instructions
 Installation Instructions SERIN Wall Mount Electronic Proximity Lavatory Faucet TE: Please refer to R30 Mounting Kit installation instructions #M4 prior to faucet installation. Certified to comply with
Optima ETF-500. Hand Hygiene. Repair Parts and Maintenance Guide PARTS LIST ETF-500 FAUCET ETF-500. See page 157 for faucet cable extension cords.
 Optima ETF-500 ETF-500 TO MOUNT FAUCET ON A SURFACE BETWEEN 0.1 (10 MM) AND 1.00 (25 MM) THICK, USE THE HARDWARE SHOWN BELOW. 7 1B 3B 1A 2 3A 5 6 11 10 5 9 PARTS LIST ETF-500 FAUCET Item No. Code No. Part
MAC FAUCETS. FA400 Autoluxe Faucets
 MAC FAUCETS FA400 Autoluxe Faucets Installation Procedure: Take a moment to view drawings and read special Installation note on page 4 of this manual before proceeding with installation. Connect Faucet
INSTALLATION AND MAINTENANCE GUIDE ELITE SERIES ELECTRONIC LAVATORY FAUCET
 INSTALLATION AND MAINTENANCE GUIDE ELITE SERIES ELECTRONIC LAVATORY FAUCET 1 INDEX 1 TECHNICAL DATA 2 PACK CONTENTS 3 PRE-INSTALLATION INFO 4-5 INSTALLATION 6-9 SETTINGS ADJUSTMENT 10 BATTERY REPLACEMENT
INSTALLATION AND MAINTENANCE GUIDE SF1596 B/E ELECTRONIC LAVATORY FAUCET
 INSTALLATION AND MAINTENANCE GUIDE SF1596 B/E ELECTRONIC LAVATORY FAUCET 1 INDEX 1 TECHNICAL DATA 2 PACK CONTENTS 3 PRE-INSTALLATION INFO 4-5 INSTALLATION 6-8 SETTINGS ADJUSTMENT WITH REMOTE CONTROL 9
EZ FILL FAUCET AUTOMATIC DECK MOUNTED FAUCET INSTALLATION AND MAINTENANCE GUIDE
 EZ FILL FAUCET AUTOMATIC DECK MOUNTED FAUCET INSTALLATION AND MAINTENANCE GUIDE 05 September 018 TABLE OF CONTENTS PRE-INSTALLATION INFORMATION PRE-INSTALLATION INFORMATION 3 PACK CONTENTS 4 TECHNICAL
Installation For Service Only
 For Service Only IMPORTANT! Aerada 1100 Series Low Arc Faucet S53-302 Battery Infrared Metering Faucet (Center Shank with 4" Trimplate) THIS SIDE UP! Packing List Read this entire installation manual to
MAC FAUCETS. FA400 Wall Mount Sensor
 MAC FAUCETS FA400 Wall Mount Sensor Installation Procedure: Take a moment to view drawings and read special Installation note on page 4 of this manual before proceeding with installation. Connect Faucet
AEF-300/300T SERIES SENSOR FAUCET SYSTEMS
 Installation and Owner s Manual AEF-300/300T SERIES SENSOR FAUCET SYSTEMS HYBRIDFLO FIXEDFLO HEALTHFLO AEF-300 AEF-301 AEF-302 AEF-303 AEF-304 AEF-306 AEF-307 AEF-320 AEF-321 AEF-322 AEF-323 AEF-300T AEF-302T
DISCONTINUED. Installation. Aerada 900 Series Futura Faucet. With Accu-Zone (AZ) Infrared Control
 Infrared Control") Aerada 900 Series Futura Faucet With Accu-Zone (AZ) Infrared Control BRADLEY SC A S53-141 4" Centerset S53-148 4" Centerset, no Solenoid Valve S53-186 4" Centerset with 8" Trim Plate S53-285 Centershank
Aerada 900 Series Futura Faucet With Accu-Zone (AZ) Infrared Control BRADLEY SC A S53-141 4" Centerset S53-148 4" Centerset, no Solenoid Valve S53-186 4" Centerset with 8" Trim Plate S53-285 Centershank
Installation Instructions
 Installation Instructions SELECTRONIC Proximity Integrated Faucet with Optional Above-Deck Mixing Flexible Selectronic Platform with Universal Sensor Easy installation. All electronics in the spout; nothing
Installation Instructions
 Installation Instructions SELECTRONIC Integrated Faucet with Above-Deck Mixing CAUTION: Use only American Standard supplied transformers and cable sets. Using non-as supplied cables, or cutting, splicing
TAG: Electronic Faucets EC Electronic Sensor Faucet. Architect/Engineering Specifications:
 EC-3100 Single hole deck mount electronic sensor faucet with polished chrome plated brass body and 4 1/16" rigid gooseneck, vandal resistant aerator, AC/DC control module with internal flow control setting
BASYS Infrared Sensor Activated
 EFX-1XX SERIES EFX-2XX SERIES 6C 6B 6A 5 3A 4 2 8 16 9 11 17 1 3B 7 PARTS LIST BASYS FAUCETS Item No. Code No. Part No. Description 1. Mid Mount Faucet Assembly Mid Mount Faucet Assembly with Mixer High
Aplos Single Lever Basin Faucet
 INSTALLATION GUIDE Aplos Single Lever Basin Faucet KEF-15301 www.kraususa.com I Toll Free: 1.800.775.0703 I 2017 Kraus USA Inc. I REV. October 25, 2017 Congratulations on the purchase of your new Kraus
GREEN & GREEN 1000 ELECTRONIC LAVATORY FAUCET. InstallatIon and maintenance guide
 GREEN & GREEN 1000 ELECTRONIC LAVATORY FAUCET InstallatIon and maintenance guide INDEX 1 TECHNICAL DATA 2-3 PACK CONTENTS 4 PRE INSTALLATION INFORMATION 5-8 FAUCET INSTALLATION 9-11 SETTINGS ADJUSTMENT
Commercial Products Catalog
 Sensor Faucets and Flush Valves Commercial Products Catalog Effective October 1, 2017 www.hydrotekintl.com Exceptional quality, reliability, and unbeatable service. Since its inception in 1985, Hydrotek
Sloan Automatic Infrared Sensing Faucets
 SF-2100 Series 6 VDC Plug-in Transformer Powered with SF-2150 Series Battery Powered -- Last up to 2 years! ADA Compliant, Sensor Activated, 6 VDC, Chrome Plated Brass, Pedestal Hand Washing Faucet with
Electronic Faucet - 591T Series
 Electronic Faucet - 591T Series 4" Cast Lavatory Specification: (example) (4") electronic faucet CAST one-piece body with integral waterproof sensor and connector Polished chrome plated trim Battery (4
INSTALLATION AND MAINTENANCE GUIDE EXTREME WM WALL MOUNTED ELECTRONIC FAUCET FOR COLD OR PREMIXED WATER
 INSTALLATION AND MAINTENANCE GUIDE EXTREME WM WALL MOUNTED ELECTRONIC FAUCET FOR COLD OR PREMIXED WATER Extreme WMB Extreme WME Extreme WMLB Extreme WMLE 1 INDEX 1 TECHNICAL DATA 2 PACK CONTENTS 2 OPERATION
Airfield Industrial Estate Hixon Staffordshire ST18 0PF
 Electronic Concealed Wall Mounted Tap for Premixed Water IR140CP and IR141CP Installation and Maintenance Instructions Intatec Ltd Airfield Industrial Estate Hixon Staffordshire ST18 0PF In this procedure
Automatic Sensor Tap Installation Manual
 CAT 67801-3S Automatic Sensor Tap Installation Manual 1 2 Product Description Infrared sensor tap, water will automatically flow from faucet when hands are detected within the sensing range. The faucet
PG-35AV-CH Coiled Hose and Spray Valve. PG-8WSAV-08 Lighweight Aluminum Spray Unit
 A Pet-Care Pre-Rinse Plumbing Units Products RINSE UNITS T&S Quality Pet-Care Plumbing Products Wash and Rinse Products Replacement Parts Model # Description EB-10K Repair Kit 013539-45 Replacement Hose
Z x 17 Countertop Lavatory
 Z5110 20 x 17 Countertop Lavatory TAG Z5110 Series 20" [508 mm] x 17" [432 mm] Vitreous china Faucet holes for single, 4" or 8" centers Self-rimming front overflow design Waste: 1-1/4" O.D. Depth: 6-5/8
Instructions. Certifications Chrome less spray Chrome with spray 10-K82-WNCH-AD-Z Chrome less spray 10-K82-WYCH-AD-Z Chrome with spray
 Instructions *Image may vary slightly from actual product Tools Required Adjustable Wrench Groove Joint Pliers Pipe Wrench Phillips Screwdriver Pipe Tape or pipe thread compound Safety Tips If you solder
SB-1821-E. Instructions for Models: What You Need To Know: Tools: Required: Need Help? For additional assistance or service call: Helpful:
 Instructions for Models: SB-8 SB-8-E What You Need To Know: Tools: Required: *Adjustable Wrench *Groove Joint Pliers *Philips Screwdriver Important Notes: Be sure to read instructions thoroughly before
INSTALLATION INSTRUCTIONS FOR SLOAN SF ELECTRONIC SENSOR ACTIVATED LAVATORY FAUCETS
 Code No. 0816496 Rev. 2 (02/09) INSTLLTION INSTRUCTIONS FOR SLON SF ELECTRONIC SENSOR CTIVTED LVTORY FUCETS SF SERIES FUCETS SF-2100 Series Transformer Powered with attery ackup, Sensor ctivated, Pedestal
INSTALLATION AND MAINTENANCE GUIDE TUBULAR SERIES WALL MOUNTED ELECTRONIC FAUCET FOR COLD OR PREMIXED WATER
 INSTALLATION AND MAINTENANCE GUIDE TUBULAR SERIES WALL MOUNTED ELECTRONIC FAUCET FOR COLD OR PREMIXED WATER Tubular B Tubular E Tubular CB Tubular CE Tubular 2030 B Tubular 2030 E 1 INDEX 1 TECHNICAL DATA
Installation and Maintenance Guide SF1593 SF1594 B/E ELECTRONIC LAVATORY FAUCET
 Installation and Maintenance Guide SF1593 SF1594 B/E ELECTRONIC LAVATORY FAUCET 1 INDEX 1 TECHNICAL DATA 2 PACK CONTENTS 3 PRE INSTALLATION INFORMATION 4-5 FAUCET INSTALLATION 6-8 SETTINGS ADJUSTMENT 9
Installation Instructions
 Installation Instructions SELECTRONIC Hard-Wired, AC Powered Proximity Integrated Faucet with Above-Deck Mixing Flexible Selectronic Platform with Universal Sensor Easy installation. All electronics in
Installation Instructions
 Installation Instructions SELECTRONIC PROXIMITY TOILET CONCEALED FLUSH VALVE. &. GPF Certified to comply with ASME A..M 00 AS America, Inc. Concealed Flushometer for -/" Top or Back Spud Bowls MODEL NUMBERS
Single Lever Pull-Out Kitchen Faucet
 INSTALLATION GUIDE Single Lever Pull-Out Kitchen Faucet KPF-1602 www.kraususa.com I Toll Free: 1.800.775.0703 I 2017 Kraus USA Inc. I REV. October 25, 2017 Congratulations on the purchase of your new Kraus
D28 SERIES WALL MOUNTED ELECTRONIC FAUCET FOR COLD OR PREMIXED WATER. D28 B D28 E D28 Dual Power B D28 Dual Power E D28 Box D28 Box E
 D28 SERIES WALL MOUNTED ELECTRONIC FAUCET FOR COLD OR PREMIXED WATER D28 B D28 E D28 Dual Power B D28 Dual Power E D28 Box D28 Box E 1 INDEX 1 TECHNICAL DATA 2-4 PACK CONTENTS 5 PRE-INSTALLATION INFO 6-11
T&S BRASS AND BRONZE WORKS, INC.
 Saddleback Cove / P.O. Box 088 Travelers Rest, SC 9690 EC-30-SM Travelers Rest, SC: 800-476-403 Simi Valley, CA: 800-43-050 Fax: 864-834-358 www.tsbrass.com " [5mm] Faucet [0mm] Deck Mounting Hole Detail
WARNING Carefully Read These Instructions Before Use
 DO NOT RETURN THIS SPRAYER TO STORE Call: 1-800-950-4458 Backpack Sprayer Use and Care Manual Manufactured for Northern Tool + Equipment Co., Inc. WARNING Carefully Read These Instructions Before Use Model
FOR TECHNICAL ASSISTANCE
 ACORN ENGINEERING COMPANY P.O. BOX 3527 CITY OF INDUSTRY, CA 91744 UNITED STATES OF AMERICA WWW.ACORNENG.COM INSTALLATION, OPERATION AND MAINTENANCE INSTRUCTIONS ST70 LAVATORY TEMPERING VALVE Patent #9,989,017
Automatic Sensor Faucet Installation Manual CAT ALL-IN-ONE AUTO VALVE FAUCET HORIZONTAL WATER SPOUT. Revision
 Automatic Sensor Faucet Installation Manual CAT 673031 ALL-IN-ONE AUTO VALVE FAUCET HORIZONTAL WATER SPOUT Revision 7 PAGE 1 Product Description No-Touch automatic faucets and accessories Systems Electronic
INFRARED TAPS. Important: Electronic taps saving water, saving power, promoting hygiene DB100 DB125 DB150 DB175 DBL200 DBL225 DBL250 DBL275
 INSTALLATION AND MAINTENANCE GUIDE INFRARED TAPS Electronic taps saving water, saving power, promoting hygiene DB100 DB125 DB150 DB175 DBL200 DBL225 DBL250 DBL275 DB200 DB225 DB250 DB275 Important: Read
Installation Instructions
 Installation Instructions SELECTRONIC DC POWERED PROXIMITY EXPOSED URINAL FLUSH VALVE 0., 0., 0. &.0 GPF Certified to comply with ASME A.9. 0 AS America, Inc. Exposed Flushometer for /" Top Spud Urinals
INSTALLATION GUIDE KPF Single Lever Kitchen Faucet With Pull-Out Sprayer
 INSTALLATION GUIDE KPF-21 Single Lever Kitchen Faucet With Pull-Out Sprayer www.kraususa.com I Toll Free: 1.800.775.0703 I 2017 Kraus USA Inc. I REV. August 7, 2017 Congratulations on the purchase of your
Instructions. Certifications. Two Handle Kitchen Faucet. Tools Required. Maintenance. Safety Tips. Important Points. Things You May Need.
 116874 Chrome less 116864 PVD brushed nickel with 0-K8-CYCH-AD-Z Chrome with 0-K8-CYBN-AD-Z PVD brushed nickel with 0-K8-CNCH-AD-Z Chrome less 0-K8-CNBN-AD-Z PVD brushed nickel less *Image may vary slightly
INSTALLATION MANUAL Aplos Single Handle Vessel Bathroom Faucet KEF I toll free: I Kraus USA Inc. I REV
 INSTALLATION MANUAL Aplos Single Handle Vessel Bathroom Faucet KEF-15300 www.kraususa.com I toll free: 1.800.775.0703 I 2014-2015 Kraus USA Inc. I REV. August 18, 2016 PRIOR TO INSTALLATION Make sure you
Ramus Single Handle Lavatory Faucet
 INSTALLATION MANUAL Ramus Single Handle Lavatory Faucet FVS-1007 www.kraususa.com I toll free: 1.800.775.0703 I 2013-2014 Kraus USA Inc. Congratulations on your new Kraus purchase! We would like to take
Installation Instructions
 Installation Instructions for -/" Top Spud Fixtures MODEL NUMBERS 607 Series 707 Series OPERATING PRESSURE: Overall Range: 0- psi ** Recommended: psi (flowing) - 80 psi (static) FLOW REQUIREMENT: gpm (9.6
Aquila Single Lever Vessel Faucet
 INSTALLATION GUIDE Aquila Single Lever Vessel Faucet FVS-13900 www.kraususa.com I Toll Free: 1.800.775.0703 I 2017 Kraus USA Inc. I REV. October 24, 2017 Congratulations on the purchase of your new Kraus
Installation Instructions for Bike Fixtation. Bottle Fill and Bike Wash Stations Manual Rev. B
 15540 Woodinville Redmond Rd NE, Suite A-200, 2647 37th Woodinville, Ave. S Unit WA 1, Minneapolis 98072 MN 55406 Phone: 425.483.7000 Phone: 612-568-3498 Email: salesandsupport@sportworks.com E-mail: info@bikefixtation.com
Installation Instructions
 Installation Instructions MANUAL FLUSH VALVE,. GPF Exposed Flushometer for /" top spud Urinals Certified to comply with: ASSE 07 ANSI/ASME A.9. ADA Compliant 0 AS America, Inc. M9600 Rev.. MODEL NUMBERS
G1849 Eyewash, Deck Mounted, AutoFlow 90º Swing-Down
 Eyewashes G1849 Eyewash, Deck Mounted, AutoFlow 90º Swing-Down G1849LH-L G1849LH G1849LH-R G1849L G1849 G1849R Model G1849LH-L Shown Application: AutoFlow eyewash for mounting on counter. Spray heads swing
SPEAKMAN SAFETY PRODUCTS Installation, Maintenance & Operation Instructions SEF-1000 EYESAVER FAUCET DESCRIPTION
 SPEAKMAN SAFETY PRODUCTS Installation, Maintenance & Operation Instructions SEF-1000 EYESAVER FAUCET DESCRIPTION The SEF-1000 Eyesaver faucet model allows a customer to convert their existing Speakman
Installation Instructions
 COLONY/COLONY SOFT Bidet Faucet and Transfer Valve with Speed Connect Drain Congratulations on purchasing your American Standard faucet with the Speed Connect drain, a feature found only on American Standard
INSTALLATION INSTRUCTIONS STUDIO S
 INSTALLATION INSTRUCTIONS STUDIO S 70.0 MONOBLOCK LAVATORY FAUCET WITH SPEED CONNECT Thank you for selecting American Standard... the benchmark of fine quality for over 00 years. To ensure that your installation
Taps, Valves & Components. Section 1
 Taps, Valves & Components Section 1 taps, valves & components index Index 1 SECTION PAGE sink taps 1.1-1.4 sink taps & spares 1.5 basin taps 1.6 general purpose taps & valves 1.7 flexible connectors, angle
Sheven Single Lever Vessel Faucet
 INSTALLATION GUIDE Sheven Single Lever Vessel Faucet FVS-1002 www.kraususa.com I Toll Free: 1.800.775.0703 I 2017 Kraus USA Inc. I REV. October 24, 2017 Congratulations on the purchase of your new Kraus
Installation Instructions
 Installation Instructions SELECTRONIC PROXIMITY DUAL FLUSH TOILET FLUSH VALVE. /. GPF,.8/. GPF Certified to comply with ASME A.9.M 00 AS America, Inc. M90 REV.. Exposed Flushometer for -/" Top Spud Bowls
General Plumbing Information
 General Plumbing Information Recommended Supply Line Pressures Service & Rough-in Abbreviations Service Fitting Index Color Coding Gas...0.216 psi Air (Ordinary)...15 psi Air (Air Powered Stirrer Operation)...40
INSTALLATION INSTRUCTIONS for EXPOSED SENSOR-FLUSH FLUSH VALVES
 INSTALLATION INSTRUCTIONS for EXPOSED SENSOR-FLUSH FLUSH VALVES Sensor-Flush Water Closet Flush Valve for 1 1/2 Top Spud Sensor-Flush Urinal Flush Valve 3/4 Top Spud Prior to Installation All Plumbing
Single Lever Pull-Out Kitchen Faucet
 INSTALLATION GUIDE Single Lever Pull-Out Kitchen Faucet KPF-1621 www.kraususa.com I Toll Free: 1.800.775.0703 I 2017 Kraus USA Inc. I REV. October 25, 2017 Congratulations on the purchase of your new Kraus
ZTM AND ZTMB ZENNER TURBINE METERS INSTALLATION, MAINTENANCE AND SERVICING
 ZTM AND ZTMB ZENNER TURBINE METERS INSTALLATION, MAINTENANCE AND SERVICING INSTALLATION 1. The meter is intended for measuring potable, cold water in one direction. 2. The meter is to be installed in a
Ventus Single Handle Vessel Bathroom Faucet
 INSTALLATION MANUAL Ventus Single Handle Vessel Bathroom Faucet KEF-15000 www.kraususa.com I toll free: 1.800.775.0703 I 2014-2015 Kraus USA Inc. I REV. August 18, 2016 Thank you for your purchase We would
Installation Instructions
 Installation Instructions MANUAL FLUSH VALVE with BEDPAN WASHER For Use with -/" Top Spud Toilets 607.860 (.6gpf) 607.80 (.8gpf) Certified to comply with: ASSE 07 CSA B. ADA Compliant 0 AS America, Inc.
Dolphin Blue Infrared Taps
 INSTALLATION AND MAINTENANCE GUIDE Dolphin Blue Infrared Taps Saving water and energy promoting hygiene Panel mounted electronic tap for cold or premixed water DB/L/XL 400 DB/L/XL 425 DB 450/475 Important:
Artec Pro Single Handle Commercial Kitchen Faucet
 INSTALLATION GUIDE Artec Pro Single Handle Commercial Kitchen Faucet KPF-603 www.kraususa.com I Toll Free:.800.775.0703 I 208 Kraus USA Inc. I REV. Aug 2, 208 Congratulations on the purchase of your new
Installation Instructions Series
 PORTSMOUTH MONOBLOCK LAVATORY FAUCET with Speed Connect Drain Installation Instructions 70.0 7.0 Series 7.0 Congratulations on purchasing your American Standard faucet with Speed Connect drain, a feature
Hydraulics. Part B, Section 1. This section covers the following unit configurations. 3700V
 Part B, Section 1 Model Voltage Pump Manifold Control This section covers the following unit configurations. 3500V 3700V 3860 3890 3930 3960 All Piston (D) 4-Port (A) 6-Port (B or C) 2-Port (S or T) Vista
Installation Instructions
 BERWICK / BOULEVARD MONOBLOCK LAVATORY FAUCET with Speed Connect Drain Installation Instructions 70.0 7.0 Congratulations on purchasing your American Standard faucet with Speed Connect drain, a feature
Installation Instructions
 Installation Instructions NextGen Selectronic Integrated Faucet with Optional Above-Deck Mixing & SmarTherm Temperature Limiter CAUTION: Use only American Standard supplied transformers and cable sets.
SERIN MONOBLOCK LAVATORY FAUCET with
 SERIN MONOBLOCK LAVATORY FAUCET with Speed Connect Drain Installation Instructions 0.0 Congratulations on purchasing your American Standard faucet with Speed Connect drain, a feature found only on American
Installation Instructions
 Installation Instructions for /" top spud Urinals Certified to comply with: ASSE 07 ANSI/ASME A.9. ADA Compliant 0 AS America, Inc. MODEL NUMBERS 0.0 FOR TOP SPUD APPLICATIONS CLOG RESISTANT Self-cleaning
INSTALLATION INSTRUCTIONS
 AVERY ELECTRONIC PULL-DOWN KITCHEN FAUCET INSTALLATION INSTRUCTIONS 0.0 Thank you for selecting American Standard... the benchmark of fine quality for over 00 years. To ensure that your installation proceeds