MK7 GTI Electronic Folding Mirror Conversion
|
|
|
- Daniella White
- 6 years ago
- Views:
Transcription


1 MK7 GTI Electronic Folding Mirror Conversion
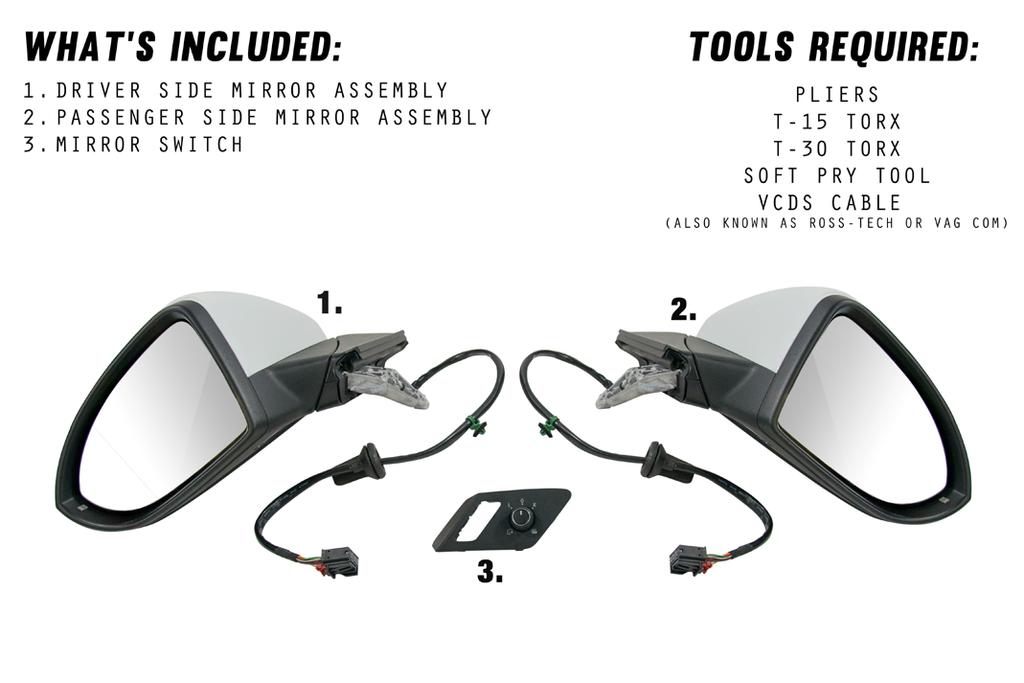
2 01

3 Mirror and Switch Installation 1. Using a soft pry tool remove the trim panel on the driver side door handle. 02

4 2. Remove 2 T-30 torx screws. 03

5 3. On the bottom of the door panel, rotate the locking clip vertical. 04

6 4. Grasp the bottom of the door panel and pull toward you. The panel is attached with strong plastic clips so this may take some effort. 05

7 5. Once the clips have been released, pull the door panel upwards. This will release the last clip and allow the panel to separate from the door. 06

8 6. Unplug the connector for the power mirrors and door locks on the back of the door panel. 07

9 7. Using a soft pry tool remove the factory power mirror switch. 08

10 8. Remove the lock button by prying on both sides to release the locking mechanism. 9. Install the lock button into the new mirror switch. Make sure both sides of the button are locked into place. Reinstall the mirror switch to the door panel snapping the side closest to the door handle in place first. 09

11 10. Unplug the connector for the factory mirror. The red locking clip will need to be pulled out before the connector can be released. 10

12 11. Remove the door module from door panel by pushing the bottom tab up and then lifting the module out. 11

13 12. Release the green clip behind the module. 12

14 13. Remove the white grommet and push the power mirror wire into the door. 13

15 14. Remove the large black grommet from the door and pull the mirror wire through the opening. 14


16 15. Remove the cover concealing the screws to the mirror. Remove the 2 T-30 torx securing the mirror. When loosening the second bolt, be sure to support the mirror with 1 hand. 15

17 16. Remove the factory mirror from the door. 16

18 17. Route the wire harness for the new mirror between the window track and inside of the door. 17

19 18. Insert the new mirror and loosely secure it using the factory T-30 screws. 18

20 19. Route the wire through the hole where the large black grommet was removed from. A small grabber tool can assist with this. 19

21 20. Insert the green clip from the new harness into the hole where the factory clip was located from step

22 21. Route the new harness through the door and secure the grommet by gentle pulling it through until it locks into place. 21
23 22. Clip the large black grommet back into place. Reinstall the door module back onto the door. Plug the mirror harness back into the door module. 23. Adjust the mirror and secure the 2 T-30 screws. 24. Reinstall the door panel in reverse order. 25. Repeat the same procedure to install the passenger side mirror. 22

24 Switching Mirror Covers If your GTI is not white you can remove the cover from the new mirrors and install your existing mirror covers. We recommend performing the switch with both mirrors off the car. 1. Push the inside corner of the mirror until it stops. 23

25 2. Using a soft pry tool, pry on the outside of the mirror. Extra care is needed to insure you do not damage the mirror. 24

26 3. With the mirror removed disconnect the 2 wires for the mirror heater. 25

27 4. Remove the 2 T-15 torx screws. 26

28 5. Release the 2 tabs securing the mirror cover by pushing them downwards 27

29 6. Remove the mirror cover. And release the front cover by squeezing the retaining tab. 28

30 7. Install the mirror cover onto the lower portion of the mirror. 29

31 8. Reinstall the front cover and snap it until place. Reinstall the T-15 screws. 30
32 9. Reconnect the wires for the mirror heater. 10. Gently snap the mirror back into place. 11. Repeat this step to transfer the cover for the other mirror. 31
33 VCDS Programming 1. Connect to the vehicle with VCDS and open controller

34 2. Once the controller opens click on
35 3. Save your existing coding and then click on long coding helper. 34

36 4. Click on the second box in number 3. Check Bit 0. 35

37 5. Click on the fifth box in number 3. Check Bit 4, 6. 36

38 6. Exit the long coding helper and click Do It! 37

39 7. You should receive a confirmation the coding was accepted. 8. Click OK and close the controller. 38

40 9. Open controller 52 and repeat the same procedure. 39
INSTALLATION INSTRUCTIONS
 INSTALLATION INSTRUCTIONS Accessory Application Publications No. AII 24642 BODY SIDE CLADDING 2003 CR-V P/N 08P21-S9A-100 Issue Date OCT 2002 PARTS LIST Right rear bumper piece Right front fender piece
Jeep JK Wrangler XHD Rear Tire Carrier
 Contents: 1. Frame (1) 2. Pivot Mount (1) 3. Latch Mount (1) 4. Lug Nuts (3) 5. Catch Pin (1) 6. M12 Washer (18) 7. M12 x 30 Hex Bolt (14) 8. Brake Light Mount (1) 9. Snap Ring (1) 10. Rub Strip (1) 11.
xpressstart Mercedes Solution Mercedes Benz S and CL Class
 DIGITAL REMOTE START SYSTEM WWW.XPRESSKIT.COM MADE IN THE USA xpressstart Mercedes Solution 2007-2012 Mercedes Benz S and CL Class Tools you will need -T-25 Torx Driver -Panel Removal tool -3/4 Drill bit
Depress each tab as you pull the bezel off. The bezels are tight. L.H. shown.
 2013-2014 Ford Mustang V6 & Boss 302 Lower Valance Fog Light Kit Parts List: Quantity: Tool List: Fog light & bulb with bracket 2 Flat head & Phillips screwdriver Black bezels 2 Ratchet & Socket set OR
Aux Port. Installation Instructions For 3.5mm Stereo Harness
 Aux Port Installation Instructions For 3.5mm Stereo Harness Thank you for choosing the Double Apex Aux Port! If you have any questions about the installation please do not hesitate to email us at support@doubleapex.co
Aux Port. Installation Instructions For Radio Harness
 Aux Port Installation Instructions For Radio Harness Thank you for choosing the Double Apex Aux Port! If you have any questions about the installation please do not hesitate to email us at support@doubleapex.co
- MK7 Mirror Integration Kit - Installation Instructions
 - MK7 Mirror Integration Kit - Thank you for choosing the Double Apex Gentex Mirror Integration kit for your Volkswagen MK7. If you have any questions about the installation please email us at support@dblapex.com.
Front Door Panel: Service and Repair Front Door Trim Panel - Removal
 Front Door Panel: Service and Repair Front Door Trim Panel - Removal REMOVAL Special Tools: 1. Disconnect and isolate the negative battery cable 2. Using trim stick or equivalent, disengage the two retaining
R-1125 C HARNESS MOUNT BAR INSTALLATION INSTRUCTIONS Fits C7 Corvette Coupes, including Z06
 R-1125 C HARNESS MOUNT BAR INSTALLATION INSTRUCTIONS Fits C7 Corvette Coupes, including Z06 The R-1125 Harness Mount Bar has been designed and tested to provide a mounting point for the shoulder harness
2017 Current Ford Raptor Stealth Fighter Rear Bumper Installation Instructions
 2017 Current Ford Raptor Stealth Fighter Rear Bumper Installation Instructions PREPARATION 1. Disconnect the negative terminal on the battery. Park the vehicle on level ground and set the emergency brake.
Outside Rear View Mirror, Remove and Install
 102989Outside Rear View Mirror, and file://c:\program Files\cosids\DATA\TMP\00102989.rtf.html Page 1 of 2 Outside Rear View Mirror, and 1. Move sash window downwards 2. Detach panel for front door inside
54531/ FORD FUSION
 54531/51531 54531/51531 13-15 FORD FUSION 13-15 FORD FUSION FORD FUSION Upper Class Grille w/ Bars TOOLS REQUIRED: Socket Set Flat/Phillips Screw Drivers Torx Bits Plastic Pry Bar 3/16 Drill Bit and Drill
INSTALLATION INSTRUCTIONS
 INSTALLATION INSTRUCTIONS Accessory Application 2012 ZDX Publications No. BII 47089 Issue Date SEP 2011 PARTS LIST Tailgate spoiler 2 Brackets 4 Nuts 4 Bolts TOOLS AND SUPPLIES REQUIRED Phillips screwdriver
INSTALLATION INSTRUCTIONS
 INSTALLATION INSTRUCTIONS Contents Description: Auto-Dimming Rearview Mirror with Compass Part Number: 990B0-35007 Applications: SX4 Hatchback, 2007- SX4 Sedan, 2008- Installation Time:.5 HRS Ref. Part
M GT 2005 up Mustang ENGINE START Push-Button INSTRUCTION SHEET
 Please contact the Ford Racing Techline for the most current instruction information @ (800) FORD-788!!! PLEASE READ THE FOLLOWING INSTRUCTIONS CAREFULLY PRIOR TO INSTALLATION!!! OVERVIEW: The following
3 Dualsport rear suspension ram truck 2500 AIR RIDE. AEV30262AA Last Updated: 07/11/17 INSTALLATION GUIDE
 3 Dualsport rear suspension ram truck 2500 AIR RIDE AEV30262AA Last Updated: 07/11/17 INSTALLATION GUIDE PLEASE READ BEFORE YOU START TO GUARANTEE A QUALITY INSTALLATION, WE RECOMMEND READING THESE INSTRUCTIONS
Written By: Tarun. This guide shows how to remove and replace the battery. AirPort Extreme A1521 Battery Replacement
 This guide shows how to remove and replace the battery. Written By: Tarun ifixit CC BY-NC-SA www.ifixit.com Page 1 of 7 INTRODUCTION The battery gives the device enough power to save the settings when
GENUINE ACCESSORIES INSTALLATION INSTRUCTIONS
 GENUINE ACCESSORIES INSTALLATION INSTRUCTIONS PART NUMBERS: APPLICABLE MODELS: 0000-89-G14A (PORT) Electrochromic Mirror Kit w/ Compass/Temp/HomeLink 2004 Mazda 3 0000-8C-G14A (PDC) KIT CONTENTS: ITEM
* * APPLICABLE MODELS: 2014 > Mazda 3
 PART NUMBER: 0000 8C L48 (DIO) / 0000 89 L84 (PIO) GENUINE ACCESSORIES INSTALLATION INSTRUCTIONS Rev. AAA *550-0700-000* APPLICABLE MODELS: 2014 > Mazda 3 REQUIRED COMPONENTS: ITEM QTY DESCRIPTION Usage
6th generation (2015+) Mustang Harness Mount Bar Installation Instructions
 Mustang Harness Mount Bar Installation Instructions") R-1180 6th generation (2015+) Mustang Harness Mount Bar Installation Instructions A. Install harness bar 1. Remove front seats. First remove the plastic bolt covers front and rear using a small flat head
R-1180 6th generation (2015+) Mustang Harness Mount Bar Installation Instructions A. Install harness bar 1. Remove front seats. First remove the plastic bolt covers front and rear using a small flat head
* * APPLICABLE MODELS: 2014 > Mazda 6
 PART NUMBER: 0000 8C H02(DIO) / 0000 89 H18(PIO) GENUINE ACCESSORIES INSTALLATION INSTRUCTIONS Rev. AAA *550-0694-000* APPLICABLE MODELS: 2014 > Mazda 6 REQUIRED COMPONENTS: ITEM QTY DESCRIPTION Usage
2015 Mustang Lightbar (All Models) CDC#
 CDC#") 2015 Mustang Lightbar (All Models) CDC# 1511-7000-01 Components: 1 CDC Lightbar Note: READ instructions before starting installation!!! CDC Part# Driver side bracket 0511-6001-05 Passenger side bracket
2015 Mustang Lightbar (All Models) CDC# 1511-7000-01 Components: 1 CDC Lightbar Note: READ instructions before starting installation!!! CDC Part# Driver side bracket 0511-6001-05 Passenger side bracket
INSTALLATION INSTRUCTIONS
 Rear Vision System Tailgate Handle Camera Mirror Display 2004-2014 Ford F-150 and 2008-2015 Ford Super Duty (Kit part numbers 9002-9521) Kit Contents: Mirror Tailgate Handle with camera and harness Interior
* * APPLICABLE MODELS: 2017 > CX-5
 PART NUMBER: 0000 8C R06(DIO) / 0000 89 R28(PIO) GENUINE ACCESSORIES INSTALLATION INSTRUCTIONS Rev. AAA *550-0681-000* APPLICABLE MODELS: 2017 > CX-5 REQUIRED COMPONENTS: ITEM QTY DESCRIPTION Usage Chart
INSTALLATION MANUAL. For: ACURA NSX
 INSTALLATION MANUAL For: ACURA NSX Package contents cable loom Electronics Bridge plug Installation manual Requested Tools Diagonal pliers small screwdriver T30 Torx Bit 1/4 or 3/8 ratchet 10mm Socket
54531/ FORD FUSION
 2014-2015 FORD Upper Class Grille w/ Bars TOOLS REQUIRED: Socket Set Flat/Phillips Screw Drivers Torx Bits Plastic Pry Bar 3/16 Drill Bit and Drill Motor PARTS LIST: (4) #8 u-nuts (2) seal brackets (driver
Installation instructions, accessories - Bluetooth, Mute kit XC / Volvo Car Corporation Göteborg, Sweden
 XC90 Section Group Weight(Kg/Pounds) Year Month 3 393 0.5/1.1 2006 11 XC90 2003, XC90 2004, XC90 2005, XC90 2006, XC90 2007, XC90 2008, XC90 2009, XC90 2010 Page 1 of 15 Required tools A0000162 IMG-242205
INSTALLATION INSTRUCTIONS
 INSTALLATION INSTRUCTIONS Accessory Application Publications No. SYSTEM 2005 ACCORD All 27511 (DX, LX) 2-AND 4-DOOR Issue Date AUG 2004 PARTS LIST Security System Attachment (LX): P/N 08E55-SDA-100A Unit
INVISIHITCH. Hidden Hitch Receiver for. BMW X5 [F15] 2014 Current (all engines/suspension pkgs/trimlines, including M Sport line and Aero kit)
![INVISIHITCH. Hidden Hitch Receiver for. BMW X5 [F15] 2014 Current (all engines/suspension pkgs/trimlines, including M Sport line and Aero kit)](/thumbs/85/92794256.jpg "INVISIHITCH. Hidden Hitch Receiver for. BMW X5 [F15] 2014 Current (all engines/suspension pkgs/trimlines, including M Sport line and Aero kit)") INVISIHITCH Hidden Hitch Receiver for BMW X5 [F15] 2014 Current (all engines/suspension pkgs/trimlines, including M Sport line and Aero kit) Capacity: 7,700 lbs. Towed Weight / 600 lbs Tongue Weight* *
INVISIHITCH Hidden Hitch Receiver for BMW X5 [F15] 2014 Current (all engines/suspension pkgs/trimlines, including M Sport line and Aero kit) Capacity: 7,700 lbs. Towed Weight / 600 lbs Tongue Weight* *
INSTALLATION INSTRUCTIONS
 INSTALLATION INSTRUCTIONS Accessory Application Publications No. AUTOMATIC AII 27160 2005 CR-V Issue Date ATTACHMENT KIT SEP 2004 PARTS LIST Automatic Day/Night Mirror Attachment Kit (sold separately)
INSTALLATION INSTRUCTIONS
 INSTALLATION INSTRUCTIONS Accessory Application Publications No. 2004 S2000 AII 26323-31611 Issue Date DEC 2005 PARTS LIST Rear defroster switch Hardtop 3-Pin subharness (If equipped, not used) 4-Pin subharness
Fitment Guide Volkswagen Golf GTI MK V1.0
 Fitment Guide Volkswagen Golf GTI MK6 2010 V1.0 www.ecliptech.com.au You need 3 wires to fit the Shift-I to the GTI. Power and Ground from the diagnostics port (near driver s side knee) and the RPM signal
1. Front Fascia Removal 1.1 Remove the 6 plastic clips that secure the upper valance, then remove. 1.2 Remove 6 upper bolts that hold the grille and f
 STRUT 2015 GMC Denali Collection Installation Manual " 1. Front Fascia Removal 1.1 Remove the 6 plastic clips that secure the upper valance, then remove. 1.2 Remove 6 upper bolts that hold the grille and
2003 Dodge Dakota ENGINE PERFORMANCE Removal & Installation - Dakota
 FUEL LINE DISCONNECT FITTINGS NOTE: Fuel lines may contain single tab, dual tab or plastic retainer ring disconnect fitting. Determine type of disconnect fitting used and use proper procedure for proper
Installation instruction do88 Intercooler for SAAB 9-3SS/SC 4-cyl Turbo
 Installation instruction do88 Intercooler for SAAB 9-3SS/SC 4-cyl Turbo This instruction shows how to replace the OEM intercooler with this performance intercooler. 1. 4. 5. At this type of installation
Water Meth DIY Button. Installation Instructions
 Water Meth DIY Button Installation Instructions Thank you for choosing the Double Apex Water Meth Button. If you have any questions about the installation please do not hesitate to email us at support@doubleapex.co
Installation Instructions Ford F Ford Expedition
 Installation Instructions 2015-2019 Ford F-150 2018 2019 Ford Expedition Notice This product is an aftermarket accessory and not designed by the vehicle s manufacturer for use on this vehicle. As such,
Installation instruction do88 Intercooler for SAAB 9-3 1,9 TTiD
 Installation instruction do88 Intercooler for SAAB 9-3 1,9 TTiD This instruction shows how to replace the OEM intercooler with this performance intercooler. At this type of installation we always recommend
INSTALLATION MANUAL
 INSTALLATION MANUAL 2563000 Parts List 1 Carrier weldment 2 Support arm assembly 1 Third brake light assembly 1 Light extension bracket 1 Spare tire adjustment plate 1 Spare tire mount plate 1 Female spade
Instructions for installing Extendable Replacement Mirrors for Ford HD vehicle.
 Instructions for installing Extendable Replacement Mirrors for Ford HD vehicle. Manual CIPA # 82100 Right Hand #82110 Left Hand #82111 Electric CIPA # 72100 #72110 #72111 Heated / Electric CIPA # 72500
2015+ HELLCAT 6.2L HEMI System vehicle specific plate system xx
 These installation instructions will guide you through installing the Nitrous Outlet 2015+ Hellcat 6.2L Hemi Vehicle Specific Plate System on your vehicle. Before you get started, remember to never use
JEEP JK WRANGLER UNLIMITED 4-DOOR Pro-Series Front Replacement Fenders
 PSFF001 2007-2016 JEEP JK WRANGLER UNLIMITED 4-DOOR Pro-Series Front Replacement Fenders HARDWARE INCLUDED 4 6mm x 25mm Hex Bolts 16 10mm x 20mm Button Head Bolts 8 6mm x 12mm x 1.6mm Flat Washers 16 10mm
INSTALLATION MANUAL
 315000 INSTALLATION MANUAL EGR & Cooler Race Kit for 2015+ 6.7L Ford Powerstroke WARNING ONLY install this kit if you are using a tuner that disables the EGR sensors & circuit system. Any product that
INSTALLATION INSTRUCTIONS
 INSTALLATION INSTRUCTIONS Accessory Application 2014 CR-V Publications No. AII 49958 Issue Date JULY 2013 PARTS LIST Attachment Kit P/N 08V03-T0A-100 Automatic day/night mirror harness Automatic Day/Night
Genuine Corvette Accessories Carbon Fiber Radio Surround Installation Instructions for Corvettes.
 Genuine Corvette Accessories Carbon Fiber Radio Surround Installation Instructions for 2005-2007 Corvettes. Difficulty: 3 out of 5. Time: Plan on about 1 hour. The tools used are: A small flashlight A
PowerBook G4 Aluminum 17" GHz Clutch Hinges Replacement
 PowerBook G4 Aluminum 17" 1-1.67 GHz Clutch Hinges Replacement Written By: Andrew Bookholt ifixit CC BY-NC-SA www.ifixit.com Page 1 of 20 INTRODUCTION Replacing the clutch hinges also provides a new attached
Locate the 4 screws on each side of the vehicle, on the inner fender well liner. Remove them with a Torx T25 bit:
 Installation Instructions for TyrolSport UG SM IC. The first step in installing the UG SMIC is removing the front bumper. Locate the 4 screws on each side of the vehicle, on the inner fender well liner.
To safely lift and install this hardtop, you will need the assistance of at least one other person.! WARNING
 1987-1995 Jeep Wrangler YJ Hardtop with Half Doors Installation Instructions PLEASE READ CAREFULLY BEFORE STARTING INSTALLATION To safely lift and install this hardtop, you will need the assistance of
RFB MK6 Jetta Fog Light Kit Wiles Rd.Coral Springs, FL
 What s Included: Tools Required: (2) Fog Lights (2) Front Grills Wire Harness Headlight Switch Hardware Kit T25 Torx Wire Cutters 10mm Socket and Rachet Headlight Switch Composite Wedge Tool 01 1. Remove
INSTALLATION INSTRUCTIONS
 INSTALLATION INSTRUCTIONS Accessory S P/N 08V67-SJC-101 Application 2012 RIDGELINE Publications No. AII 12006 Issue Date NOV 2011 PARTS LIST Back-up sensor harness 3 Wire ties with small clips (2 Not used)
w w w. h d o n l i n e s h o p. d e ELECTRA-GLO LIGHT BARS GENERAL INSTALLATION -J04723 REV Kit Number Models Kit Contents
 -J07 REV. 00-0-0 GENERAL Kit Number -09 Models For model fitment information, see the P&A Retail Catalog or the Parts and Accessories section of www.harley-davidson.com (English only). Kit Contents See
Installation instructions, accessories. Body kit
 Installation instructions, accessories Instruction No 31265373 Version 1.1 5 Part. No. Body kit IMG-256263 Volvo Car Corporation Body kit - 31265373 - V1.1 Page 1 / 42 Equipment A0000162 A0000163 IMG-239664
INTERIOR > CONSOLE, FLOOR > REMOVAL > REMOVAL > BASE FLOOR CONSOLE
 Page 1 of 18 2016 Dodge Grand Caravan 3.6L Eng VIN G SE Service Manual: BODY - INTERIOR & EXTERIOR Print Date: INTERIOR > CONSOLE, FLOOR > REMOVAL > REMOVAL > BASE FLOOR CONSOLE Fig 1: Base Floor Console
INSTALLATION INSTRUCTIONS PART NUMBER AEM C (GUN METAL GRAY FINISH)
") Equipped with AEM Dryflow Filter No Oil Required! INSTALLATION INSTRUCTIONS PART NUMBER AEM-21-805C (GUN METAL GRAY FINISH) 2016.5-17 CHEVROLET CRUZE 1.4T ITEM NO. PART NUMBER DESCRIPTION QTY. 1 21-2038DK
Equipped with AEM Dryflow Filter No Oil Required! INSTALLATION INSTRUCTIONS PART NUMBER AEM-21-805C (GUN METAL GRAY FINISH) 2016.5-17 CHEVROLET CRUZE 1.4T ITEM NO. PART NUMBER DESCRIPTION QTY. 1 21-2038DK
2017 Current Ford Raptor HoneyBadger Rear Bumper Installation Instructions
 2017 Current Ford Raptor HoneyBadger Rear Bumper Installation Instructions PREPARATION 1. Disconnect the negative terminal on the battery. Park the vehicle on level ground and set the emergency brake.
M-9424-M50CJ INTAKE MANIFOLD INSTALLATION INSTRUCTIONS
 Please visit www.fordracingparts.com for the most current instruction information!!! PLEASE READ ALL OF THE FOLLOWING INSTRUCTIONS CAREFULLY PRIOR TO INSTALLATION. AT ANY TIME YOU DO NOT UNDERSTAND THE
PF150SC15. Designed for 2015 and newer Ford F150 Super-Cab and Super-Crew vehicles without Sony System Stillwater Designs PF150SC15-A
 PF150SC15 Designed for 2015 and newer Ford F150 Super-Cab and Super-Crew vehicles without Sony System Subwoofer Assembly Amplifier Assembly Amplifier Harness 2015 Stillwater Designs PF150SC15-A2-20160502
INSTALLATION INSTRUCTIONS
 INSTALLATION INSTRUCTIONS Accessory S P/N 08V67-SJC-101 Application 2010 RIDGELINE Publications No. AII 42117 Issue Date AUG 2009 PARTS LIST Back-up sensor harness 3 Wire ties with small clip (2 Not used)
SWRA211. T-TAP x2 10MM BOLT FUSE WIRE TIES x6 SUBWOOFER ASSEMBLY 200 WATT AMP BRACKET ASSEMBLY POWER HARNESS OVERLAY HARNESS.
 SWRA211 Designed for 2011-2014 Jeep Wrangler two door with base audio or premium audio T-TAP x2 10MM BOLT FUSE WIRE TIES x6 SUBWOOFER ASSEMBLY 200 WATT AMP BRACKET ASSEMBLY POWER HARNESS 2012 Stillwater
INSTALLATION INSTRUCTIONS
 INSTALLATION INSTRUCTIONS Accessory S Application 2010 ODYSSEY Publications No. AII 41818 Issue Date JUNE 2009 PARTS LIST Right center sensor clip (Black) Backup Sensor Attachment Kit P/N 08V67-SHJ-101C
INSTALLATION INSTRUCTIONS
 INSTALLATION INSTRUCTIONS Accessory Application Publications No. All 12035 SYSTEM 2012 RIDGELINE Issue Date NOV 2011 PARTS LIST Security System Attachment Kit: P/N 08E55-SJC-101 Flange bolt Unit bracket
INSTALLATION INSTRUCTIONS CATCH CAN KIT
 INSTALLATION INSTRUCTIONS CATCH CAN KIT FORD FIESTA ST Document: 19-0175 Support: info@radiumauto.com STEPS 1-14 COVER THE PCV SIDE CATCH CAN KIT (P/N: 20-0377) STEPS 15-35 COVER THE CRANKCASE CATCH CAN
Toggle Button Kit. Installation Instructions MK5 / MK6 Golf, MK5 Jetta
 Toggle Button Kit Installation Instructions MK5 / MK6 Golf, MK5 Jetta Thank you for choosing the Double Apex Toggle Button kit. If you have any questions about the installation please do not hesitate to
Installation instruction do88 Intercooler for SAAB 9-3SS/SC 2,8 V6 Turbo
 Installation instruction do88 Intercooler for SAAB 9-3SS/SC 2,8 V6 Turbo This instruction shows how to replace the OEM intercooler with this performance intercooler. At this type of installation we always
2010 Camaro Long Tube Headers, Coated w/high Flow Cats/ Powerflo-X Crossover Assembly
 PART #30213/30214 2010 Camaro Long Tube Headers, Coated w/high Flow Cats/ Powerflo-X Crossover Assembly PACKING LIST Before installation, use this checklist to make sure all necessary parts have been included.
Mustang Clear Lens Instrument Cover (90-93) - Installation Instructions
 - Installation Instructions") Mustang Clear Lens Instrument Cover (90-93) - Installation Instructions The below installation instructions work for the following products: Mustang Clear Lens Instrument Cover (90-93) Please read through
Mustang Clear Lens Instrument Cover (90-93) - Installation Instructions The below installation instructions work for the following products: Mustang Clear Lens Instrument Cover (90-93) Please read through
INSTALLATION INSTRUCTIONS
 INSTALLATION INSTRUCTIONS Accessory Application Publications No. BII 23302 2002 MDX Issue Date PN 08U97-S3V-210 (BLACK) P/N 08U97-S3V-270 (SADDLE) NOV 2001 PARTS LIST Wood trim steering wheel 1. Make sure
GOMINIGO Third Brake Light Pulsar Kit. Installation Instructions
 Page 1 of 8 Mini Cooper Installation Instructions This kit allows the owner of any MINI Cooper or Cooper S to create a blinking effect from the third brake light assembly. The MINI Cooper being hit from
Mo- Doors Garage Door Opener Installation Victory Vision
 Mo- Doors Garage Door Opener Installation Victory Vision Your Mo- Door opener is the best garage door opener system out there for your Victory Vision. We hope you enjoy your opener as much as we do designing
Remove the 3-11mm nuts holding mirror on. Don t drop the nuts!
 2005-2012 Ford Mustang Puddle Lamp Kit Parts List: Quantity: Tool List: LED Lamps 2 Flat head screwdriver Seals 2 Ratchet & Socket set OR Nuts 2 Adjustable Wrench Wiring harness 1 Drill & 11/16 th bit
RCA PLUG KIT P/N APPLICATION BEFORE YOU BEGIN KIT CONTENTS. Verify accessory fitment at Polaris.com.
 RCA PLUG KIT P/N 2883824 APPLICATION Verify accessory fitment at Polaris.com. BEFORE YOU BEGIN Read these instructions and check to be sure all parts and tools are accounted for. Please retain these installation
Rear Door: Service and Repair REAR DOOR
 2007 Toyota Matrix L4-1.8L (1ZZ-FE) Copyright 2013, ALLDATA 10.52 Page 1 Rear Door: Service and Repair REAR DOOR Rear Door 2007 Toyota Matrix L4-1.8L (1ZZ-FE) Copyright 2013, ALLDATA 10.52 Page 2 ISASSEMBLY
FITTING OF (WESTFALIA) REMOVABLE TOWBAR ON SKODA OCTAVIA WITHOUT TOWBAR PREPARATION (04/11/16 CJ v1.0)
 REMOVABLE TOWBAR ON SKODA OCTAVIA WITHOUT TOWBAR PREPARATION (04/11/16 CJ v1.0)") FITTING OF (WESTFALIA) REMOVABLE TOWBAR ON SKODA OCTAVIA 2013+ WITHOUT TOWBAR PREPARATION (04/11/16 CJ v1.0) A. INTRO ALL STEPS COMPLETED AT YOUR OWN RISK! I AM NOT LIABLE FOR ANY LOSS OR DAMAGE! These
FITTING OF (WESTFALIA) REMOVABLE TOWBAR ON SKODA OCTAVIA 2013+ WITHOUT TOWBAR PREPARATION (04/11/16 CJ v1.0) A. INTRO ALL STEPS COMPLETED AT YOUR OWN RISK! I AM NOT LIABLE FOR ANY LOSS OR DAMAGE! These
Push Start Ignition (05-10 All) Installation
 Installation") Tools Required: Phillips head screwdriver Flat head screwdriver Ratchet 7mm Socket Torx T20 bit Wire strippers/cutters Hand file Needle nose pliers Installation Instructions: Push Start Ignition (05-10
Tools Required: Phillips head screwdriver Flat head screwdriver Ratchet 7mm Socket Torx T20 bit Wire strippers/cutters Hand file Needle nose pliers Installation Instructions: Push Start Ignition (05-10
Installation instructions, accessories. Parking assistance, rear
 Installation instructions, accessories Instruction No 31330676 Version 1.4 Part. No. 30758088, 9487266, 30786087, 31359215 Parking assistance, rear Volvo Car Corporation Parking assistance, rear- 31330676
Designed for 2015 Ford F150 Super-Cab and Super-Crew vehicles (Compatible in vehicles with or without Sony System. M6 Bolt X 2
 SF150SC15 Designed for 2015 Ford F150 Super-Cab and Super-Crew vehicles (Compatible in vehicles with or without Sony System Subwoofer Assembly Amplifier Relocation Bracket (not used on non Sony trucks)
INSTALLATION INSTRUCTIONS
 INSTALLATION INSTRUCTIONS Accessory Application Publications No. CASSETTE/MP3/ AII 30664 2006 ACCORD IN-DASH CD 2- AND 4-DOOR Issue Date ATTACHMENT AUG 2005 PARTS LIST cable Attachment Kit (sold separately):
2. With the rear door open remove pull-style clip from the passenger side just below the door latch.
 LoD Offroad FJ Cruiser Rear Bumper with Tire Carrier Installation Instructions 1. Begin with removing factory spare from the rear door. 2. With the rear door open remove pull-style clip from the passenger
INSTALLATION INSTRUCTIONS
 INSTALLATION INSTRUCTIONS Accessory Application Publications No. ATTACHMENT (EX-L WITH NAVI) 2008 RIDGELINE AII 36587 Issue Date MAY 2007 PARTS LIST Attachment Kit P/N: 08B21-SJC-102 Template Rear camera
GruvenParts.com BRASS GM Power Folding Mirror Gear Replacement Instructions. Updated 8/25/2017 Additional Pictures / Tips Posted!
 Page 1 GruvenParts.com BRASS GM Power Folding Mirror Gear Replacement Instructions Updated 8/25/2017 Additional Pictures / Tips Posted! ** Latest Design is uses an ALL BRASS SPUR GEAR!!! ** ** If you don
CONTENTS TOOLS REQUIRED:
 CONTENTS 1EA. FIVE CHANNEL AMPLIFIER P/N MPDSP033AA 1EA. AMPLIFIER BRACKET P/N RM11JK41 1EA. POWER HARNESS P/N RH41JKP 1EA. OVERLAY HARNESS P/N RH41JK 1EA. FUSE 30 AMP P/N RFUSE30 6EA. WIRE TIE P/N RFZIP6
INSTALLATION INSTRUCTIONS
 Rear Vision System Liftgate Emblem Camera Mirror Display 2009-2012 Ford Flex (Kit part number 1008-9527) Kit Contents: Mirror Liftgate Emblem Mount with Camera Interior (shorter) Harness Chassis (longer)
VW Shift Paddle Kit Installation Instructions
 VW Shift Paddle Kit Installation Instructions Parts Included: (1) Left and right shift paddle (1) Small pick tool (1) Hex key (1) T20 Torx key (1) Loctite capsule Tools Needed: Medium flat-heat screwdriver
Hatch Button Kit. Installation Instructions
 Hatch Button Kit Installation Instructions Thank you for choosing the Double Apex Hatch Button Kit. If you have any questions or feedback on the installation please do not hesitate to email us at support@doubleapex.co.
Installation Instructions
 Installation Instructions Transverse K04 Tools Required Jack and jack stands Drain pan for coolant and oil 3" and 6" extensions Channel locks 7mm, 8mm, 10mm, 11mm, 12mm, 13mm, and 16mm sockets Oxygen sensor
CONTENTS TOOLS REQUIRED:
 CONTENTS 1EA. SUBWOOFER ASSEMBLY P/N 77KICK13SUBASSEMBLY 1EA. SUB BRACKET P/N 05030060AA 1EA. 200 WATT AMP P/N REBTL200 1EA. AMP BRACKET P/N RMDR 1EA. POWER HARNESS P/N RHRAMP 1EA. OVERLAY HARNESS P/N
INSTALLATION INSTRUCTIONS ELEVATION FRONT BUMPER 2018 FORD F150
 INSTALLATION INSTRUCTIONS PARTS LIST: 1 Elevation Bumper Assembly 28 12mm x 37mm x 3mm Flat Washers 1 Driver/Left Frame Mounting Bracket 4 12mm Lock Washers 1 Passenger/Right Frame Mounting Bracket 12
igen2500 and ipro2500 IGNITION COIL RETROFIT GUIDE
 igen2500 and ipro2500 IGNITION COIL RETROFIT GUIDE This comprehensive retrofit guide is for replacing the ignition coil on Westinghouse s igen2500 and ipro2500 inverter generators. The purpose of this
INSTALLATION INSTRUCTIONS CATCH CAN KIT
 INSTALLATION INSTRUCTIONS CATCH CAN KIT FORD FIESTA ST Document: 19-0175 Support: info@radiumauto.com STEPS 1-14 COVER THE PCV SIDE CATCH CAN KIT (P/N: 20-0377) STEPS 15-31 COVER THE CRANKCASE CATCH CAN
Amp & Speaker Upgrade Install Instructions for Batwing Fairing
 Amp & Speaker Upgrade Install Instructions for Batwing Fairing Tools Needed: 1/2 inch Socket Wire Cutters 7/16 inch Socket Wire Strippers 10 mm Socket Phillips Screwdriver 1/2 inch Ratchet Wrench T25 Torx
Weistec M156/M159 ENGINE
 Weistec M156/M159 ENGINE Oil / Air Separator System Installation Guide 2007-2011 S63 AMG 2007-2011 ML63 AMG 2007 R63 AMG 2007-2008 CLK63 AMG 2008 CLK63 Black Series 2007-2011 CLS63 AMG 2008-Present C63
SUBJECT: While In Bi-level Mode, Air Flow From Panel Vents Is Less Than That Of The Floor Vents
 NUMBER: GROUP: 24-20-99 Rev. A Heating & A/C DATE: Dec. 17, 1999 This bulletin is supplied as technical information only and is not an authorization for repair. No part of this publication may be reproduced,
INSTALLATION INSTRUCTIONS
 INSTALLATION INSTRUCTIONS Accessory Application Publications No. SECURITY SYSTEM P/N 08E49-SDA-100 ACCORD 2- AND 4-DOOR AII 30666 Issue Date AUG 2005 PARTS LIST Hood switch harness Illustration of the
INSTALLATION INSTRUCTIONS
 INSTALLATION INSTRUCTIONS Accessory S Application 2013 ACCORD 4-DOOR Publications No. AII 13026 Issue Date AUG 2012 PARTS LIST Aluminum tape Backup Sensors Attachment Kit P/N 08V67-T2A-100A Control unit
Model EL8500 Series. Bagless Upright. Assembly/Disassembly Guide 1
 Model EL8500 Series Bagless Upright Assembly/Disassembly Guide 1 Table Of Contents Parts Removal / Installation Guide Belt & Brushroll Section A Page 3 Hood Assembly Section B Page 3 Main PCB Board Section
Installation instructions, accessories RTI S80
 Installation instructions, accessories Instruction No 8685714 Version 1.0 5 Part. No. RTI S80 Volvo Car Corporation RTI S80-8685714 - V1.0 Page 1 / 25 Equipment A0000161 A0000162 A0801178 D8802049 Page
Installation instructions, accessories - Bluetooth XC / Volvo Car Corporation Göteborg, Sweden
 XC90 Section Group Weight(Kg/Pounds) Year Month 3 393 1/2.2 2008 03 XC90 2003, XC90 2003, XC90 2004, XC90 2004, XC90 2005, XC90 2005, XC90 2006, XC90 2006, XC90 2007, XC90 2007, XC90 2008, XC90 2008, XC90
Installation instructions, accessories - Fuel driven heater 912-D
 XC90 Section Group Weight(Kg/Pounds) Year Month 8 87 2002 10 XC90 2003 D5244T, XC90 2004 D5244T, XC90 2005 D5244T AW50/51 AWD, XC90 2006 D5244T, XC90 2006 D5244T AW50/51 AWD D5244T R8703687 Page 1 of 20
TABLE OF CONTENTS PARTS LIST
 TROUBLESHOOTING: Note: You will have a check engine light and/or other problems unless using this product with a compatible ECM calibration. Contact your tuning supplier to learn whether or not aftermarket
STREET SCENE EQUIPMENT,INC. CONNECTING STREET SCENE SIGNAL MIRRORS
 STREET SCENE EQUIPMENT,INC. CONNECTING 365 McCormick Avenue STREET SCENE SIGNAL MIRRORS Phone (714) 426-0590 Fax (714) 426-0591 1993-2001 CONNECTING STREET SCENE SIGNAL MIRRORS INSTRUCTIONS FOR PART NUMBERS