Genuine Corvette Accessories Carbon Fiber Radio Surround Installation Instructions for Corvettes.
|
|
|
- Samuel Simmons
- 5 years ago
- Views:
Transcription


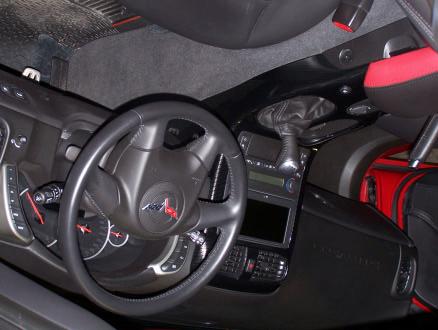
1 Genuine Corvette Accessories Carbon Fiber Radio Surround Installation Instructions for Corvettes. Difficulty: 3 out of 5. Time: Plan on about 1 hour. The tools used are: A small flashlight A small flatblade screwdriver A T15 Torx bit A T25 Torx bit A Phillips head screwdriver A 7mm socket? The original OEM surround to replace.? The shift knob comes off with a T25 torx screw. Just pull down the top of the old boot to expose it.


2 ? The next step is to remove the console cover. This requires the removal of 4 T15 Torx screws.? Next, take your flat blade screwdriver and a rag and carefully pry off the tombstone at the base of the console to expose the two 7mm bolts under it. If you have an F55 equipped car this will be your opportunity to disconnect the F55 switch. If your car is a 2005 you should also disconnect the passenger airbag light.? Once that is done, here is what you should see.


3 ? There are two more 7 mm bolts that are under the front of the emergency brake boot. You don t need to remove the handle or the boot. Just grasp the boot at the front and back and pull straight up towards the roof. This should pull the boot frame out of the side trim pocket and give you access to the two screws.? Here is a shot with the boot removed. As I said, you don t need to do this but it gives you a better idea of where the two bolts are that you need to remove. You can see them to the right of this photograph just before the silver of the console starts. You can also see the right most retainer for the emergency brake boot.


4 ? Here is what your removal should look like. This is with the boot lifted and rotated clockwise out of your way. The first bolt is fairly easy to reach. For the second bolt you will need to pull back the carpet.? Once those two 7mm bolts are out you will need to loosen the trim plate that is beside the center console and goes into the dash panel beside the glove box. You only need to loosen it from the first six inches or so beside the console.? To remove the surround now that it is loose. Start at the back near the center console. Start to lift up the on the part as if you were rocking it up towards the dash. There are

 near the top of this picture.? Next you will need to disconnect the accessory plug that goes inside the center console.")
5 no clips that hold it along the bottom. You just need to lift it off the insulating foam and disconnect the electrical connections as you go.? There is a connector at the bottom of the traction control switch and this will be the most difficult to remove. There is a triangle shaped detent at the front of the connector that must me pried loose with the small screwdriver. Don t tug on the wires. The detent is shown in close up (black connector) near the top of this picture.? Next you will need to disconnect the accessory plug that goes inside the center console.? There are three connectors near the ash tray if you have the seat heaters. Only one if you don t. They each have a press clip to loosen the connector. It should be on the top


6 of each connector. The last connector in this area will be the cigarette lighter socket. You can see the three connectors in this picture.? Keep tugging at the surround and one by one you will get it out of the clips that hold it in to the dash. There are six total, three on each side of the radio and climate control unit.? Once you have all the connectors pulled free you just need to remove the surround from the AC vent area. These are just extensions that enter the dash and mate with the foam


7 insulation that you see below. There is also one additional connector that needs to come out. This is the plug for the hazard flasher switch in the center of the AC vent.? The instructions will vary at this point. If you purchased a completed assembly skip down past the next instructions to the shift boot..? Once you have the console out and depending upon what console you have purchased for replacement you may or may not need to transfer over your accessory parts. If you bought a GCA surround you will need to transfer over the ashtray assembly with or without the seat heater. You will need to transfer over the cup holder assembly. You will need to transfer over the hazard switch which simply snaps in place. You will need to transfer over the traction control switch and the accessory lighter socket from the center console. The accessory socket will be the most difficult component to transfer over. It requires pushing in two tabs from inside the barrel of the socket. Once those are pushed in you can remove the barrel from the base. Once the barrel is removed you

8 can then take the base out of the surround. It sounds easier than it is. You will need to work at these two tabs. The dealership has a special tool to remove the socket. It is shaped like a T and it will press both tabs and allow you to rotate the socket out of the base.? The last item you will need to move is your shift boot.? The shift boot is simply held in place by 5 tabs that snap into the sides of the boot location on the center surround. You will need to pull the tabs back in the following locations (you can expose these with a light pull upward on the shift boot.? If you are transferring over an F55 switch you will need to remove the accessory tombstone and replace it with yours.

9 ? To install the completed accessory surround assembly just reverse the steps from above. You should start at the top of the surround and insert the hazard switch connector. Next reconnect the cigarette lighter plug. Next connect the two seat heater connectors if so equipped.? At this point lift your foam insulation and try to get it up and around the base of each of the cupholders. Slip the shiftboot over the top of the shifter. It is easier to do this if the shifter is in neutral at this point.? Once that is done you need to connect the accessory plug. Reconnect the airbag light if you have a 2005 model with the airbag light in the surround. ** I would recommend that you test fit the console at this point to make sure that you have clearance to bolt it down with out interference. Do this before you connect the traction control switch. This will save you the trouble of having to disconnect it again if you have any problems pressing the console down in to place so that you can bolt it in. Once you are confident that you have everything in place go ahead and reconnect your traction control switch.? Re-align the passenger side trim panel and insert and tighten the two 7mm bolts at the ebake location. Don t tighten them all the way and again make sure you have clearance for the two front 7mm bolts. If so, install and tighten the two front 7mm bolts. Now tighten the side 7mm bolts and your console is just about in place. Reinstall your surround tombstone with the airbag light and the F55 connector if so equipped.? Reseat the emergency brake boot.? Install the shift knob and pull the boot up around the base of the knob.? Re-install the center console cushion. Congratulations, you ve completed the install of your new radio surround.

10
Required Parts and Tools
 Welcome to the installation guide for the 2004 to 2009 CLK Class Mercedes Benz. Please thoroughly review this manual before installation as there are details that are essential to operation of the vehicle.
M-7210-Z3 Focus Short-Throw Shifter (fits 2000-April 2002) INSTALLATION INSTRUCTIONS
 INSTALLATION INSTRUCTIONS") Please visit www.fordracingparts.com for the most current instruction information!!! PLEASE READ ALL OF THE FOLLOWING INSTRUCTIONS CAREFULLY PRIOR TO INSTALLATION. AT ANY TIME YOU DO NOT UNDERSTAND THE
Please visit www.fordracingparts.com for the most current instruction information!!! PLEASE READ ALL OF THE FOLLOWING INSTRUCTIONS CAREFULLY PRIOR TO INSTALLATION. AT ANY TIME YOU DO NOT UNDERSTAND THE
BODY-24, Late Model 944 ( and Newer) Dash Replacement
 Dash Replacement") BODY-24, Late Model 944 (1985.5 and Newer) Dash Replacement Introduction Replacing the dash in a late model 944 is not overly difficult. However, it is very tedious and a lot of patience is required. It's
BODY-24, Late Model 944 (1985.5 and Newer) Dash Replacement Introduction Replacing the dash in a late model 944 is not overly difficult. However, it is very tedious and a lot of patience is required. It's
Push Start Ignition (05-10 All) Installation
 Installation") Tools Required: Phillips head screwdriver Flat head screwdriver Ratchet 7mm Socket Torx T20 bit Wire strippers/cutters Hand file Needle nose pliers Installation Instructions: Push Start Ignition (05-10
Tools Required: Phillips head screwdriver Flat head screwdriver Ratchet 7mm Socket Torx T20 bit Wire strippers/cutters Hand file Needle nose pliers Installation Instructions: Push Start Ignition (05-10
by B6 Boost Volkswagen -> (46) Golf & Jetta V (13) Passat B6 (11) Passat B5.5 (4) Phaeton (8) Eurovan (7) Touareg (3) Audi
 Golf & Jetta V (13) Passat B6 (11) Passat B5.5 (4) Phaeton (8) Eurovan (7) Touareg (3) Audi") 1 of 10 Top» Volkswagen» Passat B6» European Cup Holder DIY Installations European Cup Holder by B6 Boost Volkswagen -> (46) Golf & Jetta V (13) Passat B6 (11) Passat B5.5 (4) Phaeton (8) Eurovan (7) Touareg
1 of 10 Top» Volkswagen» Passat B6» European Cup Holder DIY Installations European Cup Holder by B6 Boost Volkswagen -> (46) Golf & Jetta V (13) Passat B6 (11) Passat B5.5 (4) Phaeton (8) Eurovan (7) Touareg
Convenience Lighting
 Convenience Lighting by Flopster843 19 Dec 2011 In order to cut costs and make a larger profit, many automobile manufacturers decided to cut several minor items from the production line. Chrysler removed
Mercedes Benz SLK Class
 INSTALLATION INSTRUCTIONS FOR PART 99-8713 KIT FEATURES DIN radio provision with pocket ISO radio provision with pocket Double DIN radio provision APPLICATIONS See application list inside Mercedes Benz
Tru-Billet Climate Control Knob Installation Instructions
 P/N S197-525-07 2007-08 Tru-Billet Climate Control Knob Installation Instructions Thank you for your purchase of SilverHorse Racing products. Please read all directions before beginning the installation.
Short Shifter Installation Instructions Miata 6-Speed manual
 Tools required: 10mm deep socket long extension ratchet small flathead screwdriver phillips-head screwdriver Short Shifter Installation Instructions 2006-14 Miata 6-Speed manual IMPORTANT NOTE: This shifter
INSTALLATION INSTRUCTIONS
 5 ALL VEHICLES KIT FEATURES Equalizer provisions Rear support provisions KIT COMPONENTS 99-7890 INSTALLATION INSTRUCTIONS -SHAFT HEAD UNITS: Snap the Shaft Supports into the Radio Housing. Slide the aftermarket
M GT 2005 up Mustang ENGINE START Push-Button INSTRUCTION SHEET
 Please contact the Ford Racing Techline for the most current instruction information @ (800) FORD-788!!! PLEASE READ THE FOLLOWING INSTRUCTIONS CAREFULLY PRIOR TO INSTALLATION!!! OVERVIEW: The following
Acura/Honda/Isuzu AT-807HD, IBR-807HD, CF-807HD, AW-807HD
 Installation instructions for part Acura/Honda/Isuzu 1988-2006 99-7898 AT-807HD, IBR-807HD, CF-807HD, AW-807HD WIRING & ANTENNA CONNECTIONS (sold separately) Wiring Harness: Not Required KIT FEATURES DIN
Installation Manual TWM Performance Short Shifter Cobalt SS/SC, SS/TC, HHR SS, Ion Redline and Saab 9-3
 Page 1 Installation Manual TWM Performance Short Shifter Cobalt SS/SC, SS/TC, HHR SS, Ion Redline and Saab 9-3 Please Note: It is preferable to park on a flat surface, as you will have to engage and disengage
INSTALLATION INSTRUCTIONS
 INSTALLATION INSTRUCTIONS Accessory Application Publications No. AII 27871 CIVIC IN-DASH CD CHANGER 2- AND 4-DOOR Issue Date AUG 2004 PARTS LIST In-Dash CD Changer Attachment: P/N 08B06-S5D-110 CD Changer
SUBARU/VOLVO VOLKSWAGEN INSTALLATION INSTRUCTIONS (pgs. 1-6) (pgs. 7-10)
 (pgs. 7-10)") 3b 4 5 C A B D Fig. C Fig. D 00 SERIES (LOWER DASH), 00 SERIES: For -Shaft head units, slide the aftermarket head unit into the Radio Housing and secure with shaft nuts. (see ). For DIN head units, cut
3b 4 5 C A B D Fig. C Fig. D 00 SERIES (LOWER DASH), 00 SERIES: For -Shaft head units, slide the aftermarket head unit into the Radio Housing and secure with shaft nuts. (see ). For DIN head units, cut
Installation Manual TWM Performance Kia Forte Short Shifter
 Installation Manual TWM Performance Kia Forte 2009+ Short Shifter Begin the installation by parking on a flat surface, as you will have to engage and disengage the hand brake and shift from gears to neutral.
Chrysler Multi-kit TABLE OF CONTENTS Dash Disassembly...2 Kit Assembly
 99-650345 INSTALLATION INSTRUCTIONS Chrysler Multi-kit 1998-2010 INTRODUCTION This instruction booklet will cover (3) different kits, yet carry the same applications and dash disassembly. After dash disassembly
I Page 1 of 5
 Page 1 of 5 MOUNTING LOCATION: Upper right side of radio cavity-es300 Right sideof radio cavity-sc430&es350 Right side of climate control-solara TOOLS REQUIRED: Hook tool / Pry tool 10mm driver/ Phillips
If you study the Mercedes Documents (pictured below) for several minutes before you start, you will understand them as you proceed.
 for several minutes before you start, you will understand them as you proceed.") Removing the C32 center dash panel and radio These are not my instructions, they were garnered from the web, I merely pasted them onto a doc file. There is Air Bag wiring nearby. If you feel uncomfortable
Removing the C32 center dash panel and radio These are not my instructions, they were garnered from the web, I merely pasted them onto a doc file. There is Air Bag wiring nearby. If you feel uncomfortable
STEPS FOR REMOVING REAR ASHTRAY & CUP HOLDER, CENTER ARMREST, E- BRAKE CONSOLE, FRONT ASHTRAY, LOWER CENTER CONSOLE AND GLOVE BOX
 Please give credit where credit is due! This DIY was completed ENTIRELY by the hardest working VW Vortex moderator on the site!! Gary Thompson, Ph.D. - vortex ID VGRT6, email address vgrt6@yahoo.com. Please
MANUAL FOR THE NM100 ADJUSTABLE SHORT SHIFTER
 MANUAL FOR THE NM100 ADJUSTABLE SHORT SHIFTER P.O. BOX 313 ~ ODESSA, FL 33556 ~ 1-844-NUM-RACE Tools Needed T20 Torx Driver T27 Torx Driver Needle Nose Pliers ¼ Ratchet with 10MM Socket 3MM Allen Wrench
Subaru 5-Speed Double Adjustable Short Throw Shifter
 Subaru 5-Speed Double Adjustable Short Throw Shifter 1999+ Subaru Impreza 5-Speed 2004-2005 Subaru Forester XT 5-Speed Congratulations on your purchase of the COBB Tuning Double Adjustable Short Throw
Installing the Wireless Charging upgrade kit in a 2018 XT5 (Platinum version)
") Installing the Wireless Charging upgrade kit in a 2018 XT5 (Platinum version) September 2, 2018 Tools needed: Wireless charger upgrade kit Plastic trim tools 7 mm nut driver Background: I purchased the
Installing the Wireless Charging upgrade kit in a 2018 XT5 (Platinum version) September 2, 2018 Tools needed: Wireless charger upgrade kit Plastic trim tools 7 mm nut driver Background: I purchased the
Down South Vettes Leather Sun visor Installation Instructions.
 Down South Vettes Leather Sun visor Installation Instructions. Difficulty: 3 out of 5. Time: Plan on about 30 minutes. The tools used are:? A medium blade screw driver? A small flashlight may help get
BMW E46 Android Touch Screen Radio Installation Instructions
 BMW E46 Android Touch Screen Radio Installation Instructions Enjoy your new Android Radio from Bremmen Parts, we appreciate your business. Vibrant Touch Display This radio features a responsive 9 touch
INSTALLATION INSTRUCTIONS
 INSTALLATION INSTRUCTIONS Accessory Application Publications No. AUTOMATIC AII 27160 2005 CR-V Issue Date ATTACHMENT KIT SEP 2004 PARTS LIST Automatic Day/Night Mirror Attachment Kit (sold separately)
* * Inside Ram. Tools Required 1500, 2500, 3500 IMPORTANT
 Revision 10/07/14 IMPORTANT Before starting, compare items on your invoice with items received. Carefully check through packaging material. If any item is missing, please call Crutchfield Technical Support
INSTALLATION INSTRUCTIONS
 INSTALLATION INSTRUCTIONS Accessory Application Publications No. AII 32664 TRUNK MOUNT 2007 ACCORD 4-DOOR Issue Date JULY 2006 PARTS LIST 17 Wire ties Attachment Kit (sold separately): P/N 08B26-SDA-100
AW-800PKUV INSTALLATION INSTRUCTIONS
 KIT FEATURES Works with factory brackets or Metra's 99-80 Fills space left after removing double-din unit 88-00-8000 AW-800PKUV INSTALLATION INSTRUCTIONS APPLICATIONS KIT COMPONENTS Pocket TOOLS REQUIRED
INSTALLATION INSTRUCTIONS C-VS-2000-DUR-1 20 VEHICLE SPECIFIC CONSOLE for 2018 Dodge Durango with Standard Shifter
 INSTALLATION INSTRUCTIONS C-VS-2000-DUR-1 20 VEHICLE SPECIFIC CONSOLE for 2018 Dodge Durango with Standard Shifter TOOLS REQUIRED: Phillips Screw Driver T-20 Torx bit Standard Socket set 9/64 Allen wrench
Chevrolet Cobalt Short Shifter Installation Manual
 Chevrolet Cobalt Short Shifter Installation Manual Pull shift boot down on the shifter shaft. Pull up on the shift knob to remove it. It requires some force. Remove the ebrake console, shifter console
Installation Instructions HURST COMPETITION AND BILLET/PLUS SHIFTER Mustang w/5-speed Manual Transmission (GT only)
") Installation Instructions HURST COMPETITION AND BILLET/PLUS SHIFTER 2005-2010 Mustang w/5-speed Manual Transmission (GT only) Catalog# 3915201 WORK SAFELY! For maximum safety, perform this installation
Installation Instructions HURST COMPETITION AND BILLET/PLUS SHIFTER 2005-2010 Mustang w/5-speed Manual Transmission (GT only) Catalog# 3915201 WORK SAFELY! For maximum safety, perform this installation
INSTALLATION INSTRUCTIONS
 INSTALLATION INSTRUCTIONS Accessory Application Publications No. CHANGER ATTACHMENT (TRUNK MOUNT) 2005 CIVIC 4-DOOR AII 27890 Issue Date AUG 2004 PARTS LIST Changer Attachment (sold separately) P/N 08B26-S5D-100
xpressstart Mercedes Solution Mercedes Benz S and CL Class
 DIGITAL REMOTE START SYSTEM WWW.XPRESSKIT.COM MADE IN THE USA xpressstart Mercedes Solution 2007-2012 Mercedes Benz S and CL Class Tools you will need -T-25 Torx Driver -Panel Removal tool -3/4 Drill bit
Installation Manual TWM Performance Short Shift Kit Stage 1 and Stage 2 MazdaSpeed 6
 Page 1 Installation Manual TWM Performance Short Shift Kit Stage 1 and Stage 2 MazdaSpeed 6 Please Note: It is preferable to park on a flat surface, as you will have to engage and disengage the hand brake
Illuminated Cup Holders Hyundai Elantra (GLS, Limited, Coupe)
") Illuminated Cup Holders 2011-2015 Hyundai Elantra (GLS, Limited, Coupe) Thanks for purchasing this Cup Holder Illumination Install Kit! If you have any questions or feedback please email me direct at info@accentglowled.com
Illuminated Cup Holders 2011-2015 Hyundai Elantra (GLS, Limited, Coupe) Thanks for purchasing this Cup Holder Illumination Install Kit! If you have any questions or feedback please email me direct at info@accentglowled.com
INSTALL INSTRUCTIONS C-VS-1500-DUR-1 15 VEHICLE SPECIFIC CONSOLE for Dodge Durango with OEM Center Shifter
 INSTALL INSTRUCTIONS C-VS-1500-DUR-1 15 VEHICLE SPECIFIC CONSOLE for 2011-2013 Dodge Durango with OEM Center Shifter TOOLS NEEDED: Phillips Screw Driver Standard Socket set Metric Socket set 90 Phillips
Installation Instructions
 Installation Instructions Thank you for choosing the Double Apex Garage Control. If you have any questions about the installation please do not hesitate to email us at support@doubleapex.co or call 978-371-8585.
INSTALLATION INSTRUCTIONS
 INSTALLATION INSTRUCTIONS Accessory Application Publications No. AII 27996 ATTACHMENT KIT 2005 CIVIC HYBRID Issue Date AUG 2004 PARTS LIST Changer Attachment Kit: P/N 08B26-S5B-100 4 Washer-screws, 4 x
PARTS TOOLS. Set Screw. Washer (2) Blue Bushing (2) Black Bushing (2) B&M Short Throw Shifter. Jam Nut Grease. Retaining Ring (2) Insert (2)
 Blue Bushing (2) Black Bushing (2) B&M Short Throw Shifter. Jam Nut Grease. Retaining Ring (2) Insert (2)") Installation Instructions SHORT THROW SHIFTER Fits: Porsche Boxter, Boxter S, 911, 996 Cayman & Cayman S models See Application Guide for specific year ranges and engine sizes Catalog # 45135 WORK SAFELY!
Installation Instructions SHORT THROW SHIFTER Fits: Porsche Boxter, Boxter S, 911, 996 Cayman & Cayman S models See Application Guide for specific year ranges and engine sizes Catalog # 45135 WORK SAFELY!
Aux Port. Installation Instructions For 3.5mm Stereo Harness
 Aux Port Installation Instructions For 3.5mm Stereo Harness Thank you for choosing the Double Apex Aux Port! If you have any questions about the installation please do not hesitate to email us at support@doubleapex.co
Installation Manual TWM Performance Short Shifter Nissan 350Z, 370Z Infiniti G35, G37
 Installation Manual TWM Performance Short Shifter Nissan 350Z, 370Z Infiniti G35, G37 It is preferable to park on a flat surface, as you will have to engage and disengage the hand brake and shift from
Aux Port. Installation Instructions For Radio Harness
 Aux Port Installation Instructions For Radio Harness Thank you for choosing the Double Apex Aux Port! If you have any questions about the installation please do not hesitate to email us at support@doubleapex.co
Heater Core Replacement
 Heater Core Replacement Ok, I just finished replacing the heater core in my dad's '94 840Ci. While this is fresh in my mid I thought I would outline the procedure, I'm going from memory here, so I will
Toggle Button Kit. Installation Instructions MK5 / MK6 Golf, MK5 Jetta
 Toggle Button Kit Installation Instructions MK5 / MK6 Golf, MK5 Jetta Thank you for choosing the Double Apex Toggle Button kit. If you have any questions about the installation please do not hesitate to
Installation Instructions
 86-95 Suzuki Samurai Heater Water Control Valve Wire Cable (SKU# SIB-HCVW) Installation Instructions CAUTION: Safety glasses should be worn at all times when working with vehicles and related tools and
INSTALLATION INSTRUCTIONS
 INSTALLATION INSTRUCTIONS Accessory Application Publications No. in- ENTERTAINMENT SYSTEM 2004 TSX BII 24811 Issue Date APRIL 2003 PARTS LIST Attachment Kit P/N 08B23-SDA-101A Monitor bracket harness FM
INSTALLATION INSTRUCTIONS JEEP 2011-UP JK SECURITY FULL CONSOLE #274
 INSTALLATION INSTRUCTIONS JEEP 2011-UP JK SECURITY FULL CONSOLE #274 PARTS CHECKLIST Tuffy Console #9 Left Front Mounting Bracket #10 Right Front Mounting Bracket #11 Electronics mounting bracket #12 Divider
INSTALLATION INSTRUCTIONS FOR PART APPLICATIONS. Chrysler Multi Kit. A) Radio Housing B) ISO Trim Plate C) ISO Snap in Brackets
 Radio Housing B) ISO Trim Plate C) ISO Snap in Brackets") INSTALLATION INSTRUCTIONS FOR PART 99-60 APPLICATIONS Chrysler Multi Kit 99-60 KIT FEATURES DIN Head Unit Provision with pocket ISO DIN Head Unit Provision with pocket KIT COMPONENTS A) Radio Housing B)
INSTALLATION INSTRUCTIONS FOR PART 99-60 APPLICATIONS Chrysler Multi Kit 99-60 KIT FEATURES DIN Head Unit Provision with pocket ISO DIN Head Unit Provision with pocket KIT COMPONENTS A) Radio Housing B)
Instructions for Front Midrange / Tweeter Installation in BMW 3 Series/M3 (E36)
") Disclaimer: Bavarian Soundwerks highly recommends professional installation of the products we sell. We provide these installation instructions free of charge as a guide to assist those customers who choose
Disclaimer: Bavarian Soundwerks highly recommends professional installation of the products we sell. We provide these installation instructions free of charge as a guide to assist those customers who choose
Installation Manual TWM Performance Short Shifter 2008 Mitsubishi Lancer
 Page 1 Installation Manual TWM Performance Short Shifter 2008 Mitsubishi Lancer Please Note: It is preferable to park on a flat surface, as you will have to engage and disengage the hand brake and shift
ACD-PRO Install in 2008 EvoX
 Turning in a counter clockwise direction, unscrew ift knob ACD-PRO Install in 2008 EvoX Slide back and remove the floor console panel assembly Pull up to remove the center console tray Disconnect the plug
M7 R52S & R53 Cold Air Intake Installation Guide 53-3M7301
 M7 R52S & R53 Cold Air Intake Installation Guide 53-3M7301 M7 Speed engineers and manufactures the highest quality MINI COOPER accessories and performance parts available anywhere on Planet Earth! Please
1. Disconnect the battery. This is important! This will prevent air bag deployment.
 PARTS PACKING LIST Evaporator assembly Drain tube Plastic air plug Hardware package 11040 3601 W. Clarendon Phoenix, Arizona 85019 (602) 233-0090 800-648-4475 www.ackits.com 2003-4 Jeep Wrangler EVAPORATOR
Dash removal for 1968 Chevelles
 Dash removal for 1968 Chevelles This is the procedure I used when I removed the dash from my car. It s a column shift, automatic trans, A/C car with tach and gauges. 1. Disconnect the battery. 2. Remove
Chevrolet Camaro 2010-up S-LC
 INSTALLATION INSTRUCTIONS FOR PART 99-10S-LC APPLICATIONS Chevrolet Camaro 2010-up 99-10S-LC KIT FEATURES DIN and DDIN head unit provision Painted silver to match factory dash AXXESS Interface included
Installation Instructions INDY SHIFTER Fits: Mustang Fastback & Convertible with MT-82 Transmission Catalog #
 Installation Instructions INDY SHIFTER Fits: 2015-2018 Mustang Fastback & Convertible with MT-82 Transmission Catalog # 3916036 Watch our installation video on YouTube WORK SAFELY! For maximum safety,
MK7 GTI Electronic Folding Mirror Conversion
 MK7 GTI Electronic Folding Mirror Conversion 01 Mirror and Switch Installation 1. Using a soft pry tool remove the trim panel on the driver side door handle. 02 2. Remove 2 T-30 torx screws. 03 3. On the
IPSCO STS (Short Throw Shifter) Installation Instructions (GEN II) Dodge Viper WARNING
 Installation Instructions (GEN II) Dodge Viper WARNING") WARNING Modification of your vehicle with the parts identified above may alter its stock performance; the buyer hereby expressly assumes all risks associated with any such modification. DISCLAIMER OF WARRANTY
WARNING Modification of your vehicle with the parts identified above may alter its stock performance; the buyer hereby expressly assumes all risks associated with any such modification. DISCLAIMER OF WARRANTY
* * APPLICABLE MODELS: 2014 > Mazda 3
 PART NUMBER: 0000 8C L48 (DIO) / 0000 89 L84 (PIO) GENUINE ACCESSORIES INSTALLATION INSTRUCTIONS Rev. AAA *550-0700-000* APPLICABLE MODELS: 2014 > Mazda 3 REQUIRED COMPONENTS: ITEM QTY DESCRIPTION Usage
INSTALLATION INSTRUCTIONS
 INSTALLATION INSTRUCTIONS Accessory Application Publications No. CD/CASSETTE PLAYER 2005 CIVIC 2- AND 4-DOOR AII 27857 Issue Date AUG 2004 PARTS LIST Cassette Player: P/N 08A53-S5A-100 Cassette player
CorkSport ort Mazda 3 Adjustable Shifter Mazdaspeed 3, Mazda 3 6-speed and Mazda3 SkyActiv 6-speed
 Part # Axl-6-963 CorkSport ort Mazda 3 Adjustable Shifter 2010-2013 Mazdaspeed 3, 2010-2013 Mazda 3 6-speed and 2012-2013 Mazda3 SkyActiv 6-speed Pre-Installation Notes: The CorkSport Adjustable Short
INSTALLATION INSTRUCTIONS
 INSTALLATION INSTRUCTIONS Accessory Application Publications No. CASSETTE/MP3/ AII 30664 2006 ACCORD IN-DASH CD 2- AND 4-DOOR Issue Date ATTACHMENT AUG 2005 PARTS LIST cable Attachment Kit (sold separately):
Chrysler/Dodge/Jeep (without NAV)
") Installation instructions for part 99-6507 Chrysler/Dodge/Jeep (without NAV) 2005-2010 99-6507 KIT FEATURES DIN radio provision with pocket ISO DIN radio provision with pocket WIRING & ANTENNA CONNECTIONS
Installation instructions for part 99-6507 Chrysler/Dodge/Jeep (without NAV) 2005-2010 99-6507 KIT FEATURES DIN radio provision with pocket ISO DIN radio provision with pocket WIRING & ANTENNA CONNECTIONS
Short Shifter Installation Instructions For Miata, 6-speed Manual Transmission
 Short Shifter Installation Instructions For 2006-15 Miata, 6-speed Manual Transmission PART# 994-060 Required tools: 10mm deep socket Long extension Ratchet Small flathead screwdriver Phillips-head screwdriver
* * APPLICABLE MODELS: 2014 > Mazda 6
 PART NUMBER: 0000 8C H02(DIO) / 0000 89 H18(PIO) GENUINE ACCESSORIES INSTALLATION INSTRUCTIONS Rev. AAA *550-0694-000* APPLICABLE MODELS: 2014 > Mazda 6 REQUIRED COMPONENTS: ITEM QTY DESCRIPTION Usage
Barton Short Throw Shifter 11/12 V6, GT Mustang:
 Barton Short Throw Shifter 11/12 V6, GT Mustang: Tools Required: 10mm deep socket Socket wrench 10 extension for socket wrench Jack Jack stand Small piece of wood Small hook tool (recommended) *can be
C6 (includingg Z06) Catalog # 45034
 Catalog # 45034") Installation Instructionss Precision Sport Shifter Fits: 2008-20133 Corvette C6 (includingg Z06) Catalog # 45034 WORK SAFELY! For maximum safety, perform this installation on a clean, level surface and
Installation Instructionss Precision Sport Shifter Fits: 2008-20133 Corvette C6 (includingg Z06) Catalog # 45034 WORK SAFELY! For maximum safety, perform this installation on a clean, level surface and
2015 Copyright Maxspeed-Motorsports.com
 1 Porsche PCM 3.1 Backup Camera Installation Instructions. Thank you for purchasing your product at www.maxspeedmotorsports.com Before you start please understand that these installation instructions are
Toyota
 Installation instructions for part 99-8104 KIT ATURS ISO IN radio provision ISO IN radio provision Toyota 1984-2004 99-8104 WIRING & ANTNNA CONNCTIONS (sold separately) Wiring Harness: 70-1761 Antenna
Toggle Button Kit. Installation Instructions
 Toggle Button Kit Installation Instructions Thank you for choosing the Double Apex Toggle Button kit. If you have any questions about the installation please do not hesitate to email us at support@doubleapex.co.
spec.dock BMW 5-Series e60 v.2 Installation Instructions
 Thank you for your purchase of a spec.dock ipod solution for your vehicle. Audio connections may vary according to your particular setup. 2point5 recommends having your spec.dock integrated by a certified
Hatch Button Kit. Installation Instructions
 Hatch Button Kit Installation Instructions Thank you for choosing the Double Apex Hatch Button Kit. If you have any questions or feedback on the installation please do not hesitate to email us at support@doubleapex.co.
OEM Cruise Control Installation in GMC/Chevy NBS trucks
 OEM Cruise Control Installation in 99-02 GMC/Chevy NBS trucks May 2008 ~ Rampage_Rick Having just installed factory cruise control in my 00 Sierra, I thought I d share the fun. I followed the steps outlined
INSTALLATION INSTRUCTIONS
 INSTALLATION INSTRUCTIONS Accessory CIGARETTE Application 2005 CIVIC Publications No. AII 27859 WITH ASHTRAY (EX, GX, LX, VP) 2 AND 4-DOOR Issue Date AUG 2004 The Cigarette Lighter with Ashtray cannot
VTCM Installation Manual Table of Contents
 VTCM Installation Manual Table of Contents 1. Introduction:... 2 2. Disclaimer:... 2 3. Software / Drivers:... 2 a. Plugging in the controller:... 2 b. Install 4.0.NET Frame work:... 3 c. Install COM port
PRELIMINARY INSTALLATION INSTRUCTIONS. PARTS LIST Attachment Kit(sold separately): P/N 08B23-S9V-100B. Display bracket.
: P/N 08B23-S9V-100B. Display bracket.") INSTALLATION INSTRUCTIONS Accessory Application Publications No. in- ENTERTAINMENT SYSTEM 2006 PILOT All 30502 Issue Date SEP 2005 PARTS LIST Attachment Kit(sold separately): P/N 08B23-S9V-100B Display
INSTALLATION INSTRUCTIONS Accessory Application Publications No. in- ENTERTAINMENT SYSTEM 2006 PILOT All 30502 Issue Date SEP 2005 PARTS LIST Attachment Kit(sold separately): P/N 08B23-S9V-100B Display
C4 Sound Deadening & Insulation Kit Interior Removal & Installation Instructions
 C4 Sound Deadening & Insulation Kit Interior Removal & Installation Instructions Ok, let's start with taking the radio bezel dash area off first. Here is what the OEM radio looks like, and the points you
INSTALLATION INSTRUCTIONS FOR PART APPLICATIONS GM/SUZUKI MULTI KIT
 INSTALLATION INSTRUCTIONS FOR PART 99-2003 APPLICATIONS GM/SUZUKI MULTI KIT 99-2003 KIT FEATURES DIN Head Unit Provisions with Pocket ISO DIN Head Unit Provisions with Pocket Double DIN head unit provision
Lincoln Navigator / MKX Lincoln MKZ / Zephyr 2006 (excludes models equipped with factory navigation)
") 99-5813 INSTALLATION INSTRUCTIONS Lincoln Navigator 2007-2014 / MKX 2007-2010 Lincoln MKZ 2007-2009 / Zephyr 2006 (excludes models equipped with factory navigation) KIT FEATURES DIN radio provision with
99-5813 INSTALLATION INSTRUCTIONS Lincoln Navigator 2007-2014 / MKX 2007-2010 Lincoln MKZ 2007-2009 / Zephyr 2006 (excludes models equipped with factory navigation) KIT FEATURES DIN radio provision with
Installation Instructions COMPETITION/PLUS SHIFTER Ford Mustang MT82 6-Speed Manual Transmission Catalog#
 Installation Instructions COMPETITION/PLUS SHIFTER 2015-2017 Ford Mustang MT82 6-Speed Manual Transmission Catalog# 3916037 Rev. 00 WORK SAFELY! For maximum safety, perform this installation on a clean,
Jeep Wrangler Adjustable Infrared Light Rear Vision Camera System for Factory Display Radios 2007 Current (Kit # )
") Jeep Wrangler Adjustable Infrared Light Rear Vision Camera System for Factory Display Radios 2007 Current (Kit # 9002-8857) Items Included in the Kit Required Tools & Supplies Camera Chassis Harness Power
Jeep Wrangler Adjustable Infrared Light Rear Vision Camera System for Factory Display Radios 2007 Current (Kit # 9002-8857) Items Included in the Kit Required Tools & Supplies Camera Chassis Harness Power
Remove four screws from radio trim
 ZSpeedPerformance Remove four screws from radio trim Radio trim removed, Remove 3 screws from shifter trim. The other screw is under the ash tray. Remove shift knob and remove shifter trim. Use caution
PART NUMBER: H630SXC001. Kit Contents: A. Amplifier with Bracket (1) D. Badge (2) with push nuts (4)
 D. Badge (2) with push nuts (4)") Kit Contents: A. Amplifier with Bracket (1) D. Badge (2) with push nuts (4) E. Clip B. Interface / Power Harness (1) C. Cable tie (8) F. Mounting Nuts (2) G. Replacement Front Speaker (2) H. Badge mounting
Kit Contents: A. Amplifier with Bracket (1) D. Badge (2) with push nuts (4) E. Clip B. Interface / Power Harness (1) C. Cable tie (8) F. Mounting Nuts (2) G. Replacement Front Speaker (2) H. Badge mounting
GENUINE PARTS INSTALLATION INSTRUCTIONS
 GENUINE PARTS INSTALLATION INSTRUCTIONS 1. 2. 3. 4. DESCRIPTION: Accent light Kit APPLICATION: R42H (2011) PART NUMBER: 999F3 AW000 - Universal Accent Lighting Kit. KIT CONTENTS: Item QTY Description Service
INSTALLATION INSTRUCTIONS FOR PART APPLICATIONS See Application List Inside TOOLS REQUIRED: Phillips Screwdriver Cutting Tool
 INSTLLTION INSTRUCTIONS FOR PRT 95-7801 PPLICTIONS See pplication List Inside 95-7801 KIT FETURES Double DIN Radio Provision Stacked ISO Units Provision KIT COMPONENTS ) Radio Housing ) Rear Support Tray
Evolution Motorsports Carbon Fiber Rear Strut Brace Installation Instructions For Cars WITH BOSE Subwoofer System
 Evolution Motorsports Carbon Fiber Rear Strut Brace Installation Instructions For Cars WITH BOSE Subwoofer System 1. Move both the driver and passenger side seat fully forward. 2. Fully collapse both rear
INSTALLATION INSTRUCTIONS
 INSTALLATION INSTRUCTIONS Accessory Application Publications No. AUTOMATIC PILOT AII 23597 Issue Date MAY 2002 PARTS LIST Automatic Day/Night Mirror Attachment Kit P/N 08V03-S9V-100A Day/night mirror Upper
INSTALLATION INSTRUCTIONS
 INSTALLATION INSTRUCTIONS Accessory Application Publications No. (Trunk Mount) 2009 CIVIC 4-DOOR AII 40184 Issue Date AUG 2008 PARTS LIST 8 Cushion tapes Changer Attachment (Sold Separately) P/N 08B26-SNA-101
INSTALLATION INSTRUCTIONS
 INSTALLATION INSTRUCTIONS Accessory TRIM Application 2009 ACCORD 4-DOOR Publications No. AII 40008 Issue Date JULY 2008 PARTS LIST Steering Wheel Trim (Without Navigation) P/N 08Z13-TA0-100 Right steering
Replacing the Vacuum Servo on 700/900 with ACC/ECC Double-Acting Servos. [Procedure from Dick Riess, to whom thanks are given; some notes from Dan]
![Replacing the Vacuum Servo on 700/900 with ACC/ECC Double-Acting Servos. [Procedure from Dick Riess, to whom thanks are given; some notes from Dan]](/thumbs/89/98811956.jpg "Replacing the Vacuum Servo on 700/900 with ACC/ECC Double-Acting Servos. [Procedure from Dick Riess, to whom thanks are given; some notes from Dan]") Replacing Vacuum Servos in ACC/ECC-Equipped 700/900 Cars FAQ Home Volvo Maintenance FAQ for 7xx/9xx/90 Cars HVAC Home OEM Manual Procedure for Replacing Vacuum Servos. See the FAQ file for a large.pdf
Replacing Vacuum Servos in ACC/ECC-Equipped 700/900 Cars FAQ Home Volvo Maintenance FAQ for 7xx/9xx/90 Cars HVAC Home OEM Manual Procedure for Replacing Vacuum Servos. See the FAQ file for a large.pdf
Depress each tab as you pull the bezel off. The bezels are tight. L.H. shown.
 2013-2014 Ford Mustang V6 & Boss 302 Lower Valance Fog Light Kit Parts List: Quantity: Tool List: Fog light & bulb with bracket 2 Flat head & Phillips screwdriver Black bezels 2 Ratchet & Socket set OR
GENUINE PARTS INSTALLATION INSTRUCTIONS
 GENUINE PARTS INSTALLATION INSTRUCTIONS 1. 2. 3. 4. DESCRIPTION: Accent light Kit APPLICATION: Infiniti JX (2013) PART NUMBER: 999F3 YY000 - Universal Accent Lighting Kit. KIT CONTENTS: Item QTY Description
Z-Gate Universal Shifter
 Installation Instructions Z-Gate Universal Shifter Fits: GM, Ford, Lincoln and Chrysler Transmissions See Application Guide for Specific Applications Part #80681 Rev 06/01/2018 WORK SAFELY! For maximum
* * APPLICABLE MODELS: 2017 > CX-5
 PART NUMBER: 0000 8C R06(DIO) / 0000 89 R28(PIO) GENUINE ACCESSORIES INSTALLATION INSTRUCTIONS Rev. AAA *550-0681-000* APPLICABLE MODELS: 2017 > CX-5 REQUIRED COMPONENTS: ITEM QTY DESCRIPTION Usage Chart
Mobile Video Installation Guide
 000MVGUIDE Revision 04/29/04 Mobile Video Installation Guide This installation guide offers examples of mobile video system types and suggested layouts. The installation of your system will depend upon
INSTALLATION INSTRUCTIONS
 INSTALLATION INSTRUCTIONS Contents Description: Auto-Dimming Rearview Mirror with Compass Part Number: 990B0-35007 Applications: SX4 Hatchback, 2007- SX4 Sedan, 2008- Installation Time:.5 HRS Ref. Part
2006, 2005 by B&M Racing and Performance Products
 Installation Instructions Precision Sport Shifter 1997 and up C5 & C6 Chevrolet Corvette (see www.bmracing.com for the latest vehicle fitment applications and model years) Part Number 45044 2006, 2005
Audi A4/1998 VW Passat Short Shifter Installation Instructions
 1996-99 Audi A4/1998 VW Passat Short Shifter Installation Instructions Thank you for purchasing the UUC Motowerks Audi Ultimate Short Shifter. Please follow the following directions for many miles of trouble-free
vacuum/boost vent mounted ES best viewed in Acrobat Reader This tutorial is provided as a courtesy by ECS Tuning.
 vent mounted vacuum/boost ES2713030 This tutorial is provided as a courtesy by ECS Tuning. best viewed in Acrobat Reader Proper service and repair procedures are vital to the safe, reliable operation of