Kimba KRUZE Kimba KRUZE comfort
|
|
|
- Roland Fleming
- 5 years ago
- Views:
Transcription

 User Guide.")

1 Kimba KRUZE Kimba KRUZE comfort ( sizes: 30, 34, 38, 42 ) User Guide.. (EN)... READ USER GUIDE BEFORE USAGE!!
2 Product Description Product Overview 1. front tube 2. seat tube rear 3. backrest tube 4. backrest 5. rear cross 6. front cross 7. front wheel 8. rear wheel 9. rear brace 10. seat brace 11. wheel-lock lever 12. footplate bar 13. footplate 14. footplate height adjustment lever 15. calf rest 16. spring button 17. transportation clip 18. accessory anchoring point 19. seat upholstery 20. armrest upholstery 21. tipping support 22. push handle TECHNICAL DATA Technical specification: Size 30 inch/lbs Size 34 inch/lbs Size 38 inch/lbs Size 42 inch/lbs Backrest height (mm) ,9 670,0 26,4 860,0 33,9 860,0 33,9 Seat depth (mm) ,6 320,0 12,6 350,0 13,8 350,0 13,8 Seat width (mm) ,8 340,0 13,4 380,0 15,0 420,0 16,5 Seat to footrest (mm) ,5-14, ,0-17, ,4-18, ,0-19,7 Backrest angle Seat angle Total length (mm) ,6 1030,0 40,6 1150,0 45,3 1150,0 45,3 Total width (mm) ,9 580,0 22,8 630,0 24,8 650,0 25,6 Total height / with handle (mm) Total weight (kg) ,5 39,8 25lbs 1050,0 12,5 41,3 27,5lbs 1100,0 13,5 43,3 29,8lbs 1210,0 14,5 47,6 32lbs Maximum load (kg) 45 99lbs 55,0 121lbs 75,0 165lbs 75,0 165lbs Folded buggy ,1 1170,0 46,1 1200,0 47,2 1260,0 49,6 length (mm) Folded buggy ,6 320,0 12,6 350,0 13,8 370,0 14,6 width (mm) Folded buggy ,8 370,0 14,6 380,0 15,0 380,0 15,0 height (mm) 3
3 1. Foreword INFORMATION Please read this document carefully. Follow the safety instructions. Date of last update: INFORMATION Please note that the instructions for use are revised regularly. For further questions about the instructions for use (user), please contact the qualified personnel who issued the product to you. You have purchased a high-quality product for use every day, at home and outdoors. Please read these instructions for use before you start using the product. Familiarise yourself with the handling, functions and use of the product before using it. Observe all safety information and instructions in order to prevent the possibility of injury. Store these instructions for use in a safe place for future reference. Please note the following in particular: Attendants (persons who operate and push the product) must be instructed in the use of the product by qualified personnel. The product has been adapted to the needs of the user. Subsequent changes may be made only by qualified personnel. We recommend checking the product settings regularly in order to assure optimal fit over the long term. A fitting is required every six months for children in particular. If you have any questions or cannot solve a problem, despite reading these instructions for use, please contact the qualified personnel who fitted the product or the service department (please see inside front cover or back cover for addresses). The product may only be combined with the options listed here. The manufacturer assumes no liability for combinations with third-party medical devices and/or accessories not included in the modular system. Please also observe the information in the section "Liability". Service and repairs to the product may only be carried out by qualified personnel. If you have any problems, please contact your specialist dealer. This ensures that any necessary repairs will be made exclusively with authentic spare parts. The manufacturer assumes no liability for combinations with seating systems that have not been approved by the manufacturer. The manufacturer reserves the right to make technical changes to the model described in these instructions for use. 2 Product Description 2.1 Function The rehab buggy is intended solely for transporting children with walking disabilities or who are unable to walk. The rehab buggy has been approved for transporting only one user. It is operated by an attendant (conveyance by another person). The rehab buggy can be used indoors and outdoors. It is adjustable to provide an optimised, individual fitting. 4
4 3. Safety 3.1 Explanation of Warning Symbols WARNING Warnings regarding possible risks of severe accident or injury. CAUTION Warnings regarding possible risks of accident or injury. NOTICE Warnings regarding possible technical damage. 3.2 General safety instructions CAUTION Lack of familiarisation with instructions for use Injuries due to user error Read the instructions for use before using the product. Familiarise yourself with the handling, functions and use of the product before using it. You can compromise the safety of the user if you do not follow these instructions. 3.3 Safety Instructions for Use Hazards during preparation for use WARNING Independent modification of settings Risk of tipping, falling or malposition Do not modify the settings established by the qualified personnel. Only the settings described in these instructions for use may be adjusted independently. In case of problems with the settings (unsatisfactory seating position, front wheels wobble etc.) please contact the qualified personnel who adjusted your product. Discuss all changes to the settings with the qualified personnel/therapist in advance in order to minimise health hazards and avoid putting the therapy results at risk. WARNING Improper handling of packaging materials Risk of suffocation Keep packaging materials away from children. Hazards when boarding CAUTION Wheel lock not engaged when getting in/out User may fall or tip over Before the user gets into the buggy or out of it, always engage and check the wheel lock. Engage the wheel locks to prevent the rehab buggy from moving on uneven ground or during transfers (e.g. into a car). Hazards while driving WARNING Danger from pushing too fast User may fall or tip over The steering casters may begin to wobble at higher speeds and lead to an abrupt stop, causing the rehab buggy to tip over at the front. Therefore, push the rehab buggy only at normal walking speed (see section"use"). It is not permissible to let go of the pushbar while pushing the buggy or to thrust it away from you. WARNING Impermissible use Risk of user tipping, rolling over Using a rehab buggy beyond normal conditions may be dangerous. Please note that this product is not suitable for jogging, running, skating, etc. Do not exceed the maximum load capacity (see section "Technical Data"). 5
5 CAUTION Unsupervised parking Falling, the user may fall out Never leave the user unattended, even if the seat belts are fastened and the wheel locks are engaged. CAUTION Incorrect centre of gravity Risk of user tipping, rolling over When reaching for objects, the user must not lean too far out of the seat. Always provide support to the rear when negotiating slopes and obstacles on slopes or ramps. Never park the product on slopes with the user in the seat. CAUTION Hanging heavy bags on the buggy may change the centre of gravity User may tip or roll over Do not hang heavy bags or the like on the pushhandle. CAUTION Risky operation The user may fall or tip over, and may cause accidents with other traffic participants Push slowly when crossing obstacles (e.g. steps, curbs) and negotiating uphill or downhill slopes and inclines. Never cross obstacles at an angle. Always approach obstacles head on (at an angle of 90 ). Raise the front wheels before crossing obstacles. Avoid collisions with obstacles and dropping off curbs/ledges. Avoid driving cross-country. Hazards when overcoming obstacles WARNING Negotiating stairs and obstacles Risk of falling, tipping over Only negotiate stairs and obstacles with the help of additional attendants. Use available equipment (e.g. ramps or elevators). Never use escalators with a user in the product. CAUTION Improper lifting by attendants User may fall or tip over Attendants may lift the buggy only by welded or permanently attached components. It is particularly dangerous to lift the buggy by the footrest, push bar, lap bar, or armrests. Hazard in case of damaged skin CAUTION Prolonged contact with broken skin Redness and pressure marks Check before using the product that the skin is not broken in areas subject to prolonged pressure (e.g., buttocks, back and rear side of the thighs). No liability is assumed for injuries caused by the use of the product with broken skin. 6
6 Hazards due to fire, heat and cold CAUTION Seat cushion or backrest cover may ignite User may sustain burns The seat cushion and backrest cover are not highly flammable, but there is a possibility they may catch fire. Therefore utmost caution is required near open flame. Keep away from any sources of fire, especially burning cigarettes. CAUTION Extreme temperatures Risk of hypothermia or burns on components, failure of components Do not expose the product to any extreme temperatures (e.g. direct sunlight, sauna, extreme cold). Hazards due to improper use of the rehab buggy CAUTION Loss off stability due to improper loading User may fall or tip over Please note that any additional load may have a negative impact on the stability of the rehab buggy. Do not hang heavy bags or the like on the push bar. NOTICE Overloading Damage to the product through user error Do not exceed the maximum load capacity (see the section "Technical Data"). Please note that all options and add-on components will reduce the remaining load capacity. NOTICE Use under incorrect environmental conditions Risk of damage to the product Do not use the product in salt water. If possible, prevent sand or other dirt particles from coming into contact with the wheel bearings and locking mechanism. NOTICE Impermissible loading when folded Deformation, problems when unfolding Never place heavy objects on the folded rehab buggy. 3.4 Further Information INFORMATION Even in the event of compliance with all applicable guidelines and standards, alarm systems (e.g. in department stores) may respond to your product. Should this happen, remove your product from the area where the alarm was triggered. 7


 2.")
, 3.")
 4.")


7 4. UNPACKING, UNFOLDING, FOLDING ( Check first, you received complete product including all accessories as ordered ) Unfolding the buggy: 1. Stand buggy on wheels (see PIC) 2. unlock transportation clip (see PIC), 3. lift the buggy on rear wheels (see PIC) 4. grasp one handle and push down on the opposite seat tube (see PIC). 5. Press down firmly on seat tubes to ensure 6. Use foot to lock the rear brace (see PIC) the buggy is completely opened. (see PIC) 8


 Stay behind the buggy, grasp one handle and pull up the opposite seat tube with other hand.")

8 7. Use hand to lock the seat brace ( size 34,38,42 ) (see PIC) into a straight position. Wrap the armrest padding around the armrests. Footrest set installation - go to further paragraph Accessories. Folding the buggy: Unfasten the snap fastener of armrest upholstery, unlock rear brace and seat brace ( size 34,38,42) by pushing up. (see PIC) Stay behind the buggy, grasp one handle and pull up the opposite seat tube with other hand. (see PIC) Locking for transportation: (see PIC) To keep the buggy folded lock the transportation clip It is not necessary to uninstall the footplate for folding the buggy. If you prefer to take off the footrest, please read paragraph Accessories - footrest uninstall. 5. OPERATING INSTRUCTION Wheel lock: Lock - pull the brake lever down to lock the wheel (see PIC*) Unlock - pull the brake lever up to unlock the wheel 9
; place child carefully into the buggy, fasten safety belt and fit the footrest. The child must always feel comfortable.")


9 Getting into the Buggy: Ensure the wheel lock are engaged, to make access easier, the footplate can be taken off or flipped up; if possible, place the back of the buggy against a wall or immovable object (alternatively, another helper may hold the buggy steady); place child carefully into the buggy, fasten safety belt and fit the footrest. The child must always feel comfortable. Getting out the Buggy: Ensure the wheel lock are engaged; if possible, place the back of the buggy against a wall or immovable object (alternatively, another helper may hold the pushchair steady); unfasten safety belt and lift the child carefully. Negotiating the Curb or Single Step: Down - take the rear wheels to the edge of the curb, hold the handles firmly, use the chassis tipping support (see PIC) and tip the buggy slightly backwards, help by balance on the rear wheels, lower the buggy down the curb on its rear wheels. Never tip the buggy forward at a curb. Up - take the front wheels to the curb. With a firm grip on the handles, use the foot tipping support (see PIC) and tip the buggy backwards and place the front wheels on top of the kerb. Position the front wheels at the curb top and lift to the upper level. Steps negotiating: Make use of ramps and lifts when they are available. Where possible steps should be avoided. If there is no alternative to negotiating steps then ensure at least one additional attendant is available to give assistance. Do not attempt to take the buggy up or down a flight of steps unless you and your helper are sure you have 10


. Lengthen the belts of seat reinforcement to decrease the rigidity.")
10 control of the buggy and can take the weight of its occupant. During this operation, the attendants must be well balanced and have secure grip on the buggy. The attendants hands must be inside the handle straps at all times. Take rests in regular intervals. Do not lift the buggy holding the footrest. going down steps - position the buggy squarely with the front wheels on the top step, tilt the handle backward and push the buggy forward until the rear wheels are at the top step; the additional attendants stands in front, steadies and lowers the buggy by gripping the front frame; take the weight and lower the rear wheels down the step, continue step by step to the bottom. going up steps - position the buggy squarely with the rear wheels against the bottom step, tilt the buggy backward and raise to the next step; the additional attendants stands in front, steadies and lifts the buggy by gripping the front frame; continue step by step to the top. 6. SIZE AND FUNCTION ADJUSTMENT Headrest extension when extra head support is needed is available as standard equipment in size 38, 42 and optionally can be taken off Seat reinforcement - you could increase or decrease the seat rigidity by adjustment of the seat reinforcement (see PIC). Lengthen the belts of seat reinforcement to decrease the rigidity. Shorten the belts of seat reinforcement to increase the rigidity. Never change the seat width by adjusting of the seat rigidity. Seat angle adjustment - you can set 2 position of backrest angle by releasing and moving of the connecting screw to second position. ( see PIC). If the second hole is occupied by transportation pin, exchange the positions. 11
 until you find the locking position.")


11 7. ACCESSORIES Footrest - 1 piece foldable : Install - put on the floor almost unfolded buggy with engaged wheel locks and release both safety levers (see ). Take the footrest, and slide both tubes into the both footrest attachments. Pull the safety and locking pin (see ) until you find the locking position. Uninstall - put on the floor almost unfolded buggy with engaged wheel locks. Release both footrest safety levers, pull safety and locking pin and pull out the footrests partly on one side and continue on second side by steps until you take the footrest fully out. Height adjustment - release both footrest safety levers and pull the safety and locking pin until you will find one of the 6 possible desired position. Tighten both safety levers to secure the footrest in position. Footrest - 2- Piece Flip-up : Install - put on the floor unfolded buggy and release both safety levers.take footrest one by one and slide them into the footrest attachments. Pull the safety and locking pin ( see PIC*). until you find the locking position. Uninstall - put on the floor braked buggy. Release both footrest safety levers, pull safety and locking pin and pull out fully the footrest on one side. Take out also the second footrest Height adjustment - release footrest safety levers, slide the footrest until you will find one of the 6 possible desired position. Tighten safety lever properly to secure the footrest in position. Footplate depth and width adjustment - To move the footplate to desired postion, unscrew two plastic nuts from underneath, reset the position and fasten two plastic nuts properly. Follow on the other side., if required. Footplate angle correction - flip up the footplate, take of two plastic nut protectors, unfasten both bolt/nut+nut assemblies, adjust the protruding length of the bolt (shorter = footplate angle decrease, longer = footplate angle increase). Fasten both bolt/nut+nut assemblies, put on both nut protectors. Flip down the footplate. PIC 1 PIC 2 12
.")
. Choose the hole in backrest to adjust the proper position of the shoulders straps.")

12 5-point positioning belt CLASSIC : Install - release central buckle fasteners, connecting shoulder and lower straps. Loop both lower webbing ends to anchoring points and fasten trough the plastic slip locks to secure its position (see ). Choose desired backrest belt-holes in backrest to set the proper position of the shoulders straps. Push the upper webbing through the backrest belt-holes. Anchor the belt webbing with the plastic slip lock with labyrinth-like fastening (see ). Choose the hole in backrest to adjust the proper position of the shoulders straps. (see PIC3). The hole should be level with or higher than the top of the shoulders (the shoulders straps must be mounted through backrest and backrest extension at once size 38,42, when possible). PIC3 Push the central buckle webbing, which is sewed on the crotch belt through the hole on the seat ( see PIC4), connect all fasteners of the plastic buckle. (see PIC4). PIC4 Size adjustment - release central buckle fasteners, place the child into the buggy. Adjust the length of all straps to desired, comfortable size. 13


 to anchoring points ( see ).")


.")
13 5-point positioning belt COMFORT: Install - release central buckle, Strip both main belt webbing from plastic slip locks and hip pads and shoulder pad twins. Loop both lower webbing ends (with webbing loops) to anchoring points ( see ). Push the central buckle webbing, which is sewed on the crotch belt through the hole on the seat ( see ). Choose desired backrest belt-holes in backrest to set the proper position of the shoulders straps. The hole should be level with or higher than the top of the shoulders (the shoulders straps must be mounted through backrest and backrest extension at once size 38,42, when possible). Interlace the shoulder pad twins through the pair of desired backrest belt-holes. (see PIC3). Assemble the right side webbing: push the webbing through the hip pad, central buckle, one side of shoulder pad twins and backrest belt-holes ( see PIC4 to 6). PIC3 PIC4 PIC5 PIC6 14
. PIC7 Assemble and lock the push-button central buckle.")


14 Anchor the belt webbing with the plastic slip lock with labyrinth-like fastening (see PIC7). PIC7 Assemble and lock the push-button central buckle. (see PIC8 and 9). PIC8 PIC9 Size adjustment - unlock central buckle, place the child into the buggy. Adjust requested size of the 5-point belt by setting of correct length from behind of the backrest ( see 0). Adjust the length of all straps to desired, comfortable size. Fasten properly the plastic slip lock. 0 15
 to anchoring points.")
.")


")
.")


15 2 point positioning belt : Install - release central buckle fasteners. Loop both lower webbing ends (with webbing loops) to anchoring points. Anchor the belt webbing with the plastic slip lock with labyrinth-like fastening ( see and ). Connect both fasteners of the plastic buckle. (see PIC3). Size adjustment - release central buckle fasteners, place the child into the buggy. Pull both side D-rings to adjust the length of straps to desired, comfortable size (see PIC4) PIC3 PIC4 Headrest (pair): Before headrest installing, install and adjust first the 5- point positioning belt. Install: The highest position: - pass the shorter lower belts with Velcro through top holes on backrest (see ) and flip the longer top belts with Velcro over backrest edge. (see ). Secure the belts on the rear of the backrest by putting the Velcro together (see PIC3). The lowest position: - pass the shorter lower belts with Velcro through the holes on the backrest according your height and the longer top belts with Velcro through the holes above the shorter belts. Secure the belts on the rear of the backrest by putting the Velcro together. Size adjustment - It is necessary to set the headrest width before installing the headrest on the buggy backrest. To set the size, on the lower belts of the padding first release snap buttons and put off the padding from the main belt. Turn it by 180 degrees and assemble again. Fasten the padding by pressing the snap buttons on the lower belts. 16


 and turn the shorter Velcro over")
.")
.")


16 Headwings: Before headwings installing, install and adjust first the 5- point positioning belt. Install: The highest position: - seat the child into the buggy and determine appropriate height of headwings, take the child out of the buggy. Place headwings on the buggy in desired height and put longer Velcro through the ensued holes on the backrest ( see ) and turn the shorter Velcro over upper edge of the backrest. Fasten Velcro on the back side ( see PIC3). Finally, secure headwings using side straps on the back side of the backrest by Velcro. ( see PIC4). Lower position - pass longer Velcro in desired height through the holes on the backrest, and put also shorter Velcro through ensued holes. Fasten Velcro on the back side. Finally, secure headwings using side straps on the rear of the backrest by Velcro (see PIC4). PIC3 PIC4 PIC5 17


, put the child in the buggy and")
.")
. Pass the upper belt through the backrest belt-holes.")
 and fasten trough the plastic slip locks to")
.")
17 Chest Harness: Before installing the Chest Harness, install and adjust first the 5- point positioning belt. Install - seat the child into the buggy and determine appropriate height of chest harness, take the child out of the buggy. Place the chest harness on the buggy in desired height and secure it by three straps with plastic side release buckles on the rear of the backrest ( see ). Unfasten the front of the chest harness by open the Velrco ( see PIC3), put the child in the buggy and fasten the chest harness by putting the Velcro together for a fixed and secure position of user. (see PIC4). PIC3 PIC4 Butterfly chest harness: Install - choose desired backrest belt-holes in backrest to set the proper position of the shoulders straps (see ). Pass the upper belt through the backrest belt-holes. Anchor the belt webbing with the plastic slip lock with labyrinth-like fastening ( see PIC3). Loop both lower webbing ends to anchoring points (see ) and fasten trough the plastic slip locks to secure its position. Size adjustment - release buckles (PIC4), place the child into the buggy. Choose the hole in backrest to adjust the proper position of the shoulders straps. (see ). The hole should be level with or higher than the top of the shoulders (the shoulders straps must be mounted through backrest and backrest extension at once size 38,42, when possible). Adjust the length of all straps to desired, comfortable size. 18

.")

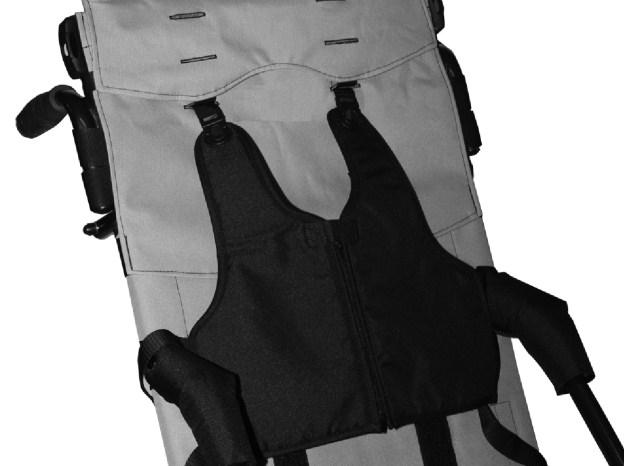
 Size adjustment - Unzip the waistcoat, place the child into the buggy.")

18 PIC3 PIC4 Full torso support vest: Install - choose desired backrest belt-holes in backrest to set the proper position of the shoulders straps. Pass the upper belt through the backrest belt-holes (see ). Anchor the belt webbing with the plastic slip lock with labyrinth-like fastening (see PIC3). Release the buckle of the middle securing belt. Place it around the backrest tube and fasten the buckle at the rear of the backrest (see PIC4 and 5). Loop both lower webbing ends to anchoring points and fasten trough the plastic slip locks to secure its position (see ) Size adjustment - Unzip the waistcoat, place the child into the buggy. Choose the hole in backrest to adjust the proper position of the shoulders straps. (see ). The hole should be level with or higher than the top of the shoulders (the shoulders straps must be mounted through backrest and backrest extension at once size 38,42, when possible). Adjust the length of all straps to desired, comfortable size. 19


19 PIC3 PIC4 PIC5 PIC6 PIC7 20
 through the belt-hole placed on the")
, and secure the block using the Velcro ( see ).")


.")
, or unzip them and put side parts into")
20 Abduction block: Install - push the slip lock (sewed on the bottom part of the block) through the belt-hole placed on the seat base. ( see ), and secure the block using the Velcro ( see ). Foot positioners: Install - put the lower straps through the footplate holes and fasten them underneath the footplate with the Velcro ( see ). To fix the users ankles place them and put strap through metal clip around and secure it with Velcro. ( see ). Make sure that the users legs are enough fixed, but not to much tighten. The user must always feel comfortable. Canopy and Sunshade: Install - place and lock the canopy/sunshade brackets into both canopy attachments on the backrest frame ( see ). Fasten side parts of the canopy upholstery with plastic clips to the chassis ( see ), or unzip them and put side parts into the net pocket. The canopy can be adjusted by pushing to the canopy frame. Uninstall - press the canopy/sunshad fittings release and pull the canopy out of the frame brackets. 21


.")


21 PIC3 Rain cover: Rain cover must be used with the canopy! Install - pull rain cover over the buggy, so the canopy, seat and also the footrest will be covered. The user must always feel comfortable. Store always dry and clean! Comfort seat cover: Comfort seat cover must be attached first. All positioning accessories fitted through the slots of the backrest and seat base must be fitted afterwards! Install - Release the rear brace and fold the buggy slightly. Put the cover on the seat. Fasten the Velcro of the cover at the rear top of the backrest ( see ). Find the appropriate position (slot) of the middle fastening strap - it must be consistent with the line between backrest and seat base. Fasten the cover middle fastening straps at the back of backrest ( see ). Flip the seat cover over the seat edge secure by the seat straps in the space between cover and seat. ( see PIC3). Backrest height extension must be installed after the installation of the comfort seat cover ( sizes 38, 42). To attach optional accessories, cut a hole in the artificial leather band of the seat cover, if needed.. 22


.")
22 PIC3 Legsmuff-summer: Install - Attach the legsmuff upper part to pipes, which stretch the upholstery on the back side, using plastic sleeves ( see ) There are two straps on each side of the legsmuff, Fasten side straps using Velcro to chassis pipes, there are two straps on each side ( see and PIC3). Child must always feel comfortable. 23


.")


23 PIC3 Basket - fabric: Maximum load of fabric basket is 6.6 lbs (3 kg)! Install - secure the upper part of basket by straps with buttons from the outside on the front side of frame ( see ). Lower part of basket secure by straps with buttons on rear seat tube ( see ). PIC3 24


, and behind the")
24 Comfort side protection Install - attach upper part of the comfort side protection by velcro on backrest ( see ), and around the armrest frame from inside ( see ). Upper extremity support surface / tray Install - seat the user into the buggy, place the tray on the legs. Attach it by adjustable straps with buckle under the seat ( see ), and behind the backrest ( see PIC3). Child must always feel comfortable. 25

25 PIC3 8. MAINTENANCE OF ACCESSORIES In case accessories are damaged or in need of any repair, only the authorised dealer is allowed to repair or service it. Only original replacement parts should be used on these accessories. Make sure you are familiar with the operation of the accessories. All accessories can be washed by hands. Never clean with ammonia based, bleach based or spirit type cleaners. After exposure to damp conditions leave in warm environment. Store the accessories in a dry and safe place. Manufacture / importer reserves the right to make design changes to any of their products without prior notice as a part of their continuous development program. 26
26 WARRANTY SHEET Identification tag / Product type (write up): Final inspection: Name: Signature: Warranty conditions: 1. On this product is applied 24 months warranty from the date of sale. The warranty is applied for material and manufacturing defects. 2. The product has to be used entirely for the purpose it is designed for and the instructions in the user guide must be followed. 3. The product has to be properly used, maintained, cleaned and stored in accordance to the user guide instructions. 4. Do not pull down the identification tag. It has to be readable and undamaged for the whole warranty period. 5. The warranty case has to be claimed by the seller, where the product was bought. Properly filled Warranty sheet and the proof of purchase must be declared by the warranty application. Every defect should be claimed immediately 6. The claim procedure can be started when the device is delivered complete, in original packaging, carefully packed and secured against damage. The owner is committed to deliver the device clean in accordance to the general hygienic measures. The basic maintenance and cleaning cannot be expected or even required when claimed. 7. The warranty does not cover: failures caused by the overloading of the products, accident, forced damage, unauthorized changes made on the product and/or its accessories, natural wear and tear of parts, especially upholstery dirt and damage, wear of plastic parts, brakes, tyre profile and tyre puncture, etc. 8. The warranty is terminated whenever the following conditions arise: the user fails to follow the instruction mentioned in this user guide and manufacturer s storage and maintenance suggested procedures, or whenever the product is serviced by any other party except of authorised service centres, or when the identification label is not sticked on the buggy and also in the warranty sheet. 9. The warranty period cannot be interchanged with using period, that means for the lifetime period when correct use and maintenance of the product in accordance to the user guide are fulfilled. 10.The producer nor the importer is not liable for any loses and injuries caused by manipulation and usage of the product in conflict with the User Guide instructions. Manufactured by: Bohemia a.s., Ceskolipska 3419, CZ Melnik, Czech Republic, 27
Phoenix Buggy User Instructions
 Phoenix Buggy User Instructions Issued 1 st March 2015 Introduction Welcome to the Phoenix Buggy User Guide. The Phoenix Buggy has been designed to provide a robust, transportable mobility solution for
Tandem User Instructions
 Tandem User Instructions Issued 1 st November 2014 Tandem Buggy We designed the tandem buggy to enable families who have a disabled child and another younger child to enjoy the freedom they deserve. The
Kimba neo. Instructions for Use (User)... 3
... 3") Instructions for Use (User)... 3 2 Ottobock Table of contents Table of contents 1 Foreword... 6 2 Product Description... 6 2.1 Function... 6 2.2 Product Overview... 7 3 Safety... 9 3.1 Explanation of Warning
Instructions for Use (User)... 3 2 Ottobock Table of contents Table of contents 1 Foreword... 6 2 Product Description... 6 2.1 Function... 6 2.2 Product Overview... 7 3 Safety... 9 3.1 Explanation of Warning
Eco Buggy Instructions for Use...8
 Eco Buggy Instructions for Use...8 Q U A L I T Y F O R L I F E 1 2 3 4 5 6 7 8 9 10 11 12 13 14 15 16 17 Eco Buggy Instructions for Use Table of Contents Page Preface...9 Intended Use...9 Declaration of
Kimba Neo, Kimba Cross, Kimba Inline. Instructions for use... 3
 Kimba Neo, Kimba Cross, Kimba Inline Instructions for use... 3 2 Ottobock Table of contents Table of contents 1 Foreword... 6 2 Product description... 6 2.1 Product Overview... 6 2.1.1 Kimba Neo... 6 2.1.2
COBRA Indoor base with gas pressure spring and 45 tilt function user manual
 COBRA Indoor base with gas pressure spring and 45 tilt function user manual - Partnering together to mobilise kids User manual for COBRA indoor base with gas pressure spring and 45 tilt Index 1 Common
Owner s Manual. Transport / Companion Wheelchairs M4TV M2TF M2TC M2TL HEALTH PRODUCTS, INC.
 Owner s Manual M4TV M2TF Transport / Companion Wheelchairs M2TL M2TC HEALTH PRODUCTS, INC. INTRODUCTION Congratulations on the purchase of your new companion chair. Please read this introduction with your
Kimba Neo. Instructions for use (user)... 3
... 3") Instructions for use (user)... 3 2 Table of contents Table of contents 1 Foreword... 5 2 Product description... 5 2.1 Function... 5 2.2 Product Overview... 6 3 Safety... 6 3.1 Explanation of warning symbols...
Instructions for use (user)... 3 2 Table of contents Table of contents 1 Foreword... 5 2 Product description... 5 2.1 Function... 5 2.2 Product Overview... 6 3 Safety... 6 3.1 Explanation of warning symbols...
REACH USER MANUAL USER: READ THIS MANUAL BEFORE USING THIS DEPENDENT MOBILITY BASE AND SAVE FOR FUTURE REFERENCE
 USER MANUAL CHAIR PROVIDER: THIS MANUAL MUST BE GIVEN TO THE USER OF THIS DEPENDENT MOBILITY BASE USER: READ THIS MANUAL BEFORE USING THIS DEPENDENT MOBILITY BASE AND SAVE FOR FUTURE REFERENCE Revision
WHEELBASE USER MANUAL
 WHEELBASE USER MANUAL Please read these instructions carefully before setting up and using the NEO Wheelbase 1 Southwest Seating & Rehab Ltd. Introduction The NEO wheelbase is specially designed to accept
Instructions for Use for LISA Rehab Folding Buggy/ Stroller (models from 2005, HR /HR )
") Contents Instructions for Use for LISA Rehab Folding Buggy/ Stroller (models from 2005, HR3213.../HR3214...) Contents Page 1 General Information...30 1.1 Preface...30 1.2 Intended Use...30 1.3 Liability...30
Contents Instructions for Use for LISA Rehab Folding Buggy/ Stroller (models from 2005, HR3213.../HR3214...) Contents Page 1 General Information...30 1.1 Preface...30 1.2 Intended Use...30 1.3 Liability...30
XXL-Rehab Minimaxx Folding Wheelchair
 user manual user manual user manual user manual user manual user manual L-Rehab Minimaxx Folding Wheelchair Strongly engineered and functionally designed exclusively for bariatric users! Push handle Back
Wallaby Wheelchair. Item #s: WB1200-2GFR, WB1400-2GJB. Accessories WB ELR - Elevating Leg Rests WB Headrest Extension STDS833N - Anti-Tippers
 by Wallaby Wheelchair Item #s: WB1200-2GFR, WB1400-2GJB Accessories WB ELR - Elevating Leg Rests WB 8021 - Headrest Extension STDS833N - Anti-Tippers EU Authorized Representative Drive Medical LTD Introduction
USER MANUAL. CareCo (UK) Ltd, Hubert Road, Brentwood, Essex, CM14 4JE PAGE 1 PRODUCT CODE WC01060.BLU
 Ltd, Hubert Road, Brentwood, Essex, CM14 4JE PAGE 1 PRODUCT CODE WC01060.BLU") by USER MANUAL PRODUCT CODE WC01060.BLU PAGE 1 CareCo (UK) Ltd, Hubert Road, Brentwood, Essex, CM14 4JE INFORMATION Thank you for purchasing a wheelchair from I-GO. This I-GO wheelchair has been designed
by USER MANUAL PRODUCT CODE WC01060.BLU PAGE 1 CareCo (UK) Ltd, Hubert Road, Brentwood, Essex, CM14 4JE INFORMATION Thank you for purchasing a wheelchair from I-GO. This I-GO wheelchair has been designed
Zoma 3 Wheeler Instruction Manual
 Zoma 3 Wheeler Instruction Manual IMPORTANT PLEASE READ THESE INSTRUCTIONS CAREFULLY BEFORE USING THIS PRODUCT KEEP FOR FUTURE REFERENCE 2 Safety Warnings Getting to know your Stroller 3 Thank you for
Apollo Tilt Wheelchair 18" and 20" Instruction Manual
 Apollo Tilt Wheelchair 18" and 20" Instruction Manual Table of Contents Contents Table of Contents... 2 Introduction... 3 Warning... 4 Safety Guidelines... 5 Parts of the Tilt Wheelchair... 6 Setup & Operation...
Ventus. Instructions for use (user)... 3
... 3") Instructions for use (user)... 3 2 Ottobock Table of contents Table of contents 1 Foreword... 5 2 Product description... 5 2.1 Function... 5 2.2 Product Overview... 6 3 Safety... 6 3.1 Explanation of warning
Instructions for use (user)... 3 2 Ottobock Table of contents Table of contents 1 Foreword... 5 2 Product description... 5 2.1 Function... 5 2.2 Product Overview... 6 3 Safety... 6 3.1 Explanation of warning
USER MANUAL PRODUCT CODE: WC CareCo (UK) Ltd, Hubert Road, Brentwood, Essex, CM14 4JE PAGE 1
 Ltd, Hubert Road, Brentwood, Essex, CM14 4JE PAGE 1") by USER MANUAL PRODUCT CODE: WC01059 CareCo (UK) Ltd, Hubert Road, Brentwood, Essex, CM14 4JE PAGE 1 CONTENTS 1. INTRODUCTION 2. IDENTIFICATION OF PARTS 3. SAFETY REGULATIONS 4. SAFETY WARNINGS 5. USER
by USER MANUAL PRODUCT CODE: WC01059 CareCo (UK) Ltd, Hubert Road, Brentwood, Essex, CM14 4JE PAGE 1 CONTENTS 1. INTRODUCTION 2. IDENTIFICATION OF PARTS 3. SAFETY REGULATIONS 4. SAFETY WARNINGS 5. USER
Breezy EC Transport Wheelchair
 B r e e z y E C Tr a n s p o r t W h e e l c h a i r Breezy EC Transport Wheelchair O w n e r s M a n u a l READ BEFORE USE REVIEW THIS MANUAL Before using this chair you, and each person who may assist
ZeZu Pramette Instruction Manual IMPORTANT PLEASE READ THESE INSTRUCTIONS CAREFULLY BEFORE USING THIS PRODUCT KEEP FOR FUTURE REFERENCE
 ZeZu Pramette Instruction Manual IMPORTANT PLEASE READ THESE INSTRUCTIONS CAREFULLY BEFORE USING THIS PRODUCT KEEP FOR FUTURE REFERENCE 2 Safety Warnings Getting to know your Pramette 3 Thank you for choosing
DEUTSCH 01 ESPAÑOL 43 PORTUGUÊS 71 SUOMI 127
 DEUTSCH 01 ENGLISH 15 FRANÇAIS 29 ESPAÑOL 43 ITALIANO 57 PORTUGUÊS 71 NEDERLANDS 85 NORSK 99 DANSK 113 SUOMI 127 Norm DIN EN 1888:2012 standard DIN EN 1888:2012 norme DIN EN 1888:2012 norma DIN EN 1888:2012
Transit Wheelchair. user guide. Profiled grip attendant handles. Padded seat and backrest. Lift up, padded armrests. Park brakes
 Transit Wheelchair Profiled grip attendant handles Padded seat and backrest Lift up, padded armrests Park brakes Pneumatic 12 (305 mm) rear wheels Solid 7 (180 mm) front wheels Detachable, swing away footrests
Nurmi Neo. Instructions for Use... 27
 Nurmi Neo Instructions for Use... 27 Instructions for Use for Nurmi Neo Table of Contents Page 1 General Information...28 1.1 Preface...28 1.2 Intended Use...28 1.3 Liability...28 1.4 CE Conformity...29
Mighty Mack Wheeled Walker
 Mighty Mack Wheeled Walker Handle with lever brake Backrest Handle height adjustment knob Brake cable Extra wide padded seat Shopping basket Side brace 7 inch (180 mm) wheels user guide Prior to use please
Thule Urban Glide 1 & 2 Instructions
 Thule Urban Glide 1 & 2 Instructions B 51100987 CONTENTS 1 INTRODUCTION 1.1 Manual Intended Use 04 1.2 Carrier Intended Use 04 1.3 Specifications 04 2 SAFETY 2.1 Symbols and Instructions 05 2.2 General
Two Seat Bicycle Trailer
 Two Seat Bicycle Trailer User s Manual This manual contains safety, assembly, use and maintenance instructions. Read these instructions carefully before use and keep them for future reference. Your child
Rocket. Two Seat Bicycle Trailer. Model Number ACIS99ROCKTBLU
 Rocket Two Seat Bicycle Trailer Model Number ACIS99ROCKTBLU User s Manual This manual contains safety, assembly, use and maintenance instructions. Read these instructions carefully before use and keep
Usage of GTM 1 and GTM HAMMER VARIO
 USER'S MANUAL TABLE OF CONTENTS Usage of GTM 1 and GTM HAMMER VARIO 3 Basic information 3 Appendix 1 4 Description of construction 5 Safe handling of GTM 1 5 Stability and Balance 6 Curbs 6 Stairways 7
Zenit. Instructions for use (user)... 3
... 3") Instructions for use (user)... 3 2 Table of contents Table of contents 1 Foreword... 5 2 Product description... 5 2.1 Function... 5 2.2 Product overview... 6 3 Safety... 9 3.1 Explanation of warning symbols...
Instructions for use (user)... 3 2 Table of contents Table of contents 1 Foreword... 5 2 Product description... 5 2.1 Function... 5 2.2 Product overview... 6 3 Safety... 9 3.1 Explanation of warning symbols...
Spirit Trailer with stroller attachment
 Spirit Trailer with stroller attachment User s Manual This manual contains safety, assembly, use and maintenance instructions. Read these instructions carefully before use and keep them for future reference.
Columbia Car Seat. User Guide. IMPORTANT Please retain this User Guide for future reference. Conforms to ECE R44.03 Universal
 Columbia Car Seat User Guide Conforms to ECE R44.03 Universal IMPORTANT Please retain this User Guide for future reference EXTREME HAZARD: Parents should not under any circumstances use this child restraint
POD. Assembly Instructions.
 POD Assembly Instructions Read these instructions carefully before use and keep them for future reference. Your child s safety may be affected if you do not follow these instructions. www.babyjogger.com
and USER MANUAL PRODUCT CODES SELF PROPELLED WC01061 TRANSIT WC02059 CareCo (UK) Ltd, Hubert Road, Brentwood, Essex, CM14 4JE PAGE 1
 Ltd, Hubert Road, Brentwood, Essex, CM14 4JE PAGE 1") and by USER MANUAL PRODUCT CODES SELF PROPELLED WC01061 TRANSIT WC02059 PAGE 1 CareCo (UK) Ltd, Hubert Road, Brentwood, Essex, CM14 4JE INFORMATION Thank you for purchasing a wheelchair from I-GO. This
and by USER MANUAL PRODUCT CODES SELF PROPELLED WC01061 TRANSIT WC02059 PAGE 1 CareCo (UK) Ltd, Hubert Road, Brentwood, Essex, CM14 4JE INFORMATION Thank you for purchasing a wheelchair from I-GO. This
Rehab strollers. for children with special needs
 Rehab strollers for children with special needs EASyS The rehab stroller with safety seat Thanks to the BSS Balance Safety System a child can lie down in full reclined position without the risk of tipping
CONTENT. Rehab buggies Rehab strollers Seating and positioning products Chassis and frames Specialty products
 Division REHA EN CONTENT Rehab buggies Rehab strollers Seating and positioning products Chassis and frames Specialty products Rehab buggies FULLY ADJUSTABLE CORZO Xcountry SEMI ADJUSTABLE CORZINO Xcountry
Thule Glide Instructions
 Thule Glide Instructions A 51100988 CONTENTS 1 Introduction 1.1 Manual Intended Use 04 1.2 Carrier Intended Use 04 1.3 Specifications 04 2 Safety 2.1 Symbols and Instructions 05 2.2 General Safety Instructions
moto G123 car seat Suitable for 9kg to 36 kg (approximately 9 months to 11 years)
") moto G123 car seat Suitable for 9kg to 36 kg (approximately 9 months to 11 years) MOT12301: V1/01/10 WARNINGS These instructions are important. Please read carefully and retain for future reference. Please
moto G123 car seat Suitable for 9kg to 36 kg (approximately 9 months to 11 years) MOT12301: V1/01/10 WARNINGS These instructions are important. Please read carefully and retain for future reference. Please
Tri-Wheel Wheeled Walker
 Tri-Wheel Wheeled Walker Handle with lever brake Brake cable Handle height adjustment knob Removable basket and tray Large vinyl bag 8 inch (203 mm) wheels user guide Prior to use please read all instructions.
Steps 1-11 USER MANUAL. Group I,II,III Suitable from 9kg to 36kg (approx. 9 mths to 12 yrs) 601 Sims Drive, Pan-I Complex Singapore
 601 Sims Drive, Pan-I Complex Singapore") Steps 1-11 USER MANUAL Group I,II,III Suitable from 9kg to 36kg (approx. 9 mths to 12 yrs) 601 Sims Drive, Pan-I Complex Singapore 387382 www.snapkis.com 88018 Approved to ECE R44-04 standard (Please read
Steps 1-11 USER MANUAL Group I,II,III Suitable from 9kg to 36kg (approx. 9 mths to 12 yrs) 601 Sims Drive, Pan-I Complex Singapore 387382 www.snapkis.com 88018 Approved to ECE R44-04 standard (Please read
AFFIX TM Booster Seat. Owner s Manual PD202326A 5/12
 AFFIX TM Booster Seat Owner s Manual READ THIS MANUAL. Do not install or use this car seat until you read and understand the instructions in this manual. FAILURE TO PROPERLY USE THIS CAR SEAT INCREASES
Owner s Operating and Maintenance Manual For Standard Wheelchairs
 L200 Owner s Operating and Maintenance Manual For Standard Wheelchairs INTRODUCTION Standard wheelchairs are the result of extensive engineering research, and rigid quality assurance testing. Every new
User Guide MDS86850E MDS86850EB Rollator
 Supplying Hospitals for Over 90 Years User Guide MDS86850E MDS86850EB Rollator Revised: May 06, 2009 Safety Instructions To ensure your safety in using the Medline rollator, the following safety information
Single Seat Trailer. Owner s manual and safety instructions
 Single Seat Trailer Owner s manual and safety instructions Owner s Manual Every effort has been made to ensure your trailer is of top quality and proven safe design, ready to provide you with many years
Single Seat Bicycle Trailer
 Single Seat Bicycle Trailer User s Manual This manual contains safety, assembly, use and maintenance instructions. Read these instructions carefully before use and keep them for future reference. Your
SIMBA. Deutsch DE Dansk DK Español ES Suomi FI Français FR English GB Italiano IT Nederlands NL 3-15
 Deutsch 3-15 Dansk 3-15 Español 3-15 Suomi 3-15 Français 3-15 English 3-15 Italiano 3-15 Nederlands 3-15 Norsk 3-15 Português 3-15 3 Preface Dear Customer, Table of Contents What's in the box? 6 Please
Escape. 338 Escape LITE Aluminium Manual Wheelchair USER MANUAL. Warranty Information. Limitation of liability
 Warranty Information Days Healthcare Escape manual wheelchairs are warranted for 12 months from the date of purchase on frame and crossbars. During the warranty period any parts that have become defective
User manual. Rigid frame wheelchairs, English 74591C
 User manual Rigid frame wheelchairs, English 74591C 13-08-15 Contents Page Explanation of symbols Car transport... 2 Handling... 3 Sitting comfort... 4-5 Transfer... 6 Handling technique... 7 Troubleshooting
INSTRUCTIONS BEFORE USING
 ENGLISH User s Guide Safari Tilt Tilt-In-Space Positioning Chairs READ INSTRUCTIONS BEFORE USING SAVE THIS BOOK FOR FUTURE REFERENCE Table of Contents Setting Up Fitting and Positioning Guide Seat Cushions
SWINGBO Plus System - Wheelchair for kids & adolescents User manual
 SWINGBO Plus System - Wheelchair for kids & adolescents User manual - Partnering together to mobilise kids User manual SWINGBO Plus System-wheelchair for kids & adolescents Content: 1 Common Information
Euro Lightweight Wheeled Walker
 Euro Lightweight Wheeled Walker Handle with lever brake Backrest Brake cable Handle height adjustment button Removable shopping bag 8 inch (200 mm) wheels Cane holder user guide Prior to use please read
contents parts description BRAKE LEVER 1/2 FOLD BACK MECHANISM ARM REST SIDE PANELS 24" WHEEL & HANDRIM LEG REST FRONT CASTOR STEPPER TUBE
 contents 1. Contents 2. Introduction 3. Parts Description 4. Leg Rest Operation 5. Folding Back Mechanism 6. Disassembly and Folding 7. Using the Stepper Tube 8. Brake Operation 9. Operation and Propulsion
Heavy Duty Four Wheeled Walker
 Heavy Duty Four Wheeled Walker Weight Capacity: 500 lbs. ITEM # W1802 Made in China 2011 ESSENTIAL MEDICAL SUPPLY, INC. Manufactured for Orlando, FL 32822 -- SAVE THESE INSTRUCTIONS -- Do not attempt to
JAY. J2, X2, & Xtreme Cushion Products JAY J2, X2 & XTREME
 JAY J2, X2 & XTREME JAY J2, X2, & Xtreme Cushion Products IMPORTANT CONSUMER INFORMATION NOTICE: This manual contains instructions for use with the foam cushion products. This information must be passed
CORZO Xcountry-SE. Multipurpose foldable rehab-buggy. RP6
 Division REHA EN www.patron.eu CORZO Xcountry-SE height adjustable backrest RP6 seat depth adjustment backrest angle adjustment fully height adjustable footrest CORZO Xcountry-SE 30 CORZO Xcountry-SE 34
EVOKE 2 & EVOKE 2 JNR
 EVOKE & EVOKE JNR USER MANUAL EVOKE EVOKE JNR TABLE OF CONTENTS. Intended Use. Product Description 3. Warnings 4. Product Specifications 5. List of Components 6. Assembly 7. Preliminary Checks 8. General
MODEL SST1 JOGGER/BIKE TRAILER. Owner s Manual should be kept for future reference
 PRODUCT REGISTRATION: MAKE SURE TO REGISTER YOUR PURCHASE AT http://allensportsusa.com/about/product-registration TO QUALIFY FOR PRODUCT WARRANTY AND TO RECEIVE IMPORTANT PRODUCT NOTIFICATIONS 1 MODEL
Skippi plus. Instructions for Use
 Instructions for Use Additional options for the The power wheelchair can be equipped with the following additional options (applicable options are checked): Electronic drive-away lock* [ ] Function enabled
Nimbo Lightweight Posterior Posture Walker
 Nimbo Lightweight Posterior Posture Walker Assembly & Operating Instructions with optional Forearm Platforms with optional Pelvic Stabiliser Please read these instructions carefully before assembling or
INSTRUCTIONS FOR INSTRUCTIONS FOR USE USE Bambino panthera panthera
 INSTRUCTIONS FOR USE Bambino panthera Contents Intended use s 2 Adaptation s 3 Maintenance s 8 Safety s 9 Crash test s 11 Intended use The Panthera Bambino wheelchair is designed for children who need
Owners Manual POWER PLUS MOBILITY OUR PRODUCTS WILL MOVE YOU
 Owners Manual POWER PLUS MOBILITY OUR PRODUCTS WILL MOVE YOU At Power Plus Mobility, we care! Thank you for choosing a wheelchair from Power Plus Mobility Inc. We are always improving in our ways to serve
Supplying Hospitals for Over 90 Years. User Guide MDS86825SLR. Ultra-Light Rollator
 Supplying Hospitals for Over 90 Years User Guide MDS86825SLR Ultra-Light Rollator Revised: July 1, 2008 Contents Ultra-Light Rollator Features... 3 Rollator Components... 4 Safety Instructions... 5 Assembly
contents parts description 1/2 FOLD MECHANISM
 contents 1. Contents 2. Introduction 3. Parts Description 4. Adjustment Features i. Rear Wheels ii. Upholstery Tension iii. Brake Adjustments iv. Leg Rest Adjustment 5. Folding Back Mechanism 6. Disassembly
2016 EZ RIDER UPRIGHT PRODUCT PPT
 2016 EZ RIDER UPRIGHT PRODUCT PPT By Nancy Guzman 310.618.0111, Ext. 143 nancyg@convaid.com Product Overview EZ RIDER 10 Fixed Tilt Customizable Multiple Upholstery Styles & Colors 5 years of Growth Capabilities
Enigma Travel Chair and Lightweight Aluminium Wheelchair Owner s Handbook
 Enigma Travel Chair and Lightweight Aluminium Wheelchair Owner s Handbook Please read this manual before operation for maintenance instructions and safe usage of this wheelchair. Introduction The Enigma
Wheelchair Safety, Maintenance and Operations Guide
 Wheelchair Safety, Maintenance and Operations Guide Back Arm Seat Tire Cross brace Axle Foot rest Hand rim Caster Index Page Introduction 3 Knowing equipment and be organised 3 Opening a wheelchair 4 Closing
SWINGBO-2 System wheelchair for kids Manual
 SWINGBO-2 System wheelchair for kids Manual - Partnering together to mobilise kids Manual SWINGBO-2 System-wheelchair for kids 1 Common Information 1.1 Preface 2 1.2 Application 2 1.3 Declaration of conformity
Petite Wheeled Walker
 Petite Wheeled Walker Handle with lever brake Brake cable Handle height adjustment knob Backrest Padded seat with concealed pouch Bag with shopping basket inside Side brace 6 inch (150 mm) wheels user
User Guide. Always abide by this User Guide
 User Guide This User Guide and all the safety instructions must be read and adhered to before use of the StrideOn. For questions, please contact the place of purchase/rental or call StrideOn Australia
R82 Stingray - E1233
 Account #: Purchase Order No.: Contact: R82 Stingray - E1233 USD Retail Price List/ Order Form Date: Mark For: Bill To: Address: City/State/Zip: Phone: Email Ship To: Address: City/State/Zip: Phone: US
Push Down Wheeled Walker
 Push Down Wheeled Walker Push down hand grip Handle height adjustment knob Backrest Padded seat with concealed pouch Side brace Bag with shopping basket inside Push down brake stopper 6 inch (150 mm) wheels
Operating Instructions for Porsche Junior Seat ISOFIX
 Operating Instructions for Porsche Junior Seat ISOFIX 33 Porsche, the Porsche Crest and Tequipment are registered trademarks of Dr. Ing. h.c. F. Porsche AG. Reprinting, even of excerpts, or duplication
expandable booster Instruction Manual US Version
 expandable booster Instruction Manual US Version product: monterey XT expandable booster model series: 108000 mfg. by: Diono US 14810 Puyallup Street E Suite 200 Sumner, WA 98390 Customer Care Tel: 1 855
Nitro Rollator
 Nitro Rollator Parts List 3 1 4 2 6 5 7 12 8 11 10 9 1. Handgrip 2. Adjustable tubing handgrip 3. Rear reflector on handgrip 4. Brake lever 5. Interlock button for handgrips 6. Back Rest 7. Seat 8. Bag
Dealer Stamp. Rollator (R6 and R8) Assembly & Operating Instructions
 Assembly & Operating Instructions") The manufacturer reserves the right to alter without notice any weights, measurements or other technical data shown in this manual. All figures, measurements and capacities shown in this manual are approximate
The manufacturer reserves the right to alter without notice any weights, measurements or other technical data shown in this manual. All figures, measurements and capacities shown in this manual are approximate
ASSIST & TRANSIT. osd USER MANUAL TABLE OF CONTENTS
 osd ASSIST & TRANSIT USER MANUAL TABLE OF CONTENTS 1. Key Specifications 2. List of Components 3. Assembly & Use 4. Troubleshooting 5. Care & Maintenance 6. Warnings 7. Warranty 8. Compliance. Service
INSTRUCTIONS FOR USE Suitable for children weighing 15kg to 36kg
 2-in-1 BOOSTER CAR SEAT INSTRUCTIONS FOR USE Suitable for children weighing 15kg to 36kg Notice 1. This is a Universal child restraint. It is approved to the EU Regulation No. 44, 04 series of amendments,
(H) TOUR VANTAGE STROLLER ASSEMBLY INSTRUCTIONS ADULT ASSEMBLY REQUIRED. Styles and colors may vary
 TOUR VANTAGE STROLLER ASSEMBLY INSTRUCTIONS ADULT ASSEMBLY REQUIRED. Styles and colors may vary") TOUR VANTAGE STROLLER ASSEMBLY INSTRUCTIONS ADULT ASSEMBLY REQUIRED Styles and colors may vary IMPORTANT: Read all instructions before assembly and use of the stroller Keep the instructions for future
TOUR VANTAGE STROLLER ASSEMBLY INSTRUCTIONS ADULT ASSEMBLY REQUIRED Styles and colors may vary IMPORTANT: Read all instructions before assembly and use of the stroller Keep the instructions for future
Quick N EZ. Two Seat Bicycle Trailer with Stroller Attachment
 Quick N EZ Two Seat Bicycle Trailer with Stroller Attachment User s Manual This manual contains safety, assembly, use and maintenance instructions. Read these instructions carefully before use and keep
stationary massage table
 stationary massage table Operator Manual TABLE OF CONTENTS Warnings... 3 Table Specifications Aura Basic... 4 Aura Lift Back... 5 Aura Deluxe... 6 Installation Caution... 7 Parts Included...7 Instructions
Compact Easy Rollator M66739
 User Instructions Compact Easy Rollator M66739 Maximum Safe Working Load 21st 135kg Please ensure these Instructions are fully read and understood before using this equipment. Retain these instructions
This Booster seat is NOT for use on Aircrafts Meets or exceeds all applicable requirements of Federal Motor Vehicle Safety Standard 213 WARNING!
 R Fits Children Between Backless Booster Weight is: 40-100 lbs (18-45 kg) Height is: 40-57 in. (101-145 cm) Age is: At least four years old Belt-Positioning Booster Car Seat Instruction Manual This Booster
Prime Engineering GRANSTAND II
 OWNER S MANUAL PRODUCT PHOTO PARTS LIST ASSEMBLY INSTRUCTIONS FITTING & ADJUSTING DAILY USAGE ACCESSORIES MAINTENANCE WARRANTY Prime Engineering GRANSTAND II Manufactured By Prime Engineering A Division
INSTRUCTIONS XL-518. ISOFIX CAR SEAT (with top tether) Group 1,2,3
 Group 1,2,3") INSTRUCTIONS XL-518 ISOFIX CAR SEAT (with top tether) Group 1,2,3 INSTRUCTIONS: PLEASE READ CAREFULLY AND KEEP FOR FUTURE REFERENCE. YOUR CHILD S SAFETY MAY BE AFFECTED IF YOU DO NOT FOLLOW THESE INSTRUCTIONS.
INSTRUCTIONS XL-518 ISOFIX CAR SEAT (with top tether) Group 1,2,3 INSTRUCTIONS: PLEASE READ CAREFULLY AND KEEP FOR FUTURE REFERENCE. YOUR CHILD S SAFETY MAY BE AFFECTED IF YOU DO NOT FOLLOW THESE INSTRUCTIONS.
TILT IN SPACE WHEELCHAIR RANGE
 TILT IN SPACE WHEELCHAIR RANGE USER MANUAL REHAB RS REHAB RX REHAB RX JNR TABLE OF CONTENTS. Intended Use. Product Description 3. Warnings 4. Product Specifications 5. List of Components 6. Assembly 7.
ASSIST & TRANSIT. osd USER MANUAL TABLE OF CONTENTS
 osd ASSIST & TRANSIT USER MANUAL TABLE OF CONTENTS 1. Key Specifications 2. List of Components 3. Assembly & Use 4. Troubleshooting 5. Care & Maintenance 6. Warnings 7. Warranty 8. Compliance 9. Service
LIGHTWEIGHT TRANSPORT CHAIR ECTR 01 Assembly and Operating Instructions
 LIGHTWEIGHT TRANSPORT CHAIR ECTR 01 Assembly and Operating Instructions Page 1 of 12 INTRODUCTION Thank you for purchasing LIGHTWEIGHT TRANSPORT CHAIR. This model has been designed to help you gain independence
TABLE OF CONTENTS Safe Use Checklist Registration & Recal Assistance Warnings Base Features Carrier Features Securing Child In Carrier
 TABLE OF CONTENTS Safe Use Checklist...4 Registration & Recall...5 Assistance...5 Warnings...6 Base Features Base Overview... Storage Compartment...3 Recline Adjustment...3 LATCH Removal & Storage...4
Lightweight Travel Chair
 Lightweight Travel Chair User Manual contents 1. Contents 2. Parts Description 3. Legrest Adjustment 4. Disassembly and Storage 5. Half-Folding Back Mechanism 6. Using the Stepper Tube 7. Using the Lap
x:panda, size 1, med. back X c x:panda, size 1, med. seat 7¼" X c
 Account No. Drop Ship: Date: Name P.O. Number: Address Buyer: City Marked For: State Zip E Mail: Tel. Fax Features included in standard price: Height, Depth & Angle Adjustable Back Angle Adjustable Adduction
User Guide Manual del usuario
 User Guide Manual del usuario Transport Chair Transport Chair English... Page 2 Español... Página 14 USA 866-694-5085 1 Contents Introduction...3 Parts List...4 Parts Diagram 5 Safety Precautions...6 Assembly...7
OWNER S MANUAL. Manufactured & Distributed by. Transfer Wheelchair
 OWNER S MANUAL & warranty Transfer Wheelchair Providing Patient Comfort Preventing Injury to caregivers Improving Nurse/Caregivers working environment Manufactured & Distributed by world s first transfer
SERVICE MANUAL
 SERVICE MANUAL 2017-02 DECLARATION OF CONFORMITY The manufacturer Neatech.it Via A. de Curtis 4/A, 80040, Cercola (NA), Italy declares that the cushion Peezy (reference code: S211) satisfies the requirements
2000 IPS (Integrated Positioning System) Car Seat CSI-2000 WARNING! Read ALL instructions before using this product!
 Car Seat CSI-2000 WARNING! Read ALL instructions before using this product!") 2000 IPS (Integrated Positioning System) Car Seat CSI-2000 EU Authorized Representative BS Partnership Cardiff CF23 6N UK www.inspiredbydrive.com WARNING! Read ALL instructions before using this product!
2000 IPS (Integrated Positioning System) Car Seat CSI-2000 EU Authorized Representative BS Partnership Cardiff CF23 6N UK www.inspiredbydrive.com WARNING! Read ALL instructions before using this product!
BINGO Evolution rehab pushchair
 BINGO Evolution rehab pushchair Size 2 for children at the age of approx. 4-10 years Crash tested according to ISO 7176-19 and ANSI/RESNA WC/Vol.1. - Section 19 Order form incl. Exportprices ( ) valid
Magician Comfy. Owner s Manual
 Magician Comfy Owner s Manual Table Of Contents Introduction...................................... 2 Safety Precautions................................ 3 Assembly........................................4-9
Daytona Car Seat. User Guide
 Daytona Car Seat User Guide IMPORTANT Please retain this User Guide for future reference. Conforms to ECE R44.03 Universal EXTREME HAZARD: Parents should not under any circumstances use this child restraint
Kanga TS pediatric frame
 Kanga TS pediatric frame Item # KG P800 KG 1000 KG 1200 KG 1400 EU Authorized Representative Drive Medical LTD Ainley s Industrial Estate Elland, West Yorkshire, United Kingdom HX5 9JP www.drivemedical.com
Therapedic Positioning Restraint System Model #2000 and Model #2500. Instructions for Use
 Therapedic Positioning Restraint System Model #2000 and Model #2500 Instructions for Use MODEL #2000: Use only with individuals who weigh between 20 and 102 pounds (9.1-46.3 kg) and whose height is less
PC-085 Use and Care Manual
 PC-085 Use and Care Manual w w w. i n t e r h e a l t h. c o m Interactive Health, 2006 The Perfect Chair is a registered trademark of Interactive Health, Inc. No medical claims warranted or implied by
Thule Chariot Chinook 1 & 2 Instructions
 Thule Chariot Chinook 1 & 2 Instructions B 51100968 CONTENTS 1 Introduction 1.0 Introduction 3 1.1 Manual Intended Use 4 1.2 Carrier Intended Use 4 1.3 Specifications 4 2 SAFETY 2.1 Symbols and Instructions