IBEX 1141 FLOOR/FIREWALL PANEL INSTRUCTIONS GOAT BUILT IBEX FLOOR/FIREWALL PANELS
|
|
|
- Melvin Anderson
- 5 years ago
- Views:
Transcription
1 GOAT BUILT IBEX FLOOR/FIREWALL PANELS Thank you for purchasing Ibex chassis kit components, before starting your build, we recommend that you read through these instructions to familiarize yourself with the steps and parts so you can plan and prepare for your built accordingly. A few notes about the 1141 floor/firewall panels: These instructions are assuming you are also installing the , front seat brackets, reference to these brackets are made in these instructions, but the seat brackets are not included in the 1141 kit. We recommend that you bolt all of the attaching panels together with all of the screws prior to tack welding any of the nutsert tabs. Tack weld all the panels and nutsert tabs in place, after all the nutserts tabs are tack welded and you are satisfied with the fitment, you can remove the aluminum panels and weld all the panels and nutsert tabs You will likely get some welding spatter on the back side of the panels while tack welding the nutsert tabs, you can put some masking tape or similar on the panel under the nutsert tabs to prevent this. You may need to do some minor trimming to fit the panels around the tubes or welds. Take your time to make sure all the parts fit correctly before tack welding. Use a level, digital protractor and tape measure to double check according to the instructions. We recommend that brackets be welded by MIG or TIG. The person welding must be a competent welder capable sufficient weld penetration and weld quality For MIG welding, we recommend 75/25 AR/CO2 shielding gas; we have found that.035 Lincoln Super-Arc L-56 wire works best. For TIG welding, use 100% Argon with ER70S-2 filler rod, we like to use 1/16 diameter filler rod with this thickness of material. Additional assembly pictures are posted on the website, 1
2 2
 Install the 1141-02 floor/seat mount between chassis tubes 1100-01 and 1101-31. The 1141-02 part is a formed steel part that is welded to the chassis tubes.")
3 and ) The and parts anchor the entire floor/fire wall assembly together, install these first and take care to correctly position them. Tack weld these only at this time. 1.2) Install the floor/seat mount between chassis tubes and The part is a formed steel part that is welded to the chassis tubes. There are a series of holes in the panel, orient the panel as shown below. There are two sets of seat mount holes in the top of the panel, the set of 4 holes goes towards the front, the set of 6 holes at the rear. The top surface of this panel should be flush with the top of the chassis tubes, you may need to grind the ends or the tube notches in the side of the panel to the top flush. Center the panel in the chassis and tack weld. 1.3) Now is a good time to install the other seat mount brackets. Install the brackets on both sides of the panel as shown above. Orient the seat mount holes in the top of these brackets to match the holes in the panel. The side to side dimension can be adjusted to fit your specific seats, most seats (PRP, Beard, etc) are 14 inside tab width, so we will continue assuming you are using seats with this dimension, if you are not, you will need to figure out the seat mount dimensions on your own. 3


4 1.4) Make sure the top surface of the seat mount brackets are flush to the top of the chassis tubes, if not, grind the ends of the brackets to fit. Using a measuring tape, position the brackets as shown below, the holes are 16.25" center to center, and the inside to inside of the brackets are 14.5", tack weld the seat mounts in place 1.5) Install the bracket to the chassis cross tube. The bracket should fit inbetween the and tubes with small gap on either side. Orient the front face of the vertical to the chassis or the top face horizontal. One of the main chassis tubes like or is a good reference. Tack weld in place 4
 Check the alignment of the -01 panels.")
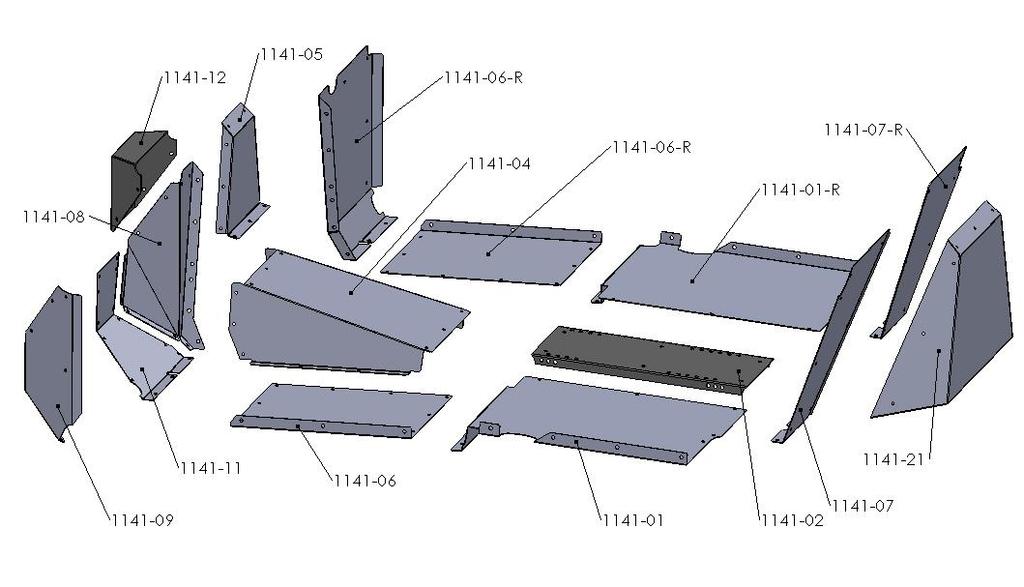
5 2. Seat back/bottom panels 2.1) Assemble the and panels to the chassis. The inside of the -01 panels will attach to the -02 seat center panel and the bottom of the -07 panels will attach to the back of the -01 panels. 2.2) Check the alignment of the -01 panels. The flanges on the outside of the -01 panels should be flush to the outside of the chassis side tubes. The flanges are used to attach side skins. 2.3) Check the alignment of the -07 seat back panels, the top should be level, the outside edges should be just under 1/8 from being flush with the outside of the chassis tubes. 2.4) If you are building a 2-seat Ibex, install the seat center panel as shown above. 2.5) Attach the nutsert tabs to the back of the panels and tack weld to the chassis tubes, you may need to grind the long end of the nutsert tabs shorter to align the tab to the hole. 3. Firewall/foot panels, trans tunnel 3.1) Assemble remainder of the panels in the order below, leave the screws loose until all the panels are assembled 3.2) Driver side foot well, -08, -09, -11. These panels will attach to the -12 panel installed in step
 Position the -05, firewall center panel and attach to the -08 and -03 panels. 3.5) Position the -04 transmission tunnel panel and attach to the -08, -03, and -05 panels. 3.6) Position the left and right -06 foot panels and attach to all the panels surrounding them.")
6 3.3) Position the passenger side firewall, -03. You will need to clamp this panel to the chassis tubes to hold it in place. 3.4) Position the -05, firewall center panel and attach to the -08 and -03 panels. 3.5) Position the -04 transmission tunnel panel and attach to the -08, -03, and -05 panels. 3.6) Position the left and right -06 foot panels and attach to all the panels surrounding them. 3.7) Install all of the screws that attach the panels to each other. Check that the panel are aligned and snug all the screws down. 3.8) Attach the nutsert tabs to the back of the panels and tack weld to the chassis tubes, you may need to grind the long end of the nutsert tabs shorter to align the tab to the hole. 4. Final assembly and notes 4.1) After all the nutsert tabs are tack welded, remove all the aluminum panels and weld the tabs and and panels to the chassis tubes. 4.2) The center panel is permanently part of the chassis and a convenient location to mount shifters or cutting brakes so you can remove the other panels and not have to remove the shifter. 4.3) If you are using an Atlas transfer case, if you use their standard shifter, you can simply cut a hole in the transmission tunnel for the shifter and boot. 6
Late Model Engine Conversion Installation Guide A-Body
 Late Model Engine Conversion Installation Guide 1964-1972 A-Body Hardware and Parts List All motor mounts come with a lifetime warranty and free replacement upon return of any mount or bracket. Quantity
Hardware and Parts List All motor mounts come with a lifetime warranty.
 Phone Number 1-770-751-0687 Fax 1-770-442-9597 WWW.BRPHotRods.COM Installation Guide for 1970-1972 Monte Carlo Hardware and Parts List All motor mounts come with a lifetime warranty. Quantity Item. 2 Frame
PPM-5224-A JK 4 DOOR REAR CAGE KIT Version 1.1
 PPM-5224-A JK 4 DOOR REAR CAGE KIT Version 1.1 GENERAL NOTES: These instructions are also available on our website; www.polyperformance.com. Check the website before you begin for any updated instructions
Factory Five Racing, Inc. 818 Kit Assembly manual revision 1J update
 Factory Five Racing, Inc. 818 Kit Assembly manual revision 1J update Turbo coolant overflow tank...1 Shifter handle...4 Install...4 Door skin...7 Door Liner... 10 Side mirrors... 14 Door handles and pulls...
Chevrolet 3100 IFS Kit
 1947-54 Chevrolet 3100 IFS Kit Congratulations on your purchase on what we believe is the finest IFS kit available for 1947-54 Chevrolet pickups with stock frames. We have invested many hours into designing
Installation Instructions
 2011-2013 LML DURAMAX COMPOUND-ADD 2011-2015 LML A Duramax TURBO KIT Add INSTALL A Turbo INSTRUCTIONS Compound Kit Installation Instructions 1-800-955-0476 - www.industrialinjection.com - info@industrialinjection.com
5231 YJ FRONT CAGE KIT Version 1.1
 POLY PERFORMANCE MFG. 870 INDUSTRIAL WAY, SAN LUIS OBISPO, CA (805) 242-0397 5231 YJ FRONT CAGE KIT Version 1.1 GENERAL NOTES: These instructions are also available on our website; www.synergysuspension.com.
Sikky Oil Pan Install Guide
 Sikky Oil Pan Install Guide **If you have a double chain timing belt or after market oil pump setup then further modifications may need to be made in order for the pan to fit.** Remove starter Remove plastic
PPM-8032 JEEP JK 2 DR STRETCH KIT Version 1
 POLY PERFORMANCE MFG. 870 INDUSTRIAL WAY, SAN LUIS OBISPO, CA (805) 242-0397 PPM-8032 JEEP JK 2 DR STRETCH KIT Version 1 GENERAL NOTES: These instructions are also available on our website; www.synergysuspension.com.
Installation Instructions
 Instructions Created by an: Inchworm Tacoma Dual Case Adapter Installation Instructions Suggested Tools: CAUTION: Safety glasses should be worn at all times when working with vehicles and related tools
CLAYTON OFF ROAD COR JEEP GRAND CHEROKEE LONG ARM UPGRADE KIT ( WJ)
") CLAYTON OFF ROAD COR-4806011 JEEP GRAND CHEROKEE LONG ARM UPGRADE KIT (1999-2004 WJ) NOTES: This product requires general welding, fabrication and automotive mechanic skills. ing should only be done by
CLAYTON OFF ROAD COR-4806011 JEEP GRAND CHEROKEE LONG ARM UPGRADE KIT (1999-2004 WJ) NOTES: This product requires general welding, fabrication and automotive mechanic skills. ing should only be done by
Part# C3132/C Up Ford Mustang 8-Point Roll Bar
 Part# C3132/C3156 2005-Up Ford Mustang 8-Point Roll Bar Installation Instructions Please read the instructions completely BEFORE starting this project. Competition Engineering 8-Point Roll Bars are not
PPM-5203 TJ/LJ FRONT CAGE KIT Version 1.1
 POLY PERFORMANCE MFG. 870 INDUSTRIAL WAY, SAN LUIS OBISPO, CA (805) 242-0397 PPM-5203 TJ/LJ FRONT CAGE KIT Version 1.1 GENERAL NOTES: These instructions are also available on our website; www.synergysuspension.com.
These instructions were written for a North American specification MkVI Golf R. Other models are similar.
 Notes: These instructions were written for a North American specification MkVI Golf R. Other models are similar. When disassembling the car, be sure to keep all fasteners so they can be reused. It is recommend
Installation Instructions
 Instructions Created by an: Inchworm Gear Clockable Toyota Dual Transfer Case Adapter Kit, 21 or 23 Spline SKU# TCASE-IW-300-000 Installation Instructions CAUTION: Safety glasses should be worn at all
Detroit Speed, Inc. 4-Point Roll Cage Camaro/Firebird P/N:
 Detroit Speed, Inc. 4-Point Roll Cage 1970-1981 Camaro/Firebird P/N: 011303 Thank you for your purchase of the Detroit Speed 4-Point Roll Cage. The exclusive DSE design follows the interior lines of the
IFS Eliminator Kit,
 IFS Eliminator Kit, 110001-1 IFS Eliminator Kit Contents: Front Leaf Springs (choice 3", 4", or 5") 1.0 High Steer Crossover Steering Kit 1.0 Frame Tube Jig Kit 1.0 Steering Stabilizer Kit 1.0 U-bolt Flip
SCOTT S HOTRODS n CUSTOMS AIRBAG FRONT STEER IFS INSTALLATION INSTRUCTIONS 1
 SCOTT S HOTRODS n CUSTOMS AIRBAG FRONT STEER IFS INSTALLATION INSTRUCTIONS 1 Installation Manual for Scott s Hotrods Airbag Front Steer IFS ***READ THIS FIRST*** Check the parts list thoroughly to be sure
INSTALLATION INSTRUCTIONS 64 ½ - 70 SUPERRIDE II INDEPENDENT FRONT SUSPENSION BX-350 FOR COYOTE AND MOD ENGINES
 INSTALLATION INSTRUCTIONS 64 ½ - 70 SUPERRIDE II INDEPENDENT FRONT SUSPENSION BX-350 FOR COYOTE AND MOD ENGINES Please read these instructions completely before starting your installation. Assemble suspension
Installation Guide. Spring Steer Suspensions. Air-Weigh Customer Support: Welded Steer Brackets PN R0
 Installation Guide Spring Steer Suspensions Welded Steer Brackets Air-Weigh Customer Support: 888-459-3247 PN 901-0146-003 R0 1 Table of Contents Overview...1 Tools Required...1 Installing the Sensor Bracket...2
Tuned Length Headers. Special Tools Required: Install Time: Difficulty: Follow these instructions carefully to ensure correct fitment and operation.
 Special Tools Required: welder / saws all Install Time: Approximately 4 Hours Difficulty: 4 out of 5 Follow these instructions carefully to ensure correct fitment and operation. STEP 1 Disconnect the negative
Detroit Speed, Inc. Second Generation Camaro/Firebird Mini-Tub Kit Camaro/Firebird P/N: ,
 Detroit Speed, Inc. Second Generation Camaro/Firebird Mini-Tub Kit 1970-1981 Camaro/Firebird P/N: 041222, 041223 The Detroit Speed Second Generation Camaro/Firebird Rear Mini-Tub Kit is designed to accommodate
SCOTT S HOTRODS n CUSTOMS STANDARD FRONT STEER IFS INSTALLATION INSTRUCTIONS 1
 SCOTT S HOTRODS n CUSTOMS STANDARD FRONT STEER IFS INSTALLATION INSTRUCTIONS 1 Installation Manual for Scott s Hotrods Standard Front Steer IFS ***READ THIS FIRST*** Check the parts list thoroughly to
Owner s Manual. Rigid Mount Weld-on Drawbars. XL-DB20016UM-en-US Rev
 Owner s Manual Rigid Mount Weld-on Drawbars Installation, Operation and Maintenance Procedures For on/off-road applications Weight: DB-1400 (approx.) 14 lbs. (6.35 kg) DB-1422 (approx.) 11 lbs. (4.98 kg)
PARTS LIST: 8581 DODGE LONG ARM BRACKETS 03-13
 SYNERGY MFG. 870 INDUSTRIAL WAY, SAN LUIS OBISPO, CA (805) 242-0397 8580 03-12 DODGE 2500/3500 4X4, 06-08 1500 MEGACAB 4X4 LONG ARM SUSPENSION KIT V3.0 GENERAL NOTES: These instructions are also available
Detroit Speed, Inc. Subframe Connectors Camaro/Firebird P/N:
 Detroit Speed, Inc. Subframe Connectors 1967-1969 Camaro/Firebird P/N: 010101 The Detroit Speed Inc., Subframe Connectors are designed to give maximum longitudinal and torsional stiffness by integrating
5021 JK FRONT LOWER CONTROL ARM FRAME BRACKETS
 SYNERGY MFG. 870 INDUSTRIAL WAY, SAN LUIS OBISPO, CA (805) 242-0397 5021 JK FRONT LOWER CONTROL ARM FRAME BRACKETS GENERAL NOTES: These instructions are also available on our website; www.synergymfg.com.
PARTS LIST: VIEWPOINT RUNNING BOARD NISSAN MURANO EXCLUDES 2dr CROSSCABRIOLET CONVERTIBLE
 PARTS LIST: VIEWPOINT RUNNING BOARD Qty Description Qty Description 1 Driver/Left Running Board 14 10-1.5mm x 35mm Bolt Plates 1 Passenger/Right Running Board 6 10-1.50mm x 30mm Hex Bolt 1 Driver/Left
60-65 Falcon, Comet & Ranchero Coil Spring IFS
 60-65 Falcon, 62-65 Comet & 62-65 Ranchero Coil Spring IFS All engine installations with this front end will require a rear sump oil pan. 289-302 Small Block Ford Motors Milodon rear sump pan holds 7 quarts
Installation Instructions
 Installation Instructions Important INSTALLATION REQUIRES WELDING to the unibody chassis by a qualified welder or metal fabricator. A bolt-on installation is not possible for this product. CHECK STEERING
May 2002 Dealer Service Instructions for: Safety Recall No. 998 Steering and Differential Frame Repair
 May 2002 Dealer Service Instructions for: Safety Recall No. 998 Steering and Differential Frame Repair Models 1996-1999 (SR) Dodge Viper (Coupe and Roadster) NOTE: This recall applies only to the above
Convertible MM Roll Bar (MMRB-10.1 to -10.7)
") 3430 Sacramento Dr., Unit D San Luis Obispo, CA 93401 Telephone: 805/544-8748 Fax: 805/544-8645 www.maximummotorsports.com 1983-93 Convertible MM Roll Bar (MMRB-10.1 to -10.7) The Maximum Motorsports RB-10.1
3430 Sacramento Dr., Unit D San Luis Obispo, CA 93401 Telephone: 805/544-8748 Fax: 805/544-8645 www.maximummotorsports.com 1983-93 Convertible MM Roll Bar (MMRB-10.1 to -10.7) The Maximum Motorsports RB-10.1
OPR Replacement Foxbody Floor Pans Pair (79-93 All)
") OPR Replacement Foxbody Floor Pans Pair (79-93 All) Time Necessary: Approximately 40-hours Tools Required: Spot Weld Cutter Tool Corded Drill Center Punch MIG Welder (minimum recommended: 110VAC/135A)
OPR Replacement Foxbody Floor Pans Pair (79-93 All) Time Necessary: Approximately 40-hours Tools Required: Spot Weld Cutter Tool Corded Drill Center Punch MIG Welder (minimum recommended: 110VAC/135A)
Deflection Sensor Installation Guide for welded steer axles Air-Weigh Customer Support:
 PN:901-0146-003 R0 Deflection Sensor Installation Guide for welded steer axles Air-Weigh Customer Support: 888-459-3247 Steer Axle Deflection Sensors See the manuals included with your kit for complete
Street-Lynx By. Reilly MotorSports, Inc. Installation Manual
 Street-Lynx By Reilly MotorSports, Inc. Installation Manual 1 1- Begin by removing your original rear suspension disconnect your brake lines, E-brake cables, and remove the driveshaft. To prevent fire
Detroit Speed, Inc Chevy II Mini-Tubs P/N:
 Detroit Speed, Inc. 1962-67 Chevy II Mini-Tubs P/N: 040404 The Detroit Speed, Inc. Mini-Tubs are inner wheel housings designed to accommodate wider tire and wheel packages, including tires as wide as 295mm
INSTRUCTION G-Comp Rear Suspension: Chevy Camaro. Kit Contents:
 INSTRUCTION 350-700 G-Comp Rear Suspension: 70-81 Chevy Camaro Speedway Motors, Inc. 2017 Kit Contents: 350700.1 G-Comp Crossmember & Chassis Brace 350700.2 G-Comp Rear Crossmember Assembly 350700.3 G-Comp
Make sure all tubes are installed to your satisfaction BEFORE finish welding!!
 INTRODUCTION: This S&W Roll Bar or Roll Cage performs both a safety and performance function. As a safety device, the main hoop of the cage protects the driver from impact. The rear braces and side bars
CLAYTON OFF ROAD COR , COR JEEP WRANGLER 2.5", 3.5" ENTRY LEVEL LIFT KIT 2 DR (2018 & UP, JL)
") CLAYTON OFF ROAD COR-2909002, COR-2909010 JEEP WRANGLER 2.5", 3.5" ENTRY LEVEL LIFT KIT 2 DR (2018 & UP, JL) NOTES: This product may require general welding, fabrication and automotive mechanic skills.
CLAYTON OFF ROAD COR-2909002, COR-2909010 JEEP WRANGLER 2.5", 3.5" ENTRY LEVEL LIFT KIT 2 DR (2018 & UP, JL) NOTES: This product may require general welding, fabrication and automotive mechanic skills.
HEIDTS SUPERIDE INSTALLATION INSTRUCTIONS OPEN WHEEL SUPERIDE INDEPENDENT FRONT SUSPENSION
 HEIDTS SUPERIDE INSTALLATION INSTRUCTIONS OPEN WHEEL SUPERIDE INDEPENDENT FRONT SUSPENSION Please read these instructions completely before starting your installation. Remember the basic rule for a successful
LoadMaxx. Installation Guide. Volvo T-Ride and Freightliner Tuf-Trac Suspensions. Welded Steer and Drive Brackets
 LoadMaxx Installation Guide Volvo T-Ride and Freightliner Tuf-Trac Suspensions Welded Steer and Drive Brackets Air-Weigh Customer Support: 888-459-3247 PN 901-0160-000 R0 1 TABLE OF CONTENTS About LoadMaxx
Alignment Spec. Power Rack & Pinion: 5 degrees positive Camber 0 degrees Toe-In 1/32
 333-TCIE237 1967-1969 Chevy Camaro Front Suspension 1968-1972 Chevy Nova Front Suspension 1967-1969 Pontiac Firebird Front Suspension 1-800-984-6259 www.totalcostinvolved.com 1967-1969 Chevy Camaro Front
DC Series Installation Manual (# )
") DC Series Installation Manual (# 101630) Page 1 of 33 In this booklet you will find: TOWER INSTALLATION... 3 U-Bolt Style mount... 4 Side Frame Style mount... 4 PIVOT INSTALLATION... 5 External Pivot Installation:
DC Series Installation Manual (# 101630) Page 1 of 33 In this booklet you will find: TOWER INSTALLATION... 3 U-Bolt Style mount... 4 Side Frame Style mount... 4 PIVOT INSTALLATION... 5 External Pivot Installation:
CLAYTON OFF ROAD COR JEEP GRAND CHEROKEE PRO SERIES 3 LINK FRONT LONG ARM UPGRADE KIT ( , ZJ)
") CLAYTON OFF ROAD COR-4804331 JEEP GRAND CHEROKEE PRO SERIES 3 LINK FRONT LONG ARM UPGRADE KIT (1993-1995, ZJ) NOTES: This product requires general welding, fabrication and automotive mechanic skills. Welding
CLAYTON OFF ROAD COR-4804331 JEEP GRAND CHEROKEE PRO SERIES 3 LINK FRONT LONG ARM UPGRADE KIT (1993-1995, ZJ) NOTES: This product requires general welding, fabrication and automotive mechanic skills. Welding
Installation Guide for Corvette
 Phone Number 1-770-751-0687 Fax 1-770-442-9597 WWW.BRPHotRods.COM Installation Guide for 1968-1982 Corvette Hardware and Parts List All motor mounts come with a lifetime warranty and free replacement upon
Evora shiftr111 Installation Instructions Rev. B Page 1 of 14
 Evora shiftr111 Installation Rev. B Page 1 of 14 READ FITTING INSTRUCTIONS IN FULL BEFORE INSTALLATION This article is sold without warranty expressed or implied. No warranty or representation is made
JEEP JK4 STEP SLIDER INSTALLATION BD-SS-100-JK4
 JEEP JK4 STEP SLIDER INSTALLATION BD-SS-100-JK4 PARTS LIST QTY DESCRIPTION 1 Drivers Side Slider Assembly 1 Passenger Side Slider Assembly 1 Wiring Harness and Fuse 1 Double Sided Sticky Squares and Alcohol
GM Floor Mount Automatic Transmission Shifter Installation Instructions
 GM Mount Automatic Transmission Shifter Installation Instructions Building American Quality With A Lifetime Warranty! TOLL FREE 1-877-469-7440 tech@lokar.com www.lokar.com GM Mount Automatic Transmission
USE THE PARTS LIST BELOW TO MAKE SURE YOUR KIT IS COMPLETE BEFORE INSTALLATION. IF ANY PIECES ARE MISSING, PLEASE CONTACT:
 60-65 Ford Falcon Triangulated 4-Link Suspension Installation Instructions Tech Line: 1-855-693-1259 www.totalcostinvolved.com Read and understand these instructions before starting any work! USE THE PARTS
JEEP JK4 STEP SLIDER INSTALLATION BD-SS-100-JK4
 JEEP JK4 STEP SLIDER INSTALLATION BD-SS-100-JK4 PARTS LIST QTY DESCRIPTION 1 Drivers Side Slider Assembly 1 Passenger Side Slider Assembly 1 Wiring Harness and Fuse 1 Double Sided Sticky Squares and Alcohol
INSTALLATION INSTRUCTIONS PORT INJECTION KIT (PIK)
") INSTALLATION INSTRUCTIONS PORT INJECTION KIT (PIK) FORD FOCUS 2.3L ECOBOOST Document: 19-0155 Support: info@radiumauto.com IMPORTANT NOTES: 1. This installation requires minor metal cutting. Air tools
INSTALLATION INSTRUCTIONS PORT INJECTION KIT (PIK) FORD FOCUS 2.3L ECOBOOST Document: 19-0155 Support: info@radiumauto.com IMPORTANT NOTES: 1. This installation requires minor metal cutting. Air tools
Section 1 - Preparation of Components
 640 North El Dorado Street Stockton, CA 95202 Phone (209)943-0991 Fax (209)943-7923 www.wildhorses4x4.com Super Crawler Dual Transfer Case 4/26/07 The Wild Horses Super Crawler dual transfer case will
E46 REAR Subframe Reinforcement Repair KIT
 INSTRUCTIONS BMW E46 323i,325i,328i,330i,M3 1999-2006 E46 REAR Subframe Reinforcement Repair KIT Tools Needed: -Qualified tech and welder -Lift -Die Grinders -Basic tools -Caulking, primer and paint -Marker
INSTRUCTION G-Comp Unser Edition Rear Suspension: Chevy Nova. Kit Contents:
 INSTRUCTION 350-400 G-Comp Unser Edition Rear Suspension: 62-67 Chevy Nova Speedway Motors, Inc. 2017 Kit Contents: 350003.1 G-Comp Chassis Brace 350003.2 G-Comp Front Support 350400.1 Chevy II Unser Rear
IMPORTANT WARRANTY & INSTALLATION INSTRUCTIONS ATTACHED
 IMPORTANT WARRANTY & INSTALLATION INSTRUCTIONS ATTACHED Please Forward All Attached Information to Consumer Warranty Not Valid Unless Returned to CORSA Performance We ask that you take a few moments to
RockJock Professional OffRoad Products presents: CE-9900TJR Antirock Sway Bar Kit Installation Instructions Fits
 - 1997-2006 Jeep TJ and LJ (Unlimited) 1) CE-9902J...45 Antirock Bar 1) CE-9900TJR-BR...RH frame bracket 1) CE-9900TJR-BL...LH frame bracket 2) CE-99003-JK...Steel Antirock Arms 2) CE-9901D...Antirock
5019 JK FRONT AIR BUMP KIT (THRU COIL)
") GENERAL NOTES: SYNERGY MFG. 870 INDUSTRIAL WAY, SAN LUIS OBISPO, CA (805) 242-0397 5019 JK FRONT AIR BUMP KIT (THRU COIL) These instructions are also available on our website; www.synergymfg.com. Check
GENERAL NOTES: SYNERGY MFG. 870 INDUSTRIAL WAY, SAN LUIS OBISPO, CA (805) 242-0397 5019 JK FRONT AIR BUMP KIT (THRU COIL) These instructions are also available on our website; www.synergymfg.com. Check
Factory Five Racing, Inc. 818 Kit Assembly manual revision 1i update
 Factory Five Racing, Inc. 818 Kit Assembly manual revision 1i update Pedal box...1 Cable Accelerator Pedal (2002-2005)...2 OEM seats...7 Windshield... 13 Center console... 19 Pedal box Attach the pedal
S&W Race Cars and Components, Inc.
 S&W Race Cars and Components, Inc. 11 Mennonite Church Road Spring City, PA 19475 TECH & INFORMATION: 610-948-7303 ORDERS: 1-800-523-3353 FAX: 610-948-7342 CAUTION!!! - The most important requirement for
CLAYTON OFF ROAD COR JEEP GRAND CHEROKEE PRO SERIES REAR LONG ARM UPGRADE KIT ( , ZJ)
") CLAYTON OFF ROAD COR-4804351 JEEP GRAND CHEROKEE PRO SERIES REAR LONG ARM UPGRADE KIT (1993-1998, ZJ) NOTES: This product requires general welding, fabrication and automotive mechanic skills. Welding should
CLAYTON OFF ROAD COR-4804351 JEEP GRAND CHEROKEE PRO SERIES REAR LONG ARM UPGRADE KIT (1993-1998, ZJ) NOTES: This product requires general welding, fabrication and automotive mechanic skills. Welding should
Installation Instructions
 Suzuki Samurai 1 Inch and 2 Inch Body Lift Kit (SKU# SSP-BL) Installation Instructions Background: These instructions are designed for installing the 2 body lift. Our approach is to raise the entire body
Chrysler 727, 904, 518 Floor Mount Automatic Transmission Shifter Installation Instructions
 Chrysler 727, 904, 518 Mount Automatic Transmission Shifter Installation Instructions Building American Quality With A Lifetime Warranty! TOLL FREE 1-877-469-7440 tech@lokar.com www.lokar.com Release Button
Subaru 5-Speed Double Adjustable Short Throw Shifter
 Subaru 5-Speed Double Adjustable Short Throw Shifter 1999+ Subaru Impreza 5-Speed 2004-2005 Subaru Forester XT 5-Speed Congratulations on your purchase of the COBB Tuning Double Adjustable Short Throw
PARTS LIST. (1) Main Hoop (1) Cage Leg (Left) (1) Main Hoop Crossbar (1) Cage Leg (Right) (1) Windshield Crossbar (2) 39 Hoop Diagonals
 Main Hoop (1) Cage Leg (Left) (1) Main Hoop Crossbar (1) Cage Leg (Right) (1) Windshield Crossbar (2) 39 Hoop Diagonals") 10-POINT ROLL CAGE, CHROME MOLY 1994-98 MUSTANG HDTP P/N C3279 NOTE: This style cage kit is designed for use with the factory dash to remain in place and the front cage supports to pass through the dash.
10-POINT ROLL CAGE, CHROME MOLY 1994-98 MUSTANG HDTP P/N C3279 NOTE: This style cage kit is designed for use with the factory dash to remain in place and the front cage supports to pass through the dash.
BA/BF ICC Install Instructions - DISCONNECT BATTERY Negative terminal.
 BA/BF ICC Install Instructions - DISCONNECT BATTERY Negative terminal. Step 1. (Figure 1) Remove the plastic gearshift surround by lifting it straight up. Lifting from the raised bump that we are pointing
IMPORTANT WARRANTY & INSTALLATION INSTRUCTIONS ATTACHED TO ACTIVATE YOUR WARRANTY GO TO: CORSAPERFORMANCE.COM/WARRANTY STOP
 IMPORTANT WARRANTY & INSTALLATION INSTRUCTIONS ATTACHED Please Forward All Attached Information to Consumer Warranty Not Valid Unless Returned to CORSA Performance We ask that you take a few moments to
Powerglide Automatic Floor Mount Shifter Installation Instructions
 Powerglide Automatic Mount Installation Instructions Building American Quality With A Lifetime Warranty! TOLL FREE 1-877-469-7440 (865) 966-2269 FAX (865) 671-1999 tech@lokar.com www.lokar.com Powerglide
Installation Instructions
 86-95 Low Range Off Road Universal Front Shock Tower Kit for Suzuki Samurai (SKU# SSP-UST) Installation Instructions Revised 10/29/13 Suggested Tools: CAUTION: Safety glasses should be worn at all times
7260 INSTRUCTIONS FOR ELIMINATOR II STRUT FRONT, 4-LINK REAR, MILD STEEL, FULL SIZE, SERIES CHASSIS
 #917260 Page 1 of 6 7260 INSTRUCTIONS FOR ELIMINATOR II STRUT FRONT, 4-LINK REAR, MILD STEEL, FULL SIZE, SERIES CHASSIS ITEM QTY SIZE/PART NO. TUBE CODE DESCRIPTION 1 2 4139 Cage Side 2 2 4250 Forward
WH Ford 2WD Steering System #2013/2015 Date 02/15/04 rev. 1
 Phone (209) 400-7200 Fax (209) 943-7923 www.wildhorses4x4.com WH Ford 2WD Steering System #2013/2015 Date 02/15/04 rev. 1 Basic system notes: This system works on 1966-1977 Broncos with manual steering
2. With the rear door open remove pull-style clip from the passenger side just below the door latch.
 LoD Offroad FJ Cruiser Rear Bumper with Tire Carrier Installation Instructions 1. Begin with removing factory spare from the rear door. 2. With the rear door open remove pull-style clip from the passenger
FULL LENGTH HEADERS/ CATTED HEAD PIPES
 INSTALLATION INSTRUCTIONS INS232 2016-2018 CAMARO 6.2L V8 FULL LENGTH HEADERS/ CATTED HEAD PIPES Part #4044 and 40440 Special Tools required: 10mm, 12mm, 13mm, 15mm Socket and Wrenches, Pliers, Saw, Welder
WRX/STI Engine Oil Cooler
 2002-14 WRX/STI Engine Oil Cooler 2014-04-21 Thank you for purchasing this PERRIN product for your car! Installation of this product should only be performed by persons experienced with installation of
Parts List See cover Page
 Thank you for purchasing the CorkSport Front Mount Intercooler Kit for the 2010-2013 Mazdaspeed 3. Keep your BAT s under check with the CorkSport FMIC Kit with the small or large intercooler. Please let
Step 5 Install the frame rail insert into the frame.
 COR-6372S, COR-6372D 63-72 C-10 Rear Coil-over KIT Tool s for the job Car Lift Floor Jack Chalks Jack Stands Standard Wrench set Standard Socket set Spring Compressor Phneumatic/ Electric Grinder Phneumatic/
Detroit Speed, Inc. Mustang Mini-Tub Kit Mustang P/N:
 Detroit Speed, Inc. Mustang Mini-Tub Kit 1964.5-70 Mustang P/N: 040405 The Detroit Speed Mini-Tubs are inner wheel housings designed to accommodate wider wheel and tire package for the 1964½ - 1970 Mustang.
Main Fuel Tank #9662 Date 3/17/23 rev. 0. Pic #1 Pic #2. Pic #4. Pic #3. Pic #5 Pic #6
 1045 S. Cherokee Lane Lodi CA 95240 Phone (209)400-7200 Fax (209)943-7923 www.wildhorses4x4.com Note: To assure a completely clean tank, use the large hole to inspect tank for any debris. It is highly
Installation Manual ZJ Long Arm Upgrade kit Jeep Grand Cherokee Last Revision No.: 1/30/12 PN
 Thank you for purchasing a Clayton Off Road suspension. Please check to make sure you have all necessary parts before you start your install. 4804010 ZJ 93-95 Long Arm Upgrade Kit 1200010 4 Link Axle Truss
Body Preparation. Stretching the Frame. Stretch Kit CHAPTER 4
 CHAPTER 4 Body Preparation This step will require cutting the back half of the Fiero from the front half. You will also remove a portion of the front fenders and bumpers. You will need to relocate the
Hardware and Parts List All motor mounts come with a lifetime warranty and free replacement upon return of any mount or bracket.
 Hardware and Parts List All motor mounts come with a lifetime warranty and free replacement upon return of any mount or bracket. Quantity Item. 1 102-1200-04 Driver Frame Mount 1 102-1200-16 Passenger
Ford C4 and C6 Floor Mount Automatic Transmission Shifter Installation Instructions
 Ford C4 and C6 Mount Automatic Transmission Shifter Installation Instructions Building American Quality With A Lifetime Warranty! TOLL FREE 1-877-469-7440 tech@lokar.com www.lokar.com Ford C4 and C6 Mount
7256 INSTRUCTIONS FOR ELIMINATOR II A-ARM FRONT, 4-LINK REAR, MILD STEEL, INTERMEDIATE, SERIES CHASSIS
 #917256 Page 1 of 7 7256 INSTRUCTIONS FOR ELIMINATOR II A-ARM FRONT, 4-LINK REAR, MILD STEEL, INTERMEDIATE, SERIES CHASSIS ITEM QTY SIZE/PART NO. TUBE CODE DESCRIPTION 1 2 4138 Cage Side 2 2 4208 Forward
AP-Xtreme Sim-Racing Chassis Master Assembly Guide
 AP-Xtreme Sim-Racing Chassis Master Assembly Guide This guide covers all options available for the AP-Xtreme chassis. Some sections of this guide will be skipped based on the options chosen. APX1000 APX2000
Installation Instructions
 Installation Instructions Magnum Grip Pro Stick Shifter including CARBON FIBER models (see www.bmracing.com for the latest fitment applications and model years) Part # s 81040,81041, 81043, & 81044 2010,
Mounting Body CHAPTER 9
 CHAPTER 9 Mounting Body During the build of your car, you will need to trial fit the body numerous times. It is possible to construct a simple moveable rack that can lift the body and then move the body
WARNING. BX Nissan Sentra S/SV/SR/SL Installation Instructions
 Attachment Tab Height: 14 Attachment Tab Width: 22 Please read BOTH these and the General Information sheet prior to installing or operating this equipment. 1. Blue Ox towing products and accessories are
QuickLoad Installation Guide
 QuickLoad Installation Guide Mack Camelback Suspensions Welded Drive Brackets Air-Weigh Customer Support: 888-459-3247 PN 901-0144-002 R0 1 Table of Contents Scale Overview...1 Overview: Sensor Installation...1
INSTALLATION INSTRUCTIONS PPM-8086 JK REAR LONG TRAVEL UPPER SHOCK MOUNT
 POLY PERFORMANCE MFG. 870 INDUSTRIAL WAY, SAN LUIS OBISPO, CA (805) 242-0397 INSTALLATION INSTRUCTIONS PPM-8086 JK REAR LONG TRAVEL UPPER SHOCK MOUNT GENERAL NOTES: These instructions are also available
LPE C5 Battery Relocation Kit
 LPE C5 Battery Relocation Kit The LPE C5 Corvette battery relocation kit improves vehicle weight distribution by moving weight to the rear of the vehicle. The improved weight distribution increases traction
55-59 Original Chevy Stock Chassis New Coil-Spring Front End on Original Stock Chassis
 1955-1959 Chevy Truck Coil-Spring Front End Tech line: 1-855-693-1259 www.totalcostinvolved.com Read and understand these instructions before starting any work! USE THE PARTS LIST BELOW TO MAKE SURE YOUR
Installation Instructions Street Bandit Shifter
 Installation Instructions Street Bandit Shifter Part Number 80797 (see www.bmracing.com for the latest technical product information) 2006, 2000 by B&M Racing and Performance Products The B&M Street Bandit
Installation Instructions Sport Shifter
 The B&M Sport Shifter can be used in vehicles equipped with most popular three speed or four speed automatic transmissions. It is equipped with neutral safety and backup light switches, transmission brackets
HIGH FLOW COLD AIR INTAKE SYSTEM INSTALLATION INSTRUCTIONS D , D A
 HIGH FLOW COLD AIR INTAKE SYSTEM INSTALLATION INSTRUCTIONS D760-0320, D760-0320A 1992-95 325i, is 1995 M3 (3.0L) Parts List: 1 Intake Tube 1 Silicone Hose 1 Air Flow Meter Bracket 1 Hose Clamp (#36z) 1
Roll Bar (MMRB-6.1 to -6.7)
") 3430 Sacramento Dr., Unit D San Luis Obispo, CA 93401 Telephone: 805/544-8748 Fax: 805/544-8645 www.maximummotorsports.com 1994-04 Roll Bar (MMRB-6.1 to -6.7) NOTE: These instructions cover Roll Bars with
3430 Sacramento Dr., Unit D San Luis Obispo, CA 93401 Telephone: 805/544-8748 Fax: 805/544-8645 www.maximummotorsports.com 1994-04 Roll Bar (MMRB-6.1 to -6.7) NOTE: These instructions cover Roll Bars with
WARNING. BX Suzuki Grand Vitara Installation Instructions. Bolt Torque Specifications. Bolt Torque Specifications
 Attachment Tab Height: 21-1/2 Attachment Tab Width: 24 Please read BOTH these and the General Instructions prior to installing or operating this equipment. 1. Blue Ox towing products and accessories are
INSTALLATION INSTRUCTIONS `64 ½ - 70 MUSTANG, HEIDTS IFS, PRO-G GEN II P/N: MTF-201
 INSTALLATION INSTRUCTIONS `64 ½ - 70 MUSTANG, HEIDTS IFS, PRO-G GEN II P/N: MTF-201 Please read these instructions completely Before starting your installation. Assemble suspension on vehicle before powder-coating
Installation Instructions for the F2B Pedal Bracket Kit
 Installation Instructions for the F2B Pedal Bracket Kit A. General Information 1. Before you begin, familiarize yourself with this installation procedure. It is assumed that the installer is an experienced
Current Range Rover Sport STRUT Collection Installation Manual
 2014 - Current Range Rover Sport STRUT Collection Installation Manual 1 1. Removing Main Grille and Lower Fascia 1.1 Run a line of low tack masking tape across the front of the bumper below the grille
WJ AUTO TRANS. ATLAS SHIFTER
 KIT CONSISTS OF: No. Qty Part No. Description 4320 Aerotech Center Way, Page 1 of 8 1 1 302051 BASE- ATLAS TWIN STICK MOUNT 2 1 302080 STUD BOLT 1/2-13 X 7 B7 3 1 303120 Serrated-Flange Hex Locknut 1/2-13
Installation Instructions For: Part Number EFK1 K-series Mount Kit for Civic and CR-X
 HASPORT PERFORMANCE Installation Instructions For: Part Number EFK1 K-series Mount Kit for 1988 1991 Civic and CR-X HASPORT PERFORMANCE Inc. 2849 S. 44 th St. Phoenix, AZ 85040 Phone: (602) 470-0065 Fax: