Wall Mount Chimney Style. Island Mount Chimney Style. Wall Mount Professional Style. Insert Mount Professional Style
|
|
|
- Laurel Beasley
- 5 years ago
- Views:
Transcription


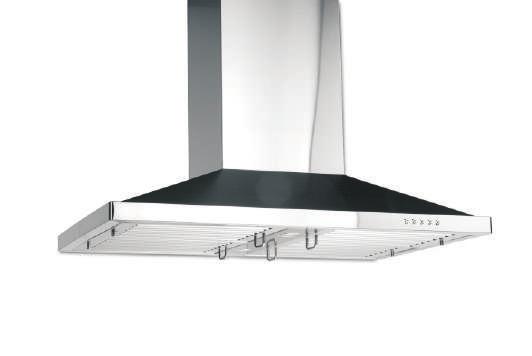


1 Wall Mount Chimney Style Island Mount Chimney Style Wall Mount Professional Style Insert Mount Professional Style
2 2
3 3
4 Installation: 4
5 Table of Contents Wall Hood Installation Island Installation Professional Wall Hood Installation Professional Island Hood Installation Professional Insert Hood Installation Range Hood Operation Controls Charcoal Filter Installation (vent free) Filter Installation Baffle/Aluminum Standard Hoods Professional Series Baffle Filter and Channel Installation Motor Diagrams and Exploded Parts Views Maintenance / Light Change Instructions grease cup Troubleshooting Warranty pgs. 6-8 pgs pgs pgs pg. 16 pg. 17 pg. 18 pg. 19 pg. 20 pg pg. 25 pg. 26 pg. 27 5
6 Wall Installation Parts Supplied: Please unpack your range hood when it is delivered and inspect to ensure all parts are included. 1. Main Hood with all lights and button banks preinstalled. 2. Adjustable Stainless Chimney Cover 3. Flexible duct (not pictured) 4. Packet of screws and anchors 5.Top mounting bracket 6
7 Seven Easy Steps to Installing Wall Hoods Step one: Find the center of the wall where you are installing the hood. Make sure there is sufficient bracing to hold the weight of the hood. Mark your center line and measure out from center to find your two mounting points. Make sure your mounting points are level when you mark them. It is recommended to install the hood directly into wood supports. fig 1 fig.1 center line 1 Step two: Mark your mounting points and install the two mounting screws provided leaving the heads out 1/4 to mount hood. fig 1 Step three: Mount the main body of the hood to the two screws and screw into place. fig fig. 2 Step four: Mount the top chimney mounting bracket centering it above the hood. fig.3 5 fig. 3 7
8 Step 5: Make your electrical and ducting connections. Use 6 rigid duct wherever possible. Try and minimize the use of elbows. More elbows and longer runs create higher static pressure. The hood comes with a grounded three prong plug that can either be direct wired or plugged into a 20 amp. circuit. fig. 4 fig. 4 Step 6: Install the 2 part chimneys on top of the hood by sliding the inside section up until the vertical vent slots are visible. Then put both pieces on top of the hood and secure the lower portion with the provided screw at the bottom. fig. 5 6 fig. 5 6 Step 7: Slide the upper portion up and over the top mounting bracket aligning the holes and securing with the screws provided. fig. 6 fig. 6 8

 4.")
9 Island Installation Parts Supplied: Please unpack your range hood when it is delivered and inspect to ensure all parts are included. 1. Main Hood with all lights and button banks preinstalled. 2. Adjustable Stainless Chimney Cover 3. Flexible duct (not pictured) 4. Packet of screws and anchors 5.Island style mounting bracket 6. Backdraft Damper 9
10 Five Easy Steps to Installation Step one: Locate the center above the stove where the hood is to be installed. Ensure that the bracket will be secured to solid wood backing. Install the duct work in the center of the bracket. Secure the upper end of the bracket to the ceiling as shown in fig.1. fig.1 Step two: Attach back draft damper to top of hood to prevent outside air from entering. fig.2 4 fig.2 Step three: Attach the lower portion of the chimney to the motor housing with the screws provided. fig.3 5 fig.3 10
11 Step four: Attach the duct to the top of the back draft damper. Place the chimney sections over the lower bracket section and on top of the main unit. Pull the plug to the top of the chimney sections. Attach lower bracket to upper bracket at desired height using screws provided. fig.4 4 fig.4 Step 5: Make your electrical and ducting connections. Use 6 rigid duct wherever possible. Try and minimize the use of elbows. More elbows and longer runs create higher static pressure. The hood comes with a grounded three prong plug that can either be direct wired or plugged into a 20 amp. circuit. Next slide the inner portion of the chimney up around the upper bracket and secure using the screws provided. fig.5-6 fig.5 6 fig.6 11
12 Professional Series Wall Installation Step one: Find the center of the wall where you are installing the hood. Make sure there is sufficient bracing to hold the weight of the hood. Mark your center line and measure out from center to find your two mounting points. Make sure your mounting points are level when you mark them. It is recommended to install the hood directly into wood supports. fig 1 Step two: Mark your mounting points and install the two mounting screws provided leaving the heads out 1/4 to mount hood. fig 1 Step three: If your hood comes with separate mounting brackets, they must be installed to the back of the hood at this point. fig.2 Otherwise your mounting points are integrated into the construction of the hood. Step four: Mount the main body of the hood to the two screws and screw into place. fig 3 Step 5: Make your electrical and ducting connections. Use 8 rigid duct wherever possible. Try and minimize the use of elbows. More elbows and longer runs create higher static pressure. The hood comes with a grounded three prong plug that can either be direct wired or plugged into a 20 amp. circuit. fig. 4 12
13 Step six: Mount the top chimney mounting bracket centering it above the hood. fig.5 Step seven: Install the 2 part chimneys on top of the hood by sliding the inside section up until the vertical vent slots are visible. Then put both pieces on top of the hood and secure the lower portion with the provided screw at the bottom. fig. 6 Step 8: Slide the upper portion up and over the top mounting bracket aligning the holes and securing with the screws provided. fig. 7 13
14 Professional Series Island Installation Step one: Position your mounting plate centered above your range. Mark the mounting holes. Take the mounting plate down and screw your mounting screws into place. fig.1 Step two: Measure how far off the range you would like to mount the hood. Adjust the brackets provided to the desired height. Connect the top mounting plate, mounting legs, and the main hood using the screws provided. fig 2. 14
15 Step three: Take the chimney sections and separate slightly to reveal the vent slots. Next take the hood and slide the top mounting bracket over the mounting screws and slide back into position. fig 3. Make your electrical and duct connections at this point using 8 inch rigid ducting wherever possible. Step four: Tighten the top mounting screws, securing the top mounting plate to the ceiling. fig 4. Step five: Slide the inner chimney up over the top mounting plate securing with two screws provided. Pull the lower section down to rest on top of the main hood. fig 5. 15
16 Professional Series Insert Installation Unpack the contents of the hood and decide which way you would like to install the hood. There are several ways to install the hood. L bracket mounting screw are provided for convenience. See Figure 4. Screws 16
17 Range Hood Operations 17

18 Filter Installations It is recommended to direct vent the hood whenever possible. If your situation does not allow for a direct vent install carbon filters are available to recirculate the air through your hood. 18
19 Baffle Filter The baffle filter is equipped with a spring loaded handle. To remove from the hood pull back toward the wall and down. Release The baffle filter can also be opened for easy cleaning. To open unscrew the cylindrical handle and separate the layers to clean. Aluminum Filter To remove the filter pull the spring loaded handle back toward the wall and down Release 19
20 Professional Series Baffle Installation Covering Models: 696 / 697 / 697 Island / KECOM / KECOM Island / 695, 698, 721 inserts / The following diagrams illustrate filters specific to the professional series of range hoods and inserts: Professional series hoods are equipped with 2 removable dishwasher safe baffle channels (one for series 695 & 698 inserts) that the baffle filters sit into. To install the channel, place inside the hood and slide into place with the edge of the hood fitting in between the channel and the installation pieces installed on the back of the channel. Removable Baffle Channel Slides Down To install filters first install the removable baffle channel. Next take the filter and put one end into the permanent baffle channel push back into place and pull down sliding the bottom of the filter into Install up and push into removable channel 20
21 Electrical Diagram Single Motor Plug Circuit Box Cover Motor Button Bank Light Transformer Circuit Board Ground Capacitor Puck Light Separate Diagram Puck Light 21
22 Electrical Diagram Double Motor Plug Circuit Board Cover Button Bank Transformer Circuit Board Capacitors Motors sep. diagram Puck Light Puck Light 22
23 Motor Diagram 23
24 Double Motor Diagram 24


25 Grease cup installation: A removable grease cup is provided to catch any excess grease at the bottom of the motor. Remove every 2-3 months wash and re-install. Slide into place 25
26 26


27 27
28 The Range Hood Store 2276 Westbrooke Drive Clolumbus, OH 43228
Designer Wall Range Hood Installation. Installation Tutorial Video
 Designer Wall Range Hood Installation Installation Tutorial Video 9 Designer Wall Range Hood Installation Please unpack your range hood when it is delivered and inspect to ensure all parts are included.
www. TheRangeHoodStore.com
 Two Locations 916 Delaware Avenue Marysville, Ohio 43040 984 East Greg Street Sparks, Nevada 89431-6521 www.zlinekitchen.com www. TheRangeHoodStore.com Table of Contents Installation for: Walls... Designer
R a n g e H o o d Installation Guide and Users Manual
 R a n g e H o o d Installation Guide and Users Manual CONTENTS IMPORTANT SAFETY INSTRUCTIONS 1 WALL RANGE HOOD INSTALLATION 4 CROWN MOLDING INSTALLATION 9 DESIGNER WALL RANGE HOOD INSTALLATION 10 ISLAND
brisas Use, Care, and Installation Guide Brisas BMI-E36AG BMI-E36AS BSI-E36AS BVE-E30AS BVE-E36AS Model number: Serial Number:
 brisas by Use, Care, and Installation Guide Brisas BMI-E36AG BMI-E36AS BSI-E36AS BVE-E30AS BVE-E36AS Model number: Serial Number: SEP08.0101 Zephyr Corporation SAFETY NOTICE... 2-3 LIST OF MATERIALS...
Viking Installation Guide
 Viking Installation Guide Viking Range Corporation 111 Front Street Greenwood, Mississippi 38930 USA (662) 455-1200 For product information, call 1-888-VIKING1 (845-4641) or visit the Viking Web site at
Charcoal Filter Installation NOTE: The charcoal filters are preinstalled if you purchased the range hood with re-circulating kit from us. 1. Remove st
 Venting Methods This range hood is factory set for venting through the roof or wall. For non-vented (re-circulating) installations, see Ductless Conversion on Page 7. Vent work can terminate either through
INSTALLATION INSTRUCTIONS WALL MOUNT RANGE HOOD WITH M600 OR M1200 BLOWER
 WARNING - TO REDUCE THE RISK OF FIRE, USE ONLY METAL DUCTWORK C U L R Read and Save These Instructions All Hoods Must Be Installed By A Qualified Installer INSTALLATION INSTRUCTIONS WALL MOUNT RANGE HOOD
Model ND-2 Specification
 Model ND-2 Specification The model ND-2 is an exhaust only canopy hood rated for all types of cooking equipment. The hood shall have the size, shape and performance specified on drawings. Construction
WhispAire Range Hood Quiet Hood
 INSTALLATION INSTRUCTIONS READ & SAVE THESE INSTRUCTIONS WhispAire Range Hood Quiet Hood IMPORTANT SAFETY INSTRUCTIONS WARNING - TO REDUCE THE RISK OF FIRE, ELEC- TRIC SHOCK, OR INJURY TO PERSONS, OBSERVE
Glenn Rogers-Cabinet Broker rtacabinetbroker.com NA NA 排風量 CFM 110. 天花 / 牆身 Ceiling or wall mounted. 4 吋圓管槽排氣 4" round vented
 TA-110 Standard Virtually silent operation ventilation fan(not suitable for kitchen), 111 CFM, 12 sones, 1007 RPM fan speed, 45 Watt, 4" duct connector, thermally protected TPF, ETL, CE, HVI listed US$9000
INSTALLATION INSTRUCTIONS WALL MOUNT RANGE HOOD WITH M600 OR M1200 BLOWER
 WARNING - TO REDUCE THE RISK OF FIRE, USE ONLY METAL DUCTWORK C U L R Read and Save These Instructions All Hoods Must Be Installed By A Qualified Installer INSTALLATION INSTRUCTIONS WALL MOUNT RANGE HOOD
INSTALLATION INSTRUCTIONS AH12 WALL MOUNT HOOD
 Read and Save These Instructions All Hoods Must Be Installed By A Qualified Installer INSTALLATION INSTRUCTIONS AH12 WALL MOUNT HOOD Read All Instructions Thoroughly Before Beginning Installation WARNING
Pro and Designer Series Ventilation
 Technical Service Manual Pro and Designer Series Ventilation V 2007 ALL RIGHTS RESERVED Basic Operation Section 1 Basic Operation of Ventilation Products 1-1 Basic Operation Section 1 - Basic Information...
Installation Instructions
 Installation Instructions Speedcook Oven Read carefully. Keep these Instructions. INSTALLATION INSTRUCTIONS Electrical Requirements Product rating is 240/208 volts AC, 60 Hertz, 30 amps and 6.5 kilowatts.
ISLAND INSTALLATION WALL INSTALLATION
 HEIGHT OF HOOD The bottom of the hood should be 30 (76.2 cm) min. to 36 (91.4 cm) max. above the countertop. This would typically result in the bottom of the hood being 66 (167.6 cm) to 72 (175.3 cm) above
Viking Installation Guide
 Viking Installation Guide Professional Series Built-In Chimney-Style Hoods Viking Range Corporation 111 Front Street Greenwood, MIssissippi 38930 USA NOTE: IF INSTALLING HOOD WITH WARMING SHELF PANEL,
120 Ventilation. Ventilation. Removes smoke and odor. Adds exceptional style.
 120 Ventilation Ventilation Removes smoke and odor. Adds exceptional style. Ventilation 121 Ventilation Bosch s efficient, highly effective ventilation products complete any Bosch kitchen package. Capable
INSTALLATION INSTRUCTIONS CWEH6-K WALL MOUNT HOOD
 Read and Save These Instructions All Hoods Must Be Installed By A Qualified Installer INSTALLATION INSTRUCTIONS CWEH6-K WALL MOUNT HOOD Read All Instructions Thoroughly Before Beginning Installation WARNING
INSTALLATION INSTRUCTIONS CWUH9 WALL MOUNT HOOD
 Read and Save These Instructions All Hoods Must Be Installed By A Qualified Installer INSTALLATION INSTRUCTIONS CWUH9 WALL MOUNT HOOD Read All Instructions Thoroughly Before Beginning Installation WARNING
INSTALLATION INSTRUCTIONS JCH/C2 DESIGNER SERIES WALL MOUNT HOOD
 WARNING - TO REDUCE THE RISK OF FIRE, USE ONLY METAL DUCTWORK C U L R Read and Save These Instructions All Hoods Must Be Installed By A Qualified Installer INSTALLATION INSTRUCTIONS JCH/C2 DESIGNER SERIES
INSTALLATION INSTRUCTIONS ZTH WALL MOUNT HOOD
 Read and Save These Instructions All Hoods Must Be Installed By A Qualified Installer INSTALLATION INSTRUCTIONS ZTH WALL MOUNT HOOD Read All Instructions Thoroughly Before Beginning Installation WARNING
RMHDT90SS/ - RMHDT100SS/ - RMHDT110SS/ Instructions Manual.
 RMHDT90SS/ - RMHDT100SS/ - RMHDT110SS/ Instructions Manual www.rangemaster.co.uk INDEX EN RECOMMENDATIONS AND SUGGESTIONS... 3 CHARACTERISTICS... 4 INSTALLATION... 5 USE... 8 MAINTENANCE... 9 2 RECOMMENDATIONS
LEIHDS110SC/ LEIHDS110BC/ Instructions Manual.
 LEIHDS110SC/ LEIHDS110BC/ Instructions Manual www.rangemaster.co.uk INDEX EN RECOMMENDATIONS AND SUGGESTIONS... 3 CHARACTERISTICS... 4 INSTALLATION... 5 USE... 8 MAINTENANCE... 9 2 RECOMMENDATIONS AND
INSTALLATION INSTRUCTIONS EUROLINE/EUROLINE PRO WALL MOUNT HOOD
 Read and Save These Instructions All Hoods Must Be Installed By A Qualified Installer INSTALLATION INSTRUCTIONS EUROLINE/EUROLINE PRO WALL MOUNT HOOD Read All Instructions Thoroughly Before Beginning Installation
INSTALLATION INSTRUCTIONS WALL MOUNT HOOD
 Read and Save These Instructions All Hoods Must Be Installed By A Qualified Installer INSTALLATION INSTRUCTIONS WALL MOUNT HOOD Read All Instructions Thoroughly Before Beginning Installation WARNING -
P RO W ALL V ENTILATION H OODS INSTALLATION INSTRUCTIONS
 P RO W ALL V ENTILATION H OODS INSTALLATION INSTRUCTIONS CONTACT INFORMATION Wolf Customer Service: 800-332-9513 Website: wolfappliance.com As you follow these instructions, you will notice WARNING and
OVER THE RANGE MICROWAVE OVEN INSTALLATION INSTRUCTIONS
 OVER THE RANGE MICROWAVE OVEN INSTALLATION INSTRUCTIONS Please read all instructions thoroughly before installing the Over the Range Microwave Oven/Hood System. Two people are recommended to install this
INSTALLATION INSTRUCTIONS JDH/C2 DESIGNER SERIES WALL MOUNT HOOD
 WARNING - TO REDUCE THE RISK OF FIRE, USE ONLY METAL DUCTWORK C U L R Read and Save These Instructions All Hoods Must Be Installed By A Qualified Installer INSTALLATION INSTRUCTIONS JDH/C2 DESIGNER SERIES
GE Monogram. Installation. Instructions. Professional Vent Hoods. 48" Models ZV881WSS, ZV891YSS ZV880WSS, ZV890YSS. 36" Models ZV671WSS, ZV681YSS
 GE Monogram Installation Instructions Professional Vent Hoods 48" Models ZV881WSS, ZV891YSS ZV880WSS, ZV890YSS 36" Models ZV671WSS, ZV681YSS ZV670WSS, ZV680YSS 30" Models ZV370YSS, ZV371YSS CAUTION WARNING
INSTALLATION INSTRUCTIONS CWSH3 WALL MOUNT HOOD
 Read and Save These Instructions All Hoods Must Be Installed By A Qualified Installer INSTALLATION INSTRUCTIONS CWSH3 WALL MOUNT HOOD Read All Instructions Thoroughly Before Beginning Installation WARNING
INSTALLATION INSTRUCTIONS EUROLINE/EUROLINE PRO WALL MOUNT HOOD
 WARNING - TO REDUCE THE RISK OF FIRE, USE ONLY METAL DUCTWORK C U L R Read and Save These Instructions All Hoods Must Be Installed By A Qualified Installer INSTALLATION INSTRUCTIONS EUROLINE/EUROLINE PRO
INSTALLATION INSTRUCTIONS EUROLINE/EUROLINE PRO WALL MOUNT HOOD
 WARNING - TO REDUCE THE RISK OF FIRE, USE ONLY METAL DUCTWORK C U L R Read and Save These Instructions All Hoods Must Be Installed By A Qualified Installer INSTALLATION INSTRUCTIONS EUROLINE/EUROLINE PRO
INSTALLATION INSTRUCTIONS K SERIES LINER INSERT
 Read and Save These Instructions All Hoods Must Be Installed By A Qualified Installer INSTALLATION INSTRUCTIONS K SERIES LINER INSERT Read All Instructions Thoroughly Before Beginning Installation WARNING
INSTALLATION INSTRUCTIONS
 ProLine Range Hoods Installation Guide Built-In Interior Power 8 Height Range Hoods ProLine Range Hoods, LLC 750 South 500 West, Suite 00 Salt Lake City, UTAH 845 USA www.prolinehoods.com INSTALLATION
Pro Island Ventilation Hoods
 INSTALLATION GUIDE Pro Island Ventilation Hoods READ AND SAVE THESE INSTRUCTIONS Contents Wolf Pro Island Ventilation Hoods................. 3 Safety Instructions............................ 4 Installation
OVER THE RANGE MICROWAVE OVEN/HOOD SYSTEM INSTALLATION INSTRUCTIONS
 OVER THE RANGE MICROWAVE OVEN/HOOD SYSTEM INSTALLATION INSTRUCTIONS Please read all instructions thoroughly before installing the Microwave Oven/Hood System. Two people are recommended to install this
Overall dimensions (WxHxD in inches): 48 x 18 x x 18 x x 18 x 25
: 48 x 18 x x 18 x x 18 x 25") ON/OFF Professional hoods 48", 36" and 30" restaurant-style hoods 48", 36" and 30" tapered-sided hoods 48", 36" and 30" straight-sided hoods 30" under-cabinet hood ZV48RSFSS, ZV36RSFSS and ZV30RSFSS ZV48TSFSS,
ON/OFF Professional hoods 48", 36" and 30" restaurant-style hoods 48", 36" and 30" tapered-sided hoods 48", 36" and 30" straight-sided hoods 30" under-cabinet hood ZV48RSFSS, ZV36RSFSS and ZV30RSFSS ZV48TSFSS,
Use, Care, and Installation Guide
 Use, Care, and Installation Guide Summit vsu-e30as vsu-e36as Model number: Serial Number: Plateau vpl-e30as vpl-e36as crescent vcr-e30ag vcr-e36ag OCT10.0301 SAFETY NOTICE... 2-3 LIST OF MATERIALS...
***ATTENTION*** PLEASE REMOVE THE RIGHT SIDE BAFFLE FILTER TO LOCATE YOUR NEW REMOTE CONTROL.
 ***ATTENTION*** PLEASE REMOVE THE RIGHT SIDE BAFFLE FILTER TO LOCATE YOUR NEW REMOTE CONTROL. Revised 6/11/18 Copyright 2018 Trade-Wind Manufacturing, LLC Proverbs 22:29 Page 1 Revised 6/11/18 Copyright
VENTILATION SYSTEM WALL MOUNT CHIMNEY HOODS CHIMNEY HOODS FOR CUSTOM BUILT-IN HOODS
 Chimney Hoods & Integrated Ventilation System Features and Specifications INTEGRATED ISLAND MOUNT VENTILATION SYSTEM WALL MOUNT CHIMNEY HOODS CHIMNEY HOODS FOR CUSTOM BUILT-IN HOODS MODEL # JXT8836AD JXT8042AD
(2) Top Support Backing Plates. Passenger/Right Top Bracket. (2) Frame Mounting Brackets. (2) 12mm x 35mm Single Bolt Plates
 Top Support Backing Plates. Passenger/Right Top Bracket. (2) Frame Mounting Brackets. (2) 12mm x 35mm Single Bolt Plates") PARTS LIST: 1 Grille Guard Assembly 6 12-1.75mm Hex Nuts 2 Frame Brackets 4 10-1.50mm x 30mm Hex Bolts 1 Driver/Left Mounting Bracket 8 10mm x 27mm OD x 3mm Flat Washers 1 Passenger/Right Mounting Bracket
PARTS LIST: 1 Grille Guard Assembly 6 12-1.75mm Hex Nuts 2 Frame Brackets 4 10-1.50mm x 30mm Hex Bolts 1 Driver/Left Mounting Bracket 8 10mm x 27mm OD x 3mm Flat Washers 1 Passenger/Right Mounting Bracket
Type of Motor & Blower
 1 INSTALLATION INSTRUCTIONS & USE & CARE GUIDE PMB Series Models PMB Series Models Model PMB02 PMB03 * PMB06 Width & Depth 22 x 12 22 x 12 22 x 12 CFM 240 390 600 Type of Motor & Blower Internal Internal
INSTALLATION INSTRUCTIONS ISLAND LINER INSERT
 Read and Save These Instructions All Hoods Must Be Installed By A Qualified Installer INSTALLATION INSTRUCTIONS ISLAND LINER INSERT Read All Instructions Thoroughly Before Beginning Installation WARNING
RA-7730SS RA-7736SS RA-7742SS RA-7748SS. For residential and indoor use only.
 RA-7730SS RA-7736SS RA-7742SS RA-7748SS For residential and indoor use only. 4 Limited Warranty P.15-P.16 WINDSTER recommends that all kitchen range hood be installed by a certified installer. 27 35 27-35
INSTALLATION INSTRUCTIONS UNDER CABINET HOOD
 Read and Save These Instructions All Hoods Must Be Installed By A Qualified Installer INSTALLATION INSTRUCTIONS UNDER CABINET HOOD Read All Instructions Thoroughly Before Beginning Installation WARNING
! FOR DOMESTIC COOKING ONLY!!
 ALLURE WS3 SERIES ALLURE WS3 SERIES READ AND SAVE THESE INSTRUCTIONS! FOR DOMESTIC COOKING ONLY!! WARNING TO REDUCE THE RISK OF FIRE, ELECTRIC SHOCK, OR INJURY TO PERSONS, OBSERVE THE FOLLOWING: 1. Use
INSTALLATION INSTRUCTIONS 3063 / FORD F-150
 INSTALLATION INSTRUCTIONS 3063 / 3063-2 2009-10 FORD F-150 PARTS LIST: Qty Description Qty Description 1 Grill Guard 4 12mm x 44mm OD Flat Washers 1 Driver/Left Lower Mounting 4 12mm Hex Nut 1 Passenger/Right
INSTALLATION INSTRUCTIONS FORD F-150 2WD & 4WD RETAINS FACTORY TOW HOOKS PART #P3063
 INSTALLATION INSTRUCTIONS FORD F-150 2WD & 4WD RETAINS FACTORY TOW HOOKS PART #P3063 PARTS LIST: 1 Grille Guard 2 10-1.5mm Nylon Lock Nuts 1 Driver/Left Frame Mounting Bracket 4 12mm Plastic Washers 1
brisas Use, Care, and Installation Guide Brisas BMI-E36AG BMI-E36AS BSI-E36AS BVE-E30AS BVE-E36AS Model number: Serial Number:
 brisas by www.zephyronline.com Use, Care, and Installation Guide Brisas BMI-E36AG BMI-E36AS BSI-E36AS BVE-E30AS BVE-E36AS Model number: Serial Number: SEP08.0101 Zephyr Corporation www.zephyronline.com
SPUN ALUMINUM POWER ROOF AND WALL VENTILATORS
 BULLETIN 0 January 007 SPUN ALUMINUM POWER ROOF AND WALL VENTILATORS TYPE ACX / ACXD TYPE ATD / ATDR / ATDW / ATDWR TYPE ATB / ATBR / AWX / AWXR Model ACX Model ATB Model ACXD Model ATDR Model AWX Centrifugal
Viking Installation Guide
 Viking Installation Guide Viking Range orporation Front Street Greenwood, Mississippi 890 US (66) 455-00 For product information, call -888-VIKING (845-464) or visit the Viking Web site at vikingrange.com
INSTALLATION INSTRUCTIONS UNDER CABINET HOOD
 Read and Save These Instructions All Hoods Must Be Installed By A Qualified Installer INSTALLATION INSTRUCTIONS UNDER CABINET HOOD Read All Instructions Thoroughly Before Beginning Installation WARNING
INSTALLATION INSTRUCTIONS K-SERIES UNDER CABINET HOOD
 Read and Save These Instructions All Hoods Must Be Installed By A Qualified Installer INSTALLATION INSTRUCTIONS K-SERIES UNDER CABINET HOOD Read All Instructions Thoroughly Before Beginning Installation
(W) INSTALLATION INSTRUCTIONS 90DEG BENT END SIDEBARS F-150 SUPER CREW CAB PART #DZ /DZ /DZ
 INSTALLATION INSTRUCTIONS 90DEG BENT END SIDEBARS F-150 SUPER CREW CAB PART #DZ /DZ /DZ") (W) INSTALLATION INSTRUCTIONS PART #DZ 371691/DZ 371692/DZ 371693 PARTS LIST: Qty Description Qty Description 1 Driver/Left Sidebar 2 12mm x 45mm Double Bolt Plates 1 Sidebar 4 s 1 Driver/Left Mounting
(W) INSTALLATION INSTRUCTIONS PART #DZ 371691/DZ 371692/DZ 371693 PARTS LIST: Qty Description Qty Description 1 Driver/Left Sidebar 2 12mm x 45mm Double Bolt Plates 1 Sidebar 4 s 1 Driver/Left Mounting
NUTONE RANGE HOOD NTM SERIES
 INSTALLATION INSTRUCTIONS READ AND SAVE THESE INSTRUCTIONS HB0043 NUTONE RANGE HOOD NTM SERIES IMPORTANT SAFETY INSTRUCTIONS IMPORTANT SAFETY INSTRUCTIONS! WARNING TO REDUCE THE RISK OF FIRE, ELECTRIC
INSTALLATION INSTRUCTIONS ISLAND RANGE HOOD
 Read and Save These Instructions All Hoods Must Be Installed By A Qualified Installer INSTALLATION INSTRUCTIONS ISLAND RANGE HOOD Read All Instructions Thoroughly Before Beginning Installation WARNING
INSTALLATION INSTRUCTIONS EUROLINE/EUROLINE PRO ISLAND RANGE HOOD
 WARNING - TO REDUCE THE RISK OF FIRE, USE ONLY METAL DUCTWORK C U L R Read and Save These Instructions All Hoods Must Be Installed By A Qualified Installer INSTALLATION INSTRUCTIONS EUROLINE/EUROLINE PRO
Viking Installation Guide
 iking Installation Guide iking Range orporation Front Street Greenwood, Mississippi 890 US (66) 455-00 For product information, call -888-IKING (845-464) or visit the iking Web site at vikingrange.com
SAFETY INSTRUCTIONS Before installation and operation, read these instructions carefully and use this product only in the manner described by the manu
 Installation Manual RANGE HOOD MODEL: BUF-07W BUF-07P BUF-07W/P TABLE OF CONTENTS Safety Instructions... 2, 3 Name of Parts... 4 Circuit Diagram... 4 Dimensions/Accessories... 5, 6 Range Hood Location...
Installation. Professional Indoor & Outdoor Hoods
 Installation Professional Indoor & Outdoor Hoods VWH53012 / CVWH53012 / VWH53612 / CVWH53612 VWH53048 / CVWH53048 / VWH53648 / CVWH53648 / VWH54248 / CVWH54248 / VWH54848 / CVWH54848 / VWH56048 / CVWH56048
Preparation Advanced Preparations: Be familiar with the controls of the range hood by reading through Range Hood Operations, Page 12. Place the range
 Electrical Requirements IMPORTANT: Observe all governing codes and ordinances. (Please consult with a qualified electrician for 220-Volt 50 Hz voltage) It is the customer s responsibility: To contact a
IMPORTANT INSTRUCTIONS - OPERATING MANUAL
 IMPORTANT INSTRUCTIONS - OPERATING MANUAL AB Series Range Hood READ AND SAVE THESE INSTRUCTIONS READ CAREFULLY BEFORE ATTEMPTING TO ASSEMBLE, INSTALL, OPERATE OR MAINTAIN THE PRODUCT DESCRIBED. PROTECT
INSTALLATION INSTRUCTIONS ISLAND RANGE HOOD
 Read and Save These Instructions All Hoods Must Be Installed By A Qualified Installer INSTALLATION INSTRUCTIONS ISLAND RANGE HOOD Read All Instructions Thoroughly Before Beginning Installation WARNING
Hood. warning. warning. caution
 Range Hood To register this product, visit: www.broan.com model QB130SS read and save these instructions for domestic cooking only Page 1 warning TO REDUCE THE RISK OF Fire, ELECTRIC SHocK, OR injury TO
INSTALLATION INSTRUCTIONS CWEH6-K WALL MOUNT HOOD
 Read and Save These Instructions All Hoods Must Be Installed By A Qualified Installer INSTALLATION INSTRUCTIONS CWEH6-K WALL MOUNT HOOD Read All Instructions Thoroughly Before Beginning Installation WARNING
INSTALLATION INSTRUCTIONS FORD F-150 2WD & 4WD RETAINS FACTORY TOW HOOKS PART #P3063
 INSTALLATION INSTRUCTIONS FORD F-150 2WD & 4WD RETAINS FACTORY TOW HOOKS PART #P3063 PARTS LIST: 1 Grille Guard 2 10-1.5mm Nylon Lock Nuts 1 Driver/Left Frame Mounting Bracket 4 12mm Plastic Washers 1
CEILING AIR INLETS CORROSION PROOF ECONOMICAL DURABLE. Ideal for all Agricultural applications.
 CEILING AIR INLETS CORROSION PROOF ECONOMICAL DURABLE Ideal for all Agricultural applications. These durable ceiling inlets are rotational moulded with high impact polyethylene. They are designed to offer
Training Bulletin New Model Introduction
 GE Monogram GE Consumer Service Training Training Bulletin New Model Introduction October 2001/ TB-14-01 ZV950SDSS Wall-Mount Euro-Style High Performance Vent Hood Purpose To introduce the new wall-mount
Viking Installation Guide
 Viking Installation Guide Viking Range Corporation Front Street Greenwood, Mississippi 890 US (66) 455-00 For product information, call -888-VIKING (845-464) or visit the Viking Web site at vikingrange.com
I N ST R UC T I ON MODEL HVH23 STAND-ALONE EXHAUST HOOD MODELS. FORM (May 2000) S. RIDGE AVENUE TROY, OHIO
 S. RIDGE AVENUE TROY, OHIO") I N ST R UC T I ON MODEL HVH23 STAND-ALONE EXHAUST HOOD S MODELS HVH23 ML-126808 701 S. RIDGE AVENUE TROY, OHIO 45374-0001 937 332-3000 www.hobartcorp.com 1 FORM 34503 (May 2000) R Ansul Fire Supression
I N ST R UC T I ON MODEL HVH23 STAND-ALONE EXHAUST HOOD S MODELS HVH23 ML-126808 701 S. RIDGE AVENUE TROY, OHIO 45374-0001 937 332-3000 www.hobartcorp.com 1 FORM 34503 (May 2000) R Ansul Fire Supression
Installation Instructions
 Installation Instructions Over The Range Microwave Oven BEFORE YOU BEGIN (Read these instructions completely and carefully.) IMPORTANT IMPORTANT Save these instructions for local inspector s use. Observe
INSTRUCTIONS FOR OPERATION
 INSTRUCTIONS FOR OPERATION UK CONTENTS Installation The right position of the absorber plate should be 60cm above the level of your electrical cook burners or 75cm if there are gas burners. The absorber
Viking Installation Guide
 Viking Installation Guide Viking Range Corporation Front Street Greenwood, Mississippi 890 US (66) 455-00 For product information, call -888-VIKING (845-464) or visit the Viking Web site at vikingrange.com
(W) INSTALLATION INSTRUCTIONS GRILLE GUARD 2014 GMC SIERRA 1500 EXCLUDES DENALI PART # /
 INSTALLATION INSTRUCTIONS GRILLE GUARD 2014 GMC SIERRA 1500 EXCLUDES DENALI PART # /") (W) INSTALLATION INSTRUCTIONS GRILLE GUARD PART # 508514/ 508515 PARTS LIST: GRILLE GUARD Qty Description Qty Description 1 Grille Guard Assembly 6 12-1.75mm Hex Nuts 2 Frame Brackets 4 10-1.50mm x 30mm
(W) INSTALLATION INSTRUCTIONS GRILLE GUARD PART # 508514/ 508515 PARTS LIST: GRILLE GUARD Qty Description Qty Description 1 Grille Guard Assembly 6 12-1.75mm Hex Nuts 2 Frame Brackets 4 10-1.50mm x 30mm
MODEL MA4210 Installation and Operation Manual Important:
 MODEL MA4210 Installation and Operation Manual Important: This manual contains specific cautionary statements relative to worker safety. Read this manual thoroughly and follow as directed. It is impossible
Use, Care, and Installation Guide
 Use, Care, and Installation Guide Lateral Wall VLA-E30AS VLA-E36AS Model number: Serial Number: JUN11.0101 SAFETY NOTICE... 2-3 LIST OF MATERIALS... 4 INSTALLATION Ducting Calculation Sheet... 5 Mounting
All (-4) Models 390CFM Code Compliant
 Models 390CFM Code Compliant") INSTALLATION INSTRUCTIONS & USE & CARE GUIDE Trade-Wind Designer Series Liners Designer Series Models Model Width CFM Type of Motor & Blower VSL430 BF 28 3/8 * Remote VSL436 BF 34-3/8 * Remote VSL442 BF
INSTALLATION INSTRUCTIONS & USE & CARE GUIDE Trade-Wind Designer Series Liners Designer Series Models Model Width CFM Type of Motor & Blower VSL430 BF 28 3/8 * Remote VSL436 BF 34-3/8 * Remote VSL442 BF
WARNINGS: Must be followed carefully to avoid personal injury. IMPORTANT: Must be followed carefully to avoid damage or incorrect installation.
 INSTALLATION INSTRUCTIONS & USE & CARE GUIDE Trade-Wind Designer Series Liners Designer Series Models 22 Depth Model Width CFM Type of Motor & Blower VSL436-0-22 BF 34 3/ 8 * Remote VSL442-0-22 BF 40 3/
Connection Diagrams (36" - 48" Widths) Wall Side 1 ¾. Connection Diagram (48" - 60" Widths) (Front View) Connection Diagram (54" - 66" Widths)
 Wall Side 1 ¾. Connection Diagram (48 - 60 Widths) (Front View) Connection Diagram (54 - 66 Widths)") R DESIGNER SERIES WALL MOUNT RANGE HOOD JPH/C2 Series Equipped with LED lighting. Not available with heat lamps. Optional duct covers available in standard and custom sizes. Recommended Mounting Height
R DESIGNER SERIES WALL MOUNT RANGE HOOD JPH/C2 Series Equipped with LED lighting. Not available with heat lamps. Optional duct covers available in standard and custom sizes. Recommended Mounting Height
Repair Parts List DRYER MODEL NUMBER LDG9306ABM. When requesting service or ordering parts, always provide the following information:
 Repair Parts List DRYER MODEL NUMBER LDG9306ABM When requesting service or ordering parts, always provide the following information: - Product Type - Part Number - Model Number - Part Description 2005
Connection Diagrams (36" - 48" Widths) Wall Side 1 ¾. Electrical. Connection Diagram (48" - 60" Widths)
 Wall Side 1 ¾. Electrical. Connection Diagram (48 - 60 Widths)") R DESIGNER SERIES WALL MOUNT RANGE HOOD JDH/C2 Series Equipped with LED lighting. Not available with heat lamps. Optional duct covers available in standard and custom sizes. Recommended Mounting Height
R DESIGNER SERIES WALL MOUNT RANGE HOOD JDH/C2 Series Equipped with LED lighting. Not available with heat lamps. Optional duct covers available in standard and custom sizes. Recommended Mounting Height
WALL MOUNTED PACKAGE AIR CONDITIONER REPLACEMENT PARTS MANUAL W30A1, W36A1. Models: Contents. General Notes. Important.
 REPLACEMENT PARTS MANUAL WALL MOUNTED PACKAGE AIR CONDITIONER Models: W0A, WA General Notes Contents Revised and/or additional pages may be issued from time to time. A complete and current manual consists
When Time Matters! listed Fire Damper
 listed Fire Damper The FAST fire damper is offered as an option for containing fire and smoke under the hood in the event of a fire from a cooking appliance. Construction : The fire damper is assembled
Installation Guide. Professional Indoor and Outdoor Hoods. Viking Range, LLC 111 Front Street Greenwood, Mississippi USA (662)
") Installation Guide Viking Range, LL Front Street Greenwood, Mississippi 890 US (66) 455-00 For product information, call -888-(845-464) or visit the Viking Web site at vikingrange.com Professional Indoor
Installation Guide Viking Range, LL Front Street Greenwood, Mississippi 890 US (66) 455-00 For product information, call -888-(845-464) or visit the Viking Web site at vikingrange.com Professional Indoor
Stovepipe DVL. DuraBlack. Double-wall interior stovepipe for connecting woodstoves to chimney. ULC S641.
 Stovepipe DVL Double-wall interior stovepipe for connecting woodstoves to chimney. ULC S641. Duralack Single-wall interior stovepipe for connecting woodstoves to chimney. Specifications DVL Applications
! FOR DOMESTIC COOKING ONLY!
 TO REDUCE THE RISK OF FIRE, ELECTRIC SHOCK, OR INJURY TO PERSONS, OBSERVE THE FOLLOWING: 1. Use this unit only in the manner intended by the manufacturer. If you have questions, contact the manufacturer
AIR CLEANERS. Model MX 6000 OWNER S MANUAL CAUTION. Read complete instructions before operating. Please file for future reference.
 AIR CLEANERS Model MX 6000 OWNER S MANUAL CAUTION Read complete instructions before operating. Please file for future reference. MODEL MX 6000 SPECIFICATIONS Input Volts: 208-230/460 VAC, 60Hz, 3 Phase
REPLACEMENT PARTS MANUAL
 REPLACEMENT PARTS MANUAL WALL MOUNTED PACKAGED AIR CONDITIONER Models: W1AA-A WAA-A WAA-B WAA-C WAA-D WAA-F General Notes Revised and/or additional pages may be issued from time to time. A complete and
Detroit Speed, Inc. Selecta-Speed Wiper Kit Corvette P/N:
 Detroit Speed, Inc. Selecta-Speed Wiper Kit 1968-72 Corvette P/N: 121621 A downpour of rain will no longer hinder your ability to clearly see the road. The Detroit Speed Selecta-Speed Wiper Kit provides
Use, Care, and Installation Guide
 www.zephyronline.com Use, Care, and Installation Guide Angolo ZAG-E30AG ZAG-M90AG ZAG-E30AG290 ZAG-M90AG290 Model number: Serial Number: Date of Purchase: Sales Dealer: JAN11.0101 2011 Zephyr Corporation
REPLACEMENT PARTS MANUAL
 REPLACEMENT PARTS MANUAL WALL MOUNTED PACKAGED AIR CONDITIONER Models: WAA-A WAA-A WAA-B WAA-C WAA-D WAA-F General Notes Revised and/or additional pages may be issued from time to time. A complete and
Twin City Fan & Blower
 Twin City Fan & Blower BULLETIN 405 April 2009 UPBLAST ROOF, WALL, & KITCHEN EXHAUSTERS TYPE DCRU / DCRUR / DCRW / DCRWR TYPE BCRU / BCRUR / BCRW / BCRWR TYPE BCRUSH (Smoke & Heat) Upblast Roof, Wall,
INSTALLATION INSTRUCTIONS GRILLE GUARD GMC SIERRA 1500 EXCLUDES DENALI PART # 4084/
 INSTALLATION INSTRUCTIONS GRILLE GUARD 14-15 GMC SIERRA 1500 PART # 4084/ 4084-2 PARTS LIST: GRILLE GUARD Qty Description Qty Description 1 Grille Guard Assembly 6 12-1.75mm Hex Nuts 2 Frame Brackets 4
Step 2 Insert the LEGS into the LEG CROSS BARS as shown below. Lock Washer. Long Legs. Wheel Axle. Cotter Pin. Hub Cap. Washer
 Assembly Instructions Step 1 Attach the LONG LEGS and SHORT LEGS to the base, opposite the tank well/hole with two (2) lock washers ½ Bolts as shown below. Lock Washer Long Legs Step 2 Insert the LEGS
MODEL WC1200 Installation and Operation Manual Important:
 MODEL WC1200 Installation and Operation Manual Important: This manual contains specific cautionary statements relative to worker safety. Read this manual thoroughly and follow as directed. It is impossible
READ AND SAVE THESE INSTRUCTIONS. Centrifugal Downblast Exhaust Fan Belt Driven for Roof & Wall Mounting
 READ AND SAVE THESE INSTRUCTIONS INSTALLATION, OPERATING INSTRUCTIONS & PARTS MANUAL Centrifugal Downblast Exhaust Fan Belt Driven for Roof & Wall Mounting Electrical wiring and connections should be done
INSTALLATION INSTRUCTIONS 3 BULL BAR W-BUILT IN LED LIGHT TOYOTA TACOMA
 INSTALLATION INSTRUCTIONS PARTS LIST: 1 3 Bull Bar 4 12mm Hex Nuts 1 Driver/Left Frame Mounting Bracket 2 10-1.50mm x 120mm x 30mm Hex Bolts 1 Passenger/Right Frame Mounting Bracket 2 10mm x 30mm OD x
TECHNICAL INFORMATION
 TECHNICAL INFORMATION Model No. Description DP4010, DP4011 2-Speed Drill 13mm (1/2") L PRODUCT P 1/ 8 CONCEPT AND MAIN APPLICATIONS Models DP4010 and DP4011 have been developed as 13mm (1/2") Drill for
W-VI Series - Internal Make-up Air Wall Canopy
 W-VI Internal Make-up ir Wall Canopy With Diffuser W-VI single shell combination internal make-up air/air curtain canopy constructed of stainless steel where visible and aluminized steel where concealed.
GRAVITY VENTILATORS SIZING
 GRAVITY VENTILATORS SIZING RCXII (sizes 6-20) RCXII (sizes 24-36) RCXII-SF BGH RLX Sizing The tables shown offer quick selections at common static pressure points. Selection choices vary widely due to