User Guide AutoTrans Conveyor. Operation & Service
|
|
|
- Thomasine Conley
- 5 years ago
- Views:
Transcription

1 User Guide AutoTrans Conveyor Operation & Service
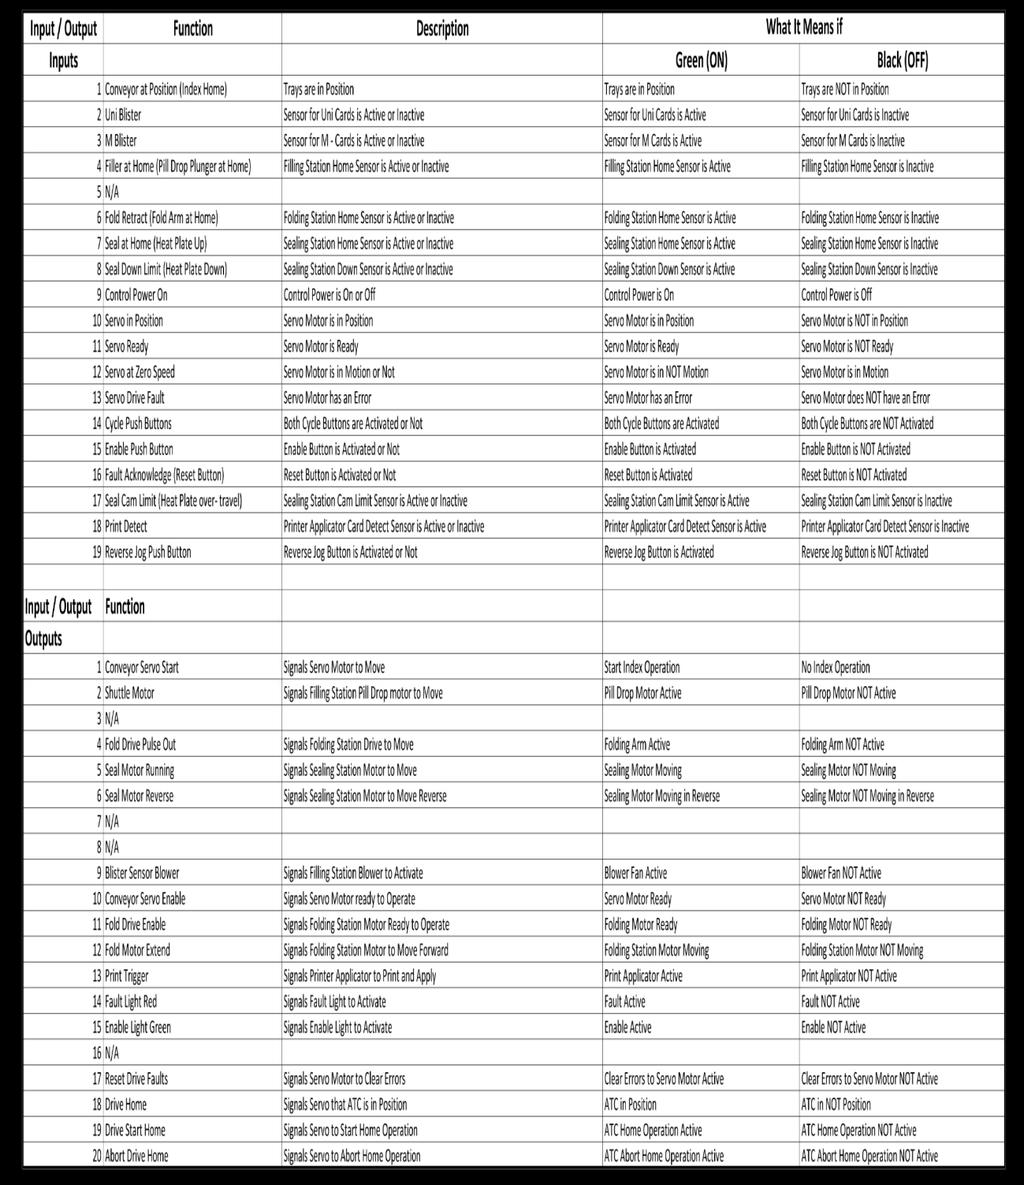
2 Table of Contents 1 Introduction Specifications, Features & Accessories Specifications Features Accessories Identification of Stations Filler Station Identification & Component Parts Folder Station Identification & Component Parts Sealing Station Identification & Component Parts Operator Panel Touchscreen PLC Inputs & Outputs Charts 11 4 Setup, Preparation, Operation & Maintenance Setup Preparation Operation Maintenance Maintenance for Printer Applicator Replacement Parts List Troubleshooting PLC Inputs & Outputs Description 24 7 One Year Warranty Maintenance and Repair History Log...26
3 1 Introduction Rx Systems, Inc. is very pleased you decided to join the growing number of AutoTrans Conveyor owners. Operating the AutoTrans Conveyor, you will appreciate the basic but efficient design of quality components. With proper care and maintenance you can expect years of trouble free service. This User Guide will make you familiar with the features, operating principals, procedures, necessary maintenance and troubleshooting of the Rx Systems AutoTrans Conveyor. Note: Please keep all packaging materials. REPLACEMENT PACKAGING is EXPENSIVE and REQUIRED for shipping. Page 1
4 2 Specifications, Features & Accessories 2.1 Specifications Overall Dimensions: Width: 34 (w/o Applicator or Conveyor), 47 (w/applicator & Conveyor) Length: 84 (w/o Applicator or Conveyor), 135 (w/applicator & Conveyor) Height: 50 (w/o Applicator or Conveyor), 70 (w/applicator & Conveyor) Weight: 650 lbs. (machine only) Electrical: 115 volt, 15 amp 2.2 Features Easy Filling, Folding, Sealing and Label Application Low Maintenance Variable Speed Filling Unique design allows fast & easy adjustment for pill sizes with in 1/64 Standard with 30, 31 or 32 count Setup (60, 62 components available) Includes a wide range of Pill dies Temperature, Time & Pressure are controlled for a consistent seal Air cooled outer shell limits access to heat plate for safety Adjustable Seal Time & Temperature Unique trays reduce moisture Safe two-handed operation Emergency Shut-Off Touch screen interface allows for multiple options and settings Stations (Filler, Folder and Sealer) are easily removed for maintenance or replacement. 2.3 Accessories Printer Applicator Conveyor Belt Pre-pack Reorder Cards Brushes Plate Kits Carrier Trays Catch Tray Page 2

5 3 Identification of Stations 3.1 The AutoTrans Conveyor is comprised of several stations, that each individually has one operation. There are several goals with this type of functionality: Easy to Upgrade / Downgrade to the next generation of machine. Easy to replace single Station if problems arise. With this innovative idea built into this machine, you can expect minimal downtime, and the best operation that fits your pharmacy s needs. Aside from keeping all materials (pill cards and medications) loaded and the collection area clean, the basic form of operating the machine is pressing the two green cycle buttons (on the operator panel) to index the pill card to the next station. Each station will then automatically perform its designed function. Each station is listed below with brief description and its operation. Loading Station: This is where you place a single card ready for packing. Filling Station: This is the module where pills are loaded into the bowl and a pill drop function releases the correct amount of pills into the pill card, based on the count of pill card being used. (ie 30, 60). Page 3
6 Inspection Station: This is where you visually inspect and correct any miss-filled pills. Folding Station: This is where the lid of the pill card gets closed. This prevents any twist of the card and aids the card into the sealing station. Sealing Station: This is where the sealing of the pill card occurs. The temperature is displayed on top left side of the station and the cooling fan keeps this station cool to the touch. Printer Applicator: This is where the card is labeled. There are two possible locations for this station: 1. Station directly after the sealing station which would label the back side of the pill card. 2. Very last station which would label the front of the pill card while it is on the conveyor belt. Operator Panel: This is where the operator controls the main operations of machine and can turn the machine ON, Cycle the Trays, Enable or Disable the machine. Touch Screen: This is the User Control Screen. Almost all controls for the machine can be adjusted here (Station settings / Adjustments, Label Printing). Conveyor Belt: This is where the card is labeled by the Printer Applicator. This station is optional and is only used if labeling on the front of the pill card is necessary. Page 4

7 Functions of the Filling Station and its Controls (more information can be found in section 4) Brush Speed Adjustment knob: This knob adjusts the speed in which the brushes spin. You may need to adjust the Brush Speed for different types of medication. Bowl: Locks the filling plates down and helps keep pills in the filling area, during the filling process. Plate Height Adjustment Dial: This dial adjusts the height of the Center Plate in relation to the Base Plate. You may need to adjust this for different types of medication. Brushes: These push the pills around the Filling Station helping them fall into the plates. These should be cleaned with soap and water when transitioning between medications. Push Bar Plunger: This pushes the Center Plate out, aligning the Center Plate with the Base Plate which fills the card with pills. Brush Height Adjustment Knob: Adjust the height of the brushes with this knob. You may need to adjust the brush height for different types of medication. Bowl Locking Ball: This holds the bowl into place. Blister Sensor: This senses if there is a card in the Filling Station. 1. If this sensor is not active the machine will not fill the cards. 2. This sensor sometimes needs to be wiped with a dry towel. Return Push Bar: This pushes the Center Plate back into the ready position. Page 5

8 Functions of the Folding Station and its Controls Roller Arm: This extends and rolls the lid of the card closed. Hold Down Finger: This holds the card down while the lid is being folded closed. Flapper Assembly: This holds the lid of the card closed after being folded. Page 6
 cool. Exhaust Vent: Allows a path to circulate the air.")
9 Functions of the Sealing Station and its Controls Watlow Temperature Control: This control regulates the temperature of the Sealing process, much like the thermostat for your house. Cooling Fan: This keeps all sealing components (other than heat plate) cool. Exhaust Vent: Allows a path to circulate the air. Page 7

10 Page 8

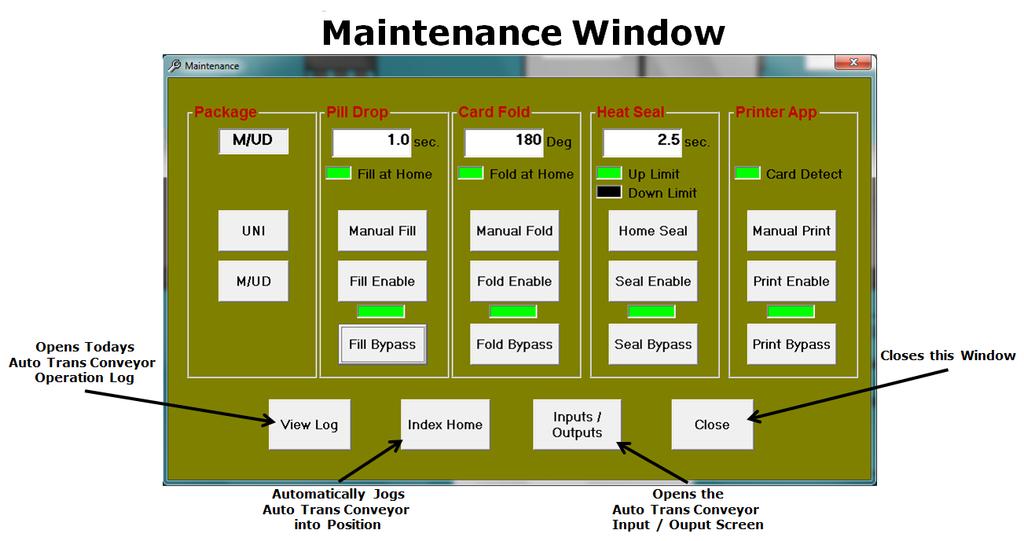
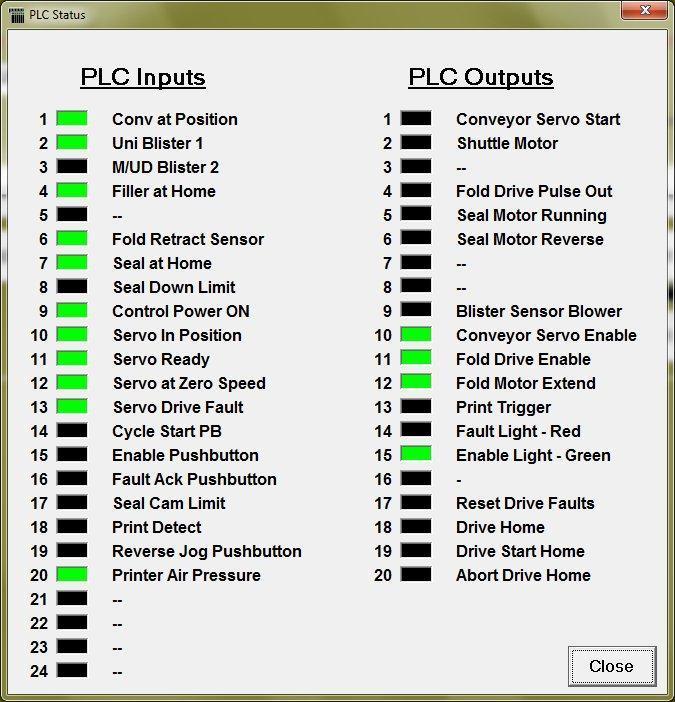
11 Functions of the Touch Screen and its Controls Page 9

12 Page 10
13 Page 11
14 4 Setup, Preparation, Operation & Maintenance 4.1 Setup The AutoTrans Conveyor will automatically Fill, Fold, Seal & Label pill cards at a constant speed and temperature. Initial set-up and one-time adjustments will be installed and completed by an Rx Systems Technician. 4.2 Preparation 1. Plug the AutoTrans Conveyor into a standard 3 prong outlet. It is necessary to use a dedicated 20 amp outlet. a. Plug the Battery Backup into a standard 3 prong outlet. 2. Plug the air line (35 psi) into the quick connect socket for the printer applicator. 3. Turn ON a. AutoTrans Conveyor power switch on right side of Operator Panel b. Computer c. Printer Applicator 4. Allow Heat Sealer to heat up. Your AutoTrans Conveyor sealing temperature is set to 325 degrees Fahrenheit. 5. Open Bartender Label format and test print a label for medication you are packing. a. This should also tell you what plates to select for this medication. b. If not listed, see Filling Plate Selection Understanding the Template System There are three types of templates. Each set of templates has a series of numbers and letters that identify the plate. The plate ID numbers are interpreted below: Top Plates o TP = Top Plate o = Hole / Cavity Count o = Size of the Plate Opening EXAMPLE: TP Top Plate, 30 Cavities,.562 diameter openings Center Plates o CP = Center Plate o = Hole / Cavity Count o C, T or V = Capsule, Tablet or Oval o = Size of the Plate Opening Page 12
15 EXAMPLE: CP 32 T 438 Center Plate, 32 Cavities, Tablet,.438 diameter openings Base Plates o BP = Base Plate o = Hole / Cavity Count o TN, MD or TK = Thin, Medium or Thick o = Size of the Plate Opening EXAMPLE: BP 32 TK 453 Base Plate, 32 Cavities, Thick Plate,.453 diameter openings 6. Install filling plates and adjust height. 7. Enable Machine 8. Test Cycle (without pills) to ensure all stations operational. 9. Load Medication into filling station. Filler Preparation Plate Selection Make sure your plates (Top Plate, Center Plate & Base Plate) are stacked neatly and are clean. Stack the Center Plates (white plates) so that the smallest number is on bottom and the biggest number is on top. Place pill through one of the holes of the Center Plates. Take the last Center Plate that the pill fit through. That will be your Center Plate for tablets. The capsules and caplets will be one or two plates larger. Match up the Center Plate Number on the Filler Plate Chart (Exhibit A), and use the appropriate Top Plate and Base Plate. NOTE: The Plate Chart is only a guide. It is generally correct for most medications. But others may take some experimentation to get the fastest and most thorough filling operation. NOTE: Helpful setup VIDEO can be found at Height Adjustment o Insert the chosen Base Plate and Center Plate into the filling station. o Place pill through one of the holes on the Center Plate. o Adjust height so the top of the pill cannot be touched by the Top Plate. Take the side of Top Plate and scrape the Center Plate over the area of the inserted pill. If the pill does not move, the height is good. If the pill moves, then increase the height more. Do not adjust the height too high or two pills will try and fill at once. Page 13
16 Brushes Pressure o Insert the chosen Top Plate o Install the Filler Bowl o Place pills into the Filler Station o Lower brushes and turn on so the brushes are moving slowly. o Adjust the brush pressure so the brushes push all of the pills around the bowl and into the holes. And so the brush bristles do not go into the holes. Speed o Set brush speed so the pills have enough time to fall into holes. Place Card into Loading / Inspection Station Load Pills into Filler Section Helpful Hints Be sure pills are whole before loading the filler Remove a brush when smaller pills pop out of the AutoFiller. Long capsules may need XL blisters to clear the base plate. See attached drawings for troubleshooting (Exhibit B) or contact us at Page 14

17 Page 15
18 Page 16
19 4.3 Operation 1. Load card & blister into Loading Station. 2. Activate the two Green Cycle Buttons on the Operator Panel. 3. Inspect filled card & blister at Inspection Station. 4. Repeat process at Step Maintenance The filler bowl, plates and brushes can all be cleaned with warm water and soap. Alcohol can also be used as an antiseptic measure after cleaning with warm water and soap. Monthly, the cover should be removed to check for dirt and dust. AS ALWAYS, THE COVER SHOULD NOT BE REMOVED UNTIL THE MACHINE IS COOL (ABOUT 30 MINUTES AFTER BEING SHUT OFF) AND UNPLUGGED. An air hose or a vacuum cleaner can be used to clean. Always remember to wear the appropriate eye protection. Care should be taken not to disconnect any of the internal wiring. The outside of the AutoTrans Conveyor can be cleaned with a window cleaner or similar product. These maintenance suggestions are just that, suggestions. The volume of your work will dictate how often maintenance should be performed. Page 17

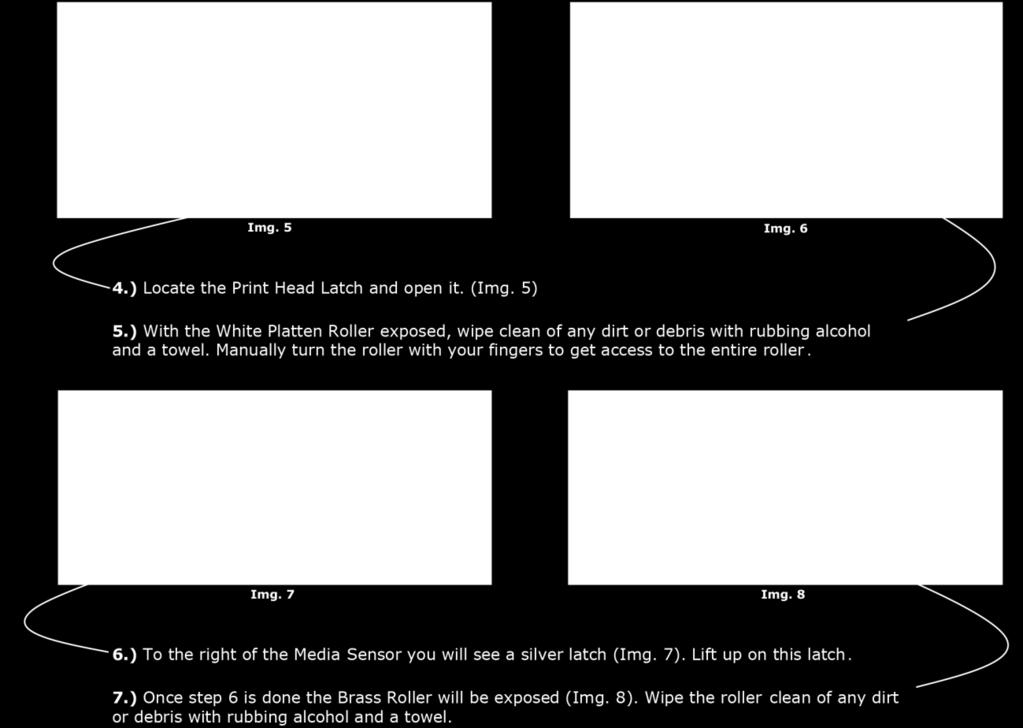
20 4.5 Maintenance for Printer Applicator Page 18
21 Page 19

22 5 Replacement Parts List We recommend using Rx Systems parts to insure reliable operation of equipment. Any use of non-rxs approved parts can void your equipment warranty. Page 20

23 6 Troubleshooting Guide Page 21
24 Page 22
25 Page 23
26 Page 24
27 7 One Year Warranty Rx Systems warrants its AutoTrans Conveyor for one year from the original date of purchase. The warranty covers defects in material and workmanship. Within the applicable warranty period, the AutoTrans Conveyor will be repaired or replaced at Rx Systems discretion. Voided Warranty: In the event an AutoTrans Conveyor is returned for warranty work and is improperly packaged, the warranty may be voided. If you need proper packaging, please call Rx Systems, it is available at a cost and required for shipping. An extended warranty may be purchased. Call Rx Systems sales staff for more information. The information contained herein is based upon our research and believed to be accurate, but the accuracy and completeness of our recommendations is not guaranteed. The user shall determine the suitability of the product for their intended use before using the product and the user assumes all risk and liability whatsoever in connection with the use of the product. Neither seller nor manufacturer shall be liable for any injury, loss or damage, direct or consequential, arising out of the use of or inability to use the product. The following is made in lieu of all warranties, express or implied: Seller s and Manufacturer s only obligation shall be to repair, replace or credit such quantity of the product proved to be defective. Page 25
28 Page 26
Part No DROP IN POPCORN WARMERS Instruction Manual Model #2343, 2344, 2345
 Part No. 39406 DROP IN POPCORN WARMERS Instruction Manual Model #2343, 2344, 2345 SAFETY PRECAUTIONS 2 INSTALLATION INSTRUCTIONS Inspection of Shipment: Unpack all cartons and check thoroughly for any
Submersible Pond Pump with UV 800 Gallons Per Hour
 Submersible Pond Pump with UV 800 Gallons Per Hour REMINDER CALL 1-888-755-6750 BEFORE RETURNING TO STORE. PACKAGE CONTENTS ITEM #PP800UV Questions, problems, missing parts? Before returning to your retailer,
RENA AF371Feeder Operating Manual. Feeder. Operating Manual. Manual Part #: M AF371 Operations Rev
 Manual Part #: M-3022 Feeder AF371 Operations Rev. 3-16-04 1 RENA AF371 Feeder YOUR RENA AF371 IS DISTRIBUTED BY RENA SYSTEMS INC. SERVICE AND SUPPORT FOR THIS PRODUCT IS PROVIDED BY YOUR RENA DEALER.
Blue Air. Commercial Refrigeration Inc. Installation & Operation Manual Chef Bases
 Blue Air Commercial Refrigeration Inc. Installation & Operation Manual Chef Bases Please read this manual completely before installing or operating this unit! BACB53 BACB71 BACB74 BACB83 BACB86 BACB96
SPECIFICATIONS CONTENTS:
 Model 3052A 1,100 Lbs Air Assist 2 Stage Transmission Jack INSTRUCTION MANUAL CONTENTS: Page 1 Specifications Page 2 Warning Information Page 3 Assembly Page 4 Operating Instructions Page 4 Preventative
A/C PRESSURE MONITOR INSTALLATION INSTRUCTIONS SYSTEM OPERATION GREEN INDICATOR LIGHT
 A/C PRESSURE MONITOR INSTALLATION INSTRUCTIONS Do not attempt to clean or inspect anything while the engine is running. Cleaning and inspection must be done by a certified mechanic. All A/C service must
Dispenser & Warmer RIC-1909 RIC-1909EXP
 Dispenser & Warmer RIC-1909 RIC-1909EXP Safety Precautions CAUTION This equipment is designed and sold for commercial use only. This equipment is not to be used by the consumer in home use. Do not allow
AEROMOTIVE Part # INSTALLATION INSTRUCTIONS
 AEROMOTIVE Part # 16303 INSTALLATION INSTRUCTIONS CAUTION: Installation of this product requires detailed knowledge of automotive systems and repair procedures. We recommend that this installation be carried
IMPORTANT! DO NOT THROW AWAY THE SHIPPING CARTON AND PACKING MATERIAL
 Operator s Manual IMPORTANT! DO NOT THROW AWAY THE SHIPPING CARTON AND PACKING MATERIAL ii Table of Contents Operator Safety... 1 Introduction... 2 Unpacking and Setup... 3 Unpacking... 3 Setup... 4 ROCKET
Auto Sentry-eXP Maintenance. Revised 12/21/07
 Auto Sentry-eXP Maintenance Revised 12/21/07 Maintenance Procedures for Auto Sentry exp Bill Dispenser Credit Card Reader Bill Acceptor Bill Dispenser Maintenance Bill Dispenser Problem / Cause Bill Dispenser
AEROMOTIVE Part # INSTALLATION INSTRUCTIONS
 AEROMOTIVE Part # 14102 INSTALLATION INSTRUCTIONS CAUTION: Installation of this product requires detailed knowledge of automotive systems and repair procedures. We recommend that this installation be carried
Premium Waterfall Pump 1200 Gallons Per Hour
 Premium Waterfall 1200 Gallons Per Hour REMINDER CALL 1-888-755-4497 BEFORE RETURNING TO STORE. MODEL #PWP1200 Questions, problems, missing parts? Before returning to your retailer, call our customer service
SPECIFICATIONS CONTENTS:
 Model 3052 1,100 Lbs 2 Stage Transmission Jack INSTRUCTION MANUAL CONTENTS: Page 1 Specifications Page 2 Warning Information Page 3 Assembly Page 4 Operating Instructions Page 4 Preventative Maintenance
8" - 12" Hydraulic Steel Squeeze Off Tool
 8" - 12" Hydraulic Steel Squeeze Off Tool ECN 19130 C812S Hydraulic Steel Squeeze Off Tool for Steel Pipe Page 1 of 8 This Footage Tools C812S Steel Squeeze Off Tool is sold with one pump configuration
Bag-In-A-Box Oil Pump System
 Bag-In-A-Box Oil Pump System Part No. 79285 Revised February 2000 INSTRUCTION MANUAL MODEL #2257 AND MODEL #2257H Cincinnati, OH 45241-4807 USA e-mail: goldme19@eos.net www.gmpopcorn.com SAFETY PRECAUTIONS
Installation & Operation Manual Chef Base
 Installation & Operation Manual Chef Base Please read this manual completely before installing or operating this unit! BACB53 BACB53M BACB71 BACB71M BACB74 BACB74M BACB83 BACB83M BACB86 BACB86M BACB96
Premium Pond Pump 330 Gallons Per Hour
 Premium Pond 330 Gallons Per Hour REMINDER CALL 1-888-755-4497 BEFORE RETURNING TO STORE. MODEL #PDP330 Questions, problems, missing parts? Before returning to your retailer, call our customer service
TRAILER WINCH MODELS ST315 AND ST712. General Safety (Continued) Description. Unpacking. General Safety Information.
 Description. Unpacking. General Safety Information.") OPERATION AND MAINTENANCE MANUAL TRAILER WINCH READ CAREFULLY BEFORE ATTEMPTING TO ASSEMBLE, INSTALL, OPERATE OR MAINTAIN THE PRODUCT DESCRIBED. PROTECT YOURSELF AND OTHERS BY OBSERVING ALL SAFETY INFORMATION.
OPERATION AND MAINTENANCE MANUAL TRAILER WINCH READ CAREFULLY BEFORE ATTEMPTING TO ASSEMBLE, INSTALL, OPERATE OR MAINTAIN THE PRODUCT DESCRIBED. PROTECT YOURSELF AND OTHERS BY OBSERVING ALL SAFETY INFORMATION.
AEROMOTIVE Part # INSTALLATION INSTRUCTIONS
 AEROMOTIVE Part # 16303 INSTALLATION INSTRUCTIONS CAUTION: Installation of this product requires detailed knowledge of automotive systems and repair procedures. We recommend that this installation be carried
Adjustable Angled Incline Conveyor Owners Manual with Operating Instructions
 Adjustable Angled Incline Conveyor Owners Manual with Operating Instructions Revision 012211 Table of Contents Basic Conveyor Features 3 Getting Started 4 Setting Up the Incline Conveyor 5 Belt Removal
In-Line Linear Actuator
 In-Line Linear Actuator Operating Instructions 12 Volt DC Input Australian Gas Springs - LiftEasy Actuators Address: 29 Tower Court Noble Park Victoria 3174 Australia Telephone: +61 3 9769 0288 Fax: +61
Pressurized Pond Filter Up to 850 gallons
 Pressurized Pond Filter Up to 850 gallons REMINER CALL 1-888-755-4497 EFORE RETURNING TO STORE. MOEL/MOELO #PZF850 Questions, problems, missing parts? efore returning to your retailer, call our customer
AEROMOTIVE Part # L Ford F L Ford Expedition L Ford F-250 Super Duty INSTALLATION INSTRUCTIONS
 AEROMOTIVE Part # 14118 97-03 5.4L Ford F-150 97-02 5.4L Ford Expedition 98-03 5.4L Ford F-250 Super Duty INSTALLATION INSTRUCTIONS CAUTION: Installation of this product requires detailed knowledge of
RCL-7A. User s Guide. Battery Charging Station. Technology in Depth
 RCL-7A Battery Charging Station User s Guide Technology in Depth - NOTICE - This manual and the information contained herein are provided for use as a maintenance and operation guide. No license or rights
AEROMOTIVE Part # & ½ L DOHC Return Style Fuel System Kit INSTALLATION INSTRUCTIONS
 AEROMOTIVE Part # 17145 & 17146 98 ½-04 4.6L DOHC Return Style Fuel System Kit INSTALLATION INSTRUCTIONS CAUTION: Installation of this product requires detailed knowledge of automotive systems and repair
For BLOWER INSTALLATION, OPERATION & MAINTENANCE INSTRUCTIONS
 www.purafil.com FIRST IN CLEAN AIR SERVICE GUIDE For BLOWER ASSEMBLY INSTALLATION, OPERATION & MAINTENANCE INSTRUCTIONS Purafil, Inc. 2654 Weaver Way, Doraville, Georgia, 30340, U.S.A. www.purafil.com
AEROMOTIVE Part # L Ford F L Ford Expedition L Ford F-250 Super Duty INSTALLATION INSTRUCTIONS
 AEROMOTIVE Part # 14118 97-03 5.4L Ford F-150 97-02 5.4L Ford Expedition 98-03 5.4L Ford F-250 Super Duty INSTALLATION INSTRUCTIONS CAUTION: Installation of this product requires detailed knowledge of
CLEAN ROOM DEVICES, LLC "WHERE TUBING AND FITTINGS COME TOGETHER"
 CLEAN ROOM DEVICES, LLC "WHERE TUBING AND FITTINGS COME TOGETHER" CRD600AF Automatic Fitting Inserter With Auto Feed OPERATIONS MANUAL (Shown with optional alcohol dispenser) 1 VERSION 1.1 LAST EDITED
ST-70 CONTROL OPERATING MANUAL REVISION DATE: PART#:
 ST-70 CONTROL OPERATING MANUAL REVISION DATE: 05-15-07 PART#: 98-0002-09 SERVICE & CUSTOMER INFORMATION CUSTOMER MUST HAVE PART NUMBER WHEN ORDERING ITEMS THROUGH THE SERVICE DEPARTMENT. IF FURTHER HELP
SUBMERSIBLE MINI-PUMP
 SUBMERSIBLE MINI-PUMP Model 41287 Set up And Operating Instructions Diagrams within this manual may not be drawn proportionally. Due to continuing improvements, actual product may differ slightly from
Customer Support
 Portable auxiliary air tanks owner's Manual aux05 aux05a aux10 WWW.CALIFORNIAAIRTOOLS.COM Customer Support 1-866-409-4581 TAbLe OF CONTeNTS INTROduCTION IntroductIon Important Safety InStructIonS components
Condensate Pump. Installation and Safety Instructions CP-22 CP CP-22LP CP-22LP-230
 Condensate Pump Installation and Safety Instructions CP-22 CP-22-230 CP-22LP CP-22LP-230 CP-22 CP-22LP CP-22T CP-22LPT CP-22-230 CP-22LP-230 CP-22T-230 CP-22LPT-230 Rated Voltage 120 Volts / 60 Hz 220
Electrically Released Motor Brake Module for EM-MBFB and EUM-MBFB Size 50, 100, 180
 Electrically Released Motor Brake Module for EM-MBFB and EUM-MBFB Size 50, 100, 180 P-273-8-WE 819-0531 Installation Instructions Vented Enclosed Version Optional Warner Electric s MBFB series of Electrically
AEROMOTIVE Part # /2 4.6L SOHC Ford Fuel Rail Kit INSTALLATION INSTRUCTIONS
 AEROMOTIVE Part # 14125 96-98 1/2 4.6L SOHC Ford Fuel Rail Kit INSTALLATION INSTRUCTIONS CAUTION: Installation of this product requires detailed knowledge of automotive systems and repair procedures. We
Illumifalls Patio Pond
 Illumifalls Patio Pond REMINDER CALL 1-888-755-4497 BEFORE RETURNING TO STORE. Questions, problems, missing parts? Before returning to your retailer, call our customer service department at 1-888-755-4497,
 Product Name: Product Description: Product Number: Comp-Gate40 40mm External TS-0505-1XXX ------------------------------------------------------------------------------------------------------------------------
Low-Water Auto Shutoff Pump with Light 300 Gallons Per Hour
 Low-Water Auto Shutoff Pump with Light 300 Gallons Per Hour REMINDER ALL 1-888-755-4497 BEFORE RETURNING TO STORE. MODEL #FP300ASL Questions, problems, missing parts? Before returning to your retailer,
AEROMOTIVE Part # & Mustang 5.0L Fuel System Kit INSTALLATION INSTRUCTIONS
 AEROMOTIVE Part # 17105 & 17106 86-93 Mustang 5.0L Fuel System Kit INSTALLATION INSTRUCTIONS CAUTION: Installation of this product requires detailed knowledge of automotive systems and repair procedures.
Pressure Sealer ES-5000 ES User Manual. <Rev >
 ES-5000 User Manual 1 1. Introduction Table of Contents 2. Installation 3. Features 1) Specifications 2) General views 4. How to Operate 1) Form Preparation 2) Loading forms 3) Start 4)
AEROMOTIVE Part # GM LS1 Fuel Rails INSTALLATION INSTRUCTIONS
 AEROMOTIVE Part # 14106 GM LS1 Fuel Rails INSTALLATION INSTRUCTIONS CAUTION: Installation of this product requires detailed knowledge of automotive systems and repair procedures. We recommend that this
Wood Chipper Model C550M Operator's Manual
 Wood Chipper Model C550M Operator's Manual THIS MANUAL MUST BE READ AND UNDERSTOOD BEFORE ANYONE OPERATES THIS MACHINE! Manual# 990023 Revised 01/2010 YOU MUST FILL OUT YOUR WARRANTY REGISTRATION TO ACTIVATE
Positive Stop Control. Prod. No.: , Part No.: Dimensions: 12 1/4" wide x 6 1/4"deep x 17 3/4" high Weight: 57 lbs.
 Positive Stop Control Prod. No.: 780-0050, Part No.: 77 Dimensions: 12 1/" wide x 6 1/"deep x 17 3/" high Weight: 57 lbs. (with stand) Pump Specifications All pumps maximum rated working pressure: 10,000
Gen 2 Electrically Released Motor Brake Module for EM-MBFB and EUM-MBFB
 Gen 2 Electrically Released Motor Brake Module for EM-MBFB and EUM-MBFB P-273-8 819-0531 Installation Instructions Vented Enclosed Version Optional An Altra Industrial Motion Company Warner Electric s
FD Conveyor for FD 260 Tabber
 FD 260-20 Conveyor for FD 260 Tabber Operator Manual 1/2011 First Edition TABLE OF CONTENTS 1. INTRODUCTION... 1 1.1 FD 260-20 DESCRIPTION... 1 1.2 ITEMS INCLUDED... 1 1.3 OPERATING MANUAL SAFETY TERMS...
Natural Fiber Planter Fountain
 Natural iber Planter ountain REMINDER CALL 1-888-755-5641 BEORE RETURNING TO STORE. PACKAGE CONTENTS Questions, problems, missing parts? Before returning to your retailer, call our customer service department
AEROMOTIVE Part # C5 Corvette Fuel Rail / Regulator Kit INSTALLATION INSTRUCTIONS
 AEROMOTIVE Part # 14129 99-04 C5 Corvette Fuel Rail / Regulator Kit INSTALLATION INSTRUCTIONS CAUTION: Installation of this product requires detailed knowledge of automotive systems and repair procedures.
General Installation Instructions for Valves and Gates
 General Installation Instructions for Valves and Gates Thank you for your purchase of a Lorenz valve. We appreciate your business! Please read this installation manual and follow recommended safety precautions.
Contrail Rockets 98mm Hybrid Rocket Motor Reload Instruction Manual
 Contrail Rockets 98mm Hybrid Rocket Motor Reload Instruction Manual Congratulations on your purchase of a Contrail Rockets 98mm Hybrid Reload. The supplied motor reload has been designed to operate in
International Scout Traveler Installation Instructions
 International Scout Traveler Installation Instructions Tools needed: 9/64 drill bit 1/8 drill bit #2 Philips bit for drill Tape measure Pencil Drill #3 Philips Screwdriver #2 Philips Screwdriver Utility
Reach ins, Freeezers & Refrigerators Installation & Operation Manual
 Reach ins, Freeezers & Refrigerators Installation & Operation Manual BSR23 BSF23 BSR49 BSF49 BSR72 BSF72 IMPORTANT SAFETY INSTRUCTIONS (SAVE THESE INSTRUCTIONS) Visit us on the web at www.blueairinc.com
Automotive Air Conditioning Manifold Gauge Sets
 Automotive Air Conditioning Manifold Gauge Sets 1 Caution: These instructions are not for use with Hybrid Vehicles. For instructions for servicing Hybrid Vehicles use Hybrid Vehicle manufacturer s service
TOTALIZER-TRANSMITTER
 TOTALIZER-TRANSMITTER MODEL TR04-2 OPERATION AND MAINTENANCE MANUAL PARTS LIST FEATURING: *SEALED HOUSING *STANDARD TOTALIZER ASSEMBLY *MAGNETICALLY ACTUATED REED SWITCH 3255 WEST STETSON AVENUE HEMET,
Presoak & Tire/Engine Cleaner Systems (Air Pump) DU TC_A & DU PS_A
 DU TC_A & DU PS_A") Presoak & Tire/Engine Cleaner Systems (Air Pump) DU TC_A & DU PS_A Owner s Manual #0795 Customer Number: Model Number: Serial Number: Installation Date: IMPORTANT Please read and u n d e r s t a n d t
Presoak & Tire/Engine Cleaner Systems (Air Pump) DU TC_A & DU PS_A Owner s Manual #0795 Customer Number: Model Number: Serial Number: Installation Date: IMPORTANT Please read and u n d e r s t a n d t
AEROMOTIVE Part # Ford 5.4L Shelby GT500 Mustang INSTALLATION INSTRUCTIONS
 AEROMOTIVE Part # 14144 07 Ford 5.4L Shelby GT500 Mustang INSTALLATION INSTRUCTIONS CAUTION: Installation of this product requires detailed knowledge of automotive systems and repair procedures. We recommend
INSTALLATION GUIDE. Universal System for Zero Turn Mowers
 INSTALLATION GUIDE Universal System for Zero Turn Mowers Table of Contents General Information 1 Important Notice to Purchaser 2 Specifications 2 Intended Usage 2 Important Information 3 General Safety
Mechanical Filter Pump Kit Up to 500 gallons
 Mechanical Filter Pump Kit Up to 500 gallons REMINDER CALL 1-888-755-6750 BEFORE RETURNING TO STORE. ITEM #FM002P Questions, problems, missing parts? Before returning to your retailer, call our customer
TOOLS REQUIRED General mechanic tools
 Product Name: Product Description: Product Number: BOOST TEE Manual Boost Controller TS-0101-1001 ------------------------------------------------------------------------------------------------------------------------
AEROMOTIVE Part # C5 Corvette Fuel Rail Kit INSTALLATION INSTRUCTIONS
 AEROMOTIVE Part # 14128 99-04 C5 Corvette Fuel Rail Kit INSTALLATION INSTRUCTIONS CAUTION: Installation of this product requires detailed knowledge of automotive systems and repair procedures. We recommend
MAGNETOGRAPHIC PRINTER
 MAGNETOGRAPHIC PRINTER DF Argos Web Cleaning Station Document release : Rev0 Oct 2010 Creation. Rev1 Nov 2012 Update NIPSON Technology SAS 12, avenue des Trois Chênes - Techn hom 3-90000 Belfort - France
installation and operating instructions for the following xtreme Battery chargers:
 installation and operating instructions for the following xtreme Battery chargers: Model Name No. of Banks Amps Per Bank Battery System Dual Pro SE Xtreme Dual Pro Xtreme Three Bank SE Xtreme Three Bank
SUPRA JZA80 TWIN TURBO BLOW-OFF VALVE ADAPTOR INSTRUCTIONS
 IMPORTANT NOTES ON FITTING YOUR SUPRA TWIN TURBO ADAPTOR Turbosmart recommends that your Blow Off Valve (BOV) and Adaptor kit is fitted by an appropriately qualified technician. ADAPTOR KIT CONTENTS Please
AEROMOTIVE Part # L 4V Fuel Rails INSTALLATION INSTRUCTIONS
 AEROMOTIVE Part # 14130 5.0L 4V Fuel Rails INSTALLATION INSTRUCTIONS CAUTION: Installation of this product requires detailed knowledge of automotive systems and repair procedures. We recommend that this
Model GX Spray Gun
 "Teamwork & Communication" Model GX-7-400 Spray Gun Parts Identification Manual 17943-ID May 24, 1999 Issue 2 GUSMER CORPORATION A Subsidiary of Gusmer Machinery Group, Inc. One Gusmer Drive Lakewood,
AEROMOTIVE Part # Ford 5.0 Liter INSTALLATION INSTRUCTIONS
 AEROMOTIVE Part # 14101 86-98 Ford 5.0 Liter INSTALLATION INSTRUCTIONS CAUTION: Installation of this product requires detailed knowledge of automotive systems and repair procedures. We recommend that this
INSPECTOR LINE LOAD SIMULATOR INSTRUCTION MANUAL TASCO, INC.
 INSPECTOR LINE LOAD SIMULATOR INSTRUCTION MANUAL INS120P TASCO, INC. THIS TESTER IS DESIGNED FOR USE ONLY BY QUALIFIED ELECTRICIANS. IMPORTANT SAFETY WARNINGS mwarning Read and understand this material
Contrail Rockets 54mm Hybrid Rocket Motor Reload Instruction Manual
 Contrail Rockets 54mm Hybrid Rocket Motor Reload Instruction Manual Congratulations on your purchase of a Contrail Rockets 54mm Hybrid Reload. The supplied motor reload has been designed to operate in
Operators Manual. Recirculating Chiller /06/08
 Operators Manual Recirculating Chiller 110-197 11/06/08 Table of Contents Section 1. General Information 1.1 Warranty 1.2 Unpacking 1.3 Package Contents 1.4 Description of the Recirculating Chiller 1.5
MANUAL Model: PT 12/24-60 Solar Converters Inc. - Rev. F
 1.0 Specification MANUAL Model: PT 12/24-60 Solar Converters Inc. - Rev. F Note: This unit is a Multi - Voltage unit with adjustable input panel and output battery adjustment. Please review the section
ValveSentry USER S MANUAL REVISED 8/6/16 IMPORTANT! PLEASE READ CAREFULLY AND SAVE
 ValveSentry USER S MANUAL REVISED 8/6/16 IMPORTANT! PLEASE READ CAREFULLY AND SAVE This user s manual contains important information about your ValveSentry device s operation. If you are installing this
HI/LO CYLINDER (Y SERIES) INSTALLATION, OPERATING & MAINTENANCE MANUAL
 INSTALLATION, OPERATING & MAINTENANCE MANUAL") HI/LO CYLINDER (Y SERIES) INSTALLATION, OPERATING & MAINTENANCE MANUAL 545 Hupp Avenue Jackson, Michigan 49204 Ph: 517-787-9444 Fx: 517-787-7585 www.airhydraulics.com info@airhydraulics.com Serial No.
HI/LO CYLINDER (Y SERIES) INSTALLATION, OPERATING & MAINTENANCE MANUAL 545 Hupp Avenue Jackson, Michigan 49204 Ph: 517-787-9444 Fx: 517-787-7585 www.airhydraulics.com info@airhydraulics.com Serial No.
AEROMOTIVE Part # / L SOHC Ford Fuel Rail Kit INSTALLATION INSTRUCTIONS
 AEROMOTIVE Part # 14119 98 1/2-04 4.6L SOHC Ford Fuel Rail Kit INSTALLATION INSTRUCTIONS CAUTION: Installation of this product requires detailed knowledge of automotive systems and repair procedures. We
AEROMOTIVE Volkswagen 1.8T Fuel Rail Part # INSTALLATION INSTRUCTIONS
 AEROMOTIVE Volkswagen 1.8T Fuel Rail Part # 14163 INSTALLATION INSTRUCTIONS CAUTION: Installation of this product requires detailed knowledge of automotive systems and repair procedures. We recommend that
Mechanical Filter Box Kit
 Mechanical Filter Box Kit REMINDER CALL 1-888-755-4497 BEFORE RETURNING TO STORE. MODEL #MFBX500P Questions, problems, missing parts? Before returning to your retailer, call our customer service department
Countertop B.I.B. Butter Dispenser Instruction Manual Model #2496
 Part No. 39177 Countertop B.I.B. Butter Dispenser Instruction Manual Cincinnati, OH 45241-4807 USA SAFETY PRECAUTIONS Installation Instructions Countertop B.I.B. Checking Shipment Unpack all cartons and
Gay 90 s Whiz Bang. Instruction Manual Model #2014. Cincinnati, OH USA. Part No Revised June 1996
 Gay 90 s Whiz Bang Instruction Manual Model #2014 Part No. 47700 Revised June 1996 Cincinnati, OH 45241-4807 USA SAFETY PRECAUTIONS INSTALLATION Your new Antique Popcorn Machine is completely assembled.
Mudhen Portable Slurry System Owners Manual
 Mudhen Portable Slurry System Owners Manual Industrial Contractors Supplies, Inc. 412. 824. 6933 www.icscompany.net Mudhen Manual Page 1 MUDHEN MANUAL 1 Disclaimer & Safety Notice 2 2 Safety Notice 3 3
LBT-3 WITH 300 CFM RECLAIM MANUAL NUMBER: 506 TABLE OF CONTENTS
 LITTLE BLASTER LITTLE BLASTER LBT-3 WITH 300 CFM RECLAIM MANUAL NUMBER: 506 TABLE OF CONTENTS PAGE FIGURE 1 - SET-UP INSTRUCTIONS 1 - OPERATING INSTRUCTIONS 1 - GENERAL MAINTENANCE 2 1 STANDARD CABINET
ACF Operation Manual
 ACF-3000 Operation Manual MAHLE Aftermarket Inc., RTI Division 10 Innovation Drive York, Pennsylvania 17402 USA Phone: 717-840-0678 Toll Free: 800-468-2321 Web-site: www.rtitech.com Manual P/N: 035 81825
FLAT BENCH OWNER S MANUAL QUESTIONS? CAUTION. Visit our website at.
 Model No. GZFW21410 Serial No. Write the serial number in the space above for future reference. Serial Number Decal QUESTIONS? As a manufacturer, we are committed to providing complete customer satisfaction.
SOARER TT BLOW-OFF VALVE ADAPTOR INSTRUCTIONS
 IMPORTANT NOTES ON FITTING YOUR BOV SOARER TWIN TURBO ADAPTOR Turbosmart recommends that your Blow Off Valve (BOV) and Adaptor kit is fitted by an appropriately qualified technician. ADAPTOR KIT CONTENTS
Dual Phase Extraction Inlet. Patent No Installation Manual. P/N Rev
 Patent No. 6520259 Installation Manual P/N 95232 Rev 6-16-11 Table of Contents ing Extraction Inlets track changing water levels to maintain optimum performance 1.Component Identification Page 1 2. How
CRD610 Automatic Fitting Inserter
 CRD610 Automatic Fitting Inserter OPERATIONS MANUAL VERSION 1.2 LAST EDITED 12.12.2018 cleanroomdevices.com 1 Table of Contents Title Page. 1 Table of Contents...2 1.0 General Product & Safety Information....3
CLEAN ROOM DEVICES, LLC "WHERE TUBING AND FITTINGS COME TOGETHER"
 CLEAN ROOM DEVICES, LLC "WHERE TUBING AND FITTINGS COME TOGETHER" CRD600 Automatic Fitting Inserter OPERATIONS MANUAL VERSION 2.1 LAST EDITED 7.25.14 DOCUMENT NUMBER 001 cleanroomdevices.com 1 Table of
SEMI-AUTOMATIC MEAT SLICER
 MS-10 SEMI-AUTOMATIC MEAT SLICER This manual contains important information regarding your Supera unit. Please read this manual thoroughly prior to equipment set-up, operation and maintenance. Failure
AEROMOTIVE Part # and F-Body Fuel System Kit INSTALLATION INSTRUCTIONS
 AEROMOTIVE Part # 17101 and 17102 93-97 F-Body Fuel System Kit INSTALLATION INSTRUCTIONS CAUTION: Installation of this product requires detailed knowledge of automotive systems and repair procedures. We
AEROMOTIVE Part # Ford 5.4L GT500 Shelby Mustang Fuel Rail Kit INSTALLATION INSTRUCTIONS
 AEROMOTIVE Part # 14145 07 Ford 5.4L GT500 Shelby Mustang Fuel Rail Kit INSTALLATION INSTRUCTIONS CAUTION: Installation of this product requires detailed knowledge of automotive systems and repair procedures.
SUPRA JZA80 TWIN TURBO BLOW-OFF VALVE ADAPTOR INSTRUCTIONS
 IMPORTANT NOTES ON FITTING YOUR SUPRA TWIN TURBO ADAPTOR Turbosmart recommends that your Blow Off Valve (BOV) and Adaptor kit is fitted by an appropriately qualified technician. ADAPTOR KIT CONTENTS Please
Submersible Waterfall Pump 1200 Gallons Per Hour
 ITEM # LL1200 Submersible Waterfall Pump 1200 Gallons Per Hour REMINDER CALL 1-888-412-6001 EFORE RETURNING TO STORE. PACKAGE CONTENTS Questions, problems, missing parts? efore returning to your retailer,
Drip-n-Gro Dual Top Feed Drip System Instruction Manual
 Notes: Hydrogardening Bucket Systems Drip-n-Gro Dual Top Feed Drip System Instruction Manual 1 Square = 1 Foot Exclusively distributed by: Exclusively distributed by: www.sunlightsupply.com www.flo-n-gro.net
AEROMOTIVE Part # Mustang 5.0L Fuel System Kit INSTALLATION INSTRUCTIONS
 AEROMOTIVE Part # 17103 83-93 Mustang 5.0L Fuel System Kit INSTALLATION INSTRUCTIONS CAUTION: Installation of this product requires detailed knowledge of automotive systems and repair procedures. We recommend
 Product Name: Product Description: Product Number: IWG75 Twin Port Twin Port Internal Wastegate Actuator TS-06XX-XXXX ----------------------------------------------------------------------------------------------------------------
ME310B BATTERY POWERED CRIMP TOOL
 Description The ME310B Battery Powered Crimp Tool is a hand held, self contained crimp tool intended to crimp machined contacts onto copper and aluminum cable. KEEP THIS MANUAL Important Safety Information
AFE8B BATTERY POWERED CRIMP TOOL
 Description The AFE8B Battery Powered Crimp Tool is a hand held, self contained crimp tool intended to crimp machined contacts onto copper and aluminum cable. KEEP THIS MANUAL Important Safety Information
Circus Playset CAUTION ELECTRIC TOY
 72-1918-250 06/99 INSTRUCTION SHEET Ready-To-Run O-027 Set Owner s Manual Circus Playset CAUTION ELECTRIC TOY AS WITH ALL ELECTRIC PRODUCTS, PRECAUTIONS SHOULD BE OBSERVED DURING HANDLING AND USE TO REDUCE
HT owners manual WHEN ACCURACY IS THE POINT.
 HT-3000 owners manual TM WHEN ACCURACY IS THE POINT. TABLE OF CONTENTS 3 Introduction 3 Operation 4 Auto-Off 4 Backlight 4 Low Battery 4 Adjusting the Display Contrast 5 Operation Summary 5 Calibration
3 Automotive Structural Adhesives
 Automotive Structural Adhesives TM Scotch-Grip Fastener Adhesives 2, 4844 (Normal Temp Formula) Data Sheet June 2 General Description M Scotch-Grip TM Fastener Adhesives are microencapsulated, room temperature
Harvil 4 Foot Air Hockey Table
 Harvil 4 Foot Air Hockey Table Thank you for your purchase of this Harvil product! We work around the clock and around the globe to ensure that Harvil products maintain the highest possible quality. However,
Low-Water Auto Shutoff Pump 420 Gallons Per Hour
 Low-Water Auto Shutoff Pump 420 Gallons Per our REMINDER ALL 1-888-755-6750 EFORE RETURNING TO STORE. PAKAGE ONTENTS ITEM #PF420AS Questions, problems, missing parts? efore returning to your retailer,
NEED HELP? CONTACT US!
 SERVICE CART IMPORTANT: Model # 73002 # 7300 bit.ly/wenvideo Your new tool has been engineered and manufactured to WEN s highest standards for dependability, ease of operation, and operator safety. When
Blue Air. Commercial Refrigeration Inc. Installation & Operation Manual Glass Door Countertop Refrigerator
 Blue Air Commercial Refrigeration Inc. Installation & Operation Manual Glass Door Countertop Refrigerator Please read this manual completely before installing or operating this unit! BAGR7 Blue Air reserves