ASSOCIATED 1:10 SCALE ELECTRIC BUGGY INSTRUCTION MANUAL FOR THE TEAM ASSOCIATED RC10B Associated Electrics, Inc. RS-1
|
|
|
- Roxanne Long
- 6 years ago
- Views:
Transcription
1 ASSOCIATED 1:10 SCALE ELECTRIC BUGGY INSTRUCTION MANUAL FOR THE TEAM ASSOCIATED RC10B4 TT RS Associated Electrics, Inc.
2

3


4


5

6


7


8


9

10

11


12


13


14

15

16


17
 and/or turn the ESCs power switch on (if included). 4. Move the steering control on the transmitter to the right and left.")
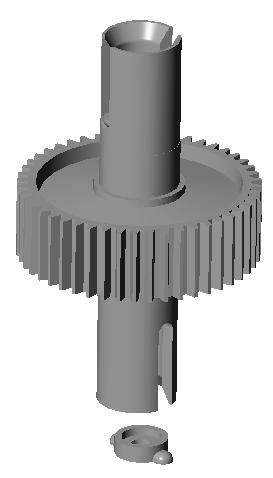
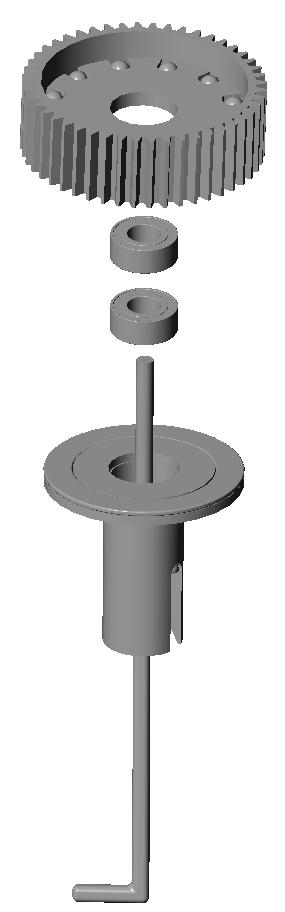
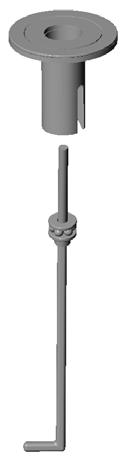
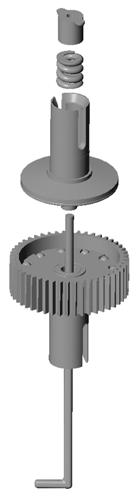
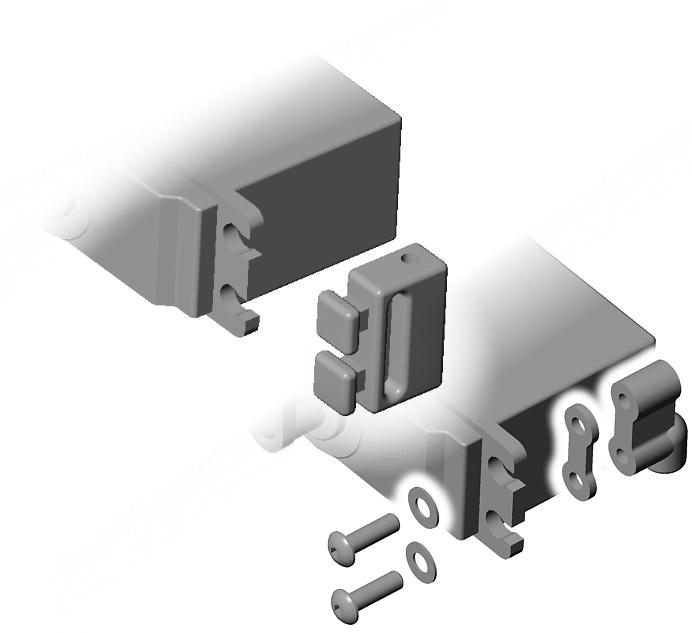
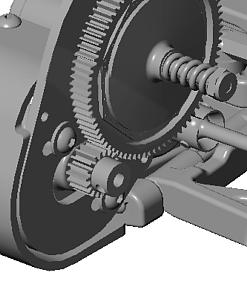
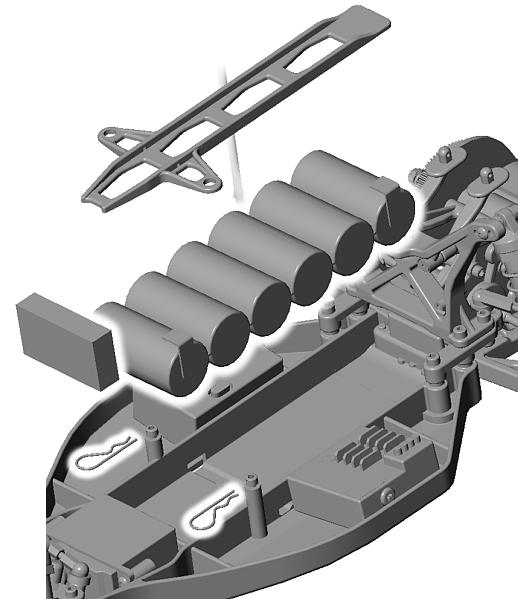
18 FINAL ADJUSTMENTS RADIO ADJUSTMENTS Use the following steps to make the final adjustments on your car. 1. Turn the transmitter on. 2. Make sure the motor is disconnected. 3. Connect your battery pack (if RTR) and/or turn the ESCs power switch on (if included). 4. Move the steering control on the transmitter to the right and left. Do the wheels move in the correct direction? If not, you must reverse the steering servo direction on your transmitter (see radio manual.) 5. Adjust your steering trim (see radio manual) until the #9659 steering rack is centered under the top plate. Then, using the two steering Make these adjustments before you drive the buggy turnbuckles, adjust the front wheels so they are pointing straight ahead. 6. Adjust the ESC (electronic speed control) according to the speed control manufacturer s instructions. Some manufacturers have the motor connected during adjustment and some do not. Now turn the power switch off. 7. Connect the motor. Place your car on a block or car stand so that all four wheels are elevated. Turn the power switch on again. Check the ESC and steering settings you have made and then turn the power switch back off. 8. Remember this! The transmitter is always the FIRST TO BE TURNED ON and THE LAST TURNED OFF. ASSEMBLE BATTERY PACK If you are not using a stick battery pack, here is how to assemble your battery pack. Solder individual cell connections as shown. Team racers prefer battery bars for sturdier connections. Insulated wire will not allow the pack to fit in the battery slot. Solder connections with Reedy Battery Bars (#651) Aim negative lead toward the front MOTOR GEARING To get the most from your motor, proper gearing is important. The gear ratios listed in the chart are recommended starting gear ratios. Ratios can vary from track to track, but you should not change the pinion size more than one tooth from the recommended ratio. CAUTION! Increasing the pinion size by more than one tooth can damage your motor from excess heat. FINAL MOTOR PINION SPUR DRIVE RATIO 24 stock (torque-based) :1 24 stock (RPM-based) :1 Spec :1 14 turn modified motor :1 13 turn modified motor :1 12 turn modified motor :1 11 turn modified motor :1 10 turn modified motor :1 MAINTENANCE Follow these steps to keep your buggy in shape for racing CHECK FOR FIT You should periodically check all the moving parts: front and rear end, suspension arms, steering blocks, steering linkage, shocks, and so on. If any of these should get dirty or bind then your car s performance will suffer. MOTOR MAINTENANCE Between runs, inspect the brushes to ensure they are moving freely in the brush holder. This is done by carefully removing the spring and sliding the brush in and out of the holder. If there is any resistance or rough spots, remove the brush and carefully wipe the brush clean. This will clean off any buildup so the brush slides smoothly in the brush holder. After every 3 to 5 runs, remove the brushes from the holders and inspect the tips for wear and/or burning. If there is a noticeable amount of wear, replace the brush with a new pair. If the tip is a burnt blue color, then the lubricant in the brush has been burned away and new brushes should be installed. After every other battery charge you should carefully clean the motor. One recommended method is to spray motor cleaner directly on the brush and commutator area. Run the motor for approximately 15 seconds. Disconnect the motor and spray it again, making sure the runoff is clear and clean. If the runoff is still dirty, repeat the spraying action until clean. After completing the cleaning, apply a small amount of lightweight oil to each bushing or bearing for lubrication. Be careful not to apply too much oil, for this will pick up dirt and contaminate the commutator and brushes. DIFFERENTIAL Adjust the differential ( diff ) as noted on page 6. Adjusting the diff is not meant to be a tuning option. If you can hear the diff making a barking or chirping sound on jump landings, either your diff is set too loose or your slipper clutch is set too tight. First check your slipper setting, then re-set the diff according to the instructions on step C SLIPPER CLUTCH The assembly instructions give you a base setting for your clutch. Turn the nut on the shaft so that the end of the top shaft is even with the outside of the nut. Tighten the nut 4 more turns. At the track, tighten or loosen the nut in 1/8 turn increments until you hear a faint slipping sound for 1-2 feet on takeoffs. Another popular way to set the clutch is to hold both rear tires firmly in place and apply short bursts of throttle. If the clutch is properly set, the front tires should lift slightly up off the surface.
 will give the front end less roll and quicken steering response.")

 will give the car an overall aggressive feeling.")
 are recommended in most cases.")
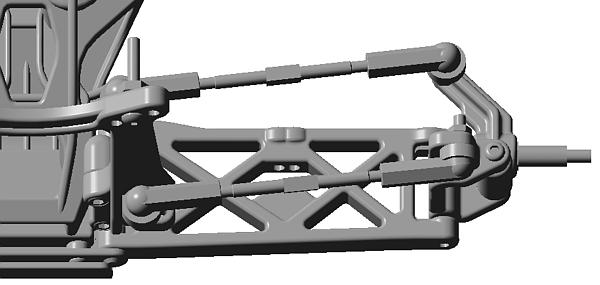
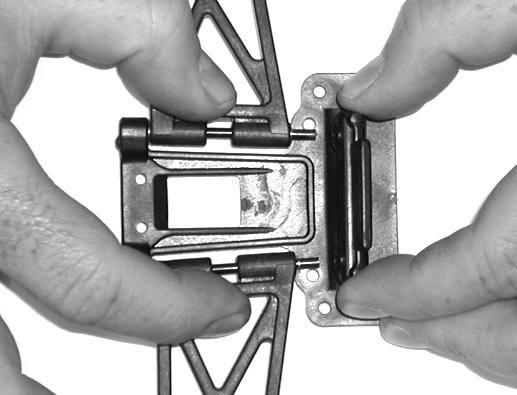
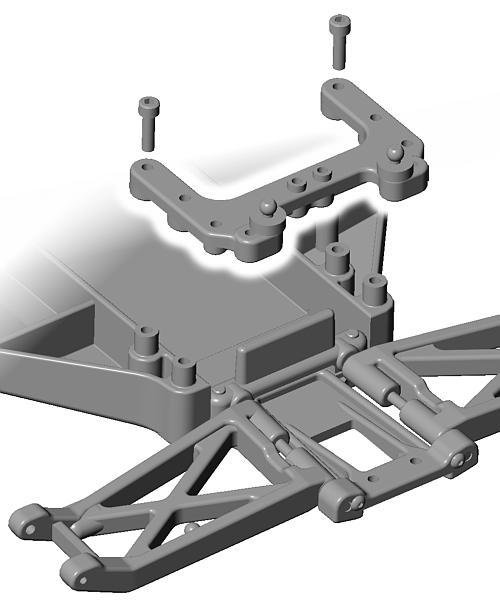
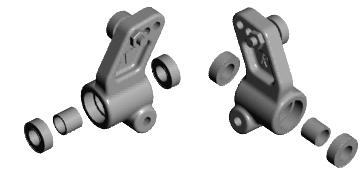
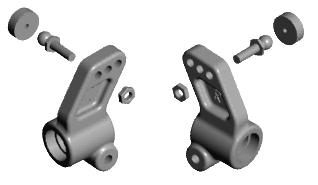
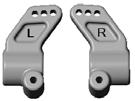
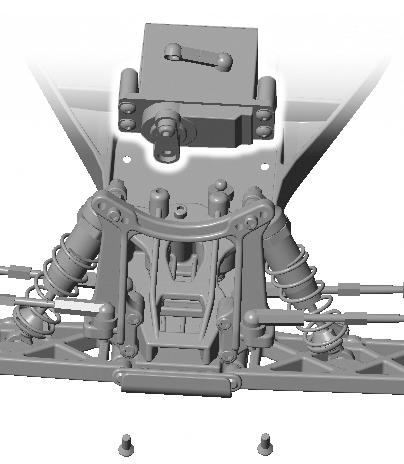
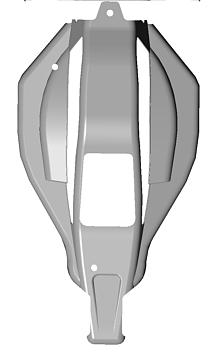
19 TUNING & SETUP TIPS These steps prepare your buggy for maximum performance FRONT CAMBER LINKS Changing the length of the camber link is considered a bigger step than adjusting the ball end height on the tower. Shortening the camber link (or lowering the ball end) will give the front end less roll and quicken steering response. Lengthening the camber link (or raising the ball end) will give the front more roll and slower steering response. Longer camber links are typically used on high grip tracks and shorter links tend to work better on med-grip loose tracks. Raise or lower the ball end by adding or subtracting washers here STEERING BLOCKS The included trailing steering blocks (# 9581) should be used in most cases. The Team especially recommends the trailing blocks on high-grip or blue-groove. Changing to the optional inline steering blocks (#9577) will give the car an overall aggressive feeling. Steering entering and exiting the corners is increased, but straight line stability is slightly reduced. CASTER Caster describes the angle of the kingpin as it leans toward the rear of the vehicle. Positive caster means the kingpin learns rearward at the top. The supplied 25 caster blocks (#9580) are recommended in most cases. For more corner entry steering and less exit steering, try the optional 30 blocks (#9593). The optional 20 blocks (#9592) will give you more exit steering and less entry steering. CAMBER Camber describes the angle at which the tire and wheel rides when looked at from the front. Negative camber means that the tire leans inward at the top. A good starting camber setting is 1. Use the included #1719 camber gauge to set your camber as shown. Positive camber, where the top of the tire is leaning out, is not recommended. Testing camber with the camber gauge FRONT TOE-IN Toe-in describes the angle of the front tires when viewed from the top. With toe-in, the front of the tires point inward. Zero degree toe-in (tires pointing straight forward) is the setting that should be used in almost all track conditions. Occasionally you can increase turn in by adding a little toe-out (front of tires point slightly out). Front toe-in is not a typical tuning adjustment used by the Team. FRONT RIDE HEIGHT Ride height is the distance from the ground to the bottom of the chassis. The standard front ride height setting is with the front arms level (referred to as arms level ). Check the ride height by lifting up the entire car about 8-12 inches off the bench and drop it. After the suspension settles into place, add or remove pre-load clips so that the left & right arms appear to be flat as seen in the following picture. Front arms should be in a straight line when ride height is set as arms level ANTI-SQUAT Anti-squat denotes the angle of the rear arms relative to the ground. Zero anti-squat means that the rear arms are flat, parallel with the ground. The kit setting is 2, and can be adjusted by installing or removing the included shims underneath the arm mount. The shim with 2 tabs is for 2 and the shim with 1 tab is for 1. You can use any combination of shims to get 0, 1, 2, or 3 antisquat. Adding anti-squat tends to make the car rotate more in corners, but doesn t handle as well through the bumps. Upper shim (with one tab), 1 Lower shim (with two tabs), 2 REAR CAMBER LINK Changing the length of the camber link is considered a bigger step than adjusting the ball end height on the rear chassis brace. Shortening the camber link (or lowering the ball end) will give the rear end less roll and the car will tend to accelerate or square up better. Lengthening the camber link (or raising the ball end) will give the rear more roll and more cornering grip. Longer camber links are typically used on high grip tracks, while shorter links tend to work better on med-grip loose tracks. The kit setting is the best compromise of cornering grip and acceleration. Raise or lower the ball end by adding or subtracting washers here REAR CAMBER Camber describes the angle at which the tire and wheel rides when looked at from the back. Negative camber means that the tire leans inward at the top. A good starting camber setting is 1. Use the included #1719 camber gauge to set your camber (shown above). Adding a small amount of positive camber, where the top of the tire is leaning out, will tend to improve straight-line acceleration on loose tracks. 21

.")
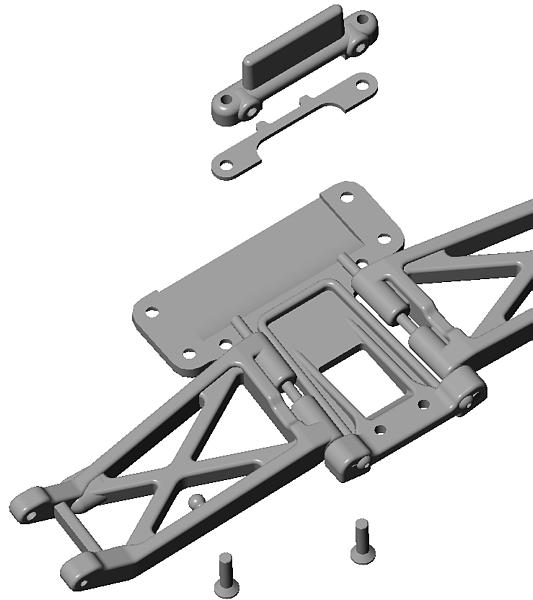
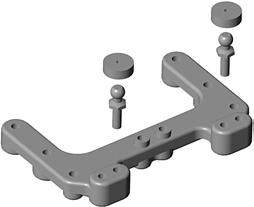
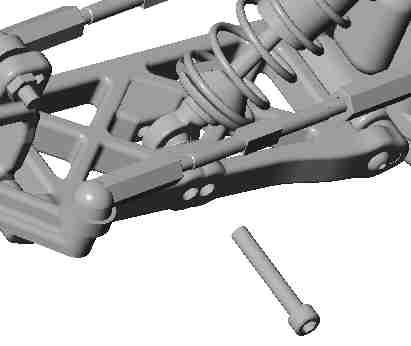
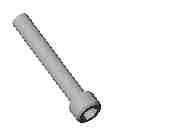
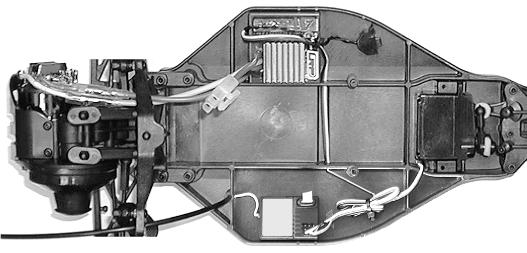
20 WHEELBASE ADJUSTMENT You have three options for rear hub spacing, Forward, Middle, & Back. The kit setting provides the most rear traction, and will be used most often. For improved handling in bumps or rhythm sections, try moving the hubs to the Middle or Back position. This can also make the car handle better in 180 turns. Spacers to the rear will place hubs forward, shortening the wheelbase ANTI-ROLL BAR The optional #9635 B4 rear anti-roll bar kit (also called the swaybar ) allows you to add roll resistance to the rear end with minimal effect on handling over bumps and jumps. It is an especially helpful tuning item on high-grip tracks (try the gold bar). The silver and black anti-roll bars are typically used on mediumgrip loose tracks. REAR RIDE HEIGHT Ride height is the distance from the ground to the bottom of the chassis. The rear ride height setting you should use most often is with the outdrive, driveshaft, and axles all on the same imaginary horizontal line (referred to as bones level ). Check the ride height by lifting up the entire car about 8-12 inches off the bench and dropping it. After the suspension settles into place, add or remove pre-load clips so that the left & right driveshafts appear to be flat as seen in the following picture. Dogbones should be in a straight line when ride height is set as dogbones level BATTERY PLACEMENT This is one of the best adjustments on the car, and it can have the biggest effect on handling. Most of the time, moving the battery pack back will yield more rear traction and decrease steering. Conversely, moving the battery pack forward will yield less rear traction and increase steering. But in some cases on extremely high grip or extremely low grip tracks, moving the pack forward will make the buggy feel more balanced and actually improve rear grip. FRONT REAR FRONT REAR Spacer to the front will place batteries to the rear Spacer to the rear will place batteries to the front SETUP SHEETS The best way to get your car handling right is to go to our website, and click on the links for setup sheets. Our Team Drivers help develop these setups at National events. Also, most drivers have a base setup that they use as a starting point for every event. Try running some of these base setups or look for track conditions and tires that are similar to your local track and mimic that setup. Remember, each adjustment has a purpose, so copy everything from the setup sheet and then make adjustments based on the recommendations in here. For more information on setups, please go online to the Tuning Guide page and order the #9656 Complete Tuning Guide: B4. TEAM ASSOCIATED ONLINE Get online help, tips, and new product information for your kit through Team Associated s web site, Tech Help. Answers to racer s questions are posted for all to learn from. Racer Spotlight. Racers proudly show off their favorite kits. Get your painting ideas here! 22 Setup Sheets. Where racers find blank and standard setups to download for their kit. New Products. Learn of new kits and parts before they are announced anywhere else. Team Associated Insider s Newsletter. Sign up for it if you want the latest Team Associated news delivered right to your box. Hobby Shop and Track Directory. Locate shops carrying spare parts and tracks where you may race your kit. Parts Catalogs. Find the most up-to-date listing of parts for your kit. Contact Associated. Our expert staff answers your toughest questions about Associated, Reedy, and LRP products.
 / OUT (-) BUMP STEER SPACER AXLE HEIGHT up middle down CASTER 20 25 30 ANTI-SQUAT 0 1 2 3 WHEELBASE long medium short")


21 Driver Track / City SETUP SHEET for the Team Associated RC10B4 FRONT SHOCK MOUNTING & CAMBER LINK Event Date REAR SHOCK MOUNTING & CAMBER LINK # WASHERS CAMBER A B # WASHERS 1 2 CAMBER A B C 1 2 RIDE HEIGHT RIDE HEIGHT TOE-IN (+) / OUT (-) BUMP STEER SPACER AXLE HEIGHT up middle down CASTER ANTI-SQUAT WHEELBASE long medium short ANTI-ROLL BAR none black (soft) sivler (med) gold (heavy) STEERING BLOCK trailing inline FRONT SHOCKS OIL wt REAR SHOCKS OIL wt SPRING (color) PISTON # SPRING (color) PISTON # SHAFT unobtainium STD # LIMITERS SHAFT unobtainium STD # LIMITERS FRONT TIRES & WHEELS REAR TIRES & WHEELS FRONT TIRES INSERTS WHEELS REAR TIRES INSERTS WHEELS TRACTION COMPOUND RADIO/BATTERIES MOTOR OTHER RADIO SERVO ESC DRAG BRAKE INIT BRAKE BATTERY PLACEMENT front rear BATTERIES MOTOR & WIND BRUSHES SPRING PINION / SPUR / BODY WING WING ANGLE CHASSIS CONDITIONS smooth bumpy low traction med traction high traction sandy soft dirt grass blue groove clay COMMENTS NOTES wet dry dusty other FOR MORE SETUPS, VISIT and click on SETUP SHEETS
3.0 Tuning Tips. To Shut Off the Engine: Use the included pipe plug or simply bump the flywheel with a wrench or plastic handled tool.
 TM 8IGHT 3.0 Tuning Tips Before you start making changes on your 8IGHT 3.0 Off-Road Racing buggy, you need to make a few decisions. First of all, tires, and how they are setup, have a tremendous impact
Team Associated RC10B4 Tuning Guide
 Team Associated RC10B4 Tuning Guide This document is a compilation of released pages from Associated Electric made for PetitRC, all credits must go to Associated Electric. Complete Tuning Guide: B4 Front
ROLL CENTER You can adjust the front and rear roll centers of the XB8 by changing the mounting locations of various components.
 Your XRAY XB8 luxury nitro buggy is a top competition, precision racing machine that features multiple adjustments that allow you to set up for any track condition. The XB8 includes innovative set-up features
Make these adjustments before racing
 FINAL ADJUSTMENTS ADJUSTING CAMBER To set the camber we recommend using our supplied #1719 camber/rear toe-in gauge. When adjusting camber you need to have the car ready to run with no body. Make these
along with standard XT2 Instruction Manual and also XT2 18 Supplementary Sheet.
 Use this XT2 Dirt Conversion Supplementary Sheet along with standard XT2 Instruction Manual and also XT2 18 Supplementary Sheet. Parts included in Bag 8: 303141 SHIM 3x5x1.0MM (10) 322111 XT2 COMPOSITE
TIPS TO FINAL ASSEMBLY Radio installation. The Electronic speed control (ESC) and the receiver need to be mounted onto the chassis, using double sided
 and the receiver need to be mounted onto the chassis, using double sided") TIPS TO FINAL ASSEMBLY Radio installation. The Electronic speed control (ESC) and the receiver need to be mounted onto the chassis, using double sided tape (not supplied.) Mount the ESC first on the chassis
TIPS TO FINAL ASSEMBLY Radio installation. The Electronic speed control (ESC) and the receiver need to be mounted onto the chassis, using double sided tape (not supplied.) Mount the ESC first on the chassis
A7741 Truggy Wheel, Yellow
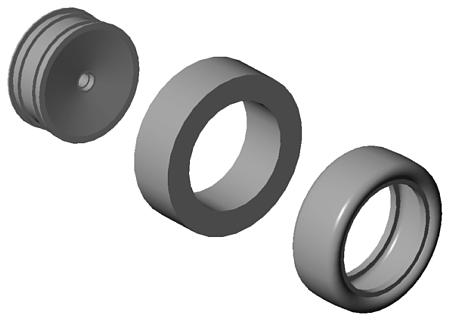
 STEP H-01 Tire Mounting BAG H 1 2 A7780B XTT Tire, Blue Truggy Foam Insert Only sold with Tires A7741 Truggy Wheel, Yellow STEP H-02 Tire Gluing The Tires need to be glued to the wheels. This can be done
:: Additional Features Your new TC6 comes unassembled and requires the following items for completion. (refer to catalog section for suggestions):
:") 8/10 2 :: Introduction Thank you for purchasing this Team Associated product. This assembly manual contains instructions and tips for building and maintaining your new RC10TC6. Please take a moment to
8/10 2 :: Introduction Thank you for purchasing this Team Associated product. This assembly manual contains instructions and tips for building and maintaining your new RC10TC6. Please take a moment to
Sportwerks Raven RTR Assembly and Operation Manual
 Sportwerks Raven RTR Assembly and Operation Manual Specifications: Scale.............. 1/10 Length............. 16 in (406mm) Front Track.......... 12.75 in (324mm) Rear Track.......... 12.5 in (318mm)
BAG F STEP F-01 STEP F-02 STEP F-03. Front and Rear Clip Installation
 q STEP F-01 BAG F Front and Rear Clip Installation The Servo Link installed in Step B-03 was set to an approximate length. The correct length will vary depending on the type of servo used, the radio settings,
PREBUIL UILT ASSEMBLY AND OPERATION MANUAL
 PREBUIL UILT Length: 15.2" [385mm] Width: 13" [330mm] Height: 5.8" [147mm] Weight: 3.3 lb [1500g] Wheelbase: 11.6" [295mm] Technical Support Information For technical assistance, contact: DuraTrax Product
TP02C. 1:10 Scale Radio Controlled Electric Powered 2WD Racing Buggy. Dimensions. Length 410mm Width 250mm Height 150mm
 TP02C 1:10 Scale Radio Controlled Electric Powered 2WD Racing Buggy Dimensions Length 410mm Width 250mm Height 150mm Transmitter Preparation Power Switch Antenna 27MHzTransmitter Crystal T 27MHz ON Extend
TOOLS NEEDED TO BUILD THIS KIT
 TOOLS TOOLS NEEDED TO BUILD THIS KIT 1. ALLEN WRENCHES A..050" B. 1/16" C. 5/64" D. 3/32" E. 2.5mm 2. NUT DRIVERS A. 3/16" B. 1/4" C. 11/32" 3. MISC. TOOLS A. NEEDLE NOSE PLIERS B. THREAD LOCKING COMPOUND
Bag 1. Bag 1. Center Pivot. Center Pivot
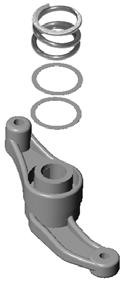
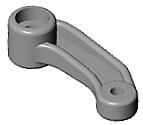
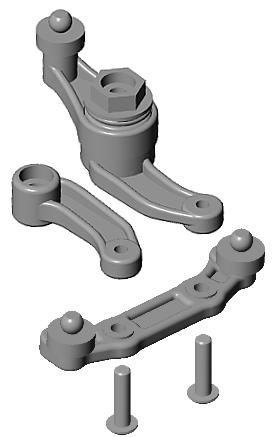
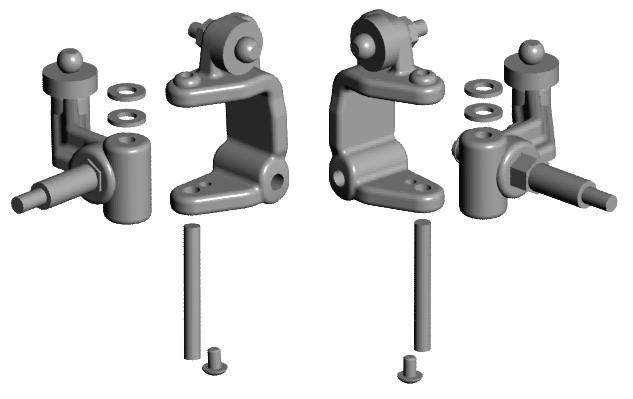
 8 00734 01901 5 Center Pivot Bag 1 3374 - Center Pivot Socket 4019 - Alum Pivot ball 3254-2-56 Button Head *Note - Sometimes it is helpful to slightly over-tighten the top clamp screws, then work the ball
.050 Allen key 1.5mm Allen key 1/16 Allen key 5/64 Allen key 3/32 Allen key Turnbuckle & 3/16 wrench
 1 Thank you for purchasing the Outlaw 4 Sprint Car! The Outlaw sprint car platform has been developed for loose dirt buggy tire racing. In this kit you will find the 4 th evolution of the car which features
#4016 KIT TOOLS SUPPLIED
 #4016 4 =? A F H L A, O = E? 5 J H K J BH JIKIFA IE.=?J HO6A= + = H > B E > A H > K A = K E K I? H A M + I F I E J A + D = I I E = @ > = A @ I 9 E @ A > = J J A H O I JI.=?J HO6A= > K A J E J = E K JK
RC Cheat Sheets. Set Up Your Radio-Control Car to Win! Page 1
 RC Cheat Sheets Set Up Your Radio-Control Car to Win! Page 1 Index GENERAL Page No: Ackermann 5 Anti-dive (on road) 6 Anti-roll Bars, Sway Bars 7 Anti-squat, off road 8 Anti-squat, on road 9 Axle Height,
Global West Suspension 655 South Lincoln Ave San Bernardino Ca Phone Fax Web address globalwest.
 Global West Suspension 655 South Lincoln Ave San Bernardino Ca. 92408 Phone 877-470-2975 Fax 909-890-0703 Web address globalwest.net Mustang coilover instruction sheets for 64-66 Kit includes the following
#0980 Intimidator 7 Direct Drive Racing Kit
 #0980 Intimidator 7 Direct Drive Racing Kit 1 Thank you for purchasing the Intimidator 7! Within this kit you will find a race winning car with over 30 years of Custom Works design and quality. The latest
New Generation Rear Wheel Drive
 New Generation Rear Wheel Drive ABC HOBBY ORIGINAL RADIO CONTROL CAR Instruction Manual Study the instructions thoroughly before assembly. REAR 2 WHEEL DRIVE REAR MOUNTED MOTOR BELT DRIVE DOUBLE DECK CHASSIS
TUNING SECTION ABOUT ADJUSTMENTS
 TUNING SECTION ABOUT ADJUSTMENTS R/C race cars, in general, are some of the most adjustable racing machines of any scale. What s really amazing is just how easy and quick it is to make all of our changes:
SETUP STUFF. *** (1) What is the difference between 1-B with 3 washers and 1-C with no washers?
 What is the difference between 1-B with 3 washers and 1-C with no washers?") SETUP STUFF Moving the Steering Spindle Up and Down changes two things: It changes the Total down travel your front end has. More Down travel in the front will give you more predictable landing off of
SETUP STUFF Moving the Steering Spindle Up and Down changes two things: It changes the Total down travel your front end has. More Down travel in the front will give you more predictable landing off of
1:12 SCALE ON ROAD CAR KIT
 2 SCALE ON ROAD CAR KIT INSTRUCTION MANUAL OR KIT #4015 SAVE VE THIS MANUAL! Use with current catalog for future, hassle-free re-ordering of parts. 1998 Associated Electrics, Inc. - 9? D = I I EI @ A I
X-Wide Body Red Standard 78T Big Shot Red Standard Trim inside corners of Foam inserts.
 SUPER DIALED SETUP! KIT SETUP 0 24mm, Arms level -1 30 No 27.5wt. #56 Orange None Bottom Narrow Rack None 3-B, 1-Ball Stud Washer 3-Middle Short Yes, on Tower 3 Pivot, 0 Hubs 2 23mm, Dogbones just under
7207 FRONT BULKHEAD, nylon FRONT BULKHEAD ALUMINUM SUPPORT HINGE PIN, inner, with clips, 1.675" pr GT RACING FRONT
 RC10GT & RTR GT MC 9 McCOY GLOW PLUG 1 3.9 2661 CLUTCH NUT CLIPS 6.7 3216 WASHER, #4 12 1.00 3719 NYLON WIRE TIES, 6" heavy duty 12 2.00 3720 NYLON TIES, 8", light duty for receiver 12 2.00 3721 SELF-TAPPING
2005 to 2008 #08 Metric Nova Chassis Set Up Sheet
 Springs 1 2005 to 2008 #08 Metric Nova Chassis Set Up Sheet Flat end of spring down on tubular lower a-arms. Left Front 800lb. Right Front 750lb. Left Rear 200lb. Right Rear 225lb. On Top of Tube Axle
ON ROAD SETUP GUIDE PART ONE
 PART ONE Ride height is adjusted by the preload of the spring collars. Winding them down will raise the ride height, while winding them up will decrease the ride height. It is important to note that adjusting
Z-CAR ZMXT-8 RTR RTR NITRO OFF-ROAD
 TEST DRIVE EXCLUSIVE! Z-CAR ZMXT-8 RTR RTR NITRO OFF-ROAD THIS TRUGGY BREAKS THE MOLD WORDS KEVIN HETMANSKI kevinh@airage.com PHOTOS JOSEPH ARTHUR Z-CAR, A DIVISION OF SH ENGINES, is distributed exclusively
Contents. # HUDY Caster Clip Remover Tool. # HUDY Chassis Balancing Tool. # HUDY 3mm Turnbuckle Tool
 Contents Introduction 2 Radio Adjustments 3 Speed Control (ESC) Adjustments 3 Connecting the Motor 3 Motor Gearing 3 Rollout 5 Differential Adjustment 5 Tightening the Differentials 6 Loosening the Differentials
OWNER'S MANUAL Magnolia Ave., Chino, CA phone: (909) fax: (909)
 fax: (909)") OWNER'S MANUAL Carefully read through all instructions to familiarize yourself with the parts, construction techniques, and tuning tips outlined in this manual. Being able to grasp the overall design of
OWNER'S MANUAL Carefully read through all instructions to familiarize yourself with the parts, construction techniques, and tuning tips outlined in this manual. Being able to grasp the overall design of
DIFFERENTIAL STEERING RACK
 BAG-A DIFFERENTIAL (2 Sets) +Driver Cap Screw Diff Ball Nylon Nut Thrust Washer Thrust Ball Diff Joint Cup A Allen Wrench 850 Bearing Diff Ring Diff Spring Nylon Nut 850 Bearing Diff Ring Diff Ball Ball
ABC HOBBY ORIGINAL RADIO CONTROL CAR
 ABC HOBBY ORIGINAL RADIO CONTROL CAR Instruction Manual Study the instructions thoroughly before assembly. FRONT WHEEL DRIVE NEW STYLE STRUT SUSPENSION BATHTUB CHASSIS 4 BEVEL GEAR DIFFERENTIAL FULL ADJUSTABLE
When You Want To Go Fast. Instruction Manual Part # 500,501 Jato Sportsman Nitro Funny Car Kit
 When You Want To Go Fast Instruction Manual Part # 500,501 Jato Sportsman Nitro Funny Car Kit If Our Name is On It, Rest Assured It's The Worlds Finest Read The Instruction Page 1 Here are "Tips and Tricks"
2103 NITRO RAIL DRAGSTER KIT
 203 NITRO RAIL DRAGSTER KIT THANKS FOR BUYING RJ SPEED S NITRO DRAG KIT. IT IS A LITEWEIGHT CAR MADE FOR STRAIGHT LINE DRAG RACING AND CAN BE BROKEN IF RUN INTO SOLID OBJECTS AT HIGH SPEED. YOU WILL NEED
ASSEMBLY AND OPERATION MANUAL
 ASSEMBLY AND OPERATION MANUAL www.duratrax.com ITEMS INCLUDED The following items are included with your Vendetta Rally. Chassis Transmitter Body Decal Sheet Instruction Manual Exploded View/Parts Listing
ASSOCIATED 1:10 SCALE T3 MANUAL
 ASSOCIATED 0 SCALE T3 MANUAL INSTRUCTION MANUAL FOR THE RC10T3 ELECTRIC TRUCKS #7003, 7009, 7010, 7013, 7038, 7048 ASSOCIATED S RC10T3 TRUCK-- READER S CHOICE OF THE YEAR TIMES! Radio Control Car Action
OWNER'S MANUAL 2000 & ROAR National Champion
 2000 & 2001 ROAR National Champion OWNER'S MANUAL Carefully read through all instructions to familiarize yourself with the parts, construction techniques, and tuning tips outlined in this manual. Being
for the B3 Sport kit #9013
 All kit versions include: 2.40:1 transmission for effortless power handling. Molded composite chassis for better rigidity and Lexan B3 racing body. Quadra-symmetric suspension for greater stability and
RJS2020 SPORT 3.2 1/10 PAN CAR KIT LESS ELECTRICS
 RJS2020 SPORT 3.2 1/10 PAN CAR KIT LESS ELECTRICS THANKS FOR BUYING THE RJ SPEED 1/10 SPORT 3.2 KIT. THE ASSEMBLY WILL NOT BE DIFFICULT IF YOU READ THE TEXT, LOOK AT THE PICTURES, AND THE EXPLODED VIEW
Shown with optional GFR-1017R Body Posts. J & D Machine / Hyperdrive / MSA 3711 Moon Bend Rd. Chapel Hill, TN
 Shown with optional GFR-1017R Body Posts J & D Machine / Hyperdrive / MSA 3711 Moon Bend Rd. Chapel Hill, TN 37034 www.hyperdriveracing.com 1 You now own a state of the art 1/10 scale oval race car. The
Caution. Electronic Speed Controller Instructions. Needle Nose Pliers Awl RCE3003 HD Grease. Fusion Tire Glue. RCE3004 Super Diff Lube
 Caution Please read the following manual closely and familiarize yourself with its contents before operating the model. Keep the manual in a safe place for future reference for repairs, part numbers and
SOARSEIKI.Co.,Ltd
 SOARSEIKI.Co.,Ltd info@soarseiki.com 1 2 3 4 BAGS A1 FRONT AND REAR DIFF 5 BAGS A2 CENTER DIFF 5 BAGS B1 FRONT TRANSMISSION STEP B1-1 Apply a thiin layer of lubricant on the gear. GR160003 BE050110040
J & D Machine / Hyperdrive / MSA 3711 Moon Bend Rd. Chapel Hill, TN 37034
 J & D Machine / Hyperdrive / MSA 3711 Moon Bend Rd. Chapel Hill, TN 37034 www.hyperdriveracing.com 1 You now own a state of the art 1/10 scale oval race car. The Hyperdrive Assault has gone through months
1:8 SCALE CATALOG 1:8 GAS KITS RC500 FRONT END BODY ACCESSORIES
 1:8 SCALE CATALOG Stock is extremely limited. Parts listing as of 7/2001. Sale prices apply to orders direct from Associated only. Items available while supplies last. Items marked Not available or are
=Apply Thread lock adhesive. =Apply CA Glue =Apply Grease NOTE : BAG 01 BAG 01 BAG mm. When track High Traction or want to reduce steering
 NOTE : =Apply Thread lock adhesive R80059 One Way Cup () R8009 One Way R80 Pulley Set- R80004 Alu-Bulkhead-L BAG 0 CA GE =Apply CA Glue =Apply Grease R8000 Upper Arm Bracket Base R8004 One Way Plastic
Installation Procedure GR40 S197 SLA Front Suspension System (Does not include Aluminum Spindle and Hub Instructions)
") Installation Procedure GR40 S197 SLA Front Suspension System (Does not include Aluminum Spindle and Hub Instructions) Please take the time and read these instructions first! The GR40 S197 system is designed
Installation Procedure GR40 S197 SLA Front Suspension System (Does not include Aluminum Spindle and Hub Instructions) Please take the time and read these instructions first! The GR40 S197 system is designed
RJS2021 LTO SPORT OVAL RACER LESS ELECTRICS
 RJS2021 LTO SPORT OVAL RACER LESS ELECTRICS THANKS FOR BUYING THE RJ SPEED 1/10 LTO SPORT KIT FOR OVAL RACING. THE ASSEMBLY WILL NOT BE DIFFICULT IF YOU READ THE TEXT, LOOK AT THE PICTURES, AND THE EXPLODED
... REQUIRED READING...
 REQUIRED READING.........UNDERSTAND THIS MANUAL! Thank You and Congratulations on purchasing the OUTLAW! Within this kit you will find a race winning car with over 21 years worth of CUSTOM WORKS design
RJS2002 FUNNY CAR KIT LESS ELECTRICS
 RJS2002 FUNNY CAR KIT LESS ELECTRICS THANKS FOR BUYING RJ SPEED S FUNNY CAR DRAG KIT. IT IS MADE FOR STRAIGHT LINE DRAG RACING AND CAN BE BROKEN IF RUN INTO SOLID OBJECTS REPEATEDLY AT HIGH SPEED. IT REQUIRES
PRO1 2001, THE ULTIMATE RACING MACHINE
 PRO1 2001, THE ULTIMATE RACING MACHINE Dear Customer Enclosed you will find several data sheets and illustrations for the 2001 PRO1 race car. All this data is based on what our factory engineers and drivers
ASSOCIATED 1:10 SCALE GT MANUAL
 ASSOCIATED 0 SCALE GT MANUAL INSTRUCTION MANUAL FOR THE RC10GT GAS TRUCKS #7060, 7061, 7067, 7068, & 7090 ASSOCIATED S RC10GT-- 3 TIMES NORRCA WORLD CUP CHAMPION! 200 Thank you for purchasing this Team
2007 Losi, A Division of Horizon Hobby Inc.
 Operation Manual Thank you for choosing the Mini-Slider from Losi. This guide contains the basic instructions for operating your new Mini-Slider. While the Mini-Slider is great for first-time R/C drivers,
Manufactured By: CustomWorks RC Products LLC 760-B Crosspoint Drive Denver, NC #0928 ENFORCER GSX2 RACING KIT
 #0928 ENFORCER GSX2 RACING KIT Manufactured By: CustomWorks RC Products LLC 760-B Crosspoint Drive Denver, NC 28037 www.customworksrc.com REQUIRED READING.........UNDERSTAND THIS MANUAL! Thank You and
GENERAL INFORMATION. Wheel Alignment Theory & Operation
 Fig. 1: Checking Steering Linkage GENERAL INFORMATION Wheel Alignment Theory & Operation ADJUSTMENTS NOTE: This article is intended for general information purposes only. This information may not apply
R R11 Eccentric Hub-Alu (4) R R11 Eccentric Hub-Alu (4) NOTICE. Pulley cover direction NOTICE BAG 01 NOTICE BAG 01
 R R11 Eccentric Hub-Alu (4) NOTICE. Pulley cover direction NOTICE BAG 01 NOTICE BAG 01") BAG BAG R Spool Axle Alu RA Front Spool Pulley Set 8T (4pcs) R Diff Gears (with Axle) Trim any excess flashing from the diff gear axle at the mold injection point. (pcs) (4pcs) R Spool Outdrive (pcs) R6
BAG BAG R Spool Axle Alu RA Front Spool Pulley Set 8T (4pcs) R Diff Gears (with Axle) Trim any excess flashing from the diff gear axle at the mold injection point. (pcs) (4pcs) R Spool Outdrive (pcs) R6
WARNING! Hard anodized, PTFE-coated shocks. Hard anodized, PTFE-coated MIP CVD's.
 200 Thank you for purchasing this Team Associated product. This manual contains steps and instructions you will use to set up your gas truck. Please read this entire manual before attempting to start your
#0923 ENFORCER GBX3 RACING KIT. Manufactured By: 760-B Crosspoint Drive Denver, NC
 #0923 ENFORCER GBX3 RACING KIT Manufactured By: 760-B Crosspoint Drive Denver, NC 28037 www.customworksrc.com REQUIRED READING.........UNDERSTAND THIS MANUAL! Thank You and Congratulations on purchasing
CONTENTS. All texts and images contained within this set-up book are copyright by XRAY. All rights reserved. XRAY
 CONTENTS Setting up the XRAY T3 3 Downstops 6 Ride Height 8 Droop 10 Track Width 12 Steering Throw Symmetry 13 Camber 14 Caster 16 Bump Steer 17 Ackermann 17 Toe 18 Tweak 20 Roll Center 24 Chassis Flex
ASSEMBLY OF THE FRONT AND REAR BALL DIFF. Builds two differentials for front and rear
 1 ASSEMBLY OF THE FRONT AND REAR BALL DIFF. 37145 40060 40060 2.6mm Nylon Nut 37110 35958 37132 2.6x6x1mm Washer 37148 Apply Grease 37120 (12 Pcs) Builds two differentials for front and rear. 38288 35958
#0710 ELECTRIC ROCKET KIT
 #0710 ELECTRIC ROCKET KIT Manufactured By: 760-B Crosspoint Drive Denver, NC 28037 www.customworksrc.com REQUIRED READING.........UNDERSTAND THIS MANUAL! Thank You and Congratulations on purchasing the
7256 INSTRUCTIONS FOR ELIMINATOR II A-ARM FRONT, 4-LINK REAR, MILD STEEL, INTERMEDIATE, SERIES CHASSIS
 #917256 Page 1 of 7 7256 INSTRUCTIONS FOR ELIMINATOR II A-ARM FRONT, 4-LINK REAR, MILD STEEL, INTERMEDIATE, SERIES CHASSIS ITEM QTY SIZE/PART NO. TUBE CODE DESCRIPTION 1 2 4138 Cage Side 2 2 4208 Forward
2. MEASURE VEHICLE HEIGHT. (b) Measure the vehicle height. Measurement points: C: Ground clearance of front wheel center
 Measure the vehicle height. Measurement points: C: Ground clearance of front wheel center") ADJUSTMENT If the wheel alignment has been adjusted, and if suspension or underbody components have been removed/installed or replaced, be sure to perform the following initialization procedure in order
ADJUSTMENT If the wheel alignment has been adjusted, and if suspension or underbody components have been removed/installed or replaced, be sure to perform the following initialization procedure in order
X 6 SQUARED X 6 SQUARED KIT K 021 KIT INSTRUCTION MANUAL. Version 1.0. K021 Instructions v1.0 First Things Page 1
 X 6 SQUARED K 021 KIT INSTRUCTION MANUAL Version 1.0 X 6 SQUARED KIT K021 Instructions v1.0 First Things Page 1 CONTENTS First Things.. 3 A Front Arms & Hubs 5 B Complete The Front End. 12 C Differential.
#0711 ROCKET PRO-COMP RACING KIT. Manufactured By: 760-B Crosspoint Drive Denver, NC
 #0711 ROCKET PRO-COMP RACING KIT Manufactured By: 760-B Crosspoint Drive Denver, NC 28037 www.customworksrc.com REQUIRED READING.........UNDERSTAND THIS MANUAL! Thank You and Congratulations on purchasing
7211 A-ARM FRONT, 4-LINK, 3 X 2 FRAME, INTERMEDIATE, ELIMINATOR CHASSIS ITEM QTY SIZE/PART NO. TUBE CODE DESCRIPTION
 #917211 Page 1 of 6 7211 A-ARM FRONT, 4-LINK, 3 X 2 FRAME, INTERMEDIATE, ELIMINATOR CHASSIS ITEM QTY SIZE/PART NO. TUBE CODE DESCRIPTION 1 2 4138 Cage Side 2 2 4208 Forward strut 3 1 4038 Main Hoop 4 1
PRO THE ULTIMATE RACING MACHINE
 PRO1 2004 THE ULTIMATE RACING MACHINE Dear Customer Enclosed you will find several data sheets and illustrations for the 2004 PRO1 race car. All this data is based on what our factory engineers and drivers
2030 OUTLAW SPRINTER HARDWARE I.D. BUTTON HD. CAP SCREW BAG H1 CHASSIS KIT BAG H3 HARDWARE BAG L2 REAR AXLE PARTS BAG L4 FRONT TIRES
 THANKS FOR BUYING THE RJ SPEED OUTLAW SPRINTER KIT. IT IS COMPLETE LESS ELECTRICS, AND MADE FOR CARPET OR PAVEMENT RACING. IT REQUIRES A 540 OR 550 SIZE MOTOR, 4 OR 6 CELL BATTERY PACK, TWO CHANNEL RADIO
BIND ST-TRIM TH-TRIM ST-D/R
 4 4 4 4 BIND ST-TRIM TH-TRIM ST-D/R 1. Put the battery in the car. 2. Install the battery. 3. Turn on the transmitter. Connect firmly. 4. Turn on the electronic speed controller. ON OFF AX80084 UV Joint
RJS2017 SPORTSMAN RACER KIT LESS ELECTRICS
 RJS2017 SPORTSMAN RACER KIT LESS ELECTRICS THANKS FOR BUYING THE RJ SPEED 1/10 SPORTSMAN RACER KIT FOR OVAL RACING, DRAG RACING OR JUST FUN STREET BASHING. THE ASSEMBLY WILL NOT BE DIFFICULT IF YOU READ
... REQUIRED READING...
 REQUIRED READING.........UNDERSTAND THIS MANUAL! Thank You and Congratulations on purchasing the OUTLAW! Within this kit you will find a race winning car with over 21 years worth of CUSTOM WORKS design
INSTRUCTIONS FOR STRUT FRONT, 4-LINK REAR, ROADSTER CHASSIS
 #917406 Page 1 of 5 7406 INSTRUCTIONS FOR STRUT FRONT, 4-LINK REAR, ROADSTER CHASSIS ITEM QTY SIZE/PART NO. TUBE CODE DESCRIPTION 1 1 4215 Front frame rail strut 1 5/8 (pair) 2 1 4236 Roadster firewall
E Thank you for purchasing VBC Racing product. COMPETITION GRADE HIGH PERFORMANCE RADIO CONTROL RACING CAR CHASSIS KIT INSTRUCTIONS MANUAL
 COMPETITION GRADE HIGH PERFORMANCE RADIO CONTROL RACING CAR CHASSIS KIT 1/10 SCALE ELECTRIC COMPETITION FORMULA CAR KIT INSTRUCTIONS MANUAL E Thank you for purchasing VBC Racing product. Things that we
Calandra Racing Concepts
 Calandra Racing Concepts Carpet Knifeä Version 3 Assembly and Setup Manual Congratulations! You now own the best 1/12th scale car on the market today, the Carpet Knifeä Version 3. This completely new car
BEFORE YOU START. XRAY Europe K Výstavisku 6992, Trenčín Slovakia EUROPE. XRAY USA RC America, 2030 Century Center Blvd #15 Irving, TX USA
 BEFORE YOU START The X12 is a high-quality, 1/12-pan car intended for persons aged 16 years and older with previous experience building and operating RC model racing cars. This is not a toy; it is a precision
BEFORE YOU START CUSTOMER SUPPORT
 BEFORE YOU START The X10 is a high-quality, 1/10-pan car intended for persons aged 16 years and older with previous experience building and operating RC model racing cars. This is not a toy; it is a precision
OTK CHASSIS- SET UP GUIDE
 OTK CHASSIS- SET UP GUIDE Introduction This setup guide is created to facilitate a user of OTK equipment to reach an optimal chassis setup and on-track performance. The different tuning possibilities and
POWER TRUCK XGX 3 PACKING LIST INSTRUCTION MANUAL
 XGX 3 POWER TRUCK INSTRUCTION MANUAL 14 PARTS - SERVICE - REPAIRS OPEN Mon - Fri 9 am-6 pm... Sat 10 am-3 pm (EST) Distributed and serviced by: Extreme RC by RSI... Ferndale, MI 48220 Phone: (586) 757-1336
RB5 MID CUSTOM SPECIAL INSTRUCTIONS MANUAL
 RB5 MID CUSTOM SPECIAL INSTRUCTIONS MANUAL INTRODUCTION This manual is intended to the few people who were lucky enough to get their hands on a Mid Custom Special conversion for the Kyosho RB5. Due to
OWNER'S MANUAL. Take your time and pay close attention to detail. Keep this manual for future reference. MADE IN THE UNITED STATES OF AMERICA
 OWNER'S MANUAL Carefully read through all instructions to familiarize yourself with the parts, construction techniques, and tuning tips outlined in this manual. Being able to grasp the overall design of
Wheel Alignment Defined
 Wheel Alignment Defined While it's often referred to simply as an "alignment" or "wheel alignment," it's really complex suspension angles that are being measured and a variety of suspension components
Assembly Manual. 1/10th Formula 1 Car
 Assembly Manual 1/10th Formula 1 Car Center Pivot Bag 1 3374 - Center Pivot Socket 40194 - Hard Anodized Alum Pivot ball 3254-2-56 *Note - Sometimes it is helpful to slightly over-tighten the top clamp
Additional equipment and parts needed: Tools needed: Disclaimer: Warnings: Warranty:
 Introduction Thank you for purchasing the Tekno RC SCT410 1/10th Scale Electric 4WD Competition Short Course Truck. The SCT410 represents the state-of-the-art in 1/10th Electric Short Course technology.
#0715 NITRO ROCKET KIT
 #0715 NITRO ROCKET KIT Manufactured By: 760-B Crosspoint Drive Denver, NC 28037 www.customworksrc.com REQUIRED READING.........UNDERSTAND THIS MANUAL! Thank You and Congratulations on purchasing the ROCKET!
RJS2001 PRO STOCK KIT LESS ELECTRICS
 RJS2001 PRO STOCK KIT LESS ELECTRICS THANKS FOR BUYING RJ SPEED S PRO STOCK DRAG KIT. IT IS MADE FOR STRAIGHT LINE DRAG RACING AND CAN BE BROKEN IF RUN INTO SOLID OBJECTS REPEATEDLY AT HIGH SPEED. IT REQUIRES
Use this NT Supplementary Instruction Sheet along with the standard NT1 Instruction Manual included in the kit.
 INSTRUCTION MANUAL SUPPLEMENTARY SHEET Use this NT1 2013 Supplementary Instruction Sheet along with the standard NT1 Instruction Manual included in the kit. New and Improved Parts All of these parts are
Contents. Symbols Used. Equipment Required L=R. Page. Apply Thread Lock. Apply. Silicone Oil. 30mm Fan
 Contents Content Page Content Page Content Page 0. Tool and Accessories 1.Filing the Edges of the Chassis 2.Bulkhead Installation 3.Spur Gear Assembly 4.Front Spool Assembly 5.Gear Differential Assembly
Chrysler A-Body Tubular A-Arms Installation Instructions A-ARM INSTALLATION
 1967-1976 Dodge Demon 1112 67-72 Chrysler A-Body Tubular A-Arms Installation Instructions Thank you for your purchase of this Hotchkis Performance product. Your A-Arm set was designed with the performance
RJS WB ELECTRIC T/F DRAGSTER KIT LESS ELECTRICS
 RJS2006 30 WB ELECTRIC T/F DRAGSTER KIT LESS ELECTRICS THANKS FOR BUYING THIS RJ SPEED DRAGSTER KIT. IT IS MADE FOR STRAIGHT LINE DRAG RACING AND MAY BE BROKEN IF RUN INTO SOLID OBJECTS REPEATEDLY AT HIGH
Item Number Item Name MSRP MAP
 Kits and RTRs 4021 RC12R6-FT KIT $439.99 $285.99 7063 ProSC 4x4 RTR $529.99 $334.99 7063C ProSC 4X4 RTR LiPo Combo $599.99 $379.99 8023 RC10F6 Factory Team Kit $499.99 $339.99 20150 SC28 RTR LUCAS OIL
ASSEMBLY AND OPERATION MANUAL
 Weight: 1lb 14oz Length: 17.25" [435mm] Width: 8" [205mm] Height: 4.5" [115mm] Wheelbase: 10.5" [265mm] Motor: 20 Turn Photon Speed Radio: 2 channel surface frequency Technical Support Information For
#0926 ENFORCER G6 DIRECT DRIVE RACING KIT
 #0926 ENFORCER G6 DIRECT DRIVE RACING KIT Manufactured By: 760 Crosspoint Drive Denver, NC 28037 www.customworksrc.com REQUIRED READING...UNDERSTAND THIS MANUAL! Thank You and Congratulations on purchasing
ASSEMBLY AND OPERATION MANUAL
 Length: 9.5" [240mm] Width: 7.4" [185mm] Height: 4.7" [120mm] Ground Clearance: 1.25" [32mm] Weight: 25 oz [725g] approx. running weight with battery/motor/esc Technical Support Information For technical
Assembly Manual. 1/10th World GT car
 Assembly Manual 1/10th World GT car Center Pivot Bag 1 3374 - Center Pivot Socket 40194 - Hard Anodized Alum Pivot ball 3254-2-56 Button Head *Note - Sometimes it is helpful to slightly over-tighten the
2011+ Adjustable Tie-rod Ends (Mm5TR-2)
") 3430 Sacramento Dr., Unit D San Luis Obispo, CA 93401 Telephone: 805/544-8748 Fax: 805/544-8645 www.maximummotorsports.com 2011+ Adjustable Tie-rod Ends (Mm5TR-2) Instructions 1. Set the parking brake
3430 Sacramento Dr., Unit D San Luis Obispo, CA 93401 Telephone: 805/544-8748 Fax: 805/544-8645 www.maximummotorsports.com 2011+ Adjustable Tie-rod Ends (Mm5TR-2) Instructions 1. Set the parking brake
Pan Car Setup and Troubleshooting
 Pan Car Setup and Troubleshooting Problems can come up in the midst of competition. Either the car is not handling properly on the track or there are problems with equipment. Troubleshooting problems should
SETTING UP THE HUDY WAY
 SETTING UP THE HUDY WAY SEVERAL years ago, following the launch of the original XRAY 808 1:8 GP Off Road Buggy, Chief Designer, Juraj Hudy, travelled with his team to USA to race major events in the lead
BEFORE YOU START. XRAY USA RCAmerica, 167 Turtle Creek Boulevard Suite C Dallas, Texas 75207, USA
 BEFORE YOU START The X12 is a high-quality, 1/12-pan car intended for persons aged 16 years and older with previous experience building and operating RC model racing cars. This is not a toy; it is a precision
SUSPENSION 2-1 SUSPENSION TABLE OF CONTENTS
 XJ SUSPENSION 2-1 SUSPENSION TABLE OF CONTENTS page ALIGNMENT... 1 FRONT SUSPENSION... 7 page REAR SUSPENSION... 16 ALIGNMENT TABLE OF CONTENTS page AND WHEEL ALIGNMENT...1 DIAGNOSIS AND TESTING SUSPENSION
What s in the Box? AMT Motorsport C5/C6 Corvette Steel Frame Camber Kit User s Guide
 AMT Motorsport C5/C6 Corvette Steel Frame Camber Kit User s Guide Thank you for purchasing the AMT Motorsport Camber Kit. We believe this is the most versatile camber kit available on the market, but with
IMPORTANT. These are included with your VW Baja Bug. These are items you will need to run your VW Bug. ONYX 6C 7.2V 2000MAH NIMH STICK DTXC2035
 www.duratrax.com These are included with your VW Baja Bug. Chassis Body Transmitter Receiver Antenna Tube Instruction Manual Replacement Parts Guide IMPORTANT These are items you will need to run your