DIE MASTER. User Manual DMRR-4013 DMRR 4013
|
|
|
- Kelley Potter
- 6 years ago
- Views:
Transcription
 951-8351 FAX")

1 212 W Lodge Drive TEMPE, AZ PHONE (480) FAX (480) DIE MASTER User Manual DMRR 4013
2 BSR-4010 TABLE OF CONTENTS SECTION 1: GENERAL INFORMATION 1-4 SECTION 2: MACHINE INSTALLATION 4-5 SECTION 3: MACHINE SETUP 6-11 SECTION 4: MACHINE OPERATION SECTION 5: MAINTENANCE 23 SECTION 6: SATION DETAIL SECTION 7: TROUBLESHOOTING 36 SECTION 8: WARRANTIES AND SERVICE 37
3 Section 1: General Information 1-1: Introduction The AZTECH DieMaster Rotary Die Cutting Machine is available in 13 inch (33.02 cm), and 18 inch (45.72 cm) widths, with dual-spindle rewinds, and web speeds up to 500 feet/minute. The DieMaster is designed to be highly productive, versatile, and simple to operate and maintain. Before operating your new DieMaster, fully read and understand all facets of this manual. Following the Procedures outlined in this manual will help assure maximum performance. Keeping your machine properly set-up and maintained will assure years of productive and satisfactory service. 1-2: Machine Information and Specifications 1
4 FRONT LAYOUT 2 Rev 1.0
5 SIDE LAYOUT Web Width: 13.0in (33cm) Unwind Capacity: 40in (101.6cm) Rewind Capacity: 16in (40.6cm) dual RW 24in (60.9cm) single RW Web Speed: 500FPM (Job Dependant) Main Drive: 3 HP DC Rewind Drive: 1 HP DC Die Nip: Yaskawa 1.3kW Servo Power Requirements: 50A 220VAC 60Hz 0.9CFM 3
6 1-3: Care and Maintenance To assure maximum performance and longevity of your Die Master, it is very important to perform periodic maintenance. Read Chapter 5 for more information. 1-4: Safety The DieMaster is designed to operate at high rates of speed, employing rollers, gears, pulleys, and other moving parts. Where possible, guards are provided to protect operator from injury. Operators must keep their hands clear of the machine when it is in operation. Making all operators aware of potential safety hazards will help minimize any chances of operator injury. Section 2: Machine Installation 2-1: Preparation It is important that your DieMaster Rotary Die Cutter be situated on solid and level ground. Make sure that site allows for access to machine from all 4 sides. If the machine is placed on unstable or un-level ground, it may tip over risking damage or serious personal injury. 2-2: Un-crating Machine To avoid damage to your new DieMaster, begin by unfastening the latches on the front panel and removing the panel to expose the machine. Carefully remove all boxes from inside the crate and set aside to avoid damage. Remove all 4 lag bolts which hold the machine to the base. 2-3: Removal and Positioning It is critical that the DieMaster be removed from the crate using a fork lift, making sure that the forks fit directly inside the 2 slots at base of the machine. Lift and remove from crate, and if equipped with adjustable feet, thread all 4 feet into threaded holes at machine s base, and lower into desired position. Machine may be leveled by turning adjustable feet until level. 60A 220VAC THREE PHASE 2-4: Electrical and Pneumatic Connections TO DISCONNECT ELECTRICAL CONNECTIONS: Your DieMaster uses a power supply of 220 volts, 20 amps AC. Improper connections or mishandling may cause serious personal injury. AZTECH highly recommends that electrical service be performed only by a qualified electrician. Electrical connection to the machine is performed by bringing electrical service to the electrical box at the back of the machine and making connections as shown. 4 Rev 1.0
7 90PSI INCOMING HP AIR PNEUMATIC CONNECTIONS: Although your machine has been thoroughly tested before shipment, connections on occasion may loosen during shipment. Visually inspect all pneumatic to assure that each is fitted securely. Connect airline to the pneumatic control panel at the back of the machine (see figure 2-B), and listen for any air leaks that may exist. Check all switches by switching back and forth from on and off to make sure they are operating properly. NOTE: Red lines on air dials indicate proper default settings. 2-5: Testing Before Operation Make sure the area around your machine is clear of any objects which may impair the machine. Also inspect and make sure all belts, pulleys, rollers, and spindles are free and clear of any objects which may impede operation, and risk machine damage. Before threading your machine, accelerate and decelerate your machine through a full range of speeds, and make sure acceleration is smooth and free of any unnatural sounds or movements. Using control switches, switch Unwind and Rewind Spindle(s) from on and off positions making sure the pneumatic system is performing properly. Then turn power on, run machine at low speed to assure machine is working properly. Then with speed set at maximum setting, press the stop button to assure that the brake is working properly. 5
8 3-1: Webbing the Machine Section 3: Machine Setup Proper webbing of your DieMaster is vital to optimal machine performance. The proper way to thread your machine for various substrates is shown on the following page. Any improper webbing of the machine may cause tension problems that will impede operation. To web the machine: 1. Turn unwind arbor switch to DEFLATE position. 2. Assure that the rewind and unwind switches on main panel are in the OFF position 3. Assure that both splice-table clamps are released into the up position. 4. Assure that the pneumatic nip roll is disengaged in the up position. 5. Assure that the slitting blades are disengaged. BE SURE TO USE CAUTION WHEN NEAR RAZOR SLITTING BLADES AS THEY ARE EXTREMELY SHARP AND MAY CAUSE SERIOUS INJURY. 6. Load roll onto unwind spindle and carefully thread the web through the machine making sure to follow web paths on the following page. 6 Rev 1.0
9 DMRR 4013 w/ UDB Web Path SERVO NIP ROLLS MAGNETIC DIE ROLLS IMPRESSION ROLLS OPTIONAL IDLE R ROLLERS MINUMUM WEB PATH Proper webbing of your DieMaster is vital to optimal machine performance. The proper ways to thread your machine for various substrates are shown. Any improper webbing of the machine may cause tension problems that will impede operation. 7
10 AUTOMATIC SERVO CENTER 3-2: Web Guide Setup The web guide is located in the center of the machine between the unwind and rewind stations. After webbing the machine, set the web by doing the following: Setting the Web Guide: COARSE SENSOR POSITIONING 1. Press the SERVO-CENTER button on the front of the web guide. 2. Align the sensor with the inside edge of the web. For fine alignment adjustment, turn knob on outside of web guide. 3. Jog the machine briefly to assure that the web is moving smoothly. 4. Press the AUTOMATIC button which will engage the sensor and allow the web guide to adjust itself to the movement of the web. 5. For more specific instructions about the features of the web guide, refer to the Accu-Web manual included with this manual. FINE SENSOR POSITIONING 3-3: Nip Roll Operation The Nip Roll is pneumatically controlled using control switch and must be in the up position while machine is running, and in the down position when threading machine. 8 Rev 1.0
11 SLITTING CHANNEL AZTECH CONVERTING SYSTEMS 3-4: Splice Table Operation The splice table on your Sidewinder BSR is located just above the Unwind Station, just after the optional Inspection Tower. To operate the Splice Table, simply follow the following steps: WEB CLAMP SWITCHES 1. Turn off machine and engage both web clamp switches. 2. Using a razor blade, carefully cut the web along the slicing channel. Disengage the clamp nearest the unwind station. Be sure to leave the other clamp engaged. 3. After waste has been removed, pull through new web, carefully align with web, and lower the handle to hold. 4. Again using a razor blade, cut the web, discard waste, pull tape under webs, fold to secure and cut tape. 5. Disengage both switches to release web clamps. 9
12 3-5: ROTARY SHEAR SET-UP Step 1 Set lower blades for desired Slit-widths and tighten set-screws, making sure upper blades are up and not in lock position. REMOVE COVER Step 2 Lower upper blade assembly by turning handle counter-clockwise and snap into lock position, making sure that the upper blades are clear of lower blades to avoid blade damage. Step 3 Gently slide upper blade(s) into cutting position flush against the lower blade(s) by pushing on both sides of the blade to avoid wobble. Hold upper blade against lower blade and tighten set-screw. TURN TO UNLOCK SLITTER TIGHTEN SET SCREWS TO LOCK BLADES 10 Rev 1.0
13 LOOSEN SET SCREW HERE SLIDE FORWARD TO REMOVE 3-6: Changing Rewind Spindle Your BSR Slitter/Rewind Inspector is equipped with Convertech pneumatically inflatable rewind spindles. These spindles are easily removed by loosening the hex-screw at the machine side and pulling away from machine. To insert new spindle, simply insert spindle into rewind station and tighten hex-screw firmly. CAUTION: Utilizing Rewind Spindles less than 1.5 in diameter require the use of Outboard Support Apparatus which is NOT included in the standard equipment. Operating the machine without the support apparatus and with spindles less than 1.5 may result in serious injury. 11
14 Section 4: Machine Operation 4-1: Operator Control Layout TOUCH SCREEN MACHINE INTERFACE REWIND TENSION ENABLE COUNTER E-STOP RATE METER INCH/ LABEL SELECT SPEED KNOB REWIND TENSION CONTROL REWIND AND NIP SWITCHES START, STOP, JOG BUTTONS 12 Rev 1.0


15 4-2: Registration Overview Your Die Master rotary die cutting system is equipped with a Re-Registration system for precisely controlling web tension as well as web position with relation to the die stations. This allows the Die-Master to be used as an all-in-one converting solution for printing or other registration controlled processes. The registration system is controlled by an industrial-pc running an HMI program and controlling mulitple servo-motor controllers within the electrical control cabinet seperate from the main machine. On power-up the PC boots and displays the AZTECH logo. Once it is finished loading, the MAIN MENU screen will be displayed. 13

16 Run Screen Setting up a job: 1. Use the RECIPIE NAME selection tool to call up a pre-programmed job 2. Turn the Registration system ON by pressing the Registration ON/OFF button in the lower right section of the screen. 3. Check to see that the machine is clear, the E-Stop is un pressed and there are no warnings present. 4. Press the start button on the operator panel and run the job. 5. Observe the run status by changing the readout units of the number displayed in the lower right corner by pressing the selections directly above the number. RECIPE NAME REGISTRATION ENABLE DIE REPEAT AND MANUAL REPEAT ADJUSTMENT 14 Rev 1.0


17 The various HMI menu selection prompts will direct you to the different sub-sections of the HMI. 15


18 Recipie Editor Press value to edit values Press to save changes. The Help menu provides an explaination of each recipe value. 16 Rev 1.0

19 Help Menu Accel: Scalar value determining the acceleration of a registration correction. Decel: Scalar value determining the deceleration of a registration correction. Die Tooth Qty: The number of teeth in the die pattern Repeat Qty: The number of repeats in the die Print Size: The distance from mark to mark in inches Flexo 1: The percent of overdrive on Flexo 1, 0.01% Flexo 2: The percent of overdrive on Flexo 2, 0.01% 17
20 Diagnostics, 1 If an error is generated, the explaination is given here. 18 Rev 1.0

21 Diagnostics, 2 The percent of total output is given here. If regen errors are experienced, they are typically accompianied by high values here. Correct the issue by turning down the overdrive values. 19

22 System Settings Per terms of delivery, a password is given to liscense the machine. It is entered here. 20 Rev 1.0
. ALWAYS USE CAUTION WHEN HANDLING ROTARY TOOLING AS DAMAGE MAY OCCUR IF MISHANDLED.")
 Use spacer washer(s) on journal on gear side to assure that the die gear is properly aligned to the anvil roll gear.")
23 4-3: Mounting Rotary Die(s) in Die Station Recapping the set-up procedures as outlined in Chapter 3, carefully follow the web path diagram in 3.1-2, web the DieMaster, and adjust the web guide if needed (see diagram 3-2). ALWAYS USE CAUTION WHEN HANDLING ROTARY TOOLING AS DAMAGE MAY OCCUR IF MISHANDLED. WHEN LAYING A ROTARY DIE DOWN, ALWAYS MAKE SURE TO SET ON SOFT SURFACE TO HELP AVOID DAMAGE. To correctly mount a rotary die: 1) Use spacer washer(s) on journal on gear side to assure that the die gear is properly aligned to the anvil roll gear. 2) Slide square bearing block onto gear side journal and slide die into place. If gears are not aligned properly, remove die, and add or remove washers until aligned. 3) Use spacer washer(s) on outboard side, and slide quarter-turn bearing block onto shaft and turn counter-clockwise, making certain that the die is snug and does not slide around. 4) With die in proper position, set die truck onto die making certain the bearings ride against the rotary die bearers. 5) Slide die bridge into place, tighten all 4 hex screws, and turn both assist knobs clockwise until snug. Secure die by turning the lock knobs clockwise until tight. 6) Using the pre-drilled holes near the die station, secure the 4 die wipers against the die bearers and lubricate all 4 with oil to help keep debris away from die. 21
24 4-4: Using the Waste-Windup With die properly positioned, slide a core onto the waste-windup spindle, inflate using the switch and perform the following steps: 1) Jog the machine to briefly begin cutting and than stop. 2) Peel the waste away from the web, using caution by keeping hands away from the die, and hold with one hand while jogging the machine to produce enough length of waste to reach the waste wind-up. 3) Thread the waste by wrapping around the capstan roll, then around the knurled idler roll, before securing to the waste windup spindle. 4) Adjust both lower capstan and waste-windup spindle tensions using the pneumatic dials. CAUTION: ALWAYS KEEP HANDS OR LOOSE CLOTHING AWAY FROM THE DIE WHEN THE MACHINE IS IN MOTION TO AVOID THE POTENTIAL FOR SERIOUS PERSONAL INJURY. 4-5: Using the Waste-Windup The cranks at the front of the machine may be used to adjust the die timing. Timing position is shown by the bar and scale are the top rear of the machine. 22 Rev 1.0
25 Chapter 5: Maintenance The DieMaster Rotary Die Cutting Machine is rigidly constructed to provide your company many years of reliable productivity, however regular and periodic maintenance is required to keep it running to its full potential and to avoid damage. To assure maximum performance and longevity, the following maintenance is essential: REGULAR MAINTENANCE: Lubricate Die and Anvil Roll bearing blocks by applying oil into holes at the top of the bearing blocks. Apply oil to all fiber wiper rolls to keep dies and rollers free of debris. Apply heavy viscosity gear grease to all roller gears. Apply grease to the die trucks using the (4) fittings and apply oil to the felt pads between the bearings and trucks. Clean blades on slitting station. PERIODIC MAINTENANCE: Turn off power and remove back cover to inspect all belts assuring they are tightened sufficiently. Clean the web guide sensor to assure that it is free of dust and debris. Clean counter sensors inside the machine under the pace roller to assure that they are free of dust and debris. Assure that all belts are sufficiently tight and tighten any loose belts. 23
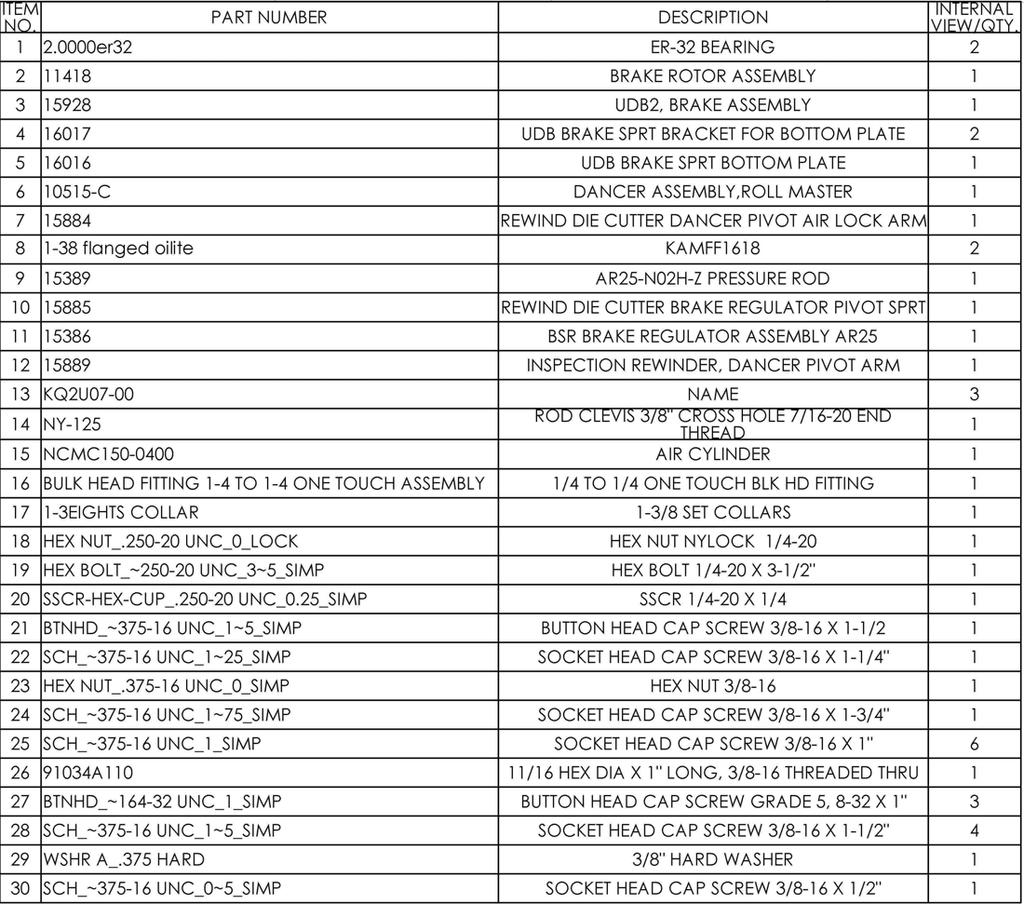
26 Chapter 6: Station Detail UDB Assembly 24 Rev 1.0
27 25
28 UDB Brake Detail 26 Rev 1.0

29 27
30 Waste Windup Assembly 28 Rev 1.0
31 Rotary Die Station: Support Roll Assembly 29
32 Rotary Die Station: Anvil Roll Assembly 30 Rev 1.0
33 Rotary Die Station: Die Truck Assembly 31
34 Main Drive: Nip Roll Assembly 32 Rev 1.0
35 Main Drive: Pace Roll Assembly 33
36 Slitting Station: Main Assembly 34 Rev 1.0
37 Slitting Station: Rotary Shear Assembly 35
38 Section 7: Troubleshooting 7-1: Why doesn t the machine turn on? First check to make sure that the main power switch on the back electrical panel is turned on. Then make sure that the emergency stop button on control panel is disengaged. 7-2: The counter is not counting accurately. Inspect and clean both counter sensors located in the machine on the gear underneath the pace roller. 7-3: Why is the counter not counting inches? Make sure that the counter sensor below the web guide is flashing red which assures that it is properly connected to the machine. Be sure that the setting on the PLC is Distance. 7-4: Why is the counter not counting labels? If your machine is equipped with the optional label counter and is not doing so, after assuring that the counter sensor below the web guide is flashing red which assures that it is properly connected, assure that the PLC is set to LABELS. 7-5: Why isn t the end-of-roll sensor working? If your DieMaster is equipped with the optional end-of-roll shut-down and it is not shutting down the machine when the unwind roll is near the end, or if it is shutting down prematurely, perform the following: 1. Assure that the light on the sensor (see figure 7-B) located near the unwind spindle is illuminated. 2. If not illuminated, check wiring for proper connections or damage. If wiring is set up properly, the sensor may need to be replaced. 3. If illuminated, the sensor may be in need of adjustment. If the machine is shutting down prema- Set Screw turely, the sensor needs to be moved closer to the unwind spindle, where if it is not shutting down the machine at all, the sensor needs to be moved away from the unwind spindle. To adjust the sensor, simply loosen the set screw, slide bracket in either direction, and re-tighten. Adjust Sensor Height 36 Rev 1.0
39 8-1: Warranties & Provisions Section 8: Warranties and Service WARRANTIES: All equipment manufactured and sold by AZTECH Converting Systems (Seller) is warranted to be free of defective materials and workmanship under normal use and service for a period of one (1) year from the date of delivery to Buyer's premises. All commercial components not manufactured by Seller carry the original manufacturer's warranty. At Seller's discretion, Seller may provide on-site warranty service for a period of ninety (90) days from the aforementioned date. REMEDIES If within the Warranty Period any such Equipment is proven to Seller's satisfaction to be defective in either material or workmanship, Seller, at its sole discretion, shall (a) repair or replace defective parts on the Equipment at Seller's cost, or (b) grant a reasonable allowance on account of such a breach. If within the Warranty Period the Seller receives notice from Buyer of defects in parts or materials. Seller will ship (ground, prepaid) replacement parts) and invoice Buyer for the full cost of the replacement parts). Buyer will receive a Return Authorization (RA) from seller, and return defective parts or materials to Seller, who at its sole discretion shall determine whether defective parts or materials are or are not subject to exclusion from this warranty as provided herein. Any defective parts or material not excluded from the Warranty Period will then be fully credited to Buyer. EXCLUSIONS THE FOLLOWING ITEMS ARE EXCLUDED FROM THIS WARRANTY: Defects or damage caused by careless or improper use. Parts that need periodic replacement from wear during normal operation. Routine maintenance and adjustment. Failure or damage caused by improper installation or inadequate maintenance by Buyer. Failure or damage caused by equipment modifications by Buyer. Equipment damage resulting from an accident, or abnormal conditions of operation. DISCLAIMER OR WARRANTY NO OTHER WARRANTY IS EXPRESSED OR IMPLIED INCLUDING WARRANTIES OF MER- CHANTABILITY AND FITNESS FOR ANY PARTICULAR PURPOSE. SELLER IS NOT LIABLE FOR INCIDENTAL OR CONSEQUENTIAL DAMAGE SUCH AS, BUT NOT LIMITED TO LOSS IN PROFITS, LOSS OF USE OF EQUIPMENT, OR INCREASED IN OPERATING COSTS OR EX- PENSES. 8-2: Technical Service In the event that your DM is not functioning properly or if you have any technical questions, an AZ- TECH Technical Service representative is available to assist you. Contact information is as follows: Phone: Fax: techservice@aztechconverting.com 37
AZTECH CONVERTING SYSTEMS 212 W Lodge Drive TEMPE, AZ PHONE (480) FAX (480)
 FAX (480)") 212 W Lodge Drive TEMPE, AZ 85283 PHONE (480) 951-8351 FAX (480) 998-5409 www.aztechconverting.com ROLL RUNNER User Manual MH-800 TABLE OF CONTENTS SECTION 1: GENERAL INFORMATION 1-4 SECTION 2: MACHINE
212 W Lodge Drive TEMPE, AZ 85283 PHONE (480) 951-8351 FAX (480) 998-5409 www.aztechconverting.com ROLL RUNNER User Manual MH-800 TABLE OF CONTENTS SECTION 1: GENERAL INFORMATION 1-4 SECTION 2: MACHINE
CRD610 Automatic Fitting Inserter
 CRD610 Automatic Fitting Inserter OPERATIONS MANUAL VERSION 1.2 LAST EDITED 12.12.2018 cleanroomdevices.com 1 Table of Contents Title Page. 1 Table of Contents...2 1.0 General Product & Safety Information....3
CRD600 Automatic Fitting Inserter
 CRD600 Automatic Fitting Inserter OPERATIONS MANUAL VERSION 2.3 LAST EDITED 12.07.2018 cleanroomdevices.com 1 Table of Contents Title Page.. 1 Table of Contents. 2 1.0 General Product & Safety Information...3
CLEAN ROOM DEVICES, LLC "WHERE TUBING AND FITTINGS COME TOGETHER"
 CLEAN ROOM DEVICES, LLC "WHERE TUBING AND FITTINGS COME TOGETHER" CRD600AF Automatic Fitting Inserter With Auto Feed OPERATIONS MANUAL (Shown with optional alcohol dispenser) 1 VERSION 1.1 LAST EDITED
Easy Packer. Industrial Case Erecting, Packing and Taping System. User Guide
 Easy Packer Industrial Case Erecting, Packing and Taping System User Guide Easy Packer Industrial Case Erecting, Packing and Taping System User Guide Revised 04/19/2012 P/N XXXXXXX Rev A Copyright and
CLEAN ROOM DEVICES, LLC "WHERE TUBING AND FITTINGS COME TOGETHER"
 CLEAN ROOM DEVICES, LLC "WHERE TUBING AND FITTINGS COME TOGETHER" CRD600 Automatic Fitting Inserter OPERATIONS MANUAL VERSION 2.1 LAST EDITED 7.25.14 DOCUMENT NUMBER 001 cleanroomdevices.com 1 Table of
Please read this manual carefully before operating! Unpacking, assembly, and operating videos are available at
 OPERATING MANUAL Gfp 563TH Please read this manual carefully before operating! Unpacking, assembly, and operating videos are available at www.gfpsmoothstart.com 1 Table of Contents Contents Page 1. Introduction
OEM TM-50 Quick Start Guide
 This quick start guide provides basic setup and operating instructions for the OEM TM-50. The intended use of the OEM TM-50 Taping Machine is to produce taped reels of individually sealed and consistently
SPECIFICATIONS CONTENTS: Specifications Warning Information. Operating Instructions Preventative Maintenance Troubleshooting
 Model 3182 2,500 Lbs Power Train Table/Lift OWNER'S MANUAL CONTENTS: Page 1 Page 2-3 Page 3 Page 4 Page 5 Page 5 Page 6 Page 7 Page 8 Specifications Warning Information Setup Operating Instructions Preventative
Please read this manual carefully before operating! Unpacking, assembly, and operating videos are available at
 OPERATING MANUAL Gfp 563TH Please read this manual carefully before operating! Unpacking, assembly, and operating videos are available at www.gfpsmoothstart.com 1 Table of Contents Contents Page 1. Introduction
Installation Instructions Limb Riser Kit JK, TJ, XJ Part#7611, 7612,7613
 NOTE: Carefully read entire instructions thoroughly before attempting to install this part. Parts included Qty Windshield Bracket L+R Lower Bracket (JK+XJ) 2 Lower Bracket (TJ) L+R M8-1.0x30mm Hex head
RolsplicerTM. Maintenance Manual And Illustrated Parts List
 RolsplicerTM Maintenance Manual And Illustrated Parts List List of Illustrations Figure Page. Rolsplicer 3 2. Roller Adjustment 4 3. Rolsplicer 6 4. Lid Hold Down Assembly 8 5. Automatic Lid Speed Adjustment
Electrical Schematic and Pneumatic Wiring Diagrams
 THE EASTMAN Raptor Electrical Schematic and Pneumatic Wiring Diagrams Technical Support: 1-800-87-5595 Please read completely before attempting to operate your new RAPTOR. ELECTRICAL HAZARD Electrical
Air Lift. Kit Honda Prelude ( ) PERFORMANCE INSTALLATION GUIDE
 PERFORMANCE INSTALLATION GUIDE") Air Lift PERFORMANCE Kit 75532 Honda Prelude (1992-2001) Cover illustration may not depict actual kit. MN-542 (06708) ECR 6206 INSTALLATION GUIDE For maximum effectiveness and safety, please read these
Air Lift PERFORMANCE Kit 75532 Honda Prelude (1992-2001) Cover illustration may not depict actual kit. MN-542 (06708) ECR 6206 INSTALLATION GUIDE For maximum effectiveness and safety, please read these
FTFR Maintenance and Parts Manual SQ-1 FLOOR TRUSS FINISH ROLLER. Operators Manual
 FTFR Maintenance and Parts Manual SQ-1 FLOOR TRUSS FINISH ROLLER Operators Manual FOREWORD This manual explains the proper maintenance of Square 1 Design Floor Truss Finish Roller as well as the daily
Modern ManufacturingServices.LLC. Attachments And Auxiliary Equipment
 Attachments And Auxiliary Equipment Proudly Manufactured in the USA Modern ManufacturingServices.LLC 640 East Main Street Palmyra NY 14522 Phone 585-289-4261 Fax 585-289-7909 Unwinds And Folding Systems
G500REC Manual Covering System for Containers
 10 Boulder Parkway N. Oxford, MA 01537 866-353-5826 pioneersales@wastequip.com www.pioneercoverall.com G500REC Manual Covering System for Containers Installation Manual WARNING: In order to prevent damage,
Adjustable Angled Incline Conveyor Owners Manual with Operating Instructions
 Adjustable Angled Incline Conveyor Owners Manual with Operating Instructions Revision 012211 Table of Contents Basic Conveyor Features 3 Getting Started 4 Setting Up the Incline Conveyor 5 Belt Removal
Read this entire manual before operation begins.
 Read this entire manual before operation begins. Record below the following information which is located on the serial number data plate. Serial No. Model No. Date of Installation Contents Specifications.............
Contact-free Reel Mower
 Contact-free Reel Mower model number 060-00-0 contact us: 866-8 IMPORTANT: Read and understand all safety rules and operating instructions before using this product. Instruction Manual model number 060-00-0
HOG SLAT. Pit Scraper System. Installation Instructions. Take special note of any warnings or safety decals on the equipment and in this manual.
 HOG SLAT Installation Instructions General Installation Notes: Make sure that all power is disconnected at source prior to installation. Installation of this equipment and related OEM equipment should
Level One Electric Vehicle Charging Station FREE STANDING Product Guide
 Level One Electric Vehicle Charging Station FREE STANDING Product Guide Model # SC2-120 Shorepower Technologies 2351 NW York St. Portland, OR 98664 503-892-7345 info@shorepower.com www.shorepower.com 2
2100 Childbearing Bed OPERATIONS MANUAL. For Parts or Technical Assistance
 2100 Childbearing Bed OPERATIONS MANUAL For Parts or Technical Assistance 1 800 327 0770 Table of Contents INTRODUCTION........................................................................... 2 SPECIFICATIONS.........................................................................
Read this entire manual before operation begins.
 Read this entire manual before operation begins. Record below the following information which is located on the serial number data plate. Serial No. Model No. Date of Installation Contents Specifications.............
Universal Bench-top Conveyor OPERATOR S GUIDE
 OPERATOR S GUIDE DISCLAIMER LIABILITY LIMITATION: The Buyer of this product accepts full responsibility and understanding for the terms and specifications set forth herein. Con-Trol-Cure makes no claim,
B DUAL DRUM SANDER
 OWNER S MANUAL B2022-25 DUAL DRUM SANDER INDEX GENERAL SAFETY INSTRUCTIONS Page 3 Specifications Page 4 Features Page 5 Assembly Instructions Initial Assembly Page 6 Installing Abrasives Page 7 Adjusting
Application Techniques for Reflective Pressure-Sensitive Films
 Introduction Before starting application consult the appropriate product data bulletin for information regarding minimum and maximum application temperatures, recommended substrates, and immediate service
AUTO REWIND AIR HOSE REEL
 Model #s 46845, 46848 AUTO REWIND AIR HOSE REEL OPERATOR S MANUAL STORE THIS MANUAL IN A SAFE PLACE FOR FUTURE REFERENCE!? NEED HELP? Save time, contact us first. 888-648-8665 support@tekton.com WARNING:
Hawk Enterprises of Elkhart THE BRUTE Owner s Manual
 Hawk Enterprises of Elkhart THE BRUTE Owner s Manual Operation Care Service COMMERICAL/INDUSTRIAL DUTY STONE RESTORATION MACHINE 13, 15, 17, 20 165 RPM 1.5 HP 180 FRAME TOTALLY ENCLOSED FAN COVERED MOTOR
INSTALLATION INSTRUCTIONS
 INSTALLATION INSTRUCTIONS Thank you for purchasing VANISH Roll-Up Cover. Agri-Cover, Inc. proudly manufactured this cover using superior quality materials and workmanship. With proper care, your cover
Installation & Set-Up Instructions
 Installation & Set-Up Instructions Hayes Performance Systems 5800 W. Donges Bay Rd. Mequon, WI 53092 Tel: 888.686.3472 Email: techsupport@hayesbicycle.com Web: www.hayescomponents.com Hayes Components
Instruction Manual for Operation & Maintenance
 Instruction Manual for Operation & Maintenance BigSprinkler.com 15250 Sunshine Rd. Yukon, OK. 73099 1-855-805-7901 Introduction Thank you for purchasing a ReelGreen RG25 Traveling Sprinkler System. Please
MODEL BARE REEL SERIES E
 MODEL 84275 BARE REEL SERIES E SPECIFICATIONS Maximum working pressure 5000 p.s.i. Material Inlet 1/2 NPT (Female) Material outlet 1/2 NPT (Female) Sheave width 10 Sheave diameter 19-1/4 Drum diameter
Wood Chipper Model C550M Operator's Manual
 Wood Chipper Model C550M Operator's Manual THIS MANUAL MUST BE READ AND UNDERSTOOD BEFORE ANYONE OPERATES THIS MACHINE! Manual# 990023 Revised 01/2010 YOU MUST FILL OUT YOUR WARRANTY REGISTRATION TO ACTIVATE
STYLE 9300 FLOW/PRESSURE METER INSTALLATION & OPERATING INSTRUCTIONS
 STYLE 9300 FLOW/PRESSURE METER INSTALLATION & OPERATING INSTRUCTIONS INTRODUCTION The Style 9300 Flow/Pressure Meter from Akron is designed to offer reliable and accurate service with an easy to install,
Read this entire manual before operation begins.
 Read this entire manual before operation begins. Record below the following information which is located on the serial number data plate. Serial No. Model No. Date of Installation Contents Specifications.............
Web Volume Control Model WV220
 WEB CONTROL PRODUCTS User Manual Web Volume Control Model WV220 1 In accordance with Nexen s established policy of constant product improvement, the specifications contained in this manual are subject
"WHERE TUBING AND FITTINGS COME TOGETHER"
 CLEAN ROOM DEVICES, LLC "WHERE TUBING AND FITTINGS COME TOGETHER" CRD200SS TUBE EXPANDER OPERATIONS MANUAL VERSION 4.3 LAST EDITED 06.17.15 cleanroomdevices.com Table of Contents Table of Contents....1
GEN 3 LED LIGHT BAR INSTALLATION MANUAL Model 7840-A 44"
 GEN 3 LED LIGHT BAR INSTALLATION MANUAL Model 7840-A 44" Your purchase of a Wolo warning light bar is the perfect choice to compliment your vehicle. Wolo s warning lights are manufactured with the finest
Read this entire manual before operation begins.
 Read this entire manual before operation begins. Record below the following information which is located on the serial number data plate. Serial No. Model No. Date of Installation Contents Specifications.............
Operation Care Service
 HAWK ENTERPRISES OF ELKHART, INC Standard Floor Machine Owner s Manual Operation Care Service 13 175 RPM 1.5 HP 15 175 RPM 1.5 HP 17 175 RPM 1.5 HP 20 175 RPM 1.5 HP 13 160 RPM 1.5 HP XHD 15 160 RPM 1.5
ReelGreen RG20 Instruction Manual For Operation and Maintenance
 ReelGreen RG20 Instruction Manual For Operation and Maintenance BigSprinkler.com 15250 Sunshine Rd. Yukon, OK. 73099 800-373-9325 Introduction Thank you for purchasing a ReelGreen RG20 traveling sprinkler
OWNER S MANUAL Z SERIES TRACKS. Rev. 355_05
 OWNER S MANUAL Z SERIES TRACKS Rev. 355_05 LOEGERING 800-373-5441 15514 37 th Street SE 701-347-5441 Casselton, ND 58012 USA Fax: 701-347-4323 E-Mail: lmi@loegering.com Internet: www.loegering.com Loegering
MOTORIZED FOLDING CAMPER WINCH
 OWNER'S MANUAL MOTORIZED FOLDING CAMPER WINCH With 1200lb Lift Capacity The 12 Volt Motorized Folding Camper Winch is used to raise and lower folding campers with the touch of the switch, eliminating hand
Model E600 Tarping System
 10 Boulder Parkway N. Oxford, MA 01537 866-353-5826 pioneersales@wastequip.com www.pioneercoverall.com Model E600 Tarping System Installation Instructions WARNING: In order to prevent damage, the tarp
TAKE-A-LABEL Power Dr. Nunica, MI Phone: (616) Fax: (616)
 Fax: (616)") OPERATIONS MANUAL MODEL TAL-3100T TAMP APPLICATOR TAKE-A-LABEL 16900 Power Dr. Nunica, MI 49448 Phone: (616) 837-9300 Fax: (616) 937-9301 http://www.take-a-label.com E-Mail sales@take-a-label.com Page
OPERATIONS MANUAL MODEL TAL-3100T TAMP APPLICATOR TAKE-A-LABEL 16900 Power Dr. Nunica, MI 49448 Phone: (616) 837-9300 Fax: (616) 937-9301 http://www.take-a-label.com E-Mail sales@take-a-label.com Page
SPECIFICATIONS CONTENTS:
 Model 3052A 1,100 Lbs Air Assist 2 Stage Transmission Jack INSTRUCTION MANUAL CONTENTS: Page 1 Specifications Page 2 Warning Information Page 3 Assembly Page 4 Operating Instructions Page 4 Preventative
Dear Customer, User Memo: Please visit us on facebook or twitter! Thank you for purchasing this product.
 Owner s Manual 1 Dear Customer, Thank you for purchasing this product. For optimum performance and safety, please read these instructions carefully. User Memo: Date of purchase: Dealer name: Dealer address:
LEWIS WINDROWER OWNER / OPERATOR MANUAL
 LEWIS WINDROWER OWNER / OPERATOR MANUAL MODEL # WR-1 WINDROWER Manufactured by: LEWIS BROTHERS MANUFACTURING, INC. Post Office Box 146 Baxley, GA 31513 Tel: (912) 367-4651 Fax: (912) 367-3958 2-21-14 1
MEX (55) QRO (442) Web Controls
 QRO (442) Web Controls") Web Controls SINGLE AND DUAL ROTOR TENSION CONTROL BRAKES MODELS:,,,, AND INSTALLATION, OPERATION, AND MAINTENANCE INSTRUCTIONS Read this manual carefully, making full use of its explanations and instructions.
Web Controls SINGLE AND DUAL ROTOR TENSION CONTROL BRAKES MODELS:,,,, AND INSTALLATION, OPERATION, AND MAINTENANCE INSTRUCTIONS Read this manual carefully, making full use of its explanations and instructions.
RED23305 Owner s Manual
 RED23305 Owner s Manual 5 foot, 3-Point Mounted Snow Blower 270 West Park Avenue Huron, SD 57350 866-526-5682 Serial Number: Date of Purchase: Red Devil Snow Blower See Figure 1. 1. The Red Devil Snow
Pressure Roller with 24-inch Fixed Extension - For application of architectural paints and coatings -
 Instructions Important Safety Instructions Read all warnings and instructions in this manual. Save these instructions. 311082D Pressure Roller with 24-inch Fixed Extension - For application of architectural
INSTALLATION INSTRUCTIONS
 0711016 Page 1 INSTALLATION INSTRUCTIONS ELECTRONIC DEADBOLT WITH KEYPAD latch 2-3/8 Your latch is now set 2-3/8 (60mm) backset latch 2-3/4 2-3/4" (70mm) 2-3/8" (60mm) Cylindrical cover Extension plate
INSTALLATION INSTRUCTIONS
 INSTALLATION INSTRUCTIONS Thank you for purchasing TONNOSPORT Roll-Up Cover. Agri-Cover, Inc. proudly manufactured this cover using superior quality materials and workmanship. With proper care, your cover
48" and 52" Hyflo Fans Installation and Operators Instruction Manual
 48" and 52" Hyflo Fans Installation and Operators Instruction Manual Thank You The employees of Chore-Time Equipment would like to thank your for your recent Chore-Time purchase. If a problem should arise,
3.5mm Coaxial Calibration Kit
 User Guide 3.5mm Coaxial Calibration Kit DC to 26.5 GHz Models: 8050CK10/11 8050CK20/21 8050-511 (A) 2/15 User Guide 3.5mm Coaxial Calibration Kit DC to 26.5 GHz Models: 8050CK10/11 8050CK20/21 2900 Inland
FR130DEL. 570A Telser Road Lake Zurich, IL USA "FR" MODEL SERIES
 FOIL HOT STAMPING UNIT MANUAL FR130DEL 570A Telser Road Lake Zurich, IL 60047 USA IL HOT STAMPING UNIT * FOIL HOT STAMPING UNIT * FOIL HOT STAMPING UNIT * FOIL HOT STAMPIN "FR" "FR" MODEL SERIES 1 Corporate
Installation Instructions To ensure that your installation proceeds smoothly--please read these instructions carefully before you begin.
 Single Lever Vessel Faucet Installation Instructions To ensure that your installation proceeds smoothly--please read these instructions carefully before you begin. P r o d u c t s Luxury Faucets and Accessories
Vertical Stacking System for both Floor and Roof Lines. SQ-1 INTELLIGENT STACKERS. Operators Manual
 Vertical Stacking System for both Floor and Roof Lines. SQ-1 INTELLIGENT STACKERS Operators Manual FOREWORD This manual explains the proper maintenance of Square 1 Design Intelligent Stacking System as
IMPORTANT! DO NOT THROW AWAY THE SHIPPING CARTON AND PACKING MATERIAL
 Operator s Manual IMPORTANT! DO NOT THROW AWAY THE SHIPPING CARTON AND PACKING MATERIAL ii Table of Contents Operator Safety... 1 Introduction... 2 Unpacking and Setup... 3 Unpacking... 3 Setup... 4 ROCKET
Users Manual Certified Series Direct Drive Pump 1-7 LPM
 Users Manual Certified Series Direct Drive Pump 1-7 LPM Safety, Operating, Installation, and Maintenance Instructions 600 S 56 th Street #9 Chandler, AZ 85226 Phone: 480-507-6478 Fax: 480-838-2232 www.fogco.com
Revised Chevy Big Block Front Mount Kit. Installation Instructions. Kits #20350, #20360, #20370, #20380 #20375, #20385
 Revised -18-09 Chevy Big Block Front Mount Kit Installation Instructions Kits #2050, #2060, #2070, #2080 #2075, #2085 Included Parts List A/C Nose Cover (94) or (9) carbon fiber Wing Bracket (2055) or
INSTRUCTIONS. Owner's Manual. Ionizing Air Nozzles Models AN-2 and AN-6
 2257 North Penn Road Hatfield, PA 19440 (215) 997-0590 (800) 538-0750 Fax: (215) 997-3450 Publication 5100935 June 2005 INSTRUCTIONS Owner's Manual Ionizing Air Nozzles Models AN-2 and AN-6 SIMCO Static
Model 616 Rotating Disk Electrode Instruction Manual
 Model 616 Rotating Disk Electrode Instruction Manual 219303 C / 1202 Printed in USA Advanced Measurement Technology, Inc. a/k/a Princeton Applied Research, a subsidiary of AMETEK, Inc. WARRANTY Princeton
1 2 3a 3b THREADING CARD 9 10 ABC Office
 1 2 3a 3b 4 5 6 7 8 9 10 THREADING CARD Important Safety instructions YOUR SAFETY AS WELL AS THE SAFETY OF OTHERS IS IMPORTANT TO GBC. IN THIS INSTRUCTION MANUAL AND ON THE PRODUCT ARE IMPORTANT SAFETY
RollSeal 1733 County Road 68 Bremen, Alabama Part No Rev Owner s Manual RS-Divider Curtain
 1. 2. 7 3. 4. RollSeal 1733 County Road 68 Bremen, Alabama 35033 256-287-7000 Part No 4801-5176 Rev 12-11-17 Owner s Manual RS-Divider Curtain Table of Contents 1 Warnings (Avertissements)... 3 2 Limited
Operator s Manual. Automatic Electric Jack Leveling. The leveling system shall only be operated under the following conditions:
 Operator s Manual with Automatic Leveling Touchpad #140-1226 Control Box #140-1224 co Copyright PowerGear 1/07 #82-L0368 Rev. 0D Contents Before You Level Your Coach 1 Caution 1 Leveling System Operating
CLEAN ROOM DEVICES, LLC "WHERE TUBING AND FITTINGS COME TOGETHER"
 CLEAN ROOM DEVICES, LLC "WHERE TUBING AND FITTINGS COME TOGETHER" CRD400 Fitting Inserter OPERATIONS MANUAL VERSION 3.1 LAST EDITED 03.08.11 DOCUMENT NUMBER 001 cleanroomdevices.com 1 Table of Contents
Dispenser & Warmer RIC-1909 RIC-1909EXP
 Dispenser & Warmer RIC-1909 RIC-1909EXP Safety Precautions CAUTION This equipment is designed and sold for commercial use only. This equipment is not to be used by the consumer in home use. Do not allow
m WARNING: READ ALL m WARNING: This unit can be dangerous! Careless or m DANGER: Risk of cut. Keep hands and feet away IMPORTANT! Safety Instructions
 16-Inch Manual Reel Mower with Catcher Model No. MJ500M Form No. SJ-MJ500M-880E A Division of Snow Joe, LLC IMPORTANT! Safety Instructions m WARNING: READ ALL INSTRUCTIONS BEFORE USE. m WARNING: This unit
Read these instructions thoroughly before attempting to install this option.
 Rewind Option Kit Installation Instructions This kit includes the parts and documentation necessary to install the Media Rewind option into the following printers: 0XiIIIPlus, 0 dpi 0XiIIIPlus, 00 dpi
INSTALLATION INSTRUCTIONS
 INSTALLATION INSTRUCTIONS Thank you for purchasing ACCESS Original Roll-Up Cover. Agri-Cover, Inc. proudly manufactured this cover using superior quality materials and workmanship. With proper care, your
TERMINATOR User Manual
 TERMINATOR User Manual TERMINATOR User Manual Table of Contents Section Page 1 2 3 4 5 6 7 8 9 10 11 12 13 14 15 16 17 18 19 20 21 Introduction Safety Precautions Features and Benefits Overview of the
TBM Series 3-Way Ball Valve
 www.simtechusa.com TBM Series 3-Way Ball Valve Operating, Installation, & Maintenance Manual Corrosion Resistant Fluid and Air Handling Systems. Dated 06-26-13 TBM Series Ball Valves SIMTECHRECOMMENDSREADINGTHEFOLLOWINGINFORMATIONPRIORTOINSTALLINGANDUSING
CHEMINSTRUMENTS HOT ROLL LAMINATOR MODEL HL-100, HL-101 OPERATING INSTRUCTIONS
 CHEMINSTRUMENTS HOT ROLL LAMINATOR MODEL HL-100, HL-101 OPERATING INSTRUCTIONS PRODUCT DESCRIPTION...2 SPECIFICATIONS...3 UNPACKING...3 ASSEMBLY...3 Key Components...5 SAFETY FEATURES...7 Trip Wire...7
PATRIOT LIFT CO. ON-Lift Installation Guidelines
 PATRIOT LIFT CO. ON-Lift Installation Guidelines Choosing A Landing Gear Type It is important to note that the Patriot Lift Systems operates more efficiently for speed /timing with some landing gear types
Anthro Mobile Device Charging Carts and Cabinets Owners Manual
 Anthro Mobile Device Charging Carts and Cabinets Owners Manual TECHNOLOGY FURNITURE Hello! Thank you for choosing Anthro. Anthro's Tablet Charging Carts and Cabinets are designed to automatically charge
B-DM-6 Diamond Master Operation & Parts Manual Model no.: B-DM-6
 B-DM-6 Diamond Master Operation & Parts Manual Model no.: B-DM-6 TABLE OF CONTENTS 01 Cover Page 02 Table of Contents 03 Warranty 04 Diamond Master Information & Basic Maintenance 05 Adjustment of Tools
Model G14SD Vapor Management System
 Instruction Manual Model G14SD Vapor Management System (For Models: DSD and SSD 110/115v) Manufactured in USA for Medivators Reprocessing Systems by: PCI Medical Inc. 12 Bridge Street, PO Box 188 Deep
INSTRUCTION and OPERATIONS MANUAL. for
 INSTRUCTION and OPERATIONS MANUAL for SPEED-O-CALIBRATOR Locomotive Speedometer Calibrator Unit MODEL NUMBER 16470-00 CAUTION Be sure to read and become thoroughly familiar with the entire contents of
Installation Instructions
 Installation Instructions To ensure that your installation proceeds smoothly--please read these instructions carefully before you begin. P r o d u c t s Luxury Faucets and Accessories Savina Product Numbers
PREMIER, MARINE, & STANDARD
 INSTA LLATION INSTRUCTION AND SERVICE MANUAL I TITAN 12" x 2" BRAKES FREE BACKING. UNI-SERVO. DUO-SERVO PREMIER, MARINE, & STANDARD Limited Warranty TITAN Inc. ("TITAN') warrants its products to be free
HS583 Sprocket Models- Curtain/Vent Machine
 HS583 Sprocket Models- Curtain/Vent Machine Installation Manual General Installation Notes: Make sure that power is disconnected from system prior to servicing. Installation of this equipment and related
Installation Instructions
 Installation Instructions Rock Crawler Roof Rack (Part # 76717) 07-Up Jeep Wrangler J/K 4Door For Technical Support/Warranty Information please call 310-762-9944 Smittybilt, 400 West Artesia Blvd, Compton,
BBAIR V Conveyor Dryer
 BBAIR-08-0V Conveyor Dryer wide by 8 long conveyor dryer with forced air and infrared Document # 6- Assembly and Operating Instructions Please review all these instructions prior to assembly. The Big Buddy-Air
EZ-EX Tape Head (2" & 3" )
") EZ-EX Tape Head (2" & 3" ) EZ-EX Tape Cartridge for Eastey Industrial Case Tapers User Guide EZ-EX Tape Head (2" & 3" ) EZ-EX Tape Cartridge for Eastey Industrial Case Tapers User Guide Revised 12/09/2016
EZ-EX Tape Head (2" & 3" ) EZ-EX Tape Cartridge for Eastey Industrial Case Tapers User Guide EZ-EX Tape Head (2" & 3" ) EZ-EX Tape Cartridge for Eastey Industrial Case Tapers User Guide Revised 12/09/2016
OWNER S MANUAL. LOEGERING th Street SE Casselton, ND USA Fax:
 OWNER S MANUAL TRAIL BLAZERS and D SERIES TRACKS LOEGERING 800-373-5441 15514 37 th Street SE 701-347-5441 Casselton, ND 58012 USA Fax: 701-347-4323 E-Mail: lmi@loegering.com Internet: www.loegering.com
User s Manual and Operating Instructions
 User s Manual and Operating Instructions Model Numbers: CL-36-BDF-A, CL-42-BDF-A, CL-48-BDF-A E355088 READ AND SAVE THESE INSTRUCTIONS IMPORTANT: Read and understand all of the instructions in this manual
SE-600-P Eco-Series. Operation & Parts Manual
 SE-600-P Eco-Series Operation & Parts Manual SE 600 PC & PS SERIES OWNERS MANUAL Table of Contents 1. Set-up instructions 2. Bridge-Tramming Procedure 3. Operation instructions 4. Cleaning 5. Troubleshooting
Installation and Operation Instructions Safety Director Arrow
 Installation and Operation Instructions Safety Director Arrow! WARNING! Failure to install or use this product according to manufacturers recommendations may result in property damage, serious bodily/personal
5-Channel Power Amplifier. User s Manual. Version 1 MODERN SOUND FOR YOUR CLASSIC.
 5-Channel Power Amplifier User s Manual MODERN SOUND FOR YOUR CLASSIC Version 1 www.retromanufacturing.com TABLE OF CONTENTS WELCOME 2 WHAT S IN THE BOX 3 PRECAUTIONS 4 POWER AND GROUND CONNECTIONS 6 MOUNTING
Air and water reels. Models and Series B. Installation and maintenance guide DANGER
 Installation and maintenance guide Air and water reels Models 83753 and 83754 Series B Date of issue June 2014 Form number 404665A Section E35 Page 83A DANGER Read manual prior to installation or use of
CBC-300 Series & CBC-300C Series Dual Channel Adjust Clutch/Brake Controls
 CBC-300 Series & CBC-300C Series Dual Channel Adjust Clutch/Brake Controls P-269-89-0408 Installation Installation & Operating Instructions Contents Introduction........................... 2 Specifications.........................
ECLIPSE Laundry Dispenser Controller
 ECLIPSE Laundry Dispenser Controller Reference Manual Programming and Operation Online and downloadable Product Manuals and Quick Start Guides are available at www.hydrosystemsco.com Please check online
Operation Care Service
 HAWK ENTERPRISES OF ELKHART, INC Glide Floor Machine Owner s Manual Operation Care Service Hawk Enterprises 52744 Park Six Court Elkhart, IN 46514 Phone: 574-294-1910 Toll Free: 888-289-4295 Fax: 574-970-0289
Patient Care Facility
 ISIMET Patient Care Facility DLA Controller Individual Room Configuration Style 1 W/ Ver 4.41 pcb & Pulse Relay pcb Installation, Operations, Start-up and Maintenance Instructions Meets all Standards for
CRD400 Fitting Inserter OPERATIONS MANUAL
 CRD400 Fitting Inserter OPERATIONS MANUAL ORIGINAL INSTRUCTIONS VERSION 3.4 LAST EDITED 01.07.2019 www.cleanroomdevices.com 1 Table of Contents Title Page.. 1 Table of Contents... 2 1.0 General Product
FAN POWERED HEPA FILTER UNIT
 READ COMPLETELY AND SAVE THESE INSTRUCTIONS FOR FUTURE REFERENCE FAN POWERED HEPA FILTER UNIT (MOTOR ACCESSIBLE) SSLFHFD-FP-MA INSTALLATION AND SERVICE MANUAL 2 Critical operation conditions of the Fan
Installation Instructions Rear Shell Roof Rack
 Installation Instructions Rear Shell Roof Rack Vehicle Application: Jeep Wrangler 1986 current Part Number: 41400 www.bestop.com - We re here to help! Visit our web site and click on Ask a Question. Click
Read this entire manual before operation begins.
 Read this entire manual before operation begins. Record below the following information which is located on the serial number data plate. Serial No. Model No. Date of Installation Contents Specifications.............