Operation and Maintenance Manual for Pumps and Systems
|
|
|
- Mary Hicks
- 6 years ago
- Views:
Transcription

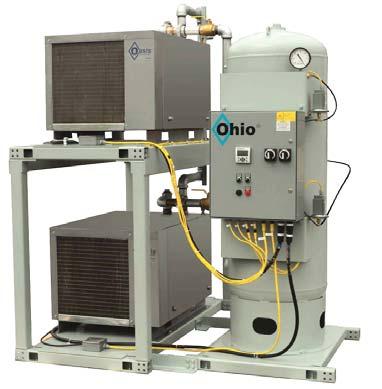
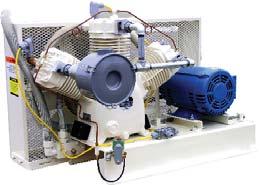

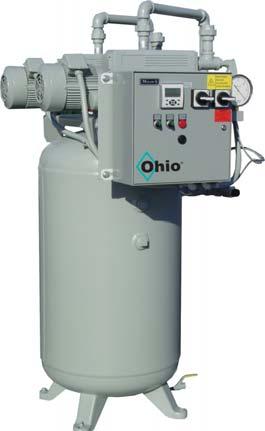
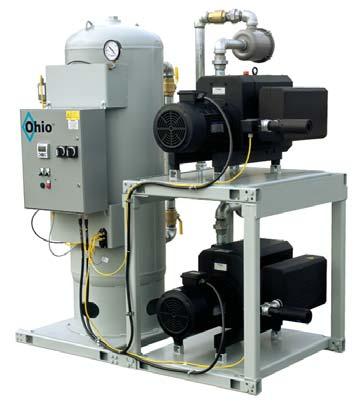
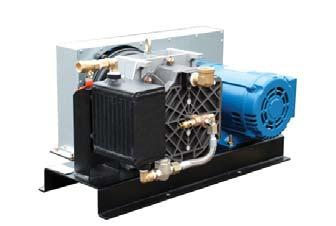

1 Operation and Maintenance Manual for Pumps and Systems (Rev. 3) 7/
2 (Rev 3) 7/2016
3 Table of Contents 1.0 INSPECTION UPON DELIVERY FOR YOUR SAFETY LOCATION INSTALLATION SETTING IN PLACE MOUNTING AND ANCHORING NOISE PIPING CONNECTIONS ELECTRICAL CONNECTIONS INITIAL START-UP PRE START-UP CHECK LIST CHECK ELECTRICAL SERVICE CHECK PUMP ROTATION STOPPING FOR MAINTENANCE PRESSURE SETTINGS VACUUM AND COMPRESSED AIR SYSTEMS LIMITED WARRANTY PUMP - COMPRESSOR WARRANTY MAINTENANCE LOG PRE START-UP CHECKLIST FORM (Rev 3) 7/2016
4 1.0 INSPECTION UPON DELIVERY Check crating or packaging for visible damage that could indicate damage to components of the equipment. Report any damage to delivering carrier immediately to process your claim. If the equipment is to be stored prior to installation it must be protected from rain and snow to prevent formation of rust on machined surfaces and components. It is important to verify the material received against the packing list to assure receipt of all of the material ordered. It is routine to include accessory items in cartons strapped to the crate. 1.1 FOR YOUR SAFETY: Items in this manual that signifi cantly affect safety are identifi ed with the following headings. Please read and understand this manual, paying special attention to items identifi ed with these headings! DANGER!, WARNING!, CAUTION! & NOTICE! are boxed and displayed in large bold capital letters to call attention to areas of vital concern. They represent different degrees of hazard seriousness, as stated below. DANGER: Immediate hazards which will result in severe personal injury or death. G! N! WARNING: Hazards or unsafe practices that could result in personal injury or death. CAUTION: Hazards or unsafe practice which could result in minor personal injury, product or property damage. NOTICE: Indicates points of particular interest for more effi cient and convenient installation operation. Each section of this instruction manual, as well as any instructions supplied by manufacturers of supporting equipment, should be read and understood prior to starting the vacuum package. If there are any questions regarding any part of the instructions please call Ohio Medical before creating a potentially hazardous situation. Life, limb or equipment could be saved with a simple phone call (Rev 3) 7/2016
5 1.1 FOR YOUR SAFETY: (Cont) Air Compressors and Vacuum Pumps are precision high-speed mechanical equipment requiring caution in operation to minimize hazard to personnel and property. Below is a list of safety rules and precautions that must be observed in the operation of this type of equipment. Transfer of toxic, dangerous, fl ammable or explosive substances is at user s risk. Turn off and lockout / tag out (per O.S.H.A. Regulation ) the main power disconnect switch before attempting to perform maintenance on any part of the package. Do not attempt to service any part of the unit while it is operating. Per O.S.H.A. Regulation relieve the system of all pressure before attempting to service any part of the package. Do not remove or paint over any of the instructional materials attached to the unit. Lack of information regarding hazardous conditions can cause personal injury or property damage. Do not use plastic pipe, rubber hose, or lead-tin soldered joints in any part of the package. Modifi cations must not be made to the system without Ohio Medical s approval. Be sure that all tools, shipping and installation debris have been removed from around the system and installation site prior to starting up. Do not operate the system in excess of the stated capacity. Make a general overall inspection of the unit daily and correct any unsafe situations. Reckless behavior of any kind is dangerous and can cause very serious injury to the participants. Provisions should be made to have the instruction manual readily available to the operator and maintenance personnel. Never use a fl ammable or toxic solvent for cleaning the air fi lter or any parts. The owner, leaser or operator of the system is hereby warned that failure to observe the above safety precautions may result in serious injury to personnel and/or damage to property. Ohio Medical neither states as fact or in any way implies that the above list of safety precautions is an all-inclusive list, the observance of which will prevent injury to personnel or damage to property. Every effort has been made to ensure that complete and correct instructions have been included in this manual. However, possible product updates and changes may have occurred since this printing. Ohio Medical reserves the right to change specifi cation without incurring any obligation for equipment previously or subsequently sold (Rev 3) 7/2016
6 WARNING: EXPLOSION HAZARD PRESENT Under no circumstances should a system be used in an area that may be exposed to toxic, volatile, or corrosive atmosphere. Do not store toxic, volatile, or corrosive agents near the system. Rotary vane vacuum pumps are not to be used for evacuation of fl ammable or explosive products. WARNING: HOT OIL HAZARD Do not remove the oil fi ll plug when pump is running, as hot air and oil vapor will escape possibly causing severe burns. Add or check oil only when the pump is off and electrically locked out. Always wear safety glasses. WARNING: Electric power always exists inside the vacuum/pressure switch whenever the package is connected to a power supply. Be careful not to touch any electrical leads when setting the vacuum/pressure switch. WARNING: Never exceed the design pressure for the system or overload the motor beyond its Maximum Amp Draw. Full Load Amps x Service Factor = Maximum Amp Draw WARNING: Never assume a system is safe to work on just because it is not operating. It may be in the automatic standby mode and may restart at any time. Follow all safety precautions outlined under Stopping for Maintenance. 1.2 LOCATION CAUTION: Indoor installation is recommended. However if it is necessary to install the pump outside, it must be protected from rain and other sources of moisture. Do not operate the system in ambient temperatures lower than 40 F. In cold climates the system should be installed in a heated building. Due to standard drive motor limitations, it is recommended that the unit be operated in temperatures under 104 F (Rev 3) 7/2016
7 1.3 INSTALLATION Bare Pump Installation Install the pump in a horizontal position on a level surface so that the pump is evenly supported on its feet. Leave of access around the pump to allow proper cooling and adequate ventilation for the fan, radiator and motor. Allow access to the oil sight glass in order to inspect the oil level and the exhaust port for easy access to change the exhaust fi lter. Do not tip the pump over if fi lled with oil The pump must be located in a clean, dry, well lighted area with the ambient temperature maintained at F System Installation The equipment must be located in a clean dry well lighted area with the ambient temperature maintained at F. Do not operate the pump(s) in ambient temperatures lower than 40 F. In cold climates the system should be installed in a heated building. Due to standard drive motor limitation, it is recommended that the system be operated in temperatures under 104 F. Adequate space and ventilation must be provided on all sides of the unit for cooling and accessibility for maintenance of all components. Inspection and maintenance checks are required daily. Therefore, we recommend a 36 walk way around the package. Provisions must be made for adequate ventilation to remove the heat of compression (2550 BTU per horsepower) from the area. CAUTION: Improper leveling may cause unnecessary wear of the rotating parts such as bearings and couplings. In addition, improper leveling may make completion of the facility piping connections more diffi cult (Rev 3) 7/2016

8 1.4 SETTING IN PLACE Packages are manufactured in a modular fashion so that the various modules can be separated from each other to allow for transportation and installation limitations. The module bases may be bolted together directly or through base alignment plates. The piping system contains pipe unions to facilitate module separation, when necessary. If the package modules have been separated prior to installation, they should be rejoined using the supplied base alignment plates to ensure proper re-connection of the piping system. The package must be securely bolted to a solid stable fl oor or housekeeping pad utilizing all of the mounting holes provided in the frame. A shim or spacer is recommended to bring the frame level. The frame should not overhang the mounting surface on any side. The object is to make the frame tight and level to absorb and eliminate transient vibrations. The use of spring type mounting devices between the frame and the mounting surface is not recommended. When possible, the unit should be installed on the ground or lower level machinery space. Alignment Plate and Spacer After the installation is complete, the module base alignment plates and spacers should be removed to provide optimal vibration control (Rev 3) 7/2016
9 1.5 MOUNTING, ANCHORING Proper mounting of the vacuum package is crucial to the safe operation and longevity of the equipment. The installation requires a fl at and level concrete fl oor or pad. Satisfactory results can usually be obtained by mounting the package on the vibration isolating pads supplied with the vacuum package. The size and quantity of the vibration isolators supplied with the package meet or exceed the entire load. Over tightened pads can cause severe vibrations resulting in cracked welds or fatigue failure. Using 1/2 or 3/4 bolts, tighten bolts and torque to 50 lbs/sq. in. See fi gure below 1.6 NOISE Sound levels of Dba are to be expected (Rev 3) 7/2016
10 1.7 PIPING CONNECTIONS All connecting piping must be in strict accordance with local codes and applicable engineering drawings. All connection piping must be self-supporting to prevent stressing of the equipment. Flexible connectors must be used on all system connections to provide vibration control and system serviceability. All connection piping must be clean and free of dirt or scale. Exhaust piping should be terminated outside the building with the discharge line turned down and screened. For medical installations, this confi guration is a requirement of NFPA 99. For further instructions on exhaust piping, contact Ohio Medical s Engineering Department. Compressor intake piping shall be installed according to Section 5 of NFPA 99 standards. WARNING! NOTE 1: Exhaust piping and fi ttings shown in gray, are to be furnished and installed by the Contractor. NOTE 2: Exhaust from oil reservoir shall be collected to a single stack, run to outside air with the discharge line turned down and screened. Do not use plastic pipe or rubber hose or lead tin soldered joints in any part of the system (Rev 3) 7/2016
11 1.8 ELECTRICAL CONNECTIONS Electrical connection should be performed by a qualifi ed electrician with knowledge of the National Electrical Code (N.E.C. ), O.S.H.A. code and or any local or state codes having precedence. Note this unit must be grounded. Check to ensure that proper electrical service has been made available. Make sure the electrical supply, control cabinet and the motor nameplate data are the same. Do not connect electrically if they are not the same. Where the unit is on the emergency power source, make sure the normal power and the emergency power are in phase. Electrical connections must be checked and tightened when necessary. Before installation, the electrical supply should be checked for adequate wire size and transformer capacity. A suitable circuit breaker or fused disconnect switch should be provided. When a 3-phase motor is used to drive the unit, any unreasonable voltage imbalance between the legs must be eliminated and any low voltage corrected to prevent excessive current draw. The installation, electric motor, wiring and all electrical controls must be in accordance with NFPA National Electric Code, National Electric Safety Code, state and local codes. Failure to abide by the national, state and local codes may result in physical harm and or property damage. DANGER: High voltage may cause personal injury or death. Disconnect and lockout/tagout per O.S.H.A. Regulation all electrical power supply before opening the electrical enclosure or servicing. CAUTION: NEMA electrical enclosures and components must be appropriate to the area installed (Rev 3) 7/2016
12 1.9 INITIAL START UP Initial start-up assistance by factory authorized personnel is available. Call our Service Department at ext: 6279 for details PRE START-UP CHECK LIST Never assume the system is safe to work on just because it is not operating. It could restart at any time. Follow all safety precautions outlined in Stopping for Maintenance. WARNING: Failure to perform the pre-start up check list may result in mechanical failure or property damage, serious injury or even death. The following items should be performed prior to connecting the unit to a power source. If any conditions of the checklist are not satisfi ed, make the necessary adjustments or corrections before starting the unit. Remove all installation tools from the unit and check for installation debris. Check fi nal leveling or shimming of the base and that the correct tightness has been applied to the vibration pads Check Electrical Service Verify that the facility power breaker is turned OFF. ` Check to ensure that the proper electrical service has been made available. Make sure the electrical supply and the control panel and motor nameplate data are the same. Verify the facility power breaker and the supply wire size is correct per N.E.C. Check fuses, circuit breakers, and thermal overload for proper size. All electrical connections both inside and outside the control cabinet must be checked and tightened when necessary. Check all safety overloads to confi rm they are set correctly for the current rating of the motor. Check all conduit connections leaving the panel to ensure they are tight. Verify that all motor disconnects and HOA switches are in the OFF position. After all of the above conditions have been satisfi ed, the unit can be connected to the proper power source (Rev 3) 7/2016
13 1.9.3 Check Pump Rotation Turn the motor disconnect ON. Jog the motor to ensure the correct rotation by momentarily turning the H-O-A switch to the H (hand) position, then quickly returning the switch to the O (off) position. The correct direction of rotation is marked by an arrow on the motor housing. Facing the fan motor cover, the correct direction of rotation is counter clockwise. If the rotation is not correct, for 3 phase units, switch any two of the three electrical service lines coming into the control panel. Each pump should be individually started, run and adjusted STOPPING FOR MAINTENANCE The following procedures should be followed when stopping the system for maintenance or service. Per OSHA Regulation , The Control of Hazardous Energy Source (Lockout/Tagout): Disconnect and lockout the main power source. Display a sign in clear view at the main power switch stating that the vacuum system is being serviced PRESSURE SETTINGS Number of Pumps Duplex Triplex Quadruplex Rotary Vane Dry Running Liquid Ring Air Compressor Cut In In Hg Cut Out In Hg Cut In In Hg Cut Out In Hg Cut In In Hg Cut Out In Hg Cut In In Hg Cut Out In Hg Lead Lag Lead Lag Lag Lead N/A N/A Lag N/A N/A Lag N/A N/A Lag N/A N/A For 24/7 Technical Support, Call for Assistance (Rev 3) 7/2016
14 OHIO MEDICAL VACUUM AND COMPRESSED AIR SYSTEMS LIMITED WARRANTY 1. Ohio Medical warrants to the original purchaser its Vacuum and Compressed Air Systems to be free from functional defects in material and workmanship for a period of (30) thirty months from the date of shipment, or for a period of (24) twentyfour months from the date of start-up, whichever comes first. a. Ohio Medical recommends that start-up should only be done by an authorized representative of Ohio Medical. 2. In the event there is a functional defect either in material or workmanship Ohio Medical will only repair or replace any part or component which is proven to be defective. a. System Components sold as individual items are not warranted to include job site installation and wiring, and the warranty set forth in Paragraph 1 is limited to complete units which include all factory installed components and interconnected piping and wiring. b. Labor on site is limited to functional defects in workmanship found to be defective at the time of start-up. c. The replacement of normal wearing or maintenance items (including but not limited to packings, mechanical seals, oil seals, piston rings, contacts, coils, fuses, etc.) made in connection with normal maintenance services are not covered by this warranty. 3. To obtain service within the warranty period, first contact your authorized Ohio Medical dealer or the Ohio Medical Service Department. Ohio Medical s responsibility under this warranty shall be limited to providing at Ohio Medical s sole discretion new or similar rebuilt replacement parts to replace any component found to be defective within the warranty period. a. Labor to repair any part or component proved to be defective within the warranty period will be provided at no charge for any item returned to our factory adequately packaged and insured with shipping costs prepaid. Standard surface freight shipping cost and return of the repaired part or component will be paid by Ohio Medical. b. Before returning any part or component to the factory for warranty consideration, proper return authorization and warranty claim form must first be obtained from Ohio Medical Customer Support or Service Department. A Purchase Order must be supplied by the claimant in the event that repairs or products returned for warranty consideration are determined to be of a Non-Warranty status. c. The user will be required to issue a Purchase Order for replacement items. Upon receipt of the defective items, Ohio Medical will issue a credit to the user in the amount equal to the purchase order. 4. The warranty is valid only when the product has been properly installed according to Ohio Medical specifications, used in a normal manner and serviced according to factory recommendations. It does not cover failure due to damage which occurs in shipment or failures which result from accidents, misuse, abuse, neglect, mishandling, alteration, misapplication or damage that may be attributable to acts of God. Similarly, this warranty does not apply to units that are re-sold or rented to others by the purchaser. 5. Ohio Medical shall not be liable for incidental or consequential damages resulting from the use of this product. There are no expressed or implied warranties which extend beyond the warranty of fitness for a particular purpose to the equipment and/or to its parts and components. 6. THE CONDITIONS OF THE BUYER S RESPONSIBILITY ARE: 6.1 The equipment is stored properly before installation. 6.2 The equipment is installed according to Ohio Medical specifications and installation procedures. 6.3 The room where the equipment is installed meets stated operating temperatures. 6.4 The equipment is placed into initial operation by an authorized representative of Ohio Medical. 6.5 The equipment is properly maintained and is not repaired or altered unless by an authorized representative of Ohio Medical. Producers of Ohmeda Suction and Oxygen Therapy Devices, Aeros Instruments Portable Suction Machines, Healthcair MedGas Pipeline Equipment, Healthcair, Labcair & Selectorr brand of Vacuum Systems and Air Compressor Packages doc (Rev. 8) 7/ (Rev 3) 7/2016
15 PUMPS - COMPRESSORS LIMITED WARRANTY 1. Ohio Medical warrants to the original purchaser its Vacuum Pumps and Air Compressors to be free from functional defects in material and workmanship for a period of twelve (12) months from the date of shipment. 2. In the event there is a functional defect either in material or workmanship Ohio Medical will only repair or replace any part or component which is proven to be defective. a. System components sold as individual items are not warranted to include job site installation and wiring. b. The replacement of normal wearing or maintenance items (including but not limited to packing, mechanical seals, oil seals, piston rings, contacts, coils, fuses, etc.) made in connection with normal maintenance services are not covered by this warranty. 3. To obtain service within the warranty period, first contact your authorized Ohio Medical dealer or the Ohio Medical Service Department. Ohio Medical s responsibility under this warranty shall be limited to providing, at Ohio Medical s sole discretion, new or similar rebuilt replacement parts to replace any component found to be defective within the warranty period. a. Labor to repair any part or component proved to be defective within the warranty period will be provided at no charge for any item returned to our factory adequately packaged and insured with shipping costs prepaid. Standard surface freight shipping cost and return of the repaired part or component will be paid by Ohio Medical. b. Before returning any part or component to the factory for warranty consideration, proper return authorization, and warranty claim form must first be obtained from the Ohio Medical Service Department. A Purchase Order must be supplied by the claimant in the event that repairs or products returned for warranty consideration are determined to be of a Non-Warranty status. c. The user will be required to issue a Purchase Order for replacement items. Upon receipt of the defective items, Ohio Medical will issue a credit to the user in the amount equal to the purchase order. 4. The warranty is valid only when the product has been properly installed according to Ohio Medical specifications, used in a normal manner and serviced according to factory recommendations. It does not cover failure due to damage which occurs in shipment or failures which result from accidents, misuse, abuse, neglect, mishandling, alteration, misapplication or damage that may be attributable to acts of God. Similarly, this warranty does not apply to units that are re-sold or rented to others by the purchaser. 5. Ohio Medical shall not be liable for incidental or consequential damages resulting from the use of this product. There are no expressed or implied warranties which extend beyond the warranty of merchantability fitness for a particular purpose to the equipment and/or to its parts and components. 6. THE CONDITIONS OF THE BUYER S RESPONSIBILITY ARE: a. The equipment is stored properly before installation; b. The equipment is installed according to Ohio Medical specifications and installation procedures; c. The room where the equipment is installed meets stated operating temperatures. d. The equipment is properly maintained and is not repaired or altered unless by an authorized representative of Ohio Medical. Producers of Ohmeda Suction and Oxygen Therapy Devices, Aeros Instruments Portable Suction Machines, Healthcair MedGas Pipeline Equipment, Healthcair, Labcair & Selectorr brand of Vacuum Systems and Air Compressor Packages doc (Rev. 8) 7/ (Rev 3) 7/2016
16 Toll Free: Service: Ext Customer Support: Ext Tech Support: Ext MACHINE DATA Make & Model: Serial #: H.P.: Lubricant: Capacity: Air Filter #: Oil Filter #: Separator #: Maintenance Log Date Hours Work Performed Done By Next Service Due (Rev2) 7/ (Rev 3) 7/2016
17 (Rev 3) 7/2016

18 2016 Ohio Medical LLC. All rights reserved. This document contains information that is proprietary and confi dential to Ohio Medical. Use of this information is under license from Ohio Medical. Any use other than that authorized by Ohio Medical is prohibited. Ohio Medical, and the Ohio Medical logo are registered trademarks of Ohio Medical. NEMA is a registered trademark of National Electrical Manufacturers Association. NFPA 70 and NFPA 99 are registered trademarks of National Fire Protection Association. Ohio Medical 1111 Lakeside Drive, Gurnee, Il Phone or fax: (Rev 3) 7/2016
Air Curtain. Installation, Operating and Maintenance Instructions
 Installation, Operating and Maintenance Instructions Save this manual for future reference. Air Curtain Model Numbers: ES026, ES036, ES042, ES048, ES060, ES072 READ THIS OWNER S MANUAL CAREFULLY BEFORE
INSTRUCTIONS FOR USE. Rx Only
 INSTRUCTIONS FOR USE - HOSE ASSEMBLY Rx Only Basic matrix shown. Consult the Ohio Medical website for full matrix or contact your Ohio Medical representative. The product package label contains your product
Cardinal DETECTO. PORTABLE PLATFORM SCALES Digital Type Series 850F Owner s Manual
 Cardinal DETECTO PORTABLE PLATFORM SCALES Digital Type Series 850F Owner s Manual CARDINAL SCALE MFG. CO. PO BOX 151, WEBB CITY, MO 64870 0066-M176-O1 Rev H 10/06 417-673-4631 www.cardinalscale.com Printed
User s Manual and Operating Instructions
 User s Manual and Operating Instructions Model Numbers: CL-36-BDF-A, CL-42-BDF-A, CL-48-BDF-A E355088 READ AND SAVE THESE INSTRUCTIONS IMPORTANT: Read and understand all of the instructions in this manual
C T h e A d va n t a g e
 C The Advantage TABLE OF CONTENTS Introduction...1 Product Numbering System...1 Safety...2 Receiving and Inspection...2 Installation...2 Electrical...3 Parts Identification...7 Lubrication...9 Start-up...10
Kitchen Tech Series Air Curtain
 Installation, Operating, and Maintenance Instructions Save this manual for future reference. Kitchen Tech Series Air Curtain Model Numbers: KTECH026, KTECH036, KTECH042, KTECH048, KTECH060, KTECH072, KTECH084,
READ AND SAVE THESE INSTRUCTIONS. Centrifugal Downblast Exhaust Fan Belt Driven for Roof & Wall Mounting
 READ AND SAVE THESE INSTRUCTIONS INSTALLATION, OPERATING INSTRUCTIONS & PARTS MANUAL Centrifugal Downblast Exhaust Fan Belt Driven for Roof & Wall Mounting Electrical wiring and connections should be done
READ AND SAVE THESE INSTRUCTIONS. High Velocity Restaurant-Duty Utility Set Belt Driven for Roof Mounting
 READ AND SAVE THESE INSTRUCTIONS INSTALLATION, OPERATING INSTRUCTIONS & PARTS MANUAL High Velocity Restaurant-Duty Utility Set Belt Driven for Roof Mounting Electrical wiring and connections should be
Owner's/Installation Manual
 Owner's/Installation Manual Power Management Module (PMM) and Starter Kit NOTE: The starter kit must be purchased and installed prior to individual PMM usage. Model Numbers: 00686-0 PMM 00699-0 PMM WITH
QUALITY MISTING PUMPS
 TOTALLY ENCLOSED DIRECT DRIVE 60030KH, 60031KH, 60050KH, 60051KH 60100KH, 60101KH, 60150KH, 60151KH MISTING PUMP MANUAL INCLUDING: SPECIFICATION DATA, GENERAL SAFETY PRECAUTIONS, OPERATION, INSTALLATION,
AUTOMATIC SUBMERSIBLE UTILITY PUMP
 AUTOMATIC SUBMERSIBLE UTILITY PUMP Zoeller is a registered trademark of Zoeller Co. All Rights Reserved. MODEL #1043-0006 Español p. 9 ATTACH YOUR RECEIPT HERE Serial Number Purchase Date Questions, problems,
1000-LB. ENGINE STAND
 1000-LB. ENGINE STAND WARNING: Read carefully and understand all ASSEMBLY AND OPERATION INSTRUCTIONS before operating. Failure to follow the safety rules and other basic safety precautions may result in
Manual PN: Rev 01. Otterbine Barebo Inc. Fractional Series 50Hz Installation Manual
 Manual PN: 75-0009 Rev 01 Otterbine Barebo Inc. Fractional Series 50Hz Installation Manual SAFETY INSTRUCTIONS ALL ELECTRICAL WORK MUST BE PERFORMED BY A QUALIFIED LICENSED ELECTRICIAN AND CONFORM WITH
1000-LB. MOTORCYCLE LIFT TABLE OWNER S MANUAL
 1000-LB. MOTORCYCLE LIFT TABLE OWNER S MANUAL WARNING: Read carefully and understand all ASSEMBLY AND OPERATION INSTRUCTIONS before operating. Failure to follow the safety rules and other basic safety
Reach ins, Freeezers & Refrigerators Installation & Operation Manual
 Reach ins, Freeezers & Refrigerators Installation & Operation Manual BSR23 BSF23 BSR49 BSF49 BSR72 BSF72 IMPORTANT SAFETY INSTRUCTIONS (SAVE THESE INSTRUCTIONS) Visit us on the web at www.blueairinc.com
4" ENVIRONMENTAL E-SERIES PUMPS OWNER'S MANUAL. DANGER warns about hazards that will cause. WARNING warns about hazards that can cause
 4" ENVIRONMENTAL E-SERIES PUMPS OWNER'S MANUAL BEFORE INSTALLING PUMP, BE SURE TO READ THIS OWNER S MANUAL CAREFULLY. CAUTION Fill pump with water before starting or pump will be damaged. The motor on
Model C230 Pump Controller
 MANUAL Model C230 Earthsafe Systems, Inc. 7553 S. Madison Willowbrook, IL 60527 T: (630) 794-5100 F: (630) 794-5106 info@earthsafe.com www.earthsafe.com March 1, 2010 The information contained herein is
HP190SL Series Slimline Radon Fans
 Installation and Operation Manual Item #: 412843 Rev Date: 070113 HP190SL Series Slimline Radon Fans United States 10048 Industrial Blvd., Lenexa, KS, 66215 Tel.: 800.747.1762 Fax: 800.487.9915 Canada
2000-LB. ENGINE STAND
 2000-LB. ENGINE STAND WARNING: Read carefully and understand all ASSEMBLY AND OPERATION INSTRUCTIONS before operating. Failure to follow the safety rules and other basic safety precautions may result in
Operating and Installation Instructions
 Model Number 20902 Fabricator's Power Module Kit - Aluminum Operating and Installation Instructions CAUTION! This product is to be installed only by persons knowledgeable in the repair and modification
Operating Instructions for PAC800 Battery Charger
 Operating Instructions for PAC800 Battery Charger General Safety The charger may only be used for the specified battery types. This battery charger is supplied with pre-set charging curves that are adapted
INSTALLATION AND OPERATION MANUAL. In-Line Centrifugal Pumps - Series: GB
 C A L L 1-866-670-0533 O R D E R O N L I N E www.burkspumpcatalog.com INSTALLATION AND OPERATION MANUAL In-Line Centrifugal Pumps - Series: GB IMPORTANT! Read all instructions in this manual before operating
HA/HAB Fiberglass Wall Mount Ventilators
 HA/HAB Fiberglass Wall Mount Ventilators INSTALLATION, OPERATION & MAINTENANCE MANUAL IM-3100 August 2015 Throughout this manual, there are a number of HAZARD S that must be read and adhered to in order
Positive Displacement Pump
 www.conairgroup.com U S E R G U I D E UGC028-1105 Positive Displacement Pump Models PD 3. 5, 7.5, 10, 15 and 25 Corporate Office: 724.584.5500 l Instant Access 24/7 (Parts and Service): 800.458.1960 l
Air-Operated Waste Oil Drainer
 Air-Operated Waste Oil Drainer 20-Gallon Tank Owner s Manual WARNING: Read carefully and understand all ASSEMBLY AND OPERATION INSTRUCTIONS before operating. Failure to follow the safety rules and other
StormPro BA Series Sump Pump
 Page 1 of 8 Marks & Meanings DANGER: Keep the pump equipment out of the reach of children! Warns that the failure to follow the directions given could cause serious risk to individuals or objects. WARNING:
Manual Transfer Switch
 Manual Transfer Switch Instruction Manual 30 1200 Amp 2, 3 & 4 Pole Page 1 WARNING Before Installation READ THIS MANUAL carefully to learn how to properly install, operate and maintain this unit. Personal
PRODUCT NUMBERING SYSTEM SERIES PHASE. 1: Single Phase 3: Three Phase
 TABLE OF CONTENTS Product Numbering System and Specifications... Safety... Receiving and Inspection... Installation... Electrical...6 Start-up...7 INTRODUCTION The compressor you have purchased is a combination
Technical Manual. DLM Module. This manual should remain with the unit.
 Technical Manual DLM Module This manual should remain with the unit. Safety Rules SAVE THESE INSTRUCTIONS! Read the following information carefully before attempting to install, operate or service this
ESE Series Cast Iron Sewage Pumps
 Owner s Manual ESE Series Cast Iron Sewage Pumps TABLE OF CONTENTS General Safety.................... 2 Specifications..................... 3 Installation.................... 4 & 5 Troubleshooting...................
before serial number 2214
 before serial number 2214 Contents Page Safety Rules... 3 Pre-operational & Safety Inspection... 4 Operating Instructions... 6 Transport... 12 Maintenance & Routine Service... 12 Specifications... 14 SAFETY
PRODUCT NUMBERING SYSTEM SERIES PHASE. HD: Heavy Duty (15,000+ hour life) SD: Standard Duty (5,000+ hour life) LD: Light Duty (2,000+ hour life)
 SD: Standard Duty (5,000+ hour life) LD: Light Duty (2,000+ hour life)") TABLE OF CONTENTS Product Numbering System...1 Safety...2 Receiving and Inspection...2 Installation...2 Electrical...3 Parts Identification...7 Lubrication...9 INTRODUCTION The compressor you have purchased
TABLE OF CONTENTS Product Numbering System...1 Safety...2 Receiving and Inspection...2 Installation...2 Electrical...3 Parts Identification...7 Lubrication...9 INTRODUCTION The compressor you have purchased
Owner s Manual GLASSLINED PUMP TANK
 Owner s Manual GLASSLINED PUMP TANK ANSI/NSF 61 Annex G Thank You for purchasing a pump tank. Properly installed and maintained, it should give you years of trouble free service. If you should decide that
HATCHGRIP Installation Instructions/Operation and Maintenance Manual
 HATCHGRIP Installation Instructions/Operation and Maintenance Manual Models: HTG-PCG Contact Information Table of Contents: Safety Precautions... 2 Product Information... 2 Operation... 3 Installation
FADE Series Wall Axial Fans
 Installation and Operation Manual Item #: 401442 Rev Date: 070113 FADE Series Wall Axial Fans Fantech Inc. certifies that the FADE Series shown herein is licensed to bear the AMCA Seal. The ratings shown
Utility Distribution Systems Installation, Operation, and Maintenance Manual
 Utility Distribution Systems Installation, Operation, and Maintenance Manual RECEIVING AND INSPECTION Upon receiving unit, check for any interior and exterior damage, and if found, report it immediately
QUALITY MISTING PUMPS
 DIRECT DRIVE TOTALLY ENCLOSED FAN COOLED 60200KH, 60201KH MISTING PUMP MANUAL INCLUDING: SPECIFICATION DATA, GENERAL SAFETY PRECAUTIONS, OPERATION, INSTALLATION, PARTS, MAINTENANCE & WARRANTY QUALITY MISTING
Product Information Responsibilities of Owners Safety Instructions Warning Labels Installation Instructions...
 Table of Contents Product Information... 2 Responsibilities of Owners... 3 Safety Instructions... 4 Warning Labels... 5 Installation Instructions... 6 Electrical Installation... 7 Load Capacity... 8 Daily
110 Volt/12 Volt Portable Inflator
 110 Volt/12 Volt Portable Inflator Owner s Manual WARNING: Read carefully and understand all ASSEMBLY AND OPERATION INSTRUCTIONS before operating. Failure to follow the safety rules and other basic safety
Extreme Duty Grapple (Rock, Skeleton, Scrap & Tine) Operation and Maintenance Manual
 Operation and Maintenance Manual") Extreme Duty Grapple (Rock, Skeleton, Scrap & Tine) Operation and Maintenance Manual Revision Date: May 12, 2017 Skid Pro PO Box 982 Alexandria, MN 56308 Toll Free: 877-378-4642 www.skidpro.com TABLE OF
Extreme Duty Grapple (Rock, Skeleton, Scrap & Tine) Operation and Maintenance Manual Revision Date: May 12, 2017 Skid Pro PO Box 982 Alexandria, MN 56308 Toll Free: 877-378-4642 www.skidpro.com TABLE OF
READ AND SAVE THESE INSTRUCTIONS. Centrifugal Upblast Exhaust Fan (Standard & High Pressure Exhaust) Belt Driven for Roof & Wall Mounting
 Belt Driven for Roof & Wall Mounting") READ AND SAVE THESE INSTRUCTIONS INSTALLATION, OPERATING INSTRUCTIONS & PARTS MANUAL Centrifugal Upblast Exhaust Fan (Standard & High Pressure Exhaust) Belt Driven for Roof & Wall Mounting Electrical wiring
READ AND SAVE THESE INSTRUCTIONS INSTALLATION, OPERATING INSTRUCTIONS & PARTS MANUAL Centrifugal Upblast Exhaust Fan (Standard & High Pressure Exhaust) Belt Driven for Roof & Wall Mounting Electrical wiring
PUMP PRIMING INSTALLATION CHECK MOTOR ROTATION PUMP START-UP MOTOR REPLACEMENT DISASSEMBLY ELECTRICAL HOOKUP ASSEMBLY
 V6 VERTICAL BOOSTER PUMP OWNER'S MANUAL BEFORE INSTALLING PUMP, BE SURE TO READ THIS OWNER S MANUAL CAREFULLY. C A U T I O N Mechanical shaft seals must not run dry. Fill pump with water before starting
Customer Support
 Portable auxiliary air tanks owner's Manual aux05 aux05a aux10 WWW.CALIFORNIAAIRTOOLS.COM Customer Support 1-866-409-4581 TAbLe OF CONTeNTS INTROduCTION IntroductIon Important Safety InStructIonS components
SUNC1200 / ITEM #40882 SUBMERSIBLE UTILITY PUMP OPERATIONS MANUAL
 SUNC1200 / ITEM #40882 SUBMERSIBLE UTILITY PUMP OPERATIONS MANUAL WWW.SUNRUNNERPOOL.COM Performance Model HP GPH of Water @ Total Feet Of Lift 0 ft. 5 ft. 10 ft. 15 ft. 20 ft. 25 ft. Max. Lift SUNC1200
Air Compressor. Owner s Manual. Sonny's Enterprises, Inc Hiatus Road Tamarac, Florida v1
 Owner s Manual Sonny's Enterprises, Inc. 5605 Hiatus Road Tamarac, Florida 33321 16v1 *Table of Contents* WARNING *SAFETY REQUIREMENTS* WARNING... 3 *INTRODUCTION*... 5 Product Specifications... 6 Optional
Model AS-FM64 Wall Mount. Full Motion Television Wall Mount
 Model AS-FM64 Wall Mount Full Motion Television Wall Mount Getting Started Introduction Congratulations on the purchase of your new Audio Solutions AS-FM64 Television Wall Mount. For maximum benefit, please
PENBERTHY MODELS GL AND GH GAS OPERATED JET PUMPS INSTALLATION, OPERATION AND MAINTENANCE INSTRUCTIONS
 Before installation, these instructions must be read carefully and understood. PRODUCT WARRANTY Emerson warrants its Penberthy products as designed and manufactured to be free of defects in the material
SUBMERSIBLE MINI-PUMP
 SUBMERSIBLE MINI-PUMP Model 41287 Set up And Operating Instructions Diagrams within this manual may not be drawn proportionally. Due to continuing improvements, actual product may differ slightly from
Heavy-Duty Sawhorse. Owner s Manual
 Heavy-Duty Sawhorse Owner s Manual WARNING: Read carefully and understand all ASSEMBLY AND OPERATION INSTRUCTIONS before operating. Failure to follow the safety rules and other basic safety precautions
INSTALLATION OPERATING MAINTENANCE INSTRUCTIONS
 INSTALLATION OPERATING MAINTENANCE INSTRUCTIONS ROTARY VANE -00% OIL-FREE VACUUM PUMP OR COMPRESSOR 0 to 08 0 to 0 3060 to 3080 C CE RoHS ISO 9000:00 300 to 30 Read through carefully and understand these
For a 25 Amp Circuit with a 10% Voltage Drop, we recommend the following [but please follow all local electrical codes]: 50 [15.2] 8 [8.
![For a 25 Amp Circuit with a 10% Voltage Drop, we recommend the following [but please follow all local electrical codes]: 50 [15.2] 8 [8.](/thumbs/84/89115068.jpg "For a 25 Amp Circuit with a 10% Voltage Drop, we recommend the following [but please follow all local electrical codes]: 50 [15.2] 8 [8.") SHURFLO 5000 Series Pumps SHURflo offers various pumps models for different applications. The information outlined by this manual is general, and not specific to all 5000 series pumps. Contact SHURFLO
SHURFLO 5000 Series Pumps SHURflo offers various pumps models for different applications. The information outlined by this manual is general, and not specific to all 5000 series pumps. Contact SHURFLO
MODEL A97 SERIES. Switchmode Utility Rectifier/Battery Charger ECN/DATE
 MODEL A97 SERIES Switchmode Utility Rectifier/Battery Charger CPN108172 ISSUE DATE: 16071 7/03 ECN/DATE 106 BRADROCK DRIVE DES PLAINES, IL. 60018-1967 (847) 299-1188 FAX: (847)299-3061 Page 1 of 7 INSTRUCTION
Advantage-D. Operating Instructions and Maintenance Manual. Central Vacuum Systems (Expandable/Modular Models) (Ver.
 (Ver.") Advantage-D Series 3 Central Vacuum Systems (Expandable/Modular Models) (Ver. 8/05) Operating Instructions and Maintenance Manual DESCRIPTION The Becker Advantage-D and Advantage-L central vacuum systems
Advantage-D Series 3 Central Vacuum Systems (Expandable/Modular Models) (Ver. 8/05) Operating Instructions and Maintenance Manual DESCRIPTION The Becker Advantage-D and Advantage-L central vacuum systems
Raydot LLC 24 Actuator (115 VOLT)
") Installation, Operation & Parts Manual Read carefully the information provided. Retain manual for future reference. Raydot LLC 24 Actuator (115 VOLT) 145 Jackson Ave. S. Cokato, MN 55321-USA (320) 286-2103
Installation, Operation & Parts Manual Read carefully the information provided. Retain manual for future reference. Raydot LLC 24 Actuator (115 VOLT) 145 Jackson Ave. S. Cokato, MN 55321-USA (320) 286-2103
Heavy Duty Four Wheeled Walker
 Heavy Duty Four Wheeled Walker Weight Capacity: 500 lbs. ITEM # W1802 Made in China 2011 ESSENTIAL MEDICAL SUPPLY, INC. Manufactured for Orlando, FL 32822 -- SAVE THESE INSTRUCTIONS -- Do not attempt to
Open Display Merchandiser Installation and Operation Manual Please read this manual completely before attempting to install or operate this equipment!
 Turbo Air Speed up the Pace of Innovation CAUTION! PLEASE KEEP POWER SWITCH ON BEFORE OPERATING THIS EQUIPMENT Open Display Merchandiser Installation and Operation Manual Please read this manual completely
Blue Air. Commercial Refrigeration Inc. Installation & Operation Manual Glass Door Countertop Refrigerator
 Blue Air Commercial Refrigeration Inc. Installation & Operation Manual Glass Door Countertop Refrigerator Please read this manual completely before installing or operating this unit! BAGR7 Blue Air reserves
12 Volt Heavy-Duty Air Inflator
 12 Volt Heavy-Duty Air Inflator Owner s Manual WARNING: Read carefully and understand all ASSEMBLY AND OPERATION INSTRUCTIONS before operating. Failure to follow the safety rules and other basic safety
Prime Attachments & Custom Fab Brush Mower Owners/Operators Manual
 Prime Attachments & Custom Fab Brush Mower Owners/Operators Manual The operator is responsible for the safe operation and maintenance of the machine. It is important that anyone who uses the machine is
Full View Flow Indicator
 Full View Flow Indicator Threaded and Flanged Process Connection Installation / Operation / Maintenance Manual P.O. Box 1116 Twinsburg, OH 44087 Phone: 330/405-3040 Fax: 330/405-3070 E-mail: view@ljstar.com
Blue Air. Commercial Refrigeration Inc. Installation & Operation Manual Chef Bases
 Blue Air Commercial Refrigeration Inc. Installation & Operation Manual Chef Bases Please read this manual completely before installing or operating this unit! BACB53 BACB71 BACB74 BACB83 BACB86 BACB96
Installation Operation & Maintenance Manual. Oil-Free (Dry) Rotary Vane Vacuum Pump Systems
 Rotary Vane Vacuum Pump Systems") Installation Operation & Maintenance Manual Oil-Free (Dry) Rotary Vane Vacuum Pump Systems Part No. 9983-0000-S07 / November 2018 OIL-FREE (DRY) ROTARY VANE VACUUM PUMP SYSTEMS TABLE OF CONTENTS CUSTOMER
Installation Operation & Maintenance Manual Oil-Free (Dry) Rotary Vane Vacuum Pump Systems Part No. 9983-0000-S07 / November 2018 OIL-FREE (DRY) ROTARY VANE VACUUM PUMP SYSTEMS TABLE OF CONTENTS CUSTOMER
Ion Technologies SHR-HR Submersible Sewage Pump Single Seal, Single Phase, & Three Phase Power
 Page 1 of 8 equipment and follow handling procedures per OSHA 29 CFR 1910.1030 when handling equipment after waste water source has been connected to system. WARNING: Risk of Asphyxiation. Installer(s)
INSTALLATION AND OPERATION MANUAL. Condensate Return Systems - Series: GV
 INSTALLATION AND OPERATION MANUAL Condensate Return Systems - Series: GV WARNING! The receiver tank is NOT a pressure vessel. It MUST be vented to atmoshere to prevent pressure buildup. Any internal pressure
INSTALLATION GUIDE. Universal System for Zero Turn Mowers
 INSTALLATION GUIDE Universal System for Zero Turn Mowers Table of Contents General Information 1 Important Notice to Purchaser 2 Specifications 2 Intended Usage 2 Important Information 3 General Safety
Installation & Operation Manual Chef Base
 Installation & Operation Manual Chef Base Please read this manual completely before installing or operating this unit! BACB53 BACB53M BACB71 BACB71M BACB74 BACB74M BACB83 BACB83M BACB86 BACB86M BACB96
SERIES 300V 115 and 230 VOLT AC FUEL TRANSFER PUMP Owner's Operation & Safety Manual Models FR300V, FR301V, FR310V & FR311V
 SERIES 300V 115 and 230 VOLT AC FUEL TRANSFER PUMP Owner's Operation & Safety Manual Models FR300V, FR301V, FR310V & FR311V SAFETY INSTRUCTIONS To ensure safe and effi cient operation, it is essential
3-Pt. Quick Hitch. Owner s Manual
 3-Pt. Quick Hitch Owner s Manual WARNING: Read carefully and understand all ASSEMBLY AND OPERATION INSTRUCTIONS before operating. Failure to follow the safety rules and other basic safety precautions may
2 INLET / HIGH HEAD DRAIN PUMP SYSTEMS MODELS , INSTALLATION INSTRUCTIONS PREINSTALLATION CHECKLIST
 Product information presented here reflects conditions at time of publication. Consult factory regarding discrepancies or inconsistencies. MAIL TO: P.O. BOX 1637 Louisville, KY 06-037 SHIP TO: 369 Cane
CTFRP Series Power Supplies
 CTFRP Series Power Supplies Ferroresonant Non-Standby Power Supplies User Manual Myers Power Products 6/2013 CTFRP Series Manual Chapter 1 General Information The Myers CTFRP Series Power Supply provides
Adjustable Shop Stool with Backrest
 Adjustable Shop Stool with Backrest Owner s Manual WARNING: Read carefully and understand all ASSEMBLY AND OPERATION INSTRUCTIONS before operating. Failure to follow the safety rules and other basic safety
DANGER: Indicates an imminently hazardous situation which, if not avoided, will result in death or serious injury.
 OWNER S MANUAL General Use Criteria Use only clean, dry air. If moisture is present please use a liquid separator. Do not use flammable, explosive gases or atmosphere that contains such gases with standard
AIR COMPRESSOR OPERATING INSTRUCTION AND PARTS LIST
 AIR COMPRESSOR OPERATING INSTRUCTION AND PARTS LIST BELT TYPE IMPORTANT PLEASE MAKE CERTAIN THAT THE PERSON WHO IS TO USE THIS EQUIPMENT CAREFULLY READS AND UNDERSTANDS THESE INSTRUCTIONS BEFORE STARTING
Hazardous Location Direct-Drive Exhaust Fans. Operating Instructions & Parts Manual
 Operating Instructions & Parts Manual EN Hazardous Location Direct-Drive Exhaust Fans Models 10D996 thru 10D999, 10E001 thru 10E007, 10E009 thru 10E020, 32ZN53 and 32ZN54 474904 PLEASE READ AND SAVE THESE
Heavy-Duty Welding Fabrication Table
 Heavy-Duty Welding Fabrication Table with Fix-Up Kit Owner s Manual WARNING: Read carefully and understand all ASSEMBLY AND OPERATION INSTRUCTIONS before operating. Failure to follow the safety rules and
Adjustable Steel Welding Table
 Adjustable Steel Welding Table Owner s Manual WARNING: Read carefully and understand all ASSEMBLY AND OPERATION INSTRUCTIONS before operating. Failure to follow the safety rules and other basic safety
APCO CRF-100A RUBBER FLAPPER SWING CHECK VALVES
 APCO CRF-100A RUBBER FLAPPER SWING CHECK VALVES Instruction D12043 June 2016 DeZURIK Instructions These instructions provide installation, operation and maintenance information for APCO CRF-100A Rubber
ACC Series Power Conditioner OPERATION & INSTALLATION MANUAL
 ACC Series Power Conditioner OPERATION & INSTALLATION MANUAL PHASETEC digital power conditioners are designed to safely operate electrical equipment in the harshest power quality environments. With a wide
Model Numbers: MAC-36-BDF, MAC-42-BDF, MAC-48-BDF CONSUMER: READ AND SAVE THESE INSTRUCTIONS
 Model Numbers: MAC-36-BDF, MAC-42-BDF, MAC-48-BDF CONSUMER: READ AND SAVE THESE INSTRUCTIONS IMPORTANT: Read and understand all of the instructions in this manual before assembling, starting, or servicing
74R & 75R SERIES ROCKING PISTON OIL-LESS PUMPS
 PART NO. 70-6850 G496PL (REV-D) 74R & 75R SERIES ROCKING PISTON OIL-LESS PUMPS OPERATION & MAINTENANCE MANUAL Model 74R Shown Model 75R6 Shown Thank you for purchasing this Gast product. It is manufactured
Installation Precautions. Use Precautions. Specifications
 Important Safety Information Safety Setup Operation Maintenance Read all safety warnings and instructions. Failure to follow the warnings and instructions may result in serious injury. Save all warnings
Extreme Duty Grapple (Rock, Skeleton, Scrap & Tine) Operation and Maintenance Manual
 Operation and Maintenance Manual") Extreme Duty Grapple (Rock, Skeleton, Scrap & Tine) Operation and Maintenance Manual Revision Date: July 2017 Skid Pro PO Box 982 Alexandria, MN 56308 Toll Free: 877-378-4642 www.skidpro.com TABLE OF CONTENTS
Extreme Duty Grapple (Rock, Skeleton, Scrap & Tine) Operation and Maintenance Manual Revision Date: July 2017 Skid Pro PO Box 982 Alexandria, MN 56308 Toll Free: 877-378-4642 www.skidpro.com TABLE OF CONTENTS
SAVE THESE INSTRUCTIONS
 12 Volt High-V Volume Air Inflator Owner s Manual WARNING: Read carefully and understand all ASSEMBLY AND A OPERATION INSTRUCTIONS before operating. Failure to follow the safety rules and other basic safety
ALITA LINEAR AIR PUMP OPERATION & MAINTENANCE MANUAL. AL- Model Number Date Code / Serial Number Date of Purchase
 ALITA LINEAR AIR PUMP OPERATION & MAINTENANCE MANUAL AL- Model Number Date Code / Serial Number Date of Purchase LIMITED WARRANTY ALITA warrants to the original retail consumer purchaser ( Customer ) that
Electric Reciprocating Compressor. Installation Guide
 Electric Reciprocating Compressor Installation Guide Air compressors should only be installed trained installation personnel call 800-531-9656 to find a local trained. Warning: Read all installation steps,
User s Manual and Operating Instructions
 User s Manual and Operating Instructions Model Numbers: MAC-36-BDF, MAC-42-BDF, MAC-48-BDF PT-36-BDF, PT-42-BDF, PT-48-BDF CONSUMER: READ AND SAVE THESE INSTRUCTIONS IMPORTANT: Read and understand all
Models PR-12F PR-12C PR-15C SURFACE MOUNTED TWO-POST LIFTS INSTALLATION AND OPERATION MANUAL
 Forward this manual to all operators. Failure to operate this equipment as directed may cause injury. INSTALLATION AND OPERATION MANUAL SURFACE MOUNTED TWO-POST LIFTS Models PR-12F PR-12C PR-15C Keep this
Model AS-RC3260 TV Cart. Rolling Cart for Audio Mount System & Flat Panel TVs
 Model AS-RC3260 TV Cart Rolling Cart for Audio Mount System & Flat Panel TVs GETTING STARTED Introduction Congratulations on the purchase of your new Helios AS-RC3260 Rolling Cart. For maximum benefit,
Installation and Service Manual for SRC25, SRC252, SRC50, SRC502, SRC75, SRC752
 Rocking Piston Compressors Installation and Service Manual for SRC25, SRC252, SRC50, SRC502, SRC75, SRC752 Thank you for purchasing the Stratus SRC series rocking piston compressor. This instruction manual
BCFS Belt Driven Centrifugal Filtered Supply Fans
 BCFS Belt Driven Centrifugal Filtered Supply Fans INSTALLATION, OPERATION & MAINTENANCE MANUAL IM-4300 August 2014 Throughout this manual, there are a number of HAZARD S that must be read and adhered to
Low Profile Creeper. Owner s Manual
 Low Profile Creeper Owner s Manual WARNING: Read carefully and understand all ASSEMBLY AND OPERATION INSTRUCTIONS before operating. Failure to follow the safety rules and other basic safety precautions
SELF PRIMING CHEMICAL SERVICE PUMPS
 SELF PRIMING CHEMICAL SERVICE PUMPS INSTALLATION AND OPERATING INSTRUCTIONS This Manual covers: SELF PRIMING MODEL RANGE J50ECX TO J250ECX STAINLESS STEEL*, and NON METALLIC SEAL PUMP MODEL: SERIAL NO:
HarmonicGuard Series Drive-Applied Harmonic Filter Installation, Operation, and Maintenance Manual
 HarmonicGuard Series Drive-Applied Harmonic Filter Installation, Operation, and Maintenance Manual No part of this publication may be reproduced, stored in a retrieval system, or transmitted in any form
Power Float Manifold. Installation and Operations Manual Module 11A
 Power Float Manifold Installation and Operations Manual Module 11A 2/14 Table of Contents 1 Features 3 2 Functional Purpose 3 3 4 Specifications System Installation 3 4 4.1 Hydraulic Connection 4 4.2 Electric
EBG Series Surface Preparation Machines
 Owner s Manual EBG Series Surface Preparation Machines EBG-20/Q EBG-20/C EBG-20/E EBG-28 EBG-20/R EBG-28/R EBG-28 EBG-20/C / 800.557.6822 Square Scrub EBG Series Surface Preparation Machines Owner s Manual
Model T2642 Wall Mount. Television Wall Mount with Tilt Option
 Model T2642 Wall Mount Television Wall Mount with Tilt Option Getting Started Introduction Congratulations on the purchase of your new Audio Solutions T2642 Television Wall Mount. For maximum benefit,
HEAVY-DUTY STEEL WAGON
 HEAVY-DUTY STEEL WAGON Owner s Manual WARNING: Read carefully and understand all ASSEMBLY AND OPERATION INSTRUCTIONS before operating. Failure to follow the safety rules and other basic safety precautions
QWIK JON ULTIMA 204 SYSTEMS INSTALLATION INSTRUCTIONS PREINSTALLATION CHECKLIST
 NOTICE TO INSTALLER: Instructions must remain with installation. SECTION: 6.10.065 Your Peace of Mind is Our Top Priority Product information presented here reflects conditions at time of publication.
PORTABLE PLATFORM SCALES Digital Type Series 850F Owner s Manual
 PORTABLE PLATFORM SCALES Digital Type Series 850F Owner s Manual Model 850F CARDINAL SCALE MFG. CO. 0066-M176-O1 Rev J 203 E. Daugherty, Webb City, MO 64870 USA 11/14 Ph: 417-673-4631 Fax: 417-673-5001
SEPTIC TANK PUMP VAULT FILTER SYSTEM PUMP VAULT INSTALLATION AND SERVICE MANUAL
 SEPTIC TANK PUMP VAULT FILTER SYSTEM PUMP VAULT INSTALLATION AND SERVICE MANUAL NOTE! To the installer: Please make sure you provide this manual to the owner of the equip ment or to the responsible party