FULL FRONTAL COLLISION SAFETY PERFORMANCE TEST PROCEDURE
|
|
|
- Georgia McLaughlin
- 5 years ago
- Views:
Transcription
1 FULL FRONTAL COLLISION SAFETY PERFORMANCE TEST PROCEDURE 1. Scope This test procedure applies to the Full Frontal Collision Safety Performance Test of passenger vehicles with 9 occupants or less and commercial vehicles with a gross vehicle mass of 2.8 tons or less conducted by the National Agency for Automotive Safety and Victims Aid (hereinafter referred to as NASVA ) in the new car assessment program information supply project. 2. Definition of Terms The terms used in this testing method are defined as follows; (1) Barrier means a wall surface of which a test vehicle is caused to collide. (2) Dummy means a model simulated the adult male human body to be placed in the test vehicle. In this test, 50 percentile adult male Hybrid III dummy that is specified in the US/CFR (Code of Federal Regulations) Title 49, Parts 572, Subpart E shall be used. (3) HIC (Head Injury Criterion) means an index showing the degree of injury to the dummy s head. (4) Resultant chest acceleration means a resultant acceleration, which occurs in the chest of a dummy at the time of collision. (5) Femur load means a load applied to parts of the dummy corresponding to the right and left femurs in the axial direction of the femurs at the time of collision. (6) NIC means a Neck Injury Criterion. (7) ThCC means a Thorax Compression Criterion. (8) V*C means a Chest Viscous Criterion. (9) TCFC means a Tibia Compressive Force Criterion. (10) TI means a Tibia Index. (11) Hip point means a reference point determined in each seat following the procedure specified in Attachment Testing Conditions 3.1 Conditions of Test Vehicle Provision of Data from Vehicle Manufacturer and Importer The vehicle manufacturer and importer shall provide the NASVA with the following data necessary for the preparation of the test properly. (1) Data specified in Appendix 1 (2) Special confirmation items relating to preparation of the test (confirmation items for the test vehicle preparation of assessment testing for concerned vehicle) Mass of Test Vehicle (1) The mass of the test vehicle shall be adjusted between 100% and 101% of the mass 1
2 of the test vehicle when brought in*, including the mass of the measuring instruments (28 kg), with no dummy placed in the driver s seat and front passenger seat (seat adjacent to the side of the vehicle among front seats parallel to the driver s seat. Hereinafter means the same.). This shall not apply to cases where the mass of the test vehicle cannot be adjusted in this range even though parts, which will not affect the test results, are removed. In case of vehicles equipped with a spare tire and tools, etc., the test may be conducted with these installed in the test vehicle. *Mass of the test vehicle when brought in: Upon receiving the test vehicle, the testing institute shall fill all fluid containers to the maximum levels of the specified ranges, and fill the fuel tank to 100% capacity (see the Paragraph 3 of Appendix 1), and then measure the mass of the test vehicle. This mass shall be regarded as the mass of the test vehicle when brought in. (2) For the test vehicle need mass adjustment to install measurement instruments, if it is necessary to remove components, which will not affect the test results, may be allowed. (Examples of components, which will not affect the test results) Parts located to the rear of the anchorage point of the shoulder webbing for the driver s seat, such as rear seats, rear bumper, trim at the rear of the vehicle, rear side window glasses, rear window glass, rear carpet, trunk lid, rear doors, muffler and lights Vehicle Posture The test vehicle with the dummies placed therein shall have an inclination of ±3 relative to the vehicle manufacturer and importer specified values on the horizontal plane in the fore-and-aft direction and an inclination of ±1 relative to the horizontal plane in the lateral direction Liquid in Test Vehicle (1) Fluids such as oils (except substitute fluid filled in the fuel tank) may be drained. (2) Battery electrolyte shall be drained (this shall not apply to cases where the battery electrolyte will not leak at the time of collision such as a case where the battery is installed in the rear trunk). If the test vehicle is equipped with electrically controlled restraint devices such as air bags or seat belts with a pre-tensioner, a substitute power supply shall be provided in a location where the test results are not affected, as required, so that these restraint devices may function properly. (3) The fuel tank shall be filled with a substitute fluid with a specific gravity similar to that of the fuel. The fuel tank shall be filled to 90% capacity or more Seat Adjustment The driver seat and front passenger seat (hereinafter collectively referred to as front 2
3 seats ) shall be adjusted specified to the required positions followed (1) to (5). Include multiple adjustment devices, detail every adjustment devices are shown in the Attachment 4. Additionally, seats other than front seats shall be adjusted to the design standard positions and angles. (1) If front seats are adjustable in the fore-and-aft direction by the seat rail, the seats shall be adjusted to the middle position in fore-and-aft direction. In the case where the seats cannot be adjusted to the middle position in fore-and-aft direction, the seats shall be adjusted to the nearest adjustable position rearward from the middle position. In the case where the dummy cannot be positioned properly and the designated hip point of the driver s seat or the front passenger seat satisfies the following formula (i.e., in the case where the coordinates (x 1, z 1 ) showing the position of the designated hip point are to the left of the straight line A in the coordinate surface shown in Figure 1), the front seats may be adjusted until the dummy can be placed properly* so that the coordinates showing the position of the designated hip point are located at the right of the straight line A on the coordinate surface shown in Figure 1 and as close to the straight line A as possible Z X < 1.94 Where: x represents the horizontal distance between the hip point of the design and a horizontal line which passes through the center of the accelerator pedal surface and is perpendicular to the longitudinal plane of the vehicle in the fore-and-aft direction (unit: mm); and z represents the distance between the hip point of the design and a horizontal straight line, which passes through the center of the accelerator pedal surface and is parallel to the longitudinal plane of the vehicle in the vertical direction (unit: mm). Z (mm) Z1 0 (x1,z1) X 1< X Straight line A: X = Z 1.94 X (mm) Center of Accelerator pedal surface Figure 1 * Until the dummy can be placed properly means conformity with the following requirements. (i) The head angle shall be within the range of ±0.5 from the horizon. (ii) The pelvis angle shall be within the range of 22.5 ± z x Design hip point
4 (iii) The amount of the accelerator pedal pressed by the foot of the dummy shall be 20 mm or less. (iv) The distance between the thigh and the steering wheel shall be 20 mm or more, and the distance between the thigh and the surface of the seat shall be 30 mm or less. (v) The distance between the lower leg and the instrument panel or the steering column cover shall be 10 mm or more. (2) The front seats shall be adjusted to the lowest position in up and down direction if the seats can be adjusted in the vertical direction (excluding seat lower, seat cushion surface and seat back angle change their angles at once). (3) If the seat back angle can be adjusted, this angle shall be adjusted to the design standard angle. If the lumbar support of the seat back can be adjusted, the lumbar support shall be adjusted to the rearmost (fully retracted) position. (4) If the head restraints of the front seats can be adjusted in the vertical direction, the head restraints shall be adjusted to the highest locking position in vertical direction. (5) If the front seats have other adjustment mechanisms other than above mentioned (1) to (4), the adjustment position or the adjustment angle shall be adjusted to the design standard position or the design standard angle, respectively Adjustment of Steering System (1) If the steering system can be adjusted in the vertical direction, the steering system shall be adjusted to the geometric center of the adjustment range. If the steering system cannot be adjusted to the center, the steering system shall be adjusted to the nearest adjustable position below the center. (2) If the steering system can be adjusted in the fore-and-aft direction, the steering system shall be adjusted to the geometric center of the adjustment range. If the steering system cannot be adjusted to the center, the steering system shall be adjusted to the nearest adjustable position rearward from the center Adjustment of Anchorage for the Seat Belt Shoulder Webbing If the position of the anchorage for seat belt shoulder webbing can be adjusted, the position of the anchorage shall be adjusted to the design standard position Other Vehicle Conditions Ignition The engine of the test vehicle shall be stall condition. The ignition switch shall be in the on position. If the test vehicle is equipped with electrically controlled restraint devices such as air bags or seat belts with a pre-tensioner, proper function of the devices shall be confirmed by the warning lamps, etc. when turning the ignition switch is on position. However the 4
5 testing institute consults with the vehicle manufacturer and importer, and it may be disconnected electric power supply to the motor, in the case, the test vehicle has the mechanism that this action does not influence to the above mentioned devices Side Windows and Doors The side windows of the test vehicle (excluding the windows rearward from the driver s seat) shall be opened if it is possible. The doors shall be closed securely, but shall not be locked. Furthermore, if the test vehicle is equipped with a vehicle- speed- sensitive or vehiclespeed- and engine- speed- sensitive door locking mechanism it shall be in unlocked position in case its locked or unlocked positions concerned are listed in the manufacture s manual, and it can be operated easily without using a tool Roof In case of vehicles having a removable roof, the roof shall be installed. In case of vehicles having a sunroof, the sunroof shall be closed. In case of convertible vehicles, the top shall be closed Drive Axle, Transmission, and Parking Brake In case of a vehicle in which the drive axle can be selected, a normally used drive axle shall be selected. The transmission shall be in neutral. The parking brake shall be released Tires The air pressure for the tires shall be a pressure specified in the specification table provided by the vehicle manufacturer and importer Others (1) Installation of Stroboscope, etc. The test vehicle shall be equipped with a stroboscope, etc. for specifying the moment of collision in the photographs taken using a high-speed photography device. However, this provision shall not apply to cases where the stroboscope, etc. is installed in the ground facilities within the visual field of the high-speed photography device. (2) Remodeling of Test Vehicle The structure and devices of the test vehicle forward from the driver s seat shall not be remodeled. However, such prohibition shall not apply to remodeling necessary for towing the test vehicle, installation of the stroboscope used to specify the moment of collision, and attachment of devices. Necessary for measuring the speed of the test 5
6 vehicle, in so far as the test results are not affected. When remodeling is necessary for towing the test vehicle, the hook, lower suspension arms, stabilizers, tension rods, front cross member, and floor cross member may be remodeled. (3) Attachment of Target Marks In order to grasp the state of deformation in the test, marks (hereinafter referred to as target marks ) shall be attached to the test vehicle at points, which are not deformed during the test. When attaching the target marks, the positions of each target mark and intervals of the target marks shall be recorded on the data sheet (dimensions shall be recorded using the key holes and the side sill or the like of the vehicle as a reference). (4) Coloring of Compartment Interior Trim The interior trim of the compartment shall be colored using colors other than liquid chalk colors, etc. applied to the dummy so that the position at which the dummy collides with the interior trim can be easily identified. (5) Adjustment of Vehicle Height The test vehicle shall be the normal running attitude prescribed in the Paragraph In case of the vehicle having a mechanism for adjusting the height depending on the vehicle speed, height of the vehicle shall be adjusted to the height specified by the vehicle manufacturer and importer when traveling at 55 km/h. (6) Crash Position Confirmed Line A line shall be provided on the front of test vehicle center plane for the purpose to confirm relative position from the barrier center Dummy and Seat Belt Placement of Dummy The dummy shall be placed in the test vehicle under the conditions prescribed in the Paragraphs through according to Attachment 1. The position, etc. of the seat may be adjusted or parts such as the steering wheel, etc. may be removed, as required, in order to position the dummy in accordance with the provision. After dummy place in requested position properly, the position, etc. of the seat shall be returned to the condition prescribed in the Paragraphs through and the removed parts shall be reinstalled in the original positions. Seat positions, which may be adjusted as prescribed in the above proviso, are the seat position in the vertical direction, seat back angle, lumbar support position of the seat back, installation angle of the lower seat, position of the head restraint in the vertical direction and the fore-and-aft direction, axial direction and angle of the steering column. Parts, which may be removed, are the covers of the adjustment devices for the positions and angles of the seats (seat positions in the vertical direction, angle of the seat back, lumbar support position of the seat back, and the installation angle of the lower seat), 6
7 head restraints, steering wheel, doors, tops of convertible vehicles, and removable roof Fastening of Seat Belt After placing the dummy in the front seat of the test vehicle, the seat belt shall be fastened so that the routing position thereof is the design standard position. In this case, the slack of the seat belt shall be taken in sufficiently. In the case where the seat belt is equipped with a device for eliminating a feeling of oppression in the wearer when fastening the seat belt, the design standard slack shall be provided at the webbing for the shoulder Measurement of Seat Belt Extension Amount The amount of extension of the seat belts at the time of the test shall be measured for the driver's seat and the front passenger seat, respectively. In case of a seat belt with a pre-tensioner, the amount of retraction of the seat belt shall also be measured. However, in the case, measurement is not possible, it may be allowed omission of measurement. Appendix 2 shows a simple measuring method using a string Temperature Conditions for Dummy The dummy shall be allowed to stand in a room at a temperature of C for four hours or more just before conducting the test, thereby stabilizing the temperature of the dummy. Operations such as placement of the dummy may be carried out during this period of time. In the case where there are justifiable reasons for making the preparation for conducting the test, the dummy may not be allowed to stand in a room maintained at the above temperature up to a maximum cumulative duration of 10 minutes. The temperature measuring point shall be at the height of the shoulders of the dummies placed in the driver's seat and the front passenger seat in the case where the dummies are placed in the test vehicle. In other cases, the temperature measuring point shall be at a height equivalent to that of the shoulders of the dummies Coloring of Dummy To evaluate the secondary collision of the head with the knee of the dummy, paint such as liquid chalk shall be applied to the face and head of the dummy. If manufacture is submit the report that paint such as liquid chalk may be applied to interior components such as the instrument panel or steering of the test vehicle excluding head and knee prior to the test Installation of Electric Measuring Instruments Installation of Accelerometer Accelerometers shall be installed at the following points in the test vehicle to measure 7
8 acceleration during the collision. However if it is difficult to install on the specified position, the testing institute may change the installation position by their judgment. (1) On the engine: Single-axis (fore-and-aft direction) (2) Tunnel: 3-axis (fore-and-aft direction, lateral direction, and vertical direction) (3) Inside of side sill to the left of vehicle: Single-axis (fore-and-aft direction) (4) Inside of side sill to the right of vehicle: Single-axis (fore-and-aft direction) The positions of the accelerometers shall be entered in Appendix Installation of Measuring Instruments (1) The measuring instruments shall be firmly secured to the test vehicle at locations where the measuring instruments are not affected by deformation caused by the collision test. However, the instruments cannot be installed in the vehicle due to the lack of space, it shall be installed outside space of the vehicle where is recommended by the vehicle manufacturer and importer. (2) Wiring connecting a transducer (apparatus which transforms physical amount to be measured into electric signals) and the measuring instruments secured in the test vehicle shall have an adequate margin so that the movements of the dummies are not affected in the collision test. 3.2 Testing Facilities and Others Barrier The barrier shall be built of steel-reinforced concrete and have sufficient mass and structure capable of withstanding the impact caused by the collision of the test vehicle. The barrier face shall be 1.5 m or more in height and 3 m or more in width and vertical to the approach path. The barrier face shall be covered with a plywood board with a thickness of 20 mm ± 2 mm in the collision test. A steel plate may be installed between the barrier and the plywood board to protect the barrier Approach Path The approach path shall be a flat, horizontal, and dry road surface Towing Device The towing device shall be capable of causing a vehicle with a mass of 2.8 tons or less to collide perpendicularly against the front face of the barrier at a coasting speed of 55.0±1 km/h Illumination Device 8
9 The illumination device shall be capable of emitting light sufficient for high-speed photography and cause no halation High-speed Photography Device The photographing speed of the high-speed photography device shall be set at 500 frame/second or more. The time intervals between reference time s signals (timing pulse, etc.) shall be 10 ms or less. The cameras may be equipped with polarize filters to reduce unnecessary light Speed Measuring Device The speed measuring device shall be capable of measuring the time required for the test vehicle to pass through the speed measuring zone in units of 0.1 ms or less. When converting the time into the speed (km/h) of the test vehicle, the speed-measuring device shall indicate the speed to the first decimal place. The speed-measuring device shall be installed so as to be able to measure the speed of the test vehicle traveling within 2 m from the collision point Temperature and Humidity Measuring Device The temperature and humidity of the dummy before conducting the test prescribed in the Paragraph and the temperature and humidity at the time of dummy verification shall be recorded at intervals of one minute or less using an automatic recorder. The minimum graduations of the thermometer shall be 0.1 C, and the minimum graduations of the hygrometer (relative hygrometer) shall be 1% Electric Measuring Device The measuring device shall comply with the requirements of ISO 6487: 2002 * under the condition in which all the devices between the constituent devices and the output devices (including a computer for analytical use) are connected (measuring device under this condition is referred to as measurement channel ). (Note) ISO 6487: 2000 consider equivalent to ISO 6487:2002 (1) The measurement channel shall measure acceleration, load, moment, and displacement according to the following channel classes (i) In case of the collision test, channel classes shall be as follows. (a) Head acceleration shall be 1,000. (b) Neck load shall be 1,000. (c) Neck moment shall be 600. (d) Chest acceleration shall be 180. (e) Chest displacement shall be 180. (f) Femur load shall be 600. (g) Knee displacement shall be
10 (h) Tibia load shall be 600. (i) Tibia moment shall be 600. (j) Acceleration in the engine installation section shall be 60. (k) Side sill acceleration shall be 60. (l) Tunnel acceleration shall be 60. (ii) In case of dummy verification, channel classes shall be as follows in addition to the provisions of (i) above. (a) Neck load shall be 60. (b) Neck pendulum acceleration shall be 60. (c) Displacement of the neck rotation detector shall be 60. (d) Acceleration of the chest impactor shall be 180. (e) Displacement of the sternum with respect to the spinal cord of the dummy shall be 180. (2) When converting analog values into digital values in the measurement channel, the number of samples per second shall be 8,000 or more in the collision test. In case of dummy verification, the number of samples shall be at least 8 times as many as the channel classes specified in (ii). (3) The HIC shall be calculated with the sampling time (time intervals of data samples to be conducted according to the above-described provision) set to the minimum time interval. The range of this calculation shall be between the collision and 200 ms after the collision. (4) Deletion (filtering) of the high-frequency components in accordance with the channel classes shall be performed before calculating the head resultant acceleration, chest resultant acceleration, HIC, and the like Accelerometer, Load Meter, Moment Meter and Dummy Accelerometer, Load Meter, and Moment Meter Used in the Test Measurement ranges of the accelerometers, load meters and moment meter used in the collision test shall be as follows. (1) The measurement range of the accelerometer to be installed in the head of the dummy shall be -1,960 m/s 2 (-200 G) to +1,960 m/s 2 (+200 G). (2) The measurement range of the load meter to be installed in the neck of the dummy shall be -890 dan (-907 kgf) to +890 dan (+907 kgf). (3) The measurement range of the moment meter to be installed in the neck of the dummy shall be -285 Nm (-29 kgfm) to +285 Nm (+29 kgfm). (4) The measurement range of the accelerometer to be installed in the chest of the dummy shall be -980 m/s 2 (-100 G) to +980 m/s 2 (+100 G). (5) The measurement range of the load meter to be installed in the knee of the dummy shall be 0 to 1,960 dan (2,000 kgf). (6) The measurement range of the accelerometer to be installed in the engine shall be 10
11 -4,900 m/s 2 (-500 G) to +4,900 m/s 2 (+500 G). (7) The measurement range of the accelerometer to be installed in the side sill shall be -1,960 m/s 2 (-200 G) to +1,960 m/s 2 (+200 G). (8) The measurement range of the accelerometer to be installed in the tunnel shall be -1,960 m/s 2 (-200 G) to +1,960 m/s 2 (+200 G) Dummy (1) The dummy shall be a Hybrid III 50 percentile male dummy prescribed in USA/CFR (Code of Federal Regulations) Title 49, Part 572, subpart E. (2) Characteristics of each part of the dummy shall conform to verification according to Attachment 3. In the case where adjustment of the shoes is required in the verification of the shoed feet, innersoles may be used. (3) A neck shield shall be attached to the neck of the dummy. The feet of the dummy shall be wearing shoes that conform to MIL-S-13192P (Amendment 1) specification for shape, size and weight, which shall be 0.57±0.1 kg with size of 11XW. The dummy may be clothed in a cotton shirt with short sleeves and short pants. (4) The limb joints of the dummy shall be adjusted so as to be able to support the weight of the limbs extended horizontally. (5) In order to confirm the movement of the dummy during the collision test, the target marks shall be attached to the dummy s head at points where the movement of the dummy can be photographed using the camera during the test. Figure 2 shows a reference example. Center of the head 23mm 50mm Figure mm Recording of Electric Measurement Results on Recording Medium The measurement results of acceleration and load shall be recorded on a recording medium with a channel class of 1,000 or more Three-dimensional Measuring Device Accuracy of the three-dimensional measuring device used to measure the dimensions of the test vehicle, seating position of the dummy, and routing of the seat belts shall be 0.5 mm/m or less. 4. Testing Method 11
12 The test vehicle traveling at 55.0 ± 1 km/h shall be caused to collide perpendicularly against the front face of the barrier. The traction acceleration of the system towing the test vehicle shall be 4.9 m/s 2 {0.5 G} or less. The lateral deviation between the median longitudinal plane of the test vehicle on impact and the median plane of the barrier shall not exceed 300 mm. 5. Recording and Measuring Items 5.1 Recording Prior to Test Check and Recording of Received Vehicle for Test After receiving a vehicle for the test, the testing institute shall check the following items and record the results in Appendix 4. At the same time, the testing institute must make sure that the vehicle received complies with specifications of the vehicle provided from the NASVA. (1) Name, model, and classification (2) Chassis number (3) Shape of body (4) Engine model (5) Drive system (6) Type of transmission (7) Type of Steering system (steering wheel, steering column, presence or absence of adjustment mechanism) (8) Types of Seat belt, retractor, and anchorage (driver s seat and front passenger seat) (9) Presence or absence of air bags (driver s seat and front passenger seat) (10) Type of seat (driver s seat and front passenger seat, presence or absence of adjustment mechanism) (11) Presence or absence of air conditioner (12) Presence or absence of power steering (13) Presence or absence of vehicle speed sensing door lock system (14) Presence or absence of ABS and traction control system (15) Presence or absence of sunroof (16) Presence or absence of foot rest Recording of Dummy Verification Results (1) The testing institute shall record the verification results for the dummy. (2) The dummy shall be re-verified after conducting the test three times. In the case where the injury criterion reaches or exceeds the acceptable limit (e. g.hic1,000), the part of the dummy concerned shall be re-verified. In the case where a component of the dummy is damaged, the component concerned shall be replaced by a verified component. 12
13 5.1.3 Recording of Measuring Instrument Calibration Results (1) The calibration results of the measuring instruments (each measurement channel including transducer) conducted before the test shall be recorded. The valid period for the measuring instrument calibration shall be one year. The measuring instruments may be used during that period. If any abnormalities, etc. are found in the measuring instruments, the measuring instruments shall be re-calibrated at that time. (2) To determine whether or not the injury criteria are calculated correctly, verification shall be made using a calibration signal generation device (waveform generator) Recording of Measurement Results for Vehicle Dimensions before Test The positions of the parts of the vehicle given below shall be measured and recorded using the three-dimensional measuring device before conducting the test. In this case, parts that will not be affected by the collision shall be selected as a reference point for measurement of the vehicle dimensions. (1) Measuring points in compartment (example) (Note) The lateral positions for part Number.4-7 shall be the brake pedal mid-position for the driver seat side and the symmetrical position of the vehicle center surface from the brake pedal mid-position of the driver for the front passenger seat side. Part Part Measuring Points No. No. Measuring Points 1 Right end of instrument panel 8 Forward end steering column 2 Mid-point of instrument panel 9 Brake pedal 3 Left end of instrument panel 10 Foot rest 4 Toe board on driver s seat side 11 Toe board A driver s seat side 5 Toe board on front passenger seat side 12 Toe board B driver s seat side 6 Floor on driver s seat side 13 Toe board C driver s seat side 7 Floor on front passenger seat side 14 Toe board D driver s seat side 5 200mm mm 11 4,5,11, ,7,13,
14 (2) Measuring points relating to door (example) Part No. Measuring Points 1 Upper end of pillar A 2 Upper end of pillar B 3 Striker bolt 4 Lower end of pillar B 5 Lower end of pillar A 6 Mid-point of pillar A 7 Root of pillar A Recording of Measurement Results for Seating Position of Dummy The seating position of the dummy placed in the vehicle according to the Paragraph and the routing position of the seat belt fastened according to the Paragraph shall be measured and recorded according to the Paragraph 13-1 of Appendix Recording of Final Vehicle Condition Prior to Test After preparing the test vehicle using the protocol described in the Paragraph 3, the following items shall be checked and recorded. (1) Mass of the test vehicle (2) Names and masse of parts removed, and mass after adjustment (3) Inclination of the test vehicle (fore-and-aft direction and lateral direction) (4) Adjusted position of the seat (driver s seat and front passenger seat) (5) Adjusted position of steering system (6) Adjusted position of seat belt anchorage (7) Positions of accelerometers in each part of vehicle body (8) Positions of target marks attached to vehicle body (9) Reference positions for measurement of vehicle dimensions Recording of Dummy Temperature (1) The start time and the finish time of the dummy soak and the temperatures therefore shall be recorded. (2) The cumulative time of duration during which the temperature conditions specified in the Paragraph could not be maintained shall be recorded. 5.2 Recording during Test Recording of Collision Speed and Deviation of Collision Position The speed of the test vehicle just before the test vehicle collides against the barrier shall be measured and recorded. The deviation between the median longitudinal plane of the test vehicle and the median plane of the barrier at the time of collision shall be measured and recorded. 14
15 The term just before the test vehicle collides shall mean within 2 m of the barrier, and the test vehicle shall be coasting Recording of Electrical Measurement Results for Each Part of Dummy, Vehicle Body, etc. The electrical measurement results for the accelerometers, load meters, displacement meters, and moment meters which are installed at each part of the dummy, vehicle body, and the barrier shall be recorded for a period of time from 20 ms before the collision to 200 ms or more after the collision. (1) Acceleration of the head of the dummy in the driver s seat in the fore-and-aft direction (2) Acceleration of the head of the dummy in the driver s seat in the lateral direction (3) Acceleration of the head of the dummy in the driver s seat in the vertical direction (4) Load applied to the neck of the dummy in the driver s seat in the fore-and-aft direction (5) Load applied to the neck of the dummy in the driver s seat in the lateral direction (6) Load applied to the neck of the dummy in the driver s seat in the vertical direction (7) Moment of the neck of the dummy in the driver s seat in the fore-and-aft direction (8) Moment of the neck of the dummy in the driver s seat in the lateral direction (9) Moment of the neck of the dummy in the driver s seat in the vertical direction (10) Acceleration of the chest of the dummy in the driver s seat in the fore-and-aft direction (11) Acceleration of the chest of the dummy in the driver s seat in the lateral direction (12) Acceleration of the chest of the dummy in the driver s seat in the vertical direction (13) Displacement of the chest of the dummy in the driver s seat (14) Load applied to the right thigh of the dummy in the driver s seat (15) Load applied to the right thigh of the dummy in the driver s seat (16) Displacement of the right knee of the dummy in the driver s seat (17) Displacement of the left knee of the dummy in the driver s seat (18) Load applied to the upper right tibia of the dummy in the driver s seat in the vertical direction (19) Moment of the upper right tibia of the dummy in the driver s seat in the fore-and-aft direction (20) Moment of the upper right tibia of the dummy in the driver s seat in the lateral direction (21) Load applied to the lower right tibia of the dummy in the driver s seat in the vertical direction (22) Moment of the lower right tibia of the dummy in the driver s seat in the fore-and-aft direction (23) Moment of the lower right tibia of the dummy in the driver s seat in the lateral 15
16 direction (24) Load applied to the upper left tibia of the dummy in the driver s seat in the vertical direction (25) Moment of the upper left tibia of the dummy in the driver s seat in the fore-and-aft direction (26) Moment of the upper left tibia of the dummy in the driver s seat in the lateral direction (27) Load applied to the lower left tibia of the dummy in the driver s seat in the vertical direction (28) Moment of the lower left tibia of the dummy in the driver s seat in the fore-and-aft direction (29) Moment of the lower left tibia of the dummy in the driver s seat in the lateral direction (30) Acceleration of the head of the dummy in the front passenger seat in the fore-and-aft direction (31) Acceleration of the head of the dummy in the front passenger seat in the lateral direction (32) Acceleration of the head of the dummy in the front passenger seat in the vertical direction (33) Load applied to the neck of the dummy in the front passenger seat in the fore-and-aft direction (34) Acceleration of the chest of the dummy in the front passenger seat in the lateral direction (35) Load applied to the neck of the dummy in the front passenger seat in the vertical direction (36) Moment of the neck of the dummy in the front passenger seat in the fore-and-aft direction (37) Moment of the neck of the dummy in the front passenger seat in the lateral direction (38) Moment of the neck of the dummy in the front passenger seat in the vertical direction (39) Acceleration of the chest of the dummy in the front passenger seat in the fore-and-aft direction (40) Acceleration of the chest of the dummy in the front passenger seat in the lateral direction (41) Acceleration of the chest of the dummy in the front passenger seat in the vertical direction (42) Displacement of the chest of the dummy in the front passenger seat (43) Load applied to the right thigh of the dummy in the front passenger seat (44) Load applied to the left thigh of the dummy in the front passenger seat (45) Displacement of the right knee of the dummy in the front passenger seat (46) Displacement of the left knee of the dummy in the front passenger seat 16
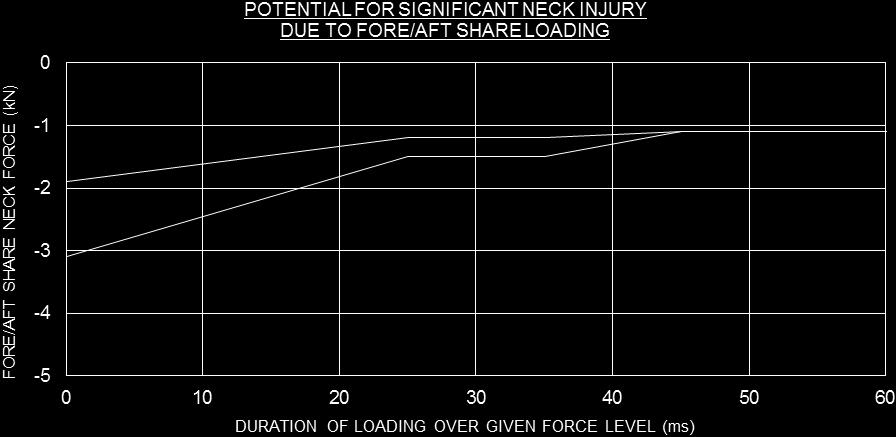
17 (47) Load applied to the upper right tibia of the dummy in the front passenger seat in the vertical direction (48) Moment of the upper right tibia of the dummy in the front passenger seat in the fore-and-aft direction (49) Moment of the upper right tibia of the dummy in the front passenger seat in the lateral direction (50) Load applied to the lower right tibia of the dummy in the front passenger seat in the vertical direction (51) Moment of the lower right tibia of the dummy in the front passenger seat in the fore-and-aft direction (52) Moment of the lower right tibia of the dummy in the front passenger seat in the lateral direction (53) Load applied to the upper left tibia of the dummy in the front passenger seat in the vertical direction (54) Moment of the upper left tibia of the dummy in the front passenger seat in the fore-and-aft direction (55) Moment of the upper left tibia of the dummy in the front passenger seat in the lateral direction (56) Load applied to the lower left tibia of the dummy in the front passenger seat in the vertical direction (57) Moment of the lower left tibia of the dummy in the front passenger seat in the fore-and-aft direction (58) Moment of the lower left tibia of the dummy in the front passenger seat in the lateral direction (59) Acceleration of the engine in the fore-and-aft direction (60) Acceleration of the right side sill in the fore-and-aft direction (61) Acceleration of the left side sill in the fore-and-aft direction (62) Acceleration of the tunnel in the fore-and-aft direction (63) Acceleration of the tunnel in the lateral direction (64) Acceleration of the tunnel in the vertical direction Record of Injury Criteria The injury criteria for the dummy shall be calculated from the waveform obtained in the Paragraph according to the following method and shall be recorded. (1) HIC (Head Injury Criterion) The maximum value among the values calculated according to the following formula shall be determined using the head resultant acceleration of the dummy. HIC 1 t2 R = t 1 2 t a t dt 2.5 ( t t )
18 Where: a R represents resultant acceleration (m/s 2 ) of head accelerations in the fore-and-aft direction, in the lateral direction, and in the vertical direction (a X, a Y, a Z ); and a 2 2 R = a X + ay + a 2 Z t 1 and t 2 represent arbitrary points in time during the collision (unit: s) provided that t 2 - t s For a sharp waveform which can be perceived as having been generated by the occurrence of a secondary collision of the head with the knee in the dummy head resultant acceleration waveform diagram and which has a section in which the positive value of the change rate of the resultant acceleration is 196 m/s 2 /ms or more and the negative value is -196 m/s 2 /ms or less, this index shall be calculated by deleting the section exceeding the acceleration when the change rate first exceeds 196 m/s 2 /ms at a point near the secondary collision start time or the acceleration when the change rate finally drops below -196 m/s 2 /ms at a point near the secondary collision finish time in the waveform concerned, whichever is the greater. The specific deletion procedure is given below. (i) Confirm that the secondary collision has taken place, either by adhesion to the knee of the paint such as liquid chalk applied to the dummy before the test, or by the images produced by high-speed photography. (ii) In the dummy head resultant acceleration waveform diagram, confirm that those portions where the positive value of the change rate of the resultant acceleration is 196 m/s 2 /ms or more and the negative value of the change rate of the resultant acceleration is -196 m/s 2 /ms or less are included in the waveform which can be perceived as having been caused by the occurrence of the secondary collision. (iii) The deletion of the resultant acceleration shall be carried out, using the deletion procedure indicated below, only when the secondary collision has been confirmed according to the provision of (i) and the head resultant acceleration caused by the collision concerned has complied with the provision of (ii). a) Using the data of the head resultant acceleration, produce numeric output values of the time, the resultant accelerations, and the change rate of the resultant accelerations from a point near the secondary collision start time to a point near the secondary collision finish time. b) Concerning the produced numeral output values, compare the acceleration in which the change rate of the resultant acceleration exceeds 196 m/s 2 /ms at the earliest time against the acceleration in which the change rate of the resultant acceleration drops -196 m/s 2 /ms at the latest time. The greater acceleration shall be the acceleration to be deleted. c) For those accelerations from when the change rate of the resultant 18

19 acceleration first exceeds 196 m/s 2 /ms to when the change rate of the resultant acceleration finally drops below -196 m/s 2 /ms, determine whether there is any acceleration, which is greater than the aforesaid acceleration to be deleted. Only such acceleration shall be replaced by the value of the acceleration to be deleted. (2) NIC (Neck Injury Criterion) NIC is determined by the compressive force in the axial direction where the neck and the head of the dummy are connected, tension in the axial direction, fore-and-aft shear strength, and the period of time (ms) in which these forces continue. The bending moment criterion of the neck is determined by the bending moment (Nm) around the horizontal axis where the neck and the head of the dummy are connected. The maximum value of the neck flexion bending moment (Nm). (3) Chest injury criterion The maximum value of the resultant acceleration of the chest of the dummy during the cumulative time of 3 ms. The maximum value of the compressed side displacement of the ribs of the dummy (ThCC: Thorax Compression Criterion). The maximum value of the momentary product of the displacement of the ribs of the dummy by the shrinkage rate (V*C: Viscous Criterion). (4) Thigh injury criterion The maximum values of the compressed loads applied to the right and left thighs of the dummy. (5) TCFC (Tibia Compressive Force Criterion) The maximum value of the compressive load (kn) transmitted in the direction of each tibia. (6) TI (Tibia Index) The maximum value calculated according to the bending moment measured in the tibia and the axial load. Recorded examples of electric measurement results measured and calculated in the Paragraphs and are shown in Appendix High-speed Photography The movements of the test vehicle and the dummy given Figure 3 shall be photographed during the collision using a high-speed VTR. Strobe lights, etc. for specifying the moment of the collision shall be included in each camera angle. Camera No. Camera angle 19
20 Movement of dummy in driver s 1 seat and collapse of vehicle Movement of dummy in front 2 passenger seat Movement and collapse of 3 vehicle (right side) 4 Situation of dummy Movement of vehicle and 5 collision position Figure 3 Covering angle of high-speed camera 5.3 Recording after Test Photographing of Vehicle Conditions Immediately after Test Distinctive sections shall be photographed both immediately after the test and after confirming opening capability of the side doors as prescribed in the Paragraph Confirmation and Recording of Opening Capability of Side Doors The opening capability of all the side doors of the test vehicle shall be confirmed, and the results shall be recorded using any of the methods given below. To do so, proceed as follows: If the door latch could not be released by pulling the outer handle in (1), try the inner handle; if the latch has been released, repeat the action (1) to see if the door opens. If it opened, record that the inner handle was used to release the door latch. If the door latch could not be released even with the inner handle, move to the next step and repeat the sequence to check opening of the door. (1) Opened with one hand. (2) Opened with both hands. (3) Opened with tools Recording of Measurement Results of Extended Amount of Seat Belt The extended amount of the seat belt shall be measured according to the Paragraph and recorded Confirmation and Recording of Removability of Dummy After measuring the extended amount of the seat belt according to the Paragraph 5.3.3, removability of each dummy from the test vehicle shall be confirmed. At this time, confirmation and a record shall be made as to how the dummies could be removed from the test vehicle using any of the methods given below. (1) No tool was used. No adjustment mechanism for the seat and the steering system, etc. was operated. (2) No tool was used. Adjustment mechanism for the seat or the steering system, etc. was operated. 20
21 (3) Tools were used. When operating the adjustment mechanism for the steering system, marks shall be made indicating the conditions before the operation. The adjustment mechanism shall then be returned to the original position before measuring the vehicle dimensions after the test as prescribed in the Paragraph Recording of Measurement Results for Vehicle Dimensions after Test ---( 追加 ) After Conducting test,dimensions of test vehicle shall be measured and be kept record based on following procedures. --- (1) After the test, the vehicle dimensions shall be measured and recorded at the same points as those before the test specified in Paragraph using the three-dimensional measuring device. The difference in the measured values before and after the test shall be calculated and recorded. (2) In the case where the steering system has a structure such as a shear capsule, whereby the steering column is removed from the steering system during the collision, the vehicle dimensions shall be measured and recorded after reinstalling the column in the steering system as precisely as possible. (3) The vehicle dimensions shall be measured and recorded without applying a load to the brake pedal. In the case where the brake pedal is designed to be completely released from the mount during the collision, the measurement results for the brake pedal shall be recorded as the brake pedal was released and no significant resistance remained in the movement of the brake pedal. In this case, the brake pedal shall be measured and recorded without applying a load to the brake pedal. In the case where the brake pedal is designed to be separated and removed from the mount during the collision, the measurement results for the brake pedal shall be recorded as the brake pedal was separated and removed from the mount during the test Recording of Measurement Results for Fuel Leakage The presence or absence of the fuel flowing or dripping from each part of the vehicle after collision shall be confirmed and recorded Calibration and Recording of Accelerometers The accelerometers used in the test shall be calibrated after collision, and the calibration results shall be recorded. 5.4 Handling of Measured Values The measured values, etc. shall be handled as follows. 21
22 (1) The measured values for speed (km/h) shall be rounded off to the first decimal place. (2) The measured values for distance (mm) shall be rounded off to the nearest whole number. (3) The measured values for acceleration (m/s 2 ) shall be rounded off to the second decimal place. (4) The measured values for load (kn) shall be rounded off to the second decimal place. (5) The measured values for moment (Nm) shall be rounded off to the second decimal place. (6) The measured values for chest displacement (mm) shall be rounded off to the second decimal place. (7) The measured values for HIC shall be rounded off to the first decimal place. (8) The measured values for TI shall be rounded off to the second decimal place. 22
23 Appendix 1 Test Vehicle Specification Data Sheet 1. Adjustment of Seat and Seat Belt 1 st row [For entry by vehicle manufacturer and importer] Driver s seat Front passenger seat Adjustment amount per stage mm mm (i)adjustment of seat in fore-and-aft direction Entire adjustment amount mm mm Middle From front edge mm ( stage) mm ( stage) position From rear edge mm ( stage) mm ( stage) (ii)adjustment of seat-slide-rail in attaching angle (iii)adjustment of seat lower and seat back at once (iv)adjustment of seat back angle (v)adjustment of seat in up and down direction Design standard position Adjustment method Design standard angle ( stage) ( stage) Tilt mm mm Lifter mm mm From lowest position Others mm mm (vi)adjustment of lumbar support From release position (vii)adjustment of anchorage for seat Adjustment range mm ( stage) mm ( stage) belt shoulder webbing Design standard position From top position mm ( stage) From top position mm ( stage) (viii)adjustment of head-rest height Adjustment range From top position mm ( stage) From top position mm ( stage) (ix)other adjustment mechanism ( ) Design standard position (Note) The number of stages for adjustment position shall start from the first locking position ( stage 0"). 23
24 2 nd and 3 rd row 2 nd row 3 rd row Adjustment amount per stage mm mm (i)adjustment of seat in fore-and-aft direction Entire adjustment amount mm mm Design From front edge mm ( stage) mm ( stage) standard position From rear edge mm ( stage) mm ( stage) (iv)adjustment of seat back angle Design standard angle ( stage) ( stage) (vii)adjustment of From top position From top position anchorage for seat Adjustment range mm ( stage) mm ( stage) belt shoulder mm ( stage) mm ( stage) Design standard position webbing (viii)adjustment of Adjustment range mm ( stage) mm ( stage) head-rest height Design standard position From top position From top position mm ( stage) mm ( stage) (ix)other adjustment mechanism Design standard position (Note) The number of stages for adjustment position shall start from the first locking position ( stage 0") Vehicle horizontal reference plane 2 (Note) position of (ix) other adjustable mechanism shall be shown on the above drawing. 2. Adjustment of Steering System (1) Vertical direction: (present, absent) Adjustment range: ~ ( stage) Vertical adjustment position: From uppermost position ( stage) (2) Fore-and-aft direction Adjustment range: mm ( stage) 24
25 Fore-and-aft adjustment position: From most forward position mm ( stage) (Note) The number of stages for adjustment position in the vertical directions and the fore-and-aft directions shall start from the uppermost position and front position ( stage 0 ), respectively. (3) Distance between steering pad center and forward end of steering shaft: mm 3. Fuel Tank Capacity: liters 4. Vehicle Whole Width: mm 5. Reference Points of Measurement of Vehicle Inclination (Enter inclination of unloaded vehicle with two dummies using this test placed on specified seats.) (1) Fore-and-aft directions Reference points (Number of points): (Points shall be indicated in the figure below.) Angle to horizontal surface: (2) Lateral directions Reference points (Number of points): (Points shall be indicated in the figure below.) Angle to horizontal surface: (Horizontal plane) 6. Relationship Between Straight Line A and Hip Point The relationship between the straight line A and the hip point shall be illustrated below if the dummy had to be set at a point other than the mid-point in the fore-and-aft direction in order to position the dummy properly when the hip point is located closer to the accelerator pedal than the straight line A prescribed in the Paragraph (1). The amount of adjustment from the middle position shall also be indicated. 25
26 Amount of adjustment from middle position: mm ( stage) 7. Location and Method for Installation of Vehicle Accelerometer Entry shall be made using Appendix Removable Parts 9. Automatic Door Locking System, etc. Vehicle speed sensitive door locking system Presence ( sensitive system), Absence Crash sensitive door lock releasing system Presence, Absence 10. Instration of Towing Hook Towing hook shall be installed at the center of the test vehicle. May use photo or drawing in here 11. Vehicle Body Measuring Reference Point The vehicle manufacturer and importer shall show 3 to 5 reference points where the points have no deformation during the collision test May use photos or drawings 12. Clamping Torque of Bolts Driver seat airbag module: N Driver seat anchor bolt: N Front passenger seat anchor bolt: N Others : N : N 26
 Recording sheet for simple measurement [For entry by vehicle manufacturer] Model name and type Chassis number Type of dummy Dummy")
27 For Full Frontal 13. Measurement, Record for Dummy Design Standard Seating Position (i) Recording sheet for simple measurement [For entry by vehicle manufacturer] Model name and type Chassis number Type of dummy Dummy number Test Date Test Site Measured by: Remarks Y M D Driver s seat Front passenger seat C D E C F H,I G H,I A,B A,B Measurement items Driver s seat Front passenger seat A Reference point ( ) ~ Hip point, in fore-and-aft direction B Reference point ( ) ~ Hip point, in vertical direction C Top of nose ~ Windshield header D Top of nose ~ Steering wheel rim upper center E Top of nose ~ Dash board F Chest ~ Steering horn pad surface (horizontal) G Chest ~ Dash board (horizontal) H Right knee ~ Lower section of dash board I Left knee ~ Lower section of dash board J Head angle (only hybrid III) K Pelvis angle (only hybrid III) L Driver s seat Front passenger seat Measurement items Driver s seat Front passenger seat M Distance between knees (Dummy center ~ Right, left) Right: Left: Right: Left: N Dummy lower section of jaw ~ Belt center (Vertical direction on dummy centerline) O Dummy center ~ Belt center (Lateral direction at height of root of neck) P (Note) For items A and B, the parts, which constitute the reference of the vehicle body, shall be entered in parentheses ( ) for the reference point. Then, dimensions of fore-and-aft and vertical components shall be measured. It is not necessary that the same reference points be employed. 27
28 (ii) Recording sheet for three-dimensional measuring device Model name and type Chassis number Type of dummy Dummy number Test Date Test Site Measured by: Remarks Y M D Driver s seat Front passenger seat A A B C,D C,D B E,F E,F Measurement items (target value) A Position equivalent to head center B Hip point C Knee joint center right (outer side of vehicle) D Knee joint center left (outer side of vehicle) E Heel center right F Heel center left G Head angle (only Hybrid III) H Pelvis angle (only Hybrid III) I Neck bracket stage (if recommended stage exist) Driver s seat Front passenger seat X Y Z X Y Z Design standard value of hip point Design hip point (Y: value of dummy center) Body base point ( ) Driver seat Fr. Passenger seat X Y Z X Y Z Body base point May use photos or drawings 28
29 13-1. Measurement, Record for Dummy Seating Position (i) Recording sheet for simple measurement [for entry by testing institute] Model named model year Test Date Y M D Chassis number Test Site Type of dummy Measured by: Dummy number Remarks Driver s seat C D Front passenger seat E C F H,I G H,I A,B A,B Measurement items Driver s seat Front passenger seat A Reference point ( ) ~ Hip point, in fore-and-aft direction B Reference point ( ) ~ Hip point, in vertical direction C Top of nose ~ Windshield header D Top of nose ~ Steering wheel rim upper center E Top of nose ~ Dash board F Chest ~ Steering horn pad surface (horizontal) G Chest ~ Dash board (horizontal) H Right knee ~ Lower section of dash board I Left knee ~ Lower section of dash board J Head angle (only hybrid III) K Pelvis angle (only hybrid III) L Driver s seat Front passenger seat Measurement items Driver s seat Front passenger seat M Distance between knees (Dummy center ~ Right, left) Left: Right: Left: Right: N Dummy lower section of jaw ~ Belt center (Vertical direction on dummy centerline) O Dummy center ~ Belt center (Lateral direction at height of root of neck) P (Note) For items A and B, the parts, which constitute the reference of the vehicle body, shall be entered in parentheses ( ) for the reference point. Then, dimensions of fore-and-aft and vertical components shall be measured. It is not necessary that the same reference points be employed. 29
 A Position equivalent to head center B Hip point C Knee joint center right (outer side of vehicle) D Knee joint center left (outer side of")
30 (ii) Record sheet for three-dimensional measuring device Model name and type Chassis number Type of dummy Dummy number Test Date Test Site Measured by: Remarks Y M D Driver s seat A Front passenger seat A B C,D C,D B E,F Measurement items (target value) A Position equivalent to head center B Hip point C Knee joint center right (outer side of vehicle) D Knee joint center left (outer side of vehicle) E Heel center right F Heel center left G Head angle H Pelvis angle I Neck bracket stages E,F Driver s seat Front passenger seat X Y Z X Y Z Removed Parts and Installed Weight Removed parts Mass of loaded weight Location of loaded weight 14. Test Results at Vehicle Manufacturer and Importer The vehicle manufacturer and importer, if necessary, shall attaché their test results in the format of Appendix 5 30
31 Appendix 2 Example of Measuring Method for Extension and Retraction of Seat Belt B pillar Bピラー (String) 糸 String retaining section 糸保持部 ( 引き込み量計測用 ) (for measuring the amount of retraction) 肩用帯部取付装置 Shoulder belt holder L' A 座席ベルト Seat belt webbing 帯部 L ( (Trim) トリム ) (String) ( 糸 ) 糸保持部 String retaining ( 引き出し section 量計測用 ) (for measuring the amount of extension) 巻き取り Retractor 装置 1. Attach one end of a string to the webbing of the seat belt (section A in figure; the string shall be sewn or affixed with tape). 2. Attach a string retaining section (e.g. a piece of styrene foam provided with a cut) to the trim that covers the retractor, as indicated in the figure. The string shall be held in such a way that it may move smoothly as the seat belt is pulled out. 3. Measure the length L in the figure before and after the test. This difference is regarded as the amount of extension. In case of seat belts equipped with a pre-tensioner, a string retaining section shall be provided at the pillar B-side. The length L in the figure shall be measured before and after the test. This difference is regarded as the amount of retraction. 31
32 Appendix 3 Position of Accelerometers [For entry by the testing institute] Centerline of vehicle Engine A B C Measuring point (1) Upper part of engine A: (2) Tunnel B: (3) Left side sill C: (4) Right side sill D: Distance from reference measuring position of vehicle dimensions (mm) 32
33 Appendix 4 Specification Data Sheet of Test Vehicle [For entry by testing institute] Model name, model type, and classification Chassis number Body style Engine type Drive type Transmission type Steering wheel type Air bag Steering Adjustment in the system vertical direction Adjustment in the fore-and-aft direction Adjustment in the fore-and-aft direction Adjustment of seat back Seat Adjustment of lumbar support Adjustment of height Pre-tensioner Seat Adjustment of shoulder belt webbing Others (Circle around items present) Absent / Present Absent / Present (Electric / Manual) Absent / Present (Electric / Manual) Absent / Present (Electric / Manual) Absent / Present (Electric / Manual) Absent / Present (Electric / Manual) Absent / Present (Electric / Manual) Absent / Present (Shoulder / Inside of waist) Absent / Present (Electric / Manual) Air conditioner / Power steering Vehicle speed sensing door lock Sunroof / Traction control / ABS Air bag for front passenger seat / Foot rest 33
 Dummy No. NASVA****-****-*** 34")
34 Appendix 5 Recorded Examples of Electrical Measurement Results HEAD RESULTANT HIC 0 T1.0 ms T2.0 ms Max Time CHEST RESULTANT G3MSm/s 2 (.0 )G Max Time FEMUR LOAD Left Max Time Min Time 12.4 Right Max Time Min Time Driver (or Passenger) Dummy No. NASVA****-****-*** 34


35 RESULTANT Max Time Min Time 12.3 X-COMP. Max Time Min Time 12.3 Y-COMP. Max Time Min Time 12.3 Z-COMP. Max Time Min Time Driver (or Passenger) Dummy Head Acc. No. NASVA****-****-*** 35
 Dummy Neck Force No.")
36 X-COMP. Max. ****** Time Min Time 12.3 Y-COMP. Max. ****** Time Min Time 12.3 Z-COMP Tension - -- Compression Max. ****** Time Min Time Driver (or Passenger) Dummy Neck Force No. NASVA****-****-*** 36


")
37 X-COMP. Max. ****** Time Min Time 12.3 Y-COMP Flexion - -- Extension Max. ****** Time Min Time 12.3 Z-COMP. Max. ****** Time Min Time Driver (or Passenger) Dummy Neck Moment No. NASVA****-****-*** 37
38 RESULTANT Max Time Min Time 12.3 X-COMP. Max Time Min Time 12.3 Y-COMP. Max Time Min Time 12.3 Z-COMP. Max Time Min Time Driver (or Passenger) Dummy Chest Acc. No. NASVA****-****-*** 38
39 DISP. Max Time Min Time Driver (or Passenger) Dummy Chest Disp. No. NASVA****-****-*** 39
40 RIGHT Max Time Min Time 12.3 LEFT Max Time Min Time Driver (or Passenger) Dummy Femur Force No. NASVA****-****-*** 40
 Right Tibia Upper F & M No.")
41 X-COMP. Max Time 12.3 Min Time 12.3 Z-COMP. Max Time 12.3 Min Time 12.3 X-COMP. Max Time 12.3 Min Time 12.3 Y-COMP. Max Time 12.3 Min Time Driver (or Passenger) Right Tibia Upper F & M No. NASVA****-****-*** 41
 Dummy TI No. NASVA****-****-*** 42")
42 RH UPPER Max Time 12.3 Min Time 12.3 RH LOWER Max Time 12.3 Min Time 12.3 LH UPPER Max Time 12.3 Min Time 12.3 LH LOWER Max Time 12.3 Min Time Driver (or Passenger) Dummy TI No. NASVA****-****-*** 42


43 Driver (or Passenger) Dummy No. NASVA****-****-*** 43
 Dummy No.")
44 RIGHT ======= LEFT Driver (or Passenger) Dummy No. NASVA****-****-*** 44

45 X-COMP. Max Time Min Time Vehicle Engine. Acc. No. NASVA****-****-*** 45
46 RH Max Time Min Time 12.3 LH Max Time Min Time Vehicle Side Sill Acc. No. NASVA****-****-*** 46
47 Attachment 1 Dummy Mounting Procedure The mounting of a dummy in the test vehicle shall be carried out following procedure given below; 1. Seating Position (1) The center between the right and left of the dummy is aligned with the center of the designed seating position. (2) The upper torso of the dummy shall be in contact with the seat back. 2. Position of Feet 2.1 Driver s Seat (1) The distance between both knees shall be adjusted as specified in Figure 1, but this measurement is not provided as the one specifying the final position. Figure 1 270±4 135±2 135±2 Knee clevis flange (Left) Dummy centerline (Right) Unit : mm (2) The right foot shall rest on the undepressed accelerator pedal, and the heel is placed on the floor pan at the lower edge of the accelerator pedal. Figure 2 Accelerator pedal Floor mat (3) When the plane formed by the femur and the tibia of the right leg is not vertical, 47
48 required adjustment shall be made by moving the knee so that it may be as vertical as possible. (4) The left foot is placed as closely as possible to on the floor point where the toe board and the floor pan cross. The foot shall rest on the toe board. If the foot does not reach the toe board, the foot is made vertical to the tibia and placed on the point as loosely as possible on the toe board. If there is a footrest, the foot shall be placed on it.(see Figures 3, 4 and 5) Figure 3 When the Foot Reaches the Toe Board Figure 4 When the Foot Does Not Reach the Toe Board Figure 5 In Case a Footrest Is Provided (5) When the plane formed by the thigh and the tibia of the left leg is not vertical, required adjustment shall be made by moving the knee so that it may be as vertical as possible. IF at this time, the leg interferes with the brake pedal or the clutch pedal, the left leg shall be made to rotate around the tibia to the minimum extent. If interference still occurs, the thigh shall be rotated to avoid such interference as much as possible. 2. Passenger Seat (1) The distance between both knees shall be adjusted as specified in Figure 1, but measurement is not required when the distance between the instrument panel and the lower legs is less than 10 mm, when the knees cannot be set at the prescribed distance, or when the knees cannot be set in the vertical position depending on the 48
 When the plane formed by the thigh and tibia of the right and left legs is not vertical, the required adjustment shall be made by moving the knee so that it may be as vertical as possible, and")
49 difference in the form of the instrument panel, floor or toe board. (2) When the plane formed by the thigh and tibia of the right and left legs is not vertical, the required adjustment shall be made by moving the knee so that it may be as vertical as possible, and the heel is placed on the floor. (3) The legs shall be positioned as specified in Paragraph 2.1(4) in the same manner as the driver s left leg. But if there is a projection from the wheelhouse, the legs shall be placed laterally away from the projection. 3. Initial Position of the Hands and Arms (1) The upper arms shall be in contact with the seat back, and with the sides of the torso. (2) The lower arms and hands shall be positioned along with the lateral surfaces of the right and left upper legs. 4. Position of the Upper Torso (1) Align the dummy hip point with the vehicle exterior with the design hip point at the time after the seat position has been adjusted. Here, it is only required that the dummy hip point is within the range indicated in Figure 6 in relation to the design hip point. But if the case, the dummy hip point cannot meet this requirement, the hip point shall be as closely as possible to Figure 6 range. Figure 6 Design hip-point 10mm 20mm Front UP Rear 15mm 15mm Down (2) Set the pelvic angle to a range of 22.5 ±2.5.(see Figure 6) (3) Set the head angle within a range of ±0.5 of the horizontal level. At this time, if the head angle cannot be set within this range, readjust the upper torso of the dummy in a sequence of the hip point and pelvic angle. Furthermore, this readjustment shall be carried out within the range provided for in (1) and (2). If this readjustment still fails to bring the head angle within the specified range provided for in this paragraph, move the neck bracket to the bring the head angle within the specified range. (see Figure 7) (4) If the pelvic angle fails to be brought within the range provided for in (2) even after the position of the dummy upper torso has been adjusted according to the provisions 49
 as a result of the aforesaid adjustments, move the neck bracket so that the neck angle becomes as close to the horizontal")
50 . of (1) through (3), the pelvic angle may be adjusted that torso of the dummy may be moved forward and rearward within a range of ±2.5 of the torso angle. However, if the head angle is now beyond the range provided for in (3) as a result of the aforesaid adjustments, move the neck bracket so that the neck angle becomes as close to the horizontal position as possible Figure 7 The hip-point position shall be a point 46.5mm horizontally forward from pelvic angle gauge hole, 65.0mm vertically below, when the dummy pelvic angle is set to a horizontal position. Hip angle Brainpan cover mating surface Head angle (Angle of head inner bottom surface perpendicular to brainpan cover mating surface) Neck bracket Pelvic angle gauge hole (Square hole whose diagonal line is vertical and parallel to the pelvis fiat surface. Using this, the pelvic angle can be measured.) Pelvic angle (Angle of pelvic flat surface) 5. Positioning of Hands and Arms 5.1. In case of the Driver s Seat (1) The thumbs are put on the rim of the steering wheel, and the palms, as far as possible, are placed on any line passing the center of the steering wheel, with backs directed to the outsides of motor vehicle, and with the armpits closed. (2) The thumbs are fixed on the steering wheel by the use of a drafting tape about 12 mm wide In case of the Front Passenger Seat (1) The upper arms shall be in contact with the seat back. (2) The lower arms and hands shall be in contact with the upper legs, and the little fingers shall be positioned so as to slightly touch the seat cushion. 6. Repositioning of Foot If the foot position is displaced during the positioning of the upper torso, etc., return the foot to the foot position that has been determined in accordance with the provision of the Paragraph 2. 50
51 Attachment 2 Procedure for Measurement the Hip Point and the Actual Torso Angle for Seating Positions in Motor Vehicle 1. Purpose The procedure described in this Attachment is used to establish the hip point location and the actual torso angle for one or several seating positions in a motor vehicle. 2. Definition of Terms 2.1 Three-dimensional manikin means a device used for the measurement of hip points and actual torso angles. This device is described in Appendix 1 to this Attachment. Thigh length and lower length of the 3-D manikin shall be adjusted 401mm and 414mm in this measurement process. 2.2 Hip point means the pivot center of the torso and the thigh of the 3-D manikin installed in the motor vehicle in accordance with the Paragraph 4 below. The hip point is located between the hip point sight buttons on either side of the 3-D manikin. Once determined in accordance with the procedure described in the Paragraph 4, The hip point is considered fixed in relation to the seat-cushion structure and to move with it when the seat is adjusted. 2.3 Torso-line means the centerline of the probe of the 3-D manikin with the probe in the fully rearward position. 2.4 Actual torso angle means the angle measured between a vertical line through the hip point and the torso line using the back angle quadrant on the 3-D manikin. 2.5 Center plane of occupant means the median plane of the 3-D manikin positioned in each designated seating position; the co-ordinate of the hip point on the Y axis represents it. For individual seats, the center plane of the seat coincides with the center plane of the occupant. For other seat, the center plane of the seat coincides with the center plane of the occupant specified by motor vehicle manufacture, etc. 2.6 Three-dimensional reference system means a system as described in Appendix 2 to this Attachment. 2.7 Fiducial marks means physical points (holes, surfaces, marks or indentations) on the vehicle body as defined by the motor vehicle manufacturer, etc. 2.8 Vehicle measuring attitude means the position of the vehicle as defined by the coordinates of fiducial marks in the three-dimensional reference system. 3. Procedure for Hip Point and Actual Torso Angle Determination 3.1 The test vehicle shall be preconditioned at the motor vehicle manufacturer s discretion, at a temperature of 20±10 to ensure that the seat material reached the room temperature. If the seat to be checked has never been sat upon, a70~80 kg person or 51
52 device shall sit on the seat twice for one minute to flex the cushion and back. All seat assemblies shall remain unloaded for a minimum period of 30 minutes prior to installation of the 3-D manikin. 3.2 The test vehicle shall be at the measuring attitude defined in the Paragraph 2.8 above. 3.3 The seat, if it is adjustable, shall be adjusted first to the rearmost normal driving or riding position, as specified by the motor vehicle manufacturer and importer, taking into consideration only the longitudinal adjustment of the seat, excluding seat travel used for purposes other than normal driving or riding positions. Where other modes of seat adjustment exist (vertical, angular, seat back, etc.), then these will be adjusted to the position specified by the motor vehicle manufacturer and importer. For suspension seats, the vertical position shall be rigidly fixed corresponding to a normal driving position as specified by the motor vehicle manufacturer and importer. 3.4 The area of the seating position contacted by the 3-D manikin shall be covered by muslin cotton, of sufficient size and appropriate texture (18.9 threads per cm 2 and weighing km/m 2 ) or knitted or non-woven fabric having equivalent characteristics. 3.5 Place the seat and back assembly of the 3-D manikin so that the center plane of the occupant coincides with the center plane of the 3-D manikin. The 3-D manikin may be moved inboard with respect to the center plane of the occupant if the 3-D manikin is located so far outboard that seat edge will not permit leveling of the 3-D manikin. 3.6 Attach the foot and lower leg assemblies, either individually or by using the T-bar and lower leg assembly. A line through the hip point sight buttons shall be parallel to the ground and perpendicular to the longitudinal center plane of the seat. 3.7 Adjust the Feet and Leg Position of the 3-D Manikin as follows; Both foot and leg assemblies shall be moved forward in such a way that the feet take up natural positions on the floor, between the operation pedals if necessary. Where possible the left foot shall be located approximately the same distance to the left of the center plane of the 3-D manikin as the right foot is to the right. The spirit level verifying the transverse orientation of the 3-D manikin is brought to the horizontal by readjustment of the seat pan if necessary, or by adjusting the leg and foot assemblies towards the rear. The line passing through the hip point sight buttons shall be maintained perpendicular to the longitudinal center plane of the seat If the left leg cannot be kept parallel to the right leg and the left foot cannot be supported by the structure, move the left foot until it is supported. The sight button shall be horizontal and vertical to the longitudinal median plane of the seat. The state shall be maintained. 3.8 Apply Lower Leg and Thigh Weights and Level the 3-D Manikin. 3.9 Tilt the back pan forward against the forward stop and draw the 3-D manikin away from the seat back using the T-bar. Reposition the 3-D manikin by one of the following methods; 52
53 3.9.1 If the 3-D manikin tends to slide rearward, use the following procedure. Allow the 3-D manikin to slide rearward until a forward load on the T-bar is no longer required (i.e. until the seat pan contacts the seat back). If necessary, reposition the lower leg If the 3-D manikin does not tend to slide rearward, use the following procedure. Slide the 3-D manikin rearwards by applying a horizontal rearward load to the T-bar until the seat pan contacts the seat back. (see Figure 2 of Appendix to this Attachment) 3.10 Apply a 100±10N load to the back pan assembly of the 3-D manikin at the intersection of the hip angle quadrant and the T-bar housing. The direction of load application shall be maintained along a line passing by the above intersection to a point just above the thigh bar housing (see Figure 2 of Appendix 1). Then carefully return the back pan to the seat back. Care must be exercised through out the reminder of the procedure to prevent the 3-D manikin from sliding forward Attach buttock weights to the left and right H point pivots then alternately attach the 8 torso weights to the torso weight hangers. Maintain the 3-D manikin level Tilt the back pan forward to release the tension on the seat back. Rock the 3-D manikin from side to side through a 10 arc (5 to each side of the vertical center plane) for three complete cycles to release any accumulated friction between the 3-D manikin and seat. During the rocking action, the T-bar of the 3-D manikin may tend to diverge from the specified horizontal and vertical alignment. The T-bar must therefore be restrained by applying an appropriate lateral load during the rocking motions. Care shall be exercised in holding the T-bar and rocking the 3-D manikin to ensure that no inadvertent exterior loads are applied in a vertical or fore and aft direction. The feet of the 3-D manikin are not to be restrained or held during this step. If the feet change position, they should be allowed to remain in that attitude for the moment. Carefully return the back pan to the seat back and check the tow spirits levels for zero position. If any movement of the feet has occurred during the rocking operation of the 3-D manikin, they must be repositioned as follows; Alternately, lift each foot off the floor, until no additional foot movement is obtained. During this lifting, the feet are to be free to rotate; and no forward or lateral loads are to be applied. When each foot is placed back in the down position, the heel is to be in contact with the structure designed for this. Check the spirit level for zero position; if necessary, apply a lateral load to the top of the back pan sufficient to level the 3-D manikin s seat pan on the seat Holding the T-bar to prevent the 3-D manikin from sliding forward on the seat cushion, proceed as follows; (a) Return the back pan to the seat back; (b) Alternately apply and release a horizontal rearward load, not exceed 25 N, to the back angle bar at the height approximately at the center of the torso weights until the hip angle quadrant indicates that a stable position has been reached after load 53
54 release. Care shall be exercised to ensure that no exterior downward or lateral loads are applied to the 3-D manikin. If another level adjustment of the 3-D manikin is necessary, rotate the back pan forward, re-level, and repeat the procedure from the Paragraph Take All Measurements; The co-ordinates of the hip point are measured with respect to the three-dimensional reference system The actual torso angle is read at the back angle quadrant od the 3-D manikin with the probe in its fully rearward position If re-run of the installation of the 3-D manikin is desired, the seat assembly should remain unloaded for a minimum period of 30 minutes prior to the re-run. The 3-D manikin should not be left loaded on the seat assembly longer than the time required to perform the test If the driver s seat and front passenger seat can be regarded as similar (bench seat, identical seat, etc.) only one hip point and one actual torso angle shall be determined. The 3-D manikin described in Appendix 1 is seated on the driver s seat as the representing seat. 54
55 ATTACHMENT 2 - APPENDIX 1 Description of 3-D Manikin (note) 1. Back and Seat Pans The back and seat pans are constructed of reinforced plastic and metal; they simulate the human torso and thigh and are mechanically hinged at the hip point. A quadrant is fastened to the probe hinged at the hip point to measure the actual torso angle. An adjustable thigh bar, attached to the seat pan, establishes the thigh centerline and serves as a baseline for the hip angle quadrant. 2. Body and Leg Elements Lower leg segments are connected to the seat pan assembly at the T-bar joining the knees, which is a lateral extension of the adjustable thigh bar. Quadrants are incorporated in the lower leg segments to measure knee angles. Shoe and foot assemblies are calibrated to measure the foot angle. Two spirit levels determine the position of the manikin in the vertical and horizontal directions. Body element weights are placed at the corresponding centers of gravity to provide seat penetration equivalent to a 76 kg male. All joints of the 3-D manikin should be checked for free movement without encountering noticeable friction. (Note) For details of the construction of the 3-D manikin refer to SAE, 400 Commonwealth Drive, Warrendale, Pennsylvania 15096, USA. The machine corresponds to that described in ISO Standard Figure 1 3-D Manikin Elements Designation Back pan Torso weight hanger Back angle level Hip angle quadrant Seat pan Thigh weight pad T-bar joining the knees Head room probe Back angle quadrant H-point sight button H-point pivot Lateral level Thigh bar Knee angle quadrant Foot angle quadrant 55
56 Figure 2 Dimensions of the 3-D H Measuring Device Elements and Load Distribution Dimensions in mm 395 Torso weight Direction and point of application of load Variable from 108 to Buttock weight 432 Thigh weight 417 Leg weight 56
57 ATTACHMENT 2-APPENDIX 2 THREE-DIMENSIONAL REFERENCE SYSTEM 1. The three-dimensional reference system is defined by three orthogonal planes established by the motor vehicle manufacturer and importer. (see Figure) Note: The reference system corresponds to ISO standard The vehicle-measuring attitude is established by positioning the vehicle on the supporting surface such that the co-ordinates of the fiducial marks correspond to the values indicated by the vehicle manufacturer and importer. 3. The co-ordinates of hip point are established in relation to the fiducial marks defined by the vehicle manufacturer and importer. Figure Three-dimensional Reference System 57
58 Attachment 3 Hybrid III AM 50 DUMMY VERIFICATION PROCEDURE 1. Verification Procedure and Requirements It is permissible to disassemble or assemble the dummy if such operation is necessary for the verification of the characteristics of each part of the dummy in accordance with the provisions of the Paragraphs 1.2 through 1.6. Furthermore, the measurement of the constructional dimensions provided for in the Paragraph 1.1 shall be conducted after all verifications the Paragraphs 1.2 through 1.6 have been completed and the dummy has been assembled in the normal condition. Moreover, tape, etc. may be used to maintain dummy posture during the measurement of dummy dimensions and verifications of characteristics Constructional Dimensions When subjected to dimensional measurements of each part of the dummy, the respective dimensions shall be the same as indicated in Figure 1. Figure 1 Constructional Dimensions of Hybrid III 1.2. Head Characteristics When the verification test is conducted, following the procedure given below, the maximum of the resultant acceleration at the time of dropping shall be 2,205m/s 2 ~ 2,695m/s 2. Furthermore, in a curve indicating the relationship between the resultant acceleration occurring at the head, and the lapse time, the maximum value of a waveform that occurs after the main waveform (referring to the maximum waveform) 58
59 shall be 10% or less of the maximum value of the main waveform. More over, the maximum value of the acceleration in a lateral direction shall be 147m/s 2 or less. (1) Condition the head to be verified, under environmental conditions in which the temperature is between 18.9 to 25.6 and whose relative humidity is between 10% to 70% for at least four hours. (2) Suspend the head as indicated in Figure 2. so that the lowest point of the forehead is 13±1mm below the lowest point of the dummy nose. Drop the head from a height of 376±3mm onto steel plate which measures 50mm or more in thickness with a surface roughness of mm to 0.002mm(ms).Measure accelerations in three axes (referring to a fore-and aft direction, aright-and-left direction and an up-and down direction) and calculated the maximum value of the resultant acceleration. In this case, it is permissible to attach a neck transducer on the head to attain the actual attaching conditions. (3) When the verification is conducted on the same head consecutively, allow at least three hours between successive tests, under the environmental conditions provided for in (1). Figure 2 Head Characteristics Test 1.3 Neck Characteristics When subjected to the verification test in accordance with the following the procedure, those characteristics at the flexion side (referring to a side where the neck is contracted) and those at the extension side (referring to a side where the neck is extended) shall comply with the requirements provided for in the following table. 59
60 Characteristics at flexion side Characteristics at extension side (i) The plane D in Figure3 shall rotate between 64 and 78 in duration of 57 ms to 64 ms after the impact (with a moment when the impact surface comes in contact with the shock-absorbing torso regarded as the time zero-point). In the first rebound, the rotation of plane D shall cross the 0 position between 113 ms and 128 ms. (ii) The maximum moment value measured by the neck measuring equipment shall occur between 47 ms and 58 ms after the impact and shall be within a range of 88Nm to 108Nm. Furthermore, the positive moment (referring to a moment in the same direction as the rotation direction of the pendulum) shall decay for the first time to 0Nm between 97 ms and 107 ms after the impact. (i) The plane D in Figure 4 shall rotates between 81 and 106 in duration of 72 ms to 82 ms after the impact. In the first rebound, the rotation of the plane D shall cross the 0 position between 147 ms and 174 ms. (ii) The maximum moment value measured by the neck measuring equipment shall occur between 65 ms and 79 ms after the impact and shall be within a range of -80Nm to -53Nm. Furthermore, the negative moment (referring to a moment in the reverse direction of the rotating direction of the pendulum) shall decay for the first time to 0Nm between 120 ms and 148 ms after the impact. Figure 3 Neck Flexion Side Characteristics Test Example: rotation angle measurement method There are measure with mounted a displacement meter, and calculate film analysis to use high speed photos 60
61 Figure 4 Neck Extension Side Characteristics Test (1) Condition the neck to be verified, under environmental conditions in which the temperature is between 20.6 and 22.2 and whose relative humidity is between 10% and 70% at least four hours. (2) Prior to the verification, tighten the jam nut of the neck cable to a torque of 1.0Nm to 1.7Nm. (3) Mount the neck and head on a pendulum as indicated Figure 5. The face section shall face toward the collision direction, in case of verification at the flexion side; and the reversed direction in case of the verification at the extension side. Here, a bib simulator (see Figures 3 and 4) shall be mounted to attain the actual matching. Furthermore, plane D shall be virtually perpendicular to the centerline of the pendulum. However, it is permissible to employ a head used exclusively for verification, on which a displacement meter for verification is mounted. (4) Apply an impact by releasing the pendulum and allow it to fall freely from a height such that the velocity at impact may become 6.89 to 7.13 m/sec in case of the verification at the flexion side; and 5.95 to 6.18 m/sec in case of the verification at the extension side. Measurement and calculate the rotational angle and moment of the neck at this moment. Here, the neck moment shall be calculated using the formula given below; (i) Case where the measuring equipment is a three-axis type M=M y (m) F x (ii) Case where the measuring equipment is a six-axis type M=M y (m) F x Where M: Moment of neck (unit: Nm) M y : Moment of neck measuring equipment (unit: N m) 61

62 F x : X axis force of neck measuring equipment (unit: N) (5) In case of the verification at the flexion side, the deceleration of the pendulum occurring at the time of impact shall be within a range specified in the right column of table A in accordance with the lapse time after the impact specified in the left column of table A. Furthermore, the curve indicating the relationship between the deceleration of the decaying pendulum and the lapse time shall first cross the 49m/s 2 level between 34 ms and 42 ms. In case of the verification at the extension side, the said deceleration shall be within a range specified in the right column of table B in accordance with the lapse time after the impact specified in the left column of table B. Furthermore, the curve indicating the relationship between the deceleration of the decaying pendulum and the lapse time shall first cross the 49m/s 2 level between 38 ms and 46 ms. Figure 5 Neck Characteristics Test Table A Table B Time(ms) Range of deceleration Time(ms) Range of deceleration (m/s 2 ) (m/s 2 ) ~ ~ ~ ~ ~ ~ or more 30 or more 285 or less 216 or less 62
63 (6) When verification is conducted on the same neck, etc. consecutively, allow at least 30 minutes between successive tests, under the environmental conditions provided for in (1) Chest Characteristics When an impact is applied to the dummy chest with an impactor, following the procedure given below, the maximum value of the impact force occurring at the impactor shall be between 515daN and 589daN. Furthermore, the maximum value of the displacement of the sternum relative to the dummy spine shall be between 63mm and 73mm. Moreover, the internal hysteresis at the moment of impact shall be within a range of 69% to 85%. (1) Condition the chest to be verified, under environmental conditions, in which the temperature is between 20.6 and 22.2 and relative humidity is between 10% and 70% for at least four hours. (2) Seat the dummy on a flat surface, without a back support or armrest, as indicated in Figure 6. At this time, the joint of the shoulder and elbow shall be tightening securely so that the upper limbs may be extended forward. Adjust the pelvic angle at an angle of 13 ±2. Here, the dummy may be clothed in a shirt and pants as provided for in the Paragraph (3) of this Technical Standard. Figure 6. Chest Characteristics Test (3) Adjust the positional relationship between the impactor and the No. 3 rib in such a way that the longitudinal centerline extended from the impactor may become 13.0±1.0mm below the horizontal centerline of the No. 3 rib on the median plane of the dummy. (4) Impact the chest with the impactor at a speed of 6.59 to 6.83 m/s. Measure and calculate the deceleration occurring at the rear end of the impactor, the 63
 and the hysteresis (the ratio of the area A between the loading and unloading portions of the force-displacement curve to the area B under the loading position of")
64 displacement of the sternum relative to the dummy spine (to be measured by means of a potentiometer to be mounted inside the sternum), the impactor force occurring at the impactor (the product of the impactor mass and the deceleration) and the hysteresis (the ratio of the area A between the loading and unloading portions of the force-displacement curve to the area B under the loading position of the curve (A/B). (see Figure 7) (5) When the verification is conducted on the same chest, etc. consecutively, allow at least 30 minutes between successive tests under the environmental conditions provided for (1). Figure 7 Chest Characteristics Test, Force-Displacement Curve 1.5 Leg Characteristics Apply an impact to each knee on the right and left side with the impactor, following the procedure given below. The maximum impact force occurring at the impactor shall be between 471 and 578 dan. (Here, this impactor refers to a cylinder whose impact applying section has a diameter of 76±1mm. To measure the impactor acceleration that occurs in the longitudinal centerline of the cylinder, the accelerometer shall be mounted on the impactor surface opposite the impactor surface in a way superposed onto the aforesaid line. Furthermore, the impactor mass shall be 5.0±0.1kg, including the accelerometer.)(see Figure 8) (1) Condition the leg to be verified, under environmental conditions in which the temperature is between 18.9 and 25.6 and the relative humidity is between 10% and 70% at least four hours. (2) Adjust the impactor position so that the height of the longitudinal center line of the impactor is same as the height of the center line of the knee pivot bolt on the vertical plane that passes through the center line of the upper leg at the time when the impactor comes in contact with the knee in a horizontal state. (3) Impact the leg with the impactor at a speed of 2.07m/s to 2.13m/s. Measure and 64
65 calculate the deceleration occurring at the rear end of the impactor and the impact force occurring at the impactor (the product of the impactor mass and the deceleration). (4) When the verification is conducted on the same leg, etc. consecutively, allow at least 30 minutes between successive tests under the environmental conditions provided for in (1). Figure 8 Leg Characteristics Test 1.6 Bending Characteristics of the Upper Legs As shown in Figure 9, when each of the upper legs is rotated vertically, the torque of the upper leg shall be 95N.m or less when rotated 30 from the initial horizontal position, and the requirement for the rotation of 40 or more to 50 or more shall be met at a torque of 203N.m. (1) The upper leg for verification shall be preconditioned for 4 hours or more under the ambient conditions with temperatures 18.9 to 25.6 and with relative humidity 10% to 70%. (2) From the dummy, the upper torso from lumber vertebra, including the abdominal region, and the legs shall be remover. (3) The dummy shall be installed on the pedestal, and keeping the upper surface of the pelvic horizontally, the pelvic shall be fixed by the use of a pelvic-fixing jig, and the lumbar vertebra by the use of a lumbar-fixing jig. The loading jig shall be installed at the axis-rotating joint of the upper leg. (4) Concerning the loading jig, its fixing bolt being kept horizontal, the jig shall be rotated upward to a torque of 203Nm along the longitudinal vertical plane of the jig. The angular velocity shall be 5 to 10 per second. The torque and the rotation angle at this moment shall be recorded. (5) When verifying the upper legs continuously, verification shall be carried out at 65
66 intervals of 30 minutes at least, under the ambient conditions of (1). Figure 9 Bending Characteristic Test for the Upper Leg 1.7 Lower Leg and Foot Characteristics Upper Foot Impact Test Test procedure Each leg assembly shall be maintained (soaked) for four hours prior to the test at a temperature of 22 ±3 and a relative humidity of 40 ± 30 %. At this time, the soak period shall not include the time required to reach steady state conditions Clean the impact surface of the upper foot section and also the impactor surface with isopropyl alcohol or equivalent prior to the test. Dust with talc Align the impactor accelerometer with its sensitive axis parallel to the direction of impact at contact with the foot Mount the leg assembly to the test fixture. (see Figure 10) The test fixture shall be rigidly secured to prevent movement during impact. The center line of the femur load cell simulator shall be vertical with a tolerance of ±0.5.Adjust the mount such that the line joining the U-link knee clevis joint and the ankle attachment bolt is horizontal with tolerance of ±3, with the heel resting on two sheets of a flat low friction (PTFE sheet) surface. Ensure that the tibia flesh is located fully towards the knee end of the tibia. Adjust the ankle such that the plane of the underside of the foot is vertical and perpendicular to the direction of impact with a tolerance of ±3 and such that the mid sagittal plane of the foot is aligned with the pendulum arm. Adjust the knee joint to 1.5±0.5 g range before each test. Adjust the ankle joint so that is free and then tighten just sufficiently to keep the foot stable on the PTFE sheet The rigid impactor comprises a horizontal cylinder diameter 50±2mm and a pendulum support arm diameter 19 ±1mm.(see Figure 13) The cylinder has a mass of 1.25±0.02kg including instrumentation and any part of the support arm within the cylinder. The pendulum arm has a mass of 285±5g. The length between the central horizontal axis of the impactor cylinder and the axis of rotation of the whole pendulum shall be 1,250±1mm. The mass of rotating part of the axis to which the support arm is attached should not be greater than 100 g. The impactor cylinder is mounted with its longitudinal axis horizontal and 66
67 perpendicular to the direction of impact. The pendulum shall impact the underside of the foot, at a direction of 185±2mm from the PTFE sheet of the heel resting on the rigid horizontal platform, so that the longitudinal center line of the pendulum arm falls within1 of a vertical line at impact. The impactor shall be guided to exclude significant lateral, vertical or rotational movement Allow a period at least 30 minutes between successive tests on the same leg The data acquisition system, including transducers, shall conform to the specifications for CFC Performance Specification When each ball of the foot is impacted at 6.7±0.1m/s in accordance with the Paragraph , the maximum lower tibia bending moment about the y-axis (My) shall be 120±25Nm Lower Foot Impact Test without Shoe Testing Procedure Each leg assembly shall be maintained (soaked) for four hours prior to the test at a temperature of 22±3 and a relative humidity of 40±30%. The soak period shall not include the time required to reach steady state conditions Clean the impact surface of the lower foot section and also the impactor face with isopropyl alcohol or equivalent prior to the test. Dust with talc. Check that there is no visible damage to the energy-absorbing insert to the heel Align the impactor accelerometer with its sensitive axis parallel to the impactor longitudinal centerline Mount the leg assembly to the test fixture (see Figure 11). The test fixture shall be rigidly secured to prevent movement during impact. Mounting of leg assembly shall be followed with the Paragraph requirements The rigid impactor shall be met the Paragraph specifications. The impactor cylinder is mounted with its longitudinal axis horizontal and perpendicular to the direction of impact. The pendulum shall impact the underside of the foot, at a distance of 62±2mm from the PTFE sheet of the heel resting on the rigid horizontal platform, so that the longitudinal center line of the pendulum arm falls within 1 of a vertical line at impact. The impactor shall be guided to exclude significant lateral, vertical or rotational movement Allow a period of at least 30 minutes between successive tests on the same leg The data acquisition system, including transducers, shall conform to the specifications for CFC Performance Specifications When each heel of the foot is impacted at 4.4±0.1m/s in accordance with the Paragraph , the maximum impactor acceleration shall be 2,894±491m/s 2 (295±50g). 67
68 1.7.3 Lower Foot Impact Test (with Shoe) Testing Procedure Each leg assembly shall be maintained (soaked) for four hours prior to the test at a temperature of 22±3 and a relative humidity of 40±30%. The soak period shall not include the time required to reach steady state conditions Clean the impact surface of the underside of the shoe with a clean cloth and impactor face with isopropyl alcohol or equivalent prior to the test. Check that there is no visual damage to the energy-absorbing insert to the heel Align the impactor accelerometer with its sensitive axis parallel to the impactor longitudinal centerline Mount the leg assembly to the test fixture (see Figure 12). The test fixture shall be rigidly secured to prevent movement during impact. Mounting the leg assembly shall be followed with the Paragraph requirements The rigid impactor shall be met the Paragraph specifications. The impact cylinder is mounted with its longitudinal axis horizontal and perpendicular to the direction of impact. The pendulum shall impact the heel of the shoe in a horizontal plane which is a distance of 62±2mm above the PTFE sheet of the dummy heel when the shoe is retesting on the rigid horizontal platform, so that the longitudinal center line of the pendulum arm falls within 1 of a vertical line at impact. The impactor shall be guided to exclude significant lateral, vertical or rotational movement Allow a period of at least 30 minutes between successive tests on the same leg The data acquisition system, including transducers, shall conform to the specifications for CFC Performance Specification When the heel of the shoe is impacted at 6.7±0.1m/s in accordance with the Paragraph , the maximum tibia compressive force (Fz) shall be 3.3±0.5kN. 68
69 Figure 10 Upper Foot Impact Test (Test set-up specification) Figure 11 Lower Foot Impact Test (without shoe) (test set-up specifications) 69
70 Figure 12 Lower Foot Impact Test (with shoe) (Test set-up specifications) 70
 Center of sensitivity of head accelerometer The center of sensitivity of the head accelerometer shall be located within a range as specified in the table below with the head center as the zero")
71 Figure 13 Pendulum Impactor 1.8 Measuring Equipment, etc. (1) Center of sensitivity of head accelerometer The center of sensitivity of the head accelerometer shall be located within a range as specified in the table below with the head center as the zero point (Here, the head center means a point that is on the dummy center plane, 23 mm above the head inner bottom surface and 63.5 mm forward from a vertical plane where the brainpan joins with the brain pan cover.) (see Figure 14) Range of fore-and-aft axis Range of right and left axis Range of up-and-down axis Range of center of sensitivity of head accelerometer (mm) Fore-and-aft direction Right-and-left direction Up-and-down Direction Within 33 ±5 ±5 ±5 ±33 ±5 ±5 ±5 ±8 (2) Installation of neck load meter The neck load meter shall be installed as indicated in Figures 14 and 15 71

72 Figure 14 Center of Sensitivity of Head Accelerometer and Installation of 3-axis Type Head Load Meter Figure 15 Installation of 6-axis Type Head Load Meter (3) Center of sensitivity of chest accelerometer The center of sensitivity of the chest accelerometer shall be located within a range, as specified in the table below, with the chest center as the zero-point. (Here, the chest center means a point on the dummy center plane, 97 mm below the upper surface of the plane on which the neck attaching bracket is mounted and 94 mm forward from the rearmost thoracic plane.) (see Figures 16 and 17) Range of fore-and- aft axis Range of right-and-left axis Range of up-and-down axis Fore-and-aft Right-and left direction direction Up-and-down direction Range of center of sensitivity of head accelerometer (mm) Within 40 backward ±10 Within 20downward Within 50 backward ±5 Within 20downward Within25 backward ±10 Within 45 downward 72


73 (4) Installation of chest potentiometer A potentiometer shall be installed as indicated in Figure 16. Figure 16 Center of Chest and Installation of Chest Potentiometer Figure17 Center of Sensitivity of Chest Accelerometer 73

) Middle position in fore-and-aft direction Seat cushion surface angle adjustment")
) Design standard angle Seat cushion surface up-and-down adjustment device(lifter)")
) Design standard position Seat cushion surface angle up-and-down adjustment")
) Design standard position Seat lower-seat back up-and-down")
74 Attachment5 Adjusting Position of Test Seat Adjustment Mechanism Fore-and-aft direction adjustment device Seat back angle adjustment device (ref (1)) (ref (3)) Middle position in fore-and-aft direction Seat cushion surface angle adjustment device( tilt or lifter) (ref (5)) Design standard angle Seat cushion surface up-and-down adjustment device(lifter) (ref (2)) Design standard position Seat cushion surface angle up-and-down adjustment device(others) (ref (5)) Lowermost position in up-and-down direction Seat lower-seat back angle adjustment device (ref (5)) Design standard position Seat lower-seat back up-and-down adjustment device(lifter) (ref (2)) Design standard position Seat lower(angle, up-and-down)-seat back angle adjustment device (ref (5)) Lowermost position in up-and-down direction Design standard position 74

 (ref. 3.1.5.")
75 Fore-and-aft, up-and-down, angle all linked adjustment device (ref (5)) Fore-and-aft, up-and-down all linked adjustment device (lifter) (ref (2)) Design standard position Lowermost position in up-and-down direction 75
SIDE COLLISION SAFETY PERFORMANCE TEST PROCEDURE
 SIDE COLLISION SAFETY PERFORMANCE TEST PROCEDURE 1. Scope This test procedure applies to the Side Collision Safety Performance Test of passenger vehicles with 9 occupants or less and commercial vehicles
Occupant Restraint Systems in Frontal Impact
 TEST METHOD 208 Occupant Restraint Systems in Frontal Impact Revised: Issued: December 1996R January 20, 1976 (Ce document est aussi disponible en français) Table of Contents 1. Introduction... 1 2. General
ECE/TRANS/WP.29/GRSP/2014/10
 Submitted by the expert from France Proposal for amendment of document ECE/TRANS/WP.29/GRSP/2014/10 Informal document GRSP-55-20-Rev1 (55th GRSP, 19-23 May 2014, agenda item 21) Formatted: French (France)
NECK INJURY PROTECTION PERFORMANCE TEST FOR REAR-END COLLISION
 NECK INJURY PROTECTION PERFORMANCE TEST FOR REAR-END COLLISION Enacted: April 1st, 2009 Revised: October 19th, 2017 April 1st, 2012 1. Effective Dates This testing procedure went into effect April 1st,
TEST METHOD Booster Seats. May 2012R January 1, Revised: Issued: (Ce document est aussi disponible en français)
") TEST METHOD 213.2 Booster Seats Revised: Issued: May 2012R January 1, 2010 (Ce document est aussi disponible en français) Table of Contents 1. Introduction... 1 2. Test Devices to be Used... 1 3. Dynamic
TEST METHOD 213.2 Booster Seats Revised: Issued: May 2012R January 1, 2010 (Ce document est aussi disponible en français) Table of Contents 1. Introduction... 1 2. Test Devices to be Used... 1 3. Dynamic
GTR Rev.1. Note:
 GTR7-06-10. Rev.1 Note: GTR 7 Head Restraints, specifies the use of the Hybrid III dummy for the purposes of assessing protection against whiplash associated disorder resulting from a rear impact. However,
Side Impact Protection
 TECHNICAL STANDARDS DOCUMENT No. 214, Revision 0 Side Impact Protection The text of this document is based on Federal Motor Vehicle Safety Standard No. 214, Side Impact Protection, as published in the
Full Width Test ECE-R 94 Evaluation of test data Proposal for injury criteria Way forward
 Full Width Test ECE-R 94 Evaluation of test data Proposal for injury criteria Way forward Andre Eggers IWG Frontal Impact 19 th September, Bergisch Gladbach Federal Highway Research Institute BASt Project
Having regard to the Treaty establishing the European Economic Community,
 No L 341 / 20 Official Journal of the European Communities 6. 12. 90 COMMISSION DIRECTIVE of 30 October 1990 adapting to technical progress Council Directive 77/ 649/ EEC on the approximation of the laws
TECHNICAL STANDARD FOR WINDSHIELD WIPING AND WASHING SYSTEMS FOR PASSENGER MOTOR VEHICLES, ETC.
 Attachment 84 1. Scope TECHNICAL STANDARD FOR WINDSHIELD WIPING AND WASHING SYSTEMS FOR PASSENGER MOTOR VEHICLES, ETC. This Technical Standard shall apply to the windshield wiping and washing systems of
SLED TEST PROCEDURE FOR ASSESSING KNEE IMPACT AREAS
 EUROPEAN NEW CAR ASSESSMENT PROGRAMME (Euro NCAP) SLED TEST PROCEDURE FOR ASSESSING KNEE IMPACT AREAS CONTENTS 1 INTRODUCTION...2 2 PREREQUISITES FOR KNEE MAPPING...3 3 HARDWARE SETUP...4 4 VALIDATION
Head Restraints. TECHNICAL STANDARDS DOCUMENT No. 202, Revision 1R. (Ce document est aussi disponible en français)
") TECHNICAL STANDARDS DOCUMENT No. 202, Revision 1R Head Restraints The text of this document is based on Federal Motor Vehicle Safety Standard No. 202a, Head Restraints, as published in the United States
TECHNICAL STANDARDS DOCUMENT No. 202, Revision 1R Head Restraints The text of this document is based on Federal Motor Vehicle Safety Standard No. 202a, Head Restraints, as published in the United States
Draft for comments only Not to be cited as East African Standard
 EAST AFRICAN STANDARD CD/K/021:2008 ICS 43.040.50 Motor vehicle safety Steering mechanism of motor vehicles (Category M 1 only) Behaviour on impact EAST AFRICAN COMMUNITY EAC 2010 First Edition 2010 CD/K/021:2008
ANCAP Test Protocol. Frontal Impact Offset Deformable Barrier v7.1.1
 ANCAP Test Protocol. Frontal Impact Offset Deformable Barrier v7.1.1 JANUARY 2018 PREFACE During the test preparation, vehicle manufacturers are encouraged to liaise with ANCAP and to observe the way cars
CNG Fuel System Integrity
 TEST METHOD 301.2 CNG Fuel System Integrity Revised: Issued: February 28, 2004R May 20, 1994 (Ce document est aussi disponible en français) Table of Content 1. Introduction... 1 2. Definition... 1 3. Test
E/ECE/324/Rev.2/Add.128/Rev.1/Amend.2 E/ECE/TRANS/505/Rev.2/Add.128/Rev.1/Amend.2
 E/ECE/324/Rev.2/Add.128/Rev.1/Amend.2 26 July 2017 Agreement Concerning the Adoption of Uniform Technical Prescriptions for Wheeled Vehicles, Equipment and Parts which can be Fitted and/or be Used on Wheeled
E/ECE/324/Rev.1/Add.94/Rev.2 E/ECE/TRANS/505/Rev.1/Add.94/Rev.2
 13 February 2014 Agreement Concerning the Adoption of Uniform Technical Prescriptions for Wheeled Vehicles, Equipment and Parts which can be Fitted and/or be Used on Wheeled Vehicles and the Conditions
EUROPEAN NEW CAR ASSESSMENT PROGRAMME (Euro NCAP)
") EUROPEAN NEW CAR ASSESSMENT PROGRAMME (Euro NCAP) MPDB FRONTAL IMPACT TESTING PROTOCOL Implementation 1 st January 2020 Copyright Euro NCAP 2018 - This work is the intellectual property of Euro NCAP. Permission
EUROPEAN NEW CAR ASSESSMENT PROGRAMME (Euro NCAP) MPDB FRONTAL IMPACT TESTING PROTOCOL Implementation 1 st January 2020 Copyright Euro NCAP 2018 - This work is the intellectual property of Euro NCAP. Permission
E/ECE/324/Rev.2/Add.136 E/ECE/TRANS/505/Rev.2/Add.136
 22 June 2016 Agreement Concerning the Adoption of Uniform Technical Prescriptions for Wheeled Vehicles, Equipment and Parts which can be Fitted and/or be Used on Wheeled Vehicles and the Conditions for
Economic and Social Council
 United Nations Economic and Social Council ECE/TRANS/WP.29/2017/59 Distr.: General 5 April 2017 Original: English Economic Commission for Europe Inland Transport Committee World Forum for Harmonization
E/ECE/324/Rev.2/Add.128/Rev.2/Amend.2 E/ECE/TRANS/505/Rev.2/Add.128/Rev.2/Amend.2
 10 August 2018 Agreement Concerning the Adoption of Harmonized Technical United Nations Regulations for Wheeled Vehicles, Equipment and Parts which can be Fitted and/or be Used on Wheeled Vehicles and
Proposal for the 02 series of amendments to Phase 2 of Regulation No. 129 (Enhanced Child Restraint Systems)
") Submitted by the expert from France Informal document GRSP-58-08 (58th GRSP, 7-11 December 2015, agenda item 19) Proposal for the 02 series of amendments to Phase 2 of Regulation No. 129 (Enhanced Child
Submitted by the expert from France Informal document GRSP-58-08 (58th GRSP, 7-11 December 2015, agenda item 19) Proposal for the 02 series of amendments to Phase 2 of Regulation No. 129 (Enhanced Child
EUROPEAN NEW CAR ASSESSMENT PROGRAMME (Euro NCAP) FULL WIDTH FRONTAL IMPACT TESTING PROTOCOL
 FULL WIDTH FRONTAL IMPACT TESTING PROTOCOL") EUROPEAN NEW CAR ASSESSMENT PROGRAMME (Euro NCAP) FULL WIDTH FRONTAL IMPACT TESTING PROTOCOL December 2016 Copyright 2016 Euro NCAP - This work is the intellectual property of Euro NCAP. Permission is
EUROPEAN NEW CAR ASSESSMENT PROGRAMME (Euro NCAP) FULL WIDTH FRONTAL IMPACT TESTING PROTOCOL December 2016 Copyright 2016 Euro NCAP - This work is the intellectual property of Euro NCAP. Permission is
EUROPEAN NEW CAR ASSESSMENT PROGRAMME (Euro NCAP) L7e FULL WIDTH FRONTAL TESTING PROTOCOL
 L7e FULL WIDTH FRONTAL TESTING PROTOCOL") EUROPEAN NEW CAR ASSESSMENT PROGRAMME (Euro NCAP) L7e FULL WIDTH FRONTAL TESTING PROTOCOL June 2014 Copyright 2014 Euro NCAP - This work is the intellectual property of Euro NCAP. Permission is granted
EUROPEAN NEW CAR ASSESSMENT PROGRAMME (Euro NCAP) L7e FULL WIDTH FRONTAL TESTING PROTOCOL June 2014 Copyright 2014 Euro NCAP - This work is the intellectual property of Euro NCAP. Permission is granted
Proposal. Submitted. agenda item 17) supersedes made 2017/04/19) Insert new. of the. The minimum size area." Insert new. inform the.
 supersedes made 2017/04/19) Insert new. of the. The minimum size area. Insert new. inform the.") Submitted by the expert from France Informal document GRSP-61-15-Rev.11 (61 st GRSP, 08-12 May 2017 agenda item 17) Proposal for Supplement 3 to the 01 series of amendments to Regulation No. 129 Submitted
Submitted by the expert from France Informal document GRSP-61-15-Rev.11 (61 st GRSP, 08-12 May 2017 agenda item 17) Proposal for Supplement 3 to the 01 series of amendments to Regulation No. 129 Submitted
FRONTAL IMPACT TESTING PROTOCOL
 FRONTAL IMPACT TESTING PROTOCOL Preface Where text is contained within square brackets this denotes that the procedure being discussed is currently being trialled in ASEAN NCAP. Its incorporation in the
EUROPEAN NEW CAR ASSESSMENT PROGRAMME (Euro NCAP) OFFSET DEFORMABLE BARRIER FRONTAL IMPACT TESTING PROTOCOL
 OFFSET DEFORMABLE BARRIER FRONTAL IMPACT TESTING PROTOCOL") EUROPEAN NEW CAR ASSESSMENT PROGRAMME (Euro NCAP) OFFSET DEFORMABLE BARRIER FRONTAL IMPACT TESTING PROTOCOL Copyright 2015 Euro NCAP - This work is the intellectual property of Euro NCAP. Permission is
EUROPEAN NEW CAR ASSESSMENT PROGRAMME (Euro NCAP) OFFSET DEFORMABLE BARRIER FRONTAL IMPACT TESTING PROTOCOL Copyright 2015 Euro NCAP - This work is the intellectual property of Euro NCAP. Permission is
Pre impact Braking Influence on the Standard Seat belted and Motorized Seat belted Occupants in Frontal Collisions based on Anthropometric Test Dummy
 Pre impact Influence on the Standard Seat belted and Motorized Seat belted Occupants in Frontal Collisions based on Anthropometric Test Dummy Susumu Ejima 1, Daisuke Ito 1, Jacobo Antona 1, Yoshihiro Sukegawa
EUROPEAN NEW CAR ASSESSMENT PROGRAMME (Euro NCAP) SIDE IMPACT MOBILE DEFORMABLE BARRIER TESTING PROTOCOL
 SIDE IMPACT MOBILE DEFORMABLE BARRIER TESTING PROTOCOL") EUROPEAN NEW CAR ASSESSMENT PROGRAMME (Euro NCAP) SIDE IMPACT MOBILE DEFORMABLE BARRIER TESTING PROTOCOL November 2017 November 2017 1 Preface Where text is contained within square brackets this denotes
EUROPEAN NEW CAR ASSESSMENT PROGRAMME (Euro NCAP) SIDE IMPACT MOBILE DEFORMABLE BARRIER TESTING PROTOCOL November 2017 November 2017 1 Preface Where text is contained within square brackets this denotes
Proposal for the 09 series of amendments to Regulation No. 17
 Informal document No. GRSP-58-28-Rev.1 Proposal for the 09 series of amendments to Regulation No. 17. Alignment to gtr No. 7 head restraints The text reproduced below was prepared by the experts from Japan
Injury Risk and Seating Position for Fifth-Percentile Female Drivers Crash Tests with 1990 and 1992 Lincoln Town Cars. Michael R. Powell David S.
 Injury Risk and Seating Position for Fifth-Percentile Female Drivers Crash Tests with 1990 and 1992 Lincoln Town Cars Michael R. Powell David S. Zuby July 1997 ABSTRACT A series of 35 mi/h barrier crash
E/ECE/324/Rev.1/Add.93/Rev.3 E/ECE/TRANS/505/Rev.1/Add.93/Rev.3
 14 September 2017 Agreement Concerning the Adoption of Uniform Technical Prescriptions for Wheeled Vehicles, Equipment and Parts which can be Fitted and/or be Used on Wheeled Vehicles and the Conditions
ARAI Date of hosting on website: 27 th October 2015 Last date for comments: 27 th November 2015
 ARAI Date of hosting on website: 27 th October 2015 Last date for comments: 27 th November 2015 CHECK LIST FOR PREPARING AMENDMENT TO AUTOMOTIVE INDUSTRY STANDARD (AIS) Draft Amd. No 01 to AIS-099 : Approval
ANCAP Test Protocol. Side Impact Mobile Deformable Barrier v7.1.2
 ANCAP Test Protocol. Side Impact Mobile Deformable Barrier v7.1.2 JANUARY 2018 PREFACE During the test preparation, vehicle manufacturers are encouraged to liaise with ANCAP and to observe the way cars
EUROPEAN NEW CAR ASSESSMENT PROGRAMME (Euro NCAP)
") EUROPEAN NEW CAR ASSESSMENT PROGRAMME (Euro NCAP) OFFSET DEFORMABLE BARRIER FRONTAL IMPACT TESTING PROTOCOL Implementation 1 st January 2016 Copyright 2015 Euro NCAP - This work is the intellectual property
EUROPEAN NEW CAR ASSESSMENT PROGRAMME (Euro NCAP) OFFSET DEFORMABLE BARRIER FRONTAL IMPACT TESTING PROTOCOL Implementation 1 st January 2016 Copyright 2015 Euro NCAP - This work is the intellectual property
COMMISSION REGULATION (EC)
") 25.7.2009 Official Journal of the European Union L 195/1 I (Acts adopted under the EC Treaty/Euratom Treaty whose publication is obligatory) REGULATIONS COMMISSION REGULATION (EC) No 631/2009 of 22 July
25.7.2009 Official Journal of the European Union L 195/1 I (Acts adopted under the EC Treaty/Euratom Treaty whose publication is obligatory) REGULATIONS COMMISSION REGULATION (EC) No 631/2009 of 22 July
ANCAP Test Protocol. Whiplash Protection (rear) v1.0
 v1.0") ANCAP Test Protocol. Whiplash Protection (rear) v1.0 JANUARY 2018 PREFACE During the test preparation, vehicle manufacturers are encouraged to liaise with ANCAP and to observe the way cars are set up for
ANCAP Test Protocol. Whiplash Protection (rear) v1.0 JANUARY 2018 PREFACE During the test preparation, vehicle manufacturers are encouraged to liaise with ANCAP and to observe the way cars are set up for
Research on Chest Injury Criteria
 Submitted by the expert from Japan Informal document GRSP 54 25 (54 th GRSP, 17 20 December 2013, agenda item 14) Research on Chest Injury Criteria JASIC 54 th GRSP 17 20 December, 2013 1 Summary of Previous
AMENDMENT NO December 2015 To AIS-100
 AMENDMENT NO. 1 15 December 2015 To AIS-100 Requirements for the Protection of Pedestrian and other Vulnerable Road Users in the event of a Collision with a Motor Vehicle 1. Page No. III and IV, Clause
EUROPEAN NEW CAR ASSESSMENT PROGRAMME (EuroNCAP) SIDE IMPACT TESTING PROTOCOL
 SIDE IMPACT TESTING PROTOCOL") www.euroncap.com EUROPEAN NEW CAR ASSESSMENT PROGRAMME (EuroNCAP) SIDE IMPACT TESTING PROTOCOL EUROPEAN NEW CAR ASSESSMENT PROGRAM (EuroNCAP) SIDE IMPACT TESTING PROTOCOL Where text is contained within
www.euroncap.com EUROPEAN NEW CAR ASSESSMENT PROGRAMME (EuroNCAP) SIDE IMPACT TESTING PROTOCOL EUROPEAN NEW CAR ASSESSMENT PROGRAM (EuroNCAP) SIDE IMPACT TESTING PROTOCOL Where text is contained within
Crashworthiness Evaluation Offset Barrier Crash Test Protocol (Version III) June 1996
 June 1996") Crashworthiness Evaluation Offset Barrier Crash Test Protocol (Version III) June 1996 Insurance Institute for Highway Safety TEST CONDITIONS Impact Speed and Overlap Offset barrier crash tests are conducted
Crashworthiness Evaluation Offset Barrier Crash Test Protocol (Version III) June 1996 Insurance Institute for Highway Safety TEST CONDITIONS Impact Speed and Overlap Offset barrier crash tests are conducted
Occupant Crash Protection
 TECHNICAL STANDARDS DOCUMENT No. 208, Revision 0R Occupant Crash Protection The text of this document is based on Federal Motor Vehicle Safety Standard No. 208, Occupant Crash Protection, as published
Fuel System Integrity
 TECHNICAL STANDARDS DOCUMENT No. 301, Revision 2R Fuel System Integrity The text of this document is based on Federal Motor Vehicle Safety Standard No. 301, Fuel System Integrity, as published in the U.S.
(Acts whose publication is not obligatory) COUNCIL COUNCIL DIRECTIVE
 COUNCIL COUNCIL DIRECTIVE") 12. 8. 74 Official Journal of the European Communities No L 221/ 1 II (Acts whose publication is not obligatory) COUNCIL COUNCIL DIRECTIVE of 22 July 1974 on the approximation of the laws of the Member
12. 8. 74 Official Journal of the European Communities No L 221/ 1 II (Acts whose publication is not obligatory) COUNCIL COUNCIL DIRECTIVE of 22 July 1974 on the approximation of the laws of the Member
EUROPEAN NEW CAR ASSESSMENT PROGRAMME (Euro NCAP) L7e SIDE IMPACT TESTING PROTOCOL
 L7e SIDE IMPACT TESTING PROTOCOL") EUROPEAN NEW CAR ASSESSMENT PROGRAMME (Euro NCAP) L7e SIDE IMPACT TESTING PROTOCOL Copyright Euro NCAP - This work is the intellectual property of Euro NCAP. Permission is granted for this material to
EUROPEAN NEW CAR ASSESSMENT PROGRAMME (Euro NCAP) L7e SIDE IMPACT TESTING PROTOCOL Copyright Euro NCAP - This work is the intellectual property of Euro NCAP. Permission is granted for this material to
Part 11: Wheelchairs. Test dummies
 INTERNATIONAL STANDARD ISO 7176-11 Second edition 2012-12-01 Wheelchairs Part 11: Test dummies Fauteuils roulants Partie 11: Mannequins d essai Reference number ISO 2012 COPYRIGHT PROTECTED DOCUMENT ISO
FMVSS/CMVSR Compliance
 2004 REQUIREMENTS FOR FMVSS/CMVSR COMPLIANCE A. INTRODUCTION Front Seats Front seats have been designed to comply with FMVSS/CMVSR 201, 202, 207, 208, 210 and 302. Any modifications to the front seats
Lateral Protection Device
 V.5 Informal document GRSG-113-11 (113th GRSG, 10-13 October 2017, agenda item 7.) Lateral Protection Device France Evolution study on Regulation UNECE n 73 1 Structure Accidentology analysis Regulation
ANCAP Test Protocol. Child Occupant Protection v7.2.1
 ANCAP Test Protocol. Child Occupant Protection v7.2.1 JANUARY 2018 PREFACE During the test preparation, vehicle manufacturers are encouraged to liaise with ANCAP and to observe the way cars are set up
Requirements on vehicle occupant protection, including interior fittings, head restraints, seat belts, vehicle doors
 L 42/70 EN Official Journal of the European Union 17.2.2015 ANNEX XIII Requirements on vehicle occupant protection, including interior fittings, head restraints, seat belts, vehicle doors 1. Definitions
EUROPEAN NEW CAR ASSESSMENT PROGRAMME (Euro NCAP) ASSESSMENT PROTOCOL ADULT OCCUPANT PROTECTION
 ASSESSMENT PROTOCOL ADULT OCCUPANT PROTECTION") EUROPEAN NEW CAR ASSESSMENT PROGRAMME (Euro NCAP) ASSESSMENT PROTOCOL ADULT OCCUPANT PROTECTION EUROPEAN NEW CAR ASSESSMENT PROGRAMME (Euro NCAP) ASSESSMENT PROTOCOL ADULT OCCUPANT PROTECTION Table of
EUROPEAN NEW CAR ASSESSMENT PROGRAMME (Euro NCAP) ASSESSMENT PROTOCOL ADULT OCCUPANT PROTECTION EUROPEAN NEW CAR ASSESSMENT PROGRAMME (Euro NCAP) ASSESSMENT PROTOCOL ADULT OCCUPANT PROTECTION Table of
STATUS OF NHTSA S EJECTION MITIGATION RESEARCH. Aloke Prasad Allison Louden National Highway Traffic Safety Administration
 STATUS OF NHTSA S EJECTION MITIGATION RESEARCH Aloke Prasad Allison Louden National Highway Traffic Safety Administration United States of America Stephen Duffy Transportation Research Center United States
Approval of Vehicles with regards to the Protection of the Occupants in the event of a Lateral Collision
 AUTOMOTIVE INDUSTRY STANDARD Approval of Vehicles with regards to the Protection of the Occupants in the event of a Lateral Collision PRINTED BY THE AUTOMOTIVE RESEARCH ASSOCIATION OF INDIA P.B. NO. 832,
Proposal for the 02 series of amendments to Phase 2 of Regulation No. 129 (Enhanced Child Restraint Systems)
") Transmitted by the experts from France Informal document GRSP-59-08-Rev.1 (59th GRSP, 9-13 May 2016, agenda item 19) Proposal for the 02 series of amendments to Phase 2 of Regulation No. 129 (Enhanced
Transmitted by the experts from France Informal document GRSP-59-08-Rev.1 (59th GRSP, 9-13 May 2016, agenda item 19) Proposal for the 02 series of amendments to Phase 2 of Regulation No. 129 (Enhanced
e-cfr Data is current as of October 31, 2012
 Page 1 of 11 ELECTRONIC CODE OF FEDERAL REGULATIONS e-cfr Data is current as of October 31, 2012 Title 49: Transportation PART 563 EVENT DATA RECORDERS Contents 563.1 Scope. 563.2 Purpose. 563.3 Application.
SPCT Method. The SPCT Method - Testing of Dog Crates. Utskrivet dokument är ostyrt, dvs inte säkert gällande.
 Kvalitetsdokument Författare, enhet Mikael Videby Bygg och Mekanik Hållfasthet och konstruktion Utgåva 1 (7) Godkännare 2 The Testing of Dog Crates Application Area... 2 References... 2 1 Test Sample Selection...
EUROPEAN NEW CAR ASSESSMENT PROGRAMME (Euro NCAP)
") EUROPEAN NEW CAR ASSESSMENT PROGRAMME (Euro NCAP) ASSESSMENT PROTOCOL ADULT OCCUPANT PROTECTION Implementation 1 st January 2020 Copyright 2018 Euro NCAP - This work is the intellectual property of Euro
EUROPEAN NEW CAR ASSESSMENT PROGRAMME (Euro NCAP) ASSESSMENT PROTOCOL ADULT OCCUPANT PROTECTION Implementation 1 st January 2020 Copyright 2018 Euro NCAP - This work is the intellectual property of Euro
E/ECE/324/Rev.2/Add.126 E/ECE/TRANS/505/Rev.2/Add.126
 7 January 2013 Agreement Concerning the adoption of uniform technical prescriptions for wheeled vehicles, equipment and parts which can be fitted and/or be used on wheeled vehicles and the conditions for
Common position by FR and CEMA on mechanical couplings for towed vehicles 28/9/2015
 Common position by FR and CEMA on mechanical couplings for towed vehicles 28/9/2015 ANNEX XXXIV Requirements on mechanical couplings 1. Definitions For the purposes of this Annex: 1.1. Mechanical coupling
(Revision 2, including the amendments which entered into force on 16 October 1995) 01 series of amendments Date of entry into force: 9 February 2017
 01 series of amendments Date of entry into force: 9 February 2017") 22 February 2017 Agreement Concerning the Adoption of Uniform Technical Prescriptions for Wheeled Vehicles, Equipment and Parts which can be Fitted and/or be Used on Wheeled Vehicles and the Conditions
22 February 2017 Agreement Concerning the Adoption of Uniform Technical Prescriptions for Wheeled Vehicles, Equipment and Parts which can be Fitted and/or be Used on Wheeled Vehicles and the Conditions
ISO INTERNATIONAL STANDARD. Wheelchair seating Part 4: Seating systems for use in motor vehicles
 INTERNATIONAL STANDARD ISO 16840-4 First edition 2009-03-15 Wheelchair seating Part 4: Seating systems for use in motor vehicles Sièges de fauteuils roulants Partie 4: Systèmes d'assise dans les véhicules
E/ECE/324/Rev.1/Add.79/Rev.1 E/ECE/TRANS/505/Rev.1/Add.79/Rev.1
 25 October 2011 Agreement Concerning the adoption of uniform technical prescriptions for wheeled vehicles, equipment and parts which can be fitted and/or be used on wheeled vehicles and the conditions
Guidelines for Using the UMTRI ATD Positioning Procedure for ATD. April 2004
 Guidelines for Using the UMTRI ATD Positioning Procedure for ATD and Seat Positioning (Version IV) April 2004 Insurance Institute for Highway Safety Guidelines for Using the UMTRI ATD Positioning Procedure
ANCAP Test Protocol. Child Occupant Protection v7.2a
 ANCAP Test Protocol. Child Occupant Protection v7.2a JANUARY 2018 PREFACE During the test preparation, vehicle manufacturers are encouraged to liaise with ANCAP and to observe the way cars are set up for
JRS Dynamic Rollover Test Toyota Camry
 Page 1 of 60 JRS Dynamic Rollover Test 2007 Toyota Camry Hybrid Version Sponsored By: Automotive Safety Research Institute Charlottesville, VA. Introduction Page 2 of 60 Center for Injury Research conducted
EUROPEAN NEW CAR ASSESSMENT PROGRAMME (Euro NCAP)
") EUROPEAN NEW CAR ASSESSMENT PROGRAMME (Euro NCAP) TESTING PROTOCOL CHILD OCCUPANT PROTECTION Implementation 1 st January 2018 Version 7.2 Copyright Euro NCAP 2017 - This work is the intellectual property
EUROPEAN NEW CAR ASSESSMENT PROGRAMME (Euro NCAP) TESTING PROTOCOL CHILD OCCUPANT PROTECTION Implementation 1 st January 2018 Version 7.2 Copyright Euro NCAP 2017 - This work is the intellectual property
Economic and Social Council
 United Nations Economic and Social Council ECE/TRANS/WP.29/GRSP/2018/29 Distr.: General 26 September 2018 Original: English Economic Commission for Europe Inland Transport Committee World Forum for Harmonization
EUROPEAN NEW CAR ASSESSMENT PROGRAMME (Euro NCAP) ASSESSMENT PROTOCOL PEDESTRIAN PROTECTION
 ASSESSMENT PROTOCOL PEDESTRIAN PROTECTION") EUROPEAN NEW CAR ASSESSMENT PROGRAMME (Euro NCAP) ASSESSMENT PROTOCOL PEDESTRIAN PROTECTION Version 9.0.2 Version 9.0.2 EUROPEAN NEW CAR ASSESSMENT PROGRAMME (Euro NCAP) ASSESSMENT PROTOCOL PEDESTRIAN
EUROPEAN NEW CAR ASSESSMENT PROGRAMME (Euro NCAP) ASSESSMENT PROTOCOL PEDESTRIAN PROTECTION Version 9.0.2 Version 9.0.2 EUROPEAN NEW CAR ASSESSMENT PROGRAMME (Euro NCAP) ASSESSMENT PROTOCOL PEDESTRIAN
EUROPEAN NEW CAR ASSESSMENT PROGRAMME (Euro NCAP) OBLIQUE POLE SIDE IMPACT TESTING PROTOCOL
 OBLIQUE POLE SIDE IMPACT TESTING PROTOCOL") EUROPEAN NEW CAR ASSESSMENT PROGRAMME (Euro NCAP) OBLIQUE POLE SIDE IMPACT TESTING PROTOCOL November 2017 November 2017 1 Preface Where text is contained within square brackets this denotes that the procedure
EUROPEAN NEW CAR ASSESSMENT PROGRAMME (Euro NCAP) OBLIQUE POLE SIDE IMPACT TESTING PROTOCOL November 2017 November 2017 1 Preface Where text is contained within square brackets this denotes that the procedure
DRAFT: Front Contact Surface Head Restraint
 DRAFT: Front Contact Surface Head Restraint 20071012 PROPOSAL FOR DRAFT AMENDMENTS TO DRAFT GTR ON HEAD RESTRAINTS Transmitted by the expert from the Netherlands Note: The text reproduced below was prepared
Small Overlap Frontal Crashworthiness Evaluation Rating Protocol (Version II)
") Small Overlap Frontal Crashworthiness Evaluation Rating Protocol (Version II) Rating Guidelines for Restraints and Dummy Kinematics, Injury Measures, and Vehicle Structural Performance Weighting Principles
Small Overlap Frontal Crashworthiness Evaluation Rating Protocol (Version II) Rating Guidelines for Restraints and Dummy Kinematics, Injury Measures, and Vehicle Structural Performance Weighting Principles
EXTRACT of chapter XXXIV coupling devices (version of ) ANNEX XXXIV Requirements on mechanical couplings
 ANNEX XXXIV Requirements on mechanical couplings") EXTRACT of chapter XXXIV coupling devices (version of 18.09.2013) ANNEX XXXIV Requirements on mechanical couplings Definitions specific to this Annex Mechanical coupling between tractor and towed vehicle
EXTRACT of chapter XXXIV coupling devices (version of 18.09.2013) ANNEX XXXIV Requirements on mechanical couplings Definitions specific to this Annex Mechanical coupling between tractor and towed vehicle
EUROPEAN NEW CAR ASSESSMENT PROGRAMME (Euro NCAP) ASSESSMENT PROTOCOL VULNERABLE ROAD USER PROTECTION
 ASSESSMENT PROTOCOL VULNERABLE ROAD USER PROTECTION") EUROPEAN NEW CAR ASSESSMENT PROGRAMME (Euro NCAP) ASSESSMENT PROTOCOL VULNERABLE ROAD USER PROTECTION February 2019 February 2019 EUROPEAN NEW CAR ASSESSMENT PROGRAMME (Euro NCAP) ASSESSMENT PROTOCOL PEDESTRIAN
EUROPEAN NEW CAR ASSESSMENT PROGRAMME (Euro NCAP) ASSESSMENT PROTOCOL VULNERABLE ROAD USER PROTECTION February 2019 February 2019 EUROPEAN NEW CAR ASSESSMENT PROGRAMME (Euro NCAP) ASSESSMENT PROTOCOL PEDESTRIAN
Infant Restraint Systems
 TEST METHOD 213.1 Infant Restraint Systems Revised: Issued: May 2012R April 1, 1982 (Ce document est aussi disponible en français) Table of Contents 1. Introduction... 1 2. Test Devices to be Used... 1
Occupant Crash Protection
 TECHNICAL STANDARDS DOCUMENT No. 208, Revision 1R The text of this document is based on Federal Motor Vehicle Safety Standard No. 208,, as published in the United States Code of Federal Regulations, Title
Economic and Social Council
 United Nations Economic and Social Council ECE/TRANS/WP.29/GRSP/2018/34 Distr.: General 21 September 2018 Original: English Economic Commission for Europe Inland Transport Committee World Forum for Harmonization
Airbags SAFETY INFORMATION
 Airbags Your vehicle is equipped with several types of airbags: front airbags, front knee airbags, side airbags, and side curtain airbags. Front Airbags (SRS) The front SRS airbags inflate in a moderate-to-severe
STUDY ON CAR-TO-CAR FRONTAL OFFSET IMPACT WITH VEHICLE COMPATIBILITY
 STUDY ON CAR-TO-CAR FRONTAL OFFSET IMPACT WITH VEHICLE COMPATIBILITY Chang Min, Lee Jang Ho, Shin Hyun Woo, Kim Kun Ho, Park Young Joon, Park Hyundai Motor Company Republic of Korea Paper Number 17-0168
Survey on Safety of New Mobility Vehicles
 Submitted by the expert from Japan Informal document GRSP-55-26-Rev.1 (55th GRSP, 19-23 May 2014, agenda item 23(j)) Survey on Safety of New Mobility Vehicles Ministry of Land, Infrastructure, Transport
E/ECE/324/Rev.1/Add.57/Rev.2/Amend.4 E/ECE/TRANS/505/Rev.1/Add.57/Rev.2/Amend.4
 11 July 2016 Agreement Concerning the Adoption of Uniform Technical Prescriptions for Wheeled Vehicles, Equipment and Parts which can be Fitted and/or be Used on Wheeled Vehicles and the Conditions for
ANCAP Assessment Protocol. Adult Occupant Protection v8.0.2
 ANCAP Assessment Protocol. Adult Occupant Protection v8.0.2 JANUARY 2018 PREFACE During the test preparation, vehicle manufacturers are encouraged to liaise with ANCAP and to observe the way cars are set
Performance as Test Procedures of the PDB and ODB Tests for a Mini-Car
 FI-3-11 Performance as Test Procedures of the PDB and ODB Tests for a Mini-Car JAPAN December 9, 2008 3rd Meeting of the Informal Group on Frontal Impact 1 Objective To examine effects on mini-cars when
JRS Dynamic Rollover Test Toyota Prius
 Page 1 of 62 JRS Dynamic Rollover Test 2010 Toyota Prius Sponsored By: Automotive Safety Research Institute Charlottesville, VA. Vehicle Donated by: State Farm Insurance Company Chicago, IL. Introduction
This document is meant purely as a documentation tool and the institutions do not assume any liability for its contents
 2009R0078 EN 01.07.2013 001.001 1 This document is meant purely as a documentation tool and the institutions do not assume any liability for its contents B REGULATION (EC) No 78/2009 OF THE EUROPEAN PARLIAMENT
Driver (Single Stage), Passenger (Single Stage) Driver (single), Passenger (single)
, Passenger (Single Stage) Driver (single), Passenger (single)") Subaru Outback Subaru Outback 2.0 diesel 'EyeSight', LHD 85% 87% 70% 73% DETAILS OF TESTED CAR SPECIFICATIONS Tested model Subaru Outback 2.0 diesel 'EyeSight', LHD Body type 5 door wagon Year of publication
Subaru Outback Subaru Outback 2.0 diesel 'EyeSight', LHD 85% 87% 70% 73% DETAILS OF TESTED CAR SPECIFICATIONS Tested model Subaru Outback 2.0 diesel 'EyeSight', LHD Body type 5 door wagon Year of publication
ANCAP Test Protocol. Oblique Pole Side Impact v7.0.2
 ANCAP Test Protocol. Oblique Pole Side Impact v7.0.2 JANUARY 2018 PREFACE During the test preparation, vehicle manufacturers are encouraged to liaise with ANCAP and to observe the way cars are set up for
EUROPEAN NEW CAR ASSESSMENT PROGRAMME (Euro NCAP) SIDE IMPACT TESTING PROTOCOL
 SIDE IMPACT TESTING PROTOCOL") EUROPEAN NEW CAR ASSESSMENT PROGRAMME (Euro NCAP) SIDE IMPACT TESTING PROTOCOL Copyright Euro NCAP - This work is the intellectual property of Euro NCAP. Permission is granted for this material to be shared
EUROPEAN NEW CAR ASSESSMENT PROGRAMME (Euro NCAP) SIDE IMPACT TESTING PROTOCOL Copyright Euro NCAP - This work is the intellectual property of Euro NCAP. Permission is granted for this material to be shared
REPORT NUMBER: 214P-MGA SAFETY COMPLIANCE TESTING FOR FMVSS 214 DYNAMIC SIDE IMPACT PROTECTION RIGID POLE
 REPORT NUMBER: 214P-MGA-21-3 SAFETY COMPLIANCE TESTING FOR FMVSS 214 DYNAMIC SIDE IMPACT PROTECTION RIGID POLE FORD MOTOR COMPANY 21 FORD F-15 4x2 REGULAR CAB NHTSA NUMBER: CA28 PREPARED BY: MGA RESEARCH
E/ECE/324/Rev.1/Add.16/Rev.5 E/ECE/TRANS/505/Rev.1/Add.16/Rev.5
 26 June 2014 Agreement Concerning the Adoption of Uniform Technical Prescriptions for Wheeled Vehicles, Equipment and Parts which can be Fitted and/or be Used on Wheeled Vehicles and the Conditions for
REPORT NUMBER: 301-CAL SAFETY COMPLIANCE TESTING FOR FMVSS 301 FUEL SYSTEM INTEGRITY REAR IMPACT MAZDA MOTOR CORPORATION 2008 MAZDA CX-9 SUV
 REPORT NUMBER: 301-CAL-08-03 SAFETY COMPLIANCE TESTING FOR FMVSS 301 FUEL SYSTEM INTEGRITY REAR IMPACT MAZDA MOTOR CORPORATION 2008 MAZDA CX-9 SUV NHTSA NUMBER: C85401 CALSPAN TRANSPORTATION SCIENCES CENTER
Kia Soul EV 84% 82% 59% 56% DETAILS OF TESTED CAR. Soul EV 81.4kW EV 'SX', LHD SPECIFICATIONS SAFETY EQUIPMENT
 Kia Soul EV Soul EV 81.4kW EV 'SX', LHD 84% 82% 59% 56% DETAILS OF TESTED CAR SPECIFICATIONS Tested model Soul EV 81.4kW EV 'SX', LHD Body type 5 door wagon Year of publication 2014 Kerb weight 1513kg
Methodologies and Examples for Efficient Short and Long Duration Integrated Occupant-Vehicle Crash Simulation
 13 th International LS-DYNA Users Conference Session: Automotive Methodologies and Examples for Efficient Short and Long Duration Integrated Occupant-Vehicle Crash Simulation R. Reichert, C.-D. Kan, D.
Date of hosting on website: 26 th October 2017 Last date for comments: 25 th November 2017
 Date of hosting on website: 26 th October 2017 Last date for comments: 25 th November 2017 CHECK LIST FOR PREPARING AUTOMOTIVE INDUSTRY STANDARD Draft AIS-146/D0 : Requirements applying to stands fitted
JRS Dynamic Rollover Test Scion xb
 Page 1 of 57 JRS Dynamic Rollover Test 2008 Scion xb Sponsored By: Automotive Safety Research Institute Charlottesville, VA. Introduction Page 2 of 57 Center for Injury Research conducted a JRS dynamic
EUROPEAN NEW CAR ASSESSMENT PROGRAMME (Euro NCAP) ASSESSMENT PROTOCOL PEDESTRIAN PROTECTION
 ASSESSMENT PROTOCOL PEDESTRIAN PROTECTION") EUROPEAN NEW CAR ASSESSMENT PROGRAMME (Euro NCAP) ASSESSMENT PROTOCOL PEDESTRIAN PROTECTION Version 8.1 Copyright Euro NCAP 2015 - This work is the intellectual property of Euro NCAP. Permission is granted
EUROPEAN NEW CAR ASSESSMENT PROGRAMME (Euro NCAP) ASSESSMENT PROTOCOL PEDESTRIAN PROTECTION Version 8.1 Copyright Euro NCAP 2015 - This work is the intellectual property of Euro NCAP. Permission is granted
REPORT NUMBER: 301-CAL SAFETY COMPLIANCE TESTING FOR FMVSS 301 FUEL SYSTEM INTEGRITY REAR IMPACT
 REPORT NUMBER: 301-CAL-09-01 SAFETY COMPLIANCE TESTING FOR FMVSS 301 FUEL SYSTEM INTEGRITY REAR IMPACT HYUNDAI MOTOR COMPANY 2009 HYUNDAI ACCENT 4-DOOR SEDAN NHTSA NUMBER: C90503 CALSPAN TRANSPORTATION
Headlight Test and Rating Protocol (Version I)
") Headlight Test and Rating Protocol (Version I) February 2016 HEADLIGHT TEST AND RATING PROTOCOL (VERSION I) This document describes the Insurance Institute for Highway Safety (IIHS) headlight test and
Headlight Test and Rating Protocol (Version I) February 2016 HEADLIGHT TEST AND RATING PROTOCOL (VERSION I) This document describes the Insurance Institute for Highway Safety (IIHS) headlight test and
TRL s Child Seat Rating, (TCSR) Front Impact Testing Specification
 Front Impact Testing Specification") TRL s Child Seat Rating, (TCSR) Front Impact Testing Specification Revision 1 Prepared by TRL Limited July 2009 Foreword The UN-ECE Regulation provides a baseline level of safety for child restraint systems
TRL s Child Seat Rating, (TCSR) Front Impact Testing Specification Revision 1 Prepared by TRL Limited July 2009 Foreword The UN-ECE Regulation provides a baseline level of safety for child restraint systems
Crashworthiness Evaluation Offset Barrier Crash Test Protocol (Version VII)
") Crashworthiness Evaluation Offset Barrier Crash Test Protocol (Version VII) November 1999 Insurance Institute for Highway Safety Document Revision History Version VII of the Insurance Institute for Highway
Crashworthiness Evaluation Offset Barrier Crash Test Protocol (Version VII) November 1999 Insurance Institute for Highway Safety Document Revision History Version VII of the Insurance Institute for Highway
Driver (Single Stage), Passenger (Single Stage) Driver (single), Passenger (single)
, Passenger (Single Stage) Driver (single), Passenger (single)") Citroën Berlingo Citroën Berlingo 1.6 diesel 'Confort', LHD 56% 74% 63% 48% DETAILS OF TESTED CAR SPECIFICATIONS Tested model Citroën Berlingo 1.6 diesel 'Confort', LHD Body type 5 door hatchback Year
Citroën Berlingo Citroën Berlingo 1.6 diesel 'Confort', LHD 56% 74% 63% 48% DETAILS OF TESTED CAR SPECIFICATIONS Tested model Citroën Berlingo 1.6 diesel 'Confort', LHD Body type 5 door hatchback Year