Trikke Freedom - Owner s Manual V Owner s Manual
|
|
|
- Shana Morris
- 5 years ago
- Views:
Transcription

1 by Trikke Freedom - Owner s Manual V Owner s Manual

2 CAREFULLY READ THE WARNINGS, SAFETY INFORMATION AND RIDING TIPS. Thank you for purchasing a Trikke product. This manual is designed to help you get the most out of your Trikke Electric Vehicle. The warnings and instructions have been carefully prepared to make your experience safer and more enjoyable. Use common sense when riding. Read an understand the Safety Information presented on this manual. Trikke Freedom Owner s Manual - V page 1
3 READ AND UNDERSTAND the sections of assembly, maintenance and safety in the owner's manual before riding. Always follow the directions and read all warnings. Always use proper safety equipment when riding the Trikke EV including a helmet approved by ANSI, Snell, CPSC, ASTM or DIN EN1078. Use proper footwear and make sure that shoes with laces are properly tied before riding. Avoid water, bumps, gravel, sand, cracks, uneven surfaces or obstacles that may suddenly block your way or cause you to lose control. The Trikke EV is not intended for off road use. Avoid using at night. Riding with only one hand or no hands can be extremely dangerous. Use both hands to hold the handlebars firmly at all times. Do not push too hard or apply uneven pressure to the two different sides of the handlebars. Do not make sudden sharp turns or apply your body weight on the handlebars when turning. Such actions can make the front wheel of the vehicle quickly turn to one side and causing the vehicle to jack-knife or stop suddenly, which can cause fall and serious injury to the rider. Tricks, riding or rolling backwards and/or extreme riding are not recommended on the Trikke EV. Riding this way you can damage the product, voiding your warranty and may result in injury or death. Do not pull up on the handlebars because in doing so the rider can slip off the foot platforms, resulting in serious injury or death. The rider must keep his weight within the area delineated by the three wheels and step on the center or frontal part of the deck, never on the back. Riding down hills is not recommended, especially for novice riders. The Trikke EV is designed primarily for use on flat, dry asphalt. Extreme caution should be used when riding on any inclined surface. We recommend that you do not exceed the Trikke EV maximum rider's weigh limit of 200 lbs (91kg). A rider should be constantly on the lookout for obstacles, debris, cracks or holes in the riding path, allowing them to be anticipated and avoided. Trikke Freedom Owner's Manual - V page 2
4 Because of the speed increase, the risk of injury and death are increased when riding with the electric motor. Attention to the ride is a constant. Practice braking to a full stop, at high speed, in a safe environment, to assess the distance required to stop. Be aware of low objects. You are taller than you think when you ride the Trikke EV. Be ready to duck for tree branches, street signs, etc.. Whenever you ride, follow the traffic rules, including traffic signs, traffic lights and crosswalks. Usually, you must follow the same rules as a bicycle or an electric bicycle. Tire wear, puncture, or blowout may result in sudden loss of control, which can cause serious injury. Always make sure that the tire maintenance is being done correctly. Do not ride with flat or worn out tires. Braking and locking or skidding with the rear wheels will damage the tires, and such damage is not covered under warranty. Rider may lose control and fall when locking the wheels during braking. Control braking power by the force applied on the brake lever. If you do not have the proper tools or find that you are unable to understand the assembly instructions, contact an authorized dealer to assemble the Trikke EV for you. Stop riding immediately if you suspect that some part of the vehicle is not working properly. Inspect the vehicle to confirm what the problem is. Contact your dealer or TRIKKE Technical Support directly if you suspect that a there is a malfunction or defect that affects safe operation. If you do not understand how to operate the Trikke EV properly, do not use it. Contact your dealer or Technical Support Trikke for proper training. Always inspect your vehicle before each use and make sure the handlebar clamp and folding mechanism of the arms are locked in place. Read the important assembly, operation and maintenance information in this manual. Test the brakes properly before each use; always engage both brakes equally with your weight evenly distributed over the rear wheels. Trikke Freedom Owner's Manual - V page 3
5 Children must be supervised by an adult while riding. The parent is responsible for proper maintenance and vehicle inspection before each use. The Trikke EV is not recommended for children under 13 years of age or less than 5 feet tall. Always use caution when you are riding close to other vehicles, pedestrians, and especially near cars if you're riding on a street. Obey all traffic laws. Be courteous to drivers of other vehicles and pedestrians. Share the road! Do not modify your Trikke EV. Use only original Trikke parts or accessories. See limited warranty for restrictions on use of non-original parts or modifications. Any modification of the electrical system will void the warranty, to increase the speed or power of the motor. The electrical system is designed to operate at specified voltage and current. Using any other batteries than the original TRIKKE battery and charger can result in system failure. Any modification will void the warranty. Trikke Tech; Inc. is not liable for injuries and / or death or any other damages caused by such changes. The Trikke EV vehicle is a lightweight, low-power electric vehicle, and may require the rider's help to overcome inclines. Continuous turning right and left should be applied to help the engine while on a climb. The use of the electric motor will propel you to speeds you may not be accustomed to, and may be beyond your skill level. Begin by practicing at lower speeds for your own safety. Remember, you control the speed. Trikke Freedom Owner's Manual - V page 4
6 The Trikke EV is an electric vehicle and as such there is potential for shock or fire, if the electrical system is tampered with or exposed to conditions of high humidity, causing possible short circuit or overload of the electric system. Electrical components must be protected from conditions of high humidity and physical damage. Using a charger other than the original Trikke charger can cause overheating of the battery and potential risk of fire. COMMON SENSE AND EDUCATION ARE VERY IMPORTANT IN THE OPERATION OF YOUR TRIKKE EV. DRIVERS SHOULD USE COURTESY WHEN USING AND SHARING THE ROADS AND SIDEWALKS. PEDESTRIANS ALWAYS HAVE THE RIGHT OF WAY. WHEN RIDING ON PUBLIC ROADWAYS, KEEP ON THE RIGHT SIDE OF THE ROAD AND REDUCE YOUR CARVING ACTION TO MINIMIZE CAUSING CONFUSION WITH THE OTHER DRIVERS ON THE SAME ROUTE. REMINDER: TRIKKE VEHICLES ARE DESIGNED TO RIDE FORWARD ONLY. PLEASE, DO NOT RIDE BACKWARDS AS THERE IS THE POSSIBILITY OF DAMAGING THE FRAME. Trikke Freedom Owner's Manual - V page 5

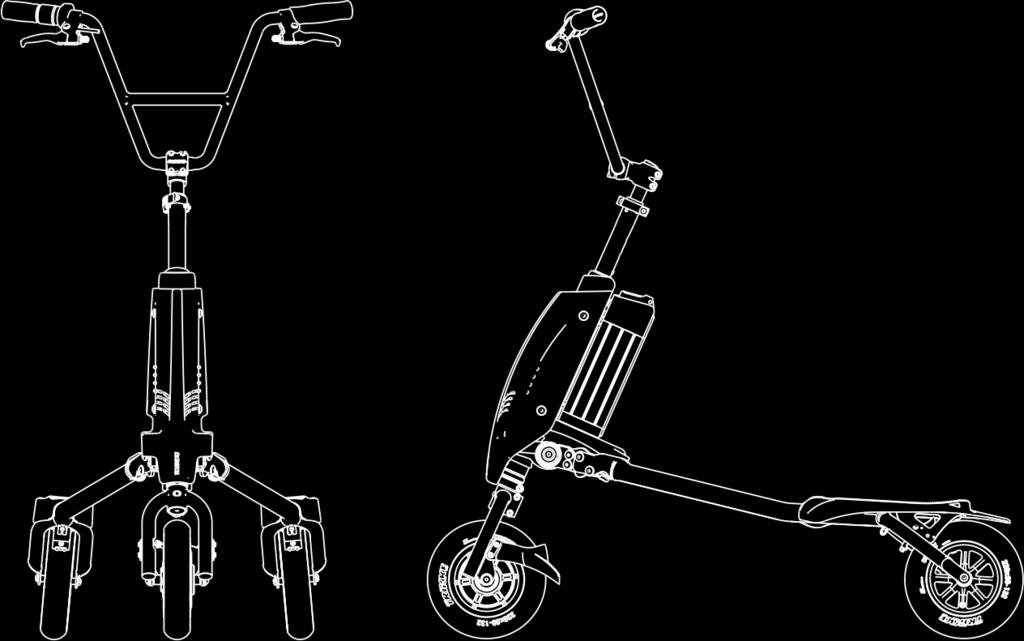
7 Know the Freedom Speed Throttle* Brake Lever Handlebar Handgrip Stem Front Tube Controler Box* Handlebar Height Adjustment Quick Release Steering Axle Battery* Right Arm Decks Cambering Axle Steering Stopper Front Fork Front Wheel Hub Motor* * - POWER COMPONENTS Left Arm Folding Mechanism Cambering Joint Front Fender Brake Pad Rear Wheel Trikke Freedom Owner's Manual - V page 6


8 Models This manual covers the 2 versions of the TRIKKE Freedom, which are mostly identical. The differences are: handlebar, steering axle, stem post, brake cable and throttle cable lenght. Sport Cruiser Trikke Freedom Owner's Manual - V page 7


9 Assembly Freedom - First Assembly The Freedom comes pre-assembled and only requires the mounting of the handlebar, front fork with motor assembly, and a quick check of some items before riding. Note: For assembly instructions go to STEP 1 Unfolding the Frame At the front of each arm there is a folding joint near the cambering mechanism. Each of the two joints has a spring loaded trigger which locks and releases the folding mechanism. The vehicle should be in its unfolded standing position in order to attach the handlebars. Use the plastic support (part of the packaging) on the floor to protect and stabilize the frame for step Push trigger button 2. Unfold arm Trikke Freedom Owner's Manual - V page 8
10 STEP 2 Mount the Handlebar Slide the handlebar stem over the post and level the top of the stem flush with the top of the post. Tighten the 2 bolts on the stem clamp with a 5mm hex wrench. Do not apply the final torque to the bolts yet, as you will need to align the handlebar with the front wheel later at step 4.4. Once aligned with front wheel, then torque the clamp bolts with a good final torque. 5mm Hex wrench Brake cables must cross once in front of the handlebar, like shown on the image above The handlebar comes attached to the stem at a preset angle as shown below. You can change the angle to your preference, by loosening the 4 bolts of the stem cap, adjusting the tilt angle and tightening back evenly with a good torque Trikke Freedom Owner's Manual - V page 9


.")

11 STEP 3 Adjusting Handlebar Height Unlock the quick release lever to raise or lower the level of the handlebar. Notice the round holes down the back of the handle bar stem post, which provide a number of height-locking positions. A spring loaded locking pin snaps into these holes to provide a second level of safety while riding. Push the locking pin IN to release the stem post and telescope the handlebars to your preferred riding height. Once the height has been set, make sure to close the quick-release clamp. Adjust clamping tension by tightening the nut. OPEN/ CLOSE PUSH STEP 4 Attaching and Aligning the Front Fork Mounting the front fork assembly to the steering axle requires a 5mm Hex wrench (supplied). First, turn the vehicle upside down so the fork post (arrow right) is aiming towards the sky. You should do this procedure on a carpet or soft surface to prevent scratching the handlebars or damaging the throttle. The quick-release clamp must feel tight when closing the lever. If needed, the tension can be adjusted through the finger nut. The handlebar resting on the ground provides a good support for the assembly Inspecting the steering axle you will find a spring loaded locking pin. On the fork, you will also find a slot to secure the locking pin on the front face of it. Trikke Freedom Owner's Manual - V page 10
. See image below. 4.4 4.")


12 4.2 - Slide the fork on the steering axle until it stops on the push-pin. (you may need to rotate the fork side-to-side to help slide in if the clamp is a little tight - make sure the 2 bolts at the clamp are loose). See image below Depress the push-pin and slide the fork until the pin snaps into the slot. Center the pin in the slot and tight the 2 bolts at the fork clamp with a 5mm hex wrench, to the final torque Alignment of front fork with handlebar: Flip the Trikke to riding position Step on the vehicle, hold it with both hands on the handlebars and look down the front tube. 4.5 Allen wrench 5mm 4.3 Fine adjust the handlebar alignment with the front wheel.. You may ask someone to hold the front wheel while you perform the alignment Use the 5mm Hex wrench to firmly tighten the two bolts that secure the handlebar stem to the post. See image on step 2.1 STEP 5 Connecting the Motor Cable to the Controller Connect the motor cable to the controller. Align both connectors by the white lines before pushing-in. Make sure to force the connectors together all the way in Route the motor cable and use the supplied plastic tie to secure it to the frame as shown on the image. This is very important in order to allow Align and push-in all the way Trikke Freedom Owner's Manual - V page 11
13 enough slack on the cable while turning the wheel left-and-right Tuck in the connectors inside the controller box, so they are not exposed. STEP 6 Inflate the tires to 80 psi or recommended pressure. Check page 21. Very Important! psi (bar) Slack to the Back STEP 7 Pre-ride Check Make sure you correctly followed steps 1-6 for the proper assembly of your vehicle. Check all bolts that secure the fork and handlebars. Push forward and pullback on the handlebars strongly to verify they're secured. Make a final check of the brake by spinning the rear wheels. They should rotate freely until you apply the brakes. It must be possible to vigorously squeeze the brake levers without the brake levers touching the handlebars. Check the folding mechanism to ensure that the arms are locked in the riding position. Check the air pressure in all tires to meet the recommended levels (See page 21). WARNING! Before riding the first time, please take a few minutes and review the Safety Riding Tips on pages 3-6 of this manual. For the safety of friends and others who will try your new Trikke EV it is your responsibility to guide them how to ride safely. Make sure you have read and understood all warnings and safety information contained in this owner's manual before riding. Please wear a safety helmet for riding. Trikke Freedom Owner's Manual - V page 12


14 Vehicle Operation Parking 1. The Trikke EV has parking brakes to keep it still and balanced. In the two manual brake levers there is a trigger that locks the actuated lever. Squeeze the brake lever all the way and pull the trigger with the index finger, then release the brake lever so the tension of the cable will keep the lock engaged. To release the parking brake, squeeze the brake lever and the trigger will jump and release from the locked position. 2. Preferably, find a flat surface for parking. If the parking spot is in an incline, point the front wheel up or down the slope. Do not park across the ramp Try to find a shoulder or lip to rest the front wheel against, in order to prevent unexpected movement due to the incline. Lock the parking brakes for safety. 4. If the above methods do not work, fold your Trikke EV and rest it against the wall or lay on the floor. Trikke Freedom Owner's Manual - V page 13

15 Operation Installing the Battery Make sure the battery key is set to unlocked position before installing. Slide the battery down on the rail until it sits on the tray. Do not force the battery in an angle - make sure it will slide straight on the rail. Turn the key clockwise to locked position while pushing the battery down (the battery is pre adjusted for a tight fit). Turn the key to the next position clockwise, to turn the battery ON. Removing the Battery Turn the key counterclockwise to OFF position. Push the key in and turn counterclockwise again to unlock the battery. Pull the battery up by the handle the entire extension of the rail until it s free. Be careful to not drop the battery on the ground during installation and removal. Battery can remain either installed to the vehicle or removed for charging. KEY Trikke Freedom Owner's Manual V page 14
16 Charging the Battery First time charge: connect the supplied charger to a power outlet and to the battery charging port. Usually, it takes 4h for a full charge. Do not leave the charger connected for over 12h once the charge is completed. Always charge the battery immediately after riding. Fully charge battery before storing for extended periods of time. Unplug charger from the wall outlet when not in use. Failure to recharge battery periodically may result in permanent damage and battery will no longer accept charge. Do not try to charge the battery under freezing temperature. Bring the battery indoors to a moderate temperature. LAY BATTERY ON THE SIDE V AC CHARGER Run time will vary with riding conditions: rider's weight, speed, tire pressure, wind, flat or hilly terrain. Constant start stop will shorten the riding range. Average battery life for a properly maintained unit is approximately 400 full charge/discharge cycles. When the charger is plugged to the wall outlet ( V) and connected to the ba ery, the status light will be lit RED indica ng that the ba ery is charging up. When the ba ery becomes fully charged, the status light will turn GREEN. Note: When the charger is connected to the battery, but not to a power supply, the status light will be lit Green, but it doesn't mean the battery is fully charged. The charger must be connected to a live power supply to work. Trikke Freedom Owner's Manual - V page 15
17 Riding Range A. The possible distance (miles) per ride of a Trikke EV depends on many factors, including the topography of the terrain, rider's weight, throttle usage, assistance with body propulsion, tire type and pressure. B. To extend the riding range of the Trikke EV avoid long or steep climbing, help the vehicle as much as possible with body propulsion and use the throttle sparingly and keep tires inflated to the recommended pressure. Riding With Electric Power Once the ba ery is switched ON, the lights on the thro le will light up indica ng the level of charge of the ba ery: full/half/low, meaning that the vehicle is ready to work. Gently twist the thro le grip backwards and the front wheel will start the movement of the vehicle. Control the amount of power to the motor by twis ng the thro le back to increase power and returning it to decrease power. If vehicle is le ON and inac ve for over 5 minutes, the system will me out and shut OFF (to save energy). Even with the ba ery switched ON, the thro le lights will turn OFF when system is med out, and there won't be power delivered to the motor when twis ng the thro le. You will need to reset the power by switching the key OFF and back ON to start the system. When climbing inclines, if the speed becomes too slow (below walking speed), it indicates that the load is too heavy for the motor. Do not insist in riding in this condi on as the motor will heat up and possibly get damaged. Try helping the motor by tackling the hill with side to side movements of the front wheel. Avoid any condi on where the motor stalls under thro le. Trikke Freedom Owner's Manual - V page 16
18 Battery 1. The lithium-ion battery included with the Trikke EV has a useful life of 400 complete cycles of operation with a performance above 70% of original capacity. A complete cycle is one complete discharge and recharge. 2. Please refer to the Li-ion battery manual for detailed information: specifications, operation, security, etc.. 3. Battery Recycling: Watch for regulations in place for recycling batteries. Find out about recycling centers in your area. Do not dispose batteries in the trash. Li-ion Li-ion Battery Cells 36V 8800mAh / 316Wh CAUTION DO NOT SHORT CIRCUIT MUST BE DISPOSED OF PROPERLY USE SPECIFIED CHARGER ONLY MAY EXPLODE IF DISPOSED IN FIRE NOT SUITABLE FOR PASSENGER AIRCRAFT TRANSPORT UN3480! CAUTION! Do not leave battery fully discharged. Use only TRIKKE approved charger. Protect from moisture or rain. For long term storage, fully recharge every 90 days. Store in a dry and cool place; do not expose to heat. Read warranty terms and conditions; read battery manual. Not permitted to fly on passenger aircraft. Do not dispose of in household trash; search online for a battery recycling center near you. Trikke Freedom Owner's Manual - V page 17


19 SAFETY WARNINGS Safety Warning 1: RIDING ON A WET OR SLIPPERY SURFACE Avoid riding on wet or slippery surfaces (also surfaces covered by sand, gravel or mud) because the wheels may skid and braking distance can be affected causing loss of control and a possible crash. If necessary travel on slippery surface, try to travel in a straight line and avoid leaning the vehicle to maximize stability and control. Riding on wet surface, the braking distance will be increased significantly. Travel at lower speed and consider a longer distance and time to stop. Safety Warning 2: WEIGHT DISTRIBUTION Starting Braking When accelerating, it is important to place the weight on the front wheel, as shown in the picture, keeping most of your weight on your toes, feet positioned in front of the platform. This will ensure good traction of the front tire. Once you and your Trikke EV are in motion, return to your normal posture. Be careful not to lean too far back or shift your weight behind the rear wheels. This warning is especially important for drivers who do not have good coordination, or are slow to react to an unexpected event. To brake more effectively, shift your weight back over your heels, over the rear wheels, as shown in the picture, but be careful not to lean too far back. Apply both brakes simultaneously (Trikke EV has independent brakes on rear wheels left and right respectively actuated by levers on the handlebars left and right). Distributing your weight evenly over each rear wheel is crucial for maximum braking efficiency. If you take the weight off of the platforms during braking you will cause the wheel to lose contact with the ground and lock. The best way to ensure you are always well positioned and to minimize the risk of the vehicle pull a wheelie, is to distribute your weight evenly between the front and rear wheels, keeping your weight on your toes and putting your feet up to the front of the Trikke Freedom Owner's Manual - V page 18
20 Avoid leaning too far over the handlebars - the rider must maintain balance on their feet, not leaning on the handlebars. The legs should be slightly bent to absorb impact, balance the body and ensure constant contact with the platforms. Avoid leaning your body back, supporting yourself on your heels, stepping behind the center of the rear wheels and pulling the handlebars back, because this way you will inevitably reduce the weight of the front wheel losing traction and control, and you may fall back and have an accident. Another reason for a balanced weight distribution is to ensure a better use of traction (front and rear tires) with no spinning or skidding during acceleration and braking. Safety Warning 3: BEHAVIOR OF THE RIDER Proper use of the handlebars, and especially how to push it to the left and right is vital for your safety. Because the front wheel is designed to trail the fork, the handlebar tends to turn in the direction you tilt the vehicle. Unlike a bicycle, which tends to follow a straight line, the front wheel will actually accentuate the turn. Because of this condition, less experienced riders should pay special attention while driving. Turning the handlebars too far, and allowing the front wheel to move quickly to the side, may cause the vehicle to stop suddenly ( jack-knifing ), throwing the rider from the vehicle, which may cause injury. Always maintain firm control over the handlebars with both hands, never drive with just one hand or no hands. The Trikke EV requires both hands on the handlebars at all times. Beginner riders have a tendency to apply excessive force on the handlebars, making sudden movements, throwing their weight from one side to another. What propels the Trikke forward manually is the leaning of the vehicle, a combination of turning and leaning of the steering column, and not just pushing the handlebars from side to side. It is better to think in terms of more leaning and less turning. Motion and trajectory in large ''S'' turns are best for beginners. Safety Warning 4: DOWNHILL As the Trikke EV is a totally new machine, with a unique handling, we recommend that you take time to familiarize yourself with the vehicle and to gradually explore the limits of performance with each ride. This is especially important before attempting climbs or steep descents. Riding uphill and downhill are advanced and require you to be fully competent before even trying. On descents, we strongly recommend that you only go down slopes on which you can Trikke Freedom Owner's Manual - V page 19
21 control the speed by turning. Riding on hills at speeds that require constant braking are not recommended for three reasons: you can reach speeds where the braking distances needed are too long to stop you safely, and you may fall at high speed causing serious injury or death, and you will simply wear out the brake pads and rear tires long before their expected life expectancy. The Trikke EV will accelerate quickly, so try to ride at speeds appropriate to your skill level. Safety Warning 5: SAFETY EQUIPMENT ALWAYS USE SAFETY EQUIPMENT, ESPECIALLY A HELMET. A helmet is essential when riding a Trikke EV or any exposed wheeled vehicle. We also recommend that you wear gloves, elbow and knee pads, especially children and inexperienced riders. Although it is a stable platform, there are always conditions that vary with the environment, which may surprise you, such as cracks in the pavement, sand, gravel, potholes, tree branches, people or other vehicles. Falls and accidents can occur. Driving at night should be avoided, but in case of night time use we recommend the use of headlamps and signal lights on front and rear. See and be seen. Also the use of horn or bell helps you call attention and be noticed. READ AND UNDERSTAND THE SECTIONS OF ASSEMBLY, MAINTENANCE AND SAFETY MANUAL BEFORE RIDING. ALWAYS FOLLOW THE INSTRUCTIONS AND READ ALL WARNINGS. Visit our website at if you want to buy safety gear (helmet, gloves, knee and/or elbow pads). Trikke Freedom Owner's Manual - V page 20
22 Basic Maintenance Tires Pressure Tire pressure affects energy consumption and battery range. Lower pressure makes a smooth ride, but will require more energy due to increased rolling resistance. Higher pressure reduces rolling resistance and increases mileage, but it makes a bumpier ride. Do not run with very low pressure, as this can damage the tires, negatively affect braking efficiency and increase the risk of a fall. Particularly the front wheel (motor wheel) should not be calibrated with a pressure higher than recommended, as this can damage the engine due to the reduction in impact cushioning. Check the table below for the adequate air pressure. The tires of the Trikke EV come with lower pressure from the factory, for transport reasons. You will have to pump the tires before riding. Do not exceed the recommended tire pressure. psi (bar) TIRE PRESSURE: psi WE RECOMMEND TO CHECK AND PUMP THE TIRES TO OPTIMAL PRESSURE EVERY 15 DAYS, USING A MANUAL OR SMALL ELECTRIC PUMP. MAKE SURE TO USE A PUMP WITH ACCURATE PRESSURE GAUGE. WARNING! Do not use automated calibrator designed for large car tires. It may overinflate the tire in the process and cause the rupture of the tire or rim, with dangerous consequences. Trikke Freedom Owner's Manual - V page 21
 as far in or towards the brake-handle as they will go, so you will have room to adjust it later. 3.")
23 Brake Adjustment 1. Tires must be inflated to 80psi. 2. Turn the brake tension adjustment screws (at the lever) as far in or towards the brake-handle as they will go, so you will have room to adjust it later. 3. Place the vehicle upside down to access the brake system which is under the foot platforms at each rear wheel. 4. Loosen the 2 bolts that hold the brake cable to the pad. 5. Pull the cable towards the front (follow arrow) until the pad is close to the tire - leave a gap, so the wheel spins freely - 3 mm (1/8 ) - The desired result is to keep the brake pad as close to the wheel as possible without rubbing. 6. Tighten the 2 bolts back. PULL 3mm allen wrench WARNING: brakes will work satisfactory when tires are inflated to proper pressure range. 3 mm (1/8") Trikke Freedom Owner's Manual - V page 22
24 Troubleshooting Electric Issues ISSUE CHECK POSSIBLE CAUSE/SOLUTION 1. Lights on throttle won t come on when battery key is turned ON. 2. The lights come on, but the motor doesn't work when twisting the throttle. 3. Motor applies intermitent power (jerks) and/or makes intermitent noises. 4. Charger doesn't turn red to start charging (stays green all the time, no charging occur). Check battery charge. Make sure battery has correct voltage on the bottom connectors (POS-NEG). Use voltmeter to check. Check connectors and cables: battery to controller, throttle to controller. Make sure the cable from the motor to the controller is properly connected. Force it in to confirm. Visually check the motor cable and connector pins for physical damage. Make sure the cable from the motor to the controller is properly connected. Force it in to confirm. Visually check the motor cable for damage. Inspect cable and connector. Wiggle connector while attached to the battery Note if the red light blinks. Possible faulty controller or throttle. Try replacing throttle. Try replacing controller. If battery voltage is OK. Try replacing throttle. Try replacing controller. Last, replace the motor if not soved by above. Motor cable, motor or controller may be damaged internally. Try replacing controller. Try replacing motor. Faulty charger - try with another charger Faulty battery Battery is fully charged. Trikke Freedom Owner's Manual - V page 23
25 Specs FRAME Weight Frame Handlebar Handlebar Width Brake Wheels Tires Deck Length With Height Length Folded 37lbs (17kg) Mid-Size, Hi-Tensile Steel with Patented High Performance 3CV Cambering System, Foldable Adjustable Height, Steel 23,5" (595mm) Dual Rear, Scrub Pad, Cable Actuated, with Parking Lock Alloy Rim with Abec5 Sealed Bearings 228x50 Slick High Pressure Reinforced Plastic 45" (115cm) 22,5" (57cm) 43" (110cm) 51" (130cm) ELECTRIC Battery Battery Life Charger Charging time Motor Controller Speed Throttle 36V 6,6Ah 240Wh Li-Ion, Quick-Swap, Aluminum Case 400 Re-charges AC V / DC A 4h DC 36V 200W (400W peak), Brushless, Hubmotor Direct Drive, Front Wheel Progressive, Sine-Wave,36V - 13A, Auto Shutt-Off Hand Twist-And-Go, 1/3 Grip, Charge Level Lights PERFORMANCE *Speed (max) 15mph (24km/h) **Range Max Rider s Weight Up to 13 miles (21km) 200lbs (91kg) *Speed and acceleration will vary with rider s weight. **Range will vary with topography, rider s weight, wind, riding style (carving assistance). Tires must be inflated to max recommended pressure. Range listed above depict an average with max recommended rider's weight. Trikke Freedom Owner's Manual - V page 24
 45 in (115cm) Folded 51 in")
 19 in (48cm) Trikke")
26 Basic Dimensions 43in (110cm) 22.4 in (57cm) 45 in (115cm) Folded 51 in (130cm) 23.5 in (595mm) 19 in (48cm) Trikke Freedom Owner's Manual - V page 25


27 Other Vehicles by TRIKKE Tech bp BODY POWERED VEHICLE Trikke BPV are vehicles that use just body movement for propulsion. An excellent form of low impact exercise that involves the entire body while providing fun combined with transportation. This simple and elegant frame provides a stable 3-point platform that leans into the turn with the rider while all three wheels remain in contact with the ground for maximum stability. Riding is described as skiing on the streets. SNOW SKI CARVING VEHICLES With the Trikke SKKI, the rider simply leans the handlebars in the direction of the turn and the three ski blades draw the curves. It's much easier to learn comparing to skis or snowboard, and beginners are always going to have fun at the first attempt. A single vehicle can be shared by riders of different ages, sizes and levels of ability. Freedom to ski with no attachment or special boots! It is like driving a race car in the snow with total control. Trikke Freedom Owner's Manual - V page 26

28 Hi-performance Trikke EVs BLDC hub motor Higher power output Extended range Aluminum frame Lithium battery Disc brakes Trikke Freedom Owner's Manual - V page 27
29 Trikke EV Limited Warranty Subject to the following limitations, terms and conditions, Trikke Tech, Inc. ("Company") warrants to the original owner of each new vehicle Trikke Trikke EV ("Vehicle") that the vehicle when new is free from defects in material and workmanship. This warranty is valid for the Term listed below, from the date of purchase from the Company or an authorized dealer or representative. This warranty is conditional on the vehicle being operated under normal use and properly maintained according to the plan established by Owner's Manual. This warranty is void if the vehicle has not been purchased from an authorized Trikke dealer, not followed the periodic maintenance in accordance with the plan, or for abuse or misuse. The Owner's Registration Card must be completed at the time of purchase by dealer and a Warranty Certificate will be issued to the first owner. If the vehicle frame breaks due to faulty materials or workmanship within the warranty period, the vehicle may be replaced subject to the Conditions of Guarantee. If any part do not function properly due to defects in material or workmanship during the warranty period, this piece will be repaired or replaced at the discretion of the Company, subject to the warranty conditions below. Warranty Term Frame and parts: 12 months Electrical parts (battery, motor, controller, throttle): 6 months Parts subject to wear and tear: (tires, tubes, brake, handgrips, decks): 30 days Warranty Conditions This Limited Warranty is made only to the original owner of the new Vehicle purchased from Company or an authorized dealer or representative, and it shall remain in force only as long as the original owner retains ownership of the Vehicle. This Limited Warranty is not transferable. This Limited Warranty is issued to the original owner of a brand new vehicle purchased from the Company or an authorized dealer or representative, and shall remain in force as long as the original owner retains ownership of the vehicle. This Limited Warranty is not transferable. In order to exercise its rights under this limited warranty, the warranty must be submitted during the warranty period, to the company or one of its authorized representatives, along with the sales invoice or other documentary proof of purchase. The owner will be responsible for costs related to return and delivery of the vehicle to the Company or its authorized Trikke Freedom Owner's Manual - V page 28
30 reseller. Under no circumstances this warranty covers the cost of shipping the vehicle to the dealer. The Company will cover the cost of labor and parts necessary to repair the vehicle warranty. This limited warranty does not apply to normal wear or of any defects, malfunctions or failures resulting from abuse, neglect, damage caused accidentally or deliberately, exceeding weight limits, improper operation, improper maintenance, alteration, collision, accident or misuse or abuse. The vehicle was NOT conceived, designed, distributed, manufactured or sold for use in stunts, jump ramps, jumps, drive aggressively, use on uneven terrain or off road, submersion in water, use in harsh climates, loaded over the weight limit, commercial activities, or any similar activities. Such uses may damage the vehicle, can cause serious injury to the rider, and in all cases will void this warranty. The user assumes all risks of physical injury, vehicle breakdown, loss or personal injury caused to third parties or related to the use of the vehicle. Product Life Cycle The Trikke Trikke EV vehicle has a lifecycle. The duration of this cycle varies with the maintenance and care received during their time of use, and the type and amount of use that the vehicle is subjected. The vehicle must be inspected periodically by observing indicators of fatigue and other indicators of potential problems. These are very important safety checks to help prevent accidents, injuries to the rider and shortening the lifecycle of the vehicle. THIS IS AN INTEGRATED AND FINAL STATEMENT OF TRIKKE S LIMITED WARRANTY. COMPANY DOES NOT AUTHORIZE OR ALLOW FOR ANYONE, INCLUDING ITS AUTHORIZED DEALERS OR REPRESENTATIVES, TO EXTEND ANY OTHER WARRANTIES, EXPRESS OR IMPLIED. NO OTHER REPRESENTATION AND NO STATEMENT OF ANYONE BUT THE COMPANY, INCLUDING A DEMONSTRATION OF ANY KIND BY ANYONE, SHALL CREATE ANY WARRANTY REGARDING THE TRIKKE CAMBERING VEHICLE. ALL OF THE REMEDIES AVAILABLE TO THE ORIGINAL OWNER ARE STATED HEREIN. IT IS AGREED THAT TRIKKE TECH, INC. S LIABILITY UNDER THIS LIMITED WARRANTY SHALL BE NO GREATER THAN THE AMOUNT OF THE ORIGINAL PURCHASE PRICE AND IN NO EVENT SHALL TRIKKE TECH, INC. BE LIABLE FOR INCIDENTAL OR CONSEQUENTIAL DAMAGES. Trikke Freedom Owner's Manual - V page 29
31 DISCLAIMER All other remedies, obligations, liabilities, rights, warranties, express or implied, arising from law or otherwise, including but not limited to, any claimed implied warranty of merchantability, any claimed implied warranty arising from course of performance, course of dealing or usage of trade, and any claimed implied warranty of fitness, are disclaimed by Company and waived by the original owner. Some states, jurisdictions, countries, do not allow some or all of the limitations set for herein, or the exclusion or limitation of incidental or consequential damages. If any provision is found unenforceable, only that provision shall be stricken and all others shall apply. This limited warranty does provide the original owner with certain legal rights and recourse and the original owner may possess other rights or recourse, depending on the state, jurisdiction, country or province. Trikke Freedom Owner's Manual - V page 30


32 The unique 3CV technology developed by Trikke Tech uses a mechanism that allows the Trikke EV frame to cambering and the suspension to adapt to the the surface and lean into turns while keeping three points of support always in contact with the ground to ensure optimal stability at any speed. This camber mechanism is elegantly simple and provides the necessary rigidity, geometry and assistance to the rider's motion to allow a greater control, speed, comfort, durability and above all the full confidence of riding. 3CV TECHNOLOGY Patent & Trademark Information The Trikke EV vehicle is a product developed, patented and property of Trikke Tech, Inc. protected by the following International Patents: U.S. 6,220,612, 6,499,751, 6,827,358, 6,976,687; Europe, Canada 2,390,224; China ZL Other patents pending. TRIKKE and Trikke EV are trademarks of Trikke Tech, Inc. Contact Information Most inquires can be addressed by the authorized dealer, distributor and service center. You can also find additional information on our website with product information, accessories, videos, photos and more. If you don t find the replacement part on our website, please contact Trikke Tech via at tech@trikke.com. Trikke Tech, Inc. 85 Industrial Way - suite F Buellton, California USA Phone: fax: This manual and its contents are the property of Trikke Tech, Inc. No portion of the text or images in this manual can be reproduced without the prior written permission of Trikke Tech, Inc. Copyright 2017 Trikke Tech, Inc. All Rights Reserved 2017 Trikke Freedom Owner's Manual - V page 31
33 ! W A R N I N G S! READ AND UNDERSTAND THE ASSEMBLY MAINTENANCE AND SAFETY SECTIONS OF THE OWNER S MANUAL BEFORE RIDING THE TRIKKE EV. ALWAYS FOLLOW THE INSTRUCTIONS AND PAY ATTENTION TO ALL WARNINGS. ALWAYS WEAR PROPER SAFETY EQUIPMENT WHEN RIDING THE TRIKKE EV, INCLUDING AN ANSI, SNELL, CPSC, ASTM, OR DIN EN 1078 APPROVED HELMET. WAER PROPER FOOTWARE AND SECURE LACES BEFORE RIDING. AVOID WATER, BUMPS, GRAVEL, SAND, CRACKS, UNEVEN SURFACES OR OBSTACLES THAT MAY STOP YOU SUDDENLY OR CAUSE YOU TO LOSE CONTROL. THE TRIKKE EV IS NOT INTENDED FOR OFF-ROAD USE AND AVOID RIDING AT NIGHT. DO NOT LEAN HEAVILY ON THE HANDLEBARS. RIDER'S WEIGHT MUST BE MOSTLY ON IT'S FEET. EXCESSIVE WEIGHT ON THE HANDLEBAR IS UNSAFE AND CAN RESULT IN LOSS OF CONTROL AND POSSIBLE FALL, IF THE FRONT WHEEL NEEDS TO BE TURNED SHARPLY OR HITS AN OBSTACLE ON THE GROUND. USE BOTH HANDS TO HOLD THE HANDLEBARS FIRMLY AT ALL TIMES. ONE-HANDED OR HANDS FREE RIDING IS EXTREMELY DANGEROUS. DO NOT PUSH TOO HARD ON OR APPLY UNEVEN PRESSURE TO EITHER SIDE OF THE HANDLEBARS. DO NOT MAKE SUDDEN SHARP TURNS OR APPLY YOUR BODY WEIGHT TO THE HANDLEBARS WHEN TURNING. SUCH ACTIONS MAY CAUSE THE VEHICLE TO JACK-KNIFE OR TO STOP SUDDENLY WHICH CAN CAUSE SERIOUS INJURY TO THE RIDER. DO NOT LEAN BACK OR PULL BACK ON THE HANDLEBARS. DOING SO CAN CAUSE THE RIDER TO FALL OFF THE BACK OF THE VEHICLE POSSIBLY RESULTING IN SERIOUS INJURY OR EVEN DEATH. RIDER MUST KEEP ITS WEIGHT WITHIN THE AREA DELINEATED BY THE 3 WHEELS. DOWNHILL RIDING IS NOT RECOMMENDED, SPECIALLY FOR NOVICE RIDERS. THE TRIKKE EV IS DESIGNED PRIMARILY FOR USE ON FLAT, DRY PAVEMENT. RIDING DOWN STEEP HILLS OR DOING PROLONGED DOWNHILL RIDES IS NOT RECOMMENDED. PROLONGED USE OF THE BRAKES CAN CAUSE THE BRAKES TO OVERHEAT AND DRAMATICALLY REDUCE THE REAR TIRES TO WEAR DOWN PREMATURELY, DRAMATICALLY REDUCING THE EFFECTIVENESS OF THE BRAKES OR EVEN CAUSING THEM TO FAIL. EXTREME CAUTION SHOULD ALWAYS BE USED WHEN RIDING ON ANY HILL. ALWAYS INSPECT THE VEHICLE BEFORE EACH RIDE AND MAKE SURE THAT THE HANDLEBAR, QUICK RELEASE AND FOLDING MECHANISMS ARE SECURELY LOCKED IN THE PROPER RIDING POSITION. READ THE ASSEMBLY SECTION OF THE OWNER S MANUAL FOR IMPORTANT ASSEMBLY AND MAINTENANCE INFORMATION. TEST THE BRAKES FOR PROPER FUNCTION BEFORE EACH RIDE. ALWAYS APPLY BOTH BRAKES EVENLY WITH YOUR WEIGHT DISTRIBUTED EVENLY OVER EACH REAR WHEEL. CHILDREN SHOULD ALWAYS BE SUPERVISED BY AN ADULT WHEN RIDING. IT IS THE RESPONSIBILITY OF THE PARENT OR GUARDIAN TO PROPERLY MAINTAIN AND INSPECT THE VEHICLE BEFORE EACH RIDING SESSION BY A CHILD. THE TRIKKE EV IS NOT RECOMMENDED FOR CHILDREN UNDER 13 YEARS OF AGE. ALWAYS EXERCISE EXTREME CAUTION WHEN YOU ARE RIDING IN CLOSE PROXIMITY TO OTHER VEHICLES, PEDESTRIANS, AND ESPECIALLY TO CARS IF YOU ARE RIDING ON A STREET. BE SURE TO OBEY ALL RULES OF THE ROAD. PLEASE BE COURTEOUS TO OTHER RIDERS AND PEDESTRIANS WHO MAY BE SHARING THE PAVEMENT WITH YOU. DO NOT MODIFY YOUR TRIKKE EV. ONLY USE TRIKKE TECH, INC. APPROVED PARTS AND ACCESSORIES. SEE THE LIMITED WARRANTY FOR USE RESTRICTIONS. WE RECOMMEND THAT YOU NOT EXCEED THE RECOMMENDED RIDER WEIGHT RESTRICTION OF 200 LBS. OR 91 KG. Trikke Freedom Owner's Manual - V page 32


34 by trikke.com
Owner s Manual THIS MANUAL IS FOR THE FOLLOWING MODELS: Pon-e 48V Pon-e L 36V
 Brake Levers with Parking Lock Feature Adjustable Handlebar Height with Quick Release Panasonic Lithium Battery Pack with On-off Key Powerful 10 Hub Motor in Front Wheel (180W, 250W or 350W) Dual Speed
3 WHEELED SCOOTER. FOR AGES THREE TO FIVE MAXIMUM WEIGHT: 50 lbs. (22.6 kgs.) OWNER S MANUAL
 OWNER S MANUAL") OWNER S MANUAL 3 WHEELED SCOOTER THIS MANUAL CONTAINS IMPORTANT SAFETY, PERFORMANCE AND MAINTENANCE INFORMATION. READ THE MANUAL BEFORE LETTING YOUR CHILD HAVE THEIR FIRST RIDE ON THEIR NEW SCOOTER, AND
OWNER S MANUAL 3 WHEELED SCOOTER THIS MANUAL CONTAINS IMPORTANT SAFETY, PERFORMANCE AND MAINTENANCE INFORMATION. READ THE MANUAL BEFORE LETTING YOUR CHILD HAVE THEIR FIRST RIDE ON THEIR NEW SCOOTER, AND
Table of Contents. Technical Information Warning Statement
 Table of Contents Technical Information-----------------------------------1 Warning Statement--------------------------------------2 Read Before Riding-------------------------------------3 List of Parts-----------------------------------------------4
USER AND SAFETY MANUAL
 USER AND SAFETY MANUAL HANDLE- BARS STEM COLLAR ROD SADDLE SAFETY HOOK- STRIP BRAKE SUPPORT BARS AFT TUBE FRONT TUBE SAFETY RULES SECURE THE ROD AND ATTACH SAFETY HOOK-STRIP before every ride. RIDE WHEELA
SATURN KICK SCOOTER -MANUAL-
 SATURN KICK SCOOTER -MANUAL- 2 TABLE OF CONTENTS 1. INTRODUCTION 4 2. INCLUDED IN THE BOX 5 3. FEATURES AND SPECS 5 4. UNFOLDING AND FOLDING 6 5. ADJUSTING THE HANDLEBAR 7 6. HOW TO CHANGE BATTERIES 7
USER MANUAL. Your ZINGO DRIFTA 360 warranty must be registered online within 7 days of purchase.
 USER MANUAL Your ZINGO DRIFTA 360 warranty must be registered online within 7 days of purchase. To activate your warranty visit www.tevo.co.za and click the Register your warranty tab at the top of the
A-Type, S-Type, & Cruiser Scooters. Read and understand this entire manual before allowing child to use this product!
 A-Type, S-Type, & Cruiser Scooters OWNER S MANUAL Read and understand this entire manual before allowing child to use this product! NOTE: Manual illustrations are for demonstration purposes only. Illustrations
Owner s Manual for 16 Slider
 Owner s Manual for 16 Slider This manual contains important safety, assembly, operation and maintenance information. Please read and fully understand this manual before operation. Save this manual for
US Patent 0540, 400 Other Patents Pending. Read this manual completely before assembling and riding our PET PRO-FLEX 500. Always wear a Helmet!
 US Patent 0540, 400 Other Patents Pending Read this manual completely before assembling and riding our 500 Always wear a Helmet! Priority Electric Transportation, LLC. 1007 West College Ave. #293 Santa
USER MANUAL. To activate your warranty visit
 USER MANUAL Your ZINGO X100 warranty must be registered online within 7 days of purchase. To activate your warranty visit www.tevo.co.za, click the Outdoor tab, then click the ZINGO X100 icon, then click
SOLO KICK SCOOTER -MANUAL-
 SOLO KICK SCOOTER -MANUAL- 1 TABLE OF CONTENTS A. Introduction 3 B. Included in the Box 4 C. Features and Specs 4 D. Unfolding and Folding 5 E. Adjusting the Handlebar 6 F. Riding the Solo 7 G. Safety
DO NOT RETURN TO STORE. NOTE:
 Pro Series Scooters Owner s Manual Read and understand this entire manual before allowing child to use this product! For assistance contact Razor. DO NOT RETURN TO STORE. NOTE: Illustrations are for demonstration
DO NOT RETURN TO STORE.
 Caster Trike Owner s Manual Read and understand this entire manual before riding! For assistance contact Razor. DO NOT RETURN TO STORE. Item Number: 20036540 Contents Safety Warnings... 1 Before You Begin...
NOT RETURN TO STORE. NOTE:
 A 5 Lux Scooter Owner s Manual Read and understand this entire manual before allowing child to use this product! For assistance contact Razor. DO NOT RETURN TO STORE. NOTE: Manual illustrations are for
PLEASE BE SAFE WHEN RIDING... ALWAYS WEAR A HELMET AND OBEY ALL LAWS!
 Powered Personal Transportation Electric Power Board Product Handbook FOR THE BLADEZ XTR Street ELECTRIC POWER BOARD Model: PB-SM1806 PLEASE BE SAFE WHEN RIDING... ALWAYS WEAR A HELMET AND OBEY ALL LAWS!
Lil Kick scooter. Read and understand this entire manual before riding!
 Lil Kick scooter Owner s Manual Read and understand this entire manual before riding! DO NOT RETURN TO STORE! NOTE: Manual illustrations are for demonstration purposes only. Illustrations may not reflect
Product Handbook FOR THE BLADEZ XTR Lite ELECTRIC POWER BOARD
 Portable Electric Power Board Product Handbook FOR THE BLADEZ XTR Lite ELECTRIC POWER BOARD PLEASE BE SAFE WHEN RIDING... ALWAYS WEAR A HELMET AND OBEY ALL LAWS! Page 1 IMPORTANT PLEASE READ THIS BEFORE
read and understand this entire manual before riding! For assistance contact razor. Do not return to store.
 OWNER S MANUAL read and understand this entire manual before riding! For assistance contact razor. Do not return to store. note: manual illustrations are for demonstration purposes only. illustrations
Instruction manual DENVER DBO
 Instruction manual DENVER DBO-6500 www.facebook.dk/denver-electronics Before operating this vehicle, read all the instructions for safe assembly and operations. User s manual can guide you through the
Powerboard TM by Exkate
 Powerboard TM by Exkate OWNERS MANUAL Introduction to The Powerboard TM Dear Customer: Congratulations and thank you for purchasing the Powerboard TM (electric skateboard). For the greatest pleasure and
Read and understand this entire manual BEFORE allowing children to use this product!
 Lil Kick scooter Owner s Manual Read and understand this entire manual BEFORE allowing children to use this product! NOTE: Manual illustrations are for demonstration purposes only. Illustrations may not
Product Handbook. Electric Power Board. Powered Personal Transportation FOR THE BLADEZ ION 150 ELECTRIC POWER BOARD
 Powered Personal Transportation Electric Power Board Product Handbook FOR THE BLADEZ ION 150 ELECTRIC POWER BOARD Model: PB-SM812 PLEASE BE SAFE WHEN RIDING... ALWAYS WEAR A HELMET AND OBEY ALL LAWS! IMPORTANT
Product Handbook. Electric Power Board. Powered Personal Transportation. FOR THE BLADEZ XTR Lite 250 ELECTRIC POWER BOARD
 ` Powered Personal Transportation Electric Power Board Product Handbook FOR THE BLADEZ XTR Lite 250 ELECTRIC POWER BOARD Model: PB-SM805-S PLEASE BE SAFE WHEN RIDING... ALWAYS WEAR A HELMET AND OBEY ALL
User Manual of Bagibike Electric Bicycles
 User Manual of Bagibike Electric Bicycles Model: Bagibike B16. http://www.bagibike.com Page 1 FOREWORD The following operation manual is a guide to assist you. This manual is not a complete document on
Pro Series Scooters, Black Label Scooters and El Dorado Scooter
 Pro Series Scooters, Black Label Scooters and El Dorado Scooter Owner s Manual Read and understand this entire manual before allowing child to use this product! For assistance contact Razor. DO NOT RETURN
FUZION V1000 LITHIUM POWERED owner s manual. 500 W of Power 18 MPH Full Suspension Disc Brake
 FUZION V1000 LITHIUM POWERED 500 W of Power 18 MPH Full Suspension Disc Brake Maximum Weight: 220 lbs (100 kilograms) Manual Version 1A-2015 CONTENTS WELCOME / Before You Start page 1 Components & Parts
Sport Scooter and Pro Model. Read and understand this entire manual before allowing child to use this product! For assistance contact Razor.
 Sport Scooter and Pro Model OWNER S MANUAL Read and understand this entire manual before allowing child to use this product! For assistance contact Razor. NOTE: Manual illustrations are for demonstration
DO NOT RETURN TO STORE! ROSSO MOTORS ELECTRIC ATV OWNERS MANUAL. Read and understand this manual Prior to Riding!
 ROSSO MOTORS ELECTRIC ATV OWNERS MANUAL Read and understand this manual Prior to Riding! DO NOT RETURN TO STORE! Illustrations may not be exact appearance of actual product. Table of Contents General information:...3
Warning Statement Read Before Riding
 Table of Contents Technical Information-----------------------------------1 Warning Statement--------------------------------------2 Read Before Riding------------------------------------- List Of Parts-----------------------------------------------4
Read and understand this entire manual before riding! DO NOT RETURN TO STORE! This does not affect your statutory rights.
 TM OWNER S MANUAL Read and understand this entire manual before riding! DO NOT RETURN TO STORE! This does not affect your statutory rights. NOTE: Manual illustrations are for demonstration purposes only.
DO NOT RETURN TO STORE.
 Caster Trike Owner s Manual Read and understand this entire manual before riding! For assistance contact Razor. DO NOT RETURN TO STORE. Item Number: 20036540 Safety Warnings WARNING: Riding the RipRider
read and understand this entire manual before riding! For assistance contact razor. Do not return to store.
 OWNER S MANUAL read and understand this entire manual before riding! For assistance contact razor. Do not return to store. note: manual illustrations are for demonstration purposes only. illustrations
Owner s Manual Read and keep this manual. Patents World Wide
 Owner s Manual Read and keep this manual. Patents World Wide S & S Industries, Inc., Sarasota, FL, USA www.trail-gator.com Copyright 2006 All Rights Reserved The following manual is provided to assist
Important Must Read Warnings, Safety Information and Riding Tips
 English Trikke Owner s Manual 4/22/06 2 Important Must Read Warnings, Safety Information and Riding Tips This owner s manual is designed to help you make the most of your Trikke cambering vehicle. Instructions
Read and understand this entire manual before allowing child to use this product! For assistance contact Razor. DO NOT RETuRN TO STORE.
 Monster kix and Zombie kix Scooters OWNER S MANUAL Read and understand this entire manual before allowing child to use this product! For assistance contact Razor. DO NOT RETuRN TO STORE. NOTE: Manual illustrations
There are many generic and copycat brands out there, but don t be fooled. If you want real swag, you re in the right place.
 USER MANUAL IN ORDER TO CONTINUE SERVING OUR CUSTOMERS AND PROVIDING THE BEST PRODUCTS, OUR PRODUCT INFORMATION INCLUDING OUR USER MANUALS MAY RECEIVE UPDATES FROM TIME TO TIME. PLEASE CHECK OUR WEBSITE
EW-20 Black. Owner s Manual. (888) Sales (888) Service
 Sales (888) Service") EW-20 Black Owner s Manual www.ewheelsdealers.com (888) 305-0881 Sales 0 (888) 571-2845 Service Table of Contents Page 2 - Feature Guide Page 3 - Product Specifications Page 4 - Operation of Scooter Page
EW-20 Black Owner s Manual www.ewheelsdealers.com (888) 305-0881 Sales 0 (888) 571-2845 Service Table of Contents Page 2 - Feature Guide Page 3 - Product Specifications Page 4 - Operation of Scooter Page
Thank you for your purchase of the SwagCycle Folding Electric Scooter by SWAGTRON!
 Thank you for your purchase of the SwagCycle Folding Electric Scooter by SWAGTRON! We are the original and official SwagCycle. There are many generic and copycat brands out there, but don t be fooled.
USER GUIDE. electric skateboard. Your ZINGO BLAZE warranty must be registered online within 7 days of purchase.
 electric skateboard USER GUIDE Your ZINGO BLAZE warranty must be registered online within 7 days of purchase. To activate your warranty visit www.tevo.co.za and click the Register your warranty tab at
Breezy EC Transport Wheelchair
 B r e e z y E C Tr a n s p o r t W h e e l c h a i r Breezy EC Transport Wheelchair O w n e r s M a n u a l READ BEFORE USE REVIEW THIS MANUAL Before using this chair you, and each person who may assist
USER GUIDE. electric skateboard. Your ZINGO CRUZE warranty must be registered online within 7 days of purchase.
 electric skateboard USER GUIDE Your ZINGO CRUZE warranty must be registered online within 7 days of purchase. To activate your warranty visit www.tevo.co.za and click the Register your warranty tab at
IMPORTANT NOTICES. speed of 3 miles per hour before the motor. The Razor electric scooter must reach a. will engage. Owner s Manual + Safety Handbook
 IMPORTANT NOTICES The Razor electric scooter must reach a speed of three miles per hour before the motor will engage. Ride only on smooth hard and dry surfaces. The Razor was not intended for off-road
Guide and Manual Before using the Solowheel, please read through these instructions completely. Inventist, Inc Inventist Inc.
 Guide and Manual Before using the Solowheel, please read through these instructions completely. Inventist, Inc. 2011 Inventist Inc. WARNING Whenever you ride the Solowheel you risk serious injury or death
Rift Caster Scooter. read and understand this entire manual before riding! do not return to Store!
 Rift Caster Scooter OWNER S MANUAL read and understand this entire manual before riding! do not return to Store! note: manual illustrations are for demonstration purposes only. illustrations may not reflect
BEFORE YOU START. page 3 page 4 page 5 page 6 page 7 page 8. page 2 page 3
 CONTENTS BEFORE YOU START MASTER ASSEMBLY UNFOLDING YOUR CITYGLIDE FOLDING YOUR CITYGLIDE ADJUSTING YOUR FOLDING MECHANISM MAINTENANCE page 3 page 4 page 5 page 6 page 7 page 8 AN IMPORTANT MESSAGE TO
Read and understand this entire manual before riding! DO NOT RETURN TO STORE!
 Owner s Manual Read and understand this entire manual before riding! DO NOT RETURN TO STORE! NOTE: Manual illustrations are for demonstration purposes only. Illustrations may not reflect exact appearance
Kiddie Kick. Owner s Manual. Read and understand this entire manual before allowing child to use this product!
 Kiddie Kick Owner s Manual Read and understand this entire manual before allowing child to use this product! Item Numbers: Blue 132KK-BL Pink 132KK-PK Contents Safety Warnings... 1 Before You Begin...
Read and understand this entire manual before allowing child to use this product! For assistance contact Razor. do NOT RETuRN TO STORE.
 Berry Lux kick Scooters OWNER S MANUAL Read and understand this entire manual before allowing child to use this product! For assistance contact Razor. do NOT RETuRN TO STORE. NOTE: Manual illustrations
Owner s Manual. Transport / Companion Wheelchairs M4TV M2TF M2TC M2TL HEALTH PRODUCTS, INC.
 Owner s Manual M4TV M2TF Transport / Companion Wheelchairs M2TL M2TC HEALTH PRODUCTS, INC. INTRODUCTION Congratulations on the purchase of your new companion chair. Please read this introduction with your
PLEASE BE SAFE WHEN RIDING ALWAYS WEAR A HELMET AND OBEY ALL LAWS!
 X-Treme TM Electric Scooters X-10 Electric Scooter Owner s Manual PLEASE BE SAFE WHEN RIDING ALWAYS WEAR A HELMET AND OBEY ALL LAWS! Page1 IMPORTANT BATTERY MAINTENANCE and CHARGING INSTRUCTIONS 1. You
There are many generic and copycat brands out there, but don t be fooled. If you want real swag, you re in the right place.
 USER MANUAL IN ORDER TO CONTINUE SERVING OUR CUSTOMERS AND PROVIDING THE BEST PRODUCTS, OUR PRODUCT INFORMATION INCLUDING OUR USER MANUALS MAY RECEIVE UPDATES FROM TIME TO TIME. PLEASE CHECK OUR WEBSITE
EW-04. Owner s Manual. ewheels Service (888)
") EW-04 Owner s Manual ewheels Service (888) 571-2845 0 Table of Contents Page 2 - Feature Guide Page 3 - Technical Specifications Page 4 - Operation of Scooter Page 8 - Folding Instructions Page 9 - Charging
EW-04 Owner s Manual ewheels Service (888) 571-2845 0 Table of Contents Page 2 - Feature Guide Page 3 - Technical Specifications Page 4 - Operation of Scooter Page 8 - Folding Instructions Page 9 - Charging
Table of Contents. Technical Information Warning Statement
 Table of Contents Technical Information-----------------------------------1 Warning Statement--------------------------------------2 Read Before Riding-------------------------------------3 List of Parts-----------------------------------------------4
Read and understand this entire manual before riding the HVRbrd.
 User s Manual Read and understand this entire manual before riding the HVRbrd. NOTE: Manual illustrations are for demonstration purposes only. Illustrations may not reflect exact appearance of actual product.
Owner s Manual and Assembly Instructions
 RollPlay 6V Mini Quad Owner s Manual and Assembly Instructions Model #: ACQUAD-P, ACQUAD-CAM, ACQUAD Read and understand the entire manual before assembly and operation. The vehicle must be assembled by
Product Handbook. Electric Power Board. Powered Personal Transportation FOR THE BLADEZ ION 350 ELECTRIC POWER BOARD
 Powered Personal Transportation Electric Power Board Product Handbook FOR THE BLADEZ ION 350 ELECTRIC POWER BOARD PLEASE BE SAFE WHEN RIDING... ALWAYS WEAR A HELMET AND OBEY ALL LAWS! IMPORTANT BATTERY
Audi R8. Ride-on Car 5F62630 OWNER S MANUAL. Keep instructions for future reference
 Audi R8 Ride-on Car 5F62630 OWNER S MANUAL Keep instructions for future reference 1 Safety The owner s manual contains assembly, use and maintenance instructions. The vehicle must be assembled by an adult
What s in the Box 1. Features & Specs 2. Charging the Battery 3. Indicator Lights 4. How to Recalibrate 5. Riding the Rogue 6. Care and Maintenance 7
 ROGUE HOVERBOARD TABLE OF CONTENTS What s in the Box 1 Features & Specs 2 Charging the Battery 3 Indicator Lights 4 How to Recalibrate 5 Riding the Rogue 6 Care and Maintenance 7 Safety Warnings 8 1. WHAT
ELECTRIC SCOOTER OWNER S MANUAL DO NOT RETURN TO STORE! QUESTIONS OR COMMENTS? CALL (866)
") ELECTRIC SCOOTER OWNER S MANUAL FOR USE WITH THE FOLLOWING PULSE PERFORMANCE PRODUCTS SCOOTERS SONIC DO NOT RETURN TO STORE! QUESTIONS OR COMMENTS? CALL (866)-434-6067 NOTE: Manual illustrations are for
ELECTRIC SCOOTER OWNER S MANUAL FOR USE WITH THE FOLLOWING PULSE PERFORMANCE PRODUCTS SCOOTERS SONIC DO NOT RETURN TO STORE! QUESTIONS OR COMMENTS? CALL (866)-434-6067 NOTE: Manual illustrations are for
ELECTRIC ROSE USER MANUAL ELECTRIC BICYCLE MODEL #: JERO16 VERSION #: 1
 USER MANUAL ELECTRIC ROSE ELECTRIC BICYCLE MODEL #: JERO16 VERSION #: 1 Congratulations on your new Jetson Electric Rose Electric Bicycle! Before your first ride, please check whether the wheels are damaged,
THANK YOU FOR CHOOSING ATOM ELECTRIC.
 THANK YOU FOR CHOOSING ATOM ELECTRIC. We have worked hard to make sure your board meets or exceeds your expectations. If for any reason it doesn t, or if you have any suggestions for improvements please
PLEASE BE SAFE WHEN RIDING... ALWAYS WEAR A HELMET AND OBEY ALL LAWS!
 Powered Personal Transportation Electric Power Board Product Handbook FOR THE BLADEZ XTR Street II ELECTRIC POWER BOARD Model: PB-SM1816 PLEASE BE SAFE WHEN RIDING... ALWAYS WEAR A HELMET AND OBEY ALL
EXTREME-TERRAIN COMBO Z12 GALAXY HOVERBOARD + JETKART XT
 EXTREME-TERRAIN COMBO Z12 GALAXY HOVERBOARD + JETKART XT TABLE OF CONTENTS What s in the Box 1 Features & Specs 2 Charging the Battery 3 Indicator Lights 4 Riding the Z12 Galaxy 5 How to Recalibrate 6
MOTOX 70cc Assembly Manual
 MOTOX 70cc Assembly Manual Assembly Manual This manual should be considered a permanent part of the motorcycle and should remain if it is resold. This manual contains the latest product information available
OWNER S MANUAL. Version 2012/1
 OWNER S MANUAL Version 2012/1 INDEX IMPORTANT SAFETY NOTICE..2 SCOOTER PARTS AND COMPONENTS....4 INSTRUCTIONS FOR ASSEMBLY...5 CHECK BEFORE RIDING...7 HOW TO RIDE YOUR FILKER SCOOTER......8 USE AND MAINTENANCE
swagger 3 USER MANUAL Ver /18/18
 USER MANUAL Ver. 1.0 7/18/18 In order to continue serving our customers and providing the best products, our product information including our user manuals may receive updates from time to time. Please
Folding Kiddie Kick Scooter
 Folding Kiddie Kick Scooter OWNER S MANUAL Read and understand this entire manual before allowing child to use this product! For assistance contact Razor. DO NOT RETURN TO STORE. NOTE: Manual illustrations
WARNING: ALWAYS WEAR YOUR HELMET WHEN RIDING THIS PRODUCT!
 WARNIN: ALWAYS WAR YOUR HLMT WHN RIIN THIS PROUT! Helmet should sit level on your head and low on your forehead Adjust the strap sliders below the ear on both sides. uckle the chin strap. Adjust strap
Tel: +44 (O) Customer Service hours: Monday - Friday 9am-5pm
 Customer Service hours: Monday - Friday 9am-5pm") Congratulations on your new scooter! Proper assembly and operation of your scooter is important for your safety and enjoyment. Our customer service department is dedicated to your satisfaction with Pacific
Congratulations on your new scooter! Proper assembly and operation of your scooter is important for your safety and enjoyment. Our customer service department is dedicated to your satisfaction with Pacific
TRIKKE ev5 OWNER MANUAL
 TRIKKE ev5 OWNER MANUAL Made in Holland TRIKKE ev5 OWNER MANUAL Introduction Congratulations with your Trikke ev5! The green, smart and easy way of personal transport over short distances. This manual
Riding Your Halo Go Before You Begin Safety Alerts
 HALO GOTM Before You Begin---------------------01 Riding Your Halo Go-----------07-10 Main Components-------------------02 Safety Alerts--------------------------11 Charging Your Batteries------------03
User Manual. Model Name: Pedaler
 User Manual Model Name: Pedaler 1 Safety and warnings Thank you for purchasing the Multi-speed Scooter Bike. Please read and understand this manual carefully before using or operating the scooter. Follow
Sport Scooter and Pro Model. Read and understand this entire manual before allowing child to use this product! For assistance contact Razor.
 Sport Scooter and Pro Model Owner s Manual Read and understand this entire manual before allowing child to use this product! For assistance contact Razor. NOTE: Manual illustrations are for demonstration
THIS VEHICLE MUST BE ASSEMBLED BY AN ADULT. PLEASE READ THE MANUAL CAREFULLY BEFORE OPERATION. WARNING CALIFORNIA PROPOSITION 65 WARNING
 TABLE OF CONTENTS A Electric Car Specifications 2 B List of Parts 4 C Assembly 5 D Battery Charging 7 E How to Use 9 F Safety Precautions 9 G Simple Repairs 10 H Maintaining your Vehicle 10 I About Thermal
User s Manual. Table of Contents CAUTION. Model No. MTSC20000
 Model No. MTSC20000 Table of Contents Important Precautions..........2 Limited Warranty..............2 Before You Begin.............3 How to Set Up and Fold the Scooter...............4 How to Operate the
FOLDING SCOOTER WITH ELECTRONIC LIGHTS. FOR AGES FIVE AND UP MAXIMUM WEIGHT: 132 lbs. (60 kgs.) OWNER S MANUAL
 OWNER S MANUAL") OWNER S MANUAL FOLDING SCOOTER WITH ELECTRONIC LIGHTS RIDERIGHT-W EARA Conduce casco con H ELM ET cuando montes cuidado: W HEN YOU RIDE. usa en siempre bicicleta this manual contains important safety,
OWNER S MANUAL FOLDING SCOOTER WITH ELECTRONIC LIGHTS RIDERIGHT-W EARA Conduce casco con H ELM ET cuando montes cuidado: W HEN YOU RIDE. usa en siempre bicicleta this manual contains important safety,
THIS VEHICLE MUST BE ASSEMBLED BY AN ADULT. PLEASE READ THE MANUAL CAREFULLY BEFORE OPERATION. WARNING CALIFORNIA PROPOSITION 65 WARNING
 TABLE OF CONTENTS A Electric Car Specifications 2 B List of Parts 4 C Assembly 5 D Battery Charging 7 E How to Use 9 F Safety Precautions 9 G Simple Repairs 10 H Maintaining your Vehicle 11 I About Thermal
User Manual Journey Onward
 User Manual 2018 Journey Onward Introduction & Disclaimer First of all we would like to thank you for buying our X1 Explorer electric bike. Our ebike has been refined and perfected for almost 2 years by
Giant Hydraulic Disc Brake System
 Giant Hydraulic Disc Brake System INSTALLATION INSTRUCTI IMPORTANT NOTICE Contact the place of purchase or Authorized Giant Retailer for information on detail of installation and maintenance. Read this
rtable Electric Scooter USER MANUAL A new era in urban mobility PLEASE CAREFULLY READ THE USER MANUAL AND WARRANTY BOOK BEFORE USING!
 rtable Electric Scooter USER MANUAL A new era in urban mobility PLEASE CAREFULLY READ THE USER MANUAL AND WARRANTY BOOK BEFORE USING! The most economical vehicle in history User Manual Page 1 / 20 04/2017
Read and understand this entire manual before allowing child to use this product!
 FLASHRIDER 360 OWNER S MANUAL Read and understand this entire manual before allowing child to use this product! NOTE: Manual illustrations are for demonstration purposes only. Illustrations may not reflect
Guide and Manual Before using the Lunicycle, READ THROUGH THESE INSTRUCTIONS COMPLETELY! Inventist, Inc Inventist Inc.
 Guide and Manual Before using the Lunicycle, READ THROUGH THESE INSTRUCTIONS COMPLETELY! Inventist, Inc. 2015 Inventist Inc. WARNING Whenever you ride the Lunicycle you risk serious injury or death from
IMPORTANT!: THIS IS A MECHANICAL PRODUCT AND IT NEEDS PERIODICAL MAINTENANCE! READ THIS MANUAL BEFORE YOU START! WARNING: adult assembling required.
 Owner s manual Model:X360 EN14619 Class A / ASTM-F2264 Please read and understand this manual before allowing yourself or your child to use the Space Scooter Junior. If you need any assistance, please
Recreational Kick Scooters, Warnings, Specifications & Instructions
 MODEL NUMBER ASSEMBLY NUMBER RAILZ SCOOTER MODELS COVERED BY THESE INSTRUCTIONS UPC 18-001 100-00018-001 793573890191 18-004 100-00018-004 040232562433 20-001 100-00020-001 793573234520 20-004 100-00020-004
Triaxe Sport. By Enhance Mobility
 Triaxe Sport By Enhance Mobility User Manual April 2016 Thank you for choosing the Triaxe Sport Folding Scooter. Please read this manual carefully before operating the the Triaxe Sport. If you have any
Read and understand this entire manual before allowing child to use this product! For assistance contact Razor. DO NOT RETURN TO STORE.
 Kuties Scooter OWNER S MANUAL Read and understand this entire manual before allowing child to use this product! For assistance contact Razor. DO NOT RETURN TO STORE. NOTE: Manual illustrations are for
EW-09. Owner s Manual. (888) Customer Service. (888) Service
 Customer Service. (888) Service") EW-09 Owner s Manual www.ewheelsdealers.com (888) 305-0881 Customer Service (888) 571-2845 0 Service Table of Contents Page 2 - Feature Guide Page 3 - Product Specifications Page 4 - Operation of Scooter
EW-09 Owner s Manual www.ewheelsdealers.com (888) 305-0881 Customer Service (888) 571-2845 0 Service Table of Contents Page 2 - Feature Guide Page 3 - Product Specifications Page 4 - Operation of Scooter
PowerWing. Read and understand this entire manual before allowing child to use this product! For assistance contact Razor. DO NOT RETURN TO STORE.
 PowerWing OWNER S MANUAL Read and understand this entire manual before allowing child to use this product! For assistance contact Razor. DO NOT RETURN TO STORE. NOTE: Manual illustrations are for demonstration
Black Label R Tec Scooter
 Black Label R Tec Scooter OWNER S MANUAL Read and understand this entire manual before allowing child to use this product! For assistance contact Razor. DO NOT RETURN TO STORE. NOTE: Manual illustrations
Read and understand this entire manual before riding! DO NOT RETURN TO STORE!
 FlashRider 360 Owner s Manual Read and understand this entire manual before riding! DO NOT RETURN TO STORE! NOTE: Manual illustrations are for demonstration purposes only. Illustrations may not reflect
2000-LB. ENGINE STAND
 2000-LB. ENGINE STAND WARNING: Read carefully and understand all ASSEMBLY AND OPERATION INSTRUCTIONS before operating. Failure to follow the safety rules and other basic safety precautions may result in
SCOOTER. Read and understand this entire manual before allowing child to use this product! For assistance contact Razor. DO NOT RETURN TO STORE.
 SCOOTER Owner s Manual Read and understand this entire manual before allowing child to use this product! For assistance contact Razor. DO NOT RETURN TO STORE. NOTE: Manual illustrations are for demonstration
Hydraulic Bead Breaker Kit
 Hydraulic Bead Breaker Kit Owner s Manual WARNING: Read carefully and understand all ASSEMBLY AND OPERATION INSTRUCTIONS before operating. Failure to follow the safety rules and other basic safety precautions
Read and understand this entire manual before allowing child to use this product! For assistance contact Razor. DO NOT RETURN TO STORE.
 MIXI SCOOTER OWNER S MANUAL Read and understand this entire manual before allowing child to use this product! For assistance contact Razor. DO NOT RETURN TO STORE. NOTE: Manual illustrations are for demonstration
User Manual. Product: Smart Balance Scooter. Model: K1
 Product: Smart Balance Scooter Model: K1 User Manual Self-balancing scooter, is a new high-tech product with self-balance, It s a good helper for leisure and entertainment. Brief Introduction Self-balancing
ELECTRIC WAGON OWNER S MANUAL. Read and understand this entire manual before allowing child to use this product! Item Numbers:
 ELECTRIC WAGON OWNER S MANUAL Read and understand this entire manual before allowing child to use this product! Item Numbers: 25144070 CONTENTS Safety Warnings... 1 Before You Begin... 2 Set-Up... 3-4
ELECTRIC SCOOTER OWNER S MANUAL
 NOTE: TO OPERATE, PUSH START SCOOTER TO APPROXIMATELY 3 MPH WHILE TWISTING THROTTLE IN ORDER FOR MOTOR TO ENGAGE. THE SCOOTER MUST BE ROLLING AT 3 MPH BEFORE THE MOTOR WILL ENGAGE. ELECTRIC SCOOTER OWNER
rungu juggernaut owners manual
 rungu juggernaut owners manual Congratulations on purchasing the Juggernaut 1! Before you ride and make new tracks, please read the following instructions carefully. IMPORTANT- Standard Bearer Machines
Daymak warranties, services, and stocks parts for everything it sells. We support our products.
 EC1 User Manual About Daymak Daymak is one of Canada s largest Alternative Vehicle providers. We design, engineer, manufacture, import and repair everything from recreational dirt bikes, go-karts and electric
DUNE BUGGY. Read and understand this entire manual BEFORE riding!
 DUNE BUGGY OWNER S MANUAL Read and understand this entire manual BEFORE riding! NOTE: Manual illustrations are for demonstration purposes only. Illustrations may not reflect exact appearance of actual