Anleitung_LB6_ :_ :32 Uhr Seite 1 PASS 3.6 A1. POWER SCREWDRIVER Operation and Safety Notes Original operating instructions
|
|
|
- Horatio Ford
- 5 years ago
- Views:
Transcription

1 Anleitung_LB6_ :_ :32 Uhr Seite 1 PASS 3.6 A1 POWER SCREWDRIVER Operation and Safety Notes Original operating instructions 6
2 Anleitung_LB6_ :_ :32 Uhr Seite 2 Before reading, unfold the page containing the illustrations and familiarise yourself with all functions of the device. Operation and Safety Notes Page 5 2


3 Anleitung_LB6_ :_ :32 Uhr Seite

4 Anleitung_LB6_ :_ :32 Uhr Seite a
5 Anleitung_LB6_ :_ :32 Uhr Seite 5 Table of contents: Page 1. Introduction Safety regulations Layout Items supplied Intended use Technical data Before starting the equipment Operation Cleaning, maintenance and ordering of spare parts Disposal and recycling Declaration of conformity Guarantee Certificate...17 The reprinting or reproduction by any other means, in whole or in part, of documentation and papers accompanying products is permitted only with the express consent of ISC GmbH. Technical changes subject to change 5
6 Anleitung_LB6_ :_ :32 Uhr Seite 6 Caution - Read the operating instructions to reduce the risk of inquiry 6
7 Anleitung_LB6_ :_ :32 Uhr Seite 7 1. Introduction cause you to lose control of the tool. Important! When using equipment, a few safety precautions must be observed to avoid injuries and damage. Please read the complete operating manual with due care. Keep this manual in a safe place, so that the information is available at all times. If you give the equipment to any other person, give them these operating instructions as well. We accept no liability for damage or accidents which arise due to non-observance of these instructions and the safety information. 2. Safety regulations General safety instructions for electric tools CAUTION! Read all safety regulations and instructions. Any errors made in following the safety regulations and instructions may result in an electric shock, fire and/or serious injury. Keep all safety regulations and instructions in a safe place for future use. The term electric tool used in the safety regulations refers to electric tools operated from the mains power supply (with a power cable) and to battery operated electric tools (without a power cable). 1. Workplace safety Keep your work area clean and well illuminated. Untidy or unlit work areas can result in accidents. Do not use this tool in a potentially explosive environment containing combustible liquids, gases or dust. Electric tools generate sparks, which can in turn ignite dust or vapors. Keep children and other persons away from the electric tool while it is being used. Allowing yourself to get distracted can 2. ELECTRICAL SAFETY The tool s connector plug must be able to fit into the socket outlet. Do not modify the plug in any way! Do not use adapter plugs in conjunction with electrically grounded tools. Unmodified plugs and matching socket outlets reduce the risk of an electric shock. Avoid touching grounded surfaces, such as those of pipes/tubes, heaters, cookers and refrigerators. There is an increased risk of getting an electric shock if you are electrically grounded. Keep the tool away from rain and moisture/wet conditions. Penetration of water into an electric tool increases the risk of an electric shock. Do not use the cable to carry the tool, hang it up or pull the plug out of the socket. Keep the cable away from sources of heat, oil, sharp edges and moving tool parts. Damaged or tangled cable increases the risk of an electric shock. If you intend to use an electric tool outdoors, ensure that you only use extension cable that is approved for outdoor applications. Using extension cable that is approved for outdoor applications reduces the risk of an electric shock. If operation of the electric tool in a damp environment can not be avoided, use a earth-leakage circuit-breaker. The earth-leakage circuit-breaker reduces the risk of an electric shock. 3. PERSONAL SAFETY Be alert, work conscientiously and exercise appropriate caution when using the electric tool. Do not use the tool if you are tired or are under the influence of drugs/medication or alcohol. One moment of carelessness or lack of attention when using the electric tool can cause serious bodily injury! Always wear personal protective 7
8 Anleitung_LB6_ :_ :32 Uhr Seite 8 equipment (PPE), including safety goggles. Wearing personal protective equipment such as a dust mask, non-slip footwear, protective headgear and ear muffs (depending upon the type of electric tool and the particular application) reduces the risk of sustaining injury. Make sure that the tool cannot start up accidentally. Ensure that the electric tool is switched off before you connect the tool to the power supply and/or insert the battery, or pick up or carry the tool. Physically touching the switch with your finger when carrying the tool or connecting the tool to the power supply switched on can lead to accidents. Remove adjusting tools/wrench(es) prior to switching on the power tool. A tool or wrench that is positioned inside a rotating power tool part can cause injury. Avoid abnormal working postures. Make sure you stand squarely and keep your balance at all times. This way, you will be able to have better control over the tool in unexpected situations. Wear suitable clothes. Never wear loose fitting clothes or jewelry. Keep hair, clothes and gloves away from moving parts. Loose clothing, dangling jewelry and long hair can be caught by moving parts. If dust extraction and dust collection devices can be mounted, ensure that these are connected and are properly used. The use of a dust extraction system can reduce the danger posed by dust. 4. Using the treatment of electric tools Do not overload your tool. Only use suitable electric tools to perform your work. Using the right electric tool allows you to work better and safer within the tool s quoted capacity range. Do not use an electric tool whose switch is defective. 8 An electric tool that no longer can be switched on or off is dangerous and must be repaired. Pull the plug out of the socket and/or remove the battery before making any adjustments to the tool, changing accessories or put the tool down. This precaution eliminates the possibility of inadvertently starting the tool. When not in use, store electric tools out of the reach of children. Do not allow those persons to use this tool who are unfamiliar with it or who have not read these instructions. Electric tools are dangerous when they are used by inexperienced persons. Take good care of your tool. Check that moving parts properly function and do not jam, that parts are not broken off or damaged in any way and that the tool can be used to its full capacity. Have damaged parts repaired prior to using the tool. The cause of many accidents can be traced back to poorly maintained electric tools. Keep your blades sharp and clean. Properly maintained blades with sharp edges jam less frequently and are easier to use. Make sure to use electric tools, accessories, attachments, etc. in accordance with these instructions. Take the conditions in your work area and the job in hand into account. Using electric tools for applications other than those intended can lead to dangerous situations. 5. Usage and treatment of battery powered electric tools Only charge the batteries in chargers that are recommended by the manufacturer. A charger that is designed for a certain type of batteries may pose a fire risk if it is used with other types of batteries. Use only the correct batteries in the electric tools. The use of other batteries may result in injuries and a fire risk. Keep unused batteries away from paper
9 Anleitung_LB6_ :_ :32 Uhr Seite 9 clips, coins, keys, nails, screws and other metallic objects that could cause a short circuit between the contacts. A short circuit between the battery contacts may cause burns or a fire. In case of incorrect use, fluid may escape from the battery. Avoid contact with it. If you touch it by mistake, rinse the affected area with water. If you get the fluid in your eyes, also seek medical advice. Leaking battery fluid can cause skin irritation or burns. 6. SERVICE Have your tool repaired only by authorized specialists using original replacement parts. This will ensure that your tool remains safe to use. Hold the equipment by the insulated handles when carrying out work during which the screw or the plug-in tool could strike concealed power cables. Contact with a live cable may also make the metal parts of the equipment live and cause an electric shock. Additional safety instructions We pay a great deal of attention to the design of every battery pack to ensure that we supply you with batteries which feature maximum power density, durability and safety. The battery cells have a wide range of safety devices. Each individual cell is initially formatted and its electrical characteristic curves are recorded. These data are then used exclusively to be able to assemble the best possible battery packs. Despite all the safety precautions, caution must always be exercised when handling batteries. The following points must be obeyed at all times to ensure safe use. Safe use can only be guaranteed if undamaged cells are used. Incorrect handling can cause cell damage. Important: Analyses confirm that incorrect use and poor care are the main causes of the damage caused by high performance batteries. Information about the battery The battery pack supplied with your cordless tool is not charged. The battery pack has to be charged before you use the tool for the first time. For optimum battery performance avoid low discharge cycles. Charge the battery pack frequently. Store the battery pack in a cool place, ideally at 15 C and charged to at least 40%. Lithium-ion batteries are subject to a natural ageing process. The battery pack must be replaced at the latest when its capacity falls to just 80% of its capacity when new. Weakened cells in an aged battery pack are no longer capable of meeting the high power requirements and therefore pose a safety risk. Do not throw battery packs into an open fire. There is a risk of explosion! Do not ignite the battery pack or expose it to fire. Do not exhaustively discharge batteries. Exhaustive discharge will damage the battery cells. The most common cause of exhaustive discharge is lengthy storage or non-use of partly discharged batteries. Stop working as soon as the performance of the battery falls noticeably or the electronic protection system triggers. Place the battery pack in storage only after it has been fully charged. Protect batteries and the tool from overloads. Overloads will quickly result in overheating and cell damage inside the battery housing without this overheating actually being apparent externally. Avoid damage and shocks. Replace batteries which have been dropped from a height of more than one meter or which have been exposed to violent shocks without delay, even if the housing of the battery pack appears to be undamaged. The battery cells inside the battery may have suffered serious damage. In this respect, 9
10 Anleitung_LB6_ :_ :32 Uhr Seite 10 please also read the waste disposal information. If the battery pack suffers overloading and overheating, the integrated protective cutoff will switch off the equipment for safety reasons. Important. Do not press the ON/OFF switch any more if the protective cut-off has actuated. This may damage the battery pack. Use only original battery packs. The use of other batteries may result in injuries, explosion and a fire risk. Information on chargers and the charging process Please check the data marked on the rating plate of the battery charger. Be sure to connect the battery charger to a power supply with the voltage marked on the rating plate. Never connect it to a different mains voltage. Protect the battery charger and its cable from damage and sharp edges. Have damaged cables repaired without delay by a qualified electrician. This battery charger is not designed to be used by people (including children) with limited physical, sensory or mental capacities or those with no experience and/or knowledge unless they are supervised by a person who is responsible for their safety or they have received instructions from such a person in how to use the equipment safely. Children must always be supervised in order to ensure that they do not play with the equipment. Do not use damaged battery chargers. Do not use the supplied battery charger to charge other cordless tools. In heavy use the battery pack will become warm. Allow the battery pack to cool to room temperature before commencing with the charging. Do not over-charge batteries. Do not exceed the maximum charging times. These charging times only apply to discharged batteries. Frequent insertion of a charged or partly charged battery pack will result in over-charging and cell damage. Do 10 not leave batteries in the charger for days on end. Never use or charge batteries if you suspect that the last time they were charged was more than 12 months previously. There is a high probability that the battery pack has already suffered dangerous damage (exhaustive discharge). Charging batteries at a temperature below 10 C will cause chemical damage to the cell and may cause a fire. Do not use batteries which have heated during the charging process, as the battery cells may have suffered dangerous damage. Do not use batteries which have suffered curvature or deformation during the charging process or which show other nontypical symptoms (gassing, hissing, cracking, ) Never fully discharge the battery pack (recommended depth of discharge max. 80%) A complete discharge of the battery pack will lead to premature ageing of the battery cells. Never charge the batteries unsupervised. Protection from environmental influences Wear suitable work clothes. Wear safety goggles. Protect your cordless tool and the battery charger from moisture and rain. Moisture and rain can cause dangerous cell damage. Do not use the cordless tool or the battery charger near vapors and inflammable liquids. Use the battery charger and cordless tools only in dry conditions and an ambient temperature of C. Do not keep the battery charger in places where the temperature is liable to reach over 40 C. In particular, do not leave the battery charger in a car that is parked in the sunshine. Protect batteries from overheating. Overloads, over-charging and exposure to direct sunlight will result in overheating and cell damage. Never charge or work with batteries which have been overheated
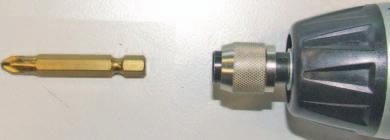
11 Anleitung_LB6_ :_ :33 Uhr Seite 11 replace them immediately if possible. Storage of batteries, battery chargers and cordless tools. Store the charger and your cordless tool only in dry places with an ambient temperature of C. Store your lithium-ion battery pack in a cool, dry place at a temperature of C. Protect them from humidity and direct sunlight. Only place fully charged batteries in storage (charged at least 40%). Prevent the lithium-ion battery pack from freezing. Battery packs which were stored below 0 C for more than 60 minutes must be disposed of. When handling batteries beware of electrostatic charge: Electrostatic discharges cause damage of the electronic protection system and the battery cells. Avoid electrostatic charging and never touch the battery poles. When shipping or disposing of batteries and cordless tools, always ensure that they are packed individually in plastic bags to prevent short circuits and fires. Do not lose this safety information. 3. Layout (Fig. 1) 1. Bit chuck 2. LED lamp 3. Locking button 4. ON/OFF switch for lamp 5. Battery capacity indicator 6. Button for battery capacity indicator 7. Charging control lamp 8. Charging connection 9. ON/OFF switch 10. Clockwise/Counter-clockwise selector switch 11. Battery charger 12. Charging cable 13. Torque selector 14. Locking sleeve 4. Items supplied Rechargeable batteries and cordless electric machines and tools contain materials that are potentially harmful to the environment. Never place any cordless electric machines or tools in your household refuse. When cordless electric machines or tools become defective or worn, remove the rechargeable batteries and return them to isc GmbH (address: Eschenstrasse 6, D-94405, Germany). If the rechargeable batteries cannot be removed, return the complete cordless machine or tool. You can then be sure that the equipment will be correctly disposed of by the manufacturer. Take all parts out of the packaging and check that they are complete. Cordless Screwdriver PASS 3.6 A1 Battery charger 26 Bits Bit holder Case Operating Instructions 11
12 Anleitung_LB6_ :_ :33 Uhr Seite Intended use The cordless screwdriver is designed for tightening and loosening screws. Sound and vibration Sound and vibration values were measured in accordance with EN The equipment is to be used only for its prescribed purpose. Any other use is deemed to be a case of misuse. The user/operator and not the manufacturer will be liable for any damage or injuries caused as a result thereof. Sound pressure level L pa Uncertainty K pa Sound power level L WA Uncertainty K WA 62 db(a) 3 db 73 db(a) 3 db Please note that our equipment has not been designed for use in commercial, trade or industrial applications. Our warranty will be voided if the equipment is used in commercial, trade or industrial businesses or for equivalent purposes. 6. Technical data Motor power supply: 3.6 V DC Idling speed: 200 rpm Clockwise/Counter-clockwise: Yes Battery charger output voltage: 6,8 V DC Battery charger output current: 550 ma Battery charger supply voltage: 230V ~ 50 Hz Charging time: 3 hours Battery type: Li-Ion/1.5 Ah Weight: 0.4 kg LED Class 1 Wear ear-muffs. The impact of noise can cause damage to hearing. Total vibration values (vector sum of three directions) determined in accordance with EN Screws without hammer action Vibration emission value a h 2.5 m/s 2 Tolerance K = 1.5 m/s 2 Warning! The specified vibration value was established in accordance with a standardized testing method. It may change according to how the electric equipment is used and may exceed the specified value in exceptional circumstances. The specified vibration value can be used to compare the equipment with other electric power tools. The specified vibration value can be used for initial assessment of a harmful effect. Keep the noise emissions and vibrations to a minimum. Only use appliances which are in perfect working order. Service and clean the appliance regularly. Adapt your working style to suit the appliance. Do not overload the appliance. Have the appliance serviced whenever necessary. Switch the appliance off when it is not in use. 12
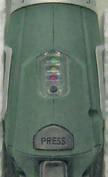
13 Anleitung_LB6_ :_ :33 Uhr Seite 13 Wear protective gloves. 7. Before starting the equipment Caution: Be sure to read the following information before you use your cordless screwdriver for the first time: 1. Only charge the battery pack using the charger (11) supplied. 2. Only use screwdriver bits which are in perfect working order and appropriate. 3. When screwing into walls or partitions, test these for electrical, gas or water connections. 8. Operation 8.1 Charging the battery pack (Fig. 1) The battery pack is protected from exhaustive discharge. An integrated protective circuit automatically switches off the equipment when the battery pack is flat. In this case the bit chuck (1) will cease to turn. Caution: Do not press the ON/OFF switch (9) any more, if the protective circuit has actuated. This may damage the battery pack. 1. Check that your mains voltage is the same as that marked on the rating plate of the battery charger. Plug the battery charger (11) in the plug socket and connect the charging cable (12) to the charging connection (8). The charging process starts as soon as the charging cable is connected to the charging connection. 2. The charging control lamp (7) indicates that the battery is being charged. 3. The charging control lamp (7) goes out when charging is completed. Caution: The handle may become a little warm during the charging process. This is normal. If the battery pack fails to charge, please check whether there is voltage at the socket-outlet. whether there is good contact at the charging contacts of the battery charger (11). If the battery still fails to charge, send the battery charger (11) and the screwdriver to our customer services department. Timely recharging of the battery pack will help to prolong its lifespan. You must recharge the battery pack when you notice that the power of the screwdriver drops. 8.2 Clockwise/Counter-clockwise changeover switch (Fig. 2/Item 10) The clockwise/counter-clockwise changeover switch (10) above the ON/OFF switch (9) is for setting the direction of rotation of the cordless screwdriver and for preventing the cordless screwdriver from being switched on inadvertently. You can select between clockwise and counter-clockwise rotation. Important. Change the direction of rotation only when the equipment is at a standstill. If you fail to observe this point, the gearing may become damaged. When the clockwise/counter-clockwise changeover switch (10) is in the middle position, the ON/OFF switch (9) is blocked. Direction Clockwise Counter-clockwise Switch position R pressed L pressed 8.3 ON/OFF switch (Fig. 2/Item 9) Press the ON/OFF switch (9) to switch the cordless screwdriver on. Release the ON/OFF switch to switch off the tool. 8.4 LED lamp (Fig. 1/Item 2) The LED lamp (2) can be used in poor lighting conditions to illuminate the area where you want to screw. To switch ON, press the switch (4) and to switch OFF, press the switch (4) again. 13
14 Anleitung_LB6_ :_ :33 Uhr Seite Handle adjustment (Fig. 1.2/Item 3) The screwdriver can be locked into 2 different angle settings. To do so, press the locking button (3) and move the screwdriver into the desired position. Then release the locking button (3). Caution: Before you switch on the screwdriver, make sure that it is correctly locked in the required angle position. 8.6 Battery capacity indicator (Fig. 4/Item. 5) Press the button for the battery capacity indicator (6). The battery capacity indicator (5) indicates the charge state of the battery on 3 coloured LEDs. All LEDs are lit: The battery is fully charged. The yellow and red LED illuminate: The battery has an adequate remaining charge. Red LED: The battery is discharged, it requires charging. 8.7 Changing the tool (Fig. 5) Important. Set the clockwise/counter-clockwise changeover switch (10) to its centre position whenever you carry out any work (for example changing the tool, maintenance work, etc.) on the cordless screwdriver. Pull back and hold the locking sleeve (14). Insert the bit (a) into the bit chuck (1) and let go of the locking sleeve (14) Check that it is properly secure by pulling the tool. For removal of bits (a), pull back the locking sleeve (14) and hold it firmly. Remove the bit (a) and let go of the locking sleeve. 8.8 Torque Setting (Fig. 1/Item 13) Caution: Only adjust the torque when the appliance is at a standstill. The cordless screwdriver is fitted with a mechanical torque selector. The torque for each particular screw size is adjustable at the torque selector (13). The required torque is dependent upon several factors: the type and hardness of the material to be worked with. the type and length of the screws used. the physical burden placed on the screw connection. When the torque is reached, this is indicated by the clutch being released. 8.9 Screws It is advisable to use self-centering screws (e.g. Torx, Philips head screws) as these will enable you to work safely and reliably. Always make sure that the bit used is of the same size and shape as the screw Screwdriver overloaded If the screwdriver is overloaded, the automatic safety switch turns the device off. After a few seconds the screwdriver can be used again. 14
15 Anleitung_LB6_ :_ :33 Uhr Seite Cleaning, maintenance and ordering of spare parts Caution: Always pull out the mains power plug before starting any cleaning work. 9.1 Cleaning Keep all safety devices, air vents and the motor housing free of dirt and dust as far as possible. Wipe the appliance with a clean cloth or blast it with compressed air at low pressure. We recommend cleaning the appliance immediately after every use. Clean the appliance regularly with a damp cloth and some soft soap. Do not use cleaning agents or solvents; these may be aggressive to the plastic parts in the appliance. Ensure that no water can get into the interior of the tool. 9.2 Maintenance There are no other parts inside the equipment which require additional maintenance. 9.3 Ordering replacement parts: Please provide the following information on all orders for spare parts: Model/type of the equipment Article number of the equipment ID number of the appliance For our latest prices and information please go to Disposal and recycling The equipment is supplied in packaging to prevent it from being damaged in transit. The raw materials in this packaging can be reused or recycled. The appliance and its accessories are made of various types of material, such as metal and plastic. Defective components must be disposed of as special waste. Ask your dealer or your local council. For EU countries only Never place any electric tools in your household refuse. To comply with European Directive 2002/96/EC concerning old electric and electronic equipment and its implementation in national laws, old electric tools have to be separated from other waste and be disposed of in an environment-friendly fashion, e.g. by taking to a recycling depot. Recycling alternative to returning the electrical equipment: The owner of the electrical equipment is obligated to arrange for its proper disposal if he no longer wants to keep the equipment in his possession and does not want to return it. In this case the old equipment can be taken to a recycling depot where it is disposed of in accordance with national recycling and waste disposal laws. This does not apply to accessory parts and aids which supplement the old equipment and contain no electrical parts. 15
16 Anleitung_LB6_ :_ :33 Uhr Seite Declaration of conformity Einhell Germany AG Wiesenweg 22 D Landau/Isar Konformitätserklärung k erklärt folgende Konformität gemäß EU-Richtlinie und Normen für Artikel t explains the following conformity according to EU directives and norms for the following product p déclare la conformité suivante selon la directive CE et les normes concernant l article C dichiara la seguente conformità secondo la direttiva UE e le norme per l articolo N verklaart de volgende overeenstemming conform EU richtlijn en normen voor het product m declara la siguiente conformidad a tenor de la directiva y normas de la UE para el artículo O declara a seguinte conformidade, de acordo com a directiva CE e normas para o artigo l attesterer følgende overensstemmelse i medfør af EU-direktiv samt standarder for artikel U förklarar följande överensstämmelse enl. EU-direktiv och standarder för artikeln q vakuuttaa, että tuote täyttää EU-direktiivin ja standardien vaatimukset. tõendab toote vastavust EL direktiivile ja standarditele j vydává následující prohlášení o shodě podle směrnice EU a norem pro výrobek X potrjuje sledečo skladnost s smernico EU in standardi za izdelek W vydáva nasledujúce prehlásenie o zhode podľa smernice EÚ a noriem pre výrobok A a cikkekhez az EU-irányvonal és Normák szerint a következő konformitást jelenti ki P deklaruje zgodność wymienionego poniżej artykułu z następującymi normami na podstawie dyrektywy WE. e декларира съответното съответствие съгласно Директива на ЕС и норми за артикул H paskaidro šādu atbilstību ES direktīvai un standartiem G apibūdina šį atitikimą EU reikalavimams ir prekės normoms Q declară următoarea conformitate conform directivei UE şi normelor pentru articolul z δηλώνει την ακόλουθη συμμόρφωση σύμφωνα με την Οδηγία ΕΚ και τα πρότυπα για το προϊόν B potvrđuje sljedeću usklađenost prema smjernicama EU i normama za artikl Izjava o sukladnosti za ovaj proizvod dostupna je na internet stranici f potvrđuje sljedeću usklađenost prema smjernicama EU i normama za artikl 4 potvrđuje sledeću usklađenost prema smernicama EZ i normama za artikal T следующим удостоверяется, что следующие продукты соответствуют директивам и нормам ЕС 1 проголошує про зазначену нижче відповідність виробу директивам та стандартам ЄС на виріб Z Ürünü ile ilgili AB direktifleri ve normları gereğince aşağıda açıklanan uygunluğu belirtir L erklærer følgende samsvar i henhold til EU-direktivet og standarder for artikkel E Lýsir uppfyllingu EU-reglna og annarra staðla vöru Akkuschrauber PASS 3.6 A1 / Ladegerät LG PASS 3.6 A1 (Parkside) x 87/404/EC_2009/105/EC 2005/32/EC_2009/125/EC 2006/95/EC 2006/28/EC 2004/108/EC 2004/22/EC 1999/5/EC 97/23/EC 90/396/EC_2009/142/EC 89/686/EC_96/58/EC x 2006/42/EC Annex IV Notified Body: Notified Body No.: Reg. No.: 2000/14/EC_2005/88/EC Annex V Annex VI Noise: measured L WA = db (A); guaranteed L WA = db (A) P = KW; L/Ø = cm Notified Body: 2004/26/EC Emission No.: Standard references: EN ; EN ; EN ; EN ; EN ; EN ; EN ; EN Landau/Isar, den Weichselgartner/General-Manager Unger/Product-Management 16 First CE: 08 Archive-File/Record: Art.-No.: I.-No.: Documents registrar: Georg Riedel Subject to change without notice Wiesenweg 22, D Landau/Isar
17 Anleitung_LB6_ :_ :33 Uhr Seite GUARANTEE CERTIFICATE Dear Customer, All of our products undergo strict quality checks to ensure that they reach you in perfect condition. In the unlikely event that your device develops a fault, please contact our service department at the address shown on this guarantee card. Of course, if you would prefer to call us then we are also happy to offer our assistance under the service number printed below. Please note the following terms under which guarantee claims can be made: 1. These guarantee terms cover additional guarantee rights and do not affect your statutory warranty rights. We do not charge you for this guarantee. 2. Our guarantee only covers problems caused by material or manufacturing defects, and it is restricted to the rectification of these defects or replacement of the device. Please note that our devices have not been designed for use in commercial, trade or industrial applications. Consequently, the guarantee is invalidated if the equipment is used in commercial, trade or industrial applications or for other equivalent activities. The following are also excluded from our guarantee: compensation for transport damage, damage caused by failure to comply with the installation/assembly instructions or damage caused by unprofessional installation, failure to comply with the operating instructions (e.g. connection to the wrong mains voltage or current type), misuse or inappropriate use (such as overloading of the device or use of non-approved tools or accessories), failure to comply with the maintenance and safety regulations, ingress of foreign bodies into the device (e.g. sand, stones or dust), effects of force or external influences (e.g. damage caused by the device being dropped) and normal wear resulting from proper operation of the device. This applies in particular to rechargeable batteries for which we nevertheless issue a guarantee period of 12 months. The guarantee is rendered null and void if any attempt is made to tamper with the device. 3. The guarantee is valid for a period of 3 years starting from the purchase date of the device. Guarantee claims should be submitted before the end of the guarantee period within two weeks of the defect being noticed. No guarantee claims will be accepted after the end of the guarantee period. The original guarantee period remains applicable to the device even if repairs are carried out or parts are replaced. In such cases, the work performed or parts fitted will not result in an extension of the guarantee period, and no new guarantee will become active for the work performed or parts fitted. This also applies when an on-site service is used. 4. In order to assert your guarantee claim, please send your defective device postage-free to the address shown below. Please enclose either the original or a copy of your sales receipt or another dated proof of purchase. Please keep your sales receipt in a safe place, as it is your proof of purchase. It would help us if you could describe the nature of the problem in as much detail as possible. If the defect is covered by our guarantee then your device will either be repaired immediately and returned to you, or we will send you a new device. Of course, we are also happy offer a chargeable repair service for any defects which are not covered by the scope of this guarantee or for units which are no longer covered. To take advantage of this service, please send the device to our service address. Einhell UK Ltd Morpeth Wharf Twelve Quays Birkenhead, Wirral CH41 1LF Tel , Fax
18 Anleitung_LB6_ :_ :33 Uhr Seite 18 18
19 Anleitung_LB6_ :_ :33 Uhr Seite 19 19
20 Anleitung_LB6_ :_ :33 Uhr Seite 20 IAN: PASS 3.6 A1 Einhell Germany AG Wiesenweg 22 D Landau/Isar 6 Last Information Update: 10/2010 Ident.-No.:
Artikel-Nr.:
 PSZ 250 A2 (LB1) Electric Hoist Artikel-Nr.: 2255120 Ident-Nr.: 01019 Komponenten / Ersatzteile Position Artikel-Nr. Beschreibung Position Artikel-Nr. Beschreibung 2 225511701002 support bracket 3 225511701003
USER S MANUAL CORDLESS GRASS & SHRUB SHEARS PSLHTM20
 USER S MANUAL CORDLESS GRASS & SHRUB SHEARS PSLHTM20 CAUTION: Read all safety regulations and instructions. failures made in following the safety regulations and instructions may result in an electric
Instruction Manual PSLGR18 Cordless Shears
 Instruction Manual PSLGR18 Cordless Shears Cordless Grass and Shrub Shears Please read and save these instructions. Safety Instructions General safety regulations for electric tools This equipment is
Instruction Manual. CORDLESS DRILL 18V Li-ion WITH IMPACT FUNCTION. Model SROM 1172
 Instruction Manual CORDLESS DRILL 18V Li-ion WITH IMPACT FUNCTION Model SROM 1172 Our tool range has you covered for DIY. Whatever the job, make light work of it with MAKO tools. Product Features: 1. Keyless
Instruction Manual CORDLESS DRILL & DRIVER 18V. Model SROM 1170
 Instruction Manual CORDLESS DRILL & DRIVER 18V Model SROM 1170 Product Features: Dear Valued Customer, Thank you for purchasing this Samson Power Tool. We are dedicated to providing quality Samson Power
4V LITHIUM-ION SCREWDRIVER OWNER S OPERATING MANUAL
 CSD-4107BG 4V LITHIUM-ION SCREWDRIVER OWNER S OPERATING MANUAL Your screwdriver has been engineered and manufactured to our high standard for dependability, ease of operation, and operator safety. When
Cordless 3.6v Grass & Shrub Trimmer Kit
 Cordless 3.6v Grass & Shrub Trimmer Kit Original Operating Instructions INTERCHANGEABLE SHRUB TRIMMING AND LAWN EDGING BLADES The perfect tool for light trimming of grass and shrubs INCLUDES TELESCOPIC
Cordless Rechargeable Saw Instructions for Use
 Technical data Voltage: DC 10.8V Weight: 1.25Kg Stroke rate: 0-2100/min Stroke: 15mm Cutting capacity: max diameter in wood 80mm / in soft metal 7mm Charging time: Between 5.0-5.5 Hours Battery: 1.3Ah
RMT1201. ORIGINAL INSTRUCTIONS Cordless Multi-Tool
 RMT1201 ORIGINAL INSTRUCTIONS Cordless Multi-Tool Important! It is essential that you read the instructions in this manual before operating this machine. Subject to technical modifications. Safety GENERAL
- Keep children and other people away while operating the rivet tool. Distractions can cause you to lose control of the tool.
 PLEASE SPEND 5 MINUTES READING THESE INSTRUCTIONS BEFORE USING YOUR NEW BATTERY RIVET TOOL. TRUST US, IT WILL SAVE YOU TIME AND INCONVENIENCE IN THE LONG RUN. Please read the following safety information
SAFETY AND OPERATING MANUAL ORIGINAL INSTRUCTIONS
 SAFETY AND OPERATING MANUAL ORIGINAL INSTRUCTIONS 1 2 3 4 9 8 5 6 7 A1 A2 1 2 1 3 2 A3 B1 3 2 1 B2 C1 2 3 1 C2 C3 C2 C3 D F E 1. KEYLESS CHUCK 2. TORQUE ADJUSTMENT RING 3. TWO-SPEED GEAR CONTROL 4. FORWARD/REVERSE
SAFETY AND OPERATING MANUAL
 SAFETY AND OPERATING MANUAL ORIGINAL INSTRUCTIONS 1 7 6 2 5 4 2 3 A1 A2 1 2 A3 B A3 B C1 C2 3 C3 D 1. FORWARD/ REVERSE ROTATION CONTROL 2. SOFT GRIP HANDLE 3. BATTERY PACK RELEASE BUTTON 4. BATTERY PACK*
SAFETY AND OPERATING MANUAL
 SAFETY AND OPERATING MANUAL ORIGINAL INSTRUCTIONS 1 2 3 4 9 5 8 7 6 A2 A1 1 2 B1 A3 3 2 1 C1 B2 2 3 1 C2 C3 C2 C3 D E F G -- -- -- = 1. CHUCK 2. TORQUE ADJUSTMENT RING 3. TWO-SPEED GEAR CONTROL 4. FORWARD/REVERSE
TOOLPRO 18V Li-Ion Brushless Impact wrench
 TOOLPRO 18V Li-Ion Brushless Impact wrench Instruction Manual CIW180HB.9 After Sales Support FREE CALL 1300 889 028 EMAIL:salesau@positecgroup.com Important - Please read these instructions fully before
18V CORDLESS DRILL DRIVER CDT16180
 18V CORDLESS DRILL DRIVER CDT16180 LX400 SAFETY INSTRUCTIONS WARNING! Read all safety warnings and all instructions. Failure to follow the warnings and instructions may result in electric shock, fire and/or
SAFETY AND OPERATING MANUAL. Lithium-Ion cordless hammer drill WX372 WX372.1 WX372.9
 SAFETY AND OPERATING MANUAL 2 Original Instructions General Power Tool Safety Warnings WARNING: Read all safety warnings and all instructions. Failure to follow the warnings and instructions may result
CORDLESS DRILL User Manual EN
 CORDLESS DRILL User Manual EN B1 7 1 6 9 11 2 3 5 8 4 B2 B3 5 4 4 B4 1 B5 8 6 Lo Hi 9 3 2 2 B6 B7 7 7 b a 7 B8 10 1 Description of the tool 1 Selection Torque 2 Inverter Switch 3 ON/OFF 4 Battery 5 Pushlock
SAFETY AND OPERATING MANUAL ORIGINAL INSTRUCTIONS
 SAFETY AND OPERATING MANUAL ORIGINAL INSTRUCTIONS LITHIUM-ION BRUSHLESS DRILL DRIVER LITHIUM-ION BRUSHLESS HAMMER DRILL WU175 WU175.1 WU309 1 2 3 4 10 5 9 8 6 7 12 11 100% A1 A2 0% 1 2 A3 A4 B1 B2 2 C1
Artikel-Nr.:
 QG-PM 51 S B&S; EX; UK Petrol Lawn Mower Artikel-Nr.: 3400744 Ident-Nr.: 11021 Komponenten / Ersatzteile Position Artikel-Nr. Beschreibung Position Artikel-Nr. Beschreibung 1 340074402001 engine B/S 625
Instruction Manual 4.0V Li-Ion Screwdriver. Part #: ECLIPSE ENTERPRISES, INC Chula Road, Amelia Court House, VA 23002, U.S.
 Instruction Manual 4.0V Li-Ion Screwdriver Part #: 902-588 ECLIPSE ENTERPRISES, INC. 13302 Chula Road, Amelia Court House, VA 23002, U.S.A 2 3 Intended use Your ECLIPSE ENTERPRISES, INC. 902-588 screwdriver
SAFETY AND OPERATING MANUAL
 SAFETY AND OPERATING MANUAL ORIGINAL INSTRUCTIONS 1 2 3 4 8 9 5 7 6 A1 A2 1 2 1 3 2 A3 B1 A3 B1 3 2 1 B2 C1 2 3 1 C2 C3 D E1 1-18 D E1 E2 E3 F 1-18 6 1. CHUCK 2. TORQUE ADJUSTMENT RING 3. TWO-SPEED GEAR
24V CORDLESS HAMMER DRILL
 24V CORDLESS HAMMER DRILL CDI224MN ORIGINAL INSTRUCTIONS GENERAL POWER TOOL SAFETY WARNINGS WARNING: Read all safety warnings and all instructions. Failure to follow the warnings and instructions may result
Anleitung_BG_PW_48_SPK1:_ :33 Uhr Seite 1. Operating Instructions Petrol Water Pump. Art.-Nr.: I.-Nr.
 Anleitung_BG_PW_48_SPK1:_ 25.06.2008 9:33 Uhr Seite 1 Operating Instructions Petrol Water Pump Art.-Nr.: 41.713.43 I.-Nr.: 11010 BG-PW 48 Anleitung_BG_PW_48_SPK1:_ 25.06.2008 9:33 Uhr Seite 2 Read and
R18DDBL ORIGINAL INSTRUCTIONS. 18V Brushless Drill Driver
 R18DDBL ORIGINAL INSTRUCTIONS 18V Brushless Drill Driver Important! It is essential that you read the instructions in this manual before assembling, operating and maintaining the product. Subject to technical
CORDLESS TACKER MODEL NO: CCT48 OPERATION & MAINTENANCE INSTRUCTIONS PART NO: LS0414
 CORDLESS TACKER MODEL NO: CCT48 PART NO: 6485070 OPERATION & MAINTENANCE INSTRUCTIONS LS0414 INTRODUCTION Thank you for purchasing this CLARKE product. Before attempting to use this product, please read
Cordless Screwdriver
 ENGLISH Cordless Screwdriver MODEL 6796D MODEL 6796FD MODEL 6797D MODEL 6797FD MODEL 6798D MODEL 6798FD 00260 I N S T R U C T I O N M A N U A L WARNING: For your personal safety, READ and UNDERSTAND before
RPS1215 ORIGINAL INSTRUCTIONS. Cordless Pruner
 RPS5 ORIGINAL INSTRUCTIONS Cordless Pruner Important! It is essential that you read the instructions in this manual before assembling, operating and maintaining the product. Subject to technical modification.
TOOLPRO 18V 2 Speed Drill Driver
 TOOLPRO 18V 2 Speed Drill Driver Instruction Manual CDT218G.1 After Sales Support FREE CALL 1300 889 028 EMAIL:salesau@positecgroup.com Important - Please read these instructions fully before operating
eclipse Instruction Manual 4.0V Li-Ion Screwdriver Part #:
 eclipse Instruction Manual 4.0V Li-Ion Screwdriver Part #: 902-588 Test Equipment Depot - 800.517.8431-99 Washington Street Melrose, MA 02176 TestEquipmentDepot.com Test Equipment Depot - 800.517.8431-99
Cordless High Speed Drill
 ENGLISH Cordless High Speed Drill MODEL 6503D 00039 I N S T R U C T I O N M A N U A L WARNING: For your personal safety, READ and UNDERSTAND before using. SAVE THESE INSTRUCTIONS FOR FUTURE REFERENCE.
Battery Charger JCB-FCH12Li
 Safety and operating manual Battery Charger JCB-FCH12Li ORIGINAL INSTRUCTIONS SAFETY INSTRUCTIONS WARNING: Read all safety warnings and all instructions.failure to follow the warnings and instructions
3.6V SCREWDRIVER INSTRUCTION MANUAL CSD36F
 3.6V SCREWDRIVER INSTRUCTION MANUAL CSD36F ORIGINAL INSTRUCTIONS GENERAL POWER TOOL SAFETY WARNINGS WARNING! Read all safety warnings and all instructions. Failure to follow the warnings and instructions
INSTRUCTION MANUAL. Cordless Angle Drill XAD01
 INSTRUCTION MANUAL Cordless Angle Drill XAD0 0474 ENGLISH (Original instructions) SPECIFICATIONS Model XAD0 Capacities Steel 0 mm (3/8") Wood 25 mm (") No load speed (RPM) 0 -,800 /min Overall length 34
ELECTRIC CAR POLISHER
 ELECTRIC CAR POLISHER MODEL NO: CP254 PART NO: 6462108 OPERATION & MAINTENANCE INSTRUCTIONS LS0610 INTRODUCTION Thank you for purchasing this CLARKE electric car polisher. Before attempting to use this
Cordless Impact Driver JCB-ID20LIBL
 Safety and operating manual Cordless Impact Driver JCB-ID20LIBL ORIGINAL INSTRUCTIONS GENERAL POWER TOOL SAFETY WARNINGS WARNING! Read all safety warnings and all instructions. Failure to follow the warnings
SSW 18 LTX 600 SSW 18 LTX 400 BL
 SSW 18 LTX 600 SSW 18 LTX 400 BL en Operating Instructions 5 fr Mode d'emploi 9 es Instrucciones de manejo 13 www.metabo.com SSW 18 LTX 400 BL 1 SSW 18 LTX 600 1 2 3 2 3 4 5 7 4 7 6 6 9 8 9 8 10 2 11.
Subject to change. USERS MANUAL Art.nr. CDM6026 PCD-2400I. NiCd
 UK Subject to change UK USERS MANUAL Art.nr. CDM02 PCD-2400I NiCd 040-2 4 1 2 4 R L EXPLODED VIEW 3 Fig. A Fig. D B 1 2 Fig. B Fig. E 3 10 11 SPARE PARTS LIST PCD-2400I A Fig. C 3 Fig. F REF NR DESCRIPTION
original instructions 18V Torch RFP1801
 original instructions 18V Torch RFP1801 Important! It is essential that you read the instructions in this manual before operating this machine. Subject to technical modifications. Safety GENERAL POWER
C3 Operating Instructions
 Version 3.1 Stand 09.2014 Robert Bosch (Australia) Pty. Ltd. 1555 Centre Road Clayton, Victoria 3168 C3 Operating Instructions For further information please contact Bosch at: Australia 1300 30 70 40 www.boschautoparts.com.au
C O R D L E S S I M PA C T D R I V E R W I T H 1 2 V LI- I O N B AT T E RY OWNER S MANUAL
 C O R D L E S S I M PA C T D R I V E R W I T H 1 2 V LI- I O N B AT T E RY OWNER S MANUAL WARNING: Read carefully and understand all ASSEMBLY AND OPERATION INSTRUCTIONS before operating. Failure to follow
Cordless Impact Driver
 ENGLISH: Original instructions INSTRUCTION MANUAL Cordless Impact Driver TD0D Read before use. SPECIFICATIONS Model: TD0D Fastening capacities Machine screw 4 mm - 8 mm Standard bolt High tensile bolt
4-VOLT LITHIUM-ION AUTO-LOAD SCREWDRIVER w/led WORKLIGHT
 SKU 241-1394 4-VOLT LITHIUM-ION AUTO-LOAD SCREWDRIVER w/led WORKLIGHT Operation Manual WARNING! Please read this manual before using this product. Failure to do so can result in serious injury. SAVE THIS
WHAT S IN THE BOX METAL CUTTING SHEARS. Metal Cutting Shears 500W INSTRUCTION MANUAL SPECIFICATIONS. Hex Key. Max. Thickness: ozito.com.
 WHAT S IN THE BOX METAL CUTTING SHEARS 500W INSTRUCTION MANUAL SPECIFICATIONS Motor: No load speed: Max. Thickness: Tool weight: 500W 0 1,600 rpm 1.2mm 2.2kg Metal Cutting Shears Hex Key ozito.com.au MCS-5000
ATD V CORDLESS LITHIUM ION DRILL & DRIVER COMBO KIT Instruction Manual
 ATD 10525 12V CORDLESS LITHIUM ION DRILL & DRIVER COMBO KIT Instruction Manual KNOW YOUR PRODUCT (DRILL) 1. Keyless chuck 2. Torque adjustment collar 3. Speed selector 4. Forward/reverse selector 5. Battery
ELECTRIC ENGRAVER 15W WARRANTY INSTRUCTION MANUAL SPECIFICATIONS WHAT S IN THE BOX. ozito.com.au. Electric Engraver
 IN ORDER TO MAKE A CLAIM UNDER THIS WARRANTY YOU MUST RETURN THE PRODUCT TO YOUR NEAREST BUNNINGS WAREHOUSE WITH YOUR BUNNINGS REGISTER RECEIPT. PRIOR TO RETURNING YOUR PRODUCT FOR WARRANTY PLEASE TELEPHONE
FMC641
 3 8 4 7 2 1 6 5 www.stanley.eu FMC641 ENGLISH (Original instructions) 5 6 5 10 A 11 B 13 4 13 3 C1 C2 D 1 2 D 2 (Original instructions) ENGLISH Intended use Your Stanley Fat Max FMC641 impact wrench has
MP V 8A Electronic Smart Charger. Instruction and Information Manual
 MP7428 12V 8A Electronic Smart Charger Instruction and Information Manual In order to ensure correct and safe usage of your battery charger, you should read these instructions carefully. Please retain
GTC650L-XE Australia New Zealand
 www.blackanddecker.com.au GTC650L-XE Australia New Zealand 2 11 D1 D2 D3 D4 3 ENGLISH (Original instructions) Intended use Your Black & Decker hedgetrimmer has been designed for trimming hedges, shrubs
SFC 18 A SFC 22 A English
 SFC 18 A SFC 22 A English en 1 Information about the documentation 1.1 About this documentation Read this documentation before initial operation or use. This is a is a prerequisite for safe, trouble-free
Power Carver 50W CPC-050. To view the full range visit: Instruction Manual 3 Year Replacement Warranty
 Power Carver 50W Instruction Manual 3 Year Replacement Warranty CPC-050 WARNING! Read all safety warnings and all instructions. Failure to follow the warnings and instructions may result in electric shock,
PROFESSIONAL CORDLESS IMPACT SCREWDRIVER
 PROFESSIONAL CORDLESS IMPACT SCREWDRIVER Model CIS00 Part No 4500625 OPERATING & MAINTENANCE INSTRUCTIONS GC0309 INTRODUCTION Thank you for purchasing this CLARKE Impact Screwdriver. Before attempting
SAFETY AND OPERATING MANUAL. Cordless rotary hammer WX382 WX382.1 WX382.2 WX382.3 WX382.4
 SAFETY AND OPERATING MANUAL Original instructions 2 General Power Tool Safety Warnings WARNING: Read all safety warnings and all instructions. Failure to follow the warnings and instructions may result
SAFETY AND OPERATING MANUAL. Cordless Hedge Trimmer WG259E WG259E.5 WG259E.9
 SAFETY AND OPERATING MANUAL 2 General Power Tool Safety Warnings WARNING: Read all safety warnings and all instructions. Failure to follow the warnings and instructions may result in electric shock, fire
Cordless Driver Drill
 INSTRUCTION MANUAL Cordless Driver Drill MT064 MT065 003947 IMPORTANT: Read Before Using. ENGLISH (Original instructions) SPECIFICATIONS Model MT064 MT065 Steel 0 mm 3 mm Capacities Wood 25 mm 28 mm Wood
Cordless Impact Driver
 ENGLISH: Original instructions INSTRUCTION MANUAL Cordless Impact Driver DTD5 Read before use. SPECIFICATIONS Model: DTD5 Fastening capacities Machine screw 4 mm - 8 mm Standard bolt High tensile bolt
18V CORDLESS STAPLER/NAILER
 18V CORDLESS STAPLER/NAILER MODEL NO: CONSN18LI PART NO: 6487055 OPERATION & MAINTENANCE INSTRUCTIONS LS1213 INTRODUCTION Thank you for purchasing this CLARKE product. Before attempting to use this product,
12V CORDLESS DRILL DRIVER. Model HY2150. User Manual
 12V CORDLESS DRILL DRIVER Model HY2150 User Manual CONTENTS Section Description Page N o /N o s 1. OWNER S MANUAL & SAFETY INSTRUCTIONS 3 2. GENERAL SAFETY 3 5 3. BATTERY PACK 5 6 4. CHARGING 6 5. INSERTING/REMOVING
Cordless Impact Wrench
 ENGLISH (Original instructions) INSTRUCTION MANUAL Cordless Impact Wrench DTW50 DTW5 007450 IMPORTANT: Read Before Using. ENGLISH (Original instructions) SPECIFICATIONS Model DTW50 DTW5 Capacities Standard
18V CORDLESS DRILL MODEL NO: CON18LiC
 18V CORDLESS DRILL MODEL NO: CON18LiC PART NO: 6479531 OPERATION & MAINTENANCE INSTRUCTIONS ORIGINAL INSTRUCTIONS GC0817 - ISS 2 INTRODUCTION Thank you for purchasing this CLARKE Cordless Drill. Before
Power Paint Scraper 200W CPS-200. To view the full range visit: Instruction Manual 3 Year Replacement Warranty
 Power Paint Scraper 200W Instruction Manual 3 Year Replacement Warranty CPS-200 WARNING! Read all safety warnings and all instructions Failure to follow the warnings and instructions may result in electric
Cordless Impact Wrench
 ENGLISH: Original instructions INSTRUCTION MANUAL Cordless Impact Wrench DTW90 Read before use. SPECIFICATIONS Model: DTW90 Fastening capacities Standard bolt M8 - M6 Square drive High tensile bolt M8
Cordless Driver Drill
 ENGLISH: Original instructions INSTRUCTION MANUAL Cordless Driver Drill DF02D Read before use. SPECIFICATIONS Model: DF02D Drilling capacities Steel 5 mm Wood 6 mm Fastening capacities Wood screw ø3.8
Li-ion Cordless Screwdriver
 Li-ion Cordless Screwdriver HPC-0023 Please note that your safety is your personal responsibility PLEASE READ BEFORE USE AND RETAIN THESE INSTRUCTIONS FOR FUTURE REFERENCE. IMPORTANT NOTE: ALWAYS CHECK
A B 0 0 C D E 6 7 G F F H 8 9 K M O O L N I J 1
 1 2 1 5 4 3 2 2 1 6 3 8 7 1 9 4 C A B 5 0 0 D E 6 G 7 F F H 8 K 9 M O O I J L N 1 GENERAL OPERATIONAL PRECAUTIONS 1. Keep work area clean. Cluttered areas and benches invite accidents. 2. Avoid dangerous
PSR 960 PSR 1200 PSR 1440
 2 609 140 210 - Buch Seite 1 Montag, 18. November 2002 8:07 08 Operating Instructions PSR 960 PSR 1200 PSR 1440 English 2 609 140 210 - Buch Seite 2 Montag, 18. November 2002 8:07 08 1 2 7 3 4 PSR 960
Cordless Impact Wrench
 ENGLISH INSTRUCTION MANUAL Cordless Impact Wrench BTW0 00534 WARNING: For your personal safety, READ and UNDERSTAND before using. SAVE THESE INSTRUCTIONS FOR FUTURE REFERENCE. ENGLISH SPECIFICATIONS Capacities
Cordless Driver Drill
 ENGLISH (Original instructions) INSTRUCTION MANUAL Cordless Driver Drill 607D 637D 6337D 6347D 0089 IMPORTANT: Read Before Using. ENGLISH (Original instructions) SPECIFICATIONS Model 607D 637D 6337D 6347D
Operating instructions in the back. PD1420LP
 Operating instructions in the back www.blackanddecker.co.uk PD1420LP 2 ENGLISH (Original instructions) Intended use Your Black & Decker Dustbuster handheld vacuum cleaner has been designed for vacuum cleaning
Challenge Xtreme 18V CORDLESS HAMMER DRILL
 Challenge Xtreme 18V CORDLESS HAMMER DRILL Assembly Manual-Original Instructions After Sales Support UK/Ireland 0345 640 0800 Web WWW.ARGOS.CO.UK Important - Please read these instructions fully before
Cordless Impact Wrench
 ENGLISH: Original instructions INSTRUCTION MANUAL Cordless Impact Wrench DTW84 DTW85 Read before use. SPECIFICATIONS Model: DTW84 DTW85 Fastening Standard bolt M0 - M0 capacities High tensile bolt M0 -
OPERATING MANUAL 18V Ni-Cd Battery Pack
 OPERATING MANUAL 18V Ni-Cd Battery Pack 054-3105-6 Toll-free Helpline : 1-800-689-9928 IMPORTANT : Read this Operating Manual carefully before using the charger. Pay close attention to all Safety Instructions,
Cordless Driver Drill
 INSTRUCTION MANUAL Cordless Driver Drill FD0 008796 ENGLISH (Original instructions) SPECIFICATIONS Model FD0 Steel 0 mm (3/8") Capacities Wood 2 mm (3/6") Wood screw 5. mm x 63 mm (7/32" X 2-/2") Machine
CORDLESS HAND VACUUM ORIGINAL INSTRUCTIONS
 WHAT S IN THE BOX Cordless Vacuum CORDLESS HAND VACUUM ORIGINAL INSTRUCTIONS SPECIFICATIONS Voltage: 18V Air Flow: 8 l/sec Dust Bowl Capacity: 540ml Weight: 0.85kg Brush Tool Crevice Tool ozito-diy.co.uk
Operating instructions in the back. PD1820LF
 Operating instructions in the back www.blackanddecker.co.uk PD1820LF 2 ENGLISH (Original instructions) Intended use Your BLACK+DECKER Dustbuster handheld vacuum cleaner has been designed for vacuum cleaning
CORDLESS GRASS TRIMMER KIT ORIGINAL INSTRUCTIONS
 WHAT S IN THE BOX CORDLESS GRASS TRIMMER KIT ORIGINAL INSTRUCTIONS SPECIFICATIONS Voltage: Battery: Charge Time: No Load Speed: Cutting Diameter: Weight: ozito-diy.co.uk 18V 2.0Ah Li-ion 2.5 Hours 8,500/min
I Bensiinikäyttöinen ruohotrimmeri Käyttö- ja turvaohjeet Alkuperäiskäyttöohje
 Petrol Grass Trimmer FBS 43 A1 K O Petrol Grass Trimmer Operation and Safety Notes Original operating instructions U Bensindriven röjsåg Bruksanvisning och säkerhetsanvisningar Original-bruksanvisning
SIW 22T-A 1 / 2 " SIW 22T-A 3 / 4 "
 SIW 22T-A 1 / 2 " SIW 22T-A 3 / 4 " English en 1 Information about the documentation 1.1 About this documentation Read this documentation before initial operation or use. This is a is a prerequisite for
60V RECHARGEABLE LITHIUM-ION BATTERY
 60V RECHARGEABLE LITHIUM-ION BATTERY LB60A00/LB60A03/LB60A01/LB60A02 Owner s Manual TOLL-FREE HELPLINE: 1-855-345-3934 www.greenworkstools.com Read all safety rules and instructions carefully before operating
Cordless Driver Drill
 ENGLISH (Original instructions) INSTRUCTION MANUAL Cordless Driver Drill DDF343 DDF453 009075 IMPORTANT: Read Before Using. ENGLISH (Original instructions) SPECIFICATIONS Model DDF343 DDF453 Steel 0 mm
Battery Charger JCB-FCH20LI2
 Safety and operating manual Battery Charger JCB-FCH20LI2 ORIGINAL INSTRUCTIONS SAFETY INSTRUCTIONS WARNING: Read all safety warnings and all instructions.failure to follow the warnings and instructions
QUICK CONNECT SYSTEM 18V POWER UNIT & DRILL ATTACHMENT Australia BDCDMT180 New Zealand
 QUICK CONNECT SYSTEM 18V POWER UNIT & DRILL ATTACHMENT www.blackanddecker.com.au BDCDMT180 Australia New Zealand 5 A B C D E 2 (Original instructions) ENGLISH Intended use Your Black & Decker MATRIX multi-purpose
Cordless Driver Drill
 ENGLISH (Original instructions) INSTRUCTION MANUAL Cordless Driver Drill 670D 680D 6390D R 0056 IMPORTANT: Read Before Using. ENGLISH (Original instructions) SPECIFICATIONS Model 670D 680D 6390D Steel
1200W CaR PoliSheR en RS4900
 1200W Car Polisher RS4900 RS4900 8 1 2 7 3 4 5 6 A B flat nozzle C D E F 1200W Car Polisher RS4900 G H flat nozzle I J K L 4 1200W Car Polisher COMPONT LIST 1 2 3 4 5 6 7 Variable speed control Switch
HDE 500-A22. English. Printed: Doc-Nr: PUB / / 000 / 03
 HDE 500-A22 English 1 Information about the documentation 1.1 About this documentation Read this documentation before initial operation or use. This is a prerequisite for safe, trouble-free handling and
Battery Charger JCB- SCH20LI.2
 Safety and operating manual Battery Charger JCB- SCH20LI.2 ORIGINAL INSTRUCTIONS SAFETY INSTRUCTIONS WARNING: Read all safety warnings and all instructions.failure to follow the warnings and instructions
SFC 14 A SFC 22 A English
 SFC 14 A SFC 22 A English 1 Information about the documentation 1.1 About this documentation Read this documentation before initial operation or use. This is a prerequisite for safe, trouble-free handling
CORDLESS GLUE GUN. 7.2V Lithium Ion INSTRUCTION MANUAL SPECIFICATIONS. ozito.com.au GGL-7000 WHAT S IN THE BOX. Cordless Glue Gun.
 WHAT S IN THE BOX CORDLESS GLUE GUN 7.2V Lithium Ion INSTRUCTION MANUAL SPECIFICATIONS Input: 7.2V Glue Stick Diameter: 7.2mm Glue Stick Length: 190mm Heating Time: 15sec Working Time: 45min Battery Power:
Belt Sander JCB-BS950
 Safety and operating manual Belt Sander JCB-BS950 ORIGINAL INSTRUCTIONS GENERAL POWER TOOL SAFETY WARNINGS WARNING! Read all safety warnings and all instructions. Failure to follow the warnings and instructions
Artikel-Nr.:
 SPJCS 3740; EX; UK Petrol Chain Saw rtikel-nr.: 4501361 Ident-Nr.: 01029 Komponenten / Ersatzteile Position rtikel-nr. Beschreibung 1 450136001001 Right cover assembly 26 450136001026 air filter cover
PT-1441 Cordless Drill Driver 14.4V User s Manual
 PT-1441 Cordless Drill Driver 14.4V User s Manual 1 st Edition, 2009 2009 Copy Right by Prokit s Industrial Co., Ltd. Please read this handbook carefully before using the tool General Safety Rules WARNING
ENGLISH (Original instructions) INSTRUCTION MANUAL. Cordless Nibbler BJN160 BJN161. IMPORTANT: Read Before Using.
 INSTRUCTION MANUAL. Cordless Nibbler BJN160 BJN161. IMPORTANT: Read Before Using.") ENGLISH (Original instructions) INSTRUCTION MANUAL Cordless Nibbler BJN60 BJN6 07 IMPORTANT: Read Before Using. ENGLISH (Original instructions) SPECIFICATIONS Model BJN60 BJN6 Steel up to 400 N/mm.6 mm
ENGLISH (Original instructions) INSTRUCTION MANUAL Cordless Nibbler BJN60 BJN6 07 IMPORTANT: Read Before Using. ENGLISH (Original instructions) SPECIFICATIONS Model BJN60 BJN6 Steel up to 400 N/mm.6 mm
Screwdriver. Cordless 3.6V. Operating Instructions XSD-360. XU1 Power tools
 Cordless Operating Instructions XSD-360 Screwdriver 3.6V XU1 Power tools 1 23 Letcon Drive, Bangholme, Victoria, Australia 3175 Telephone: 1800 069 486 Website: www.xuone.com.au XSD-360 0816 SAFETY INSTRUCTIONS
ENGLISH (Original instructions) INSTRUCTION MANUAL. Cordless Recipro Saw DJR181 DJR182. IMPORTANT: Read Before Using.
 INSTRUCTION MANUAL. Cordless Recipro Saw DJR181 DJR182. IMPORTANT: Read Before Using.") ENGLISH (Original instructions) INSTRUCTION MANUAL Cordless Recipro Saw DJR8 DJR82 006896 IMPORTANT: Read Before Using. ENGLISH (Original instructions) SPECIFICATIONS Model DJR8 DJR82 Length of stroke
ENGLISH (Original instructions) INSTRUCTION MANUAL Cordless Recipro Saw DJR8 DJR82 006896 IMPORTANT: Read Before Using. ENGLISH (Original instructions) SPECIFICATIONS Model DJR8 DJR82 Length of stroke
Cordless two speed drill/driver K 10613
 Cordless two speed drill/driver K 10613 SAFETY AND PRECAUTION 1 Consider work area environment. Do not expose tools to rain. Do not use tools in damp or wet locations Keep work area clean and well lit.
EVO181B1. English
 EVO181B1-TW EVO181B1-KR EVO181B1 English 4 10 16 A B 8 C EVO181B1-KR EVO181B1-TW D 2 E 13 8 9 EVO181B1-KR EVO181B1-TW F 3 ENGLISH (Original instructions) EVO181B1 MULTI TOOL Technical data Multi Tool Voltage
TE 2-A22. English. Printed: Doc-Nr: PUB / / 000 / 00
 TE 2-A22 English en 1 Information about the documentation 1.1 About this documentation Read this documentation before initial operation or use. This is a is a prerequisite for safe, trouble-free handling
ENGLISH (Original instructions) INSTRUCTION MANUAL. Cordless Angle Drill DA330D DA331D. IMPORTANT: Read Before Using.
 INSTRUCTION MANUAL. Cordless Angle Drill DA330D DA331D. IMPORTANT: Read Before Using.") ENGLISH (Original instructions) INSTRUCTION MANUAL Cordless Angle Drill DA330D DA33D 03258 IMPORTANT: Read Before Using. ENGLISH (Original instructions) SPECIFICATIONS Model DA330D DA33D Capacities Steel
ENGLISH (Original instructions) INSTRUCTION MANUAL Cordless Angle Drill DA330D DA33D 03258 IMPORTANT: Read Before Using. ENGLISH (Original instructions) SPECIFICATIONS Model DA330D DA33D Capacities Steel
Users Guide & Warranty
 14.4V CORDLESS HAMMER DRILL PCC-1440 Name: Address Contact Telephone No.: Users Guide & Warranty 14.4V CORDLESS HAMMER DRILL PCC-1440 Fault Description: Please complete this section before sending in your
ORIGINAL INSTRUCTIONS
 OPERATION & MAINTENANCE INSTRUCTIONS CBB200 Shown here BUFFER/POLISHER MODEL NO: CBB150, CBB200 PART NO: 6500485, 6500490 ORIGINAL INSTRUCTIONS LS0818 - ISS 1 INTRODUCTION Thank you for purchasing this
ORIGINAL TH540 TH380 USER GUIDE
 ORIGINAL TH540 TH380 USER GUIDE Ref. NTH540/380 Index 03. Contents Description:... 2 Characteristics:... 2 Mounting the handle no. 4:... 3 Mounting the hedge-trimmer head on the POWERCOUP handle:... 3