USER S MANUAL LAWN MOWER PSLCLM60
|
|
|
- Drusilla Wilson
- 5 years ago
- Views:
Transcription

1 USER S MANUAL LAWN MOWER PSLCLM60
2 2
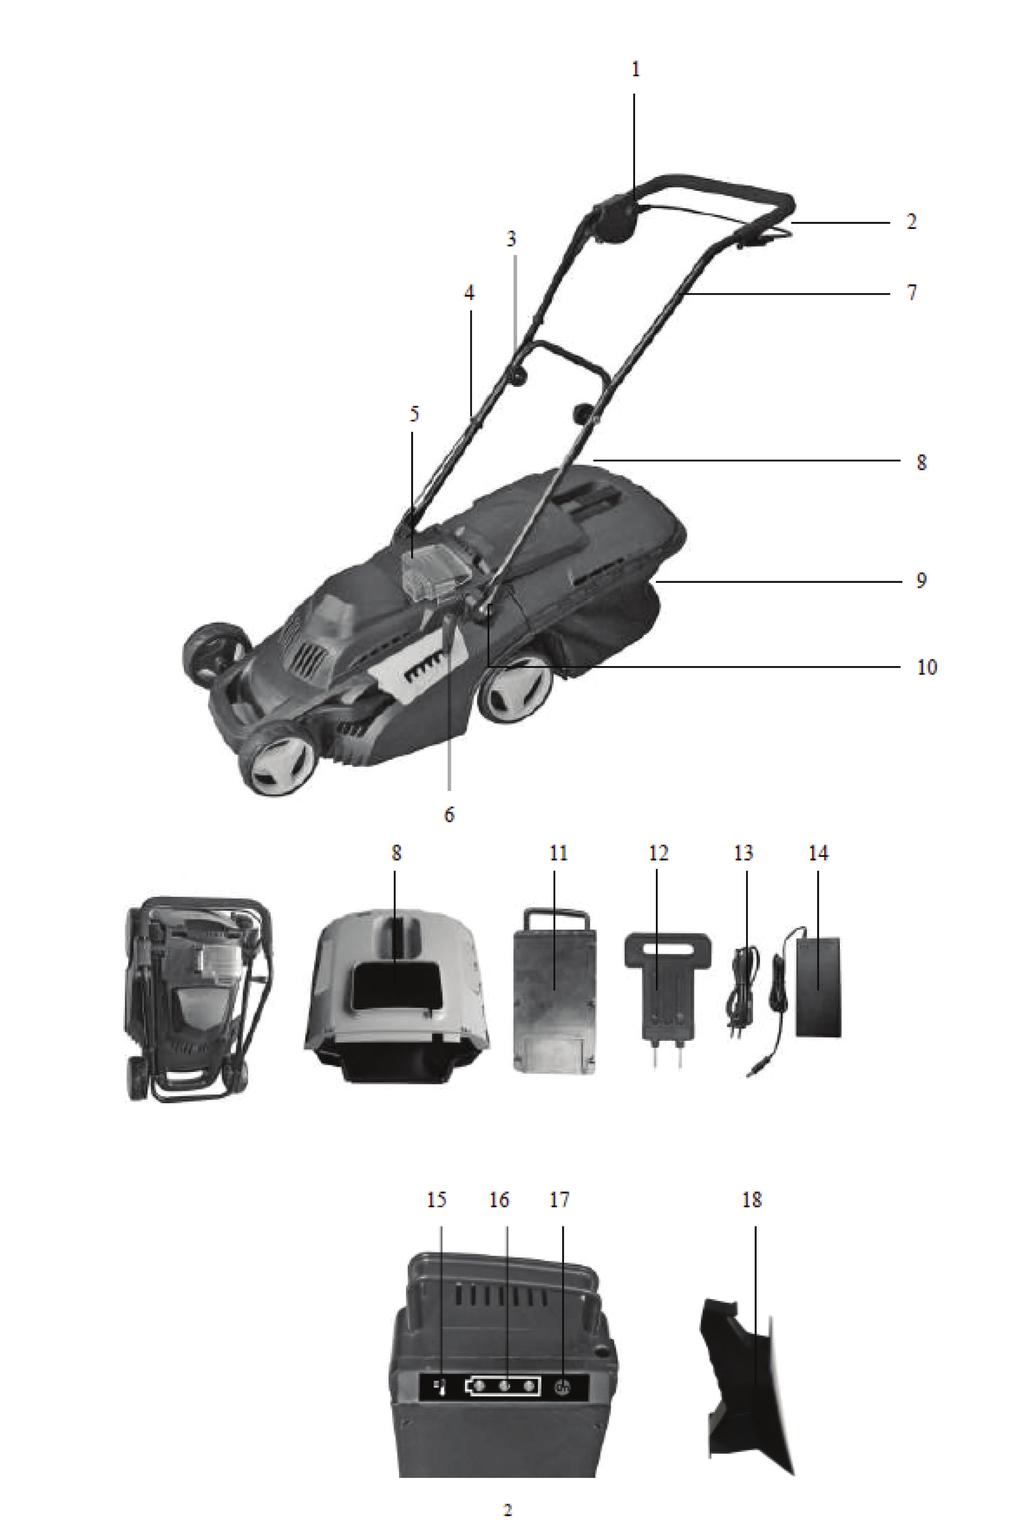
3 1 Safety Button 11 Battery Pack 2 Switch Lever 12 Safety Key 3 Handle Knob 13 Power Cord for Charger 4 Cable Clip 14 Charger 5 Battery Cover 15 Battery Temperature Indicator 6 Height Adjustment Lever 16 Battery Power Indicator 7 Upper Push Bar 17 Switch Button for Indicator 8 Grass Collection Indicator 18 Mulching Insert 9 Grass Collection Bag 10 Quick Fold Lever INTENDED USE This lawn mower is designed for family use of grass and lawn mowing, not for commercial use. Use the tool in right way, Do not force the tool for purposes not intended. SAFETY NOTES Warning! It is important that you read, fully understand and observe the following safety precautions and warnings. Careless or improper use of the machine may cause serious or fatal injury. The user is responsible for any accidents involving other people or other people s property. Explanation of symbols on the Lawn Mower General hazard safety alert Read user s manual Beware of thrown or flying objects to bystanders Keep bystanders a safe distance away from the machine Sharp blade(s), Beware of severing toes or fingers. Switch off, remove battery power plug from battery power socket before adjusting, cleaning, performing any maintenance work and before leaving the lawn mower unattended for any period. Wait until all machine components have completely stopped before touching them. The blades continue to rotate after the machine is switched off, a rotating blade can cause injury. Do not mow in the rain or leave the lawn-mower outdoors whilst it is raining. Beware electric shock hazard. Keep supply flexible cord away from cutting means. Only use the battery charger indoors Battery charger contains a safety transformer Not applicable. 3
4 Never allow children or people unfamiliar with these instructions to use the lawnmower. Local regulations may restrict the age of the operator. Never mow while people, especially children or pets, are nearby. The operator or user is responsible for accidents or hazards occurring to other people or their property. Do not operate the lawnmower when barefoot or wearing open sandals, always wear substantial foot wear and long trousers. Thoroughly inspect the area where the lawn-mower is to be used and remove all stones, sticks, wires, bones and other foreign objects. Before using, always visually inspect to see that the blades, blade bolts and cutter assembly are not worn or damaged. Replace worn or damaged blades and bolts in sets to preserve balance. Mow only in daylight or in good artificial light. Avoid operating the lawnmower in wet grass, where feasible. Walk, never run. Never operate the appliance with defective guards or shields, or without safety devices, for example deflectors and/or grass catchers in place. Mowing on banks can be dangerous: - Do not use the mower on a slope steeper than 15ºmaximum. - Always be sure of your footing on slopes or wet grass. - Mow across the face of slopes never up and down. - Exercise extreme caution when changing direction on slopes. Use extreme caution when stepping back or pulling the lawnmower towards you. Never mow by pulling the mower towards you. Stop the blades if the lawnmower has to be tilted for transportation when crossing surfaces other than grass and when transporting the lawnmower to and from the area to be mowed. Do not tilt the machine when starting or switching on the motor, except if the machine has to be tilted for starting in long grass. In this case, do not tilt it more than absolutely necessary and tilt only the part which is away from the operator. Always ensure that both hands are in the operating position before returning the machine to the ground. Switch on the lawnmower according to instructions and with feet well away from the blades. Do not put hands or feet near or under rotating parts. Keep clear of discharge opening at all times. Never pick up or carry the lawnmower while the motor is running. Under the following conditions, the unit must be switched off, the battery power plug must be removed from battery power socket, and the unit must be brought to a standstill: - leaving the lawnmower - unblocking a blade - intending to check, clean or work on the lawnmower - you have encountered a foreign object, in which case you should check the lawnmower for damage and carry out any necessary repairs. - the lawnmower is vibrating heavily (switch off immediately and ascertain the cause). - you wish to change the settings or carry out cleaning work. - you wish to check whether the connection cables have become tangled or damaged. Keep all nuts, bolts and screws tight to be sure that the lawnmower is in safe working condition. Check the grass collection bag frequently for wear or deterioration. Replace worn or damaged parts for safety. Ensure replacement cutting means of the right type are used. Ensure replacement parts fitted are from manufacturer. Ensure the switch is in the off position before connecting battery power plug with battery power socket. Connecting battery power plug with battery power socket that have the switch on invites accidents. 4


5 Protect the battery charger from rain and moisture. The penetration of water in a battery charger increases the risk of electric shock. Recharge only with the charger supplied by the manufacturer. A charger that is suitable for one type of battery pack may create a risk of fire when used with another battery pack. Do not charge other batteries. The battery charger is suitable only for charging the battery pack of this lawn mower within the listed voltage range. Otherwise there is danger, fire and explosion. Keep the battery charger clean. Contamination may cause the danger of electric shock. Check the battery charger, cable and plug each time before using. Do not use the battery charger when defects are detected. Do not open the battery charger yourself and have it repaired only by qualified personnel using original spare parts. Damaged battery chargers, cables and plugs increase the risk of electric shock. Do not operate the battery charger on easily inflammable surfaces (e. g. paper, textiles, etc.) or in combustible environments. There is danger of fire due to the heating of the battery charger during charging. Use product only with specifically designated battery packs. Use of any other battery packs may create a risk of injury and fire. When battery pack is not in use, keep it away from other metal objects like paper clips, coins, keys, nails, screws, or other small metal objects that can make a connection from one terminal to another. Shorting the battery terminals together may cause burns or a fire. Under abusive conditions, liquid may be ejected from the battery; avoid contact. If contact accidentally occurs, flush with water. If liquid contacts eyes, additionally seek medical help. Liquid ejected from the battery may cause irritation or bums. Do not open the battery pack yourself. There is danger of a short circuit. Do not short-circuit the battery. Touching electrically conductive parts of battery pack might result in an electric shock, be sure to wear rubber gloves before inspection or maintenance work. Protect the battery against moisture and water. Store the battery only within a temperature range between -4"F (-20"C) and +104'F (+40"C). As an example, do not leave the battery in your car in the summer. ASSEMBLY Do not connect the battery or this safety key before the mower is completely assembled. 1. Fasten push bars The push bar Is already fully assembled, only need to be unfolded to the desired position. First unfold the quick fold lever (Pos. 12) and loosen the handle knob (Poe. 3). Expand the handle, make sure the upper handle and lower handle match well. Then screw them tight with the handle knob (Pos. 3) and swing nuts. The swing nuts should be hand tightened only. Never use a spanner or any other tool to tighten them. See Figure 1 Fig. 1 Fig. 2 5


6 2. Securing cable by using cable clips Fig. 3 Secure the cable from the motor to the switch assembly by using four cable clips-two is fixed on upper push bar, the other one Is fixed on lower push bar. See Figure 3 3. Mount the grass collection bag. Before mounting the grass collection bag, the motor must be switched off first. Fig. 4 Fig. 5 Figure 4. Raise the safety flap as far as possible and place the collection bag on two hooks of the under deck. Always fit the grass collection bag on mower before connecting to the main. 4. Adjusting cutting height Stop releasing the switch lever and wait until the motor stops before adjusting the height. The blades continues to rotate after the machine was switched off, a rotating blade can cause injury. CAUTION! Do not touch the rotating blades. Figure 5. For the first cutting of season, a high cutting adjustment should be selected. The mower can be set to 6 cutting heights, between 25mm and 75mm. Press the height of cut lever inwards, then lift or push down the mower until required height was selected. The lawn mower maybe used to 25mm by moving the blank plate. 6

7 OPERATION Using the height of cut between 25mm to 35mm will further shorten the battery duration. 1. Tips for the use of this battery-powered mower Under normal conditions, the battery should run for approximately 30 minutes per single charge the operation time and the area that can be mow by this battery-powered mower is dependent on various factors, These are: Fig. 6 Type of lawn Battery-powered lawnmowers are suitable for lawns which are mow frequently, for example, Battery-powered mowers are not suitable for infrequently-mow meadows or similar. To produce a well-maintained lawn, we recommend mowing the lawn as often as you can, once a week if possible, so that you are only cutting 1 to 2 inches (20mm to 50mm) of grass each mowing session(see figure 6). Trying to cut more than 2 inches (50mm) will drastically reduce the charge life of the battery and quality of the cut. After relatively long intervals between mowing (holiday lawn), first of all cut in one direction with the cutting height as high as possible, then cut in the crosswise direction at the cutting height required. Lawn structure The area that can be mow decreases in proportion to the density of the grass. The mowing capability is lowest on extremely dense grass, e.g. golf greens, which is not suitable for battery-powered lawn mowers to mow. Lawn condition The length of time that the mower s battery can hold its charge while mowing a lawn depends upon lawn conditions: tall, thick, or damp grass make the Mower work harder, causing the battery to discharge faster. Under normal mowing conditions the run time is around 45 minutes. To mow longer, consider purchasing a second battery and keep it fully charged. Before starting the mower, adjust the cutting height so that you only cut 1 to 2 inches (20 mm to 50mm) of grass at a time(see figure 6). Cut thicker grass at a higher cutting height, or cut a narrower swath. Do not force the mower forward in tall, thick or wet grass. Mowing / walking speed The walking speed influences the duration of mowing and therefore the area that can be covered. We therefore recommend mowing at a steady pace. To avoid damage and extend battery life, always mow at a speed which allows the motor to run smoothly. The mowing path should not be covered twice if possible and the overlap of mowing tracks should be kept as minimal as possible. Frequently switching the mower on and off likewise decreases the battery s power. Try to work continuously and smoothly when mowing. Blade sharpness Keep your mower blade sharp! A sharp mower blade cuts the grass quickly and cleanly, using less of the mower s power, which conserves battery life. For best results, inspect the blade often and have an extra sharp blade ready to install as a replacement while the dull blade is being sharpened. 7

8 2. Charging and caring for the battery Important: Before charging the battery, read all instructions and warning markings in this manual and on your mower, Do not operate your mower until you have read and understand all instructions and the battery has been fully charged. Battery: This mower comes with a sealed Li-ion battery, already installed at the factory, the battery is rated for 36volts and 2.6 amp hours. The battery is completely maintenance-free. However, as with all rechargeable batteries, they will eventually need replacement. Warning! Do not attempt to alter or open the battery. Charging time Important: The battery is supplied charged at the factory but may lose charge during transportation, and when it has been stored for some time. You MUST charge the battery for 3-5 hours before you use the mower for the first time. Charging procedure The red light on the charger only indicates that the charger is plugged in and the battery charging procedure starts, The light on the charger will change color to green when the battery is fully charged. Note: During whole charging status, the LED light of battery pack will not be on, The LED lights will be on when you press the bottom on the battery pack. Attention! Only use the charger in dry rooms! Only use the supplied battery charger Use normal household voltage when charging your battery. Plug the charger directly into the electric outlet. Ensure that the charging plug is correctly seated, Do not abuse the cords, Never carry the charger by the cord. Always pull the plug and not the cord. The battery for this mower can be charged in or outside the mower. The performance of your mower is same, regardless of which charging method you choose. Figure 7-8 To take the battery out, open the transparent cover first, then pull the battery pack out of mower. Fig. 7 Fig. 8 8

9 Important: Always connect the charger to the battery first, and then plug it into the wall outlet. When unplugging, reverse the process: unplug the charger from the wall outlet first and then disconnect it from the battery. Charging the battery inside and outside the mower Figure Plug charging plug into battery power socket, see Figure Plug the charger into a wall outlet, see Figure 9-10 Fig. 9 Fig. 10 During the charging process, the charger will be warm to be touch. This is normal and does not indicate a problem. Storage Temperature Range For superior battery performance, always store the battery in temperatures between 4 F ( 20 C) and +104 F (+40 C).Make sure the storage temperatures will never be outside these limits. The lower the storage temperature is within the specified range, the better: The battery will discharge more slowly at low temperatures. Caring for the Battery You can lengthen the life of your battery by following some simple guidelines. Always charge the battery indoors in a garage or other covered area where it will be dry and protected from the weather. Only charge the battery when the temperature is at least 41 F (5 C) above freezing but not more than 95 F (35 C).Charging in lower or higher temperatures can be harmful to the battery. Always keep the battery away from water, heat sources (stoves, radiators, open flames, etc.), and hazardous chemicals. Only use the supplied battery charger to charge your battery; never attempt to use any other charger. Use of a different charger may cause a fire or explosion. Never use the charger with any other product. Never operate the charger if it is damaged. If a cord or the charger unit has been damaged, replace the charger. Do not worry about leaving the battery charging for longer than 12 hours the battery cannot be over charged and will not be damaged after 12 hours. It will not impact the battery to leave it on the charger for up to 48 hours. When storing the battery after removing it from the Mower, follow the storage guidelines in - Maintaining and Storing Your Mower. on page If the motor will not run after you have fully charged the battery, consult the techniques in Troubleshooting Tips, on page 16-18, If you still need help, contact with your local service station for help. 9

10 4. Starting and Stopping Attention! Rotary cutter blade, The blade continues to rotate for a few seconds after the machine is switched off. Allow the motor/blade to stop rotating before switching on again. Do not rapidly switch off and on. Starting Figure 11 Before start make sure the battery pack was put into the mower and put the safety key into its socket. Figure 12 Switch on motor with mower placed on level and firm ground, not in high grass - alternatively tilt slightly then follow below procedures: Press and hold the safety button > Squeeze the switch lever forwards the handle > Release the safety button. Stopping Release the switch lever Fig. 11 Fig. 12 Mowing with the grass collection bag The grass collection bag must be emptied as soon as the grass is left lying on the lawn. Danger! Foreign bodies thrown out of the mower can cause injuries! Only lift safety flap with the motore switched off and the cutting blade has come to standstill. 1. Lift safety flap and remove the grass collection bag by the handle. 2. Empty the grass box and hang it on the back again using the mounting hook on the under deck. We recommend always mow the lawn with the grass collection bag. Mowing without the grass collection bag Danger! Risk of injury! Do not put your hand in the discharge opening. When the safety flap is released, this closes automatically and covers the discharge opening. The safety flap is arranged in such a way that it is still possible to mow with the safety flap closed but without a grass collection bag. The cut grass is then discharged onto the lawn. 10
 Mowing tips: If grass residue is left in the discharge opening, pull mower backwards about 1-2m so that the grass residue can drop out downwards.")
. Trying to cut more than 2 inches (50mm) will drastically reduce the charge life of the battery and quality of the cut.")
11 Figure 13 Fig. 13 Instructions for mowing without the grass collection bag We recommend: The grass should not be too high nor too wet! Mow slow while mowing. Do not cut grass more than 20mm (see Fig. 16) Mowing tips: If grass residue is left in the discharge opening, pull mower backwards about 1-2m so that the grass residue can drop out downwards. To produce a well-maintained lawn, we recommend mowing the lawn as often as you can, once a week if possible, so that you are only cutting 1 to 2 Inches (20mm to 50mm) of grass each mowing session< see Fig. 6). Trying to cut more than 2 inches (50mm) will drastically reduce the charge life of the battery and quality of the cut. Before starting the mower, adjust the cutting height so that you only cut 1 to 2 inches (20 mm to 50mm) of grass at a time <see figure 6). Cut thicker grass at a higher cutting height, or cut a narrower swath. Do not force the mower forward in tall, thick or wet grass. After relatively long intervals between mowing (holiday lawn), first of all cut in one direction with the cutting height as high as possible, then cut in the crosswise direction at the cutting height required. Interruptions of work: Never leave the mower unattended at the working area. If you interrupt your work, store the mower in a safe place, remove battery power plug from battery power socket. If you stop work to move to another area of the garden, switch off the mower and remove safety key form the socket! LED battery charge-control Indicator The battery pack is equipped with a LED battery charge-control Indicator,which indicates the battery capacity and ifs temperature. 11 Fig. 14 Fig. 15
12 One green light goes on, low battery capacity Two green light goes on, mid battery capacity Three green light goes on, full battery capacity Red light which show the battery temperature lights on, battery temperature was too high, please wait until the red light off, then start charging process again. When Finished Mowing Switch off the mower and remove battery power plug from battery power socket. Recharging immediately after each use of the mower Always fully recharge the battery immediately after each use, no matter how short a time it was used. Fully recharge even if the indicator light on the mower is still green. This is important in order to maintain maximum mower performance and extend the useful life of the battery. Unlike smart batteries found in devices such as cell phones, this mower s battery can NOT be run until it is completely drained. Running the battery until it is fully depleted will damage the performance of the battery. When the charger is disconnected from the mains, the charging plug must also be removed from the charging socket as otherwise the battery will discharge itself via the charger. Leaving the battery on the charger for an extended period of time (up to 48 hours) will not damage the battery. It is impossible to overcharge the mower s battery. Important: If a depleted battery is stored, the batteries charging capacity will decrease. MAINTAINING & STORING WARNING! ALWAYS switch off the mower, remove safety key from its socket, and remove battery before performing any adjustments, maintenance, blade change, or repairs to your mower. 1. Cleaning Your Mower Periodically clean your mower to ensure peak performance. Supplies needed: Clean cloth or sponge Mild soap or detergent (if needed) Soft nylon brush (if needed) 1. Remove the safety key from it s socket, and remove battery. 2. Only use a dry cloth or sponge for cleaning of battery pack. 3. Only use a dry cloth or sponge to clean the battery pack seat. 4. Using a damp cloth or sponge with a mild soap or detergent, clean the Mower. Never use water, gaso line, solvents, or other petroleum-based or solvent-based products when cleaning remember, this is an electric mower. 5. Use a soft nylon brush or non-metallic scrubbing pad to remove any clippings that have accumulated on the underside of the deck and in the rear discharge plate. Do not use a wire brush; it will scratch and harm the surface of your mower. 6. You may use water to clean the grass collection bag, but not the mower itself. For proper grass collection, make sure the grass collection bag is clean and the mesh holes are not clogged. Allow the grass collection bag to dry thoroughly before using it again. Note: A wet grass collection bag will clog quickly and hamper grass collection. 12

13 2. Removing and Attaching the Blade You must remove the blade to sharpen it, or to change to a spare blade. Always check the blade for sharpness, damage, and tightness before and after each use. Replace the blade promptly if it has been bent or damaged. Only use spare blade from manufacturer. Fig. 16 Fig Tools & Supplies needed: 14 mm socket wrench (supplied with Mower) Gloves or rag to protect your hands Wear heavy gloves to protect your hands when holding, removing and attaching blades. 1. Remove the safety key from if socket, and remove battery. If you are charging the battery, first disconnect the charger from the electrical (wall) outlet. 2. While holding the handle bars, tum the Mower over on its right side to expose the blade. 3. Place the socket wrench over the blade nut. 4. While holding the blade in place, loosen the blade nut by turning counterclockwise. Be careful; wear heavy gloves to hold the blade in place so the blade does not spin and strike your hand (see Figure 17). 5. Remove the blade nut, steel square spacer, plastic: spacer and blade in that order (see Figure 18). 6. To install a new or sharpened blade, reverse steps 1 to 5. Be sure to replace all parts in order exactly as they were removed. Make sure the blade Is properly seated and securely tightened. 7. Turn your mower upright Sharpening the Blade When the blade Ia dull, the cut ends of the gi'b88 will be ragged and may tum brown soon after mowing. A dull blade also causes the battery to discharge more quickly. When this occurs, sharpen the blade. Important: You must remove the blade from the mower to sharpen it. Tools & Supplies needed: Fine-toothed file or sharpening stone Gloves Safety glasses Sharpening the Blade in a vise 1. Remove battery power plug from battery power socket, and remove battery. 2. While holding the handlebars, turn the mower over on its right side to expose the blade. 3. Remove the blade. 4. Secure the blade in a sturdy vise. 5. While wearing safety glasses, carefully file the cutting edge of the blade using even strokes. Be sure to file both sides of the blade equally. 6. Check the blade after sharpening to be sure it is still balanced.
14 Balancing the Blade Attention! When sharpening a used blade, be especially careful to keep it balanced. If in doubt, replace the blade with a new one. An out-of-balance blade cause your machine to vibrate excessively. Excessive vibration may cause damage to the Mower, especially to its motor. Because you are removing metal from the blade, make sure to remove an equal amount from each side to keep the blade balanced. Of course, you can always have a mower service sharpen and balance your blade. Storing your Mower Whether you store the mower for a short or long period of time, You can safely keep the battery in the mower or store the battery outside the Mower, but always follow these important guidelines: Remove safety key from it s socket. Always store the mower in an environment where the temperature is between 4 F ( 20 C) and +104 F (+40 C). Make sure the storage temperatures will never be outside these limits. For long-term storage, store your battery in an environment where the temperature is lower, since the battery self-discharges slower at low temperatures. Store the Mower in a dry environment. Do not store it on a floor that may be damp or subject to accidental flooding. Water will damage the mower and battery. Do not store the mower near chemicals, such as fertilizers. These products are often highly corrosive and may cause permanent damage to your mower. Do not store the battery in proximity to organic or other solvents. Do not store the battery close to a source of heat, sparks or open flames. Do not expose the battery to abnormal shaking or shocks. Store the battery away from children and animals. Do not press, bend, or use force on the terminals of battery Do not apply heat (such as a soldering iron) to the terminals of battery Regularly observe the external appearance of the battery and keep it clean and dry. Never use a battery that shows cracks, changes shape, leaks, or otherwise is obviously damaged. During long-term storage of batteries that are intended for reuse, it must be charged at least once every three months to maintain its full performance and to protect the battery from damage. TROUBLESHOOTING Most difficulties are easy to fix. Consult the troubleshooting table for common problems and their solutions. If you continue to experience problems or need repairs beyond these minor adjustments, contact your local licensed service center for assistance. WARNING! ALWAYS switch off the mower, remove battery power plug from battery power socket, and remove battery before performing any adjustments, maintenance, blade change, or repairs to your mower. 14
15 Problem Possible Cause Corrective Action Safety key removed from battery power socket Put safety key into battery power socket safety key has been put into the Take out safety key and put it into socket,but the connection is not the socket again, to ensure the so tight and secure plugging tight and secure Battery discharged Need to recharge the battery before every use, only use a fully charged battery. Motor fails to start Battery is defective Replace with a fully charged battery Starting procedure is not correct Make sure you follow the correct starting procedure: 1. Press and hold the safety button (1). 2. Squeeze the trigger bar (2) towards the handle. 3. Release the safety button (1). The blade may be blocked. Remove safety key form the socket, remove battery, turn the mower over, and check the blade. Mower stops while mowing (for reasons other than releasing the trigger bar) Mower is hard to push The battery has been completely depleted. The grass may be too high for the cutting height. The blade, mower deck, or rear discharge plate may be clogged with debris. The mower bogs down or stalls in heavy grass The grass is wet The battery capacity is not enough The wheels may not be rotating freely. Recharge the battery immediately or replace it with a fully charged battery. Raise the cutting height or narrow your cutting swath and try again Remove the safety key from the socket,, and remove battery, turn the mower over on the right side, and check below the deck. Clear the debris if necessary. Raise the height of Mower. Cut a narrower swath. Walk more slowly Let the grass dry before mowing Charge the battery or replace with a fully charged battery. Remove the safety key from the socket,, and remove battery, turn the mower over on the right side, and check the wheels for damage. Replace with new wheels if necessary. 15
16 Problem Possible Cause Corrective Action The blade may be loose Remove the safety key from the socket,, and remove battery, turn the mower over on the right side, and check that the blade is tightly attached or not, if not, tighten the blade. Excessive vibration or noise The blade may be unbalanced, Remove the safety key from the bent, or damaged socket, and remove battery, turn the mower over on the right side, remove the blade, and check its condition. Replace with a new blade if necessary. The battery is not fully charged Charge the battery hours to get a full charge The blade may be dull Remove safety key from the socket, and remove battery, turn the mower over on the right side, and check the condition of the blade. Sharpen or replace the blade, if Mower runs, but cutting performance is unsatisfactory, or there is a loss of power Battery loses its power quickly Collection bag is collecting grass poorly The blade may be bent, loose, or damaged The grass may be too high or too thick for the cutting height The Mower is moving too fast The battery is not fully charged The grass may be too high or too thick The battery may be getting old The collection bag is full The grass is too long, or the Mower is cutting too low The Mower is moving too fast The rear discharge may be clogged necessary. Remove the safety key from the socket, and remove battery, turn the mower over on the right side, and check the condition of the blade. Sharpen or replace the blade, if necessary Raise the cutting height or narrow your cutting swath and try again. Slow down a little bit Charge the battery 5 hours to get a full charge,you will need to charge the battery at least five times to achieve maximum cutting time Raise the cutting height or narrow your cutting swath The battery will need to be replaced. Empty the collection bag, and clean it if necessary. Raise the cutting height Slow down Remove the safety key from the socket, and remove battery, turn the mower over on the right side, and clean away any debris from the rear discharge plate and below the deck 16
17 Problem Possible Cause Corrective Action The mesh holes on the collection Clean the collection bag bag are clogged The collection bag is wet. Collection bag is collecting grass poorly Allow the collection bag to dry thoroughly before using it again. LAWN MOWER FEATURES AND SPECIFICATIONS Features: Versatile & Cordless Lawn Mowing Ability Easy-to-Use, Hassle-Free Operation Built-in Rechargeable Battery Removable Battery for Convenient Charging Height Adjustable Grass Cutting Ability (6) Selectable Grass Size Settings: 25-75mm Durable & Long Lasting Cutting Blade Cutting Blade Removes for Sharpening Integrated Grass Collection Container Bin Grass Bin Easily Detaches for Quick Waste Disposal 'Quick-Stop' Safety Button & Lever Heavy-Duty, Rugged & Reliable Lightweight Frame for All-Terrain Management LED Battery Power Indicator Lights Folds for Storage & Portability Includes Battery Wall Charger Adapter Perfect for Lawns, Gardens, Sidewalks, Walkways, Landscapes Technical Specs: Construction Material: Metal Alloy, Engineered ABS Cutting Blade Length: 370mm Battery Type: Lithium-ion, 36V Charge Time: 3-5 Hours Operation Speed: RPM Grass Collection Bin Capacity: 40L Dimensions: 49.2'' x 18.1'' x 37.4'' Sold as: 1 Weight: 39 lbs. 17
18
19
20
Instruction Manual. 36V Lithium Push Mower PMLI-14
 Instruction Manual 36V Lithium Push Mower PMLI-14 This Manual Contains Important Information Regarding: SAFETY, ASSEMBLY, OPERATION AND MAINTENANCE. Please Read And Keep This Book For Future Reference.
Rechargeable Battery-Powered Lawn Mower EVO1536Li. This manual contains important information regarding SAFETY, ASSEMBLY, OPERATION AND MAINTENANCE.
 Instruction Manual Rechargeable Battery-Powered Lawn Mower EVO1536Li This manual contains important information regarding SAFETY, ASSEMBLY, OPERATION AND MAINTENANCE. Please read and keep this book for
SAFETY AND OPERATING MANUAL
 SAFETY AND OPERATING MANUAL 2 General Power Tool Safety Warnings WARNING! Read all safety warnings and all instructions. Failure to follow the warnings and instructions may result in electric shock, fire
Qualcast V Lithium-Ion Cordless Rotary Mower (Model: CLMF2433M)
") Qualcast 4689128 24V Lithium-Ion Cordless Rotary Mower (Model: CLMF2433M) Instruction Manual After Sales Support UK/Ireland 0345 640 0800 Web www.argosspares.co.uk Important - Please read these instructions
Qualcast 4689128 24V Lithium-Ion Cordless Rotary Mower (Model: CLMF2433M) Instruction Manual After Sales Support UK/Ireland 0345 640 0800 Web www.argosspares.co.uk Important - Please read these instructions
Cordless Lawn Mower Instructions for Use
 IMPORTANT: Read and understand this manual before assembling or operating this appliance. Improper use of this appliance can cause severe injury. Description Battery pack Battery type: Charger time: No-load
RLM36X40H25 ORIGINAL INSTRUCTIONS. Cordless Lawn Mower
 RLM6X40H5 ORIGINAL INSTRUCTIONS Cordless Lawn Mower Important! It is essential that you read the instructions in this manual before assembling, operating and maintaining this machine. Subject to technical
RMi34 36V Lithium-Ion Cordless Rotary Mower (Model: CLMB3634M)
") RMi34 36V Lithium-Ion Cordless Rotary Mower (Model: CLMB3634M) Instruction Manual Safety Warning Warning! Read these instructions carefully, familiarize yourself with the controls and the correct usage
RMi34 36V Lithium-Ion Cordless Rotary Mower (Model: CLMB3634M) Instruction Manual Safety Warning Warning! Read these instructions carefully, familiarize yourself with the controls and the correct usage
RLM36X46L50HI RLM36X46L40 RLM36B46L ORIGINAL INSTRUCTIONS. Cordless Lawn Mower
 RLM36X46L50HI RLM36X46L40 RLM36B46L ORIGINAL INSTRUCTIONS Cordless Lawn Mower Important! It is essential that you read the instructions in this manual before assembling, operating and maintaining this
ENGLISH (Original instructions) INSTRUCTION MANUAL. Cordless Lawn Mower BLM430 LM430D. IMPORTANT: Read Before Using.
 INSTRUCTION MANUAL. Cordless Lawn Mower BLM430 LM430D. IMPORTANT: Read Before Using.") ENGLISH (Original instructions) INSTRUCTION MANUAL Cordless Lawn Mower BLM40 LM40D 095 IMPORTANT: Read Before Using. ENGLISH (Original instructions) SPECIFICATIONS Dimensions (L x W x H) Model Mowing width
ENGLISH (Original instructions) INSTRUCTION MANUAL Cordless Lawn Mower BLM40 LM40D 095 IMPORTANT: Read Before Using. ENGLISH (Original instructions) SPECIFICATIONS Dimensions (L x W x H) Model Mowing width
Cordless Line Trimmer
 RLT6X RLT6B ORIGINAL INSTRUCTIONS Cordless Line Trimmer Important! It is essential that you read the instructions in this manual before assembling, maintaining and operating this machine. Subject to technical
60V RECHARGEABLE LITHIUM-ION BATTERY
 60V RECHARGEABLE LITHIUM-ION BATTERY LB60A00/LB60A03/LB60A01/LB60A02 Owner s Manual TOLL-FREE HELPLINE: 1-855-345-3934 www.greenworkstools.com Read all safety rules and instructions carefully before operating
CORDLESS LAWN MOWER KIT. 2 x 18V Lithium Ion INSTRUCTION MANUAL SPECIFICATIONS. ozito.com.au PXCLMK-018 WHAT S IN THE BOX.
 WHAT S IN THE BOX CORDLESS LAWN MOWER KIT 2 x 18V Lithium Ion INSTRUCTION MANUAL SPECIFICATIONS Voltage: 18V x 2 Battery: 3.0Ah Li-ion Charge Time: 1 Hour Cutting Diameter: 360mm Cutting Heights: 25-75mm
CORDLESS LAWN MOWER KIT INSTRUCTION MANUAL
 WHAT S IN THE BOX Cordless Lawn Mower CORDLESS LAWN MOWER KIT INSTRUCTION MANUAL SPECIFICATIONS Voltage: 18V x 2 Battery: 4.0Ah Li-ion Charge Time: 80min Cutting Diameter: 360mm Cutting Heights: 25-75mm
CORDLESS LAWN MOWER KIT INSTRUCTION MANUAL
 WHAT S IN THE BOX Cordless Lawn Mower CORDLESS LAWN MOWER KIT INSTRUCTION MANUAL SPECIFICATIONS Voltage: 18V x 2 Battery: 2.0Ah Li-ion Charge Time: 2.5 hours Cutting Diameter: 330mm Cutting Heights: 25-65mm
48 Side Discharge Mower
 FORM NO. 9 7GB Wheel Horse 48 Side Discharge Mower for Lawn & Garden Tractors Model No. 7868 790000 & Up Operator s Manual IMPORTANT: Read this manual carefully. It contains information about your safety
4V LITHIUM-ION SCREWDRIVER OWNER S OPERATING MANUAL
 CSD-4107BG 4V LITHIUM-ION SCREWDRIVER OWNER S OPERATING MANUAL Your screwdriver has been engineered and manufactured to our high standard for dependability, ease of operation, and operator safety. When
EN Operator's manual PRLM21i
 EN Operator's manual 2-12 PRLM21i Contents INTRODUCTION... 2 SAFETY... 3 ASSEMBLY...6 OPERATION...8 MAINTENANCE...9 TRANSPORTATION AND STORAGE...12 Operator's manual The initial language of this operator's
Operating Instructions
 Please Read These Instructions Before Using Your Mower Operating Instructions for SP470 ES Lawnmower with Briggs & Stratton engine Product Code: 99468/BQ Call our Helpline if you have any problems: Helpline
Instruction Manual. CORDLESS DRILL 18V Li-ion WITH IMPACT FUNCTION. Model SROM 1172
 Instruction Manual CORDLESS DRILL 18V Li-ion WITH IMPACT FUNCTION Model SROM 1172 Our tool range has you covered for DIY. Whatever the job, make light work of it with MAKO tools. Product Features: 1. Keyless
135CC PETROL LAWN MOWER INSTRUCTION MANUAL DYM-1773
 135CC PETROL LAWN MOWER INSTRUCTION MANUAL DYM-1773 CONTENTS Warranty 2 Introduction 3 Environmental protection 3 Description of symbols 3 Specifications 4 Safety rules for petrol lawn mowers 4 Operation
RLM1836H40 OLM1836H. ORIGINAL INSTRUCTIONS Cordless Lawn Mower
 RLM836H40 OLM836H ORIGINAL INSTRUCTIONS Cordless Lawn Mower Important! It is essential that you read the instructions in this manual before assembling, operating, and maintaining the product. Subject to
18V CORDLESS STAPLER/NAILER
 18V CORDLESS STAPLER/NAILER MODEL NO: CONSN18LI PART NO: 6487055 OPERATION & MAINTENANCE INSTRUCTIONS LS1213 INTRODUCTION Thank you for purchasing this CLARKE product. Before attempting to use this product,
Z Master. 62 Mower. for Z Master Z 255 Traction Unit. Model No & UP. Operator s Manual
 FORM NO. 9 88 Z Master 6 Mower for Z Master Z 55 Traction Unit Model No. 7408 89000 & UP Operator s Manual IMPORTANT: Read this manual carefully. It contains information about your safety and the safety
Wheel Horse. 42 Mower. for Lawn and Garden Tractors. Model No & Up. Operator s Manual
 FORM NO. 9 559 Rev A Wheel Horse 4 Mower for Lawn and Garden Tractors Model No. 78 890000 & Up Operator s Manual IMPORTANT: Read this manual carefully. It contains information about your safety and the
Wheel Horse. 52 Mowers. Model No & Up Model No & Up. Operator s Manual
 FORM NO. 9-567 Wheel Horse 5 Mowers for Lawn & Garden Tractors Model No. 7880 890000 & Up Model No. 7885 890000 & Up Operator s Manual IMPORTANT: Read this manual carefully. It contains information about
CORDLESS TACKER MODEL NO: CCT48 OPERATION & MAINTENANCE INSTRUCTIONS PART NO: LS0414
 CORDLESS TACKER MODEL NO: CCT48 PART NO: 6485070 OPERATION & MAINTENANCE INSTRUCTIONS LS0414 INTRODUCTION Thank you for purchasing this CLARKE product. Before attempting to use this product, please read
m WARNING: READ ALL m WARNING: This unit can be dangerous! Careless or m DANGER: Risk of cut. Keep hands and feet away IMPORTANT! Safety Instructions
 16-Inch Manual Reel Mower with Catcher Model No. MJ500M Form No. SJ-MJ500M-880E A Division of Snow Joe, LLC IMPORTANT! Safety Instructions m WARNING: READ ALL INSTRUCTIONS BEFORE USE. m WARNING: This unit
The information in this operator s manual is limited in application to the Honda mulching kit for Honda H4000 Series lawn tractors with 42 and 46
 The information in this operator s manual is limited in application to the Honda mulching kit for Honda H4000 Series lawn tractors with 42 and 46 mower decks. Before installing or operating this equipment,
Wheel Horse. 48 Mower. for Lawn and Garden Tractors. Model No & Up. Operator s Manual
 FORM NO. 5 Wheel Horse 48 Mower for Lawn and Garden Tractors Model No. 786 990000 & Up Operator s Manual IMPORTANT: Read this manual carefully. It contains information about your safety and the safety
Operating Instructions
 Please Read These Instructions Before Using Your Mower Operating Instructions for model HP470 & SP470 Lawnmowers with Briggs & Stratton engine Product Codes: 99646/BQ 97646/BQ Call our Helpline if you
SAFETY AND OPERATING MANUAL. Cordless Hedge Trimmer WG259E WG259E.5 WG259E.9
 SAFETY AND OPERATING MANUAL 2 General Power Tool Safety Warnings WARNING: Read all safety warnings and all instructions. Failure to follow the warnings and instructions may result in electric shock, fire
USER S MANUAL CORDLESS GRASS & SHRUB SHEARS PSLHTM20
 USER S MANUAL CORDLESS GRASS & SHRUB SHEARS PSLHTM20 CAUTION: Read all safety regulations and instructions. failures made in following the safety regulations and instructions may result in an electric
Form No Wheel Horse. 52 in. Mower 5xi Tractor Attachment. Model No and Up. Operator s Manual. Domestic English (EN)
") Form No. -50 Wheel Horse 5 in. Mower 5xi Tractor Attachment Model No. 7870 0000000 and Up Operator s Manual Domestic English (EN) Contents Page Introduction................................ Safety and Instruction
Form No. -50 Wheel Horse 5 in. Mower 5xi Tractor Attachment Model No. 7870 0000000 and Up Operator s Manual Domestic English (EN) Contents Page Introduction................................ Safety and Instruction
44 and 52 Twin Bagger 100 Series Z Master
 Form No. 7 87 and 5 Twin Bagger 00 Series Z Master Model No. 7855 Serial No. 000000 and Up Operator s Manual English (CE) Contents Page Introduction................................ Safety.....................................
OPERATOR'S MANUAL Model CHL91302 Battery Charger for use with LITHIUM EARTHWISE Lithium-ion Battery Pack
 OPERATOR'S MANUAL Model CHL91302 Battery Charger for use with LITHIUM EARTHWISE Lithium-ion Battery Pack SPECIFICATIONS: Model Input Charging Voltage Charging Current Net Weight CHL91302 90-260 Volts,
SAFETY AND OPERATING MANUAL. Lithium-Ion cordless hammer drill WX372 WX372.1 WX372.9
 SAFETY AND OPERATING MANUAL 2 Original Instructions General Power Tool Safety Warnings WARNING: Read all safety warnings and all instructions. Failure to follow the warnings and instructions may result
20V Lithium-Ion Battery Pack
 20V Lithium-Ion Battery Pack 252-8034 OPERATOR S MANUAL CAUTION: To Reduce The Risk Of Injury, User Must Read And Understand Operator s Manual. Save These Instructions For Future Reference. For questions
original instructions 18V Torch RFP1801
 original instructions 18V Torch RFP1801 Important! It is essential that you read the instructions in this manual before operating this machine. Subject to technical modifications. Safety GENERAL POWER
RPS1215 ORIGINAL INSTRUCTIONS. Cordless Pruner
 RPS5 ORIGINAL INSTRUCTIONS Cordless Pruner Important! It is essential that you read the instructions in this manual before assembling, operating and maintaining the product. Subject to technical modification.
OWNER S MANUAL TOLL-FREE HELPLINE: (Monday - Friday / 8am - 4:30pm CST)
") LITHIUM ION BATTERY OWNER S MANUAL TOLL-FREE HELPLINE: 1-877-572-7278 (Monday - Friday / 8am - 4:30pm CST) READ ALL SAFETY RULES AND INSTRUCTIONS CAREFULLY BEFORE OPERATING STRIKEMASTER LITHIUM 40v BATTERY
LITHIUM ION BATTERY OWNER S MANUAL TOLL-FREE HELPLINE: 1-877-572-7278 (Monday - Friday / 8am - 4:30pm CST) READ ALL SAFETY RULES AND INSTRUCTIONS CAREFULLY BEFORE OPERATING STRIKEMASTER LITHIUM 40v BATTERY
Wheel Horse. 48 Mower. for 5xi Tractors. Model No & Up. Operator s Manual
 FORM NO. 9 Wheel Horse 48 Mower for 5xi Tractors Model No. 786 990000 & Up Operator s Manual IMPORTANT: Read this manual, and your tractor manual, carefully. They contain information about your safety
RMT1201. ORIGINAL INSTRUCTIONS Cordless Multi-Tool
 RMT1201 ORIGINAL INSTRUCTIONS Cordless Multi-Tool Important! It is essential that you read the instructions in this manual before operating this machine. Subject to technical modifications. Safety GENERAL
Cordless Rechargeable Saw Instructions for Use
 Technical data Voltage: DC 10.8V Weight: 1.25Kg Stroke rate: 0-2100/min Stroke: 15mm Cutting capacity: max diameter in wood 80mm / in soft metal 7mm Charging time: Between 5.0-5.5 Hours Battery: 1.3Ah
18V CORDLESS DRILL MODEL NO: CON18LiC
 18V CORDLESS DRILL MODEL NO: CON18LiC PART NO: 6479531 OPERATION & MAINTENANCE INSTRUCTIONS ORIGINAL INSTRUCTIONS GC0817 - ISS 2 INTRODUCTION Thank you for purchasing this CLARKE Cordless Drill. Before
ProLine. 36 Mower. for Mid-Size Traction Unit. Model No & Up. Operator s Manual
 FORM NO. 8 77 Rev A ProLine 6 Mower for Mid-Size Traction Unit Model No. 05 79000 & Up Operator s Manual IMPORTANT: Read this manual carefully. It contains information about your safety and the safety
Parklander Cylinder Mower
 Parklander Cylinder Mower WARNING: To reduce the risk of injury, the user must read and understand the Operator s Manual before using this product. Save these instructions for future reference. Table of
48 Side Discharge Mower
 FORM NO. 9 650 Rev A Wheel Horse 8 Side Discharge Mower for Classic Garden Tractor Model No. 786 890000 & Up Operator s Manual IMPORTANT: Read this manual carefully. It contains information about your
24 Volt - 3/8" Cordless Impact Wrench
 24 Volt - 3/8" Cordless Impact Wrench INSTRUCTION MANUAL Item # 3994040 IMPORTANT SAFETY INSTRUCTIONS WARNING: When using electrical equipment such as this, basic safety precautions should always be followed
SP6. Automatic Battery Charger. Model
 Model SP6 Automatic Battery Charger OWNERS MANUAL PLEASE SAVE THIS OWNERS MANUAL AND READ BEFORE EACH USE. This manual will explain how to use the charger safely and effectively. Please read and follow
19 40 V Lithium-Ion Cordless Mower
 19 40 V Lithium-Ion Cordless Mower 2502902 Owner s Manual TOLL-FREE HELPLINE: 1-888-90WORKS (888.909.6757) www.greenworkstools.com Read all safety rules and instructions carefully before operating this
36 Rear Discharge Mower
 FORM NO. 8 95 Rev. A Wheel Horse 6 Rear Discharge Mower for Classic Garden Tractor Model No. 7805 790000 & Up Operator s Manual IMPORTANT: Read this manual carefully. It contains information about your
INSTRUCTION MANUAL. Cordless Angle Drill XAD01
 INSTRUCTION MANUAL Cordless Angle Drill XAD0 0474 ENGLISH (Original instructions) SPECIFICATIONS Model XAD0 Capacities Steel 0 mm (3/8") Wood 25 mm (") No load speed (RPM) 0 -,800 /min Overall length 34
KING COBRA/CALIBER GRASS COLLECTION SYSTEM PARTS & OPERATORS MANUAL
 KING COBRA/CALIBER GRASS COLLECTION SYSTEM PARTS & OPERATORS MANUAL GRASS CATCHER W/WEIGHTS: TUBE KITS: BLOWER KITS: 52 542128 52 542119 5101002 60 542129 60 542120 5101003 2 WORLDLAWN POWER EQUIPMENT
GARDENA. N FIN P E I DK S NL F GB D
 GARDENA AccuCut 400 Li Art. 8840 D Betriebsanleitung Operating Instructions F Mode d emploi Coupe bordures NL Instructies voor gebruik S Bruksanvisning freeetrim DK Brugsanvisning freeetrim I Istruzioni
ENGLISH (Original instructions) INSTRUCTION MANUAL. Cordless Lawn Mower DLM380. IMPORTANT: Read Before Using.
 INSTRUCTION MANUAL. Cordless Lawn Mower DLM380. IMPORTANT: Read Before Using.") ENGLISH (Original instructions) INSTRUCTION MANUAL Cordless Lawn Mower DLM80 04477 IMPORTANT: Read Before Using. ENGLISH (Original instructions) SPECIFICATIONS Dimensions (L x W x H) Model Mowing width
ENGLISH (Original instructions) INSTRUCTION MANUAL Cordless Lawn Mower DLM80 04477 IMPORTANT: Read Before Using. ENGLISH (Original instructions) SPECIFICATIONS Dimensions (L x W x H) Model Mowing width
Corded and Cordless LED Worklight
 INSTRUCTION MANUAL Corded and Cordless LED Worklight DML805 DOUBLE INSULATION ENGLISH (Original instructions) SPECIFICATIONS Model LED Operating time* (with Battery BL830) Power source Standard battery
Operator and Parts Manual
 Operator and Parts Manual Collection System 966406901 CAUTION BEFORE ASSEMBLING GRASS CATCHER TO MOWER Set parking brake. Place motion control levers in NEUTRAL position. Turn ignition key OFF and remove
OPERATING INSTRUCTIONS ELECTRIC LAWNMOWER MODEL : LSM 1200 EL
 OPERATING INSTRUCTIONS ELECTRIC LAWNMOWER MODEL : LSM 1200 EL Thank you for purchasing the Lawn Star Lawnmower which is one of the finest and most advanced lawnmowers today s technology can produce. Before
CORDLESS GRASS TRIMMER & SHEAR
 WHAT S IN THE BOX Cordless Grass Trimmer / Shear CORDLESS GRASS TRIMMER & SHEAR Hedge Trimmer Blade Grass Shear Blade INSTRUCTION MANUAL SPECIFICATIONS Voltage: 18V No Load Speed: 1,200/min Hedge Trimmer:
TOOLPRO 18V Li-Ion Brushless Impact wrench
 TOOLPRO 18V Li-Ion Brushless Impact wrench Instruction Manual CIW180HB.9 After Sales Support FREE CALL 1300 889 028 EMAIL:salesau@positecgroup.com Important - Please read these instructions fully before
RLM18X36L40 OLM1836H. ORIGINAL INSTRUCTIONS Cordless Lawn Mower
 RLM8X6L40 OLM86H ORIGINAL INSTRUCTIONS Cordless Lawn Mower Important! It is essential that you read the instructions in this manual before assembling, operating, and maintaining the product. Subject to
BRUSHLESS LAWN MOWER ORIGINAL INSTRUCTIONS
 STANDARD EQUIPMENT Brushless Lawn Mower BRUSHLESS LAWN MOWER ORIGINAL INSTRUCTIONS Safety Key SPECIFICATIONS Voltage: 18V Cutting Diameter: 300mm Cutting Heights: 30, 50 & 70mm No Load Speed: 3,300/min
Instruction Manual CORDLESS DRILL & DRIVER 18V. Model SROM 1170
 Instruction Manual CORDLESS DRILL & DRIVER 18V Model SROM 1170 Product Features: Dear Valued Customer, Thank you for purchasing this Samson Power Tool. We are dedicated to providing quality Samson Power
KNOW YOUR PRODUCT SETUP & PREPARATION CORDLESS LAWN MOWER 1. Wheels 8. Upper Handle 2. Battery Cover 9. Lock-off Button 3. Battery Cover Securing Latc
 WHAT S IN THE BOX Cordless Lawn Mower CORDLESS LAWN MOWER INSTRUCTION MANUAL SPECIFICATIONS Voltage: 18V x 2 Battery: 2.0Ah Li-ion Charge Time: 40min Cutting Diameter: 330mm Cutting Heights: 25-65mm (5
Worldlawn Power Equipment, Inc. Industrial Park 2415 Ashland Ave. Beatrice, NE Toll Free Number:
 Operator s Manual R WYZ48/52/60CS BAGGER Worldlawn Power Equipment, Inc. Industrial Park 2415 Ashland Ave. Beatrice, NE 68310 Toll Free Number: 1-800-267-4255 OPERATOR S MANUAL This catcher manual is for
.$/,7*76(7$ /HDI %ORZHU USER MANUAL
 USER MANUAL Technical Data Voltage No Load Speed Weight Max Blow Speed Charging Time Battery Sound Level Run Time DC 18v 13000/min (2-High); 9000/min (1-Low) 2kg 120kph (2-High); 80kph (1-Low) 3-5 hours
Battery Charger JCB-FCH12Li
 Safety and operating manual Battery Charger JCB-FCH12Li ORIGINAL INSTRUCTIONS SAFETY INSTRUCTIONS WARNING: Read all safety warnings and all instructions.failure to follow the warnings and instructions
BRUSHLESS LAWN MOWER ORIGINAL INSTRUCTIONS
 STANDARD EQUIPMENT Brushless Lawn Mower BRUSHLESS LAWN MOWER ORIGINAL INSTRUCTIONS Safety Key SPECIFICATIONS Voltage: 18V Cutting Diameter: 300mm Cutting Heights: 30, 50 & 70mm No Load Speed: 3,300/min
Table of Contents. Safety symbols... 3 Assembly 6. Operation Maintenance Troubleshooting 11. Storage. 12. Notes. 13
 Table of Contents Safety symbols... 3 Assembly 6 Operation... 8 Maintenance... 10 Troubleshooting 11 Storage. 12 Notes. 13 2 Safety Information Attention; this machine can be dangerous! All operators should
ITEM # V SNOW SHOVEL. MODEL #KSS 2540A-06 Español p. 18. ATTACH YOUR RECEIPT HERE Serial Number. Purchase Date
 ITEM #0727249 40 V SNOW SHOVEL MODEL #KSS 2540A-06 Español p. 18 ATTACH YOUR RECEIPT HERE Serial Number Purchase Date Questions, problems, missing parts? Before returning to your retailer, call our customer
LAWN MOWER OWNER S MANUAL
 LAWN MOWER OWNER S MANUAL 1.8kW Petrol Engine 123CC 420mm CUTTING WIDTH MODEL: S421-C SAFETY OPERATION ASSEMBLY MAINTENANCE WARRANTY CAUTION: Read and follow all Safety Rules and Instructions before operating
120v. 22" Cordless Lawn Mower Self Propelled LITHIUM-ION. Model: Y0LMX22S300 OPERATOR S MANUAL
 Model: Y0LMX22S300 OPERATOR S MANUAL 22" Cordless Lawn Mower Self Propelled READ & UNDERSTAND INSTRUCTION MANUAL. SAVE ALL WARNINGS AND INSTRUCTIONS FOR FUTURE REFERENCE. Merotec Inc. 3655 Kennesaw North
RLM36X50HP RLM36B50HP ORIGINAL INSTRUCTIONS. Cordless Lawn Mower
 RLM36X50HP RLM36B50HP ORIGINAL INSTRUCTIONS Cordless Lawn Mower Important! It is essential that you read the instructions in this manual before assembling, operating, and maintaining the product. Subject
(R86049) WARNING: To reduce the risk of injury, the user must read and understand the operator s manual before using this product.
 WARNING: To reduce the risk of injury, the user must read and understand the operator s manual before using this product.") OPERATOR S MANUAL 12 VOLT LITHIUM-ION BATTERY CHARGER 140446001 (R86049) Your charger has been engineered and manufactured to our high standards for dependability, ease of operation, and operator safety.
OPERATOR S MANUAL 12 VOLT LITHIUM-ION BATTERY CHARGER 140446001 (R86049) Your charger has been engineered and manufactured to our high standards for dependability, ease of operation, and operator safety.
40 V Lithium-Ion Dual Blade Mower 25282
 40 V Lithium-Ion Dual Blade Mower 25282 Owner s Manual TOLL-FREE HELPLINE: 1-888-90WORKS (888.909.6757) www.greenworkstools.com Read all safety rules and instructions carefully before operating this tool.
42 Mower Wheel Horse Classic Garden Tractor Attachment
 Form No. 6 9 Mower Wheel Horse Classic Garden Tractor Attachment Model No. 78 000000 and Up Operator s Manual Domestic English (EN) Contents Page Introduction................................ Slope Chart..............................
KNOW YOUR PRODUCT SETUP & PREPARATION CORDLESS LAWN MOWER 1. Wheels 8. Upper Handle 2. Battery Cover 9. Lock-off Button 3. Battery Cover Securing Latc
 WHAT S IN THE BOX Cordless Lawn Mower CORDLESS LAWN MOWER KIT INSTRUCTION MANUAL SPECIFICATIONS Voltage: 18V x 2 Battery: 2.0Ah Li-ion Charge Time: 2.5 hours Cutting Diameter: 330mm Cutting Heights: 25-65mm
ITEM # V CORDLESS SNOW SHOVEL MODEL #KSS 1280B-06 Español p. 19. ATTACH YOUR RECEIPT HERE Serial Number. Purchase Date
 ITEM #0533632 80 V CORDLESS SNOW SHOVEL MODEL #KSS 1280B-06 Español p. 19 ATTACH YOUR RECEIPT HERE Serial Number Purchase Date Questions, problems, missing parts? Before returning to your retailer, call
18V Lithium-ion Cordless Grass Trimmer
 Qualcast 18V Lithium-ion Cordless Grass Trimmer Instruction Manual After Sales Support UK/Ireland 0845 077 8888 Republic of Ireland 0124 77708 Web www.homebasespares.co.uk Important - Please read these
48 Mower Wheel Horse Classic Garden Tractor Attachment
 Form No. 6 96 Rev B 8 Mower Wheel Horse Classic Garden Tractor Attachment Model No. 786 000000 and Up Operator s Manual Domestic English (EN) Contents Page Introduction.................................
LAWN MOWER OWNER S MANUAL
 LAWN MOWER OWNER S MANUAL Woodies SKU: 1153279 & 1153280 CAUTION: Read and follow all Safety Rules and Instructions before operating this equipment Thank you for choosing our Gasoline Lawnmower. 1 To ensure
SAFETY RULES SPECIFICATIONS READ ALL INSTRUCTIONS BEFORE OPERATING SAVE THESE INSTRUCTIONS
 READ ALL INSTRUCTIONS BEFORE OPERATING SAVE THESE INSTRUCTIONS Thank you for purchasing 7" Polisher. Before attempting to operate your new Polisher please read these instructions thoroughly. You will need
STIGA TORNADO 51 S 51 SE PRO 51 S
 STIGA TORNADO 51 S 51 SE PRO 51 S 8211-0225-09 SVENSKA S 1 2 3 1. 2. ADD FULL FULL ADD ADD FULL 0,15 l. 3. LS 45 4. XTE 60 3x 5. LS 45 6. XTE 60 STOP I H 7. 8. 2 S SVENSKA 9. 10. 11. 12. LS 45 0,75 mm
Cordless Driver Drill
 INSTRUCTION MANUAL Cordless Driver Drill MT064 MT065 003947 IMPORTANT: Read Before Using. ENGLISH (Original instructions) SPECIFICATIONS Model MT064 MT065 Steel 0 mm 3 mm Capacities Wood 25 mm 28 mm Wood
HDE 500-A22. English. Printed: Doc-Nr: PUB / / 000 / 03
 HDE 500-A22 English 1 Information about the documentation 1.1 About this documentation Read this documentation before initial operation or use. This is a prerequisite for safe, trouble-free handling and
4HP PETROL LAWN MOWER
 4HP PETROL LAWN MOWER RL504 INSTRUCTION MANUAL 1 Black Cyan Magenta Yellow Code: RL504 IM Date: 070421 Edition: 13 Op: GM Contents Warranty 2 Introduction 3 Description of symbols 3 Specifications 4 Safety
Parts missing or damaged? Questions? Toll-free Helpline
 INSTRUCTION MANUAL Multi-Charger 054-3107-2 Parts missing or damaged? Questions? Toll-free Helpline 1-800-689-9928 Important: Carefully read this Instruction Manual before using this tool. Pay close attention
Operation Manual. 21 Inch Self-Propelled Lawn Mower MODEL #
 21 Inch Self-Propelled Lawn Mower MODEL # 106461 Operation Manual This safety alert symbol identifies important safety messages in this manual. Failure to follow this important safety information may result
40 V Lithium-Ion Dual Blade Mower 25302
 40 V Lithium-Ion Dual Blade Mower 25302 Owner s Manual TOLL-FREE HELPLINE: 1-888-90WORKS (888.909.6757) www.greenworkstools.com Read all safety rules and instructions carefully before operating this tool.
OPERATOR'S MANUAL. Cat. No. C12 PC. To reduce the risk of injury, user must read and understand operator's manual.
 OPERATOR'S MANUAL Cat. No. C12 PC M12 Cordless Copper Tubing Cutter To reduce the risk of injury, user must read and understand operator's manual. General POWER TOOL SAFETY WARNINGS WARNING Read all safety
7.2V Cordless Grass Shear/Shrub
 7.2V Cordless Grass Shear/Shrub 1600002 Owner s Manual TOLL-FREE HELPLINE: 1-888-90WORKS (888.909.6757) www.greenworkstools.com Read all safety rules and instructions carefully before operating this tool.
TOOLPRO 18V 2 Speed Drill Driver
 TOOLPRO 18V 2 Speed Drill Driver Instruction Manual CDT218G.1 After Sales Support FREE CALL 1300 889 028 EMAIL:salesau@positecgroup.com Important - Please read these instructions fully before operating
Functional Description and Specifications. Intended Use. Packing List. Technical Specifications
 Functional Description and Specifications Intended Use The Nemo Submersible Angle Grinder is the world s first and only waterproof electric grinder, designed for performing cutting, grinding, polishing,
CORDLESS HEDGE TRIMMER KIT INSTRUCTION MANUAL
 WHAT S IN THE BOX Cordless Hedge Trimmer CORDLESS HEDGE TRIMMER KIT INSTRUCTION MANUAL SPECIFICATIONS Voltage: 18V Battery: 2.0Ah Li-ion Charge Time: 2.5Hrs No Load Speed: 2,200/min Max. Cutting Capacity:
GRASS CATCHER PART S & OPERATORS MANUAL
 GRASS CATCHER PART S & OPERATORS MANUAL WORLDLAWN POWER EQUIPMENT, INC. WORLDLAWN.COM 2415 ASHLAND AVE BEATRICE, NE 68310 800-267-4255 FAX 402-223-4103 2 3 4 OPERATORS MANUAL This catcher manual is for
eclipse Instruction Manual 4.0V Li-Ion Screwdriver Part #:
 eclipse Instruction Manual 4.0V Li-Ion Screwdriver Part #: 902-588 Test Equipment Depot - 800.517.8431-99 Washington Street Melrose, MA 02176 TestEquipmentDepot.com Test Equipment Depot - 800.517.8431-99
Functional Description and Specifications. Intended Use. Packing List
 Functional Description and Specifications Intended Use The Nemo Submersible Hammer Drill is intended to drill tough materials such as cement, brick, blocks, or stone, and can be used underwater, in wet
DIAMONDBACK/EDGE GRASS COLLECTION SYSTEM PARTS & OPERATORS MANUAL
 DIAMONDBACK/EDGE GRASS COLLECTION SYSTEM PARTS & OPERATORS MANUAL GRASS CATCHER W/WEIGHT: TUBE KIT: BLOWER KIT: 48 5101305 632093 632078 52 5101305 542119 632074 60 632086 542120 632081 3 WORLDLAWN POWER
Models: SP3, SPSS3 Automatic Battery Charger
 OWNERS MANUAL Models: SP3, SPSS3 Automatic Battery Charger PLEASE SAVE THIS OWNERS MANUAL AND READ BEFORE EACH USE. This manual will explain how to use the charger safely and effectively. Please read and
PETROL LAWN MOWER 13 9 c c 41c m
 PETROL LAWN MOWER 13 9 c c 41c m USER MANUAL For all product queries please phone NZ 0508 77 88 99 Dear Valued Customer, Thank you for purchasing this Westminster Power Tool. We are dedicated to providing