Water Meter & Flow Sensor
|
|
|
- Damian Russell
- 6 years ago
- Views:
Transcription

1 Installation & Instruction Manual Water Meter & Flow Sensor Page 1
2 Dear Valued Customer, We are pleased that you chose to buy one of our products and want you to be just as pleased with it. To be sure that you are 100% satisfied with our products, we provide technical and sales support Monday through Friday, 8:00 am to 5:00 pm, eastern time at (888) In addition, you may also reach us via at Before installing your new ION product, please read the information on the following pages carefully. We believe that you will find the ION water meters easy to install and use for monitoring and managing your water and utility consumption. Be sure to forward this manual to the owner after installation is complete so that they may use it as a reference guide. Thank you. ION Page 2


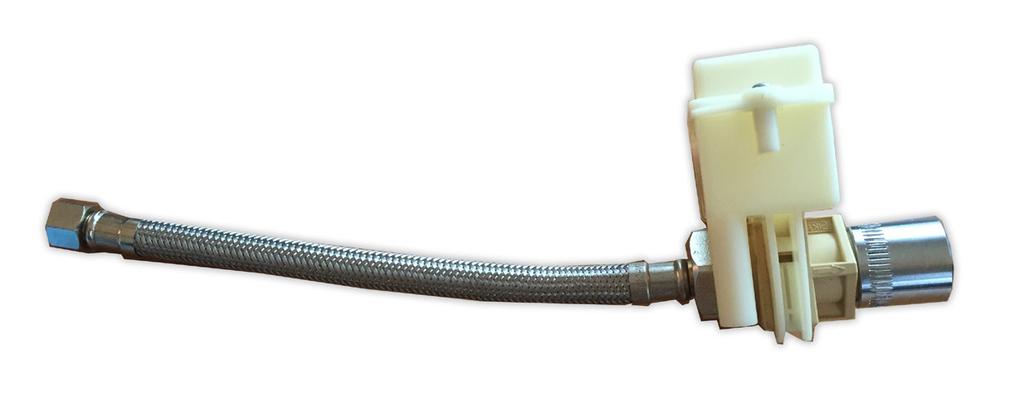
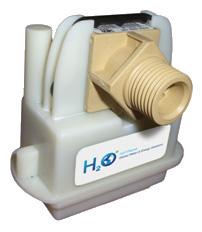
3 Introduction These instructions detail the installation of the ION water meter and flow sensor. Your ION package includes (1) flow sensor and (1) water meter (line powered or battery powered.) ION Water Meter The water meter is a fully enclosed unit with no serviceable parts inside. Part # M54122 Line-Powered Water Meter Part # M54120 Battery Powered Water Meter ION Flow Sensor The flow sensor is the unit that comes in contact with the water supply. Flow Sensor - Part # PLM10100 Page 3

4 Pre-Installation & Flow Sensor Installation Pre-Installation Information Before beginning the installation of the ION water meter and flow sensor make sure that the properly identified plumbing assembly is available for this particular location. Flow Sensor Installation Information ** IMPORTANT ** Flow Sensor Direction Be sure to note the water flow direction. The water flow direction is critical for proper flow sensor operation. The proper water flow direction is indicated by an arrow on the flow sensor shown in the circle on Figure 1. The flow sensor inlet has the 3/4 NPSM Connection. Figure 1 ** WARNING ** NO Plumbers Putty or Paste! Do not use plumber s putty or paste on the flow sensor as it may interfere with proper flow sensor operation. Use of either material will void any warranty. ** CAUTION ** NO Channel Locks to Tighten! The ION flow sensor is made of a special plastic that is NSF 61G certified. Installation requires care not to strip the plastic threads or crack the plastic body. The flow sensor is attached by hand tightening to the hose or fitting, then turning the flow sensor a quarter turn using open end or adjustable wrenches. Do NOT use channel locks. Page 4

5 1. The 1/2 NPT side of the flow sensor is the inlet, and is attached to the water line with hoses or with a rigid connection and a hose. The inlet hose or rigid connection should contain a black face gasket that will provide a water tight seal. No plumber s tape or putty is necessary if the flow sensor is properly tightened. 2. The 3/4 NPSM side of the flow sensor is the Outlet, and is attached to the water line with hoses or with a rigid connection and a hose. The outlet hose or rigid connection should contain a black face gasket that will provide a water tight seal. No plumber s tape or putty is necessary if the flow sensor is properly tightened. 3. Turn the water on and examine the connection for leaks. Torque a leaking connection just slightly to stop the leak. If the leak persists, then turn off water and inspect connections. Look for possible debris, missing gaskets or damage to the flow sensor. 4. Once the plumbing has been completed and checked, the meter can be installed. Water Meter Installation Figure 2 Page 5


6 Water Meter Installation 1. Mate the meter to the flow sensor by aligning the insertion tab on the flow sensor to the indent on the top of the meter body shown in the red circle in figure Use the black security clip to secure flow sensor & meter together. ** IMPORTANT ** Space between flow sensor and meter guides Proper installation will show a 1/4 space between the flow sensor and the top of the meter guides. An improper installation will put the flow sensor even with the end of the meter guides. The plastic security clip will not engage properly if the orientation is not correct 3. Once the meter is properly installed on the flow sensor, install the plastic security clip by pressing each clip end into the meter until a click is heard.there will be two clicks, one for each side of the meter. ** IMPORTANT ** Clip should not require force to secure! It should not require alot of force to secure the clip. If the security clip does not click, it typically means the meter is not oriented properly, or is not fully engaged with the flow sensor. Page 6

7 Water Meter Commissioning ** IMPORTANT ** Validate network connectivity! To verify that a water meter has successfully joined the wireless network, the installer must magnet the water, and watch for the appropriate LED sequence. 1. The process of magneting a device causes the device to look for a network. If it finds a network, then it attempts to join the network, transmit a data packet and give a receive/acknowledgement indicator (Red and Green LED flashes.) 2. Hold a ceramic block magnet on the upper portion of the water meter body near the insertion tab. Page 7

8 3. You should see the magnet LED sequence start through the translucent body. Four consecutive green LED flashes means the meter has successfully joined the network. Any other LED sequencing requires further troubleshooting. 4. Upon completion of installation and commissioning, attach the meter ID sticker to the master meter ID sticker sheet for future reference and database setup. 5. Completed meter ID sticker sheets should be faxed to (888) , or scan and to with the property name in the subject line. Questions? Please contact ION BEFORE uninstalling, removing or returning any product. Many times we can assist with issues in the field without having to return the item. For technical or sales support call ION at (888) or Page 8
SUPERPLUS WATER FILTRATION SYSTEM
 SUPERPLUS WATER FILTRATION SYSTEM For Model #: SP20-1 INSTRUCTIONS/ASSEMBLY USE AND CARE MANUAL (Important: Read this manual thoroughly before install) TABLE OF CONTENTS 2 3 4 6 8 9 10 11 12 General Notes
I-799/79V Coil Components
 WARNING Read and understand all instructions before attempting to install any Victaulic products. Depressurize and drain the piping system before attempting to install, remove, or adjust any Victaulic
Installation Instructions
 Installation Instructions SELECTRONIC EXPOSED TOILET FLUSH VALVE AC POWERED PROXIMITY.,.8,.6,.6/. &.8/. GPF Certified to comply with ASME A.9. 08 AS America, Inc. MODEL NUMBERS 606B. 606B. 606B.6 606B.7
Installation Instructions
 Installation Instructions SELECTRONIC EXPOSED TOILET FLUSH VALVE AC POWERED PROXIMITY.,.8,.6,.6/. &.8/. GPF Certified to comply with ASME A.9. 0 AS America, Inc. MODEL NUMBERS 6067. 6067. 6067.6 6067.7
One- Touch Installation Instructions
 One- Touch Installation Instructions 1 1 Height Adjustable Pivot w/ screws 9 Upper Work Surface 2 Rail Mount Knobs 10 Back Cover 3 Transformer 11 Center Pivot w/ screws 4 Support Legs 12 Left Monitor Arm
Page 1 of 17. Part# M0200 Rev.11 7/29/2016
 Part# M0200 Rev.11 7/29/2016 This manual contains important information concerning the installation and operation of the product listed above. Read manual thoroughly and keep for future reference INSTRUCTIONS
Installation Manual v1.0: Force Cool Kit Dodge with NV4500/NV4500HD/NV5600 Manual Transmissions. Please read all instructions before installation.
 Installation Manual v1.0: Force Cool Kit Dodge with NV4500/NV4500HD/NV5600 Manual Transmissions Please read all instructions before installation. Figure 1 - Force Cool Kit Note: Use Teflon sealing tape
PLEASE READ BEFORE CALLING OR RETURNING PRODUCT. EXTREMELY IMPORTANT!!!
 Thank you for your purchase of WeaponX Smart Direct Fire Ignition Coil System for your vehicle. The following are the instruction manuals for your ignition system kit. Please read carefully and enjoy your
Installation Instructions
 Installation Instructions SELECTRONIC PROXIMITY CONCEALED URINAL FLUSH VALVE.0, 0. & 0. GPF Certified to comply with ASME A.9. 07 AS America, Inc. MODEL NUMBERS 0B.X0 0B.X0 0B.X0 CAUTION: Use only American
1 of 1 7/1/17, 2:02 PM. Air Cleaner Assembly Replacement ALLDATA, LLC. All Rights Reserved. (Version )
") Air Cleaner Housing Service and Repair, Removal and Replacement: Ai... http://repair.alldata.com/alldata/article/display.action?componentid=367... 1 of 1 7/1/17, 2:02 PM Air Cleaner Assembly Replacement
Air Cleaner Housing Service and Repair, Removal and Replacement: Ai... http://repair.alldata.com/alldata/article/display.action?componentid=367... 1 of 1 7/1/17, 2:02 PM Air Cleaner Assembly Replacement
INSTALLATION INSTRUCTIONS
 INSTALLATION INSTRUCTIONS SHOWN WITH TUB-FILLER SET (NOT INCLUDED) MODEL: MODERN 50040 (RH-656) 5007 (RH-656X) REV C Restoration Hardware Diverter Trim Kit Product Size Specification Diagram Dimensions
BEFORE BEGINNING INSTALLATION
 COMPLETE CHASSIS FUEL LINE KITS For 1996-2000 Honda Civic Equipped with B-Series Engine INSTALLATION INSTRUCTIONS PLEASE study these instructions carefully before beginning this installation. Most installations
6-12 WIDESPREAD 6-12 W. Cleopatra Series INSTRUCTION GUIDE SAVE THIS INSTRUCTION GUIDE
 INSTRUCTION GUIDE STEP-BY-STEP ILLUSTRATED INSTALLATION INSTRUCTIONS TROUBLE SHOOTING & REPAIR TIPS 20 YEAR LIMITED WARRANTY PROPER FINISH CARE Read these instructions carefully before installing your
Installation Instructions
 Installation Instructions SELECTRONIC DC POWERED PROXIMITY EXPOSED URINAL FLUSH VALVE 0., 0., 0. &.0 GPF Certified to comply with ASME A.9. 0 AS America, Inc. Exposed Flushometer for /" Top Spud Urinals
Installation Instructions
 Installation Instructions SELECTRONIC CONCEALED TOILET FLUSH VALVE.,.8 &. GPF Certified to comply with ASME A.9. 0 AS America, Inc. MODEL NUMBERS 0B.XX Exposed Back Spud Concealed Back Spud Top Spud CAUTION:
Replacing Your 2nd Generation Battery Pack
 Replacing Your 2nd Generation Battery Pack Video tutorial: https://www.youtube.com/watch?v=xvcfwpo8rok Tools needed: 4mm hex tool. If you do not have a hex wrench, please email us at recall@boostedboards.com
Fontaine Fifth Wheel Instructions. Armor Yard Truck
 The only fifth wheel designed specifically for yard trucks Fontaine Fifth Wheel Instructions Armor Yard Truck Pre-service and operation Coupling instructions Inspection & maintenance FOR YOUR SAFETY USE
E-Coder)R900i Quick Install Guide. E-CODER)R900i QUICK INSTALL GUIDE
R900i Quick Install Guide. E-CODER)R900i QUICK INSTALL GUIDE") E-Coder)R900i Quick Install Guide E-CODER)R900i QUICK INSTALL GUIDE 1 Safety & Preliminary Checks Verify that you are at the location specified on the Site Work Order. Verify that the site is safe for
E-Coder)R900i Quick Install Guide E-CODER)R900i QUICK INSTALL GUIDE 1 Safety & Preliminary Checks Verify that you are at the location specified on the Site Work Order. Verify that the site is safe for
3.4L V6 SUPERCHARGER 7 TH INJECTOR KIT
 Part Number: 00602-17620-260 00602-17620-261 00602-17620-263 00602-17620-264 00602-17620-274 00602-17620-275 00602-17620-276 Section I Installation Preparation Kit Contents Item # Quantity Reqd. Description
INSTALLATION & OPERATING INSTRUCTIONS
 INSTALLATION & OPERATING INSTRUCTIONS WARNING RISK OF ELECTRIC SHOCK. CONNECT ONLY TO A CIRCUIT PROTECTED BY A GROUND-FAULT CIRCUIT-INTERRUPTER. THE UNIT SHOULD BE INSTALLED BY A QUALIFIED SERVICE REPRESENTATIVE.
Instant Chat off the main page of Or simply call our tech team at
 02-07 WRX/STI Air Oil Separator for Top Mounted Intercooler Setups 2013-02- 27 Thank you for purchasing this PERRIN product for your car! Installation of this product should only be performed by persons
Installation Instructions
 Installation Instructions SELECTRONIC PROXIMITY DUAL FLUSH TOILET FLUSH VALVE. /. GPF,.8/. GPF Certified to comply with ASME A.9.M 00 AS America, Inc. M90 REV.. Exposed Flushometer for -/" Top Spud Bowls
Installation Instructions
 Installation Instructions SELECTRONIC PROXIMITY TOILET CONCEALED FLUSH VALVE. &. GPF Certified to comply with ASME A..M 00 AS America, Inc. Concealed Flushometer for -/" Top or Back Spud Bowls MODEL NUMBERS
Small knife. Remove black panel shown. Save 6 retaining pins for re-install later.
 2005-2009 Ford Mustang V6 Fog Light Wiring Kit Parts List: Quantity: Tools Required: Wiring harness 1 Flat head screwdriver PB-3425 Parts Bag 1 Ratchet & Socket set OR Ford OEM Switch (if you 1 Adjustable
Ford Mustang V6 OEM-Style Fog Light Kit Parts List: Quantity: Tool List:
 2015-2017 Ford Mustang V6 OEM-Style Fog Light Kit Parts List: Quantity: Tool List: LED Foglights/ Bezels 2 Flat head & Phillips screwdriver (if you ordered part#3600) Ratchet & Socket set OR Wiring harness
Serial Number Purchase Date
 ITEM #02708 KITCHEN FAUCET MODEL #6720-20 Français / Español p. 8 ATTACH YOUR RECEIPT HERE Serial Number Purchase Date Questions, problems, missing parts? Before returning to your retailer, call our customer
Dual Port Manifold Water Filtration Systems Instruction Manual
 M TM Water Filtration Products Dual Port Manifold Water Filtration Systems Instruction Manual For DP1XX, DP2XX and DPXX High Flow Series Water Filtration Systems Installer: Please leave this manual with
STYLE 9300 FLOW/PRESSURE METER INSTALLATION & OPERATING INSTRUCTIONS
 STYLE 9300 FLOW/PRESSURE METER INSTALLATION & OPERATING INSTRUCTIONS INTRODUCTION The Style 9300 Flow/Pressure Meter from Akron is designed to offer reliable and accurate service with an easy to install,
HIGH PRESSURE CONTROL VALVE R2L ACTUATOR
 R2L ACTUATOR All Rights Reserved. All contents of this publication including illustrations are believed to be reliable. And while efforts have been made to ensure their accuracy, they are not to be construed
2001 SERIES CRYOGENIC BAR STOCK BODY VALVES
 12501 Telecom Drive, Tampa, FL 33637 Ph: (813) 978-1000 Fax: (813) 977-3329 www.cpc-cryolab.com INSTALLATION, OPERATING, AND MAINTENANCE INSTRUCTIONS 17/4.5.2 Rev. 0 2001 SERIES CRYOGENIC BAR STOCK BODY
Instant Chat off the main page of Or simply call our tech team at
 Subaru WRX/STI Air Oil Separator for Front Mounted Intercooler Setups 2013-02- 22 Thank you for purchasing this PERRIN product for your car! Installation of this product should only be performed by persons
THANK YOU FOR CHOOSING BATHERBOX GETTING STARTED WHAT S IN THE BOX? N. Northview Ave Sioux Falls, SD 57107
 INSTRUCTION MANUAL THANK YOU FOR CHOOSING BATHERBOX You are on your way to creating an unmatched bathing experience both for you and the lucky animal. The BatherBox is designed to save you hours of time
F-4600 INLINE ULTRASONIC FLOW METER Installation and Operation Guide
 F-4600 INLINE ULTRASONIC FLOW METER Installation and Operation Guide 11451 Belcher Road South, Largo, FL 33773 USA Tel +1 (727) 447-6140 Fax +1 (727) 442-5699 1054-7 / 34405 www.onicon.com sales@onicon.com
RK-03, RK-HS-03, RK-OC-03, and RK-IR-03 Flow Through Adapters
 30-0951RK-03, 30-0951RK-HS-03, 30-0951RK-OC-03, and 30-0951RK-IR-03 Flow Through Adapters Part Number: 71-0423 Revision: P1 Released: 4/6/17 www.rkiinstruments.com Description The attached detector head
INSTALLATION INSTRUCTIONS
 INSTALLATION INSTRUCTIONS SHOWN WITH TUB-FILLER SET (NOT INCLUDED) MODEL: VINTAGE 690090 (RH-576L) 690040 (RH-576) REV C Restoration Hardware Diverter Trim Kit Product Size Specification Diagram Dimensions
INSTALLATION INSTRUCTIONS
 INSTALLATION INSTRUCTIONS MODEL: LUGARNO RH-5960 Restoration Hardware RomanTub Product Size Specification Diagram Recommended Deck Hole Size /4 Diameter Dimensions are in Inches and Approximation of a
LAWN SPRINKLER, IRRIGATION PUMP
 LAWN SPRINKLER, IRRIGATION PUMP MODEL #, SP0P, SP5P, SP20P, EL0P, EL5P, EL20P SAFETY INFORMATION Please read and understand this entire manual before attempting to assemble, operate or install the product.
Allura. Widespread Lavatory Faucet SLW-4712 Installation and Service Instructions. Quick Install Guide Allura Widespread Lavatory Faucet, SLW-4712
 Widespread Lavatory Faucet SLW-4712 Installation and Service Instructions Model Numbers SLW-4712 Lavatory faucet with pop-up drain Alternate Finish Code append to part numbers when applicable -STN Satin
METERING VALVE 2" STEM GUIDED
 2" STEM GUIDED All Rights Reserved. All contents of this publication including illustrations are believed to be reliable. And while efforts have been made to ensure their accuracy, they are not to be construed
DIRECTOR COLLECTION D39. D39 Installation Manual
 DIRECTOR COLLECTION D39 D39 Installation Manual Table of Contents Introduction 1 Specifications 2 What s Included 3 Tools & Items 3 Wire Recommendation 3 Wiring Options 4 About Speaker Wire 6 Installing
Manual No: Revision: F. Mag Probe Assembly Manual
 Manual No: 576013-730 Revision: F Mag Probe Assembly Manual Notice Veeder-Root makes no warranty of any kind with regard to this publication, including, but not limited to, the implied warranties of merchantability
2003 Saturn Vue. SATURN 3.0L V6 DOHC - L-Series After VIN & Vue
 TIMING BELT Removal 1. Disconnect negative battery cable. Remove air cleaner assembly. 2. Raise and support vehicle. Remove right front wheel. Remove lower front splash shield. 3. Lower vehicle. Loosen,
STEP 1 STEP 2. Disconnect the negative terminal from both batteries.
 TROUBLESHOOTING: Please read and understand all installation instructions before proceeding with the installation. If you have questions during the installation of this product, please email H&S Motorsports
PFadvantage MF 6850/6855; Ideal 9080/9090
 MF 6850/6855; Ideal 9080/9090 Note: Indented items indicate parts included in an Quantity by Model assembly listed above MF Ideal Part Name/Description Part Number 6850 6855 9080 9090 Instruction Kit MF
Scale Feeder Manifold Water Filtration System Instruction Manual
 3M TM Water Filtration Products Scale Feeder Manifold Water Filtration System Instruction Manual For SF1XX High Flow Series Water Filtration Systems Installer: Please leave this manual with owner/operator.
Tech Tub 2 Modular Cart System
 FTT624, FTT624-USB, FTT632, FTT632-USB Tech Tub 2 Modular Cart System Assembly Guide FTT624_624-USB_632_632-USB_2018_A Check out our other products online at www.copernicused.com For assistance, please
Installation Manual v1.0: : Pulse Flow Exhaust Manifolds 2006 LBZ Duramax 6.6L EGR Equipped Vehicles
 10/11/2013 204-901-4308 - INST Installation Manual v1.0: 204-901-4308: Pulse Flow Exhaust Manifolds 2006 LBZ Duramax 6.6L EGR Equipped Vehicles Figure 1 - Kit Contents 1 Please read all instructions before
FUEL KITS P/N & 526-2
 FUEL KITS P/N 526-1 & 526-2 NOTE: These instructions must be read and fully understood before beginning installation. If this manual is not fully understood, installation should not be attempted. Failure
ARB UTILITY MANAGEMENT SYSTEMS WATER ELECTRIC GAS. E-Coder)R900i Quick Install Guide. E-Coder)R900i QUICK INSTALL GUIDE
R900i Quick Install Guide. E-Coder)R900i QUICK INSTALL GUIDE") ARB UTILITY MANAGEMENT SYSTEMS WATER ELECTRIC GAS E-Coder)R900i Quick Install Guide E-Coder)R900i QUICK INSTALL GUIDE 1 Safety & Preliminary Checks Verify that you are at the location specified on the
ARB UTILITY MANAGEMENT SYSTEMS WATER ELECTRIC GAS E-Coder)R900i Quick Install Guide E-Coder)R900i QUICK INSTALL GUIDE 1 Safety & Preliminary Checks Verify that you are at the location specified on the
5874SS/5874PB/5874PBF/VRK5874/PBA6/ PBA6HPB/PBA7 Valve/Push Button
 INSTALLATION, OPERATION & MAINTENANCE INSTRUCTIONS 1455 Kleppe Lane Sparks, NV 89431-6467 (775) 359-4712 Fax (775) 359-7424 E-mail: haws@hawsco.com website: www.hawsco.com No. 2077650(1) 5874SS/5874PB/5874PBF/VRK5874/PBA6/
Installation Guidelines
 STYLE No. CODE No. GUPB81 GUSV81R IMPORTANT: To ensure this product is installed properly, you must read and follow these guidelines. STYLE No. CODE No. GUPB87 (with Diverter) GUSV87R The owner/user of
HANDLEBAR BAG WITH PHONE CHARGER KIT
 HANDLEBAR BAG WITH PHONE CHARGER KIT P/N 2883687; 2883786 APPLICATION Verify accessory fitment at Polaris.com. BEFORE YOU BEGIN Read these instructions and check to be sure all parts and tools are accounted
Clutch Installation Guide
 Clutch Installation Guide 0 STOP! READ CAREFULLY BEFORE INSTALLING CLUTCH This clutch must be installed by a qualified installer. Improper installation or failure to replace or resurface the flywheel,
Dual Flow Manifold Systems Instruction Manual
 3M TM Water Filtration Products Dual Flow Manifold Systems Instruction Manual For DF1XX and DF2XX High Flow Series manifolds and water filtration systems Installer: Please leave this manual with owner/operator.
INSTALLATION GUIDE. Rainier Coil Pull Down Kitchen Faucet PB-K01
 INSTALLATION GUIDE Rainier Coil Pull Down Kitchen Faucet PB-K01 RECOMMENDED TOOLS AND MATERIALS Plumbers Putty Adjustable Wrench Tape Measure Basin Wrench Phillips Screwdriver Pencil Masking Tape BEFORE
INSTALLATION INSTRUCTIONS
 INSTALLATION INSTRUCTIONS Thank you for purchasing VANISH Roll-Up Cover. Agri-Cover, Inc. proudly manufactured this cover using superior quality materials and workmanship. With proper care, your cover
I-731-D/W731-D. Suction Diffuser. Important Installation Information. series 731-D and W731-D
 Important Installation Information WARNING Read and understand all instructions before attempting to install, remove, adjust, or maintain any Victaulic piping products. Depressurize and drain the piping
Model 2008 I Battery Operated Irrigation Timer with 3/4 in. Anti-Siphon Valve
 i n s t r u c t i o n m a n u a l Model 2008 I Battery Operated Irrigation Timer with 3/4 in. Anti-Siphon Valve Features Weekly or cyclical programming 4 start times per day in weekly program Irrigation
2013 IMPCO Technologies, Inc. Page 1 of 20 EPR Repair Kit Instructions (PPI-122, Rev-B)
") EPR Repair Kit Instructions PPI-122 (Rev-B) A. Introduction: This document covers the repair of the Electronic Pressure Regulator (EPR) used on Spectrum III series fuel systems. These instructions will
EPR Repair Kit Instructions PPI-122 (Rev-B) A. Introduction: This document covers the repair of the Electronic Pressure Regulator (EPR) used on Spectrum III series fuel systems. These instructions will
OWNER S MANUAL TOLL-FREE HELPLINE: (Monday - Friday / 8am - 4:30pm CST)
") LITHIUM ION BATTERY OWNER S MANUAL TOLL-FREE HELPLINE: 1-877-572-7278 (Monday - Friday / 8am - 4:30pm CST) READ ALL SAFETY RULES AND INSTRUCTIONS CAREFULLY BEFORE OPERATING STRIKEMASTER LITHIUM 40v BATTERY
LITHIUM ION BATTERY OWNER S MANUAL TOLL-FREE HELPLINE: 1-877-572-7278 (Monday - Friday / 8am - 4:30pm CST) READ ALL SAFETY RULES AND INSTRUCTIONS CAREFULLY BEFORE OPERATING STRIKEMASTER LITHIUM 40v BATTERY
THE safety accessory of the 21 st Century.
 00 006 Chevrolet SSR Signal Mirror Installation Instructions THE safety accessory of the st Century. Note: Professional Installation Recommended Warranty does not cover damage to the vehicle or mirror
Advanced Wheelchair Anti-Rollback Device INSTALLATION INSTRUCTIONS. An installation video is available at our website
 Safe t mate SM2-3 Advanced Wheelchair Anti-Rollback Device INSTALLATION INSTRUCTIONS An installation video is available at our website www.safetmate.com MODELS SM2-3 16-20 wide wheelchairs SM2-3W 22-24
FAX
 INSTALLATION INSTRUCTIONS 6090 Air Suspension Kit (pat. pending) 1999-2006 Tahoe, Suburban, Avalanche, Yukon Thank you for purchasing a quality Hellwig Product. PLEASE READ THIS INSTRUCTION SHEET COMPLETELY
Remove 4 circled pins. Route wiring along dashed line. Remove the 2 9mm nuts and black retaining plate that secure extractor.
 2015 Ford Mustang Turn Signal Hood Kit Parts List: Quantity: Tool List: Bracket & pre-installed lamp 2 Flat head screwdriver Wiring harness 1 Phillips screwdriver PB-3660 Parts Bag 1 Ratchet & Socket set
Wireless Temperature/Humidity Station
 Wireless Temperature/Humidity Station Installation Manual For Vantage Pro2 and Vantage Pro2 Plus The Wireless Temperature/Humidity Station, referred to as the Temp/Hum Station in this manual, is for use
Operations Manual Pika Harbor Smart Battery
 Operations Manual Pika Harbor Smart Battery Harbor Flex / Harbor Plus Part of the Pika Energy Island M00017-02 Harbor Smart Battery Serial Number: RCP Number: We are committed to quality and constant improvement.
Self-Adjust Clutch Installation Guide
 Self-Adjust Clutch Installation Guide 0 STOP! READ CAREFULLY BEFORE INSTALLING CLUTCH This clutch must be installed by a qualified installer. Improper installation or failure to replace or resurface the
General Operation. To set Time of Day. To set Time of Regeneration / Backwash
 1 General Operation When the system is operating one of two displays will be shown: time of day or days until the next regeneration. Pressing UP or DOWN will toggle between the two choices. To set Time
MODEL 11A REGULATOR
 MODEL 11A17-001 REGULATOR REBUILD INSTRUCTIONS Important: Any maintenance, service or repair should be performed by trained and experienced service technicians. Proper tools and equipment should be used
INSTALLATION INSTRUCTIONS
 INSTALLATION INSTRUCTIONS MODEL: GRAFTON RH-510 1 REV.A Restoration Hardware Balance Pressure Tub /Shower Set Specification Diagram Ensure that the stop ring () is correctly installed, prior to finished
Figure 1 - Kit Contents
 11/11/2009 204-900-4248 - INST Installation Manual v1.2: 204-900-4248: Pulse Flow Exhaust Manifolds 2001-2004 LB7 Duramax 6.6L Note: OFF-ROAD USE ONLY if used on California emissions LB7 or EGR Equipped
CW-2651 (WL1100) CB-2651 (BL1100)
 CB-2651 (BL1100)") INSTALLATION INSTRUCTIONS C1-2650 (LB1100) CROSS HANDLE BATH SHOWER MIXER CW-2651 (WL1100) WHITE LEVER BATH SHOWER MIXER CB-2651 (BL1100) BLACK LEVER BATH SHOWER MIXER C1-2650 (LB1100) CW-2651 (WL1100)
INSTALLATION INSTRUCTIONS C1-2650 (LB1100) CROSS HANDLE BATH SHOWER MIXER CW-2651 (WL1100) WHITE LEVER BATH SHOWER MIXER CB-2651 (BL1100) BLACK LEVER BATH SHOWER MIXER C1-2650 (LB1100) CW-2651 (WL1100)
Fluid-O-Tech ROTOFLOW ROTARY VANE PUMP REBUILD MANUAL
 Fluid-O-Tech PUMP TECHNOLOGY AT ITS BEST WWW.FLUID-O-TECH.COM Office: 161 Atwater St., Plantsville, CT 06479 Phone: (860) 276-9270 Fax: (860) 620-0193 ROTOFLOW ROTARY VANE PUMP REBUILD MANUAL 08/09 Ed.,
INSTALLATION GUIDE. Tenino Retro Pot Filler Hi-Rise Kitchen Faucet PB-K05
 INSTALLATION GUIDE Tenino Retro Pot Filler Hi-Rise Kitchen Faucet PB-K05 RECOMMENDED TOOLS AND MATERIALS Sink Hole Cover (Optional) Allen Wrench Set Plumbers Putty Adjustable Wrench Tape Measure Basin
Technical Support (707)
") Installation Instructions CONSOLE MEGASHIFTER Fits: 1982-1992 Camaro & Firebird w/automatic Transmission *except 1988-1992 Firebird Formula Model Catalog # 80692 WORK SAFELY! For maximum safety, perform
Installation Instructions CONSOLE MEGASHIFTER Fits: 1982-1992 Camaro & Firebird w/automatic Transmission *except 1988-1992 Firebird Formula Model Catalog # 80692 WORK SAFELY! For maximum safety, perform
Full Flow Drinking Water System Model: 3MFF100
 Installation and Operating Instructions For Full Flow Drinking Water System Model: 3MFF100 System tested and Certified by NSF International against NSF/ANSI Standard 42 and 53 for the reduction of the
Owner s Manual Pelican Whole House Iron and Manganese Filtration System
 Owner s Manual Pelican Whole House Iron and Manganese Page 2 Copyright 2011 Enviro Water Solutions Inc. All rights reserved. All information contained herein is the property of. makes no warranty of any
M7 R52S & R53 Cold Air Intake Installation Guide 53-3M7301
 M7 R52S & R53 Cold Air Intake Installation Guide 53-3M7301 M7 Speed engineers and manufactures the highest quality MINI COOPER accessories and performance parts available anywhere on Planet Earth! Please
I-317. AWWA Check Valves WARNING INSTALLATION AND MAINTENANCE INSTRUCTIONS SERIES 317 WARNING
 Read and understand all instructions before attempting to install, remove, adjust, or perform maintenance on any Victaulic piping products Wear safety glasses, hardhat, and foot protection. Failure to
Installation Manual v1.1: The ATS Arc-flow Intake Manifold Dodge-Cummins 5.9. Please read all instructions before installation.
 Installation Manual v1.1: The ATS Arc-flow Intake Manifold 2006-07 Dodge-Cummins 5.9 Please read all instructions before installation. Thank you for purchasing the ATS Arc-flow Intake Manifold. This manual
WATCH GUARD 440 SERIES FLOAT VALVES INSTALLATION INSTRUCTIONS MODELS: T, TX, T, BT,
 WATCH GUARD 440 SERIES FLOAT VALVES INSTALLATION INSTRUCTIONS MODELS: 440-22T, 440-22TX, 440-23T, 440-23BT, 440-24 Overview The Watch Guard 440 Series of float valves fills and maintains fluids in reservoirs.
Complete Home Water Protection
 Valve Complete Home Water Protection leaksmart is an innovative, wireless system that eliminates the threat of water damage by keeping you in constant control of your home s water supply. It not only detects
INSTALLATION INSTRUCTIONS
 INSTALLATION INSTRUCTIONS FRONT DISC BRAKE CONVERSION KITS A148-9 & A148-15 1949-54 Chevy Trucks Thank you for choosing STAINLESS STEEL BRAKES CORPORATION for your braking needs. Please take the time to
INSTALLATION INSTRUCTIONS
 INSTALLATION INSTRUCTIONS Thank you for purchasing ROLTECTM Electric Hopper Conversion. Agri-Cover, Inc. proudly manufactured this hardware using superior quality materials and workmanship. With proper
INSTALLATION INSTRUCTIONS Air Spring Kit Dodge 2500 with Rear Coil Springs IMPORTANT NOTES
 559-734-7451 800-367-5480 FAX 559-734-7460 INSTALLATION INSTRUCTIONS 6214 Air Spring Kit Dodge 2500 with Rear Coil Springs Thank you for purchasing a quality Hellwig Product. PLEASE READ THIS INSTRUCTION
LOW PRESSURE BALANCED VALVE DIAPHRAGM BALANCED
 DIAPHRAGM BALANCED All Rights Reserved. All contents of this publication including illustrations are believed to be reliable. And while efforts have been made to ensure their accuracy, they are not to
IMPORTANT SAFETY INSTRUCTIONS
 OWNER S MANUAL FLO-MASTER XP2 SERIES PUMPS IMPORTANT SAFETY INSTRUCTIONS When installing and using this electrical equipment, basic safety precautions should always be followed, including the following:
Remove the 3-11mm nuts holding mirror on. Don t drop the nuts!
 2005-2012 Ford Mustang Puddle Lamp Kit Parts List: Quantity: Tool List: LED Lamps 2 Flat head screwdriver Seals 2 Ratchet & Socket set OR Nuts 2 Adjustable Wrench Wiring harness 1 Drill & 11/16 th bit
Self-Priming Centrifugal Pumps Refer to pump manual for General Operating and Safety Instructions.
 Please read and save this Repair Parts Manual. Read this manual and the General Operating Instructions carefully before attempting to assemble, install, operate or maintain the product described. Protect
Installation Instructions
 86-95 Suzuki Samurai HD Transfer Case Mount (SKU# STC-EOS) Revised 4/11/14 Installation Instructions Suggested Tools: CAUTION: Safety glasses should be worn at all times when working with vehicles and
Ventus Single Handle Vessel Bathroom Faucet
 INSTALLATION MANUAL Ventus Single Handle Vessel Bathroom Faucet KEF-15000 www.kraususa.com I toll free: 1.800.775.0703 I 2014-2015 Kraus USA Inc. I REV. August 18, 2016 Thank you for your purchase We would
INSTALLATION INSTRUCTIONS
 INSTALLATION INSTRUCTIONS Thank you for purchasing TONNOSPORT Roll-Up Cover. Agri-Cover, Inc. proudly manufactured this cover using superior quality materials and workmanship. With proper care, your cover
Installation Instructions 6L80 Cast Aluminum. Deep Transmission Fluid
 Installation Instructions 6L80 Cast Aluminum Deep Transmission Fluid Pan SPECIFICALLY DESIGNED FOR 2010-2014 CAMARO SS (V8) Part Number 70391 (see www.bmracing.com for the latest vehicle fitment applications
Gradient Pumping for Pressure, Flow, and Concentration Modes
 Gradient Pumping for Pressure, Flow, and Concentration Modes With Teledyne Isco Syringe Pumps Syringe Pump Technical Bulletin TB24 Overview Gradient pumping is used in applications requiring time-controlled
AC Irrigation and Propagation Controllers I Four Station, 5006-I and 5006-IP Six Station
 AC Irrigation and Propagation Controllers 5004-I Four Station, 5006-I and 5006-IP Six Station I N S T R U C T I O N M A N U A L Table of contents Introduction 1 1. Specifications 1 2. Controller Mounting
SPEEDKEY KIT P/N APPLICATION BEFORE YOU BEGIN KIT CONTENTS. Instr Rev Page 1 of 9. GEM e2, e4, e6, el XD
 SPEEDKEY KIT P/N 2883054 APPLICATION GEM e2, e4, e6, el XD BEFORE YOU BEGIN Read these instructions and check to be sure all parts and tools are accounted for. Please retain these installation instructions
REARVIEW MIRROR AND BACKUP CAMERA KIT
 REARVIEW MIRROR AND BACKUP CAMERA KIT P/N 2881483 APPLICATION Verify accessory fitment at Polaris.com. BEFORE YOU BEGIN Read these instructions and check to be sure all parts and tools are accounted for.
INSTALLATION INSTRUCTIONS
 2802 INSTALLATION INSTRUCTIONS SECTION - AIR SPRING SECTION 2 - AIR ACCESSORY -6 ! IMPORTANT PLEASE DON T HURT YOURSELF, YOUR KIT OR YOUR VEHICLE. TAKE A MINUTE TO READ THIS IMPORTANT INFORMATION. DO NOT
AGRI-COVERTM SWITCH CONTROL INSTRUCTIONS
 AGRI-COVERTM SWITCH CONTROL INSTRUCTIONS Use these instructions in place of the rocker switch and solenoid sections in your roll tarp or ROLTECTM Electric Hopper Conversion instructions. Some installs
INSTALLATION INSTRUCTIONS Air Spring Kit IMPORTANT NOTES
 INSTALLATION INSTRUCTIONS 6119 Air Spring Kit Thank you for purchasing a quality Hellwig Product. PLEASE READ THIS INSTRUCTION SHEET COMPLETELY BEFORE STARTING YOUR INSTALLATION IMPORTANT NOTES DO NOT