Read all Instructions before beginning!!!!
|
|
|
- Alexia Newman
- 6 years ago
- Views:
Transcription

1 Read all Instructions before beginning!!!! Caution EXTREME DANGER Caution Do not use or mix any other manufacturer s products with any Nitrous Express products. Do not use or mix any Nitrous Express products with any other manufacturer s products. THESE INSTRUCTIONS APPLY TO NITROUS EXPRESS PRODUCTS ONLY! DIRECT PORT (NOZZLE SYSTEM) INSTRUCTIONS CAUTION: An experienced technician familiar with the use and handling of high-pressure cryogenic gases should install this system. If you have any doubt about your skills this system should be taken to a qualified shop for installation. If you have decided to do the install yourself please read and understand all of these instructions before you start. Some of these instructions may or may not apply to your vehicle, if you have any questions please call our tech department :00A.M.-5:00P.M. CST. Before starting, disconnect the negative terminal on the battery. If you have any questions about your particular vehicle consult a shop manual. These instructions are divided into 6 sections: 1. Mounting the Bottle & Routing the Supply Line 2. Removing and Drilling the Intake Manifold 3. Plumbing the Hardlines and Mounting the Solenoids 4. Plumbing the Fuel System 5. Wiring the system 6. Safety tips 7. Testing the System 8. Power Tuning Tips Before starting any installation steps: 1) Never use Teflon tape on any system fittings. Tape debris will cause numerous problems ranging from clogged solenoids to blocked jets. Use the liquid thread sealer furnished with your NX system (for use on straight thread and NPT fittings, DO NOT USE ON TAPERED AN FITTINGS). A drop is all it takes. 2) Have your nitrous bottle filled by a reliable source, being sure it is filled to the correct capacity with FILTERED NY-TROUS+ nitrous oxide.
 must be installed. The positioning of the bottle should be as shown in illustration A.")
2 MOUNTING THE BOTTLE The nitrous bottle should be mounted in the trunk area or outside of the passenger compartment. If this is not possible or practical a NHRA approved blow down tube and vent fitting (PN s 11708, 11709) must be installed. The positioning of the bottle should be as shown in illustration A. This will allow the siphon tube to be covered at all times. The mounting brackets should be assembled on the bottle with the short bracket approx. 2 from the bottom. The long bracket should be place approx. 7 above the lower bracket on 10lb bottles. The upper bracket should be approximately 12 above the lower bracket on 15lb bottles. Note: Before drilling holes to mount the bottle, be sure to check for clearance beneath the mounting surface i.e.: fuel tank, fuel lines, brake lines, etc. ILLUSTRATION A To route the supply line, drill a ¾ hole beneath the valve discharge port. Before beginning the routing procedure; place tape over both ends of the line. Now route the line beneath the car being sure to avoid all exhaust, suspension and other moving parts. Following the factory fuel line is usually the safest. Be careful to avoid any positive 12-volt sources, one small spark to the outer braid of the line will destroy it!!! Secure the line carefully, zip ties work best here. Before connecting the line to the bottle, purge the line of all possible debris by carefully blowing compressed air through the line for several seconds. Connect the line to the bottle nipple and tighten securely. REMOVING AND DRILLING THE INTAKE MANIFOLD Note: NX offers intake plumbing services with a 1 week turnaround time. See for more info. Before any modifications are made to the engine compartment, we suggest that you make a diagram of all hoses, wiring, and linkages. Measure your engine, (intake manifold, valve covers, linkages, etc.) for nozzle and plumbing clearances. Now remove the intake manifold - If you have question regarding this step please consult a service manual on your engine type. Drilling the Intake Manifold for 90 Degree Nozzles - for Shark, Piranha, SSV and VXL nozzles. (If you have Annular style nozzle such as the STD or Triple-D, Skip to the next section) 1) Mark the center of each runner approximately inches from the manifold flange in a location that locates the nozzles in a position that clears the valve covers, linkages, etc. This distance is not critical to overall performance; however, the higher up the runner the nozzle is placed the harder the Hit will be when the system is engaged. 2) This step is critical to a successful installation. The use of a Bridgeport style mill is suggested. The nozzle mounting hole should be tilted back toward the manifold plenum degrees to ensure adequate valve
 If your system is furnished with Shark Nozzles drill each runner using an R (.339 ) bit. Tap each hole to a uniform depth using a 1/8 NPT tap.")
 If your system is furnished with VXL nozzles drill each runner using an I (.272 ) drill bit. Tap each hole to a uniform depth using a 5/16-24 tap. 3) Debur the holes inside and out.")
 Using the pictures in Illustration B as a guide, map out how you want your NX system to look after it is installed.")
 1) Make sure your manifold is designed to work with an annular style nozzle, if it does not have mounting pads cast or machined into the")
3 cover clearance. Measure for nozzle and plumbing clearance before drilling!! Each hole must be in alignment, front to rear, and top to bottom. a) If your system is furnished with Shark Nozzles drill each runner using an R (.339 ) bit. Tap each hole to a uniform depth using a 1/8 NPT tap. b) If your system is furnished with Piranha or SSV nozzles drill each runner using a.250 drill bit. Tap each hole to a uniform depth using a 1/16 NPT tap. c) If your system is furnished with VXL nozzles drill each runner using an I (.272 ) drill bit. Tap each hole to a uniform depth using a 5/16-24 tap. 3) Debur the holes inside and out. 4) Install the nozzles in the tapped holes using a Teflon based paste sealer. Be sure each nozzle is installed to a uniform depth. 5) Using the pictures in Illustration B as a guide, map out how you want your NX system to look after it is installed. Illustration B Drilling the Intake Manifold for Annular (Straight Thru) Nozzles STD or Triple D nozzles. (If you have 90 degree nozzles refer to the section above) 1) Make sure your manifold is designed to work with an annular style nozzle, if it does not have mounting pads cast or machined into the manifold you will have to add nozzle mounting bungs (NX Part #16309). (See Illustration C ) Illustration C 2) Mark the center of each runner approximately inches from the manifold flange in a location that locates the nozzles in a position that clears the valve covers, linkages, etc. This distance is not critical to overall performance; however, the higher up the runner the nozzle is placed the harder the Hit will be when the system is engaged. 3) This step is critical to a successful installation. The use of a Bridgeport style mill is suggested. Measure for nozzle and plumbing clearance before drilling!! Each hole must be in alignment, front to rear, and top to bottom. 4) You can now drill and tap the manifold for the nozzle size that came in your system. (Or weld in bungs if applicable)
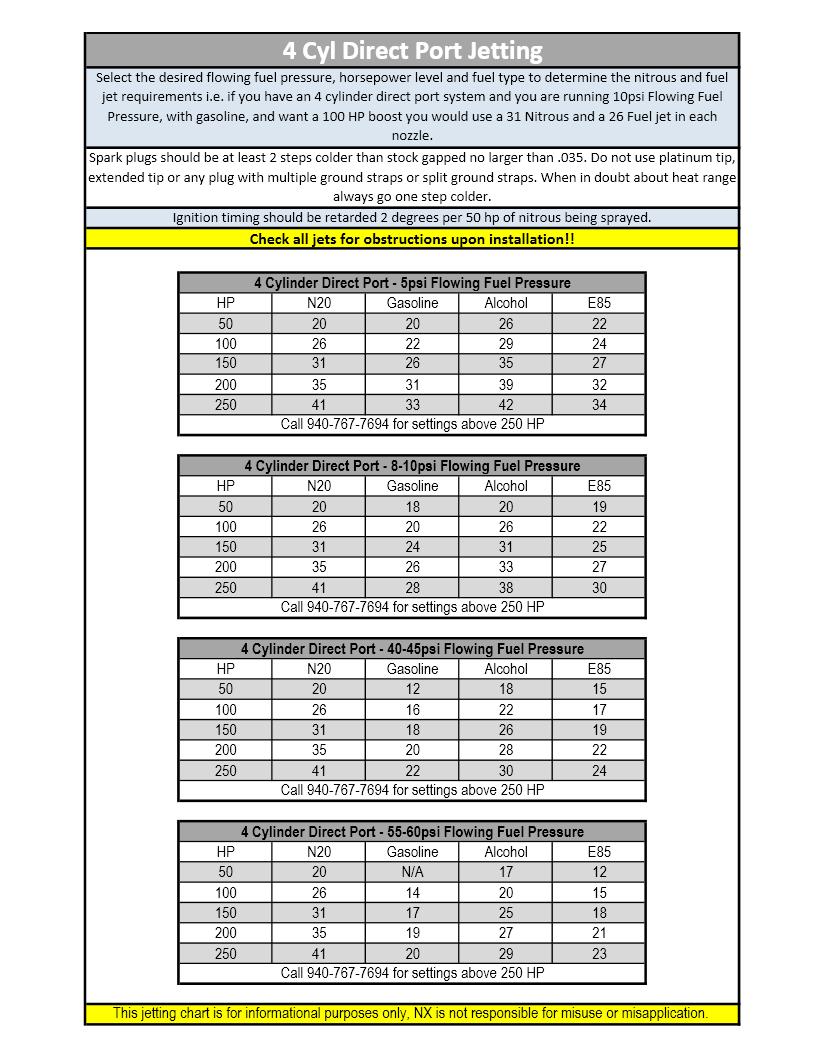
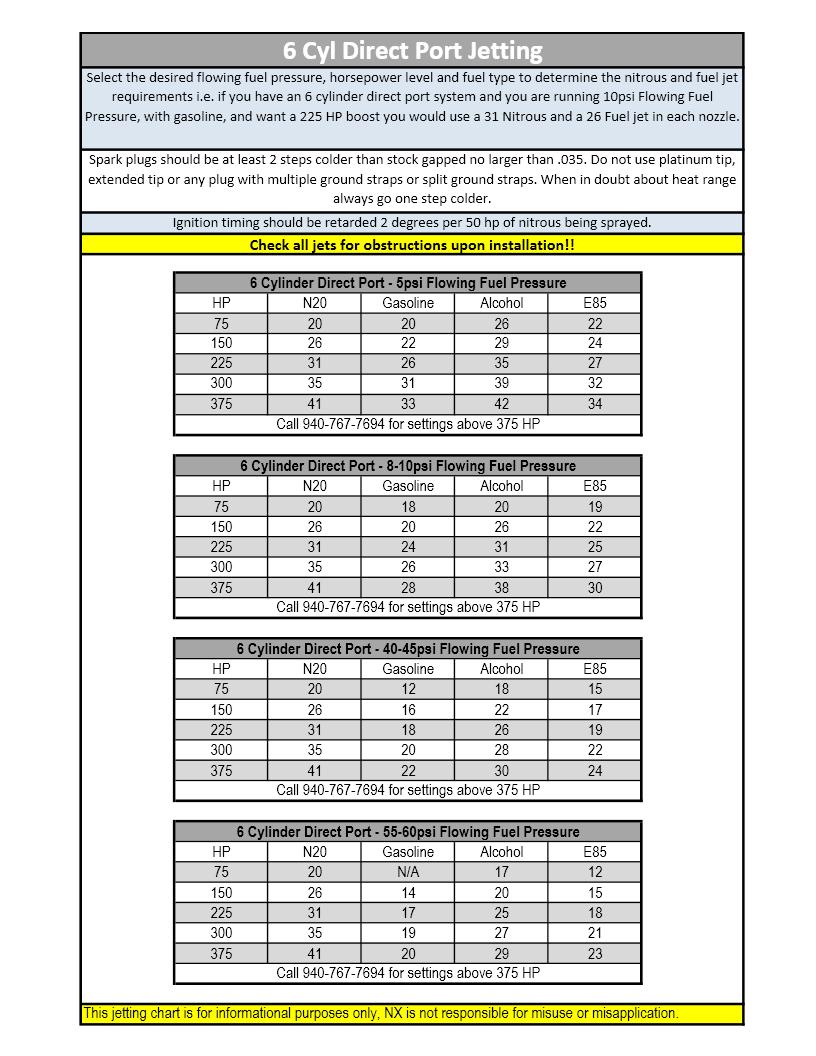
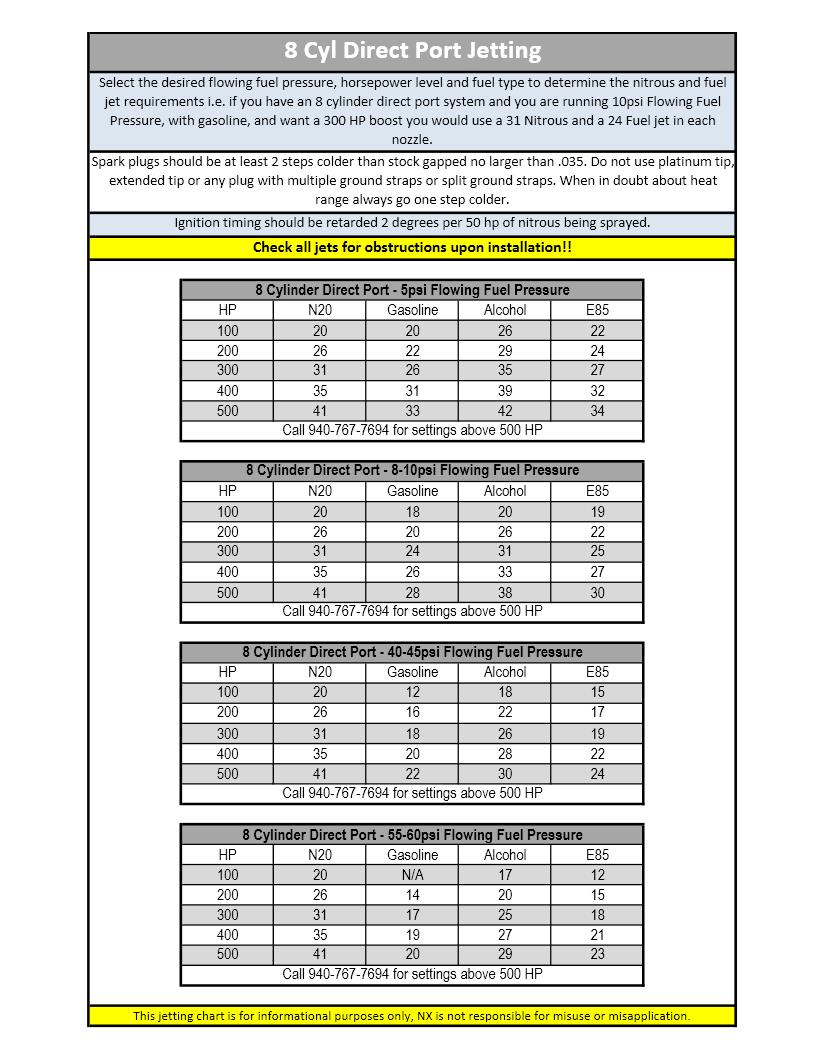
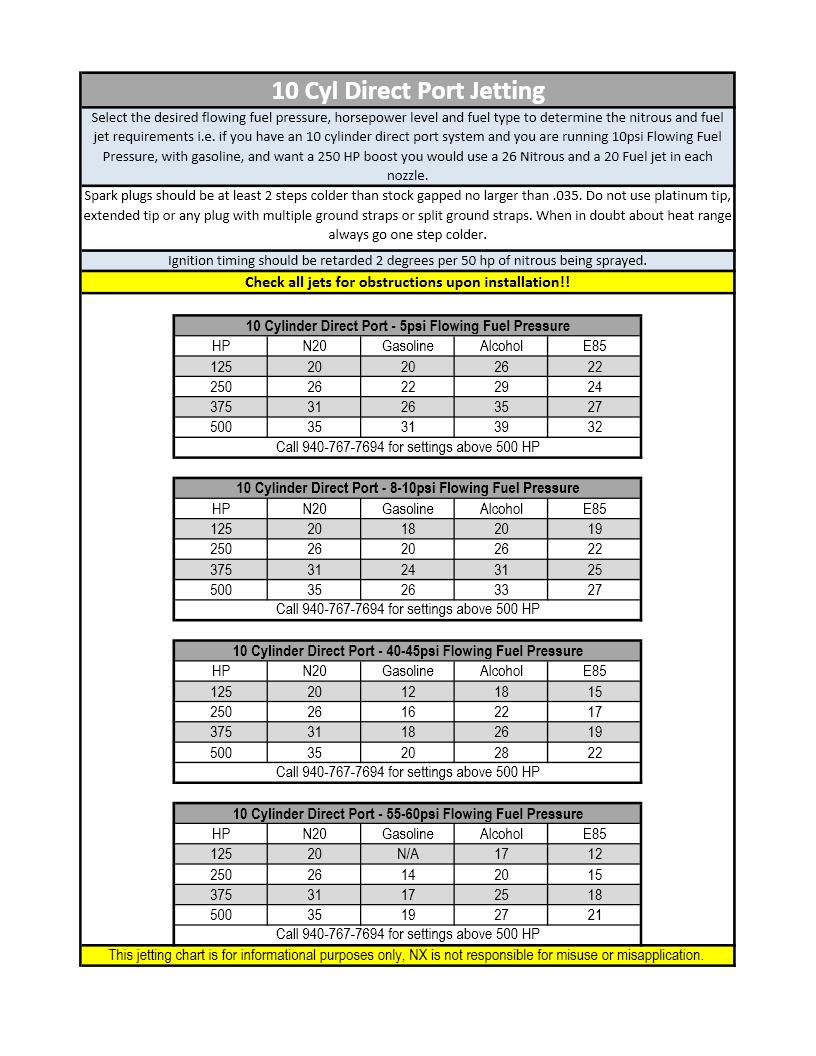
4 a) If your system is furnished with STD nozzles or 1/16 Triple D nozzles, drill each runner using a.250 drill bit. Tap each hole to a uniform depth using a 1/16 NPT tap. b) If your system is furnished with 1/8 NPT Triple D nozzles, drill each runner using an R (.339 ) bit. Tap each hole to a uniform depth using a 1/8 NPT tap. 5) Debur the holes inside and out. 6) Install the nozzles in the tapped holes using a Teflon based paste sealer. Be sure each nozzle is installed to a uniform depth. 7) Using the pictures in Illustration C as a guide, map out how you want your NX system to look after it is installed. Plumbing the Hardlines and Mounting the Solenoids 6) Position the solenoids and distribution blocks on each side of the manifold so as not to interfere with any linkages or other equipment. Cut, bend, install B-nuts, sleeves and flair each 3/16 line to support the solenoids and distribution blocks in the desired location. 7) Using the supplied jumper lines and billet distribution Y fittings, connect the nitrous solenoids together. 8) After all installation on the manifold is complete, flush all lines and orifices using compressed air. Attention to detail here will save you time and money in the long run. Do not shortcut this step! 9) Reinstall the intake manifold and carburetor; hook up all vacuum lines, and linkages using the diagram prepared before disassembly. Reconnect the fuel lines and tighten securely. 10) Install the nitrous supply line leading from the bottle to the Y fitting. NOTE: Tape over both ends of the nitrous supply line before beginning. a) Route lines carefully to prevent the possibility of restricting any nitrous flow. If routed under vehicle, locate and drill a 3 4 inch diameter hole in a suitable area near the bottle valve for the main line. b) Starting at the bottle nipple, route the line to the engine compartment. Following the factory fuel lines is usually the best path. Note: Keep maximum clearance between all moving parts, suspension components and hot engine components, securing the supply line where possible ( Zip-Ties work best here). Be especially careful of the feed line being near any HOT electrical leads, even a small spark will result in a nitrous leak. If the line is too long, coil the excess near the bottle, if it is too short; try rerouting the line to gain length. If this does not work contact the factory for a custom length supply line. c) After the nitrous supply line is in place, remove the tape from both ends. d) Before attaching the nitrous supply line, purge it of any foreign matter that may have accidentally entered the line during installation; This is done by removing the tape used during installation and blowing compressed air through the feed line. (Have an assistant hold the end of the hose aimed away from the car and any people. Wearing a glove is recommended). e) Immediately after the purging operation, connect the main feed line to the N2O solenoids and the nitrous bottle, tighten securely. PLUMBING THE FUEL SYSTEM 1) Your NX system requires a dedicated fuel pressure regulator. If you use a multi stage system a regulator must be used for each stage. Mount the regulator as close to the fuel solenoid as practical. 2) The N2O system fuel regulator must be fed by direct pump pressure. Do not connect the nitrous system fuel regulator through the carb regulator. 3) All NX systems are designed to be tuned by flowing fuel pressures. This information can be found on the jetting card under FFP. Using the NX Master Flo-check (PN or 15529) this pressure can easily be calibrated. These flowing pressures are only a base line tune up and will generally be rich. 4) Fine-tune your combination by reading your spark plugs after a full throttle pass. When the tune up for your combination is correct, the spark plug should be almost completely white with little or no color on the porcelain. For the ultimate in reliability and safety, our fuel pressure safety switch should be used. (PN for low pressure
 It is not necessary for you to use a dedicated fuel pump for your nitrous system if the pump flows enough to support your engine and nitrous power.")
5 and for EFI pressures) Note: A higher fuel pressure will not result in a safer system. Too much fuel can cause the same type of engine damage as too little fuel. 5) It is not necessary for you to use a dedicated fuel pump for your nitrous system if the pump flows enough to support your engine and nitrous power. However, if you feel it is necessary to run a dedicated pump you should run a bypass line with a maximum.020 orifice from the fuel pressure regulator, or fuel solenoid bypass port back to the fuel tank to eliminate air from the system and to limit pressure creep. 6) All NX systems are calibrated at 1000-PSI bottle pressure. The safe operating range is 900 PSI to 1050 PSI. WIRING THE SYSTEM 1) Mount the master arming switch within easy reach, and plain sight of the driver. 2) The system is furnished with a universal wide open throttle (WOT) switch. This WOT micro-switch is designed to work with the universal mounting bracket. Its maximum capacity is 10 AMPS and should only be used to activate low amp draw accessories or in conjunction with a relay. a) Assemble the micro-switch on the mounting bracket using the supplied bolts and nuts. The switch can be mounted in several different configurations, select the position you require and tighten the bolts. Do not over-tighten; the plastic micro switch can be damaged. b) The mounting bracket is made of easily bend- able material and may be formed to any con- figuration that will allow it to place the WOT switch in a location where it will be activated above 80% throttle. c) The activation arm on the micro-switch is extra-long. This allows you to twist, bend, or cut it to aid in the ease of installation. 3) The best power source for the nitrous system is the terminal on the back of the alternator labeled BAT. The next best power source is directly to the Positive post on the battery. Do not try to Splice into the factory wiring harness for a power supply, this will not have adequate amperage to operate the solenoids. If desired a 60 amp fuse may be installed in this circuit. 4) Solder all connections for a permanent trouble free installation. NOTE: The nitrous and fuel solenoids are rated only for intermittent duty. Do not engage either solenoid for more than 20 continuous seconds without a 5 minute cooldown period between activation. Solenoids that have burned or scorched electro-magnets will not be replaced under warranty.
6 Testing the System 1) Re-check all installation procedures to be sure nothing has been omitted. 2) Be sure the nitrous bottle has not been opened and the supply line is empty! 3) Using the toggle switch ARM the system. 4) Test solenoid operation by using the system activation switch. Both solenoids should Click (The nitrous solenoid should click loud, and the fuel solenoid will click soft). If they do not, re-verify all electrical connections and wiring diagrams. 5) Carefully open the nitrous bottle and verify that no fittings or hoses are leaking. Correct any leaks before proceeding. 6) Start engine and check for any fuel leaks. Correct any leaks before proceeding. 7) The Nitrous System is now ready for normal usage. 8) All NX systems are intended for off road use only and should only be used in that context. 9) Choose a suitable testing area, such as your local race track is best. Drive the vehicle to verify all operations are normal and the throttle linkage is operating properly. 10) Pre-stage the vehicle, arm the system, and purge the air from the supply line using 3 one-second bursts from the purge valve (PN 15601). Stage and launch the vehicle, shutting off at the 60ft mark. Check all system components to verify proper operation, correct any noted problems before proceeding. 11) Repeat the staging procedure, the system should be crisp and responsive, make a full throttle pass and shut the engine off for a spark plug check. Verify each cylinder is getting equal amounts of N2O and fuel. The plugs should have look nearly new, if they are sooty or black the fuel pressure must be reduced for optimum performance. Additional parts recommended for operating your nitrous system satisfactorily: Nitrous Pressure gauge (PN 15508) - STRONGLY RECCOMMENDED Purge Valve (PN 15601) Bottle Jacket (PN for 10lb or PN for 15lb bottles) Fuel pressure Safety Switch (PN for 3-10psi or PN for psi) Bottle heater (NX 15941) - STRONGLY RECCOMMENDED NHRA legal blow down vent fitting (PN 11709) NHRA legal blow down vent tube (PN 11708) SAFETY TIPS Do not attempt to start engine if nitrous has been accidentally injected while the engine was not running. Disconnect coil wire and turn motor with throttle wide open for several revolutions before attempting to restart. If it is not possible to disable the ignition then the spark plugs must be removed and the engine cleared of all nitrous before attempting to start engine. 1. Never permit oil, grease, or any other readily combustible substances to come into contact with nitrous cylinders, valves, solenoids, hoses and fittings. Oil and certain gases (such as oxygen and nitrous oxide) may combine to produce a flammable condition. 2. Never interchange solenoids or other appliances used for one compressed gas with those used for another. 3. Identify the gas content by the label on the bottle before using. If the bottle is not identified to show the gas contained, return the bottle to the supplier. 4. Do not deface or remove any markings, which are used for content identification. 5. Cylinder valves should be closed except when nitrous is actually being used. 6. Notify supplier of any condition, which might have permitted any foreign matter to enter the valve or bottle. 7. Never drop or violently strike the bottle 8. Keep valves closed on all empty bottles to prevent accidental contamination.
7 POWER TUNING TIPS: Nitrous oxide works well with all applications; 4 cycle, 2 cycle, diesel, and rotary engines. Each one has individual tuning characteristics, and these tips apply generally to each one. Nitrous oxide is referred to as Liquid Supercharging because it, in effect, does the same thing as a mechanical supercharger, adding more fuel and oxygen into each cylinder, thus producing more power. The biggest enemy of all supercharged, turbo charged and nitrous injected engines is DETONATION. The use of higher-octane fuel, and or a combination of better fuel and timing retard can control this. Remember detonation is a spark plug, head gasket and engine KILLER. 1. Your engine should be tuned to its maximum power prior to nitrous usage. 2. The ignition is an integral part of the nitrous system and must be able to ignite the mixture under very high cylinder pressures. The hotter the spark the better! 3. In stock engine applications and street usage the spark plugs should be at least 2 steps colder than stock. Do not use platinum tip, extended tip or any plug with multiple ground straps or split ground straps. When in doubt about heat range always go one step colder. A spark plug that is to Hot will cause detonation, burned plugs, poor performance, and engine damage. In competition engines always use the coldest plug available. Never use an extended tip plug in a racing engine. 4. The NX nitrous system is so advanced, (technology, engineering, and workmanship) that huge amounts of timing retard is not usually required. We recommend 2 degrees timing retard for each 50 horsepower boost as a starting point. Your engine may need more or less depending on your combination. 5. Your fuel system is also an integral part of the nitrous system, be sure it is in top shape and all filters are clean. 6. Engine operating temperature should be between 160 and 200 degrees prior to nitrous usage. 7. Never lug your engine and hit the nitrous system, use the system at wide-open throttle only, nitrous should not be used below 3000 rpm s. If you do any of the above a serious Back Fire could result in engine damage. 8. The better the exhaust system the better the nitrous system will work. 9. Do not attempt to drill or alter the jets, solenoids, or the tubes in the nitrous plate. These items are engineered to their maximum capability. Any modification you can make will decrease power and destroy engine parts. 10. Do not mix or attempt to match any other brand solenoids, plate, or nozzles with this system. Any attempt at this could lead to serious engine damage. 11. All of our systems are designed to operate at 1000 PSI bottle pressure. This is extremely important and cannot be stressed enough. If your bottle pressure is below 1000 PSI the system will run rich and will not produce the advertised horsepower. If the bottle pressure is above 1000 PSI the system will run lean, possibly damaging engine parts. This pressure is easily monitored by using a NX liquid filled pressure gauge (PN 15509). Note: When the ambient temperature is below 97 degrees a bottle warmer is required (PN or 15941). An NX bottle jacket (PN15945 or 15946) will help stabilize bottle pressure in the winter and summer. CAUTION: NEVER USE AN OPEN FLAME TO HEAT A NITROUS BOTTLE. THIS IS A VERY DANGEROUS AND POTENTIALLY FATAL PRACTICE!!!!!!!!!!! 12. A purge valve (PN 15601) is recommended on all NX systems. When the weather begins to get hot a purge valve is worth up to a tenth of a second on a 1 4 mile pass. Note: The correct purging procedure for drag racing is: 1. Complete the burnout. 2. Light the pre-stage bulb. 3. Push the purge button three times, one second each. 4. Stage immediately, GO FAST. 13. If there is a question about the purity of your nitrous supply, a filter (PN15610 or 15607) should be used when refilling your bottle. Just attach the filter to your bottle when you take it to be refilled. Contaminated nitrous will cause serious damage to the nitrous solenoids and possibly to your engine. This is a lifetime renewable filter. 14. If you have questions about the suitability of your torque converter or gear ratios, call the factory tech line for the inside scoop. 15. Your nitrous bottle should be turned off when not in use (even between runs). An NX remote bottle opener (PN 11107) will make this task much easier. 16. Start with the lowest power setting in your system. Don t try to be the track Hero on your first pass. Remember start out small and work your way up, NX systems produce more real horsepower than any other brand on the market today. 17. If the solenoids must be disassembled for cleaning or rebuilding always use the proper wrench (PN 15921). Do not use any clamping devise on the solenoid tower, instant non-warranty, damage will result. 18. If you run an NX system of spraying more than 50hp on 4cyl, 75hp on 6cyl or 100hp on 8cyl you must use a high octane racing type fuel. These are some tips to help you choose and maintain the correct fuel for your application: A. The most important statistic you should look for in the fuel specifications is the MON or m otor octane number. In most cases the higher the number the more timing you can run and detonation will not be a problem
8 B. Most V-8 or V-12 engines with stock compression will run on 93 unleaded pump gas with up to 150 horsepower boost, most 4 or 6 cylinders with stock compression can use up to 75 horsepower. C. Racing engines with high compression or higher must run racing fuel. The higher the compression, and the higher the boost, the higher the MON must be. D. With nitrous usage usually the highest MON available is the one that should be used. E. All NX systems are calibrated to use fuel with.730 specific gravity or SG. If you use a fuel with a lower SG you must use a larger fuel jet to compensate for the lighter fuel. If you use a fuel with a higher SG, a smaller fuel jet will be required. Most unleaded pump gas is.730 SG or above. F. Racing fuel should be stored in an airtight, dark container. Exposure to atmosphere allows very important elements to evaporate, lowering the octane of the fuel. Sunlight oxidizes the lead contained in racing fuel, since this is the most important ingredient used to raise octane it must be protected. G. Never leave the fuel in your car between race days. This allows evaporation of the very important High end hydrocarbons and lowers the octane of the fuel. H. Never buy racing fuel from an underground or vented storage tank. Always demand to see where and how the fuel is stored; a sealed drum is the only correct way. I. AV gas or aviation fuel is not compatible with nitrous usage, don t be tempted by the cheap price, instant engine damage will result! J. For a fuel recommendation, contact your NX dealer. 19. All vehicles, including full competition race cars, must have an alternator to provide adequate amperage required by today s racing accessories. Add up all the amps required by your car, you ll be surprised! 20. If you have trouble with your NX system or any related parts, call your dealer first. If you still need help call the factory tech line :00AM-5:00PM CST Mon-Fri. We are the nitrous experts and will give straight answers to your questions. In conclusion. This instruction sheet and power tuning tips are valid only for a NX system. If you have a kit from another manufacturer this information will not help you! A tune up from any other brand of nitrous kit will not work with the NX Next Generation technology. DO NOT LISTEN TO: A. YOUR BUDDY! B. YOUR BUDDY S FRIEND! C. THE LOCAL NITROUS GURU! D. ANY ARTICLE IN ANY MAGAZINE If you follow the foregoing suggestions, your NX system will operate trouble free and provide years of thrills. ABOVE ALL REMEMBER TO RACE SAFE AND HAVE FUN!
9
10
11
12
Read all Instructions before beginning!!!!
 Read all Instructions before beginning!!!! Caution EXTREME DANGER Caution Do not use or mix any other manufacturer s products with any Nitrous Express products. Do not use or mix any Nitrous Express products
Before starting, disconnect the negative terminal on the battery. If you have any questions about your particular vehicle consult a shop manual.
 DRY NITROUS SYSTEM INSTALLATION INSTRUCTIONS CAUTION: An experienced technician familiar with the use and handling of high-pressure cryogenic gases should install this system. If you have any doubt about
Read all Instructions before beginning!!!!
 Read all Instructions before beginning!!!! Caution EXTREME DANGER Caution Do not use or mix any other manufacturer s products with any Nitrous Express products. Do not use or mix any Nitrous Express products
Read all Instructions before beginning!!!!
 Read all Instructions before beginning!!!! Caution EXTREME DANGER Caution Do not use or mix any other manufacturer s products with any Nitrous Express products. Do not use or mix any Nitrous Express products
Before starting, disconnect the negative terminal on the battery. If you have any questions about your particular vehicle consult a shop manual.
 CAUTION: An experienced technician familiar with the use and handling of high-pressure cryogenic gases should install this system. If you have any doubt about your skills this system should be taken to
DIRECT PORT (NOZZLE SYSTEM) INSTRUCTIONS MOUNTING THE BOTTLE
 INSTRUCTIONS MOUNTING THE BOTTLE") DIRECT PORT (NOZZLE SYSTEM) INSTRUCTIONS Congratulations on the purchase of your Nitrous Express Direct Port system. Nitrous Express utilizes only the highest quality components designed for the use of
DIRECT PORT (NOZZLE SYSTEM) INSTRUCTIONS Congratulations on the purchase of your Nitrous Express Direct Port system. Nitrous Express utilizes only the highest quality components designed for the use of
Read all Instructions before beginning!!!!
 Read all Instructions before beginning!!!! Caution EXTREME DANGER Caution Do not use or mix any other manufacturer s products with any Nitrous Express products. Do not use or mix any Nitrous Express products
Read all Instructions before beginning!!!! Caution EXTREME DANGER Caution
 Read all Instructions before beginning!!!! Caution EXTREME DANGER Caution Do not use or mix any other manufacturer s products with any Nitrous Express products. Do not use or mix any Nitrous Express products
NXd Diesel Stacker System Instructions
 NXd Diesel Stacker System Instructions INSTALLATION INSTRUCTIONS Congratulations on the purchase of your Nitrous Express NXd Diesel Stacker system. You have chosen the finest nitrous system ever. Nitrous
Read all Instructions before beginning!!!!
 Read all Instructions before beginning!!!! Caution EXTREME DANGER Caution Do not use or mix any other manufacturer s products with any Nitrous Express products. Do not use or mix any Nitrous Express products
NITROUS EXPRESS CARBURETOR PLATE SYSTEMS INSTRUCTIONS
 NITROUS EXPRESS CARBURETOR PLATE SYSTEMS INSTRUCTIONS READ UNDERSTAND AND FOLLOW these instructions. If there is something you don t understand, STOP! Call the NX tech department for help. 9:00 AM to 5:00
Read all Instructions before beginning!!!!
 Read all Instructions before beginning!!!! Caution EXTREME DANGER Caution Do not use or mix any other manufacturer s products with any Nitrous Express products. Do not use or mix any Nitrous Express products
Read all Instructions before beginning!!!!
 Read all Instructions before beginning!!!! Caution EXTREME DANGER Caution Do not use or mix any other manufacturer s products with any Nitrous Express products. Do not use or mix any Nitrous Express products
MOUNTING THE BOTTLE MOUNTING THE NITROUS PLATE
 READ UNDERSTAND AND FOLLOW these instructions. If there is something you don t understand, STOP! Call the NX tech department for help. 9:00 AM to 5:00 PM CST 940-767-7694. The installation procedures are
NXD12001, 12002, DIESEL STACKER NITROUS INSTALLATION INSTRUCTIONS
 NXD12001, 12002, 12003 DIESEL STACKER NITROUS INSTALLATION INSTRUCTIONS Congratulations on the purchase of your Nitrous Express Diesel Nitrous System. This system does not add fuel and is intended to be
Read all Instructions before beginning!!!! Caution EXTREME DANGER Caution
 Read all Instructions before beginning!!!! Caution EXTREME DANGER Caution Do not use or mix any other manufacturer s products with any Nitrous Express products. Do not use or mix any Nitrous Express products
3-BOLT LS NITROUS PLATE SYSTEM INSTALLATION INSTRUCTIONS. On all settings above 100 horsepower the following precautions should be observed:
 3-BOLT LS NITROUS PLATE SYSTEM INSTALLATION INSTRUCTIONS Congratulations on the purchase of your Nitrous Express LS Plate system. Nitrous Express utilizes only the highest quality components designed for
ELECTRONIC FUEL INJECTED FR-S/BRZ PLATE SYSTEM INSTALLATION INSTRUCTIONS
 ELECTRONIC FUEL INJECTED FR-S/BRZ PLATE SYSTEM INSTALLATION INSTRUCTIONS Congratulations on the purchase of your Nitrous Express Plate system. Nitrous Express utilizes only the highest quality components
On all settings above 100 horsepower the following precautions should be observed:
 ELECTRONIC FUEL INJECTED 5.0 COYOTE PLATE SYSTEM INSTALLATION INSTRUCTIONS Congratulations on the purchase of your Nitrous Express Coyote Plate system. Nitrous Express utilizes only the highest quality
ELECTRONIC FUEL INJECTED SINGLE NOZZLE NITROUS SYSTEMS
 ELECTRONIC FUEL INJECTED SINGLE NOZZLE NITROUS SYSTEMS INSTALLATION INSTRUCTIONS Congratulations on the purchase of your Nitrous Express EFI single nozzle system. Nitrous Express utilizes only the highest
EFI NITROUS PLATE SYSTEM FOR HEMI APPLICATION INSTRUCTIONS. On all settings above 100 horsepower the following precautions should be observed:
 EFI NITROUS PLATE SYSTEM FOR HEMI APPLICATION INSTRUCTIONS Congratulations on t he purchase of your Nitrous Express Plate system FPRP Hemi powered vehicles. N itrous Express utilizes only the highest quality
ELECTRONIC FUEL INJECTED FORD GEMINI TWIN PLATE SYSTEMS
 ELECTRONIC FUEL INJECTED FORD GEMINI TWIN PLATE SYSTEMS INSTALLATION INSTRUCTIONS Congratulations on the purchase of your Nitrous Express Ford Plate system. You have chosen the finest nitrous system ever.
5.0 COYOTE HIGH OUTPUT PLATE SYSTEM INSTALLATION INSTRUCTIONS. On all settings above 100 horsepower the following precautions should be observed:
 5.0 COYOTE HIGH OUTPUT PLATE SYSTEM INSTALLATION INSTRUCTIONS Congratulations on the purchase of your Nitrous Express Coyote High Output Plate system. Nitrous Express utilizes only the highest quality
Read all Instructions before beginning!!!!
 Read all Instructions before beginning!!!! Caution EXTREME DANGER Caution Do not use or mix any other manufacturer s products with any Nitrous Express products. Do not use or mix any Nitrous Express products
ELECTRONIC FUEL INJECTED NITROUS SYSTEMS
 ELECTRONIC FUEL INJECTED NITROUS SYSTEMS INSTALLATION INSTRUCTIONS Congratulations on the purchase of your Nitrous Express EFI system. You have chosen the finest nitrous system ever. Nitrous Express utilizes
ELECTRONIC FUEL INJECTED 5.0 COYOTE PLATE SYSTEM INSTALLATION INSTRUCTIONS
 ELECTRONIC FUEL INJECTED 5.0 COYOTE PLATE SYSTEM INSTALLATION INSTRUCTIONS Congratulations on the purchase of your Nitrous Express Coyote Plate system. Nitrous Express utilizes only the highest quality
Instruction Packet Trick Flow Specialties TFX Nitrous Systems by Nitrous Express For Trick Flow EFI manifolds
 Instruction Packet Trick Flow Specialties TFX Nitrous Systems by Nitrous Express For Trick Flow EFI manifolds Thank you for purchasing a Trick Flow TFX Nitrous System. These systems are the most advanced,
DDR SERIES SYSTEM INSTALLATION INSTRUCTIONS
 DDR SERIES SYSTEM INSTALLATION INSTRUCTIONS Read all Instructions before beginning!!!! Caution EXTREME DANGER Caution Do not use or mix any other manufacturer s products with any Nitrous Express products.
Trick Flow Specialties TFX Nitrous Systems by Nitrous Express For Holley 4150 and 4500 carburetors
 Trick Flow Specialties TFX Nitrous Systems by Nitrous Express For Holley 4150 and 4500 carburetors Thank you for purchasing a Trick Flow TFX Nitrous System. These systems are the most advanced, state of
Installation Instructions Dual Perimeter Plate Nitrous System (#82185)
") Installation Instructions Dual Perimeter Plate Nitrous System (#82185) Thank you for choosing ZEX. If at any time you have questions regarding this or any of our products, please call our ZEXTEK support
Installation Instructions Dual Perimeter Plate Nitrous System (#82185) Thank you for choosing ZEX. If at any time you have questions regarding this or any of our products, please call our ZEXTEK support
Read all Instructions before beginning!!!!
 Read all Instructions before beginning!!!! Caution EXTREME DANGER Caution Do not use or mix any other manufacturer s products with any Nitrous Express products. Do not use or mix any Nitrous Express products
Part #82064 Add-A-Stage EFI Nitrous System
 1 INSTRUCTIONS Part #82064 Add-A-Stage EFI Nitrous System Thank you for choosing products; we are proud to be your manufacturer of choice. Please read this instruction sheet carefully before beginning
Installation Instructions Diesel Nitrous System (#82028)
") Installation Instructions Diesel Nitrous System (#82028) Thank you for choosing ZEX. If at any time you have questions regarding this or any of our products, please call our Nitrous Help support line at
Installation Instructions Diesel Nitrous System (#82028) Thank you for choosing ZEX. If at any time you have questions regarding this or any of our products, please call our Nitrous Help support line at
Installation Instructions EFI V8 BB Direct Port Nitrous System (82063)
") Installation Instructions EFI V8 BB Direct Port Nitrous System (82063) Thank you for choosing ZEX. If at any time you have questions regarding this or any of our products, please call our ZEXTEK support
Installation Instructions EFI V8 BB Direct Port Nitrous System (82063) Thank you for choosing ZEX. If at any time you have questions regarding this or any of our products, please call our ZEXTEK support
INSTRUCTIONS. #82044 Race Diesel Nitrous System
 INSTRUCTIONS #82044 Race Diesel Nitrous System Thank you for choosing ZEX products; we are proud to be your manufacturer of choice. Kit Parts List Description Qty. Description Qty. Nitrous Solenoid 2.088
#82312B Blackout Series Race Perimeter Plate Nitrous System
 INSTRUCTIONS 1 #82312B Blackout Series Race Perimeter Plate Nitrous System Thank you for choosing products; we are proud to be your manufacturer of choice. Please read this instruction sheet carefully
350/370Z System Instructions Part #
 INTRODUCTION Thank you for purchasing the highest quality nitrous system on the market. Nitrous Outlet strives to offer the best product with the best price and customer service available. Nitrous Outlet
#82087 Gen III High Output Nitrous System
 INSTRUCTIONS #82087 Gen III High Output Nitrous System Thank you for choosing products; we are proud to be your manufacturer of choice. Please read this instruction sheet carefully before beginning installation,
Single Nozzle Systems UNIVERSAL NOZZLE SYSTEM INSTRUCTIONS Part #'S 00-1XXXXX
 INTRODUCTION Thank you for purchasing the highest quality nitrous system on the market. Nitrous Outlet strives to offer the best product with the best price and customer service available. Nitrous Outlet
#82221 EFI Perimeter Plate Nitrous System
 1 INSTRUCTIONS #82221 EFI Perimeter Plate Nitrous System Thank you for choosing products; we are proud to be your manufacturer of choice. Please read this instruction sheet carefully before beginning installation,
#82037 Race EFI Nitrous System
 1 INSTRUCTIONS #82037 Race EFI Nitrous System Thank you for choosing products; we are proud to be your manufacturer of choice. Please read this instruction sheet carefully before beginning installation,
INSTRUCTIONS. #82028 Diesel Nitrous System. Thank you for choosing ZEX products; we are proud to be your manufacturer of choice.
 1 INSTRUCTIONS #82028 Diesel Nitrous System Thank you for choosing ZEX products; we are proud to be your manufacturer of choice. Why our nitrous system is better: 2 Performance enthusiasts know the potential
BoonDocker Nitrous System Installation Instructions for Kawasaki KFX-700 ATV
 BoonDocker Nitrous System Installation Instructions for Kawasaki KFX-700 ATV Before you begin, please read the instructions below and check kit contents Nitrous Kit Contents: 1 Nitrous Manifold with fittings
#82044 Race Diesel Nitrous System
 INSTRUCTIONS #82044 Race Diesel Nitrous System Thank you for choosing products; we are proud to be your manufacturer of choice. Please read this instruction sheet carefully before beginning installation,
BoonDocker Nitrous System Installation Instructions For Yamaha Apex Important information.
 BoonDocker Nitrous System Installation Instructions For Yamaha Apex Important information. REGISTER THIS PRODUCT ONLINE AS SOON AS POSSIBLE As part of our on going dedication to customer satisfaction,
#82231 Silverado Edition Nitrous System
 1 INSTRUCTIONS #82231 Silverado Edition Nitrous System Thank you for choosing products; we are proud to be your manufacturer of choice. Please read this instruction sheet carefully before beginning installation
Installation Instructions Truck Nitrous System (82047)
") Installation Instructions Truck Nitrous System (82047) Thank you for choosing ZEX. If at any time you have questions regarding this or any of our products, please call our ZEXTEK support line at 1-888-817-1008.
Installation Instructions Truck Nitrous System (82047) Thank you for choosing ZEX. If at any time you have questions regarding this or any of our products, please call our ZEXTEK support line at 1-888-817-1008.
DOMINATOR FUEL PUMPS P/N & Installation Instructions 199R10573
 DOMINATOR FUEL PUMPS P/N 12-1400 & 12-1800 Installation Instructions 199R10573 WARNING! THESE INSTRUCTIONS MUST BE READ AND FULLY UNDERSTOOD BEFORE BEGINNING INSTALLATION. FAILURE TO FOLLOW THESE INSTRUCTIONS
Victor Jr. Plate Upgrade Kits for Square Flange and Dominator Carburetors Kit #70024 and #70025 INSTALLATION INSTRUCTIONS
 Victor Jr. Plate Upgrade Kits for Square Flange and Dominator Carburetors Kit #70024 and #70025 INSTALLATION INSTRUCTIONS Please study these instructions carefully before installing your new Edelbrock
ELECTRIC FUEL PUMPS P/N , , & FUEL PRESSURE REGULATOR P/N
 ELECTRIC FUEL PUMPS P/N 80000100, 80000101, & 80000102 FUEL PRESSURE REGULATOR P/N 80000103 Installation Instructions 199R10583 These instructions must be read and fully understood before beginning the
#82235B Blackout Series GM LSX Nitrous System
 1 INSTRUCTIONS #82235B Blackout Series GM LSX Nitrous System Thank you for choosing products; we are proud to be your manufacturer of choice. Please read this instruction sheet carefully before beginning
Not required for most applications. Not required for most applications. High pressure ( provided) High pressure ( provided)
 High pressure ( provided)") ELECTRIC FUEL PUMPS P/N 12-801-1, 712-801-1, 12-802-1, 12-802-2, 712-802-1, 12-812, 12-815-1, & 712-815-1 FUEL PRESSURE REGULATORS P/N 12-500, 12-501, 12-803, 12-803BP, 12-804, & 15812NOS Installation
ELECTRIC FUEL PUMPS P/N 12-801-1, 712-801-1, 12-802-1, 12-802-2, 712-802-1, 12-812, 12-815-1, & 712-815-1 FUEL PRESSURE REGULATORS P/N 12-500, 12-501, 12-803, 12-803BP, 12-804, & 15812NOS Installation
HP FUEL PUMPS P/N & Installation Instructions 199R10569
 HP FUEL PUMPS P/N 12-700 & 12-890 Installation Instructions 199R10569 WARNING! THESE INSTRUCTIONS MUST BE READ AND FULLY UNDERSTOOD BEFORE BEGINNING INSTALLATION. FAILURE TO FOLLOW THESE INSTRUCTIONS MAY
INSTRUCTIONS. Part # th Gen V8 Camaro Nitrous System
 INSTRUCTIONS 1 Part # 82380 5 th Gen V8 Camaro Nitrous System Thank you for choosing products; we are proud to be your manufacturer of choice. Please read this instruction sheet carefully before beginning
# Mustang GT Nitrous System
 1 INSTRUCTIONS #82217 1999-2004 Mustang GT Nitrous System Thank you for choosing products; we are proud to be your manufacturer of choice. Please read this instruction sheet carefully before beginning
#82322 Dodge Hemi Challenger Nitrous System. Thank you for choosing ZEX products; we are proud to be your manufacturer of choice.
 1 INSTRUCTIONS #82322 Dodge Hemi Challenger Nitrous System Thank you for choosing ZEX products; we are proud to be your manufacturer of choice. KIT PARTS LIST Description Qty. Description Qty. Nitrous
BoonDocker Nitrous System Installation Instructions for Snowmobile with Three Nitrous Manifolds
 BoonDocker Nitrous System Installation Instructions for Snowmobile with Three Nitrous Manifolds Before you begin, please read all the instructions below and check kit contents. Nitrous Kit Contents: Quality
HP FUEL PUMPS P/N ERL & ERL Installation Instructions 199R11108
 HP FUEL PUMPS P/N 1200600ERL & 1200890ERL Installation Instructions 199R11108 WARNING! THESE INSTRUCTIONS MUST BE READ AND FULLY UNDERSTOOD BEFORE BEGINNING INSTALLATION. FAILURE TO FOLLOW THESE INSTRUCTIONS
#82321 Scion tc Nitrous System
 1 INSTRUCTIONS #82321 Scion tc Nitrous System Thank you for choosing products; we are proud to be your manufacturer of choice. Please read this instruction sheet carefully before beginning installation,
Installation Instructions
 Installation Instructions for 15912 to 15916 Electric Fuel Pumps & Fuel Pressure Regulators Installation Instructions WARNING! These instructions must be read and fully understood before beginning the
2007-Current, Nissan 350Z Nitrous System #82238
 1 INSTRUCTIONS 2007-Current, Nissan 350Z Nitrous System #82238 Thank you for choosing products; we are proud to be your manufacturer of choice. Please read this instruction sheet carefully before beginning
#82220 Nissan 350Z Nitrous System
 1 INSTRUCTIONS #82220 Nissan 350Z Nitrous System Thank you for choosing products; we are proud to be your manufacturer of choice. Please read this instruction sheet carefully before beginning installation,
HOLLEY VR2 FUEL PUMPS P/N & Installation Instructions 199R10975
 HOLLEY VR2 FUEL PUMPS P/N 12-3000 & 12-3000-2 Installation Instructions 199R10975 WARNING! THESE INSTRUCTIONS MUST BE READ AND FULLY UNDERSTOOD BEFORE BEGINNING INSTALLATION. FAILURE TO FOLLOW THESE INSTRUCTIONS
INSTRUCTIONS. #82177 Charger/Magnum Nitrous System. Thank you for choosing ZEX products; we are proud to be your manufacturer of choice.
 1 INSTRUCTIONS #82177 Charger/Magnum Nitrous System Thank you for choosing ZEX products; we are proud to be your manufacturer of choice. 2 Kit Parts List Description Qty. Description Qty. Nitrous Management
OWNER S MANUAL CONGRATULATIONS
 1 OWNER S MANUAL CONGRATULATIONS ON THE PURCHASE OF YOUR NY-TREX NITROUS OXIDE PERFORMANCE SYSTEM NOTICE: Installation of Ny-Trex performance products signifies that you have read this entire document
#82176 Hemi Truck Nitrous System
 1 INSTRUCTIONS #82176 Hemi Truck Nitrous System Thank you for choosing products; we are proud to be your manufacturer of choice. Please read this instruction sheet carefully before beginning installation,
DevilsOwn Injection. Universal Stage 2 Ver 2 controller
 Universal Stage 2 Ver 2 controller How the DevilsOwn Alcohol Injection System works: The DevilsOwn Alcohol Injection System begins with a connection to a supply tank containing a methanol/water mixture.
BoonDocker Nitrous System Installation Instructions Skidoo REV XP Snowmobile
 BoonDocker Nitrous System Installation Instructions Skidoo REV XP Snowmobile Before you begin, please read all the instructions below and check kit contents. Quality check by: 1 Nitrous Manifold with fittings
Instant Chat off the main page of Or simply call our tech team at
 Subaru WRX/STI Air Oil Separator for Front Mounted Intercooler Setups 2013-02- 22 Thank you for purchasing this PERRIN product for your car! Installation of this product should only be performed by persons
Instant Chat off the main page of Or simply call our tech team at
 02-07 WRX/STI Air Oil Separator for Top Mounted Intercooler Setups 2013-02- 27 Thank you for purchasing this PERRIN product for your car! Installation of this product should only be performed by persons
BoonDocker Nitrous System Arctic Cat Installation Instructions
 BoonDocker Nitrous System Arctic Cat Installation Instructions Before you begin, please read all the instructions below and check kit contents. Nitrous Kit Contents: 1 Nitrous Manifold with fittings installed
SNIPER NITROUS SYSTEMS
 SNIPER NITROUS SYSTEMS P/N 07002NOS, 07003NOS, & 07007NOS Part Number 07002NOS Shown GENERAL INFORMATION The Sniper System is intended for use on domestic V-6 and V-8 engines using a single 4V Holley or
TRANSFER PUMP INSTRUCTIONS P/N 14251NOS
 TRANSFER PUMP INSTRUCTIONS P/N 14251NOS A5048-SNOS SAFETY TIPS Never directly inhale nitrous oxide. When inhaled in large quantities, nitrous oxide can cause respiratory ailments or in extreme cases, death
BoonDocker Nitrous System Suzuki King Quad 700
 BoonDocker Nitrous System Suzuki King Quad 700 Before you begin, please read the instructions below and check kit contents Nitrous Kit Contents: Quality and contents inspected by 1 Nitrous Manifold with
Multiple-Carburetor Competition Cheater Kit Number: 02010NOS. Two-Stage Competition Cheater Kit Numbers: 02201NOS and 02202NOS
 Multiple-Carburetor Competition Cheater Kit Number: 02010NOS Two-Stage Competition Cheater Kit Numbers: 02201NOS and 02202NOS OWNER S MANUAL P/N A5052-1-SNOS NOTICE: Installation of Nitrous Oxide Systems
Edelbrock Victor II Intake Manifold. For Chrysler 5.7L (Eagle), 6.1L and 6.4L Gen III HEMI Engines Part #7179
, 6.1L and 6.4L Gen III HEMI Engines Part #7179") For Chrysler 5.7L (Eagle), 6.1L and 6.4L Gen III HEMI Engines PLEASE study these instructions carefully before beginning this installation. You should be familiar with and comfortable working on your
For Chrysler 5.7L (Eagle), 6.1L and 6.4L Gen III HEMI Engines PLEASE study these instructions carefully before beginning this installation. You should be familiar with and comfortable working on your
WEBER CARBURETOR TROUBLESHOOTING GUIDE
 This guide is to help pinpoint problems by diagnosing engine symptoms associated with specific vehicle operating conditions. The chart will guide you step by step to help correct these problems. For successful
BoonDocker Nitrous System Arctic Cat Installation Instructions
 BoonDocker Nitrous System Arctic Cat Installation Instructions Before you begin, please read all the instructions below and check kit contents. Nitrous Kit Contents: 1 Nitrous Manifold with fittings installed
SNIPER NITROUS SYSTEMS
 SNIPER NITROUS SYSTEMS P/N 07001NOS & 07004NOS GENERAL INFORMATION INSTALLATION INSTRUCTIONS P/N A7001-SNOS The Sniper System is intended for use on domestic V-6 and V-8 engines using a single 4V Holley
AMS F1-I INTAKE MANIFOLD
 AMS F1-I INTAKE MANIFOLD The goal of AMS is to provide the highest quality, best performing products available. By utilizing research and development, and rigorous testing programs AMS will never compromise
BoonDocker Nitrous System Installation Instructions for Skidoo REV Snowmobile
 BoonDocker Nitrous System Installation Instructions for Skidoo REV Snowmobile Before you begin, please read all the instructions below and check kit contents. Note: The air box will need to be modified
KIT CONTENTS. Multimeter or test light Wire crimpers or soldering equipment. Wire terminals & connectors 10A inline fuse
 RUSSELL FORD 5.0L COMPLETE EFI PLUMBING KIT INSTALLATION INSTRUCTIONS Please study these instructions carefully before installing your new complete fuel system kit. If you have any questions, please call
#82326 Pontiac G8 GT Nitrous System
 1 INSTRUCTIONS #82326 Pontiac G8 GT Nitrous System Thank you for choosing products; we are proud to be your manufacturer of choice. Please read this instruction sheet carefully before beginning installation
#82034 Ford Mustang GT Nitrous System
 1 INSTRUCTIONS #82034 Ford Mustang GT Nitrous System Thank you for choosing products; we are proud to be your manufacturer of choice. Please read this instruction sheet carefully before beginning installation,
DESCRIPTION MECHANICAL FUEL PUMP FUEL FILTER HIGH PRESSURE (35-90 PSI) HIGH PRESSURE (35-90 PSI) (STEEL/INCLUDED)
 HIGH PRESSURE (35-90 PSI) (STEEL/INCLUDED)") Edelbrock EFI Universal Fuel Sump System - Adjustable Part #36031, 36032, 36033, 36034 INSTALLATION INSTRUCTIONS PLEASE study these instructions carefully before beginning this installation. This installation
Edelbrock EFI Universal Fuel Sump System - Adjustable Part #36031, 36032, 36033, 36034 INSTALLATION INSTRUCTIONS PLEASE study these instructions carefully before beginning this installation. This installation
Thank You. for purchasing an Edelbrock Nitrous Oxide Injection System. Please take the time to read and understand the following.
 Thank You. for purchasing an Edelbrock Nitrous Oxide Injection System. Nitrous Oxide injection is one of the most exciting performance enhancements for the dollar invested on the market today. With the
2010+ Camaro Triple-Threat Wet Nitrous System
 2010+ Camaro Triple-Threat Wet Nitrous System This Installation Guide is to be used with the Ny-Trex Owner s Manual. (Refer to the Owner s Manual for installation tips, safety tips, and precautions) 1.
QUICK FUEL TECHNOLOGY HOT ROD SERIES CARBURETORS SLAYER SERIES CARBURETORS SUPER STREET SERIES CARBURETORS
 QUICK FUEL TECHNOLOGY Installation Instructions HOT ROD SERIES CARBURETORS SLAYER SERIES CARBURETORS SUPER STREET SERIES CARBURETORS HR-580-VS 580 CFM Vac. Secondary!!! SS-680-VS 680 CFM Vac. Secondary
Diesel Nitrous Oxide System
 P/N 199R10317 Diesel Nitrous Oxide System Kit Number 02519NOS OWNER S MANUAL CONGRATULATIONS on purchasing your NOS Nitrous Oxide Injection System! Your system is composed of the highest quality components
Opposed 4 & 6 Cylinder Sportsman Fogger System
 P/N A5064-SNOS Opposed 4 & 6 Cylinder Sportsman Fogger System Kit Numbers: 05080NOS, 05082NOS, & 05085NOS OWNER S MANUAL NOTICE: Installation of Nitrous Oxide Systems Inc. products signifies that you have
Multiple-Carburetor Big Shot Kit Numbers: 02110NOS, NOS, & 02111NOS. Two-Stage Big Shot Kit Numbers: 02401NOS & 02402NOS
 P/N A5054-SNOS Multiple-Carburetor Big Shot Kit Numbers: 02110NOS, 02110-9NOS, & 02111NOS Two-Stage Big Shot Kit Numbers: 02401NOS & 02402NOS OWNER S MANUAL NOTICE: Installation of Nitrous Oxide Systems
BoonDocker Nitrous System Installation Instructions for Yamaha RX1 Snowmobile with Dual K&N Filters
 BoonDocker Nitrous System Installation Instructions for Yamaha RX1 Snowmobile with Dual K&N Filters Before you begin, please read the instructions below and check kit contents Note: This installation requires
2015+ dodge charger dedicated fuel system
 This Nitrous Outlet Dedicated Fuel System is designed specifically for the 2015+ Dodge Charger. If you need any assistance during installation or if you have questions about this item, call our Tech Help
Edelbrock EFI Universal Fuel Sump System - Adjustable Part #36031, INSTALLATION INSTRUCTIONS
 Edelbrock EFI Universal Fuel Sump System - Adjustable Part #36031, 36032 INSTALLATION INSTRUCTIONS PLEASE study these instructions carefully before beginning this installation. This installation can be
5.0L Ford Holley SysteMax Big Shot Kit
 5.0L Ford Holley SysteMax Big Shot Kit Kit Number: 02119NOS OWNER S MANUAL P/N 199R10329 CONGRATULATIONS on purchasing your NOS Nitrous Oxide Injection System. Your system is composed of the highest quality
2244 West McDowell Road Phoenix, AZ RACE (fax)
") 2244 West McDowell Road Phoenix, AZ 85009 602-257-9591 1-800-274-RACE 602-340-8429 (fax) www.hughesperformance.com HUGHES PERFORMANCE HP2215 VALVE BODY Installation Instructions 9/24/16 For over 45 years
2244 West McDowell Road Phoenix, AZ 85009 602-257-9591 1-800-274-RACE 602-340-8429 (fax) www.hughesperformance.com HUGHES PERFORMANCE HP2215 VALVE BODY Installation Instructions 9/24/16 For over 45 years
INLINE SPORTSMAN FOGGER SYSTEM
 P/N A5072-SNOS INLINE SPORTSMAN FOGGER SYSTEM Kit Numbers: 05030NOS, 05030-FINOS, 05040NOS, and 05040-FINOS OWNER S MANUAL NOTICE: Installation of Nitrous Oxide Systems Inc. products signifies that you
Weistec M157 WMI System
 Weistec M157 WMI System Installation Guide 2012-2013 E63 2014+ E63 4matic(S) 2011-2013 CLS63 2014+ CLS63 4matic(S) 2015+ S63 AMG (Without ABC Suspension) This product is legal in California for racing
BoonDocker Nitrous System Installation Instructions for Polaris Snowmobile
 BoonDocker Nitrous System Installation Instructions for Polaris Snowmobile Before you begin, please read all the instructions below and check kit contents. Nitrous Kit Contents: Quality check by: 1 5-hole
BoonDocker Nitrous System Universal Installation Instructions for ATV
 BoonDocker Nitrous System Universal Installation Instructions for ATV Before you begin, please read the instructions below and check kit contents Nitrous Kit Contents: Quality and contents inspected by